

Page 1
USER MANUAL
NHEA PLUS SE TERMINAL
PLUS DIGITAL SYSTEM
Code 50123372 TNHEA ENPLUS SE REV.0219
Page 2

NHEA PLUS SE HANDS-FREE AUDIO TERMINAL
INTRODUCTION
First ofall, we thank and congratulate you for purchasing this product manufactured by Golmar.
Our commitment to achieving the satisfaction of customers like you is manifested through our ISO-9001 certification
and the manufacture of products like the one you have just purchased.
Its advanced technology and strict quality control will ensure that customers and users enjoy the numerous features
that this device offers. To get the most out of them and ensure proper operation from day one, we recommend that you
read this instruction manual.
CONTENTS
Introduc ........................................................................................................................................................... ........2tion . .
Contents........................................................................................................................................................................ 2.
Safety precautions.......................................................................................................................................... .. 2............. .
Characteristics.............................................................................................................................................................. 3..
System operation. ......................................................................................................................................................... . 3.
Description of the terminal.................................................................................................................................................
Description
Programming the terminal
Advanced programming (terminal functions)......................................................................................................... ...........
Menu 1
- ................................................................................................................ ................. ... 9.Changing the ringtone melody
- ........................................................................................................ 9.Activating/deactivating the doctormode function
Men 2.........................................................................................................................................................................9u
- ............................................................................................ 9....
Intercom with Plus terminals, telephones and monitors
- ............................................................................................................... ............... 10Changing the button function
- ............................................................................................................................ 10. .Changing the button function
Men 3.......................................................................................................................................................................u 10
- ............................................................................................................... ......... ... ................. 10
Repeating the ringtones
- ........................................................................................... ............... 10Adjusting the 'door panel communication time'
- .............................................................................................................. ...10............Adjusting the 'door panel call time'
Men 4.......................................................................................................................................................................1u 1
Setting all of the terminal's advanced programming options to the 'default value'
- ......................................... 1.............. 1.
Optional connections
- ...................................................................................................................... ..1........... 2.
Activation of auxiliary devices
-I .................................................................................................................. 1...... 3.Intercom within the same apartment
- ............................................................................. 1................ 4.Button for receiving calls from the apartment front door
- ................................................................................................................................................14Cleaning the terminal
Wiring diagram
................................................................................................................................................................. 4..
.......................................................................................................................................................... .... 4.... .Status LED
...................................................................................................................................................4Connection terminals
.................................................................................................................................................... 4.Connector terminals
............................................................................................................................................ .....5......... .Function buttons
........................................................................................................... . 5.......................... ............. .Audio volume control
........................................................................................................ .... 5...................... .................... .Call volume control
...................................................................................................... 6.Installing theterminal ina wallmounting connector
........................................................................................................ ........ . . 7.Installing the terminal in an embedding box
.............................................................................................................................................. 8.
.........................................................................................................................................................................9
............................................................................................................................................. ..........
.................................................. ..................... .1... ......... 2Exterior lookbutton input for activating the door panel release
........................................................................................................................................ ........1............. 5.
2
SAFETY PRECAUTIONS
- Do not overtighten the Nhea Plus SE terminal's fixing screws.
- Always disconnect the power supply before installing or making modifications to the device.
- The fitting and handling of these devices must be carried out by authorised personnel.
- All of the wiring must run at least 40cm away from any other wiring.
- Install the Nhea Plus SE terminal in a dry protected location free from the risk of dripping or splashing water.
- Do not place in humid, dusty or smoky locations, or near sources of heat.
- Before connecting the device to themains, check the connections between the door panel, power supply and terminals.
- Always follow the instructions contained in this manual.
Page 3
NHEA PLUS SE HANDS-FREE AUDIO TERMINAL
CHARACTERISTICS
- Nhea Plus SE hands-free audio terminal for Plus installation.
- Terminal with 4 common wire installation.
- Function and advanced programming access buttons (to customise terminal functions).
- Totally private conversation.
- Auto switch-on function.
- 'Doctor mode' function (automatic door opening, see p. 9).
- Intercom between two devices in the same apartment.
- Apartment front door call input.
- Call reception volume control (maximum and minimum).
- Audio volume control (maximum and minimum).
- Call volume adjustment: maximum, minimum and novolume 'night mode' (see p. 5 'function buttons').
- Exterior b for d l kutton input oorpanel oo release
- Output to auxiliary call repeater.
- Call to main and secondary guard unit.
- Panic call to guard units.
- Different ringtonesto identify call origin: oor panel, guard unit, intercomand interior door of apartment 'HZ.’d
- Activation of auxiliary functions: courtesy lights, second lock release, etc.
- Configuration of the terminal as a slave and intercom (quick programming mode).
- Door release button.
- Terminal status LED.
3
SYSTEM OPERATION
- To make acall, the visitor presses the buttonfor the apartment, a number of audible tones indicate that the call is being
made and LED on the door panel illuminates.At this moment, the apartment's terminal receives the call. If the visitor
presses the button for another apartment by mistake, the call can be cancelled by pressing the button for the correct
apartment.
- In systems with several access doors, the other door panel(s) automatically disconnects. If another visitor attempts to
call, a number of telephone tones will indicate that the channel is busy and LED on the doorpanel willilluminate.
- General entrance door panels (mode EL501): If the call is being made from the general entrance door panel, the
interior door panel of the building being called and other possible general entrance door panels automatically
disconnect. If another visitor attempts to call from either a busy interior door panel, a number of telephone tones will
indicate that the channel is busy and LED of the door panel will illuminate, or from another general entrance door
panel, a number of telephonetones will indicate thatthe channel is busy and LED of the general entrance door panel
will blink for 3 seconds.The door panels of theother interior buildings will remain free to be used.
- General entrance door panels (mode EL501): If the call is made from an interior door panel, the other interior door
panels will remain free to be used. It is only possible to make calls to interior buildings from the general entrance door
panels when their door panels are not in use. If an attempt is made to make a call to a busy interior door panel, a
number of telephone tones will indicate that the channel is busy and LED of the general entrance door panel will
blink for 3 seconds.
- The call lasts for 45 seconds and the status LED of the master terminal will illuminate (green). If the call is not
answered within 45 seconds, the master terminal's status LED will illuminate (red), LED on the door panel will turn
off and thechannel will be free.
- To establish communication, press button of the terminal or lift the handset of the telephone (monitor), and the
terminal's status LED (green) and the door panel's LED will illuminate.
- Communication will last for one and a half minutes or until button on the terminal is pressed again or the handset
of the telephone (monitor) is replaced. After communication, the terminal's status LED will illuminate (red), the door
panel's LED will turn off and the channel will be free.
- To open the door, press door release button during the call or communication processes: one press will activate
the lock release for 3 seconds and LED will alsoilluminate for3 seconds.
- A descriptionof thefunction buttonscan befound onp. 5.
Page 4
NHEA PLUS SE HANDS-FREE AUDIO TERMINAL
DESCRIPTION OF THE TERMINAL
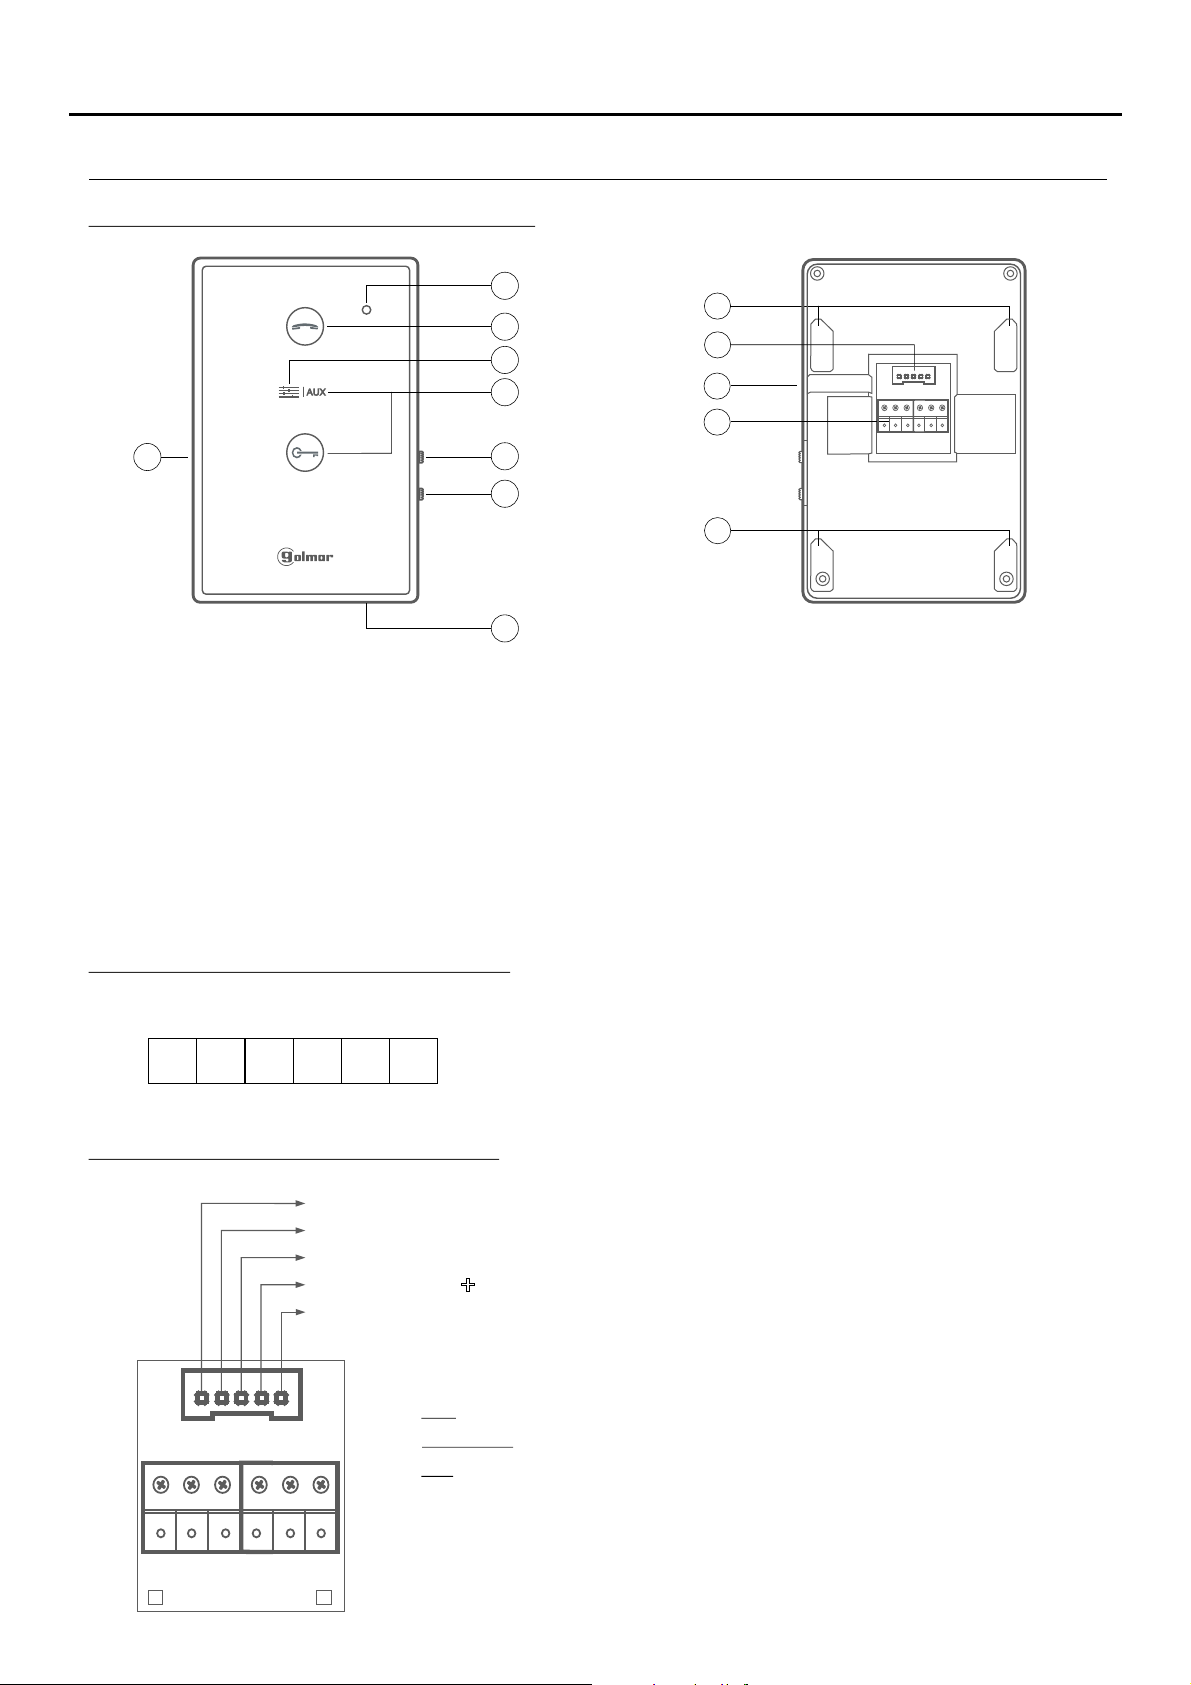
Description of the NHEA PLUS SE terminal
4
f
a.
Status LED.
- Standby: LED illuminated red.
- Call: LED illuminated green.
(master Nhea terminal).
- Communication: LED illuminated green.
- Night mode: LED blinking red.
- Doctor mode: LED blinking green.
b.
Function buttons.
c.
Audio volume control switch.
d.
Ringtone volume control switch.
a
g
b
b
b
h
i
j
c
d
g
e
Microphone.
e.
Speaker.
f.
g.
Connector fixings.
h.
Con ectorn .
i.
Horizontal cable entry.
j.
Connection terminals
Description of the connection terminals:
+, - :
.
_
+ SA
A D HZ
-
A , D :
HZ :SA :
Description of the connector terminals:
(YELLOW): ( ) NEGATIVE
( ):BLACK AP
(RED): INTERCOM
( ):GREEN ( ) POSITIVE
( ):WHITE A1
-
+
- AP: Auxiliary door opening button input.
- Intercom: Between two or more terminals in the same apartment.
- A1: Output (negative) auxiliary device activation (max. consumption 50mA).
Positive, negative (18Vdc power supply)
Audio, digital communication
Door bell button input.
Output (negative) auxiliary call repeater (max. consumption 250mA).
.
Page 5
NHEA PLUS SE HANDS-FREE AUDIO TERMINAL
MAX
+
+
-
DESCRIPTION OF THE TERMINAL
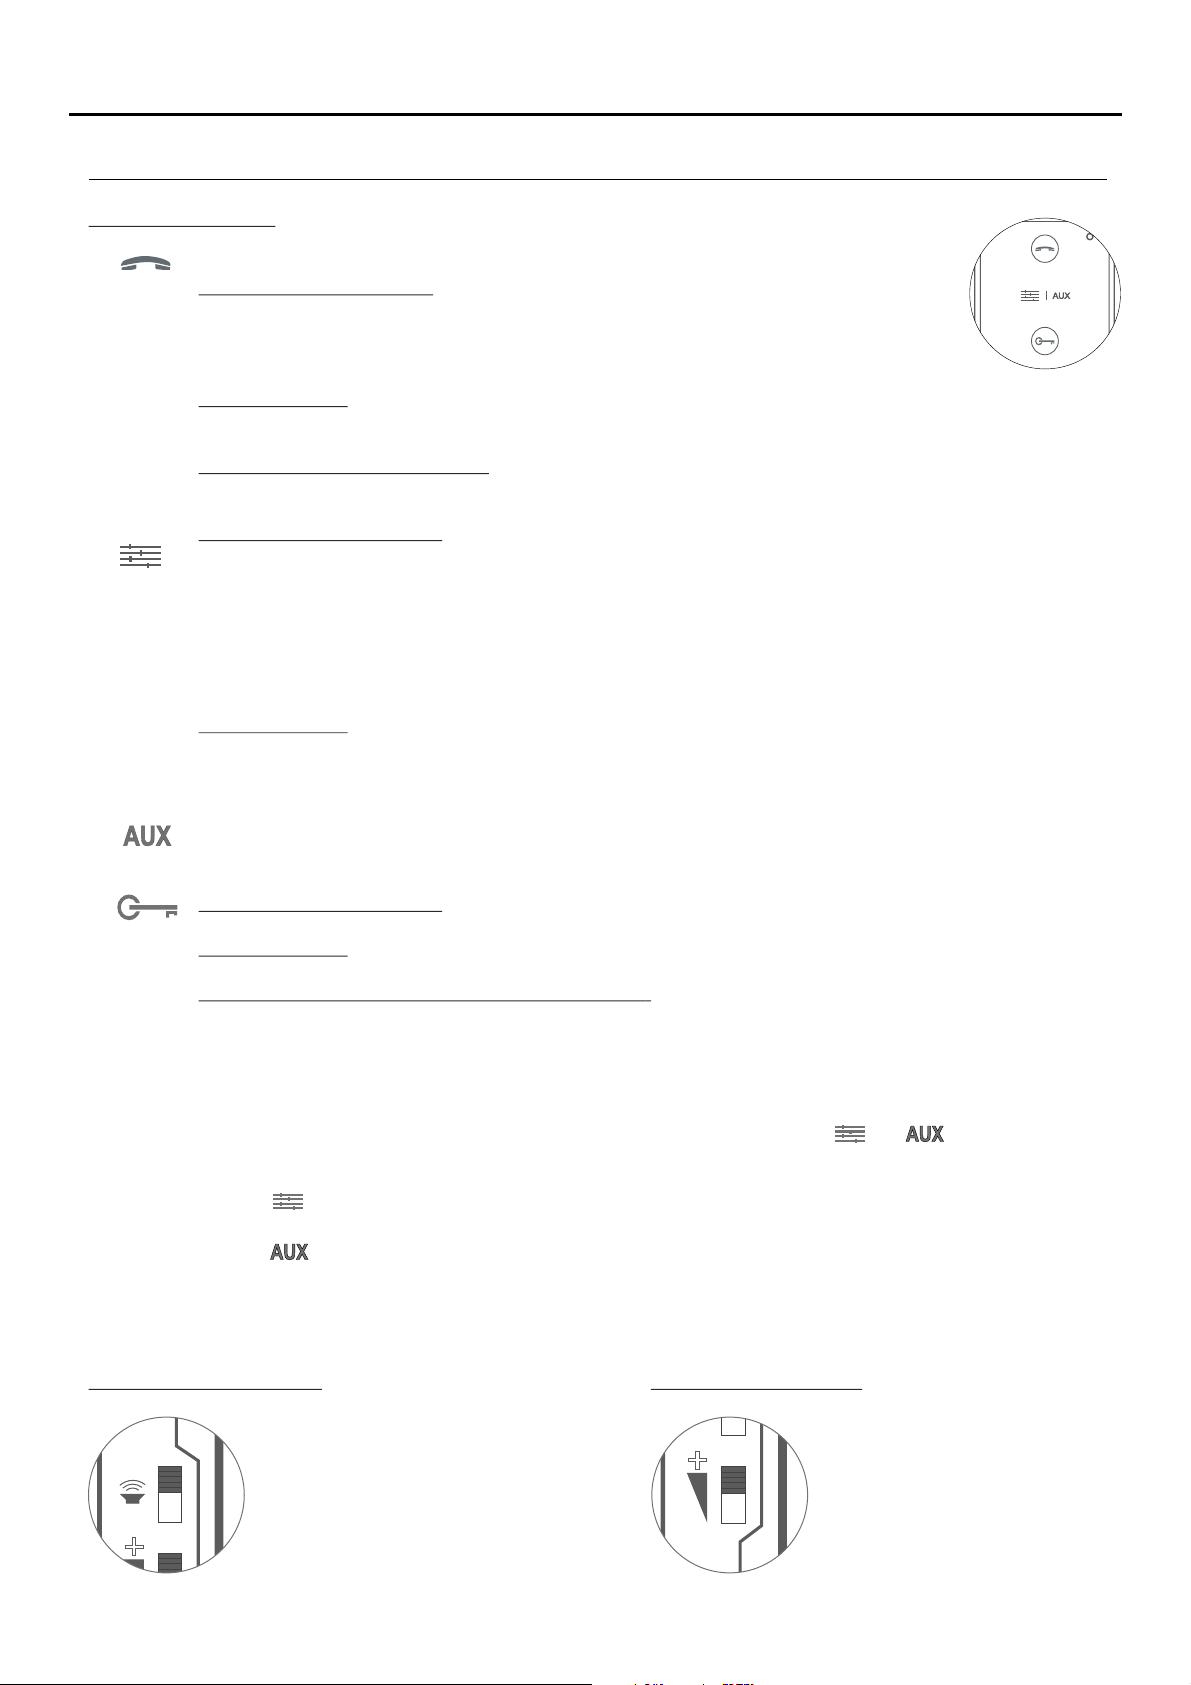
Function buttons:
Start/stop communication button.
With the terminal instandby:
A short 1-second press activates the terminal in function mode (for 5 seconds).
A long 3-second press turns off the terminal. With the terminal turned off, one short
1-second press turns on the terminal (over the next 45 seconds, no operation can be
performed in 'function mode').
In function mode:
A long 3-second press turns off the terminal. With the terminal turned off, one short 1-second press turns
on the terminal (over the next 45 seconds, no operation can be performed in 'function mode').
During a communication process:
The talk/listen function is activated.
With the terminal in standby:
( )
*
One long 3-second press activates 'ringtone volume mode', with a tone indicating the current volume
selected. Then each long 3-second press (before 5 seconds elapse) selects a ringtone volume level and
so on (in carousel mode) with the following selections (maximum, minimum and no volume 'night mode'.
Note: The 'night mode' status LED blinks red . During a call process, the terminal will emit a ringtone and)
exit volume mode.
Regardless of the volume selected, the 'apartment interior door call' ringtone will always sound at
maximum volume.
5
In function mode:
A short 1-second press activates the auto switch-on function, enabling audio communication with door
panels that have this function activated to be established. This only functions if no communication is in
progress.
( )
*
( )
In advanced programming mode (see p. 10), the default functions of function buttons and can be changed with
*
one of the following functions at the same time andper button:
- :Function button
- :Function button
Auxiliary device 'A1' is activated at any time (regardless of whether the terminal is in standby orfunction, call,
communication or intercom mode).
With the terminal in standby:
Ashort 1-secondpress makesa paniccall tothe unitsconfigured toreceive such calls.
In function mode:
Ashort 1-secondpress makesa normalcall tothe mainunit.
During call reception and communication processes:
Ashort 1-secondpress activatesthe lockrelease for3 seconds.
Activation of auxiliary device 'A1,' call to secondary guard unit or auto switch-on.(1)
(1) Activation of auxiliary device 'A1,' call to secondary guard unit, auto switch-on or intercom.
(1) Factory setting
Audio volume control:
The terminal has a communication
audio volume control with maximum
and minimum volume settings.
Call volume control:
The terminal has a call volume
control with maximum and
minimum volume settings.
Page 6
NHEA PLUS SE HANDS-FREE AUDIO TERMINAL
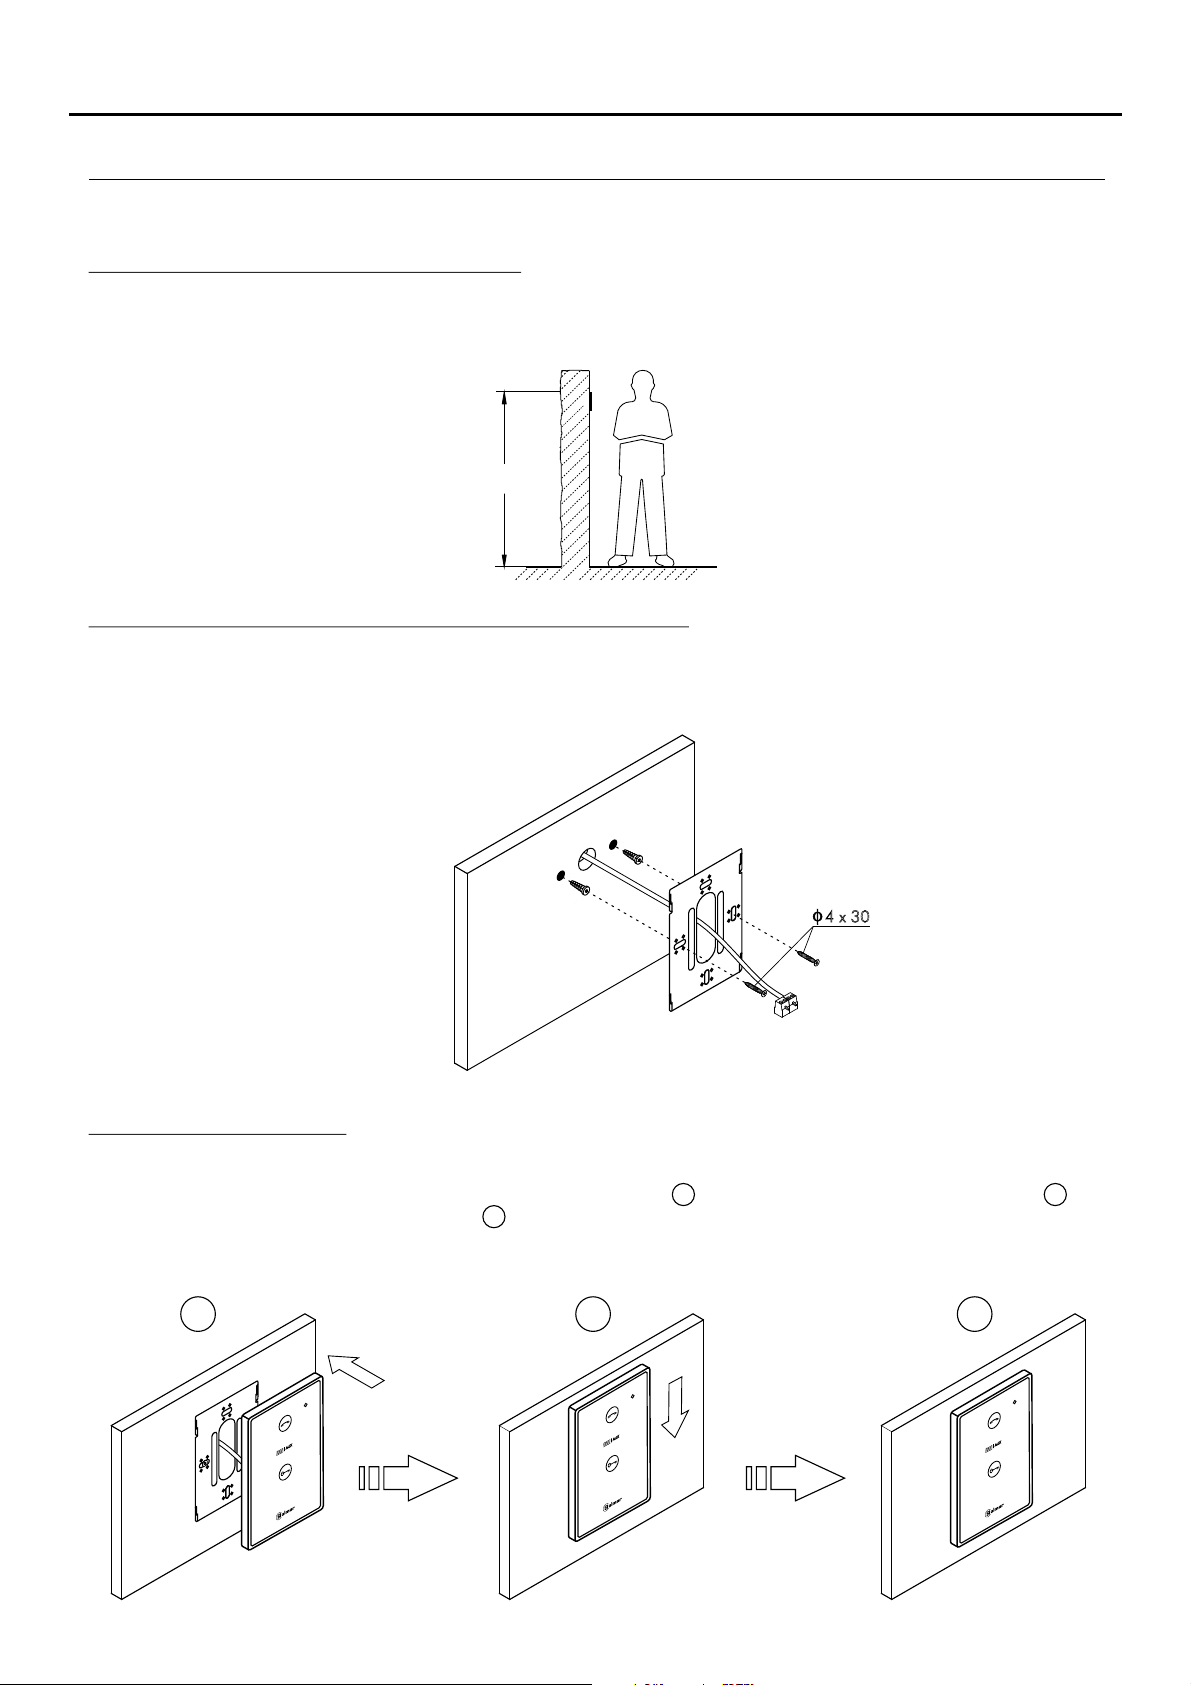
INSTALLING THE TERMINAL IN A WALL MOUNTING CONNECTOR
Avoid dusty or smoky environments or locations near sources of heat.
Positioning the wall mounting connector:
The top of the connector must be positioned at a height of 1.60m. The minimum distance between the sides of the
connector and the closest object must be 5cm.
1 6. 0m
Fixing the terminal's wall mounting connector to the wall:
Fix the terminal's wall mounting connector to the wall by drilling two 6mm diameter holes and using the screws and
plugs supplied with the terminal.
6
x4 30
Positioning the terminal:
Connect the cables to the terminal (see p. 4), position the terminal in front of the wall mounting connector, ensuring that the
holes in the base of the terminal line up with those on the connector , and then move the terminal downwards until
the terminal is securely fixed to the connector .
Remember toremove the protective covering from the front of the terminalonce installation has been completed.
3
1
2
1 2 3
Page 7
NHEA PLUS SE HANDS-FREE AUDIO TERMINAL
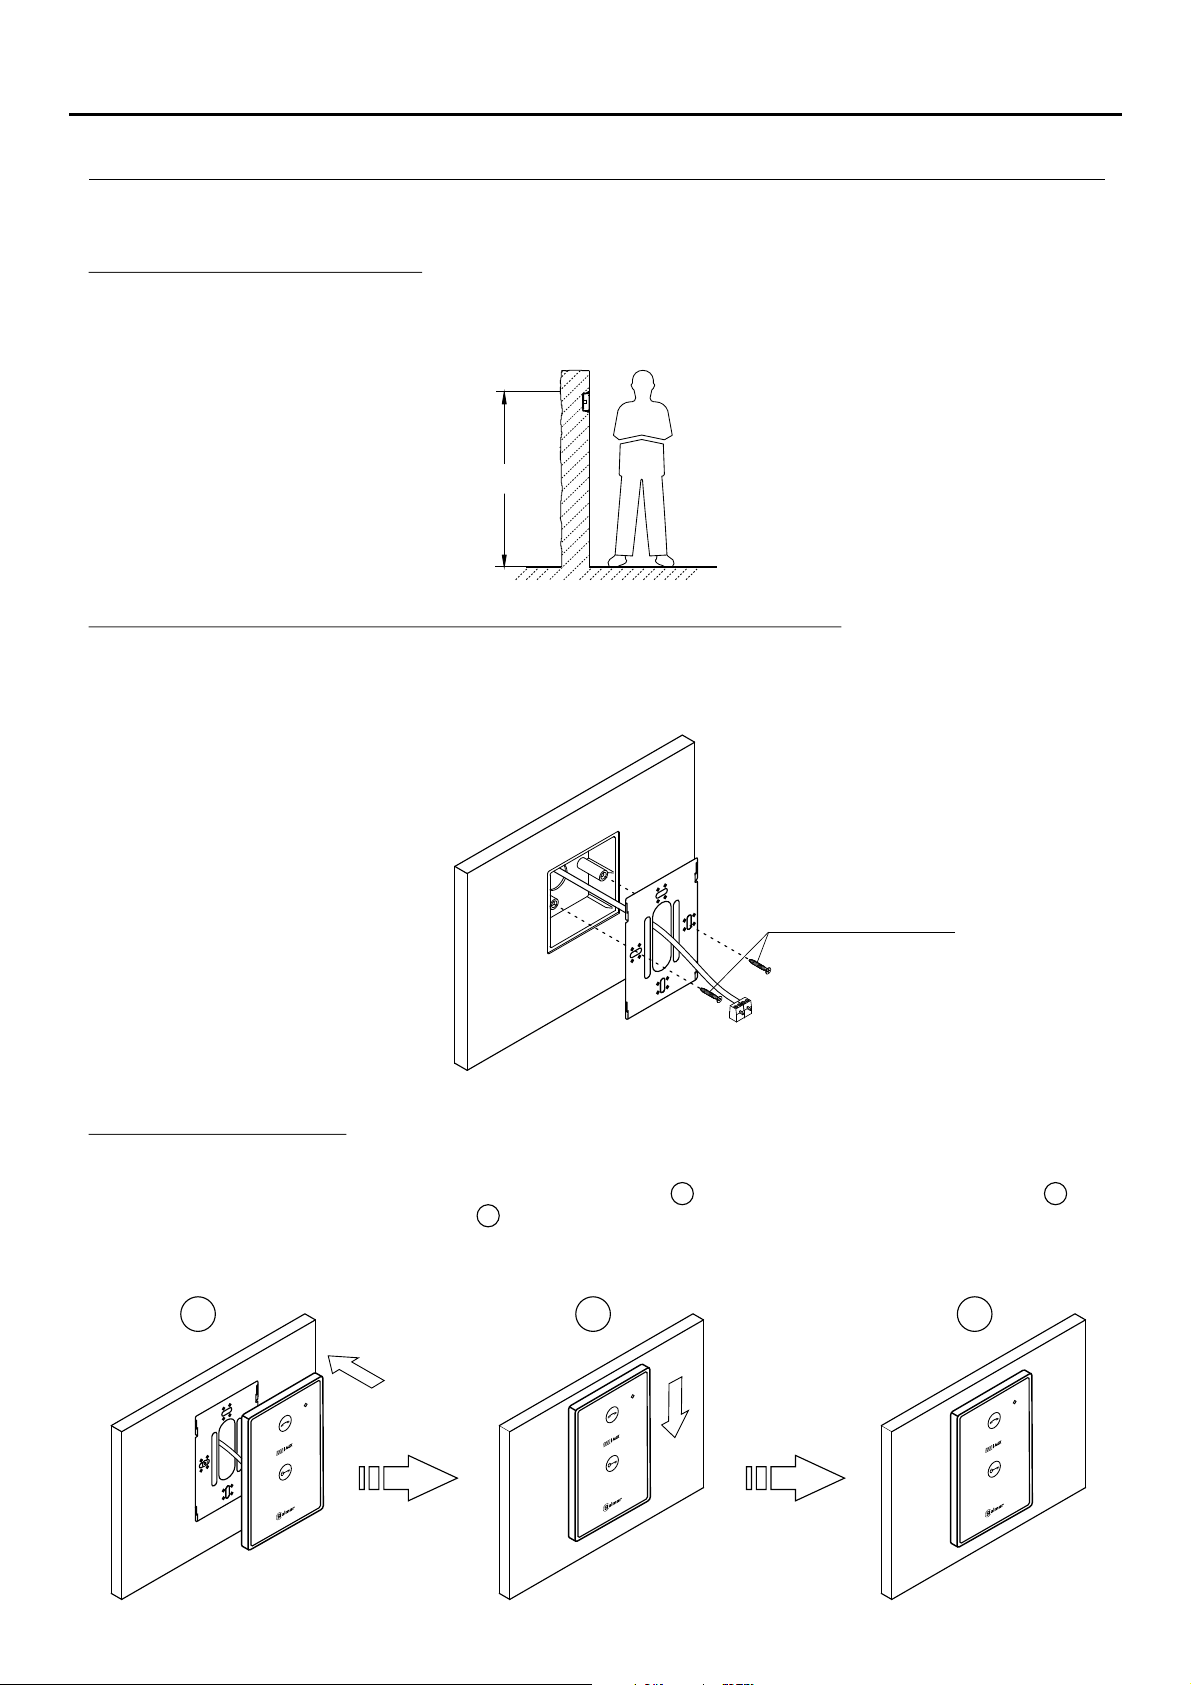
INSTALLATION OF THE TERMINAL IN AN EMBEDDING BOX
Avoid dusty or smoky environments or locations near sources of heat.
Location of the embedding box:
Make a hole in the wall to position the top of the universal embedding box at a height of 1.60 m from the ground. The
minimum distance between the sides of the embedding box and the closest object must be 5cm.
1 6. 0m
Positioning the embedding box and fitting the wall mounting connector:
Pass the cable through the hole made in the embedding box. Embed the box and ensure that it is level and flush.
Fix the wall mounting connector of the terminal to the embedding box with the screws supplied.
7
Screws supplied with
the embedding box.
Positioning the terminal:
Connect the cables to theterminal (see p. 4),position the terminal in front of thewall mountingconnector, ensuringthat the
holes in the base of the terminal line up with those on the connector , and then move the terminal downwards until
the terminalis securely fixed to theconnector .
Remember toremove the protective covering from the front of the terminalonce installation has been completed.
3
1
2
1 2 3
Page 8
NHEA PLUS SE HANDS-FREE AUDIO TERMINAL
PROGRAMMING THE TERMINALS
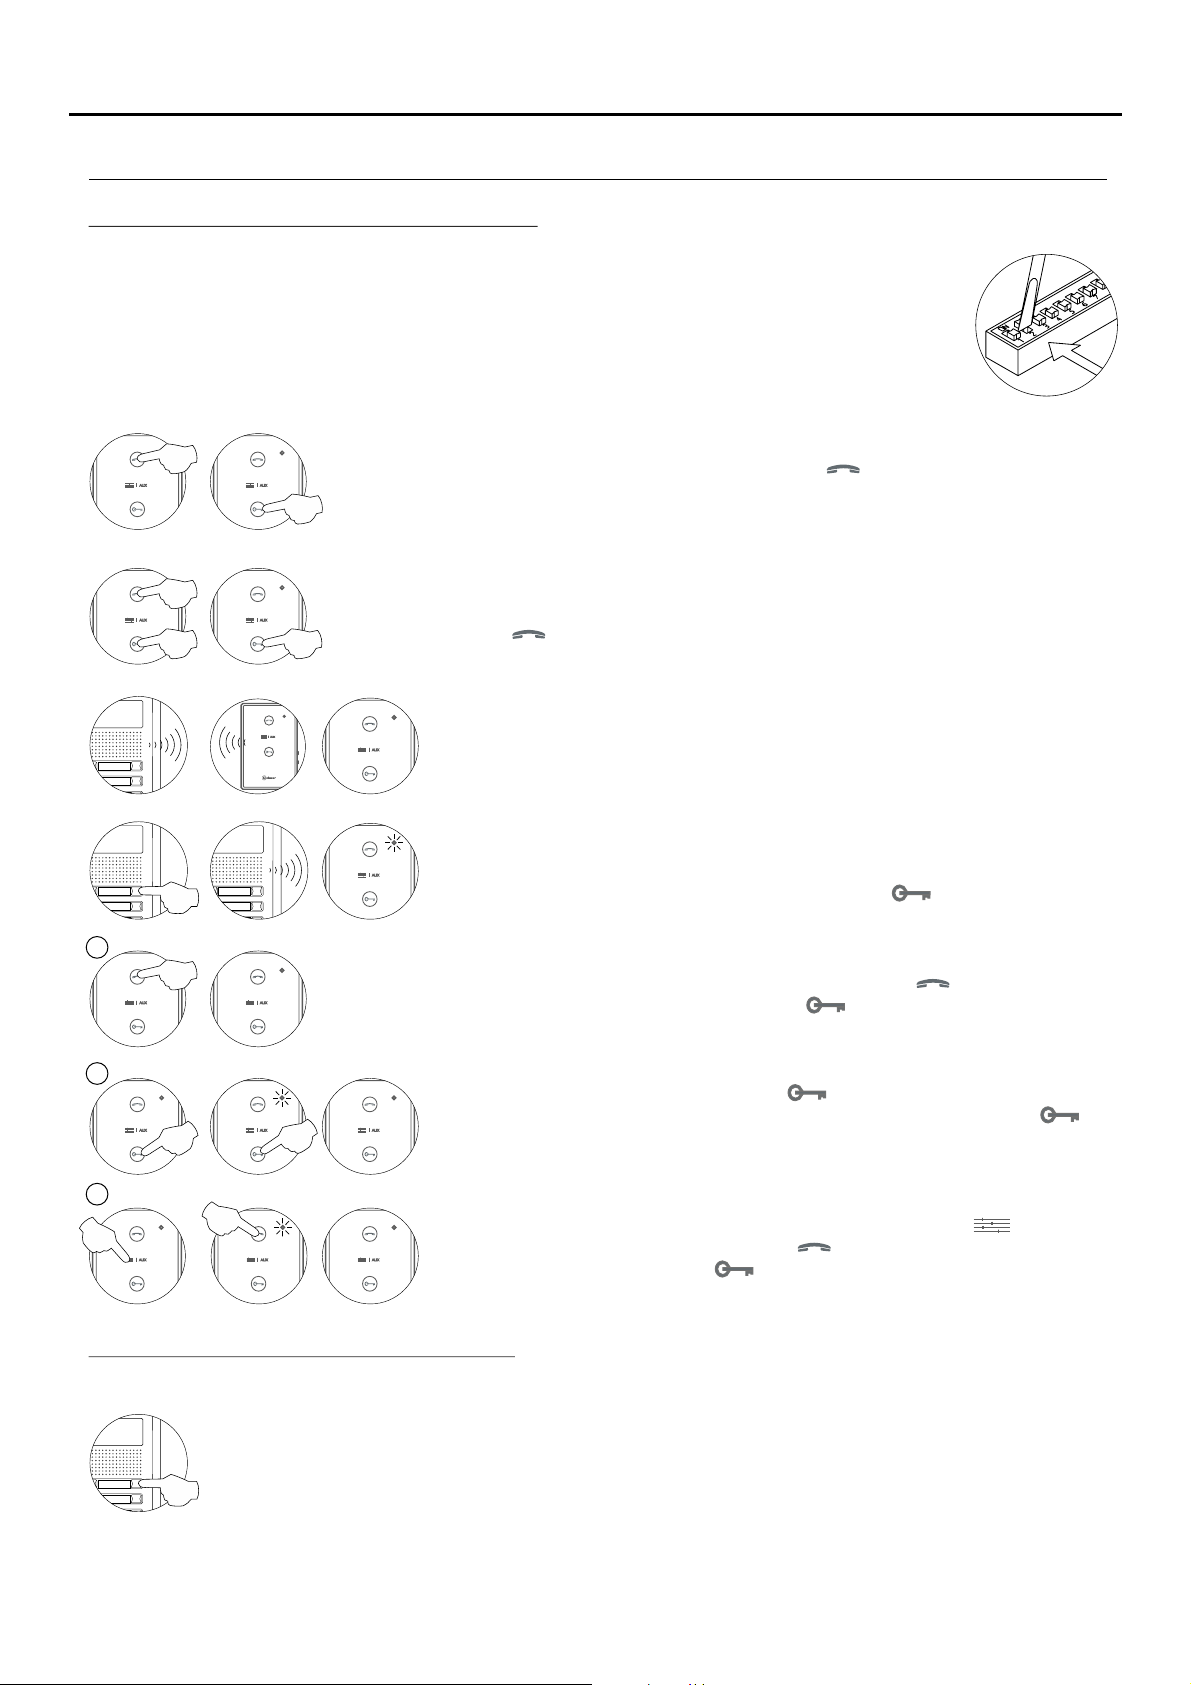
Programming the NHEA Plus SE terminals:
Locate the SW2DIP switch situatedon thetop left-hand side of theback ofthe EL632/PLUSmodule and
set number 2 to ON. The door panel will reproduce a sound to advise that the system has entered into
programming mode.
In systems with more than one door panel, only perform this procedure on the main door panel of each
building.
Turn off theterminal tobe programmed(press button for 3 seconds).
Once switched off,press the door release button.
Press and hold the door release button and, without releasing it, switch on the terminal
(press button for 1second).
8
To show that the device is ready for programming, the door panel and terminal
will emit a number of tones (the status LED on the terminal will illuminate red),
enabling the door release button to be released. The terminal is in audio
communication with the door panel.
Press the button of the door panel that will call this terminal.
At this moment, the door panel and terminal handset will emit a number of tones
(the statusLED on the terminalwill blink red and LED willilluminate).
M
To programme the terminal as , press button for 1 second (theMaster
terminal's LED will illuminate redand LED will turn off).
S
To programme it as , press button once, and the status LEDwill blinkSlave 1
(green) once. Continue successively to , pressing button fourSlave 4
times, and the status LED will blink (green) four times.
SI
To programme the terminal as , press button and the LEDSlave + Intercom
will blink (green) once. Then press button for 1second (the terminal's status
LED will illuminate red and LED will turn off).
Each apartment must only have one master unit; if there are parallel units, either terminals or monitors, they must be
configured as slaves.
Make a call to check that the terminal has been successfully programmed. Programme the other
terminals in the same way.
Once theprogramming hasfinished, set the programming switch to OFF. If this is not done, the door panel
will emit tones to indicate that the system is still in programming mode.
Page 9
NHEA PLUS SE HANDS-FREE AUDIO TERMINAL
PROGRAMMING THE TERMINALS
Advanced programming of the NHEA Plus SE terminals:
Advanced programming enables the terminal's default settings to be changed:
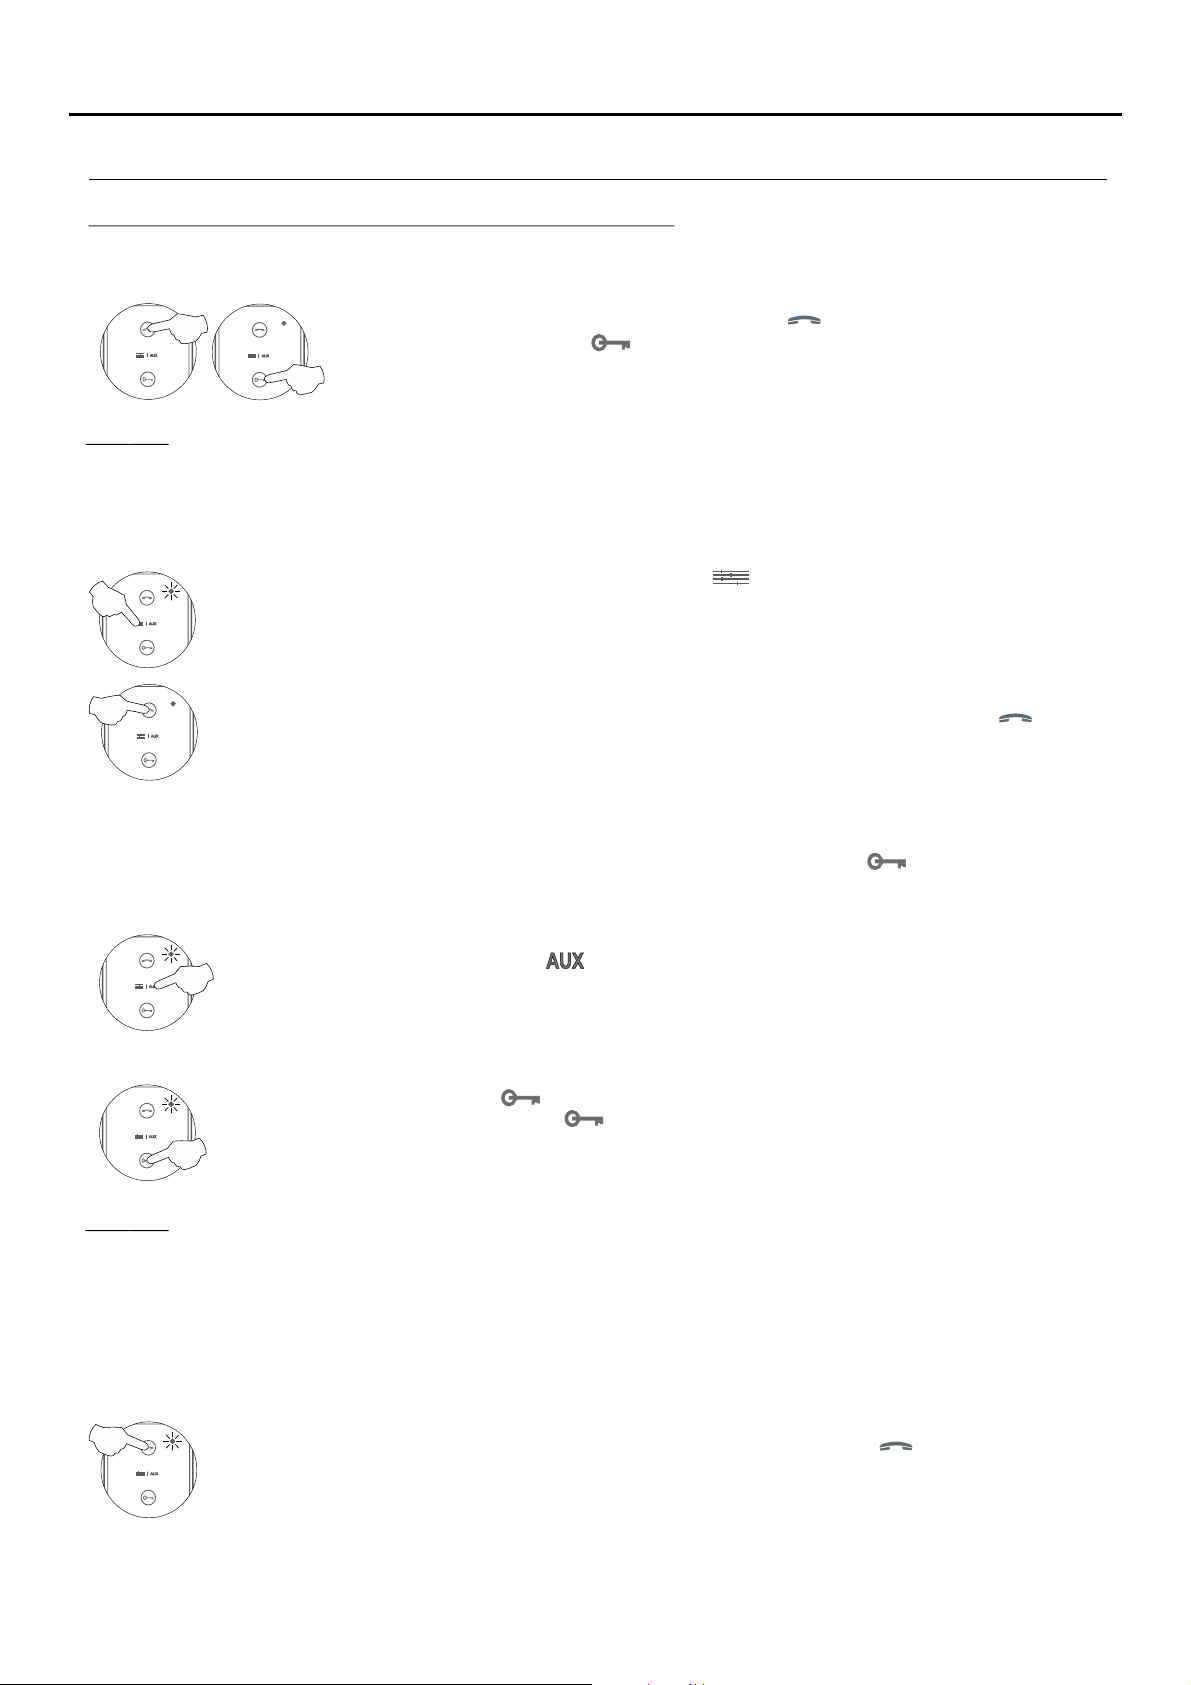
Turn off theterminal tobe programmed(press button for 3 seconds).
Once switched off, pressbutton for 3 seconds to enter 'Menu 1'of advanced programming,
theterminal willemit anumber of tonesandtheLEDwill illuminate yellow.
Men 1:u
Then adjust the settings as required:
- Changing the ringtone melody:
The terminal has different ringtones to identify the origin of the call.The melodies assigned by default to the ringtones
can be selected from among others available on the terminal.
Select the ringtone to be changed: Each press on button selects a ringtone which is indicated with
blinks (1 to 4 blinks) of the status LED and in the following order: door panel, guard unit, intercom call
and 'HZ' apartment interior door call. When the final selection is reached, the following press returns
the user to the first selection and the status LED blinks once (carousel mode).
9
Then select the melody for the ringtone (selected in the previous step) by pressing button until the
required 'carousel mode'melody is heard.
- Activating/deactivating the doctor mode function: Doctor mode not activated (default setting).
The 'doctor mode' function enables the lock release to be activated automatically 10 seconds after making a call from
the door panel without having to establish communication or press door release button . The call ends after 20
seconds and the channel is free.
(Only the master terminal should be configured with 'doctor mode').
To activate doctor mode: Press button , and the status LED will indicate with 2 blinks that the function
is activated orwith 1 blink that the function is deactivated.
- Accessing 'Menu 2' or exiting programming mode:
To access'Menu 2,' press button , andthe status LEDwill blink twice.
To exit programmingmode,press button for 3 seconds, and the status LED will turn off (see p. 11).
Men 2:u
Then adjust the settings as required:
- Intercom with Plus telephones/monitors: Intercom with Plus SE terminals, telephones/monitors (default setting).
If an apartment has T-540 Plus telephones, Tekna Plus monitors and NHEA Plus SE terminals, the NHEA Plus SE
terminals must be configured in 'Intercom with Plus telephones/monitors' mode, as T-540 Plus telephones and
Tekna Plus monitors do not allow an intercom call to a particular telephone/monitor in the apartment to be made.
That way, when an intercom call is made, all of the terminals, monitors/telephones in the apartment will receive
the call.
To activate the 'Intercom with Plus telephones/monitors' mode: Press button , and the status LED
will indicate with 1 blink that the function is in 'Intercom with Plus telephones/monitors' mode or with
2 blinks that the function is in 'Intercom with Plus SE terminals, telephones/monitors' mode.
Continued overleaf
Page 10
NHEA PLUS SE HANDS-FREE AUDIO TERMINAL
PROGRAMMING THE TERMINALS
Continued from previous page
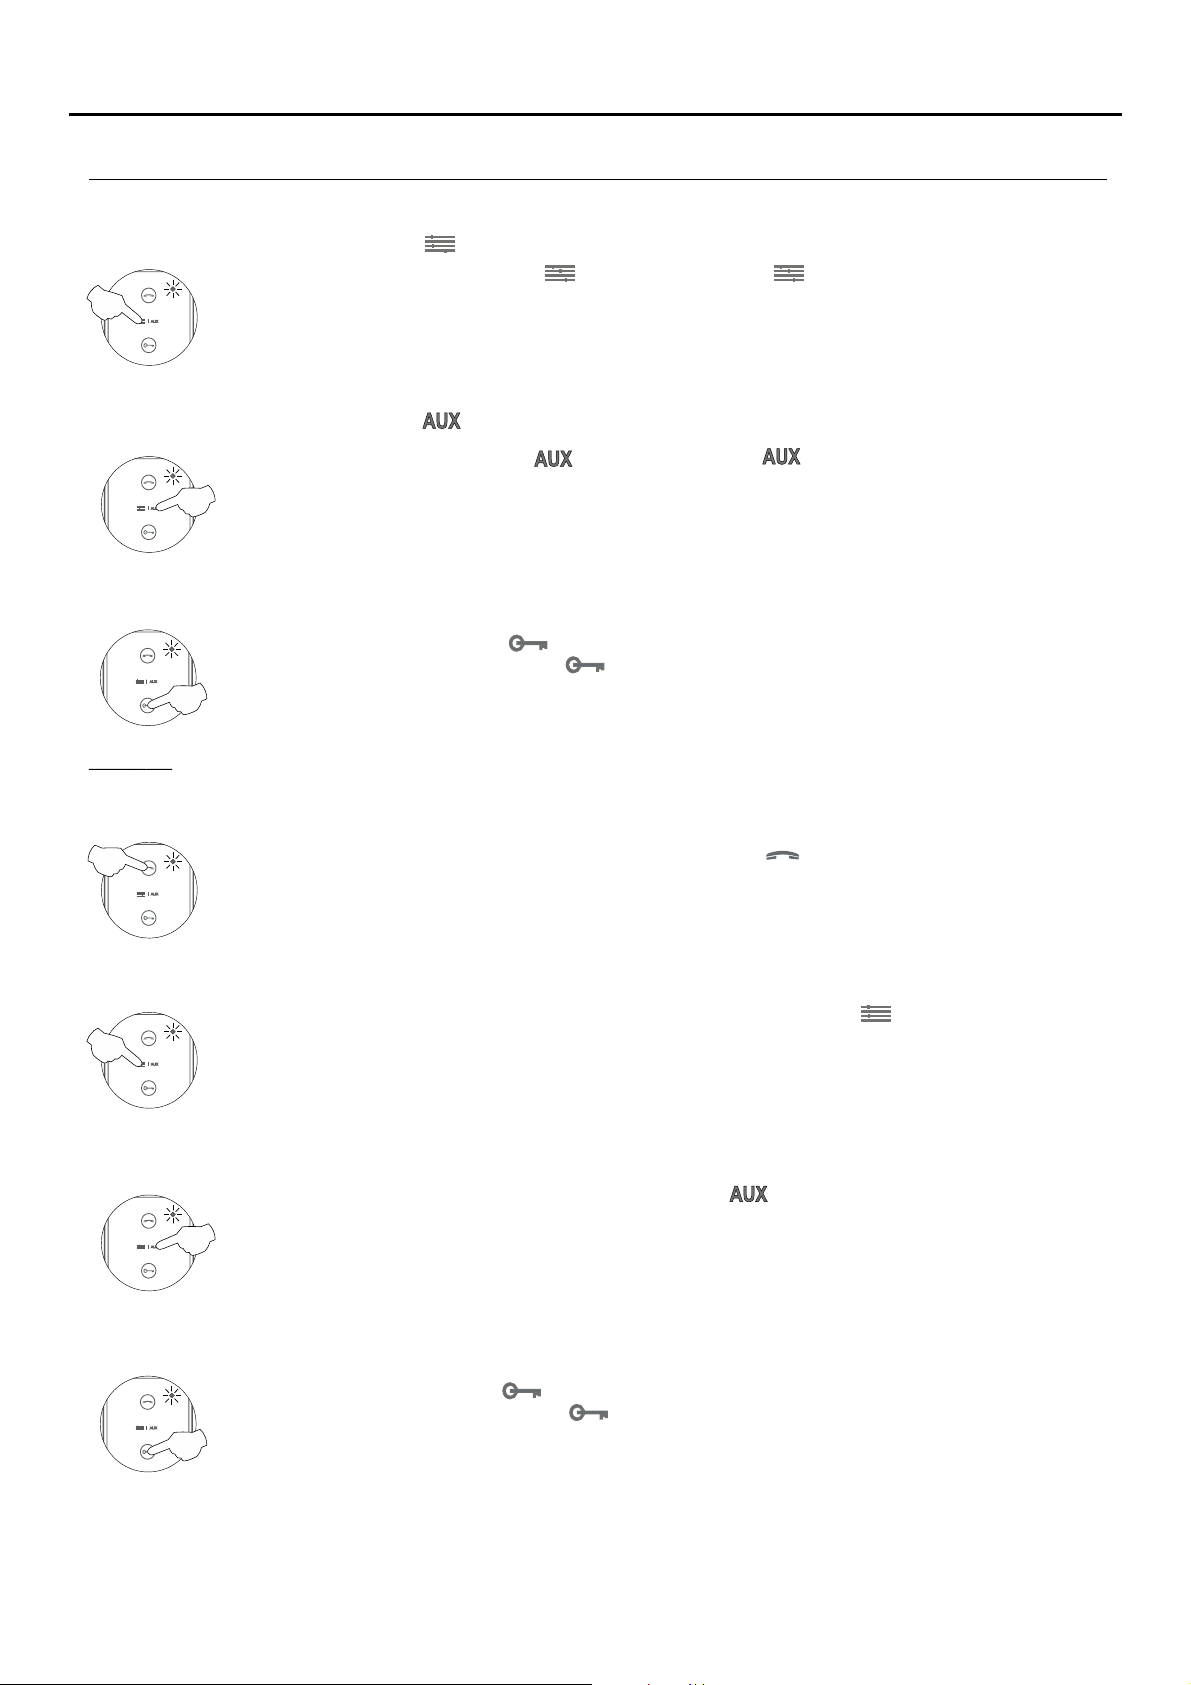
- Changing the function of button : Auto switch-on function (default setting).
Select the function to assign to button :Each presson button selects a different function which
is indicated with blinks (1 to 3 blinks) of the status LED and in the following order: activation of
auxiliary device 'A1,' call to secondary guard unit, auto switch-on. When the final selection is
reached, the following press returns the user to the first selection and the status LED blinks once
(carousel mode).
- Changing the function of button : Activation of auxiliary device 'A1' function (default setting).
Select the function to assign to button : Each press on button selects a different function which is
indicated with blinks (1 to 4 blinks) of the status LED and in the following order: activation of auxiliary
device 'A1,' call to secondary guard unit, auto switch-on and intercom. When the final selection is
reached, the following press returns the user to the first selection and the status LED blinks once
(carouselmode).
- Accessing 'Menu 3' or exiting programming mode:
To access press button , and the status LED will blink 3 times.'Menu 3,'
To exitprogramming mode, press button for3 seconds, andthe status LED will turn off (see p. 11).
10
Men 3:u
Then adjust the settings as required:
- Repeating the ringtones: One repeat (default setting).
To 'repeat the ringtone' on the terminal: Each press on button selects a repeat of the ringtones
which is indicated with blinks (1 to 3 blinks) of the status LED and in the following order: 1, 2 or 3
repeats. When the final selection is reached, the following press returns the user to the first
selection and the status LEDblinks once (carousel mode).
- Adjusting the 'door panel communication time': 90 seconds (default setting).
To adjust the 'door panel communication time': Each press on button selects a door panel
communication time (1:60 seconds, 2: 90 seconds, 3: 120 seconds, and 4: 150 seconds), which will
be indicated with blinks (from 1 to 4 blinks) on the status LED and in the following order: 1, 2, 3 or 4
repetitions. When the final selection is reached, the following press returns the user to the first
selectionand and thestatus LED blinks once (carousel mode).
- Adjusting the 'door panel call' time: 45 seconds (default setting).
To adjust the 'door panel call' time: Each press on button selects a door panel call time (1: 30
seconds, 2: 45 seconds, 3: 60 seconds, and 4: 90 seconds), which will be indicated with blinks (from
1 to 4 blinks) on the status LED and in the following order: 1, 2, 3 or 4 repetitions. When the final
selection is reached, the following press returns the user to the first selection and and the status LED
blinks once (carouselmode).
- Accessing 'Menu 4' or exiting programming mode:
To access press button , and thestatus LED will blink 4 times.'Menu4,'
To exit programming mode, press button for 3seconds, and the status LED will turnoff (see p. 11).
Continued overleaf
Page 11
NHEA PLUS SE HANDS-FREE AUDIO TERMINAL
PROGRAMMING THE TERMINALS
Continued from previous page
Men 4:u
Then adjust the settings as required:
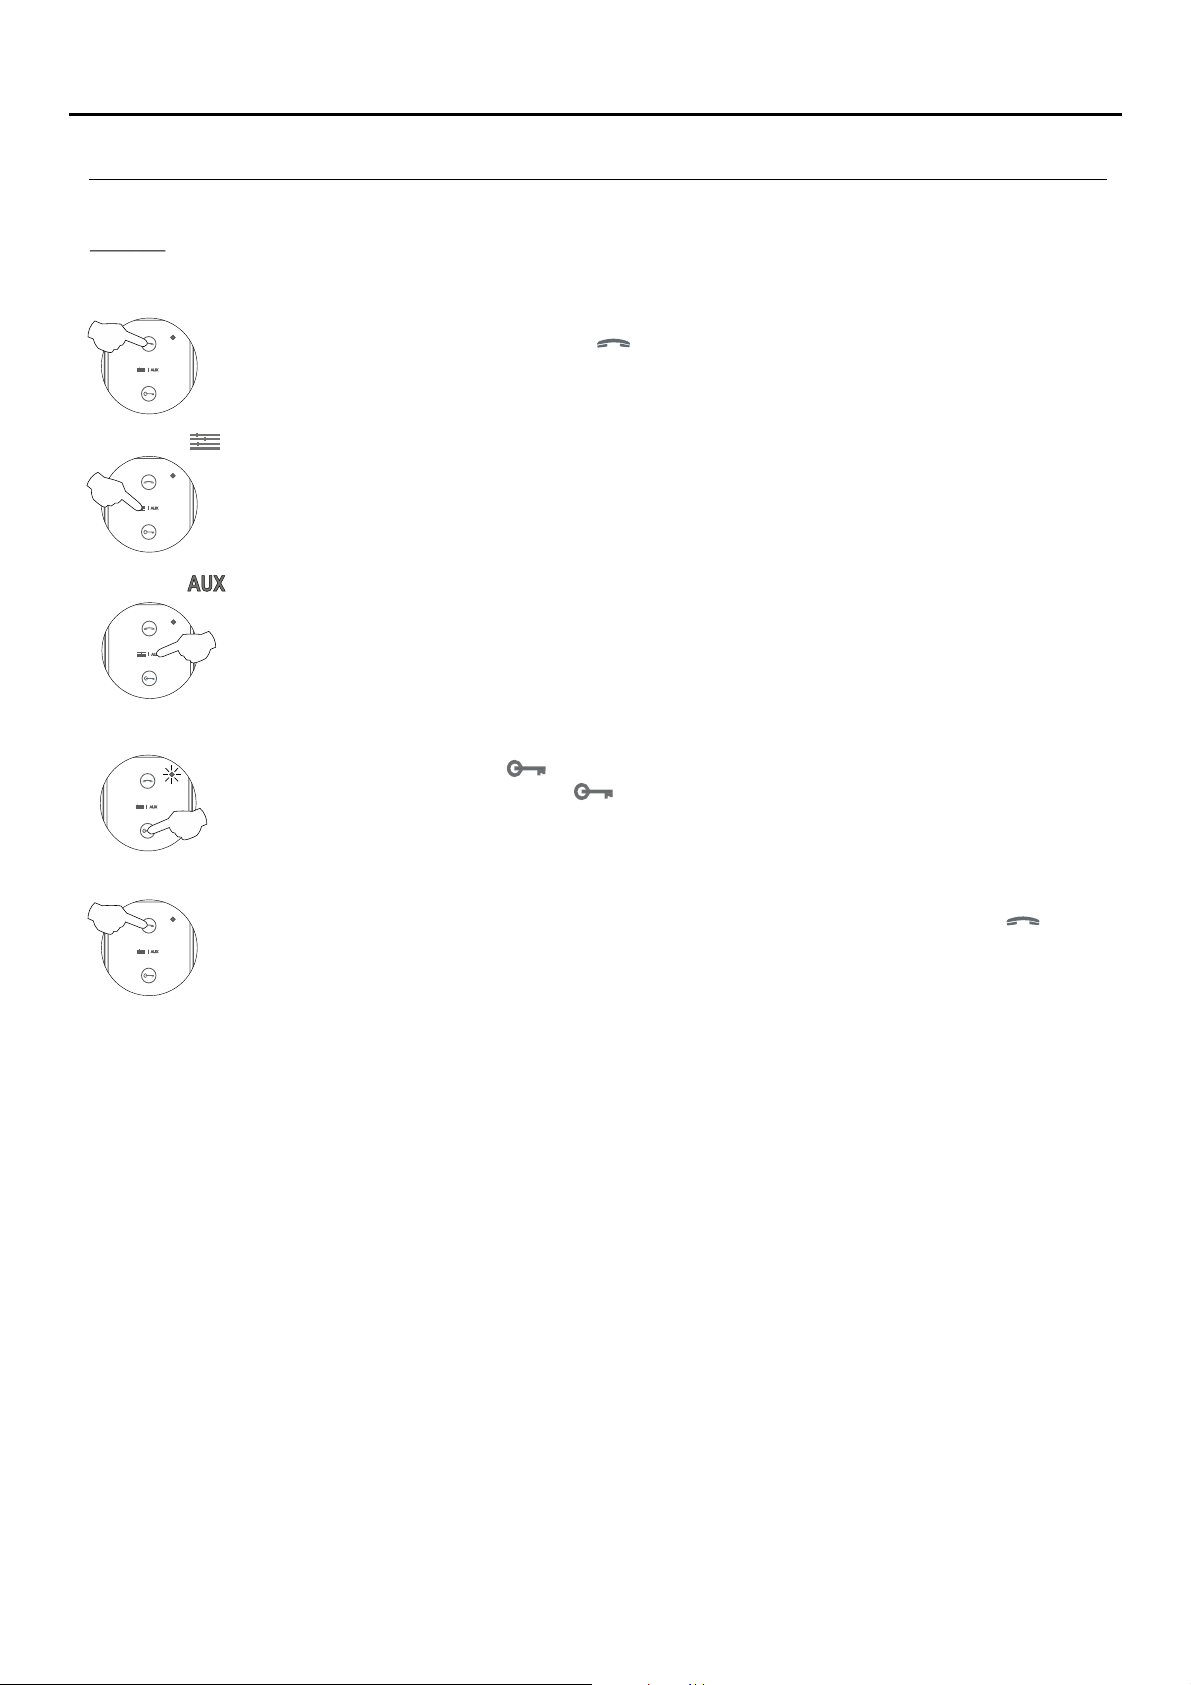
- Setting all of the terminal's advanced programming options to the .'default value'
Setting to the 'default value': Press button , and the terminal will indicate with two audible tones
that all of the options of the terminal's advanced programming (p. 9-10) are set to their default
value.
- Button has no function.
Reserved.
- Button has no function.
No function.
11
- Accessing 'Menu 1' or exiting programming mode:
To access press button , and the status LED will blink once (see p. 9).'Menu1',
To exit programming mode, press button for 3 seconds, and the status LED will turn off.
- Turning on the terminal when exiting programming:
When exiting advanced programming mode, the terminal will be turned off: Press button for 1
second to turn the terminal back on. After any resetting of the terminal and for the following 45
seconds, no operation with it can be performed.
Page 12
NHEA PLUS SE HANDS-FREE AUDIO TERMINAL
OPTIONAL CONNECTIONS
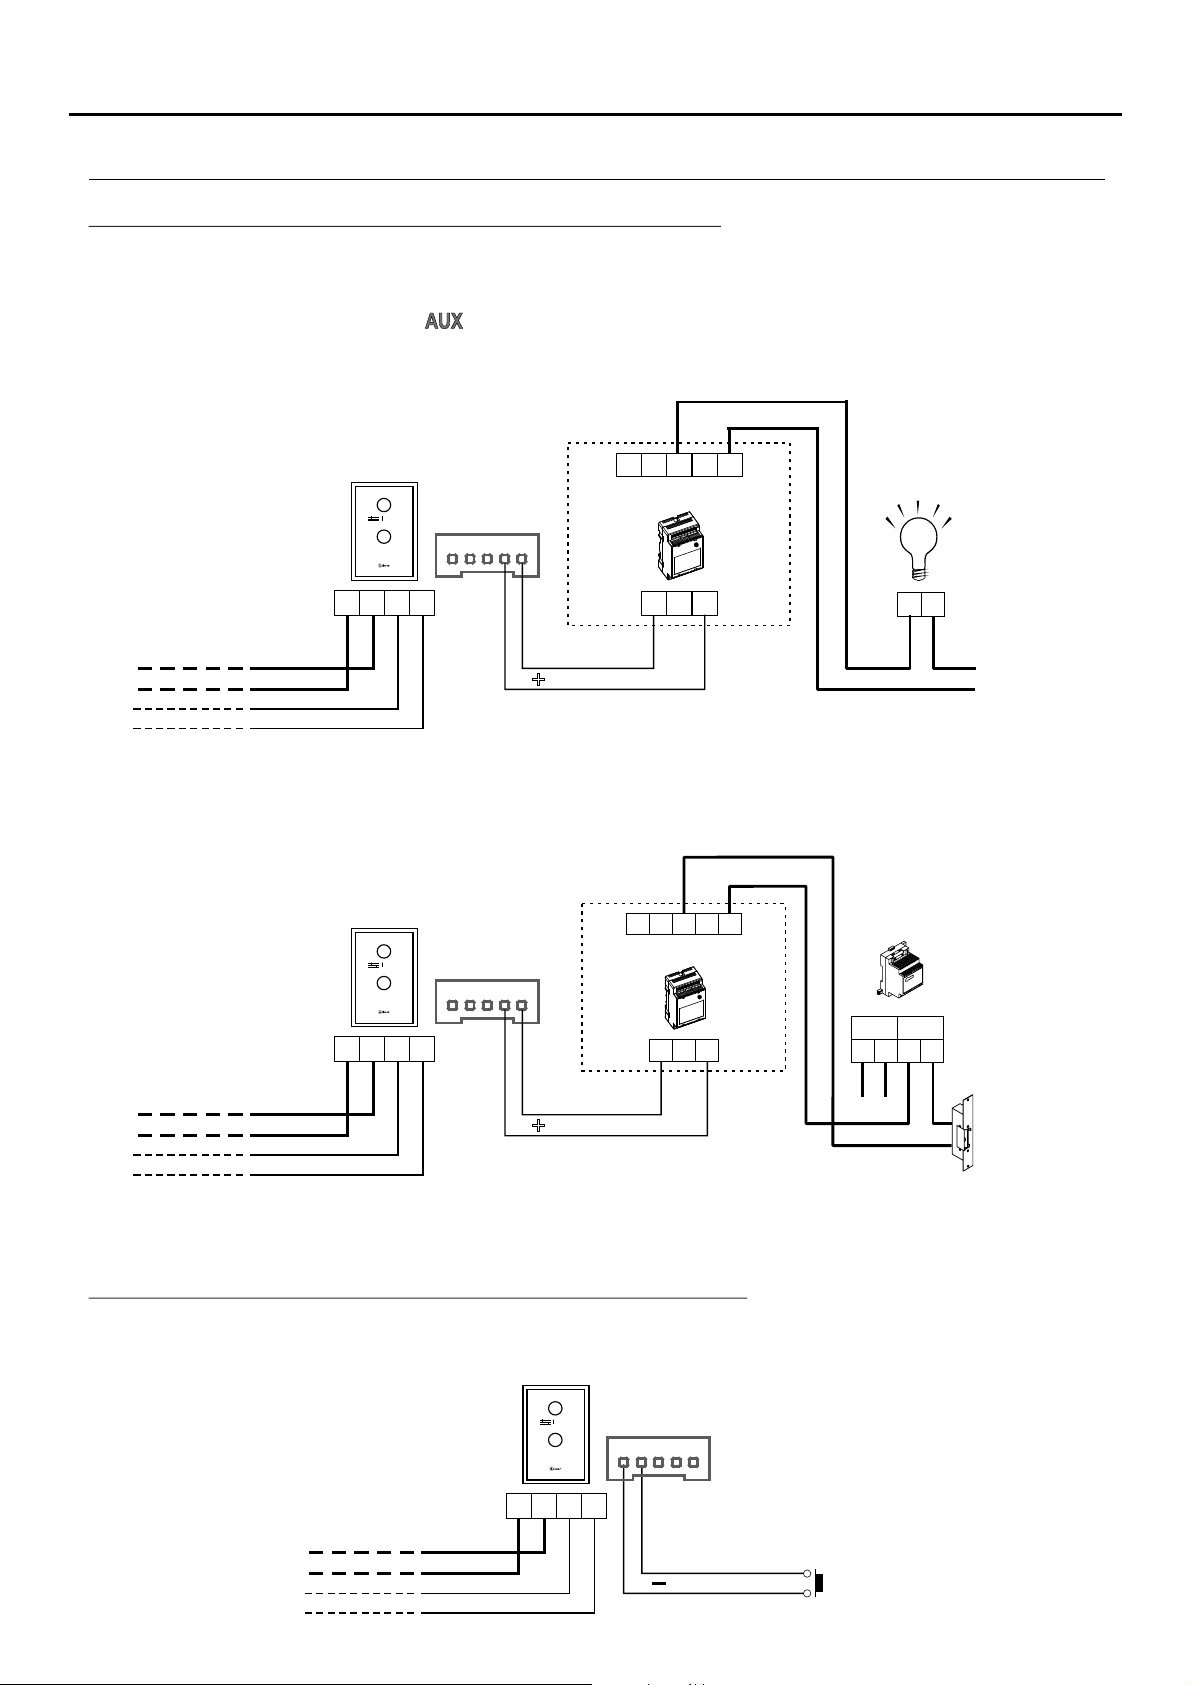
Activation of auxiliary devices with NHEA Plus SE terminals:
Auxiliary device activation requires the use of an SAR-12/24 relay unit. If the feature is shared by all terminals,
connect their A1 terminals; if, however, each terminal has its own feature, use an SAR-12/24 relay for each one
and do not connect theirA1 terminals.
This functionis activated when button of the terminal is pressed atany time (regardless of whether the terminal is
in standby or function, call, communication or intercom mode).
The most common applications are activating the stairway lights and opening a second door.
12
NHEA Plus SE
AUX
_
+
To the distributor/
door panel
( )
*
The neutral of the lighting power supply is arranged serially through the contacts of the SAR-12/24 relay and the
A
5 4 3 2 1
D
CN2
A1
( )
+
(White)
NC NA C
SAR-12/24
IN IN
(Green)
To the stairway light
activation button
F
220 Va /c
1.8A max.
N
maximum consumption of the element to be connected does not exceed 1.8A.
To activate a second lock release, a TF-104 transformer is required.
To the distributor/
door panel
NHEA Plus SE
AUX
_
+
A
D
CN2
5 4 3 2 1
A1
( )
+
(White)
(Green)
NC NA C
SAR-12/24
IN IN
T 104F-
PRI
Mains
SEC
~~ ~~
*
( )
*
Vac lock release.
Important: Place the varistor supplied with the sound module directly onto the terminals
*
of the lock release.
Exterior button input for activating the door panel lock release:
This enables the door panel lock release to be activated during a call or communication with the door panel.
With the terminal in standby, a panic call to the guard units configured to receive such calls is made.
NHEA Plus SE
To the distributor/
door panel
AUX
_
+
A
5 4 3 2 1
D
CN2
AP
( )
(Black)
(Yellow)
AP
Continued overleaf
Page 13
NHEA PLUS SE HANDS-FREE AUDIO TERMINAL
OPTIONAL CONNECTIONS
Continued from previous page.
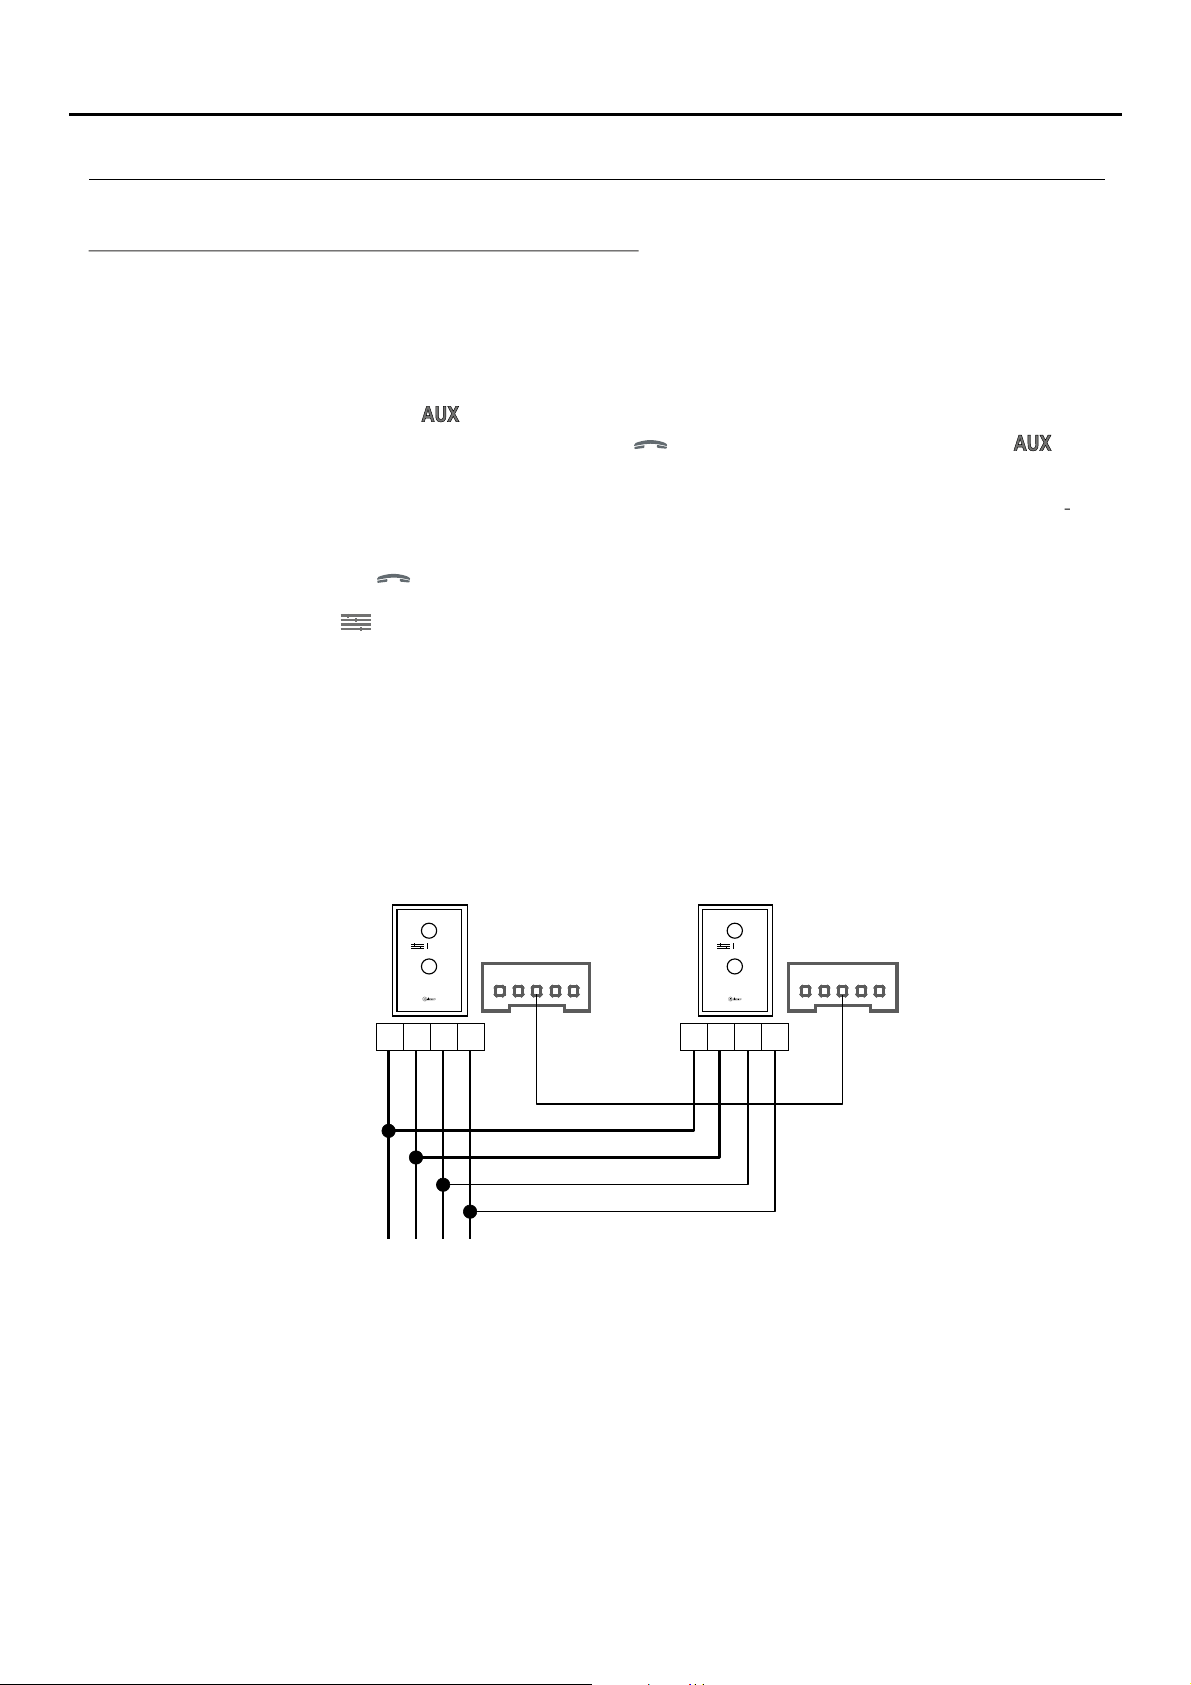
Intercom between two points in the same apartment:
The NHEAPlus SE terminal features as standard an intercom function between two points in the same apartment.
To enable this function, the following is necessary:
- One of the terminals needs to be configured as master and the other as slave with intercom, as described on
p. 8. In the case of intercom between a monitor and a terminal, it is recommended to configure the monitor as
the master.
- The INTterminal of the intercom devices needs to be connected (see diagram attached).
- Changing the function of button by default with activation of aux devices 'A1' for 'intercom' (see p. 10).
To use the intercom function, enter function mode (press button for 1second), then press and hold button until
you hear a confirmation tone call all of the terminals in the apartment. To call individual devices, press the button
once to call the 'master' terminal, twice to call 'slave 1', 3 times to call 'slave 2', 4 times to call 'slave 3' and 5 times to
call 'slave 4'. This selective intercom call mode is only available with the Plus SE terminal, telephone and monitor.
This only functions if no call or communication is in progress.A number of audible tones emitted by the terminal will
confirm that the call is being made or that the unit being called is in communication with the door panel. To establish
communication, press button of the unit being called. If acall is received from the door panel during an intercom
process, the terminal of the master unit will emit a number of audible tones. To establish communication with the
door panel, press button on the unit configured as master or press the door release button to simply open the
door.
The ringtones vary depending on where the call is being made from, enabling the user to identify its origin.
Note: If the apartment also has T-540 Plus telephones, the NHEA Plus SE terminals must be configured as
'Intercom with Plus telephones/monitors' (see p. 9). This configuration mode does not allow selective intercom
calls to different terminals/telephones in the apartment; when the intercom button is pressed, all of the
terminals/telephones in the apartment will receive the call.
13
NHEA Plus SE
AUX
_
+
D
A
CN2
5 4 3 2 1
INT
(Red)
NHEA Plus SE
AUX
_
+
D
A
CN2
5 4 3 2 1
Continued overleaf
Page 14
NHEA PLUS SE HANDS-FREE AUDIO TERMINAL
OPTIONAL CONNECTIONS
Continued from previous page.
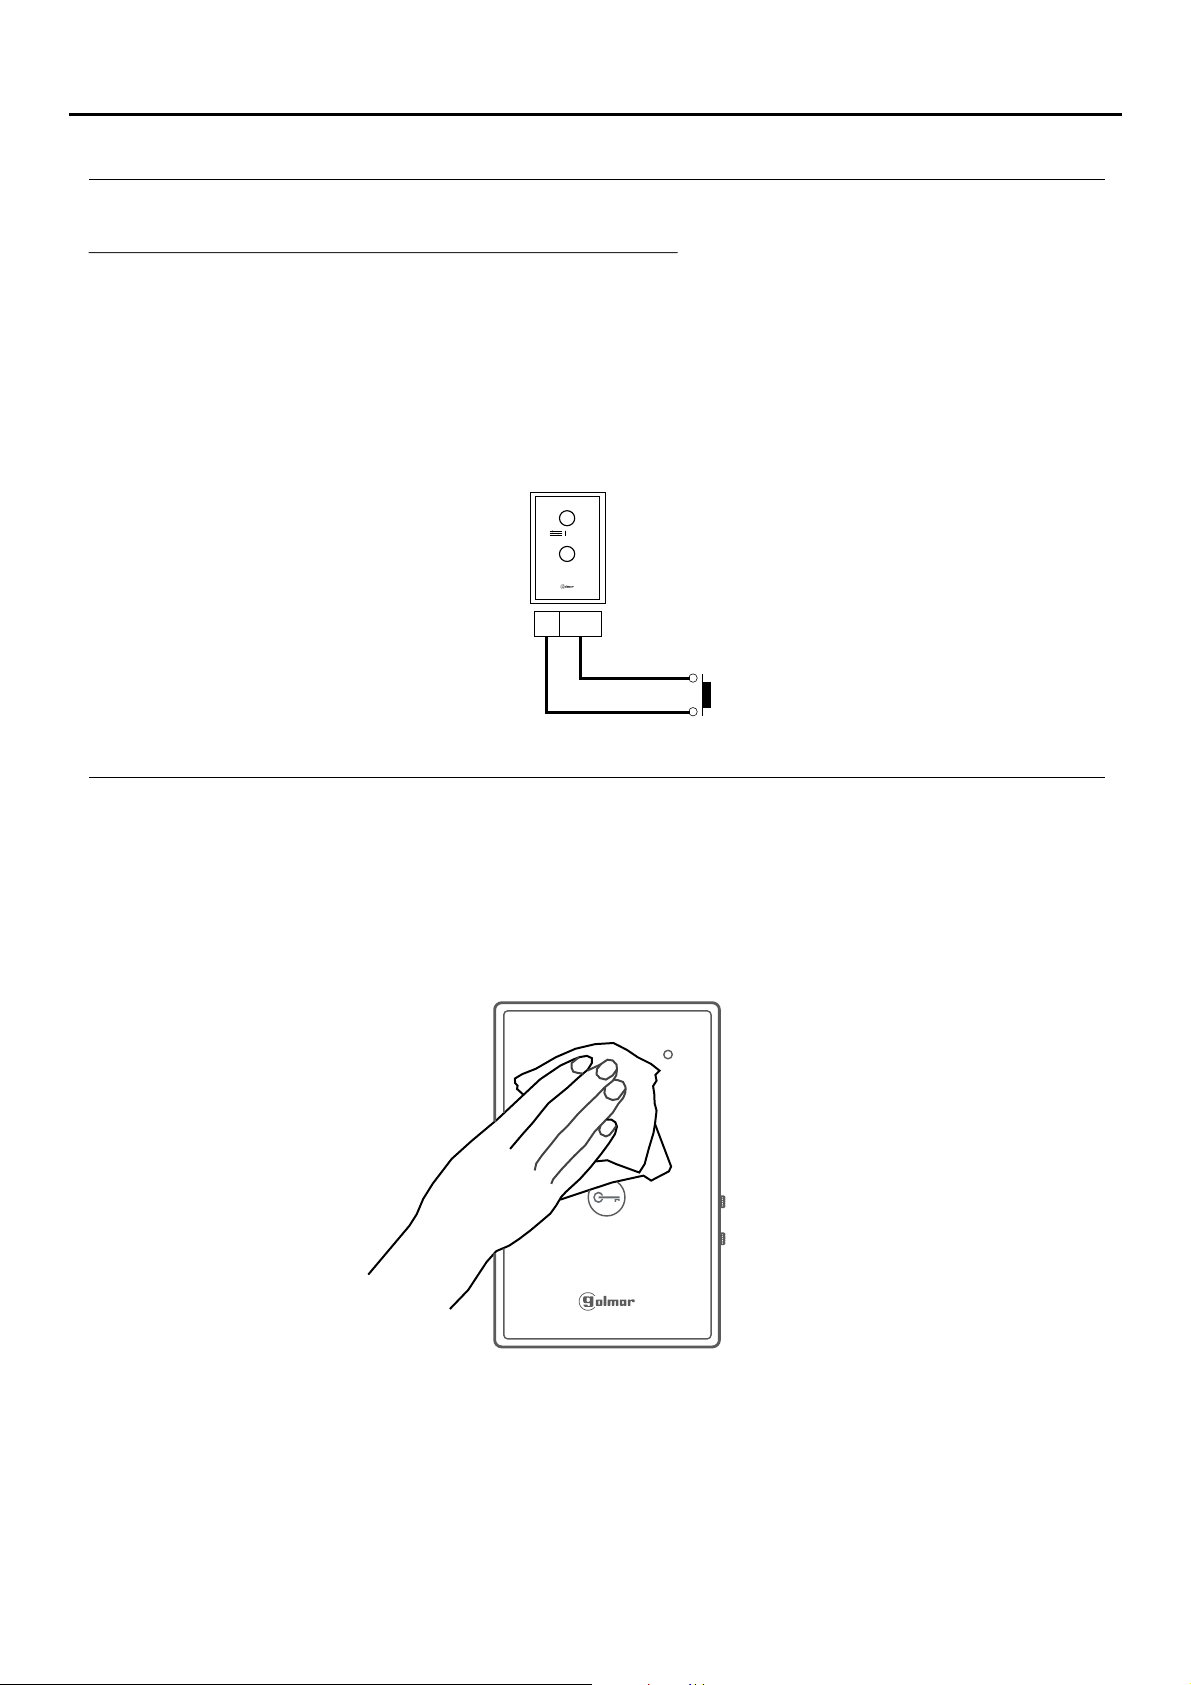
Button for receiving calls from the apartment front door:
The NHEA Plus SE terminal features as standard the ability to receive calls from the apartment front door. This
feature precludes the need to use the bell by positioning a switch between terminals 'HZ—' and '—' of the
terminal.
The ringtones vary depending on where the call is being made from, enabling the user to identify its origin. If a call is
made from the apartment front door during a conversation with the doorpanel or intercom, theterminal will emit a
number of tones to indicate so.
.
Note: Regardless of the volume set for the terminal's ringtones (see p. 5) and the 'night mode' function, the
'apartment front door call' ringtone will always sound at maximum volume.
NHEA Plus SE
AUX
-
HZ-
14
CLEANING THE TERMINAL
- Do not use solvents, detergents or cleaning products that contain acids, vinegar or abrasive components.
- Use a soft dry lint-free cloth.
- Always wipe the terminal in the same direction, from top to bottom, and without applying pressure.
Page 15
NHEA PLUS SE HANDS-FREE AUDIO TERMINAL
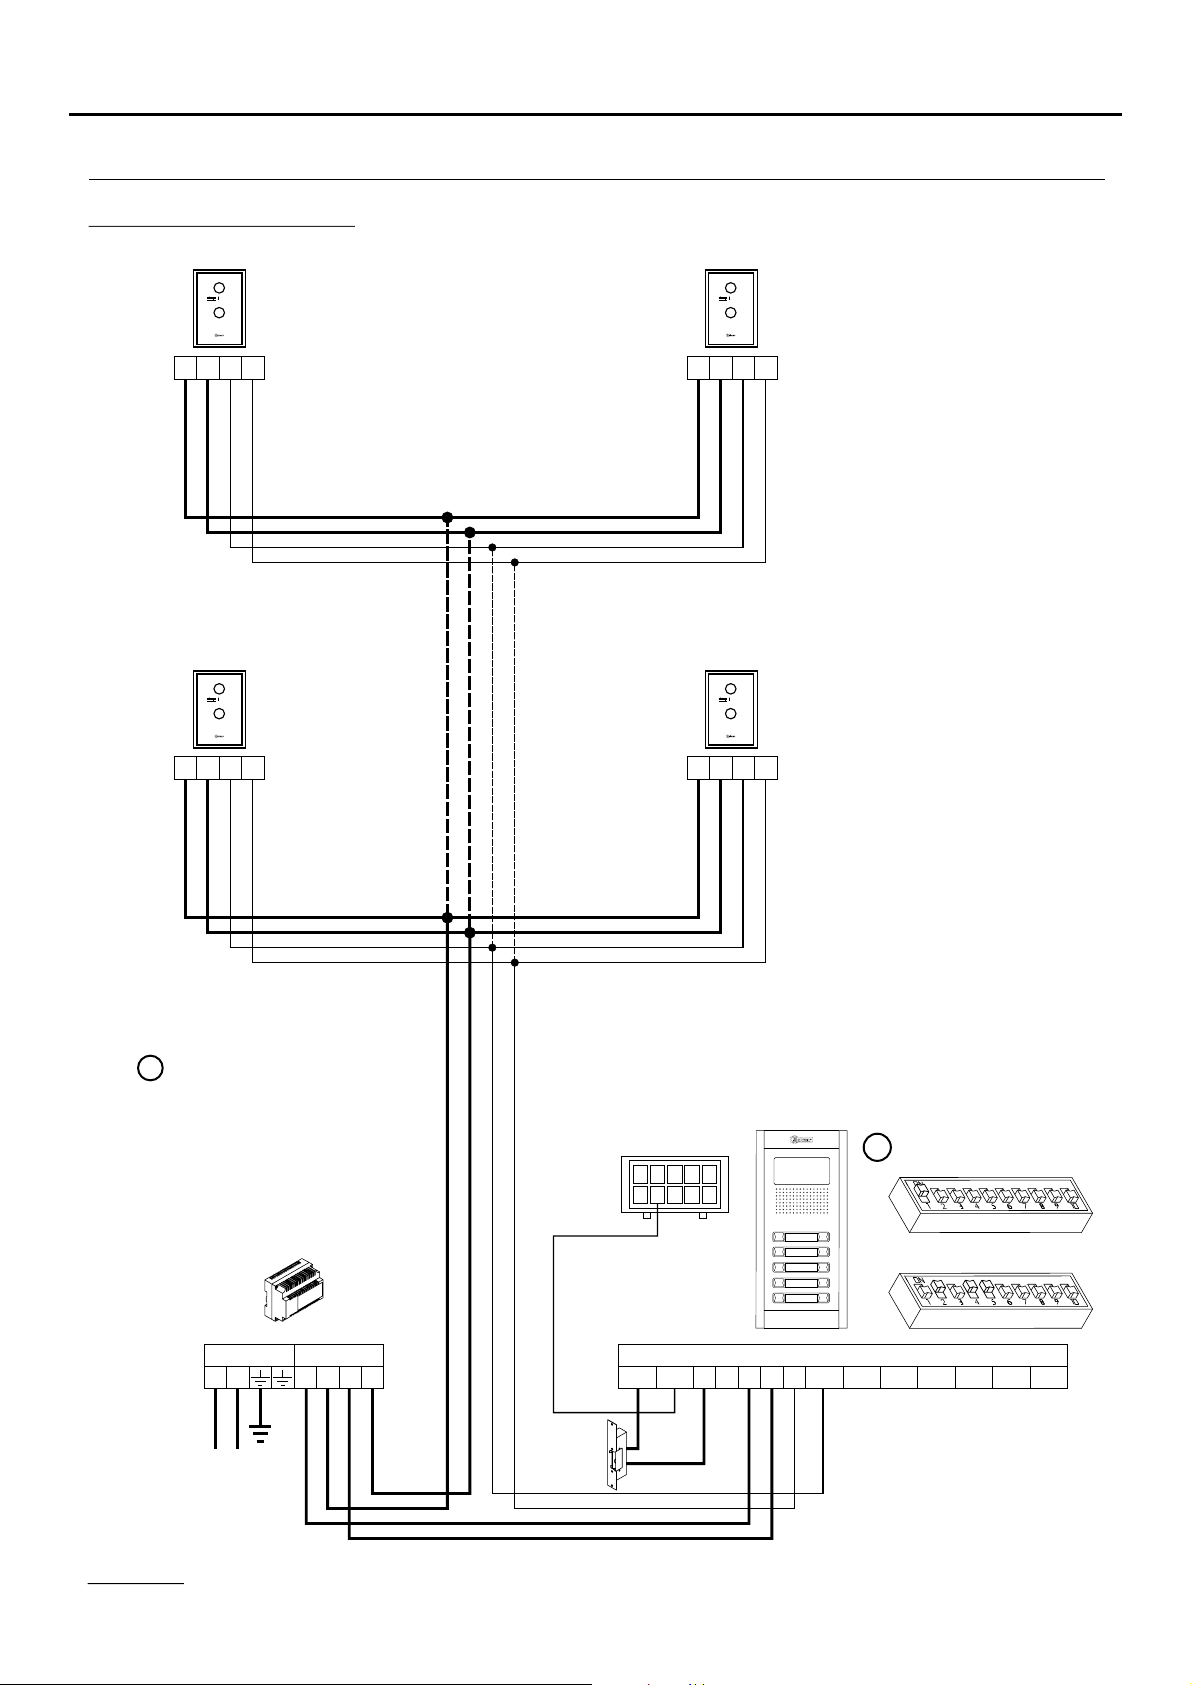
WIRING DIAGRAM
Audio door entry system:
15
NHEA Plus SE
AUX
_
+
D
A
NHEA Plus SE
AUX
_
+
D
A
NHEA Plus SE
AUX
_
+
D
A
NHEA Plus SE
AUX
_
+
D
A
M =Master.
Access panel
* Place this power supply
as close as possible to the
first terminal.
FA-Plus/C or FA-Plus
PRI
~~
+ +
Mains
SEC
--
DC
lock release
CN3
9
10
1
6
837
4
5
2
M
SW2
SW1
CN1
-
D
+-+CV1CV2
Vin-AinAout Vin+ Vout-Vout+
Mesh
Important:
For further information about the door panel, sections, distances, other wiring diagrams, etc., see the T632 PLUS P/T ML Manual.
https://doc.golmar.es/search/manual/50122328
Page 16
Sistemas de comunicaciónS.A.
www.golmar.es
GOLMAR S.A.
C/ Silici, 13
08940- Cornellá de Llobregat
SPAIN
Golmar se reserva el derecho a cualquier modificación sin previo aviso.
Golmar se réserve le droit de toute modification sans préavis.
Golmar reserves the right to make any modifications without prior notice.
 Loading...