


Code 50121913 T G 2 ENPENTHA B REV.0 13 7
PENTHA ONITORMG 2B
USER MANUAL
C m raa e
Door
Me sa ess g Media Call Log
Intercom Divert
Phone
Light Call
Options
14:14
Mon .
05 / 06 / 2017
TECHNOLOGY

INTRODUCTION
First of all, we thank and congratulate you for purchasing this product.
Our commitment to achieving the satisfaction of customers like you is manifested through our ISO-9001 certification
and the manufacture of products like the one you have just purchased.
Its advanced technology and strict quality control will ensure that customers and users enjoy the numerous features
that this device offers. To get the most out of them and ensure proper operation from day one, we recommend that you
read this instruction manual.
CONTENTS
2
SAFETY PRECAUTIONS
- Avoid overtightening the screws of the monitor's wall mounting connector.
- Always disconnect the power supply before making modifications to the device.
- The fitting and handling of these devices must be carried out by .authorised personnel
- .All of the wiring must run at least 40cm away from any other wiring.
- Install the monitor in a dry protected location free from the risk of dripping or splashing water.
- Do not place in humid, dusty or smoky locations, or near sources of heat.
- Before connecting the device to the mains, check the connections between the door panel, power supply, distributors
and monitors.
- Always follow the instructions contained in this manual.
Introduction.................................................................................................................................................................. ..2.
Contents....................................................................................................................................................................... .2. .
Safety precautions........................................................................................................................................... .2.............. .
Characteristics ............................................................................................................................................................... .3
System operation.......................................................................................................................................... .3................. .
Description of the monitor................................................................................................................................................
................................................................................................................................................................. .4. .
Description
...................................................................................................................... .4............. .Function push button and LEDs
.............................................................................................................................................. . 4.... .Connection terminals
............................................................................................................................. .... 4................................... .DIP switch
................................................................................................. ........... 5................. .Setting the monitor's address codes
Installing the monitor in a wall mounting connecto
r .... ................................................................................................ ..... . 6.
Installing the monitor in an embedding box.................................................................................................................... . 7. .
Operation............................................................................................................................................................... ..........
...................................................... .8. .
Description and communication with hearing aids (PENTHA GB2/H monitor only)
1.1 ........................................................................................................................ 8.Receiving a call from the door panel
1.2 ......................................................................................................... .9..................... .Call not answered (missed call)
1.3 .................................................................................................................... .9........ .Ending a call from the door panel
1.4 ....................................................................................................................... 9.Answering a call from the door panel
1.5 Answering a call from the door panel, activating the light (SAR-GB2 required) and displaying cameras
(DQ-CAM-GB2 required)
. 10-11..........................................................................................................
Monitor screen and volume settings menu (brightness, colour, contrast, communication volume andscreen format)..12-13
User menu......................................................................................................................................................... .. .......... ..
.................................................................................................................................................. 14..
Accessing the menu
.................................................................................................................... .14-15.... .Displaying main door panel image
.............................................................................................................................. .15-16.Displaying door panel images
.................................................................... .16-17.......... .Displaying camera pictures (DQ-CAM-GB2 module required)
.............................................................................................................................................. .17-21....... .Text messages
.............................................22.Viewing photos and videos ofdoor panel calls/cameras and deleting photos and videos
......................................................................................... . 23-24.... .MicroSD card (information, copying and formatting)
...................................................................................................................................... .. 25............. .Viewing the call log
.............. .26-30.. .Intercom (transmission within the same apartment and between apartments) and call to guard monitor
............ . 31-32................................................ .Configuring divert call phone numbers and GSM-GB2 device information
................................................................................................ .32.Activating external light (SAR-GB2 module required)
..................................................................... .33-34..................... .Enabling / disabling do not disturb or divert call modes
................. .35-41....................... .Settings (volume/ringtones, date/time, language, default settings, installer menu, etc.)
.. . 41-43.............. .Configuring from the monitor menu (address, master/slave and displaying slave monitor image in call)
Cleaning the monitor
............................................................................................................................................... .....43.
Annex: Changing the time range of the monitor's day mode................................................................................... .45-46. .
PENTHA MONITORG 2B

CHARACTERISTICS
- Hands-free monitor.
- 7” TFT colourscreen.
- Monitor with simple installation (non-polarised 2 wire BUS).
- The PENTHA GB2/H monitor interacts with hearing aids equipped with T-mode, making conversation between the
door panel and apartment easier.
- Capacitive menu access and (slave monitor only) start/stop communication button.
- Touch screen for access and selection of menu functions:
User menu:
- Displaying door panel images.
- Displaying camera pictures (DQ-CAM-GB2 module required).
- Sending and receiving text messages from the same apartment and other apartments in the building.
- Viewing photos or videos ofmissed calls (microSD card up to 16 GB and Class 10 required).
- Door panel or intercom call log (received and made).
- Intercom calls within the same apartment.
- Intercom calls between apartments.
- Call to guard.
- Activating external light (SAR-GB2 module required).
- About: Information, access to the installer menu and default settings (restore).
- Settings: Ringtone, ringtone volume, date / time, language and enabling intercom between apartments.
Installer menu:
- Monitor as master or slave 1, slave 2 or slave 3. Up to 4 monitors per apartment.
- Enabling the menu to be viewed when the Bus is busy.
- Enables the monitor address to be programmed from the installer menu.
Screen, volume and control settings menu: (during auto switch-on or communication).
- Manual photo or video recording (microSD card up to 16GB and Class 10 required).
- Door 1 opening control / door 2 opening control.
- Start/stop communication control.
- External light control (SAR-GB2 module required).
- Scene: Normal, bright, soft or user picture.
- Brightness, contrast and colour.
- Screen format (4:3, 16:9 wide and 16:9 high).
- Displaying camera pictures (DQ-CAM-GB2 module required).
- Different ringtones to identify the originof the call (door panel, intercom or apartment door).
- DIP switches for setting the monitor address (callcode) and end of line.
- Input for call from the apartment door.
- SAR-12/24 call repeater output (12Vdc/50mAmaximum).
SYSTEM OPERATION
- To make a call, the visitor must press the button of the apartment; an audible sound indicates that the call is being
made and LED will turn on. If vocal synthesis is enabled, a 'Call is in progress' message appears indicating that a
call is being made. At this moment, the apartment's monitors receive the call. If another apartment is called by
mistake, press the button for the correct apartment and the first call will be cancelled.
- The call lasts for 40 seconds and, when received, the image appears on the master monitor without the visitor
knowing. To view the image on a slave monitor, this function needs to have been enabled on the monitor. House kit
application: the image appears on the monitor (with code 0 'apartment 1' or monitor with code 16 if the call is in
'apartment 2') when receiving the call without the visitor being alerted.
If the call is not answered within 40 seconds, LED willturn off and the channel will be freed.
- To establish communication,press option on the screen ofthe master monitor or the logo on the front of
any slave monitor in the apartment (unless the 'display image in call' function is enabled on the slavemonitor, in which
case, option must be pressed), and LED on the door panel will illuminate. If the monitor is a PENTHA GB2/H
with icon on the front, make sure that the hearing aid is between 15 and 25 cm away from the monitor to ensure
maximum audio quality during communication with the door panel.
- Communication will last for one and a half minutes or until option on the monitor screen is pressed. When
communication has finished, LEDs and will turn off and the channel will be freed. If vocal synthesis is enabled, a
'Communication is finished' message will indicate that the call is over.
- To open door 1 or 2, press option / on the monitor screen during the call or communication processes: one
press will activate the lock release for 5 seconds and LED will also illuminate for 5 seconds. If vocal synthesis is
enabled, a 'Door Opened!' message will be indicated on the door panel.
- The description of the function push button and LEDs can be found on p. 4.
3
1 2
PENTHA MONITORG 2B

DESCRIPTION OF THE MONITOR
Connection terminals and DIP switch:
Connection terminals:
L1, L2: Bus connection(non-polarised).
HZ+, HZ-: Door bellconnection.
CALL REPEATER, GND: Call repeater connection (SAR-12/24).
(12Vdc/50mAmaximum).
Configuration DIP switch:
DIP 6: Configures the end of line. Leave in the ON position in
monitors where the bus cable terminates. Set to OFF in
intermediate monitors only.
DIP 1 to DIP 5: To set the monitor address (addresses 0 to 31).
The switches set toOFF have a zero value.
The values of the switches set to ON are shown in the table
below.
The monitor code is the sum of the values of the switches set to
ON.
1 2 3
ON DIP
4 5 6
L1
L2
(R ):ED CALL REPEATER
( ):BLACK GND
( ):YELLOW
DO NOT USE
4
1 2 3
ON DIP
4 5 6
E mpl : 0 + 0+ 4 + 0 +16 = 20xa e
Switch nº: 1 2 3 4 5
: 1 2 4 8 16
Value when ON
Table of values
a. Microphone.
b. Monitor status light and capacitive menu access
(in standby) / slave monitor communication start
button.
c. Communication with hearing aids (PENTHA GB2/H).
Set the hearing aid switch to T-mode, see p. 8.
d. Speaker.
e. 7” TFT colourscreen.
f.. 'Do not disturb' mode LED.
g. 'Divert call' mode LED.
h. Vertical wiring entry.
i. Connector fixings.
j. Con ector.n
k.
DIP switch.
l. Bus connection terminals.
k
l
i
j
e
1 2 3
ON DIP
4 5 6
h
i
h
d
a
c
MicroSD card
(Max. 16GB
Class 10)
g
f
b
'Divert call' mode LED:
Off: 'Divert call' mode disabled.
On: 'Divert call' mode enabled.
LED :S
'Do not disturb' mode LED:
Off: 'Do not disturb' mode disabled.
On: 'Do not disturb' mode enabled.
Function push button / Monitor status light:
Monitor status light:
Standby: Light fixed (low intensity).
Call: Light blinking.
Communication: Light fixed
.
Missed call: Low and variable intensity light.
1 2 3
ON DIP
4 5 6
( ):WHITE HZ+
( ):GREEN HZ-
PENTHA MONITORG 2B
Function push button: Menu access (in standby) /
During a call process, it initiates communication
in a slave monitor (unless the 'display image in
call' function is enabled - see 'System operation'
on p. 3).

5
DESCRIPTION OF THE MONITOR
Setting the monitor's address codes (addresses 0 to 31):
DIP 6: Configures the end of line. Leave in the ON position in monitors where the video cable terminates. Set to OFF in
intermediate monitors only.
1 2 3
ON DIP
4 5 6
Co 0/32de
1 2 3
ON DIP
4 5 6
Co 01de
1 2 3
ON DIP
4 5 6
Co 02de
1 2 3
ON DIP
4 5 6
Co 03de
1 2 3
ON DIP
4 5 6
Co 04de
1 2 3
ON DIP
4 5 6
Co 05de
1 2 3
ON DIP
4 5 6
Co 06de
1 2 3
ON DIP
4 5 6
Co 07de
1 2 3
ON DIP
4 5 6
Co 08de
1 2 3
ON DIP
4 5 6
Co 09de
1 2 3
ON DIP
4 5 6
Co 10de
1 2 3
ON DIP
4 5 6
Co 11de
1 2 3
ON DIP
4 5 6
Co 12de
1 2 3
ON DIP
4 5 6
Co 13de
1 2 3
ON DIP
4 5 6
Co 14de
1 2 3
ON DIP
4 5 6
Co 15de
1 2 3
ON DIP
4 5 6
Co 16de
1 2 3
ON DIP
4 5 6
Co 17de
1 2 3
ON DIP
4 5 6
Co 18de
1 2 3
ON DIP
4 5 6
Co 19de
1 2 3
ON DIP
4 5 6
Co 20de
1 2 3
ON DIP
4 5 6
Co 21de
1 2 3
ON DIP
4 5 6
Co 22de
1 2 3
ON DIP
4 5 6
Co 23de
1 2 3
ON DIP
4 5 6
Co 24de
1 2 3
ON DIP
4 5 6
Co 25de
1 2 3
ON DIP
4 5 6
Co 26de
1 2 3
ON DIP
4 5 6
C 27ode
1 2 3
ON DIP
4 5 6
Co 28de
1 2 3
ON DIP
4 5 6
Co 29de
1 2 3
ON DIP
4 5 6
Co 30de
1 2 3
ON DIP
4 5 6
Co 31de
DIP 1 to DIP 5: To set the monitor address (addresses 0 to 31).
1 2 3
ON DIP
4 5 6
DIP 6 to ON
DIP 6 to OFF
1 2 3
ON DIP
4 5 6
( )
**
( )
**
Important:
-
In door panel systems with call buttons, the first address on the monitor is 'Code 0'.
-In coded panel systems (N3301/GB2), 'Code 0' is 'Code 32', which means that when a call is made to a monitor with
'Code 0' (DIP 1 to DIP 5 set to OFF), it needs to be entered on the N3301/GB2 numeric keypad.
-In the software (Address Manager GB2), 'Code 0' is also shown as 'Code 32'.
23
PENTHA MONITORG 2B

INSTALLING THE MONITOR IN A WALL MOUNTING CONNECTOR
The top of the connector must be positioned at a height of 1.60m. The minimum distance between the sides of the
connector and the closest object must be 5cm.
Positioning the wall mounting connector:
Fix the monitor's wall mounting connector to the wall by drilling two 6mm diameter holes and using the screws and plugs
supplied with the monitor.
Fixing the monitor's wall mounting connector to the wall:
Positioning the monitor:
1 2 3
Avoid dusty or smoky environments or locations near sources of heat.
6
Connect the cables to the monitor (see p. 4), position the monitor in front of the wall mounting connector, ensuring
that the holes in the base of the monitor line up with those on the connector , and then move the monitor
downwards until the monitor is securely fixed to the connector .
Remember to remove the protective covering from the front of the monitor once installation is complete.
1
2
3
1 6. 0m
x4 30
PENTHA MONITORG 2B

INSTALLING THE MONITOR IN AN EMBEDDING BOX
Make a hole in the wall to position the top of the universal embedding box at a height of 1.60 m from the ground. The
minimum distance between the sides of the embedding box and the closest object must be 5 cm.
Positioning the embedding box:
1 6. 0m
Pass the cable through the hole made in the embedding box. Embed the box and ensure that it is level and flush.
Fix the wall mounting connector of the monitor to the embedding box with the screws supplied.
Positioning the embedding box and fitting the wall mounting connector:
Avoid dusty or smoky environments or locations near sources of heat.
Screws supplied with
the embedding box.
7
Positioning the monitor:
Connect the cables to the monitor (see p. 4), position the monitor in front of the wall mounting connector, ensuring
that the holes in the base of the monitor line up with those on the connector , and then move the monitor
downwards until the monitor is securely fixed to the connector .
Remember to remove the protective covering from the front of the monitor once installation is complete.
1
2
3
PENTHA MONITORG 2B
1 2 3
OPERATION
When a call is received, the monitor(s) will play a melody, the status light of the monitor(s) will blink and show the image
of the door panel on the main monitor without alerting the visitor. If the call is not answered within 40 seconds the
monitor returns to standby mode.
The monitor automatically takes a photo or records a video (MicroSD card required for video).
1.1 Receiving a call from the door panel:
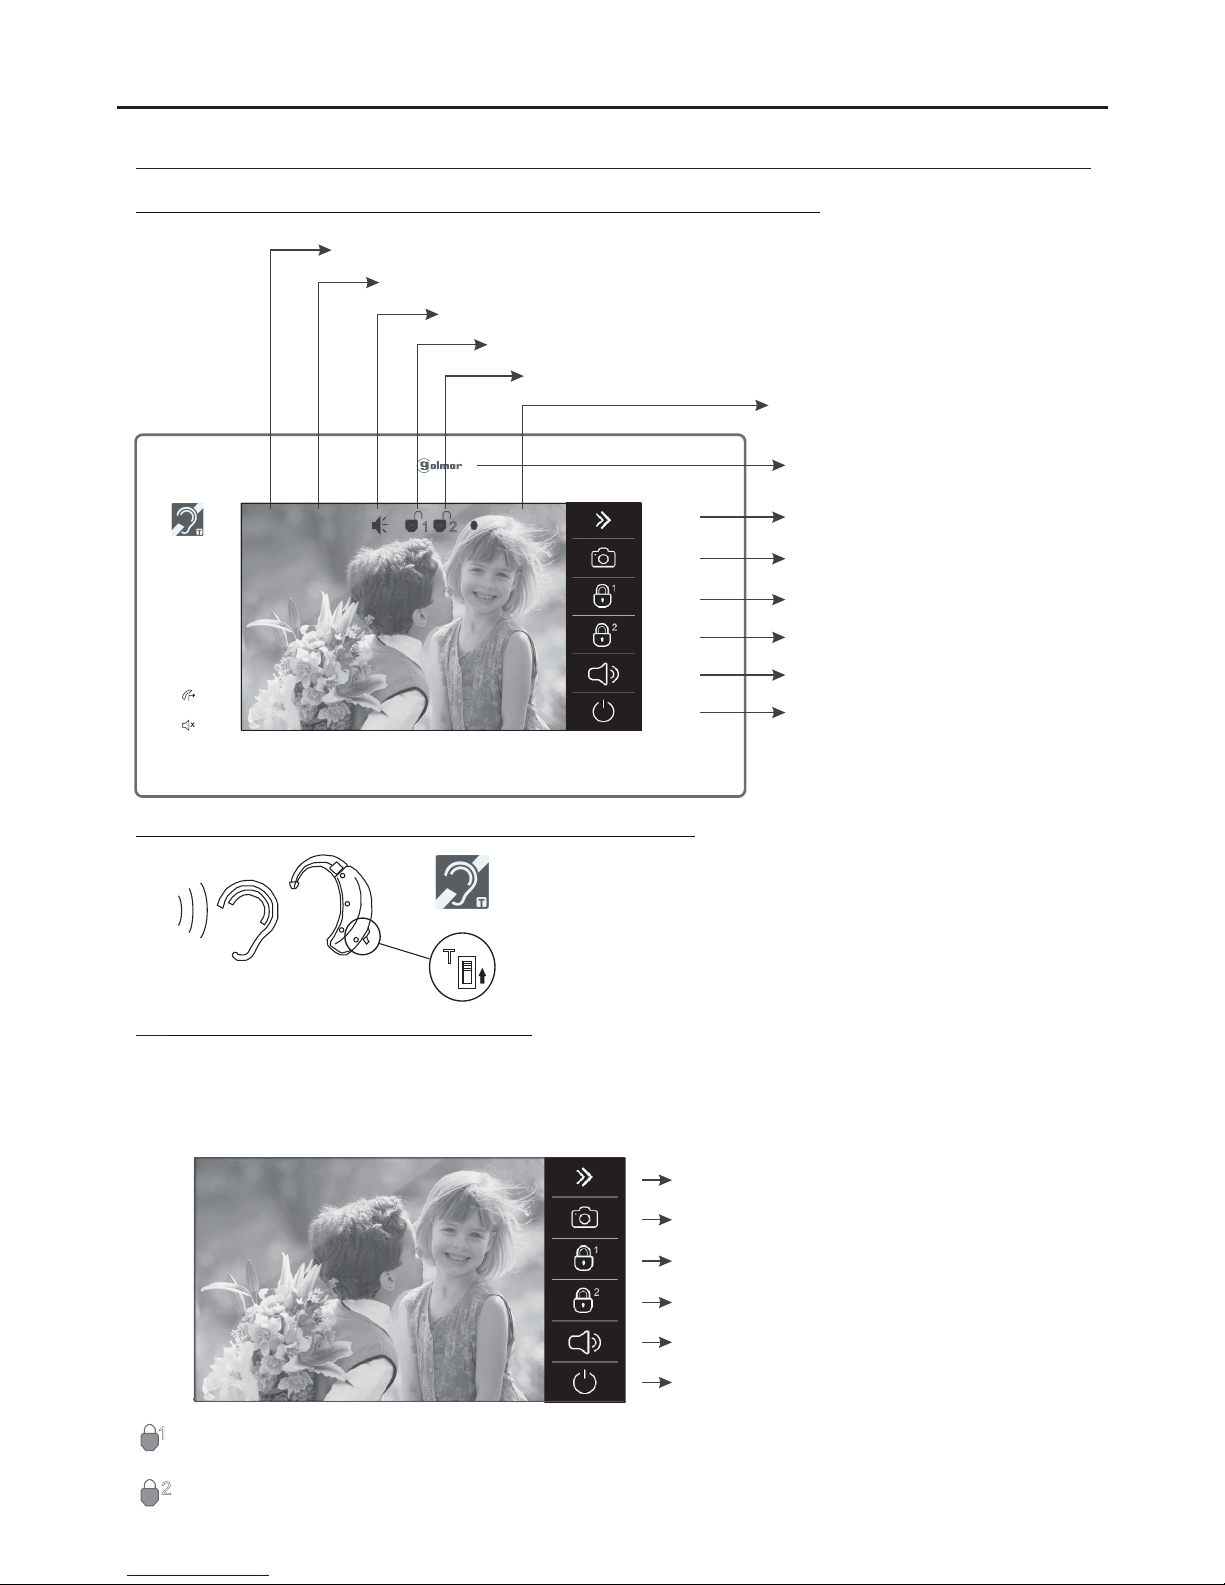
Monitor description when receiving a call and during communication:
8
Continued overleaf
T
Communication with hearing aid (Pentha GB2/H monitor only):
Make sure that the hearing aid is 15-25 cm away from the
monitor to ensure maximum audio quality during
communication with the doorpanel.
PENTHA MONITORG 2B
00:30 -1PL
Call/communication time elapsed.
Door panel that made the call.
Enable lock release 1.
Start communication.
End call/communication.
Recording
Door enabled.2
Photo or video capture enabled
(MicroSD card required for video recording).
Communication enabled.
2
Door 1 enabled.
1
Take photo or record video manually.
Video recording (MicroSD card required).
Enable lock release .2
Screen settings, monitor volume, activating
the light, CCTV camera picture selection
(DQ-CAM-GB2 module required).
Start communication.
(Only if it is a slave monitor).
To open door 1, press the door release option on the screen during the call process: one press will activate the
lock release for 5 seconds.
To open door 2, press the door release option on the screen during the call process: one press will activate the
lock release for 5 seconds.
Start communication.
End call/communication.
Enable lock release 1.
Take photo or record video manually.
Video recording (MicroSD card required).
Enable lock release .2
Screen settings, monitor volume, activating
the light, CCTV camera picture selection
(DQ-CAM-GB2 module required).
1
2
00:30 -1PL
OPERATION
When a call is received, the monitor(s) will play a melody, the status light of the monitor(s) will blink and show the image
of the door panel on the main monitor without alerting the visitor. To end the call, press option on the screen of the
monitor.
To open door 1 or 2, press option / on the screen of the monitor during the call process: one press will activate
the door release 1 or 2 for 5 seconds.
1.3 Ending a call from the door panel:
Continued from previous page.
1.2 Call not answered (missed call):
To open door 1, press the door release option
during the call or communication process:
one press will activate the door release for 5
seconds.
9
1.4
Answering a call from the door panel:
Start communication.
When a call is received, the monitor(s) will play a melody, the status light of the monitor(s) will blink and show the image
of the door panel on the main monitor without alerting the visitor. If the call is not answered within 40 seconds the
monitor returns to standby mode.
The monitor automatically takes a photo or records a video (MicroSD card required for video).
To open door 2, press the door release option
during the call or communication process:
one press will activate the door release for 5
seconds.
To open door 1, press the door release option
on the screen during the call process: one
press will activate the lock release for 5
seconds.
To open door 2, press the door release option
on the screen during the call process: one
press will activate the lock release for 5
seconds.
End call.
PENTHA MONITORG 2B
00:30 -1PL
21
11
2
00:30 -1PL
00:30 -1PL
When a call is received, the monitor(s) will play a melody, the status light of the monitor(s) will blink and show the image
of the door panel on the main monitor without alerting the visitor. The monitor automatically takes a photo or records a
video (MicroSD card required for video). To answer a call, press option on the master monitor screen or the
logo on the front of any slave monitor in the apartment (unless the 'display image in call' function is activated
on the slave monitor, in which case, option must be pressed). If the monitor is a PENTHA GB2/H with icon on
the front, make sure that the hearing aid is 15 and 25 cm away from the monitor to ensure maximum audio quality
during communication with the door panel.
Communication will last for 90 seconds or until option onthe screen is pressed.
To opendoor 1or 2, press option / on screen during the communication or call processes: one press will enable
the lock release for 5 seconds.
1 2
11
2
End communication.
Continued overleaf
OPERATION
Continued from previous page.
10
PENTHA MONITORG 2B
1.5
Answering a call from the door panel (activating the light and displaying pictures from
DQ-CAM-GB2 cameras):
Start communication.
To open door 1, press the door release option
during the call or communication process:
one press will activate the door release for
5 seconds.
To open door 2, press the door release option
during the call or communication process:
one press will activate the door release for
5 seconds.
00:30 -1PL
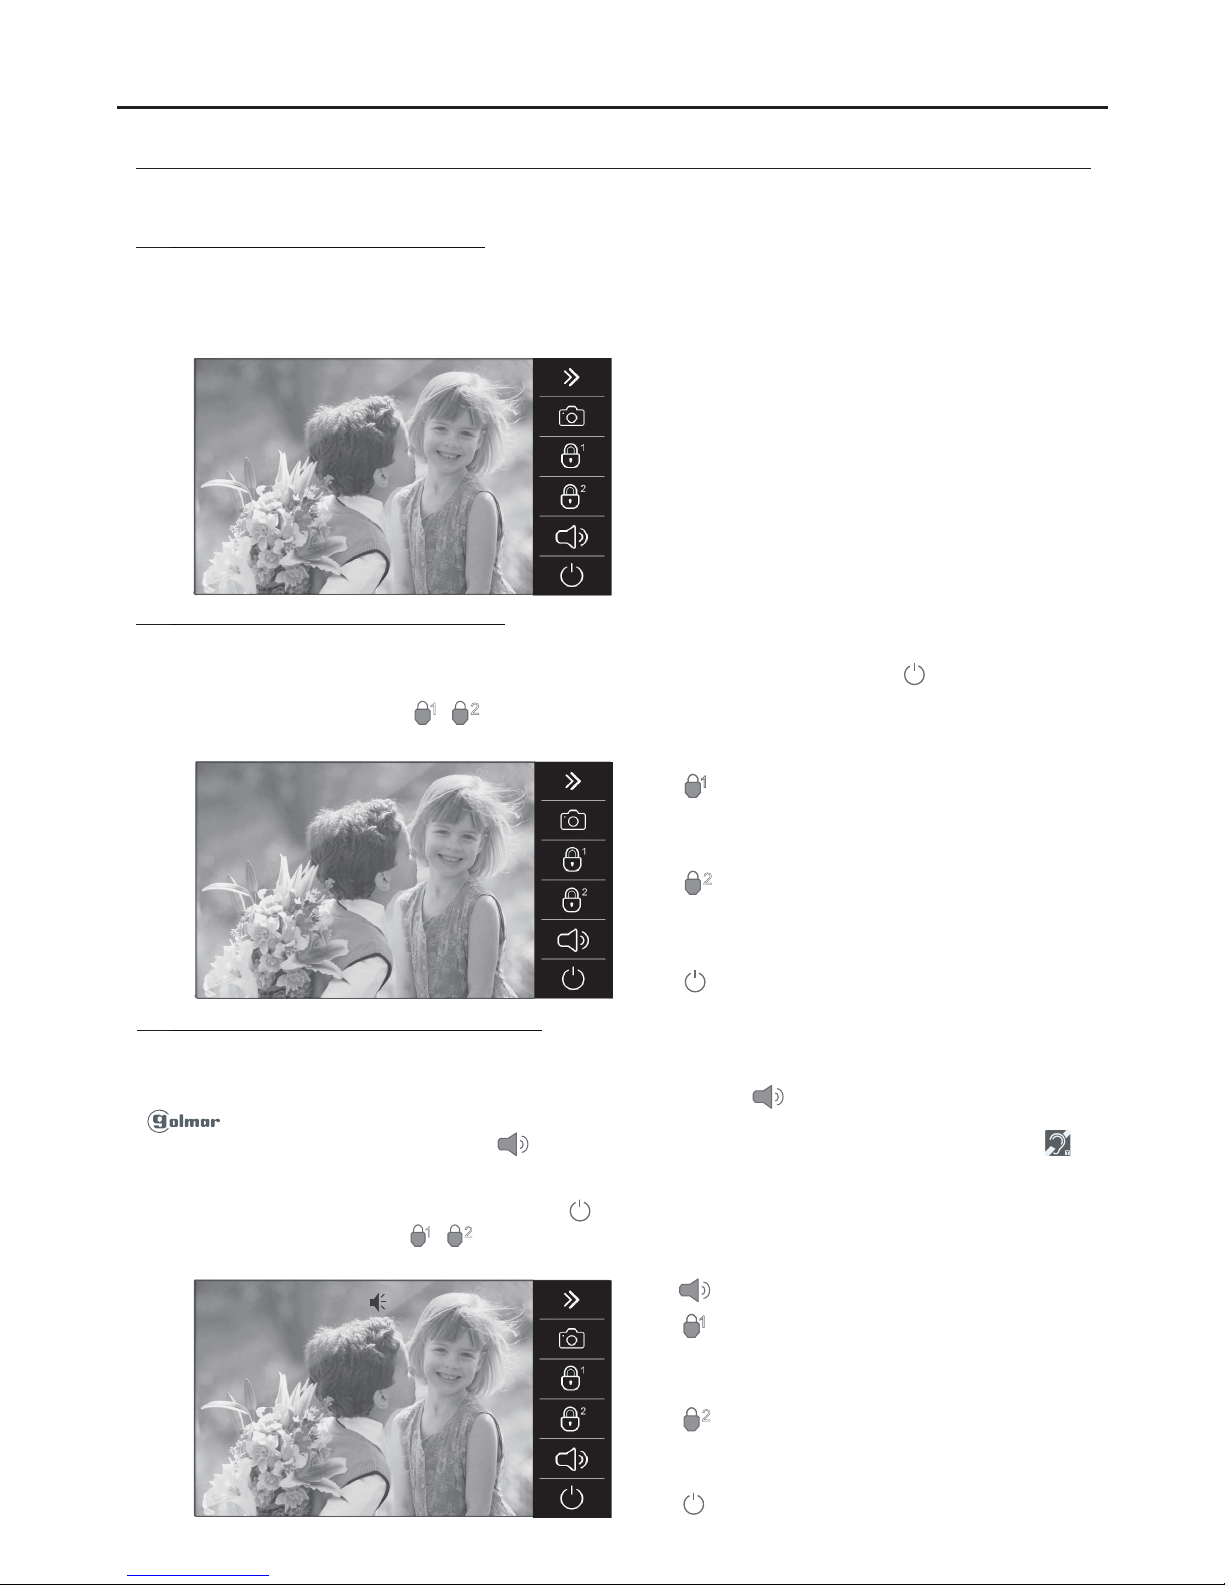
When a call is received, the monitor(s) will play a melody, the status light of the monitor(s) will blink and show the image
of the door panel on the main monitor without alerting the visitor. The monitor automatically takes a photo or records a
video (MicroSD card required for video). To answer a call, press option on the master monitor screen or the
logo on the front of any slave monitor in the apartment (unless the 'display image in call' function is activated
on the slave monitor, in which case, option must be pressed). If the monitor is a PENTHA GB2/H with icon on
the front, make sure that the hearing aid is 15 and 25 cm away from the monitor to ensure maximum audio quality
during communication with the door panel.
Communication will last for 90 seconds or until option on thescreen is pressed.
To open door1 or 2, press option / on screen during the communication or callprocesses: one press will enable the
lockrelease for 5 seconds.
1 2
11
2
End communication.
Continued overleaf
During the communication process, the following functions can be performed:
00:30 -1PL
Communication time elapsed (communication time of 90 seconds).
Door panel that made the call.
Enable lock release 1 (relay 1 of the door panel).
End communication.
Communication enabled.
Take photo or record video manually from the door panel.
Video recording (MicroSD card required).
Go to 2nd selection screen.
Enable lock release 2 (relay 2 of the door panel).
00:30 -1CM
Adjust brightness, contrast, colour and communication
volume (see pp. 12-13).
Display image from door panel that made the call.
(See p. 11).
Activate external light (SAR-GB2 module required).
Go to 1st selection screen.
Adjust screen format (see pp. 12-13)
Select CCTV camera pictures, see p. 11.
(DQ-CAM-GB2 module required)
2nd selection screen
1st selection screen

OPERATION
Continued from previous page.
11
PENTHA MONITORG 2B
Then, by displaying the picture from camera 1 'CM - 1' selected and maintaining audio communication (with the door
panel that made the call), the following functions can be performed:
00:30 -1CM
Communication time elapsed (communication time of 90 seconds).
Picture from the camera selected.
Enable lock release 1 (relay 1 of the door panel in communication).
End communication.
Communication enabled (with the door panel that made the call).
Take photo or record video manually from the camera selected.
Video recording (MicroSD card required).
Go to 2nd selection screen.
Enable lock release 2 (relay 2 of the door panel in communication).
00:30 -1CM
Adjust brightness, contrast, colour and communication volume
(see pp. 12-13).
Display image from door panel that made the call.
Activate external light (SAR-GB2 module required).
Go to 1st selection screen.
Adjust screen format (see pp. 12-13)
Select CCTV camera pictures.
(DQ-CAM-GB2 module required)
2nd selection screen
1st selection screen
To display the picture from one of the installed cameras,press option . The followingselection screen will be displayed.
(DQ-CAM-GB2 camera module required).
00:30 -1PL 00:30 -1PL
Then press option ; the following camera selection screen will be displayed. Press the option corresponding to the
'CM' camera whose picture needs to be displayed.
00:30 -1PL
Select camera
CM - 1
CM - 2
CM - 3
CM - 4
Exit the camera selection screen.

Normal Bright Soft User
5
5
5
6
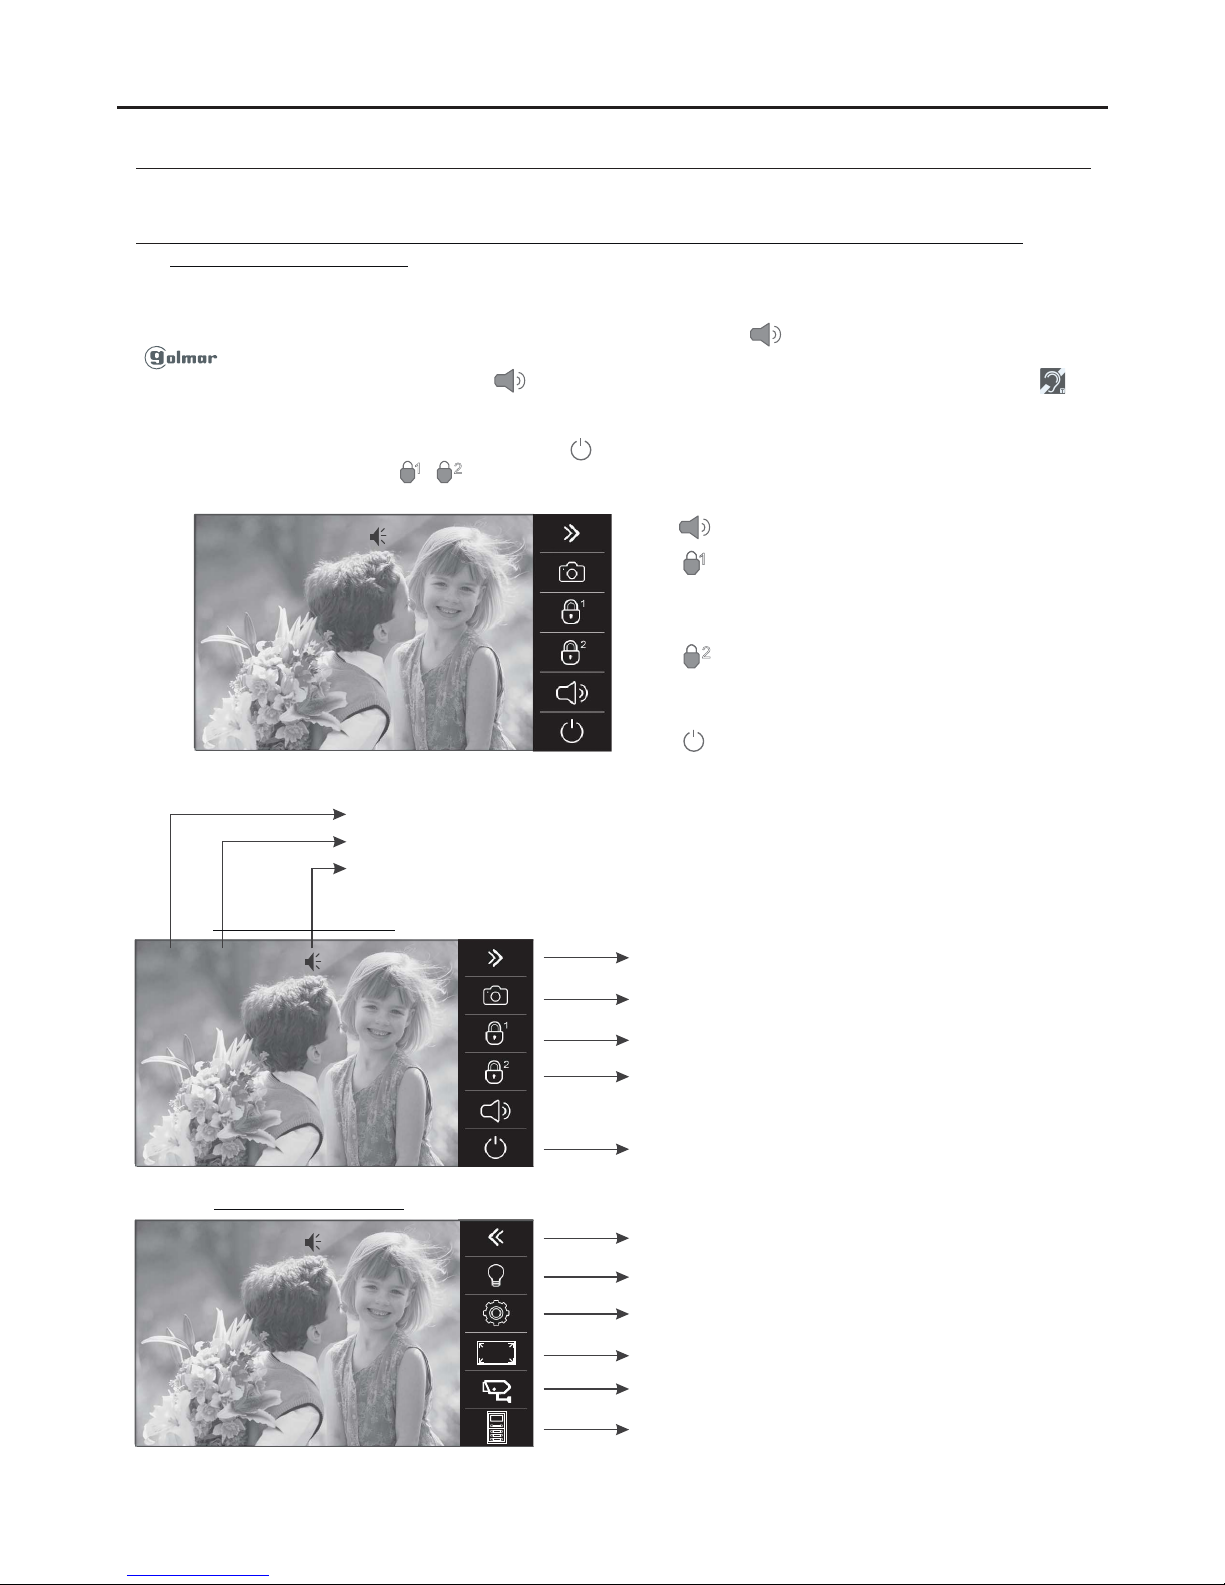
SCREEN AND VOLUME SETTINGS MENU
12
To access the screen and volume settings menu in the monitor, it must be in communication or auto switch-on
mode. Then press option and the 1st selection screen will be displayed.
PENTHA MONITORG 2B
00:30 -1PL 00:30 -1PL
To access scene settings, press option . The following selection screen will be displayed; select the type of picture
required (normal, bright, soft or user) by pressing the respective option. Press the door panel image shown on the
screen to exit and return to the 1st selection screen.
1st selection screen
00:30 -1PL
To access the brightness, contrast and colour settings, press option . The following selection screen will be
displayed; press option or in each selection field to increase or decrease contrast , brightness and
colour . Press the door panel image shown on the screen to exit and return to the 1st selection screen.
1st selection screen
00:30 -1PL
Normal Bright Soft User
5
5
5
6
To access the monitor's volume setting, press option . The following selection screen will be displayed; press
option or in selection to increaseor decrease thevolume. Press the doorpanel image shown onthe screen
to exit and return to the 1st selection screen.
1st selection screen
00:30 -1PL
Normal Bright Soft User
5
5
5
4
Continued overleaf

SCREEN AND VOLUME SETTINGS MENU
13
PENTHA MONITORG 2B
Continued from previous page.
To access the screen format setting, press option . The following selection screen will be displayed; select the
type of screen format required by pressing the respective option.
1st selection screen
00:30 -1PL 00:30 -1PL
4:3
16:9
16:9
Press option to exit and return to the 1st selection screen.
1st selection screen
00:30 -1PL
00:30 -1PL
4:3
16:9
16:9
Press option to exit the screen and volume settings menu.
1st selection screen
00:30 -1PL
00:30 -1PL
Press option to end communication or auto switch-on.
00:30 -1PL
Monitor in standby

To access the menu, the monitor must be in standby. Then click on the screen or the logo on the front of the
monitor.The main menu options screen will then appear.
Main menu screen
Continued overleaf
USER MENU
14
PENTHA MONITORG 2B
Camera
Door
Mes a ess g Media Call
Log
Intercom Divert
Phone
Light Call
Options
14:14
Mon .
05 / 06 / 2017
1.1 Displaying the main door panel image:
To display the main door panel image, press 'Camera / Door'. The following selection screen will be displayed. Press
option 'PL - 1'.
The following screen will display the image from the door panel with address 1, indicating the door panel selected
'PL-1' and the connection time elapsed. The connection will lastfor 30 seconds or until option is pressed.
C m raa e
Door
Mes a ess g Media Call
Log
Intercom Divert
Phone
Light
Call
Options
14:14
Mon .
05 / 06 / 2017
Camera Door/
PL - 1
PL - 2
PL - 3
PL - 4
CM- 1
CM- 2
00:30 -1PL
Start communication.
End auto switch-on (return to the selection screen).
Enable lock release 1.
Take photo or record video manually.
Video recording (MicroSD card required).
Enable lock release .2
Screen settings, monitor volume, activating the light,
CCTV camera picture selection (DQ-CAM-GB2 module
required). (See settings pp. 12-13).
To open door 1, press the door release option on the screen during the picture display process: one press will
activate the lock release for 5 seconds.
To open door 2, press the door release option on the screen during the picture display process: one press will
activate the lock release for 5 seconds.
1
2

USER MENU
15
PENTHA MONITORG 2B
To establish audio and video communication with the door panel selected, press option . The screen will display
symbol . If the monitor is a PENTHA GB2/H withicon on the front,make sure that the hearing aid is between 15
and 25 cm away from the monitor to ensure maximum audio quality during communication with the door panel.
Connection will last for 30 seconds or until option is pressed.
Continued from previous page.
To open door 1, press the door release option on the screen during the communication process: one press will
activate the lock release for 5 seconds.
To open door 2, press the door release option on the screen during the communication process: one press will
activate the lock release for 5 seconds.
1
2
Start communication.
End auto switch-on (return to the selection screen).
Enable lock release 1.
Take photo or record video manually.
Video recording (MicroSD card required).
Enable lock release .2
Screen settings, monitor volume, activating the light, CCTV
camera picture selection (DQ-CAM-GB2 modulerequired).
(See settings pp. 12-13).
00:30 -1PL
1.2 Displaying images from the door panels:
To display the image from one of the installed door panels, press 'Camera/Door'. The following selection screen
will be displayed. Press the option corresponding to the 'PL' door panel whose image needs to be displayed.
The following screen will display the image from the door panel with address 2, indicating the door panel selected
'PL-2' and the connection time elapsed. The connection will lastfor 30 seconds or until option is pressed.
C m raa e
Door
Mes a ess g Media Call
Log
Intercom Divert
Phone
Light Call
Options
14:14
Mon .
05 / 06 / 2017
Camera Door/
PL - 1
PL - 2
PL - 3
PL - 4
CM- 1
CM- 2
00:30 -PL 2
Start communication.
End auto switch-on (return to the selection screen).
Enable lock release 1.
Take photo or record video manually.
Video recording (MicroSD card required).
Enable lock release .2
Screen settings, monitor volume, activating the light, CCTV
camera picture selection (DQ-CAM-GB2 modulerequired).
(See settings pp. 12-13).
To open door 1, press the door release option on the screen during the picture display process: one press will
activate the lock release for 5 seconds.
To open door 2, press the door release option on the screen during the picture display process: one press will
activate the lock release for 5 seconds.
1
2
Continued overleaf
This symbol is only displayed in communication enabled mode.

USER MENU
16
PENTHA MONITORG 2B
This symbol is only displayed in communication enabled mode.
To establish audio and video communication with the door panel selected, press option . The screen will display
symbol . If the monitor is a PENTHA GB2/H with icon on the front, make sure that the hearing aid is between
15 and 25 cm away from the monitor to ensure maximum audio quality during communication with the door panel.
Connection will last for 30 seconds or until option is pressed.
Continued from previous page.
To open door 1, press the door release option on the screen during the communication process: one press will
activate the lock release for 5 seconds.
To open door 2, press the door release option on the screen during the communication process: one press will
activate the lock release for 5 seconds.
1
2
Start communication.
End auto switch-on (return to the selection screen).
Enable lock release 1.
Take photo or record video manually.
Video recording (MicroSD card required).
Enable lock release .2
Screen settings, monitor volume, activating the light, CCTV
camera picture selection (DQ-CAM-GB2 modulerequired).
(See settings pp. 12-13).
00:30 -PL 2
1.3 Displaying camera pictures (DQ-CAM-GB2 module required):
To display the picture from one of the installed cameras, press 'Camera/Door'. The following selection screen will
be displayed. Press the option corresponding to the 'CM' camera whose picture needs to be displayed.
Continued overleaf
Camera
Door
Mes a ess g Media Call
Log
Intercom Divert
Phone
Light Call
Options
14:14
Mon .
05 / 06 / 2017
Camera Door/
PL - 1
PL - 2
PL - 3
PL - 4
CM- 1
CM- 2
Camera Door/
CM- 3
CM- 4
Quad - 1
1st selection screen
2nd selection screen
- Press option to display the 2nd selection screen
- Press option to display the 1st selection screen
- Press option 'Quad-1'; the monitor will display the
pictures from all of the cameras.
Main menu screen
- Press option to return to the main menu screen.

The following screen will then display the picture from the camera selected with address 4, indicating the camera
selected 'CM-4' and the connection time elapsed.
The connection will last for 30 seconds or until option is pressed.
USER MENU
17
PENTHA MONITORG 2B
Continued from previous page.
00:30 -CM 4
No function.
End auto switch-on (return to the selection screen).
No function.
Take photo or record video manually.
Video recording (MicroSD card required).
No function.
Screen settings, monitor volume, activating the light, CCTV
camera picture selection (DQ-CAM-GB2 modulerequired).
(See settings pp. 12-13).
Camera
Door
Mes a ess g Media Call
Log
Intercom Divert
Phone
Light Call
Options
14:14
Mon .
05 / 06 / 2017
Main menu screen
Camera/Door
PL - 1
PL - 2
PL - 3
PL - 4
CM- 1
CM- 2
1st selection screen
To exit and return to the main menu screen, press option .
2.1 Text messages:
To access the text message functions, press option 'Messages'.The following selection screen will be displayed.
C m raa e
Door
Me sa ess g Media Call
Log
Intercom Divert
Phone
Light Call
Options
14:14
Mon .
05 / 06 / 2017
To send a text message, press option . The following recipient selection screen will be displayed.
Select Recipient
[ 00 ] Sr. García
[ 01 ] Sr. Fernández
[ 02 ] Sr. Correa
[ 03 ] Sra. López
[ 04 ] Sra. Vicario
[ 05 ] Sra. Herrera
Recipient selection screenSelection screen
Continued overleaf
Write
Message
OutboxInbox
Write
Message
OutboxInbox

Then press the apartment to which the text message needs to be sent.
USER MENU
18
PENTHA MONITORG 2B
Continued from previous page.
Select Recipient
[ 00 ] Sr. García
[ 01 ] Sr. Fernández
[ 02 ] Sr. Correa
[ 03 ] Sra. López
[ 04 ] Sra. Vicario
[ 05 ] Sra. Herrera
Recipient selection screen
Scroll backwards in the residents list.
Return to the selection screen.
Scroll forwards in the residents list.
The following screen will be displayed; use the keypad to enter the text message (up to 78 characters).
[ 02 ] Sr. Fernandez
I have found your keys.
Apartment selected.
Screen (text message up to 78 characters).
Alphabetical keypad.
Access the numeric keypad.
Key to delete characters.
Send SMS ok !
Message sent successfully.
Key to send text message.
Return to the recipient selection screen.
Continued overleaf
Press option to return to the recipient selection screen.
Select Recipient
[ 00 ] Sr. García
[ 01 ] Sr. Fernández
[ 02 ] Sr. Correa
[ 03 ] Sra. López
[ 04 ] Sra. Vicario
[ 05 ] Sra. Herrera
Recipient selection screen
Selection screen
Write
Message
OutboxInbox
Then press option to go to the selection screen.

Then press the message that you want to read. The following screen will be displayed.
USER MENU
19
PENTHA MONITORG 2B
Continued from previous page.
Messages received screen
Time Received ameN 01 / 03
14 - 06 10 : 46 [ 01 ] Sr. Fernández
02 - 06 18 : 34 [ 03 ] Sra. López
23 - 05 12 : 16 [ 00 ] Sr. García
17 - 05 08 : 33 [ 02 ] Sr. Correa
11 - 04 17 : 25 [ 04 ] Sra. Vicario
05 - 03 21 : 10 [ 05 ] Sra. Herrera
Down arrow indicates incoming text message.
14 - 06 10 : 46 [ 01 ] Sr. Fernández
I have found your keys.
Access the recipient selection screen to write a text message
(see pp. 17-18 'Text messages').
Delete this message.
Make a call to the apartment that sent the text message.
Return to the messages received screen.
14 - 06 10 : 46 [ 01 ] Sr. Fernández
I have found your keys.
Date / time and apartment sending the message.
Message.
To read text messages received, press option . The following text messages received screen will be displayed.
Icon will indicateif any new messages have been received and the latest message(s) will be in red.
Messages received screen
Selection screen
Access the recipient selection screen to write a text message
(see pp. 17-18 'Text messages').
Delete all messages received.
Page 01 of a total of 03 pages is displayed.
Messages received screen
Go to the next page.
Go to the previous page.
Return to the selection screen.
Time Received ameN 01 / 03
14 - 06 10 : 46 [ 01 ] Sr. Fernández
02 - 06 18 : 34 [ 03 ] Sra. López
23 - 05 12 : 16 [ 00 ] Sr. García
17 - 05 08 : 33 [ 02 ] Sr. Correa
11 - 04 17 : 25 [ 04 ] Sra. Vicario
05 - 03 21 : 10 [ 05 ] Sra. Herrera
Time Received ameN 01 / 03
14 - 06 10 : 46 [ 01 ] Sr. Fernández
02 - 06 18 : 34 [ 03 ] Sra. López
23 - 05 12 : 16 [ 00 ] Sr. García
17 - 05 08 : 33 [ 02 ] Sr. Correa
11 - 04 17 : 25 [ 04 ] Sra. Vicario
05 - 03 21 : 10 [ 05 ] Sra. Herrera
Write
Message
OutboxInbox
1
Continued overleaf
Press option to return to the messages received screen.
1

USER MENU
20
PENTHA MONITORG 2B
Continued from previous page.
Selection screen
Messages received screen
Time Received ameN 01 / 03
14 - 06 10 : 46 [ 01 ] Sr. Fernández
02 - 06 18 : 34 [ 03 ] Sra. López
23 - 05 12 : 16 [ 00 ] Sr. García
17 - 05 08 : 33 [ 02 ] Sr. Correa
11 - 04 17 : 25 [ 04 ] Sra. Vicario
05 - 03 21 : 10 [ 05 ] Sra. Herrera
Write
Message
OutboxInbox
Then press option to go to the selection screen.
Then press the message sent that you want to read. The following screen will be displayed.
Messages sent screen
Time Received ameN 01 / 03
14 - 06 10 : 46 [ 01 ] Sr. Fernández
02 - 06 18 : 34 [ 03 ] Sra. López
23 - 05 12 : 16 [ 00 ] Sr. García
17 - 05 08 : 33 [ 02 ] Sr. Correa
11 - 04 17 : 25 [ 04 ] Sra. Vicario
05 - 03 21 : 10 [ 05 ] Sra. Herrera
14 - 06 10 : 46 [ 01 ] Sr. Fernández
I have found your keys.
To read text messages sent, press option . The following text messages sent screenwill be displayed.
Messages sent screen
Selection screen
Access the recipient selection screen to write a text message
(see pp. 17-18 'Text messages').
Delete all messages sent.
Page 01 of a total of 03 pages is displayed.
Messages sent screen
Go to the next page.
Go to the previous page.
Return to the selection screen.
Time Sent ameN 01 / 03
14 - 06 10 : 46 [ 01 ] Sr. Fernández
02 - 06 18 : 34 [ 03 ] Sra. López
23 - 05 12 : 16 [ 00 ] Sr. García
17 - 05 08 : 33 [ 02 ] Sr. Correa
11 - 04 17 : 25 [ 04 ] Sra. Vicario
05 - 03 21 : 10 [ 05 ] Sra. Herrera
Time Sent ameN 01 / 03
14 - 06 10 : 46 [ 01 ] Sr. Fernández
02 - 06 18 : 34 [ 03 ] Sra. López
23 - 05 12 : 16 [ 00 ] Sr. García
17 - 05 08 : 33 [ 02 ] Sr. Correa
11 - 04 17 : 25 [ 04 ] Sra. Vicario
05 - 03 21 : 10 [ 05 ] Sra. Herrera
Write
Message
OutboxInbox
indicates error in text message sent (e.g. apartment without Pentha monitor).
Continued overleaf

Up arrow indicates text message sent.
14 - 06 10 : 46 [ 01 ] Sr. Fernández
I have found your keys.
Access the recipient selection screen to write a text message
(see pp. 17-18 'Text messages').
Delete this message.
Make a call to the apartment that sent the text message.
Return to the messages sent screen.
Date / time and apartment to which the message is being sent.
Mes a e.s g
Press option to return to the messages received screen.
USER MENU
21
PENTHA MONITORG 2B
Continued from previous page.
Messages received screen
Time Received ameN 01 / 03
14 - 06 10 : 46 [ 01 ] Sr. Fernández
02 - 06 18 : 34 [ 03 ] Sra. López
23 - 05 12 : 16 [ 00 ] Sr. García
17 - 05 08 : 33 [ 02 ] Sr. Correa
11 - 04 17 : 25 [ 04 ] Sra. Vicario
05 - 03 21 : 10 [ 05 ] Sra. Herrera
Selection screen
Write
Message
OutboxInbox
Then press option to go to the selection screen.
Continued overleaf
C m raa e
Door
Mes a ess g Media Call
Log
Intercom Divert
Phone
Light Call
Options
14:14
Mon .
05 / 06 / 2017
Main menu screen
To exit and return to the main menu screen, press option .
Selection screen
Write
Message
OutboxInbox

3.1 Viewing photos and videos of door panel calls, cameras and deleting photos and videos:
To access the photo or video viewing functions, pressoption 'Media'. The followingselectionscreen will be displayed.
C m raa e
Door
Mes a ess g Media Call
Log
Intercom Divert
Phone
Light Call
Options
14:14
Mon .
05 / 06 / 2017
USER MENU
22
PENTHA MONITORG 2B
Continued from previous page.
Playback
Voicemail
Prompts
Visitor
Message
Memory
Information
Copy
To SD
Format
SD Card
To view photos or play back videos from calls/cameras, press option . The following selection screen will be
displayed; use options and to select the photo or video to be viewed. If the MicroSD card is being used, the length
of each video is 10 seconds. Option enables the video tobe played or paused.
Note: The monitor enables photos to be taken as standard. For the video option, a MicroSD card is required. Use
of this card cancels the photo option.
Playback
Voicemail
Prompts
Visitor
Message
Memory
Information
Copy
To SD
Format
SD Card
00:08 00:10
Video: 001/002 2017 / 06 / 15 12 : 04 : 02
To delete photos or videos, use options and to select the photo or video to be deleted and then press option to
bring up the following deletion screen.
Press option to delete the photo or video selected or press option to exit without deleting and return to the
previous screen.
Press option to return to the selection screen.
00:08 00:10
Video: 001/002 2017 / 06 / 15 12 : 04 : 02
00:08 00:10
Video: 001/002 2017 / 06 / 15 12 : 04 : 02
Playback Voicemail
Prompts
Visitor
Message
Memory
Information
Copy
To SD
Format
SD Card
00:08 00:10
Video: 001/002 2017 / 06 / 15 12 : 04 : 02
Continued overleaf
Selection screen
Selection screen
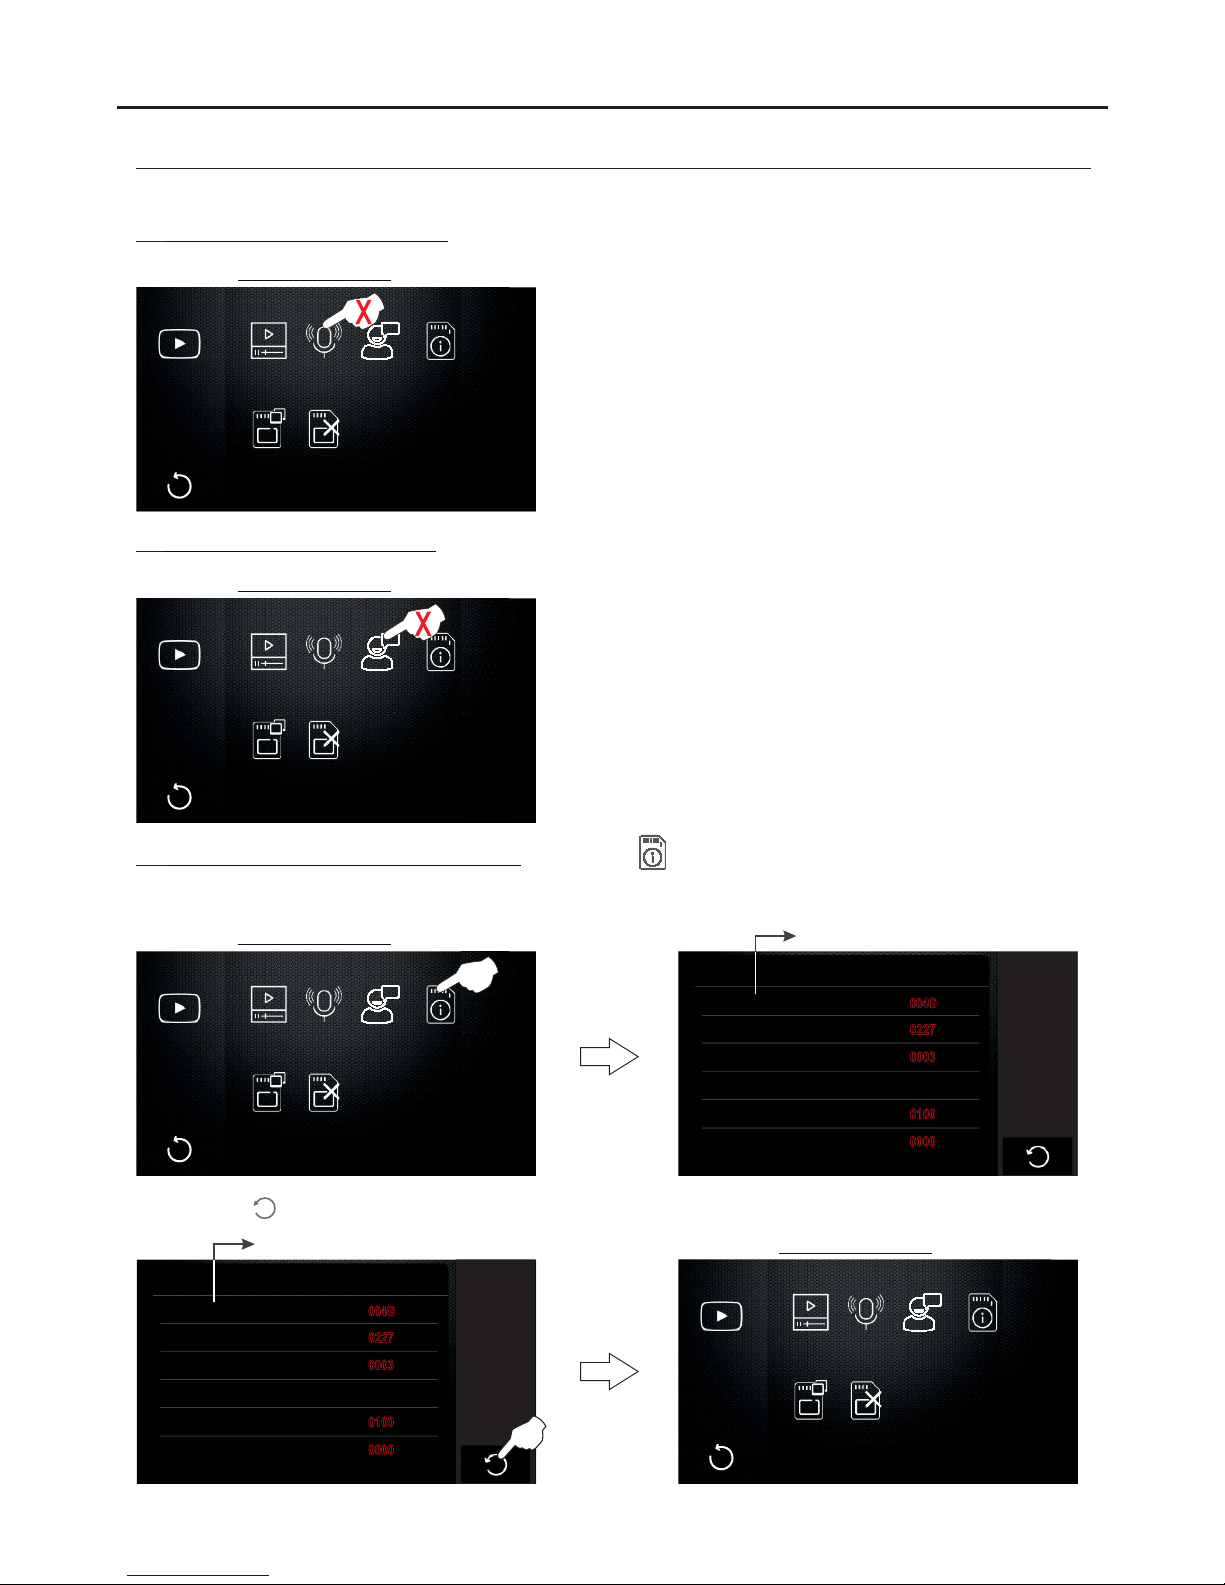
3.4 To access the MicroSD card information, press option . The following information screen will be displayed.
Note that the monitor has a flash memory for photos but, if video recording is required, a MicroSD card must be
inserted.
USER MENU
23
PENTHA MONITORG 2B
Continued from previous page.
Playback Voicemail
Prompts
Visitor
Message
Memory
Information
Copy
To SD
Format
SD Card
Memory tionInforma
SD Card
Capacity
Used
Flash
Capacity
Used
0100
0000
Selection screen
MicroSD card must be inserted.
004G
0227
0003
Press option to return to the selection screen.
Playback Voicemail
Prompts
Visitor
Message
Memory
Information
Copy
To SD
Format
SD Card
Selection screen
Memory tionInforma
SD Card
Capacity
Used
Flash
Capacity
Used
0100
0000
MicroSD card must be inserted.
004G
0227
0003
Continued overleaf
3.2 Voicemail prompts (no function).
Playback Voicemail
Prompts
Visitor
Message
Memory
Information
Copy
To SD
Format
SD Card
Selection screen
Playback Voicemail
Prompts
Visitor
Message
Memory
Information
Copy
To SD
Format
SD Card
Selection screen
3.3 Visitormessages (no function).

3.6 To format the MicroSD card, press option . The following screen will be displayed. Press option to format
the MicroSD card or option to cancel and return to the selection screen.
Playback Voicemail
Prompts
Visitor
Message
Memory
Information
Copy
To SD
Format
SD Card
Selection screen
Format SD Card & Restart ?
Continued overleaf
USER MENU
24
PENTHA MONITORG 2B
Continued from previous page.
To return to the main menuafter formatting the MicroSD card,press the screen orthe logo on the front of
the monitor.The main menu options screen will then appear.
Main menu screen
C m raa e
Door
Me sa ess g Media Call
Log
Intercom Divert
Phone
Light Call
Options
14:14
Mon .
05 / 06 / 2017
3.5 To copy photos from the flash memory to the MicroSD card, press option . The following screen will be
displayed. Press option to copy photos to the MicroSD card or option to cancel and return to the selection
screen.
Playback Voicemail
Prompts
Visitor
Message
Memory
Information
Copy
To SD
Format
SD Card
Selection screen
Press option to return to the selection screen.
Playback Voicemail
Prompts
Visitor
Message
Memory
Information
Copy
To SD
Format
SD Card
Selection screen
Copy Pictures To SD ?
Done!

USER MENU
25
PENTHA MONITORG 2B
Continued from previous page.
Show previous page.
Return to the main menu screen.
Show next page.
Call Log 01 / 12
16 - 06 08 : 54 [ 01 ] Sr. García
16 - 06 07:30 PL - 1
14 - 06 18 : 10 [ 02 ] Sr. Correa
06 - 06 12:30 PL - 1
27 - 05 10:30 PL - 1
27 - 05 10:29 PL - 1
Page 01 of a total of 12 pages is displayed.
Call log entry selected.
If a door panel call log entry is pressed.
View the photo or video captured.
Video recording (MicroSD card required).
Delete call log entry selected.
Show previous page.
Return to the main menu screen.
Show next page.
Call Log 01 / 12
16 - 06 08 : 54 [ 01 ] Sr. García
16 - 06 07:30 PL - 1
14 - 06 18 : 10 [ 02 ] Sr. Correa
06 - 06 12:30 PL - 1
27 - 05 10:30 PL - 1
27 - 05 10:29 PL - 1
Page 01 of a total of 12 pages is displayed.
Call log entry selected.
If an intercom call log entry from an apartment is pressed.
Call the apartment of the call log entry selected.
Delete call log entry selected.
4.1 Viewing the call log:
To view the call log, press option 'Call Log'. The following screen will be displayed.
'Call Log' screen description.
C m raa e
Door
Mes a ess g Media Call
Log
Intercom Divert
Phone
Light Call
Options
14:14
Mon .
05 / 06 / 2017
Show previous page.
Return to the main menu screen.
Show next page.
Call Log 01 / 12
16 - 06 08 : 54 [ 01 ] Sr. García
16 - 06 07:30 PL - 1
14 - 06 18 : 10 [ 02 ] Sr. Correa
06 - 06 12:30 PL - 1
27 - 05 10:30 PL - 1
27 - 05 10:29 PL - 1
1
Call Log 01 / 12
16 - 06 08 : 54 [ 01 ] Sr. García
16 - 06 07:30 PL - 1
14 - 06 18 : 10 [ 02 ] Sr. Correa
06 - 06 12:30 PL - 1
27 - 05 10:30 PL - 1
27 - 05 10:29 PL - 1
Photo or video of missed call (door panels only).
Down arrow indicates incoming call (red: not answered).
Up arrow indicates outgoing call.
Page 01 of a total of 12 pages is displayed.
Continued overleaf

USER MENU
26
PENTHA MONITORG 2B
Continued from previous page.
5.1 Intercom (internal broadcast):
To access the internal broadcast function, press option 'Intercom'. The following selection screen will be
displayed; press option 'Internal Broadcast'.
C m raa e
Door
Me sa ess g Media Call
Log
Intercom Divert
Phone
Light Call
Options
14:14
Mon .
05 / 06 / 2017
Internal
Broadcast
Internal
Call
Residents
List
Guard
The following communication screen will be displayed (the other monitors do not display any communication screens).
It is now possible to talk and listen to the other monitors in the apartment from each of the monitors. Communication
will last for one and a half minutes or until option is pressed from the monitor that has performed the broadcast
function.
Reduce communication volume.
End communication.
Increase communication volume.
If a call is received from the door panel during the internal broadcast process, the intercom call will be cancelled; a
melody in the apartment's monitors will play to indicate that a call is being made and an image will appear on the
master monitor. Toestablish communication, press option on the master monitor screen or the logo on
the front of any slave monitor in the apartment (unless the 'display image in call' function is enabled on the slave
monitor,in which case, option must be pressed).
If a call is received from another apartment during the internal broadcast process, the intercom call will be cancelled; a
melody in the apartment's monitors will playto indicate thata call is beingmade and the callscreen and the addressof
the apartment making the intercom call will appear on the master monitor (see 'intercom calls between apartments' on
p. 28).
Continued overleaf

USER MENU
27
PENTHA MONITORG 2B
Continued from previous page.
5.2 IIntercom calls within the same apartment:
To access the intercom calls within the same apartment function, press option 'Intercom'. The following selection
screen will be displayed; press option 'Internal Call'.
C m raa e
Door
Mes a ess g Media Call
Log
Intercom Divert
Phone
Light Call
Options
14:14
Mon .
05 / 06 / 2017
Internal
Broadcast
Internal
Call
Residents
List
Guard
The following call screen will appear and a melody in the other monitors of the apartment will play to indicate the
presence of the intercom call. The call will endif it is not answered within 40 seconds or if option is pressed.
Call again.
End call and return to the selection screen.
P ...lease Wait
Receive an intercom call
Establish communication.
End call.
Press button to accept the call and establish communication or press option to end the call.
Make an intercom call
If the call is accepted, communication will last for 90 seconds or until option is pressed.
In communication
Reduce communication volume.
End communication.
Increase communication volume.
If a call is received from the door panel during the intercom process, the intercom call will be cancelled; a melody in the
apartment's monitors will play to indicate that a call is being made and an image will appear on the master monitor.To
establish communication with the door panel, press option on the master monitor or the logo on the
front of any slave monitor in the apartment (unless the 'display image in call' function is enabled on the slave monitor,
in which case, option must bepressed).
Continued overleaf

USER MENU
28
PENTHA MONITORG 2B
Continued from previous page.
5.3 Intercom calls between apartments:
To access the intercom calls between apartments function, press option 'Intercom'. The followingselection screen
will be displayed; press option 'Residents List'.
C m raa e
Door
Me sa ess g Media Call
Log
Intercom Divert
Phone
Light Call
Options
14:14
Mon .
05 / 06 / 2017
Internal
Broadcast
Internal
Call
Residents
List
Guard
The following apartment selection screen will be displayed. Press the apartment to be called. Then press option to
make the call.
Edit residents list.
Scroll backwards in the residents list.
Return to the selection screen.
Scroll forwards in the residents list.
Make the call.
Residents List
[ 00 ] Sr. García
[ 02 ] Sr. Correa
[ 03 ] Sra. López
[ 04 ] Sra. Vicario
[ 05 ] Sra. Herrera
Apartment selection screen
[ 01 ] Sr. Fernández
Call again
End the call and return to the apartment selection screen.
Receive an intercom call
Establish communication.
End call
To accept the call, pressoption on the master monitor screen or the logo on the front of any slave monitor
and establish communication. Press option to end the call.
Make an intercom call
The following call screen will be displayed indicating the address and name of the apartment to be called. In the
monitor(s) of the apartment called, a melody will play indicating the presence of an intercom call and the address and
name of the apartment making the call will be displayed on the master monitor. The call will end if it is not answered
within 40 seconds or if option is pressed.
[ 01 ] Sr. Fernández
[ 00 ] Sr. García
Continued overleaf

USER MENU
29
PENTHA MONITORG 2B
Continued from previous page.
If the call is accepted, communication will last for 90 seconds or until option is pressed.
In communication
Reduce communication volume.
End communication.
Increase communication volume.
If a call is received from the door panel of another apartment during the intercom process, the intercom call will be
cancelled; the monitors in the apartment will play a melody indicating that the call is being made and the image will
appear on the master monitor. To establish communication with the door panel, press option on the master
monitor or the logo on the front of any slave monitor in the apartment (unless the 'display image in call'
function is enabled on the slave monitor,in which case, option mustbe pressed).
[ 01 ] Sr. Fernández
Continued overleaf

USER MENU
30
PENTHA MONITORG 2B
Continued from previous page.
5.4 Call to guard monitor:
To access the call to guard monitor function (if the building has one), press option 'Intercom'. The following
selection screen will be displayed; press option 'Guard'.
C m raa e
Door
Me sa ess g Media Call
Log
Intercom Divert
Phone
Light Call
Options
14:14
Mon .
05 / 06 / 2017
Internal
Broadcast
Internal
Call
Residents
List
Guard
Call again.
End call and return to the selection screen.
Receive an intercom call
Establish communication.
End call.
To accept thecall, press option on the guard monitor screenand establish communication orpress option to end
the call.
Make an intercom call
The following call screen will be displayed and a melody will play, indicating the 'GU' address of the guard monitor to be
called. The call will end ifit is not answered within 40 seconds or if option is pressed.
GU
[ 00 ] Sr. García
If the call is accepted, communication will last for 90 seconds or until option s pressed.i
In communication
Reduce communication volume.
End communication.
Increase communication volume.
If a call is received from the door panel of another apartment during the intercom process, the intercom call will be
cancelled; the monitors in the apartment will play a melody indicating that the call is being made and the image will
appear on the master monitor. To establish communication with the door panel, press option on the master
monitor or the logo on the front of any slave monitor in the apartment (unless the 'display image in call'
function is enabled on the slave monitor,in which case, option mustbe pressed).
GU
Continued overleaf

USER MENU
31
PENTHA MONITORG 2B
Continued from previous page.
6.1 Configuring divert call phone numbers:
To access divert call phone number configuration, press option 'Divert Phone'. The following selection screen will
be displayed; press option 'Divert Numbers'.
C m raa e
Door
Mes a ess g Media Call
Log
Intercom Divert
Phone
Light Call
Options
14:14
Mon .
05 / 06 / 2017
Continued overleaf
Divert
Numbers
Device
Info
The following phone number settings screen will be displayed; press option 'Tel 1'. The following phone number editing
screen will be displayed;enter thephone numberwith the numeric buttons.To save, press option 'OK'; on the settings
screen, press option ; and then,to exit, press option . To exit without saving, pressoption and, on the settings
screen, press option . From the settings screen, to enter a 2nd and 3rd divert call phone number, press the options
('Tel 2', 'Tel 3')and repeat the number editing steps from option 'Tel 1'.
Divert Numbers
Tel 1: -
Tel 3: -
Notify Call Divert Enabled
Settings screen
Tel 2: -
TEL NUMBER 1
6191718XX
TEL NUMBER 1
6191718XX
TEL NUMBER 1
6191718XX
Editing screen
Selection screen
Divert Numbers
Tel 1: 6191718XX
Tel 3: 9764865XX
Notify Call Divert Enabled
Settings screen
Tel 2: 6292324XX
The following settings screen will then be displayed with the phone number(s) now edited. Press option 'Notify Call
Divert Enabled' and the mobile phones configured will receive an SMS message indicating that the phone number is
linked to the apartment's divert call function. Press option to exit.
Divert
Numbers
Device
Info
Selection screen
Divert
Numbers
Device
Info
Selection screen
Press option to exit and return to the main menu screen.
C m raa e
Door
Me sa ess g Media Call
Log
Intercom
Divert
Phone
Light Call
Options
14:14
Mon .
05 / 06 / 2017
Main menu screen

USER MENU
32
PENTHA MONITORG 2B
Continued from previous page.
6.2 GSM GB2 device information:
To access the GSM GB2 device information, press option 'Divert Phone'. The following selection screen will be
displayed; press option 'Divert Device Info'.
C m raa e
Door
Mes a ess g Media Call
Log
Intercom Divert
Phone
Light Call
Options
14:14
Mon .
05 / 06 / 2017
Divert
Numbers
Device
Info
Selection screen
The divert device information screen will then be displayed, indicating the status of the GSM GB2 module. Press
option to exit.
Device Info
D :evice
SIM:
Network:
Signal Level:
GSM
OK
Connected
4
Selection screen
7.1 Activating the external light:
To activate the external light, press option 'Light'. The outdoor light (SAR-GB2 module required) will activate for 1
minute. See the “TSAR-GB2 ML” user manual for how to set other light activation times.
C m raa e
Door
Mes a ess g Media Call
Log
Intercom Divert
Phone
Light
Call
Options
14:14
Mon .
05 / 06 / 2017
Continued overleaf

USER MENU
33
PENTHA MONITORG 2B
Continued from previous page.
8.1 Do not disturb mode:
To access do not disturb mode, press 'Call Options'. The following selection screen will be displayed.
C m raa e
Door
Me sa ess g Media Call
Log
Intercom Divert
Phone
Light Call
Options
14:14
Mon .
05 / 06 / 2017
Selection screen
To enable do not disturb mode, press option 'Do Not Disturb' on the master monitor. Icon will be enabled in the
option selected and icon will be displayed on the main menu screen and the LED on the front of the master and
slaves monitors in the apartment, indicatingthat the functionis enabled. The monitors in theapartment will notreceive
door panel or intercom calls. Press option to exit and return to the main menu.
Call Options
Normal
Do Not Disturb
Voicemail, immediate
Voicemail, If No Answer
Divert, Immediate
Divert, If No Answer
Selection screen
Call Options
Normal
Do Not Disturb
Voicemail, immediate
Voicemail, If No Answer
Divert, Immediate
Divert, If No Answer
C m raa e
Door
Me sa ess g Media Call
Log
Intercom
Divert
Phone
Light Call
Options
14:14
Mon .
05 / 06 / 2017
Main menu screen
To disable do not disturb mode, press option 'Normal' and icon will no longer be displayed on the main menu
screen or the LED on the front of the main and slave monitors in the apartment. Press option to exit and return to the
main menu.
Selection screen
Call Options
Normal
Do Not Disturb
Voicemail, immediate
Voicemail, If No Answer
Divert, Immediate
Divert, If No Answer
C m raa e
Door
Me a esss g Media Call
Log
Intercom Divert
Phone
Light Call
Options
14:14
Mon .
05 / 06 / 2017
Main menu screen
8.2 Leave a message: No function
'Voicemail, Immediate' and 'Voicemail, If No Answer' modes: No function.
C m raa e
Door
Me sa ess g Media Call
Log
Intercom Divert
Phone
Light
Call
Options
14:14
Mon .
05 / 06 / 2017
Selection screen
Call Options
Normal
Do Not Disturb
Voicemail, immediate
Voicemail, If No Answer
Divert, Immediate
Divert, If No Answer
Continued overleaf
'Do not disturb' mode is enabled.

USER MENU
34
PENTHA MONITORG 2B
Continued from previous page.
8.3 Divert call mode (GSM-GB2 module required):
To access divert call mode, press 'Call Options' on the apartment's master monitor. The following selection screen
will be displayed.
C m raa e
Door
Me sa ess g Media Call
Log
Intercom Divert
Phone
Light Call
Options
14:14
Mon .
05 / 06 / 2017
Selection screen
Call Options
Normal
Do Not Disturb
Voicemail, immediate
Voicemail, If No Answer
Divert, Immediate
Divert, If No Answer
To enable the required divert option,press option'Divert, Immediate' or'Divert, If NoAnswer'. Icon will be enabled
in the option required and icon will be displayed on the main menu screen and the LED on the front of the monitor,
indicating that the function is enabled. Press option to exit and returnto the main menu.
Selection screen
Call Options
Normal
Do Not Disturb
Voicemail, immediate
Voicemail, If No Answer
Divert, Immediate
Divert, If No Answer
To disable divert call mode, press option 'Normal' and icon will no longer be displayed on the main menu screen or
the LED on the frontof the monitor. Press option to exit and returnto the main menu.
Selection screen
Call Options
Normal
Do Not Disturb
Voicemail, immediate
Voicemail, If No Answer
Divert, Immediate
Divert, If No Answer
C m raa e
Door
Mes a ess g Media Call
Log
Intercom Divert
Phone
Light Call
Options
14:14
Mon .
05 / 06 / 2017
Main menu screen
Continued overleaf
Return to the main menu screen.
Monitor 'Normal' mode:
'Do not disturb' mode is not enabled.
'Divert, Immediate' mode is not enabled.
'Divert, If No Answer' mode is not enabled.
Door panel call mode, immediate divert.
Door panel call mode, divert if not answered within 35 seconds.
Important: Before enabling divert call mode, the divert phone numbers need to be configured
(see 'Configuring divert call phone numbers' on p. 31).
Indicates that divert mode is enabled.
C m raa e
Door
Me sa ess g Media
Call
Log
Intercom Divert
Phone
Light
Call
Options
14:14
Mon .
05 / 06 / 2017
Main menu screen

USER MENU
35
PENTHA MONITORG 2B
Continued from previous page.
9.1 Settings:
To access the configuration functions, press option . The following settings screen will be displayed.
C m raa e
Door
Me sa ess g Media Call
Log
Intercom Divert
Phone
Light Call
Options
14:14
Mon .
05 / 06 / 2017
Settings screen
C m raa e
Door
Mes a ess g Media Call
Log
Intercom Divert
Phone
Light Call
Options
14:14
Mon .
05 / 06 / 2017
Continued overleaf
9.1.1 To access the ringtone and volume settings, press option 'Sounds'. The following settings screen will be
displayed (default settings: Door tones '19', intercom '01', bell '03' and alert '04'. Day volume '06' and Night
volume '03').
Settings screen
C m raa e
Door
Mes a ess g Media Call
Log
Intercom Divert
Phone
Light Call
Options
14:14
Mon .
05 / 06 / 2017
Ring Tone
<
19 TelRing
<
Door1 Door2 Door 3 Door 4 Intercom Bell Al re t
1919 19 19 19 01 03 04
Day Volume
<06<
Night Volume
<06<
Link Door Tones
Touch Sounds Enabled
Sound settings screen
19 TelRing
Call type.
Select from 20 melodies.
Quick access to other settings.
To change the door panel ringtones, press option 'Door 1' and then press or to select the melody. Repeat the
process to change the ringtones for the other call types.
For the door panel ringtones, a different tone for each of the 4 doors or the same tone for all of the 4 doors can be
selected, depending on whether option 'Link Door Tones' is selected.
Ringtone.
Select for the same ringtone on all 4 doors.
Select to hear sound when pressing the screen.
'Night' mode call volume setting.
'Day' mode call volume setting.
To change the volume level in 'Day' and 'Night' mode for the different types of ringtone, press option or . Press
option to return tothe main menu page.
<
<
Ring Tone
<
19 TelRing
<
Door1 Door2 Door 3 Door 4 Intercom Bell Al re t
1919 19 19 19 01 03 04
Day Volume
<06<
Night Volume
<06<
Link Door Tones
Touch Sounds Enabled
Ring Tone
<
19 TelRing
<
Door1 Door2 Door 3 Door 4 Intercom Bell Al re t
1919 19 19 19 01 03 04
Day Volume
<06<
Night Volume
<06<
Link Door Tones
Touch Sounds Enabled
<
<
Main menu screen
C m raa e
Door
Mes a ess g Media Call
Log
Intercom Divert
Phone
Light Call
Options
14:14
Mon .
05 / 06 / 2017
Sound settings screen
Sounds
Date & Time
Language
More…
About
Home
Settings
Sounds
Date & Time
Language
More…
About
Home
Settings

To continue with the configuration functions, press option . The following settings screen will be displayed.
USER MENU
36
PENTHA MONITORG 2B
Continued from previous page.
C m raa e
Door
Me sa ess g Media Call
Log
Intercom Divert
Phone
Light Call
Options
14:14
Mon .
05 / 06 / 2017
Settings screen
C m raa e
Door
Me sa ess g Media
Call
Log
Intercom Divert
Phone
Light Call
Options
14:14
Mon .
05 / 06 / 2017
9.1.2 To access the time and date settings, press option 'Date & Time'. The following settings screen will be
displayed.
To change the time and date, press selection field '2010' and then press option or . Repeat the process with the
remaining selection fields.
Settings screen
C m raa e
Door
Me sa ess g Media Call
Log
Intercom Divert
Phone
Light Call
Options
14:14
Mon .
05 / 06 / 2017
Date & Time
<
<
Sync fromSystem Clock
Enable RTC Server
2010 06 27 09 57 42
Date and time screen
Selection fields (year - month - day).
Press to accept and save the new values.
Selection fields (hour: minutes: seconds).
Change the value selected.
Leave selected on all monitors.
Select only on one monitor (with the date and time set);
the other monitors will be synchronised with the date and
time of the monitor with this box enabled. To synchronise,
disconnect and then reconnect the power supply.
Quick access to other settings.
<
<
Date & Time
<
<
Syncfrom SystemClock
Enable RTC Server
2010
06 27 09 57 42
To accept and save the new values, press option and a confirmation tone will be heard on the monitor. Then press
option to return tothe main menu page.
Date & Time
<
<
Sync fromSystem Clock
Enable RTC Server
2017 06 27 09 57 42
Date and time screen
Main menu screen
C m raa e
Door
Me sa ess g Media Call
Log
Intercom
Divert
Phone
Light Call
Options
14:14
Mon .
05 / 06 / 2017
Continued overleaf
Sounds
Date & Time
Language
More…
About
Home
Settings
Sounds
Date & Time
Language
More…
About
Home
Settings

To continue with the configuration functions, press option . The following settings screen will be displayed.
USER MENU
37
PENTHA MONITORG 2B
Continued from previous page.
C m raa e
Door
Me sa ess g Media Call
Log
Intercom Divert
Phone
Light Call
Options
14:14
Mon .
05 / 06 / 2017
Settings screen
C m raa e
Door
Me sa ess g Media Call
Log
Intercom
Divert
Phone
Light Call
Options
14:14
Mon .
05 / 06 / 2017
9.1.3 To access the language settings, press option 'Language'.The following settings screen will be displayed.
Settings screen
C m raa e
Door
Me sa ess g Media Call
Log
Intercom Divert
Phone
Light Call
Options
14:14
Mon .
05 / 06 / 2017
Fecha y Hora
<
SincronizardesdeReloj Sistema
Activar Servidor Horario
2010
Language settings screen
Language
<
<
Spanish
English
Portuguese
Dutch
French
Greek
To change the language, press the required language (default setting: Spanish, 'PENTHA GB2/H monitor French').
Press to accept and save the new values.
Quick access to other settings.
Display next language page.
Display previous language page.
SincronizardesdeReloj Sistema
Activar Servidor Horario
2010
Language
<
<
Spanish
English
Portuguese
Dutch
French
Greek
To accept and save the language selected, press option and a confirmation tone will be heard on the monitor. Then
press option to return to the main menu page.
Fecha y Hora
<
<
SincronizardesdeReloj Sistema
Activar Servidor Horario
2010 06 27 09 57 42
Language
<
<
Spanish
English
Portuguese
Dutch
French
Greek
Main menu screen
C m raa e
Door
Me sa ess g Media Call
Log
Intercom Divert
Phone
Light
Call
Options
14:14
Mon .
05 / 06 / 2017
Language settings screen
Continued overleaf
Sounds
Date & Time
Language
More…
About
Home
Settings
Sounds
Date & Time
Language
More…
About
Home
Settings

To continue with the configuration functions, press option . The following settings screen will be displayed.
USER MENU
38
PENTHA MONITORG 2B
Continued from previous page.
C m raa e
Door
Me sa ess g Media Call
Log
Intercom Divert
Phone
Light Call
Options
14:14
Mon .
05 / 06 / 2017
Settings screen
C m raa e
Door
Me sa ess g Media Call
Log
Intercom Divert
Phone
Light Call
Options
14:14
Mon .
05 / 06 / 2017
9.1.4 To access the rename door / camera, auto switch-on time and disable intercom settings, press option
'More...'. The following settings screen will bedisplayed.
Settings screen
C m raa e
Door
Me sa ess g Media Call
Log
Intercom Divert
Phone
Light Call
Options
14:14
Mon .
05 / 06 / 2017
Rename Door
<
<
Autoswitch ON Time
Disable Intercom
30 sec
PL - 1
PL - 2
PL - 3
PL - 4
CM -1
CM -2
CM -3
CM -4
Rename Camera
To rename a door / camera, press on the selection field for the required door / camera. The following text editing
screen will be displayed. Using the alphanumeric buttons, enter the new text for the door / camera. To save, press
'OK'. To exit without saving, press option . From the selection screen, repeat the steps to rename the doors /
cameras in the other selection fields.
PL - 1
Rename Door
<
<
Autoswitch ON Time
Disable Intercom
30 sec
PL - 1
PL - 2
PL - 3
PL - 4
CM -1
CM -2
CM -3
CM -4
Rename Camera
DOOR1 RENAME
PL - 1
To disable the intercom between apartments function, press option 'Disable Intercom'.
(Default setting: Intercom between apartments enabled).
Rename Door
<
<
Autoswitch ON Time
Disable Intercom
30 sec
PL - 1
PL - 2
PL - 3
PL - 4
CM -1
CM -2
CM -3
CM -4
Rename Camera
Rename Door
<
<
Autoswitch ON Time
Disable Intercom
30 sec
PL - 1
PL - 2
PL - 3
PL - 4
CM -1
CM -2
CM -3
CM -4
Rename Camera
Continued overleaf
Sounds
Date & Time
Language
More…
About
Home
Settings
Sounds
Date & Time
Language
More…
About
Home
Settings

USER MENU
39
PENTHA MONITORG 2B
Continued from previous page.
Continued overleaf
To adjust the auto switch-on time, press option or (default setting: 30 sec.).Then pressoption to return to the
main menu page.
Rename Door
<
<
Autoswitch ON Time
Disable Intercom
30 sec
PL - 1
PL - 2
PL - 3
PL - 4
CM -1
CM -2
CM -3
CM -4
Rename Camera
Settings screen
C m raa e
Door
Me a esss g Media Call
Log
Intercom Divert
Phone
Light Call
Options
14:14
Mon .
05 / 06 / 2017
<
<
To continue with the configuration functions, press option . The following settings screen will be displayed.
C m raa e
Door
Me a esss g Media
Call
Log
Intercom Divert
Phone
Light Call
Options
14:14
Mon .
05 / 06 / 2017
Settings screen
C m raa e
Door
Me a esss g Media
Call
Log
Intercom
Divert
Phone
Light Call
Options
14:14
Mon .
05 / 06 / 2017
9.1.5 To access the default setup and installer menu settings, press option 'About' or (see p. 40). The
following selection and information screen on the monitor will be displayed.
Settings screen
C m raa e
Door
Me a esss g Media Call
Log
Intercom Divert
Phone
Light
Call
Options
14:14
Mon .
05 / 06 / 2017
About
Device Address
Video Format
System Version
Display Driver
Font Type
User Interface
2 . 1
2 . 1
00 . 00
AUTO
02 . 00 . 10
2 . 6
To access the default setup function, press option and the following screen will be displayed. Press option to
confirm and leave the default settings in '9.1 Settings' (see pp. 35-39) unchanged or press option to cancel and
return to the selection screen.
About
Device Address
Video Format
System Version
Display Driver
Font Type
User Interface
2 . 1
2 . 1
00 . 00
AUTO
02 . 00 . 10
2 . 6
Restore Factory Default?
Sounds
Date & Time
Language
More…
About
Home
Settings
Sounds
Date & Time
Language
More…
About
Home
Settings

USER MENU
40
PENTHA MONITORG 2B
Continued from previous page.
Continued overleaf
To access the installer menu, press the logo on the front of the monitor for 3 seconds. The following setup
screen will be displayed.
About
Device Address
Video Format
System Version
Display Driver
Font Type
User Interface
2 . 1
2 . 1
00 . 00
AUTO
02 . 00 . 10
2 . 6
TEL NUMBER 1
6191718XX
TEL NUMBER 1
6191718XX
INSTALLER SETUP
-
@+OK: Address Setting
123
Then enter the function code with the numeric buttons. Confirm the function code entered by pressing 'OK'. Press
option to exit and return to the monitor's selectionand information screen.
INSTALLER SETUP
123
8000
About
Device Address
Video Format
System Version
Display Driver
Font Type
User Interface
2 . 1
2 . 1
00 . 00
AUTO
02 . 00 . 10
2 . 6
Function codes (installer):
[8000]: . [8001] [8003]:toMaster monitor (factory default) Slave monitor 1 to 3.
[8004]: . [8005]:Guard monitor End guard monitor (factory default).
[9015]: [9016]:Intercom enabled (factory default) Intercom disabled.
[2910]: Send the residents list of the configured monitor to all of the building's monitors (installation without RD-GB2A
repeater).
Each apartment must have only one master unit:Any other units in the apartment must be configured as slaves.
*
*
*
To exit the monitor's selection and information screen, press option . The menu screen will be displayed.
Main menu screen
Selection screen
About
Device Address
Video Format
System Version
Display Driver
Font Type
User Interface
2 . 1
2 . 1
00 . 00
AUTO
02 . 00 . 10
2 . 6
C m raa e
Door
Me a esss g Media Call
Log
Intercom Divert
Phone
Light Call
Options
14:14
Mon .
05 / 06 / 2017
For a shortcut to accessingthe default setupand installermenu settings, pressoption and the following
selection and information screen on the monitor will be displayed (follow the steps described on pp. 39-40 to adjust
the settings). To exit and return tothe menu screen, press .
Main menu screen
C m raa e
Door
Me a esss g Media Call
Log
Intercom Divert
Phone
Light Call
Options
14:14
Mon .
05 / 06 / 2017
Selection screen
About
Device Address
Video Format
System Version
Display Driver
Font Type
User Interface
2 . 1
2 . 1
00 . 00
AUTO
02 . 00 . 10
2 . 6

Main menu screen Monitor in standby
USER MENU
41
PENTHA MONITORG 2B
Continued from previous page.
To exit the monitor's user menu function, press option .
C m raa e
Door
Me sa ess g Media Call
Log
Intercom
Divert
Phone
Light Call
Options
14:14
Mon .
05 / 06 / 2017
Configuring from the menu (monitor address, master/slave and displaying slave monitor image in call):
The Pentha monitor enables you to configure: address and master / slave on the monitor.
To access the installer menu, press the logo on the front of the monitor for 3 seconds. The following installer
screen will be displayed.
Step 1: To access the menu, the monitor mustbe in standby.Press the screen or on the logo on thefront of the
monitor. The main menu options screen will then appear. For example, move DIP 1 of the configuration DIPNote:
switch from ON to OFF (see p. 4) and go directly to the selection screen (see p. 42).
Then press and the following selection and information screen will be displayed.
Installer screen
Main menu screen
C m raa e
Door
Me sa ess g Media Call
Log
Intercom Divert
Phone
Light Call
Options
14:14
Mon .
05 / 06 / 2017
Main menu screen
C m raa e
Door
Me sa ess g Media Call
Log
Intercom Divert
Phone
Light
Call
Options
14:14
Mon .
05 / 06 / 2017
About
Device Address
Video Format
System Version
Display Driver
Font Type
User Interface
2 . 1
2 . 1
00 . 00
AUTO
02 . 00 . 10
2 . 6
Selection and information screen
About
Device Address
Video Format
System Version
Display Driver
Font Type
User Interface
2 . 1
2 . 1
00 . 00
AUTO
02 . 00 . 10
2 . 6
Selection and information screen
TEL NUMBER 1
6191718XX
TEL NUMBER 1
6191718XX
INSTALLER SETUP
-
@+OK: Address Setting
123
INSTALLER SETUP
Continued overleaf
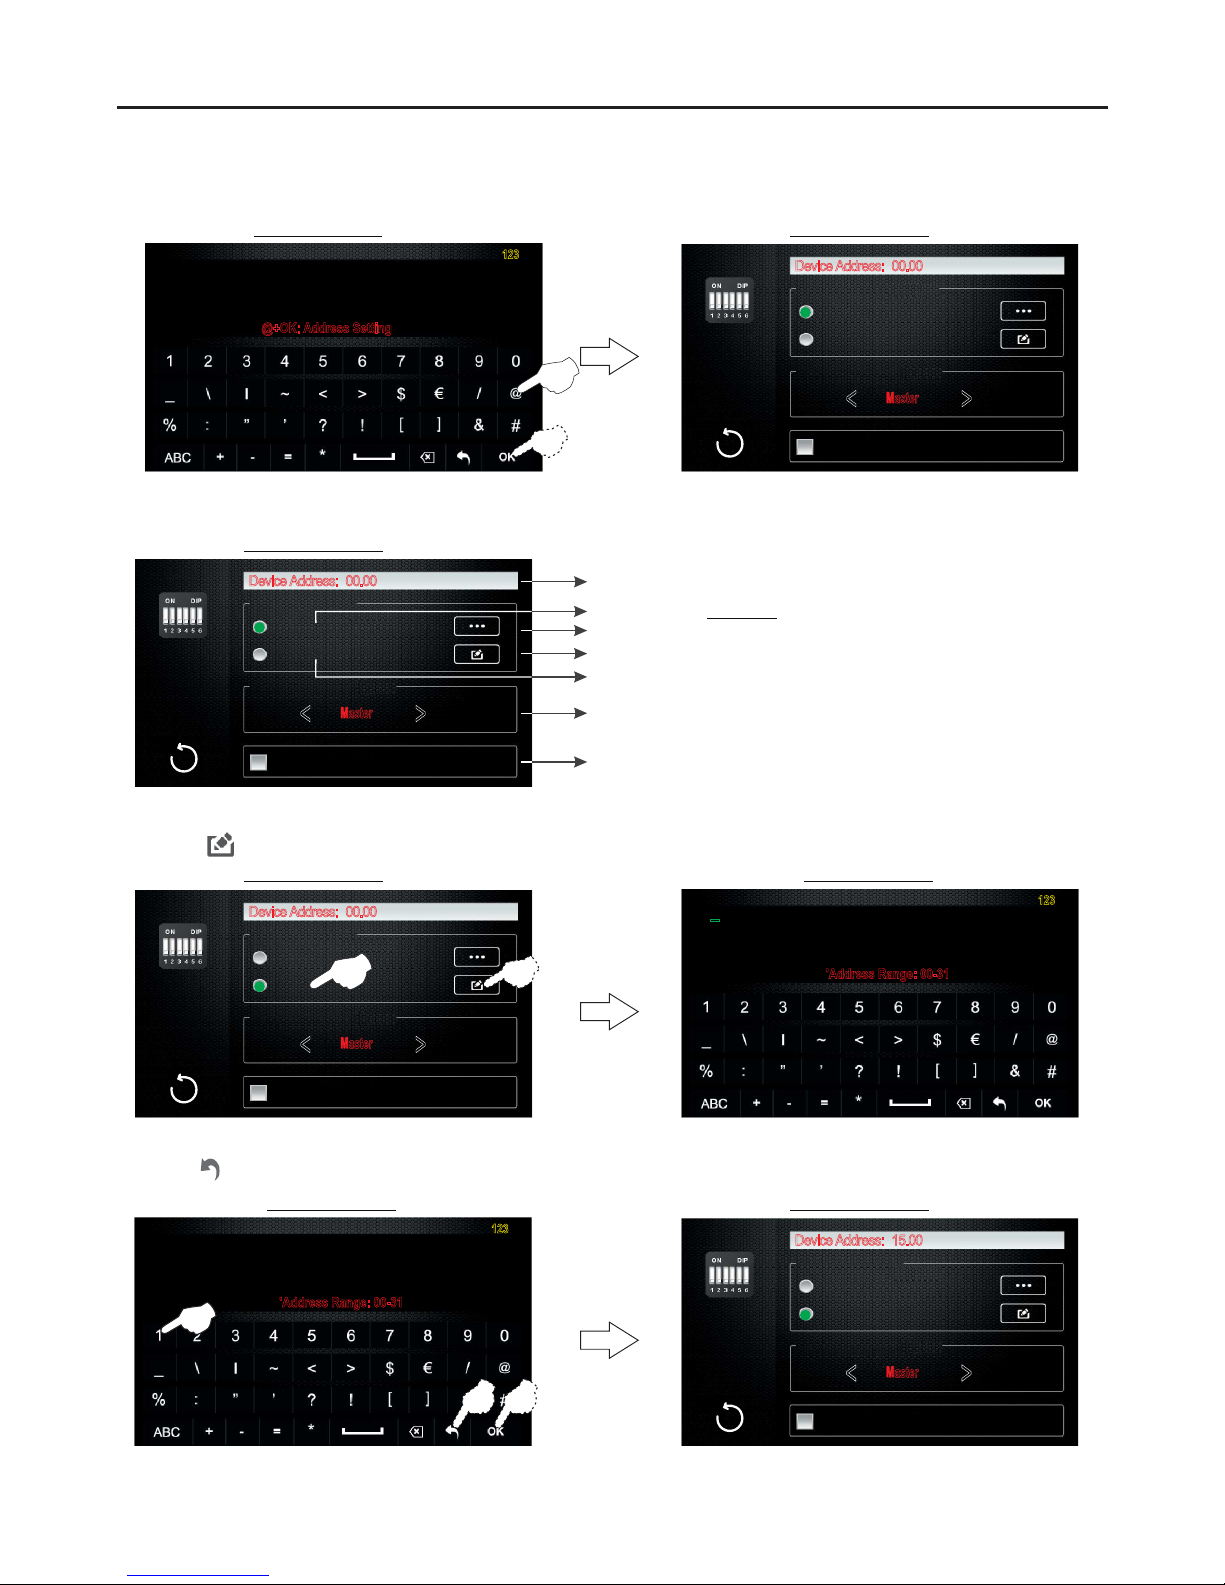
42
Continued overleaf
To access the selection screen to configure the address and master / slave of the monitor, enter function code '@' and
confirm by pressing 'OK'.
Installer screen
TEL NUMBER 1
6191718XX
TEL NUMBER 1
INSTALLER SETUP
@+OK: Address Setting
123
Selection screen
PENTHA MONITORG 2B
@
Select Setting Mode
DeviceAddress: 00.00
'DIP Switch
'Digital Address input
Master / SlaveSetting
<
<
Master
Image Display DuringCall
Continued from previous page.
Selection screen
Select Setting Mode
DeviceAddress: 00.00
'DIP Switch
'Digital Address input
Master / SlaveSetting
<
<
Master
Image Display DuringCall
Step 2: The following functions can then be performed on the selection screen:
Indicates the address of the monitor.
Setting mode ' ' (see p. 4).by switch
Setting mode 'by menu' ('Input Address' screen).
Displays the address codes (0 to 31) of the monitor (see p. 4-5).
Accesses the 'Input Address' screen (enter codes from 00-31).
Sets the monitor as master / slave.
Enables the image on the slave monitor to be displayed during a
call from the door panel.
Selection screen
Select Setting Mode
DeviceAddress: 00.00
'DIP Switch
'Digital Address input
Master / SlaveSetting
<
<
Master
Image Display DuringCall
To configure the monitor with manual setting mode 'by menu', press 'Digital Address Input' and then press
option to bring up the following settings screen.
Settings screen
TEL NUMBER 1
6191718XX
TEL NUMBER 1
6191718XX
INPUT ADDRESS
-
'Address Range: 00-31
123
Enter the required monitor address (address from 00 to 31). Confirm the address entered by pressing 'OK', then
press to exit and return to the selection screen.
Selection screen
Select Setting Mode
DeviceAddress: 15.00
'DIP Switch
'Digital Address input
Master / SlaveSetting
<
<
Master
Image Display DuringCall
Settings screen
TEL NUMBER 1
6191718XX
TEL NUMBER 1
6191718XX
INPUT ADDRESS
'Address Range: 00-31
123
15

Continued from previous page.
43
PENTHA MONITORG 2B
Then press or to change the 'Master / Slave Setting', showing in 'Device Address' the address and master or slave
configured on the monitor.
Selection screen
Select Setting Mode
DeviceAddress: 15.00
'DIP Switch
'Digital Address input
Master / SlaveSetting
<
<
Master
Image Display DuringCall
<
<
Selection screen
Select Setting Mode
DeviceAddress: 15.10
'DIP Switch
'Digital Address input
Master / SlaveSetting
<
<
S 1lave
Image Display DuringCall
Important: Each apartment must only have one master unit; if there are other units, they must be configured as slaves.
*
Step 3: To exit the selection screen,press option . The main menu screen will be displayed.
Selection screen
Select Setting Mode
DeviceAddress: 15.00
'DIP Switch
'Digital Address input
Master / SlaveSetting
<
<
Master
Image Display DuringCall
Main menu screen
C m raa e
Door
Me sa ess g Media
Call
Log
Intercom Divert
Phone
Light Call
Options
14:14
Mon .
05 / 06 / 2017
To exit the monitor's user menu function, press .
Monitor in standby
Main menu screen
C m raa e
Door
Me sa ess g Media Call
Log
Intercom Divert
Phone
Light Call
Options
14:14
Mon .
05 / 06 / 2017
CLEANING THE MONITOR
- Do not use solvents, detergents or cleaning products that contain acids, vinegar or abrasive components.
- Use a soft damp cloth (not wet) that sheds no fibres.
- Always wipe the monitor in the same direction, from top to bottom.
- After cleaning the monitor,remove any moisture with a soft dry cloth that sheds no fibres.
golmar@golmar.es
www.golmar.es
Sistemas de comunicaciónS.A.
Golmar se reserva el derecho a cualquier modificación sin previo aviso.
Golmar se réserve le droit de toute modification sans préavis.
Golmar reserves the right to make any modifications without prior notice.
GOLMAR S.A.
C/ Silici, 13
08940- Cornellá de Llobregat
SPAIN

USER MENU (ANNEX)
45
To change the 'Day' mode start and finish time:
The monitor's ringtone is louder during the time set as day mode (default setting of 06:00 to 18:00).
To access the installer menu, press the logo on the front of the monitor for 3 seconds. The following installer
screen will be displayed.
Step 1: To access the menu, the monitor mustbe in standby.Press the screen or on the logo on thefront of the
monitor.The main menu options screen will then appear.
Then press and the following selection and information screen will be displayed.
Continued overleaf
Installer screen
Main menu screen
C m raa e
Door
Me sa ess g Media Call
Log
Intercom Divert
Phone
Light Call
Options
14:14
Mon .
05 / 06 / 2017
Main menu screen
Cámara
Placa
Mensajes Multi-
media
Call
Log
Intercom Divert
Phone
Light Call
Options
14:14
Mon .
05 / 06 / 2017
About
Device Address
Video Format
System Version
Display Driver
Font Type
User Interface
2 . 1
2 . 1
00 . 00
AUTO
02 . 00 . 10
2 . 6
Selection and information screen
About
Device Address
Video Format
System Version
Display Driver
Font Type
User Interface
2 . 1
2 . 1
00 . 00
AUTO
02 . 00 . 10
2 . 6
Selection and information screen
TEL NUMBER 1
6191718XX
TEL NUMBER 1
6191718XX
INSTALLER SETUP
-
@+OK: Address Setting
123
To access the 2nd installer screen, press the logo on the front of the monitor again for 3 seconds.
Installer screen
TEL NUMBER 1
6191718XX
TEL NUMBER 1
6191718XX
INSTALLER SETUP
-
@+OK: Address Setting
123
2nd installer screen
TEL NUMBER 1
6191718XX
TEL NUMBER 1
6191718XX
PROPERTY SETUP
-
123
PENTHA MONITORG 2B

Function code:
1#0#62#2#0#07,15#
Day mode finish time (in hexadecimal).
Day mode start time (in hexadecimal).
To set day mode to start at 07:00 in the morning and finish at 21:00 at night, enter the following code (with the
hours in hexadecimal):
Decimal
01
02
03
04
05
06
Hexadecimal
01
02
03
04
05
06
Decimal
07
08
09
10
11
12
Hexadecimal
07
08
09
0a
0b
0c
Decimal time to hexadecimal time conversion table:
Step 3: To exit the monitor's selection and information screen, press option . The menu screen will be displayed.
Then press option to exit the monitor's user menu function.
Decimal
13
14
15
16
17
18
Hexadecimal
0d
0e
0f
10
11
12
Decimal
19
20
21
22
23
24
Hexadecimal
13
14
15
16
17
18
Important: If the function code contains letters, enter them in lower case.
Monitor in standby
Step 2: Then enter the function code with the alphanumeric buttons. Confirm the function code entered by pressing
'OK'. Press option to exit and return to the monitor's selection and information screen.
46
Continued from previous page.
2nd installer screen
TEL NUMBER 1TEL NUMBER 1
PROPERTY SETUP
123
1#0#62#2#0#07,15#
About
Device Address
Video Format
System Version
Display Driver
Font Type
User Interface
2 . 1
2 . 1
00 . 00
AUTO
02 . 00 . 10
2 . 6
Selection and information screen
About
Device Address
Video Format
System Version
Display Driver
Font Type
User Interface
2 . 1
2 . 1
00 . 00
AUTO
02 . 00 . 10
2 . 6
Selection and information screen
Main menu screen
C m raa e
Door
Me sa ess g Media Call
Log
Intercom Divert
Phone
Light Call
Options
14:14
Mon .
05 / 06 / 2017
C m raa e
Door
Me sa ess g Media Call
Log
Intercom Divert
Phone
Light Call
Options
14:14
Mon .
05 / 06 / 2017
Main menu screen
PENTHA MONITORG 2B
 Loading...