

Page 1
MCMSTMHXX0612MN002
User Manual
GO Live 3031
Page 2

GO Live 3031
User Manual
1
Page 3

Content
Phone Display 4
Dial / Answer Key 4
Left / Right soft Key 4
Navigation Key 4
End / Power Key 4
0 Key 4
* Key 4
# Key 5
OK Key 5
Getting Started 5
Installing the SIM Card
and the battery 5
Charging the battery 6
Switching the phone on
and off 6
Call Functions 6
Making a call 6
Call Waiting 7
Input Method 7
Call Record 8
myLife 9
Photo Album 9
Media Player 9
Messages 9
Write Messages 9
Inbox 10
Drafts 10
Outbox 10
Sent 10
Delete messages 10
Email 10
Broadcast Message 11
Templates 11
Message Settings 11
Contacts 12
Quick search 12
Smart search 12
Add New Contacts 12
Caller Groups 13
Speed dial 13
Blacklist 13
Delete all Contacts 13
Copy contacts 13
Move contacts 13
Contacts Settings 13
Camera 14
Multimedia 14
TV 14
Photo Album 14
Media Player 14
Photo editor 15
Sound recorder 15
FM radio 16
JAVA 16
Organizer 16
Private Menu 16
Calendar 16
Calculator 17
File manager 17
Alarm 17
Azzan alarm 17
World clock 17
Notes 18
Unit Converter 18
2
Page 4

Currency converter 18
Stopwatch 18
Ebook reader 18
Zakat calculator 18
File Manager 19
Internet 19
Internet service 19
License manager 20
STK 20
Settings 20
Profiles 20
Display settings 20
Date and Time 21
Phone Settings 21
Call settings 22
Connection Settings 22
Security settings 23
Phone security 23
Auto keypad lock 23
Certificate manager 23
Restore factory settings 23
USB Features 23
USB mass storage 23
General Information 23
Accessories 23
GPRS / EDGE 24
Battery Care 24
Charger attention 24
Care and maintenance 25
Product Care 25
Important Sefety
Information 26
Access Codes 26
Radio frequency energy 26
Pacemaker 26
Hearing aids 26
Aircraft 26
Potentially explosive
atmospheres 27
Driving 27
Emergency calls 27
3
Page 5
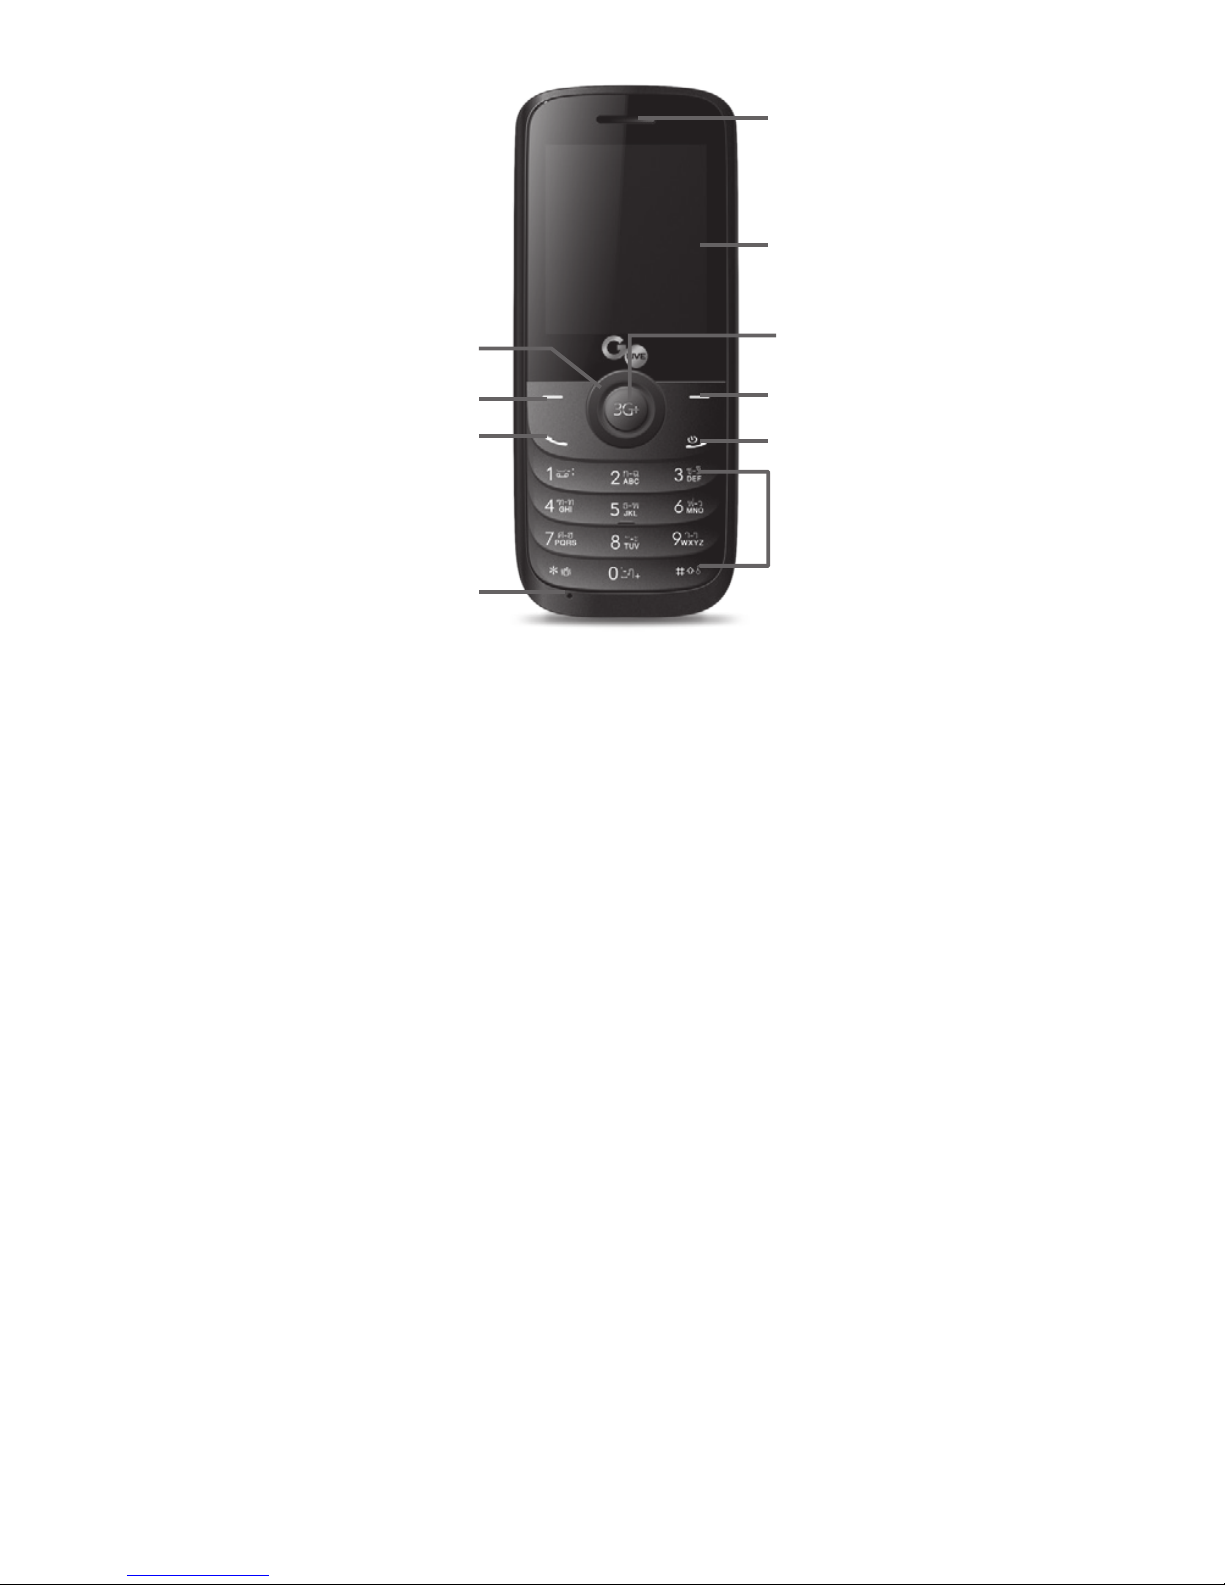
Phone Display
Navigation Key
Ear piece
Display
OK Key
Right Soft Key
End / Power Key
Left Soft Key
Dial / Answer Key
Microphone
Keypad
Dial / Answer Key
• Press to answer / make a call.
• Press Dial / Answer Key to view call logs in standby mode.
Left / Right soft Key
• Press to perform the function currently displayed in the bottom
left / right corner of the screen.
• Press Left Soft Key to confirm the selected function.
• From any screen, press and hold Left Soft Key for 5 seconds to
access myLife portal.
• From any screen, press and hold Right Soft Key for 5 seconds to
access Camera.
Navigation Key
• Within a menu, press Up, Down, Left or Right to scroll through
menu options.
End / Power Key
• Press to end a call.
• Press and hold to power on / off the phone.
0 Key
• Press and hold the 0 key to toggle among 0, + or P, and W.
Press to enter the symbol when editing text.
*Key
• In idle mode, press and hold to activate or deactivate the silent mode.
Press to switch input modes when entering text.
4
Page 6
Getting started
Installing the SIM card and the battery
You need to insert the SIM card and charge the battery before using the
phone.
• Keep all miniature SIM cards out of the reach of little children.
• Be careful to handle, insert or remove the SIM card since the SIM card
and the contacts inside can easily be damaged by scratching or bending.
• Before installing / removing the SIM card, always make sure that the
phone is switched off.
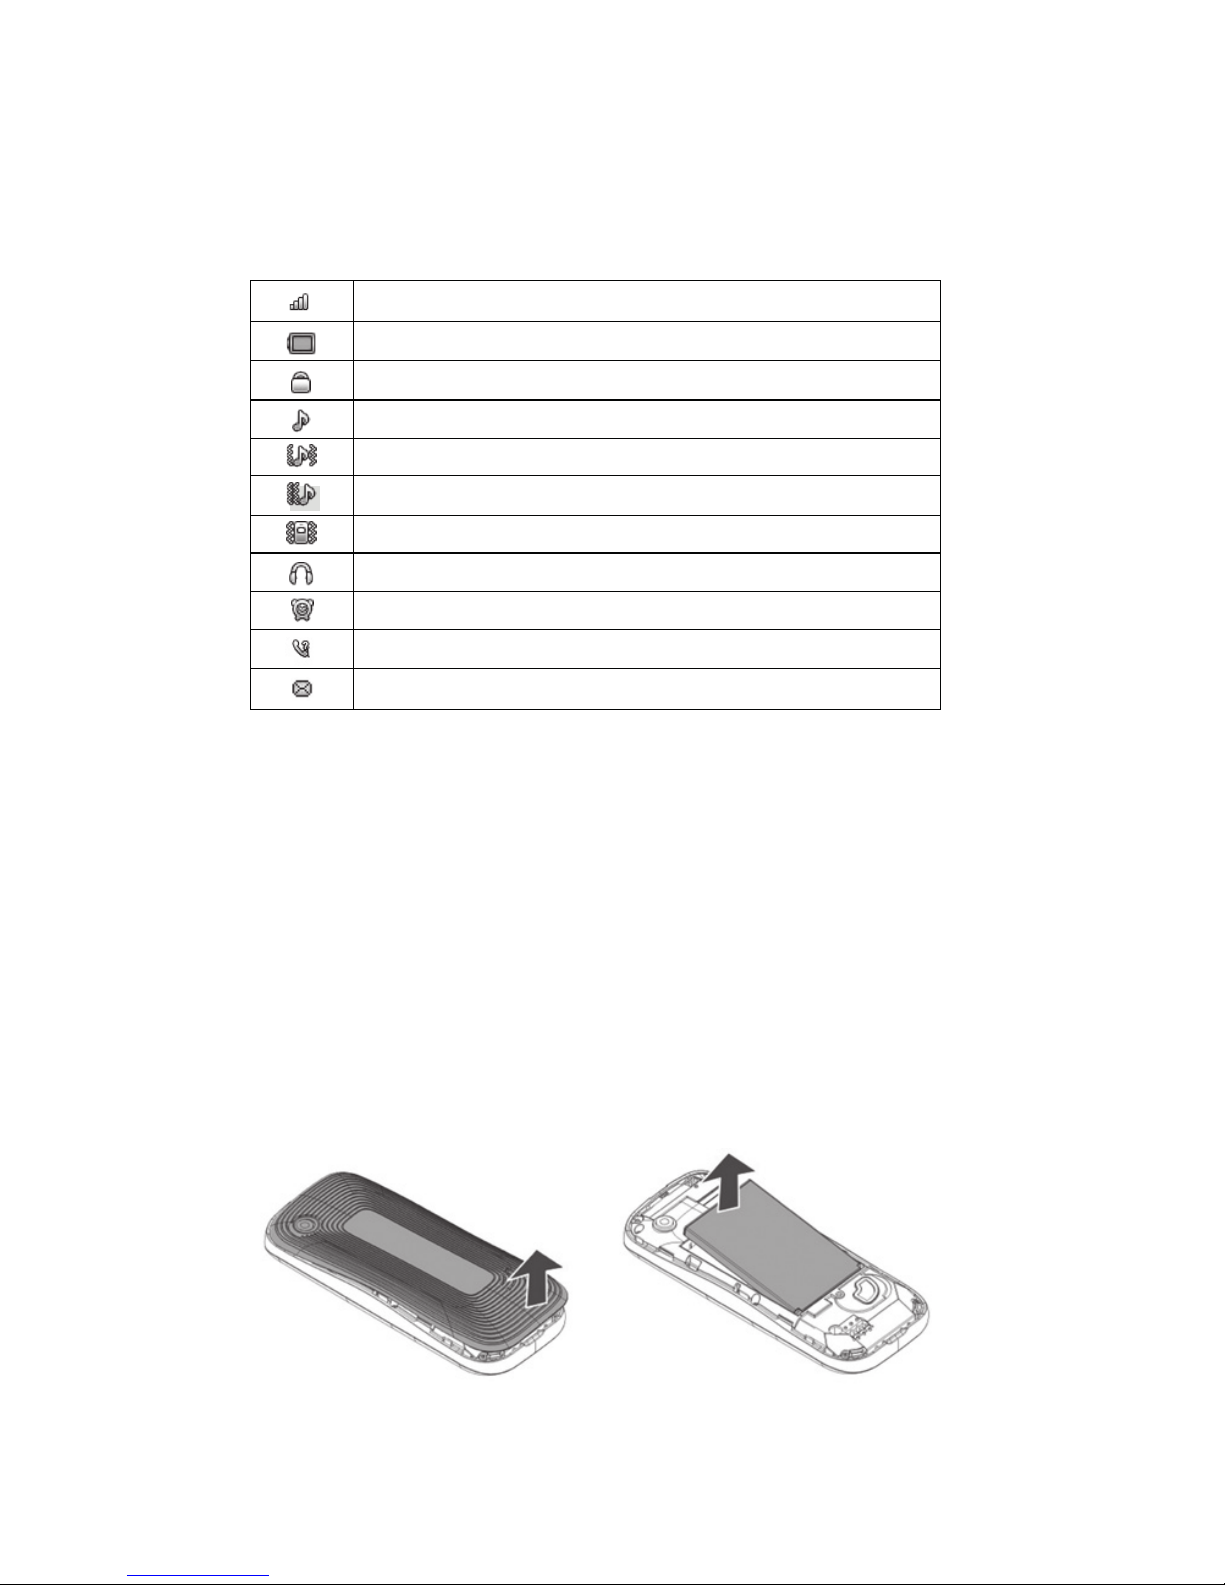
1. Remove the back cover (1) and lift the battery away (2).
(1) (2)
Vertical bars indicate the signal strength of the 3G+ network signal.
Indicates the battery level.
Indicates the keypad is locked.
Indicates your phone uses the alert type of “Ring”.
Indicates your phone uses the alert type of “Vibrate and ring”.
Indicates your phone uses the alert type of “Vibrate then ring”.
Indicates your phone uses the alert type of “Vibrate”.
Indicates your phone uses the headsets profile settings.
Indicates the alarm clock is set.
Indicates a missed call.
Indicates new text message (s).
# Key
• Press to switch input modes when entering text.
• In idle mode, press and hold to lock the keypad.
OK Key
• Confirm the selection.
• From any screen, press and hold OK key for 5 seconds to access
H Life page.
5
Page 7
(3)
(4)
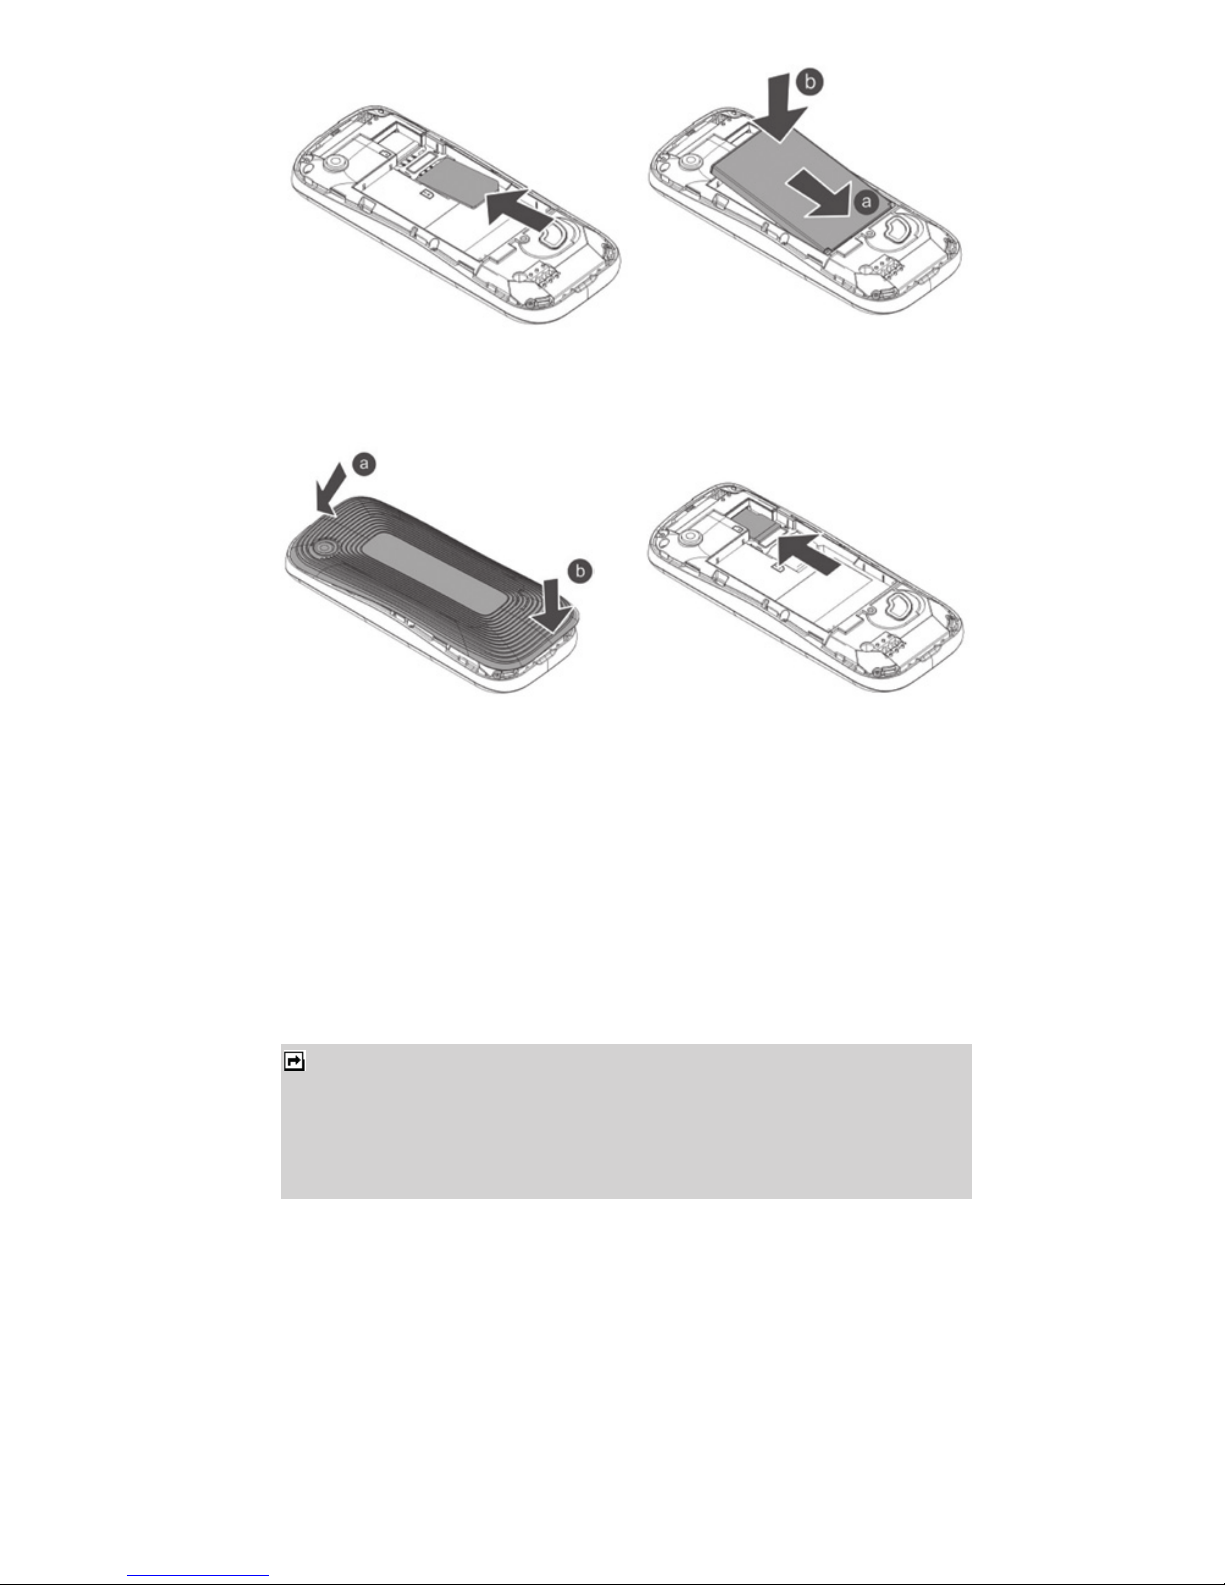
2. Insert the SIM card (3), install the battery (4).
Note: make sure that the metallic contacts of the battery are facing the metallic contacts in the battery slot.
When all the battery scroll bars are steady, the battery is fully charged. You can then disconnect the charger.
3. Attach the battery cover as shown (5), installing a Micro SD Card (6).
(5) (6)
Charging the battery
You must fully charge the battery before using your phone for the first time.
1. Connect charger cable to the micro charger port on the left side of
your phone.
2. Connect charger to an AC wall outlet.
Switching the phone on and off
• Press and hold the Power Key.
Call Functions
This section gives you information about the calling service supported in
your phone.
Making a call
In standby mode, key in the number, including the area code, and
press Dial / Answer Key.
Notes:
1.You can also use the phone without SIM card. If the phone asks for PIN code, key
in the PIN code, and press the Left Soft Key (LSK) to confirm.
2. Do not switch the phone on when the phone use is prohibited or when it may
cause interference or danger.
6
Page 8

Call Waiting
If you want to answer another incoming call, you should activate the
call waiting function first.
During a call, press Answer Key to answer a new incoming call. You can
swap back anytime by pressing the Left Soft Key (LSK) and select Swap.
Input Method
You can key in text by pressing the keypad.
To select an input method
Before you key in text, press Options and select Input Method, or you
can press Options > Input Method to switch input Method.
To insert a space
You could press the 0 Key or Navigation Right Key to insert space after
letters.
To insert the symbols
Press the * key to access the symbols.
Smart input method
To make a call from Contacts
In standby mode, press the Left soft key to enter the main menu, then
select Contacts > Quick search. Scroll to the desired contact name or
type the name in the search bar, then press the Call Key to make the call.
To make an international call
1. Press and hold the 0 key until “+” appears on the screen.
2. Key in the country code, area code and the phone number.
3. Press Dial key to call.
Answering or rejecting an incoming call
• Press Answer Key to receive the call.
• To reject an incoming call, press the End Key.
2 to 9 Press to input letters.
Navigation
Left / Right Key
Press to confirm the letter or word, or move the
cursor to the left or right.
Navigation
Up / Down Key
Press to browse the last or next available word.
Left Soft Key
(Select)
Press to confirm the letter or word.
Right Soft Key
(Clear)
Press to delete a letter, press and hold to clear all
entries.
# Switch between input modes.
* Press to activate punctuation mode.
1 Press to input symbol.
0 Press to input space.
7
Page 9

Call Record
Your phone can save the call records of missed calls, received calls, dialed
calls, the time that have a call and cost of calls in the Call record menu.
Dialed Calls
To view Dialed Calls
In Call record menu, choose Dialed calls, and press the Navigation.
Key up and down to view the records.
Missed Calls
To view Missed Calls
In Call record menu, choose Missed calls, and press the Navigation.
Key up and down to view the records.
Received Calls
To view Received Calls
In Call record menu, choose Received calls, and press the Navigation.
Key up and down to view the records.
Delete call logs
Your phone allows you to delete Records from the Missed Calls list,
Dialed Calls list, Received Calls list, or All Calls list.
Call timers
Your phone allows you to view the duration of your incoming
and outgoing calls.
Call Cost
This function allows you to check the cost of your last phone
call or the total cost.
To reset the cost, you need to enter PINcode. The password
can be obtained from your service provider.
Text msg. counter
This function allows you to check the numbers of message.
In Call record menu, choose Text msg. counter to view the records.
You can press Reset to reset the counter.
Example: How to enter the word “HOME”.
1. Press the # Key to switch to “ ” mode;
2. Press 4 6 6 3, the first word “GONE” appears;
3. Press navigation down key to browse and select “HOME”;
4. Press the Left Soft Key [Select] to confirm “HOME”.
Notes:
1. Once the call list exceeds the memory limitation, the oldest one will be
deleted automatically.
2. For the call logs, you can press Dial Key in standby mode to have a quick review.
8
Page 10

Messages
Your phone supports voice mail notification messages and text
messages. Voice mails, short message service (SMS) and
multimedia message (MMS) are network service. Please check
your service provider for further details on the fees.
GPRS Counter
This function allows you to check the data size (both message
and WAP) of GPRS packet you used.
In Call record menu, choose GPRS counter to view the content.
The following options are available for GPRS counter:
• Last Sent: The GPRS volume you sent last time.
• Last Received: The GPRS volume you received last time.
• All Sent: The total GPRS volume you have sent.
• All Received: The total GPRS volume you have received.
• Reset Counter: Press to reset the counters.
Write Messages
To write a message:
1. From the main menu, select Messages > Write message.
2. In message content, you are able to add picture, sound and video
into your message.
3. After finished, select Options and then Send to.
4. Add the recipient by inputting the number manually or searching
them in the Contact.
5. Finally, select Options and select the send option to send the message.
The following items are available for SMS counter:
• Sent: The number of Text messages you have sent.
• Received: The number of Text messages you have received.
myLife
Allows you visit the website http://mylife.truelife.com/m
Photo Album
Photo Album lets you to access photos you have taken. For photos,
you can do basic editing tasks, set them as wallpaper or contact picture
and share them to your friends.
Media Player
This menu allows you to listen to your favorite music MP3.
Notes:
You are not able to receive multimedia messages during a call, any active WAP
connection over GPRS data.
9
Page 11

Inbox
Your phone saves the text messages (SMS) and multimedia messages
(MMS) that have been received and sent in the Inbox folder.
To read messages
When you have received a message, icons will indicate that this message
is from SIM card or Phone in inbox. If your inbox is full since the messages
you have received are saved in SIM as default setting, your message
will be saved in the phone instead of SIM card. If the phone’s inbox
is full also, there will be a pop-up window to remind you that your
inbox is full and cannot accept new messages.
1. From the main menu, select Messages.
2. Then select Inbox. All received messages are listed in this folder.
Drafts
Saved messages are saved in Drafts folder.
Outbox
Unsent messages are saved in Outbox folder.
Sent
Successfully sent messages are saved in Sent folder.
Delete messages
You are able to delete a message in a folder or even all messages at once.
Email
To create an account
1. First, you must create the data account.
2. Go back to idle mode by pressing the Power Key. Select Menu >
Messages > Email > Email accounts.
3. Select Options > New account to add a new email account, follow
the steps which prompt you to go ahead.
4. After you have finished, your phone will save the new account
automatically.
5. Choose one of your favorite accounts, Select Options > Activate to
activate the selected account.
To write an email
1. In idle mode, press the Left Soft key to access the main menu, and
then select Messages > Email > Write Email.
2. Add the Email address in the fields of To where you would like the
message sent.
Notes:
1. To key in the content, please refer to “Input Method”.
2. To use the multimedia message function, your network operator or service
provider support is necessary. Only phones equipped with this function can
receive and display multimedia messages.
10
Page 12

Broadcast Message
Your phone allows you to receive commercial messages. You can
either enable or disable the receiving mode and edit settings based on
your personal preference.
Templates
There are several default SMS and MMS templates in your phone.
Message Settings
Your phone allows you to set up default setting on the SMS and MMS
features.
1. Go to Messages and choose Message settings.
2. Then select SMS, MMS or Service message to change settings.
3. Choose the field you would like to change.
SMS provide following options to customize:
• Profile settings: Allows you to set profile name, SMSC address,
SMS validity period, and type of message.
• Voicemail server: Allows you to edit voicemail server contact
number.
• Common settings: Allows you to set Delivery Report on / off
for sent and received messages.
• Memory status: Allows you to check memory status in Phone or
SIM card.
• Preferred storage: You can choose your preferred storage on
phone, SIM or both.
• Preferred connection: Allows you to set preferred connection
to GPRS, GSM or GSM only.
MMS provide the following options to customize:
• Compose: You can set a compose format based on the option
listed below.
• Slide Time: Define the time for the delay between each slide.
• Creation Mode: If you select Restricted, the device prevents
you from sending messages that may not be supported.
To include content in your message without notifications,
select Free.
Notes:
If you send an email through Gmail, you have to install a certificate, please
contact your Gmail operator for more information.
3. Scroll to the subject field, enter the subject by selecting Edit, attach
the files, set priority, and edit the email content.
4. When you have finished, select Done. A popup screen will indicate
the mail size.
5. Select Yes to send, send and save, save to drafts, or quit without saving.
11
Page 13

Contacts
Your Contact list is saved either on the SIM card’s memory or Phone’s
memory. You can also choose to list both.
Quick search
Enter the first few letters of the contact name to search.
Smart search
You can enable or disable Smart search function. Smart search allows
you to search the phonebook by partial numbers you have entered.
In standby mode, you can only input series numbers to search; the search
result will display the list with matched numbers. Then select the one
you would like to dial.
Add New Contacts
To create a new SIM / phone contacts:
1. Select Menu > Contacts > Add New Contacts.
2. You can set the contact preferred storage under Menu > Contacts >
Contacts settings > Preferred storage > Phone / All. Then the
contact details will be saved to your preferred storage automatically.
3. Then enter all related information about the contact.
4. Press Options > Save to save the contact details.
Notes:
1. Your phone allows you to save 1000 entries of phone numbers.
2. Image and video can be selected from both default and file manager.
Notes: You may contact with your network service operator to consult MMS settings.
• Picture Resizing: Define the size of the image in an MMS.
• Auto Signature: Define whether you want to add a signature
at the end of an MMS automatically.
• Signature: Define the signature that you want to be added.
• Sending: This setting contains the options, such as priority,
delivery report, and so on.
• Retrieval: This setting contains the options, such as roaming, read
report, and so on.
• Preferred storage: Allows you to change your preferred storage
as SIM or phone.
• Memory status: Allows you check multimedia message memory
status in Phone or SIM card.
12
Page 14

• Preferred Storage: You can choose your preferred storage on
phone, SIM, or All.
• My vCard: Allows you to define number or name.
• Extra numbers: This menu allows you to keep a list of useful
numbers such as Owner number, Service dial number and SOS
number.
• Memory Status: You can check how many entries are stored in
SIM card’s and Phone’s memory. This menu also allows you to
dial only the numbers in the fixed dial list.
• Backup & Restore: Allows you to back up all contact lists in
Contact to your memory card or phone, handset will
automatically generate “Contact” folder under File Manager
menu to keep csv format. You might restore them to your Contact.
• Name display: You may customize the Contact list
information you want to show on your display.
Blacklist
Allows you to filter and block incoming calls for certain contacts you
defined.
Delete all contacts
This menu allows you to delete all contacts from phone or SIM.
Copy contacts
This menu allows you to copy the contacts among two storages.
Move contacts
This menu allows you to move the contacts among two storages.
Contacts Settings
To access the Contacts settings, in standby mode, press the Left Soft key
to enter the main menu, and then select Contacts > Contacts Settings
Your phone provides you various setting options to personalize your
phone, including,
Caller Groups
In standby mode, press the Left Soft key to enter the main menu, and
then select Contacts > Caller groups. You can add caller groups and edit
the group details. With the caller group function, you can send a message
to all members of a group at the same time.
Speed dial
If you assign the number to one of the speed dialing Keys (from the key
2 to key 9) saved in the Contact list, you can dial the phone number by
pressing and holding the key in the standby mode. First, you should turn
this feature on, and then set the number by associating with a contact.
13
Page 15

Media player
Your phone provides you a friendly music player device for entertainment
purpose. You may also download music content via USB or other
connection. Music tracks must be saved in My Music folder in File Manager
in order to be automatically detected and added into a default play list.
You may listen to the music through headset or speaker. A user-friendly
interface is specially designed to enable users to control, play and pause
the music player as you wish.
Camera
You can use this phone to take photos and shoot videos with the phone’s
built-in camera and adjust its settings. The display of the phone works
as a viewfinder. If there’s no enough memory for camera, you need to
delete old photos or videos to free some spaces for new photos or you
can choose to save photos in memory card. The status of your camera
setting will be displayed on the top of preview mode.
Multimedia
TV
This feature enables your phone to access a TV from H TV service.
Photo Album
All images from photo folder can be reviewed from here and storage is
located in either the phone or memory card.
To change the storage, please select Options and select Storage.
To start using Camera
1. In the main menu, select Camera.
2. To take the picture, press the OK Key.
3. Your phone supports to uploading photos. After taking a photo,
you can short press “Upload” button once to upload the picture
to Cloud and share to myLife.
To setup the Camera
1. Press the Left Soft Key in the preview mode. All options will be
displayed, and then you can adjust the setting through the
preview mode directly.
2. Now you can set the image size, quality, scene mode, and so on.
Notes: Do not use this feature when it violates local laws.
Notes: The photo will be saved in the Photos folder in File Manager menu.
You can also view the picture by selecting Photos from option list or
open Photos folder from File Manager menu.
14
Page 16
Sound recorder
The Sound recorder is a simple sound-recording tool, providing all the
required functionalities for you to manage voice files.
To start recording
1. In Multimedia menu, choose Sound Recorder.
2. Select Options > Record to start recording.
Photo editor
Your phone provides following selections for your option:
• Photo Artist: Allows you to edit the image or photo files saved in
your phone or memory card.
• Image Tiles: Allows you to split images based on the number of
segments per image.
To start using Photo Artist
1. In Multimedia menu, select Photo Editor.
2. Select Photo artist.
3. Choose Select from file.
4. Select Memory Card or Phone to open the folders.
5. Select the Images folder or Photos folder.
6. Select an image file you’d like to edit and touch OK to start photo editing.
Notes: You can make or answer a call while using the music player. During a phone
call, the music playback will be paused and continue after you end the call.
Notes:
1. During recording, you can pause or stop the voice recording anytime by
pressing Left Soft Key.
2. You can press Options > Settings to set the voice file format. The voice file
format can be AMR, WAV, AWB and AMR.
Navigation Key
Left or Right
Short press to select the previous song / next song. Press
and hold to rewind or fast forward the track during playback.
Navigation Up/Down Key
Left Soft Key [Options]
Right Soft Key [Back]
Adjust volume.
Displays different options.
Return to previous menu.
Key Description
Center Key Press to Start / Play / Pause the current music.
15
Page 17

FM radio
This feature allows you to listen to your favorite FM radio station anytime
with frequency ranging from 87.50 MHz. to 108.00 MHz.
Organizer
Private Menu
Your phone allows you to hide call records, messages, file manager
and Contact (includes caller groups). It can help you keep your
personal data protected. Access of private menu requires password.
The default password for Private Menu is “0000”. You will be able to
change the password under the Private Menu.
To start using
1. First, please plug in the earphone.
2. From main menu, choose FM Radio.
3. You can press option, then record to record the FM radio.
4. You can press the Navigation Up / Down Key to adjust the volume.
5. Press the Navigation Left / Right Key to search previous/next available
FM station.
Your phone provides the following selections for your option:
• Channel list: Allows you to bookmark up to 9 radio stations by
entering the channel name and frequency. You can have quick
access to 9 radio stations by Numeric Key. You are allowed to
play, delete or edit a selected radio station frequency.
• Manual input: Allows you to key in the radio station frequency
manually.
• Auto Search: Allows you to auto scan the radio station and the
station searched will be memorized in the channel list.
• Settings: Allows you to change the settings of background play,
loudspeaker and auto search.
• Record: Allows you to record your favorite programs.
• Append: Allows you to resume the file you have recorded and
continue to record at the same file.
• File List: Allows you to list the radio program you have recorded.
You may send the file to your friends.
JAVA
Allows you to choose games or applications on your mobile phone.
Games and applications can be downloaded from H Life menu.
Calendar
This feature allows you to keep track of your schedule and tasks saved
in the calendar. You can also switch on the alarm with the task for
reminding.
To make a note and reminder in Calendar for the first time:
1. In Organizer menu, choose Calendar.
16
Page 18

Azzan alarm
Azzan alarm feature is designed for Muslim prayers.
You can set Fajr alarm, Zuhr alarm, Asr alarm, Maghrib alarm and Isha
alarm by selecting Azaan alarm.
World clock
You can view the local date and time via selecting the GMT and city.
When the cross points out a certain city, it will show the local date and
time.
Alarm
This function allows you to set the alarm to ring at the time specified.
The alarm clock works even when the phone is switched off.
1. In the Organizer menu, choose Alarm.
2. Select Edit to set alarm time. First, you should turn it on.
3. To set the alarm, directly input the hours and minutes via the
Numeric Keys.
4. Choose Once / Everyday / Custom in Repeat option for your
ring mode.
5. After you finish all the settings above, select Done to save the
alarm setting.
Calculator
The calculator applies simple calculator function such as addition,
subtraction, multiplications and division.
File manager
You can also view, edit or delete the tasks from the options under this
feature. For the first-time user, you will need to follow the steps below:
1. Select Add in the Task List.
2. Edit your File manager by entering date, time, subject, alarm,
repeat, priority and other information.
3. You can choose to turn the alarm on as the reminder.
4. Select OK and Yes to save your task.
2. Select a day in the calendar.
3. Select Options > View to view the event. You can press Add
event to add a new event.
4. Input the start and end time of your event, and describe the event
contents in Subject and Details, after you finish editing the contents
of your event, select Options > Done to save your description.
5. Choose Alarm clock to turn on or off.
6. Choose Once / Everyday / Custom / Weekly / Monthly
/ Yearly in Repeat.
7. Then you can edit other information.
8. Press Done to save the event.
17
Page 19

Unit Converter
This feature helps you to convert either weight or length to a different unit.
Currency converter
First, you should enter the rate, and then enter the local data.
Press the OK key, and the foreign data conversion will be
shown automatically.
Ebook reader
This feature allows you to read Ebook saved in the phone.
Press Left Soft Key [Options] to following submenus:
Clean up bookshelf: Allows you to clean the bookshelf.
Global settings: In global settings, you can set the Font size, Scroll by,
Auto scroll, Scroll speed, Full screen, and Alignment.
Zakat calculator
Zakat calculator is a kind of special calculator designed for Islam. This
calculator will show the Zakat that is due on you. It should work with
any currency i.e. Dollars, Pounds, Rupees etc.
Stopwatch
This function is designed to store the timepiece, which is to start or stop
for exact timing.
To use stopwatch
1. From the main menu select Organizer > Stopwatch.
2. Select Typical stopwatch. You can choose different record
methods and view records.
• Split Timing: When you select this, the timepiece will be saved
and continue to count when you press Split. The 2nd timepiece
is recorded based on the continuous timing. You can stop and
resume anytime.
• Lap Timing: When you select this, the timepiece will be saved
and start the new timing when you press Lap. The 2nd timepiece
is recorded in new timing. You can stop and resume anytime.
• View records: You can view those timepieces you have recorded
or delete the records.
3. Select nWay stopwatch. You can make four records by pressing
the Navigation Key.
Notes
This function allows you to make note list as reminder.
To create a note:
1. In Organizer menu, choose Notes.
2. Touch Add to create a new note.
3. Edit the note details.
4. After you finish editing the contents of your note, touch Options >
Done to save.
18
Page 20

File Manager
In this menu, you can manage the contents you have downloaded.
Two storages Phone and Memory Card will be displayed:
Internet
Services described in the following are supported by your service
provider. If you cannot connect either one of those services, you might
contact with your service provider for further information.
Internet service
Your phone supports WAP browser. You can obtain various services
such as up-to date news, weather, sport, and other information as well
as other Internet services. These services are designed and maintained
by WAP service providers.
Homepage
To access the browser from standby mode, go to WAP in Services and
select Homepage. Once connected, the homepage is displayed. The
content depends on the service provider. To exit the browser, press the
End Key.
You can set the homepage address in Internet > Internet service >
Settings > Homepage.
Bookmarks
You can use this menu to save URL addresses to quick access WAP
pages.
Input Address
You can key in the URL address. After the address is entered, you may
select the URL and select Options > Go to to connect next time.
Last web address
Press to access the last web address you visited.
Recent Pages
You can view the recent pages you have visited.
Stored pages
Press to view the pages that you have stored.
Settings
Allows you access more browser settings here.
To check files saved in the File Manager
1. From the main menu, select File Manager. You may see one
more drive named Memory Card if you insert Micro SD Card in.
Scroll to the menu to Phone and press Options to open options list.
Notes:
1. To activate WAP service, you may need to contact your service provider.
2. Do not switch the phone on when the wireless phone use is prohibited or
when it may cause interference or danger.
19
Page 21

Data account
You can access WAP via GPRS Network. To get the analogue number,
ISDN number information or the access point of GPRS, you may need
to contact your operator for the service.
Settings
Profiles
Your phone provides 5 different pr ofiles, including General, Silent,
Meeting, Outdoor and My style profiles.
To activate a Profile
1. In Profiles menu, select a profile.
2. Select Options > Activate.
To edit the Profile
You can customize Profile settings to meet your preference.
1. In Profiles menu, select a profile.
2. Select Options > Customize.
Display settings
This feature allows you to personalize your display setting through
following options:
• Wallpaper: Allows you to change wallpaper displayed on the idle screen.
1. In Settings menu, choose Phone settings > Display >
Wallpaper.
2. Choose User defined, select one image from File manager.
3. Or choose System and press OK.
• Screen Saver: Allows you to play different screen savers.
The waiting time is from 5 sec. to 1 min. after activated.
• Show operator name: Set On or Off. When On, the operator
name will be displayed on the screen.
• Show owner number: If it is on, owner number will be shown in
standby mode.
• Power on display: Allows you to set power-on animation from
system or file manager.
Please contact your operator.
STK
Notes: The submenus of this feature depends on the operator and different
operators may provide different services, which cannot be modified.
Notes: If you customize the alert type, the indication icon may be changed.
The Headset profile can only be activated when the headset is plugged in.
The Bluetooth profile can only be activated when the Bluetooth headset
is connected.
License manager
In this content, you can see your Licence list, status and advance options.
20
Page 22

Pref. input method
This menu allows you to set your prefer input method here.
Greeting text
This function indicates the message when you power on in main screen
display. You may edit any message for your welcome note.
Shortcuts
This function allows you to set the shortcuts feature.
Auto update time
You can set on or off.
Misc. settings
You can choose to switch signal LED on or off.
Date and Time
This function allows you to set your home city, view and change the
time and date settings in your phone.
You can also set time format here.
You can set Auto update time on or off under this menu.
Phone Settings
Schedule power on / off
You are allowed to schedule the power on and off time for 4 different
time settings.
Language
This phone allows you to set a language for the display in this phone.
In Settings menu, choose Phone settings > Language.
Notes: The option of Automatic depends on your service provider and
languages supported by your phone. If you select Automatic, your
phone will auto detect the language supported by your SIM and phone.
• Power off display: Allows you to set power-off animation from
system or file manager.
• Show date and time: If it is on, date and time will be shown in
standby mode.
• Screen switch effect: Allows you to set the screen switch effect.
The screen switch effect can be None, Normal, or Best.
• Clock type: You can set clock type as Analog or Digital.
• LCD backlight: This menu allows you to set the LCD backlight
brightness and time.
21
Page 23

Connection Settings
Here you can search the network, set your preferred network, change
the GPRS connection.
Bluetooth (BT)
Your phone is designed to be compliant with Bluetooth technology.
Bluetooth technology enables wireless connections between electronic
devices. The Bluetooth connection can be used to listen to stereo
music, send images, video, texts and vCards.
Conn. Management
This menu allows you to manage network connection.
Network settings
Here you can search the network, set your preferred network, change
the GPRS connection.
Security settings
This function allows you to activate password to protect your phone
against unauthorized use.
Your phone provides the following selections for your option:
Call settings
• Caller ID: Allows you to either send or hide your ID during calling or
sending out the message. Your phone is defaulted in Set by network,
which means your ID is determined by your service provider.
• Call Waiting: Allows you to enable call waiting function.
• Call Divert: Allows you to set the call condition by which calls are
diverted to another number.
• Call Barring: Allows you to restrict incoming calls and outgoing
calls from your phone.
• Line switching(Line1/ Line2): This is a network service to select
phone line 1 or 2, which is the subscriber number for making calls.
• Auto redial: If it is on, your phone will make a maximum attempts
to connect the call after an unsuccessful call attempt.
• Call time reminder: Allows you to set a time reminder during a call.
• Auto quick end: Allows you to activate or deactivate auto end.
You can also set the time when a call will be ended automatically.
• Reject by SMS: Allows you to set it on or off. If it is on, you can
reject a call by sending a message when receiving an incoming call.
• Connect notice: Allows you to set connect notice on or off. If it is
on, you can hear a notice sound when a call is connected.
• Answer mode: Select to set any key answer mode, some profiles
do not support this function.
• Background sound: You can set a background sound to be
played during conversations.
22
Page 24

Phone security
You can switch on or off to activate the phone lock function to protect
your phone. If you switch phone lock on, you need to enter the
password to set the request on. The default password is 0000. You can
also choose Change password to change the phone password.
Auto keypad lock
This allows you to lock the phone’s keypad to prevent accidental key
pressed. In Auto keypad lock sub menu, select the time, and press OK.
Certificate manager
Select to view, delete, or set the key usage.
Restore factory settings
This function allows you to reset the most of the phone setting to the
original setting when it is produced. The phone lock password is
needed to access this function.
USB Features
USB mass storage
You can use the internal memory in the phone, or an external memory
card inserted in the phone, as external storage. When user selects USB
mass storage, with the USB cable connected to a PC, the PC will auto
detect the phone as an external drive. Users can access the internal or
external memory on the phone.
General Information
Accessories
There are various accessories for your mobile phone. Your pack includes
standard battery x 1, charger x 1, and headset x 1<as gift>. Please note:
• Headset is not a standard accessory in this mobile. It will be taken
as a gift for end user. Please use it properly to enjoy the music and
answer the phone under earphone mode.
• Use only accessories and charging devices approved by the phone
manufacturer otherwise you would risk serious damage to health
and property.
• Failure to do this may invalidate your warranty.
• Accessories may be different in different regions.
Security settings
• PIN Lock: This function allows you to lock the phone with a specific
SIM card. The feature is designed to prevent the use of your SIM
cards by means of another person’s phone if your SIM cards lost.
You can switch on or off to activate the PIN Lock function.
• Change PIN: Allows you to change PIN password.
23
Page 25

GPRS / EDGE
Note, Only download supports EDGE and upload supports GPRS.
Charger attention
Attention: Please check the model of charger before using with this
mobile phone. This mobile phone is intended to use when supplied
with power.
Warning: Only use batteries, chargers, and enhancements approved by
service hall with particular models. Using any other types of batteries,
chargers and enhancements will invalidate the approval or warranty,
and may be dangerous. Please check with your dealer for availability of
approved enhancements. Please grasp and pull the plug, not the cord
when you disconnect the power cord of any enhancement.
Battery Care
Your phone is powered by a rechargeable battery.
• The operation voltage range of the phone battery is 3.6 V - 4.2 V.
• The battery can be charged and discharged hundreds of times but it
will eventually wear out. When the operating time (talk and standby)
is noticeably shorter than normal, you should buy a new battery at
the time.
• Unplug the travel charger when not in use, and don’t leave the
battery connected to a travel charger for longer than a week, since
overcharging may shorten its lifetime.
• Overcharging may shorten its lifetime, and if left unused a fully
charged battery may discharge itself over time.
• Never store or charge battery in extreme hot or cold temperature,
since extreme temperature can shorten the life of your mobile
phone and damage battery.
• Use only the charger and batteries that are approved for use or
recommended by the manufacturer. Use any unqualified charger or
batteries may cause damages to your mobile phone.
• Use the battery only for its intended purpose.
• Do not leave the battery inside of your car of in extreme weather
conditions, since extreme temperature might cause damage to your
battery.
• Do not short-circuit the battery. Short-circuiting the terminals may
damage the battery or the connecting object.
• Dispose of used batteries according to local regulations or
manufacturer’s instructions. Do not dispose of batteries in a fire.
• Actual battery life will depend on network configuration, product
settings, usage patterns, battery and environmental conditions.
CAUTION: RISK OF EXPLOSION IF BATTERY IS REPLACED BY AN INCORRECT
TYPE. DISPOSE OF USED BATTERIES ACCORDING TO THE INSTRUCTIONS.
24
Page 26

Care and maintenance
Your mobile phone is a highly sophisticated electronic device. Please
read this information before using your mobile phone. If any device is
not working properly, take it to the nearest authorized service center.
Product Care
• Keep your mobile phone and all of its parts out of young
children’s reach.
• Keep your mobile phone dry. Precipitation, humidity, and all types
of liquids or moisture can contain minerals that will corrode
electronic circuits.
• Avoid exposing your mobile phone to extreme hot or cold
temperatures. The temperature range for using the phone is
0°C - 40°C.
• Avoid placing your mobile phone close to lit cigarettes, naked
flames or any heat source.
• Do not attempt to disassemble it. Only qualified personnel may
install or repair your mobile phone.
• Do not drop, knock or shake your mobile phone. Rough handling
can break internal circuit boards.
• Do not paint your mobile phone. Paint could obstruct the
earphone, microphone or any movable parts and prevent proper
operation.
• Treat your mobile phone with care and keep it in a clean and dust
free place.
• Do not use the phone if the antenna is damaged. If a damaged
antenna contacts skin, it may cause a light burn. Please contact the
nearest authorized service center to replace the damaged antenna.
• Use chargers indoors.
• Your mobile may have internal and external antennas. As with any
radio transmitting device, avoid touching the antenna area
unnecessarily while the antenna is transmitting or receiving.
Contact with such an antenna affects the communication quality
and may cause your mobile to operate at a higher power level
than proper operation needed and may reduce the battery life.
• Avoid using the phone at an altitude higher than 3000 meters.
25
Page 27

Important Safety Information
Access Codes
PIN code
The Personal Identification Number (PIN code) protects your SIM card
against unauthorized use. Your SIM card usually supplies the PIN code.
The password can be obtained from your service provider. If the incorrect
PIN code occurred three times in succession, you may need to key in PUK code.
PUK code
The Personal Unlocking Key (PUK code) is required to change a blocked
PIN code. The password can be obtained from your service provider. If
incorrect PUK code occurred for ten times in succession, then SIM card
cannot be used anymore. You might need to contact your service
provider for a new card.
Phone code
Phone code protects the phone against unauthorized use. It is not
enabled when you buy the phone. You can change the phone code
(0000) to any four to eight-digit personal codes.
Radio frequency energy
Your mobile phone is a radio transmitter and receiver. When the phone
is turned on, it receives and transmits radio frequency (RF) energy.
Depending on the type of mobile phone you posses, it operates on
different frequency ranges and employs commonly used modulation
techniques. The system handles your call when you are using your
phone and it also controls the power level at which your phone transmits.
Pacemaker
Mobile phones may affect the operation of some implanted cardiac
pacemakers and other medically implanted equipments. Pacemaker
manufacturers recommend that a minimum separation of 20 cm
(6 inches) should be maintained between a hand-held wireless phone
and a pacemaker to avoid potential interference with the pacemaker.
These recommendations are consistent with independent research by
the Wireless Technology Research Association.
Hearing aids
Some hearing aids might be disturbed by mobile phones. In the event
of such disturbance, you may want to consult your service provider, or
call the customer service line to discuss alternatives.
Aircraft
• Turn off your mobile phone before boarding any aircraft.
• Do not use it on the ground without crew permission.
To prevent interference with communication systems, you must not
use your mobile phone while the plane is in the air.
Currency converter 18
Stopwatch 18
Ebook reader 18
Zakat calculator 18
File Manager 19
Internet 19
Internet service 19
License manager 20
STK 20
Settings 20
Profiles 20
Display settings 20
Date and Time 21
Phone Settings 21
Call settings 22
Connection Settings 22
Security settings 23
Phone security 23
Auto keypad lock 23
Certificate manager 23
Restore factory settings 23
USB Features 23
USB mass storage 23
General Information 23
Accessories 23
GPRS / EDGE 24
Battery Care 24
Charger attention 24
Care and maintenance 25
Product Care 25
Important Sefety
Information 26
26
Page 28

Potentially explosive atmospheres
Switch off your phone when in any area with a potentially explosive
atmosphere and obey all signs and instructions. It is rare, but your
phone or its accessories could generate sparks. Sparks in such areas
could cause an explosion or fire resulting in bodily injury or even death.
Areas with a potentially explosive atmosphere are often, but not
always, clearly marked. They include fuelling areas, such as petrol
station, below deck on boats, fuel or chemical transfer or storage
facilities, and areas where the air contains chemicals or particles, such as
grain, dust, or metal powders, and any other area where you would
normally be advised to turn off your vehicle engine.
Driving
Check the laws and regulations on the use of mobile phones in the
areas where you drive. If you are going to use your phone while driving,
please:
• Give full attention to driving.
• Use the “handsfree” setting. (Required by law in many countries.)
• Pull off the road and park before making or answering a call if
driving conditions require.
RF energy may affect some electronic systems in motor vehicles such
as the car stereo, safety equipment etc. In addition, some vehicle
manufacturers do not allow use of mobile phones, unless the installation
is supported by a handsfree kit with an external antenna in their
vehicles. Check with your vehicle manufacturer’s representative to be
sure that your mobile phone will not affect the electronic systems in
your vehicle.
Emergency calls
Important:
This phone, like any wireless phone, operates using radio signals,
wireless and landline networks as well as user programmed functions.
Because of this, connections in all conditions cannot be guaranteed.
Therefore, you should never rely solely upon any wireless phone for
essential communications (e.g. medical emergencies).
Emergency calls may not be possible on all wireless phone networks or
when certain network services and/or phone features are in use. Check
with your local service provider.
27
Page 29

 Loading...