

Page 1
GPS Orientation Smart Sport Watch
Peruse Before Use
Table of Contents
User Manual
Page 2
Thank you very much for purchasing our
product.
To ensure correct use of the product,
please
peruse this manual before use.
Keep the manual properly for convenient use at all times as required.
The protection film affixed on the product, as in most cases, must be
removed before use.
When used with the film remaining on, stain or rust may occur due to
adhesion of sweat, dust or dirty water.
1
Copyright ©2016 GOYOURLIFE INC.
1
Peruse this manual before use
※
Page 3
2
Copyright ©2016 GOYOURLIFE INC.
Precautions on using the product
PrecautionsWarning
●
Avoid using or storing GoWatch in any of
the following places
■
Where vapors of volatile products ( e.g.
nail polish remover, pesticide, etc. ) exist.
■
Where temperatures exceeding the range
of -10 °C ~ 60 °C on a long-term basis.
■
Where subject to magnetic field or
electrostatic effect on a long-term basis.
●
Other precautions
■
Do not dismantle or modify watch or any
component.
■
Do not let children handle GoWatch, to
prevent them from swallowing it, injury or
allergic reaction.
■
Used battery must be disposed of according
to local regulations.
●
In the event of allergy or macula
※ Stop use and seek medical care
immediately.
●
Stop using the product in any of following
cases.
■
If the watch body or strap becomes
sharpened due to any reason.
※ Contact the store you purchased the
product from or our Customer Services
Center immediately.
●
Do not dismantle watch or remove battery
for recharge or modification.
■
Dismantling the watch requires special
expertise and battery replacement
requires correct specification ; please
allow handling by the dealer where the.
product was purchased.
※ Incorrect installation of battery may cause
fracture, over-heating or fire.
※ Improper dismantle of watch may cause it in
water and damage.
●
Keep watch away from infants.
※ In case swallowed by infant, seek
medical care immediately.
This mark indicates that incorrect
operation may result in minor injury
or material losses
This mark indicates that improper
handling may result in major injury
or severe consequences
1
Peruse this manual before use
Page 4

●
Reception of GPS signal, immediate time
adjustment automatically.
Applicable to 39 time zones and 408 cities in the
world.
About Time Zone P. 14
Activate automatic time zone P. 14
Manual time zone setting P. 14
●
Via microcomputer, current atmosphere/ altitude,
temperature and azimuth can be calculated within
the -10 °C~60 °C range.
Press [ OK ] in watch mode to switch to
Sensors screen; followed by pressing (Up)
or (Down) to switch among Atmosphere/
Altitude and Temperature. P. 29
Press [ OK ] again to switch-over to Com
pass Screen P. 30
3
Copyright ©2016 GOYOURLIFE INC.
Product Features
※ The product is a smart watch for outdoor activities featuringmicrocomputer, GPS and
3 major sensors.
-
11:00
-
7:00
-
2:00
+
6:00
+
1:00
※ GPS refers to Global Positioning System.
Three major sensors include devices for detecting atmosphere/altitude, temperature and azimuth.
CompassAtmosphere/ Altitude/
Temperature
1
Peruse this manual before use
At any location in the world, a single
press on the button is all you need
for an automatic switch-over to the
local standard time.
Built-in 3 major sensors for
detecting Atmosphere/Altitude,
Temperature and Azimuth
Page 5
Product Features
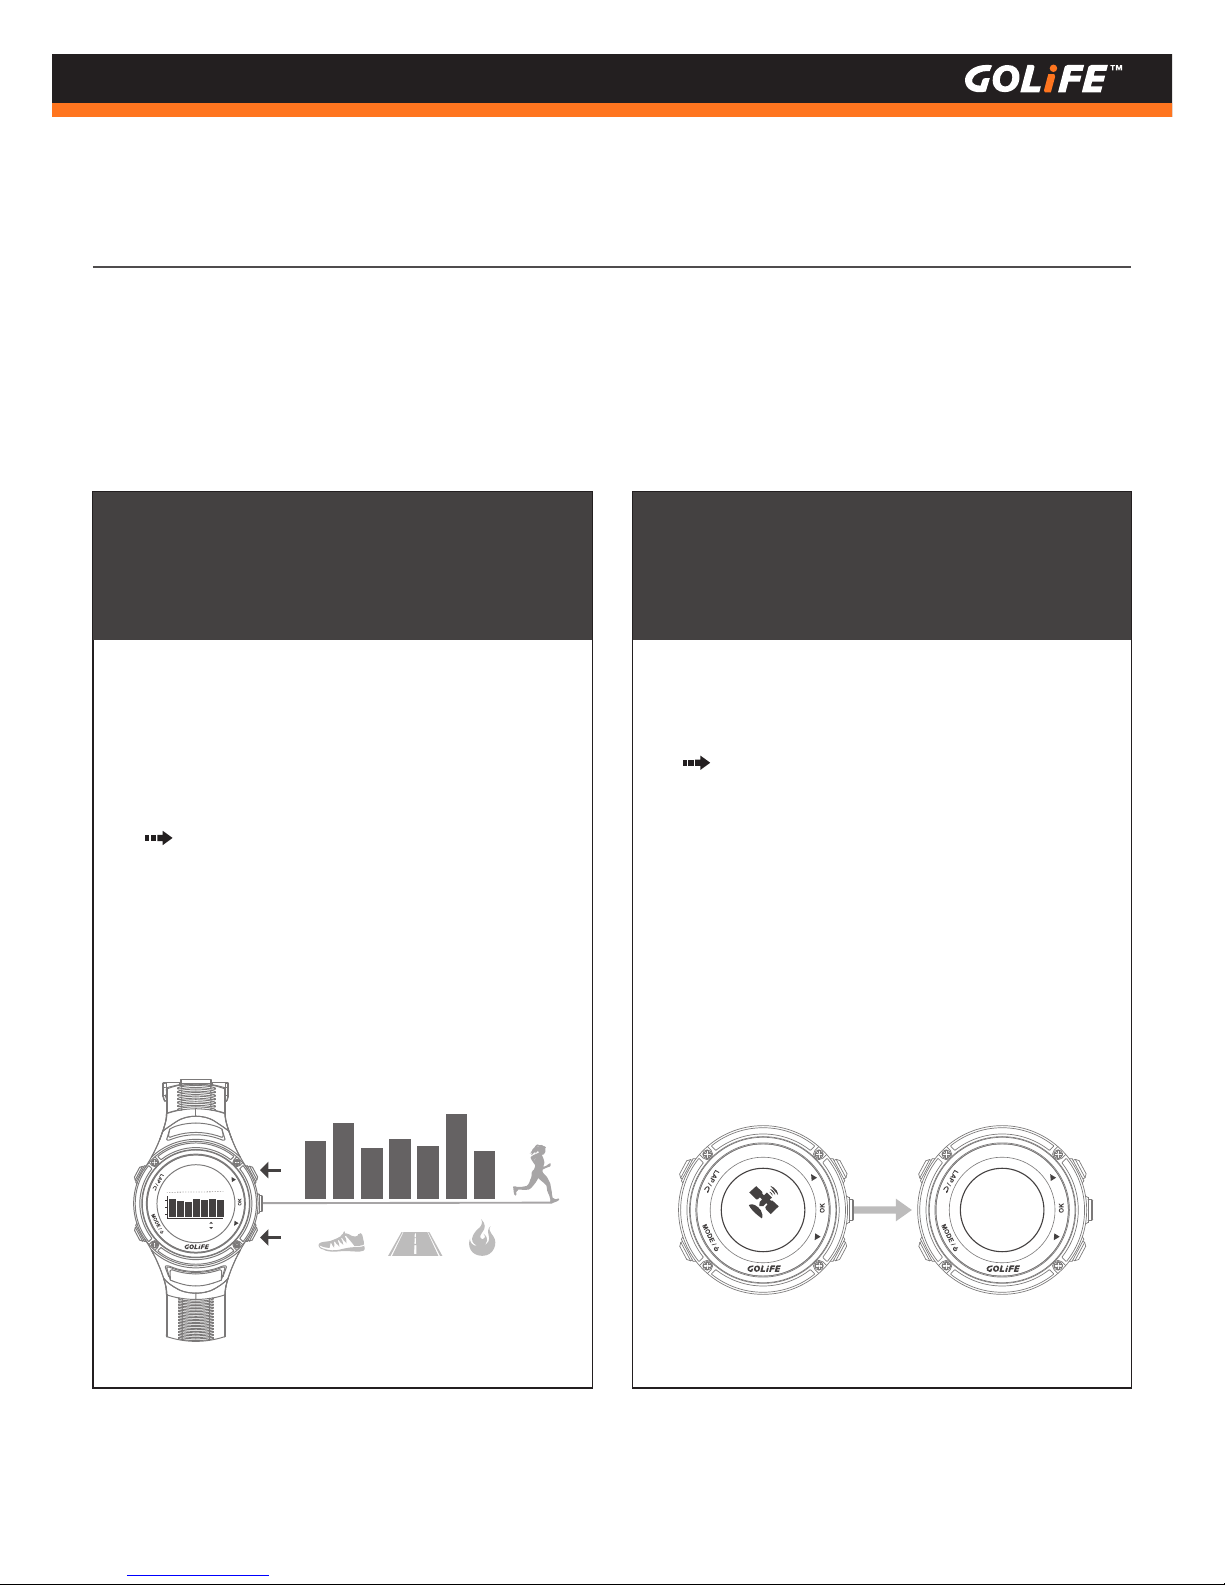
Tracing Daily Activities
Automatic tracing amount of daily activities
including paces, distance and calories.
Bar Chart showing weekly pace variation and
current week average can be displayed.
Press [ OK ] to switch to [ Daily Activity
Tracing ] screen. Followed by pressing [ Up ]
[ Down ] to switch-over between Weekly
Pace Bar Chart and Weekly Average. P. 30
4
Copyright ©2016 GOYOURLIFE INC.
●
On completion of positioning, current coordinates
are displayed at once.
Press [ OK ] to switch to real time coordinates
screen. On completion of positioning,
GoWatch displays current coordinates at
once. P.30
Real time coordinates display
※ The WGS84 format is supported for the time
being.
More formats will be supported in the future
via firmware upgrading.
Weekly Pace
20:36
WGS84
X : 121.544945
Y : 25.051655
Searching...
1
Peruse this manual before use
●
Page 6
Product Features
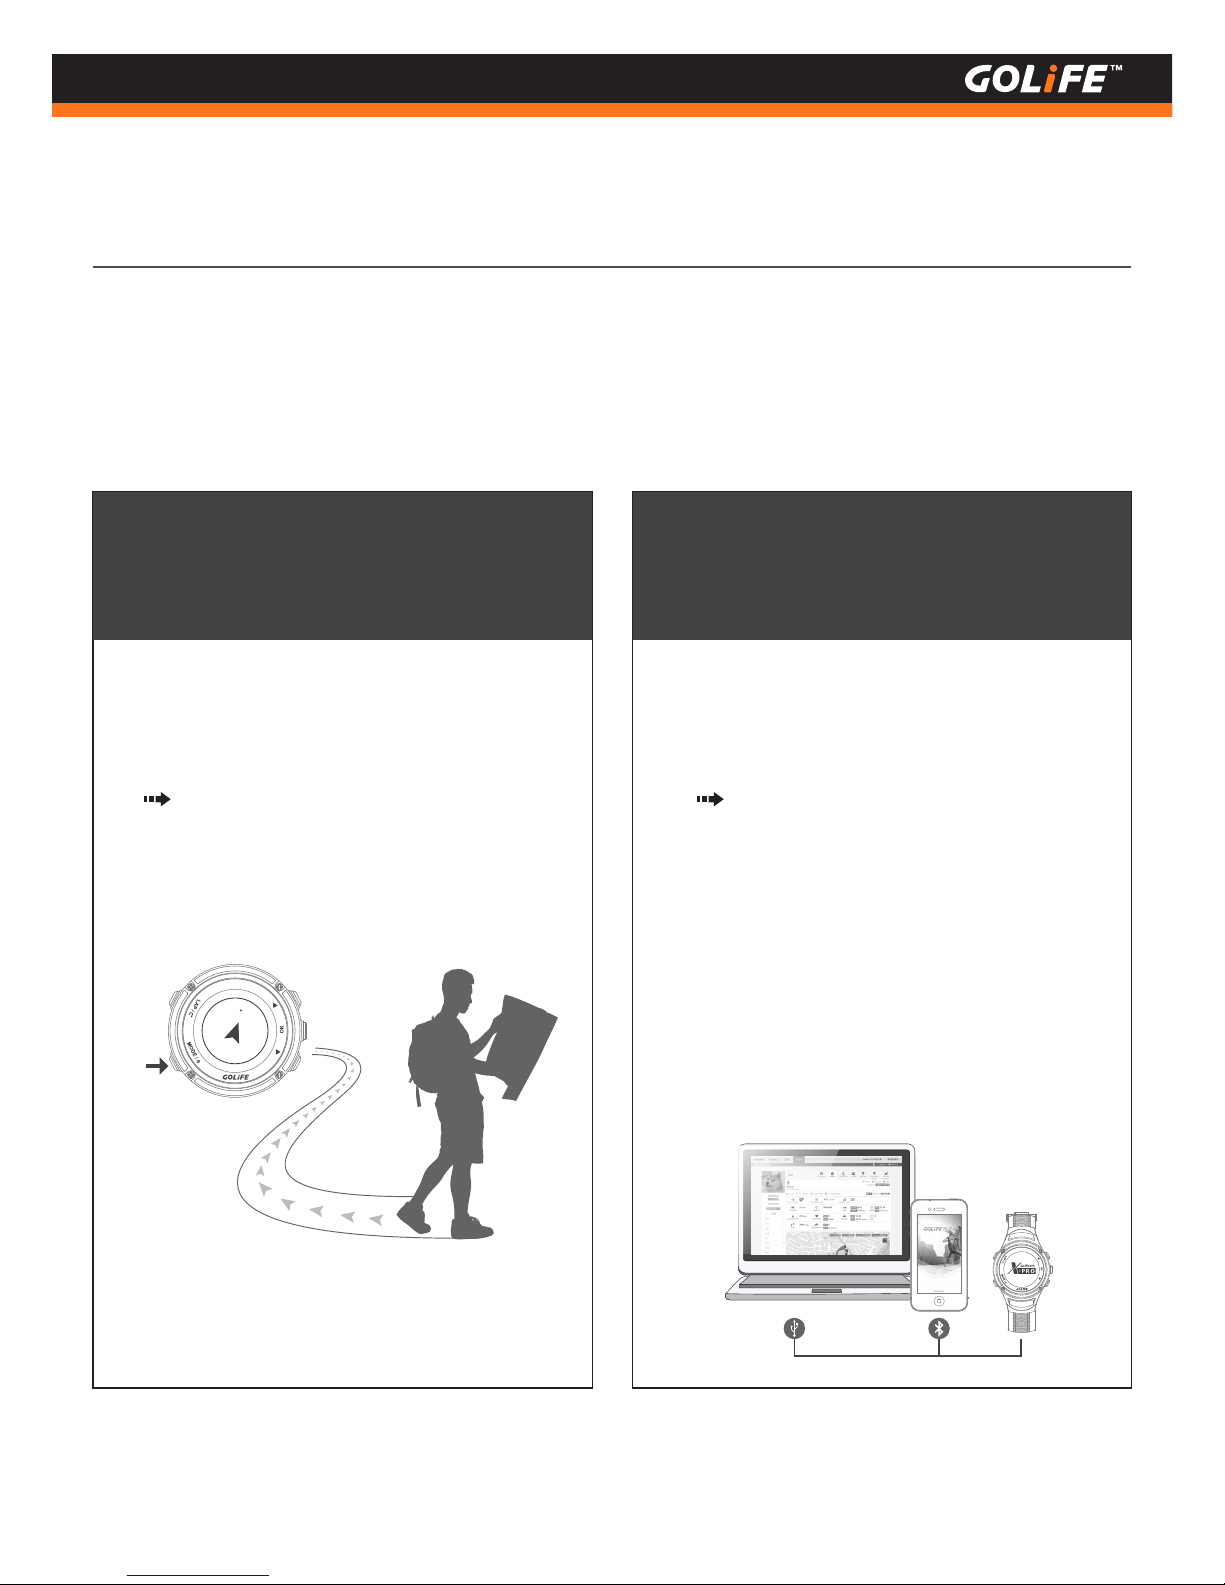
Navigate Function
●
On completion of positioning, GoWatch will act
accordingly and indicate direction and distance of its
location.
Press [ MODE ] key to enter Main Menu, select
[ Navigate ] to activate the function P. 44
5
Copyright ©2016 GOYOURLIFE INC.
Display Smart Phone prompt info in Chinese.
Use GOLiFE RUN App from Smart Phone to record
activities.
Press [ Down ] key in clock screen of daily
mode to read prompt info read from Smart Phone.
On the Smart Phone, press GOLiFE RUN App
[ Synchronize Data ] > [ Begin Syncing ] and place
X-PRO together with the phone, this will activate
synchronizing activity records to Smart phone and
the cloud service site. P. 19
Smart Phone Connection
15
25 m
Synchronize Data
●
1
Peruse this manual before use
Page 7
Initial Use of Watch
6
Copyright ©2016 GOYOURLIFE INC.
Perform calibration before initial use
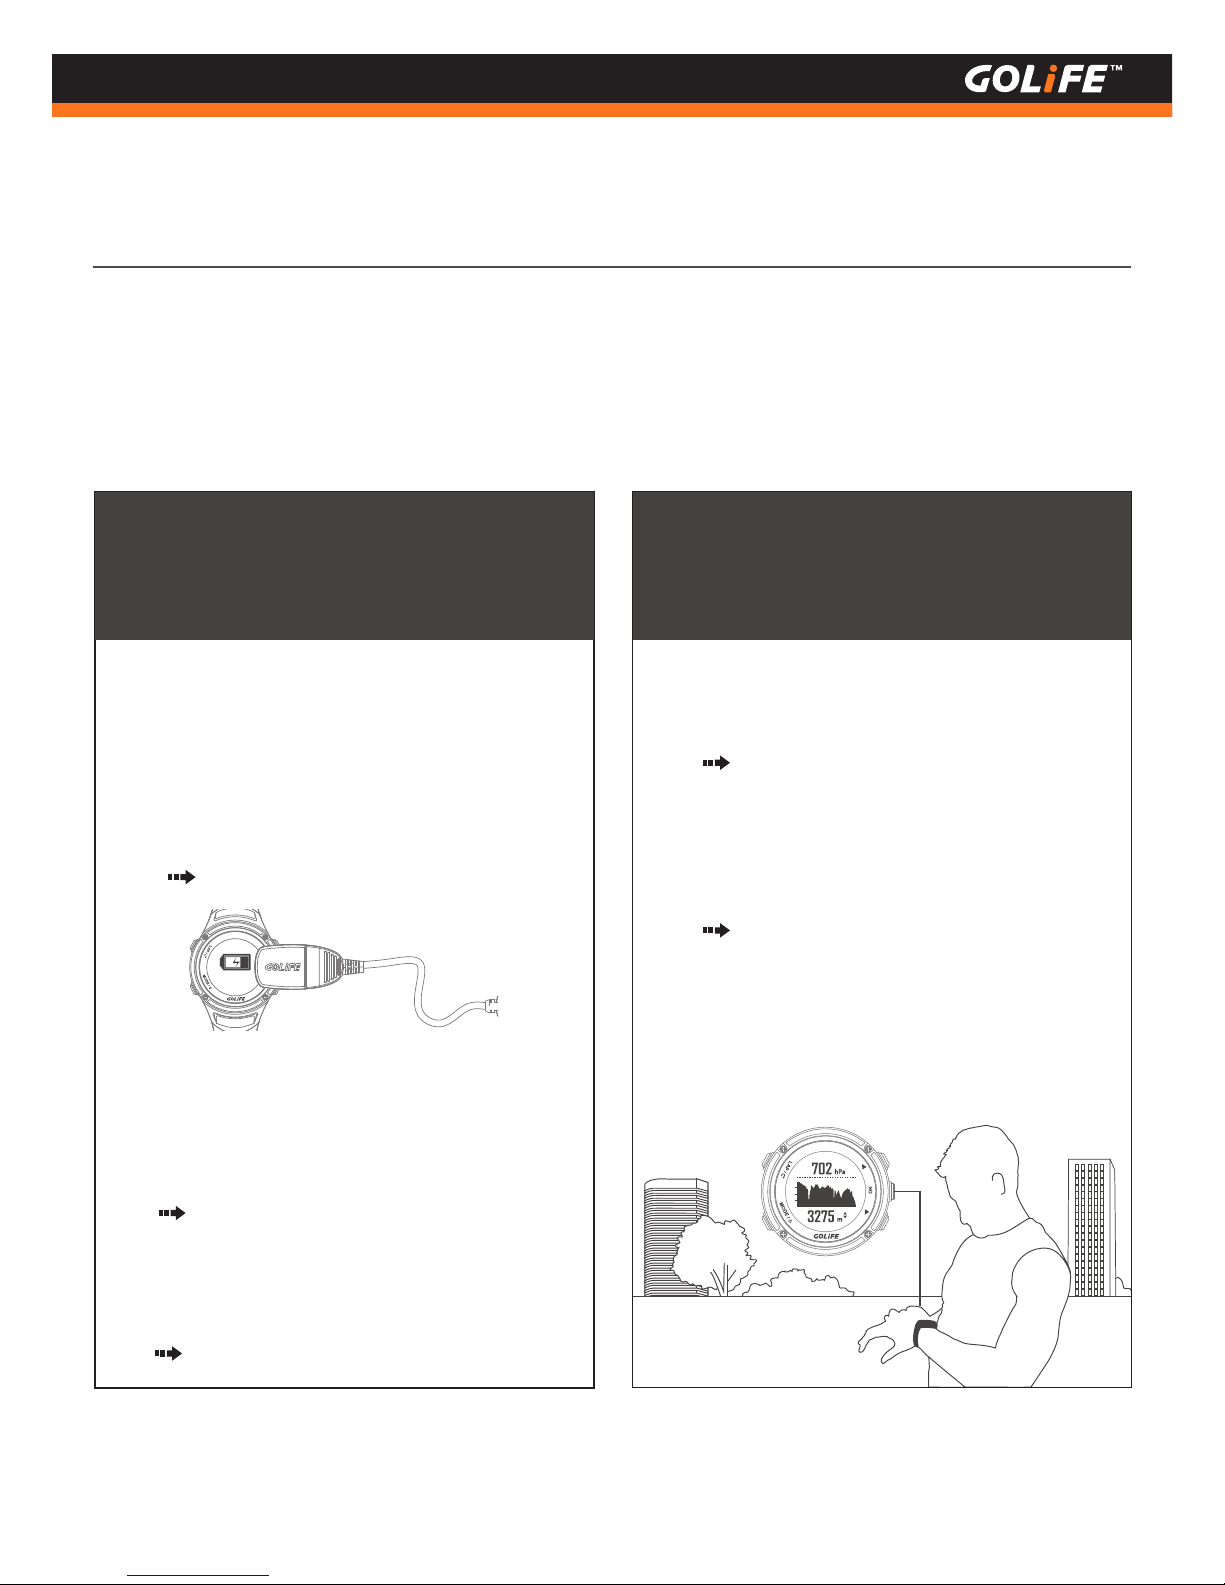
Charge your watch for initial use; get outdoors for
automatic calibration of both time and time zone.
Calibrating 3 Sensors
In addition to initial use, perform these calibration items if the product was left unused for a long
time, for ensuring the watch being ready and actual when providing respective functionalities.
※
charging
●
The watch, when bought from a shop, may be fully
discharged. Charge the watch for at least 10
minutes before putting to use.
For charging method please see P. 9
●
Perform calibration before using compass the first
time.
For calibration method please see P. 30
●
Atmosphere is subject to natural alterations in
different time and space. Calibrate the function
before using the Atmosphere/Altitude function.
For calibration method please see P. 29
●
On completion of charging GoWatch, go
outdoors where signal is stronger; press and hold
[MODE] key to switch on GoWatch and to
automatically calibrate the time and time zone.
For setting procedures after switching on
GoWatch, please see
P. 13
●
If you are indoors where positioning is not possi-
ble, or you want to manually set the time:
please see P. 14
●
1
Peruse this manual before use
Page 8

7
Copyright ©2016 GOYOURLIFE INC.
2
Table of Contents
Table of Contents
1. Peruse this manual before use ------------------------------------------------- 01
Precautions on using the product ----------------------------------------- 02
Product Features ----------------------------------------------------------- 03
Perform calibration before initial use ------------------------------------- 06
2. Table of Contents ----------------------------------------------------------------- 07
3. Before Use ------------------------------------------------------------------------ 09
Charging GoWatch -------------------------------------------------------- 09
Components --------------------------------------------------------------- 10
4. Basic Operation ------------------------------------------------------------------- 11
Basic Operation ------------------------------------------------------------ 11
Status Line ---------------------------------------------------------------- 12
Initiating GoWatch X-PRO ----------------------------------------------- 13
Time Zone Calibration ( Manual and Automatic ) ----------------------------- 14
GOLiFE RUN APP Smart Phone app (Sync and upload records via smart phone) 15
GOLiFE RUN APP Smart Phone app features ----------------------- 15
How to install GOLiFE RUN App ------------------------------------ 17
How to pair with GoWatch X-PRO ---------------------------------- 18
How to upload activity data to GOLiFE RUN App ------------------ 19
GOLiFE CONNECT ( Sync and Upload records via PC ) -------------------------- 20
How to install GOLiFE CONNECT ---------------------------------- 20
GOLiFE CONNECT Upload Instruction ----------------------------- 22
GOLiFE RUN Cloud Service Site ------------------------------------------- 23
GOLiFE RUN Cloud Service Site, features -------------------------- 23
How to use GOLiFE RUN Cloud Service Site ---------------------- 25
5. Modes and Functions ------------------------------------------------------------ 27
Modes --------------------------------------------------------------------- 27
Daily Mode --------------------------------------------------------- 28
Clock --------------------------------------------------------------- 28
Atmosphere and Altitude ( Barometer Calibration ) ------------------- 29
Compass (Compass Calibration) --------------------------------------- 30
Steps Count --------------------------------------------------------- 30
Coordinates --------------------------------------------------------- 30
Message ----------------------------------------------------------- 31
Page 9
8
Copyright ©2016 GOYOURLIFE INC.
2
Table of Contents
Start Activity --------------------------------------------------------------- 34
Activity Mode -------------------------------------------------------------- 35
Menu Mode ---------------------------------------------------------------- 37
Activity -------------------------------------------------------------- 37
GYM ----------------------------------------------------------------- 41
Stopwatch ----------------------------------------------------------- 44
Timer ---------------------------------------------------------------- 44
Navigation ---------------------------------------------------------- 44
Track/Notify ( Steps and Messages ) ----------------------------------- 44
Settings ------------------------------------------------------------- 45
Bluetooth ------------------------------------------------------------------ 52
Data sync ----------------------------------------------------------- 52
Pair ------------------------------------------------------------------ 52
Pairing Sensors ------------------------------------------------------------ 53
H.R. Monitor -------------------------------------------------------- 53
Speed and Cadence Sensor ---------------------------------------- 53
6. ANT+ Sensor --------------------------------------------------------------------- 54
Wearing a H.R. Monitor (
Option ) ------------------------------------ 54
Wearing a Speed and Cadence Sensor ( Option ) -------------------- 56
7. Precautions ---------------------------------------------------------------------- 60
Start-up setting procedures after reset ----------------------------- 60
Prolonging battery lifespan ----------------------------------------- 61
Firmware Upgrade -------------------------------------------------- 63
Precautions on Use -------------------------------------------------- 64
FAQs ------------------------------------------------------------------ 66
8. References ----------------------------------------------------------------------- 70
Daylight Saving Time ------------------------------------------------ 70
For more information ----------------------------------------------- 70
Index of Function ---------------------------------------------------- 71
Technical Specification ---------------------------------------------- 73
Page 10
9
Copyright ©2016 GOYOURLIFE INC.
3
Before Use
Charge GoWatch
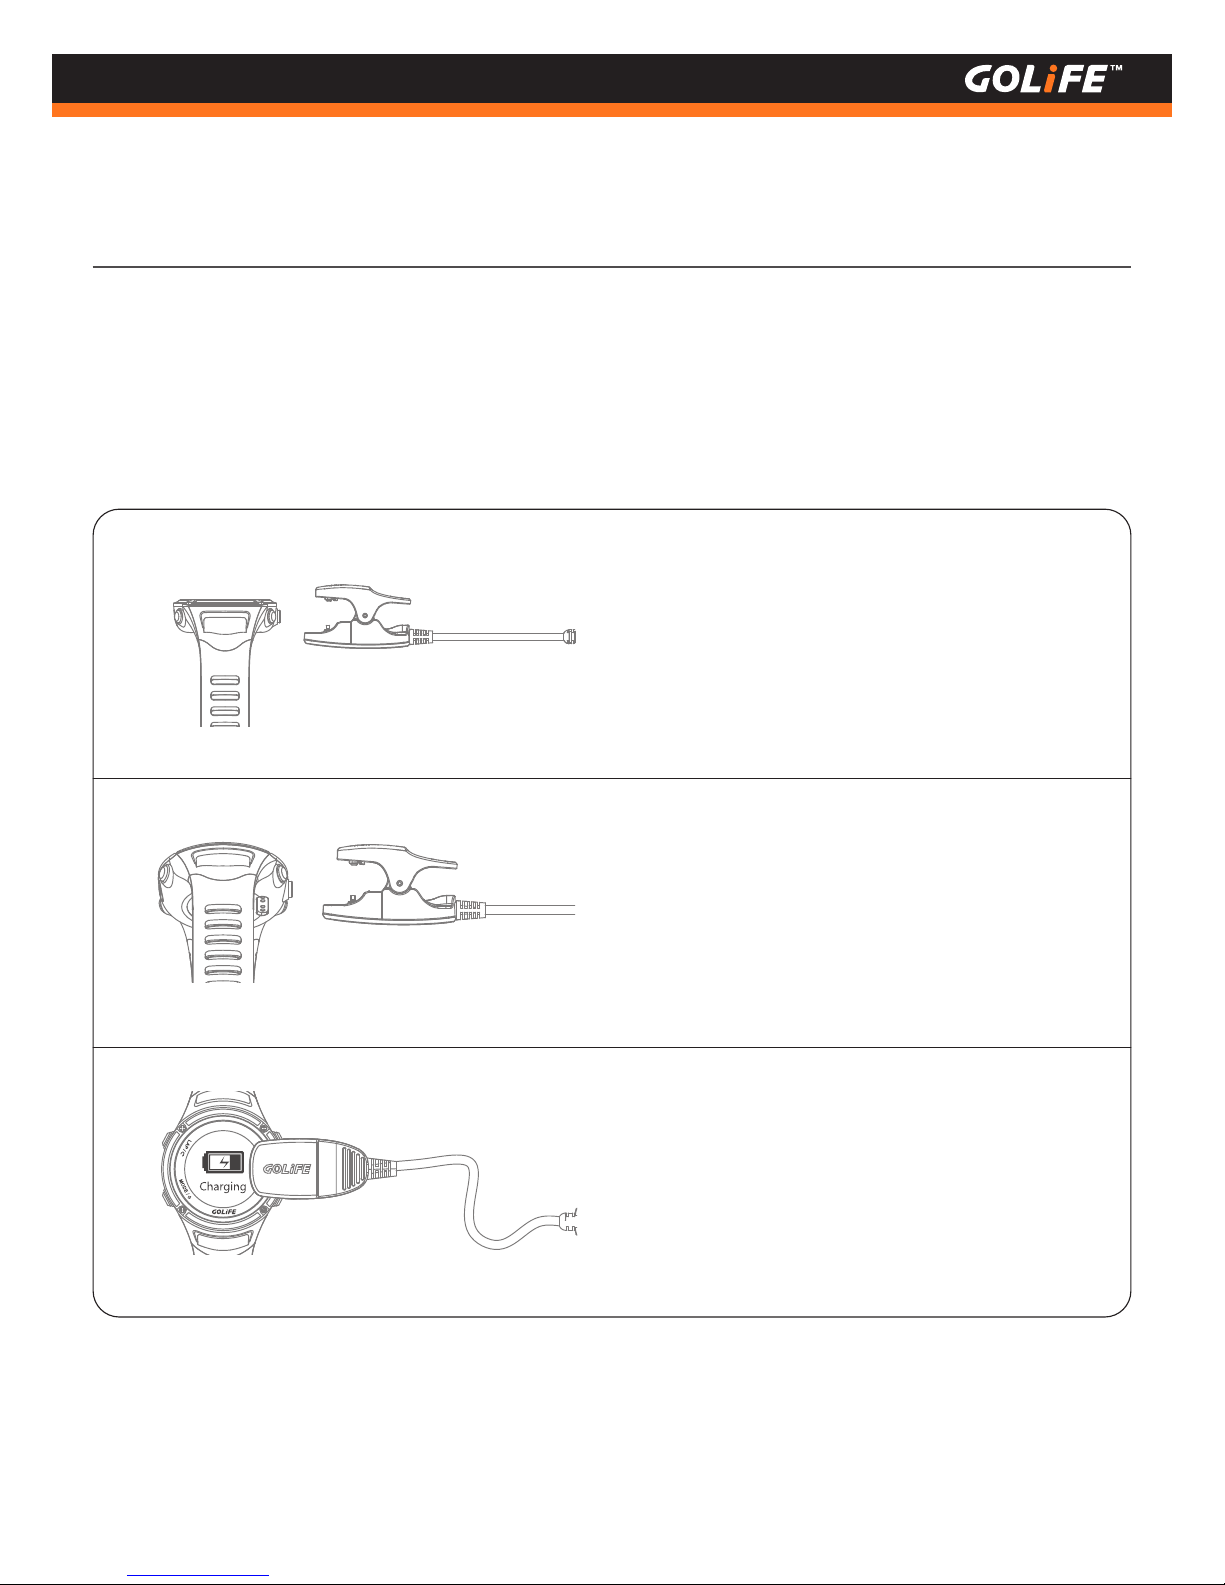
As shown in the figure, both the GOLiFE mark on
the Charge Clip and the face of watch must face
up.
●
Gently press down the tail of Charge Clip so that
the protruding pin at the front end of the clip
aligns the corresponding hole on the bottom of
watch, release the tail so that the clip is firmly
gripping GoWatch and connecting the metal
contact.
●
Connect the USB cable on the other end of
Charge Clip to PC; GoWatch will start to charge
automatically in about 2 seconds.
●
When charging GoWatch, care must be taken to prevent GoWatch from subjecting to high temperatures for a
prolonged period.
( Efforts must be made to allow GoWatch being charged within the range of working temperature, -10°C~60°C )。
※
Page 11
10
Copyright ©2016 GOYOURLIFE INC.
3
Before Use
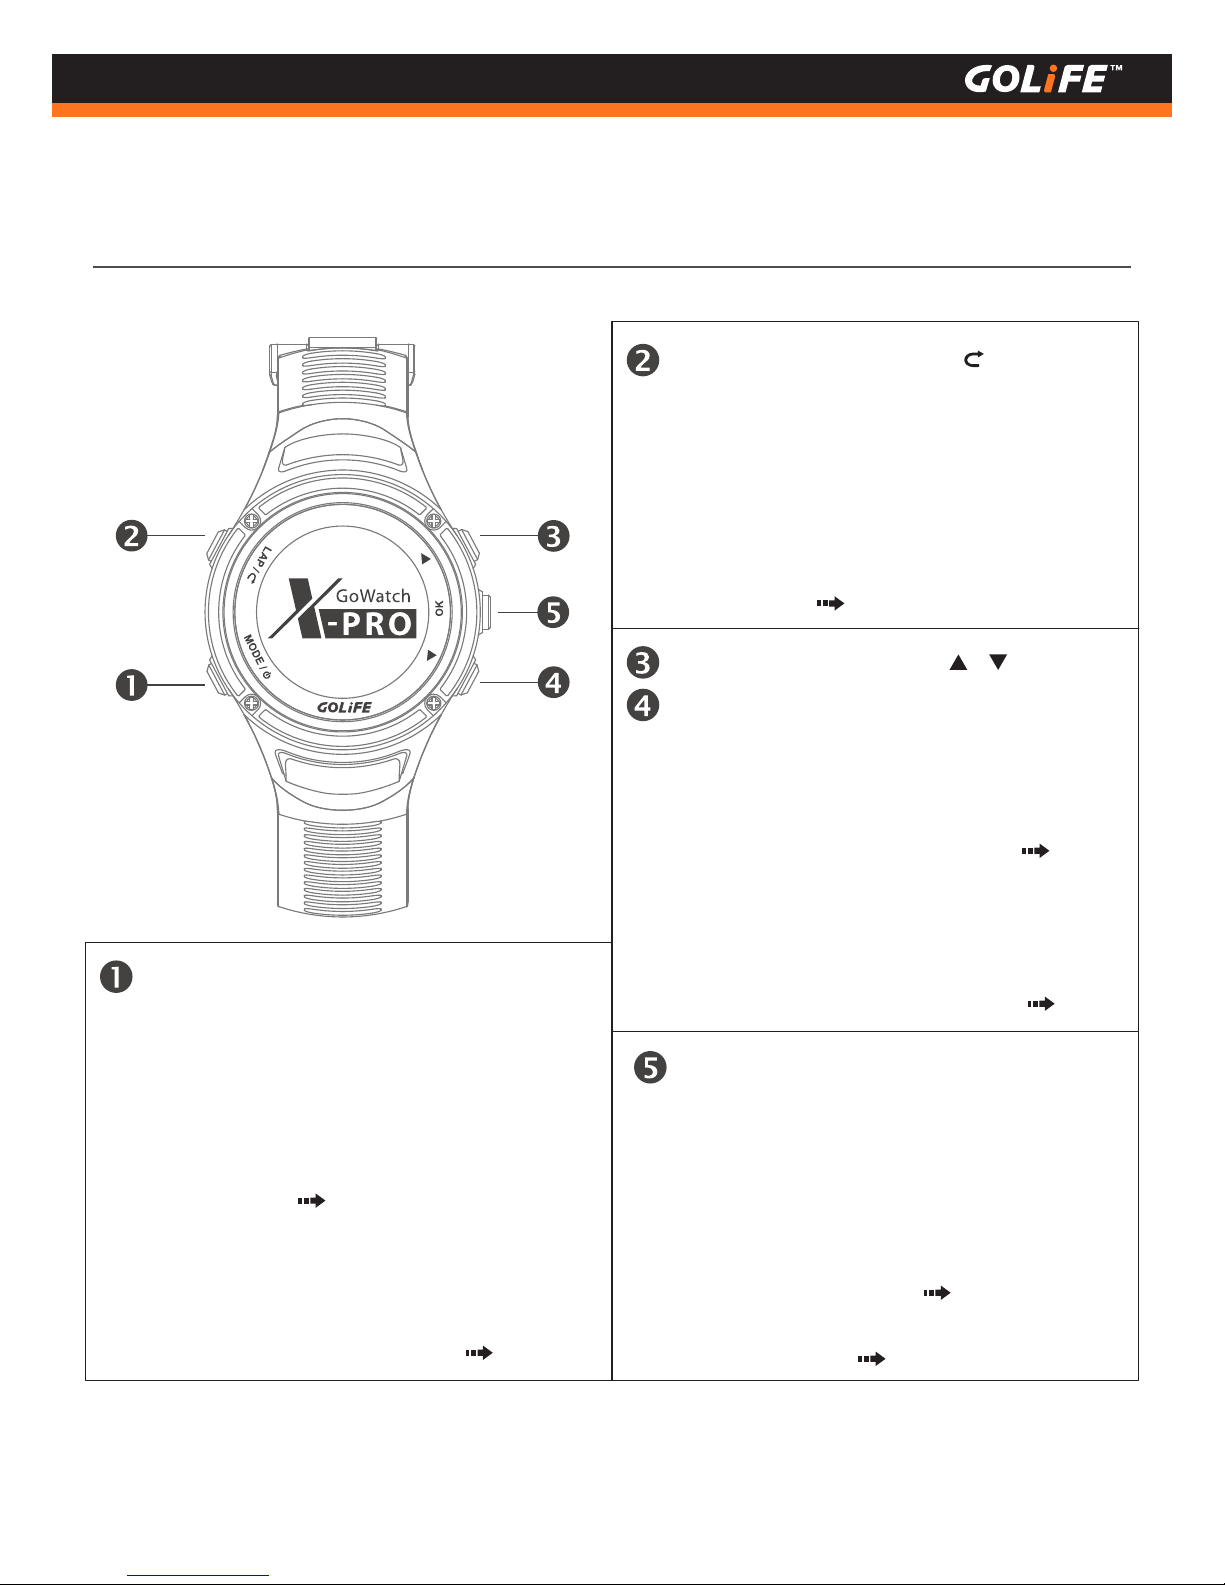
Components
●
Press this key in Menu to return to the previous
layer of menu.
[ LAP / Return ] Key ( LAP / )
●
Press and hold this key in Clock Screen of Daily
Mode to lock up GoWatch for preventing
unwanted key activation.
●
Press this key in Activity Mode to set a Lap. If
the activity is in a Pause, press the key to stop
the activity.
P. 35
[ OK ] Key
Press this key in a Menu to select the option.
●
Press this key in Clock Screen of Watch Mode
to sequentially switch-over to the 3-Sensor
screen of Atmosphere, Altitude and Tempera-
ture; the Compass screen; and the Daily
Activity Tracking Screen.
●
P. 35
See P. 27 Point 3
Press this key in Activity Record Mode starts or
stops the activity.
●
[ MODE / Power ] Key ( MODE / Φ )
●
Press to switch off/on GoWatch.
Press this key in Activity Mode to return to
Clock Screen. ( Followed by pressing [OK] Key
will switch-over to the 3-Sensor screen of
Atmosphere, Altitude, and Temperature etc.
sequentially. )
P. 11
●
Remember to end the activity before returning to
Daily Mode, otherwise the recording continues
since GPS keeps on working which leads to rapid
power consumption of GoWatch.
P. 35
※
Press this key in Menu to move to a previous or
next option. (Followed by pressing [OK] to
select.)
Press [Down] Key in Clock Screen of Daily
Mode to enter View Message screen.
Press this key in Activity Mode to view the
previous or next page (each page provides
different fields for user defined data such as
Distance, Elevation, Pace, Calorie, etc.)
[ UP ] and [ Down ] Keys ( / )
●
P. 31
P. 45
Page 12
11
Copyright ©2016 GOYOURLIFE INC.
4
Basic Operation
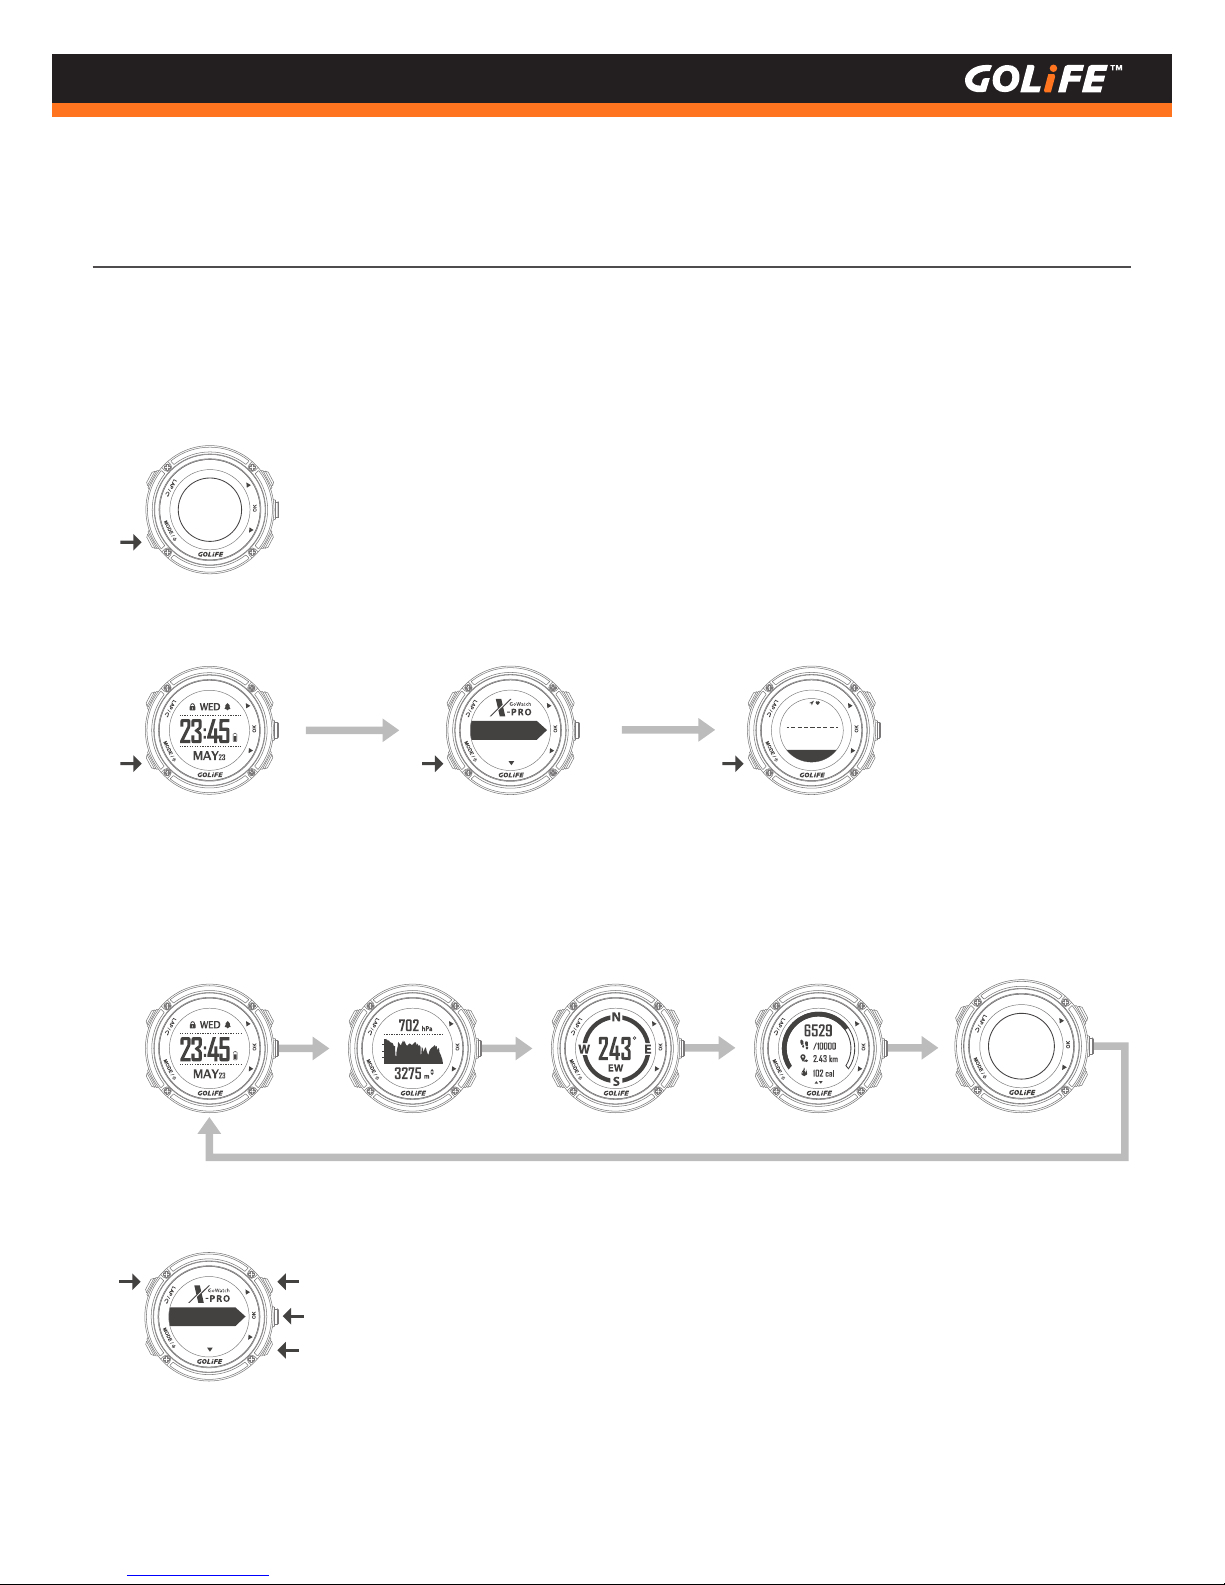
Basic Operation
Press and Hold [ MODE ] Key to switch OFF/ON.
※
Press [ MODE ] key to switch-over among 3 major modes: Daily Mode, Menu Mode, and Activity Mode.
※
※
Use [ Up ], [ Down ], [ OK ], and [ LAP ] keys to operate the menu.
In Daily Mode, press [ OK ] Key to switch-over among Clock Screen, 3-Sensor Screen ( Atmosphere/ Altitude/
Temperature ), Compass, Daily Track Screen, etc. ( Press [ UP ] or [ Down ] in each screen to switch among
different data fields. )
※
Gym
Activity
145
bpm
05:00
/km
Heart rate
Curr. pace
WGS84
X: 121.544945
Y: 25.051655
Gym
Activity
Page 13
12
Copyright ©2016 GOYOURLIFE INC.
4
Basic Operation
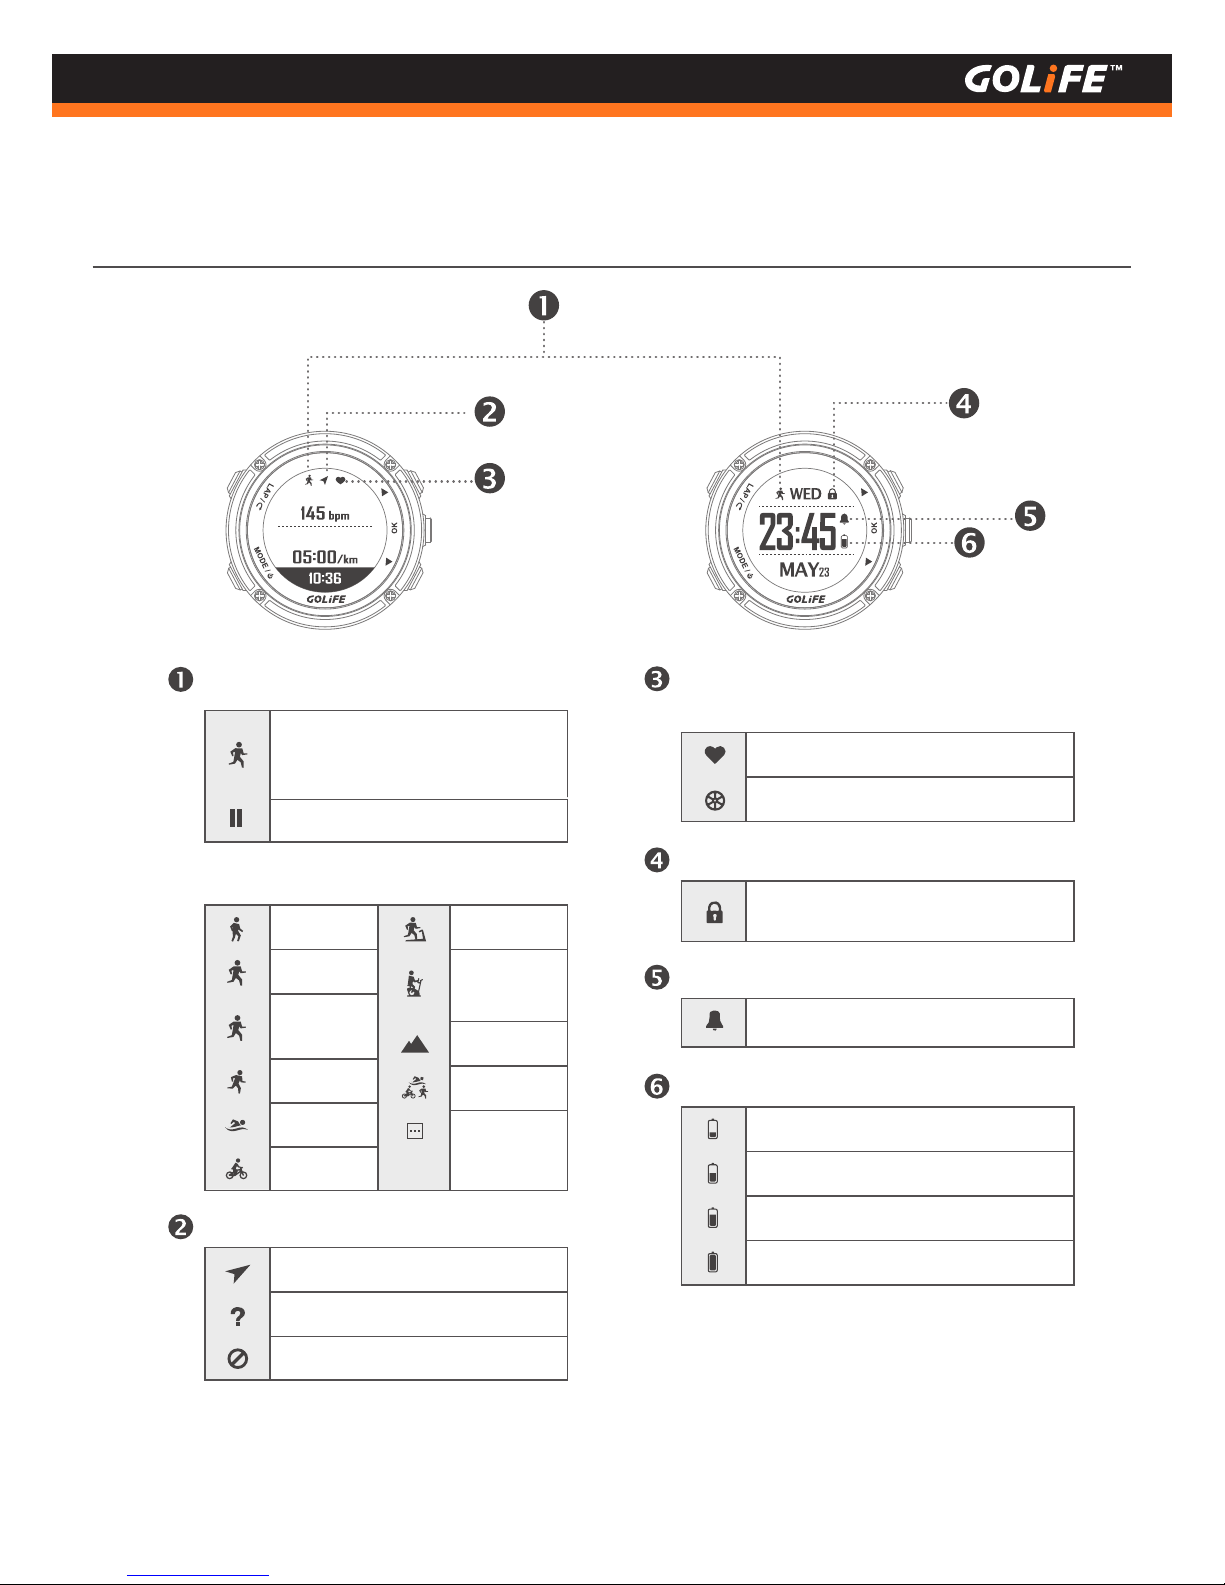
Status Line
Heart rate
Curr. pace
In Activity Record (Depending
on type of exercise)
In Clock Function, this Icon flashes
Pause the record
Exercise Record Status
Type of Exercise
Walk Indoor Run
Run
Half
Marathon
Indoor
Cycling
Marathon
Hiking
Swimming
Triathlon
Cycling
Other
GPS Status
Positioning OK
Not positioned
GPS Off
Battery Status
Battery near depletion
Power 50%
Power 75%
Power full
Alarm Status
Alarm setting activated
Lock Status
Key Lock status, Press and Hold
[ LAP ] Key to unlock.
H.R. Monitor / Speed Cadence Sensor
Connection
H.R. Monitor Connected
Speed Cadence Sensor Connected
Page 14
1. Charge : Connect a charging clamp to charge X-PRO(using either a PC’s USB port, a 5V/1A
portable power source, or a smart phone charger.)。
2. Start-up : On completion of charging, Press and Hold [ MODE ] key for 2 seconds ;
this will activate GoWatch X-PRO.
3. Select a Language:Press [ Up ] or [ Down ] key to select [ Traditional Chinese ], [ Simplified Chinese ],
[ English ], or [ Japanese ].
4. Time/Time Zone Setting :
5. On completion of the above procedure, you may enter the Watch Screen.
13
Copyright ©2016 GOYOURLIFE INC.
4
Basic Operation
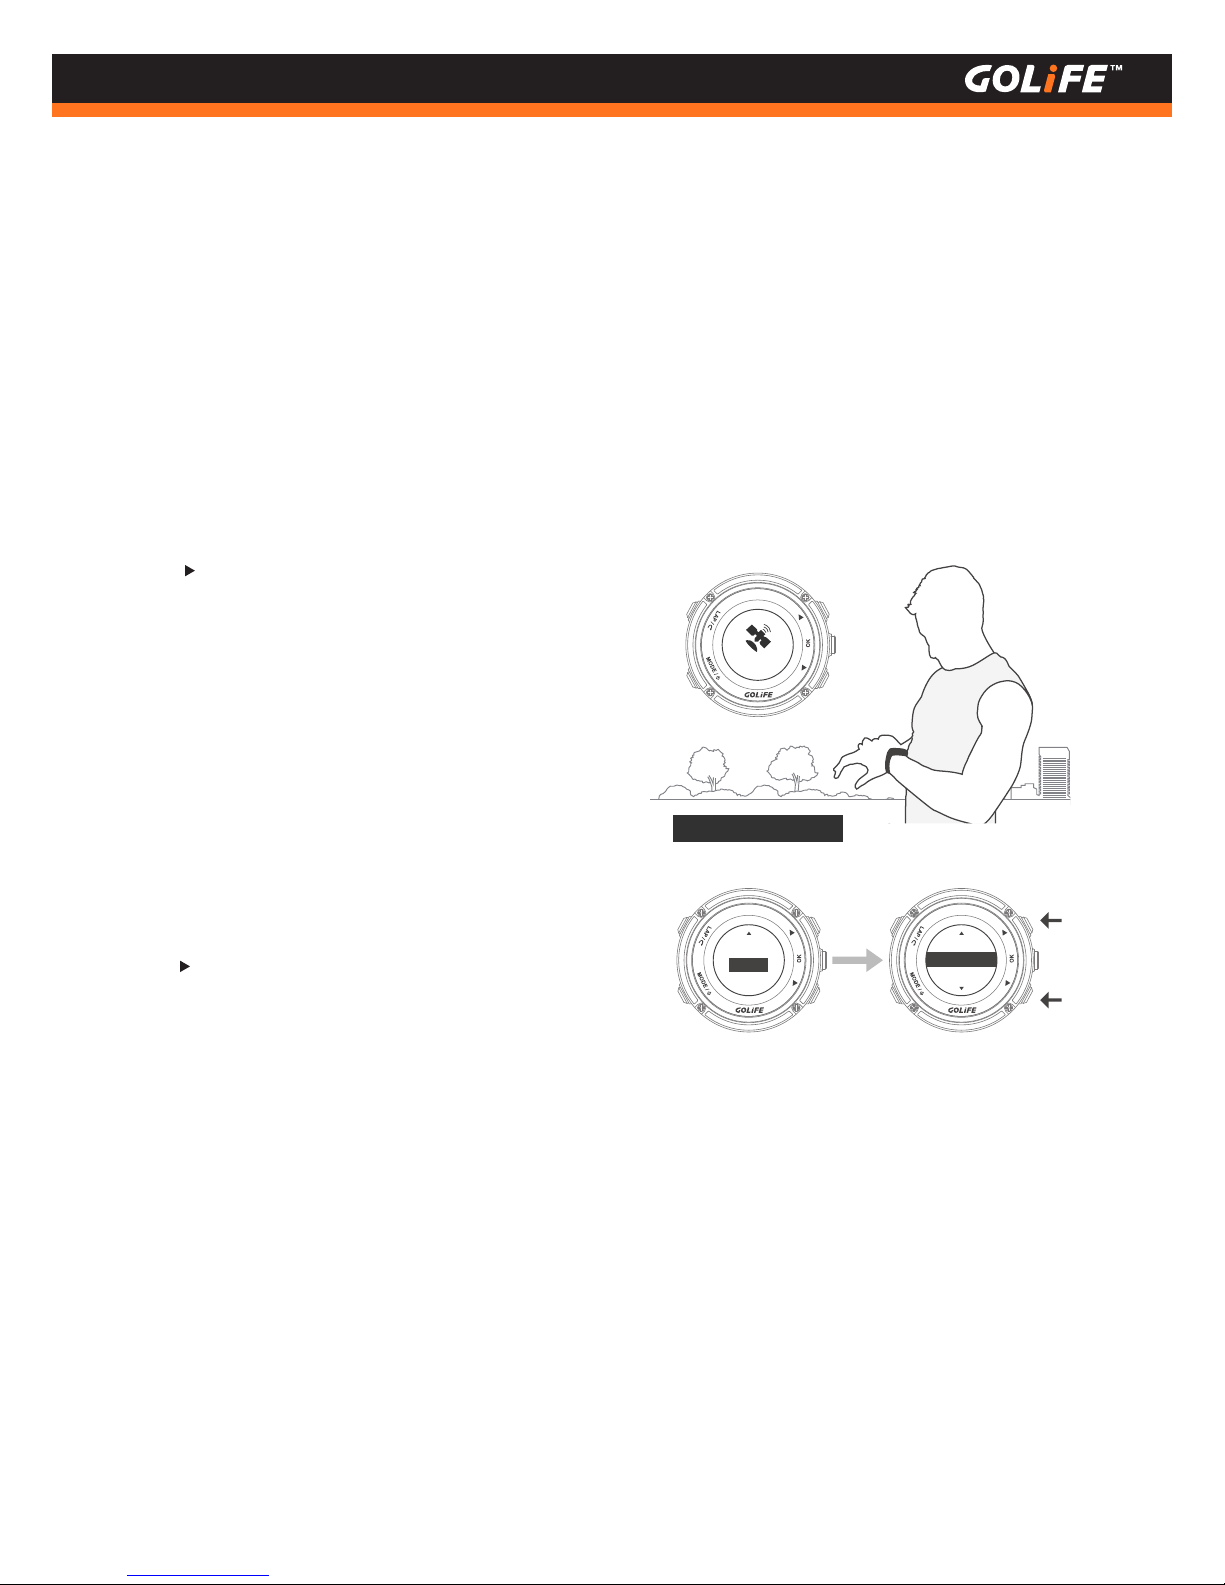
Initiate GoWatch X-PRO
Select [ Yes ], press [ OK ] Key on the right →
Satellite Searching
• Make sure that your position has good
reception of GPS signal, such as at top
floor of building, unshaded area, etc.
• It takes about 5 minutes to complete
satellite positioning.
• On completion of satellite positioning,
verify the current local time and calibrate it.
Select [ No ], press [ OK ] Key on the right →
Manual Time Zone Setting
• Press [ Up ] or [ Down ] key to select a time
zone within the range of [ -12:00 ] to [ +14:00 ].
Searching...
Automatic Time Zone Set
Manual Setting of Time Zone
+ 09:30
+ 08:30
+ 09:00
Please perform positioning at a fixed unshaded area when GoWatch X-PRO displays Satellite
Searching Screen; it takes about 1 to 5 minutes to complete positioning. For first-time positioning
of GoWatch, or for positioning it after a prolonged period of switched off status, it may take more
than 5 minutes. Any movement or warm-up exercise during the positioning process may cause a
prolonged GPS positioning session.
※
Manual
+ 09:00
* Unshaded area
Page 15
14
Copyright ©2016 GOYOURLIFE INC.
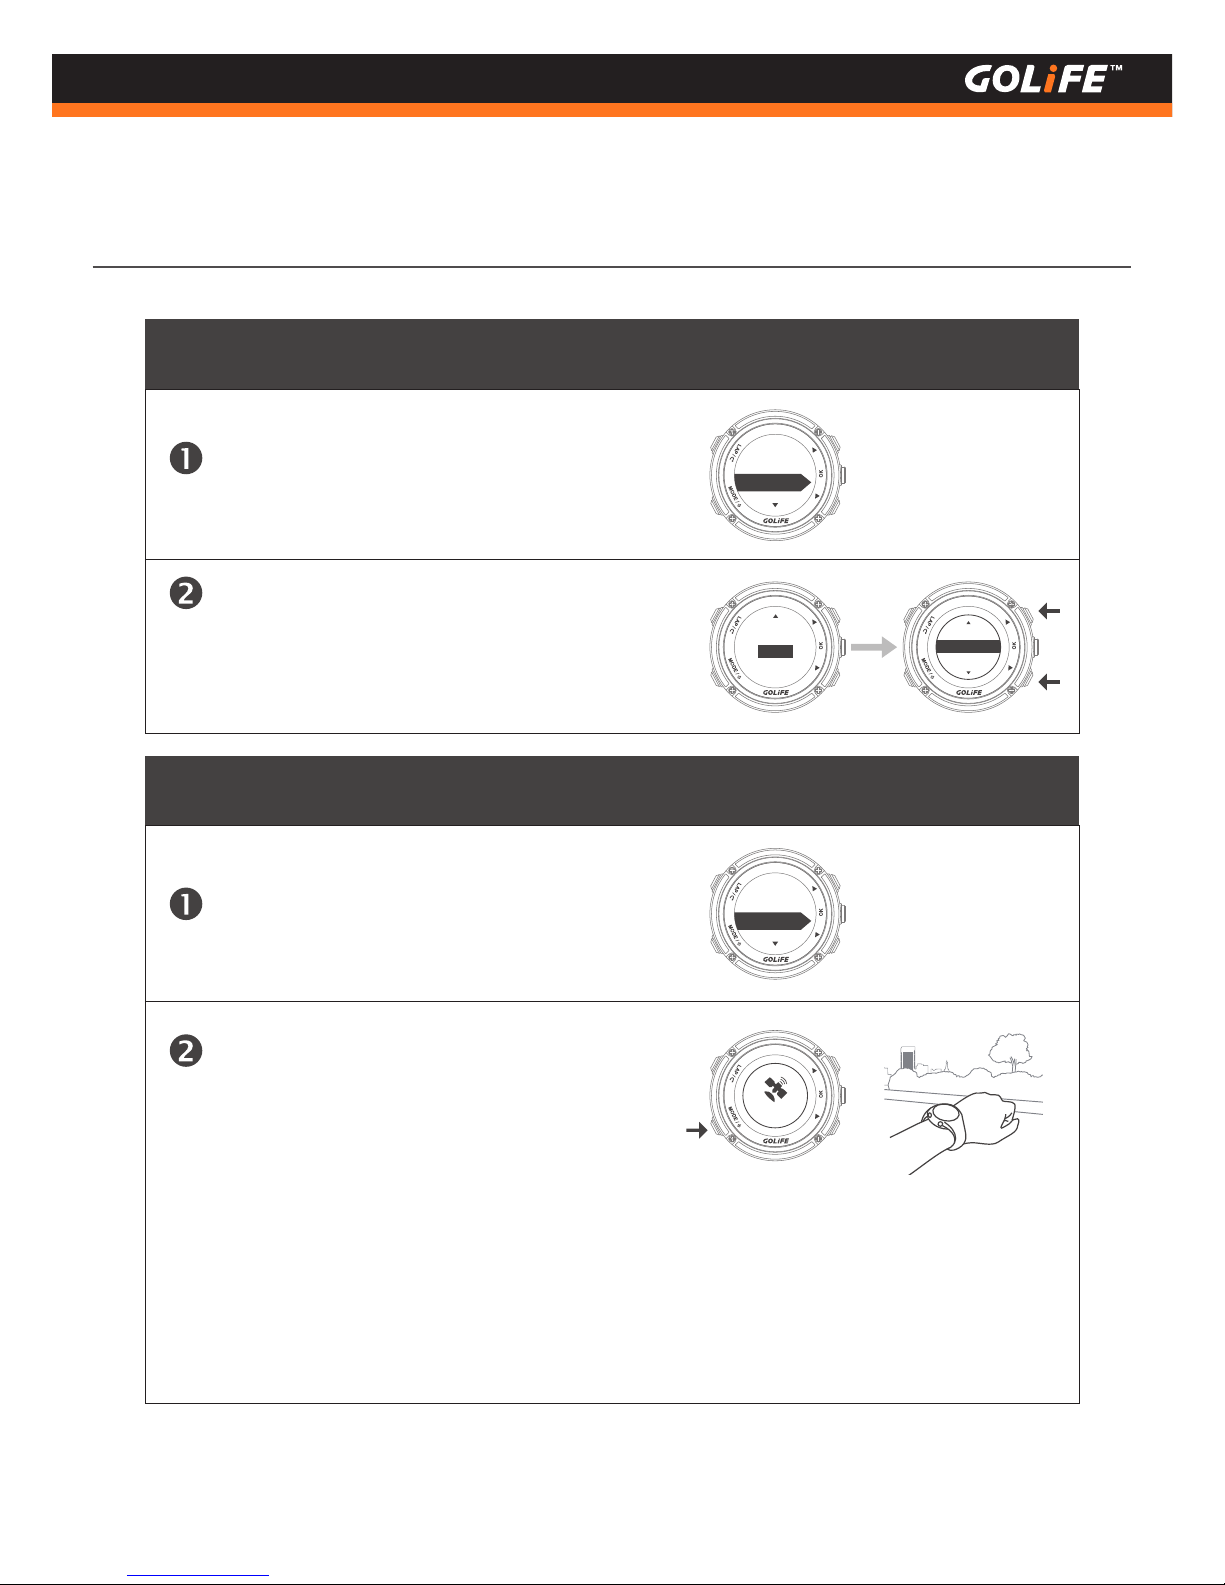
Time Zone Calibration
Automatic Time Zone Calibration
Manual Time Zone Calibration
Go to GPS Setting [ Menu Mode ] → [ Setting ] →
[ GPS Setting ], check GPS for activated status.
Go outdoors and press [ MODE ] key once;
GoWatch will display Satellite Searching;
it takes about 1 to 5 minutes to complete
positioning and automatic time zone calibration.
+ 09:30
+ 08:30
+ 09:00
Manual
+ 09:00
ON
GPS
Go to GPS Setting [Menu Mode] → [ Setting ] →
[ GPS Setting ], check GPS for activated status.
Go outdoors and press [ MODE ] key once;
GoWatch will display Satellite Searching;
it takes about 1 to 5 minutes to complete
positioning and automatic time zone calibration.
Searching...
Please perform positioning at a fixed unshaded area when GoWatch X-PRO displays Satellite
Searching Screen; it takes about 1 to 5 minutes to complete positioning. For first-time position-
ing of GoWatch, or for positioning it after a prolonged period of switched off status, it may take
more than 5 minutes. Any movement or warm-up exercise during the positioning process may
cause a prolonged GPS positioning session.
※
4
Basic Operation
ON
GPS
Page 16
GOLiFE RUN App is only applicable to iOS 8.3 or higher / Android 4.3 or higher Smart Phone or
Tablet with Bluetooth 4.0 transfer functions.
※
15
Copyright ©2016 GOYOURLIFE INC.
GOLiFE RUN App Smart Phone App
Android System / iOS System
4
Basic Operation
Exercise Amount Accumulation
Easy to Use
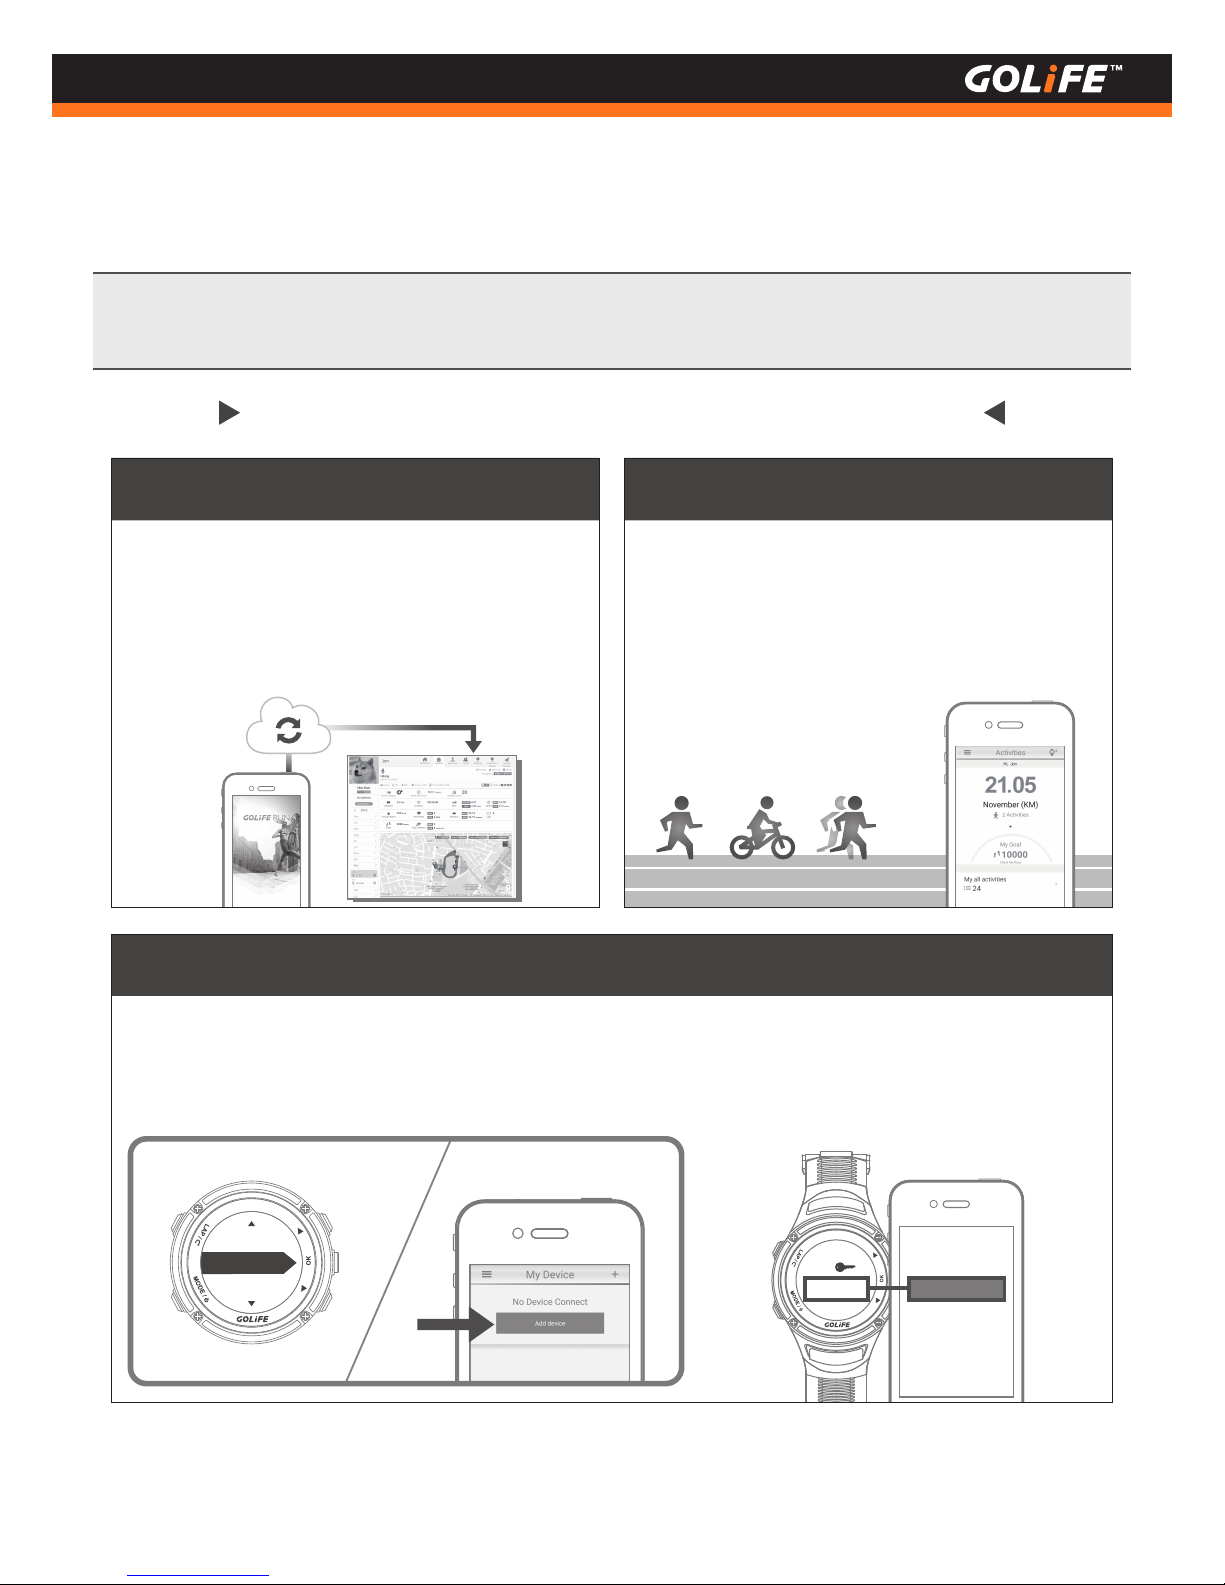
GOLiFE RUN Smart Phone App Features
All the exercise records can be uploaded to smart
phone and GOLiFE RUN platform via GOLiFE RUN
App Bluetooth Pairing by one-key operation, for
carrying out comprehensive analyses.
Pairing GoWatch X-PRO with a GOLiFE RUN App. First go to [ Bluetooth ] and enter [ Pair ]. At the same
time activate RUN App and enter [ My Device ], and add device. Please follow the steps of APP, and key the
paring code in it; this completes the pairing.
6 5 2 9 3 2
PIN
6 5 2 9 3 2
GOLiFE RUN App is capable of displaying
monthly accumulation of respective exercises
such as Run / Cycling / Marathon, for convenient
check up of accumulated exercise amount as
well as self-defined targets.
Data sync.
Pair
Upload on the spot
Page 17
16
Copyright ©2016 GOYOURLIFE INC.
4
Basic Operation
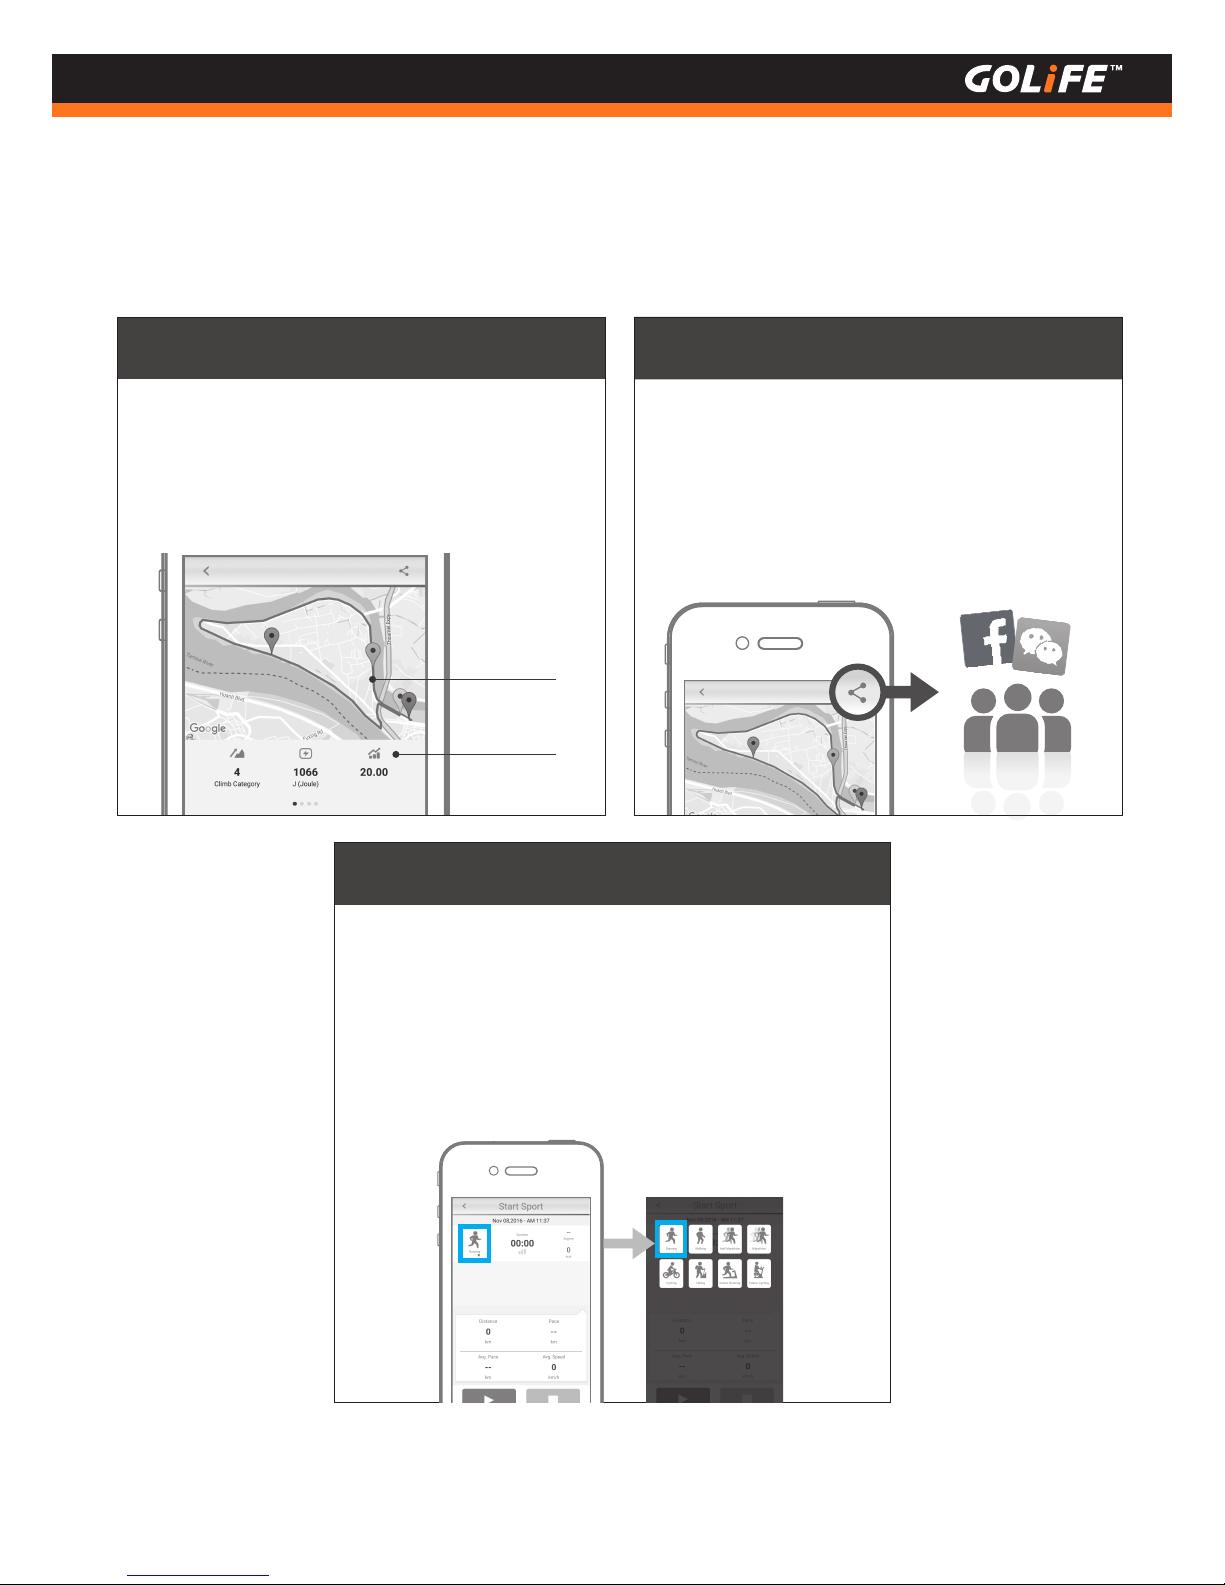
Exercise data can be uploaded to smart phone
or cloud platform via one-key operation; it
allows as well sharing in Facebook, WeChat and
friends.
Running
On the spot Viewing
All the exercise data allow for clear viewing from a
smart phone, including route browsing, distance,
time, lap count or calorie consumption, etc.
Quick Sharing
Route map
Exercise data
Easy exercise without carrying GoWatch
Without carrying a GoWatch, you may still simply
record the current exercise data with a smart phone.
You may select Run, Walk, Half Marathon, Marathon,
Cycling, or Hiking mode. On completion of exercise, the
data can then be uploaded and viewed immediately.
Select an exercise type
Running
Page 18
17
Copyright ©2016 GOYOURLIFE INC.
4
Basic Operation
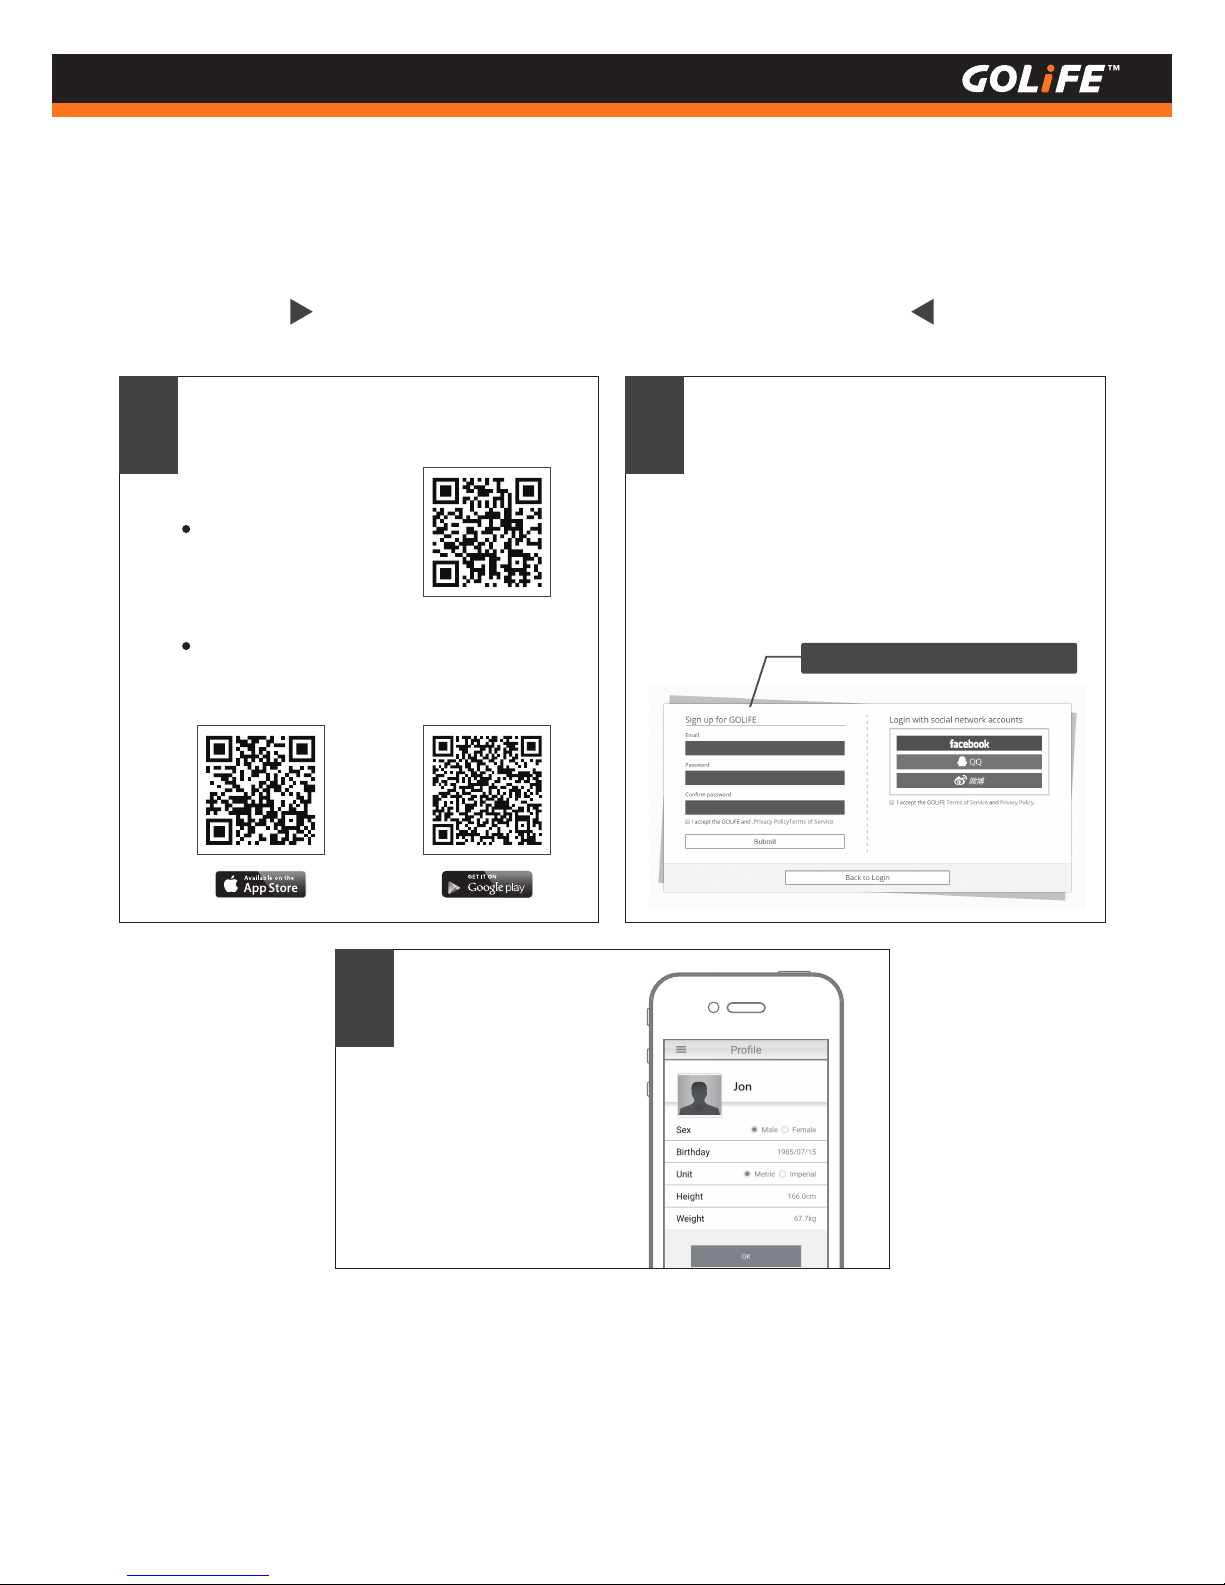
How to install GOLiFE RUN App
On completion of
logging in, enter your
basic information.
3
On completion of installation, select
GOLiFE RUN App, log in with a GOLiFE
account. If you have no GOLiFE account
yet, go to GOLiFE RUN at
http://run.goyourlife.com/
to create a new GOLiFE account.
Download and install the App using the
following method:
1 2
Apply for a new account
Scan the QR Code
on the right.
Or go to Google Play Store / Apple Store
and select Install GOLiFE RUN App.
Page 19
4
Basic Operation
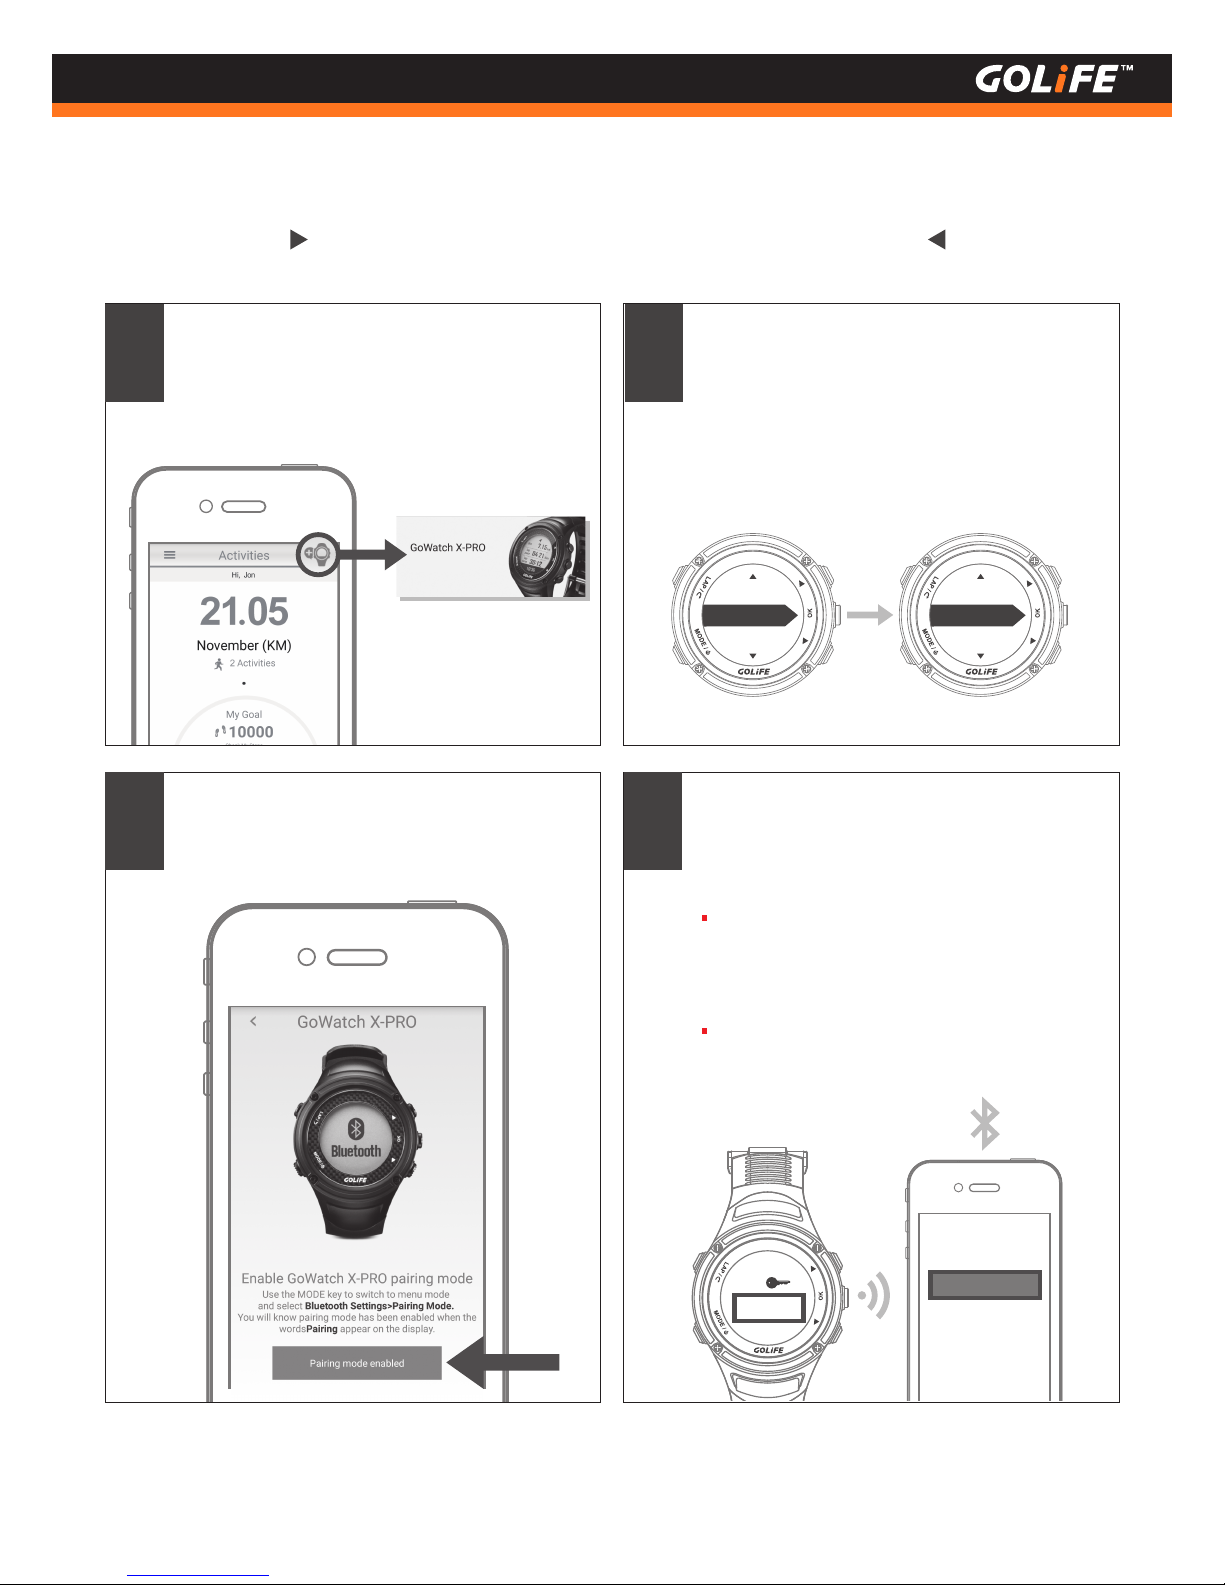
How to pair with GoWatch X-PRO
18
Copyright ©2016 GOYOURLIFE INC.
6 5 2 9 3 2
PIN
6 5 2 9 3 2
Press the [ Add Watch ] icon on the upper
right corner in the GOLiFE RUN App and
select [ GoWatch X-PRO ].
Followed by pressing [ MODE ] key of
X-PRO to switch over to Menu Mode,
select [ Bluetooth ] > [ Pair ]; enter the
pairing mode by selecting [ Yes ] when
[ Start Pairing ] message appears.
1 2
Bluetooth
Settings
Sensors
At the same time press GOLiFE RUN App>
[ Pairing mode enabled ]>[ Begin pairing ].
3
Enter the 6-digit pairing code displayed on
GoWatch into GOLiFE RUN App; this must
lead to a successful pairing.
During the pairing period, press [ LAP ] key to
return only when the Android mobile phone
shows an X-PRO Device Paired
See P67 for any problem regarding pairing
with an Android smart phone.
4
Data sync.
Pair
GPS Professional Smart Sports Watch
Notification Sport Barometer
Temperature Compass
Page 20
4
Basic Operation
19
Copyright ©2016 GOYOURLIFE INC.
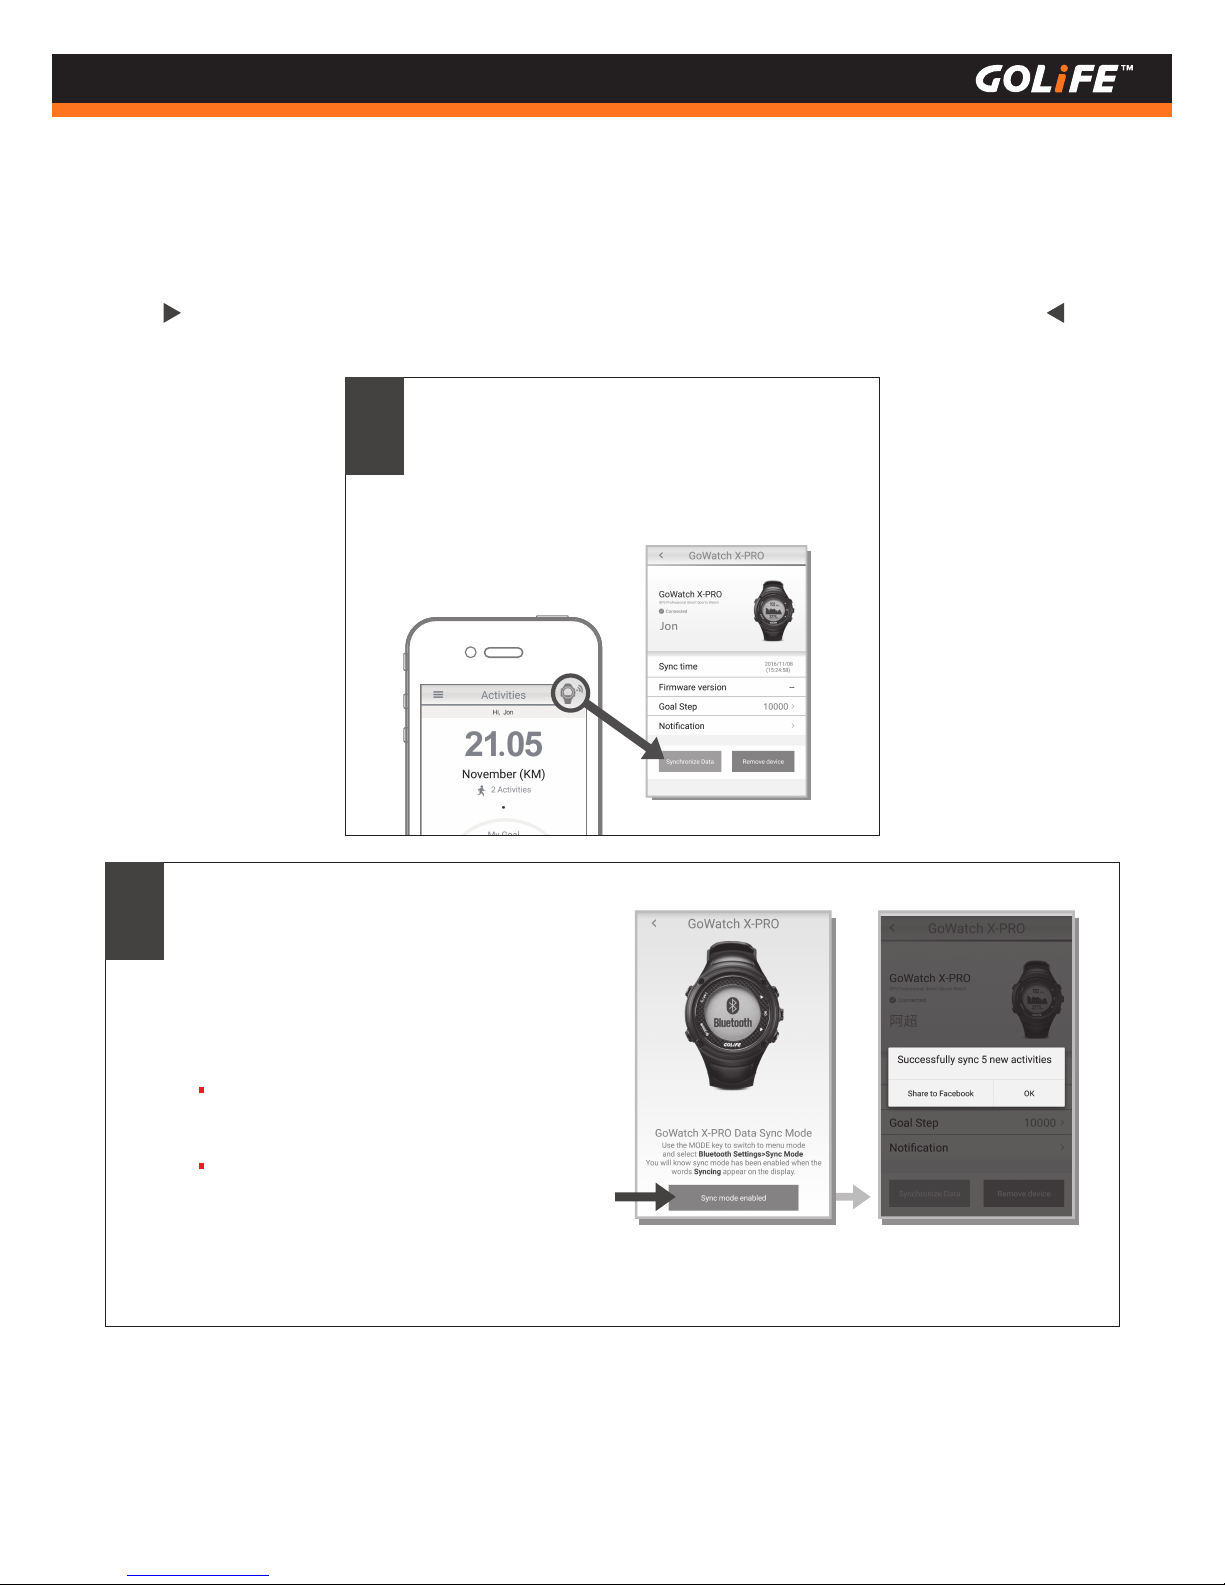
How to upload activity data to GOLiFE RUN App
Press the watch icon on upper right corner of
GOLiFE RUN App and press [ Synchronize
Data ], to activate data sync of GoWatch
X-PRO.
1
2
Press [ Sync mode enabled ] on GOLiFE RUN
App and start data sync. [ Synchronizing... ]
will be shown on X-PRO. Data sync is done
when [ Successfully sync the data of steps! ]
screen shows up.
Perform pairing of watch before uploading
activity log.
If X-PRO has not yet paired with a smart
phone, you may also upload your activity log
to your GOLiFE CONNECT account via a PC.
See next Chapter GOLiFE CONNECT
Page 21
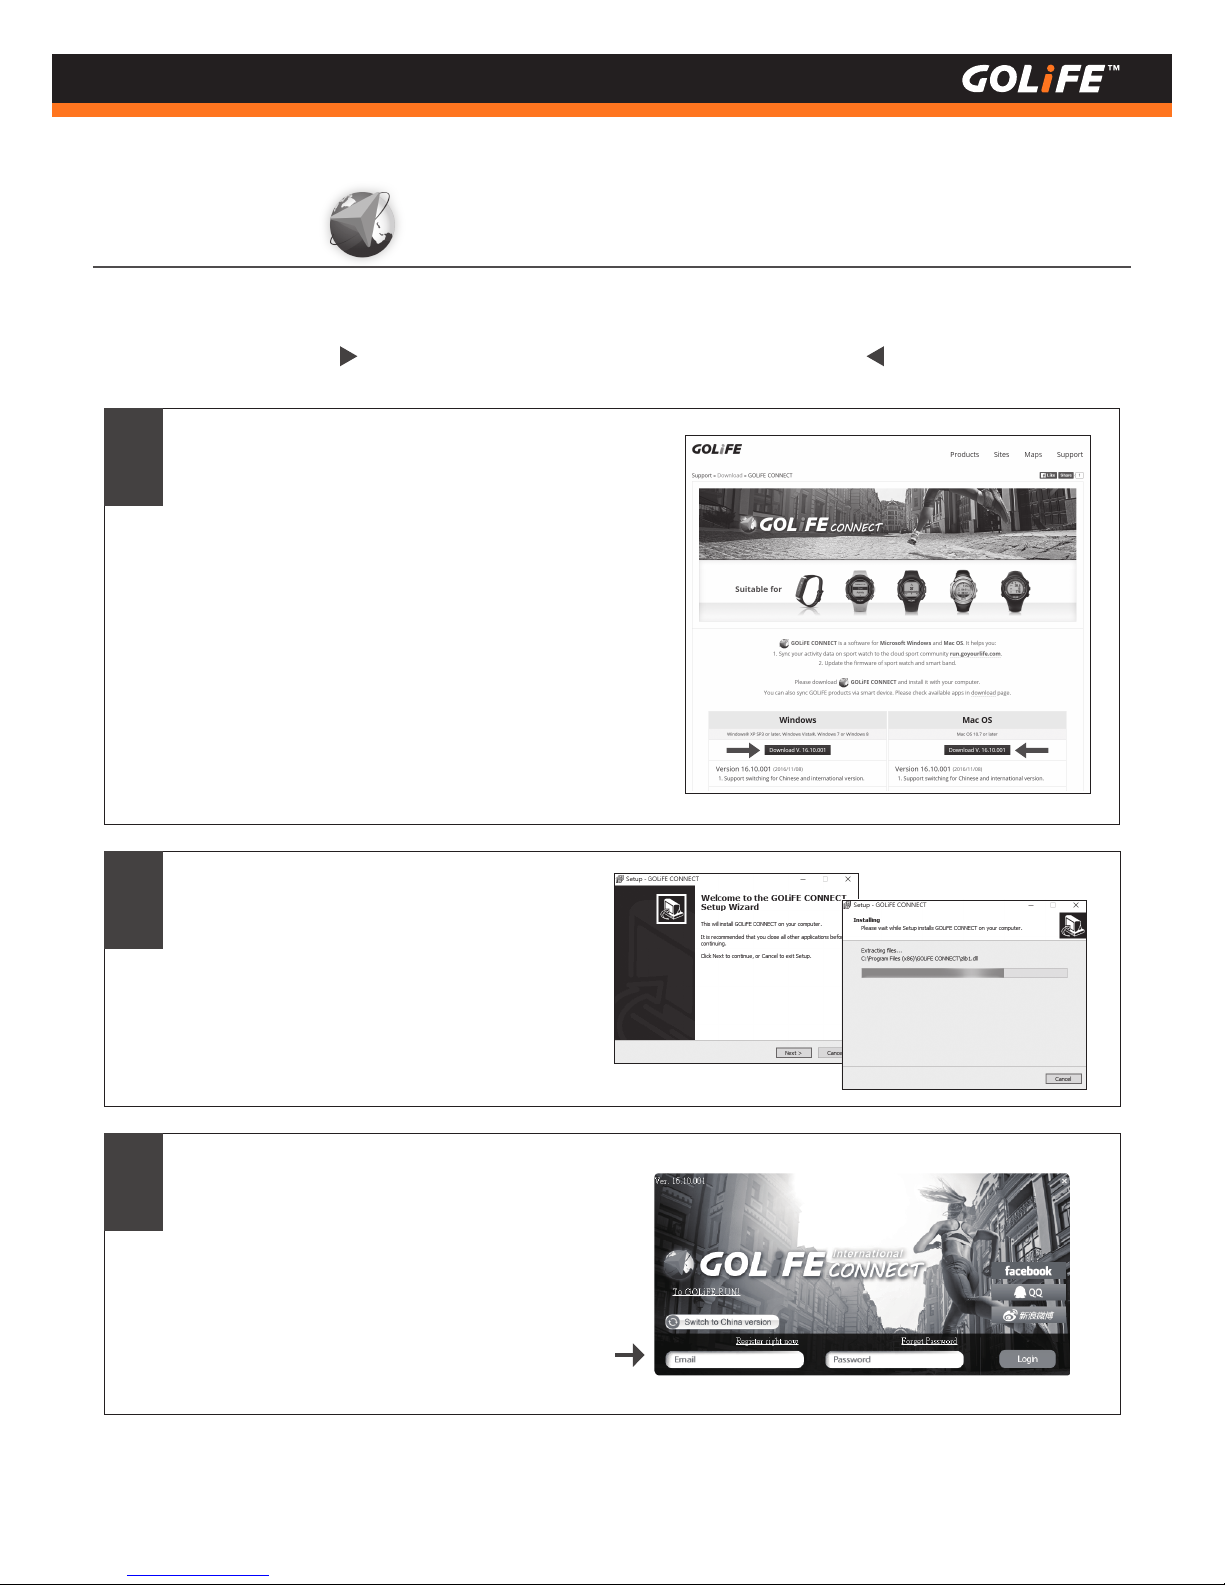
How to install GOLiFE CONNECT
20
Copyright ©2016 GOYOURLIFE INC.
4
Basic Operation
GOLiFE CONNECT
Go to http://www.goyourlife.com/golife-connect/
and download GOLiFE CONNECT.
2
1
After download, click GOLiFE CONNECT
to perform installation.
Supports Windows® XP SP3 and later,
Windows Vista®, Windows 7 or Windows
8, Mac OS 10.7 and later.
※
3
Open the installed GOLiFE CONNECT and
log in your GOLiFE account. If you don’t
have a GOLiFE account, go to GOLiFE RUN
at : http://run.goyourlife.com/ to create a
GOLiFE account.
Page 22
21
Copyright ©2016 GOYOURLIFE INC.
4
Basic Operation
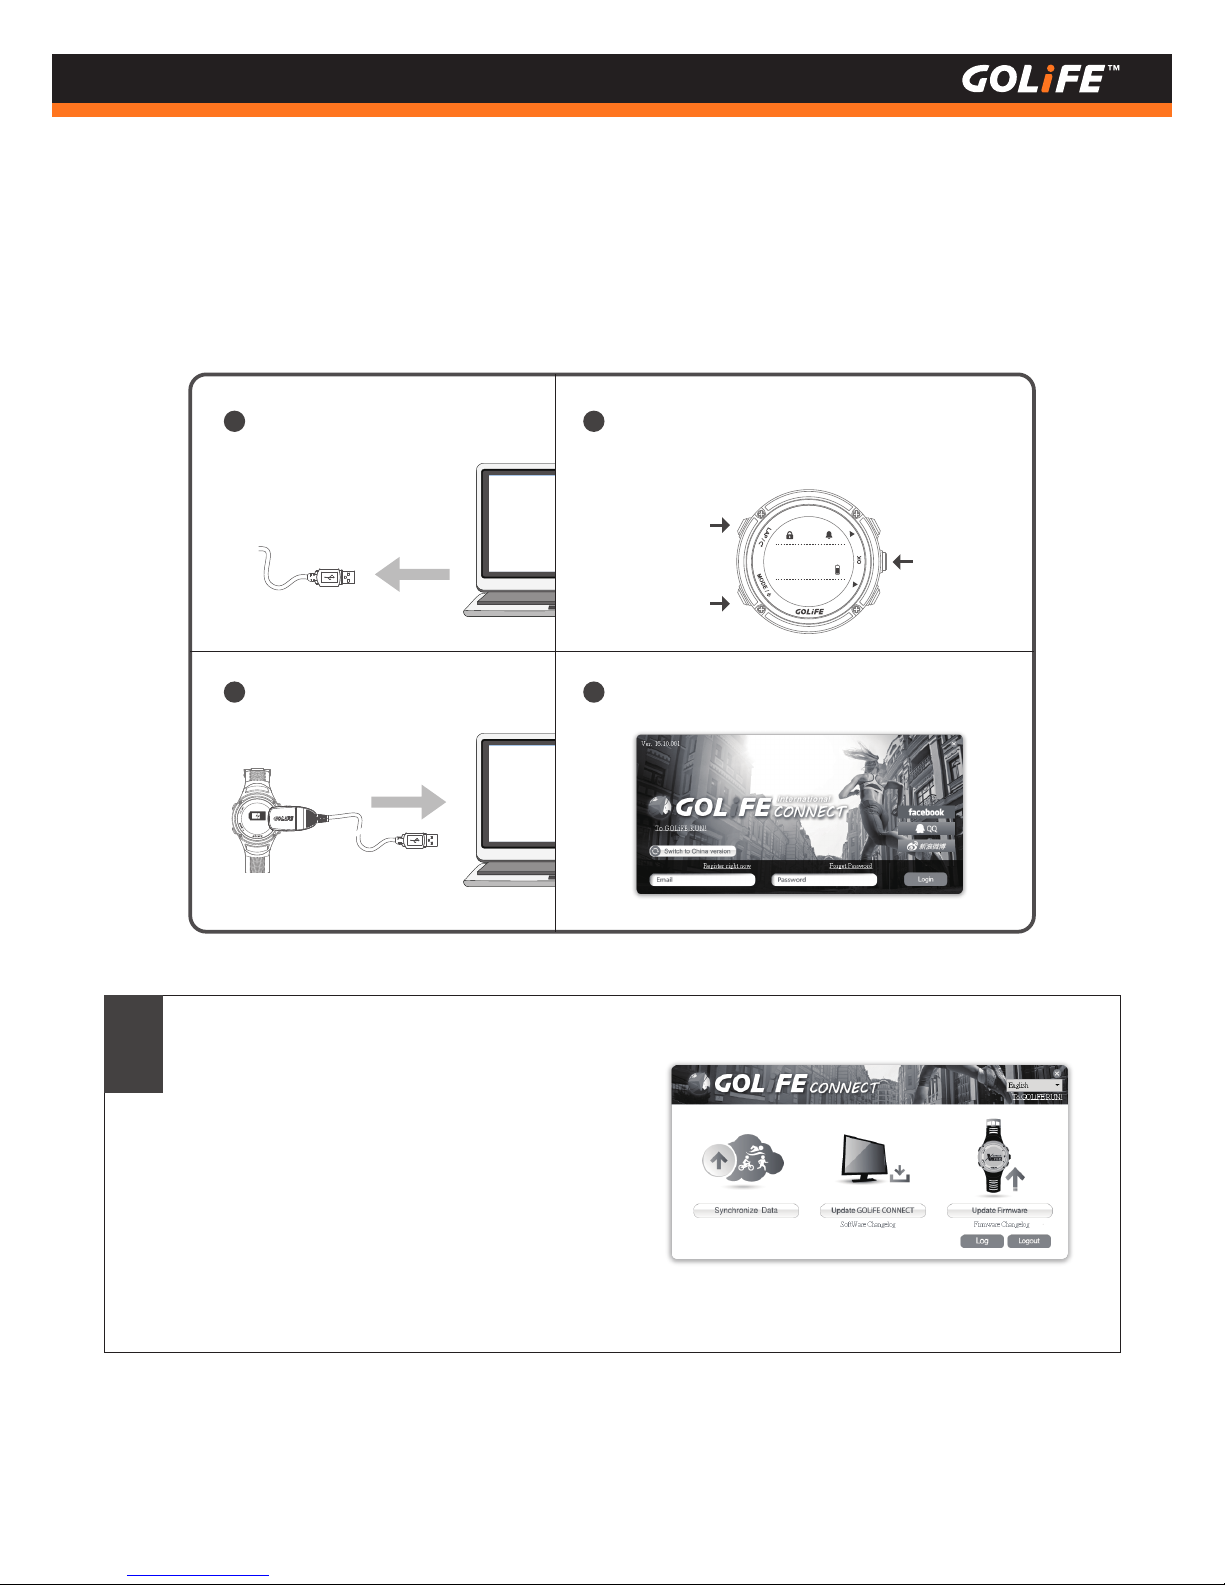
If the system shows GOLiFE device not found, verify your connection and log in again.
If connection is correct, proceed with the following steps :
※
4
After logging in, you may select [ Synchronize
Data ], [ Update GOLiFE CONNECT ], [ Update
Firmware ]. This helps to :
Remove USB cable on the
other end of Charge
Clip from PC.
1
Press [ LAP ]+[ MODE ]+[ OK ] at the same
time to re-start-up GoWatch.
2
Re-start GOLiFE CONNECT.
4
Re-connect device with USB
cable.
3
MAY
23
WED
23:45
Charging
Synchronize your activities data of your
GoWatch to GOLiFE Cloud Service Site.
( run.goyourlife.com )
Upgrade firmware of your GoWatch or
smart band.
1.
2.
Page 23
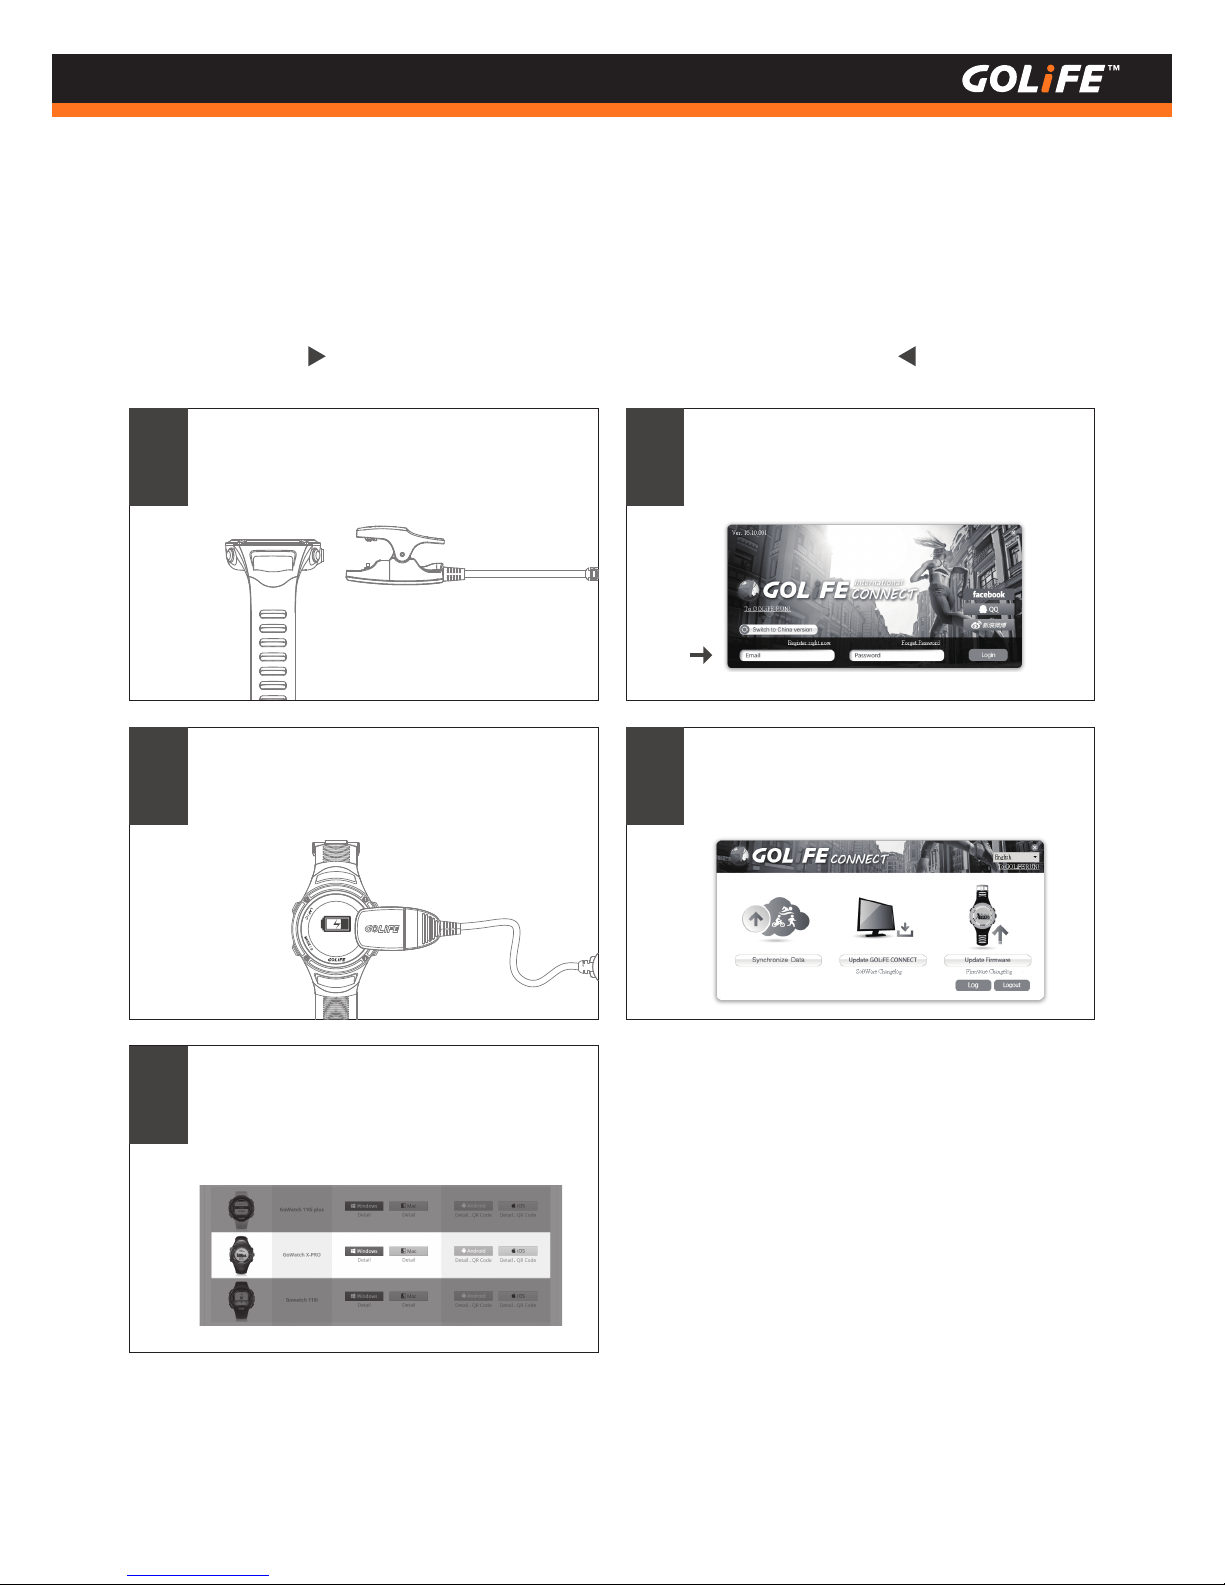
GOLiFE CONNECT Upload Intruction
22
Copyright ©2016 GOYOURLIFE INC.
4
Basic Operation
1
Clip up Charge Clip to GoWatch.
2
Charging
Connect USB cable on the other end of
Charge Clip to USB port of PC.
3
Use PC to activate www.goyourlife.com/
download and install GOLiFE CONNECT.
Skip this step if already installed.
4
Enter a GOLiFE account or log in your
Facebook, QQ or Weibo account.
5
Now you may select [ Synchronize Data ]
or [ Update Firmware ].
Page 24
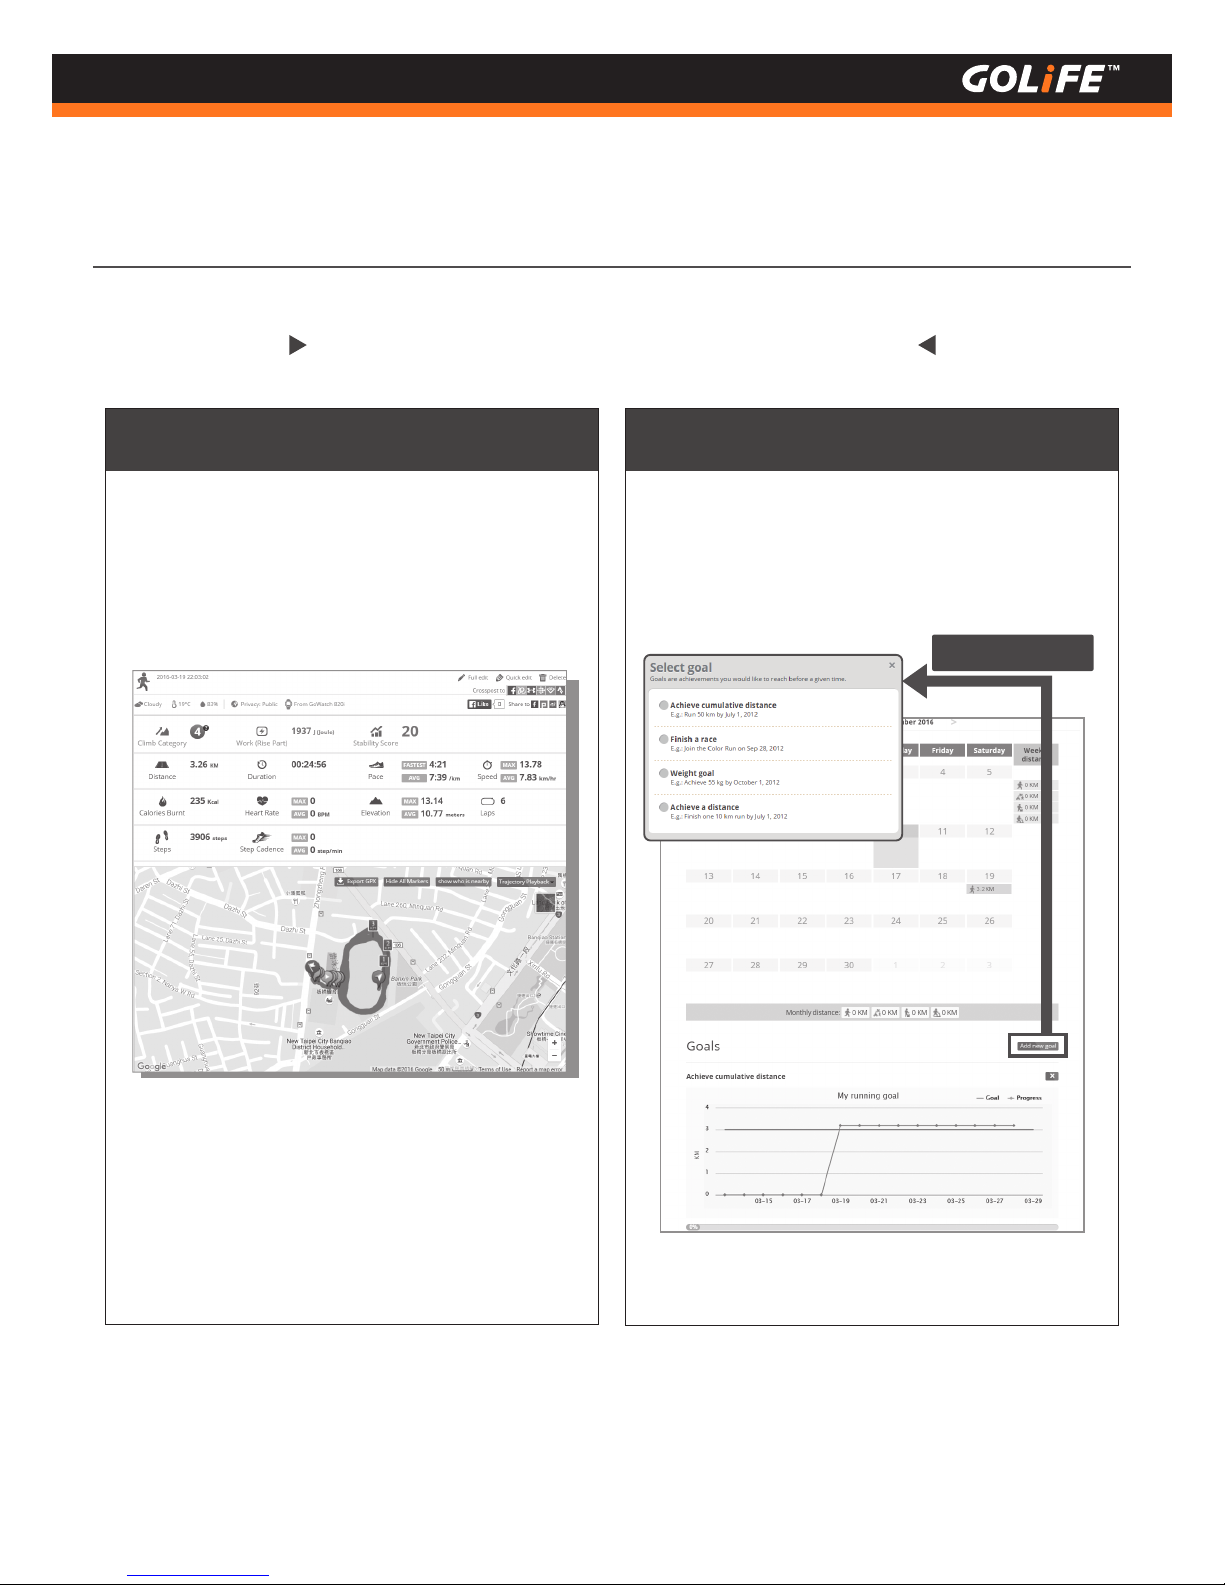
GOLiFE RUN Cloud Service Site fetures
23
Copyright ©2016 GOYOURLIFE INC.
4
Basic Operation
GOLiFE RUN Cloud Service Site
Data Analysis
All of the exercise data can be viewed clearly in a
smart phone, including route browsing and data
of distance, time, lap or calorie consumption.
Planning exercise training programs
Select a fitness target and download a daily
training plan. Create your goals and log in daily
figures, GOLiFE RUN will generate your growth
curve in no time.
Add new goal
Page 25
24
Copyright ©2016 GOYOURLIFE INC.
4
Basic Operation
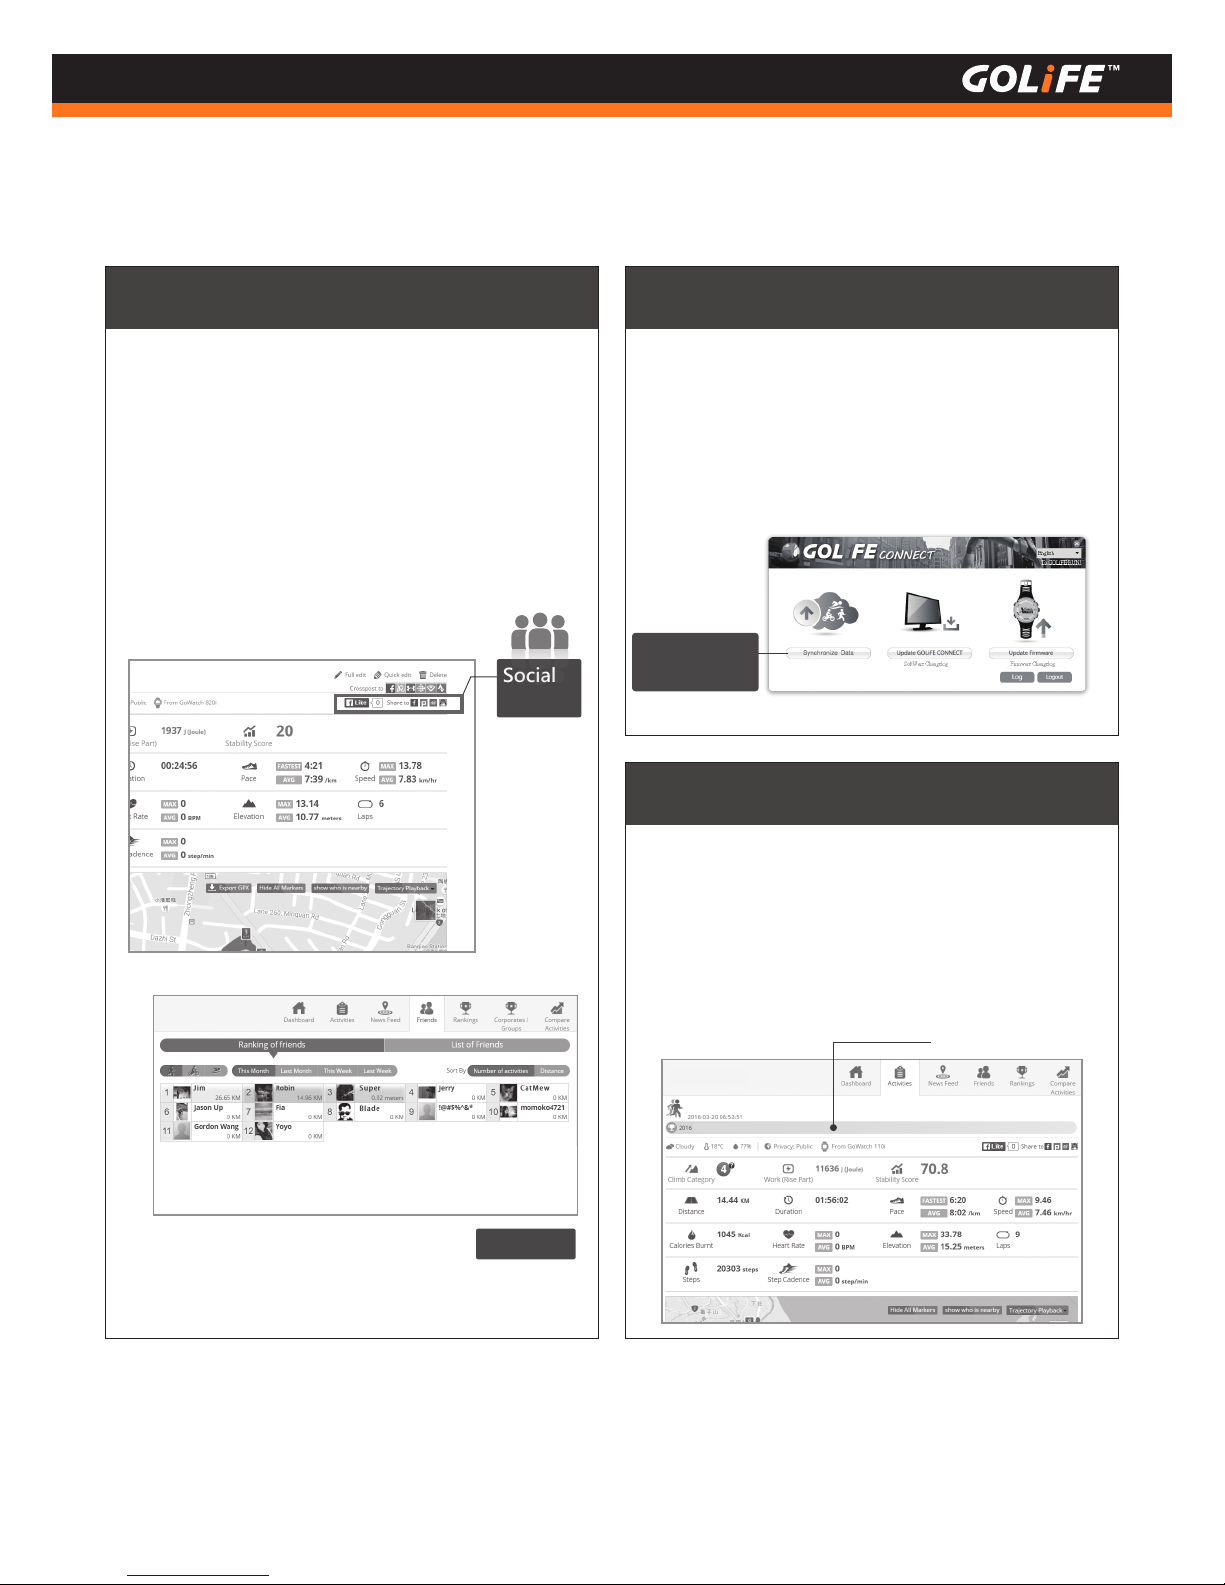
Sharing activities
Link with friends, follow up other’s activities,
post photos and messages, or share trajectory
to a social platform. Add other friends to allow
ranking in terms of type of exercise, date, log
count and total distance of all the friends.
Saving Activities
On completion of activity and saving data into a
device, you may upload your activity log to
GOLiFE CONNECT, where you may store your
data as long as you like.
Jim
Ranking
Synchronize
Data
Auto detect races
When uploading your activity after attending a
race, the system will automatically match up
with the most appropriate race and record the
results and trajectory of each activity.
※ To apply for a free account, go to
http://run.goyourlife.com/
Jim
WAN JIM SHI MARATHON
NEW TAIPEI CITY WAN JIM SHI MARATHON -14K
Social
Sharing
Match Races
Page 26
25
Copyright ©2016 GOYOURLIFE INC.
4
Basic Operation
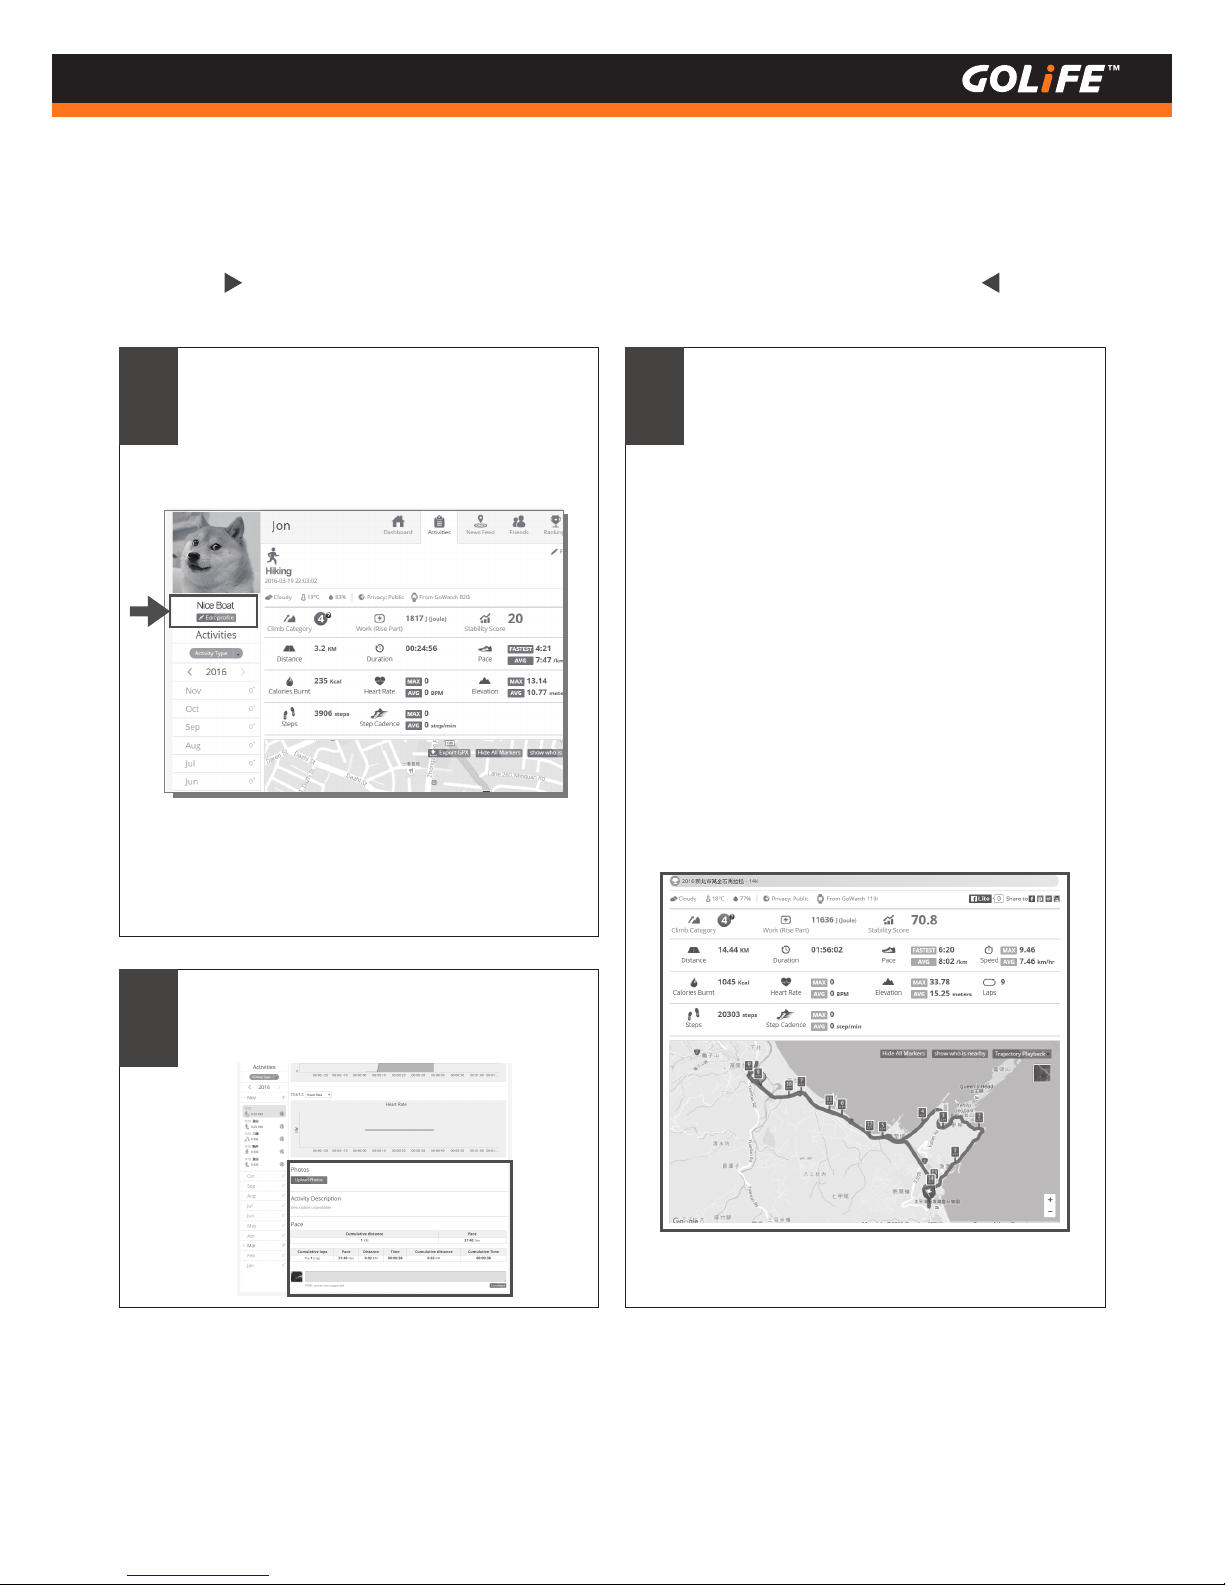
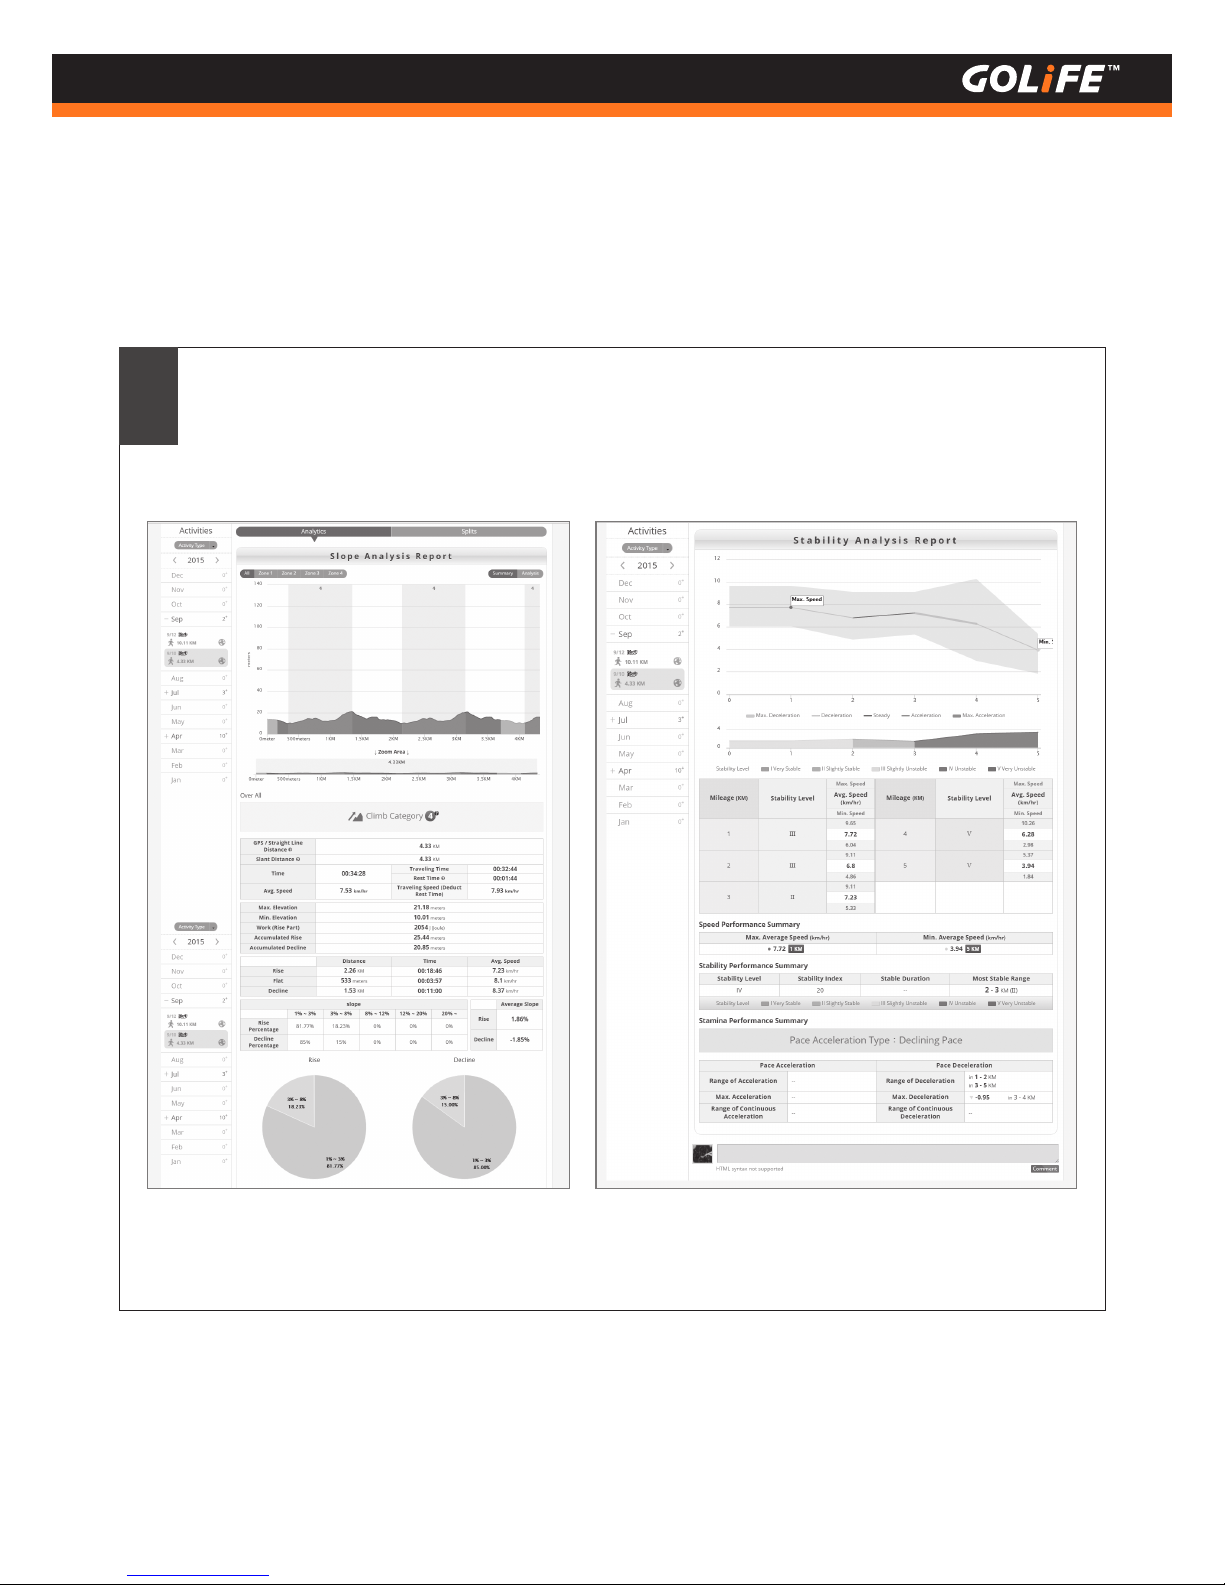
By uploading exercise log using GOLiFE
RUN APP or GOLiFE CONNECT, you may
view data of climb category, work of rise
part, stability score, trajectory, time, dis-
tance, elevation, heart rate, calories burnt,
cadence, trace, pace acceleration, etc. You
may also covert these data into charts,
analysis report, export GPX and playback
trajectory. Buttons on the upper right
corner allow you to share your exercise data
on Facebook, Plurk, Weibo, QQ, and other
platforms.
How to use GOLiFE RUN Cloud Service Site
After logging in GOLiFE RUN Cloud Service
Site, you may edit data on the left side and
introduce yourself.
1 2
Upload activity photos and give your
comments.
3
Page 27
26
Copyright ©2016 GOYOURLIFE INC.
4
Basic Operation
It allows clear viewing of slope and stability analysis report
or selecting basic data reports on the right.
4
To apply for a free account, visit http://run.goyourlife.com/
※
Page 28
27
Copyright ©2016 GOYOURLIFE INC.
5
Modes and Functions
Modes and Functions
Modes
Press [
MODE ] Key to switch-over to the
following modes
145 bpm
05:00 /km
心率
現在步速
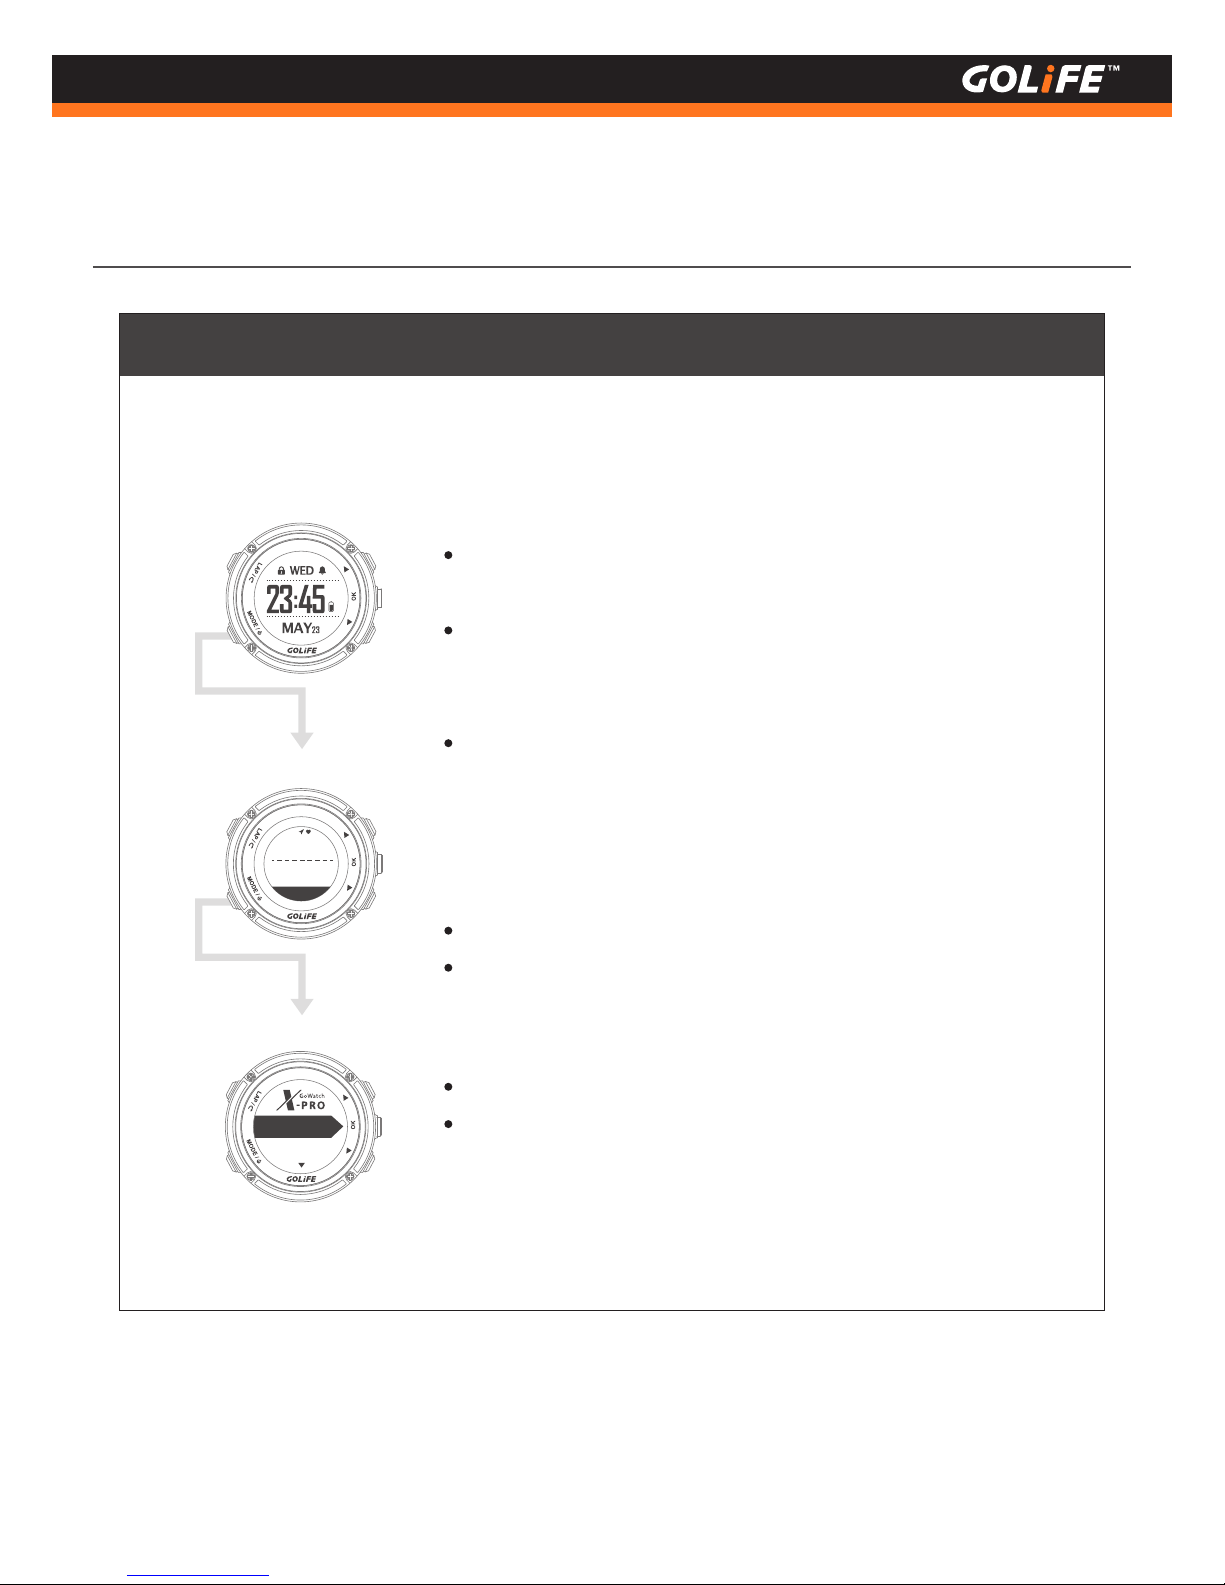
When not performing exercise logging, GoWatch X-PRO is used as
an ordinary watch.
24H, 12H Style Setting: see Menu Mode→ [ Setting ] → [ Time Mode ]
→ [ Time Style ] and [ Time Format ].
For changing time style, see P48, Setting>Time Mode.
Pressing [ OK ] in this mode will sequentially switch over screens of
Clock, Atmosphere/Altitude/Temperature, Compass, Daily Track, and
Current Coordinates.
Daily Mode:
Starts an exercise and logs trajectory and activity.
Displays exercise data in real time.
Activity Mode:
For setting up personal info and basic setting of GoWatch.
GYM Function.
Device Pairing and Bluetooth Sync
Set up activity mode and check activity records.
Menu Mode:
Gym
Activity
Page 29
28
Copyright ©2016 GOYOURLIFE INC.
5
Modes and Functions
Daily Mode Clock
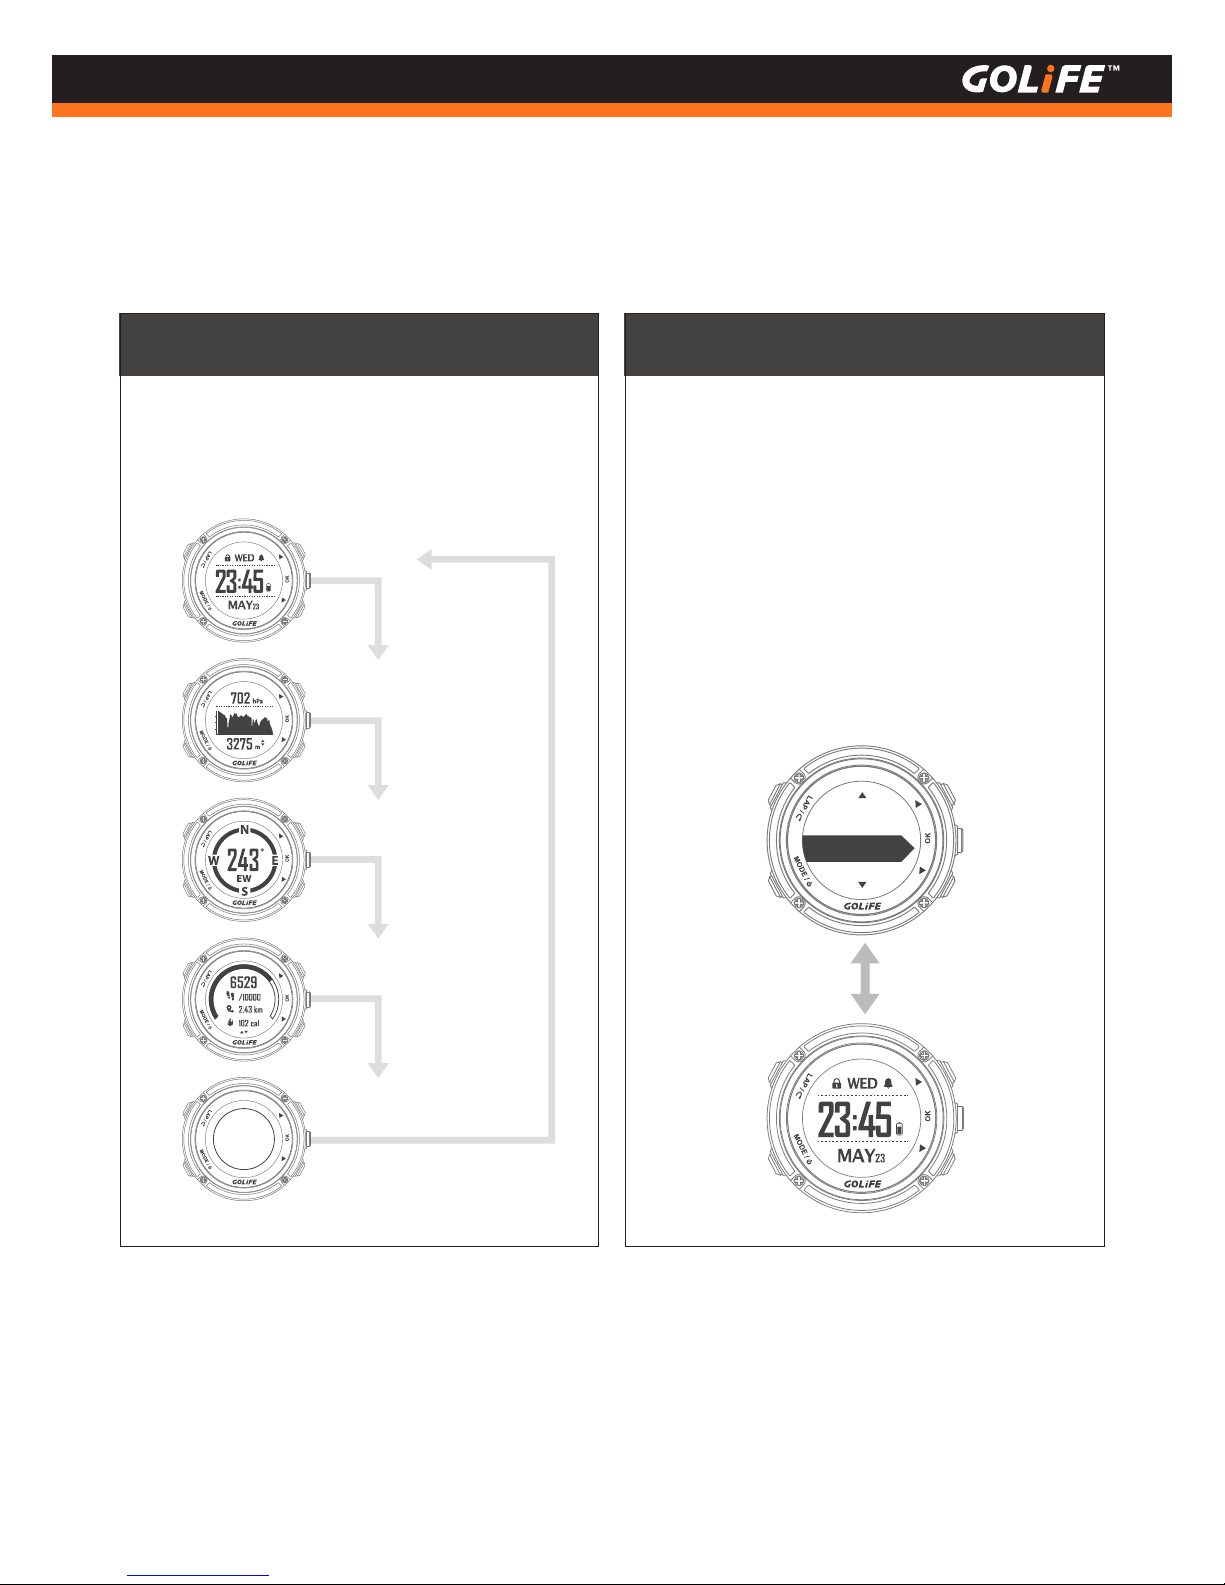
In Daily Mode, press [ OK ] to
switch over functions
WGS84
X: 121.544945
Y: 25.051655
Clock
Atmosphere / Altitude
Compass
Daily Activity Tracking
Current Coordinates
GoWatch X-PRO can be used as an ordinary
watch when not performing exercise records.
You may manually return to Daily Mode.
GoWatch will return to this mode ( no-activity
mode ) after being standby for a while ( which
can be checked by Menu Mode → [ Setting ] →
[ Display ] → [ Standby ]; default value is 10min. )
10minutes
Standby
Page 30
29
Copyright ©2016 GOYOURLIFE INC.
5
Modes and Functions
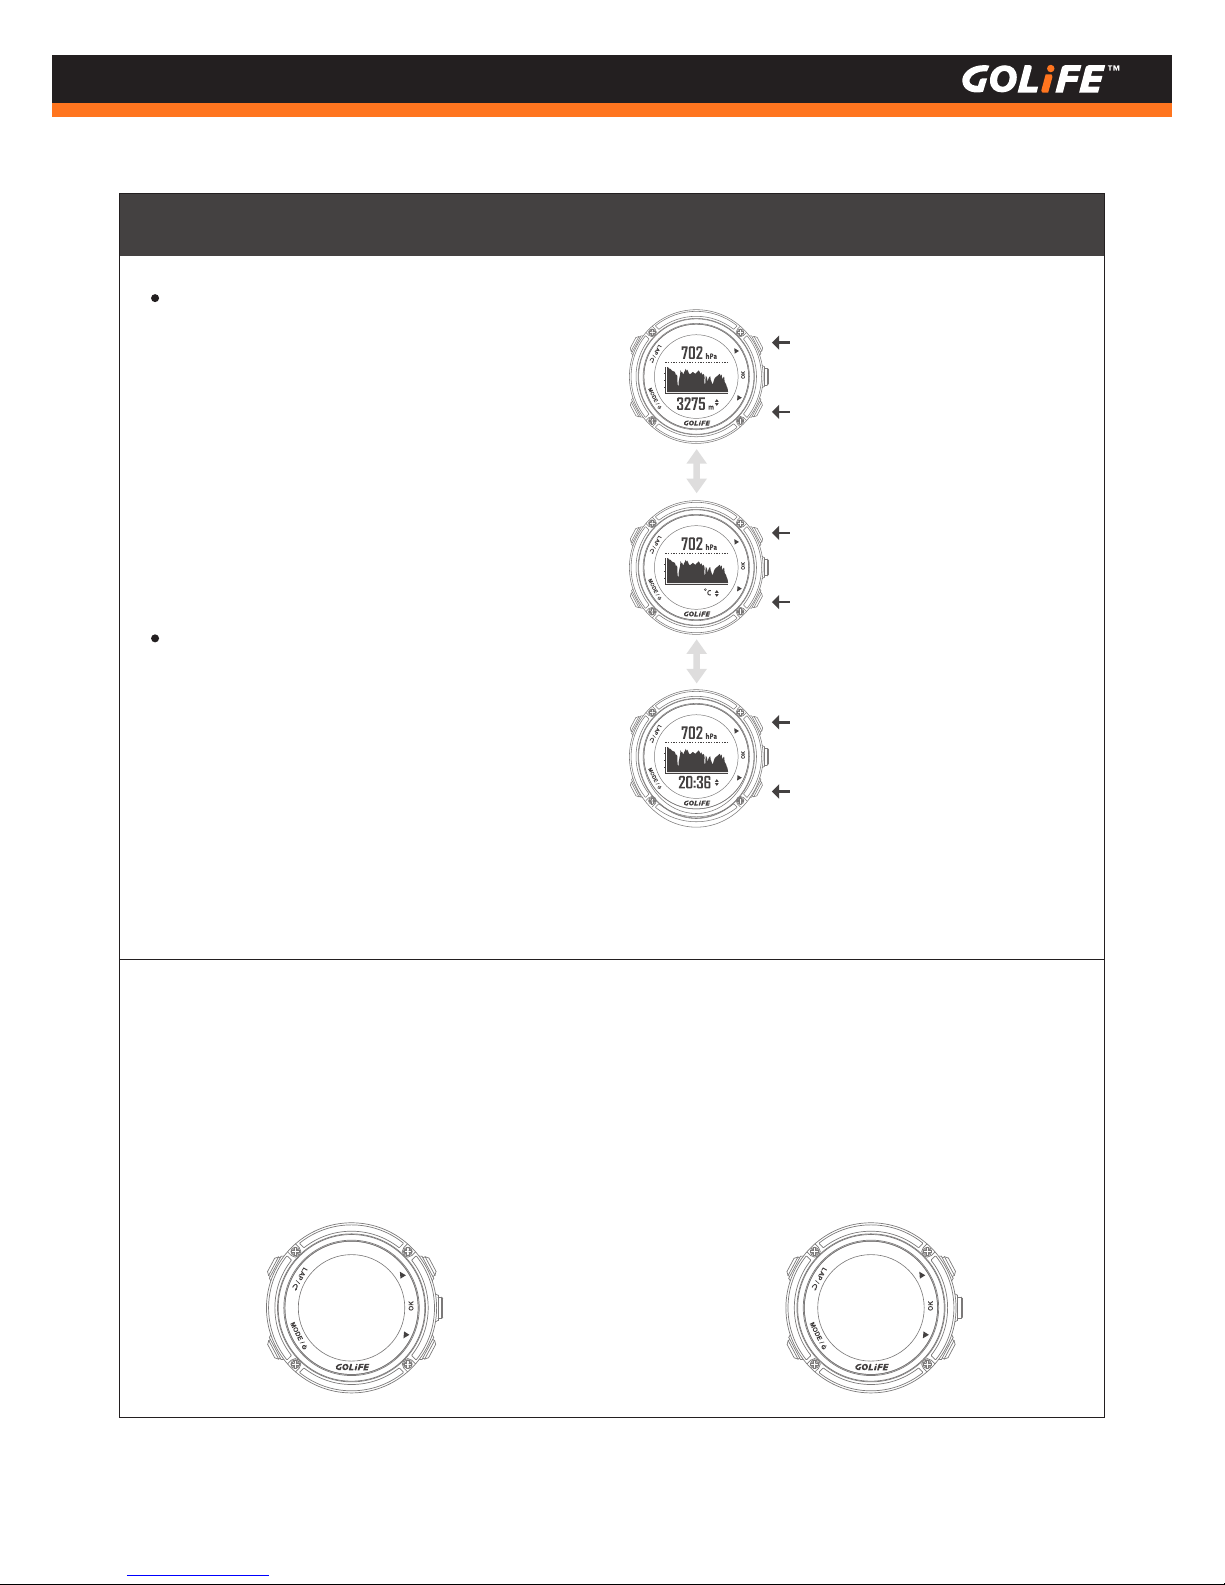
Atmosphere and Altitude
Calibrate barometer:
X-PRO has built-in barometer and altime-
ter. In general use, X-PRO collects altitude
and atmosphere data continuously in
every 5 mins, intervals and displays the
data in the atmosphere screen. Barometer
displays approximate altitude based on
atmospheric change, while barometer
displays environment pressure according
to the most recent calibration of altitude.
Temperature reading may be inaccurate
since your body temperature will affect
reading of temperature sensor if you are
wearing the watch on your wrist.
For accurate reading, you need to take it
off from your wrist or simply wear in
outside the hiking jacket or glove.
( Allow 10 minutes to stabilize. )
[ By Pressure ]: Enter Sea Level Pressure of
current location. Current Sea Level Pressure
of respective areas in Taiwan can be looked
up from the Central Weather Zone.
[ By Current Elevation ]: For example, after
entering current altitude when you reach
an altitude benchmark in the mountain,
GoWatch will automatically calibrate the
atmosphere value.
9.8
Elevation
Current atmosphere,
historic atmosphere chart,
current altitude
Press [ Up ], [ Down ]
to display:
Current atmosphere, historic
atmosphere chart, current
temperature
Press [ Up ], [ Down ]
to display:
Current atmosphere, historic
atmosphere chart, current
time
Sealevelpressure
06.36
inHg
Elevation
0800
m
Page 31
Steps Count
Current Coordinates
30
Copyright ©2016 GOYOURLIFE INC.
5
Modes and Functions
Compass
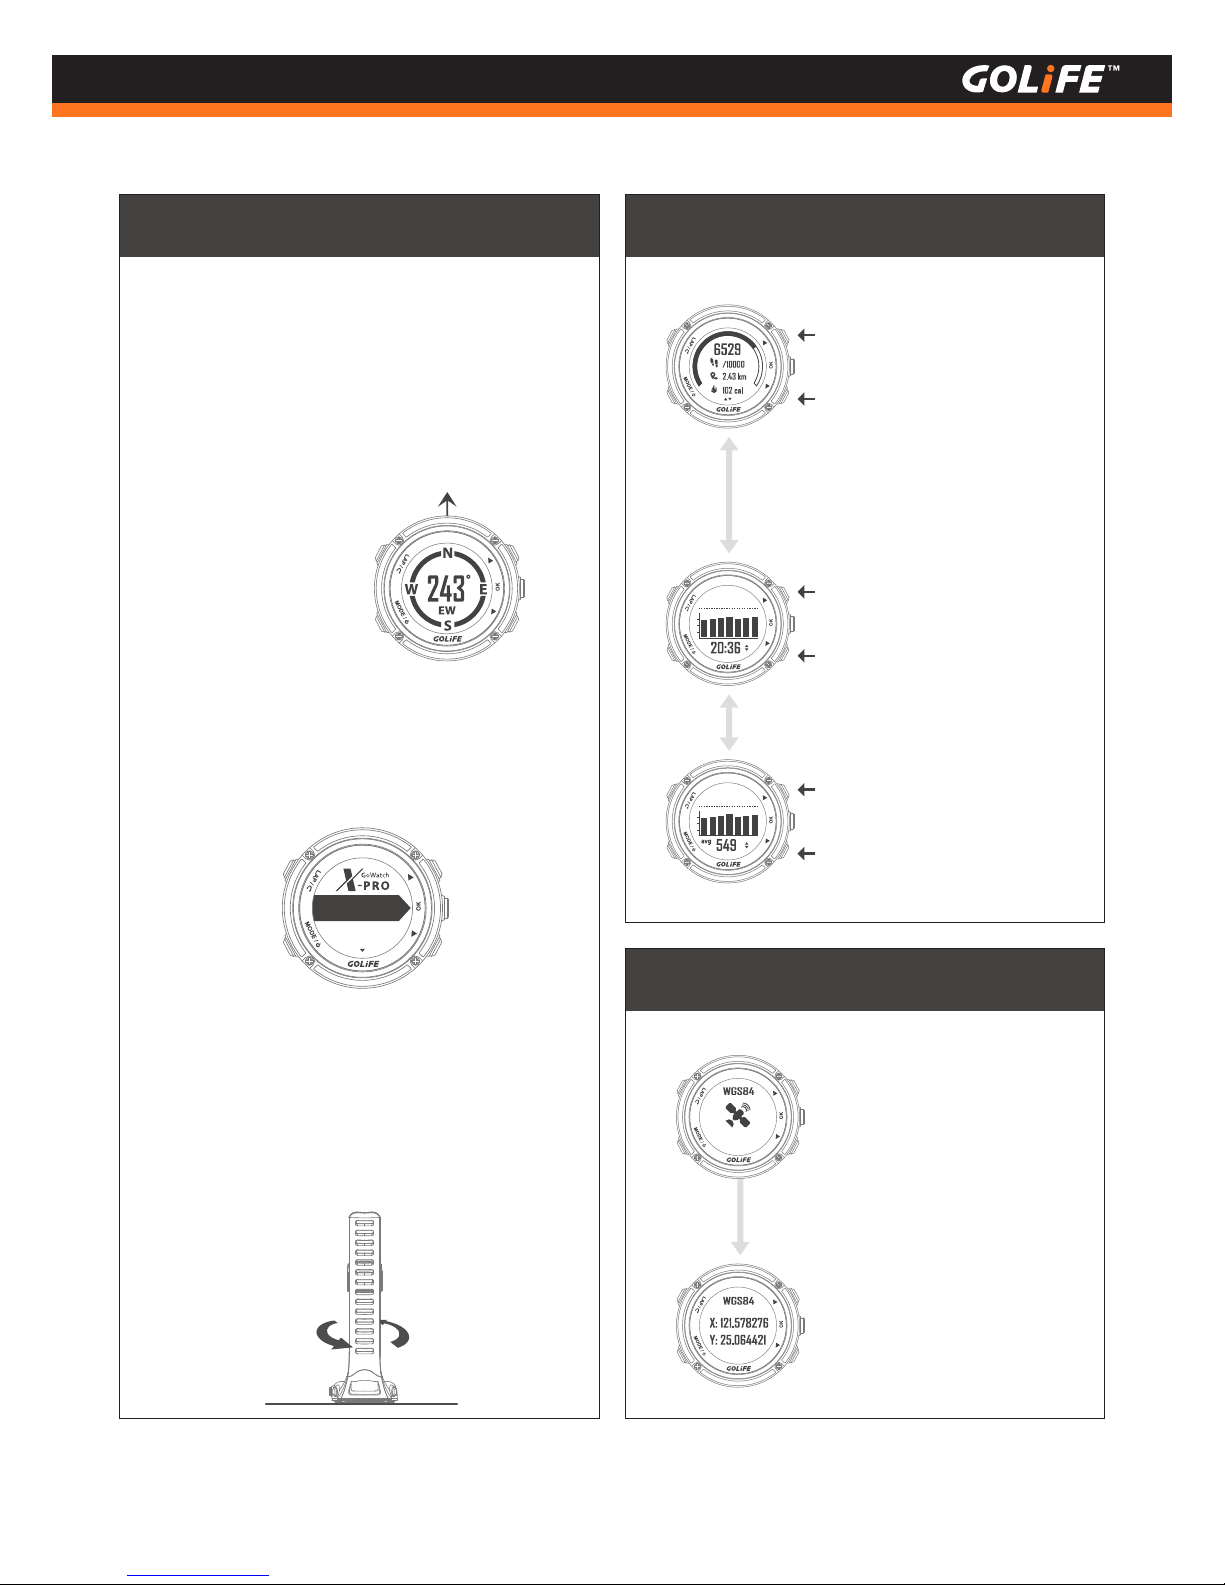
Week steps
Press [ Up ] or
[ Down ] to display :
Current Steps (ex. 6529)
Target Steps (ex. 10000)
Distance (ex. 2.43 km)
Calorie consumption
(ex. 102 kcal)
Press [ Up ] or
[ Down ] to display :
Week Steps Bar Chart
and current time
Go outdoors to wait
for GPS search and
positioning.
On completion of
positioning, coordinates
of current location
WGS84 is displayed.
Press [ Up ] or
[ Down ] to display :
Week Steps Bar Chart
and Average Steps
(ex. 549)
Compass will alter orientation in accordance
with the watch movement, with the center of
watch displaying the angle between Watch
Frontal and Magnetic North Point together
with the orientation.
Compass calibration :
Go to Menu Mode → [ Setting ] → [ Compass ]
→ [ Calibration ].
[ Calibration ] : For initiating or re-calibrating
the Compass, press [ OK ] and place the
watch on a horizontal surface with its face
down. Turn the watch at the spot until the
message of successful calibration shows up.
Watch Frontal
Declination
Calibration
Week steps
Searching...
Page 32
31
Copyright ©2016 GOYOURLIFE INC.
5
Modes and Functions
Message
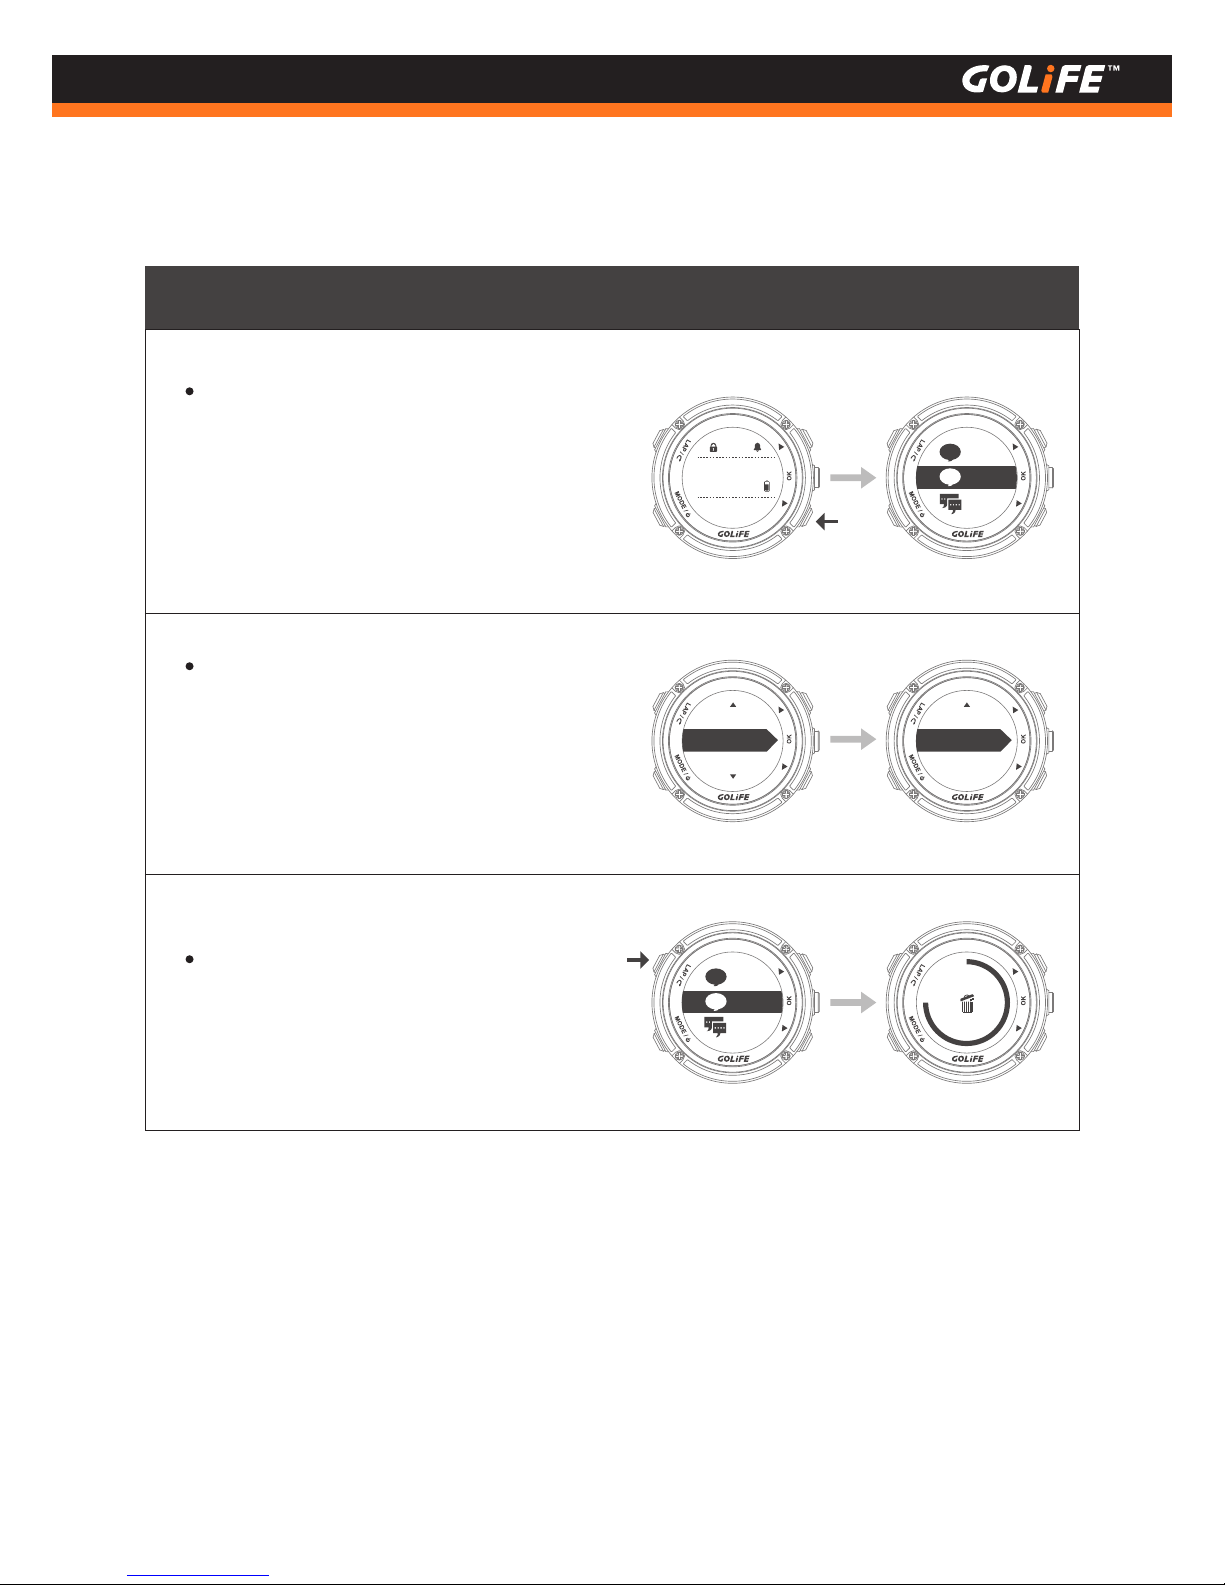
During Clock mode of GoWatch X-PRO,
press [ Down ] to view messages and
notifications of communication apps such
as LINE, Facebook, etc. ( Smart phone
notification must be open in advance. )
For deleting a message, Press and Hold
[ LAP ] Key until a circle appears on the
watch, indicating the deletion is done.
For activating Message Function, go to
Menu → [Track/Notify] → [Msg Notify]
→ [On] .
See P61 for closing specific message for
extending battery service performance.
※
ALEX
Josh
LINE
Andy
LINE
Track/Notify
Navigate
Settings
ON
Msg notify
MAY
23
WED
23:45
ALEX
Josh
LINE
Andy
LINE
Page 33
32
Copyright ©2016 GOYOURLIFE INC.
5
Modes and Functions
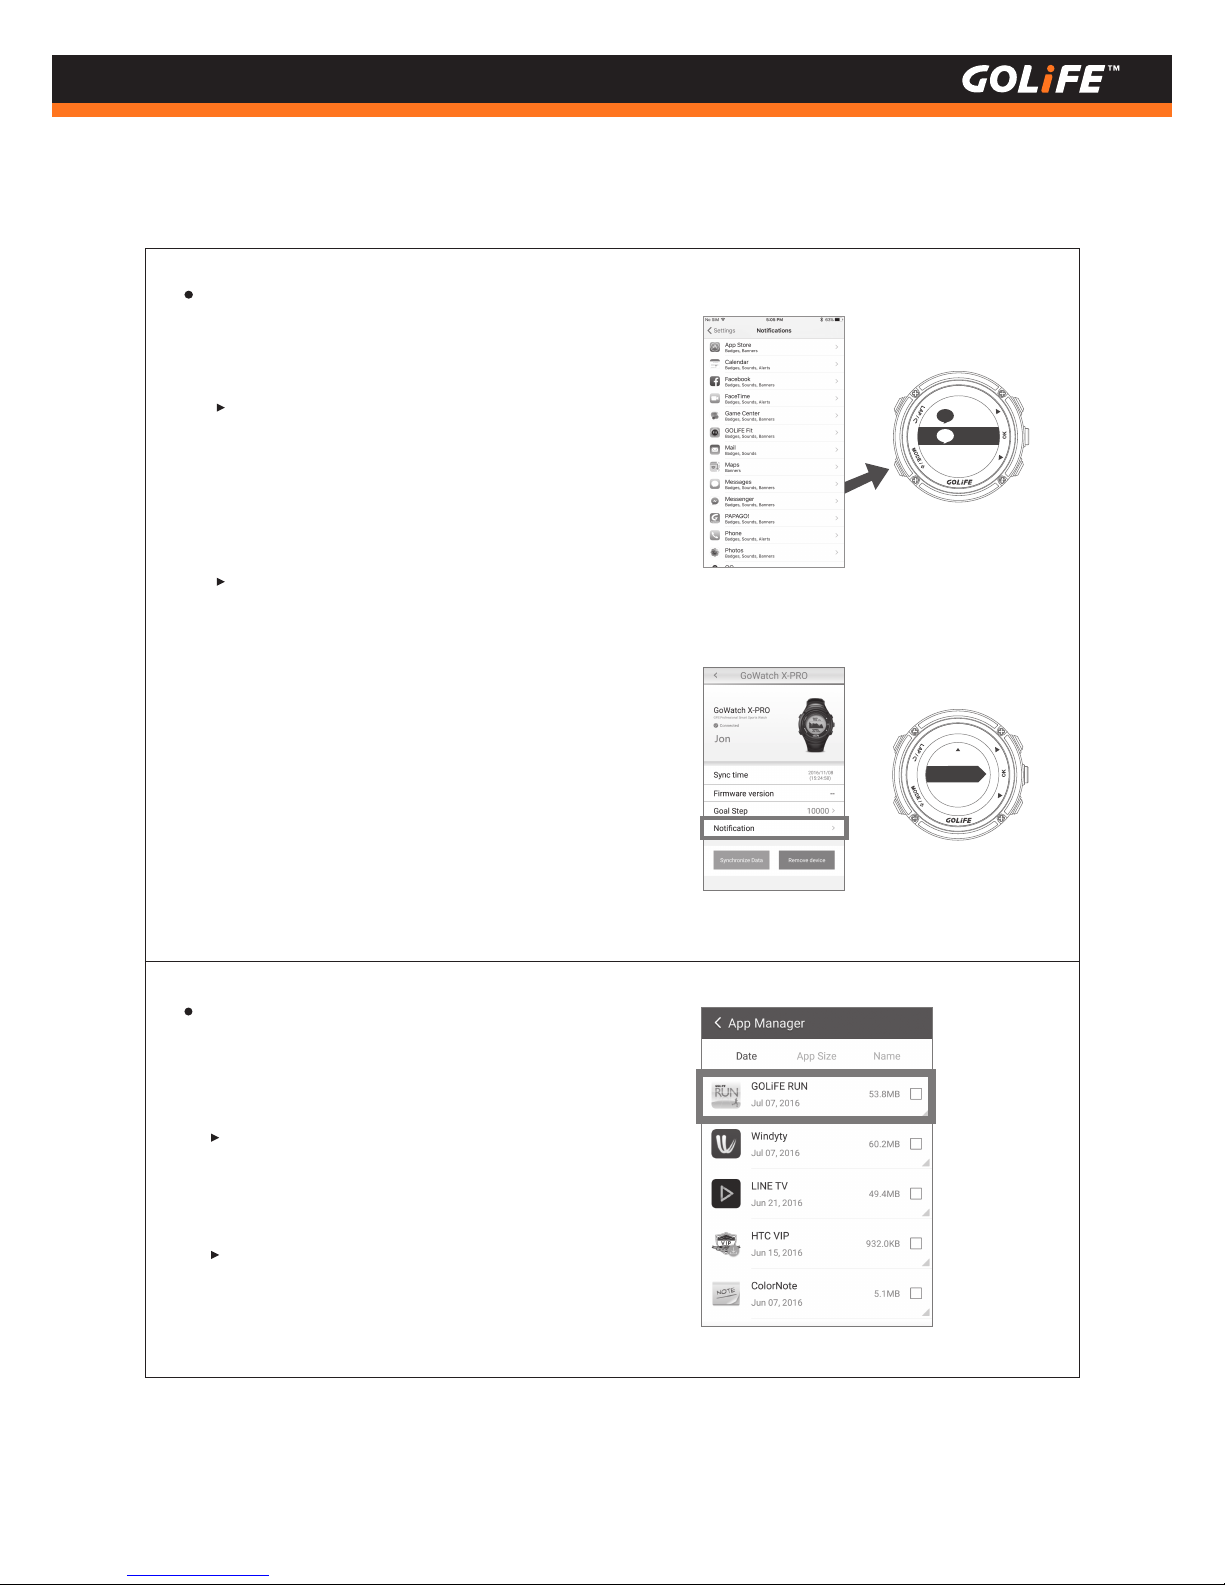
In iOS System :
You may set type of App
and message in [Notifications] of your
smart phone; notification displayed by
X-PRO will be consistent to these settings.
Manage Notifications: You may manage
messages displayed on the X-PRO using a
paired mobile device.
In the event an Android series smart phone
encounters Bluetooth disconnected problems,
refer to the following settings.
Josh
LINE
Andy
LINE
In Android System :
Open GOLiFE RUN App and Bluetooth and
pair with X-PRO; select [ Device ]→Select
X-PRO → [ Notifications ] before selecting
to open or close notification. Or, go to
X-PRO Menu Mode → [ Track/Notify ] →
[ Msg notify → [ Off ]. (This procedure will
close all the messages.)
For how to install GOLiFE RUN App, see P17;
for pairing method, see P18.
※
If the phone has Auto Start Management
function, please set GOLiFE RUN as Allow
for Auto Start.
Enter the Auto Start Management List and
open the GOLiFE RUN, add GOLiFE RUN
into the Allow for Auto Start list.
iOS
Android
ON
OFF
Page 34
For how to install GOLiFE RUN App, see P17; for pairing method, see P18.
※
33
Copyright ©2016 GOYOURLIFE INC.
5
Modes and Functions
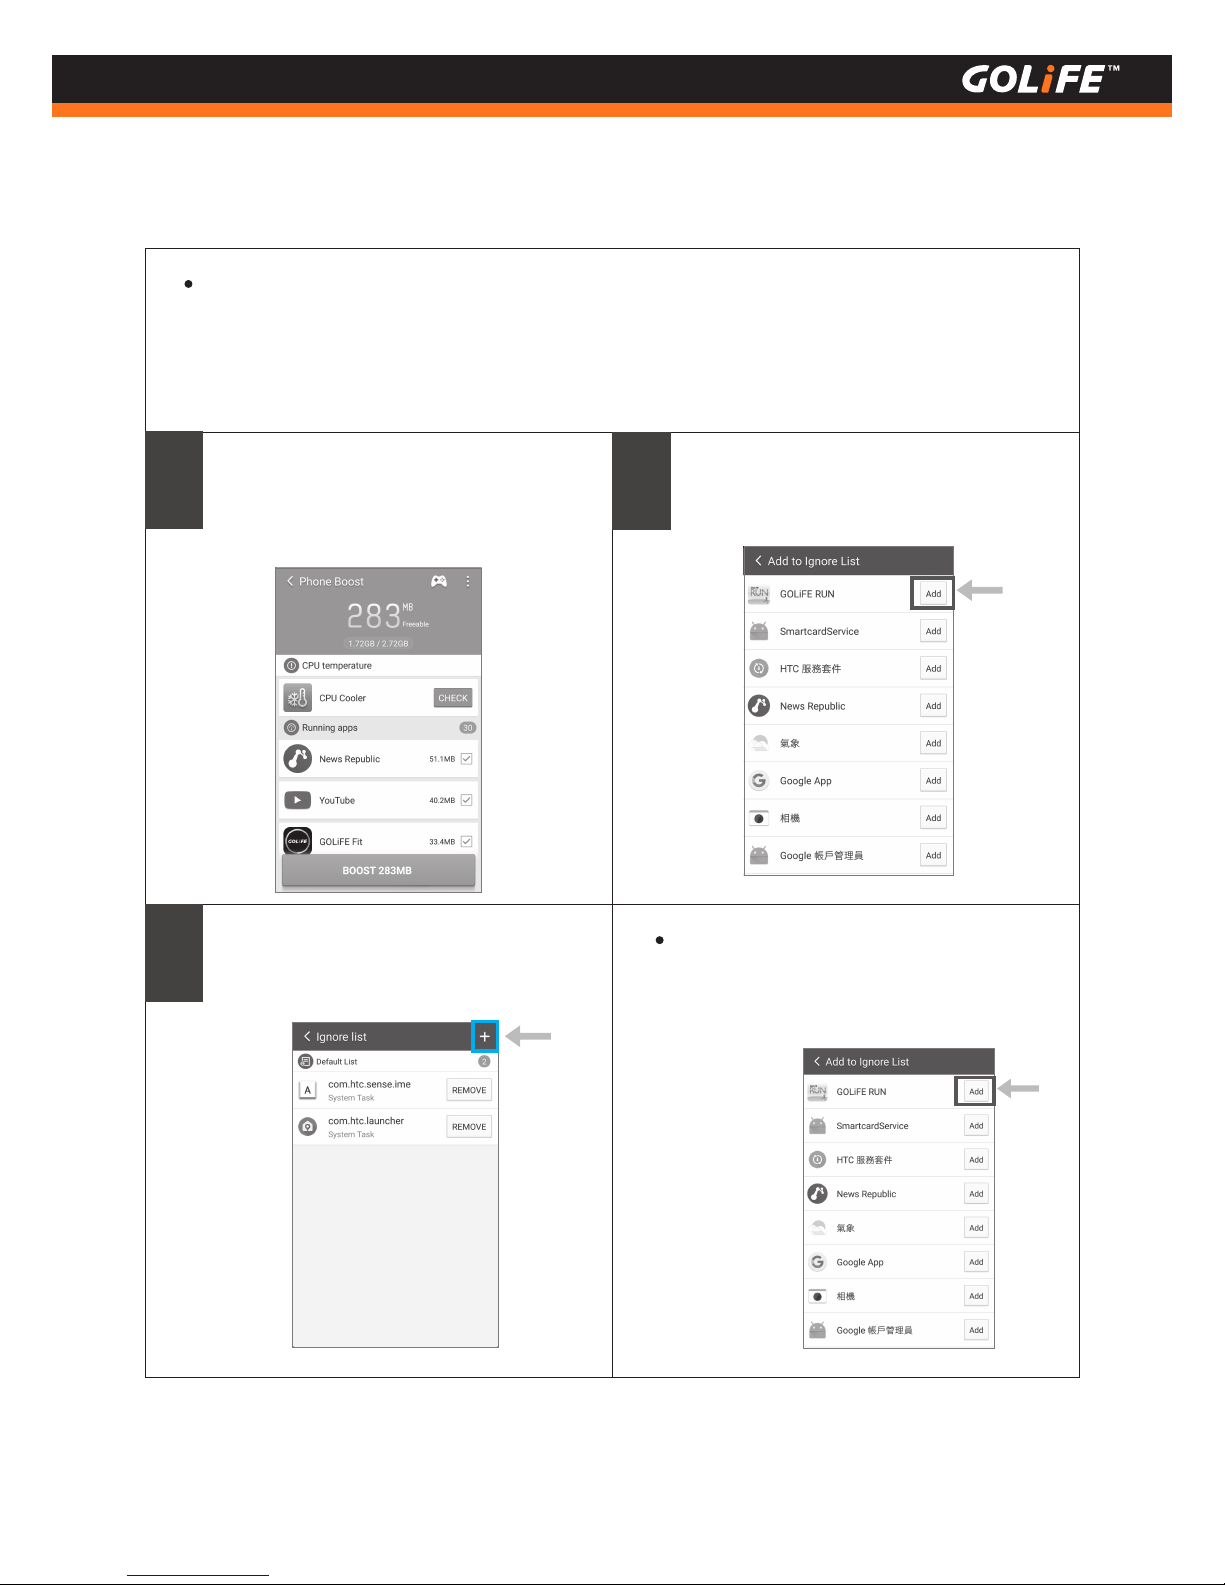
For smart phones provided with One-key Delete, One-key Acceleration, Smart Phone Acceler-
ation, Clear Internal Storage, Release Memory or similar functions, add GOLiFE RUN into the
Ignore List (or Exception List, Protected List, White List).
Open [Smart Phone Acceleration] setting,
click More Functions at the upper right
corner and select [Ignore List].
Enter [ Ignore List ] page and click [ + ] at
the upper right corner for adding a new
app.
Find GOLiFE RUN and click [ Add ].
If the smart phone has One-key power
saving, Power Optimization, or similar
functions, please add GOLiFE RUN to
Ignore List.
1
2
3
Restart your smart phone after completing settings of all the above functions.
※
Page 35
For adjusting page info type, go to [ Setting ] → [ Page ]; see P45 for
more info.
※
After Sync of activity data, you may select a corresponding activity by selecting [Activities]
at the upper left corner of GOLiFE RUN App to view data and tracks, or log in the GOLiFE
RUN website to view the same. ( For how to install GOLiFE RUN App, see P17. )
※
34
Copyright ©2016 GOYOURLIFE INC.
5
Modes and Functions
Start Activity
Status of the current exercise is displayed when you start an activity.
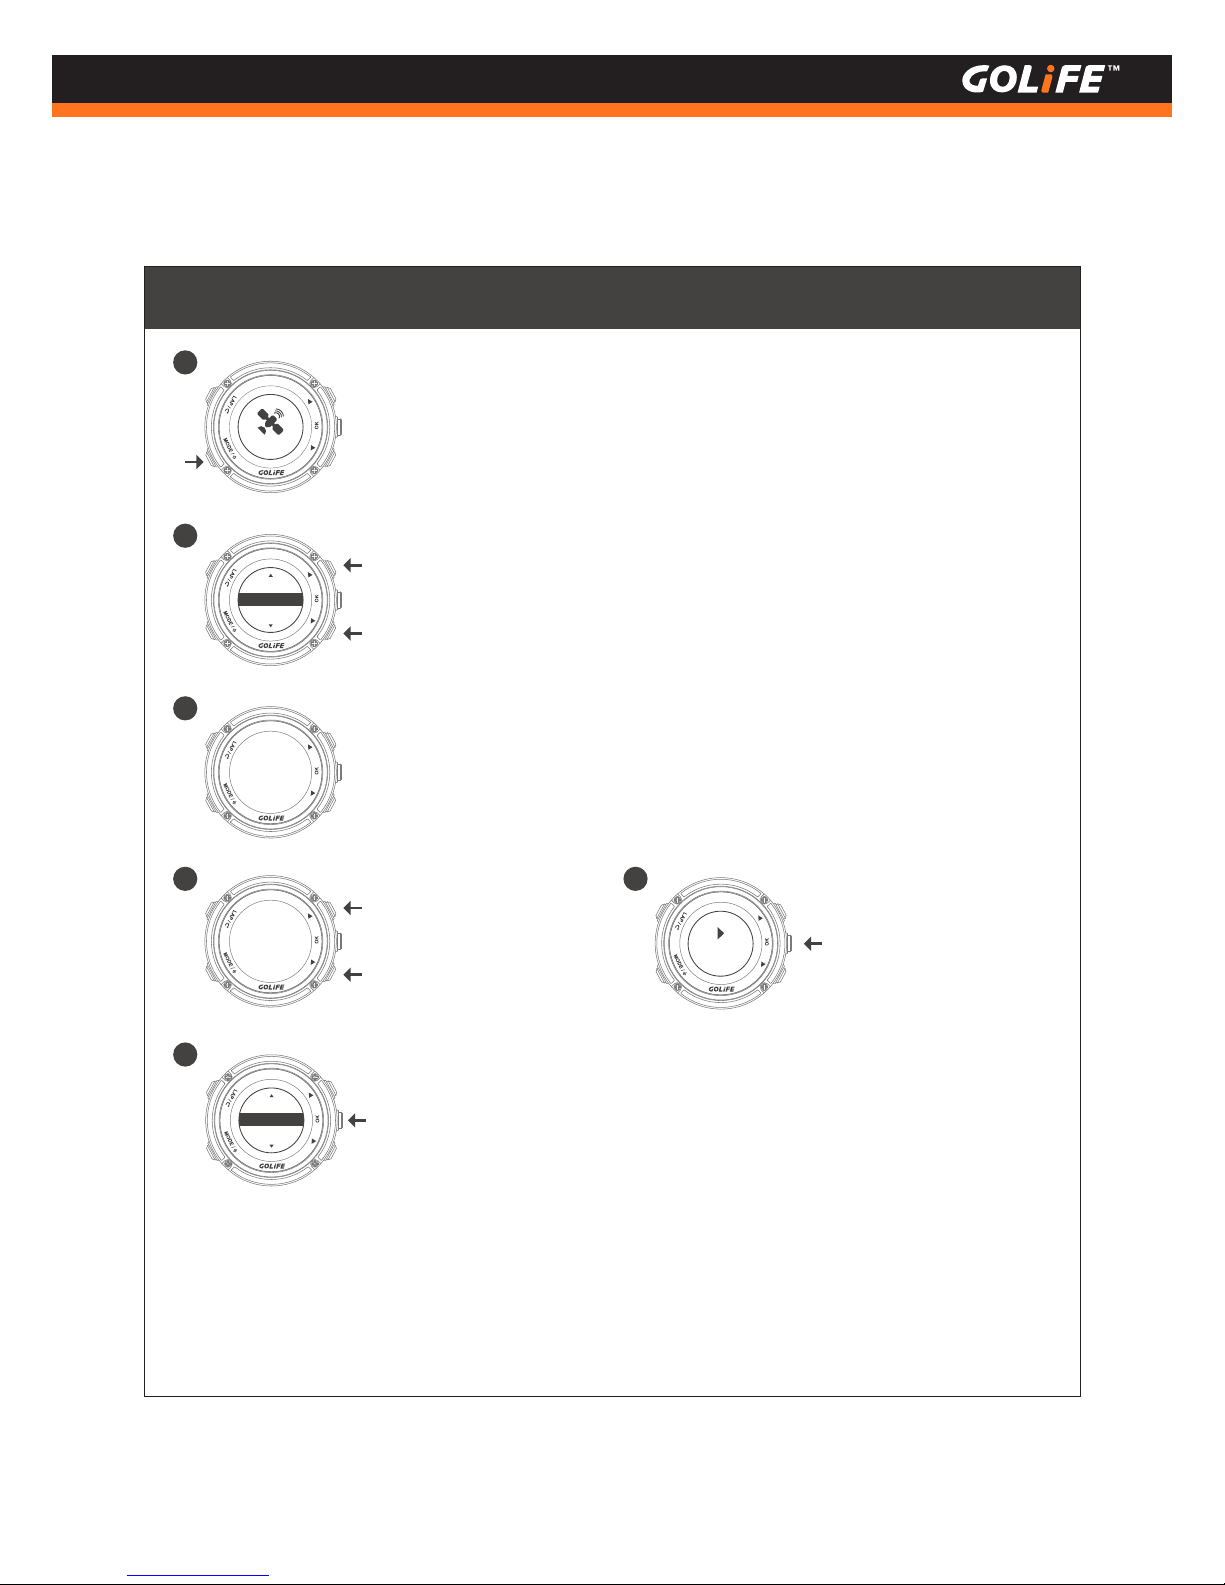
Press [ MODE ] and wait for GPS search and positioning ( Press [ OK ] twice
to skip GPS search for Indoor Cycling and Indoor Running ).
Press [ OK ] on completion of positioning; followed by pressing [ Up ] or
[ Down ] to select an activity mode ( including Run, Cycling, Triathlon,
Hiking, Walk, Marathon, Half Marathon, Swimming, Indoor Running,
Indoor Cycling, etc. ), then press [ OK ].
AVG speed
km
07:15
3
1
Searching...
5
Press [ OK ] once to
pause activity log;
press [ OK ] again to
continue.
Start
6
At the end of exercise, press [ OK ] to pause; press [ LAP ], the screen
prompts [ Resume ], [ Save ], [ Abort ]; select [ Save ] to store the activity
data.
2
Running
Triathlon
Cycling
Abort
Resume
Save
4
Distance
km
20
Press [ Up ] or [ Down ]
to check activity data.
Page 36
35
Copyright ©2016 GOYOURLIFE INC.
5
Modes and Functions
Activity Mode
Heart rate
Curr. pace
AVG speed
km
[ Up ] / [ Down ]: Switch pages of exercise
information ( GoWatch X-PRO provides 6
pages for viewing data, select with Menu
Mode → [ Setting ] → [ Page ] for setting
up data to be displayed on pages. )
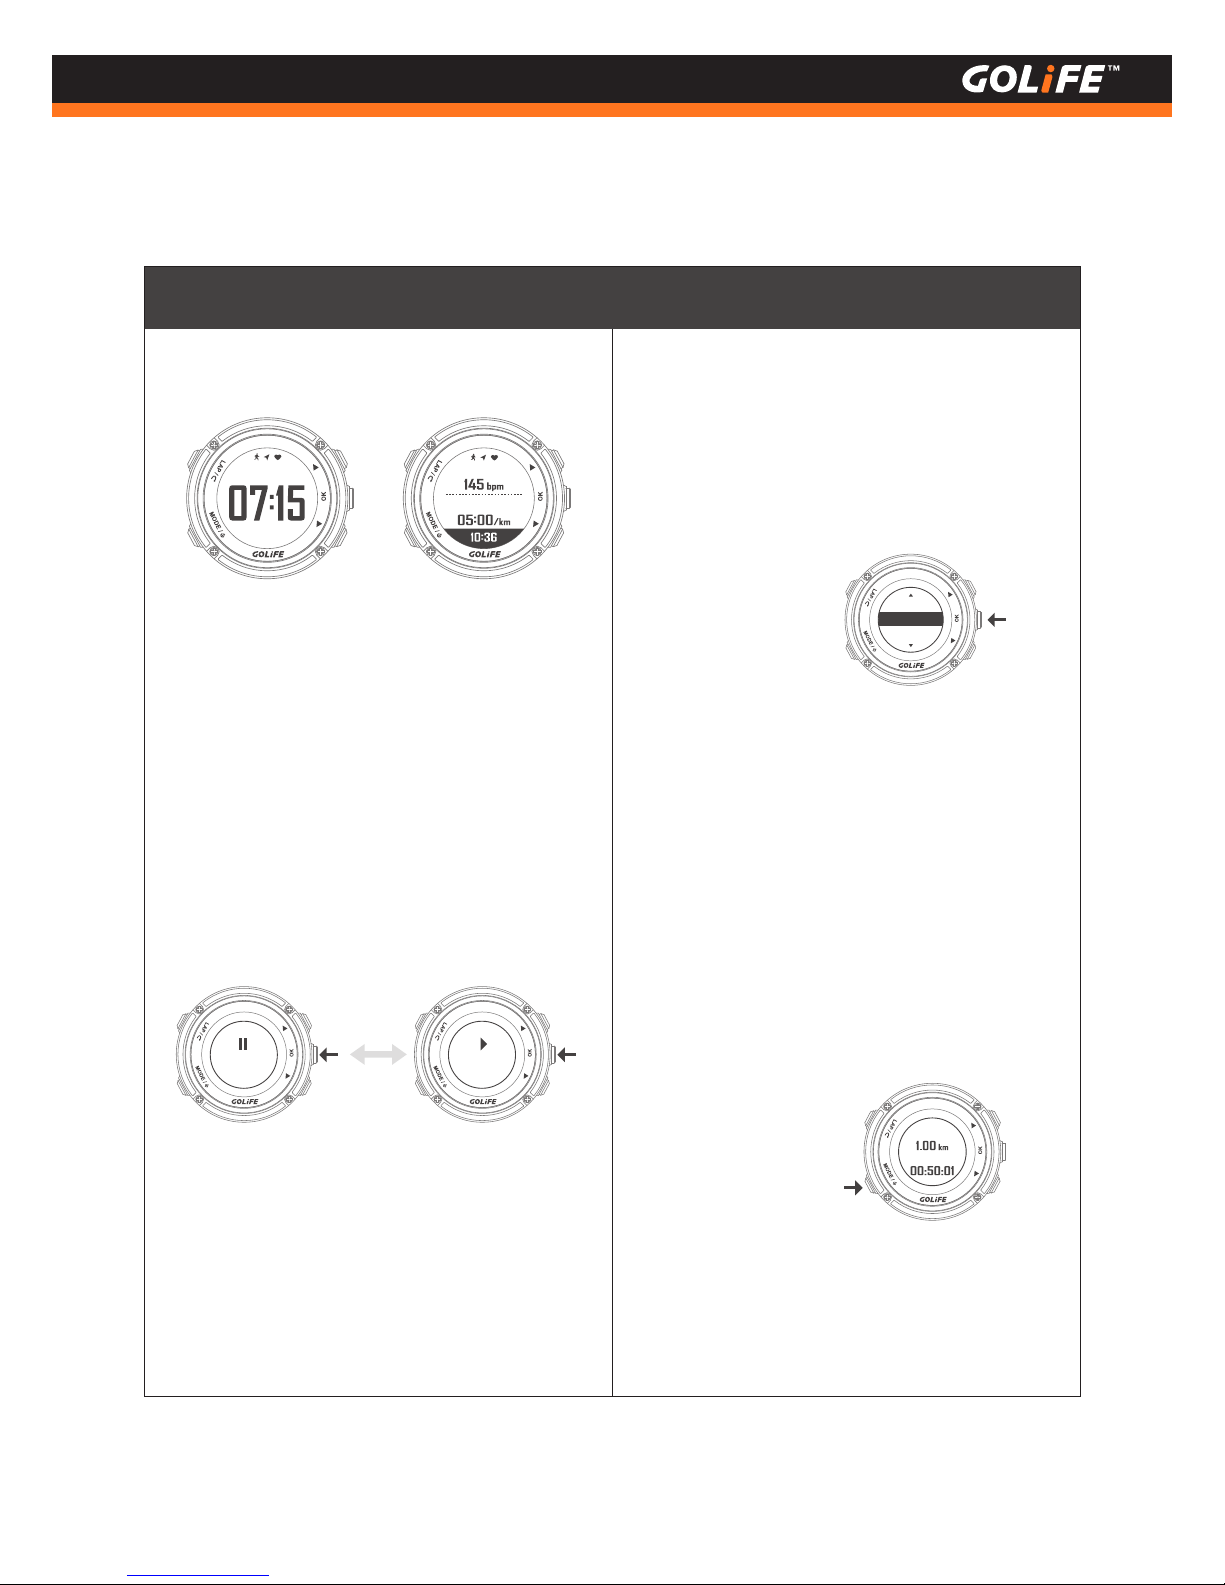
Manual Pause: Press [ OK ] to pause
recording; press [ OK ] again to resume
recording ( see Fig.1 ).
Recording Exercise:
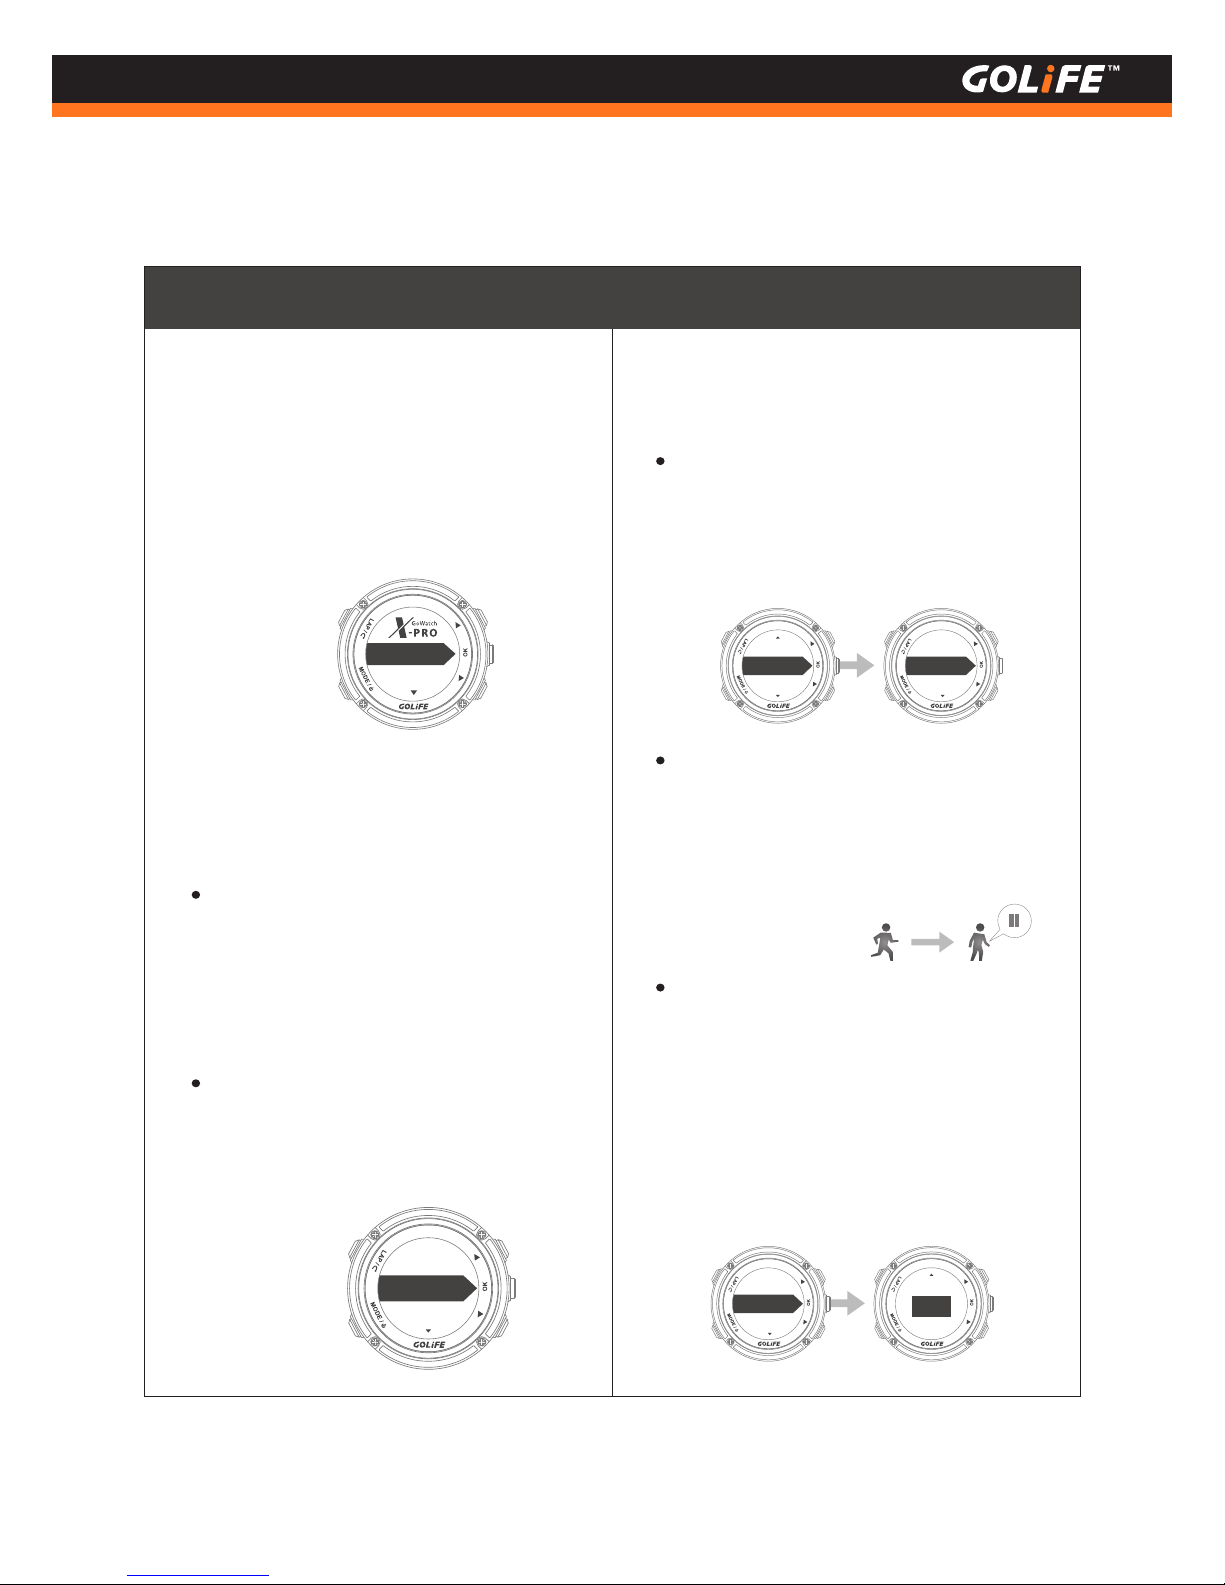
You may select whether to Auto Pause
recording via Menu Mode → [ Activity ] →
[ Settings ] → [ Auto Pause ] or not.
Auto Pause:
Press [ OK ] to pause recording;
press [ LAP ], the page prompts [ Resume ],
[ Save ], [ Abort ]; select [ Save ] to store activity
data. ( See Fig. 2 )
Stop Recording:
Press [ LAP ] to activate message of Lap Page.
To adjust message content, go to Menu
Mode → [ Setting ] → [ Page ] → [ Lap Page ].
Manual Lap:
Calculate lap based on distance or time;
settings can be adjusted by Menu Mode
→[ Activity ] → [ Settings ] → [ Auto laps ].
( See Fig. 3).
Auto Lap Count:
Press [ MODE ] to switch over to Time Mode
or Menu Mode.
Switch Mode:
Activity Mode Functions:
Fig.1
Fig. 2
Fig.3
Abort
Resume
Save
Start
Lap dist
Lap time
Pause
Page 37
36
Copyright ©2016 GOYOURLIFE INC.
5
Modes and Functions
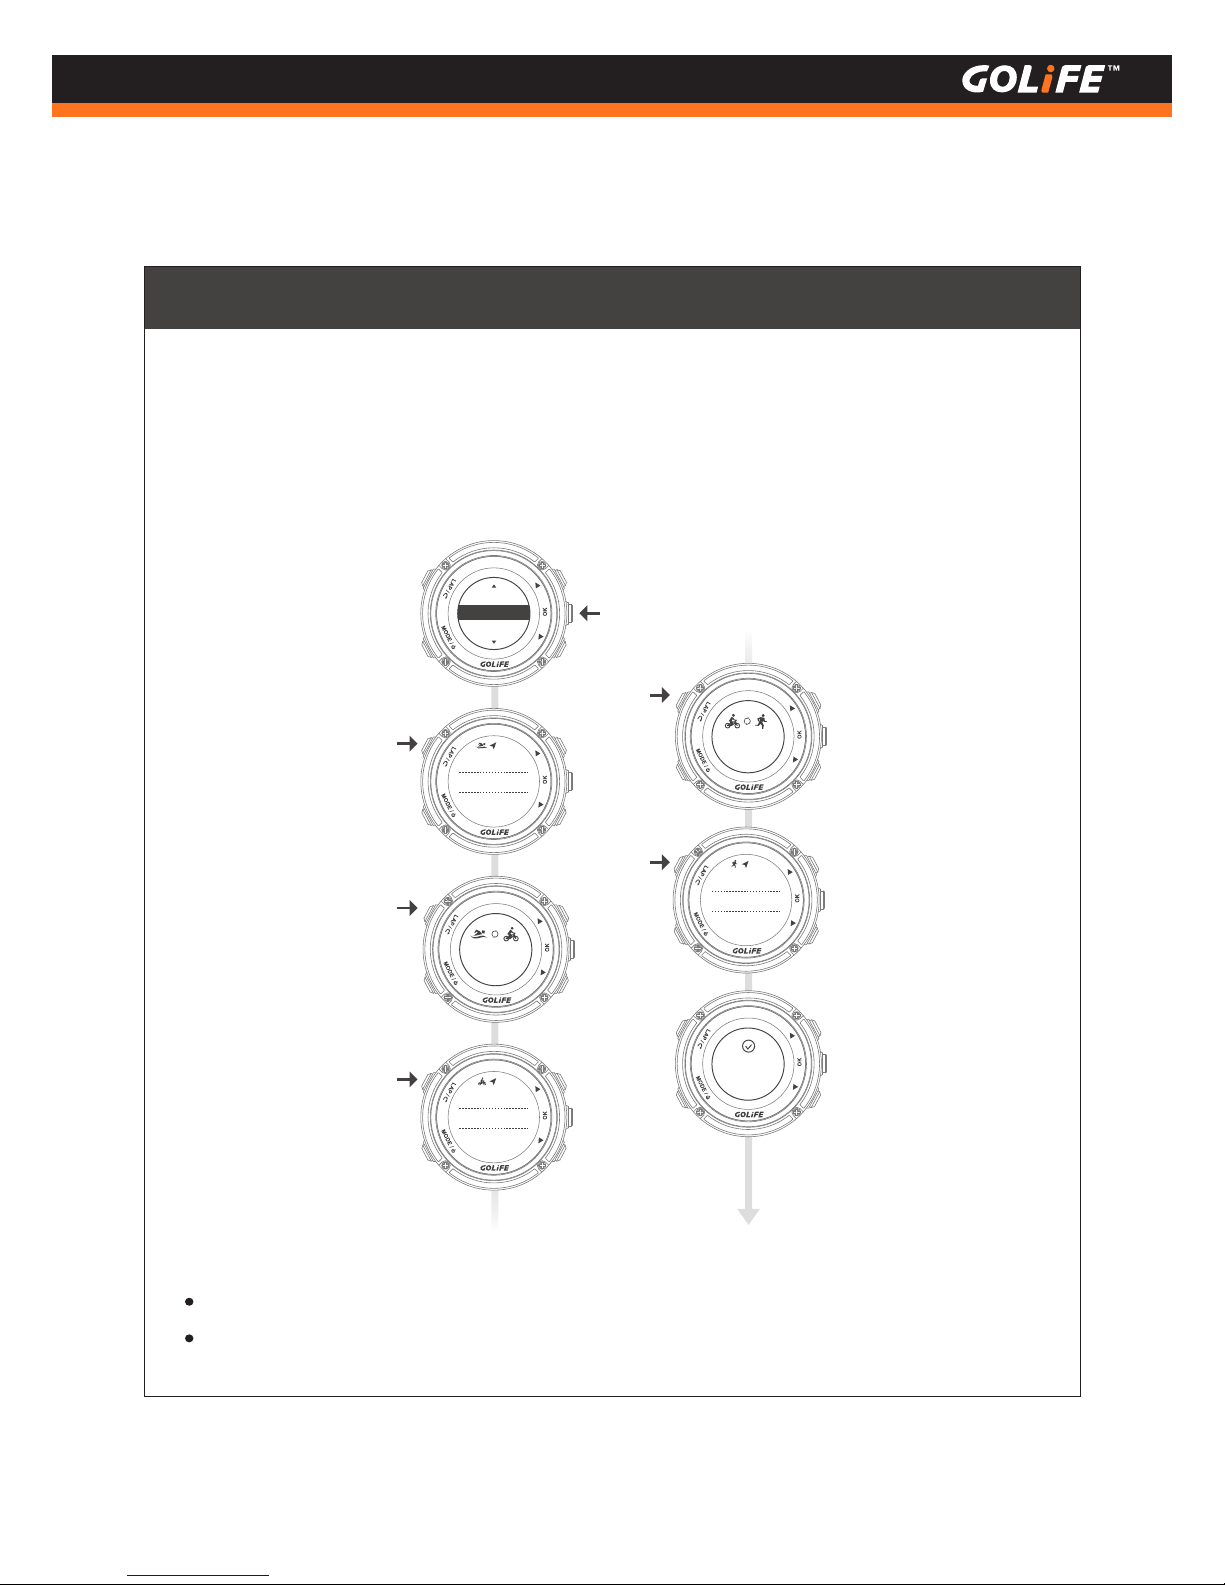
Press [ LAP ] to switch-over to Transition or Next Activity
To set up type and sequence of 3 items under Triathlon, go to Menu Mode → [ Activity ] →
[ Settings ] → [ Triathlon Set ] → Activity 1-3.
In Triathlon Activity Mode:
Check exercise and lap log:
24:35
1.05
km
3.12 kph
swim
time
swim
dist
curr.
spd
Transition
00:05:37
1:10:04
55.10 km
45.30 kph
bike
time
bike
dist
curr.
spd
Transition
00:02:23
35:12
6.55 km
11.15 kph
run
time
run
dist
curr.
spd
Triathlon
Complete
Running
Triathlon
Cycling
You may check via Menu Mode → [ Activity ] → [ Log ].
In Triathlon Mode, new screens will be added for Triathlon items.
Activity Mode
Page 38
37
Copyright ©2016 GOYOURLIFE INC.
5
Modes and Functions
Menu Mode
Historic records are listed by date.
Press [ OK ] to enter and view detailed
exercise info.
[ Log ]
Menu Mode → [ Activity ] → [ Log ]
Activity: Menu Mode → [ Activity ]
[ Settings ]
[ Transition ]: For setting Transition
On/Off under the Triathlon, Default is [
On ]. If [ Off ] is selected, pressing [ LAP ]
in Triathlon will directly switch over to
next exercise activity.
[ Activity ]: Set up type and sequence of 3
items under Triathlon; default is Activity
1: Swimming; Activity 2: Cycling; Activity
3: Running.
1.
[ Triathlon Set ]:
Menu Mode→ [ Activity ] → [ Settings ]
→ [ Triathlon Set ] → [ Transition ]
Set whether to pause activity record or
not when reaching a pre-set low speed
or a full stop during activity recording.
Default setting is [ OFF ].
If set to [ When Stop ], GoWatch pauses
activity recording when the speed
drops to 0 during the exercise, it
resumes recording automatically when
movement re-starts.
If set to [ Custom Spd ], you need to set
a minimum speed; GoWatch pauses ac-
tivity recording when movement gets
below the pre-set minimum speed
during the exercise. It resumes record-
ing automatically when movement ex-
ceeds the minimum speed.
2.
Auto Pause: Menu Mode → [ Activity ]
→ [ Settings ] → [Auto Pause ]
Auto pause
Alarm
Triathlon set
Custom spd
Auto pause
Below
3:00
kph
Custom spd
Auto pause
Auto pause
Custom spd
Gym
Activity
Page 39
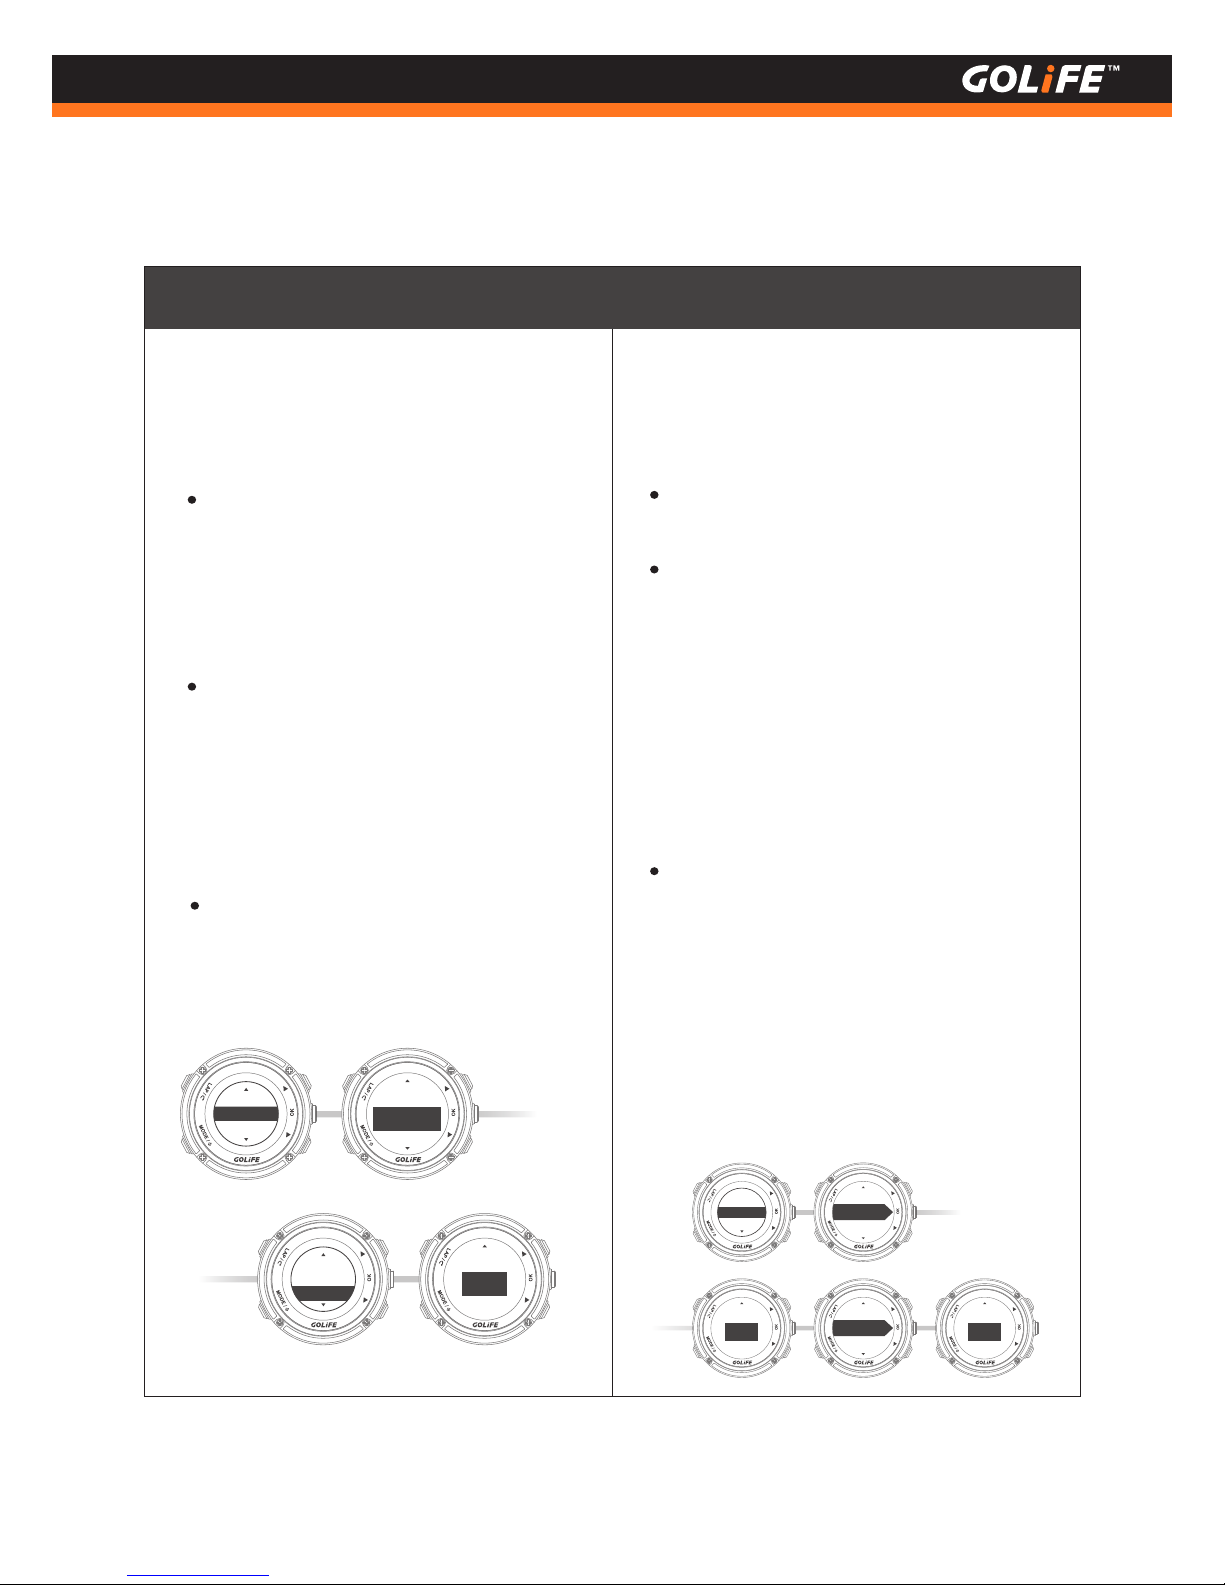
38
Copyright ©2016 GOYOURLIFE INC.
5
Modes and Functions
Menu Mode
To enable [ Speed/Pace ] alarm, set for
taking [ Speed ] or [ Pace ] as the unit.
When taking [ Speed ] ( km/hour or
mile/hour ) as baseline, set the switch of [
Fast Speed ] / [ Low Speed ] to [ On ], then
set values of [ Fast than ] / [ Slower than ]
speeds. GoWatch gives a BEEP/Vib. alarm
when the pre-set Max/Min speed is
reached during the exercise, to facilitate
an effective training.
When taking [ Pace ] ( minute/km or
minute/mile ) as baseline, set the switch of
[ Fast Speed ] / [ Low Speed ] to [ On ],
then set values of [ Fast than ] / [ Slower
than ] Paces. GoWatch gives a BEEP/Vib.
alarm when the pre-set Max/Min pace is
reached during the exercise, to facilitate
an effective training.
2.
[ Speed /Pace ]: Menu Mode→ [
Activity ] → [ Settings ] → [ Alarm ]
→ [ Speed/Pace ]
Fast speed
On
Pace
Speed
Slower than
5.00
kph
Low speed
On
Faster than
10.00
kph
[ Alarm ]
For setting up a BEEP or vibration alarm
according to the pre-set time/distance
and frequency of occurrence, or after
reaching a pre-set Speed/Pace/Heart
Rate.
For enabling vibration alarm, go to Menu
Mode → [Settings] → [ Sound/Vib. ]
Menu Mode → [ Activity ] → [ Settings ]
→ [ Alarm ]
To enable [ Time/Dist. ] alarm,
set Frequency as [ Once ] or [ Repeated ],
then set [ Time/Dist. ] interval for each
alarm.
1.
[ Time/Dist. ]:
Menu Mode → [ Activity ] →
[ Settings ] →[ Alarm ] → [ Time/Dist. ].
Repeated
OFF
Once
Alert at
00:01:00
Alert at
5:00
km
OFF
Repeated
Once
Page 40
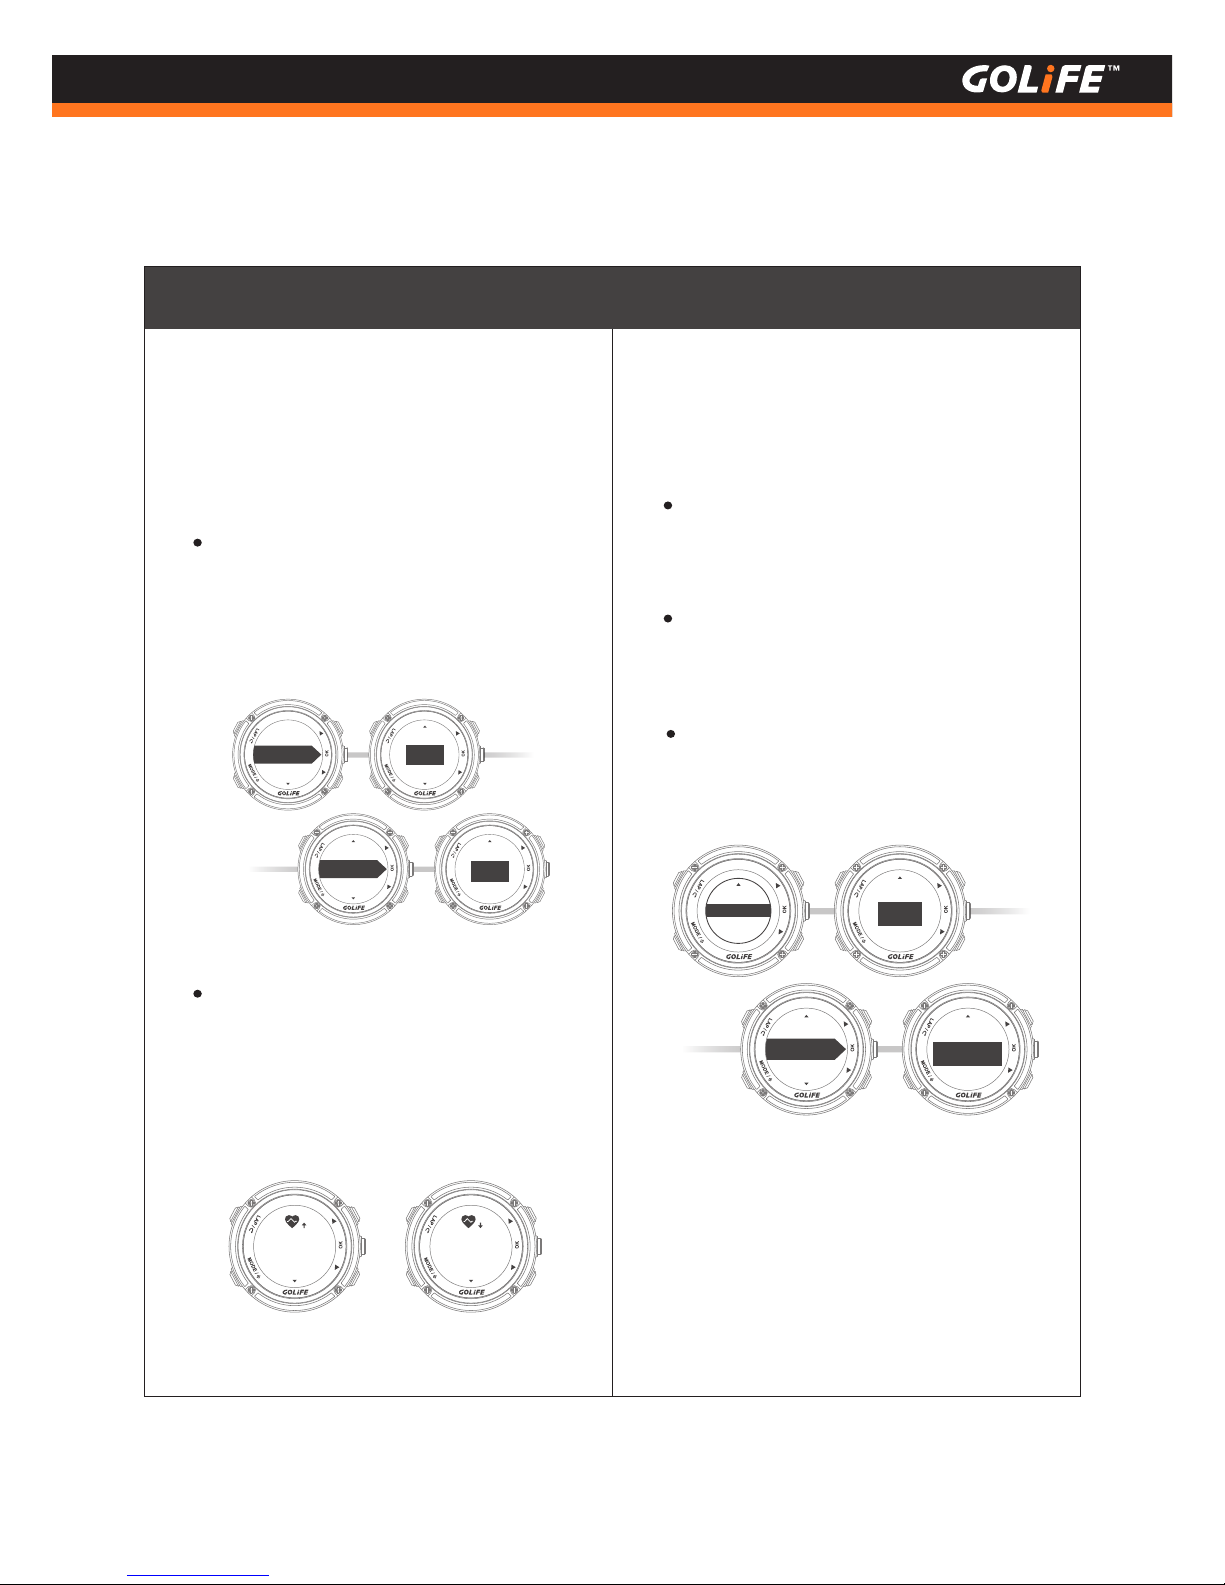
[ Auto laps ]
Set whether to add a lap record when
reaching a pre-set lap condition.
Default setting is [ Off ].
If [ Distance ] is set, then set distance
interval ( km or mile ) for adding a lap
count.
If [ Exercise Time ] is set, then set time
interval for adding a lap count.
Menu Mode→ [ Activity ] → [ Settings ]
→ [ Auto laps ]
39
Copyright ©2016 GOYOURLIFE INC.
5
Modes and Functions
Menu Mode
When taking [ Heart Rate ] ( bpm ) as
baseline, set switch of [ Max HR alert ] / [
Min HR alert ] to [ On ], then set [ Over ]
/ [ Below ] HR values.
During the exercise, when reaching the
pre-set values of Max/Min HR, GoWatch
gives a BEEP/Vib. alarm, to facilitate an
effective training.
Heart Rate:
Menu Mode→ [ Activity ] → [
Settings ] → [ Alarm ] → [ Heart
Rate ]
3.
Max HR alert
On
Over
180
bpm
Below
60
bpm
Min HR alert
On
Over max
HR
Below min
HR
Distance
1.00
km
Distance
Exercise time
Exercise time
00:10:00
Auto laps
Exercise time
Page 41
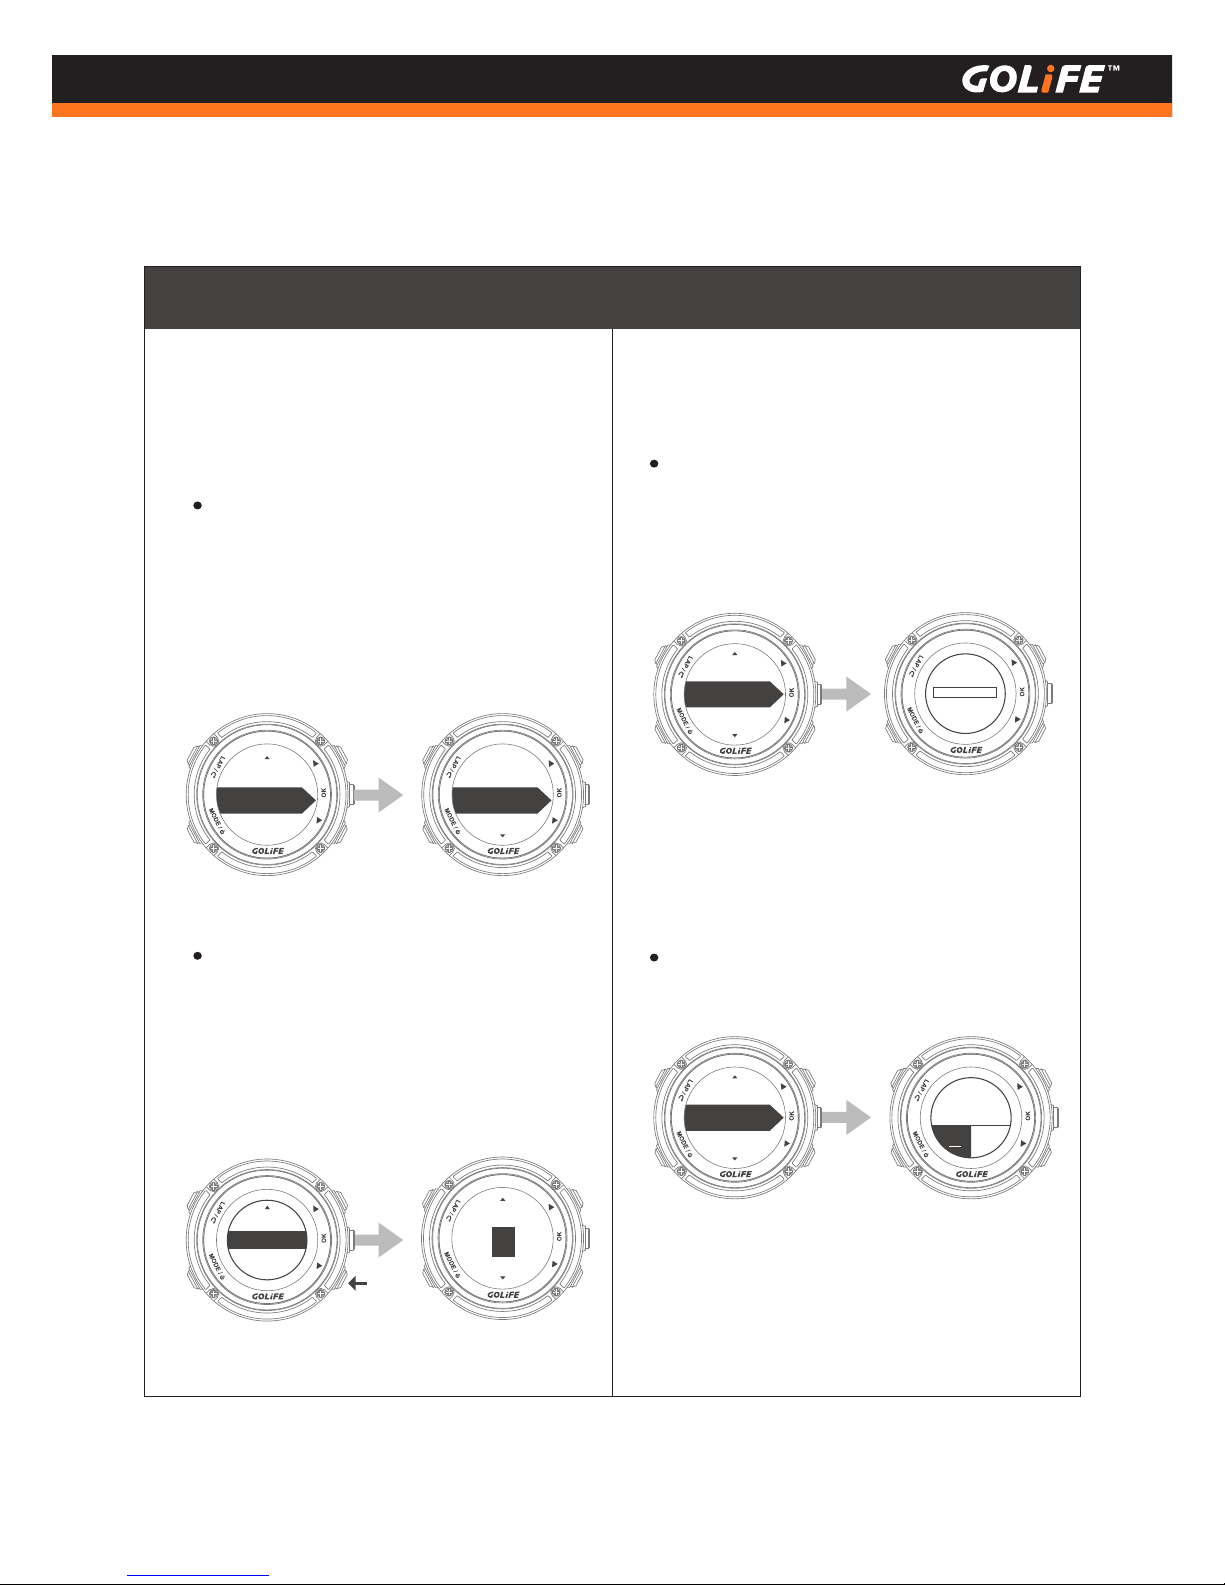
Menu Mode
[ Interval ]
Set interval for recording a GPS point,
and allow checking for remaining time of
data log. [ Record Type ] default value is [
Per Second ]; Total length of GoWatch
data records is 45 hr 30 min.
If you wish to extend data length, set [
Record Type ] to [ Custom Time ], then
set [ Time interval ] ( Maximum setting is
20s ); on completion of setting, verify the
remaining time.
Menu Mode → [ Activity ] → [ Settings ]
→ [ Interval ]
[ Memory ]
Check for available memory of GoWatch.
System is capable of recording 45.5
hours of data when no Activity Log
exists.
Menu Mode → [ Activity ] → [ Memory ]
[ Delete all ]
Select [ Yes ] or [ No ] for deleting all
the records.
Menu Mode→ [ Activity ] → [ Delete all ]
40
Copyright ©2016 GOYOURLIFE INC.
5
Modes and Functions
Record type
Per second
Auto laps
Interval
Per second
Custom time
Memory
45.5 hr
Time interval
2
sec
Memory
Settings
Delete all
Memory
Delete all
Delete all?
NY
Page 42
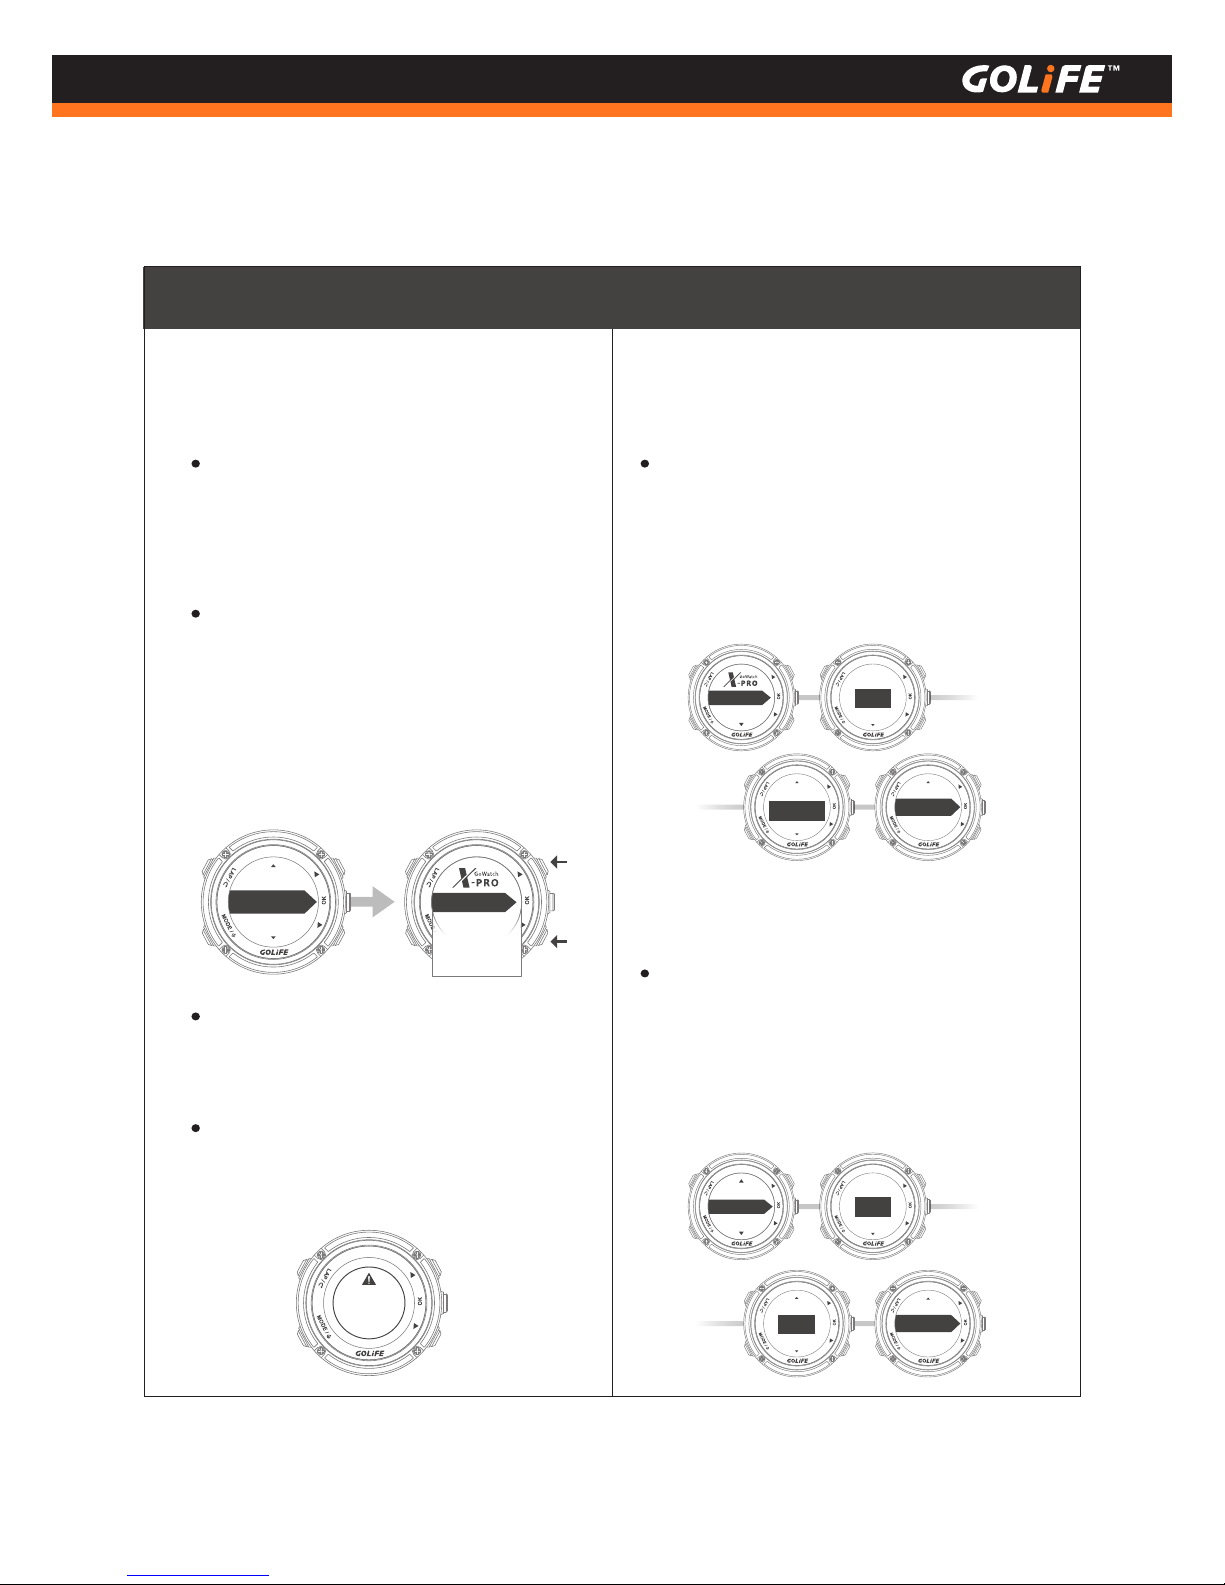
GYM: Menu Mode → 「Gym」
[ Trainer ]
Menu Mode → [ Gym ] → [ Trainer ]
41
Copyright ©2016 GOYOURLIFE INC.
5
Modes and Functions
GoWatch X-PRO is your private coach that
acts as a virtual trainer accompanying
your training after setting speed, distance,
and time targets.
When training starts, the screen shows
[ Rest Dist ], [Ahead/Behind] the virtual
athlete by how many distance, completed
percentage, etc. Press [ Up ] and [ Down ]
to switch-over other 4 pages of activity
info.
[ Dist./Time ]: Menu Mode → [ Gym ]
→ [ Trainer ] → [ Dist./Time ]
Training Target: To achieve how many
distance in how long time. First set [
Distance ] and [ Exercise time ]; then
select [ Start training ] and press [ OK ]
to start and record the track.
On completion of 100% training, you
need to manually stop training and save
the record, otherwise Activity Mode
continues, it will not stop automatically.
GPS Positioning must be completed
before you can start training.
Activity
Drive mode
Gym
Dist/Time
Dist/Speed
Speed/Time
Pace/Dist
Distance
1.00
km
Dist/Time
Dist/Speed
Time
00:10:00
Start training
Distance
1.00
km
Dist/Speed
Speed/Time
Dist/Time
Start training
Speed
1.00
kph
1.
[ Dist./Speed ]: Menu Mode→ [ Gym ]
→ [ Trainer ] → [ Dist./Speed ]
Training Target: To achieve how many
distance at what speed.
First set [ Distance ] and [ Speed ]; then
select [ Start training ] and press [ OK ] to
start and record the track.
2.
Positioning
failed
can't start
Page 43
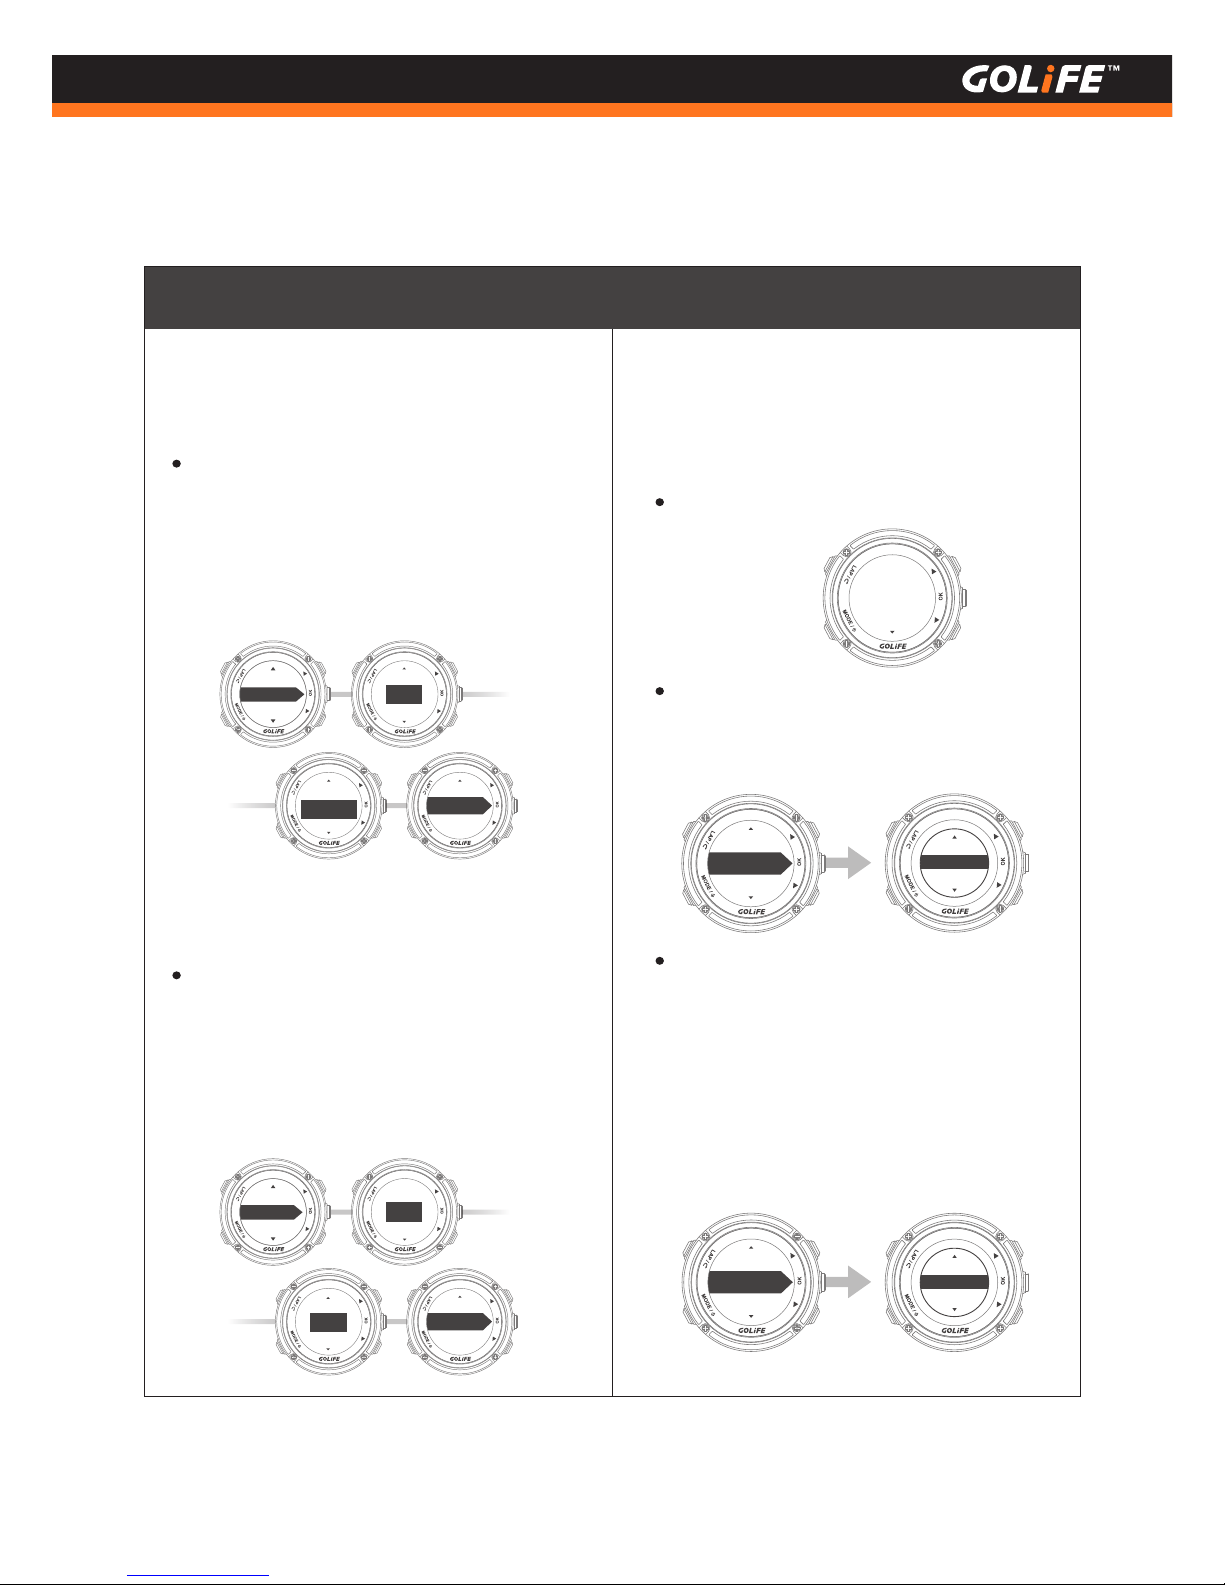
[Train Name]: System Default, e.g.:
TRAINING01
[ Add item ]: Add Training Item in Training
Plan; you may set 3 items: [ Train time ].
[ Train dist. ], and [ Rest ].
[ Repeated ]: You may set whether to
repeat all the added training items.
Available settings are [ Off ], [ Repeated ],
[ Repeatedly ]. Default is [ Off ].
For [ Repeated ] setting, you may further
set repeating times.
[ Interval ]
Create Training: Menu Mode →
[ Gym ] → [ Interval ] → [ Create ]
GYM
42
Copyright ©2016 GOYOURLIFE INC.
5
Modes and Functions
[ Speed/Time ]: Menu Mode → [ Gym ]
→ [ Trainer ] → [ Speed/Time ]
Training Target: To maintain how long time
at what Average Speed. First set [ Speed ]
and [ Exercise time ], then select [ Start
training ] and press [ OK ] to start and
record the track.
Pace
1.00
/km
Pace/Dist
Speed/Time
Start training
Distance
1.00
km
Speed/Time
Pace/Dist
Dist/Speed
Speed
1.00
kph
Time
00:10:00
3.
1.
[ Pace/Dist. ]: Menu Mode → [ Gym ]
→ [ Trainer ] → [ Pace/Dist. ]
Training Target: To achieve how many
distance at what Average Pace. First
set [ Speed ] and [ Distance ], then
select [ Start training ] and press [ OK ]
to start and record the track.
4.
Start training
Train Name
TRAINING01
Rest
Train time
Train dist
Repeated
Off
Repeatedly
Off
Repeated
Activity
Drive mode
Gym
Page 44
43
Copyright ©2016 GOYOURLIFE INC.
5
Modes and Functions
GYM
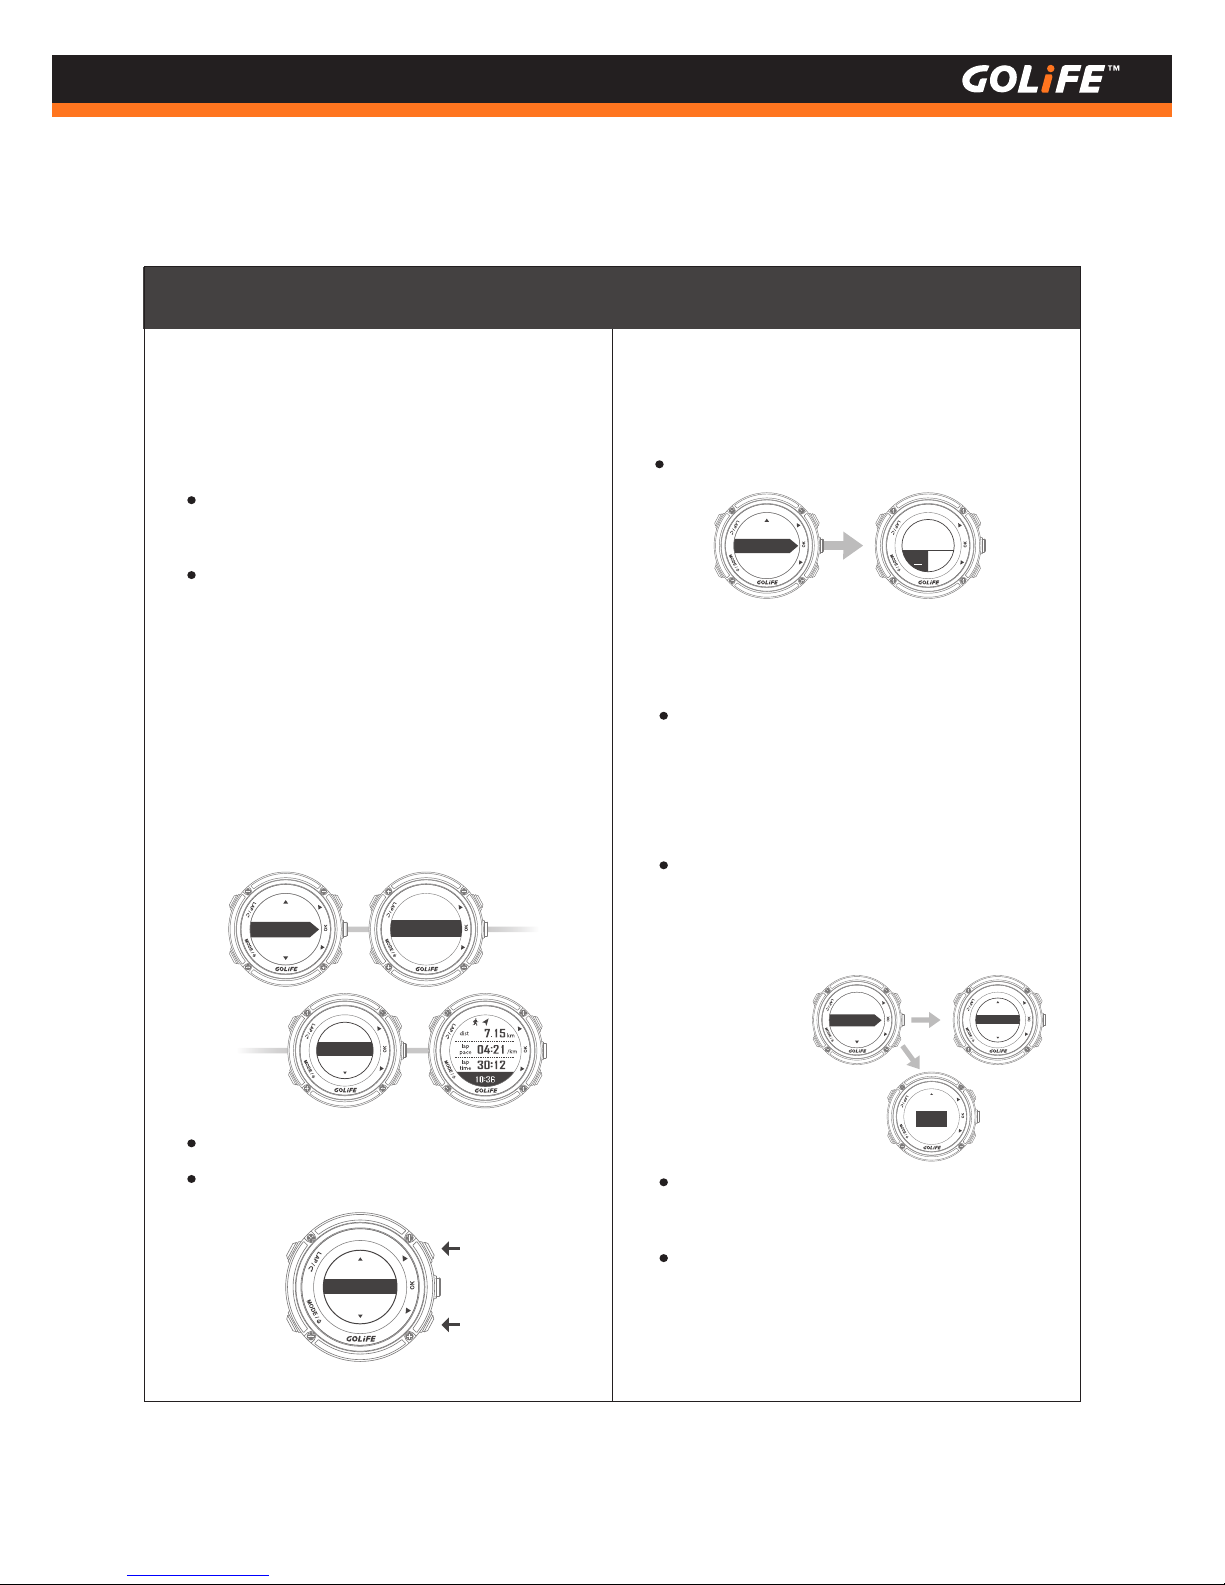
Press [ OK ] after selecting a created
Training Plan.
Start Training: After pressing [ OK ] to
start training, track recording starts.
During the training, the screen shows
[ Rest Dist. ], [ Ahead /Behind ] virtual
athlete by how many distance, and
competed percentage. Press [ Up ]
and [ Down ] to switch over other 5
pages of activity info.
[ Training list ]:
Menu Mode → [ Gym ] → [ Interval ]
→ [ Training list ]
Edit: Edit created Training Plan sessions.
Delete: Delete Training Plan sessions.
2.
Delete all the Training Plan sessions.
[ Delete all ]: Menu Mode → [ Gym ]
→ [ Interval ] → [ Delete all ]
3.
Delete
Start training
Edit
Edit
Start training
Training list
Delete all
Create
TRAINING01
TRAINING02
Delete all
Training list
Delete all
N
Y
[ Metronome ] ( Cadence Trainer )
Menu Mode → [ Gym ] → [ Metronome ]
Metronome gives a regular and steady
tempo prompt for facilitating pace
adjustment, so that runner is trained at a
more consistent pace.
You may select [ Off ], [ Activity ], [ Start ].
Press [ Down ] to select Steps per Minute
(SPM) for entering a pace you would like
to maintain.
By selecting [ Activity ], a prompt sound
for adjusting the pace will be given when
you start the activity.
By selecting [Start], a prompt sound for
adjusting the pace will be given
immediately.
Metronome
Off
Start
Off
Activity
Cadence
160
spm
Page 45
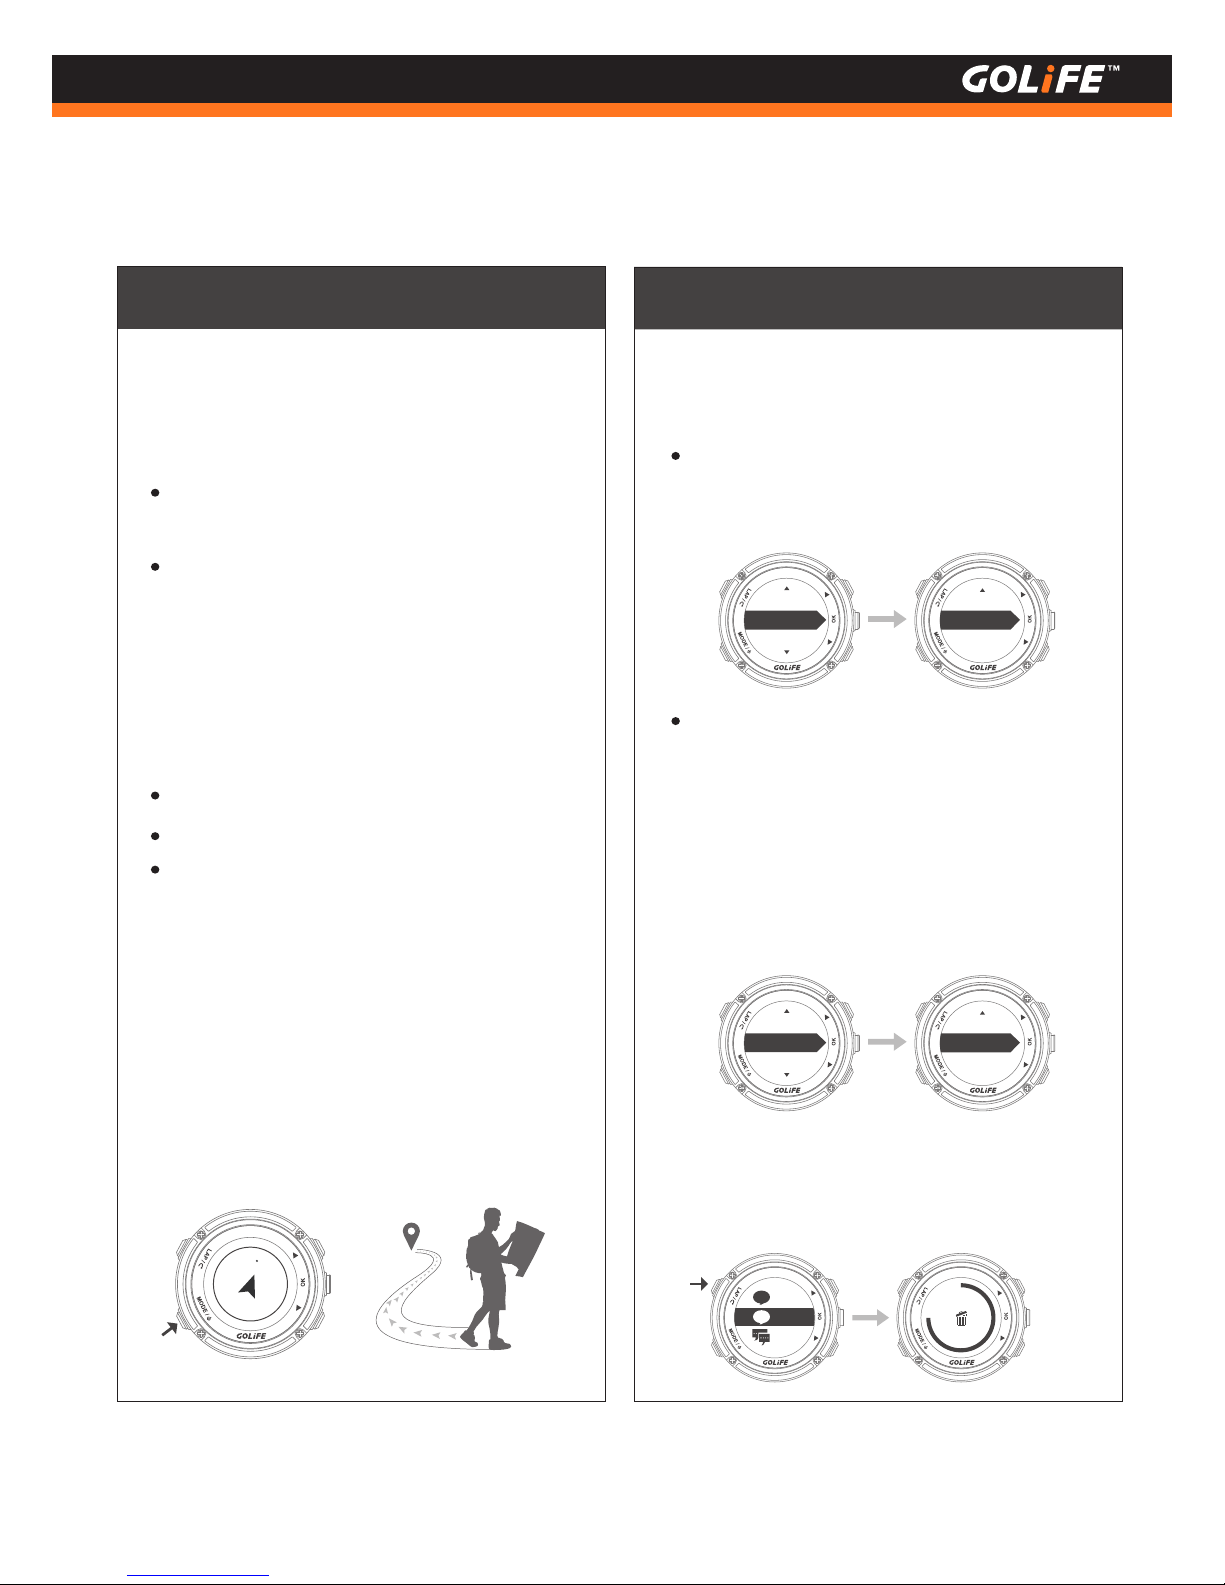
[ Navigate ]: Menu Mode → [ Navigate ]
[ Stopwatch ]:
Menu Mode → [ Stopwatch ],
this will
activate Stopwatch function.
44
Copyright ©2016 GOYOURLIFE INC.
5
Modes and Functions
Track /Notify
Navigate
Back Point Navigation Function: Positioning is
carried out when entering this function.
GoWatch will indicate distance and orientation
to this positioned point.
To delete a message, Press and Hold [ LAP ]
Key until a circle appears on the watch,
indicating the deletion is done.
※
ALEX
Josh
LINE
Andy
LINE
Pedometer: Calculates daily steps;
can be set to [ Off ] or [ On ] based on
personal needs.
[ Msg. Notify ]: For viewing Message
notification of communication apps
such as LINE, Facebook, etc.
( Smart phone notification must be
open in advance. )
Can be set to [ Off ] or [ On ] based on
personal needs.
Press [ OK ] to start activity; press [ OK ] again
to pause activity.
Press [ LAP ] to record a lap when Stopwatch
is activated; press [ UP ] to view the record of
the lap; press [ DOWN ] to zero the value and
return to Stopwatch screen.
[ Timer ]: Menu Mode → [ Timer ], this
will activate Timer function.
Press [ Start ] and [ OK ] to start Timer;
press [ OK ] again to pause activity.
Press [ UP ] to restart Timer.
Time default is one minute. Go to Menu
Mode → [ Timer ] → [ DOWN ] → [ Time ] to
set the time.
[ Track/Notify ]:
Menu Mode → [ Track/Notify ]
On
Transition
Track/Notify
Navigate
Settings
On
Msg notify
Track/Notify
Navigate
Settings
15
25 m
Page 46
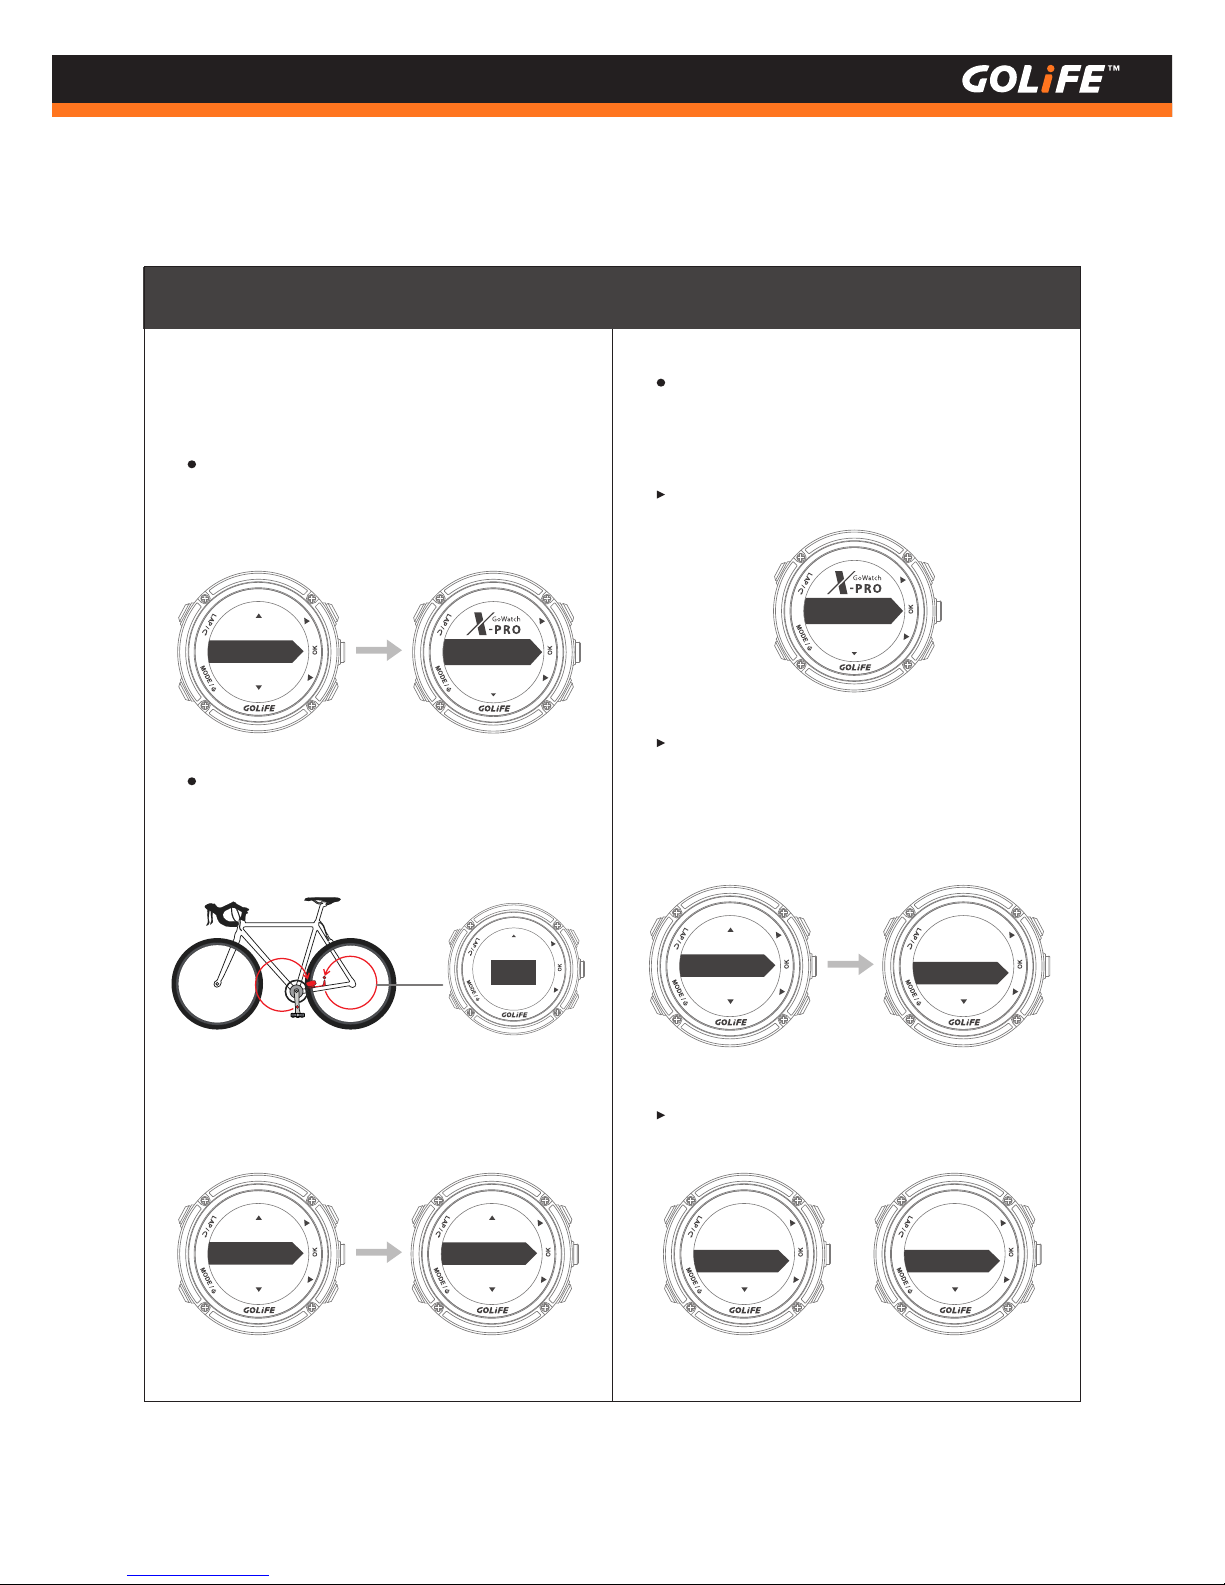
Settings
[ Profile ] includes User Name, Gender,
Age, Height, Weight, Wheel Radius,
Step Length, etc.
Combining with ANT+ Speed Cadence
Sensor, Wheel data can be used for
calculating ( wheeling ) speed.
[ Profile ]: Menu Mode → [ Settings ]
→ [ Profile ]
1.
[ Page ]: Menu Mode → [ Settings ]
→ [ Page ]
Set page format for real time viewing
of exercise data when recording the
exercise :
2.
45
Copyright ©2016 GOYOURLIFE INC.
5
Modes and Functions
Page
Profile
Settings
Track/Notify
Bluetooth
Lap page
Page4
Altitude page
Lap dist
Lap data 1
On
Altitude page
On
Coordinates
Page
Profile
Barometer
Settings
Track/Notify
Bluetooth
Wheel
2070
mm
[ Page 1 ], [ Page 2 ], [ Page 3 ], [ Page 4 ]
[ Lap page ]: can be set.
( Lap page will appear when calculating
laps in Activity Mode ).
[ Altitude page ], [ Coordinates ]
Page2
Page1
Page 47
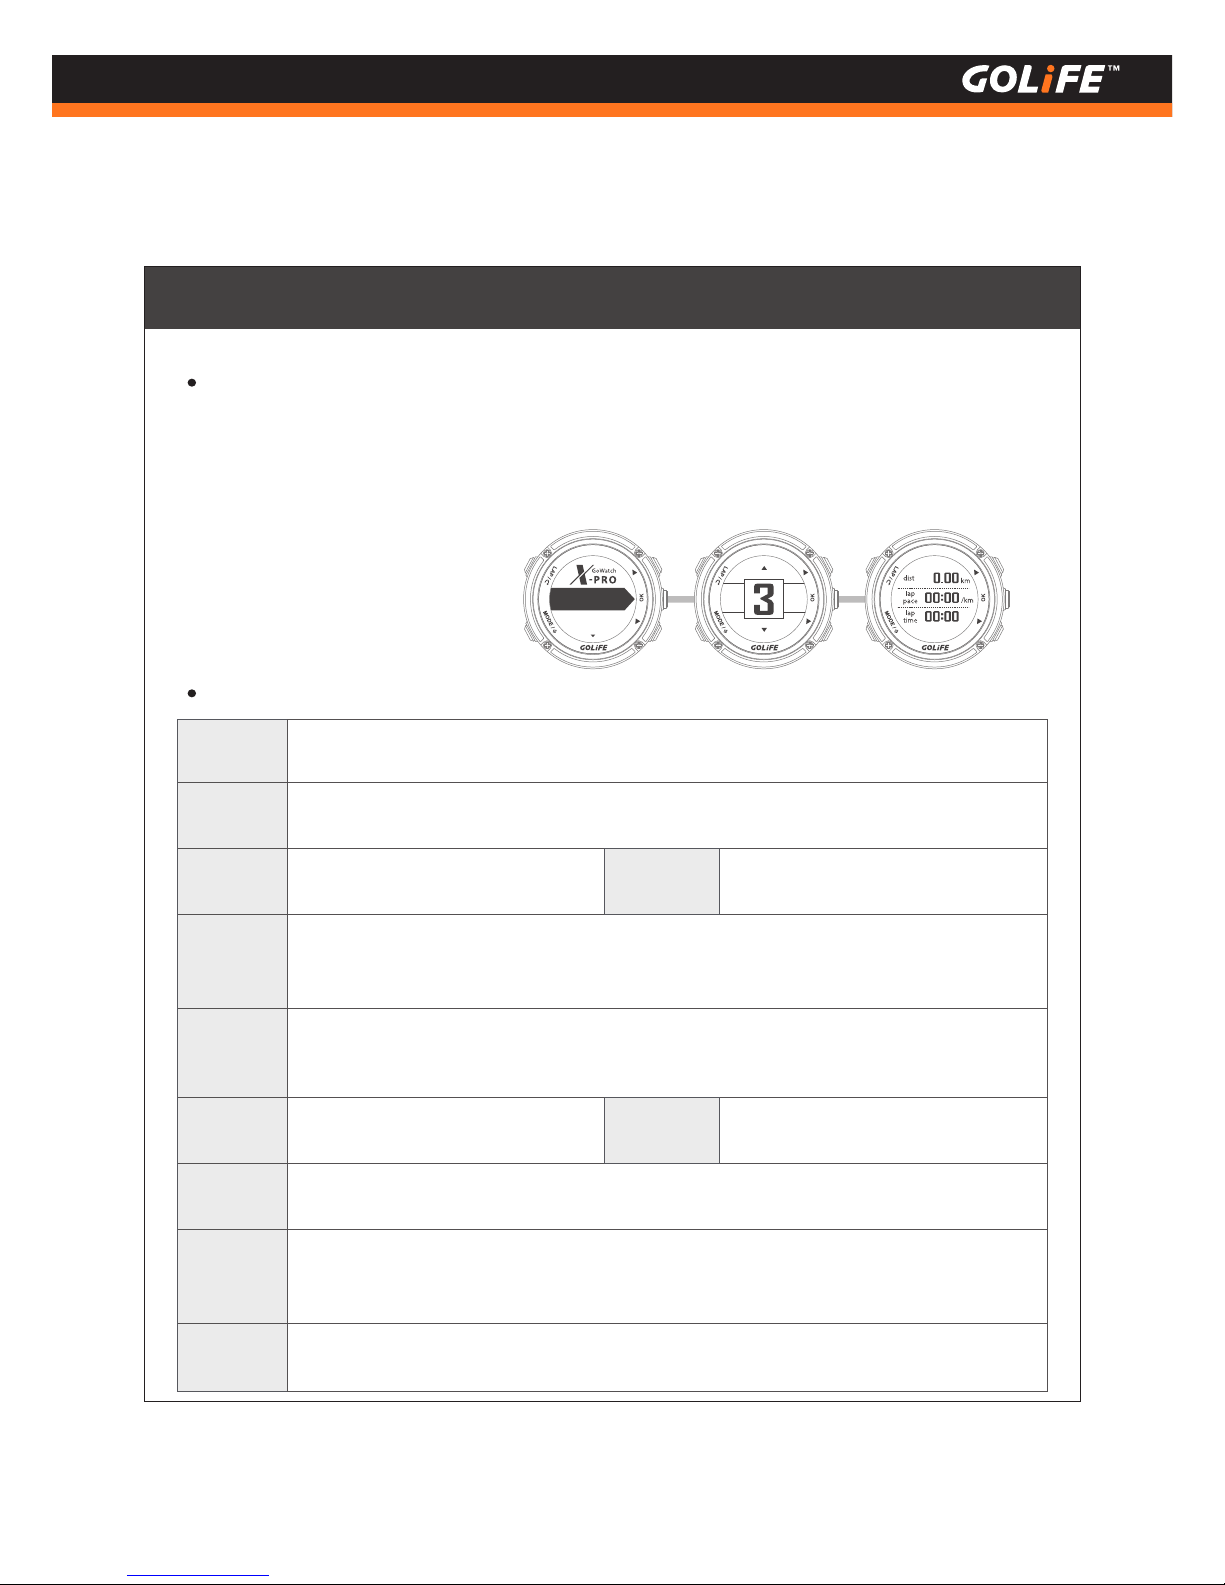
Page Format Setup, taking example of Page 1: Select [ Page 1 ], press [ UP ] and
[DOWN] to select number of data per page; each page can display up to 4 exercise
types. Once selected, press [ OK ] to enter menu of exercise pages, press [ OK ] to
select desired exercise data; after setting up every fields, press [ LAP ] to exit. This
completes the setup.
The data of pages which can be selected are as follows:
46
Copyright ©2016 GOYOURLIFE INC.
5
Modes and Functions
Pace Current Pace ( Curr. pace ), Average Pace ( Avg pace ), Maximum Pace ( Max pace )
Speed
Current Speed ( Curr. speed ), Average Speed ( Avg speed ), Maximum Speed ( Max speed )
Time Exercise Time, Day Time Distance
Cycling
Cadence, Average Cadence ( Avg cadence ), Maximum Cadence ( Max cadence ),
Wheel speed, Average Wheel Speed (Avg whl. spd), Maximum Wheel Speed (Max whl. spd)
Altitude
Altitude, Maximum Altitude ( Max altitude ), Minimum Altitude ( Min altitude ),
GPS Altitude ( GPS alt. )
Calorie
Calories, Calorie Rate
Heart
Rate
Heart Rate, Average Heart Rate ( Avg HR ), Maximum Heart Rate ( Max HR )
Distance( nm ), Curr. spd ( knot ), Avg. spd( knot ), Lap Dist.( nm ), Lap Spd. ( knot )
Laps
Current Laps ( Curr. lap ), Lap Distance ( Lap dist ), Lap Pace, Lap Speed,
Lap Calories, Lap Heart Rate ( Lap HR ), Lap Time
Navigate
Steps, Step Cadence ( Step cad. )
Steps
Distance
Page 2
Page 1
Settings
Page 48
Settings
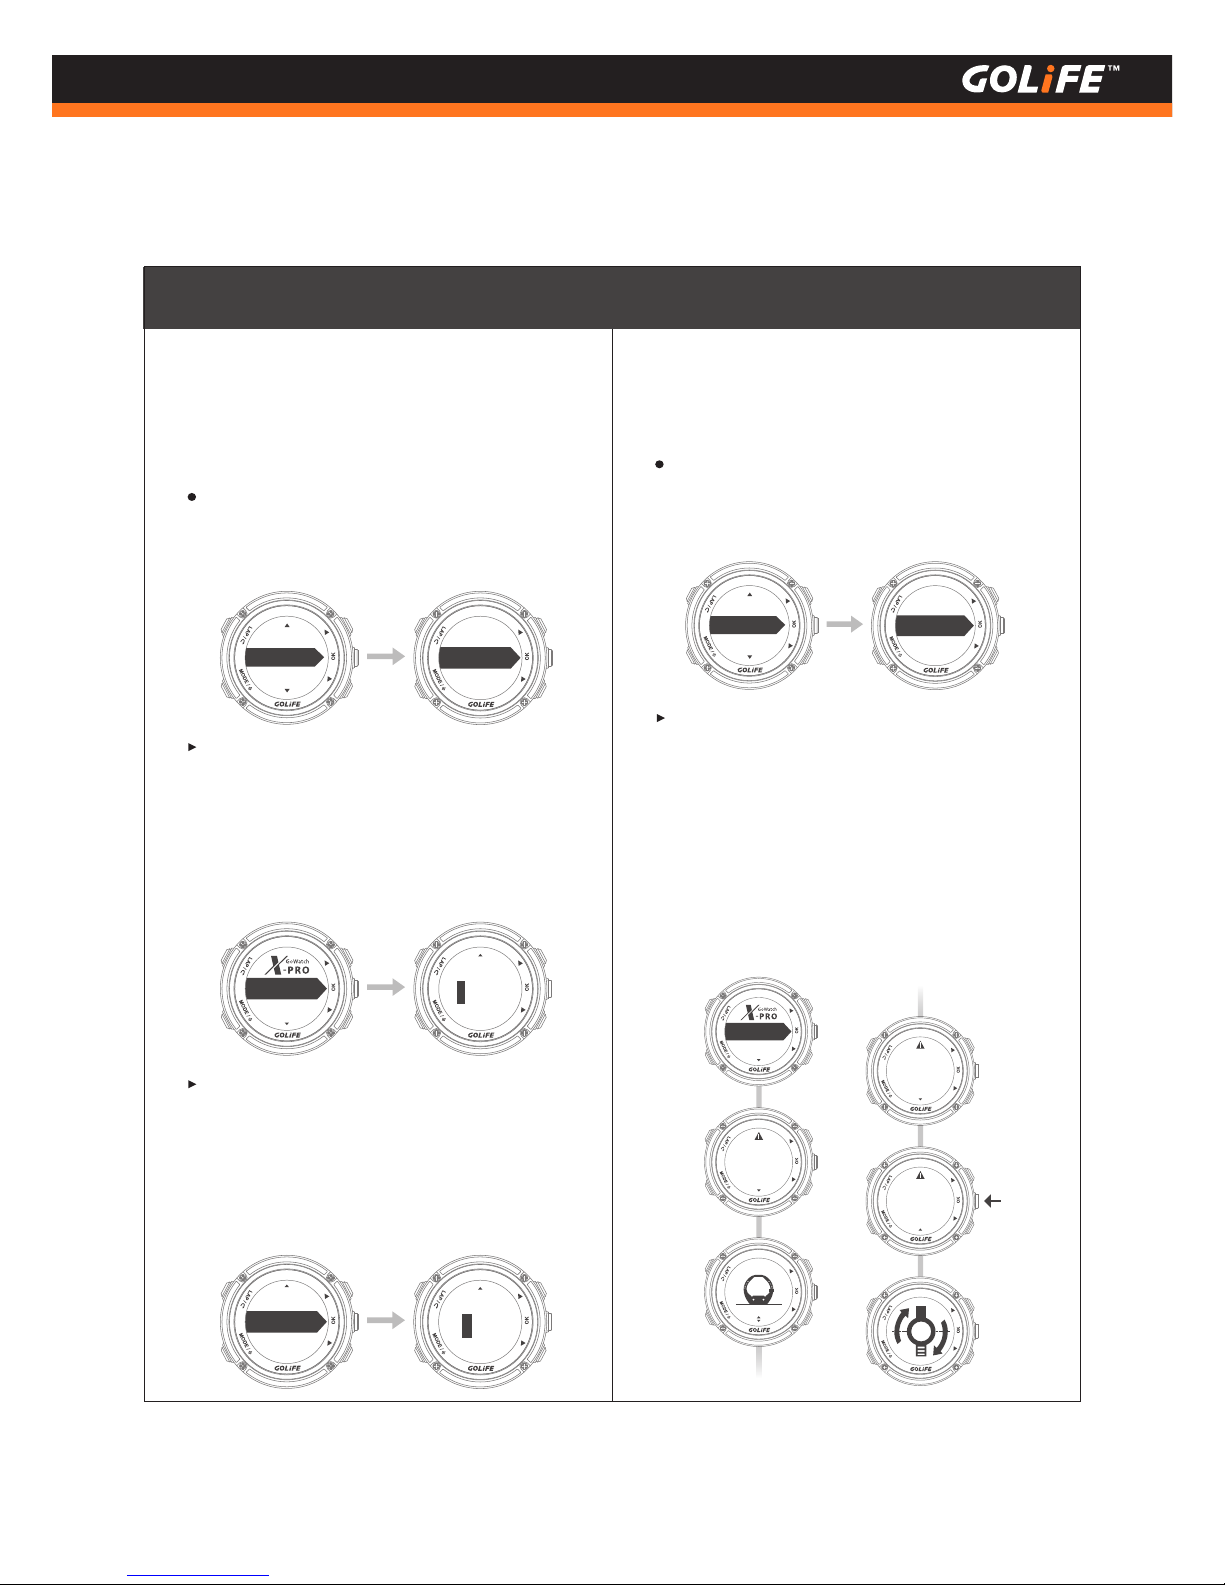
Calibrate Barometer: Menu Mode
→ [Settings ] → [ Barometer ] →
[ Calibration ]
[Barometer]:
Menu Mode → [ Settings ] →
[ Barometer ]
3.
Calibrate Compass: Menu Mode →
[ Settings ] → [ Compass ] →
[ Calibration ] and [ Declination ]
[ Compass ]: Menu Mode →
[ Settings ] → [ Compass ]
4.
47
Copyright ©2016 GOYOURLIFE INC.
5
Modes and Functions
Calibration
Barometer
Page
Compass
[ Calibration ]:
For initiating or re-calibrating the
Compass, press [ OK ] and place the
watch on a horizontal surface with its
face down. Turn the watch at the spot
until the message of successful
calibration shows up.
[ By pressure ]: Enter sea level pressure
of current location. Current Sea Level
Pressure of respective areas in Taiwan
can be checked up from Central
Weather Zone.
[ By curr. elevation ]: For example, after
entering current altitude when you
reach an altitude benchmark in the
mountain, GoWatch will automatically
calibrate the atmosphere value.
By pressure
By curr.elevation
Sealevelpressure
1015.8
hpa
By pressure
By curr.elevation
Sealevelpressure
0079
m
Declination
Calibration
Let the watch
face down,flat
on the horizontal
plane.
Then rotate,
until success
message
appears.
Press [ OK ]
to start
Calibration
Barometer
Page
Compass
Page 49
Time/Clock
Unit
Display
24 hour
Format
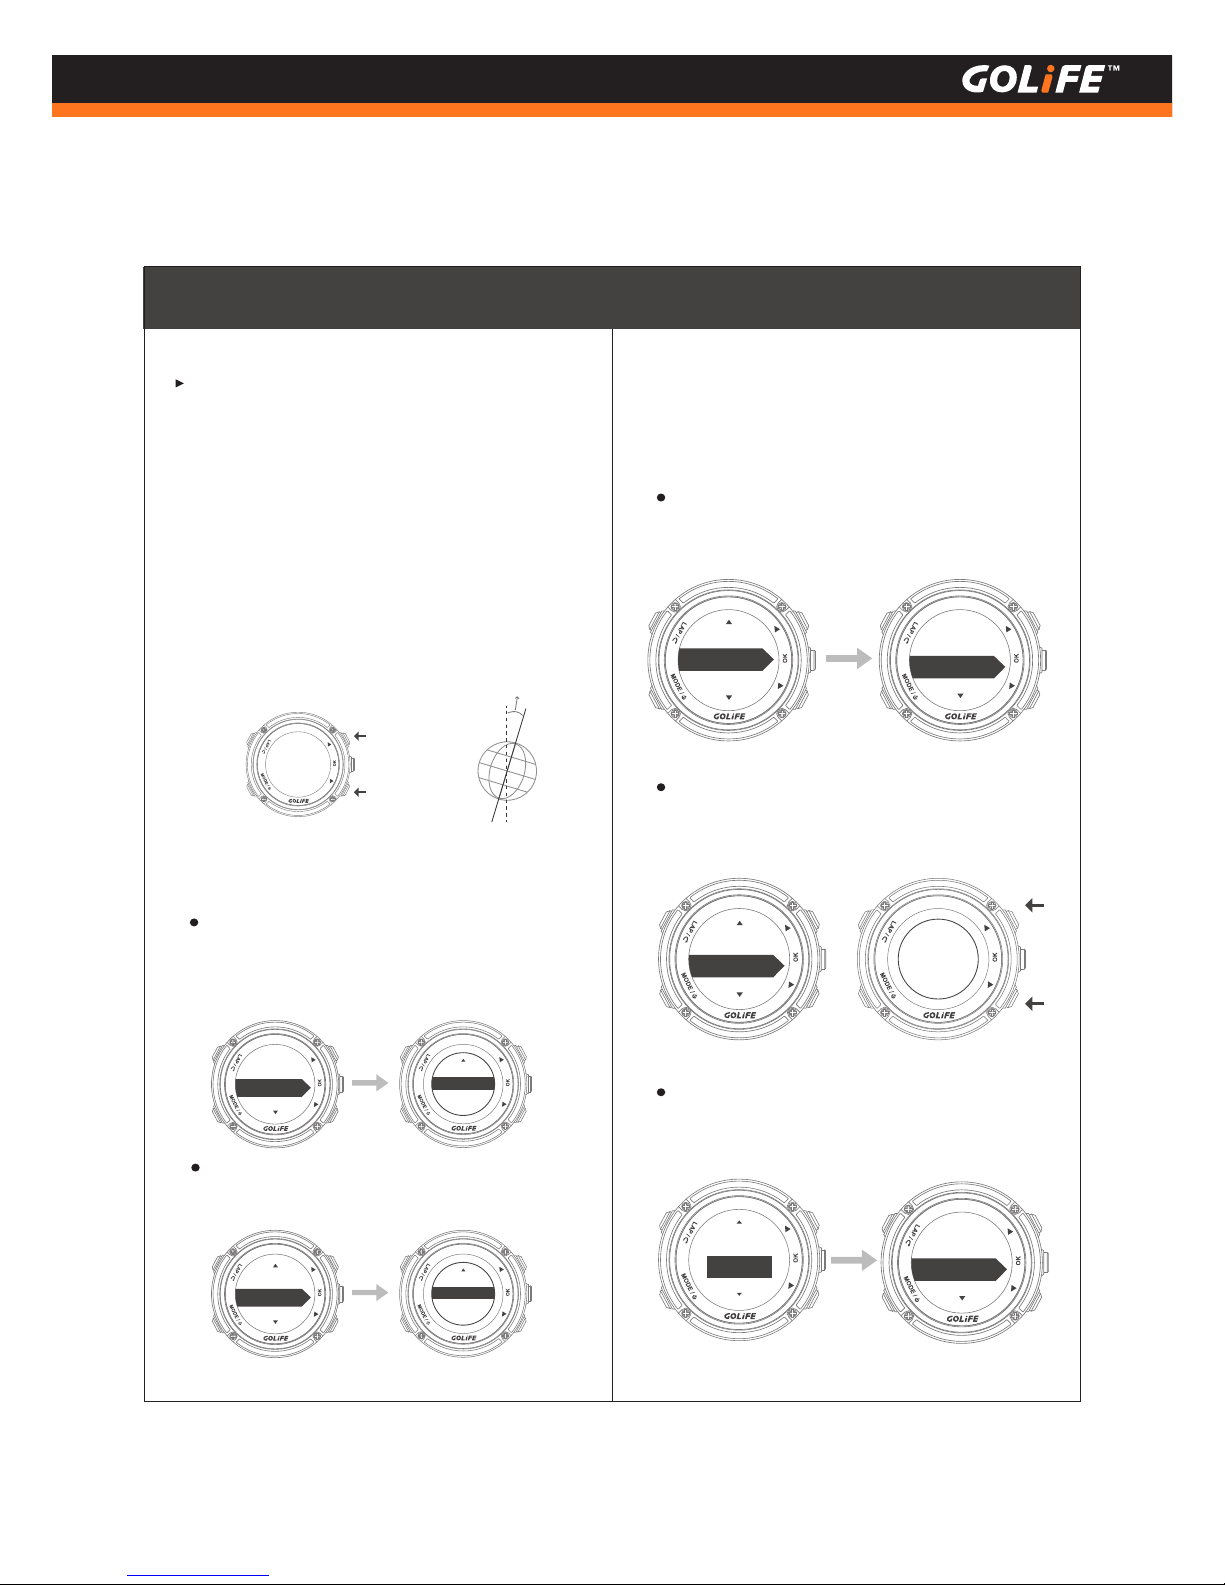
Unit: Set up unit to be displayed on the
watch, options are [ Metric m/kph ] and
[ Imperial ft/mph ].
Pressure Unit: Set up barometric pressure
unit, options are [ hPg ] and [ inHg ].
[ Unit ]:
Menu Mode → [ Settings ] → [ Unit ]
5.
Format: Set up for [ 12 hour ] or [ 24
hour ] display. Default is [ 12 hour ].
Clock style: GoWatch X-PRO provides
5 styles; you may set up as preferred.
Time zone: Time zone can be set
automatically ( by GPS ) or manually.
[ Time / Clock ]:
Menu Mode → [ Settings ] → [ Time /
Clock ]
6.
m,kph
Unit
Settings
48
Copyright ©2016 GOYOURLIFE INC.
5
Modes and Functions
[ Declination ]: To ensure correct reading
of compass, magnetic declination must
be set correctly. Since geomagnetic
North Pole is not at the same location of
geographic North Pole, a declination
representing the angle between the two
must be set for the compass. You can
find the most accurate update of
inclination on-line.
Declination
W 0.5°
ft,kph
m,kph
Press up
/ down to
select clock
style
hPa
Pressure units
inHg
hPa
Style 1
Clock style
Manual
Time/Clock
Time zone
+08:00
Inclination
Geographic
North Pole
Magnetic
Page 50
49
Copyright ©2016 GOYOURLIFE INC.
Settings
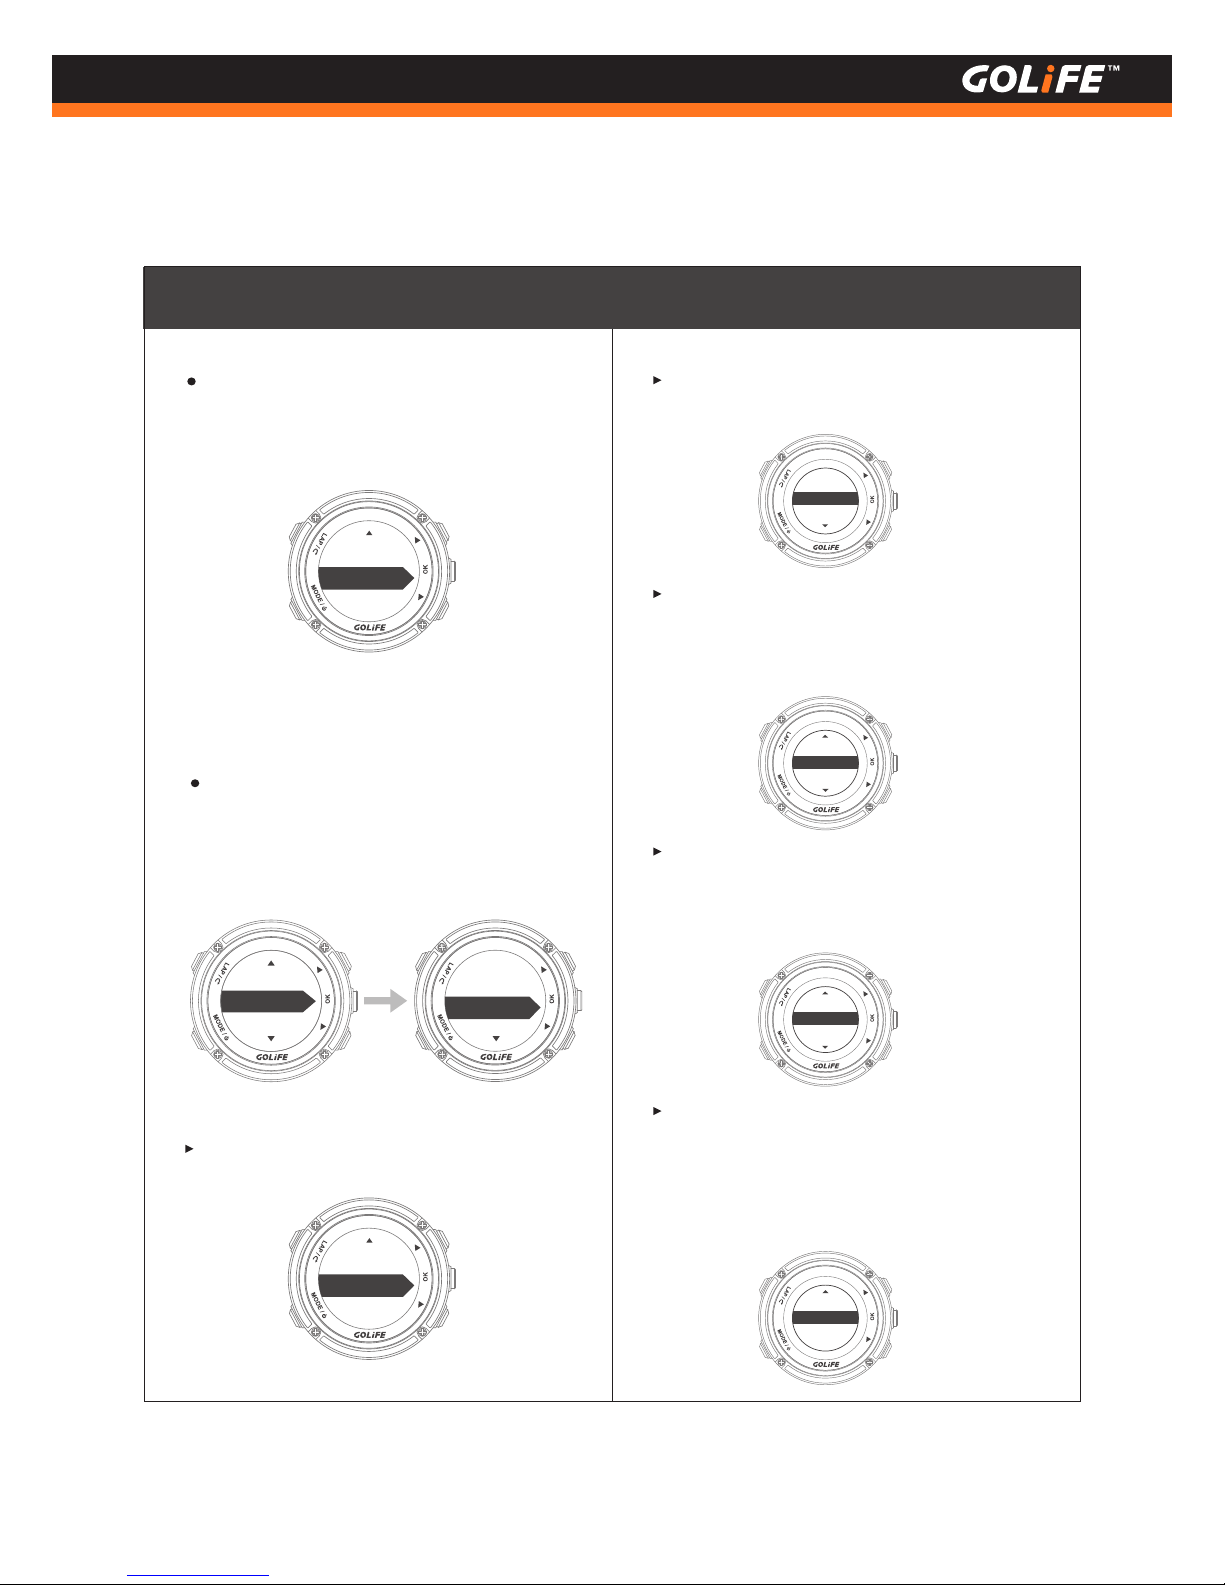
Daylight Saving Time (DST): DST setting
switch, default is [ Off ].
For Daylight Saving Time, see P70.
※
Backlight:
Menu Mode → [ Settings ] →
[ Display ] → [ Backlight ]
[ Display ]: Menu Mode →
[ Settings ] → [ Display ]
7.
Display
Time/Clock
Key beep
Always
Off
Off
DST
On
Auto light
Key
Backlight
[ Off ]: Backlight is off.
[ Always ]: Backlight is always ON, will
not go out automatically.
[ Message ]: When GoWatch X-PRO
pops up a message, backlight will
light up automatically and go out in
10s.
Key
Message
Always
[ Key ]: When any key of GoWatch is
pressed, backlight will light up auto-
matically and go out in 10s.
Key/Msg
Key
[ Key / Msg ]: When GoWatch X-PRO
pops up a message or when any key is
pressed, backlight will light up auto-
matically and go out in 10s.
Always
Off
Message
5
Modes and Functions
Page 51
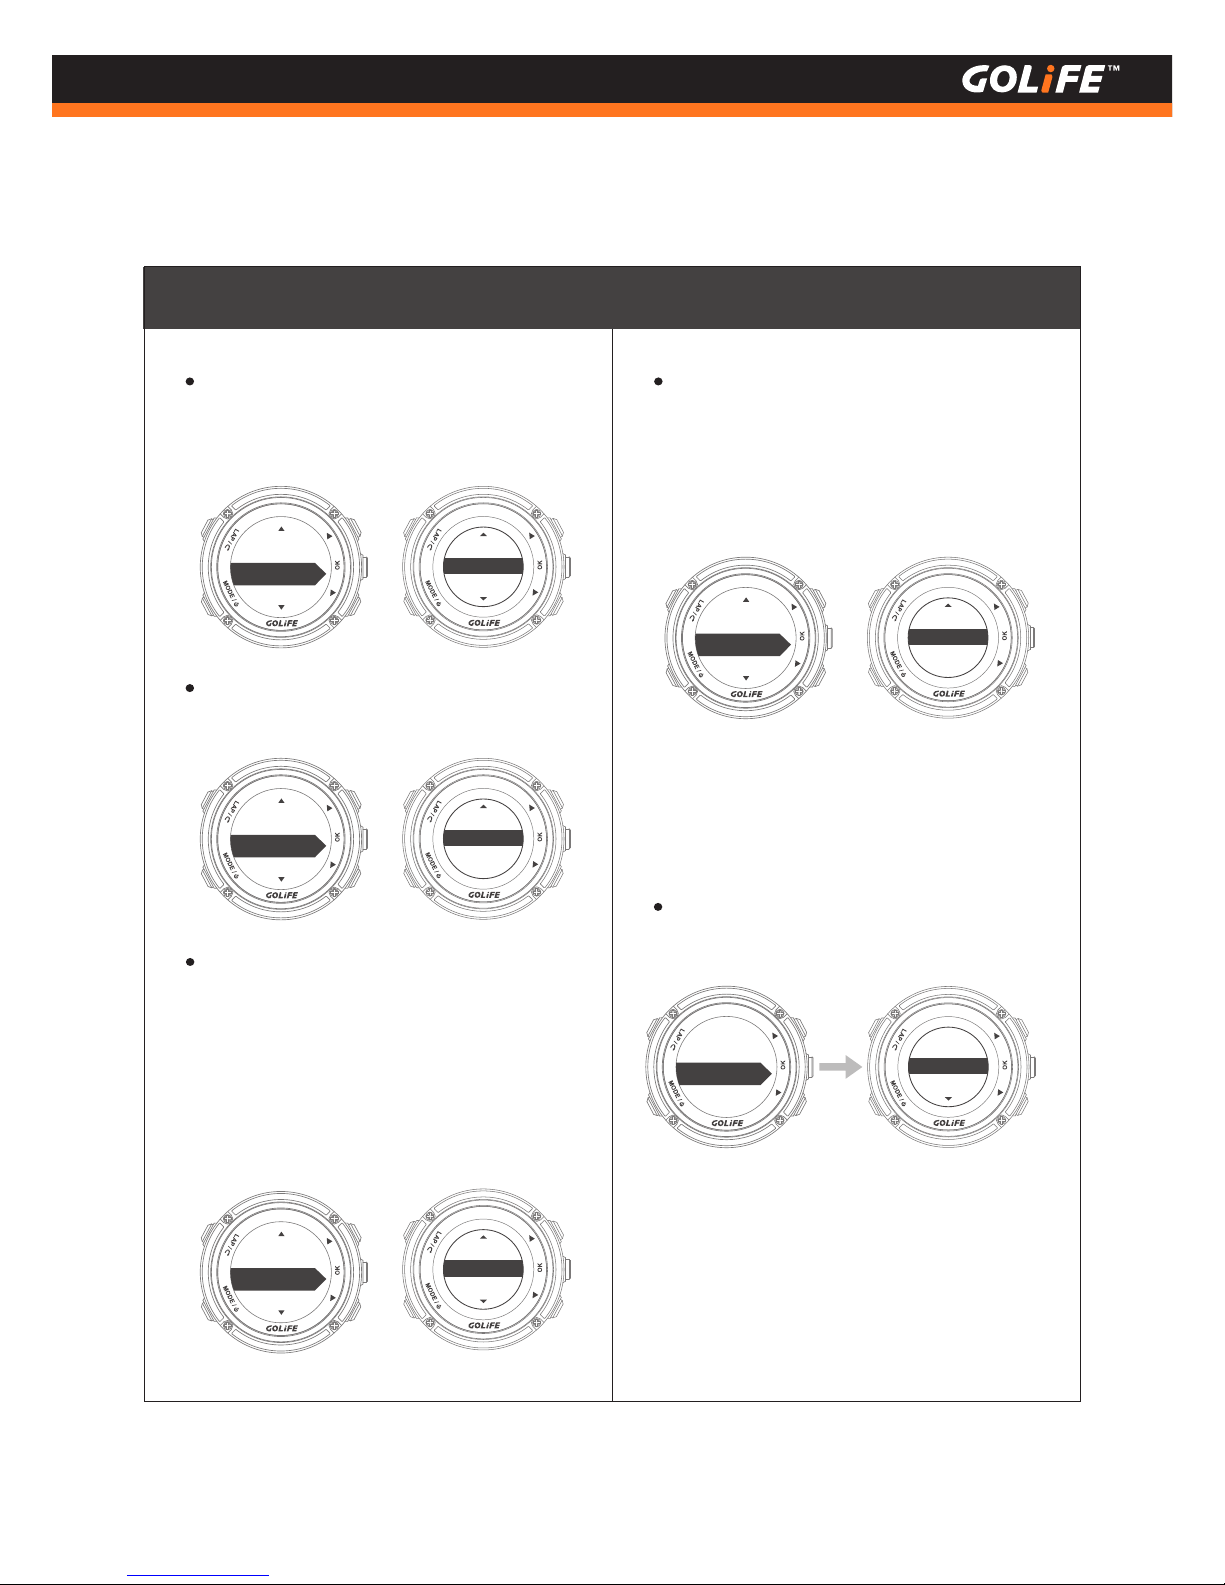
Key beep:
Menu Mode→ [Settings] → [Key
Beep]
8.
10 minutes
5 minutes
Off
English
简体中文
正體中文
50
Copyright ©2016 GOYOURLIFE INC.
5
Modes and Functions
Settings
Language: Available options:
[ Traditional Chinese ], [ Simplified
Chinese ], [ English ], [ Japanese ].
Color: [Black] or [White] can be selected
based on user preference.
正體中文
Language
White
Color
5 minutes
Standby
On
Off
Off
Key Beep
Standby: GoWatch X-PRO enters Time
Mode automatically within 30 minutes if
not in use. Default: [ 10 minutes ].
Options: [ Off ], [ 5 minutes ], [ 10 min-
utes ], [ 15 minutes ], [ 20 minutes ], [ 25
minutes ], [ 30 minutes ].
Key beep: Sets Beep Prompt of GoWatch
X-PRO; options: [ Off ], [ On ].
White
Black
On
Off
Auto Light: Backlight lights up when you
lift up your hand; screen can be seen in
the night without pressing a key.
Default: [ On ]. Options: [ Off ], [ On ].
On
Auto Light
Page 52
Vibrate
Sound
Off
Sound / Vib.
Settings
On
GPS
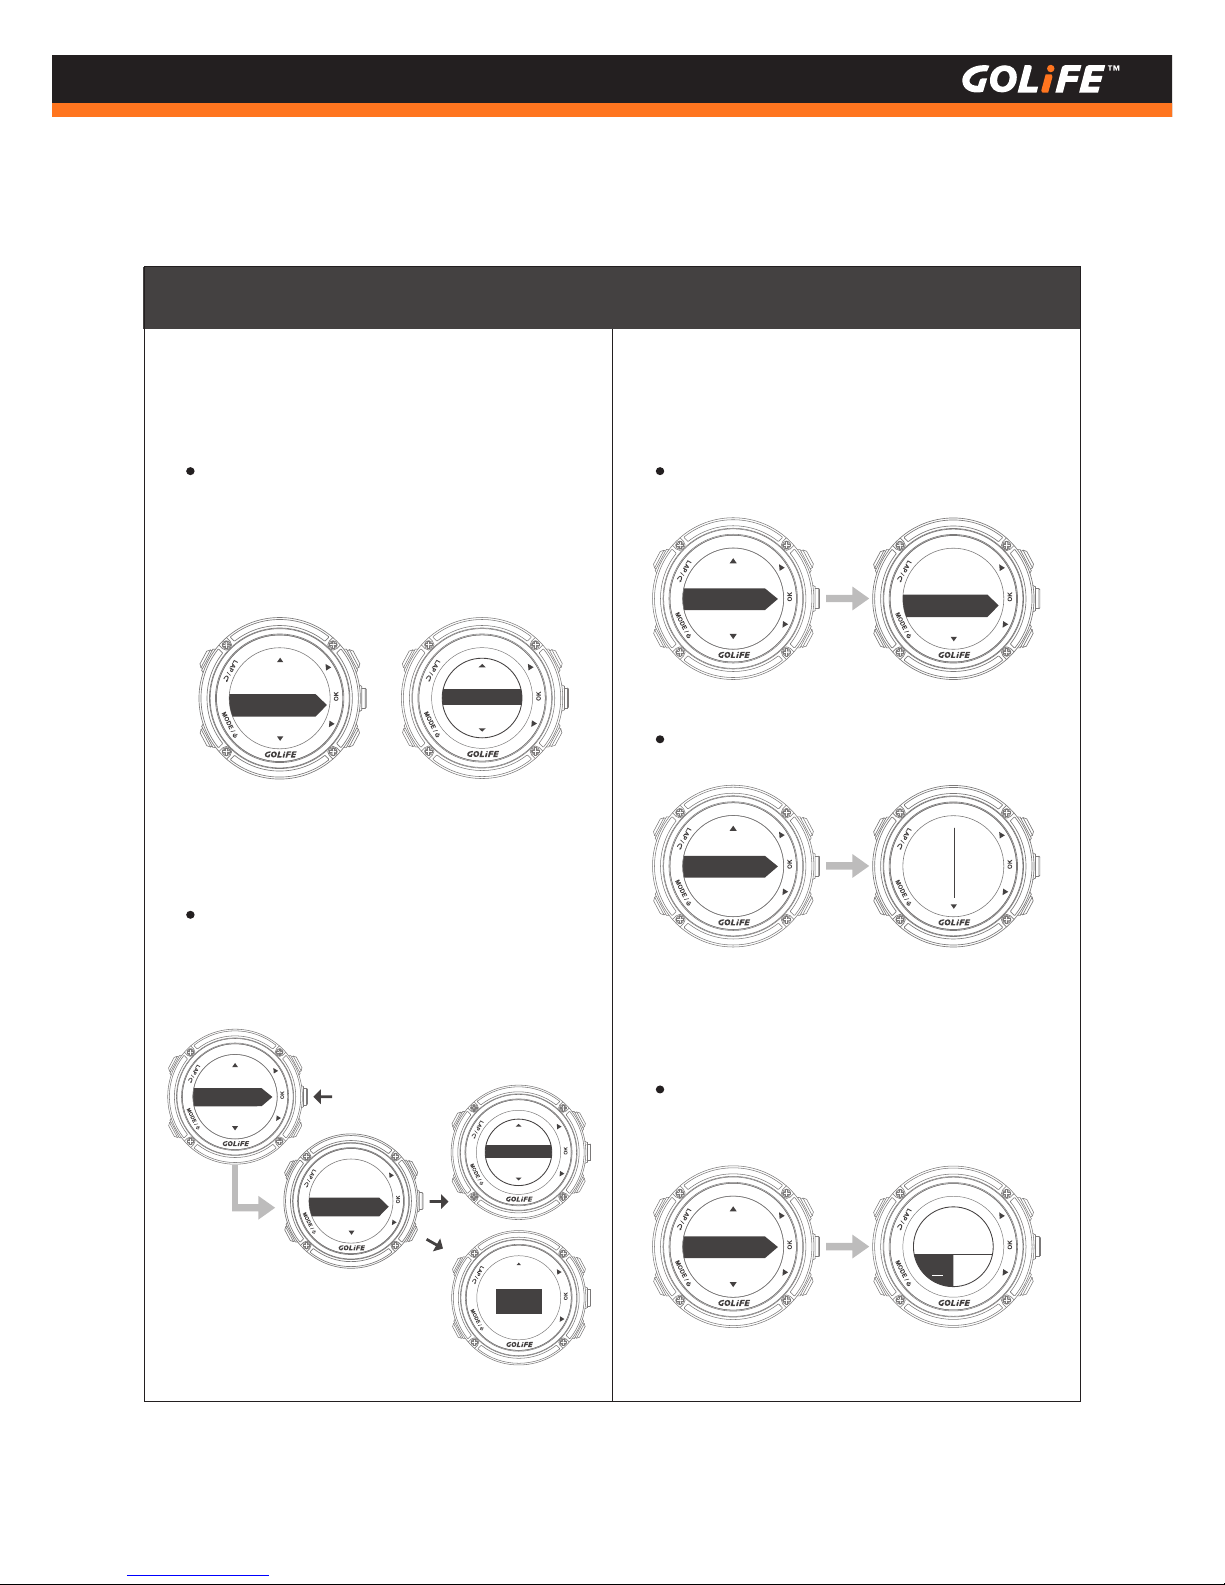
Sound / Vib.: Menu Mode →
[ Settings ] → [ Sound / Vib. ]
9.
Sets Vibration Prompt of GoWatch
X-PRO.
Options: [ Off ], [ Sound ], [ Vibrate ],
[ Sound / Vib ]; Default: [ Sound ].
Alarm: Menu Mode → [ Settings ]
→ [ Alarm ] →[ Alarm clock ]
10.
Enables Alarm Function. Default: [ Off ].
When enabled, an alarm icon appears in
Time Mode.
GPS: Menu Mode → [ Settings ]
→ [ GPS ]
11.
GPS: Options: [ Off ], [ On ]; Default: [ On ].
Reset: Menu Mode → [ Settings ]
→ [ Reset ]
12.
Resumes GoWatch X-PRO to default
settings.
51
Copyright ©2016 GOYOURLIFE INC.
5
Modes and Functions
Settings
Alarm
Settings
GPS
GPS
Alarm
Reset
Reset
GPS
About
17
30
8
18
18
20
0
0
GPS Info
Off
Alarm clock
Sunday
Every day
Off
Time
07:00
GPS Info: For viewing GPS Signal Strength.
Factory
reset?
NY
Page 53
V 1.02.04
Firmware
Pair
Data sync.
Date sync...
Pairing
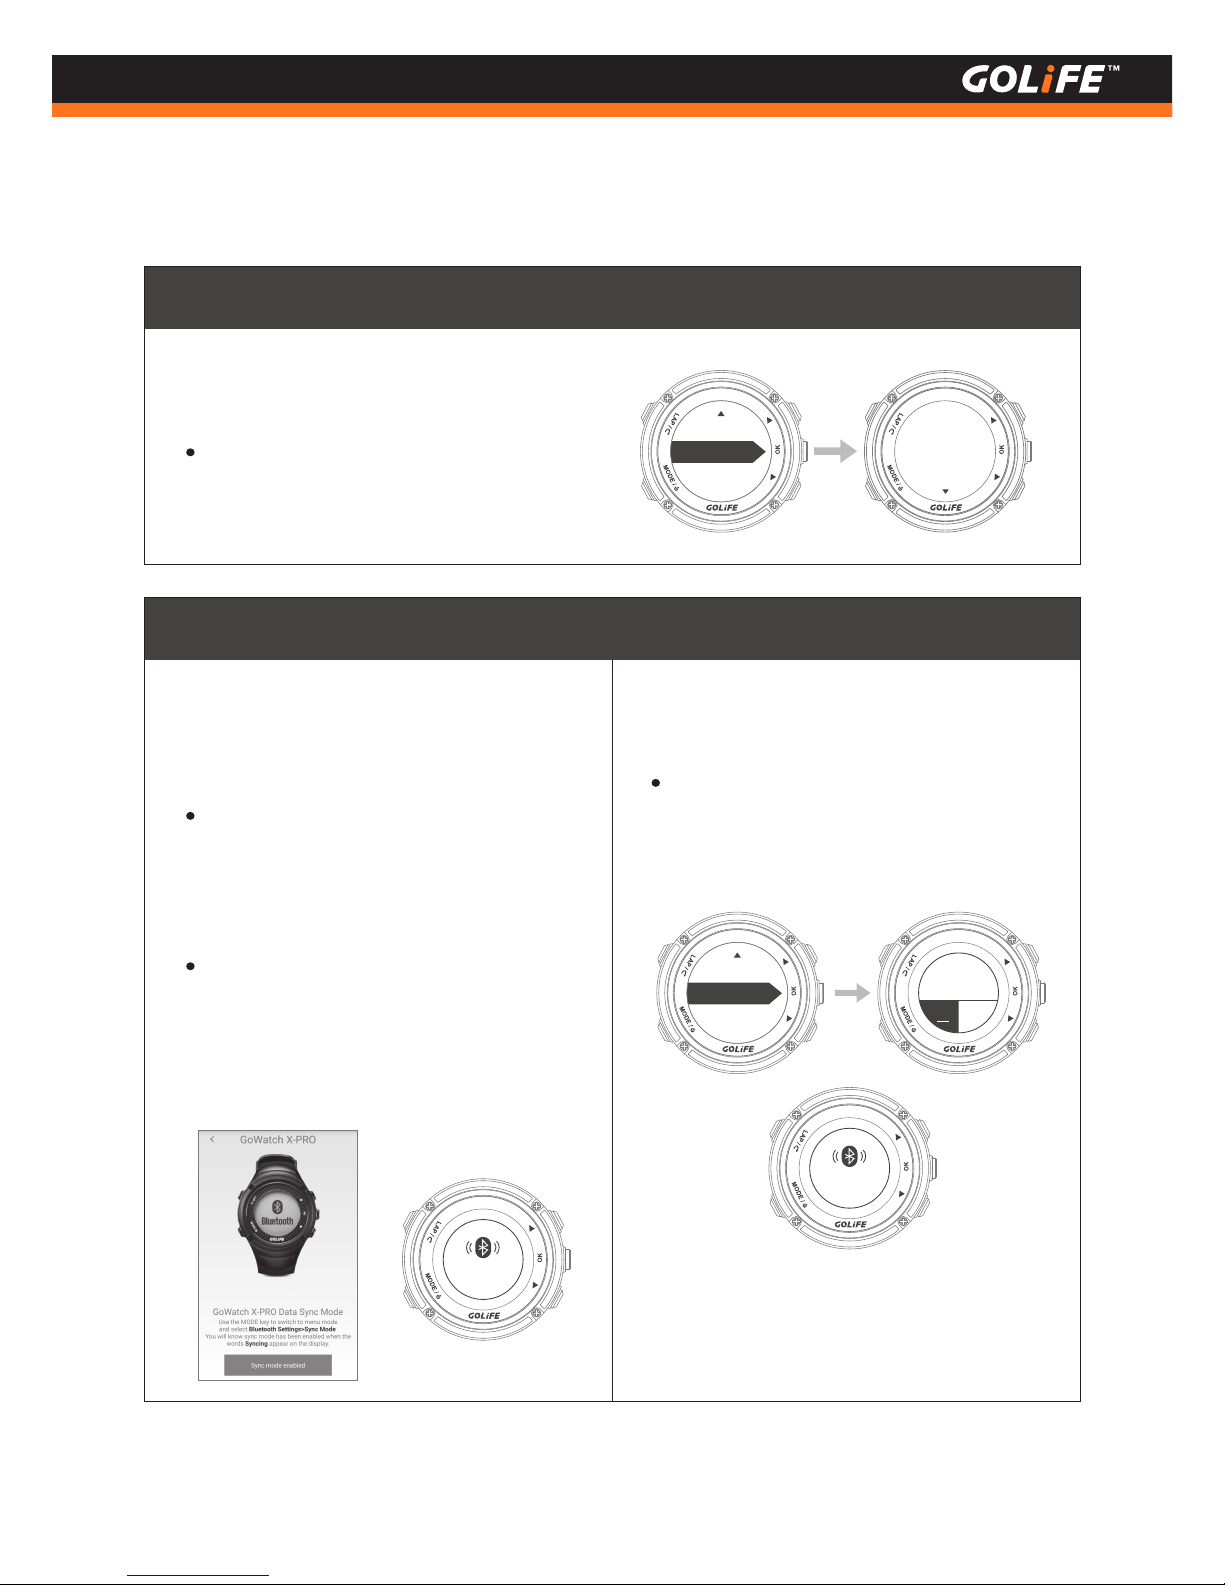
About: Menu Mode → [ Settings ]
→ [ About ]
13.
For viewing GoWatch X-PRO firmware
version, product model and serial
number.
52
Copyright ©2016 GOYOURLIFE INC.
5
Modes and Functions
Settings
About
Reset
Data sync.:
Menu Mode → [Bluetooth] →
[Data sync.]
1.
Switch on GoWatch X-PRO Sync Mode
to upload Activity Log with GOLiFE RUN
App. Follow App instructions for carry-
ing out data sync.
Or directly click [Begin syncing] on
GOLiFE RUN App screen to start data
sync.
Bluetooth
For data sync, see → How to upload
Activity Data to GOLiFE RUN App P19
※
Pair: Menu Mode → [ Bluetooth ]
→ [ Pair ]
2.
Enables pairing mode of GoWatch X-PRO.
For pairing method, see
→ How to pair GoWatch X-PRO P18
※
Start
pairing?
N
Y
Page 54
53
Copyright ©2016 GOYOURLIFE INC.
5
Modes and Functions
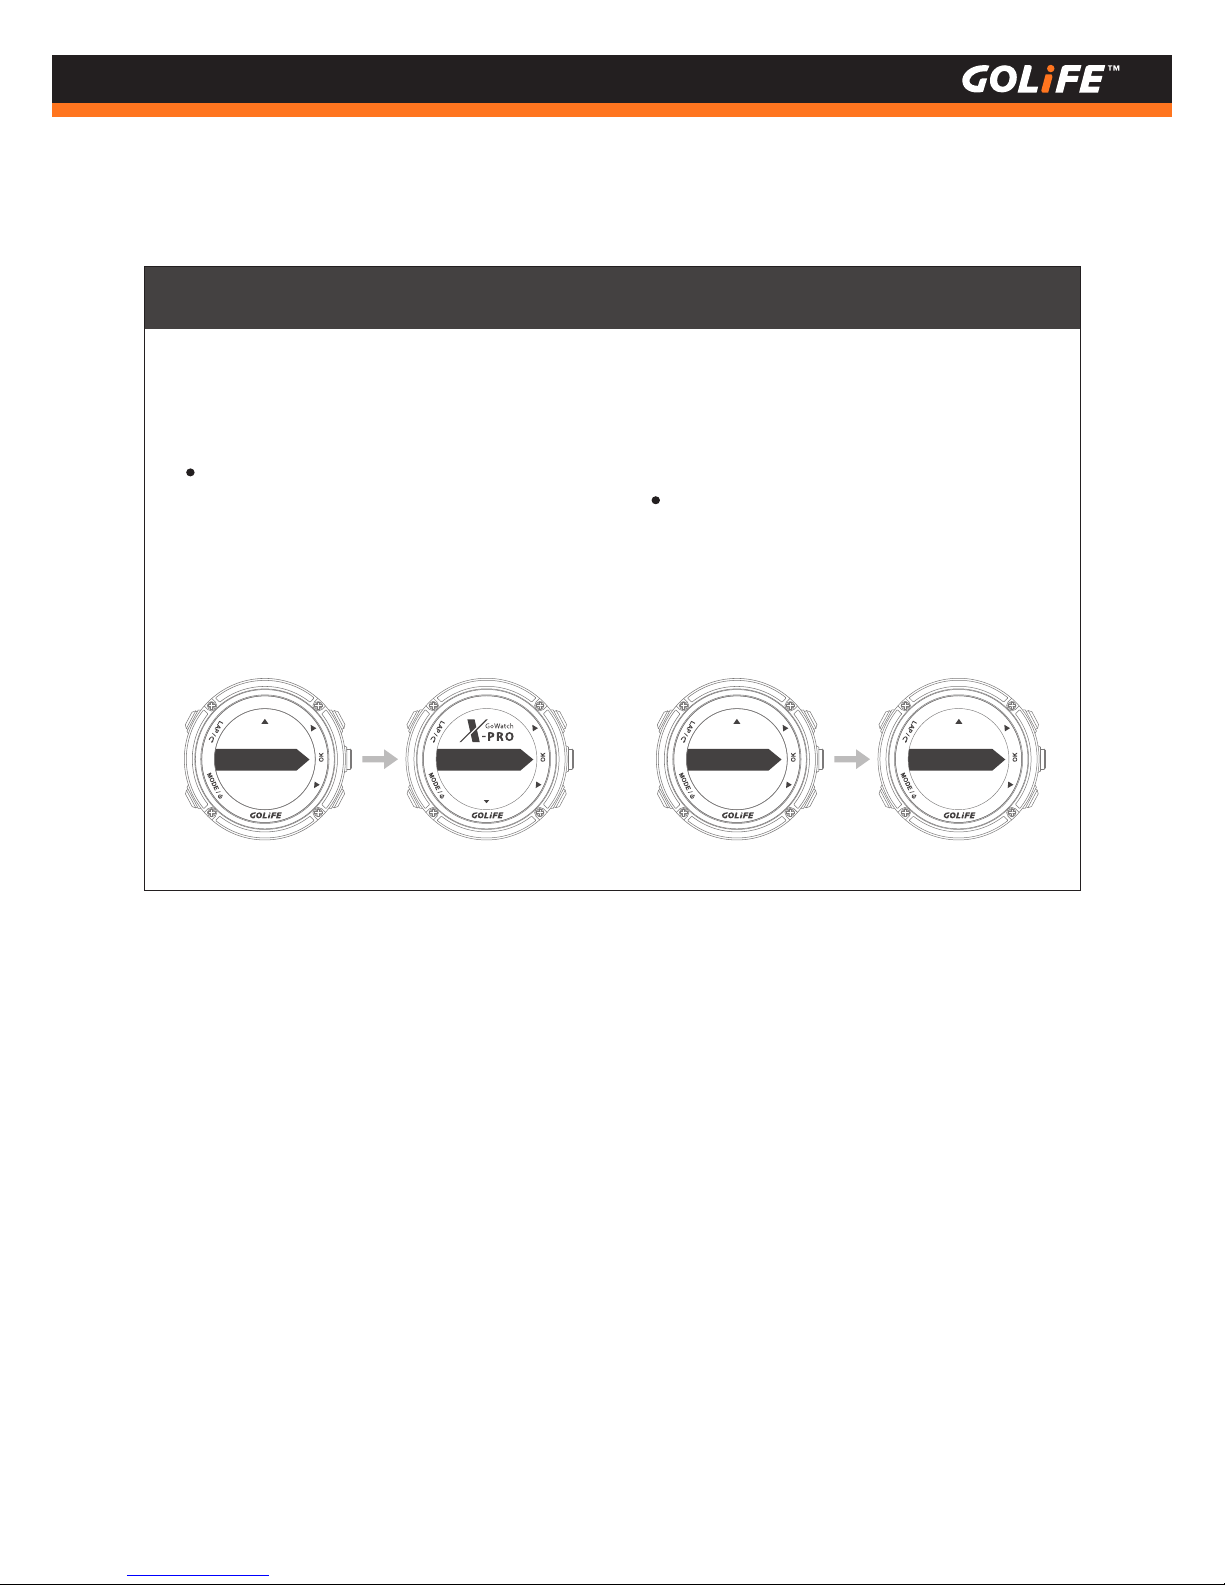
H.R. Monitor: Menu Mode →
[ Sensors ] → [ H.R. Monitor ]
1.
GoWatch X-PRO supports H.R. Monitor
using ANT+ protocol.
Sensors
Sensors
Bluetooth
For pairing and using a H.R. Monitor, see
next chapter Wearing H.R. Monitor.
※
Speed / Cadence:
Menu Mode → [ Pairing Sensors ]
→ [ Speed/CAD ]
2.
GoWatch X-PRO supports Speed Ca-
dence Sensor using ANT+ protocol.
For pairing and using a Speed Cadence
Sensor, see next chapter Wearing Speed
Cadence Sensor.
※
Speed/CAD
H.R. Monitor
Speed/CAD
H.R. Monitor
Sensors
Bluetooth
Page 55
54
Copyright ©2016 GOYOURLIFE INC.
6
ANT+ Sensor
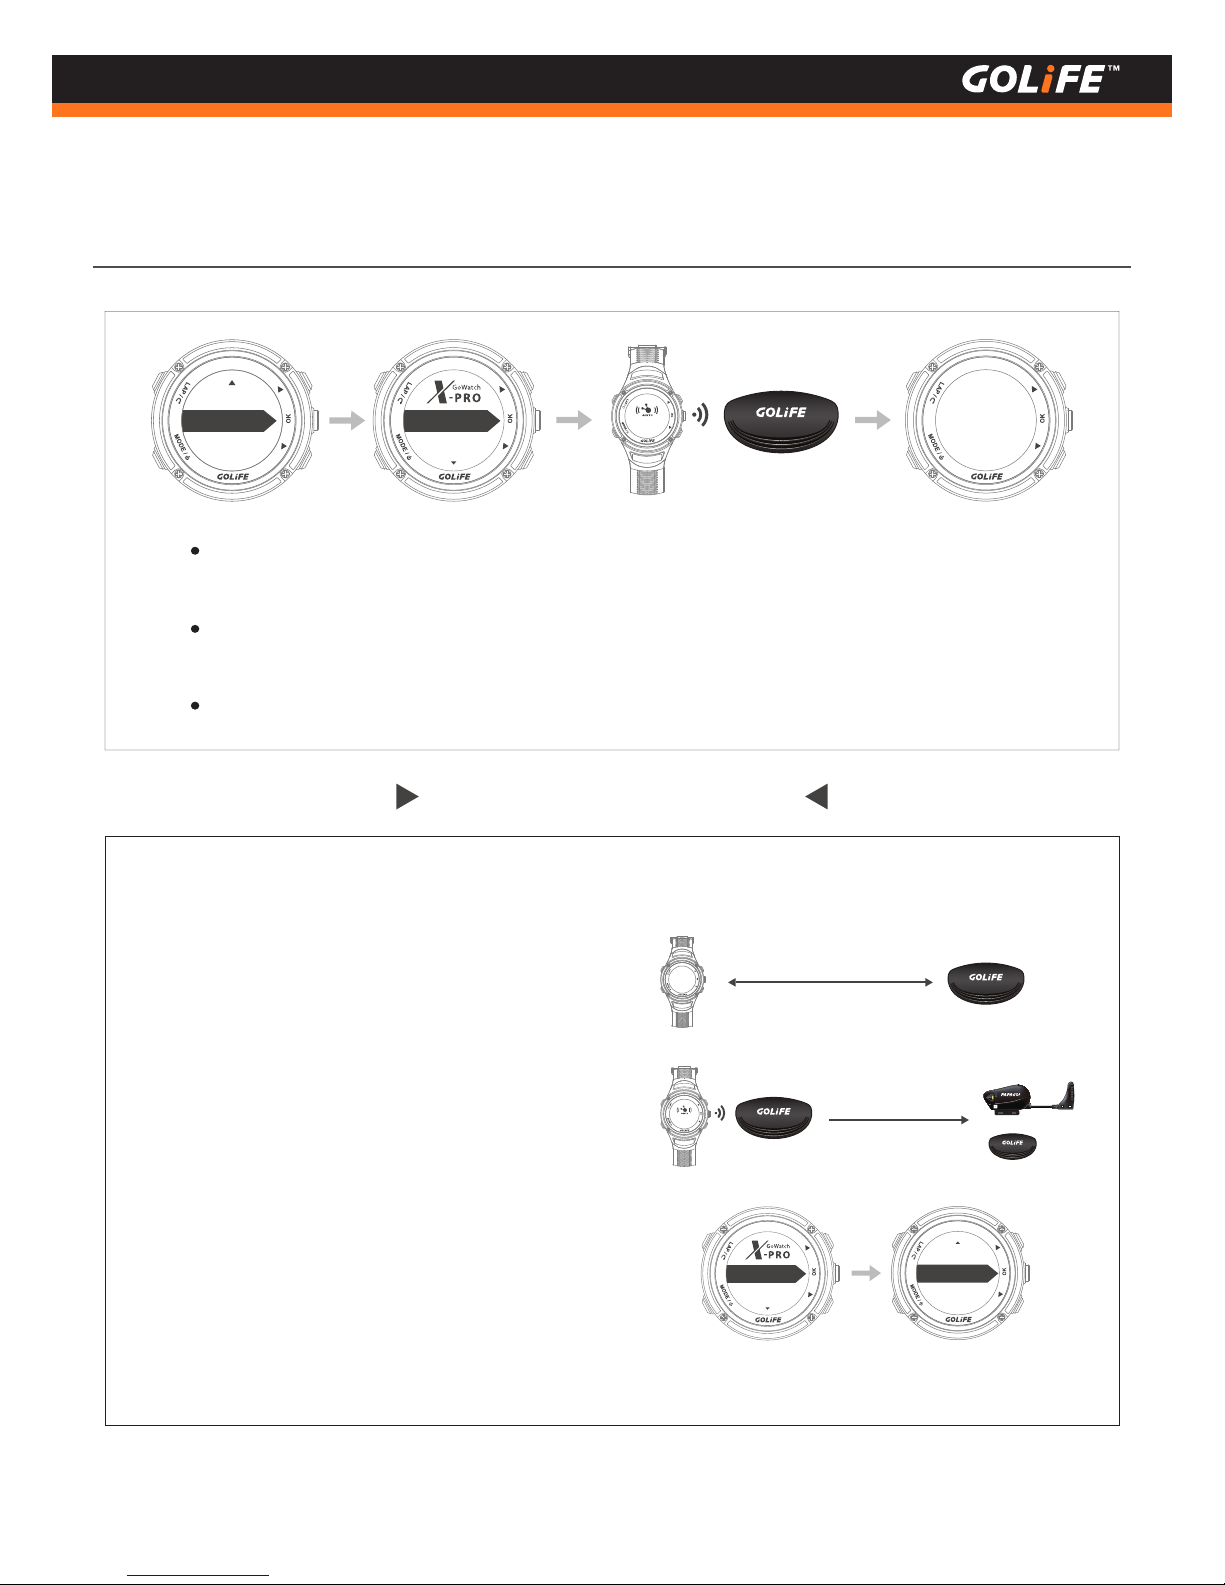
Before initial use of ANT+ Sensor, you need to pair the sensor with your GoWatch. Go to
Menu Mode → [Sensors], and select sensor.
After successful pairing, sensor will automatically link with your device and record data
when you start an activity.
Once a sensor is paired with GoWatch, the screen shows status of successful pairing.
Pairing ANT+ Sensor
Wearing a H.R. Monitor
Pairing
Sensors
Bluetooth
Speed/CAD
H.R. Monitor
Skip this if you do not have a H.R. Monitor.※
If not wearing a H.R. Monitor, no H.R. Monitor
data will be transmitted or received.
※
H.R. Monitor must be within a 1.5m distance
from the device for data transmission/reception.
※
When performing pairing, make sure that other
ANT+ Sensors, if any, are kept at least 10m away.
※
GoWatch X-PRO will automatically save and
prioritize the recently paired H.R. Monitor. You
may check the pairing status in [ H.R. monitor ].
※
If you want to replace H.R. Monitor,
press [ MODE ] to switch over to Menu Mode, select
[ Sensors ] → [ H.R. Monitor ] → [ Re-pairing ] to
perform replacement.
※
Within 1.5 m
Re-pairirng
Speed/CAD
H.R. Monitor
配對中
10 m at least
pairing
Success
Page 56
Pairing a H.R. Monitor
55
Copyright ©2016 GOYOURLIFE INC.
6
ANT+ Sensor
Wearing Method
1
2
3
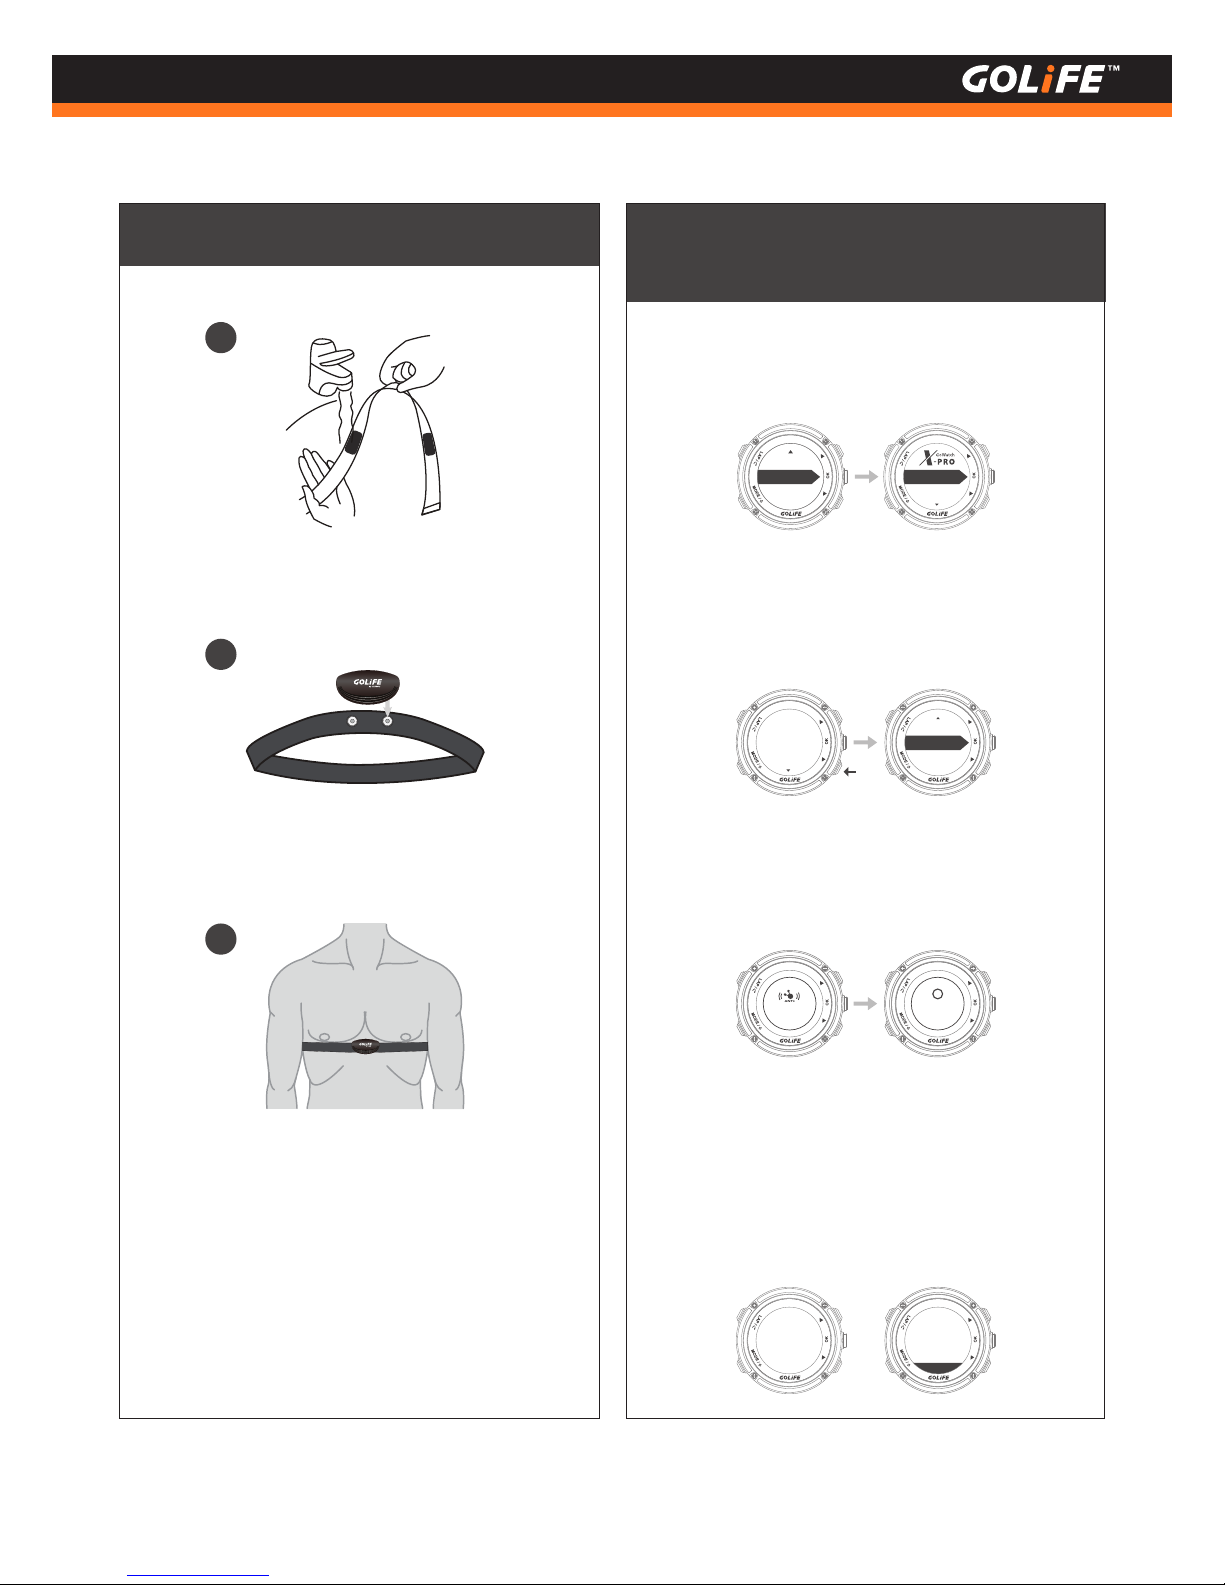
Wet the sensor area with some water.
※ Wear H.R. Monitor correctly before pairing it
Fix H.R. Monitor onto chest belt
First go to last item [ Sensors ] of Menu
Mode, press [ OK ] and select [ H.R. Monitor ].
1.
After selecting [ H.R. Monitor ], a message
indicating pairing failed shows up.
Press [ Down ] key for [ Re-pairing ].
2.
After pressing [ Re-pairing ], screen shows
[ ANT+ Pairing ] for about 1min before
showing Paring Successful.
3.
Press [ LAP ] key; screen shows linking
status and pairing successful. This means
H.R. Monitor is successfully paired with your
GoWatch. Heart Rate data will be shown on
the watch when you start activity.
4.
pairirng paired
pairing
failed
Re-pairirng
Heart rate
080
18:00
bpm
pairing
Success
Wear the chest belt, adjust it to a
comfortable tightness and latch
up. To ensure optimal sensing
effect, make sure the H.R. Monitor
is in close contact with your skin at
the center of chest.
Sensors
Bluetooth
Speed/CAD
H.R. Monitor
Page 57
Pairing Speed Cadence Sensor
Wearing a Speed Cadence Sensor
56
Copyright ©2016 GOYOURLIFE INC.
6
ANT+ Sensor
Skip this if you do not have a Speed Cadence Sensor.※
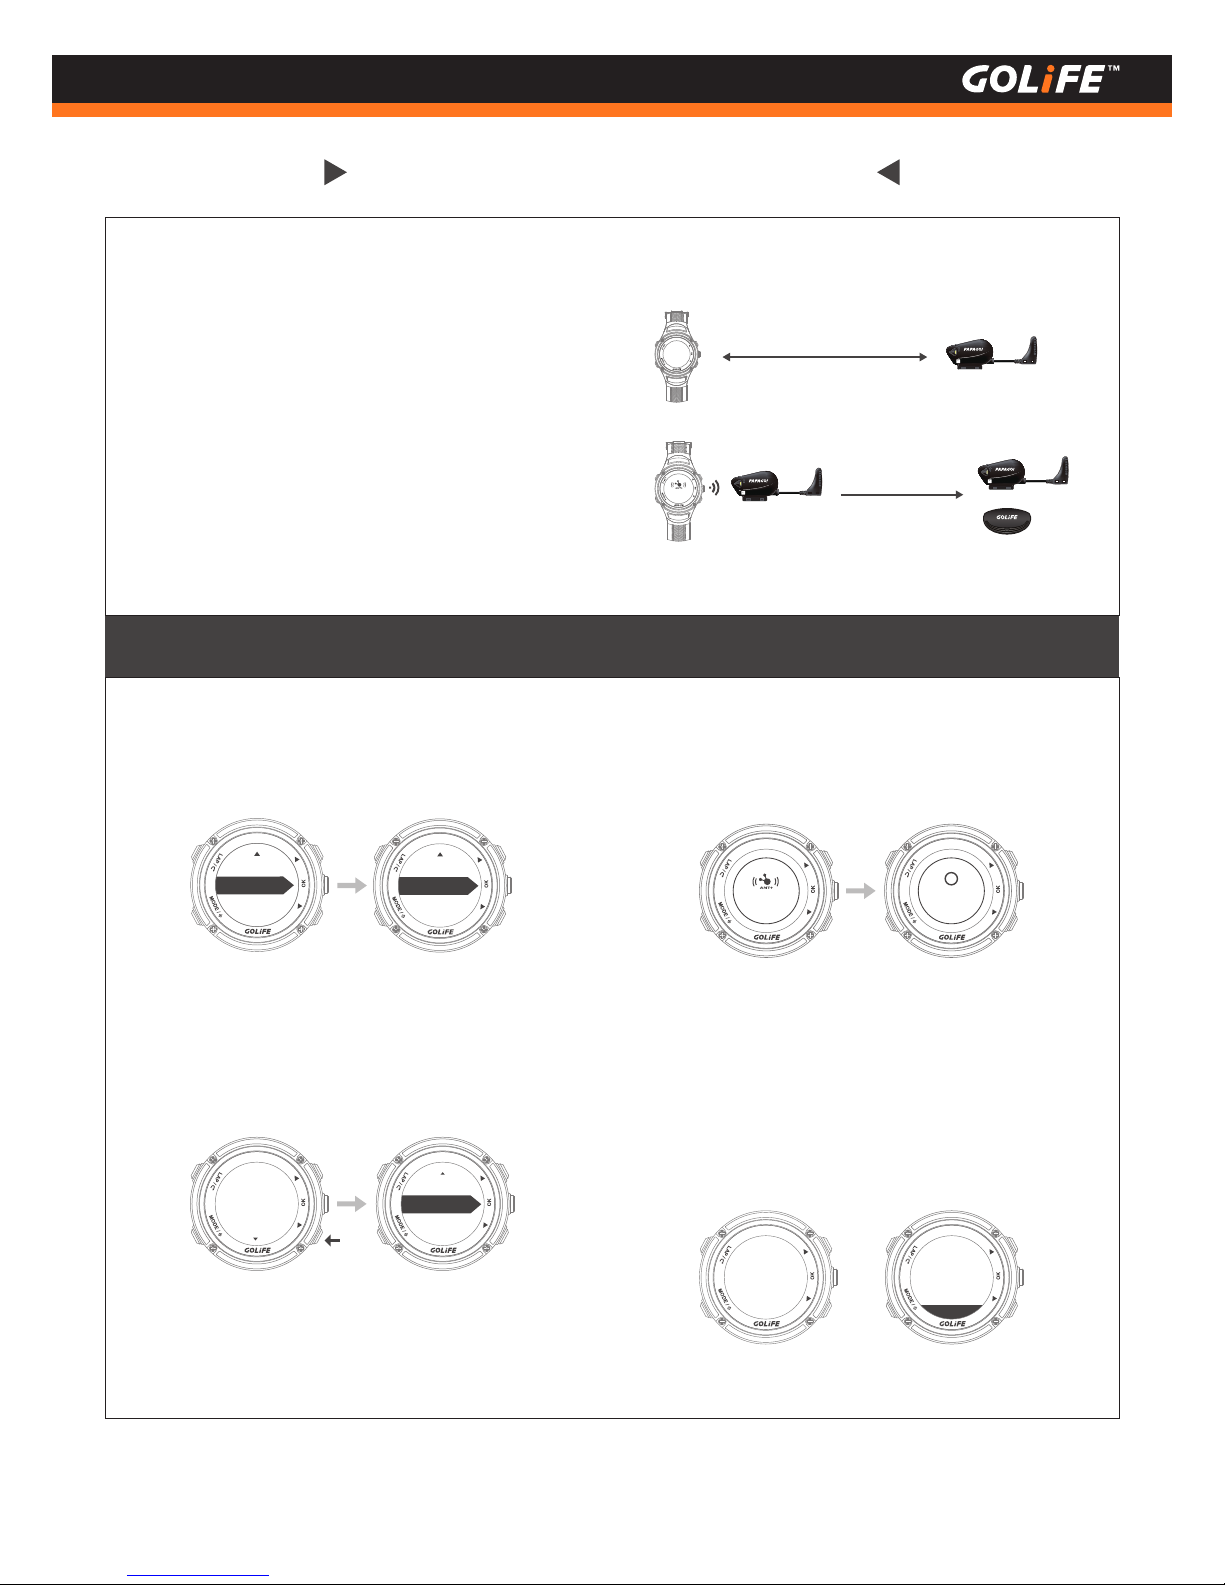
When performing pairing, make sure that other
ANT+ Sensors, if any, are kept at least 10m away.
※
For showing cadence and wheel speed on the screen, see P45 Page Settings.
※
If your Bicycle has no Speed Cadence Sensor,
no data transmission/reception will take place
in the watch.
※
Speed Cadence Sensor must be within a 1.5m
distance from the device for data transmission/
reception.
※
Within 1.5 m
配對中
10 m at least
After pressing [Re-pairing], screen shows
[ANT+ Pairing] for about 1min before
showing Paring Successful.
After selecting [ Speed/CAD], a message
indicating pairing failed shows up.
Press [ Down ] key for [ Re-pairing ].
Press [ LAP ] key; screen shows linking
status and pairing successful. This means
Speed Cadence Sensor is successfully
paired with your GoWatch. Cadence and
Wheel Speed data will be shown on the
watch when you start activity.
Speed/CAD
H.R. Monitor
First go to last item [ Sensors ] of Menu
Mode, press [ OK ] and select [ Speed/CAD ].
1.
2.
3.
4.
Sensors
Bluetooth
pairing
failed
Re-pairirng
pairirng paired
Heart rate
080
18:00
bpm
pairing
Success
Page 58
Use Method
57
Copyright ©2016 GOYOURLIFE INC.
6
ANT+ Sensor
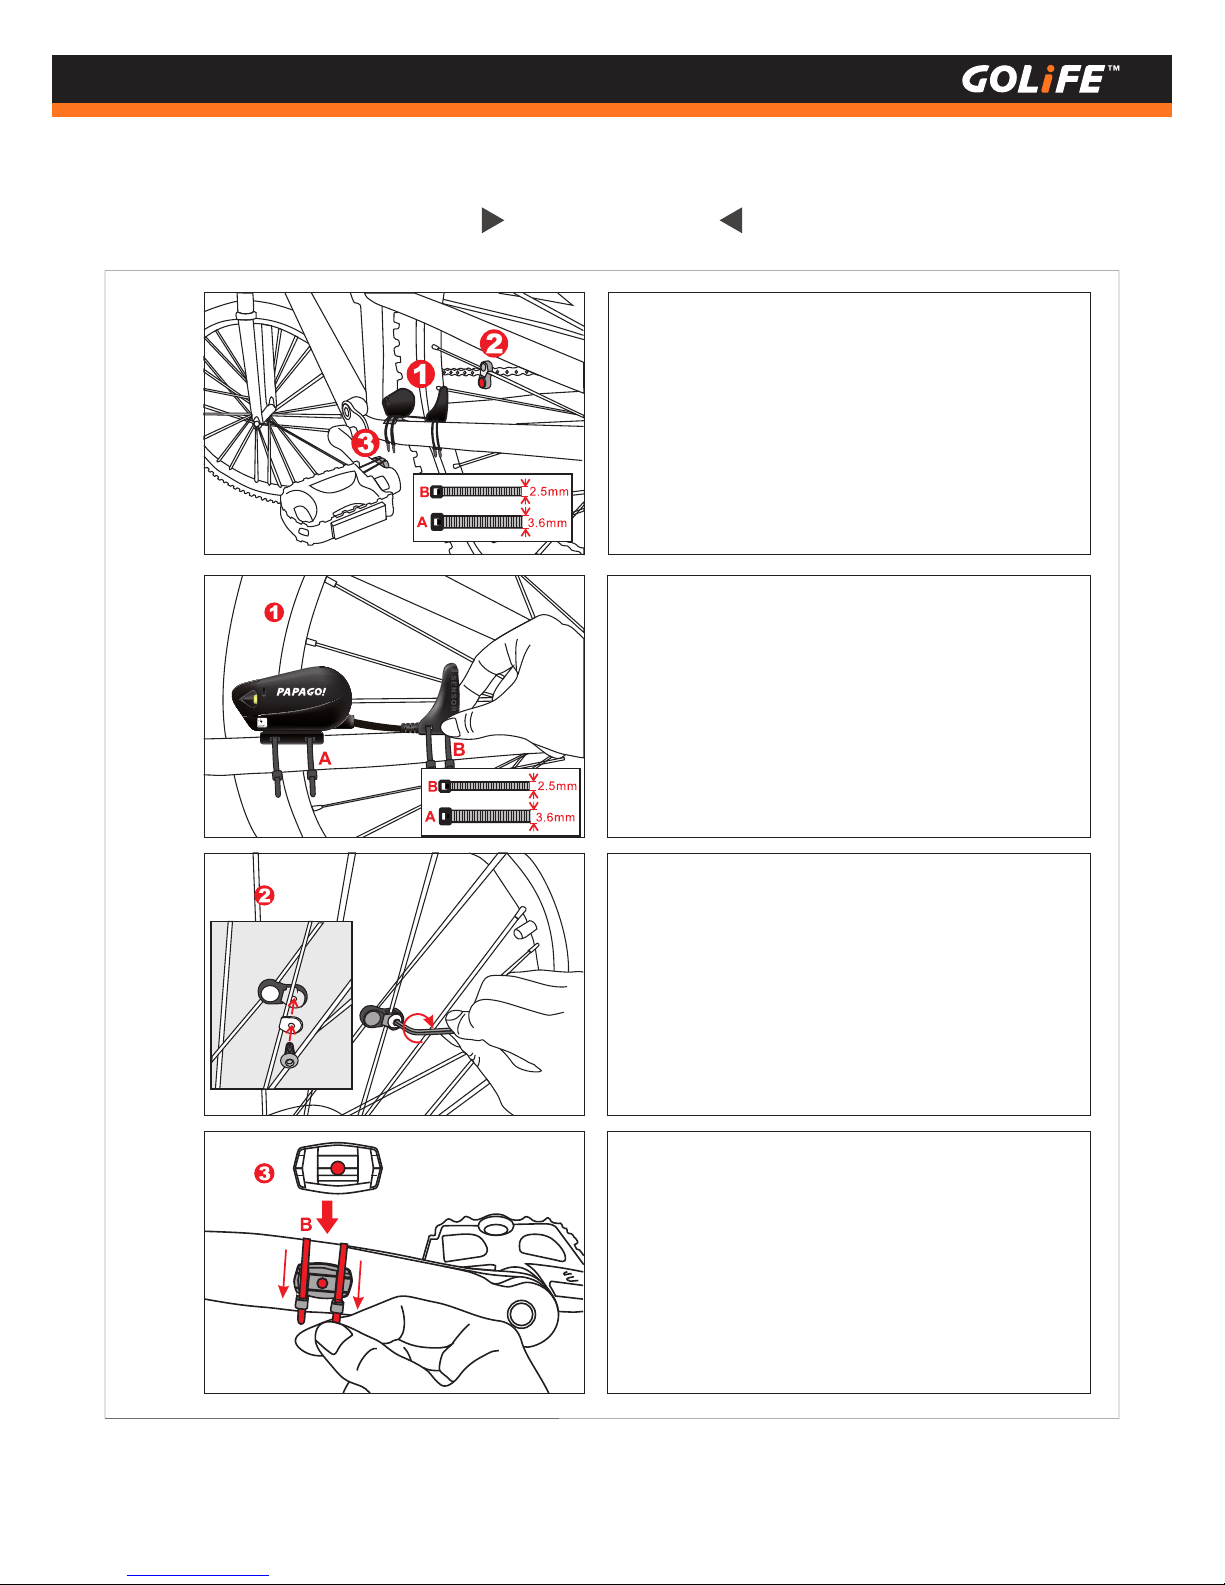
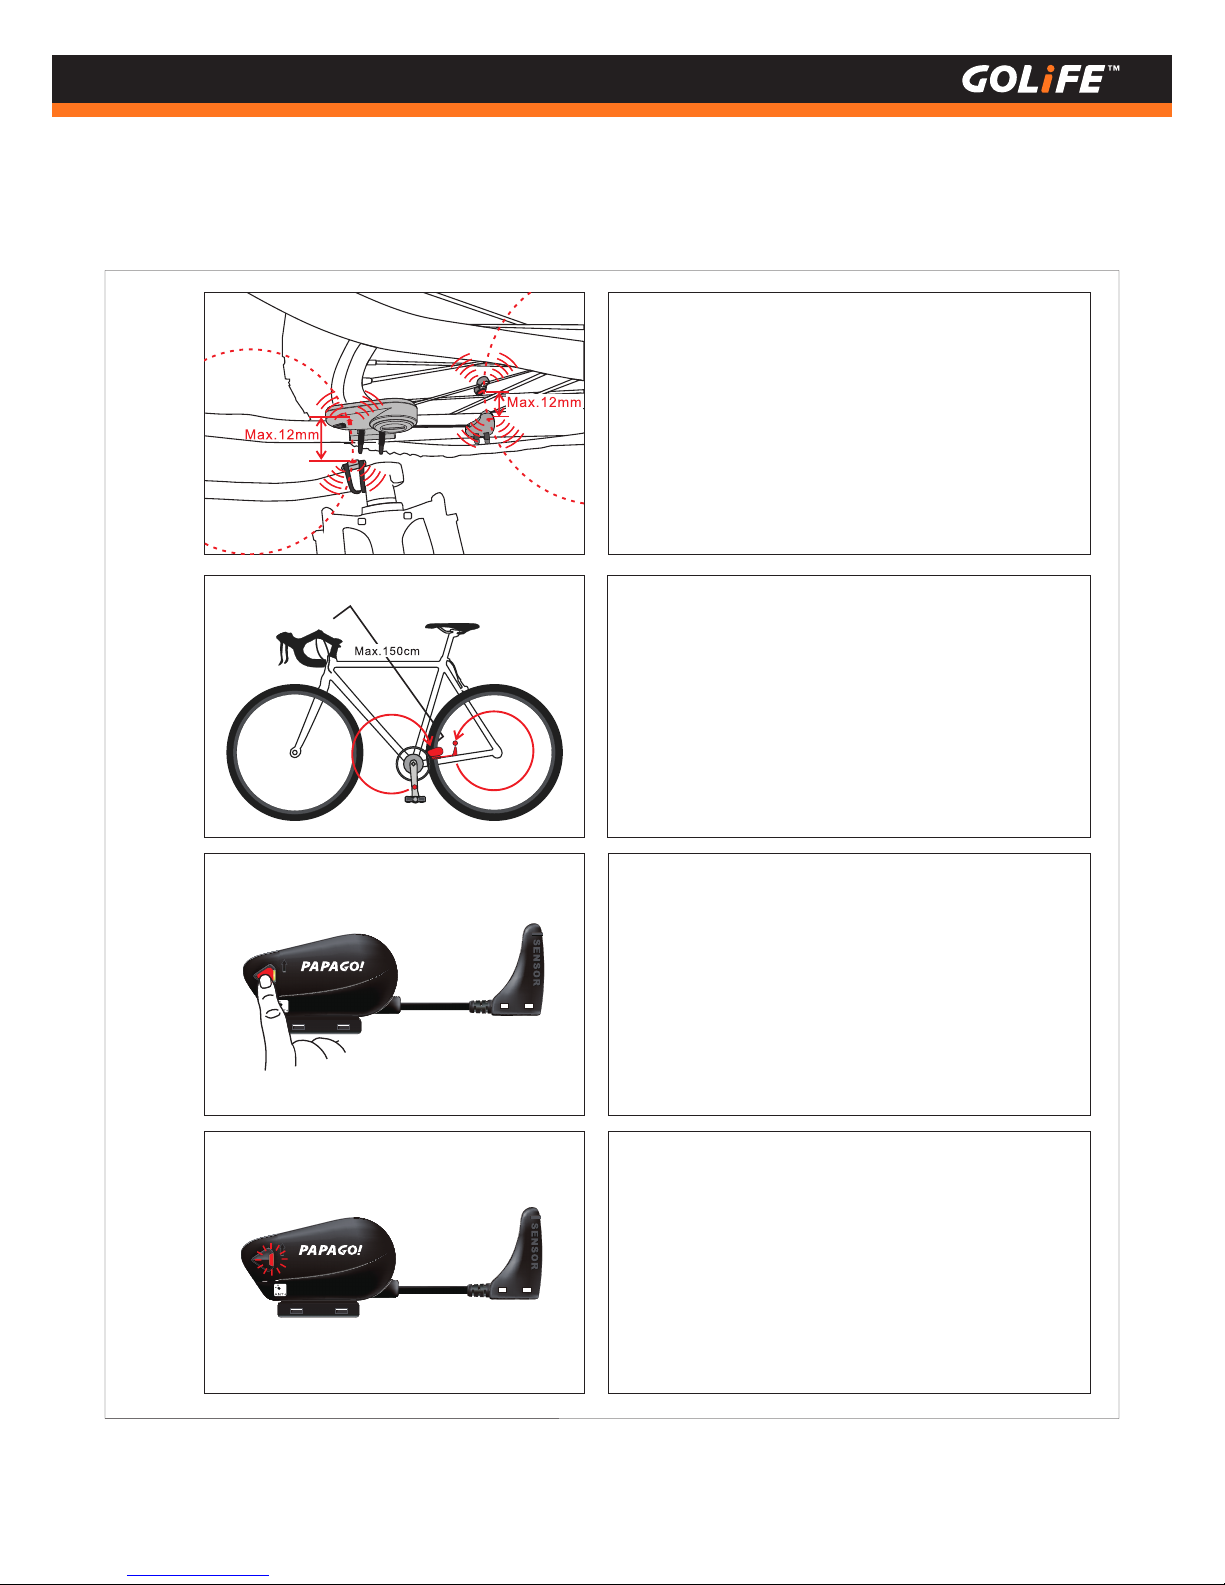
GoRide 100 Components:
GoRide 100 Speed Cadence Sensor
Magnet ( Large )
Magnet ( Small )
3.6 mm Strap
2.5 mm Strap
1.
2.
3.
A.
B.
Fix Sensor onto rear lower Fork
( Horizontal Fork ).
Straps have different size and
limited quantity; make
sure they are installed correctly.
( 1 )
Use an L spanner to fix
the small magnet on spoke wires
of rear wheel.
(2 )
Attach the large magnet
on the inner side of crank,
fix it with Strap B.
( 3 )
Page 59
58
Copyright ©2016 GOYOURLIFE INC.
6
ANT+ Sensor
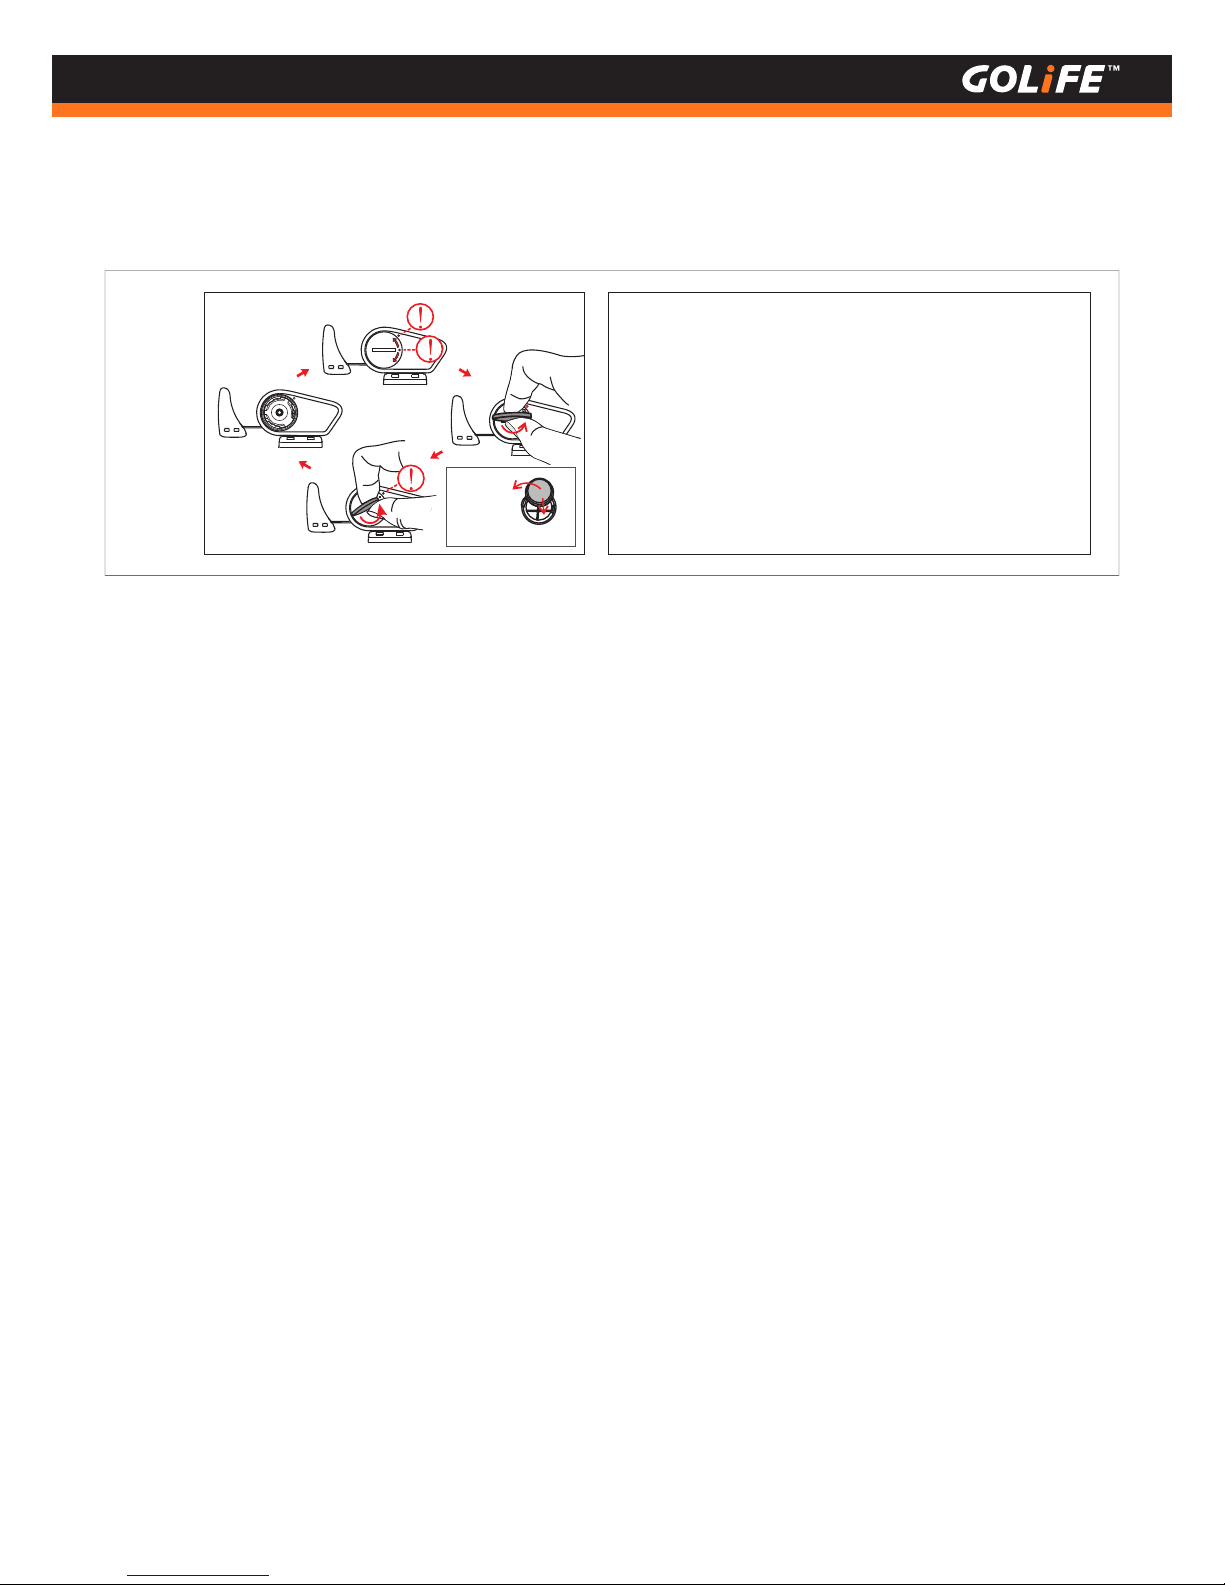
Locate the Sensor on the route
of magnet movement.
With other ANT+™ devices,
the maximum sensing range is 150 cm.
( 5 )
When magnet gets closer to
Sensor, a relative distance of 12
mm gives the most accurate
data.
( 4 )
Press the button to start
or reset.
( 6 )
At start-up,
indicator lights up for 2 seconds;
when linked with sensor,
indicator flashes 10 times.
( 7 )
Page 60
59
Copyright ©2016 GOYOURLIFE INC.
6
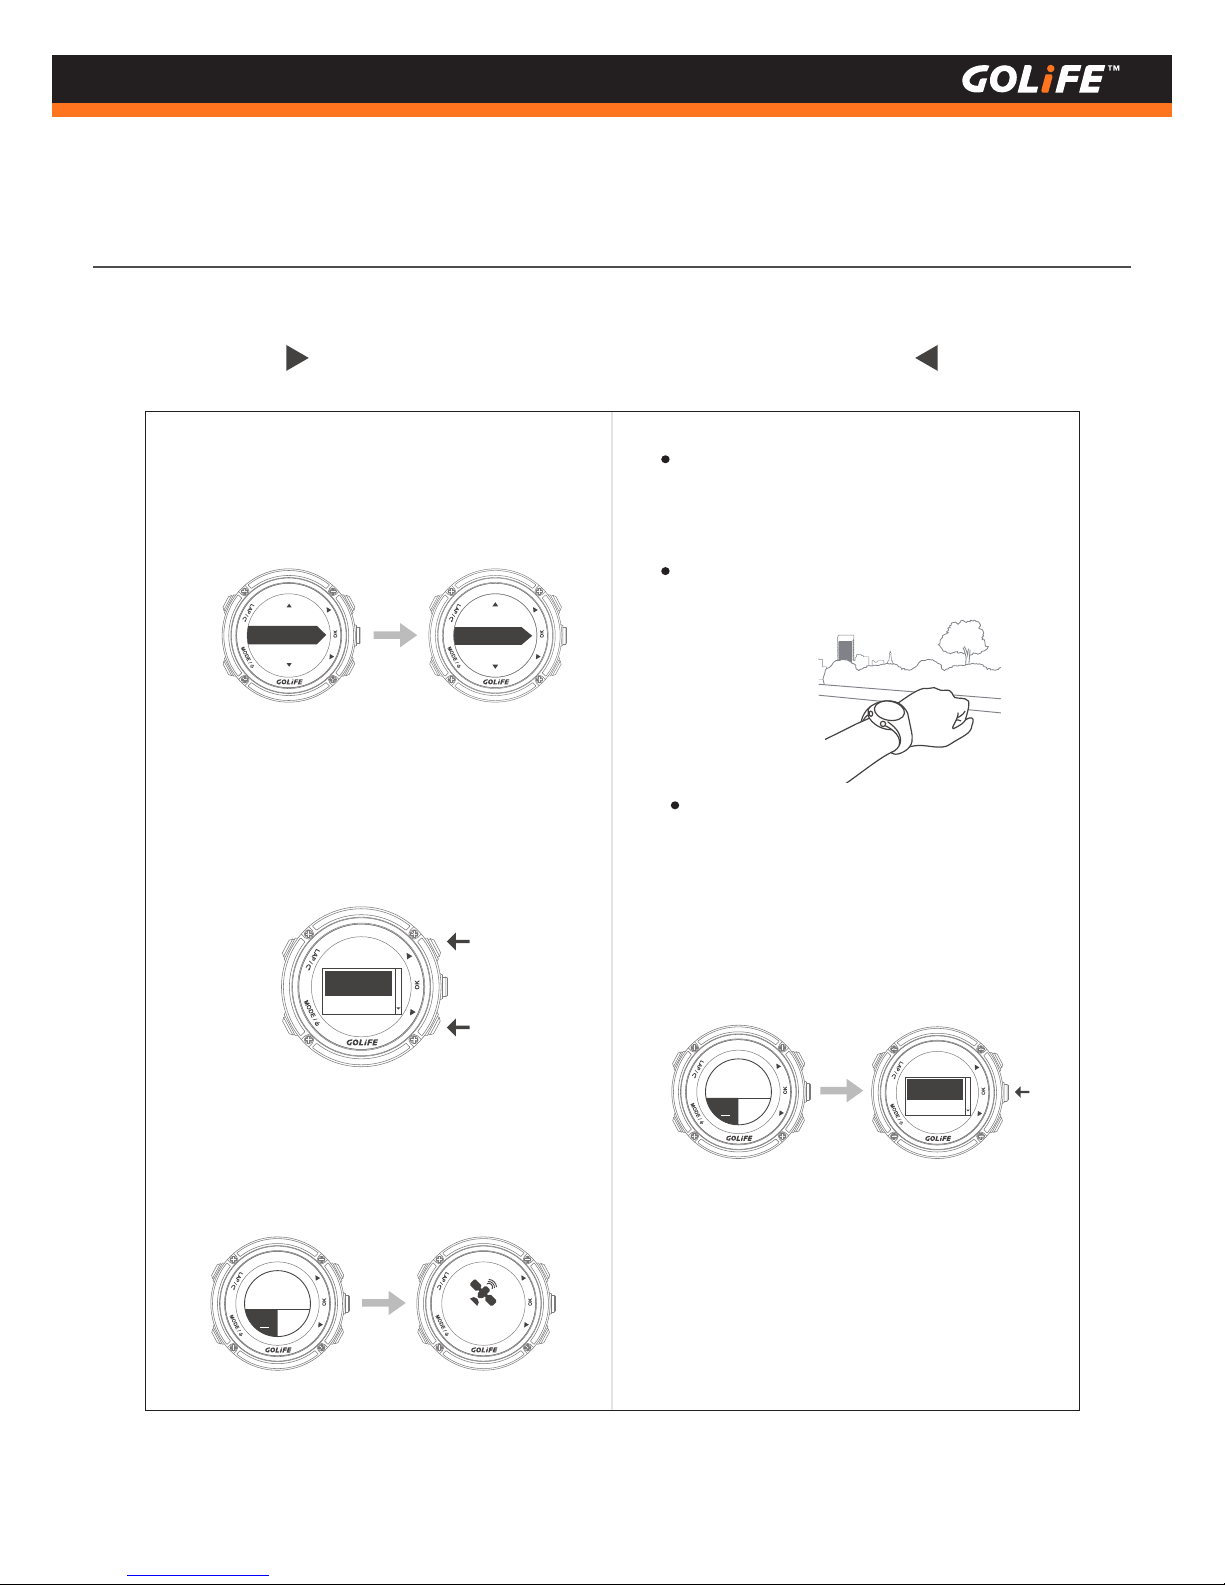
ANT+ Sensor
See the drawing on the right
for replacing battery.
( 8 )
Battery
Replacement
Page 61
60
Copyright ©2016 GOYOURLIFE INC.
7
Precautions
Precautions
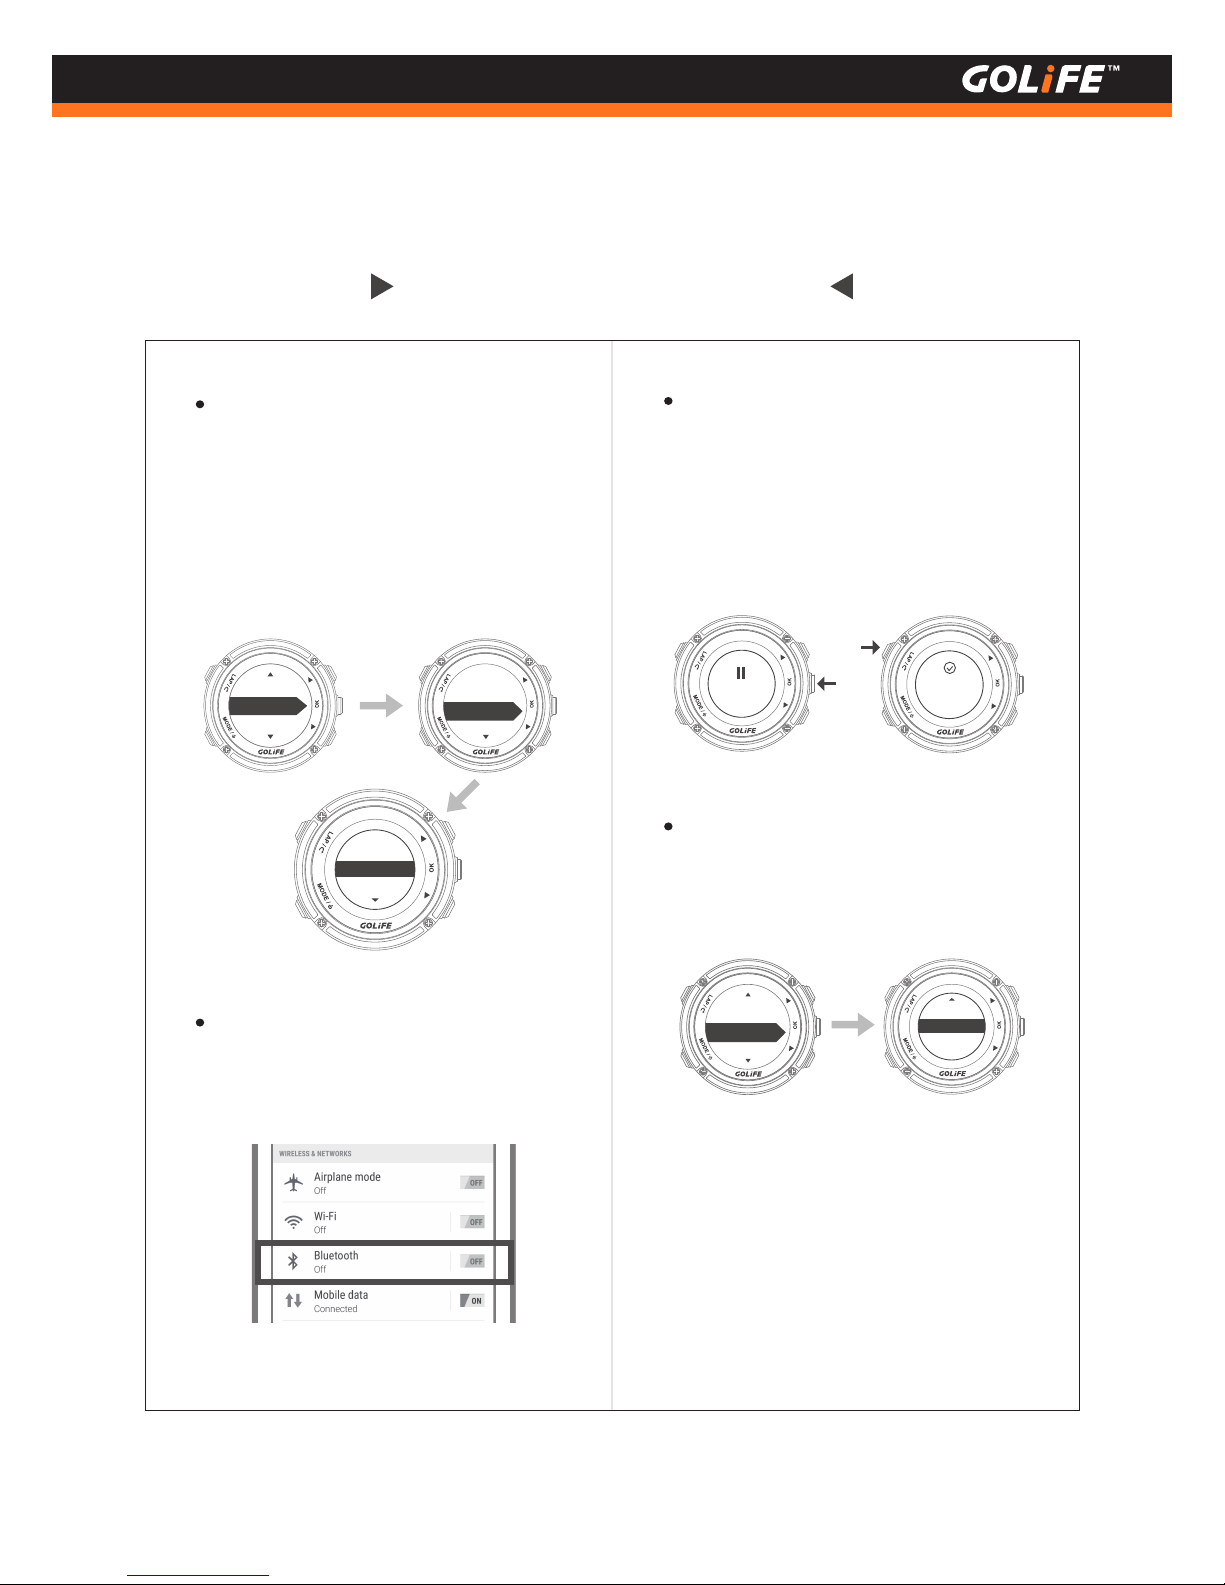
Start-up Setting Procedures after Reset
Reset:
Use [ Settings ] → [ Reset ] to reset
setting values and Activity Log.
Time Zone, Time settings:
Auto Time Zone setup - Select [ Yes ],
press [ OK ] on the right → GPS Searching
On completion of the above procedures,
you may enter Watch Screen.
Manual Time Zone Setup - Select [ No ],
press [ OK ] on the right → Manual
Time Zone
Select Language:
Press [ Up ], [ Down ] to select [ Traditional
Chinese ], [ Simplified Chinese ], [ English ],
or [ Japanese ].
Make sure that you are at a location
with good reception of GPS signal,
such as top of building or an open area.
It takes about 1min to accomplish GPS
positioning.
After GPS positioning, find out time
zone of the current location and you
may accurately calibrate the time.
Language
简体中文
正體中文
Manual
+08:45
+08:00
Auto time
Zone ?
NY
Searching...
Note that this procedure does not
delete activity records, it only returns
the watch to its default settings.
※
1.
2.
3.
4.
Settings
Track/Notify
Bluetooth
Reset
GPS
About
Auto time
Zone ?
NY
Page 62
61
Copyright ©2016 GOYOURLIFE INC.
7
Precautions
Prolonging Battery Lifespan
Pause Activity:
If you are resting or pausing track
records, press [ OK ] to pause logging;
then press [ LAP ] to stop logging and
select [ Save ] to save data.
Auto Light:
Menu Mode → [ Settings ] → [ Display ]
→ [ Auto Light ]. Please select [ Off ].
Turn off Backlight:
Menu Mode → [ Settings ] → [ Display ]
→ [ Backlight ]; available options
include [ Off ], [ Always ], [ Message ],
[ Key ], [ Key/Msg ]. Only [ Off ] offers
reduced power consumption.
Turn Off Bluetooth:
Disable Bluetooth function of your smart
phone when connection is not required.
On
Off
On
Auto Light
Always
Off
Activity
saved
Display
Time/Clock
Key beep
Key
Backlight
Pause
Page 63
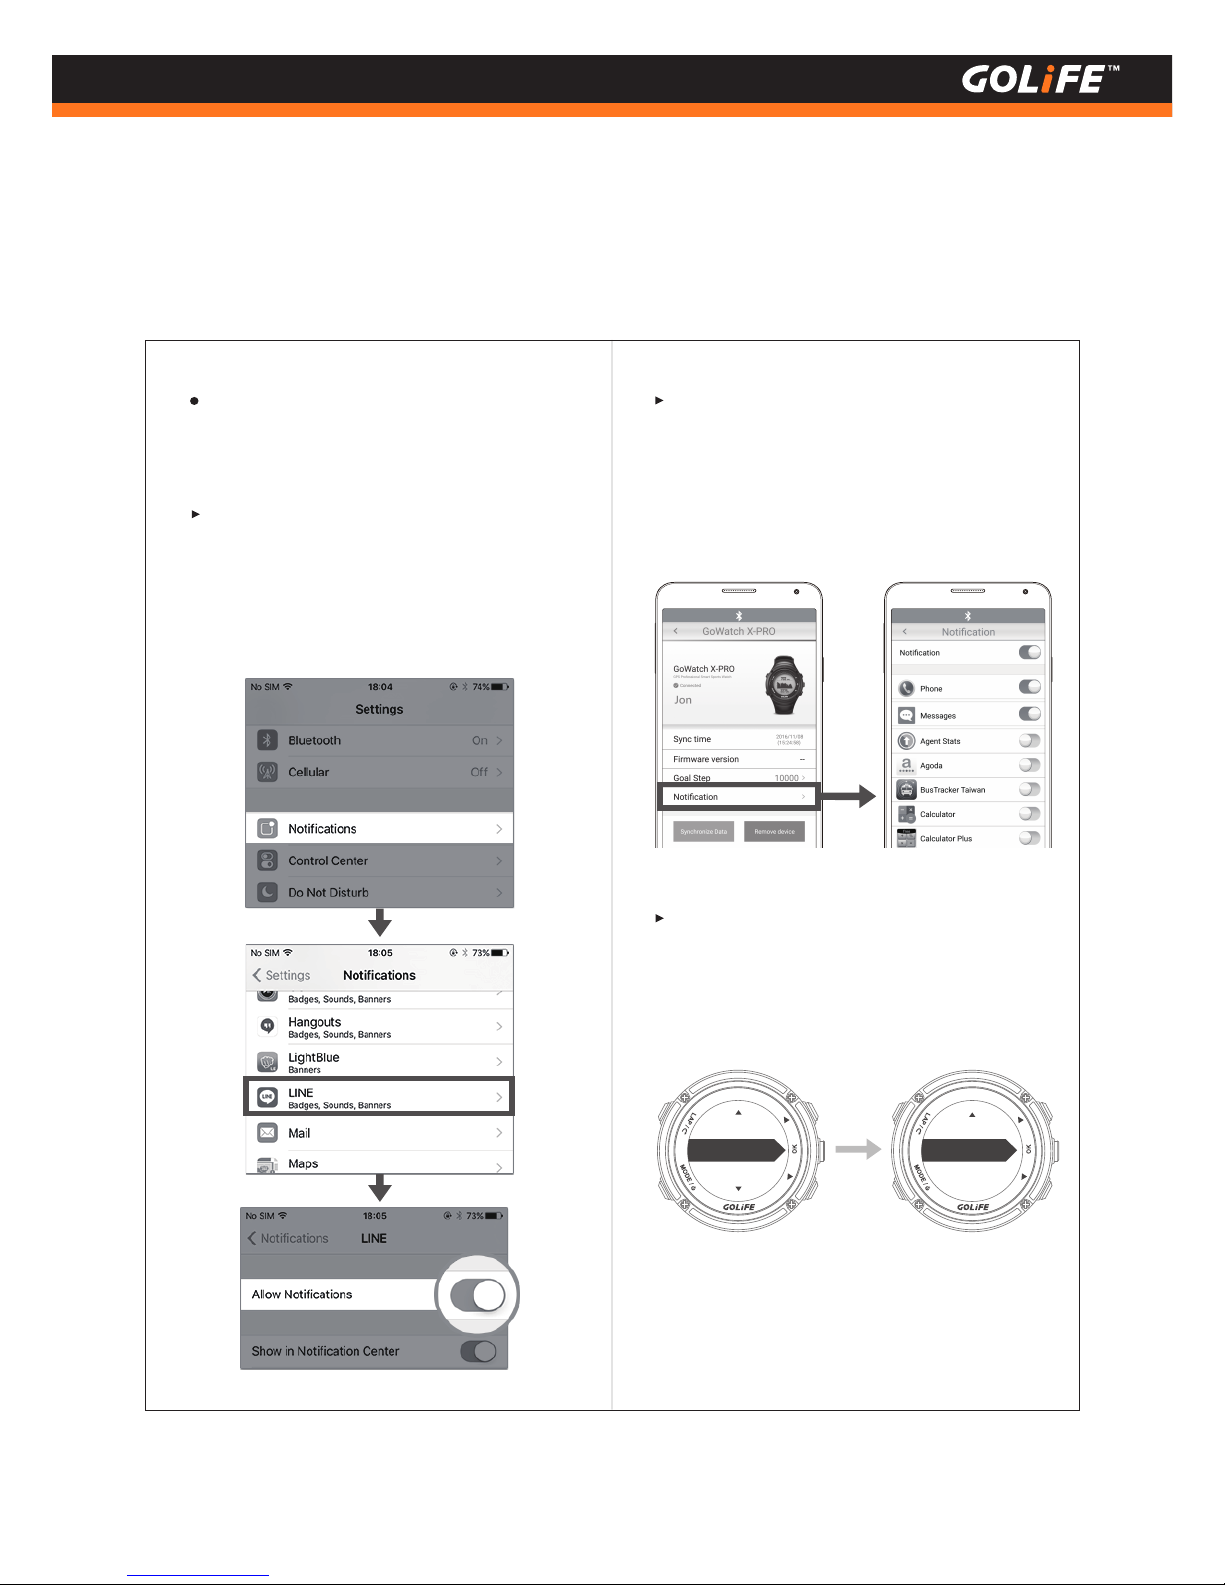
For downloading GOLiFE RUN App,
see P17; for pairing method, see P18.
※
Notification Management:
You may manage messages displayed
on X-PRO using a paired device.
In iOS System: You may set type of prompt
App and message in Notifications of your
smart device; notification displayed by
X-PRO will be consistent to these settings.
In Android System: Open GOLiFE RUN
App and Bluetooth and pair with
X-PRO; select [ Device ]→Select X-PRO
→ [ Notifications ] to open or close
notifications.
Or, go to X-PRO
Menu Mode → [ Track/Notify ] → [ Down ]
key→ [ Msg notify ] → [ Off ].
( This procedure will close all the messages. )
62
Copyright ©2016 GOYOURLIFE INC.
7
Precautions
On
Msg notify
Track/Notify
Navigate
Settings
Page 64
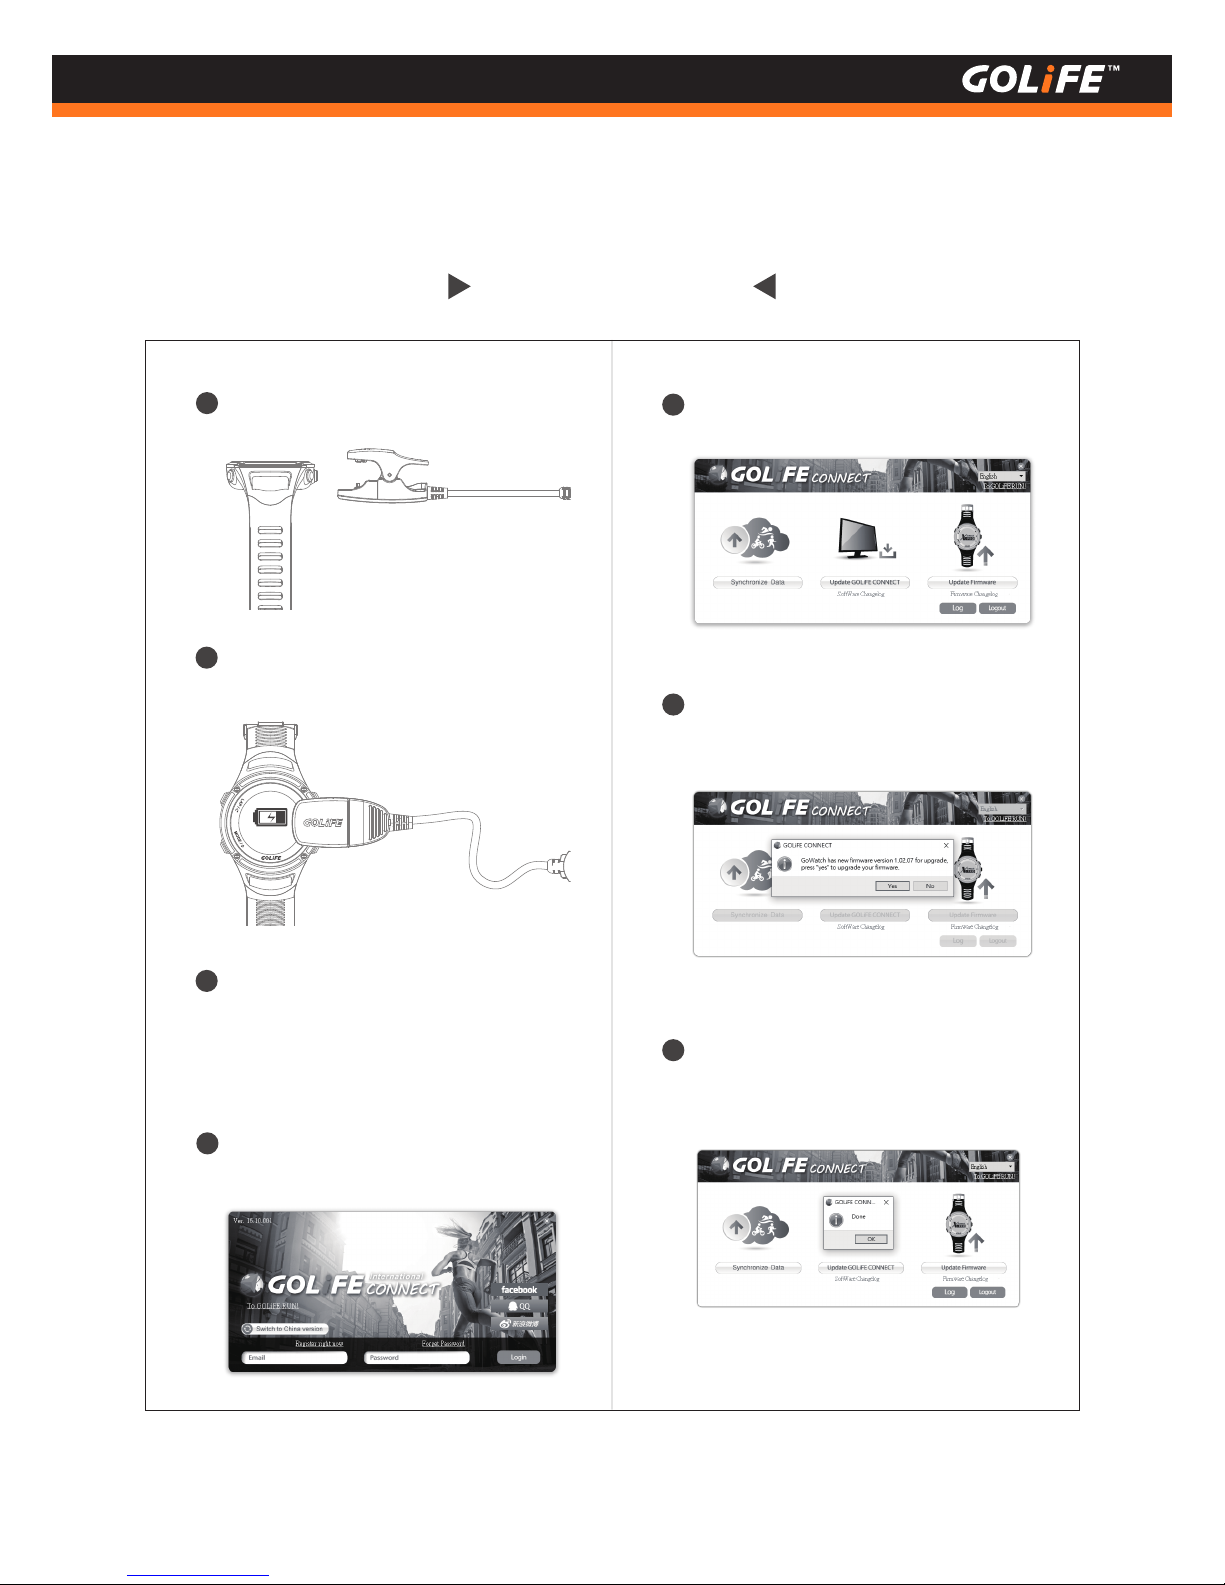
Firmware Update
63
Copyright ©2016 GOYOURLIFE INC.
7
Precautions
1.
Clip up Charge Clip to GoWatch.
1
3. Connect USB cable on the other end
of Charge Clip to USB port of PC.
2
Charging
3 Use PC to activate
www.goyourlife.com/download
and install GOLiFE CONNECT.
Skip this step if already installed.
3
4.
Enter a GOLiFE account or log in your
Facebook, QQ or Weibo account.
4
Confirm to update GOLiFE X-PRO
firmware and press [ Yes ].
6
On completion of updating, [ Done ]
appears; press [ OK ] to end the process.
7
5. Select [ Update Firmware ] on the right.
5
Page 65
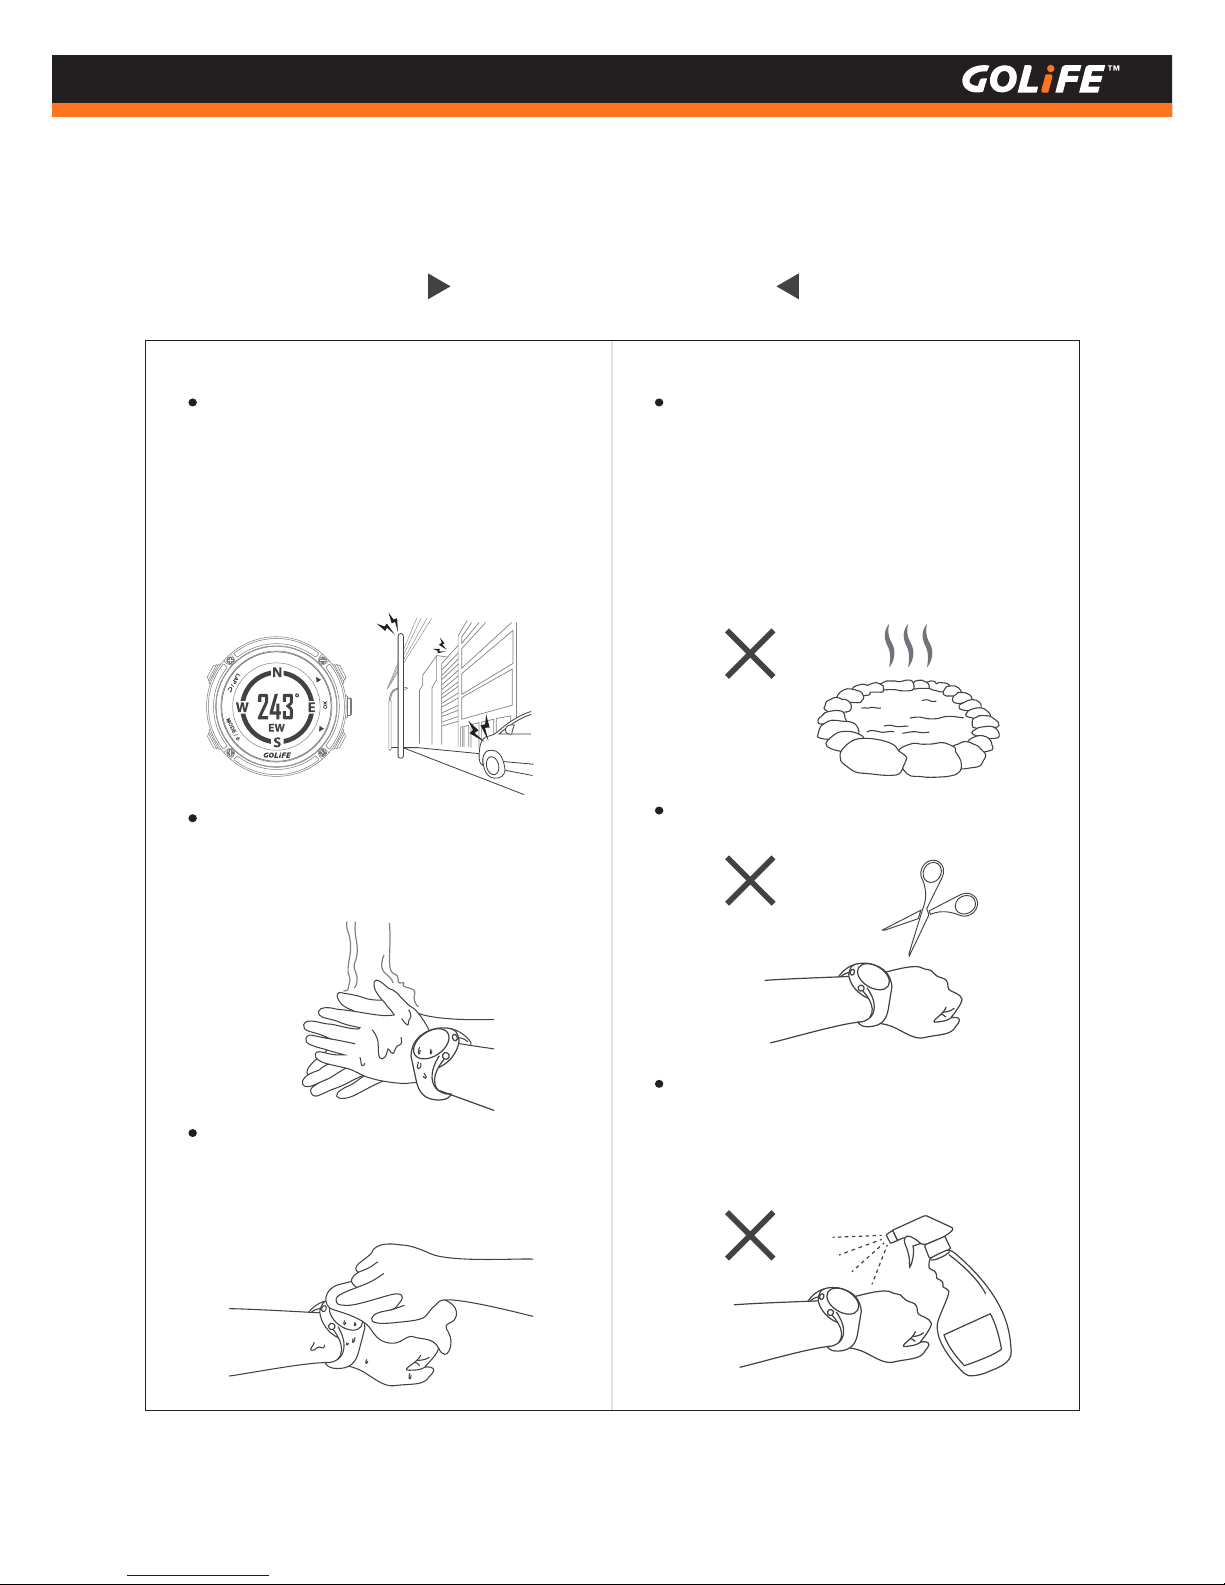
Precautions on Use
X-PRO Compass function is subject to
influence of external magnetic field.
Before using Compass, pay attention to
objects in the vicinity that may cause
electromagnetic interference, such as
cars, buildings or electric poles.
GoWatch is waterproof and sustainable
to ordinary hand wash and face wash
activities or water splash.
To prevent corrosion, make sure to thor-
oughly dry the watch after cold water
shower (short time) or swimming.
Not suitable for diving or uses in highly
humid environments ( e.g., hot spring
bath, steam room, hot showers, diving,
etc. ). A waterproof watch is not suitable
for hot water ( hot spring ) activities, or
moisture may infiltrate the watch.
DO NOT clean the watch with sharp objects.
Avoid using organic solutions, chemical
detergents or insect repellents that may
damage plastic parts of the watch.
64
Copyright ©2016 GOYOURLIFE INC.
7
Precautions
Page 66
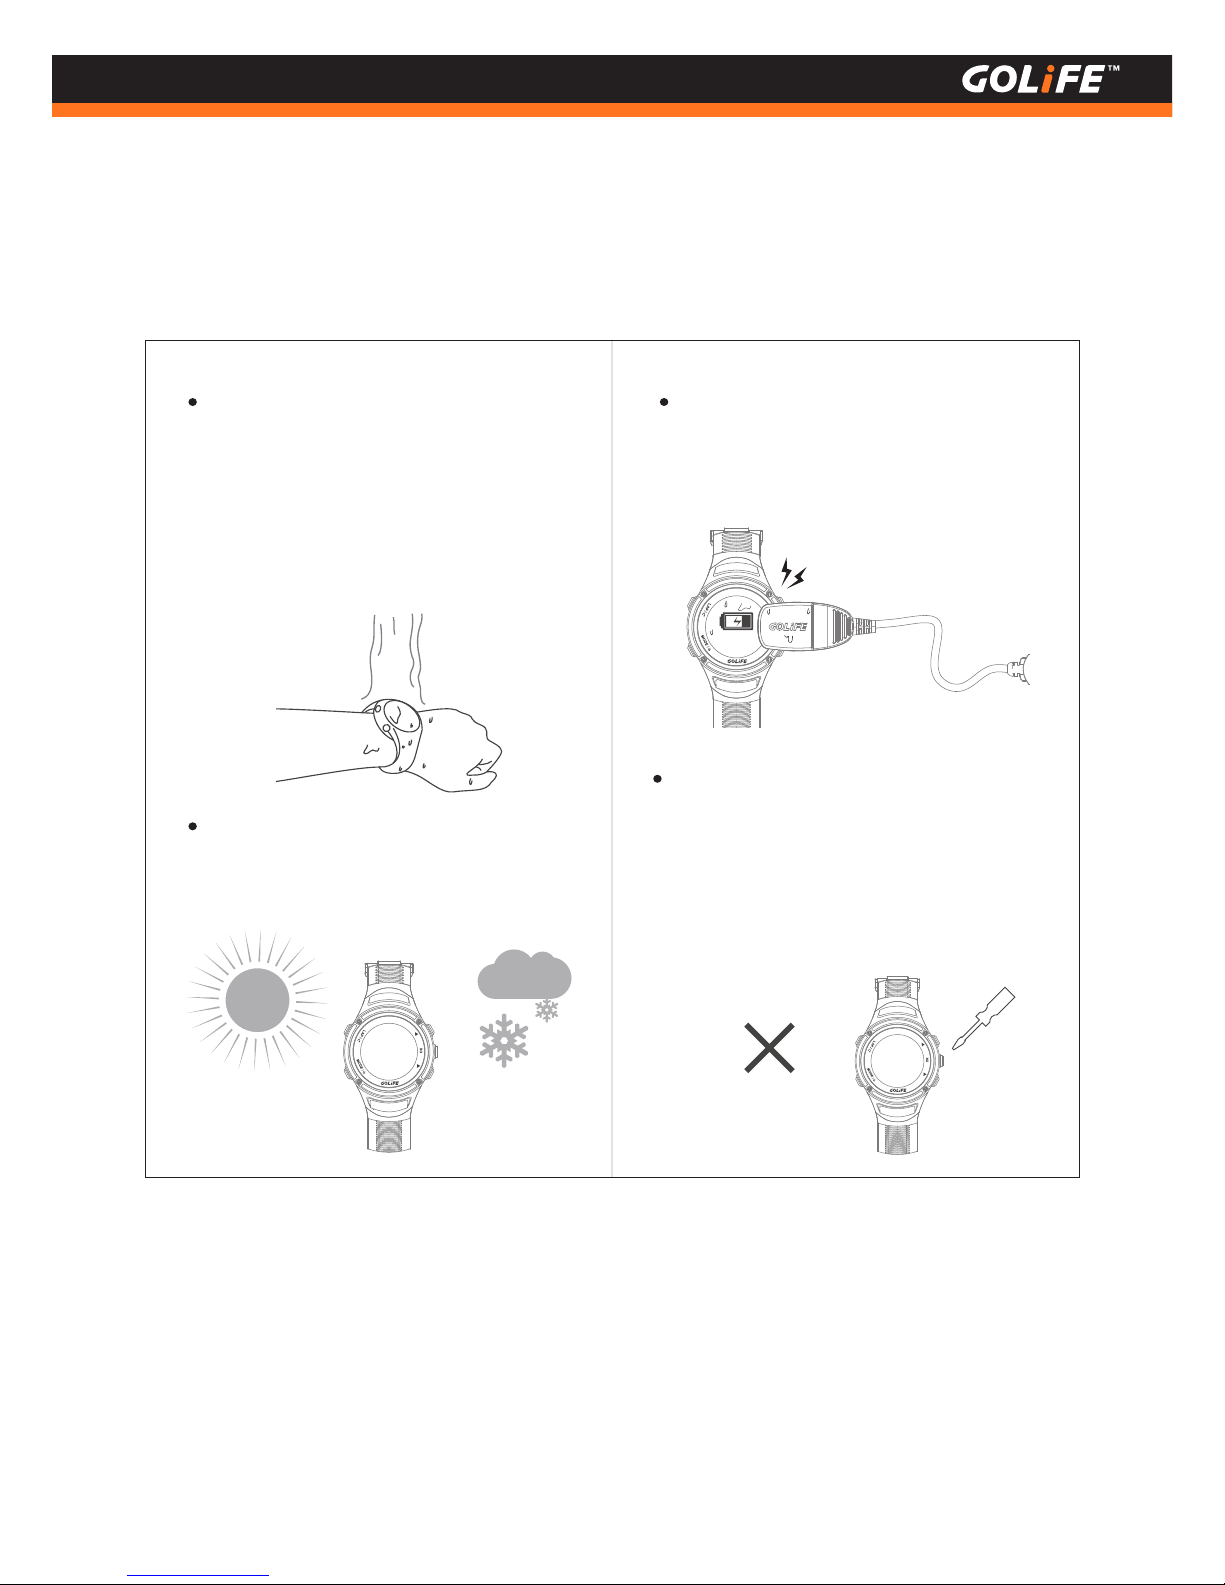
Clean the watch with plenty of clean
water after contacting ammonia, salty
water, suntan lotion, makeup, alcohol or
other chemicals; prolonged contact
with such substances may result in
damage of watch.
Avoid exposing the watch in extreme
temperatures ( cold or hot ),
or permanent damage may occur.
65
Copyright ©2016 GOYOURLIFE INC.
7
Precautions
When charging the watch, even small
amount of sweat or moisture may cause
affect the charging adversely.
Charging
Never take out the battery from a
GOLiFE product.
Goyourlife Inc. shall not be held liable
for any product damage, injury or casu-
alty resulting from arbitrary disman-
tling of its product.
Page 67
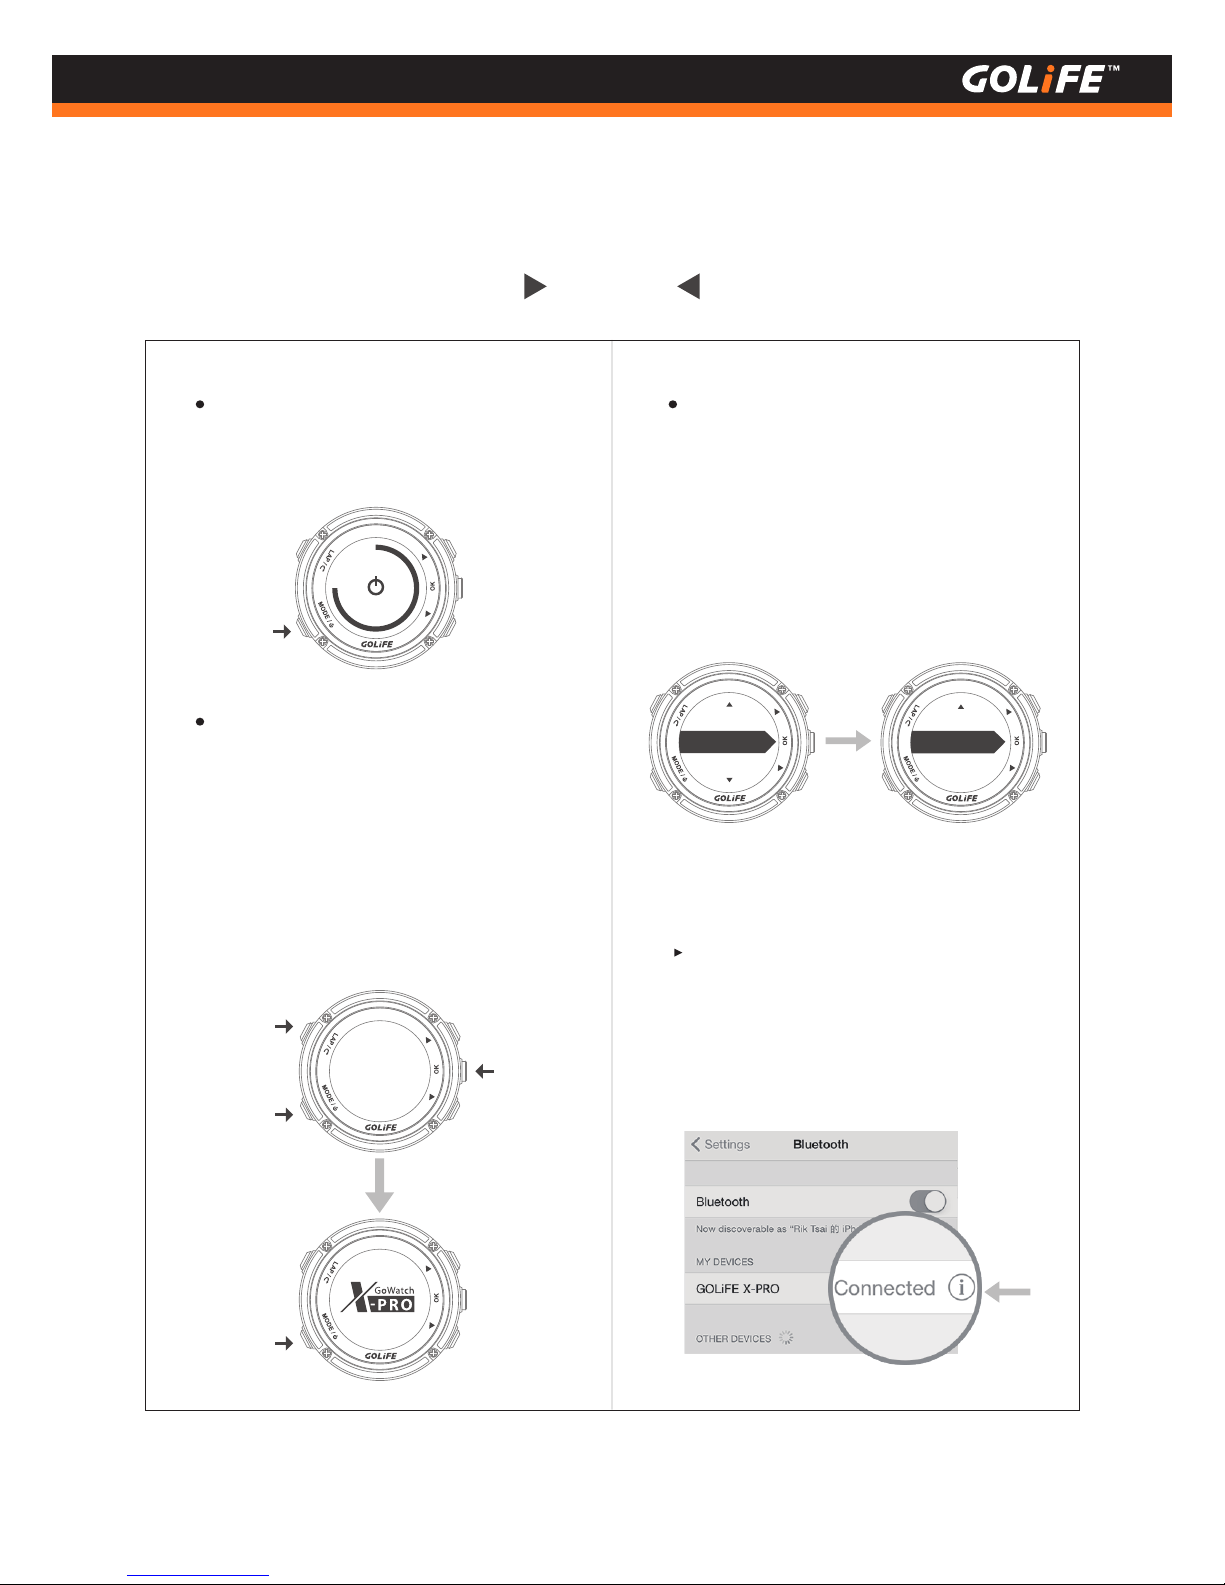
66
Copyright ©2016 GOYOURLIFE INC.
7
Precautions
FAQs
Re-start watch if it has no response for
a long time. Press and Hold [ MODE ]
for 2 seconds to restart.
Checking steps if GoWatch fails to
pair with GOLiFE RUN App:
First check if [ Track/Notify ] of GoWatch
X-PRO is [ On ].
( Menu Mode→ [ Track/Notify ] →
[ Msg Notify ] → [ ON ] )
Reset the watch if restart is not
effective: Press and Hold [ MODE ],
[ LAP ] and [ OK ] at the same time for
2 seconds. ( This will not delete any
setting or data of the watch. ) After
resetting the watch, Press and Hold
[ MODE ] for 2 seconds to start up.
1.
Re-start Bluetooth. You need to remove
Bluetooth from your smart phone first:
iOS smart phone→[ Settings ]→
[ Bluetooth ]→[ GOLiFE X-PRO ]→if the
Bluetooth Exclamation Mark appears→
Select [ Forget This Device ].
2.
On
Msg notify
Track/Notify
Navigate
Settings
Page 68
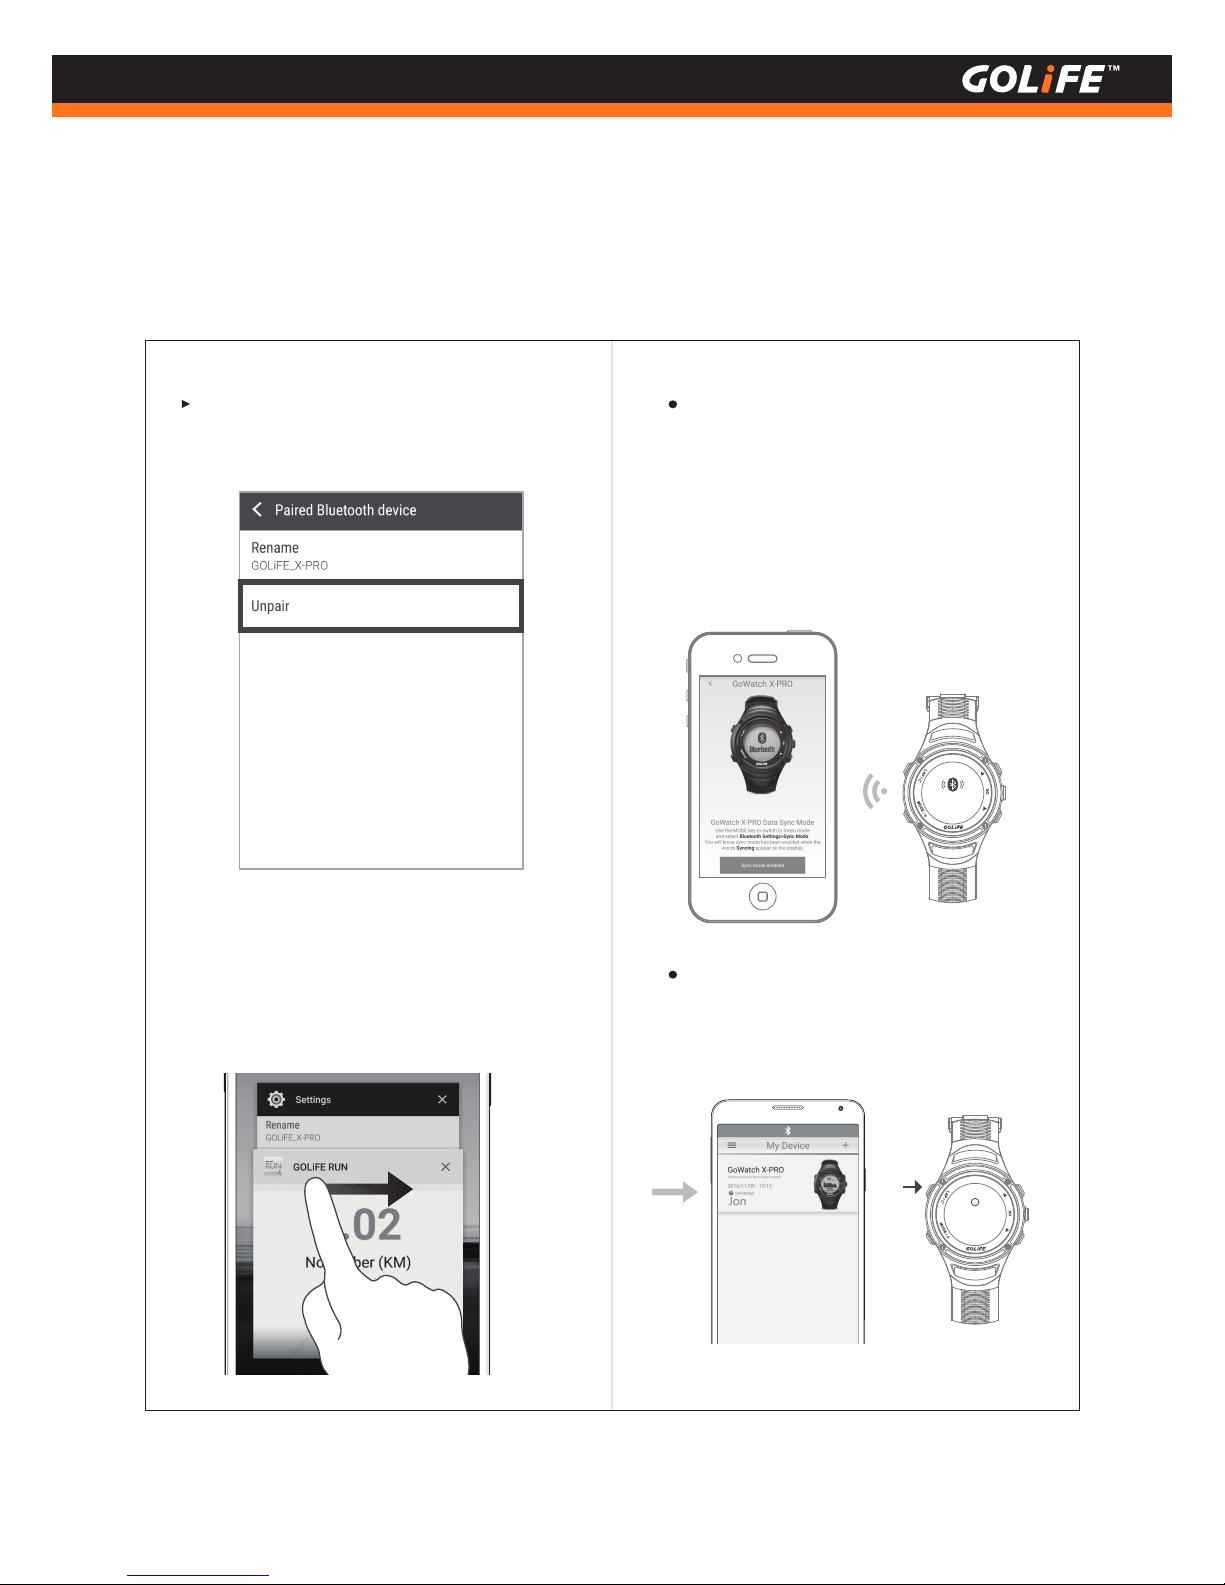
67
Copyright ©2016 GOYOURLIFE INC.
7
Precautions
When performing sync, place GoWatch
X-PRO in the proximity of smart phone;
excessive distance may prevent or
interrupt uploading of the activity log.
Pairing may take a long time, please be
patient.
When performing pairing, press [ LAP ]
of X-PRO to return only when the
Android phone shows the Paired Device
Android smart phone→[ Settings ]→
[ Bluetooth ]→[ GOLiFE X-PRO ]→ Delete it.
Pairing...
paired
Close GOLiFE RUN App Background
Operation; then re-start and re-pair.
※ See P18 for pairing method.
3.
Page 69
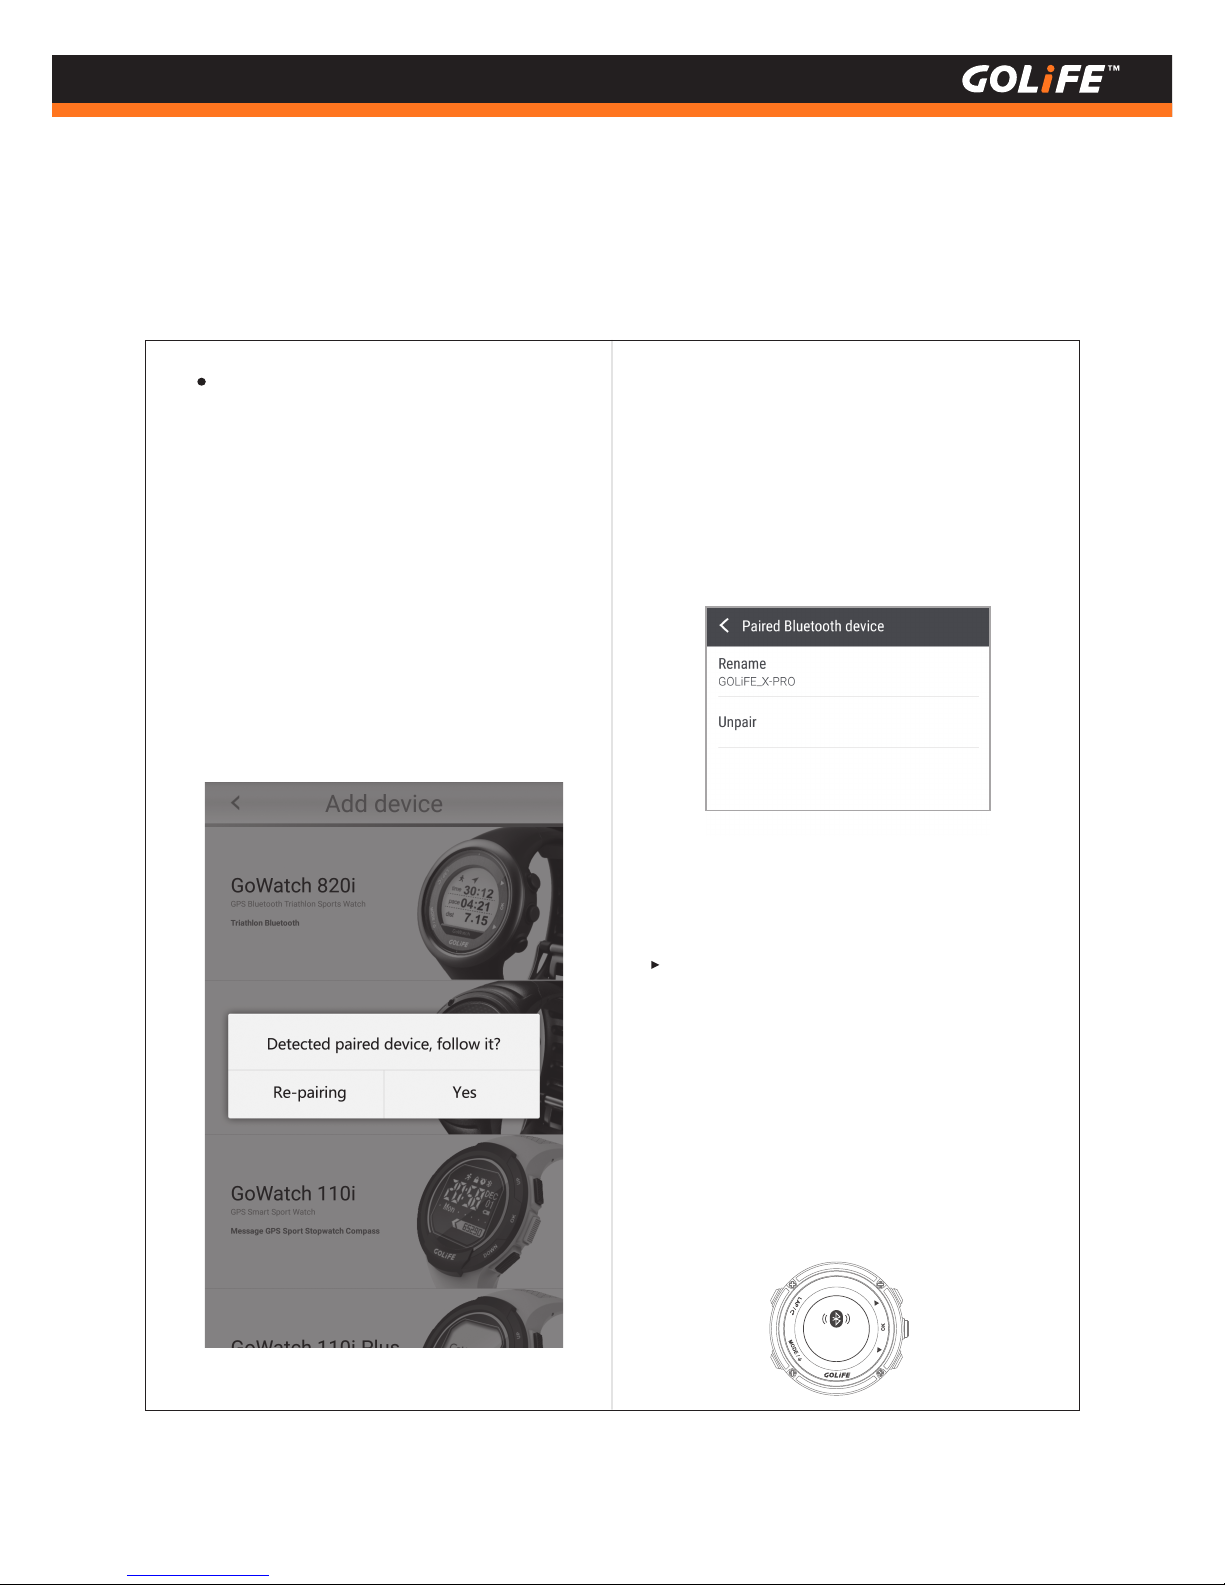
When Android phone user using GOLiFE
RUN App to pair GoWatch X-RPO, if
[ Android System ]→[ Bluetooth ]→
[ Paired Device ] shows [ GOLiFE_X-PRO ]
already exists, the App will pop up a
message indicating as follows:
First go to Menu Mode of GoWatch X-PRO
→[ Bluetooth ]→[ Pair ], then press [ Yes ];
this will activate device search and trial
pairing. When a device is found, a pairing
message will show up on the phone,
prompting the user to carry out pairing.
Three different messages may appear
depending on smart phone model:
68
Copyright ©2016 GOYOURLIFE INC.
7
Precautions
Verify if GoWatch X-RPO is the previous
device in use, and if you wish to continue
using it, just click [ Yes ] to complete
pairing.
1.
If you wish to use the device as a new one,
click [ Repairing ] to proceed Next Step as
follows:
2.
If not paired, go to [Android System]→
[ Bluetooth ] to search for [ GOLiFE_X-PRO ]
Pairing Sensors. If GOLiFE_X-PRO device
appears in [ Android System ]→
[ Bluetooth ]→[ Paired Device ], carry out
pairing as described above again.
※
Pairing...
Page 70
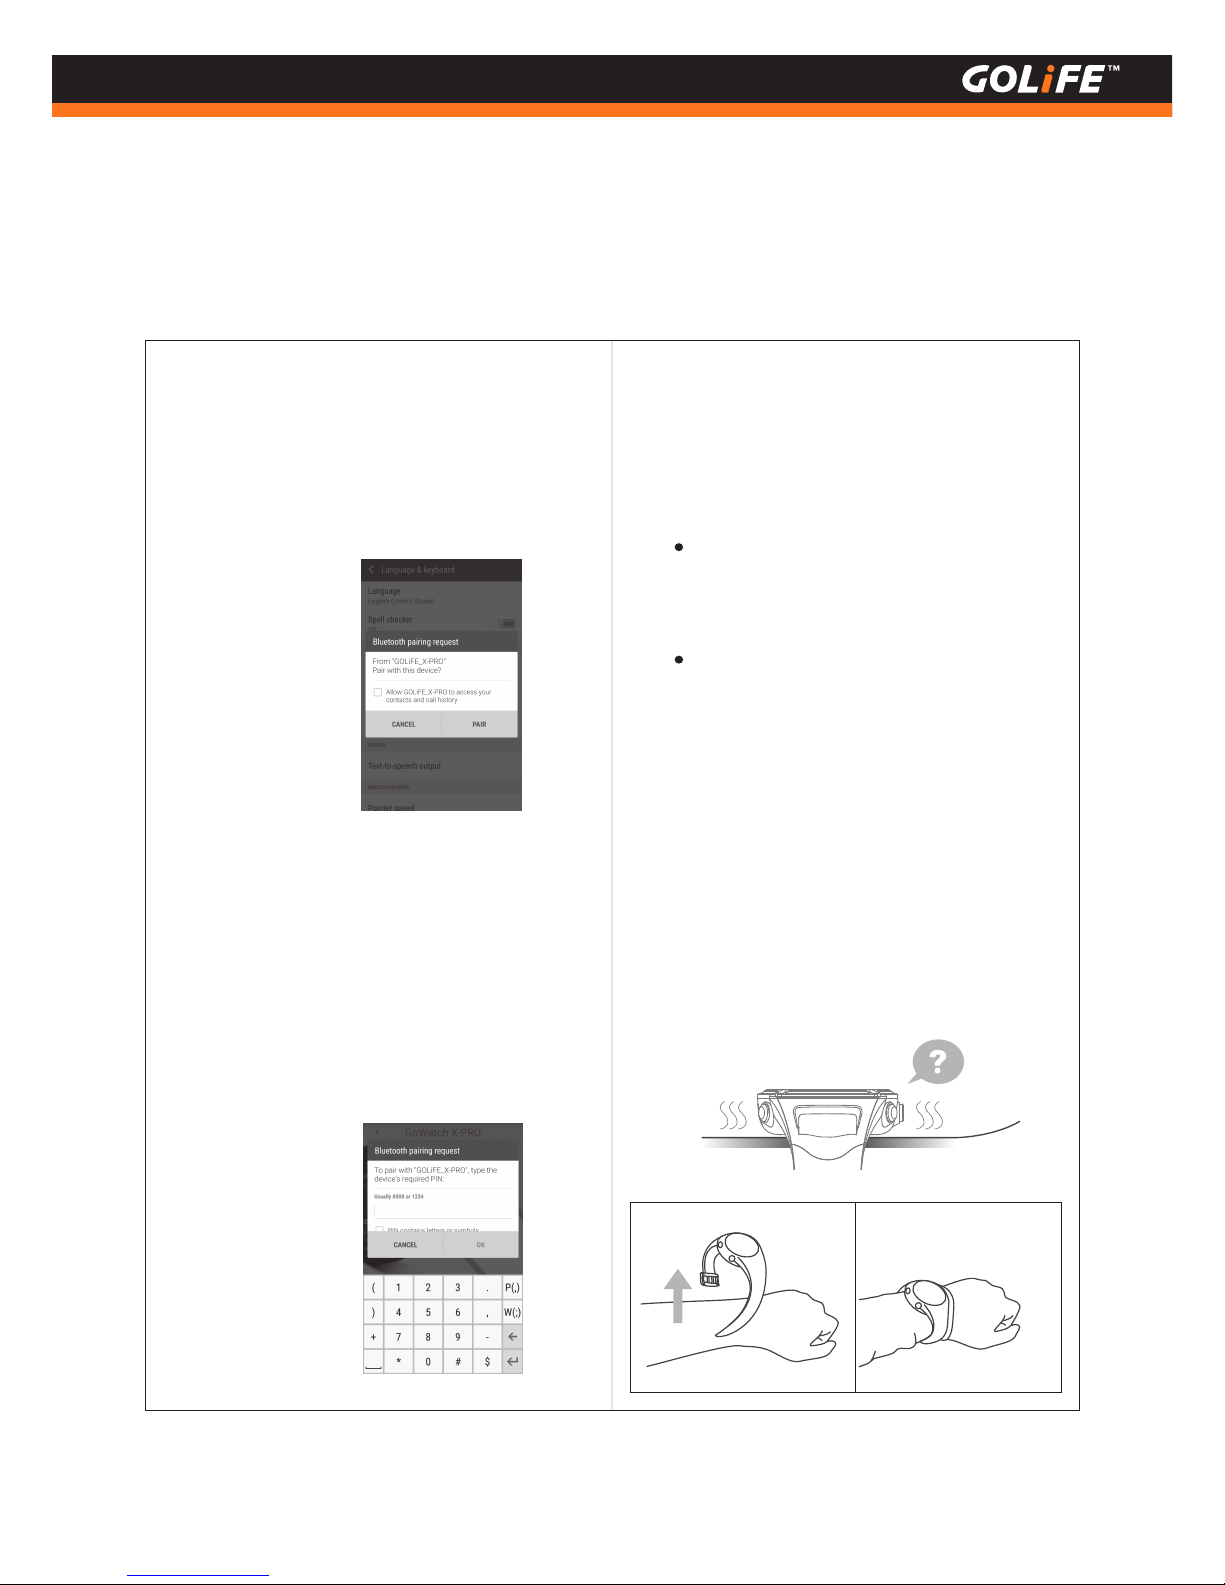
For Bluetooth link interruption problems
between Android System smart phone
and GoWatch,see P32.
Temperature incorrect.
This is because the reading is affected
by your body temperature if you are
reading Temperature with GoWatch
worn on your wrist; the reading may be
high. For accurate temperature reading,
please remove the watch from your
wrist or wear it outside of a hiking
jacket or glove.
( It takes about 10 minutes to obtain a
stable reading. )
A system message pops up. Enter
pairing code and complete pairing;
after detection, App will complete
pairing automatically.
(1)
An App prompt message pops up. Enter
pairing code and complete pairing; after
detection, App will complete pairing
automatically.
(2)
(1) and (2) only require entering
pairing code once for the watch to
complete pairing.
※
System completes pairing automatically.
In this case, as soon as the App detects
the device, pairing will be completed.
(3)
See P18 for pairing method.
※
69
Copyright ©2016 GOYOURLIFE INC.
7
Precautions
RUN App Pairing
System pairing
Wear it outside a
hiking jacket or gloves.
Remove
the watch
Page 71
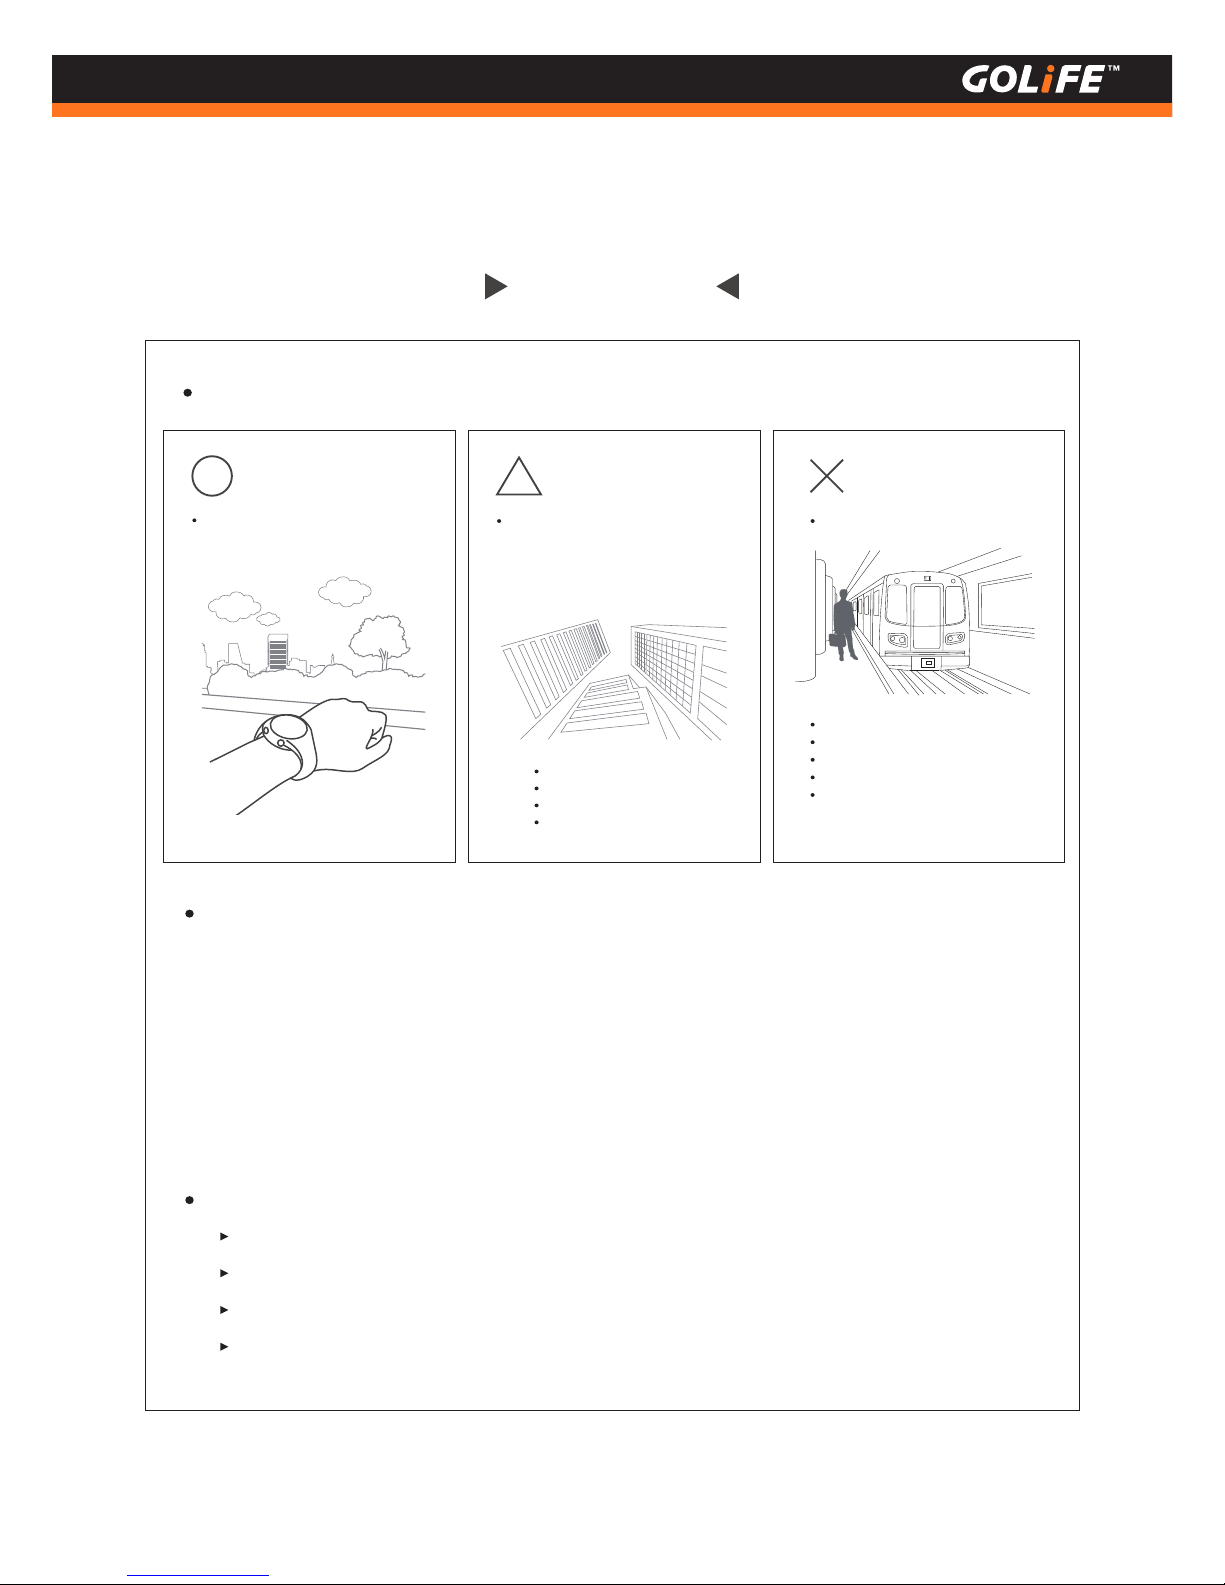
References
Daylight Saving Time ( Summer Time ):
Different regions have respective Daylight Saving Times ( DST ). The so-called Summer Time
refers to the time in the summer; a system that advances the time by one hour so as to
lengthen the daytime. Mainly in Europe, DST is currently adopted by about 80 countries.
However, the period and zoning for enforcing DST may differ from country to country.
Summer Time ( DST ) in different areas may sometimes change due to national or regional
conditions.
※
70
Copyright ©2016 GOYOURLIFE INC.
8
References
Environments with easy GPS
reception
Environments with no GPS
reception
Outdoors where you can see the sky and have a
wide view.
The narrower view of the visible sky, the harder
reception of signals. Furthermore, when receiving
signals ( especially when adjusting time zone ),
any object that may block GPS signal may cause
difficult GPS reception.
With no or little view of the sky.
Between high-rise buildings
Vicinity of trees
Stations and airports
Indoor rooms with windows
( Some windows block signals. )
Indoor rooms without windows
Underground
Passing through a tunnel
Special partition glazing with heat insulation effects
The vicinity of machine or radio equipment that
emits noise signals
Environments with difficult
GPS reception
For more information:
GOLiFE official link: http://www.goyourlife.com/
GoWatch X-PRO Product Link: http://www.goyourlife.com/gowatchxpro/
Maintenance and Warrant: http://www.goyourlife.com/rma/#policy
Customer Service: http://www.goyourlife.com/feedback/
Locations with easy reception/ no reception of GPS signal
Page 72
Index of Functions
71
Copyright ©2016 GOYOURLIFE INC.
8
References
Calibration functions
Calibration before initial use............. For initial use of GoWatch, you need to charge
it and take it outdoors for Auto Calibration of Time and Time Zone. See→P6
Auto and Manual Time Zone Calibration……....... See→P14
Barometer Calibration……....... For manual calibration of barometer, See→P29
Compass Calibration……....... For compass calibration, See→P30
Charge functions
Charge GoWatch……....... Use GOLiFE Charge Clip for charging, See→P9
Extend battery lifespan……....... See→P61
Activities and Functions
Other functions............. For functions other than exercise and activity, See→
P28~P31
Notifications and Messages……....... For closing or opening App messages, See→P44
Start Activity............. For starting recording activities such as Run, Cycling, Triathlon,
Swimming, Indoor Cycling, Indoor Run, etc., See→P34
Page Format Set Up……....... For setting up displayed info during activities, See→P45
Metronome…….......See→P43
Sync and Upload
Data Sync and Upload via Smart Phone............. For Data Sync and Upload via Smart
Phone, See→P19
Data Sync and Upload via PC............. For Data Sync and Upload via PC, See→P22
Pairing Sensors
Using and Pairing ANT+ H.R. Monitor……....... See→P54
Using and Pairing ANT+ Speed Cadence Sensor……....... See→P56
Page 73
72
Copyright ©2016 GOYOURLIFE INC.
8
References
Precautions
GPS Positioning……....... See→P13
GoWatch Firmware Update……....... See→P63
Waterproof……....... See→P64
Locations with easy reception/no reception of GPS signal……....... See→P70
Troubleshooting
GoWatch not responding……....... See→P66
GoWatch not paring with smart phone……....... See→P68
About GoWatch Temperature Reading……....... See→P69
More information
Daylight Saving Time ( Summer Time ) ……....... See→P70
More product information……....... See→P70
X-PRO Product Technical Specifications……....... See→P73
Page 74
Technical Specifications
73
Copyright ©2016 GOYOURLIFE INC.
8
References
Physical Dimensions
Weight
Screen Definition
Material
Color
Charging Method
Working temperature
Waterproof Class
Operation Time
Record Time
GPS
Support Functions
ANT+
Gravity Sensor
Matching Software
Prompt Effect
Activity Modes
Warrant Period
48.5 × 48.5 × 15.5 mm
70g
110 x 110 LCD
Stainless Steel Face Ring / PC Watch Casing / Scratch
Resistant TPU
Carbon Fiber Black / Hair-line Silver
Standard USB connector
-10 ~ +60℃
5 ATM
GPS Mode: 11hrs;
Watch Mode: 17 - 18 hrs;
Watch Mode with Pedometer / Msg. Notify: 11 - 12 days
45.5 hrs
High sensitivity GPS receiver
Bluetooth, Barometer, Altimeter, Compass,
Pedometer Function, Msg. Notify
Support 2.4 GHz ANT+ H.R. Monitor,
Speed Cadence Sensor
6-axis Acceleration Sensor
GOLiFE RUN APP
( Applicable to Bluetooth v4.0 BLE Smart Phone )/
GOLiFE CONNECT PC App
( For Windows and iMac )
Support Sound and Vibration Prompt
Run, Cycling, Swimming, Hiking, Walk,
Indoor Run, Indoor Cycling, Triathlon
One Year after purchase date
Subject to change of design or specification without notice.
 Loading...