

Page 1
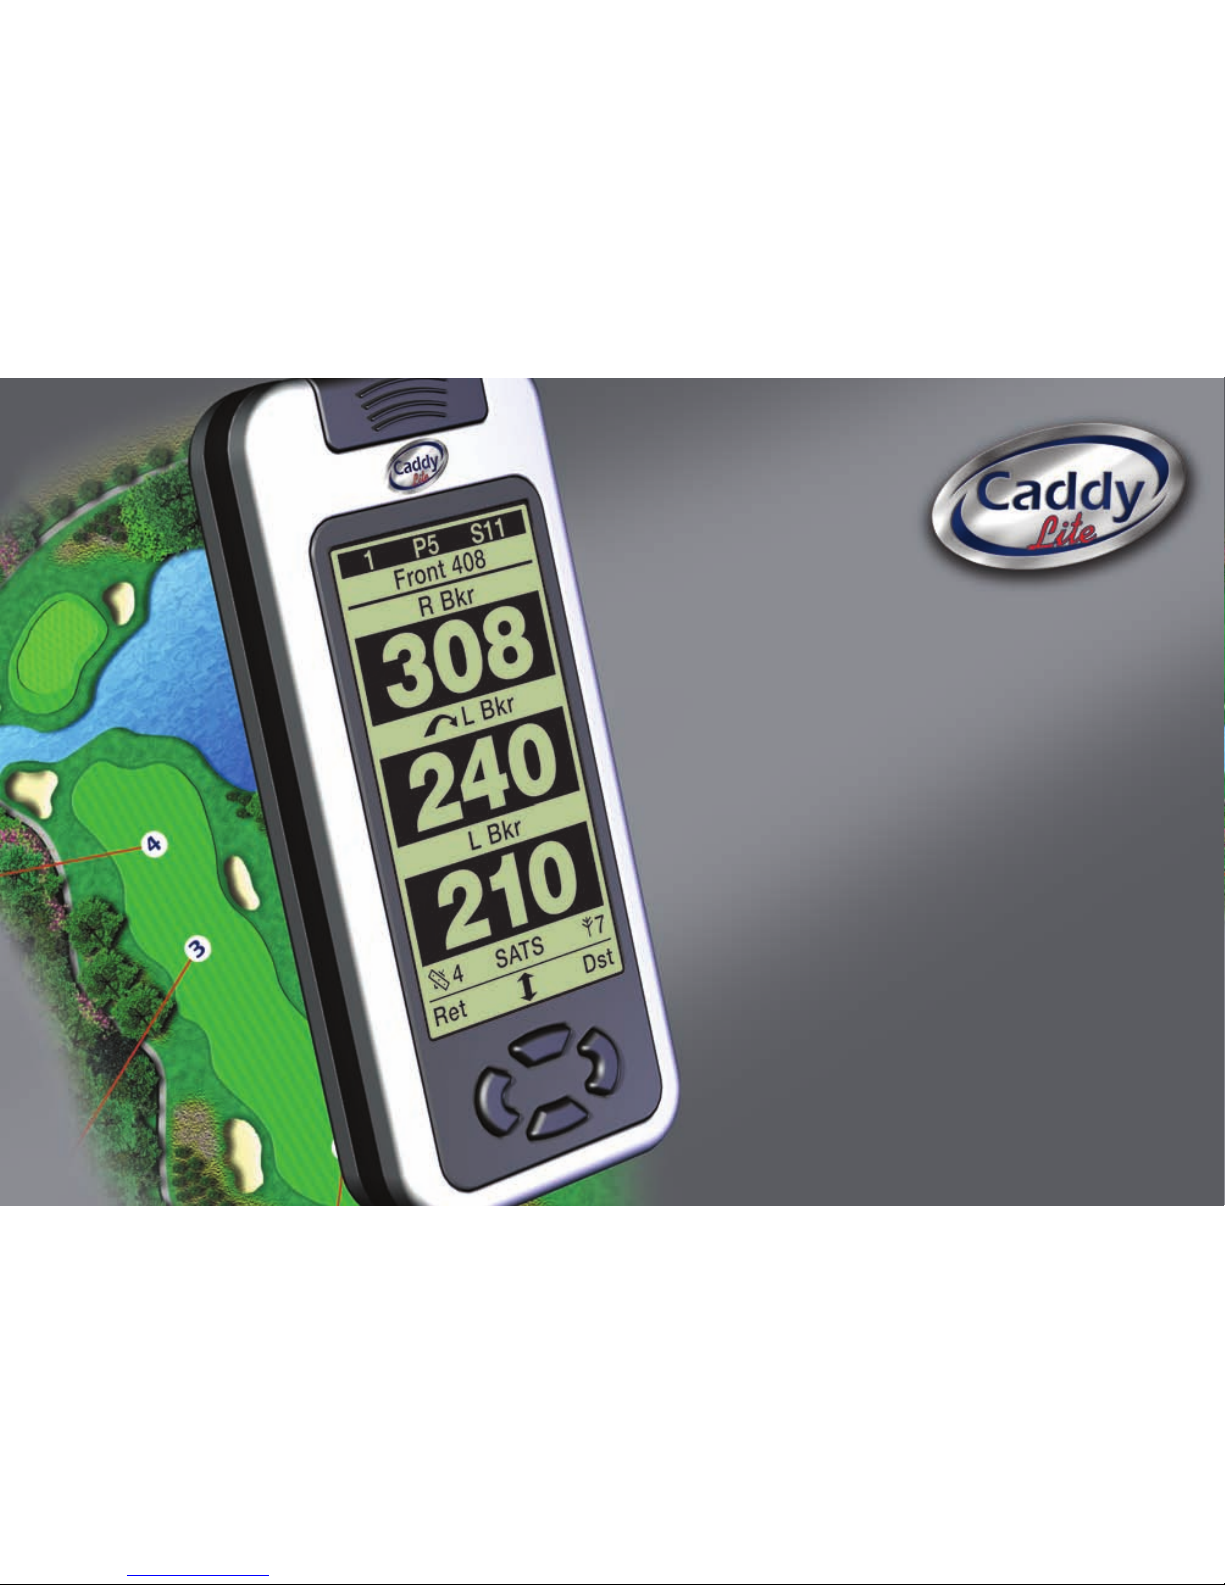
distance is everything
My Caddy Lite
User Guide
Page 2

2
Caddy Lite User Guide - Version 1.0 2007
Limited Warranty
This Golf Plus product is warranted
to be free from defects in materials or
workmanship for 12 months from the date
of purchase. Within this period Golf Plus will,
at its sole option, repair or replace any components that
fail in normal use. Such repairs or replacement will be made at no
charge to the customer for parts or labour, provided that the customer
shall be responsible for any transportation cost. This warranty does
not cover failures due to abuse, misuse, accident or unauthorised
alterations or repairs.
To ensure the activation and the commencement of the warranty period
users are encouraged to register their Caddy Lite online at
www.caddy.co.uk
The warranties and remedies contained herein are exclusive and in lieu
of all other warranties express or implied or statutory, including any
liability arising under any warranty or fitness for a particular purpose,
statutory or otherwise. In no event shall Golf Plus be liable for any
incidental, special, indirect or consequential damages, whether resulting
from the use, misuse or inability to use this product or from defects in
the product.
Golf Plus retains the exclusive right to repair or replace the unit or
software or offer a full refund on the purchase price at its sole
discretion. Such remedy shall be your sole and exclusive remedy for any
breech of warranty.
To obtain warranty service, call Golf Plus Customer Services on 01494
795110 for delivery instructions and an RMA (Return to Manufacture
Authority) reference number.
The units should be securely packed with the RMA number clearly
written on the outside of the package. The unit should be sent, freight
charges prepaid, to the Golf Plus returns address listed below. A copy of
the original sales receipt is required as the proof of purchase for
warranty repairs.
Golf Plus will repair or replace the faulty unit but will not replace missing
components from any packaging.
Returns Address: Golf Plus Ltd, Walters House,
12 Merlin Centre, Lancaster Road, High Wycombe, Bucks HP12 3TB
Please ensure the name and address of the sender is clearly marked on
the outside of the packaging and enclose a covering letter.
To obtain an RMA number – please phone 01494 795110 or email:
[email protected]
Software Licence Agreement
BY USING THE CADDY LITE, YOU AGREE TO BE BOUND BY THE
TERMS AND CONDITIONS OF THE FOLLOWING SOFTWARE LICENCE
AGREEMENT. PLEASE READ THIS AGREEMENT CAREFULLY.
Golf Plus grants you a limited licence to use the software embedded in
Caddy Lite (the ‘software’) in code form in the normal operation of the
product. Title, ownership rights and intellectual property rights in and to
the software remain in Golf Plus Ltd at all times.
You acknowledge that the software in the Caddy Lite and the structure
of the software in all Caddy Lite maps is the property of Golf Plus and is
protected under UK and international copyright laws.
You agree not to decompile, disassemble, modify, reverse assemble,
reverse engineer or reduce to human readable form the software or
any part of the software or create any derivative works based on
the software.
Page 3

3
Caddy Lite User Guide - Version 1.0 2007
Warning
The Global Positioning System (GPS) is operated by the United States
Government, which is solely responsible for its accuracy and
maintenance. The system is subject to regional and global changes over
which Golf Plus Ltd has no influence. Such regional and global changes
to the satellite system implemented by the US Government could
temporarily or permanently affect the accuracy and performance of all
GPS receiving equipment.
Golf Plus cannot and expressly does not guarantee the continuing
availability or accuracy of the satellite system operated by the US
Government. Although the Golf Plus GPS receiver is a precision
electronic satellite receiver any receiver can be misused or misinterpreted
and, therefore, become unreliable.
What is GPS?
The Global Positioning System (GPS) is a system of 24 satellites that
circle the earth in a precise orbit and transmit information to satellite
receivers. The Caddy Lite is a satellite receiver and must continuously
‘see’ at least four of these satellites to calculate your location and
provide distance measuring information on a golf course.
If some of the satellites in view get blocked or ‘shaded’, the receiver
can simply use an alternate satellite to maintain the location fix.
Because the Caddy Lite relies on satellite signals to provide you with
distance information, the receiver must have an unobstructed, clear
view of the sky for best performance. The GPS receiver’s view of the
sky generally determines how fast you get a location fix, or if you
get a fix at all. GPS signals do not travel through rocks, buildings,
people or metal, so remember to keep a clear view of the sky at all
times for best performance.
Your Caddy Lite needs to be given the opportunity to find satellites and
auto-locate itself (‘initialisation’).
Once you initialise the unit to a location it typically computes a view of
the available satellites within a couple of minutes. This process is
referred to as ‘downloading the Ephemeris’. The simple ability to see
satellites does not, in itself, provide enough information for the Caddy
Lite to satisfy the demands of the application for which it was designed.
In addition to the Ephemeris your Caddy Lite needs to download ‘The
Almanac’ when it is first switched on in a new area.
The Almanac consists of 25 pages of A4 information transmitted at the
rate of 50 kilobits per second. This process can take up to 12.5 minutes
to complete. Your Caddy Lite must download the Almanac completely
for it to work effectively in the application for which it was designed.
Once the Almanac has been received the word SATS will appear on the
display of your Caddy Lite. Until this state has been achieved your Caddy
Lite will not perform to the best of its capabilities.
Subject to your Caddy Lite having not moved more than 1000
kilometres, the effective Almanac will be stored and reused for a period
of up to 3 hours after it has been switched off.
Should the Caddy Lite be switched off and switched back on, within 3
hours you will not have to wait for the Almanac to be downloaded and
it will operate to its optimum capabilities as soon as the Ephemeris has
been received (up to 2 minutes), subject to the Caddy Lite having not
been moved more than 1000 kilometres. For a graphical presentation of
the ‘Lock On’ and ‘Warm Up’ period see the section ‘Power On’ on page
8 of this User Guide.
Page 4
4
Caddy Lite User Guide - Version 1.0 2007
Hazards & Targets
A ‘waypoint’ is the GPS terminology used to identify targets on any
given golf hole. These might be targets to hit the front, centre & back of
the green or targets to avoid like bunkers, water or Fairway Run Outs
which a golf course designer put in to make the game even more
difficult – if it wasn’t hard enough already!
We at Golf Plus have taken the view that any waypoint/hazard within
15-20 yards away from where you are is ‘out of play’. As a consequence,
when you get within 15-20 yards of any pre-programmed hazard,
your Caddy Lite will change/skip to those hazards or targets which
are relevant.
At the Green
Similarly when you get within 15-20 yards of the green your Caddy Lite
will display At The Green and your result in this part of the game comes
down to ‘touch and feel’.
Comparing 2 GPS Receivers
If you and a playing partner happen to compare Caddy Lite’s and they
show slightly different yardages, the most common reason would be
that they are both looking at different satellites – simply move both to
face the same direction, walk at normal pace and they should re-align
quite quickly. Remember with an expected accuracy of +/- 2.5 yards this
could look like a 5 yard difference where the answer is actually in
between both results.
Mapping Methodology
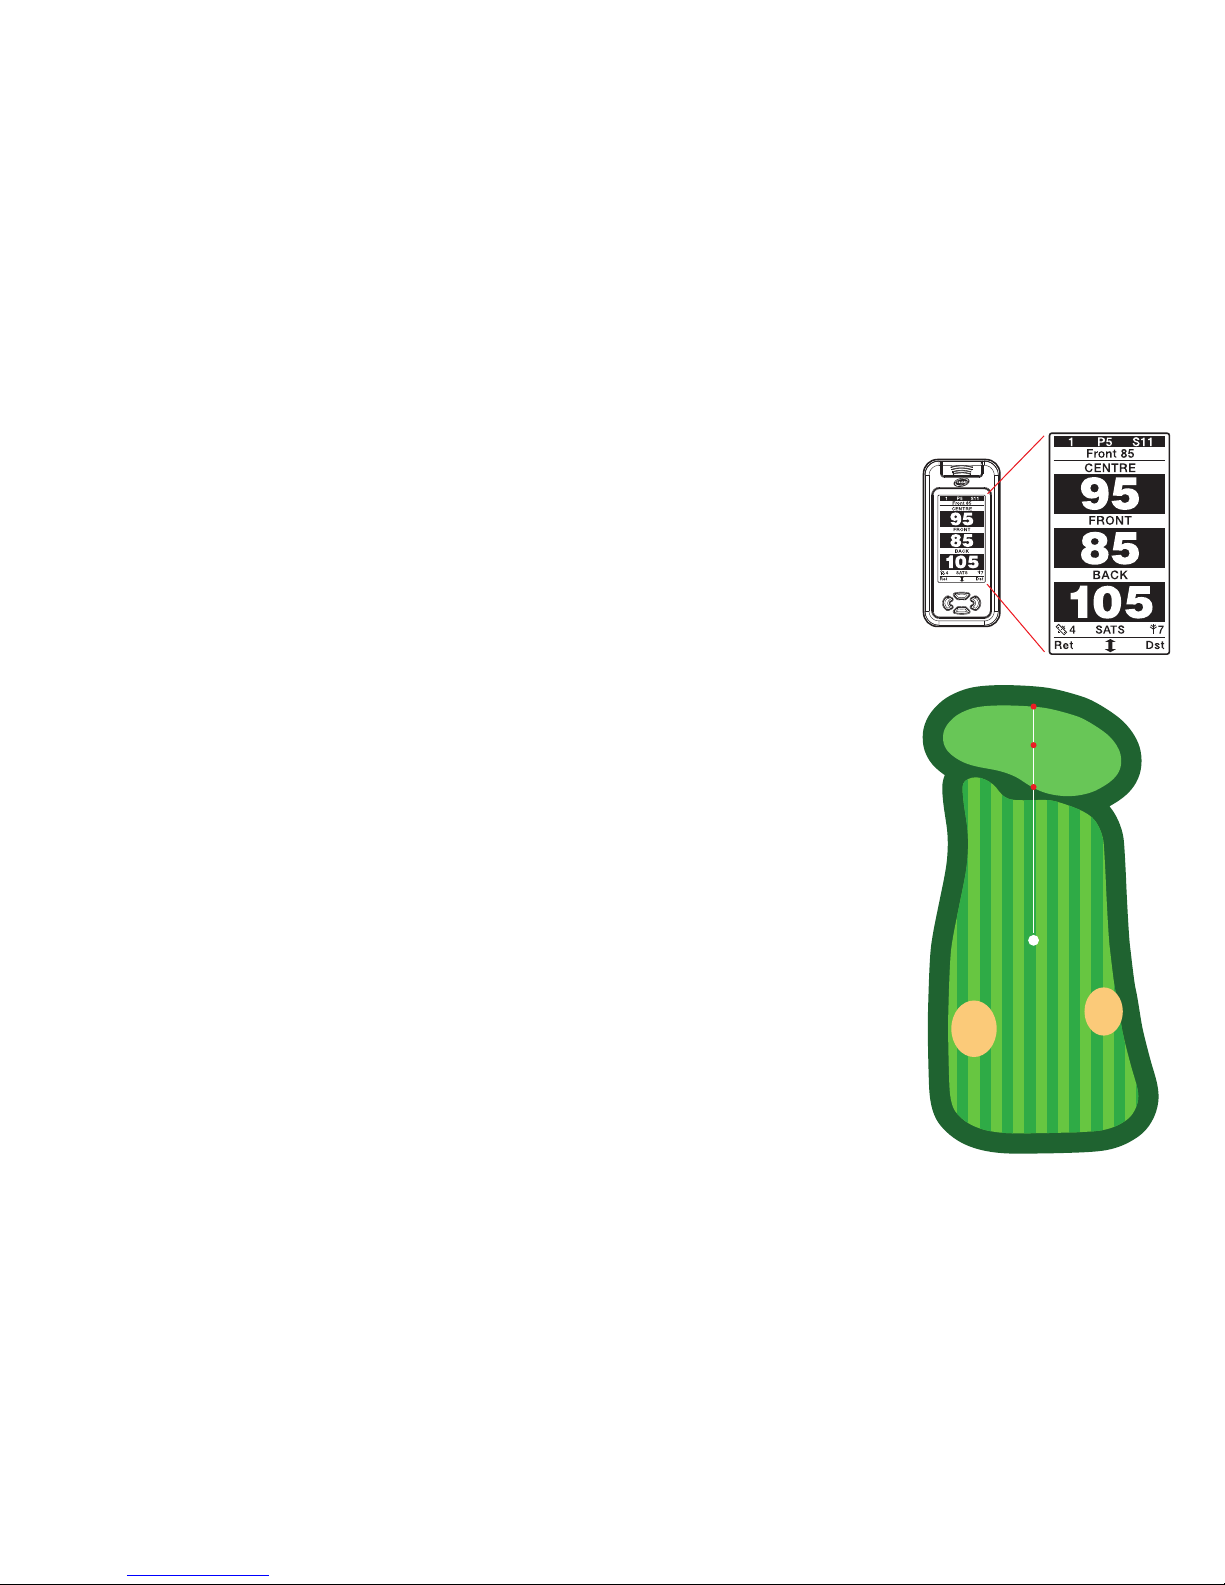
To define and understand where
the exact front of the green has
been mapped, we always assume
that the green is being
approached from the centre of
the fairway and that the back of
the green is an extension of the
straight line between centre of
the fairway and the front of the
green.
The centre of the green is then
mapped as being equidistant
between these 3 points.
The exception is on Par 3 holes
where the centre is located
through the application of golfing
knowledge and observation.
Page 5
5
Caddy Lite User Guide - Version 1.0 2007
Getting The Best Out
Of Your Caddy Lite
The reliability of the accuracy of any GPS
receiver is a constant variable. As a generalisation
your Caddy Lite should be accurate to within
+/- 2.5 yards.
At times it will be scarily accurate, at other
times, even at the exact same location, at
different times of the day or on different days
it will produce variable results, due to the
following potential circumstances.
Not locked-on: All GPS receivers require a
‘lock-on’ period immediately after being
switched on.
Not warmed up: All GPS receivers
require a period of up to 12.5 minutes of
continuous satellite reception to provide
optimum accuracy (see the POWER UP section
of this guide).
Signal Interruption:
• If you slice or hook into heavy undergrowth
with a solid covering of heavy or damp trees,
you may temporarily lose satellite reception.
• If your Caddy Lite is placed in the pocket of
the golf bag it may, due to the metal content
of your clubs, lose sight of the satellites.
• If your Caddy Lite is used inside a buggy or
fixed to the base of your bag it may be
adversely effected. Endeavour to locate your
Caddy Lite on the highest possible point
on your bag.
• Even the presence of humans can interrupt a
signal, if your Caddy Lite has a crowd of
people around it, signal strength and satellite
visibility may be reduced.
Insufficient Satellites: Similar to a
mobile phone, very infrequently, even with a
clear view of the sky, your Caddy Lite will not
be able to receive a sufficiently strong signal to
provide an accurate reading although this is
very unusual in open spaces.
Apparent Inaccuracies: There are a
number of circumstances where your Caddy
Lite may appear inaccurate, when it is actually
performing within expectations.
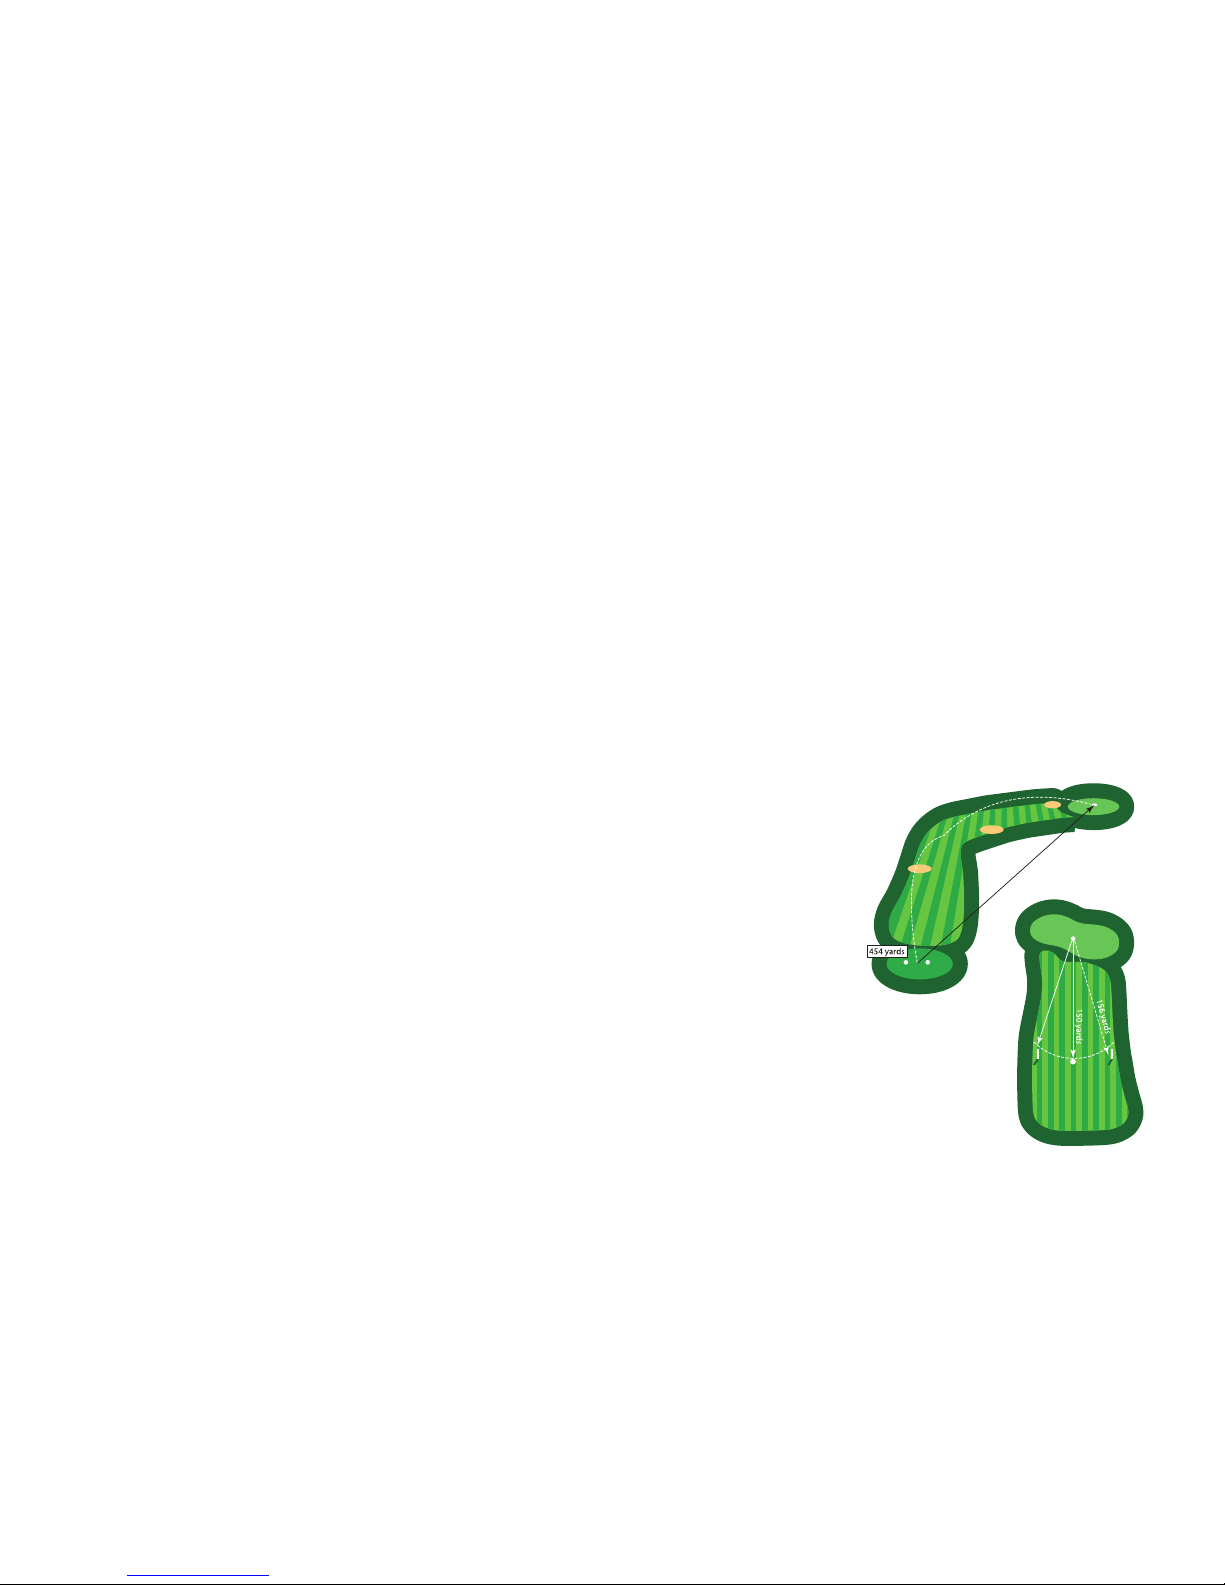
Dog legs: Your Caddy Lite will always
provide a straight line measurement to its preidentified target (waypoint) and on the tee of a
dog leg hole or even a hole which is not dead
straight your Caddy Lite, when measuring to
the front of the green, will NOT agree with the
yardage information provided on the tee box
marker or the yardage book.
Uphill & Downhill: Your Caddy Lite will
always measure as if it was looking at a
completely flat surface and will appear to
contradict measurements which have been
measured over the ground’s surface.
Distance Markers: It is not unusual for
fairway yardage markers to be inaccurate. They
may have been moved or the original method in
which the markers were measured may have
been inaccurate. Certainly, this is true when
fairway distance markers are aligned in a
horizontal manner, i.e. if a central fairway
marker is measuring 150 yards and both the
side of the fairway posts are exactly horizontal,
then one or two of these distance
guides must be wrong.
Your Caddy Lite will
always measure in a
straight line to its target.
GPS Reading 330 Yards
Hole
454
Yards
Page 6
6
Caddy Lite User Guide - Version 1.0 2007
Thank you for purchasing your
personal Caddy Lite
Your Caddy Lite is a sophisticated GPS receiver which communicates
with satellites that are orbiting 11,000 miles above the earth at speeds
of up to 5000 miles an hour. Despite this sophisticated technological
wonder, your Caddy Lite has been designed to be simple to operate and
provide you with hands-free and interference free yardage information
on the Golf Course. Simply ‘Put Your Caddy Lite on the Bag’ and refer
to it when you need to. However, to obtain the best results from
your Caddy Lite please read this guide before use.
Before you tee off
...please visit www.caddy.co.uk to register
and download your chosen course maps.
In some instances your requested golf
course will have to be mapped – once
requested and dependant upon available
imagery, golf plus endeavour to complete a
map within 14 working days. Your Caddy
Lite needs golf course data to work – if
there is no course stored within the unit, it
will not be able to use the GPS data.
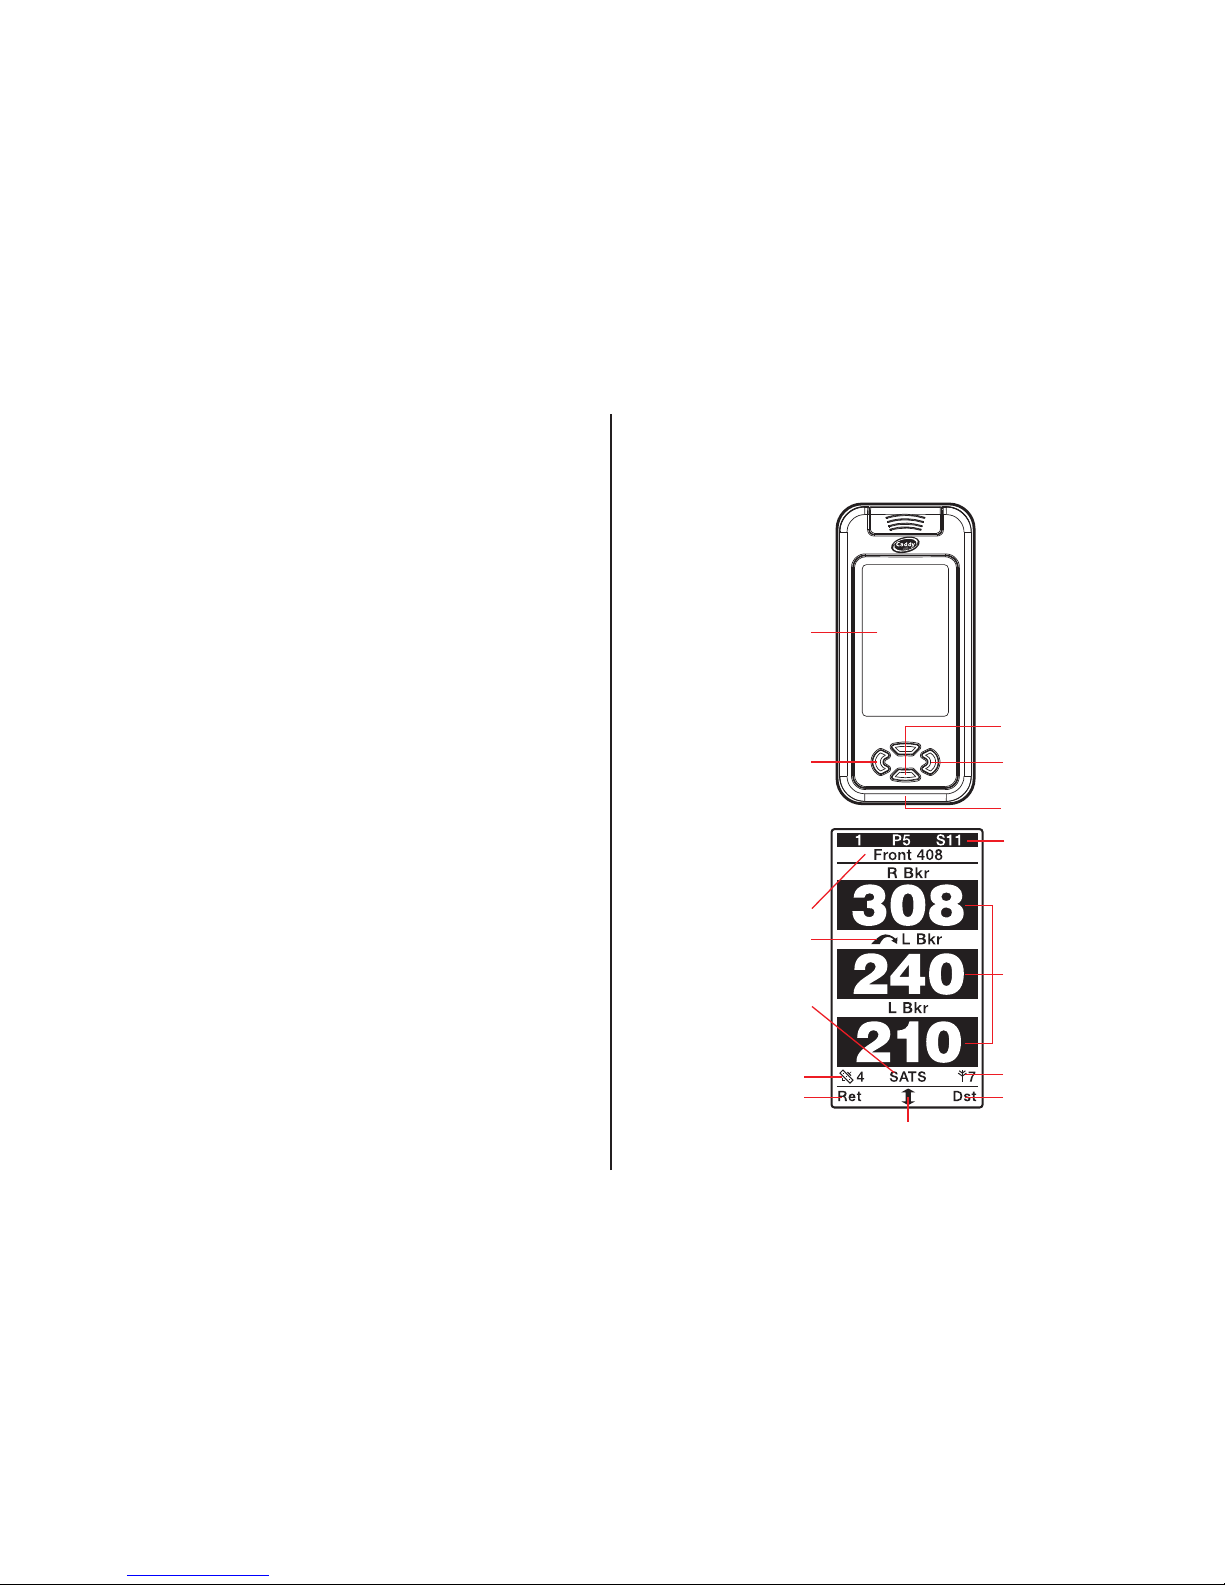
1 Your Caddy Lite in detail
Caddy Lite Body
Caddy Lite Screen
Hole number, par and stroke
index (information relative to
current hole)
Front of green
continuous display
Carry icon
Satellite status
Scroll Up/Down Button action
Multi-function screen
Left function button
Number of
satellites in use
Left Function
Button action
Right Function
Button action
Quality of satellite signal
Right function button
Scroll up/down buttons
GPS reception aerial
(Requires clear view of the
sky at all times)
Measurement to hazards
USB Socket for PC
connection and charging
Page 7
7
Caddy Lite User Guide - Version 1.0 2007
2 Charging your Caddy Lite
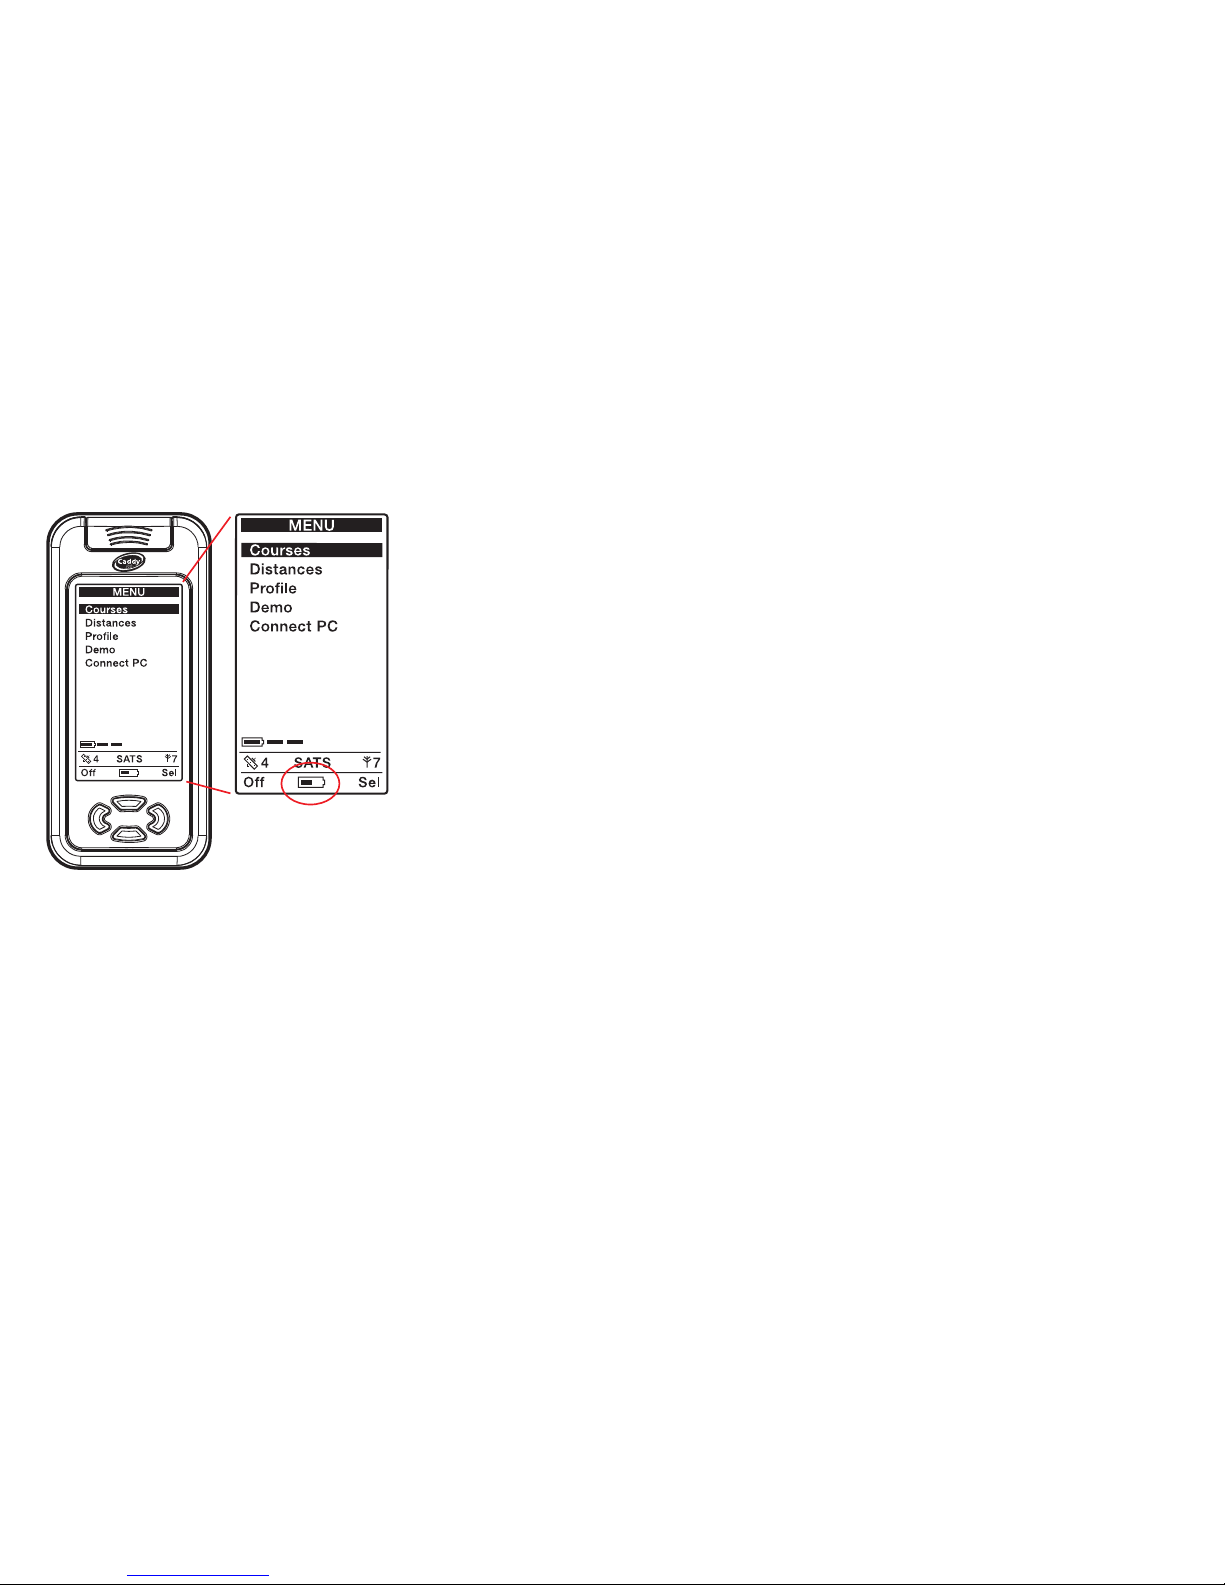
Your Caddy Lite is charged as part of the
manufacturing process and as a result should
be delivered to you with enough power to
complete at least 1 round of golf.
Your new Caddy Lite, with a new battery, will
provide 9 hours of use from one full charge.
Please fully charge your new Caddy
Lite for a minimum of 6 hours before
you use it for the first time.
As a power conservation feature your Caddy
Lite will auto shut off, if no buttons are
pressed in any period of 6 hours, unless the
Caddy Lite is ON charge, in which case it will
continue to inform you either that it is in the
charging process or that it is fully charged.
Battery Power
If your Caddy Lite detects that the power
availability is less than 2 bars, there is therefore
a risk that it will be unable to complete a full
round of golf, it will tell you by changing the
scroll icon in the bottom line of the display to
a virtually empty battery icon. During this
notification process the scroll button will
continue to function as it should.
When the power meter reduces to 1 bar
the same battery icon will start to flash as
a warning.
When the Caddy Lite detects that it has less
than 10 minutes of power it will communicate
a warning in the main screen area ‘VERY LOW
BATTERY’, for a period of 10 minutes before
the Caddy Lite auto shuts off. In the event of
auto shut off, an attempt to restart will
provide an on screen message that requests a
recharge and will instantly auto shut down
again. This cycle can be repeated 3 times
before your Caddy Lite will not respond to the
Power On button. Repeat charging, or
‘topping up’ your battery charge, does not
unduly damage or reduce the battery’s life
expectancy. Your Caddy Lite can, dependent
upon environmental characteristics, support up
to 500 charge cycles before it needs to be
returned to the manufacturer for a
replacement.
You are able to charge your Caddy Lite via the
USB connection lead. If you require a mains
charger please visit www.caddy.co.uk to
purchase this additional charging device.
Battery icon appears when
2 bars (1 game or less) of
charge remain
Page 8
8
Caddy Lite User Guide - Version 1.0 2007
3 Power On
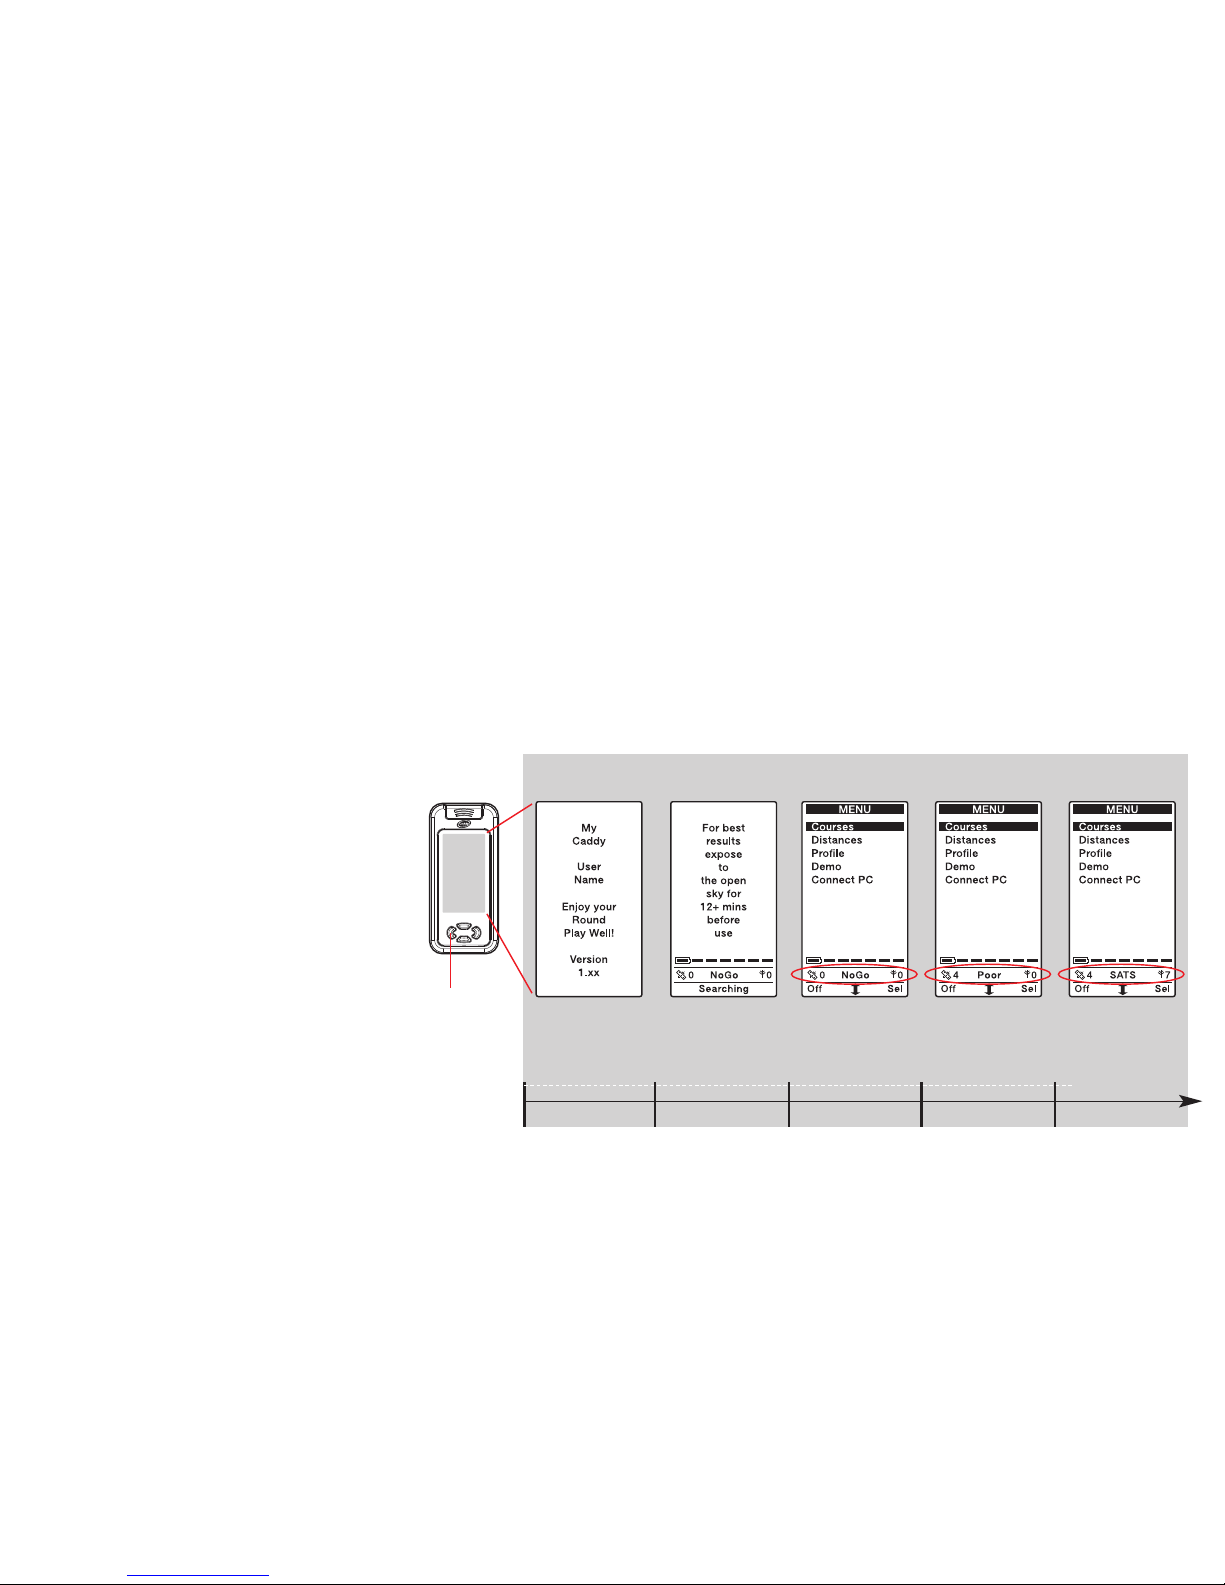
All satellite receivers require a period of up to
12.5 minutes of continuous satellite reception
to provide optimum accuracy. Initially, after
pressing the left hand Power On button for
more than 2 seconds your new Caddy Lite will
start to search for satellites. It is essential that
your Caddy Lite has an unobstructed, clear
view of the sky at all times. Satellite
transmission can not travel through rocks,
buildings, people or metal. Your Caddy Lite
needs to be given the opportunity to find the
available satellites (‘Lock On’). Once locked on
to a minimum of 4 satellites, if you are in the
region of a mapped golf course, it typically
computes a fix within a couple of minutes.
During this period of ‘Locking On’ your Caddy
Lite will display NoGo in the satellite reception
bar. Once it has ‘Locked On’ it will tell you
how many satellites the unit can see. However,
the satellite strength indicator will continue to
read zero.
Given the accuracy demands of calculating
distances, your Caddy Lite needs to ‘Warm
Up’. This warming up process involves the
downloading of detailed satellite location
information which includes atmospheric and
orbital path corrections. Your Caddy Lite will
not give you the best possible accuracy
readings until it has completed this
downloading process. Whilst your Caddy Lite
can operate and provide readings, if it has not
completed the ‘Warm Up’ process, it will give
you relatively poor results. During the process
of ‘Warm Up’ your Caddy Lite will display Poor
in the satellite reception bar.
When all the required data has been
successfully downloaded the satellite indicator
bar will tell you how many satellites it can see
in the range of 4 (minimum required) up to as
many as 16. The satellite signal strength
indicator provides you with a measurement of
the quality of the signal being received. The
higher the number the better the signal (in the
range of 4-9). The clear message SATS will be
displayed in the satellite indicator bar.
Ideally your Caddy Lite should be switched on
as soon as you arrive at the golf club and left
outside, clipped to your bag to ‘Warm Up’
while you practice, putt, or have a coffee. If
such luxuries are not available it is advisable, if
possible, to switch your Caddy Lite on while
travelling. Fixed on the dashboard of your car,
it will have a good view of available satellites
and should enable the warm up process to
take place.
Welcome
Screen
2 secondsTime in state
Time elapsed
3 seconds <2 minutes up to 8-10 minutes
up to 12.5 minutes
ready to go...
Advice
Screen
Menu
Screen
Menu
Screen
Menu
Screen
Note: NoGo No
satellite visibility
Press and hold
left button for
2 seconds
Note: Poor
Satellite visibility OK
but likely to produce
inaccuracies
Note: SATS
Ready for optimum
performance
Page 9
9
Caddy Lite User Guide - Version 1.0 2007
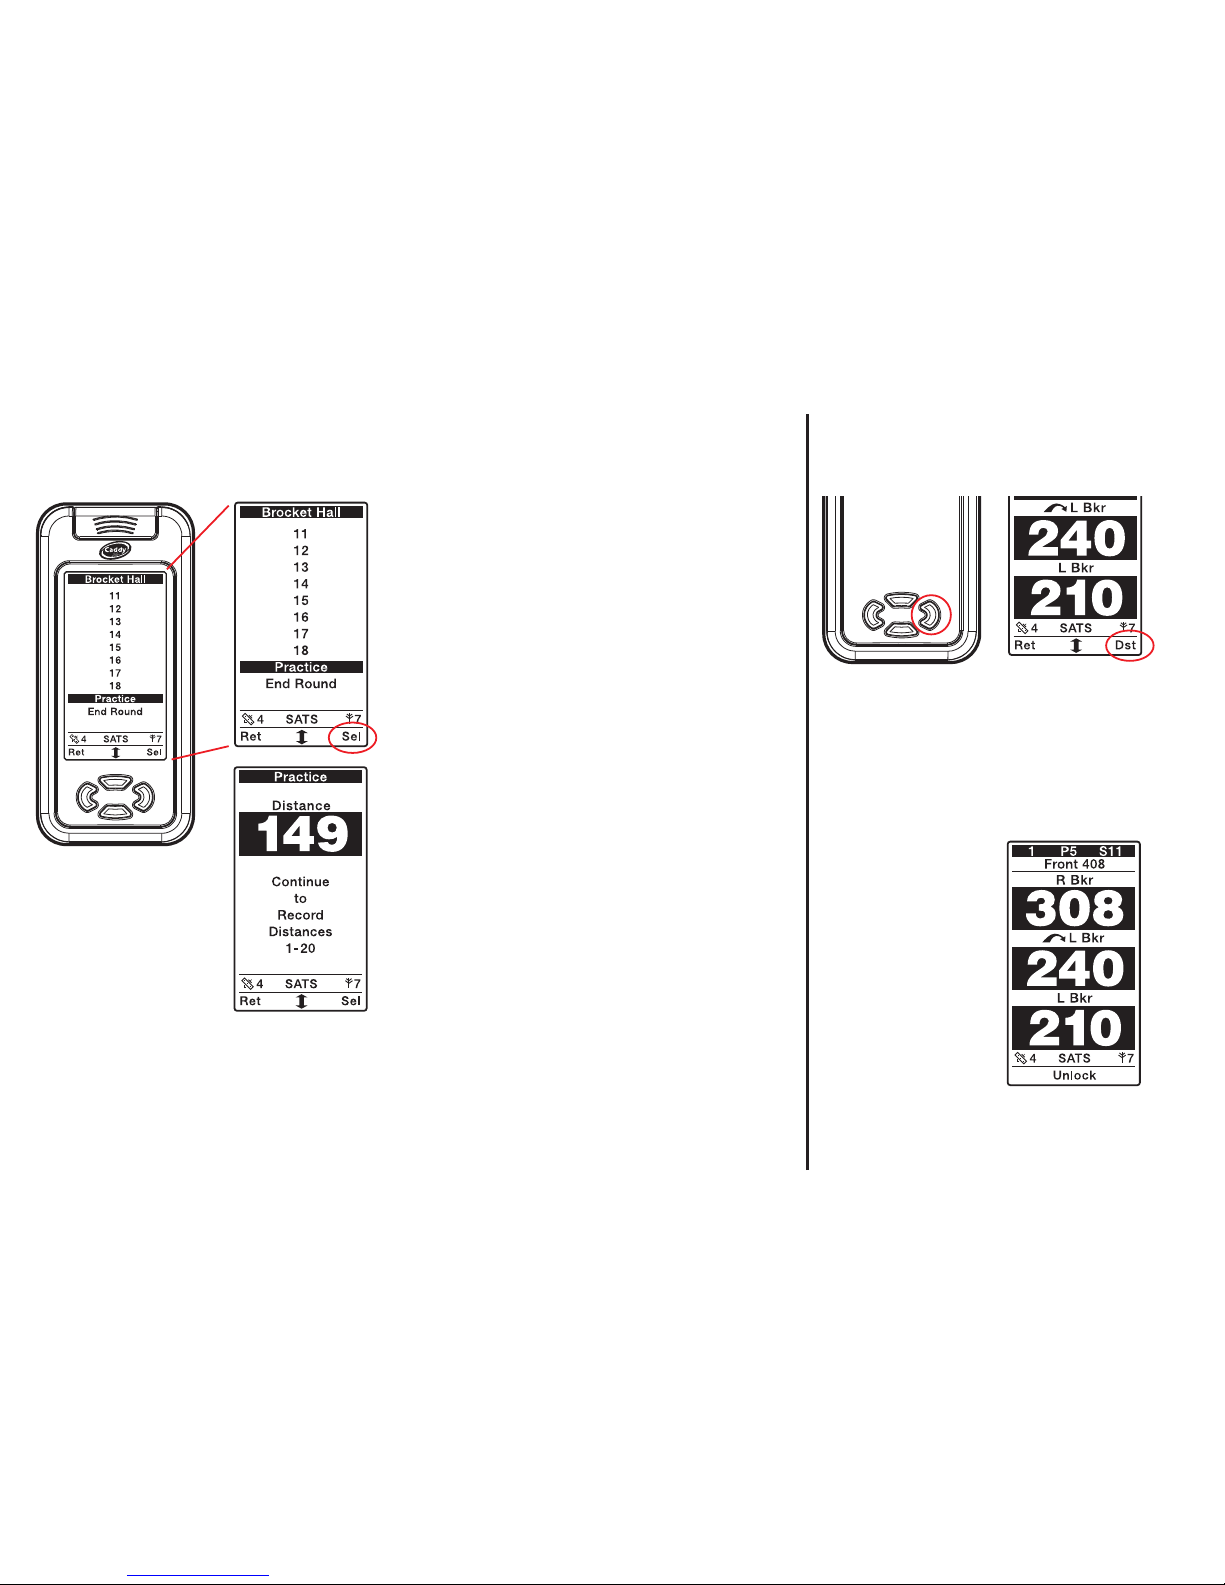
4 The Practice Feature
Each Caddy Lite map consists of 18 holes PLUS,
as the 19th hole, a practice feature.
The practice feature can ONLY be used within 1
kilometre of a GPS mapped golf course, (a Caddy
Lite Map) or driving range, or another area
specifically mapped for the purpose of practice.
The principal objective of the practice feature is
to allow you to benchmark the distance you
hit each club in the bag.
Select a practice area, near the course, select
the practice feature from the menu of golf
holes and press ‘YES’ to the question ‘Start
Practice from here’.
Hit up to 20 balls with the same golf club, walk
up to each ball and at each of the 20 locations,
press REC, your Caddy Lite will record the
distance of each shot and provide you with an
average distance for that particular club.
You might be surprised and even disappointed
at the result, BUT it IS factual and you will
know absolutely which club to pick when your
Caddy Lite gives you the distance to the centre
of the green from each fairway while you are
competing out on the course.
Repeat this process for each club in the bag
and even half swings of the wedges, to record
your personal information.
5 Key Lock
It is possible to lock the buttons on your Caddy
Lite to avoid accidental key presses.
To activate the Key Lock press and hold down
the right soft button for 2 seconds.
Key Lock can ONLY be activated AFTER a hole
has been selected.
To unlock the Key
Lock and reactivate
the key pad press
and hold down the
right soft button for
2 seconds.
Page 10
10
Caddy Lite User Guide - Version 1.0 2007
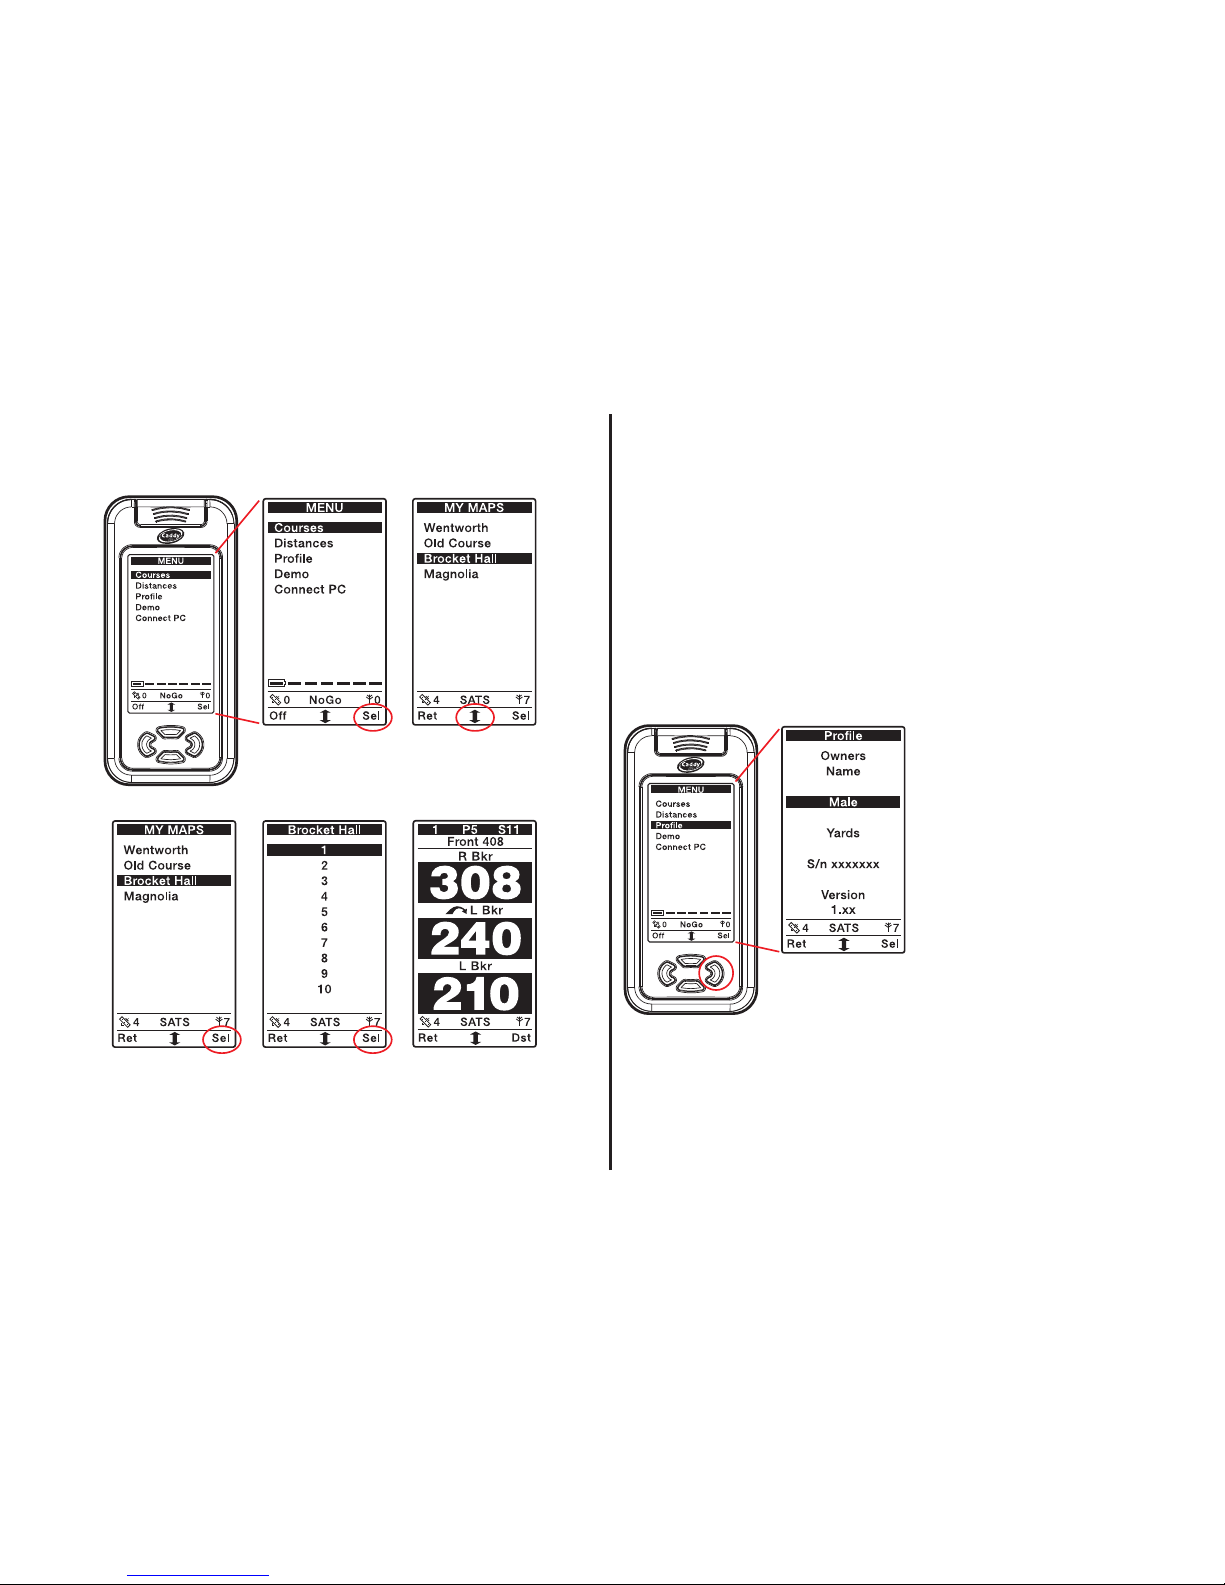
6 Selecting a Course 7 Changing your Profile
Your Caddy Lite defaults to Male and Yards. Due to the stroke indices
and par value of each hole being different for male and female, it is
important to tell your Caddy Lite your gender.
From the menu, select Profile.
Male or Female
To change from Male to Female press the right select button then
when Female is showing in the display press the left return button to
return to the menu screen.
Yards or Metres
To change from Yards to
Metres press the scroll button to
scroll down. Once yards is
highlighted press the right select
button then when Metres is
showing in the display, press the
left return button to return to
the menu screen.
Press the right
button to select
Courses
Scroll down the
course of your
choice
Press the right button
to select Hole 1 or
scroll down to select a
different hole
Press the right
button to select
the chosen course
Clip your Caddy
to the bag and
play golf!
Page 11
11
Caddy Lite User Guide - Version 1.0 2007
8 Recording your Distance
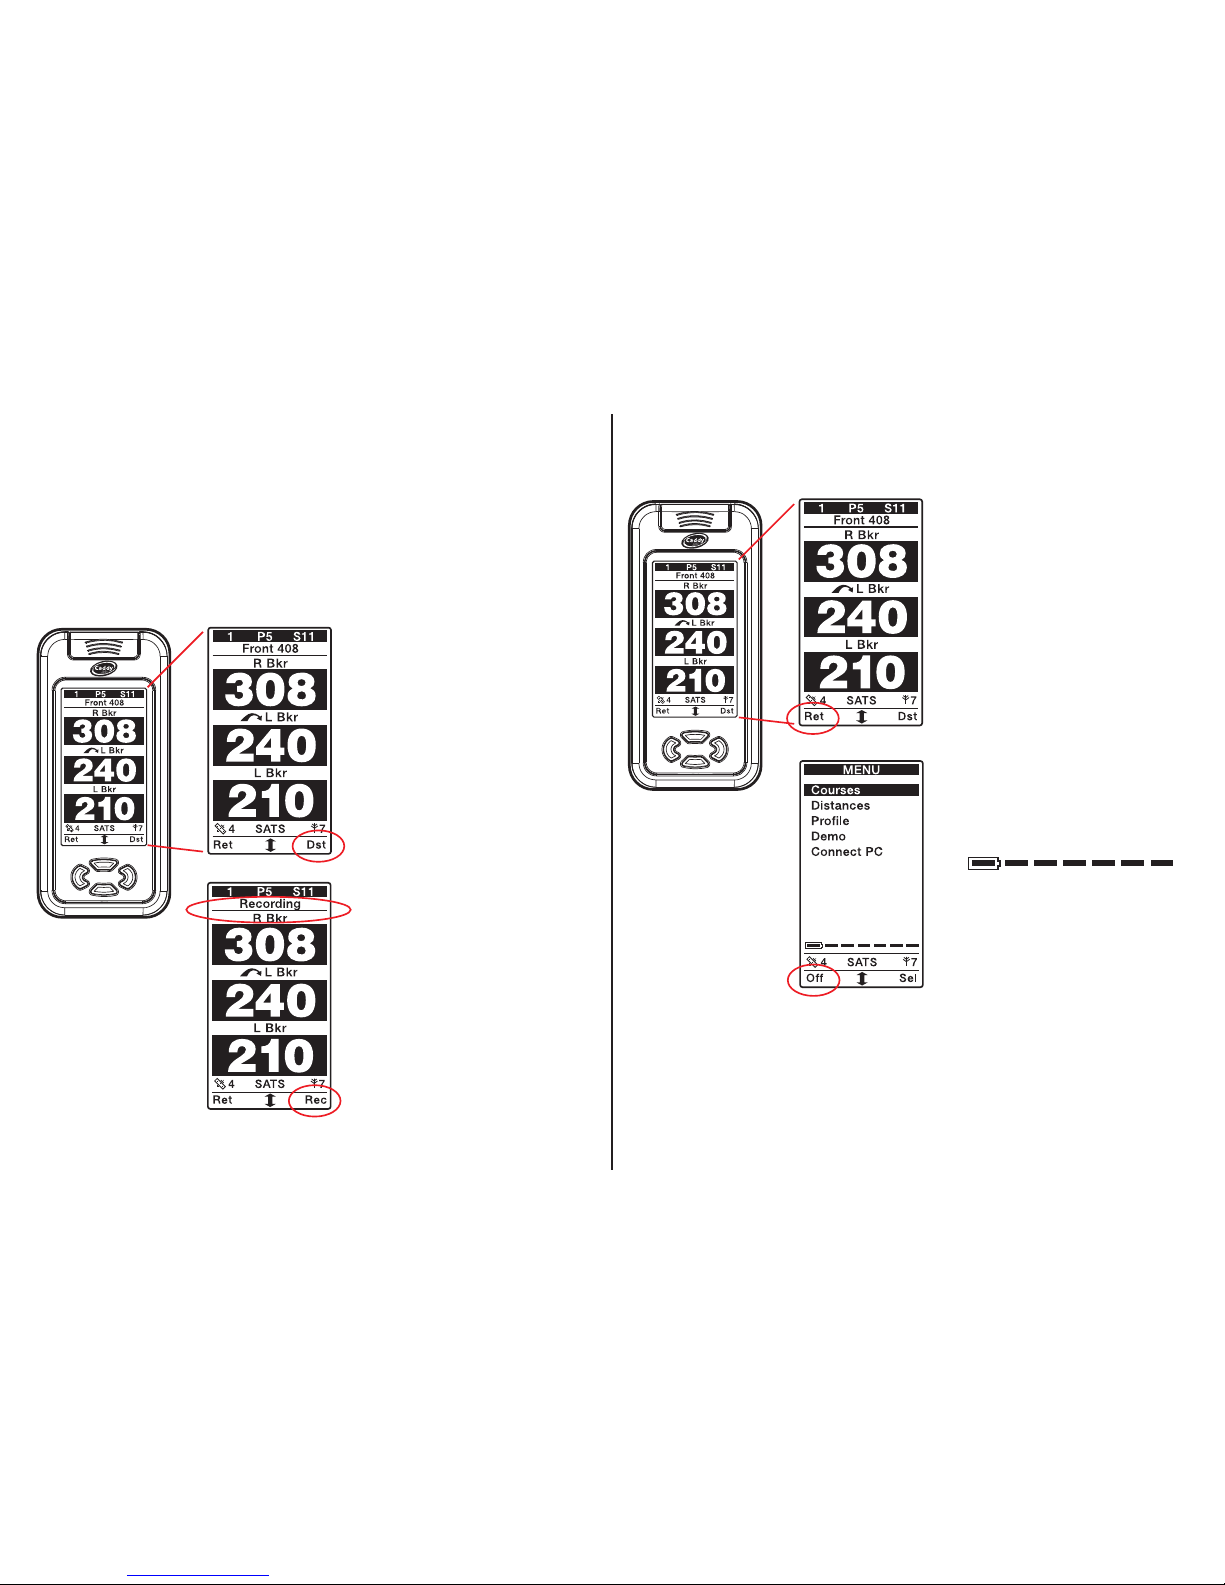
At any point on the course you can decide to measure the distance you
have hit the ball. Your Caddy Lite will record the distance, which course
you were playing and on which hole you achieved that ‘300 yard drive’.
Caddy Lite will store this information for you under Distances found in
the menu screen.
After you have hit the ball
simply press the right button
Dst. Your Caddy Lite will
automatically start recording
the distance and show the
information in the top info
panel, in place of the Front
measurement.
After pressing the right
button the Front
measurement will change to
Recording. As you walk
down the fairway the
distance will increment in
yards until you reach the
ball and press the right
button to record the
distance. No hazard/yardage
information will be
disrupted by measuring
distance.
9 Switching off your Caddy
Whenever you want to turn
the power off, continue
pressing the left Ret button
until you return to the
menu screen.
Press and hold down the
Off button for 2 seconds.
Check the meter and
remember to charge your
Caddy Lite.
Battery charge level is
shown in the menu screen
2 bars = approx. 1 round
Page 12
10 PC Connectivity
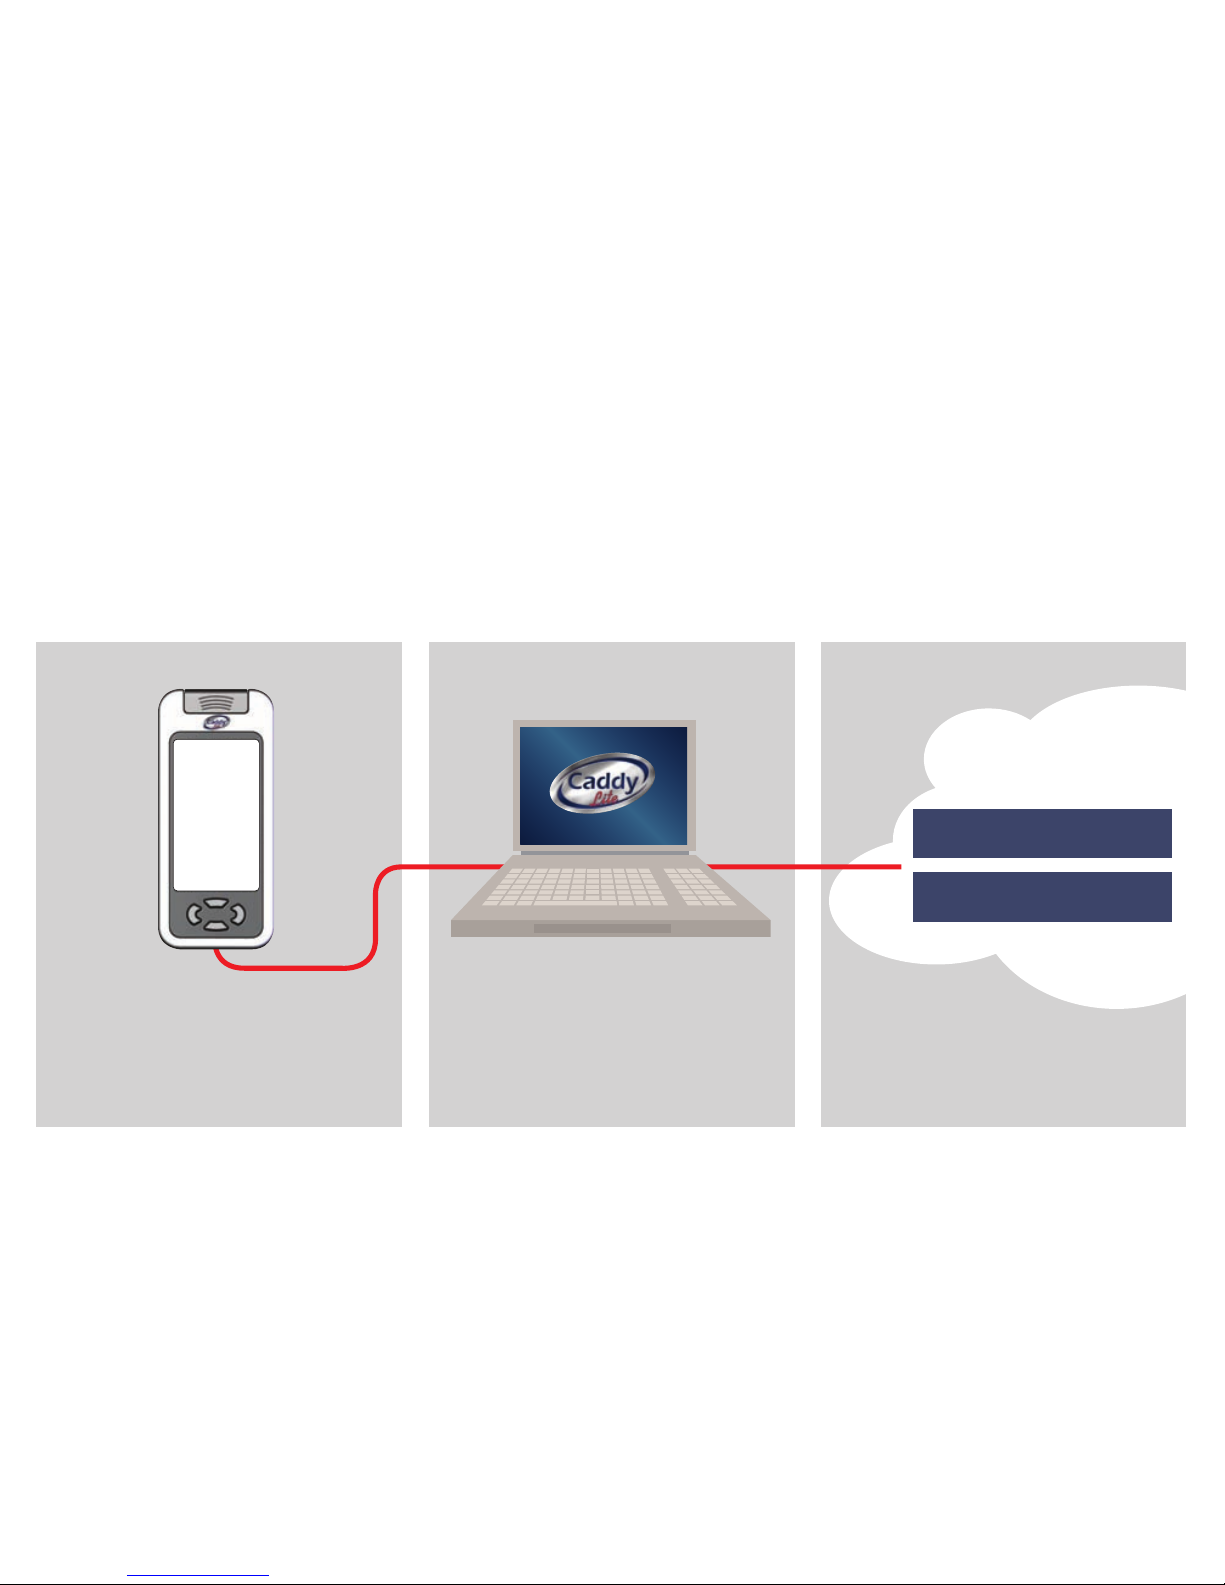
By connecting your Caddy Lite to your PC you will be able to register it with Golf Plus Ltd, give it a screen name and download maps from your
online account onto your Caddy Lite. Your Caddy Lite can hold up to 10 maps at any one time. There is no limit to the number of maps you can add
to your online account.
DO NOT CONNECT YOUR CADDY LITE TO YOUR PC UNTIL YOU HAVE INSTALLED THE CADDYCONNECT SOFTWARE!
12
Caddy Lite User Guide - Version 1.0 2007
Follow the easy steps to load the Caddy Lite
Connect software on your PC, connect your
Caddy Lite and load the drivers required
www.caddy.co.uk
will allow you to...
...Manage your account, purchase and add
new maps into your online account and
download maps onto your Caddy Lite!
123
Purchased Maps
Membership Maps
Page 13
13
Caddy Lite User Guide - Version 1.0 2007
Installing CaddyConnect Software
The following installation instructions relate to Windows XP and Vista.
The CaddyConnect software requires that you have Service Pack 2
installed on your computer if you are running Windows XP.
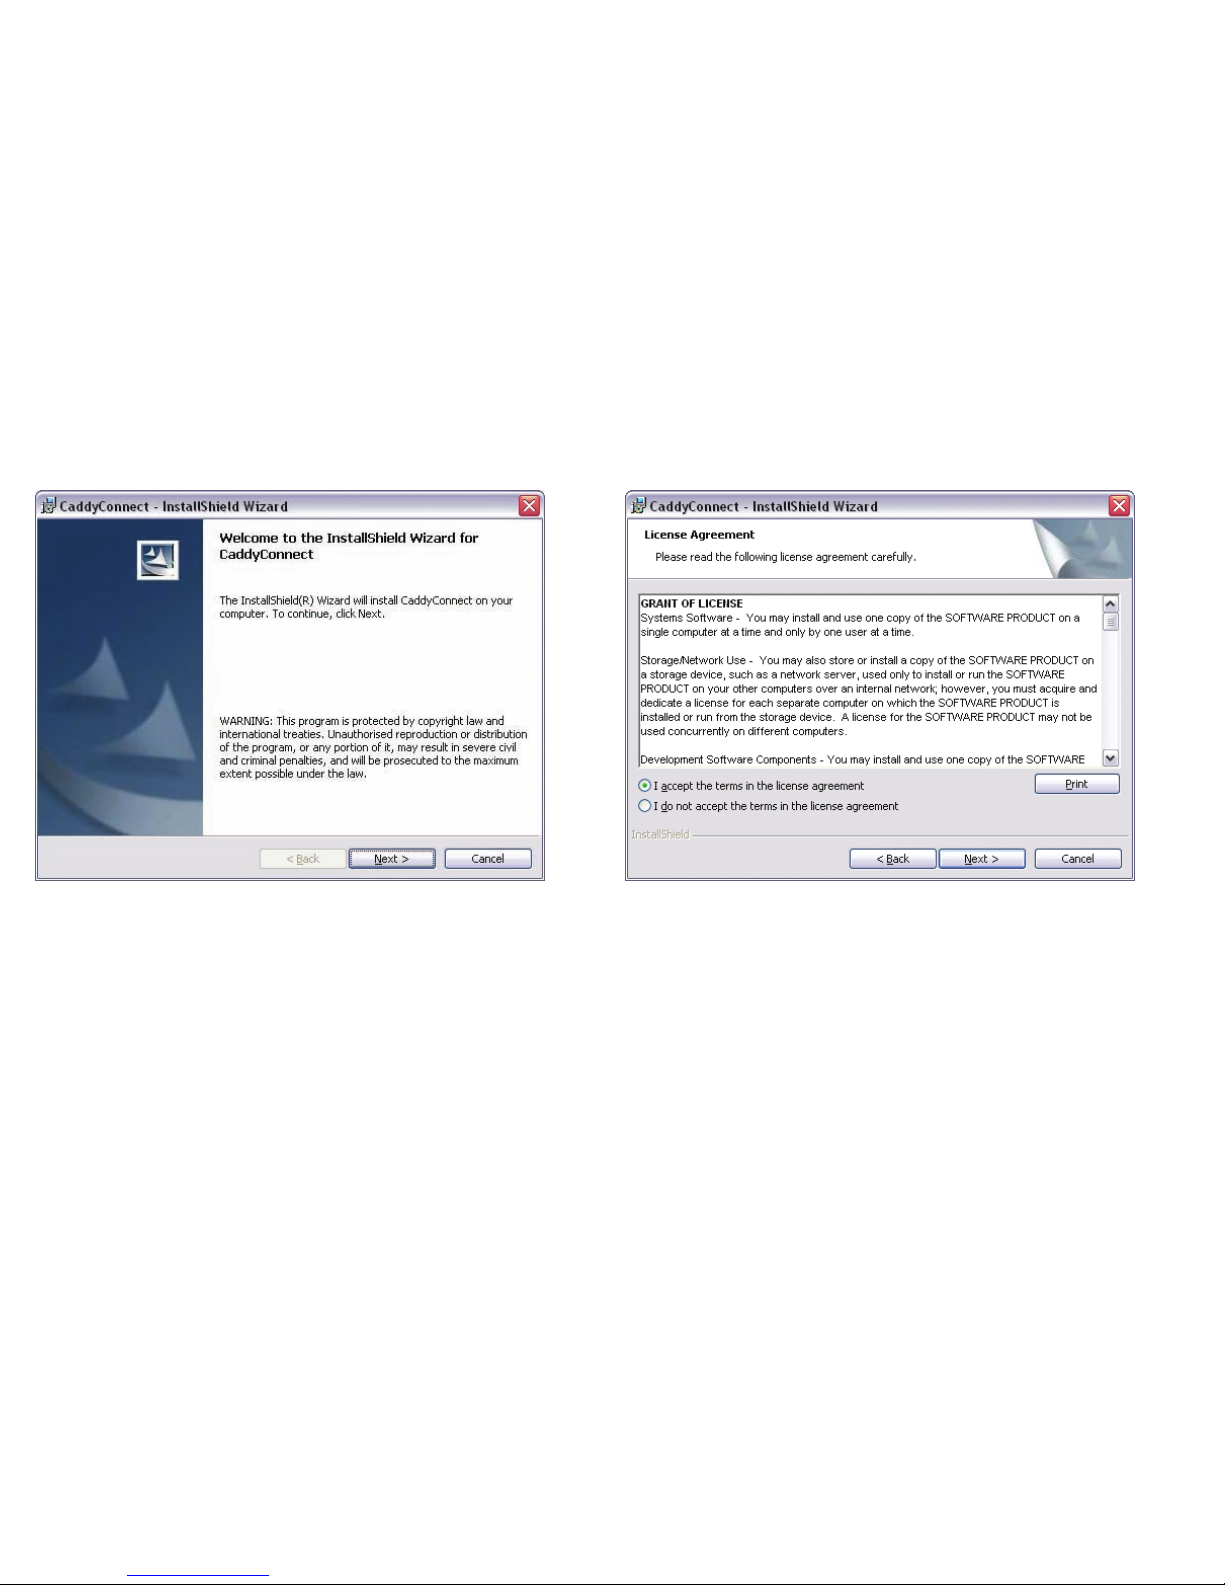
Insert the Caddy Lite CD ROM into your CD Drive.
The install wizard will start automatically.
Click on the next button.
When the Licence Agreement window appears, select I accept the
terms in the licence agreement. (If you want to print the licence for
future reference, click on the print button.)
Click on the next button.
Page 14
Installing CaddyConnect Software
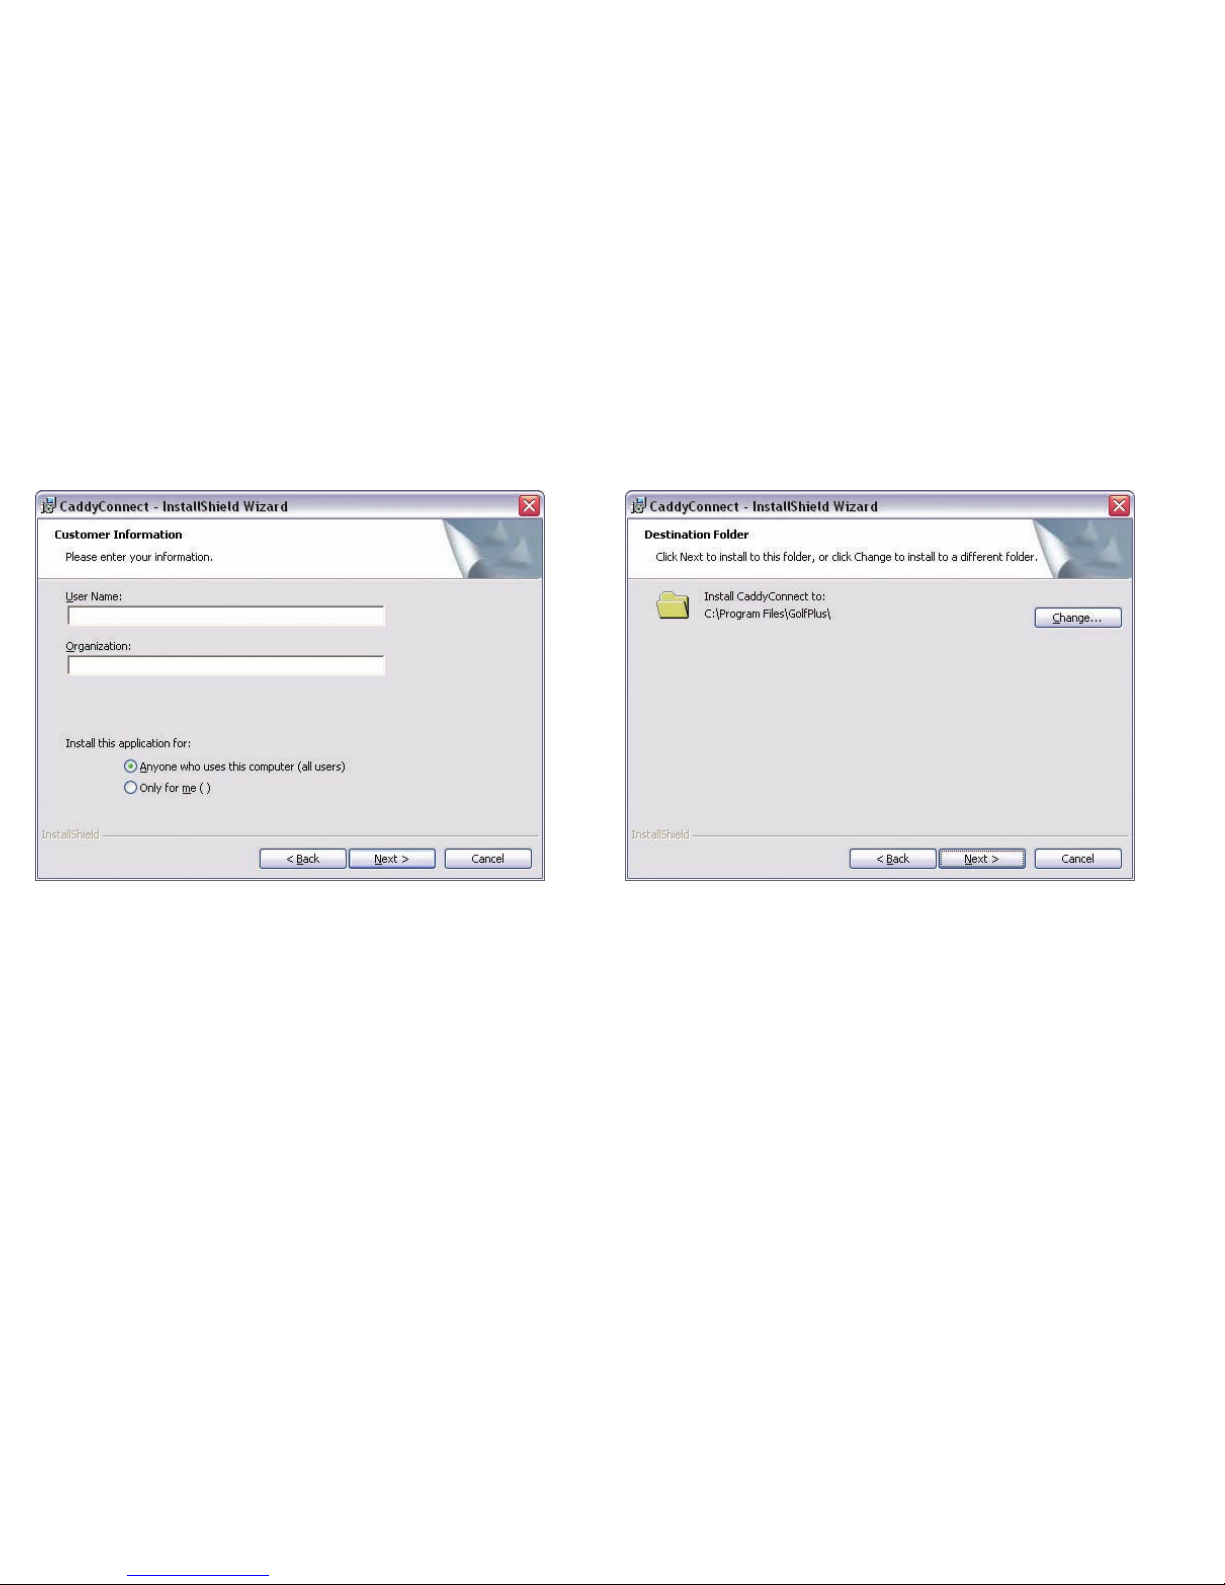
When the Customer Information window appears, enter your user name
and an organisation name if applicable. You may find these boxes are
automatically completed by your computer.
Select Anyone who uses this computer (all users).
Click on the next button.
When the Destination Folder window appears, check the destination
(default) and if you want to change it click on the change button. It is
recommended that you use the default destination.
Click on the next button.
14
Caddy Lite User Guide - Version 1.0 2007
Page 15
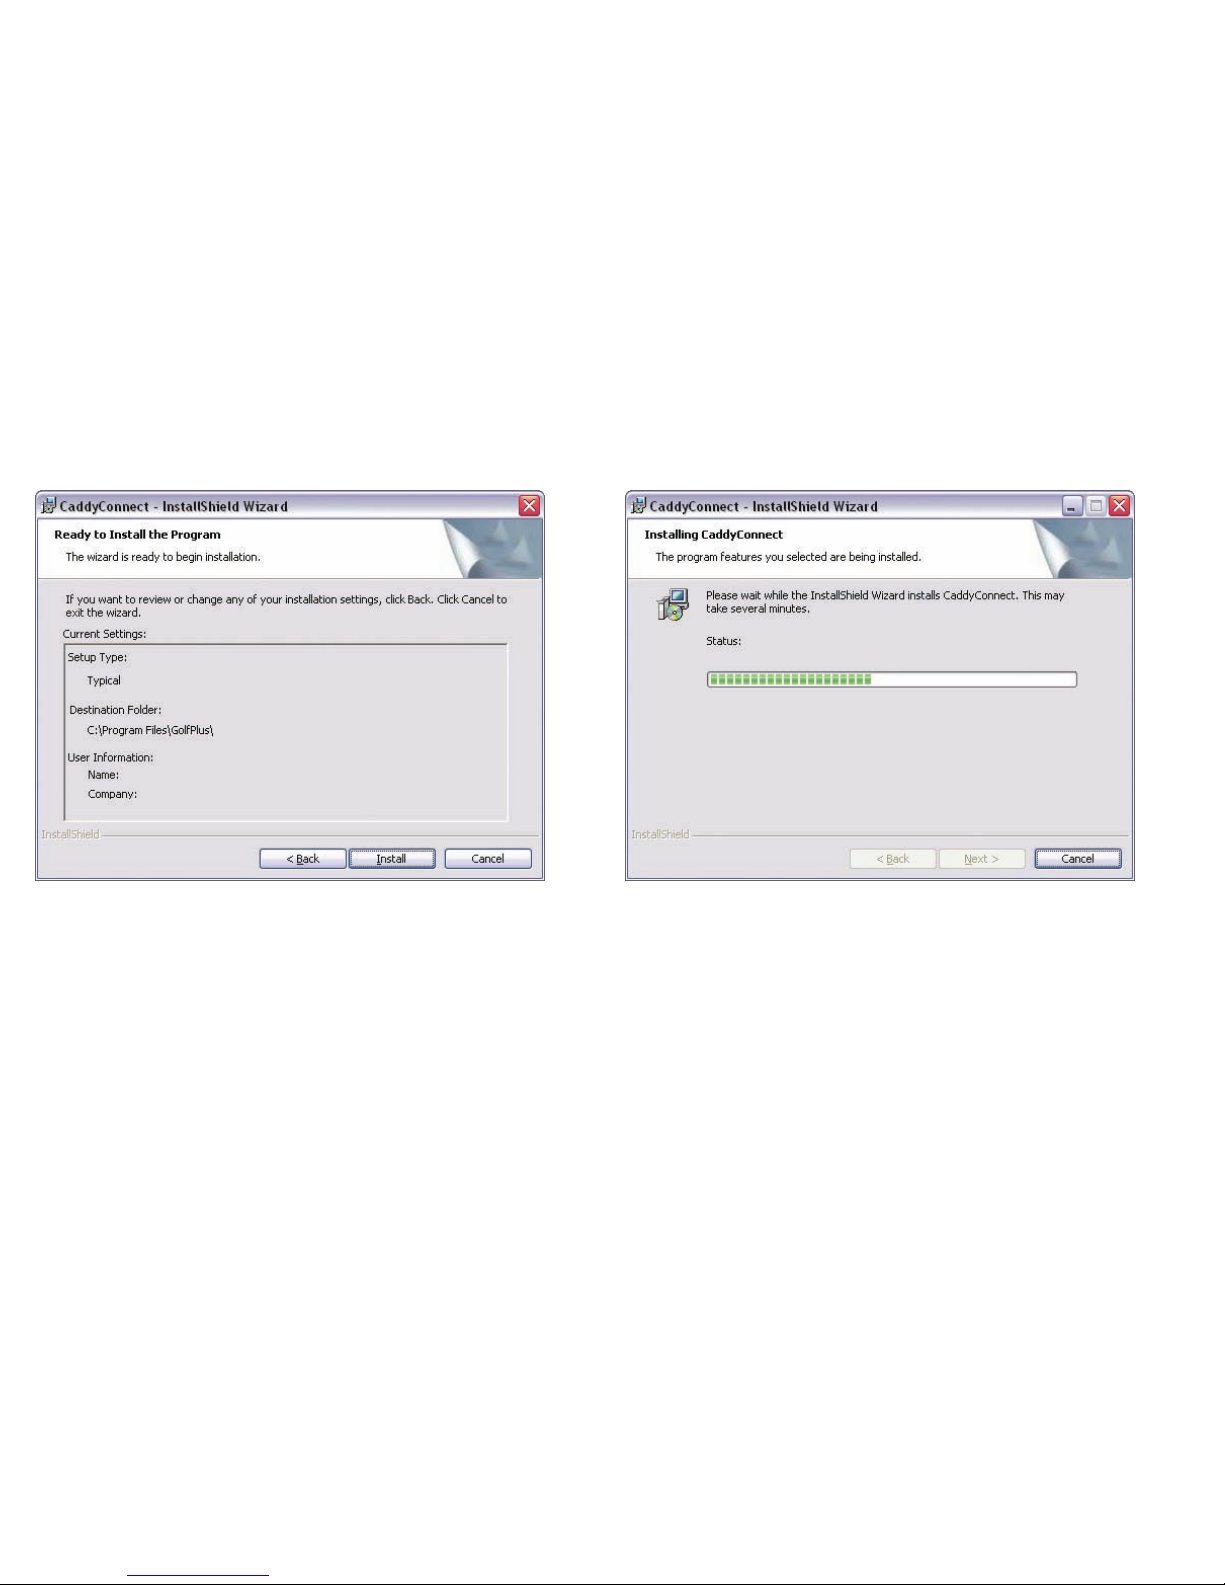
Installing CaddyConnect Software
The next window confirms the destination.
Click on the install button.
The software will now load. It may take several minutes to
complete the installation.
15
Caddy Lite User Guide - Version 1.0 2007
Page 16
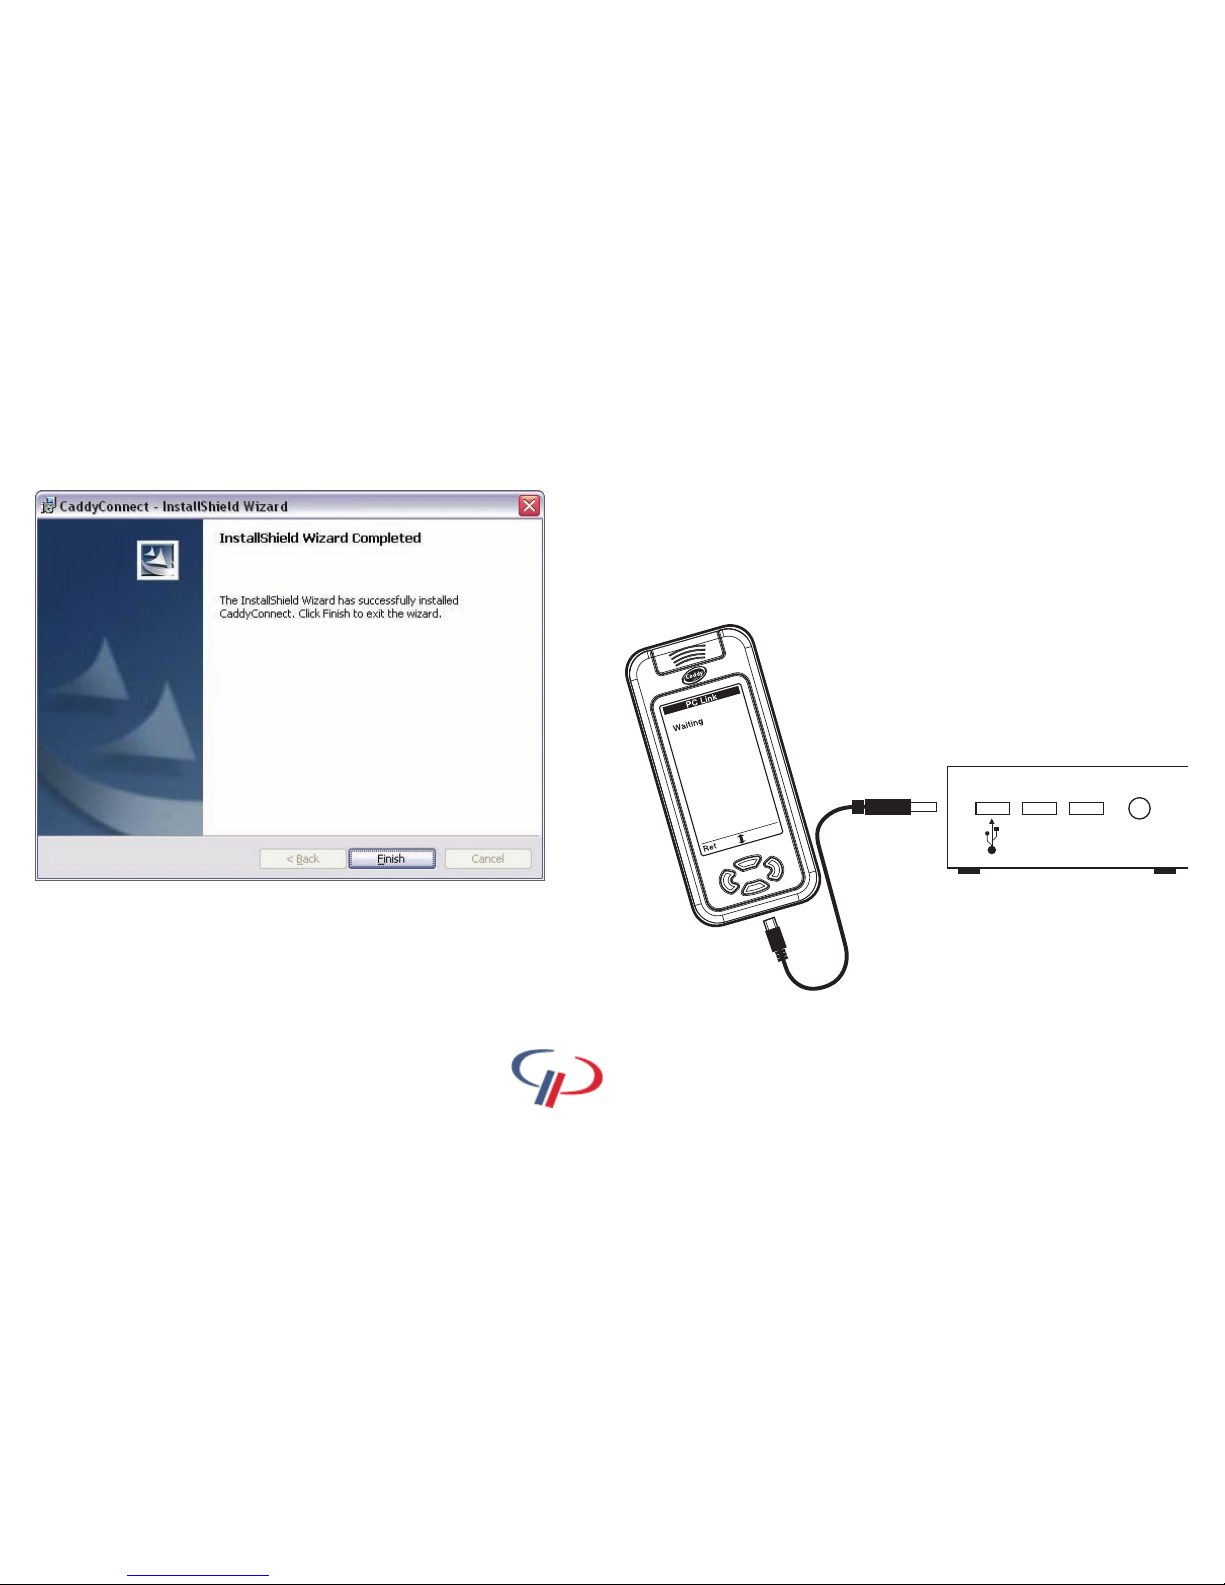
Installing CaddyConnect Software
When the InstallShield Wizard Completed window appears, your
software installation is complete.
Click on the finish button.
If at any time you wish to uninstall the software, insert the Caddy Lite
Software CD in to the CD drive and follow the uninstall instructions on
screen. You can also repair the software using this method.
You now have a Golf Plus icon on your
desktop. Double click on the icon and open the software.
16
Caddy Lite User Guide - Version 1.0 2007
You can now connect your Caddy Lite.
Insert the small end of the USB cable provided.
Insert the other end of the cable in to an available USB slot on the PC.
Your Caddy Lite will switch on automatically.
Insert small end of
supplied USB cable into
your Caddy Lite
Insert large end of supplied USB
cable into an available USB slot on
the PC
Page 17
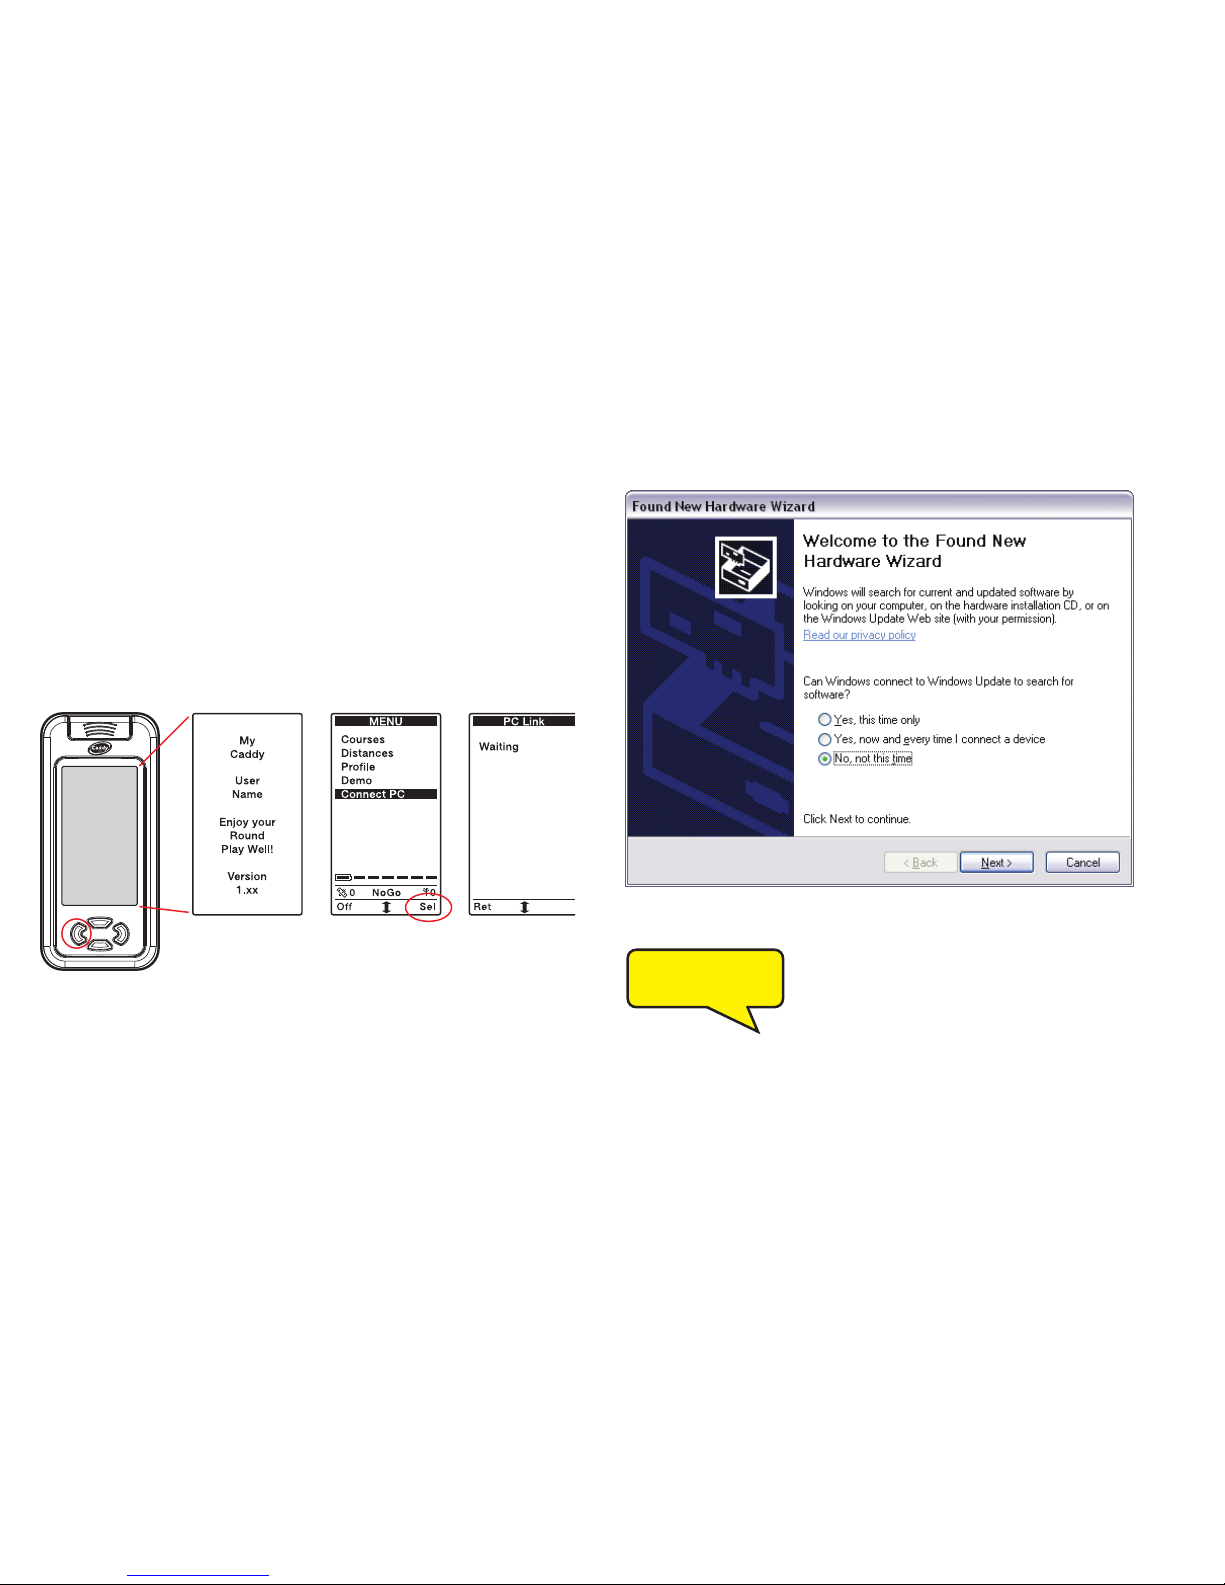
Installing CaddyConnect Software
Once connected, the driver installation will begin. This process will
install the drivers required by the Caddy Lite software.
The following instructions are replicated on-screen.
When the menu screen appears use the scroll button to
move down to Connect PC.
Press the right button to select this option.
The Caddy Lite screen will now display Waiting.
You will see a message at the bottom of the PC screen that reads:
When the Welcome to the Found New Hardware
Wizard window appears, it may ask you if it can
search for software.
Select No, not this time.
Click on the next button.
If this window does not appear, go to next stage.
17
Caddy Lite User Guide - Version 1.0 2007
Scroll down
and select
Connect PC
Found new hardware
USB<->Serial
Page 18
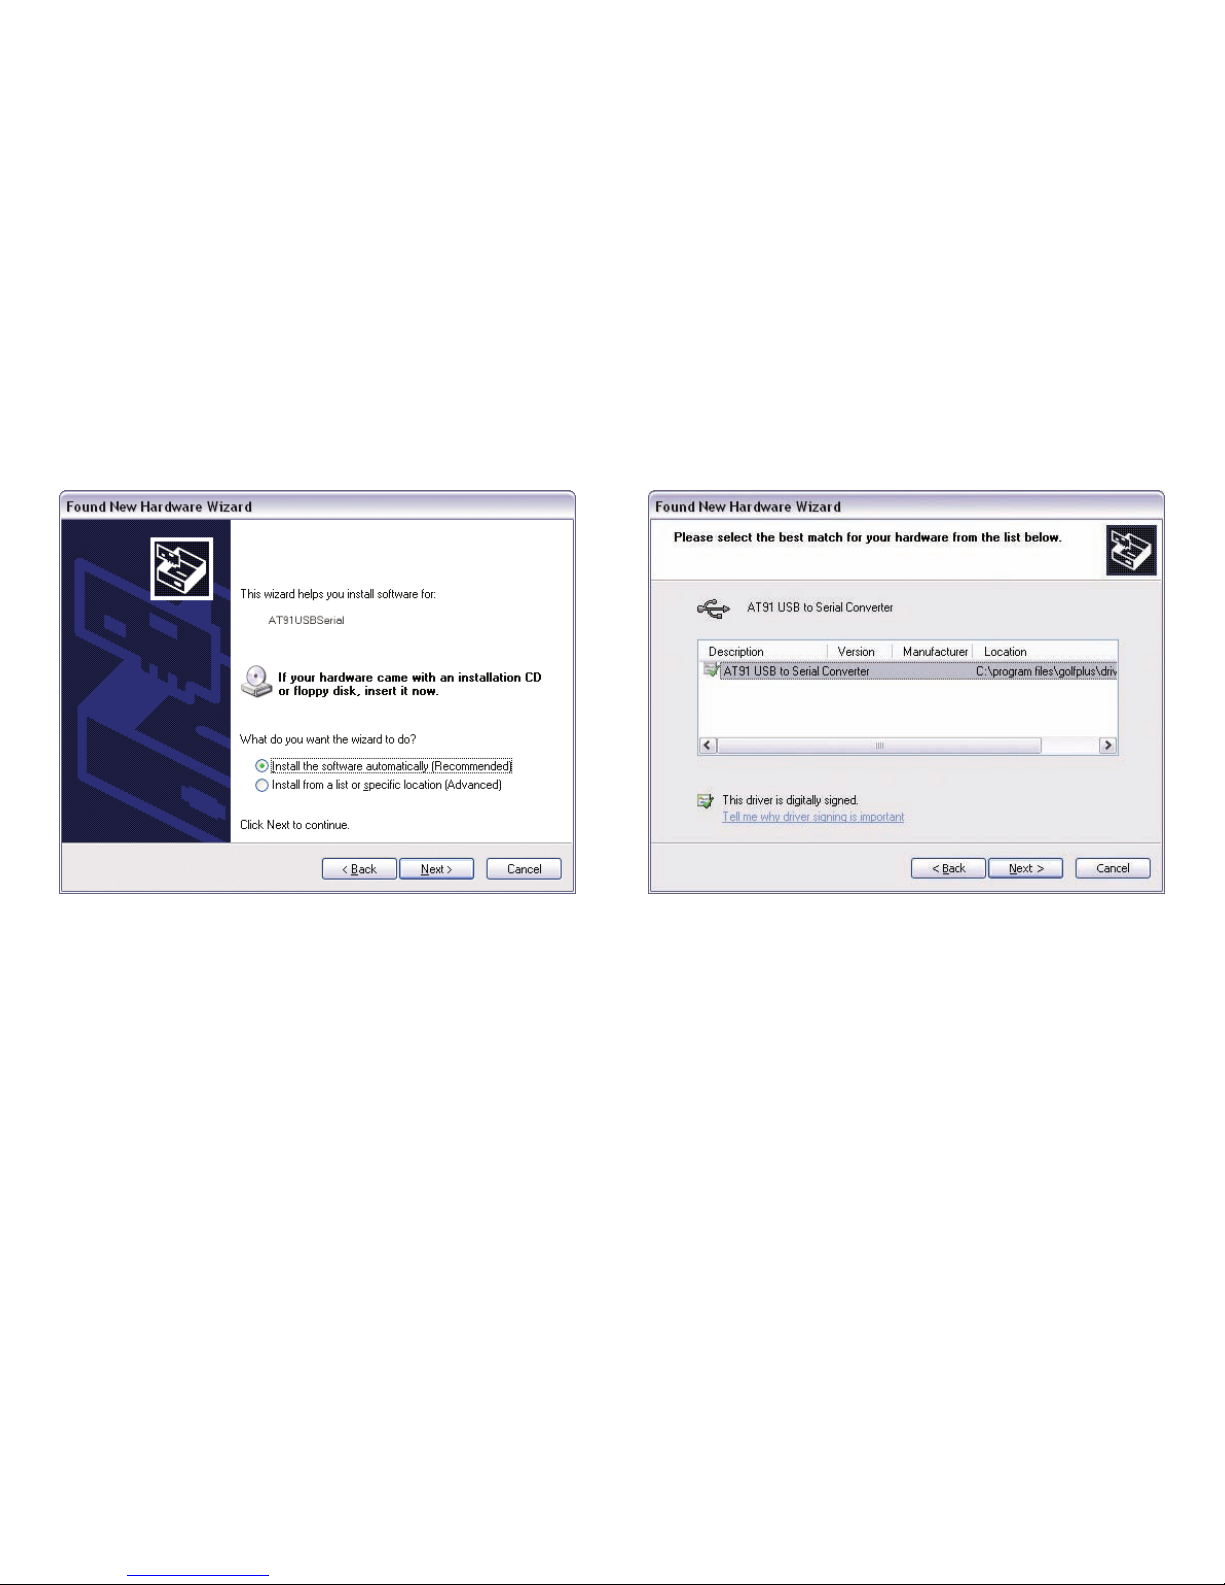
Installing CaddyConnect Software
When the Welcome to the Found New Hardware Wizard window
appears, select Install the software automatically (Recommended).
Click on the next button.
When the PC has found the driver, you will see the following window or
a similar version. The default information is correct.
Click on the next button.
Next you may get a Driver Certification Warning window.
Click on the continue anyway button.
18
Caddy Lite User Guide - Version 1.0 2007
Page 19
Installing CaddyConnect Software
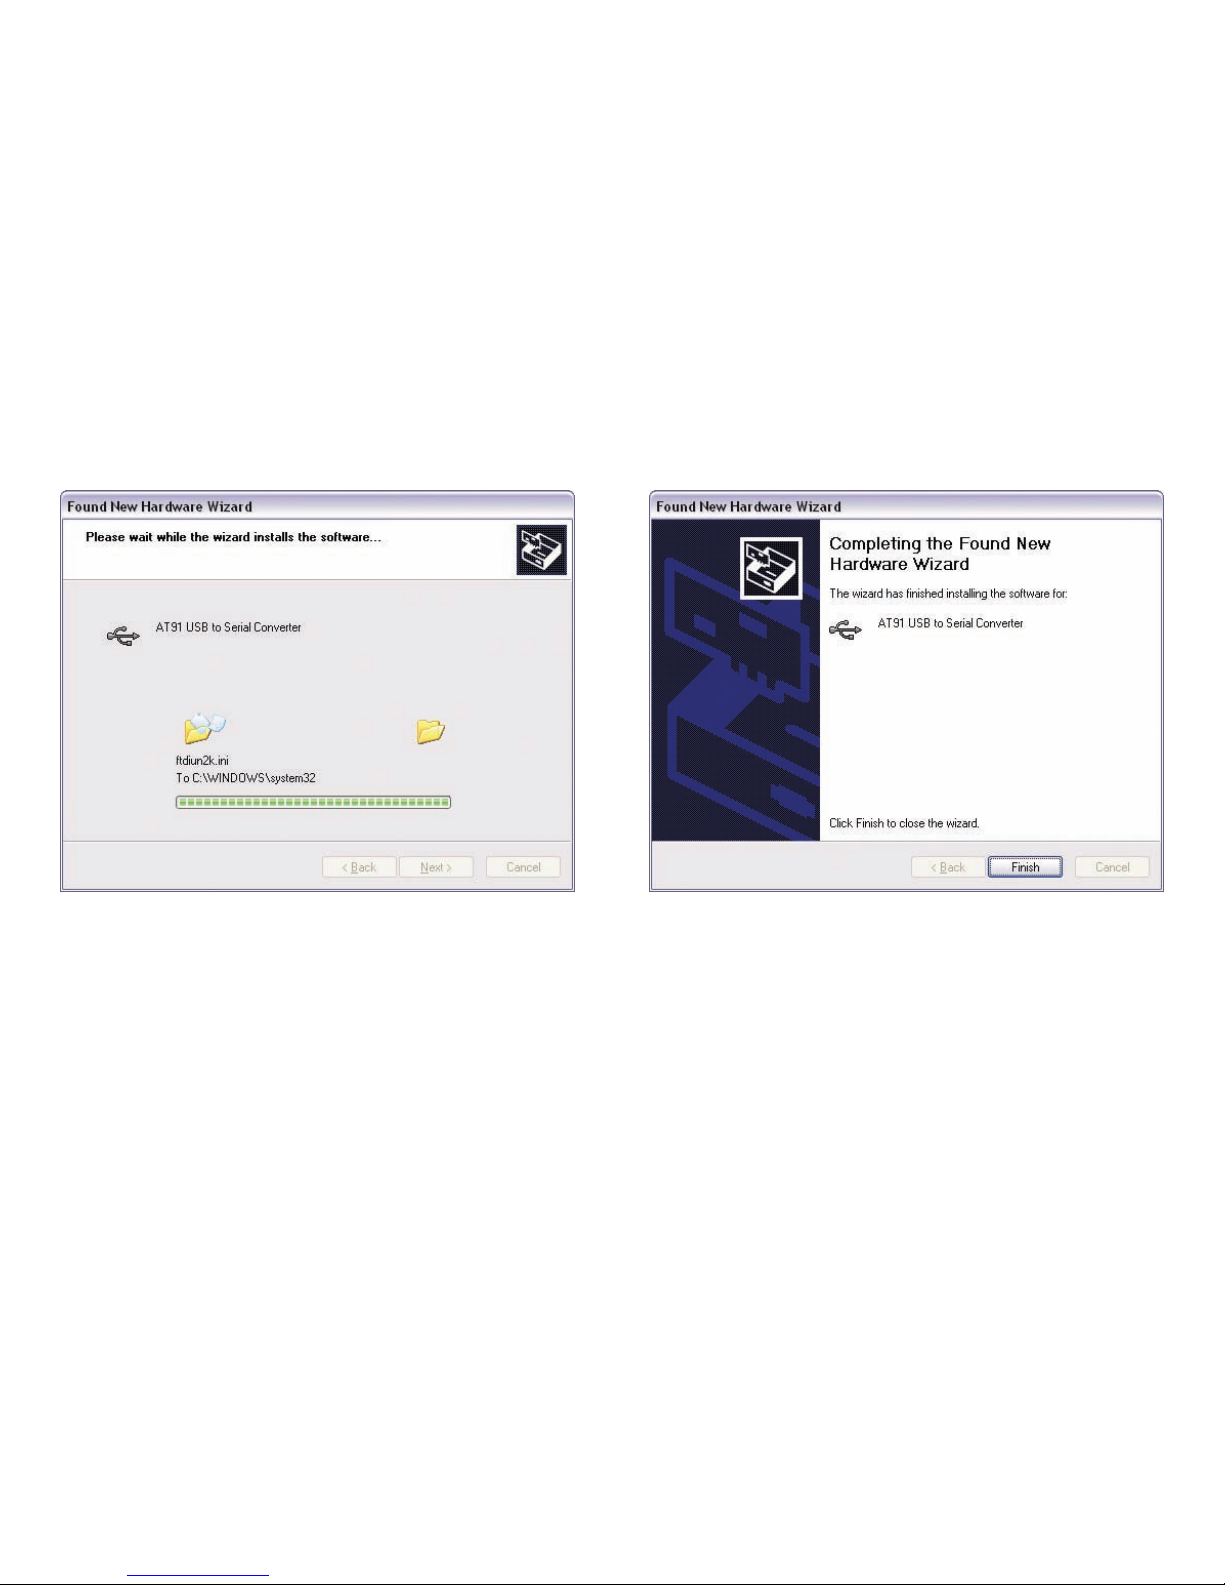
The driver will be installed and the window will close once it has
completed the process.
You will then see the Completing the Found New Hardware Wizard
window. Click on the finish button
19
Caddy Lite User Guide - Version 1.0 2007
Page 20
20
Caddy Lite User Guide - Version 1.0 2007
Connecting your
Caddy Lite
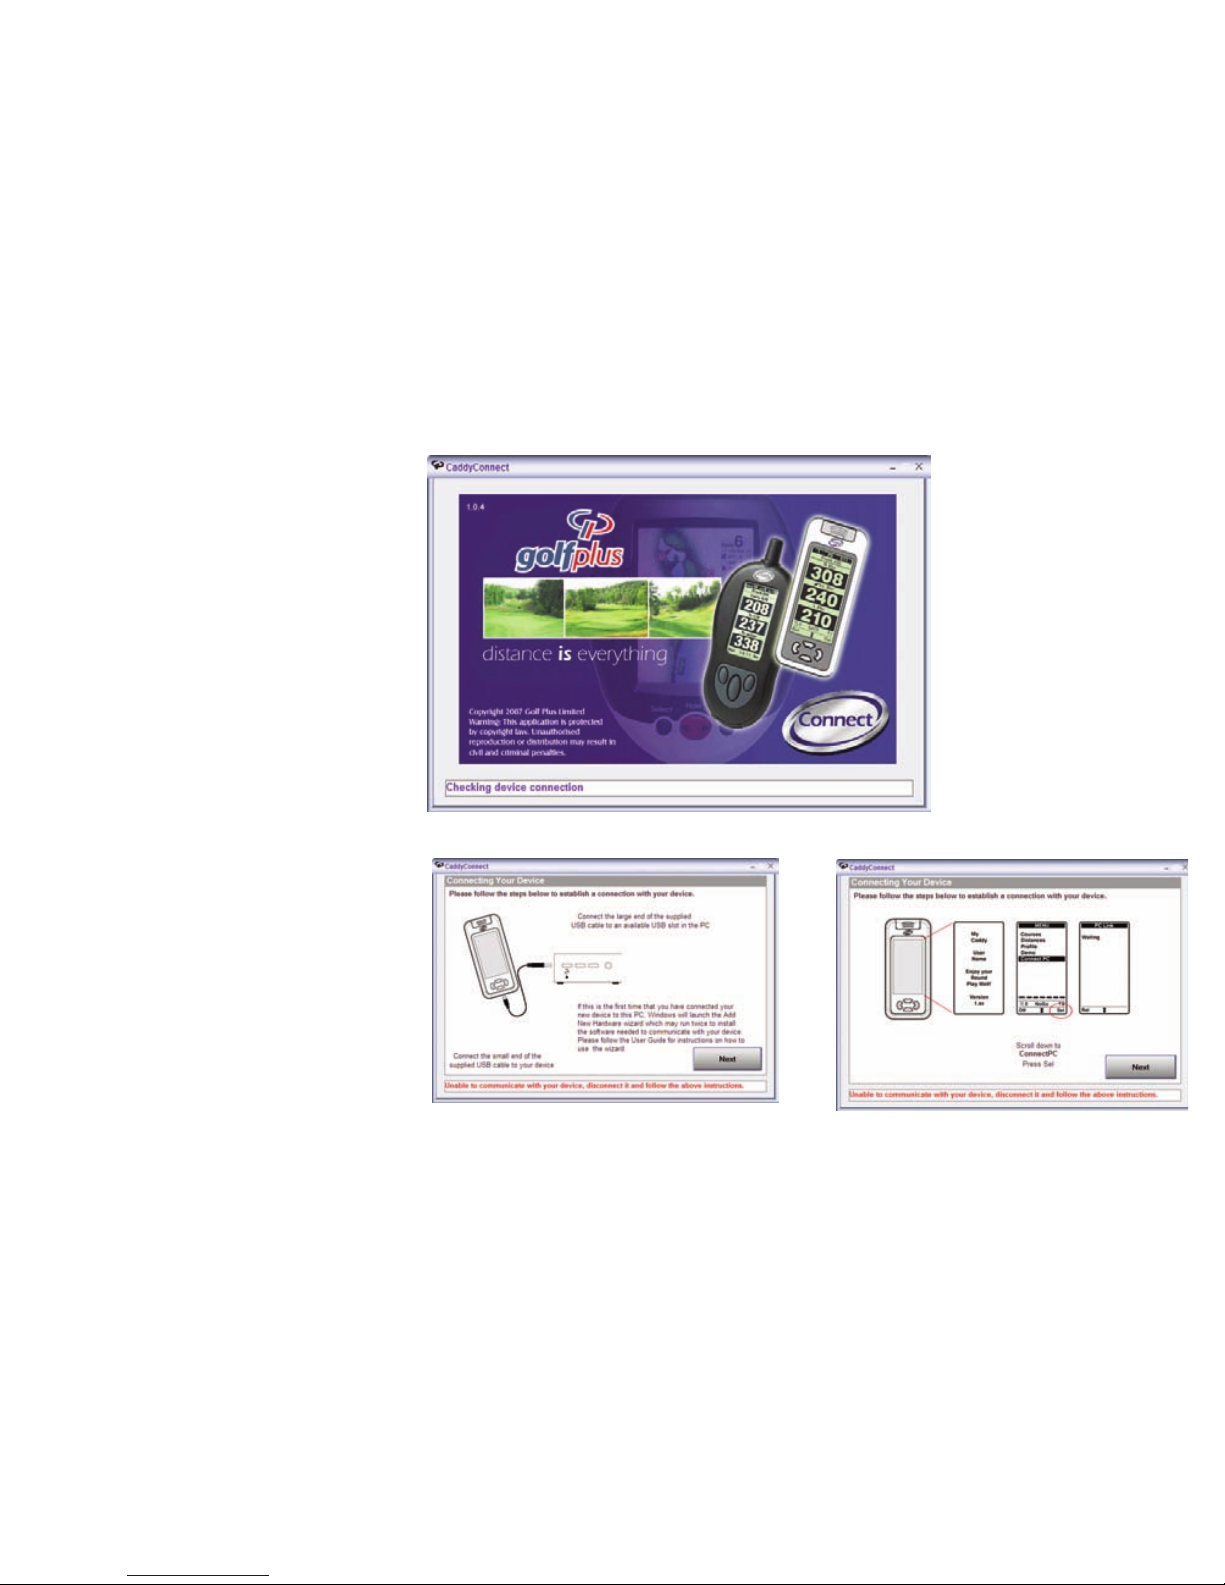
When you first install your CaddyConnect
software you will open the software as
instructed on page 16. The following
instructions are for all subsequent connections.
When you double click on the CaddyConnect
desktop icon you will see the connect screen.
This will automatically move on to the next
screen.
Follow the on-screen steps to connect your
Caddy Lite to the PC.
After each stage, click on the next button.
Page 21
21
Caddy Lite User Guide - Version 1.0 2007
Registering your Caddy Lite
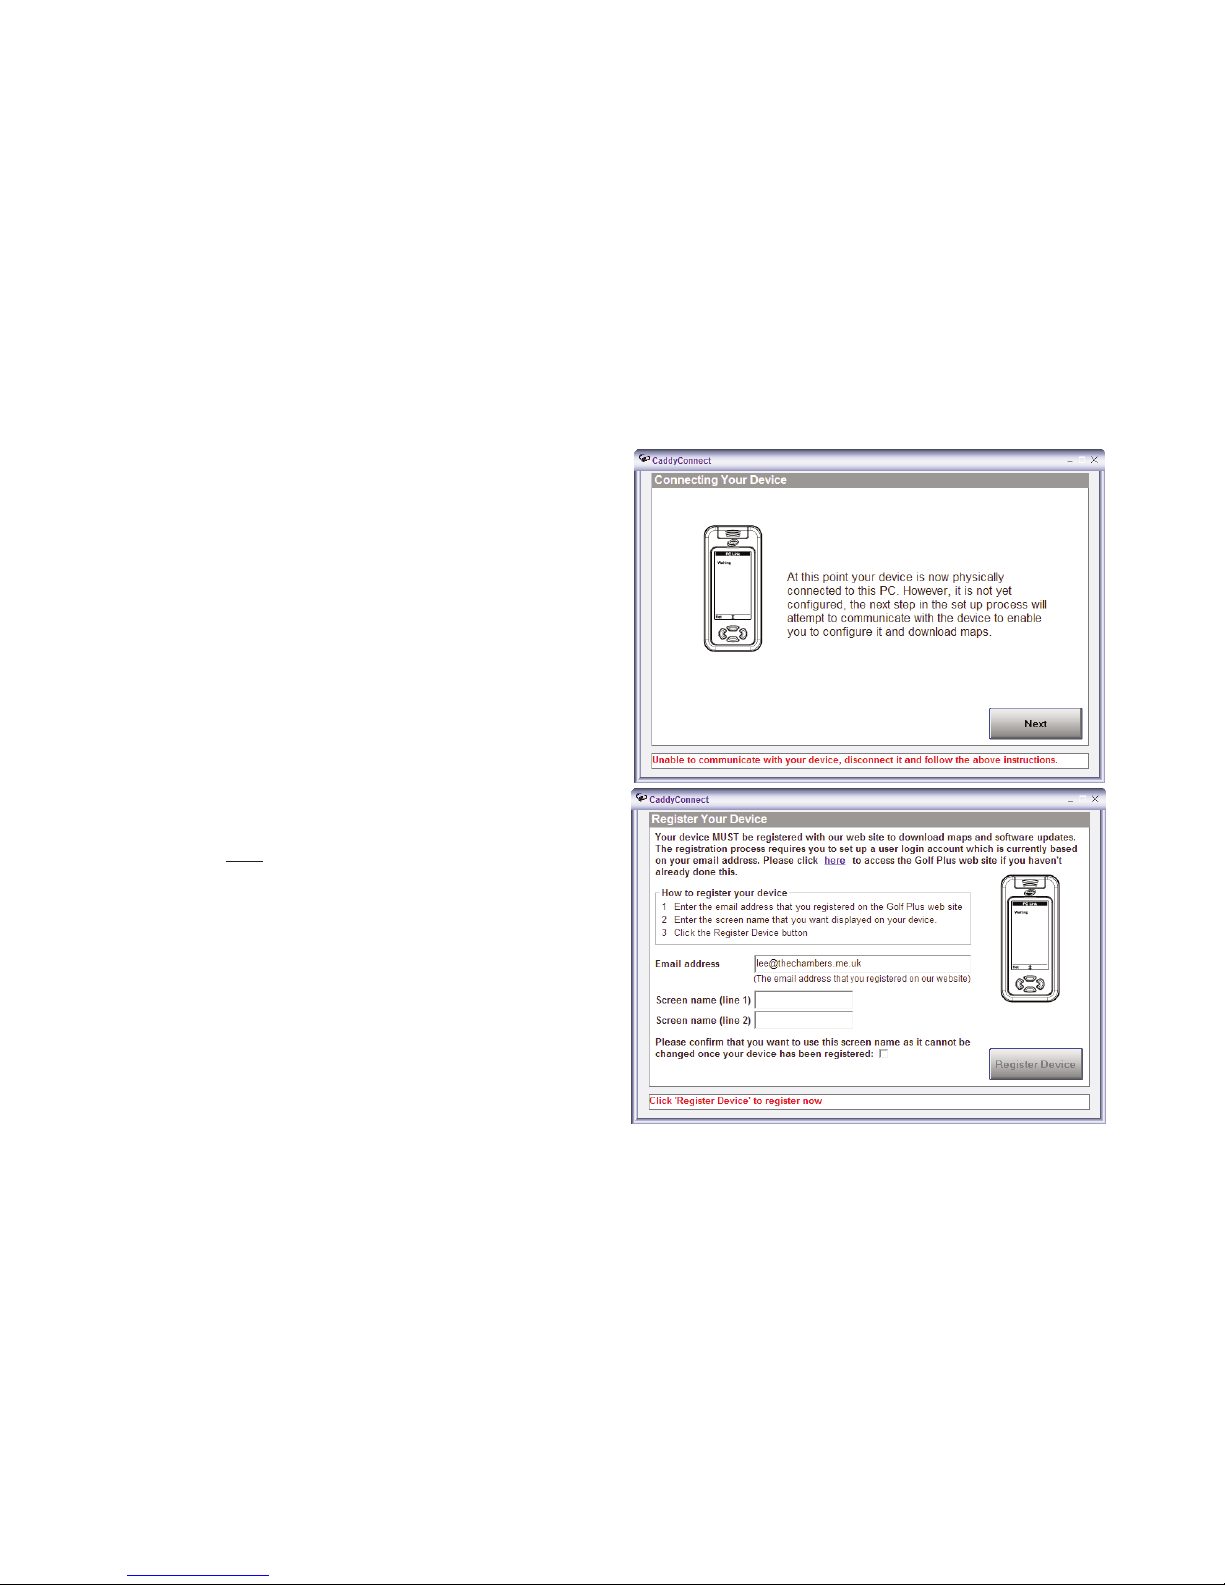
When the image of your Caddy Lite appears, you have successfully
connected the unit to the PC.
Your CaddyConnect software should automatically detect your Caddy
Lite and move to the next screen.
If it does not, click on the Find Caddy Lite button.
If this fails to detect your Caddy Lite, please contact golf plus technical
support on 090 1723 0141 (please note that calls to this number will be
charged at 35p per minute).
When the Register Your Device screen appears you can register your
Caddy Lite and give it a screen name.
First however you must have a login account and password.
If you bought your Caddy Lite online from Golf Plus you will already
have done this. If you bought from a retail outlet you will need to do
this stage. Use the click here
link to connect to the Golf Plus website
(www.caddy.co.uk). Follow the New customer register here
instructions on the website.
When you have completed the online registration return to the
CaddyConnect software. It may not recognise you instantly due to the
unpredictable speed of an internet database update.
Enter your email address in the first box.
Enter your chosen screen name (maximum of 2 lines).
Tick the box confirming that you want to use the screen name.
Click on the Register Device button.
Page 22
22
Caddy Lite User Guide - Version 1.0 2007
Registering your Caddy Lite
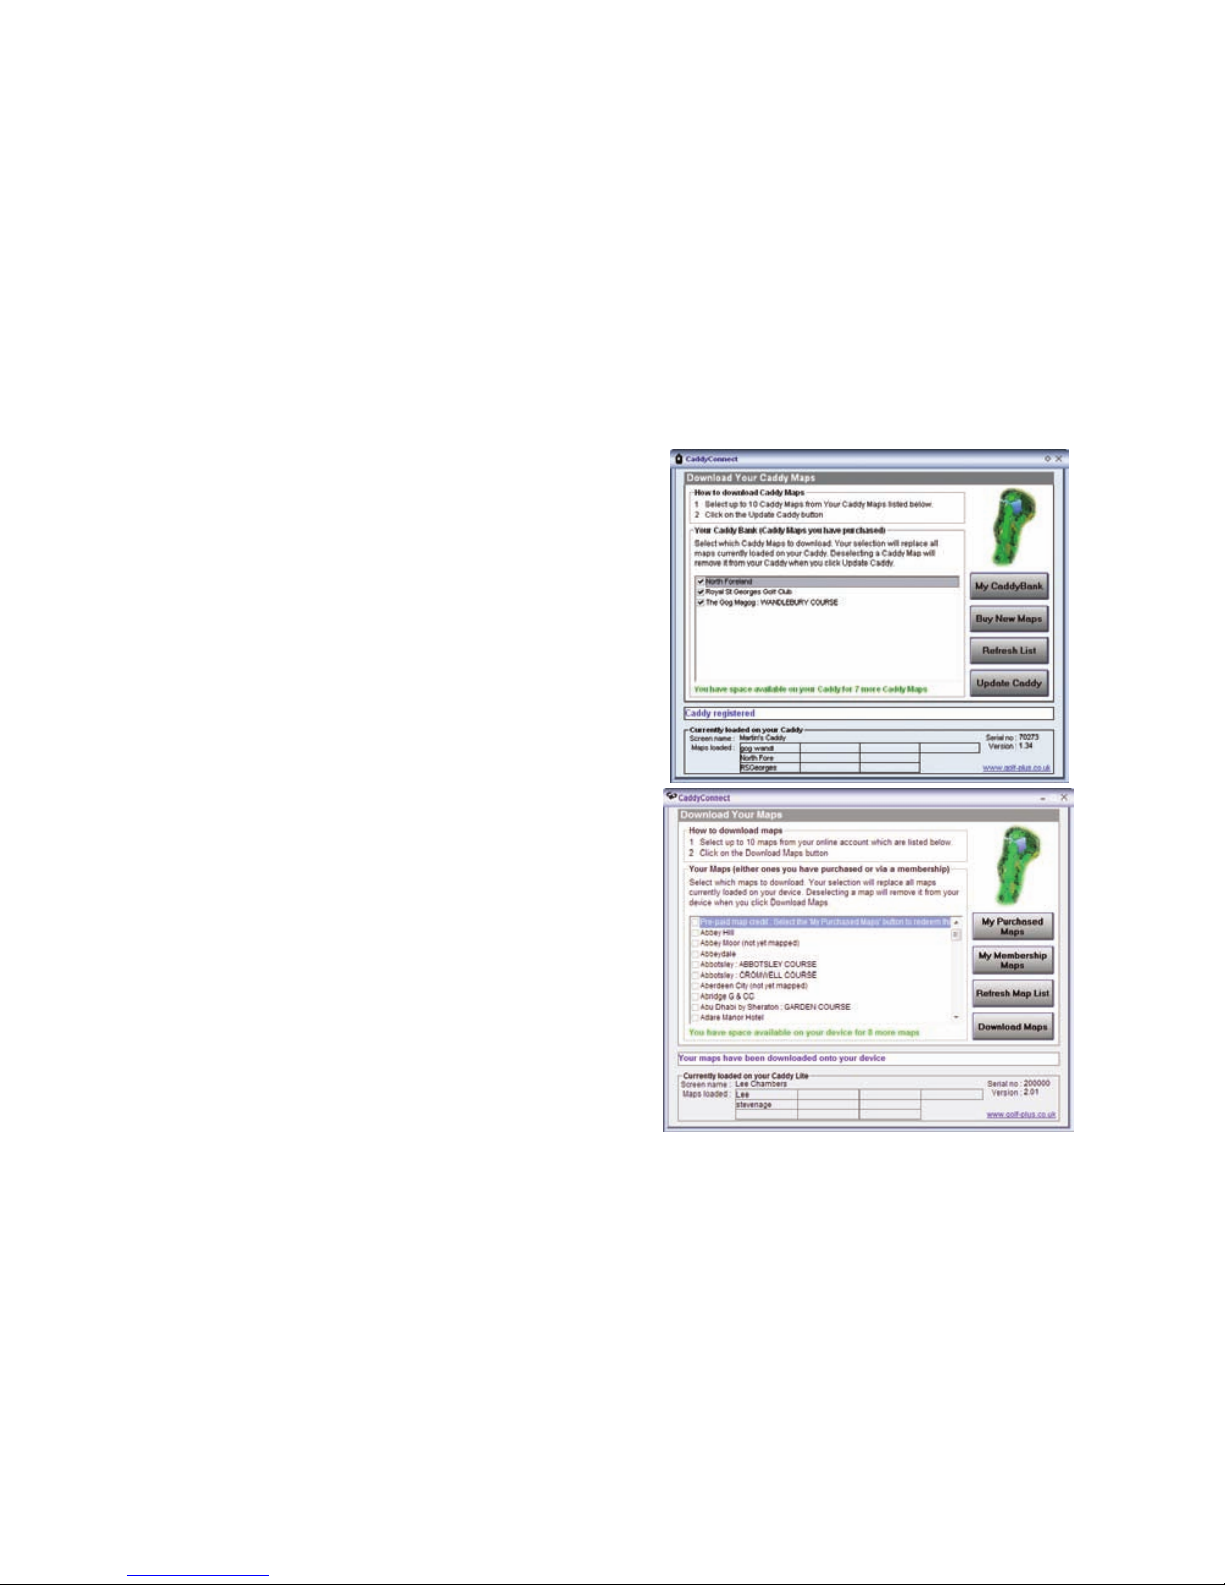
When your registration is accepted (this may take a few minutes) you
will see the Download Your Maps window.
From here you can access your purchased and membership maps,
update your course list and download maps to your Caddy Lite.
Download Your Maps
To load maps onto your Caddy Lite, select your maps in the list by
clicking on the checkbox adjacent to the course name.
The number of maps that you can load onto your Caddy Lite is shown
below the list.
To unload a map from your Caddy Lite, uncheck the checkbox in the list
adjacent to the course name you wish to remove. This does not remove
the map from your online account.
Click on the Download Maps button to update your Caddy Lite with
your map selection.
When updating your Caddy Lite, maps that are not ticked in your
map list will be removed from your Caddy Lite.
Click on the My Purchased Maps button to purchase or add maps
(redeem map credits) into your online account via the Golf Plus web site.
Click on the My Membership Maps button to add maps into your
online account as part of your Golf Plus membership (if applicable) via
the Golf Plus web site.
Click on the Refresh Map List button to refresh the list of maps shown.
Page 23
23
Caddy Lite User Guide - Version 1.0 2007
Your Caddy Lite Specification
Physical
Case: Partially sealed, high impact ABS, water resistant
Size: 5.4cm Wide x 11.5cm High x 2cm Deep
Weight: Approx. 350g
Operating temperature: -20C to +60C
Display: 128 x 64 pixels, 3cm Wide x 6cm High
Performance receiver: 12 Channel Parallel receiver
Acquisition time: Up to 2 minutes (cold start) Approx 5 minutes (first time)
Time to effectiveness: Up to 12.5 minutes (cold start)
Up to 2 minutes (warm start)
Update rate: 1/second, continuous
GPS Accuracy:* > 50% confidence up to 2.5 metres
> 90% confidence 2.5 metres - 5.5 metres
Antenna: Built-in active
Power
Battery type: Rechargeable built-in lithium polymer battery
Battery voltage: 3.7v 900 Milliamps per hour
Battery charge: 5 volts input via USB/Mains adaptor/Cigarette lighter
Charge management: On board charge management at 4.2 volts
Battery life: 10 hours, typical use from new
Charge time to full power: 4 hours
Auto switch off: 6 hours if no button pressed unless charging
No. of charge cycles: Up to 1000 prior to replacement
Degradation: 80% efficiency following 500 charge cycles
Connectivity
Caddy Lite USB: USB Mini B Socket
PC Connection USB Mini B Socket to Standard USB A Connector (lead supplied)
USB type: USB 2.0 and 1.0
Specifications subject to change without notice.
* Subject to continuing satellite availability and visibility and the non implementation of purposeful accuracy degradation
to 100m under the U.S. Department of Defense’s continuing option to implement imposed selective availability and accuracy
degradation for internal security reasons on a regional, national or international basis.
Page 24
Back of Green Back
Front of Green Front
Centre of Green Centre
Bunker Bkr, Bk
Left Bunker L Bkr
Right Bunker R Bkr
Bunkers Bkrs
Carry Cry or
Front Bunker Frnt Bkr
First Bunker Bkr 1
Second Bunker Bkr 2
Front Bunker Fnt Bk
Last Bunker Lst Bkr
Last Left Bunker LstLBkr
Last Right Bunker LstRBkr
Fairway Bunker FwyBkr
Fairway Fwy, or Fw
End of Fairway End Fwy
Water Lake, Wtr
River River, Wtr
Stream Stream, Wtr
Pond Pond, Wtr
Burn Burn, Wtr
Ditch Ditch, Wtr
Second Fairway Bunker FWBkr2
Greenside Water GrnWtr
Greenside Bunker GrnBkr
Left Greenside Bunker GrnLBkr, GrnLBk
Right Greenside Bunker GrnRBkr, GrnRBk
First Water Water 1
Second Water
Water 2, Wtr2
Water Back of The Green WaterBk
Inside Dogleg In DogLg
Right Fairway Rfwy
Second Fairway Fwy 2
Road Path
Track Path
Path Path
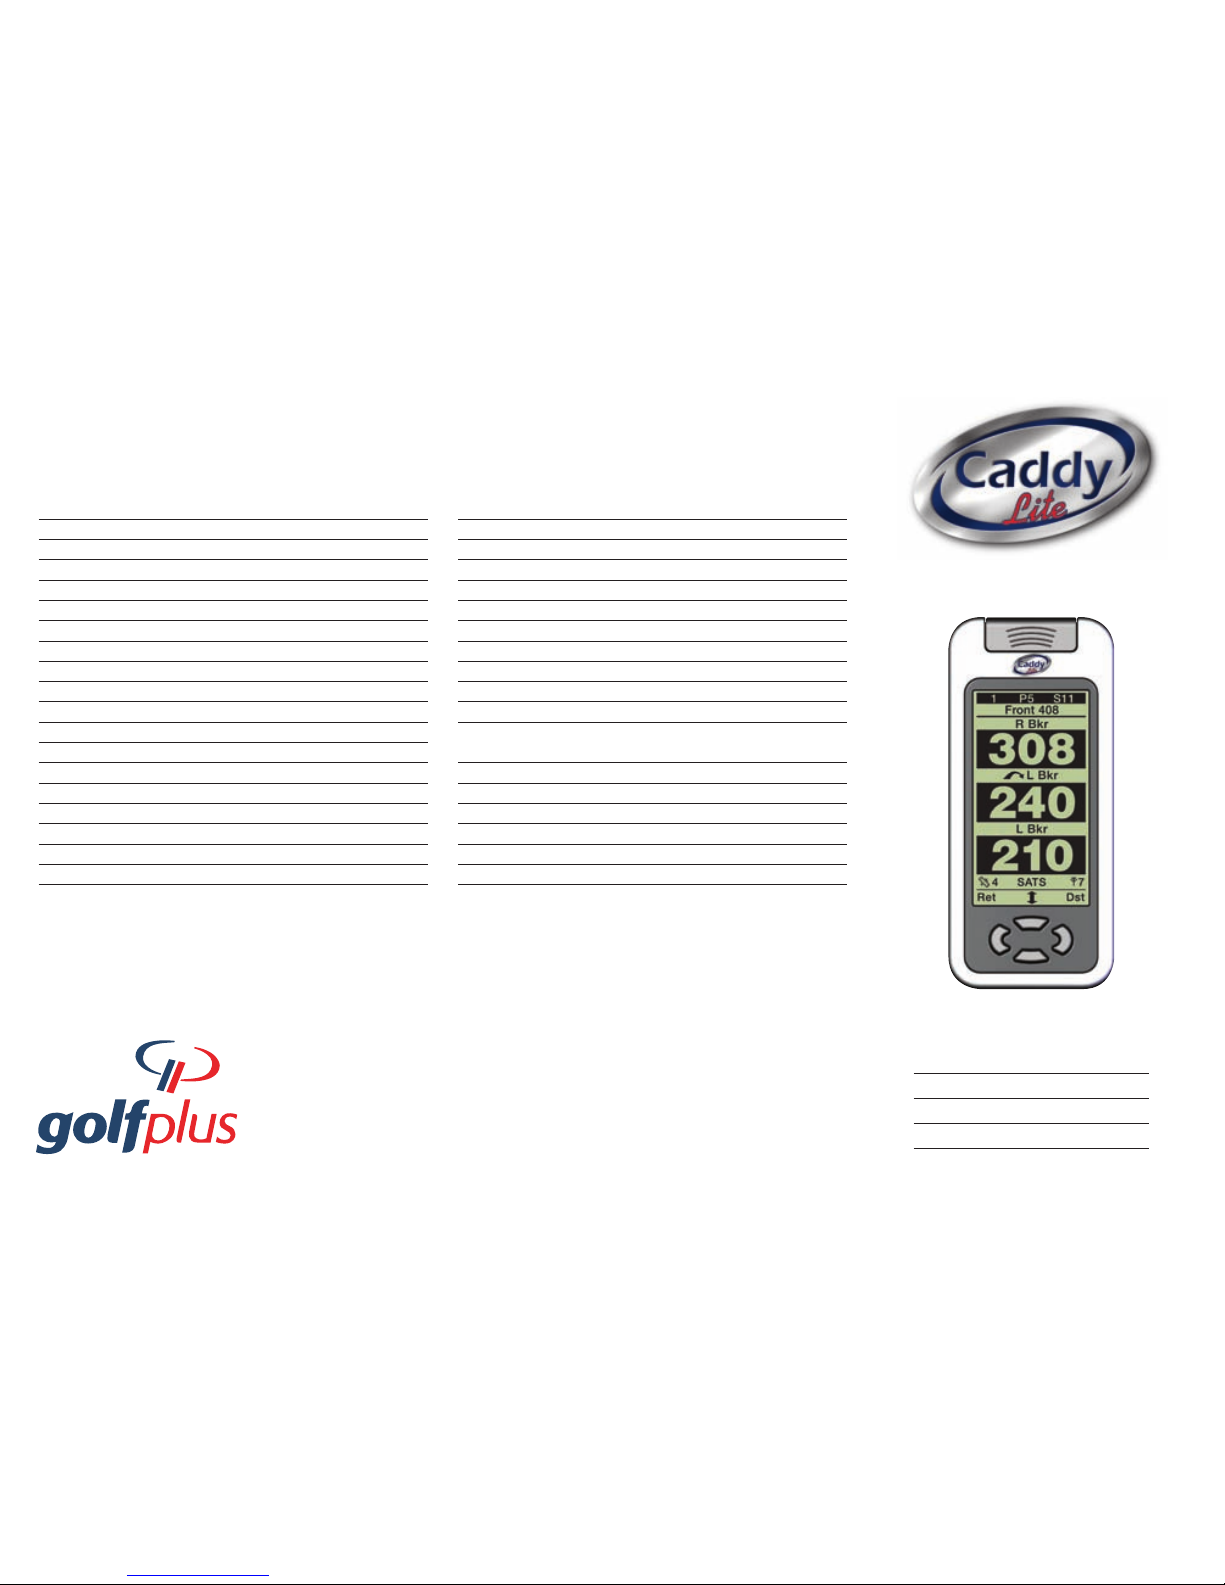
Your Caddy Lite Language
In all cases distances are To the hazard unless preceded by Cry or the Carry Icon.
Contents
Your Caddy Lite
USB Connection Lead
Caddy Lite Connect software
Instruction manual
Golf Plus, Walters House, 12 Merlin Centre, Lancaster Road,
High Wycombe, Bucks HP12 3TB
Tel: +44 (0)1494 795110 Fax: +44 (0) 1494 461107
E-Mail [email protected] www.golf-plus.co.uk www.caddy.co.uk
distance is everything
 Loading...