

Page 1
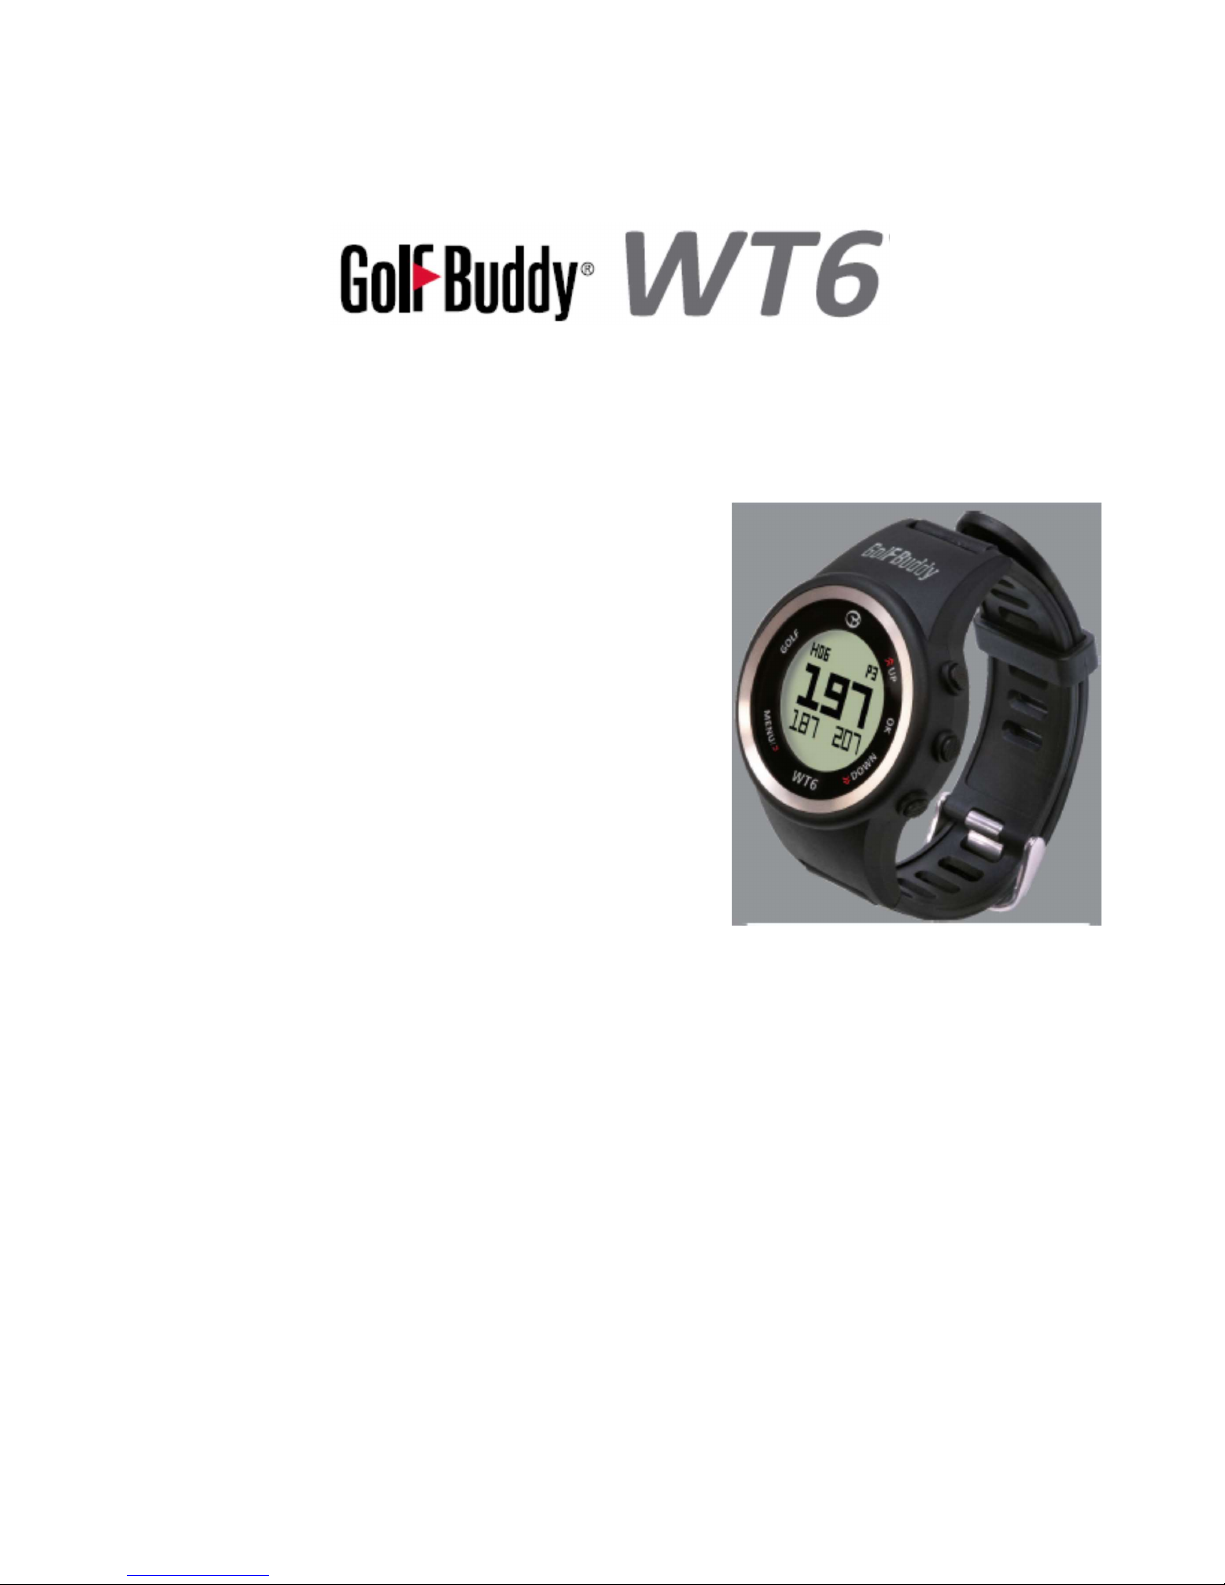
Thank you for choosing the GolfBuddy WT6
The WT6 is a GolfBuddy Popular Golf GPS watch with
MONO LCD which is high visibility and intuitiveness. WT6
provides simple and easy user interface based on user
experience and supports direct golf mode button. And
WT6 can support easy change golf hole number. The
WT6 combines course views for over 38,000 courses
preloaded in 130 countries around the world, making it a
great addition to your game. WT6’s battery life time is
over 9 hours. In addition, you’ll be able to download free
course updates via your PC.
TABLE OF CONTENTS
1. DEVICE OVERVIEW & CHARGING
2. MAIN MENU
3. GOLF MODE
4. CARE & MAINTANANCE
5. UPGRADE
Page 2
1. DEVICE OVERVIEW & CHARGING
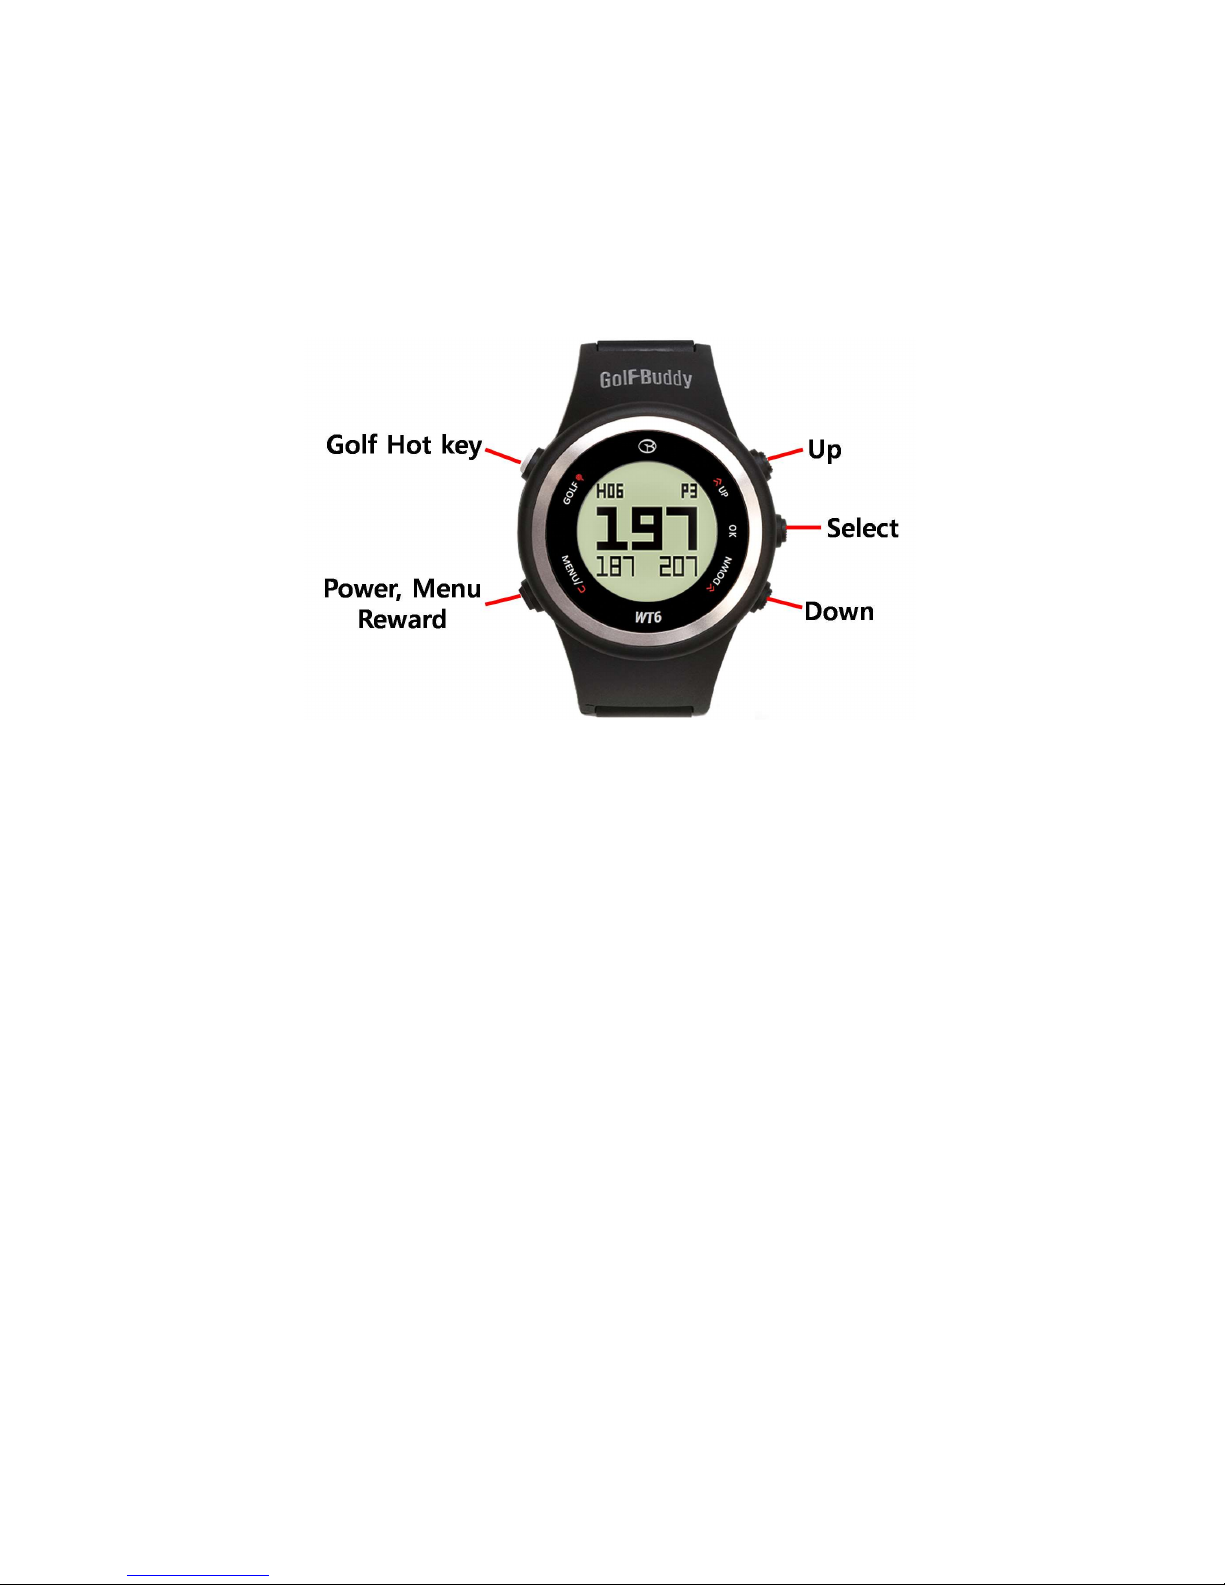
Using your Golfbuddy WT6 GPS Golf Watch
GOLF : This is hot key to play golf mode
MENU : To view menu option, previous and Power on
OK : Select
UP : Move menu and item
DOWN : Move menu and item
1.1 Power On
Press and hold MENU button for 2 seconds to POWER ON, then Your GolfBuddy WT6 will
power on to time mode screen. If the watch is still off, charge the watch first.
Note : Date/time will set automatically once the WT6 successfully connects to satellites.
(Please note you must be out doors to connect to satellites.) The default time zone is
“LND 0H”, to manually adjust the WT6 to your time zone
Page 3

1.2 Charging your Device
When the watch's power gets critically low, function of Golf, Odometer,
Set Time, GPS Status are all disabled and "LOW POWER" message will
be displayed.
Plug the USB cable into a standard USB port. This USB cable is
compatible with USB ports found on computers, laptops, in
automobiles, or standard 5V AC USB chargers
Insert the Micro USB cable plug into the Micro USB socket of the
watch. Then the screen shown in the image to the left (image B) will
display when the device is connected to the USB charging cable. This
screen indicates USB data connection as well as battery charging.
The battery indicator will display while charging and will display 100%.
When fully charged, remove the Micro USB cable from device
If your WT6 battery stops scrolling when connected and shows a low-battery icon (image A.), it
indicates that a full charge has not been achieved. Check your connection to make sure the
cable is properly aligned with the connector, then allow the WT6 to charge until the battery
shows 100%.
** IMPORTANT : DO NOT USE QUICK-CHARGER AC ADAPTERS TO CHARGE THE WT6 WATCH. DOING
SO MAY CAUSE DAMAGE AND VOID THE WARRANTY. AD ADAPTERS SHOULD NOT EXCEED 5.0V
CHECK YOUR AC ADAPTE’S RATING PRIOR TO USING
A
B
C
Page 4
2. Main MENU
From Watch Mode (TIME), press button “MENU” to view the Main Menu. Navigate with button
“UP” or “DOWN”. Press button “OK” to activate the selected function from the menu. Function
include “SETTINGS", "SET TIME", "ODOMETER", "POWER OFF", and “INFO".
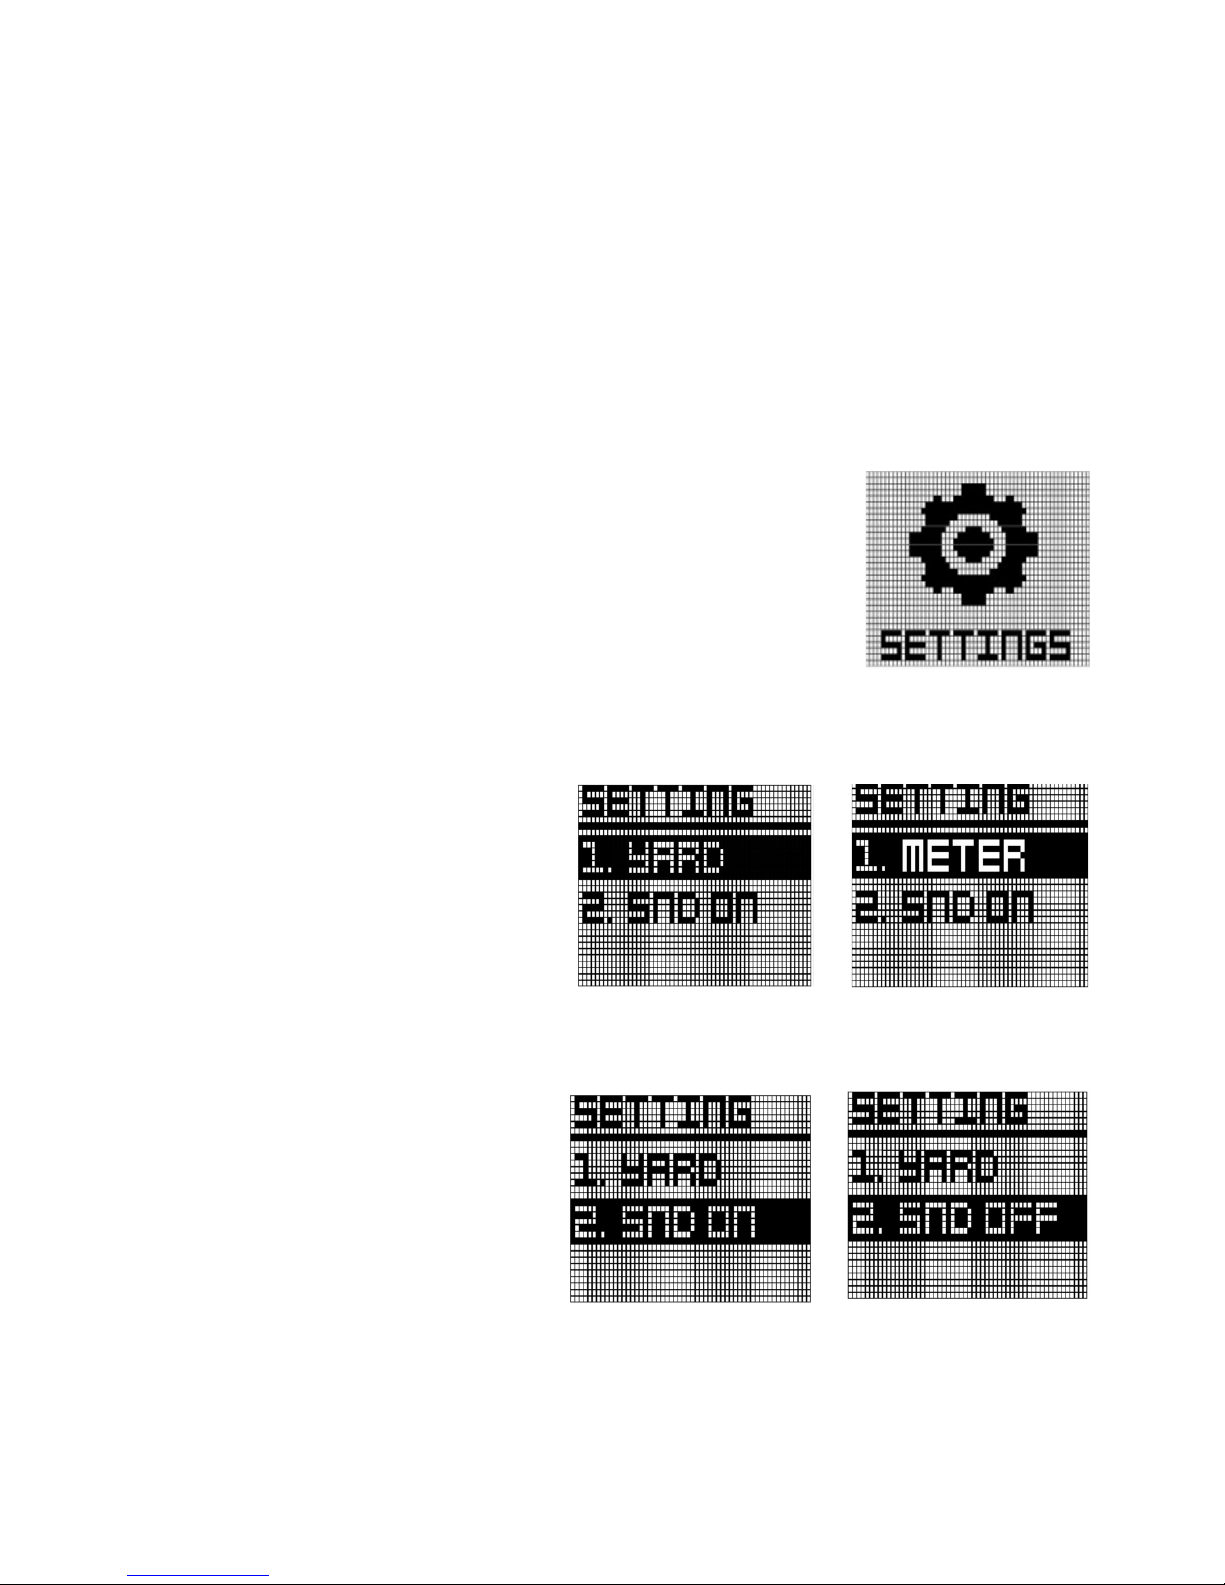
2.1 SETTINGS
In Main Menu mode, press Button “UP” and “DOWN” to select
"SETTING" function. Press button “OK” to activate this function. Then
you can see three items which are unit scale, sound, slope
.
UNIT
To set unit of measurement
(affecting Golf Mode and
Odometer) “YARD” or “METER,
press the “OK” button. Then it will
be toggled
.
SOUND
In order to turn on the beep
sound or off, move to menu using
navigate button.
Press the “OK” button, it will be
toggled
Page 5
2.2 SETTIME
WT6’S time will set automatically once the watch successfully connects
to satellites. First of all, user need to set the Time Zone, 12/24 Hours
Format, Day Format and DST.
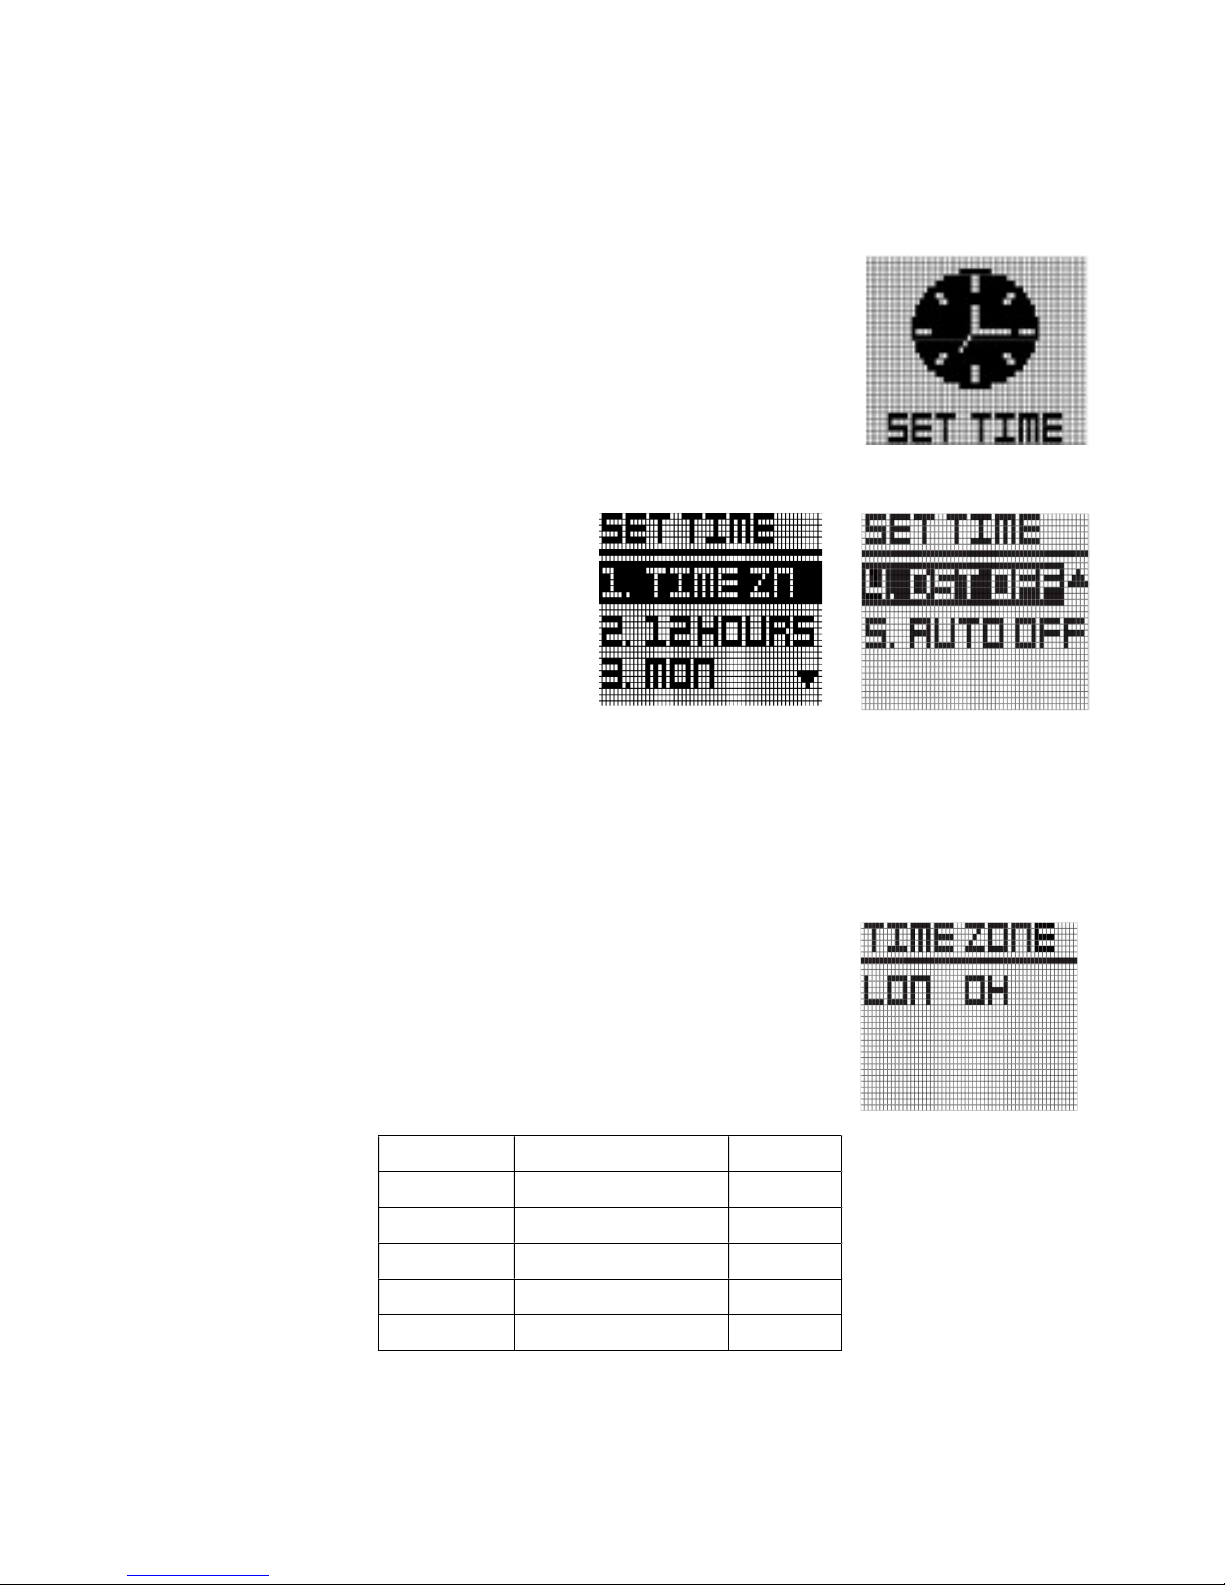
In Main Menu mode, press Button “UP” and “DOWN” to select "SET
TIME" function. Press button “OK” to activate this function
In Set Time mode, you have option for "1.
TIME ZN", "2. 12HOURS", "3. MON", "4. DST
OFF" and "5. AUTO ON/OFF" setting. Press
button “UP” and “DOWN” to select the
function and press button “OK” to confirm
the selection.
Time zone
User can change time zone to suit user location. Select “TIME
ZN”, the screen will change right figure. Press “UP” and “Down”
to change time zone
Time Zone default setting is "LON 0H".
Abbreviation
City Difference
WLG Wellington +12H
NOU New Caledonia +11H
SYD Sydney +10H
DRW Darwin +9.5H
KOR Korea +9H
Page 6

PEK Beijing +8H
HKG Hong Kong +8H
BKK Bangkok +7H
RGN Yangon +6.5H
DAC Dhaka +6H
DEL Delhi +5.5H
KHI Karachi +5H
KBL Kabul +4.5H
DXB Dubai +4H
THR Tehran +3.5H
MOW Moscow +3H
ATH Athens +2H
CAI Cairo +2H
BER Berlin +1H
PAR Paris +1H
CAS Casablanca 0
LON London 0
BSB Brasilia -3H
RIO Rio de Janeiro -3H
CCS Caracas -4H
WAS Washington -5H
NYC New York -5H
MSY Monterrey -6H
CHI Chicago -6H
ELP El Paso -7H
DEN Denver -7H
LAX Los Angeles -8H
SFO San Francisco -8H
ANC Anchorage -9H
HNL Honolulu Hawaii -10H
PPG Pago Pago -11H
Page 7
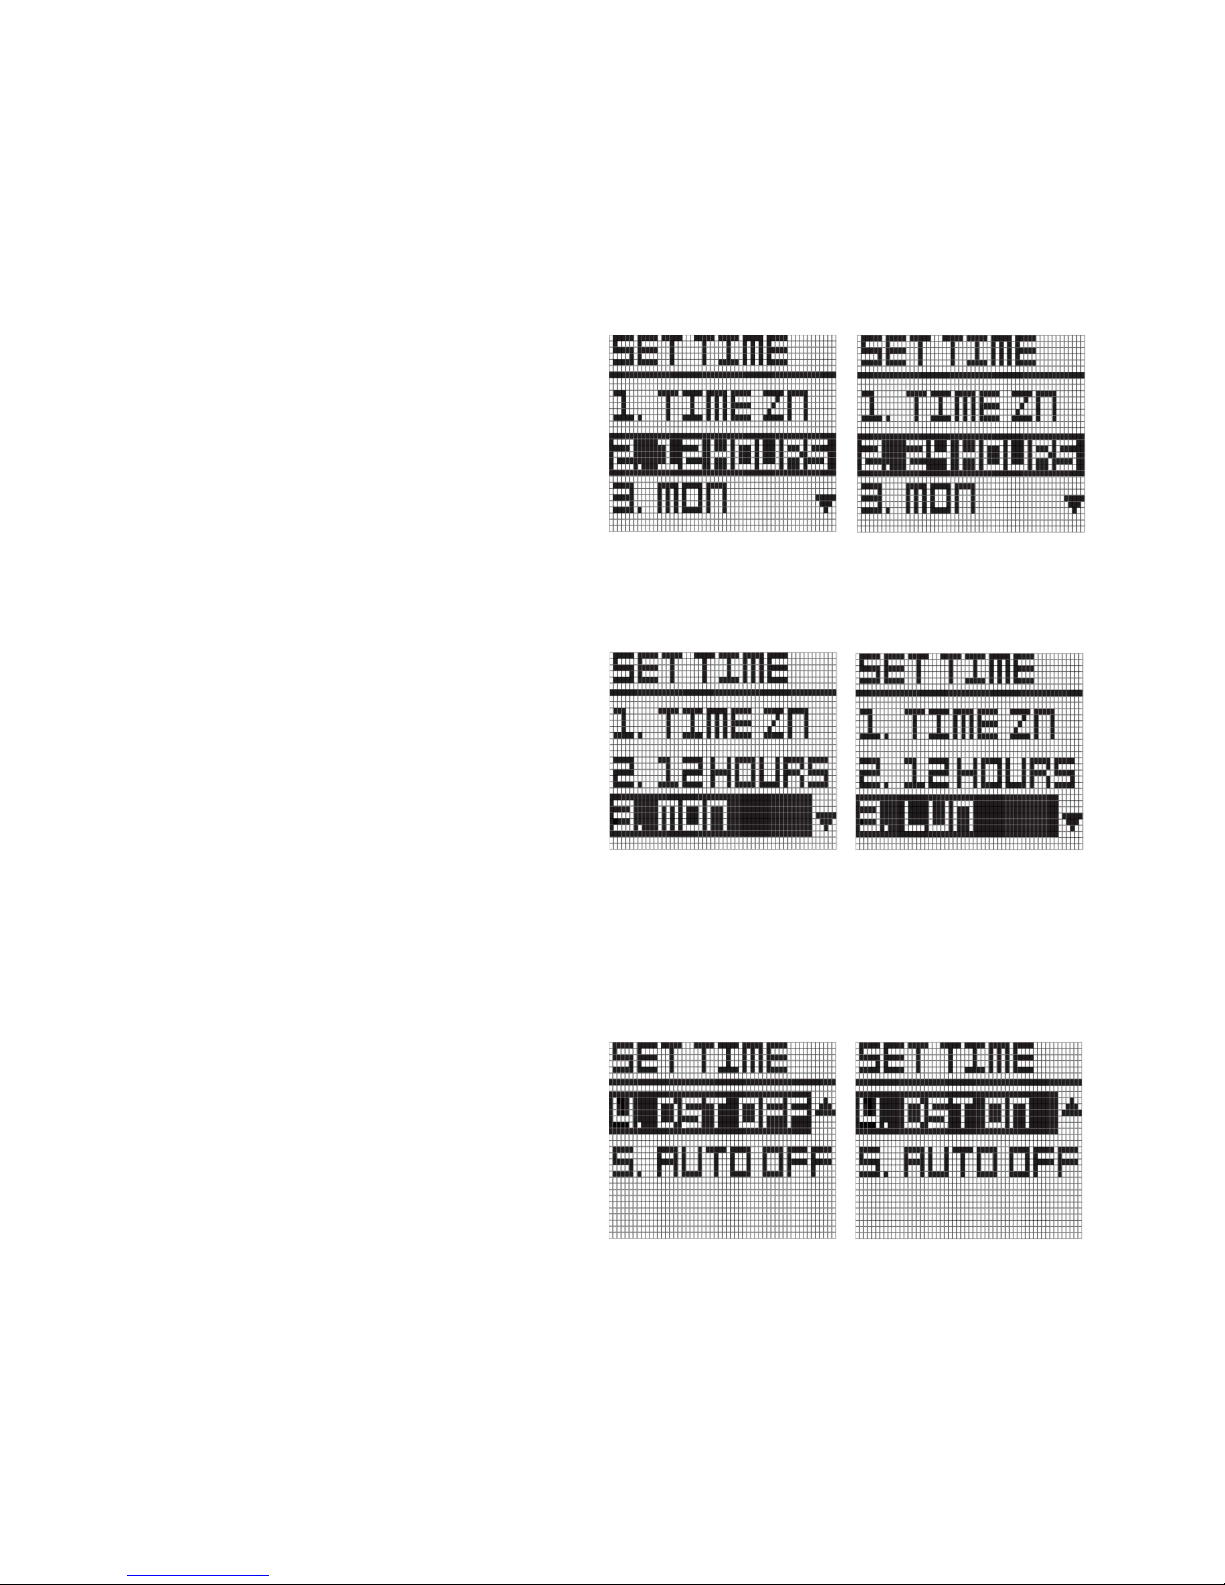
12/24 Hour Format
In order to change, move to menu
using navigate button. Press the “OK”
button, it will be toggled
The default is "12HOURS" and the
other option is "24HOURS".
Day Format
In order to change, move to menu
using navigate button. Press the “OK”
button, it will be toggled
The default Day Format is "MON" and
the other option is "LUN".
MON : English notation of day
LUN : French notation of day
DST
DST is Day Light Saving function
In order to change, move to menu
using navigate button. Press the “OK”
button, it will be toggled.
The default is "DST OFF " and the other
option is "DST ON".
Page 8
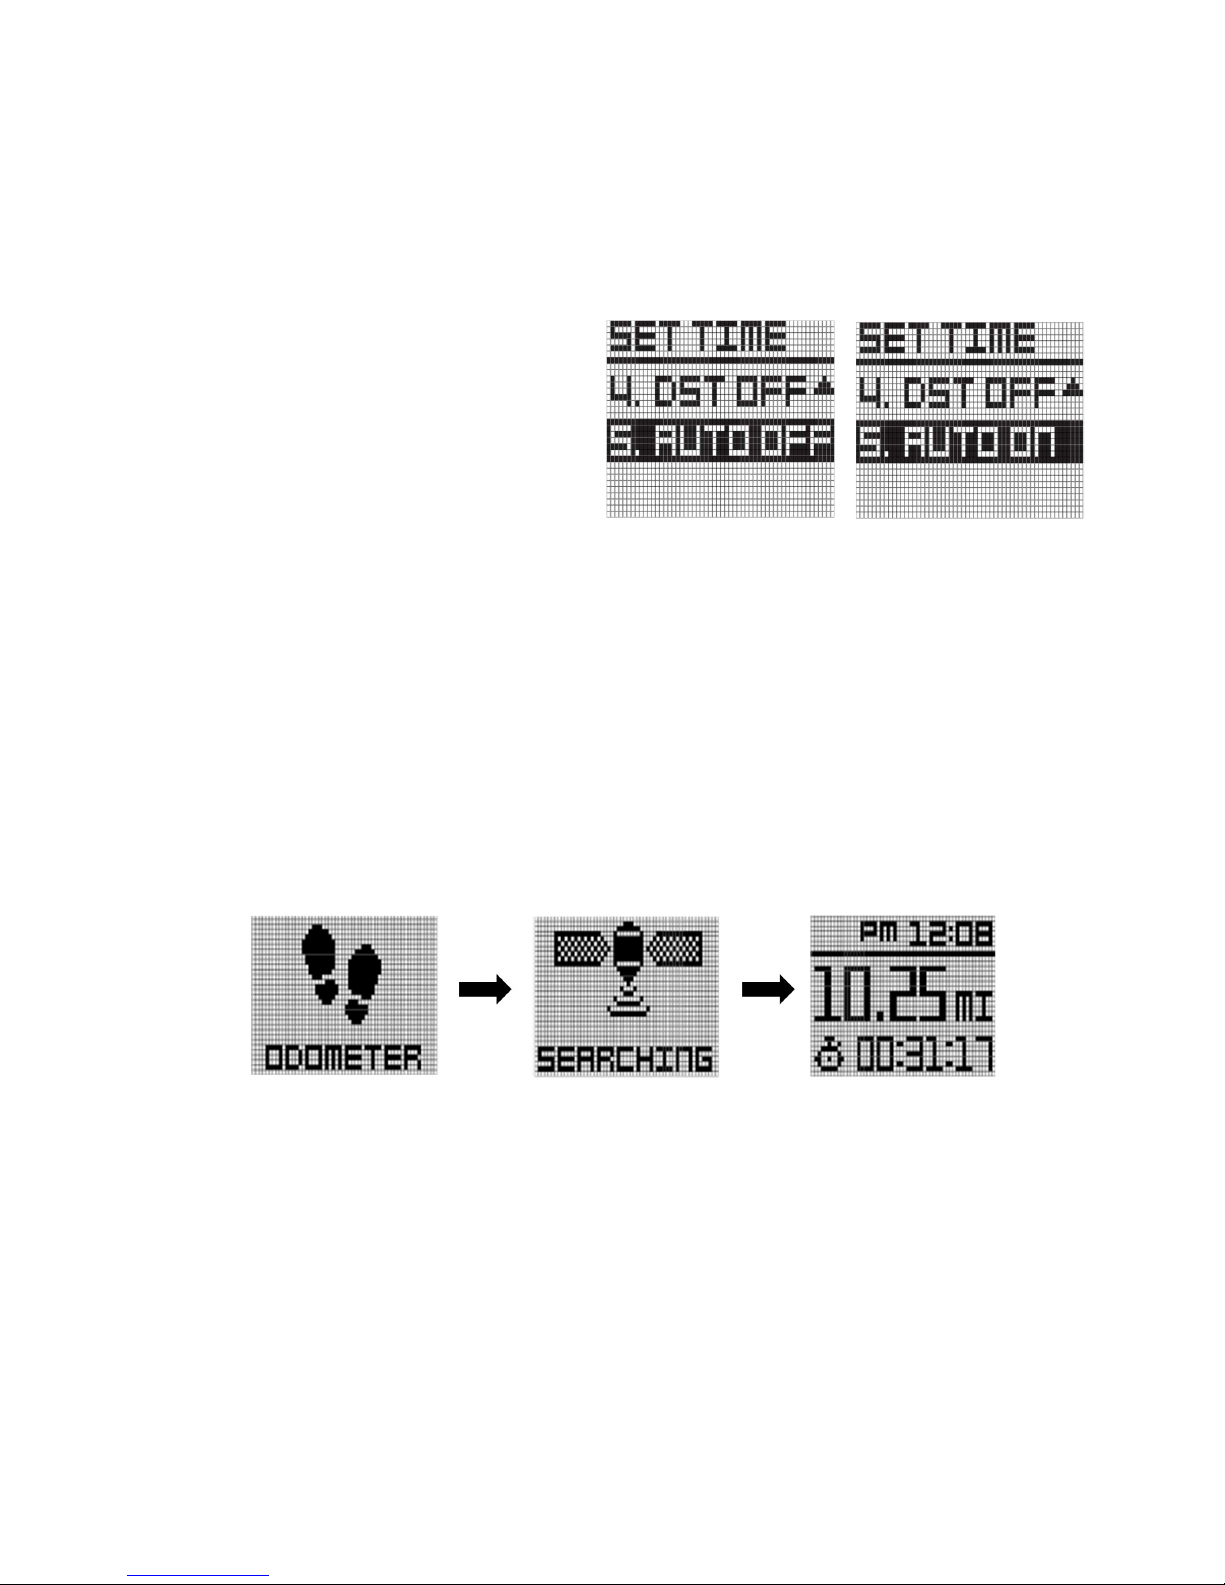
AUTO ON/OFF
This feature is included to allow users
that prefer to sync their time. In most
cases, this is unnecessary. Minutes are
set via GPS only. Press the “OK” button,
it will be toggled.
2.3 ODOMETER
In Main Menu mode, press Button “UP” and “DOWN” to select "ODOMETER" function. Press
button “OK” to activate this function.
The watch will start to search for the GPS signal. And message "SEARCHING" will be displayed.
Press button “MENU” to disable Odometer mode and return to Time mode.
When the watch locks with the GPS signal, the display will show Distance at the middle row and
Exercise Time at the lower row. Exercise time counting will be started automatically.
Press button “DOWN” to pause the Exercise Time and again press button “DOWN” to restart the
counting.
Press button “UP” to reset the Odometer and press “MENU” button to return back to Time
mode.
Page 9
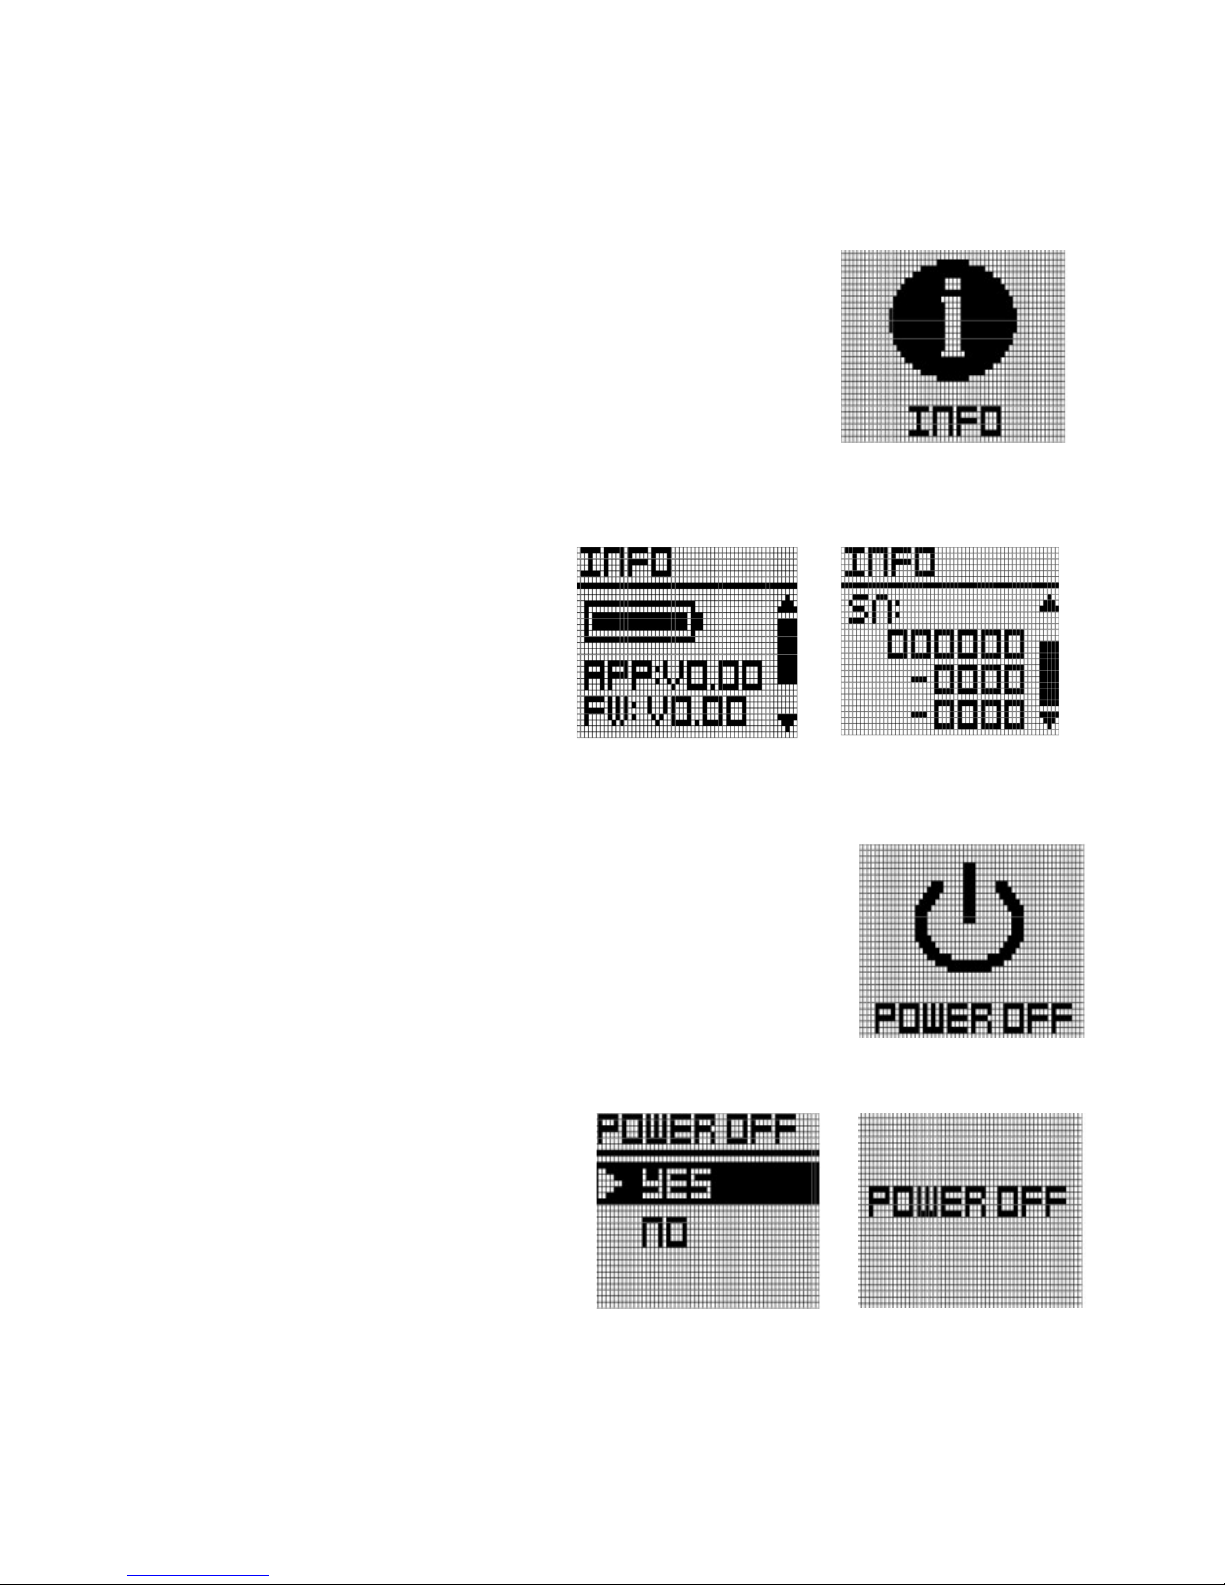
2.4 INFORMATION
To check the remaining battery, Application, firmware version and
serial number.
In Main Menu mode, press Button “UP” and “DOWN” to select "INFO"
function. Press button “OK” to activate this function.
Information of Battery Level, Firmware version and Serial No. will be displayed by using button
“UP” or “DOWN”.
APP : Golf application version
FW : Device firmware version
SN : Device serial number
2.5 POWER OFF
In Main Menu mode, press Button “UP” and “DOWN” to select
"POWER OFF" function. Press button “OK” to activate this function.
Press button “UP” or “DOWN” to select "YES" or "NO. Press button
“OK” to confirm your selection
If yes is selected and confirmed by button
“OK”, message "POWER OFF" will be
displayed for 5 second and the screen will be
turned off.
Press and hold “MENU” button for 2 sec in
OFF mode to activate the watch again
Page 10
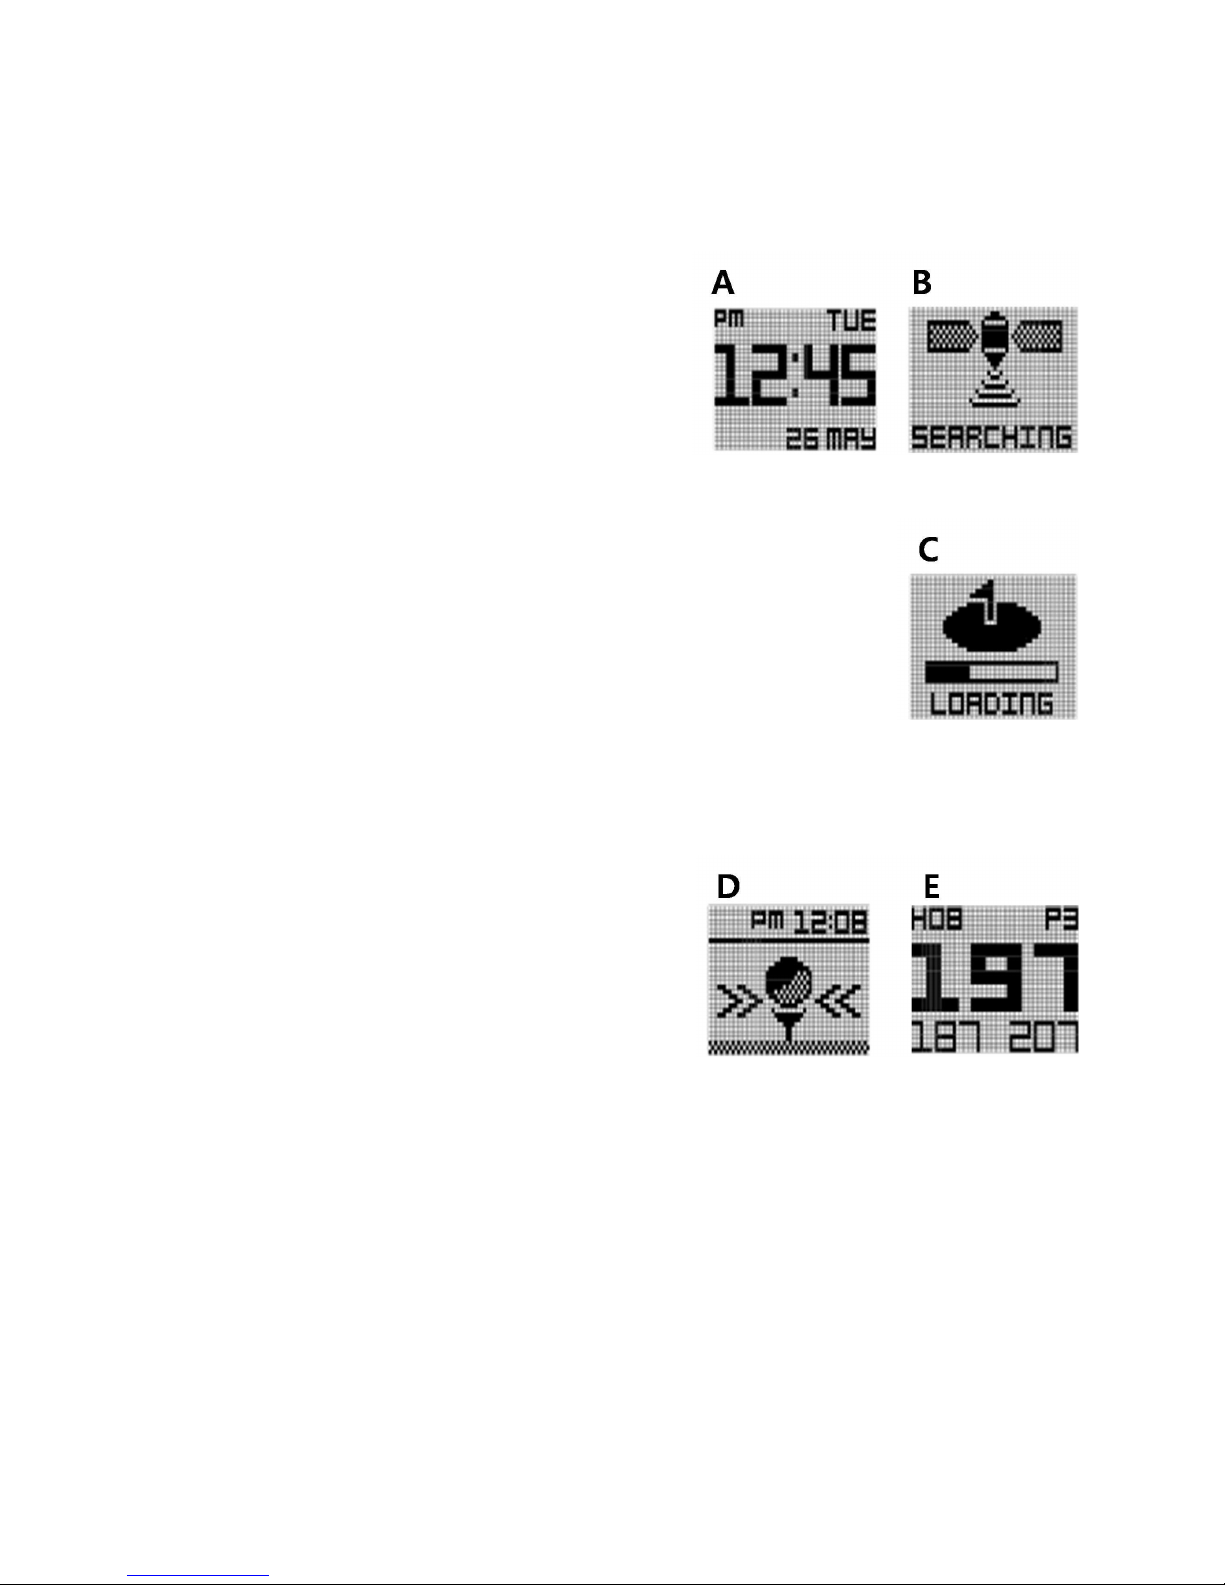
3. GOLF MODE
To enter Golf Mode, simply press the GOLF button
from the time mode.(Image A).
The screen show image B.
After selecting Golf Mode, the WT6 will search for satellite signal as
shown in the image to the left (image B). This can be cancelled by
pressing the “MENU” button once, and you will be returned to the time
mode. Once a satellite connection is established the WT6 will load the
golf course (image C.). This will take approximately 25 – 30 seconds. The
loading screen also shows the golf unit of measurement setting for
confirmation.
If you are not at a tee box after the golf course has
finished loading, the WT6 will prompt you to head to
the tee box (image D.). Once you arrive at your
starting tee box, the front, center, and back of the
green distances (FCB) screen will appear (image E.).
Note : To access Play Golf mode properly, you should be at the golf course. If you are not at the golf
course, the loading courses screen will display a "Go to Course". This will also display in the rare
occasion that you are at a golf course that is not currently mapped.
If your course is not mapped, please contact the Golf Buddy Course Department:
http://golfbuddyglobal.com/course library
Page 11
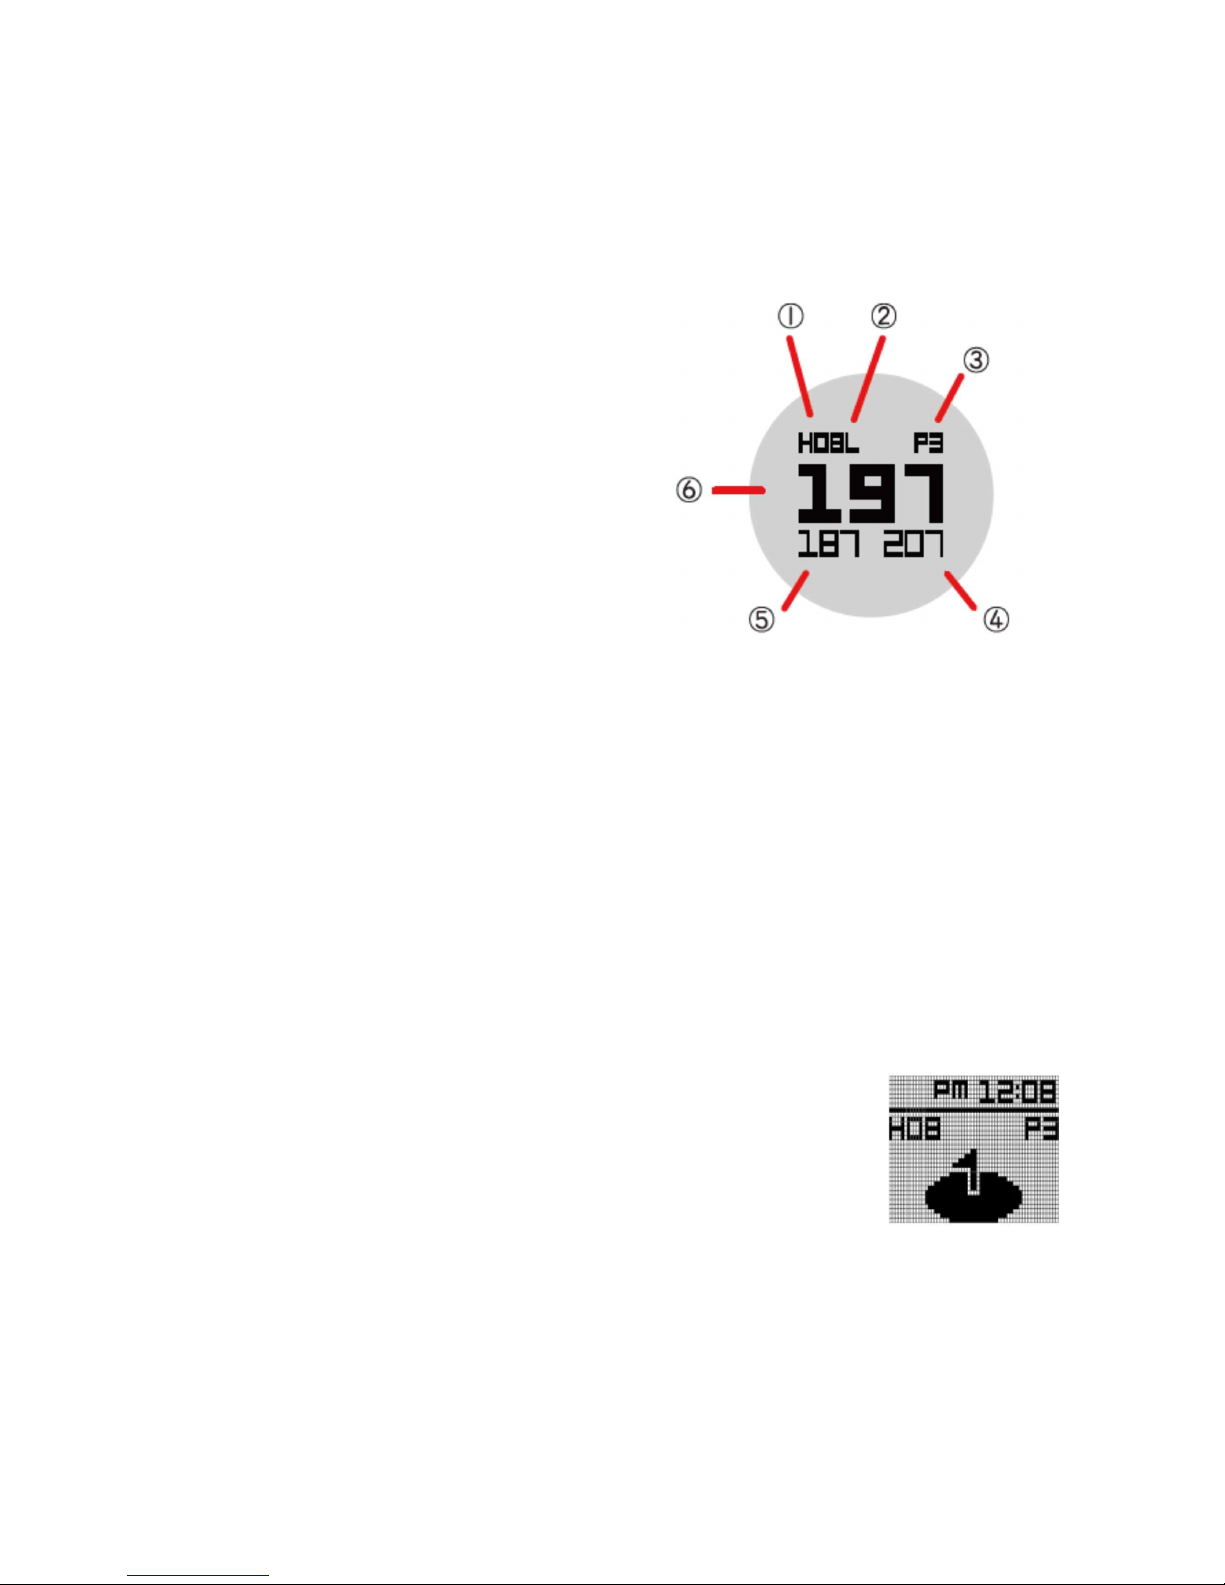
3.1 Front/Center/Back (FCB) Screen Overview
① Hole Number
Ex) H08 : 8th Hole of Total Golf course
② L/R Green information
③ Par Information
④ Distance to the Back of the Green
⑤ Distance to the Front of the Green
⑥ Distance to the Center of the Green
The WT6 watch will automatically advance to the next hole as you play through a course.
Please note that in rare instances it may be necessary to manually advance to the next hole
(UP button) or return to a previous hole (DOWN button). Pressing the OK button will cycle
through golf features. (FCB, Hazards, Information, Shot Distance)
If WT6 change to the wrong hole by passing through the adjacent hole, press DOWN long key
to return to the hole just played
Note : If the hole has a Left and Right green, you will see an (L) or (R)
between the hole number and par information. (This feature only
support Korea and Japan, the other country do not support it)
Note : When the distance to the center of the green is less than 20
yards, the WT6 will display a green-with-pin icon and the time.
Page 12
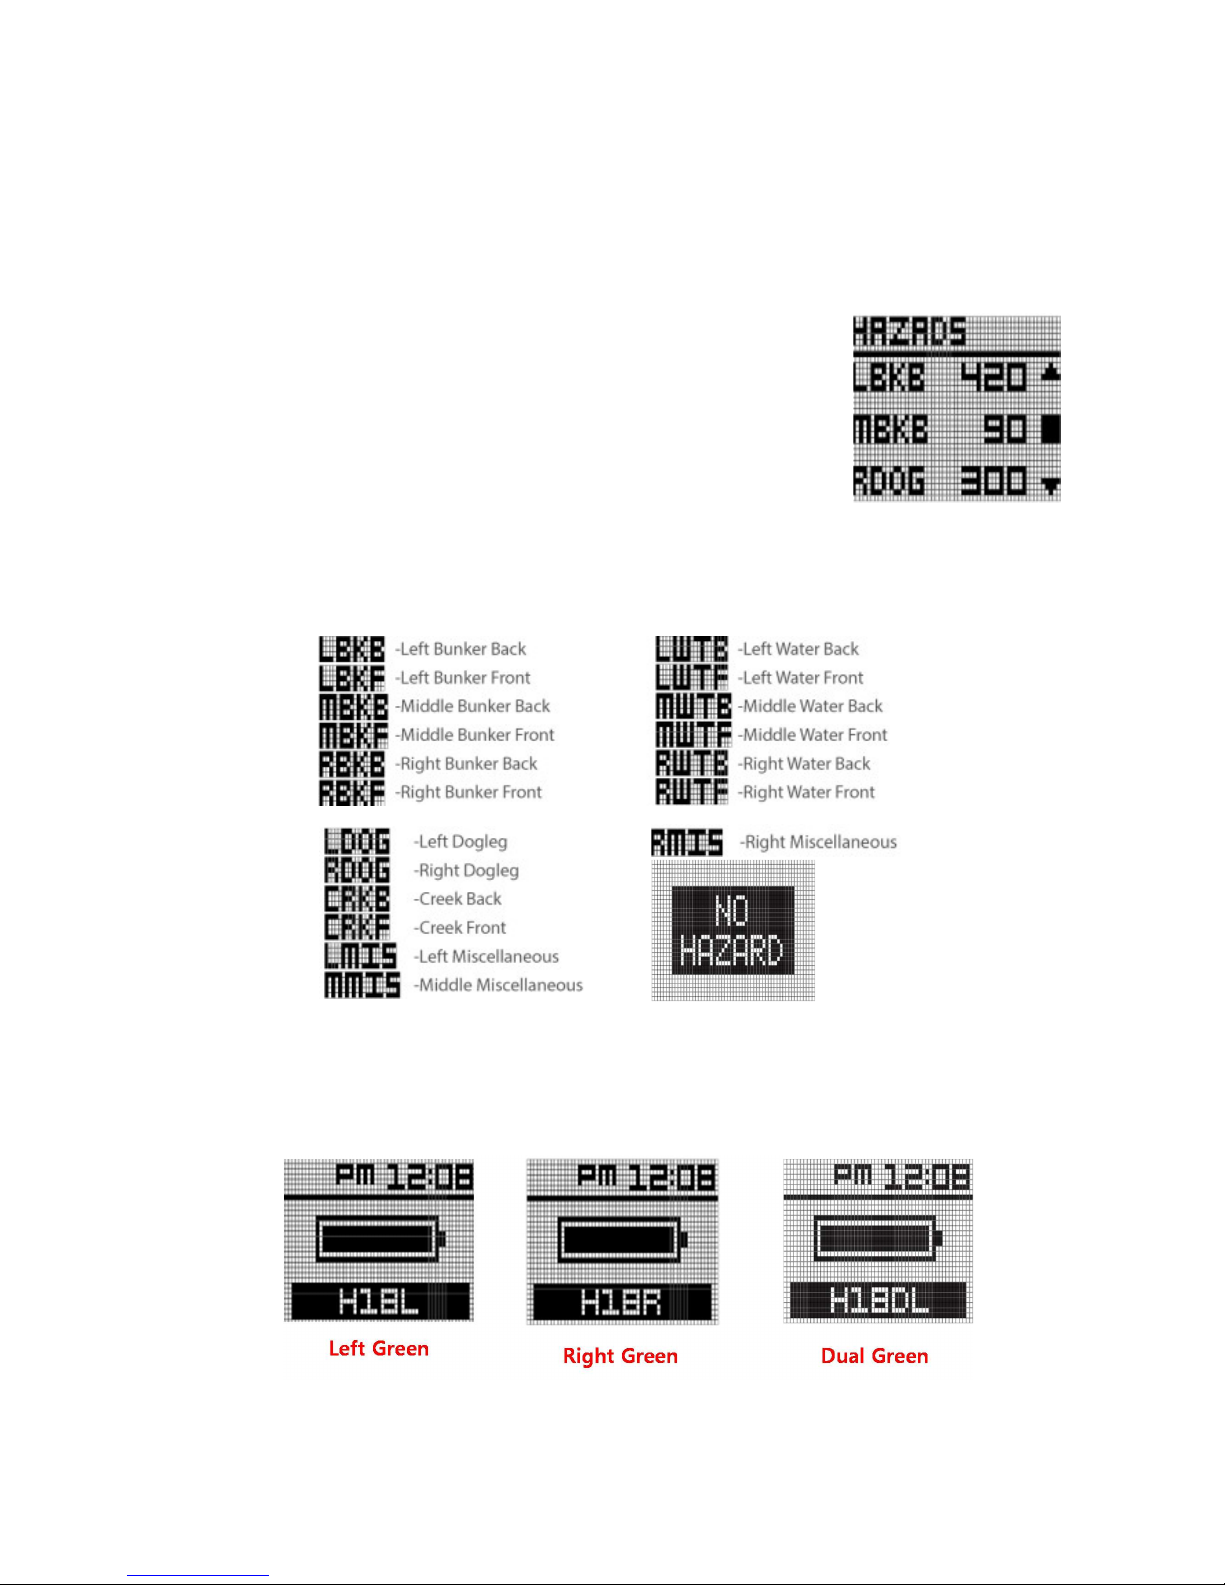
3.2 Hazards
To view the available hazards for your current hole, press OK button
from the FCB screen. The WT6 watch displays up to 11 hazards per
hole. Cycle through hazards using the UP button for next Hazard and
the DOWN button for previous hazard. Distance to the start point of
hazards display at the bottom of the screen, while distance to the end
point of hazards (if available) display at the top of the screen (Note:
only 1 distance provided at a time).
Below are abbreviation information of Hazards
One more pressing the OK button from the Hazards screen will show Green information
(Information screen) and remaining battery life. User can change green information, using the
UP button and the DOWN as below.
Page 13
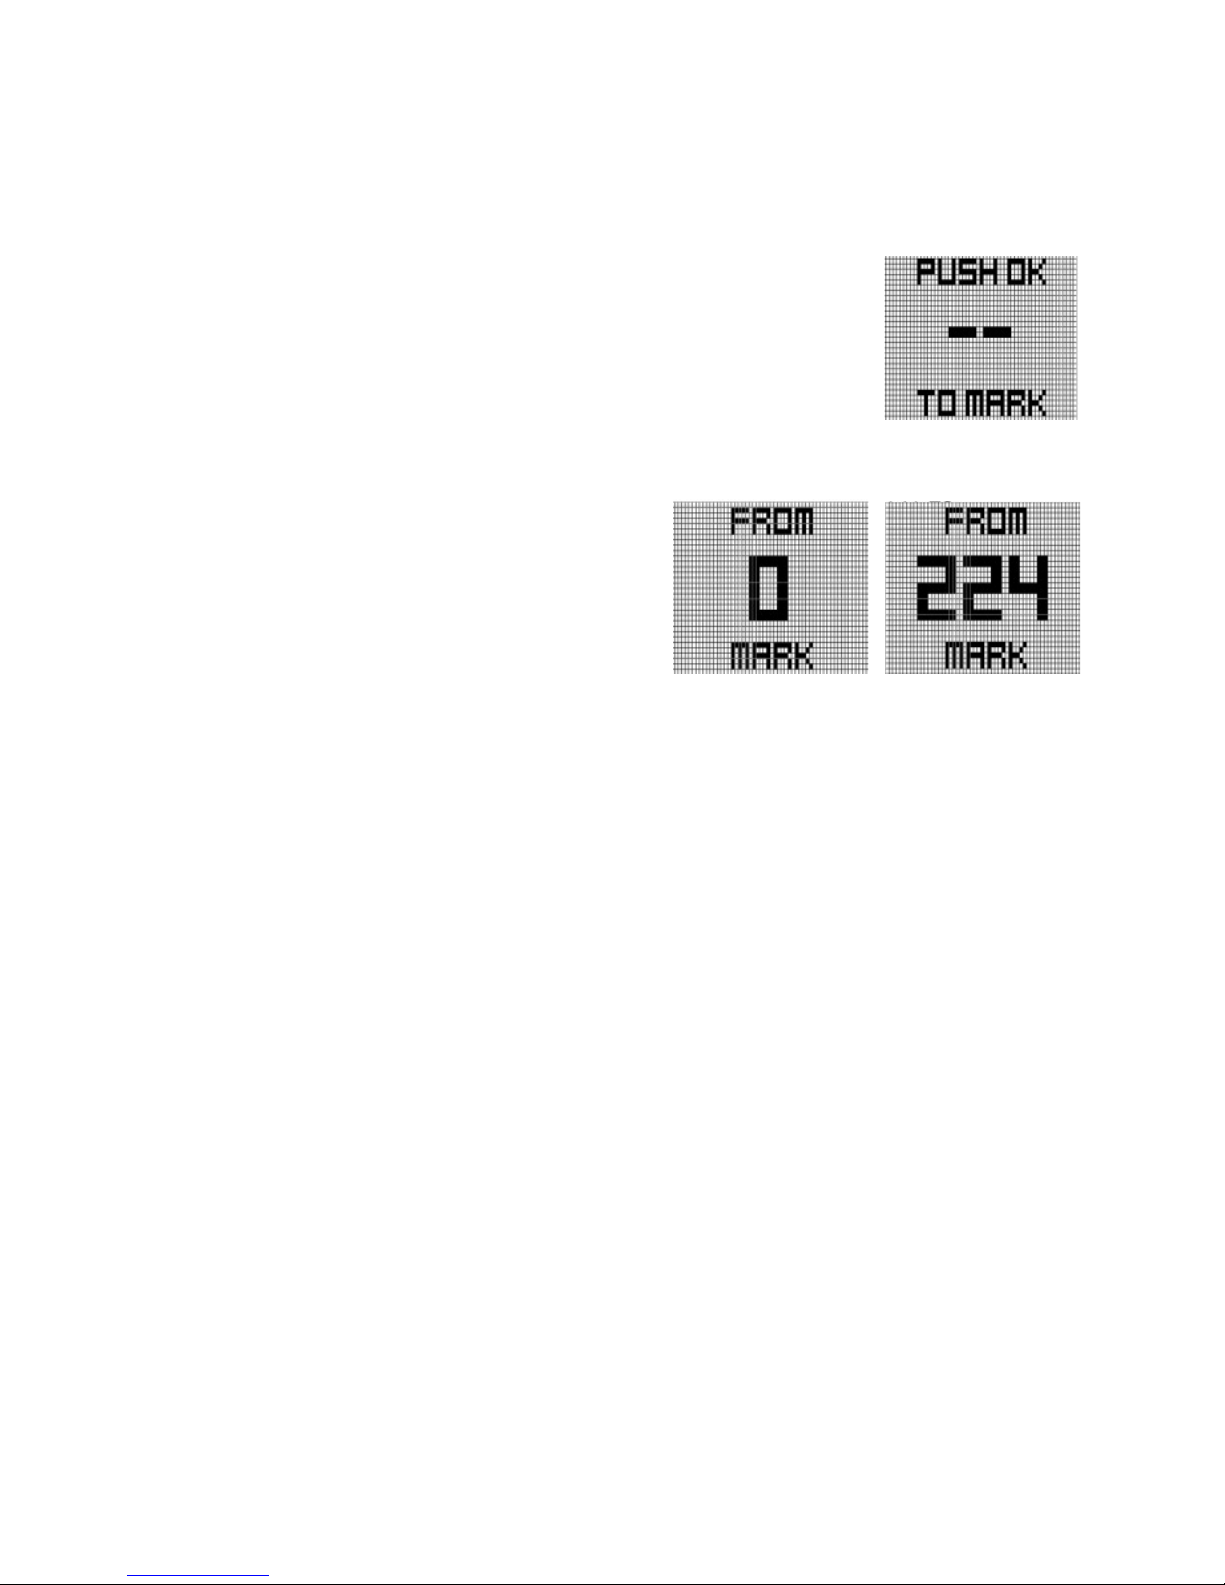
3.3 Mark Function (Shot Distance)
Mark Function is Shot Distance Measurement feature. To measure the
distance of any shot, press GOLF button at Golf play mode. Screen will
show right figure.
When standing at the location where the shot is
taken, press OK button to activate Mark Function,
then screen will change right.
Doing so will set the shot location (point A) to zero,
and the device will begin measuring distance as you
move toward your ball. Once you have made it to your ball (point B), the number displayed is
the distance between point A and point B in a straight line.
Pressing the OK button when user want to re-measure Shot Distance screen will show “0” above
screen.
Pressing one of MENU, UP, DOWN when on the Shot Distance screen will return to the FCB
screen. Active shot measurements will continue in the background, and can be viewed by cycling
back to the Shot Distance screen.
Note : Shot data will reset when a hole advancement occurs (automatic hole advance or manual
hole advance).
3.4 Time check when Golf mode
To check time when FCB screen, press MENU button. Then, screen show right figure.
This screen shows the current time, date, current hole number, and current green information
(Left, Right, Dual).
Page 14
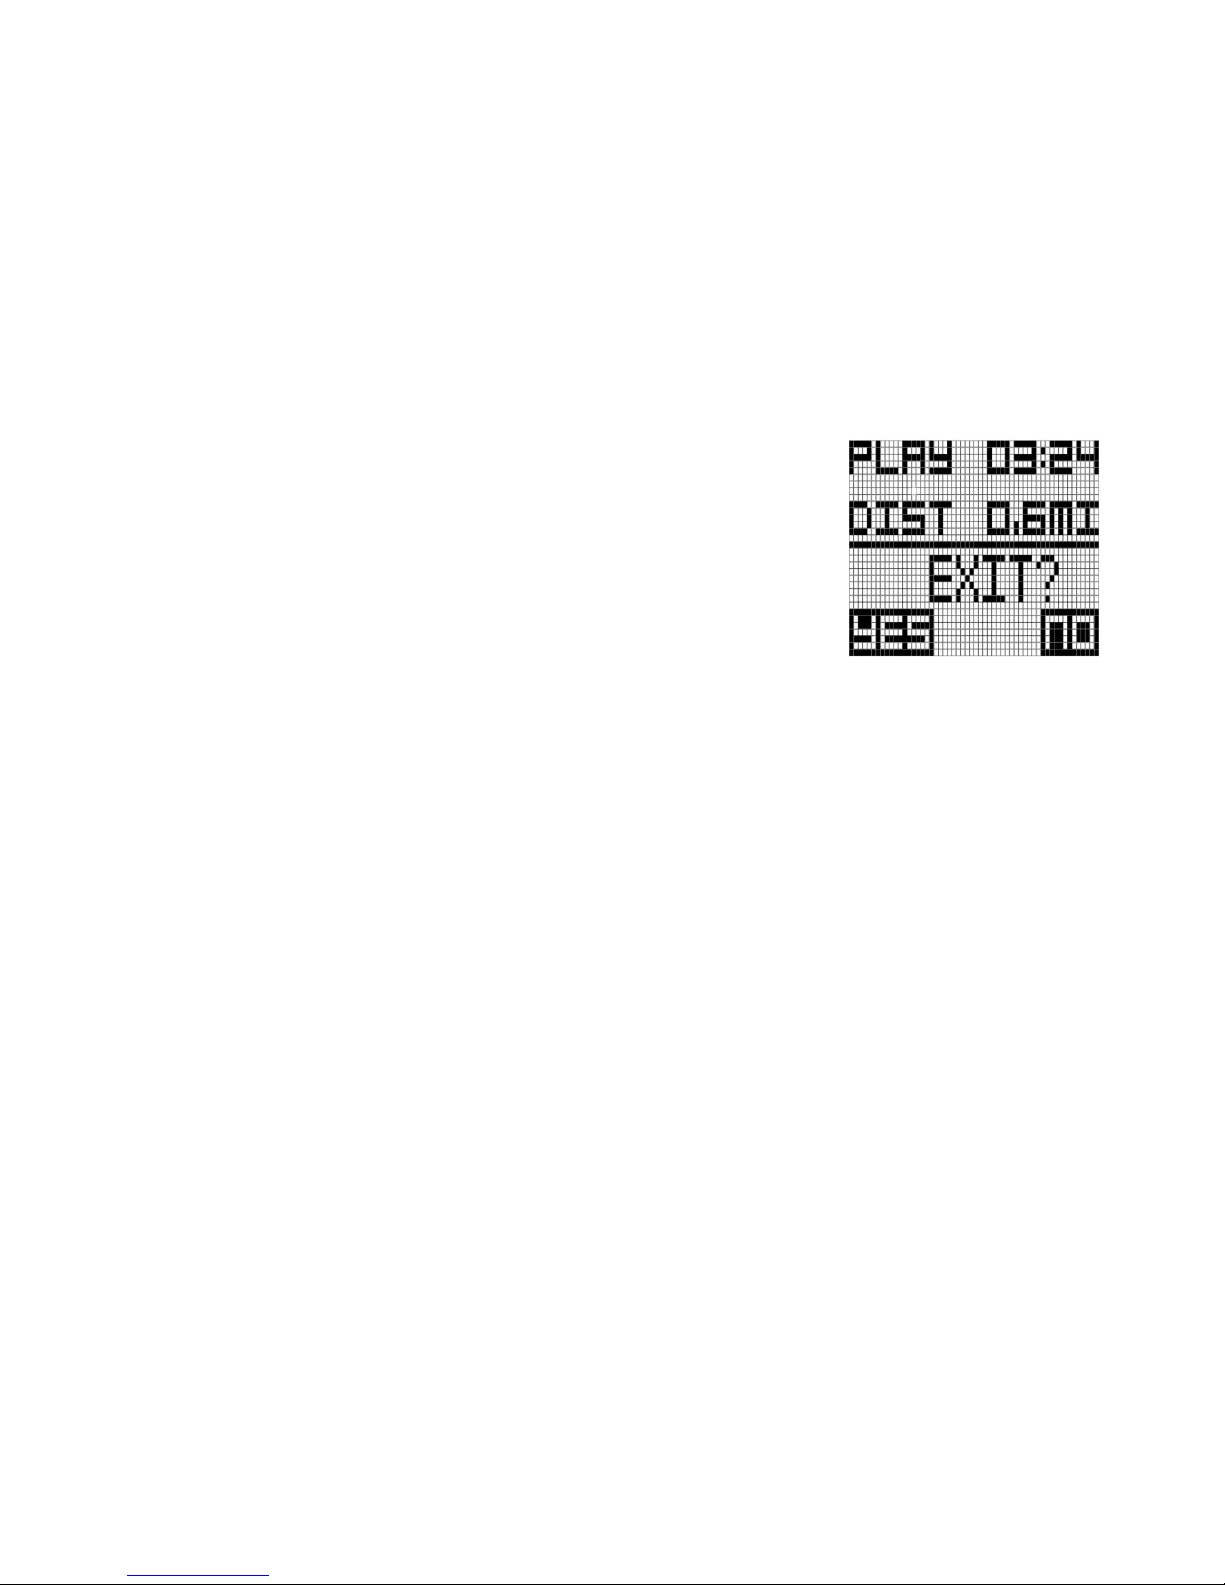
After 10sec, automatically return to FCB screen from time check screen, or press any buttons
will return to FCB screen
3.5 Exit Golf play
To Exit Golf play, press and hold MENU button during 3seconds, the
WT6 will display a prompt to confirm your selection. If you want to
finish golf play, press the MENU button to confirm your selection. You
will then see the End of Golf play Summary.
Alternately, If you want to keep the golf play, press the DOWN button
to return to Golf Mode.
Page 15

4. CARE & MAINTENANCE
The WT6 GPS Golf Watch is water resistant. To help ensure reliable operation, the following
care and maintenance guidelines are recommended:
• Avoid exposing the device to extreme environmental conditions for prolonged periods of time.
• Avoid severe impacts on the device.
• You may clean the device occasionally with a soft, damp cloth.
• Brush the clip contacts on the bottom of the device regularly. Debris accumulation may affect
charging & data transfer. Use a soft-bristled brush. Hard bristles or wire brushes may scratch
the device.
• DO NOT expose the device to strong chemicals such as alcohol, gasoline, etc. as they will
damage the device.
• Store the device in a dry place when not in use.
WARNING
• DO NOT attempt to open the WT6 watch. Risk of explosion if battery is replaced with incorrect
type.
• DO NOT attempt to open, disassemble, or service the internal battery, the battery MUST be
replaced by a qualified technician.
• DO NOT crush, puncture, or short the battery’s external contacts. DO NOT expose to
temperatures above 140º F (60 º C).
• Properly recycle or dispose of the battery. DO NOT dispose in fire or water.
Legal Disclaimer
By using this product, you agree that Deca International Corp. will not be held legally responsible
for any injury or damage to you or any person or property caused by the user’s improper
operation and/ or poor judgment while using this product.
Additional Information
The Global Positioning System (GPS), a network of 32 satellites orbiting the Earth, is operated
and maintained by the U.S. government. This GPS device requires at least 3 acquired satellites
to accurately determine your position. Any change made
Page 16

5. UPGRADE
Your GolfBuddy WT6 unit has been pre-loaded with the latest firmware and world-wide course
maps available at the time of manufacture, so it’s ready to play right out of the box. For optimum
performance and longer product life, we recommend that you register your unit and keep it
updated with the latest course maps and updates for free. The instructions below will provide a
step-by step guide on how to register and update your GolfBuddy WT6.
5.1 Downloading the GolfBuddy Management Software (GB Manager) to your computer:
• Please visit our website at www.golfbuddyglobal.com
• Click on the panel titled “Download GB Course Manager.” You will then see a screen with an
option to choose either Windows or Mac based software.
• Click on the correct version for your computer. Once downloaded, you can run the application
to install the GB Manager on your computer.
• Once completed, you will see a blue icon labeled “GolfBuddy World Course Manager” on your
desktop. Use this to access the GB Manager once you have registered.
5.2 Creating a User ID:
• Open the GB Manager application by clicking on the blue icon on your desktop.
• You will see a Login Panel . Click on “Sign up” at the bottom. This will bring up a webpage for
you to create your User ID and Password.
• Fill in all the details that are required ( indicated by " * " ). Please note the instructions regarding
no Caps, Symbols, Spaces, & a 4-15 character-long requirement. You will need to click “Check
Availability” to verify your selected User ID is valid and not already being used.
• Click “Submit” at the bottom of the form when finished.
• Your User ID and Password are now created...Make sure to write them down and keep
them in a safe place in case you forget them!
Page 17
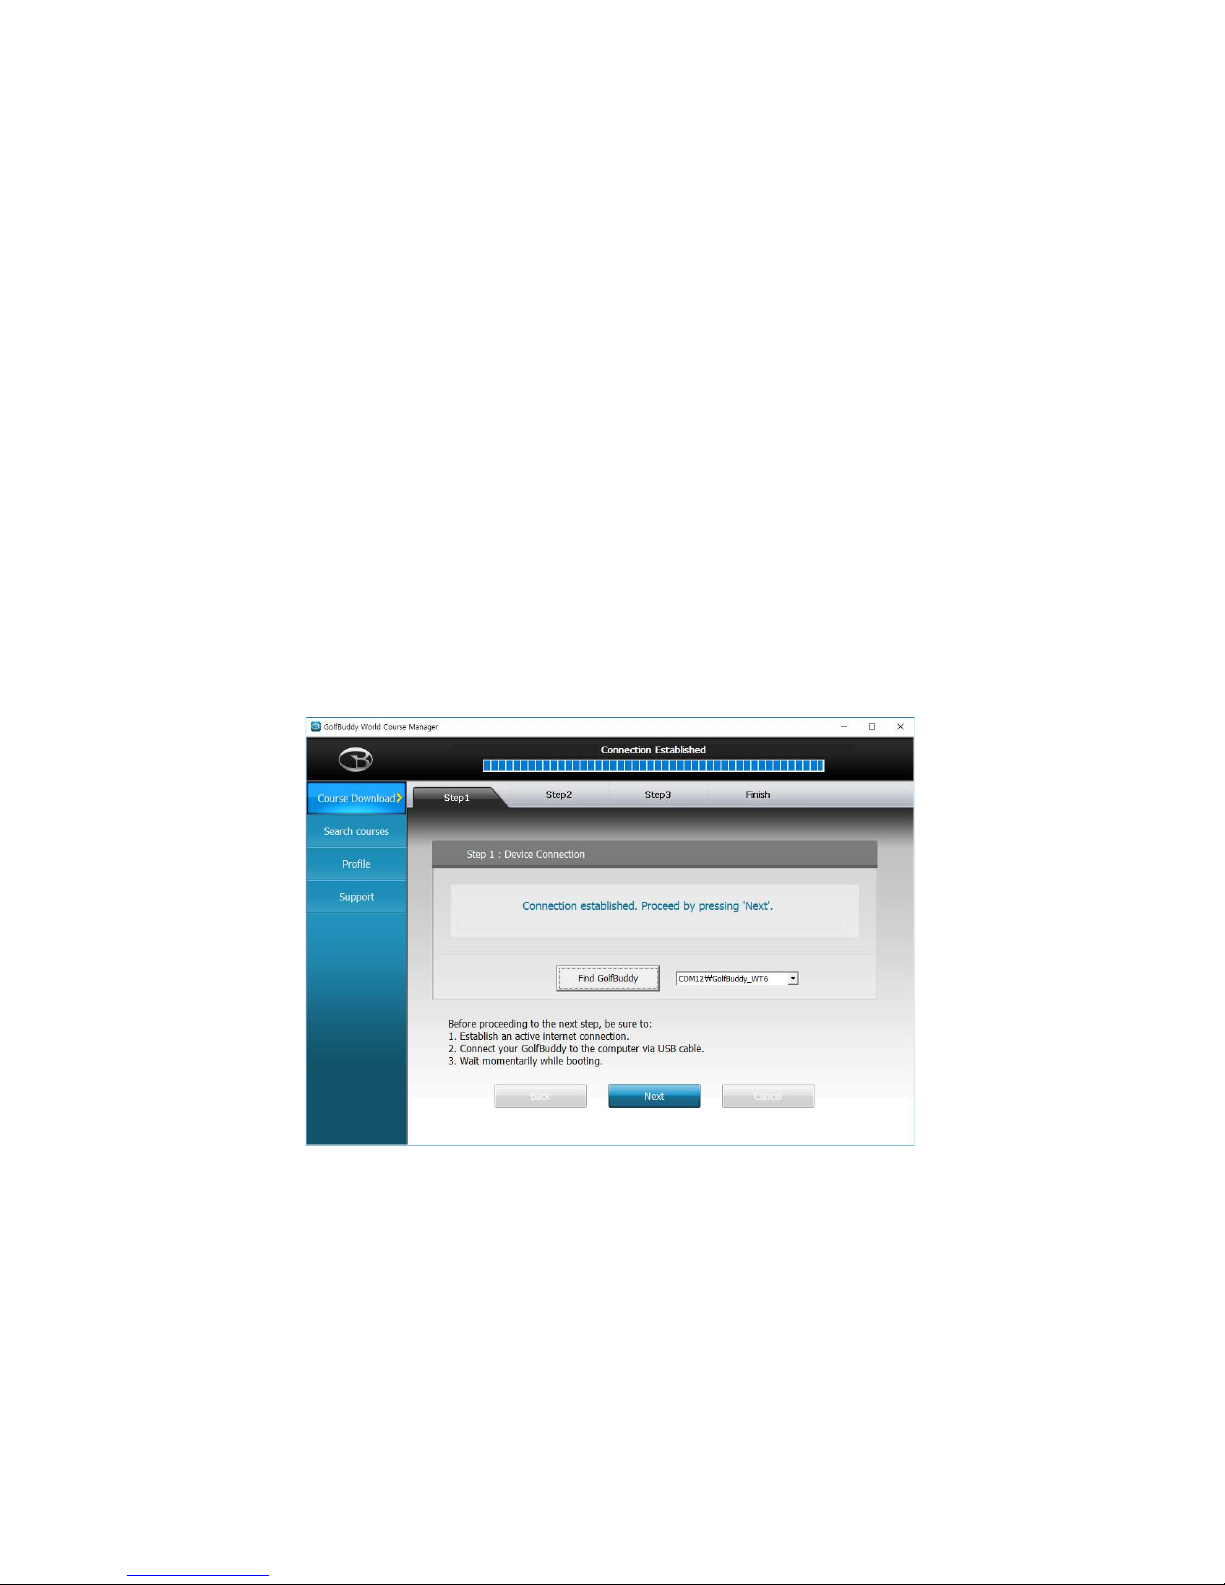
5.3 Registering your GolfBuddy WT6:
Connect your GolfBuddy unit to a USB port on your computer using the USB cable provided
with the unit.
• After a short time, your GolfBuddy unit should show an icon on the screen indicating it is
connected to the computer.
Notes: Disregard any driver download requests that your computer may say is required.
• Click on the blue GB icon on your desktop and open the Login Panel.
• Enter your User ID and Password. You should now see a panel that indicates the GB Manager
is searching for the device.
After a short time, you will
see “Connection Established”. At this stage, your unit is successfully registered to your account
that you created.
Page 18
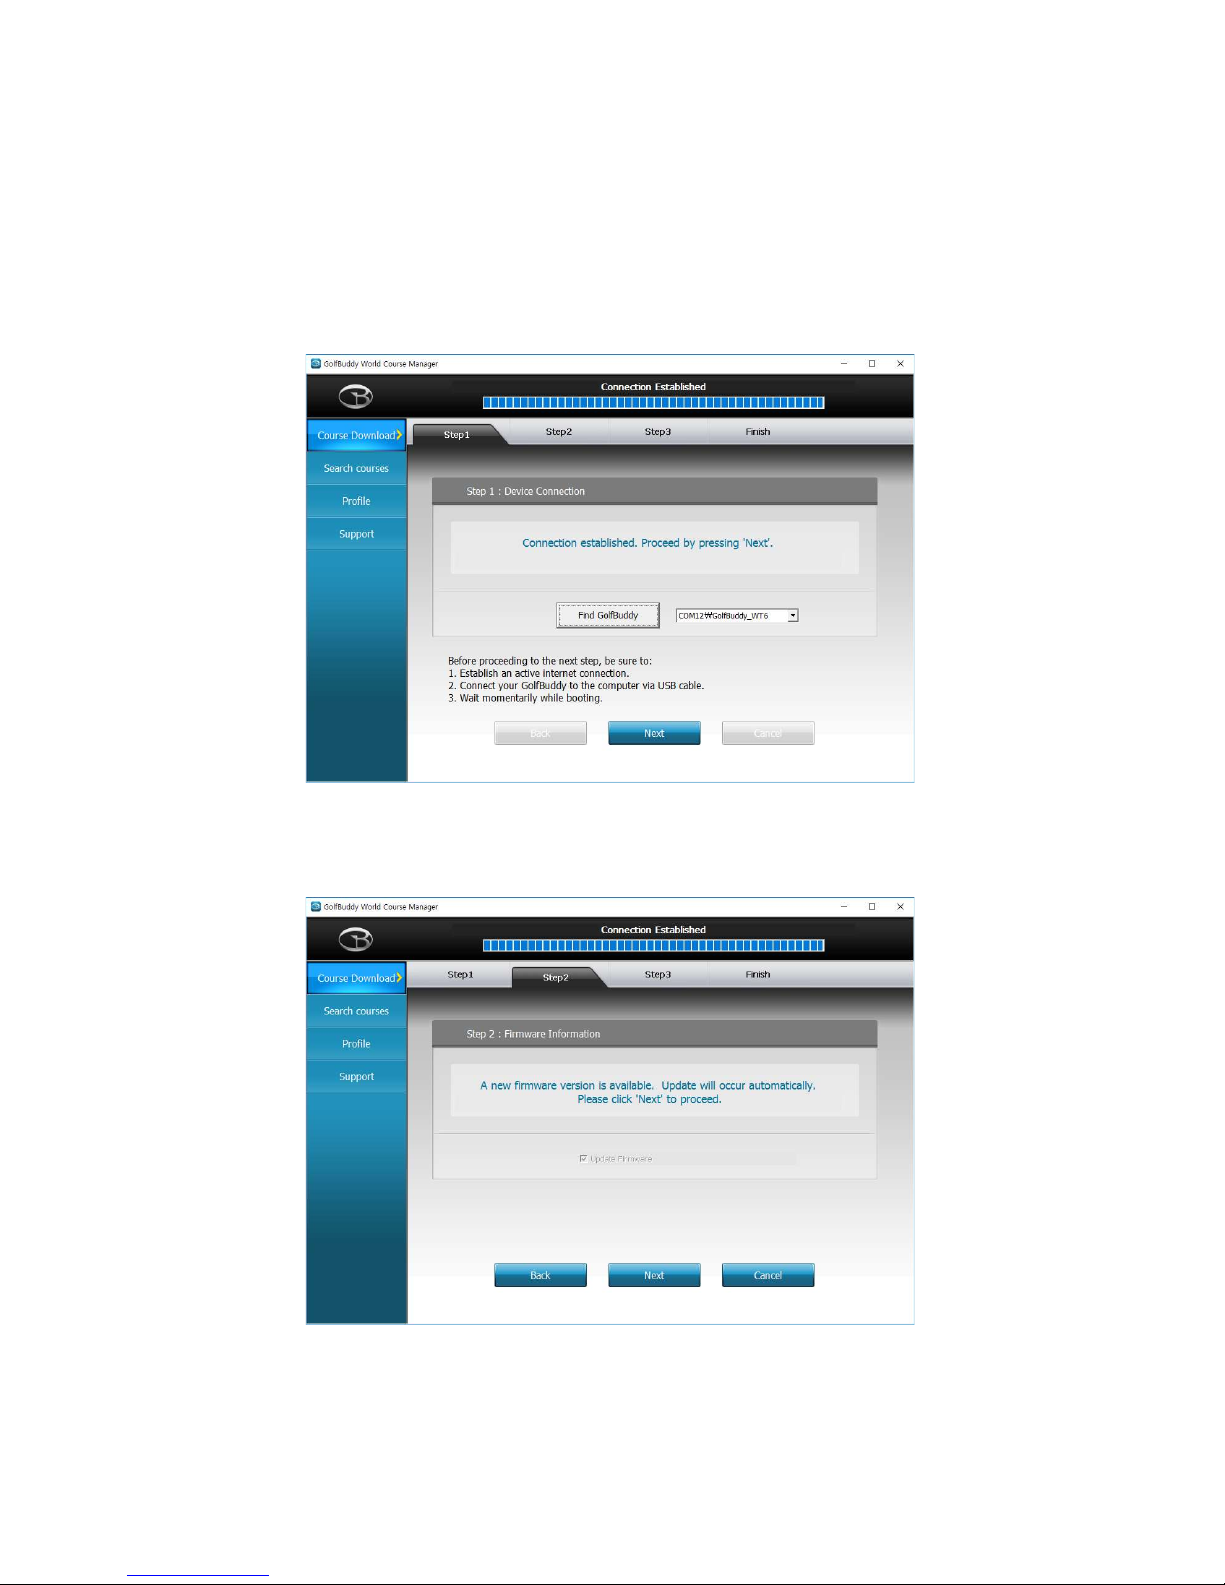
5.4 Updating your GolfBuddy WT6 in three Steps:
Step 1. Once you get the “Connection Established” message, please click “Next” to proceed to
Step #2: Firmware Update.
Step 2. At step 2, click “Next” to install the latest firmware. If the firmware is already up to
date, click “Next” to proceed to step 3.
Page 19
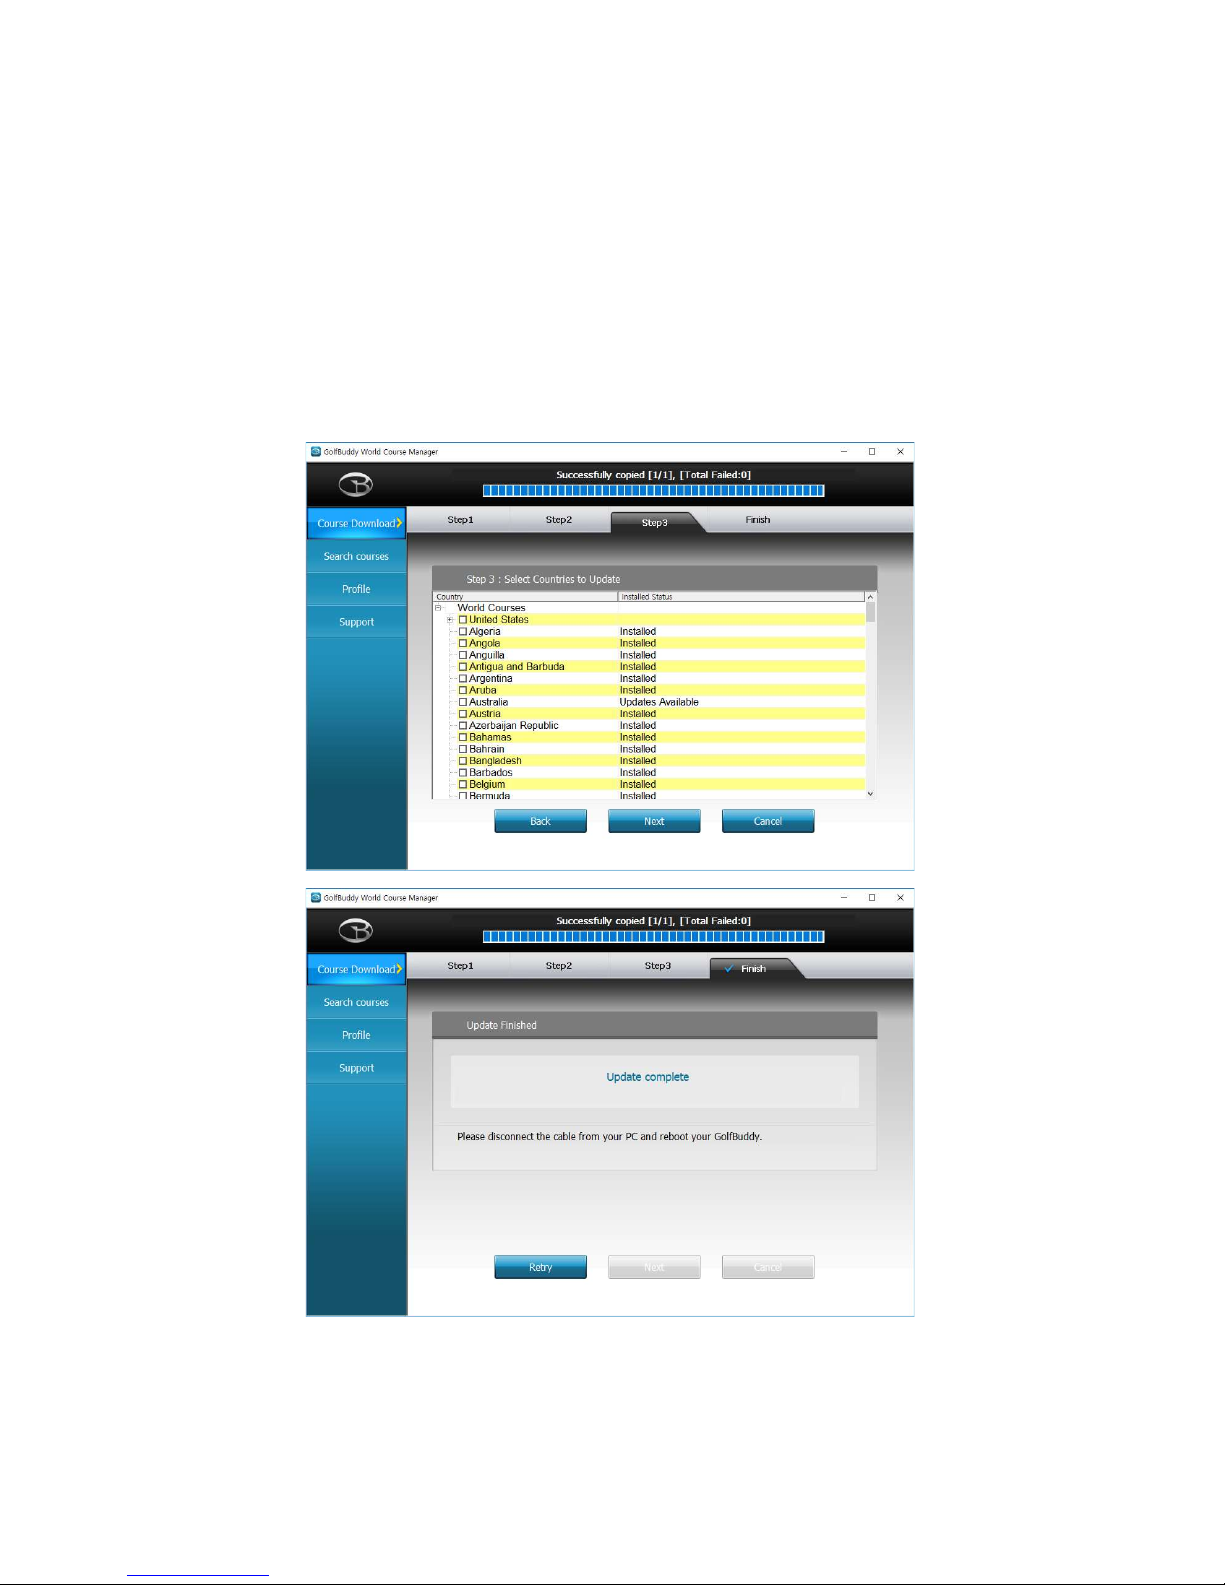
Step 3. Select the countries that you would like to update and click “Next”. You will see a
panel that asks you to “Overwrite” or “Newly Updated Only”. Select your preferred option, then
click “OK” to start the course update. Once all the courses have been downloaded you will
receive a message “Update Complete”. You can now disconnect the unit. Your GolfBuddy is
now ready to go with the latest updates!
Page 20
Note: Do not disconnect the WT6 from the computer during the update process to prevent software
malfunctions.
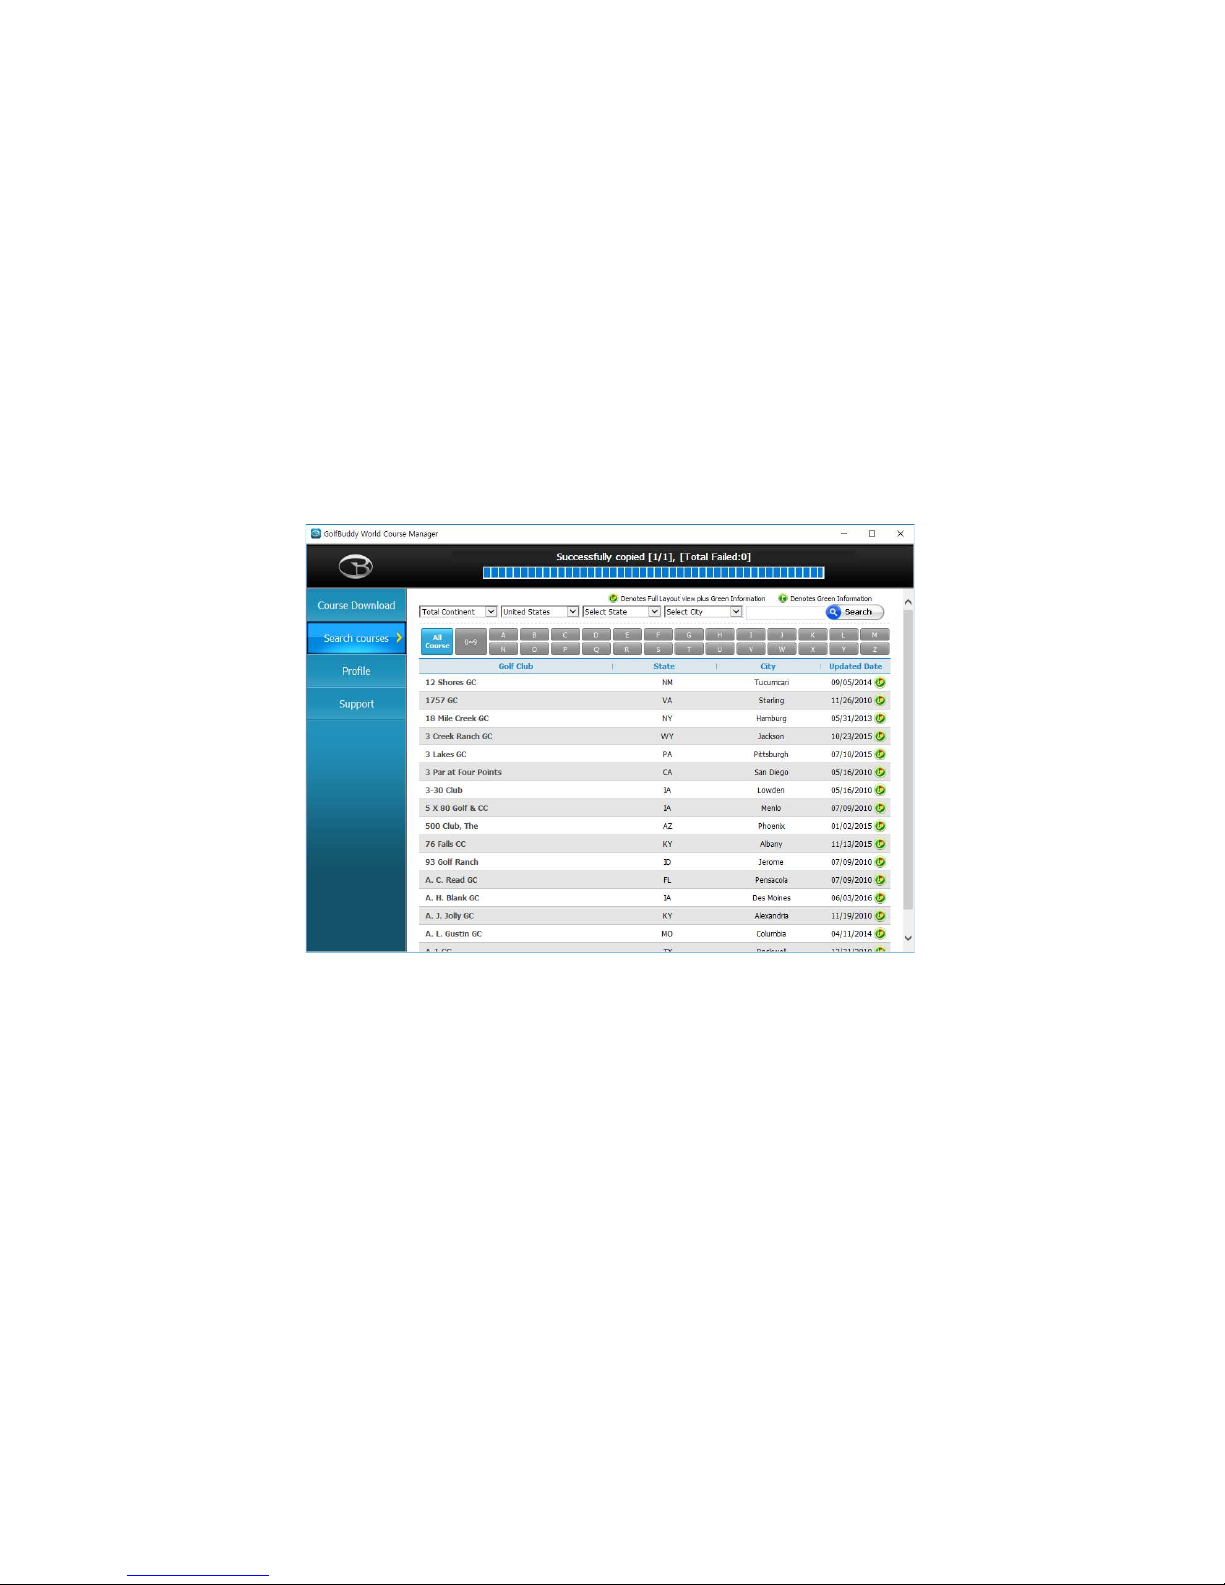
5.5 Updated Course Info
You can search courses by country, state, and city. You can also check to see when the course
was last updated.
Page 21
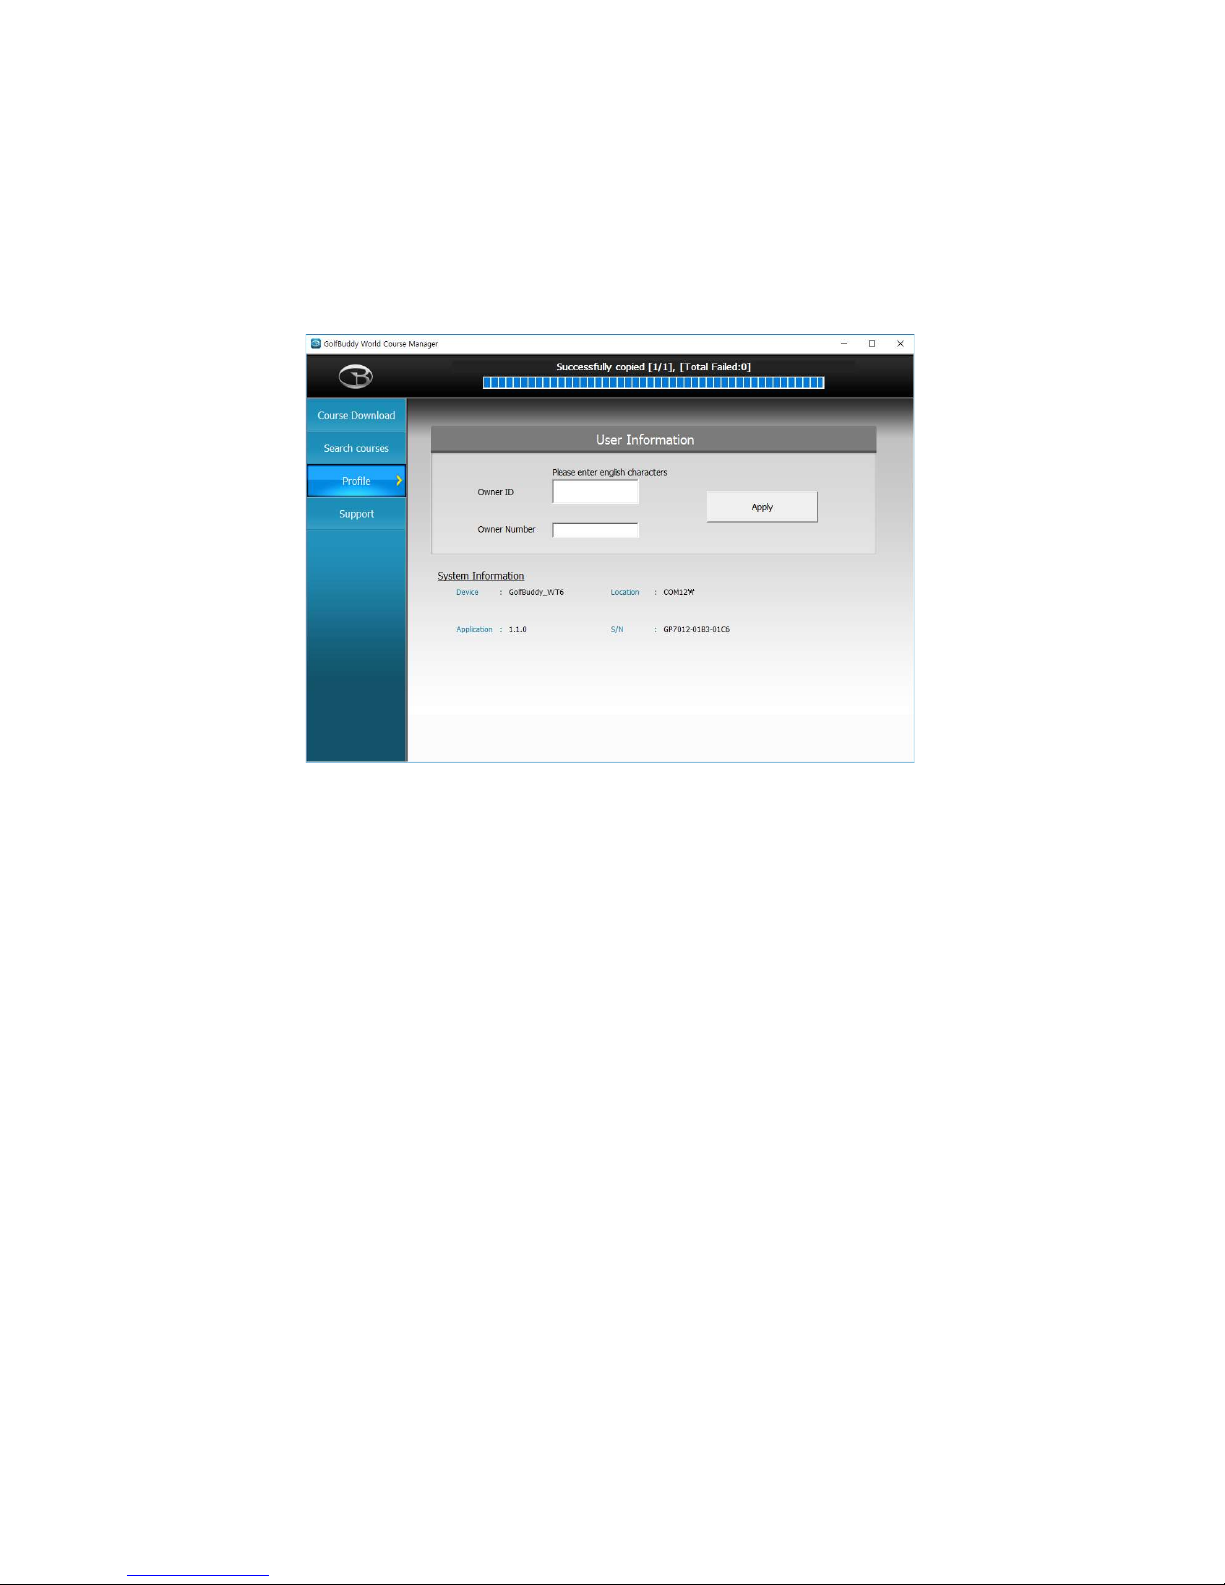
5.6 Profile Info
System Information for your WT6 can be found under the profile tab.
 Loading...