

Page 1

CONTENTS
Page 2

CONTENTS
1. GETTING STARTED
2. BASIC OPERATIONS
3. ADVANCED OPERATIONS
4. SOFTWARE UPDATES
Page 3
5
Thank you for choosing GolfBuddy.
The GolfBuddy WT4 is a feature-rich lifestyle GPS watch
that brings fashion and function to one device. The slim
watch design offers both digital and analogue watch
features that you can wear on and off the course. As
with all other GolfBuddy products, the WT4 comes
preloaded with over 37,000 course information & free
lifetime course & software updates, in more than 130
countries around the world.
Page 4
76
1
2
3
4
5
6
7
8
9
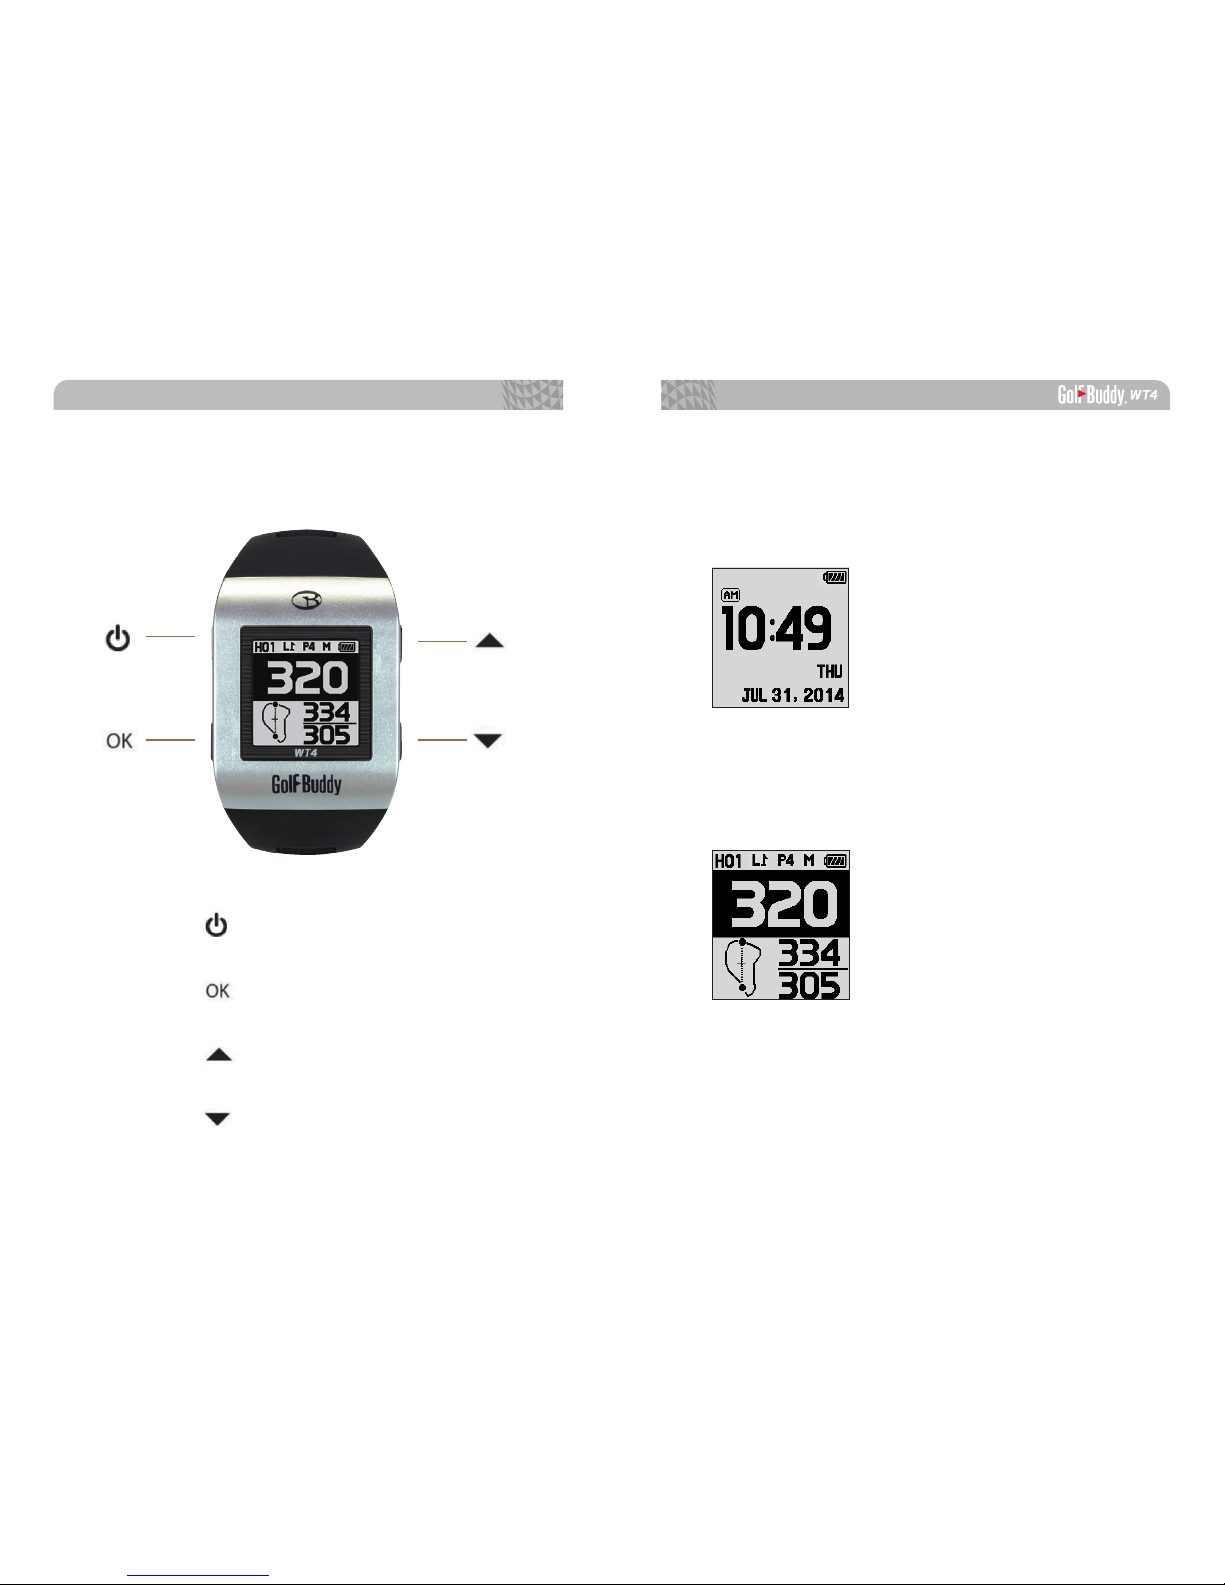
Hole Number
Left/ Right Green
Par Info
Meters (In Yards if not indicated)
Battery Indicator
Dynamic Green View
Distance to the Center of the Green
Distance to the Back of the Green
Distance to the Front of the Green
1
2
3
4
Time
Day
Date
Battery Indicator
⦾
Play Mode Screen
Up / Mark
Power / ESC
Menu / Select
Down / Score card
⦾
Watch Mode Screen
5
6
7
9
8
3 421
1
4
2
3
Screen OverviewButton overview
Page 5
8 9
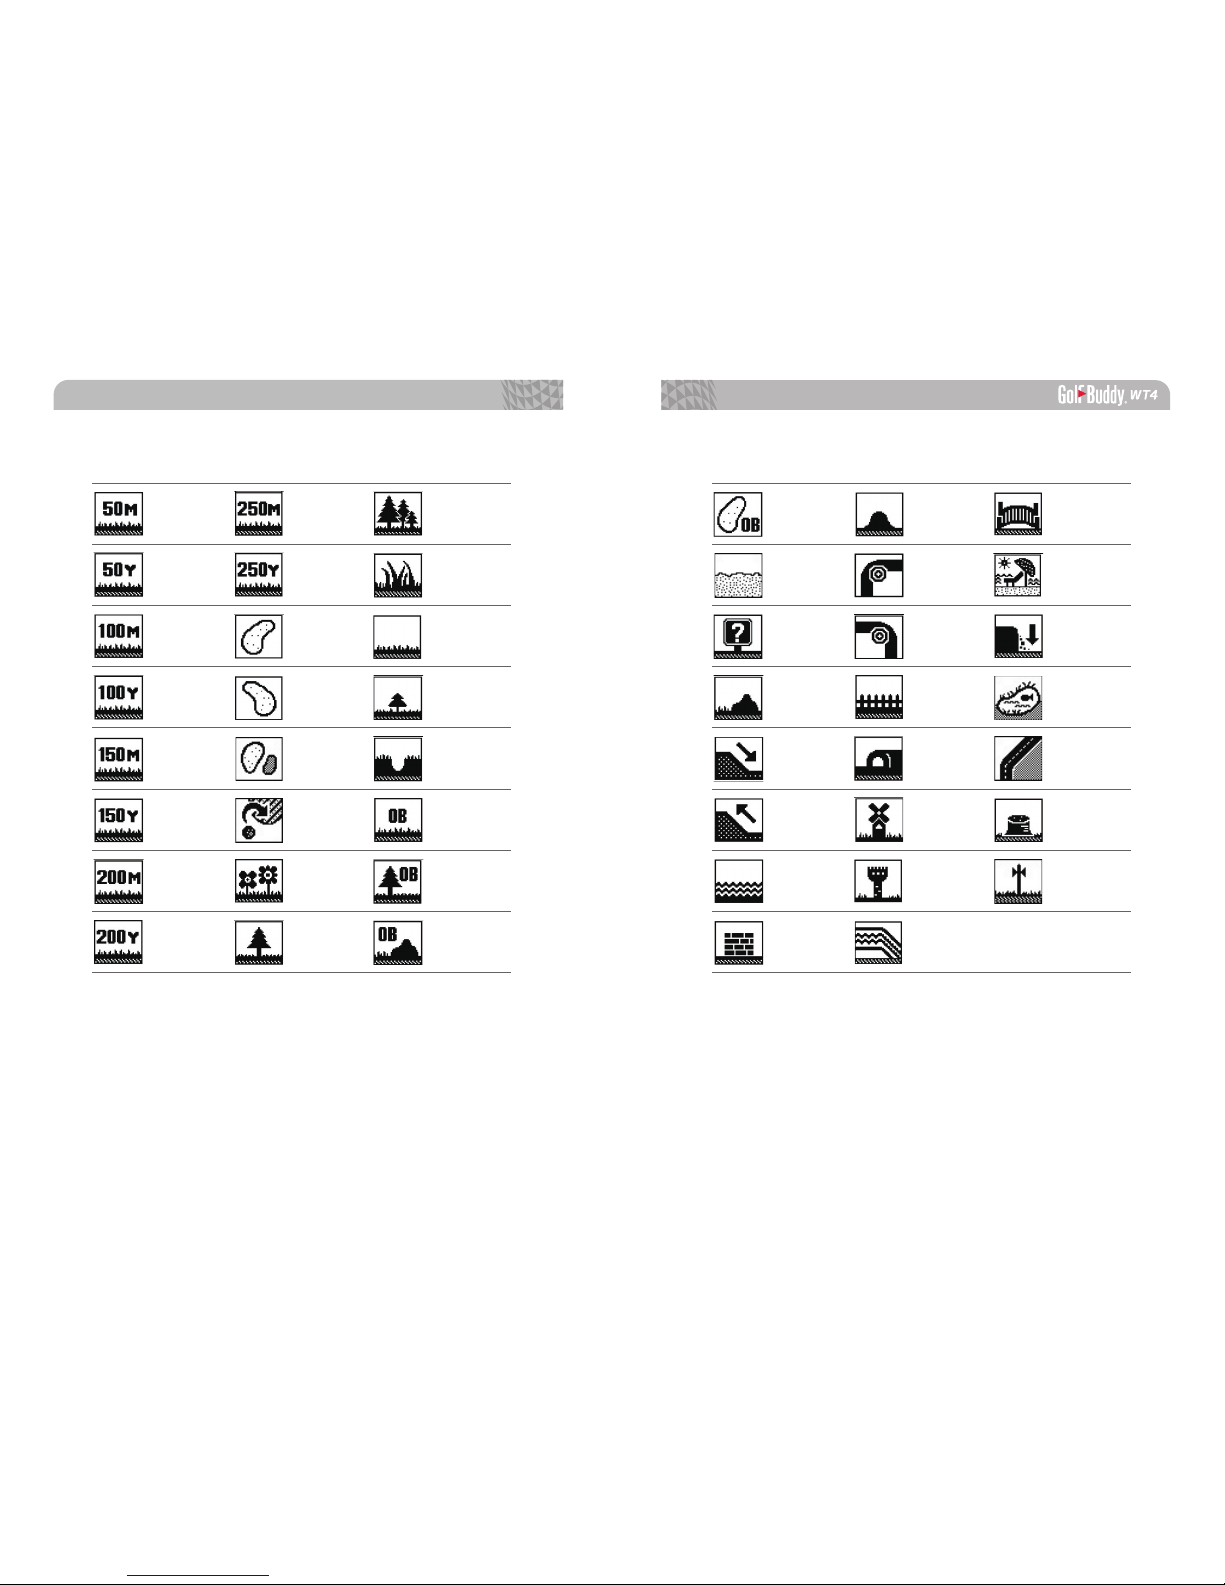
Target Icon Information
50Yardpost
Sand Box
50Meterpost
OB + Bunker
250Yardpost Right Dogleg
250Meterpost
Hill
Bush Beach
Trees Bridge
100Meterpost
TargetLeft Bunker
Left Dogleg
Rough Cliff
100Yardpost
RockRight Bunker FenceShort Tree Pond
150Meterpost
DownhillBunkers CaveHole Cart Path
150Yardpost
UphillFairway
Windmill
Out of Bound
Stump
200Meterpost
Water
200Yardpost
Wall
Garden To wer
Tree Creek
OB + Tree Pole
OB + Rock
Page 6

1. GETTING STARTED
Page 7
12 13
GETTING STARTED
1.1. Power On/Off
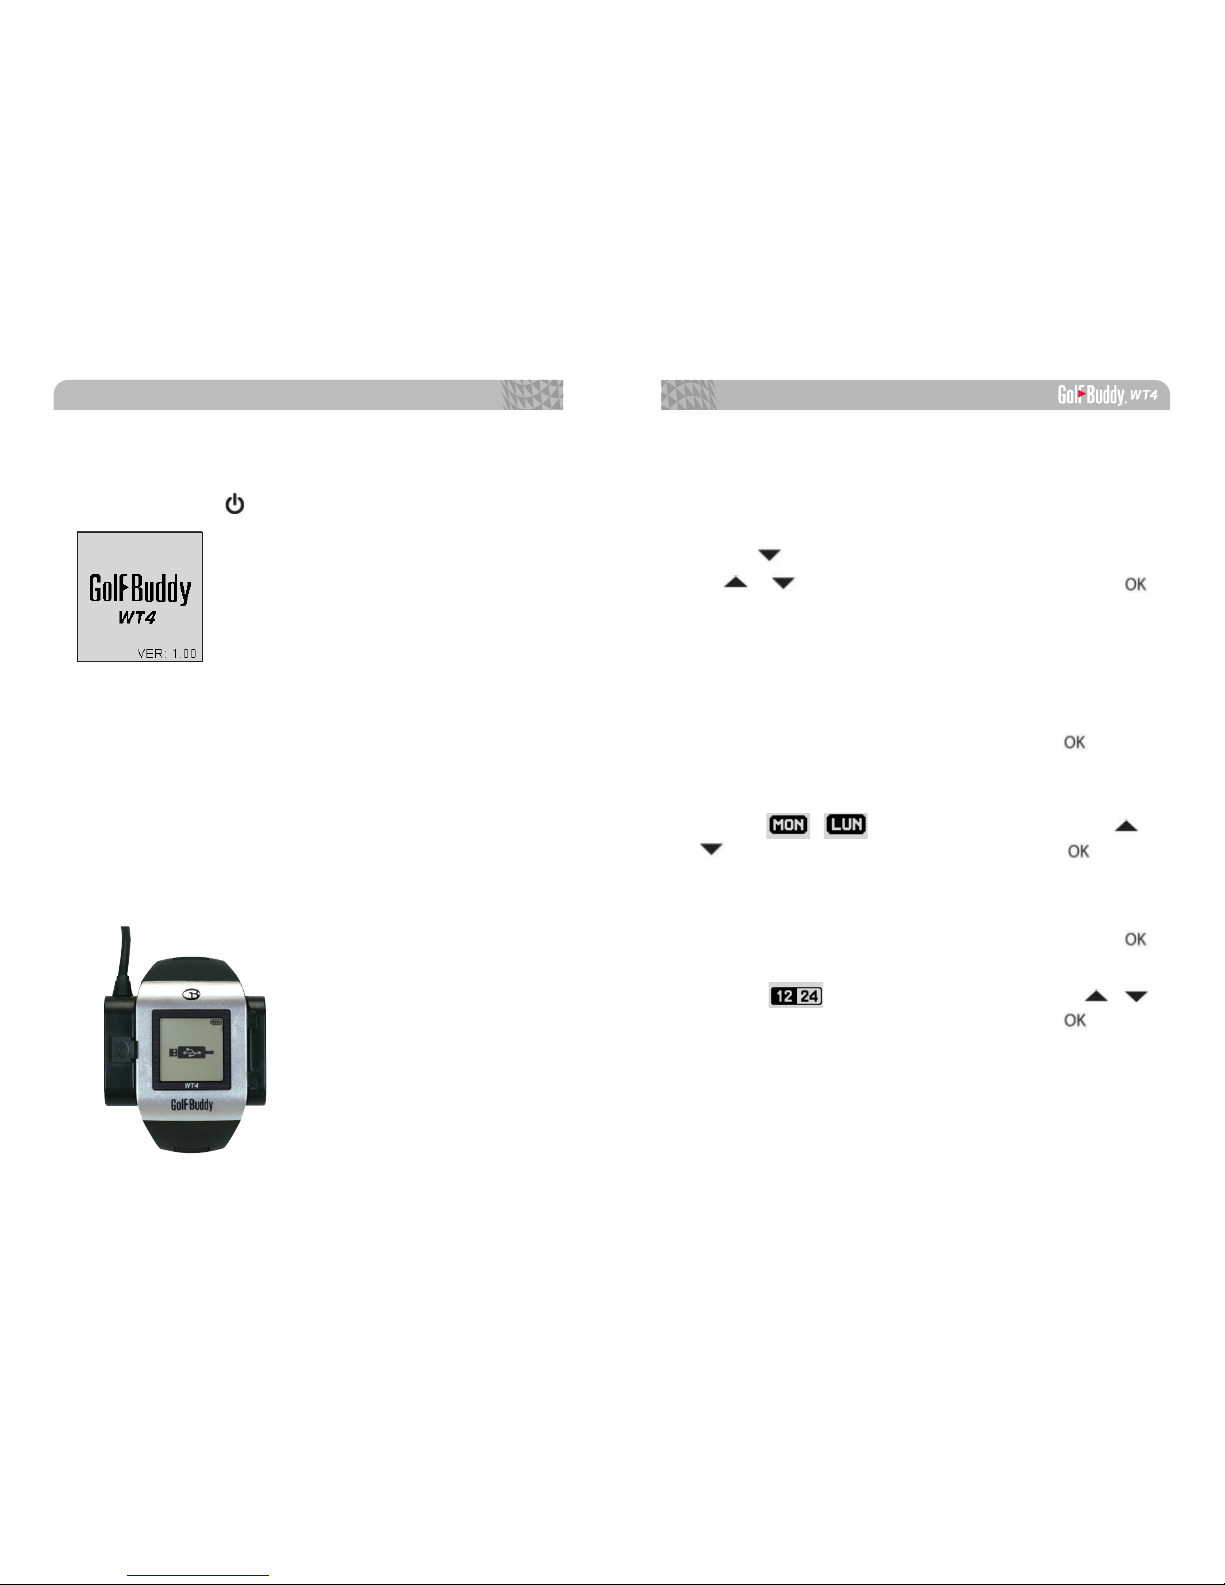
Press and hold the button to turn on/off the device.
1.2 Charging
You can charge the device by inserting the device into the
charging dock as depicted in the picture below. Align the
charger posts with the two buttons on the right side of your
WT4 unit, and tilt it so that the right side goes in first. Then,
press the unit down until it clicks. The battery indicator will
displaywhile charging and will displaywhen fully charged.
To release, slide the GB icon on the left side of the charger
over to the left.
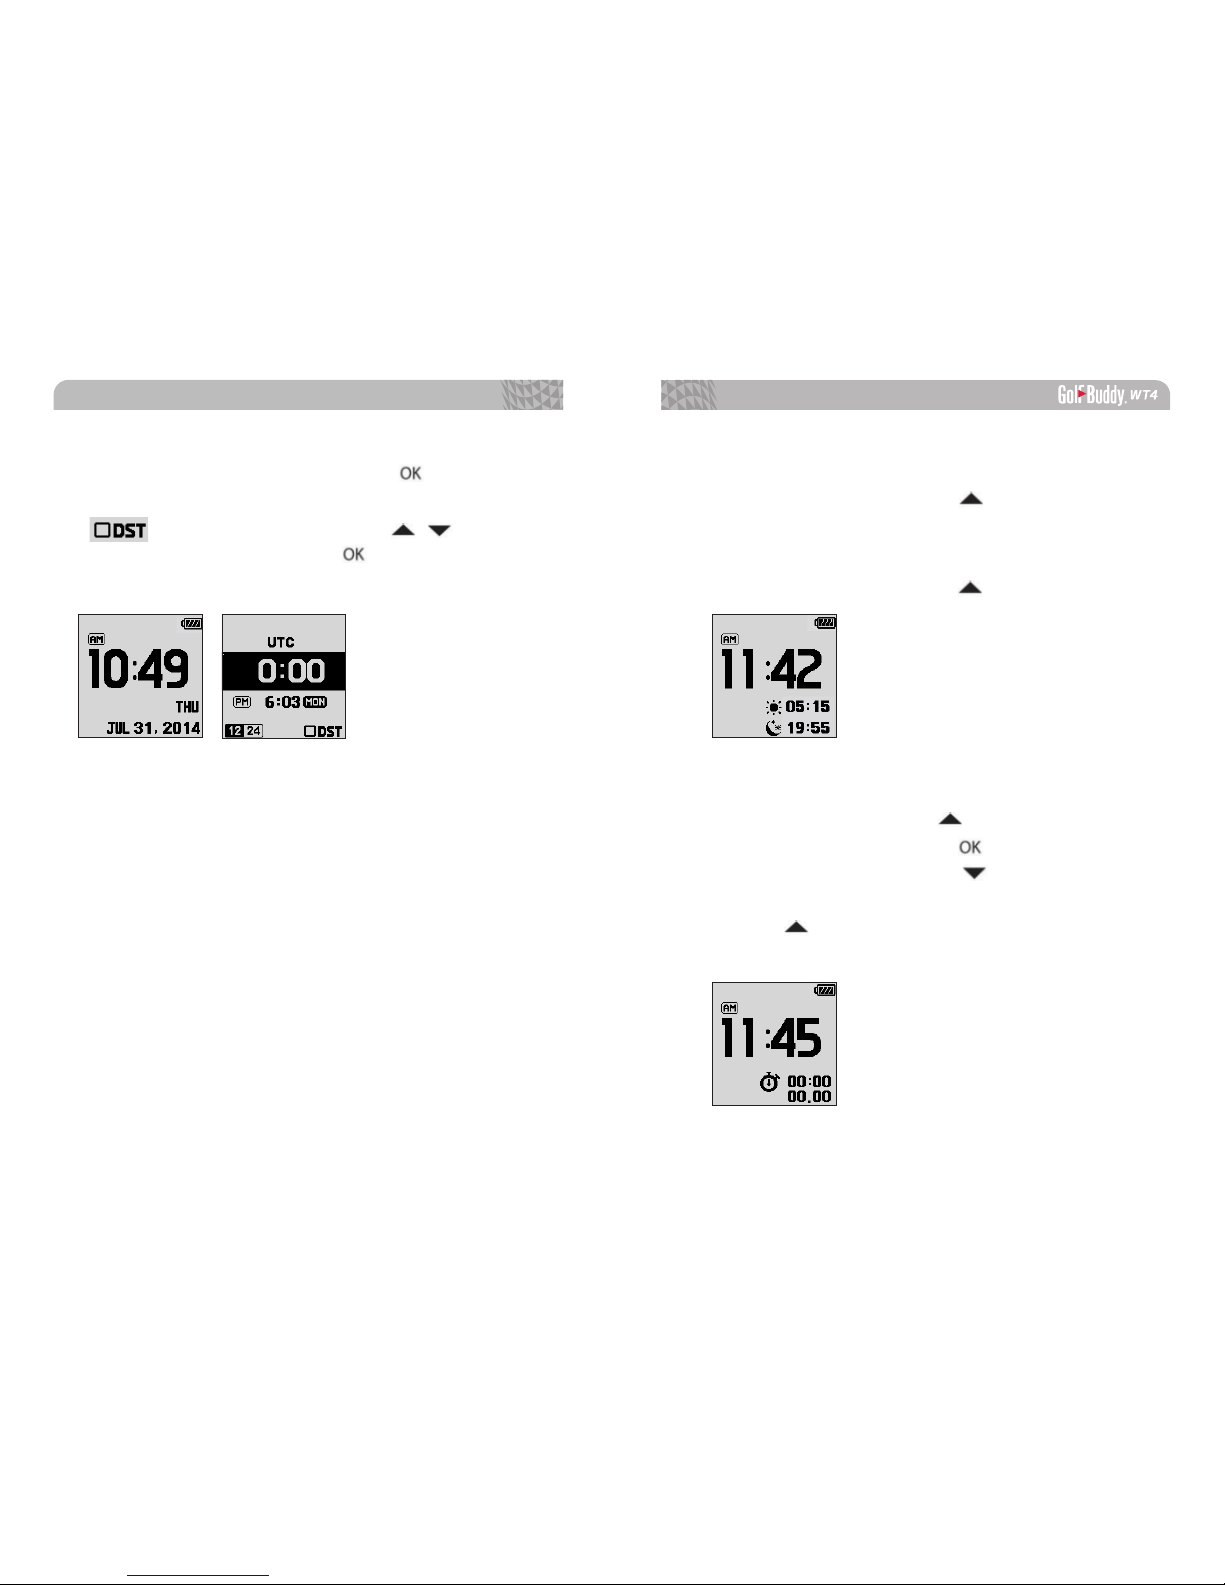
* Day Format: In time setting mode, press the button
once to edit the Day Format. The default Day Format is
in English; the secondary option is in French. When the
blinking / icon appears, navigate with the /
buttons to select desired selection. Press the button
three times to apply the changes and return to Watch
Mode.
* 12/24 Hour Format: In time setting mode, press the
button twice to edit the 12/24 Hour Format. When the
blinking
icon appears, navigate with the /
buttons to select desired selection. Press the button
twice to apply the changes and return to Watch Mode.
1.3. Time Setting
The time will set automatically once the WT4 successfully
connects to satellites. To set the clock manually, press and
hold the button to bring up the time setting mode. Press
the or button to change the hour, then press the
button 4 times to apply the changes.
Note: The minutes are set automatically upon successful satellite
connection and cannot be manually adjusted.
Page 8
14 15
GETTING STARTED
■
Sunrise/Sunset Time
From Watch Mode, press the button to view the
Sunrise/Sunset Time (only applicable when the WT4 is
connected to the satellite). To exit this function and to
return to Watch Mode, press the button twice.
■
Stop Watch
From Watch Mode, press the button twice to use the
Stop Watch Function. Press the button to start/ stop
the Stop Watch, and press the button to reset the
record. To exit this function and to return to Watch Mode,
press the button.
* DST: In time setting mode, press the button three
times to edit the Daylight Savings Time. When the blinking
icon appears, navigate with the / buttons to
turn on/off DST mode. Press the button once to apply
the changes and return to Watch Mode.
Page 9
2. BASIC OPERATION
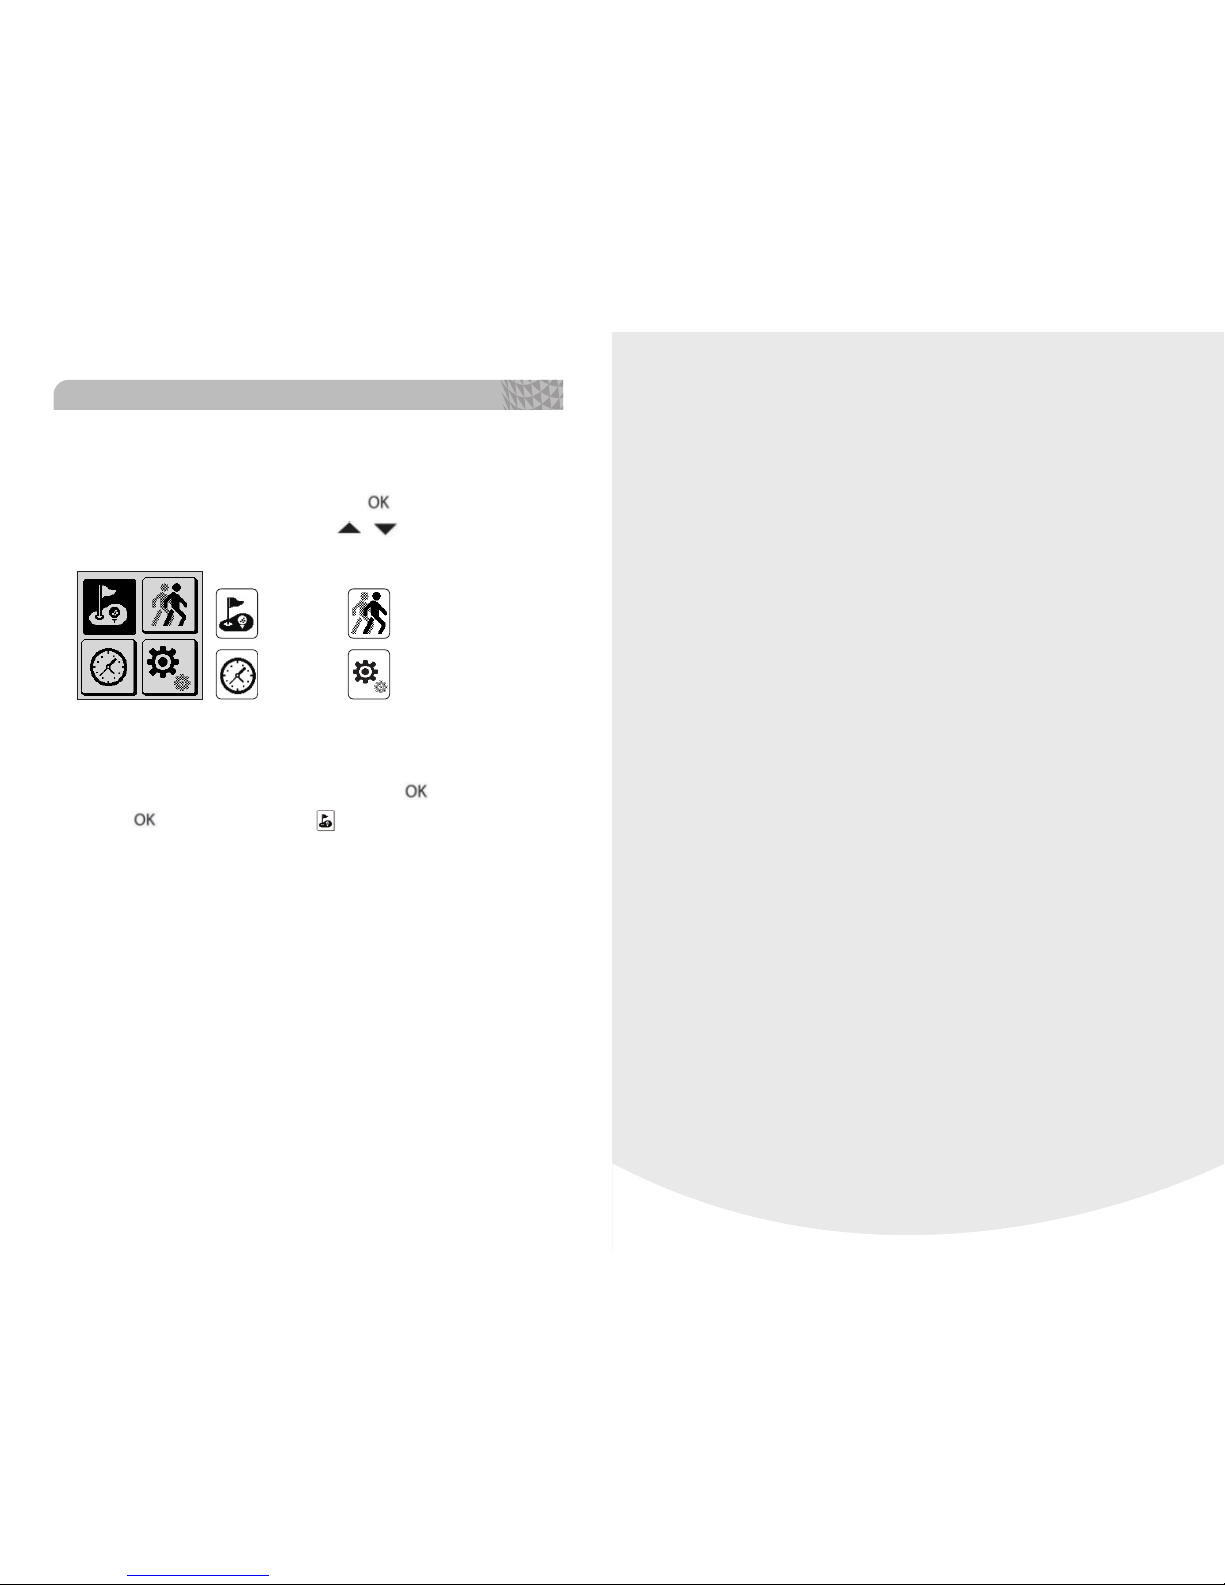
1.4. Main Menu
From Watch Mode, press and hold the button to view the
Main Menu and navigate with the / buttons.
PLAY GOLF GPS TRACKING
TIME SETTING
■
Switching to Play Screen
From Watch Mode, press and hold the button. Press
the button to select the icon and to switch to Play
Screen. After the GolfBuddy WT4 connects to satellites,
it will recognize the nearest golf course and provide the
course/hole information.
GETTING STARTED
Page 10
18 19
■
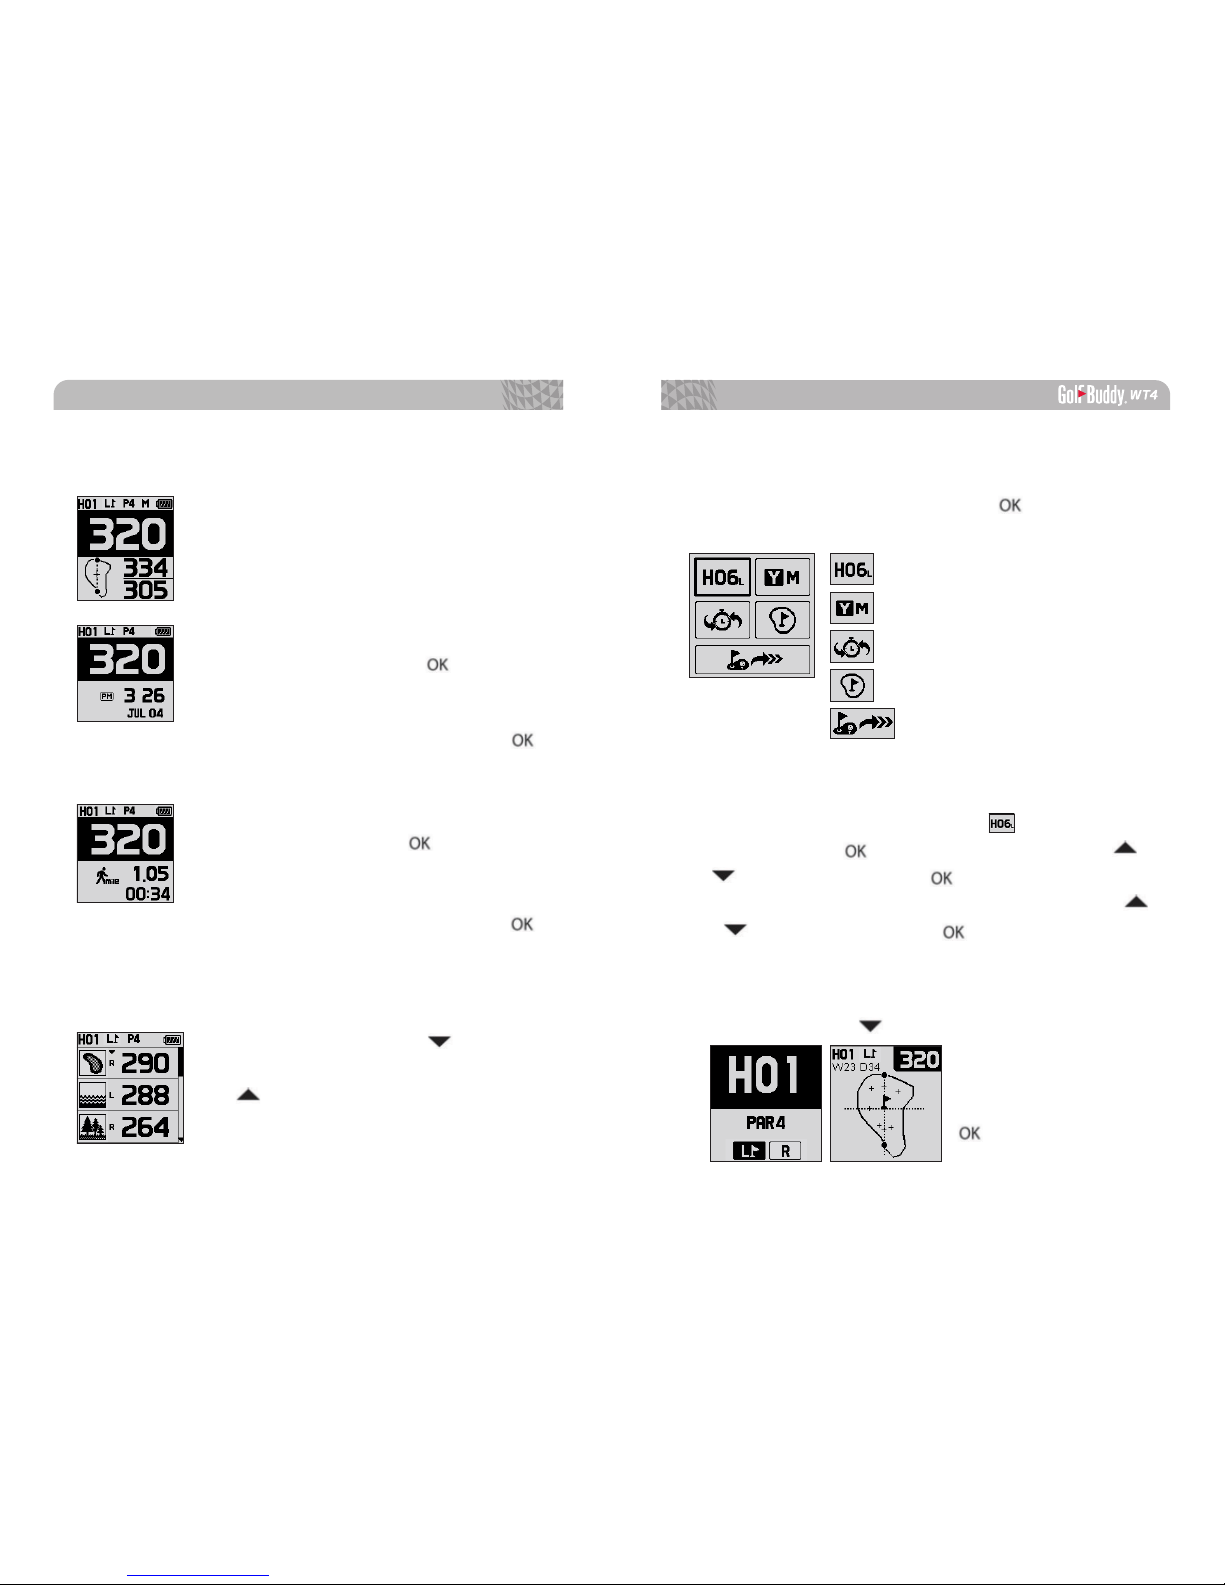
Hole Selection / Left & Right Green Selection
From Play Mode, to change holes or to change the Left
& Right Green Selection, select the icon by pressing
and holding the button. Navigate by using the
/
buttons, then press the button to select desired
hole. Select left or right green* by navigating with the
/
buttons then press the button to confirm the
selection. (*Note: The Left & Right Green selection is only
available if there is a left & right green on the course).
Press and hold the button for 2 seconds while on the
pin placement screen to
select between the left
and right green. Press the
button to confirm.
BASIC OPERATION
2.1. Play Screen Information
■
Distance to the Green
Play Mode provides the distances to the
front, center and back of the green
.
■
Time
From Play Mode, press the button to
view the current time while displaying the
distance to the center of the green. To exit
and to return to Play Mode, press the
button twice.
■
GPS Tracking
From Play Mode, press the button twice
to view GPS tracking while displaying the
distance to the center of the green. To exit
and to return to Play Mode, press the
button once.
2.2. Targets/Hazards Information
From Play Mode, press the button to
view the Targets/Hazards information. Press
the button again to return to Play Mode.
2.3. Setting
From Play Mode, press and hold the button for the
menu.
Hole Selection/ Left & Right Green Selection
Pin Placement
Exit
Yard / Meter
Previous Hole Selection
Page 11
20
3. ADVANCED OPERATIONS
BASIC OPERATION
■
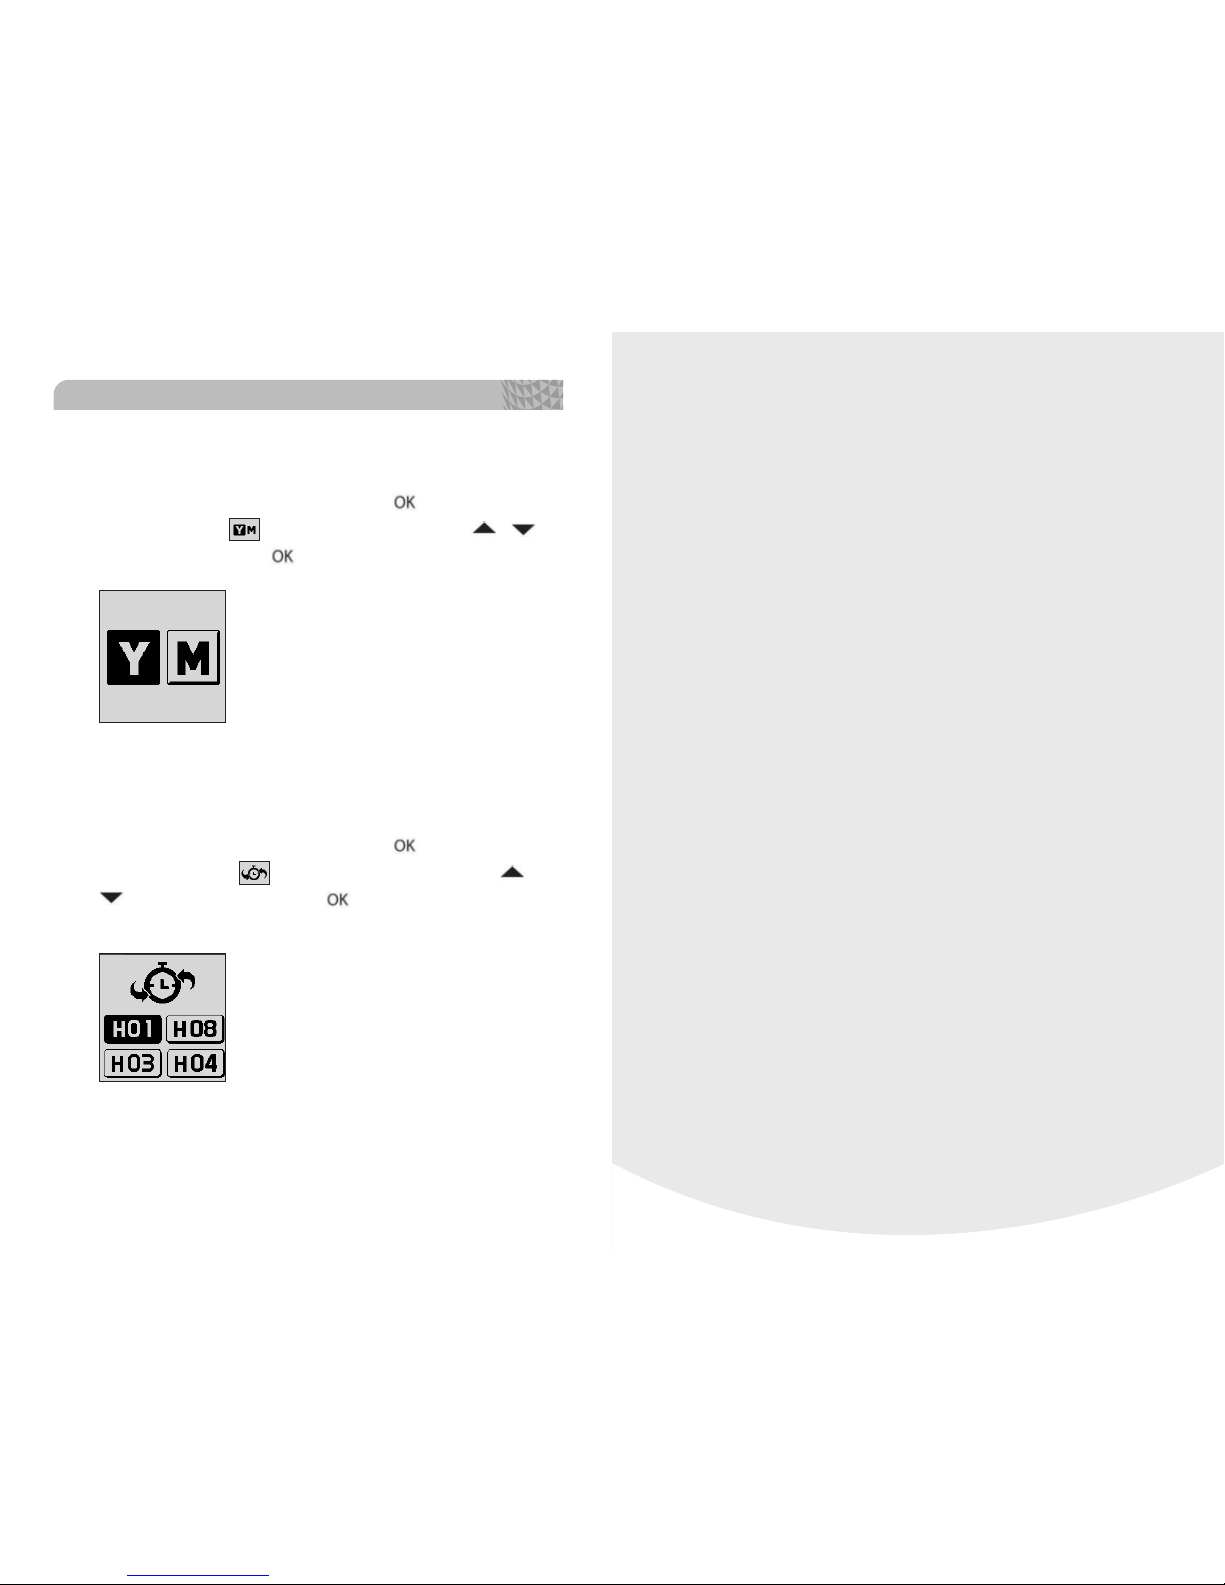
Switching between Yard / Meter
From Play Mode, press and hold the button for the
menu. Select the icon by navigating with the /
buttons, then press the button to confirm the selection.
■
Previously Recognized Hole Selection
From Play Mode, press and hold the button for the
menu. Select the icon by navigating with the /
buttons, then press the button to confirm the
selection.
Page 12
22 23
ADVANCED OPERATIONS
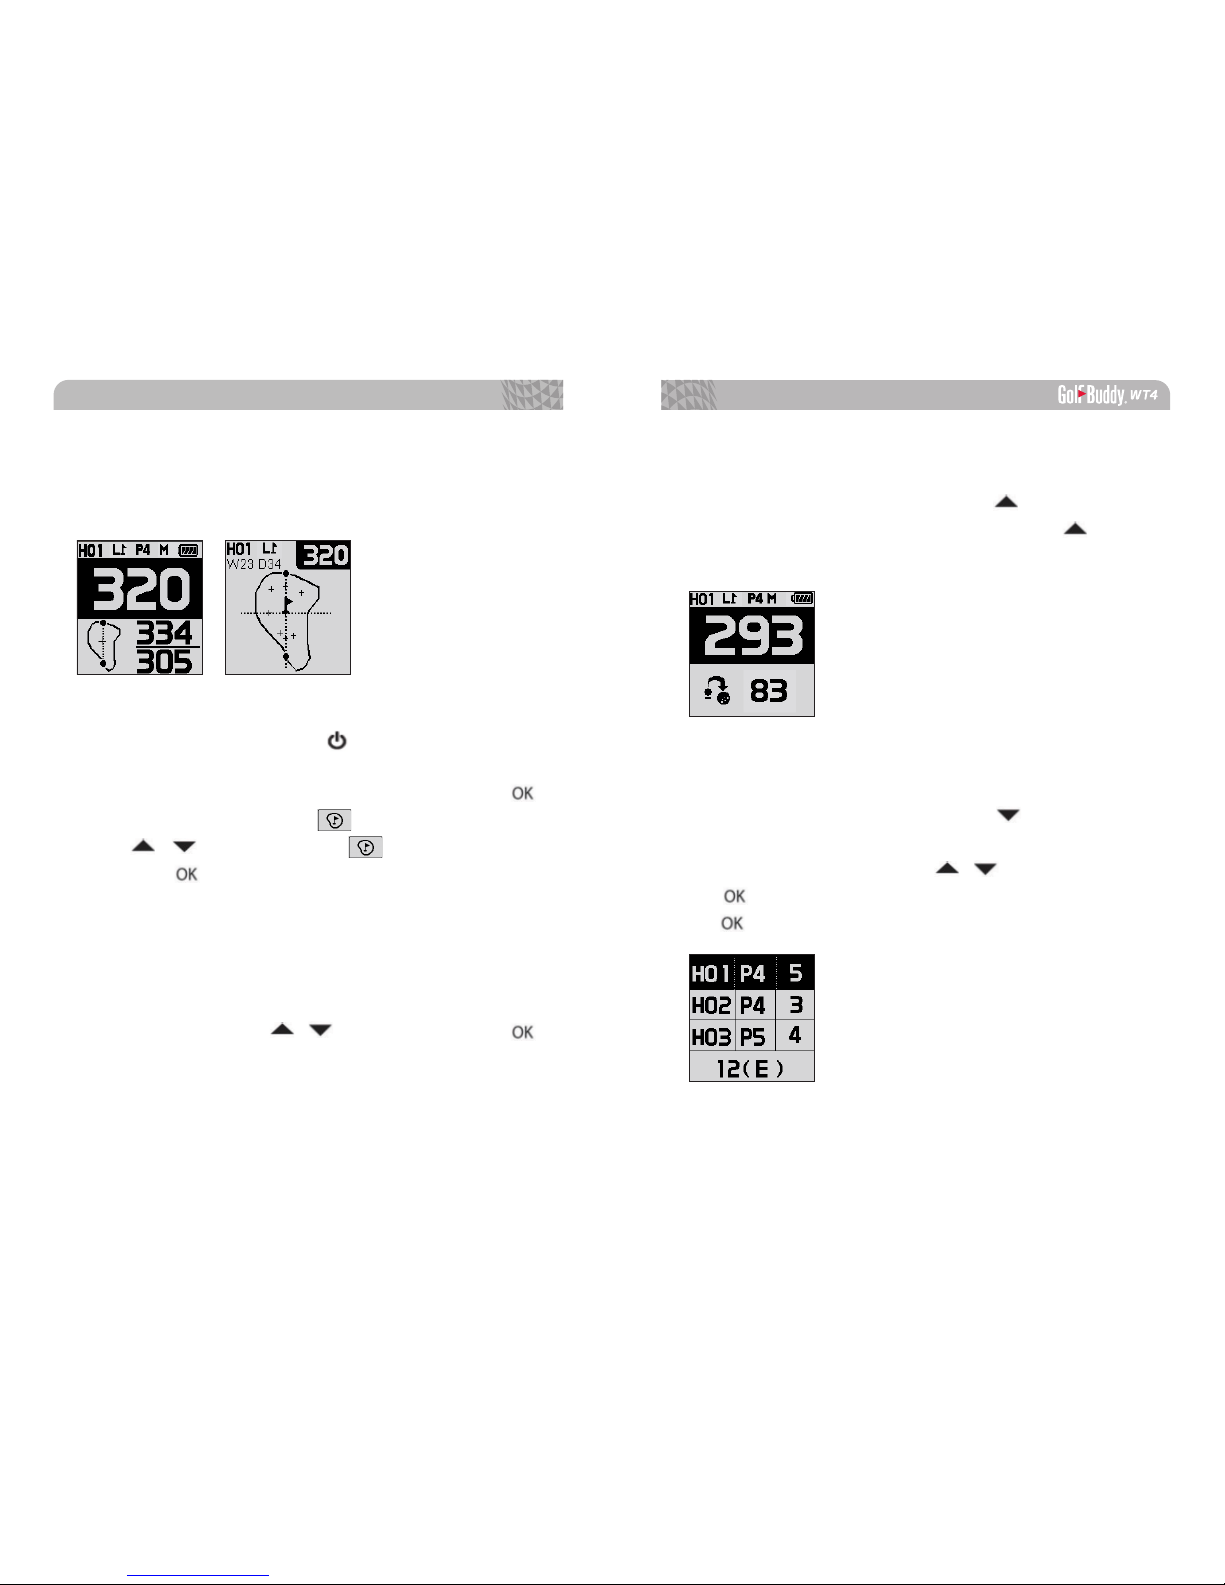
3.1 Dynamic Green View / Pin Placement
You can access the Dynamic Green View/ Pin Placement
Mode by simply pressing the button from Play Mode.
You can also access the Dynamic Green View/ Pin Placement
Mode from Play Mode, by pressing and holding the
button and by selecting the icon by navigating with
the /
buttons. Once the icon is highlighted,
press the button. Dynamic Green View will allow you
to always get the Front/Center/Back distances to the green
from your angle of approach.
■
Pin Placement
From Green View, you may also change the Pin placement
by navigating with the / buttons, then press the
button to return to Play Mode.
■
Dynamic Green View
3.2. Measuring Shot Distance
From Play Mode, press and hold the button to start
measuring your shot distance. Then press the button
again to finish and view the measured distance.
3.3. Recording Scores
From Play Mode, press and hold the button to start
accessing the Score Tracking Module. You can navigate and
record your scores by using the / buttons then press
the
button to complete the recording. Press and hold
the
button anytime to go back to Play Mode.
Page 13
24 25
ADVANCED OPERATIONS
3.4. End Round
From Play Mode, press and hold the button. Select the
icon by navigating with the / buttons, then press
the button. Select Yes or No by navigating with the /
buttons, then press the button.
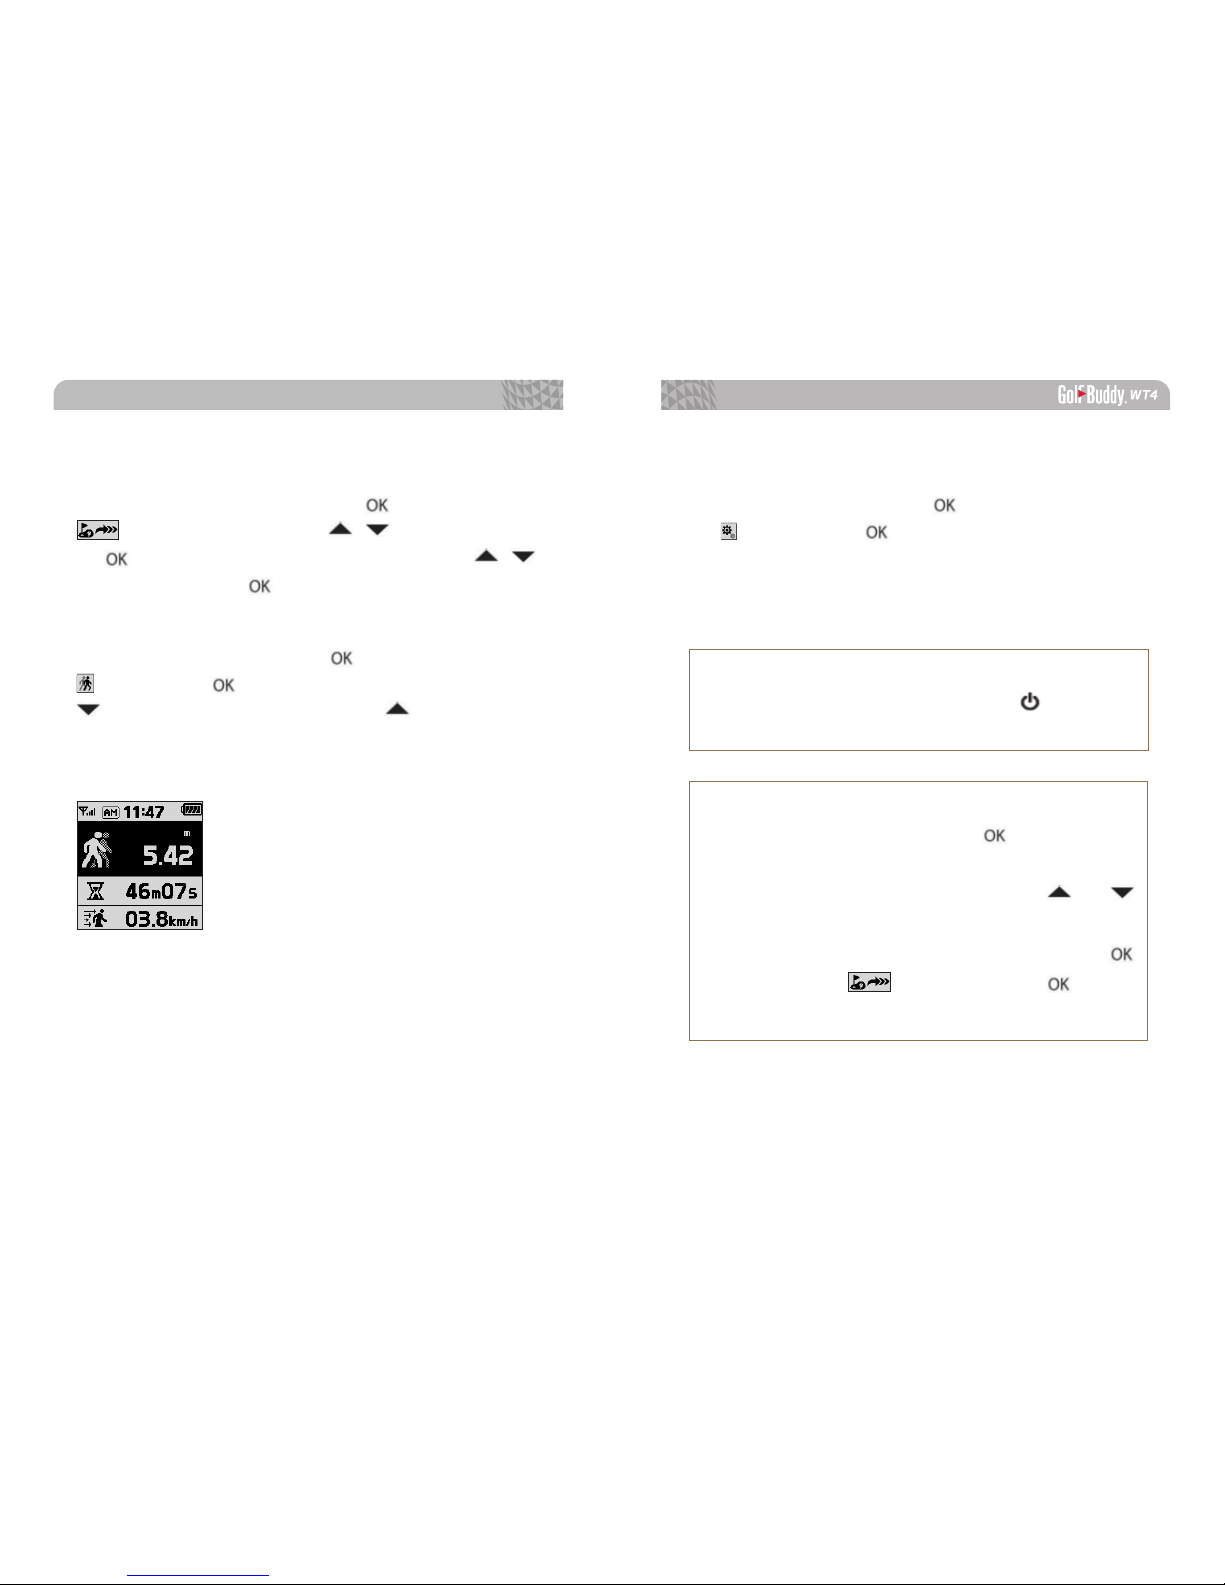
3.5. GPS Tracking
While in Watch Mode, press the button then select the
icon. Press the button to start recording and press the
button to delete the record. Press the button to switch
between Yard / Meter. GPS tracking is activated automatically
when the WT4 is in Play Mode.
3.6. Systems Information
While in Watch Mode, press the button twice then select
the icon. Press the button to view detailed system
information including model number and serial number.
※
How to Reset the WT4
To reset the device, press and hold the buttons for
about 8 seconds simultaneously to restart the device.
※
How to Set in Demo Mode
In Watch Mode, press and hold the button to bring
up the Main Menu. Select Play Golf, and when the unit
is searching for satellites, press and hold the and
buttons simultaneously for 2 seconds to activate the
Demo Mode. To exit Demo Mode, press and hold the
button. Select the icon and press the button.
Confirm “Y” to exit Demo Mode.
Page 14

4. SOFTWARE UPDATES
Page 15
28 29
SOFTWARE UPDATES
Your GolfBuddy WT4 unit has been pre-loaded with the
latest firmware and world-wide course maps available at the
time of manufacture, so it’s ready to play right out of the box.
For optimum performance and longer product life, we do
recommend you register your unit and keep it updated with
the latest levels of firmware. You can also add the latest course
maps and updates for free once you have registered your unit.
The instructions below will provide you with a step-by step
guide on how to register and update your GolfBuddy WT4.
1. Downloading the GolfBuddy Management
Software (GB Manager) to your computer:
• Please visit our website at www.gpsgolfbuddy.com
• Click on the panel titled “Download GB Course Manager”to
download and install the GolfBuddy Manager program.
You will then see a screen with an option to choose either
Windows or Mac based software.
• Click on the correct version for your computer. Once
downloaded, you can run the application to install the GB
Manager on your computer.
• Once completed, you will see a blue icon on your desktop
that you will use to access the GB Manager once you have
submitted the registration for your User ID and Password.
2. Creating a User ID:
• Open the GB Manager application by clicking on the blue icon
on your desktop.
• You will see a Login Panel . Click on “Sign up for new user” at
the bottom. This will bring up a panel for you to create your
User ID and Password.
• Fill in all the details that are required (indicated by “*”). Please
note the instructions regarding no Caps, Symbols or Spaces
& 4-15 characters long. You will need to click the “Check
Availability” to verify your selected User ID is valid and not
already being used.
• Click “Submit” at the bottom of the form.
• You have now created your User ID and Password.
Make sure you write them down somewhere in case you
forget them!
Page 16
30 31
SOFTWARE UPDATES
3. Registering your GolfBuddy WT4:
• Connect your GolfBuddy unit to a USB port on your
computer using the USB cable provided with the unit.
• After a short time, your GolfBuddy unit should show an icon
on the screen indicating it is connected to the computer.
Notes: You can disregard any driver download requests that
your computer may say is required.
• Click on the blue GB icon on your desktop and open the
Login Panel.
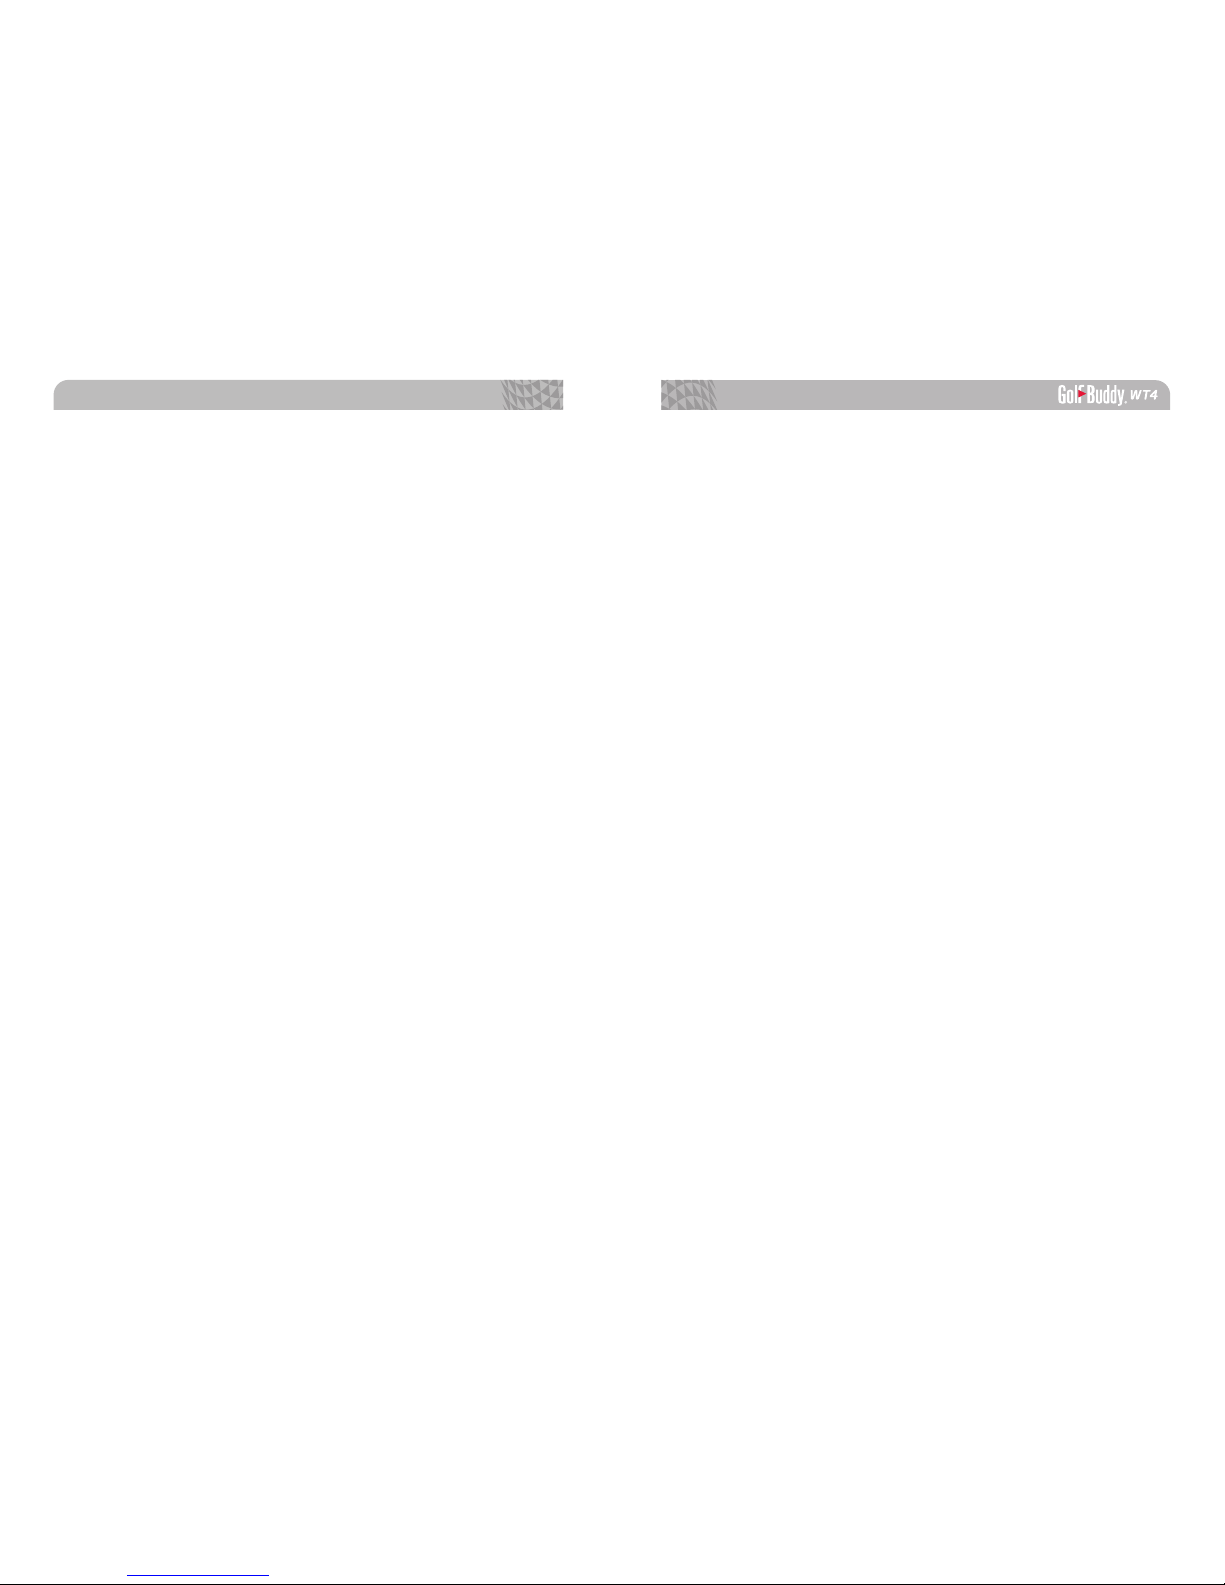
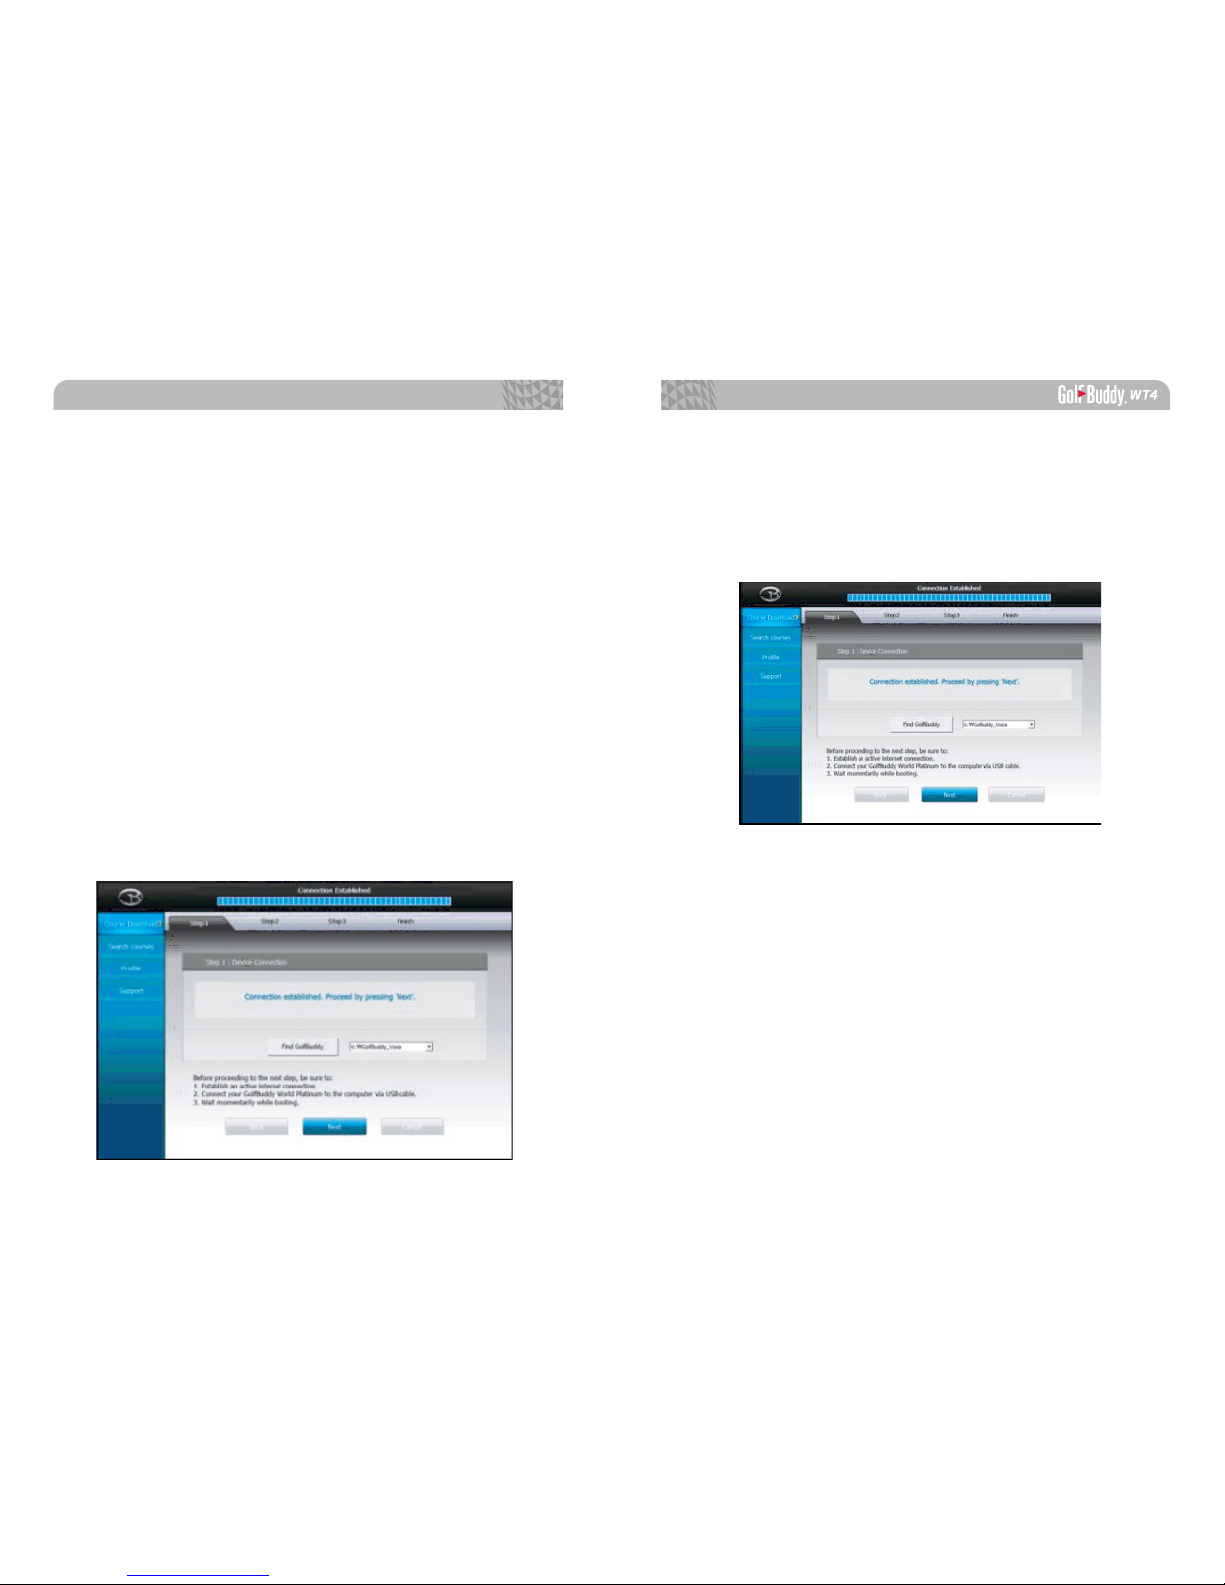
• Enter your User ID and Password. You should now see
a panel that indicates the GB Manager is searching for
the device. After a short time, you will see “Connection
Established”. At this stage, your unit is successfully registered
to the User ID that you created and will not be able to
connect to any other User ID.
4. Updating your GolfBuddy
4.1. Step 1
Once you get the “Connection Established” message, please
click “Next” to proceed to Step2. Firmware Update.
Page 17
32 33
SOFTWARE UPDATES
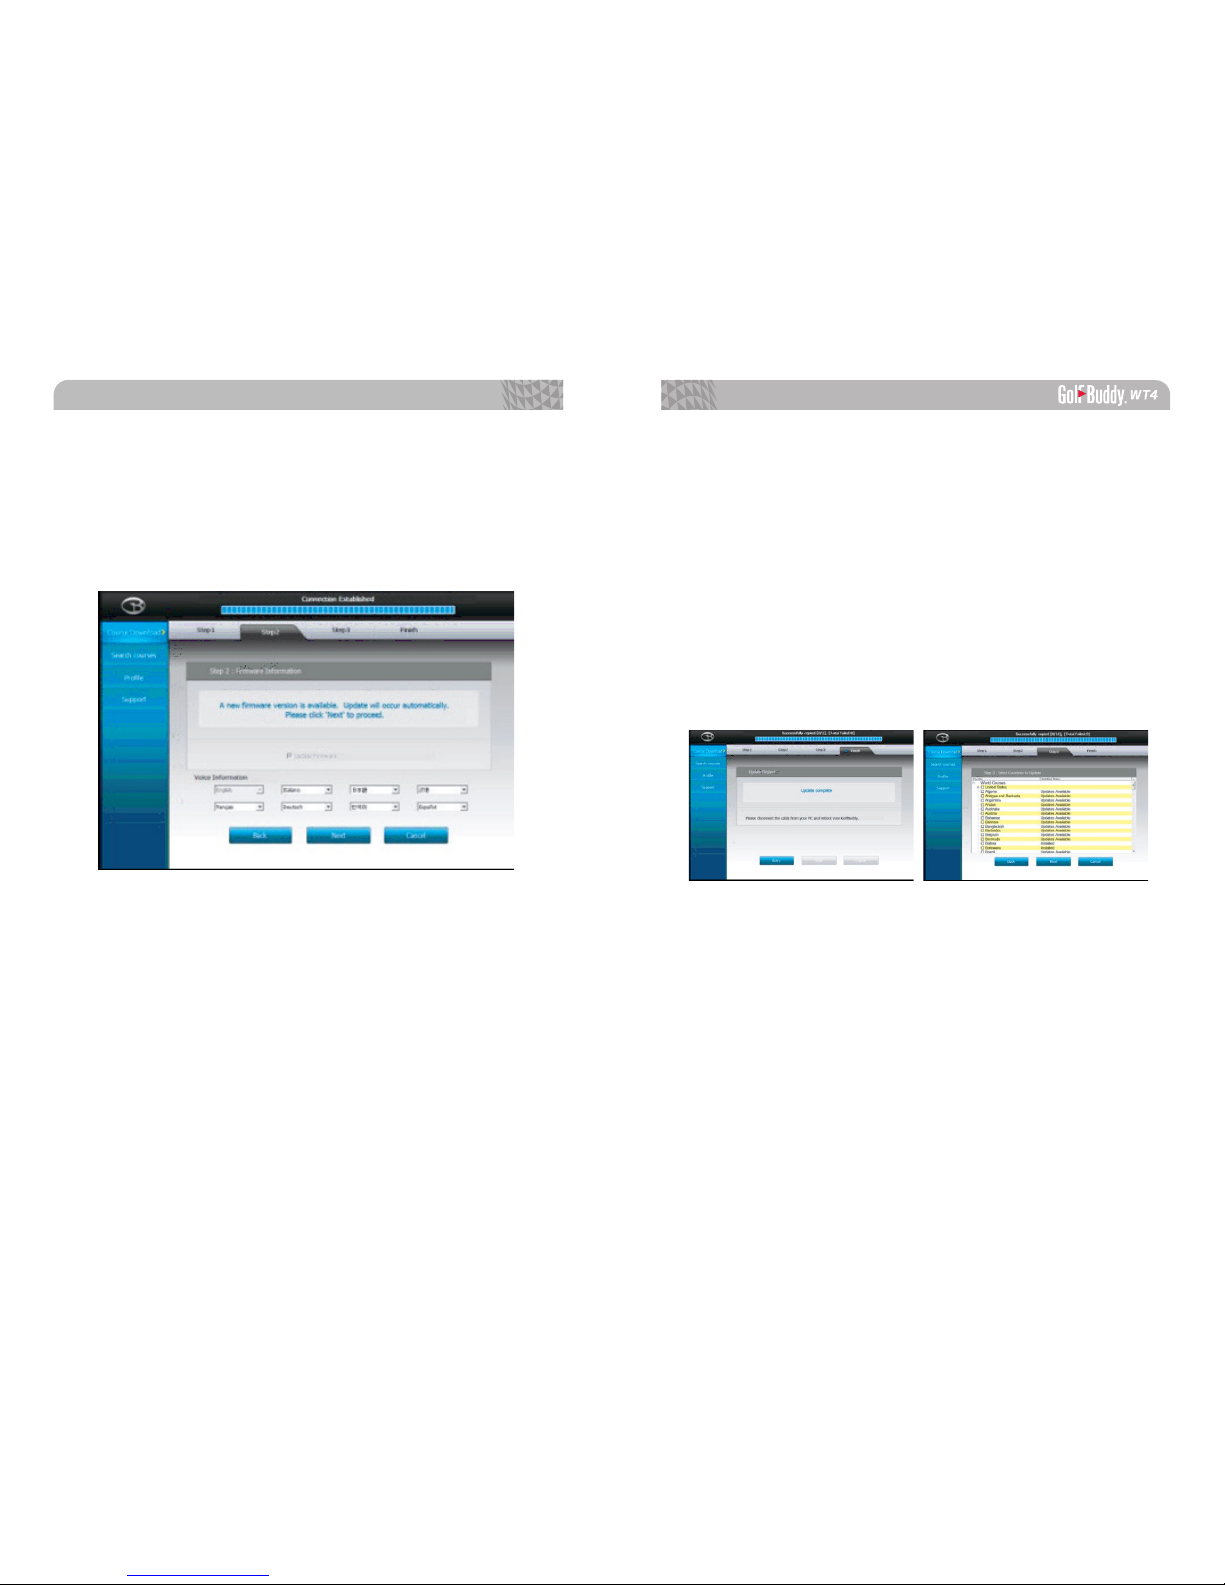
4.2. Step 2 : Firmware Update
At step 2, click “Next” to install the latest firmware. If the
firmware is already at the latest level, click “Next” to proceed to
step 3.
4.3. Step 3 : Course Download
Select the countries that you would like to be updated from the
list of countries. Click “Next”. You will see a panel that asks you
to select “Overwrite” or “Newly Updated Only”(default option already selected). Click “OK” to start the course update.
Once all courses have been downloaded and your unit
updated, you will receive a message “Update Complete”. You
can now disconnect the unit. Your GolfBuddy is now ready to
go with the latest updates!
Page 18
34 35
Getting Started
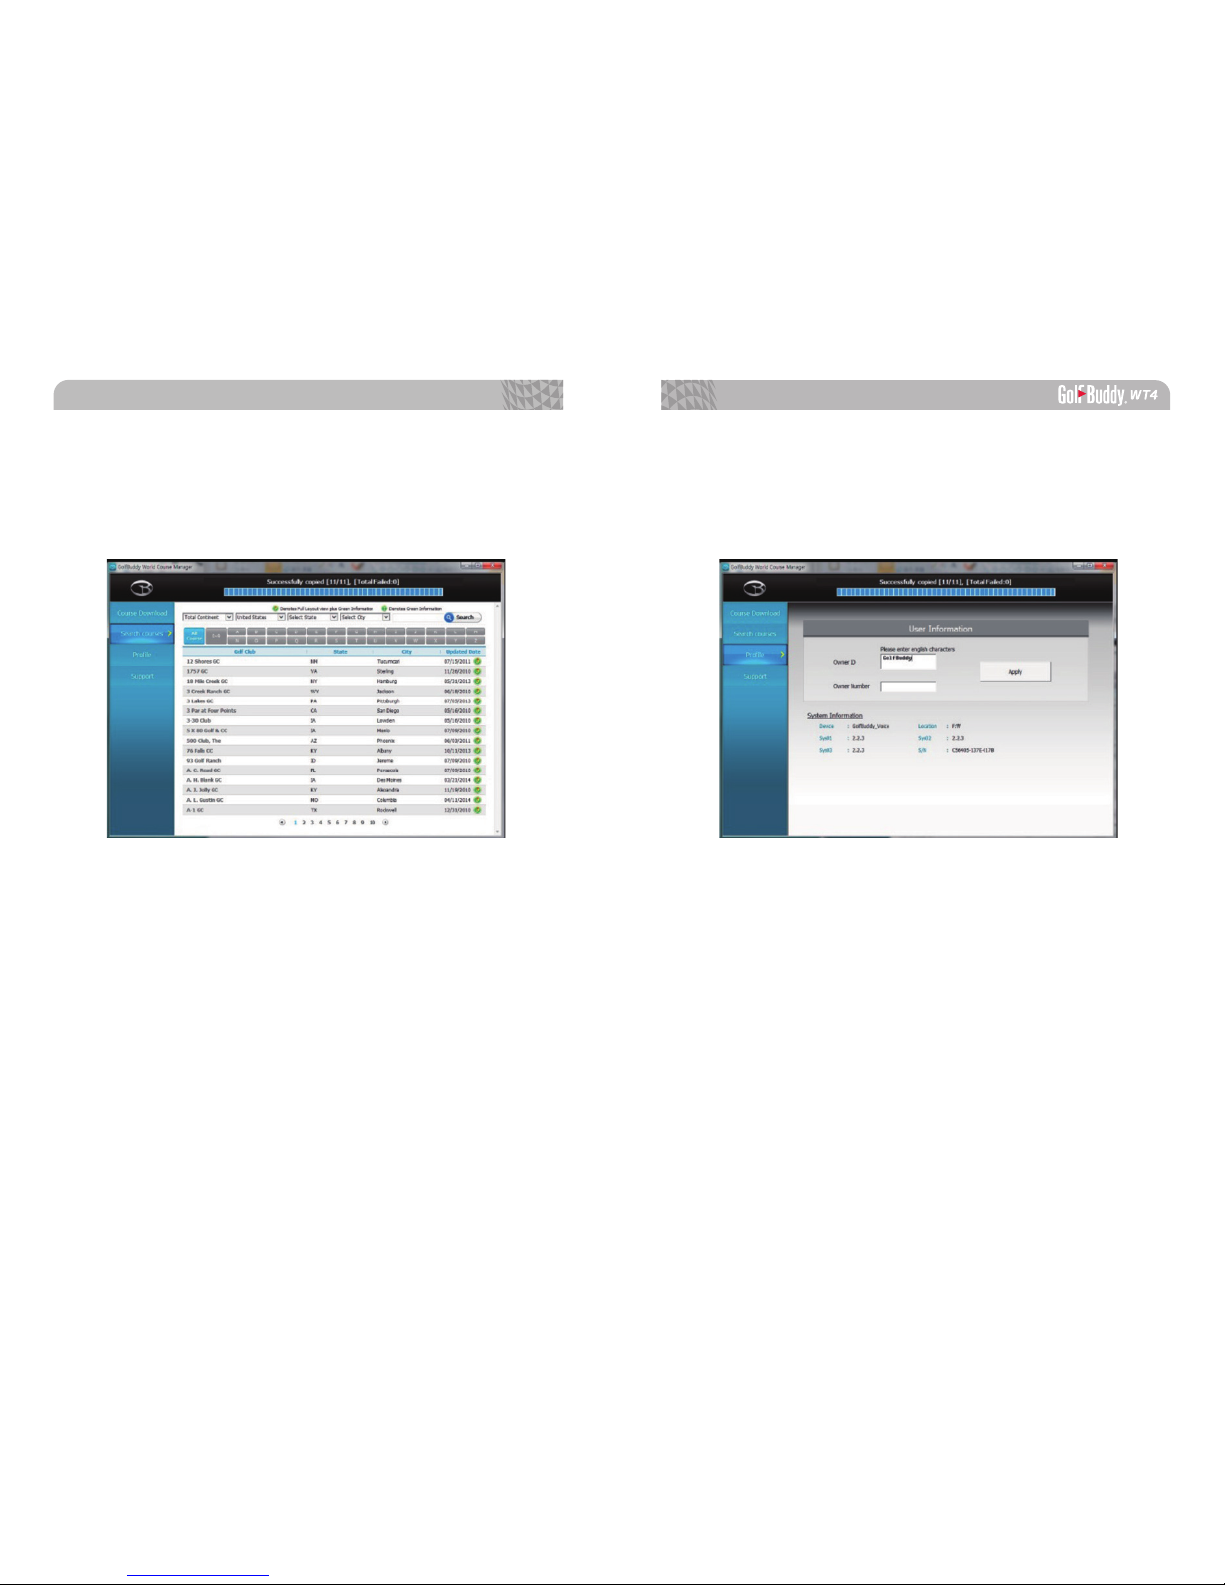
4.4. Search Courses
You can search courses by country, state, and city. You can also
view when the course was last updated.
4.5. Profile
System Information for user’s WT4 can be found here.
Page 19

 Loading...