

Golf Buddy VT3 User Manual

Language
English
中文
日本語
한글
Manual

CONTENTS
1. Getting Started
2. Basic Operations
3. Advanced Operations
4. Course Updates

Thank you for choosing GolfBuddy.
The GolfBuddy VT3 provides you with accurate
golf course distance information to enhance your
golfing experience. It has a multi-function touch
screen that you can navigate with a simple touch or
swipe of a finger.
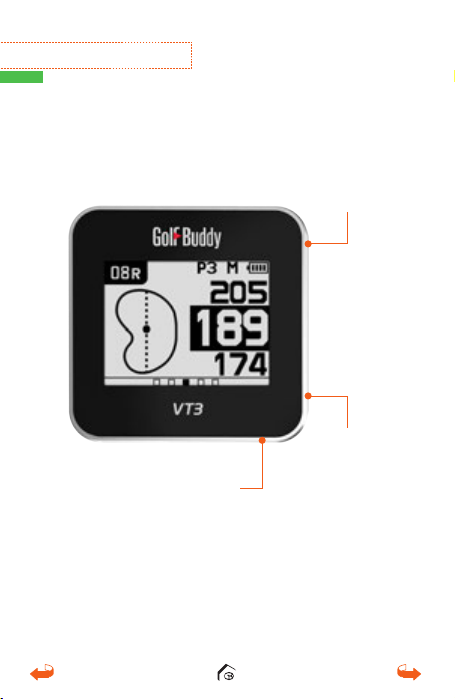
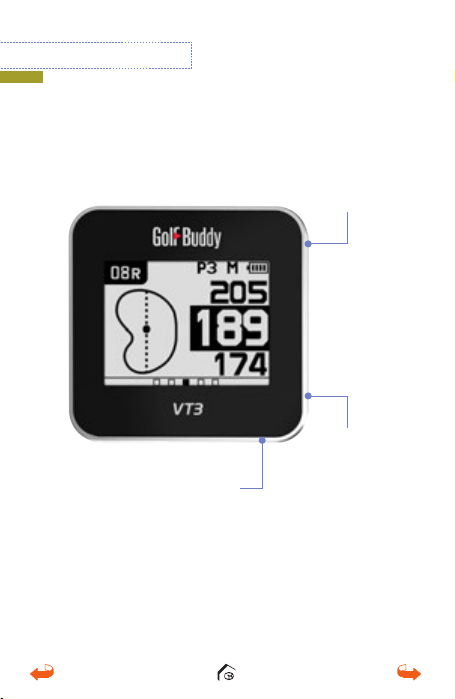
Quick Overview of GolfBuddy
USB Port
Mark Button
Power/
Quick Menu
Button

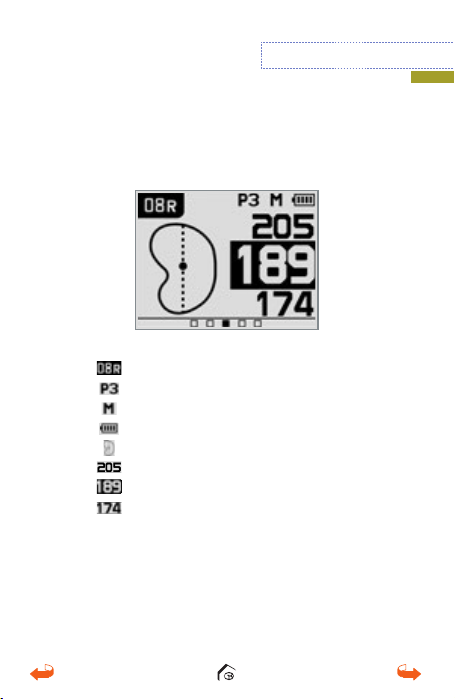
1.
Hole No.
2.
Par Information
3.
Meter (In Yards when not shown)
4.
Battery Indicator
5.
Dynamic Green View
6.
Remaining distance to the back of the Green
7.
Remaining distance to the center of the Green
8.
Remaining distance to the front of the Green
Main Screen Description

Getting Started
1
1. Getting Started
Connect the unit to the power adapter using
the data cable provided. Plug into a power
socket to charge the unit.
You may visit our website (www.gpsgolfbuddy.
com) and go to our Course Library. You will find
listed, over 36,000 golf courses in more than
130 countries around the world. (Your new
GolfBuddy comes pre-loaded with our latest
firmware and golf courses. It’s ready to play
right out of the box.)
You may register and update your GolfBuddy
with the latest course updates using the GB
Manager program available from our website.
Please refer to “4. Course Updates” in this Quick
Start Guide.
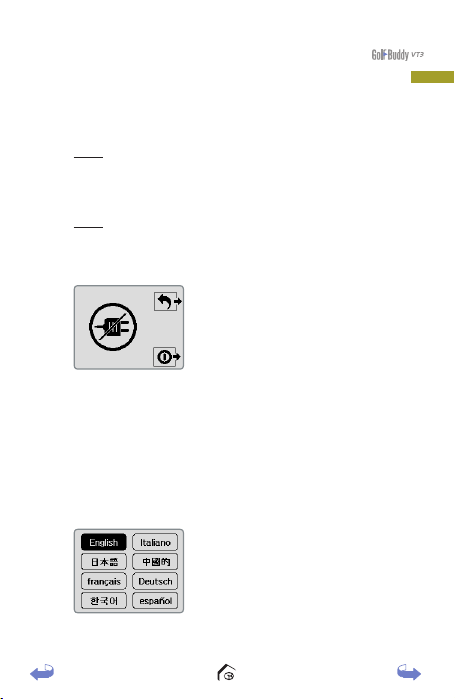
1.1. Power On/O
Power On : To power on, press and hold the power
button for 2-3 seconds. Once you are at a course,
simply power on to start playing. The unit locates
your course and hole automatically.
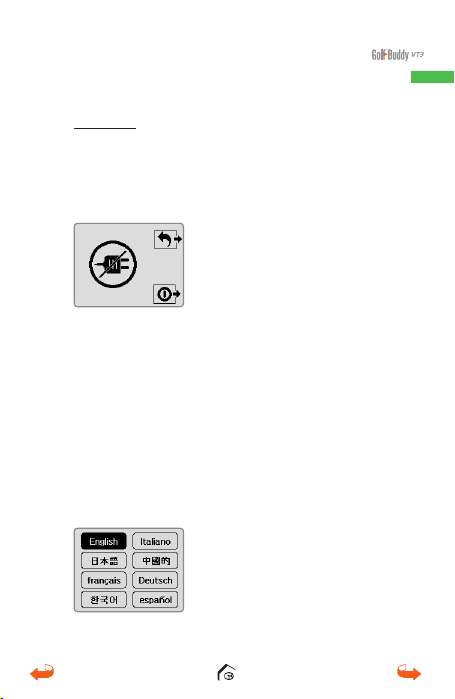
Power Off : Press and hold the power button for 1-2
seconds and 2 options will appear on the display.
Press the power button again to power off or press
the Mark button to return to the previous screen.
1.2. Language Selection
From the set-up screen, swipe down to bring up
the Setting Screen. Then press and hold the Mark
button to bring up the Language Selection screen.
Select the desired language twice and the unit will
load in the language selected.
1. Getting Started
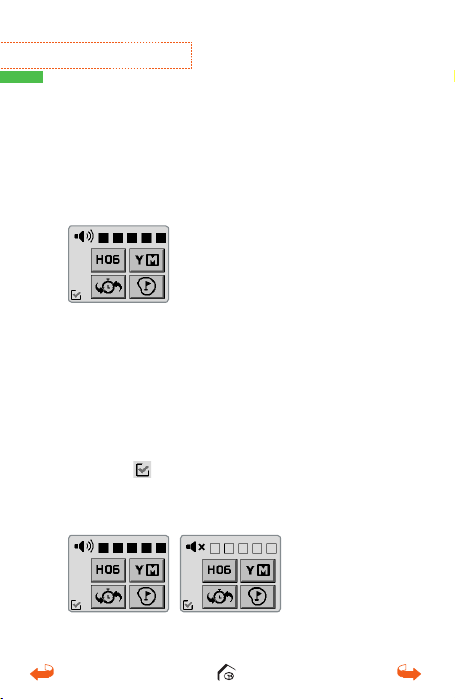
1.3. Setting Screen
From the main screen, swipe down to bring up
the Setting Screen. The Hole Number, Yard/Meter,
Volume/Mute, and Pin positioning options will be
displayed.
1.3.1. Volume Setting
From the main screen, swipe down to bring up the
Setting Screen and touch the desired volume level
to set your sound level.
Touch the
and go back to your previous screen.
* Mute : Touch the speaker icon to “mute” volume.
icon at the bottom left corner to save
1.3.2. Distance Mode Setting
From the main screen, swipe down and touch the
icon to change from Yards to Meter or vice
versa.
Touch the
and go back to your previous screen.
icon at the bottom left corner to save
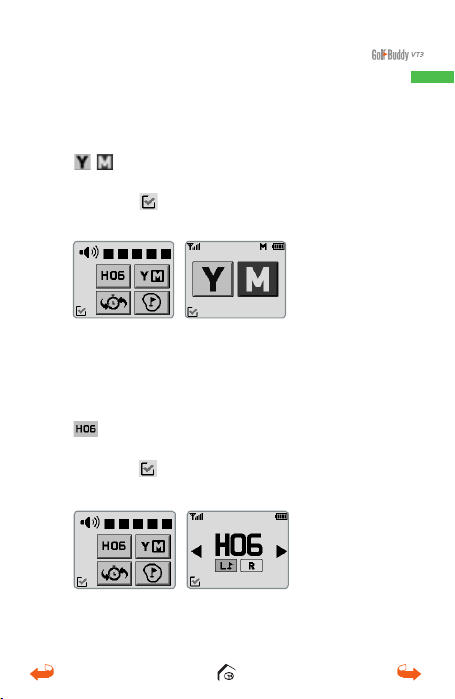
1.3.3. Changing Holes
From the main screen, swipe down and select the
icon. From the Hole Selection Screen, touch
the arrows to find your desired hole.
Touch the
and go back to your previous screen.
icon at the bottom left corner to save

1. Getting Started
1.3.4. Back to Previous Hole
From the main screen, swipe down and touch the
icon to go back to the previously recognized
hole.
2Basic Operations
2. Basic Operations
2.1. Distance Information to the Green
The main screen provides the distance information.
Touch the screen to get voice information to the
center of the green. Touch and hold the screen to
get voice information to the front and back of the
green.
2.2. Target/Hazard Information
From the main screen, slide the screen upwards
once to bring up the Target/Hazard Information.
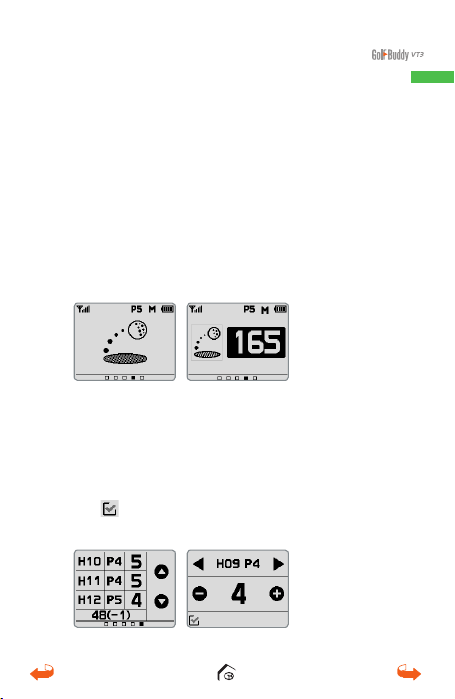
2.3. Measuring Distance
From the main screen, press the Mark button for the
Measuring Distance screen or slide right from the Main
screen. Touch and hold the icon to mark your position.
You can also press and hold the Mark button to start
measuring. As you move, the screen will now show
the distance from the marked position. Tap the Mark
Distance screen or press the Mark button to finish
measuring and you can see/hear the measured distance.
2.4. Score Tracking
From the main screen, slide two screens to the right
to access the Score Tracking screen. Touch the score
box next to the desired hole to enter your score and
touch plus or minus sign to adjust the score. Touch
the
icon at the bottom left corner to save and
return to the score tracking screen.
2. Basic Operations
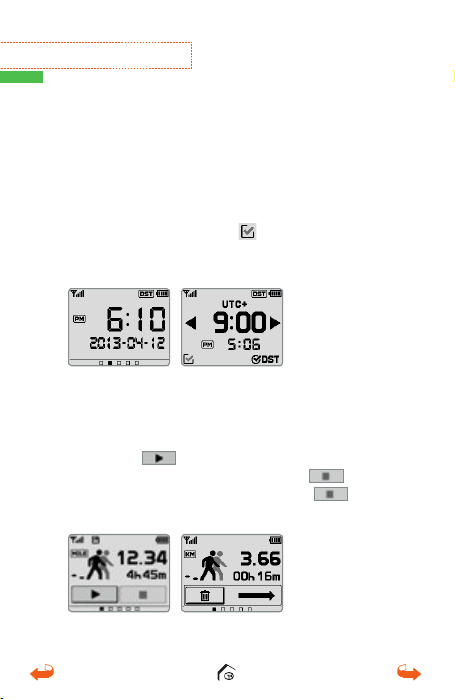
2.5. Watch Module
From the main screen, slide the screen to the left
once to access the Watch Mode. Touch the screen
and your VT3 device will speak the time. The time
will be set when the VT3 connects with the satellite;
but in order to set the local time zone, touch and
hold the screen. Touch the
left corner and return to Watch Mode screen.
icon at the bottom
2.6. GPS Tracking
From the main screen, slide two screens to the left
to access the GPS tracking/Odometer function.
Touch the
tracking can be paused pressing the
Tracking can be re-set by pressing the
twice and then by sliding the trash can icon to the right.
icon to begin tracking. Current
icon.
icon

3Advanced Operations
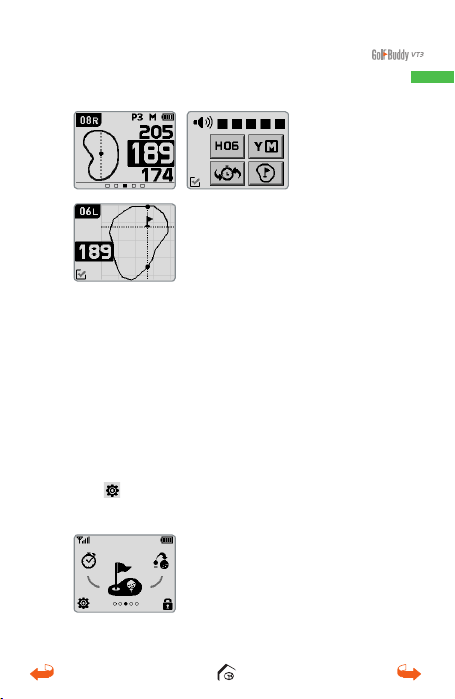
3. Advanced Operations
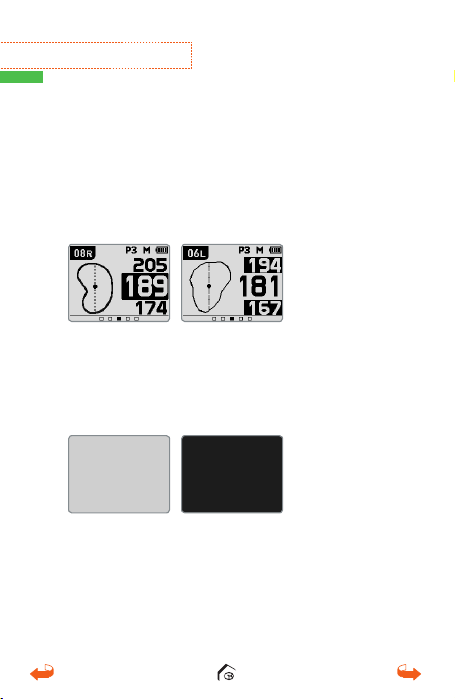
3.1. Dynamic Green View /
PIN Placement Setting
You will see the green shape change as you move
to different sides of the green while on the main
screen or green view screen. This “Dynamic Green
View” means you will always get the Front /Center/
Back distances from your angle of approach.
To select green view screen, touch the
in the bottom right from the Setting Screen or
touch the green shape twice from main screen.
From the green view screen, touch and drag the
PIN to desired location to set the PIN position. The
distance of the centre will now read to the new PIN
placement.
Touch the
back to the main screen.
icon at the bottom left corner to go
icon
2
1. Hole No.
2. Green View
Remaining Distance to the
3.
Center
1
3
3.2. Quick Menu Screen
Press the power button to activate the quick
function selection screen. Touch the desired
selection to bring to the front of the screen, then
touch it again to activate that function.
The
icon located at the bottom of the screen
will access the Set-Up screen.
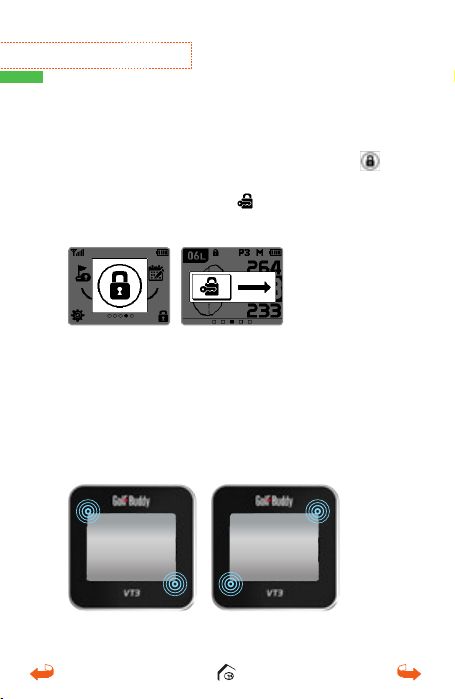
3. Advanced Operations
3.3. Screen Lock Mode
Press the power button to bring up the Quick Menu
screen. You can lock the screen by touching the
icon at the bottom right corner of the screen. To
unlock, touch and slide the
icon to the right.
3.4. Reset
To reset the unit, press and hold the 2 touch points
depicted below for 10 seconds.

4Course Updates
4. Course Updates
Please visit our website at www.gpsgolfbuddy.
com and click on “Downloads” – under
“SUPPORT” and install the GolfBuddy Course
Manager program for either your PC or MAC.
Once installed, you will have the “GB Manager”
icon on your desktop. Open the GB Manager
application, and select “sign-up for new user”
and enter your information.
Important! Please remember the user ID and
password you used to register with. Please
use the enclosed USB cable to connect your
GolfBuddy VT3 to your computer. Run the
GolfBuddy Course Manager previously installed
on your computer and enter the user ID and
password; then click on “Login” to run the
program.
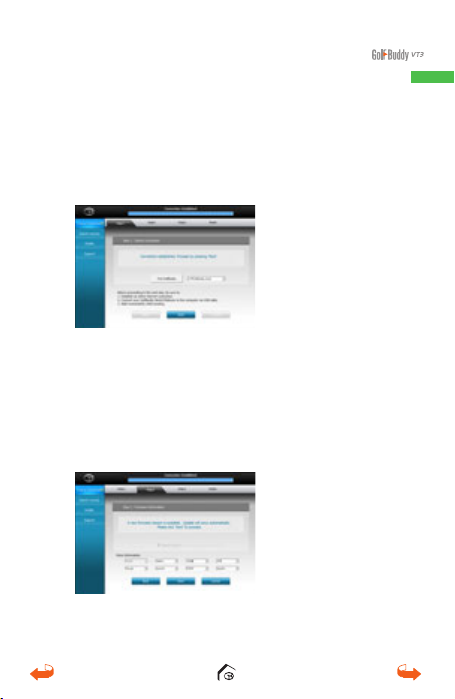
4.1. Device Connection
Please connect your GolfBuddy VT3 to your PC or
MAC. Once the device is connected, please click
“Next” to proceed to Step 2.
4.2. Firmware Information
Click “Next” to install the latest firmware if it has not
already been upgraded. If the firmware has already
been upgraded, click “Next” to proceed to Step 3.
4. Course Updates
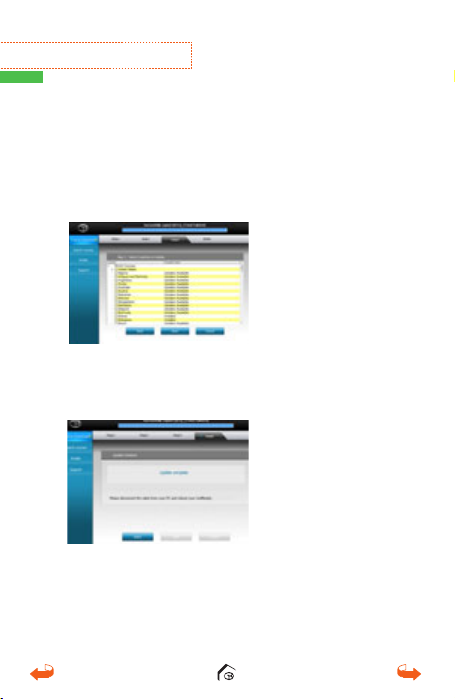
4.3. Course Download
Select the desired country/state that needs to be
updated. Click “Next” and a pop-up screen with the
“Newly Updated Only” option will display. Click “Ok”
to proceed and to update courses.
Once the courses have been downloaded, the message
“Update Complete” will appear. It is now safe to
disconnect your GolfBuddy unit and power off your unit.
※
How to View Demo
In the main screen, press the mark button and the power
button to access the Demo Mode.

内容
1.
2.
3.
4.
启动系统
基本功能
全新功能
球场下载

感谢您选择
GolfBuddy
。
GolfBuddy VT3
电子语音球童为您提供最精确的球场
信息,为您带来全新的高尔夫体验。 只需轻触屏幕
或滑动手指即可为您全程导航
。
产品概述
USB
马克键
开关/快捷菜单
接口
1.
2.
3.
4.
5.
6.
7.
8.
显示屏说明
球洞
标准杆数
米(不显示码数时)
电池电量
动态果岭
相距果岭后方的距离
相距果岭中心的距离
相距果岭前方的距离
启动系统
1

1.
启动系统
使用数据线将设备与电源转换器相连接后插入电
源插座进行充电
如有需要您可浏览我司网址(
com
)在线查看 “球场数据库
36,000
童已预装
。
www.gpsgolfbuddy.
130
”。
全球
多个球场的列表可在线查看。 (您的电子球
GolfBuddy
最新固件与高尔夫球场。 打开
包装即可开始使用。)
您可以登录网站上的球场管理软件进行注册,并
将您的电子球童球场数据进行更新。 具体操作参
考使用手册中 “球场下载”部分
。
多个国家
1.1.
电源
开关
,
开机
:按住电源开关键2~3秒。当您位于球场时
单的启动电源开启装置,系统将自动定位您所在的球
。
场位置
关机
:按住电源开关键1~2秒直至看到屏幕提示,再
。
次按压电源键后,设备关机
或按压马克键,设备将返回上一界面
2.
1.
语种切换
向下滑动屏幕至设置界面。 按压马克键启动语言切换界
面。 选择所需的语种两次后,系统将加载所选语种
如果不再次按压电源键
。
简
。
 Loading...