

Page 1
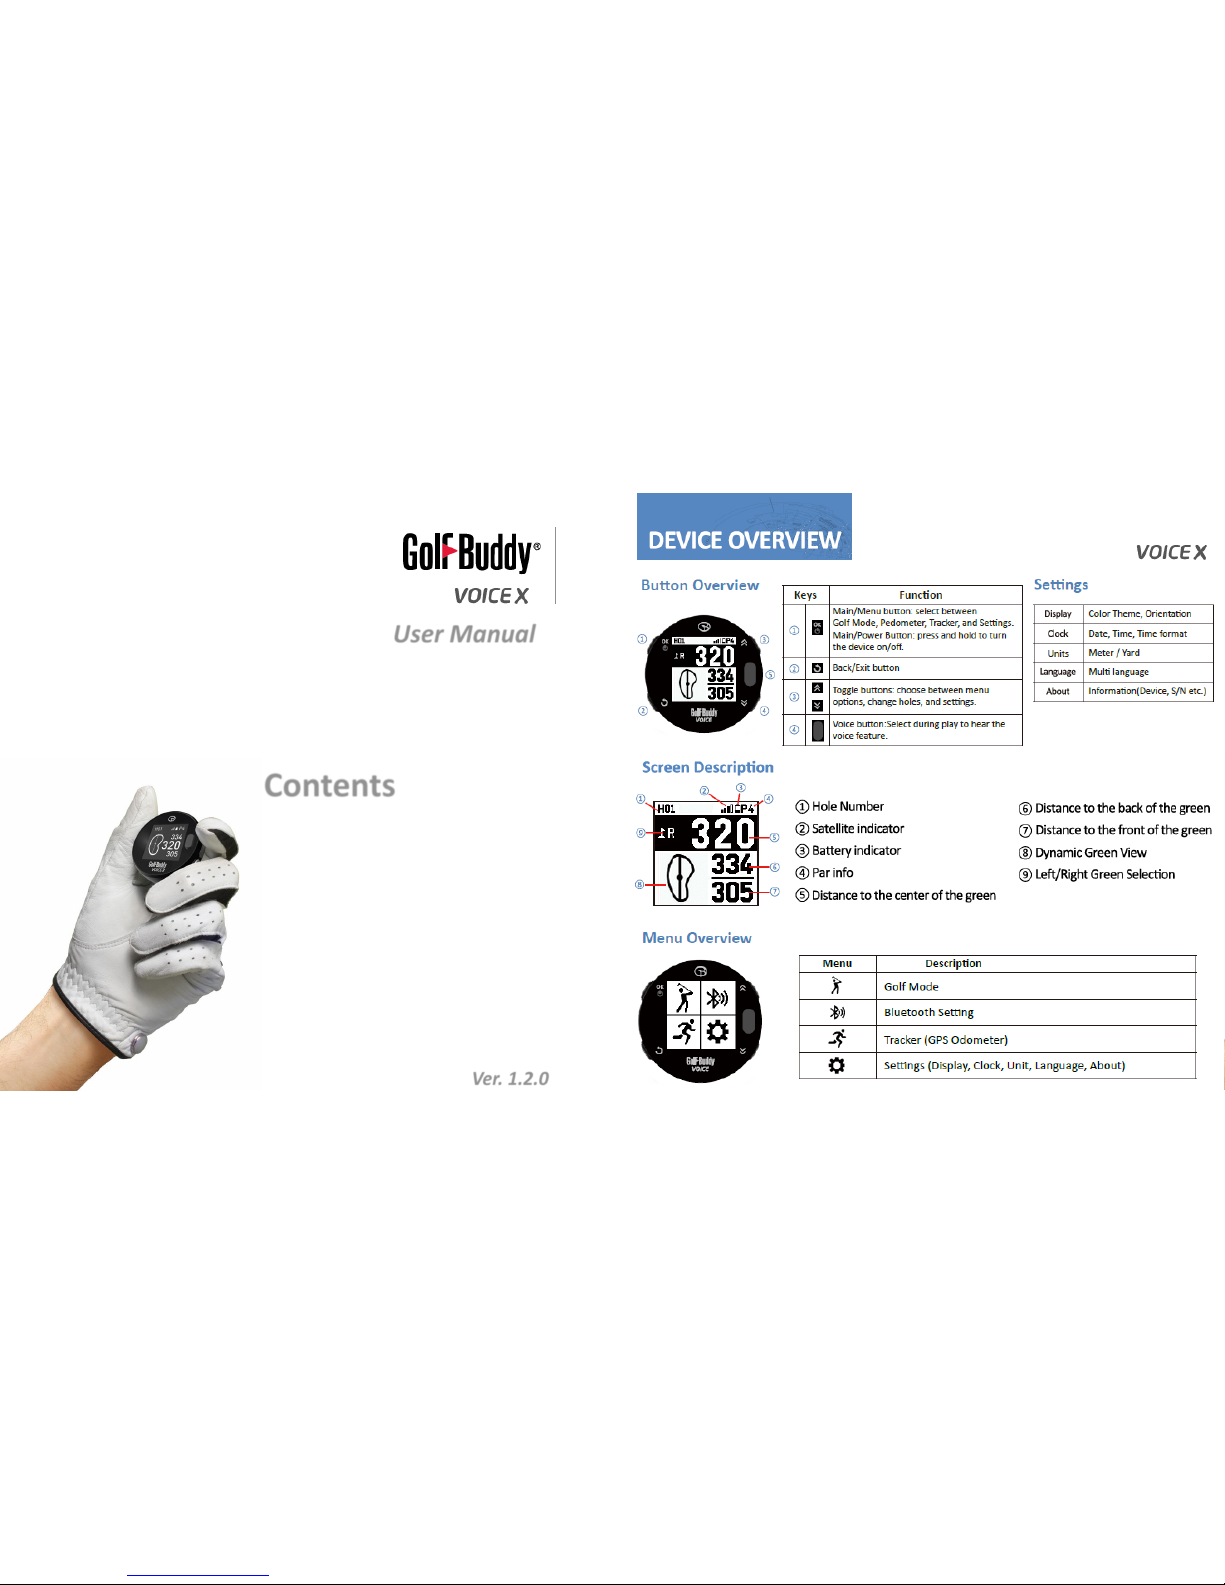
User Manual
Contents
1
1. DEVICE OVERVIEW
2. GETTING STARTED
3. BLUETOOTH
4. GOLF MODE
5. GPS TRACKER
6. SETTINGS
1
2
7
9
15
19
Ver. 1.2.0
Page 2
3
2
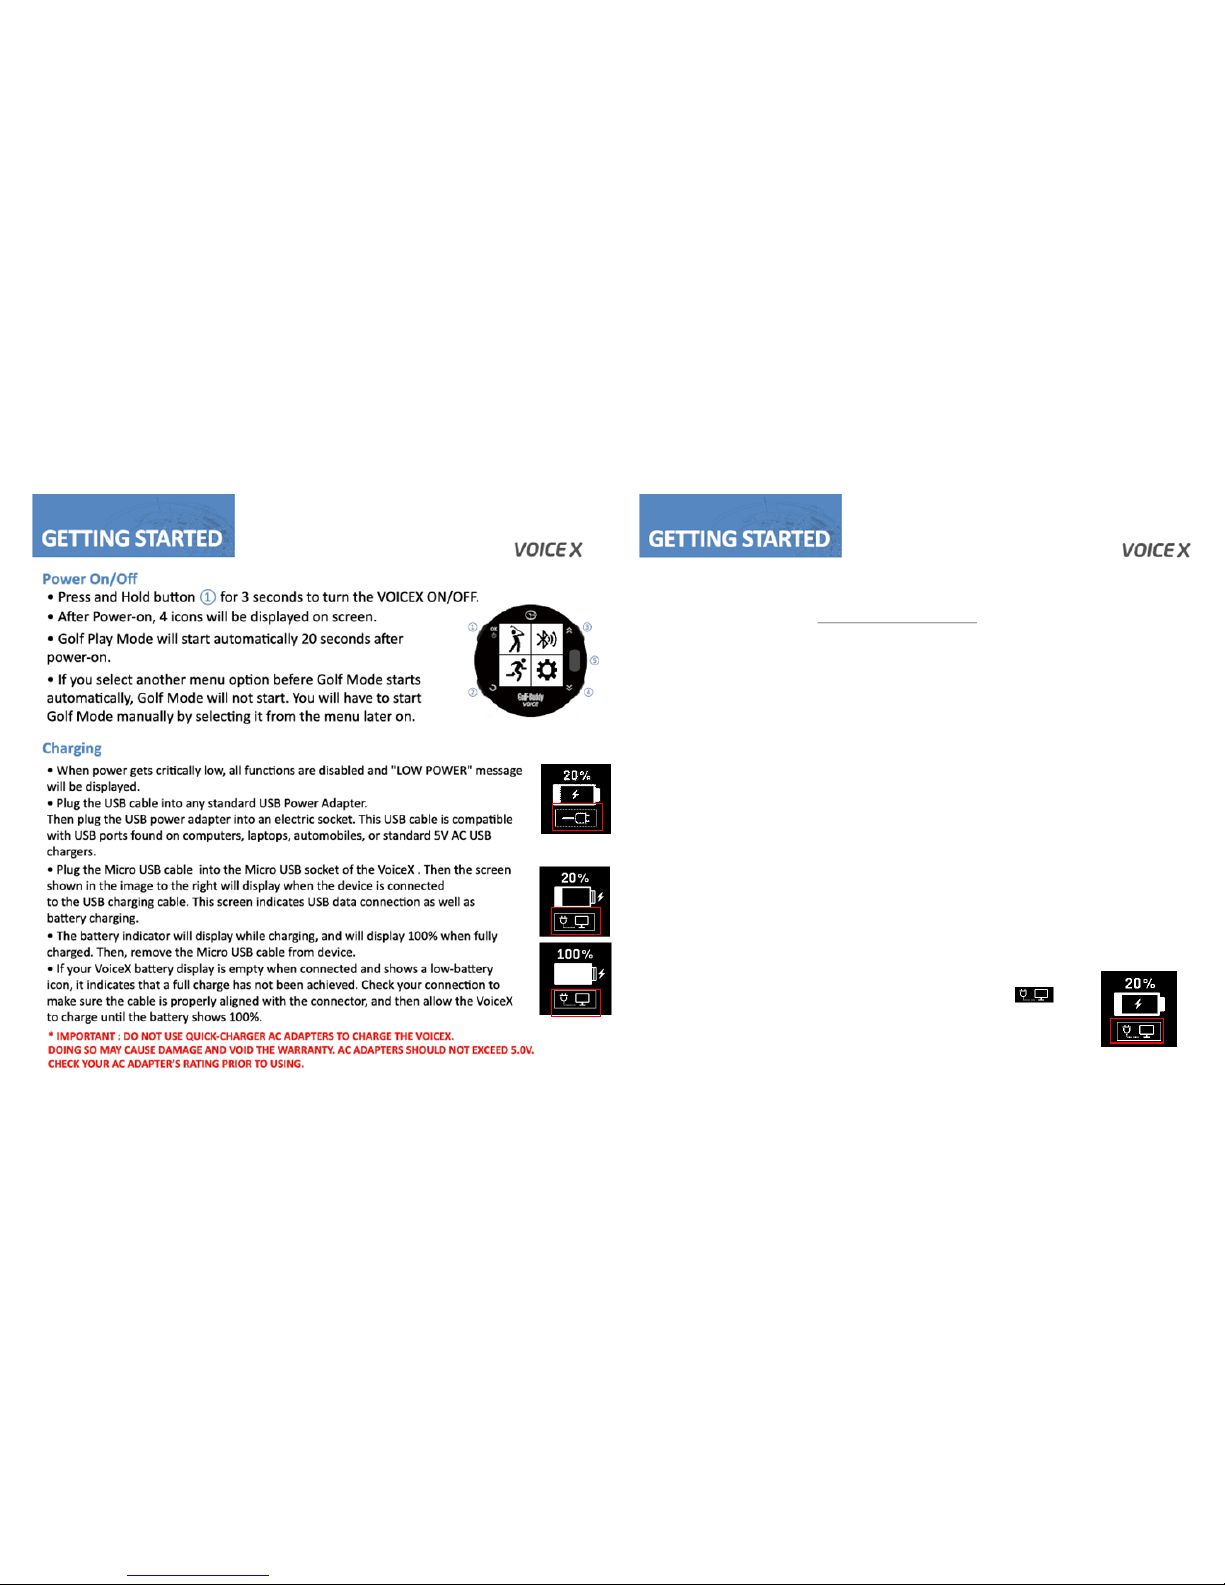
<Wall Charger>
<Computer>
Software Updates
1. Downloading the GolfBuddy Management Software(GB Manager) to your computer
• Please visit our website at www.golfbuddyglobal.com
• Click on the panel titled “Download GB Course Manager.” You will then see a screen with
an option to choose either Windows or Mac based software.
• Click on the correct version for your computer. Once downloaded, you can run the application
to install the GB Manager on your computer
• Once completed, you will see a blue icon labeled "GolfBuddy World Course Manager" on your
desktop that you will use to access the GB Manager once you have registered.
2. Creating a User ID:
• Open the GB Manager application by clicking on the blue icon on your desktop.
• You will see a Login Panel . Click on “Sign up for new user” at the bottom.
This will bring up a panel for you to create your User ID and Password.
• Fill in all the details that are required ( indicated by " * " ). Please note the instructions
regarding no Caps, Symbols, Spaces, & 4-15 character-long requirement. You will need to click
the “Check Availability” to verify your selected User ID is valid and not already being used.
• Click “Submit” at the bottom of the form when finished.
• You have now created your User ID and Password...
※ Make sure you write them down somewhere in case you forget them!
3. Registering your GolfBuddy VOICEX:
• Connect your GolfBuddy unit to a USB port on your computer using
the USB cable provided with the unit.
• After a short time, your GolfBuddy unit should show an icon
on the screen indicating it is connected to the computer.
You can disregard any driver download requests that your computer
may say is required.
• Click on the blue GB icon on your desktop and open the Login Panel.
Page 3
5
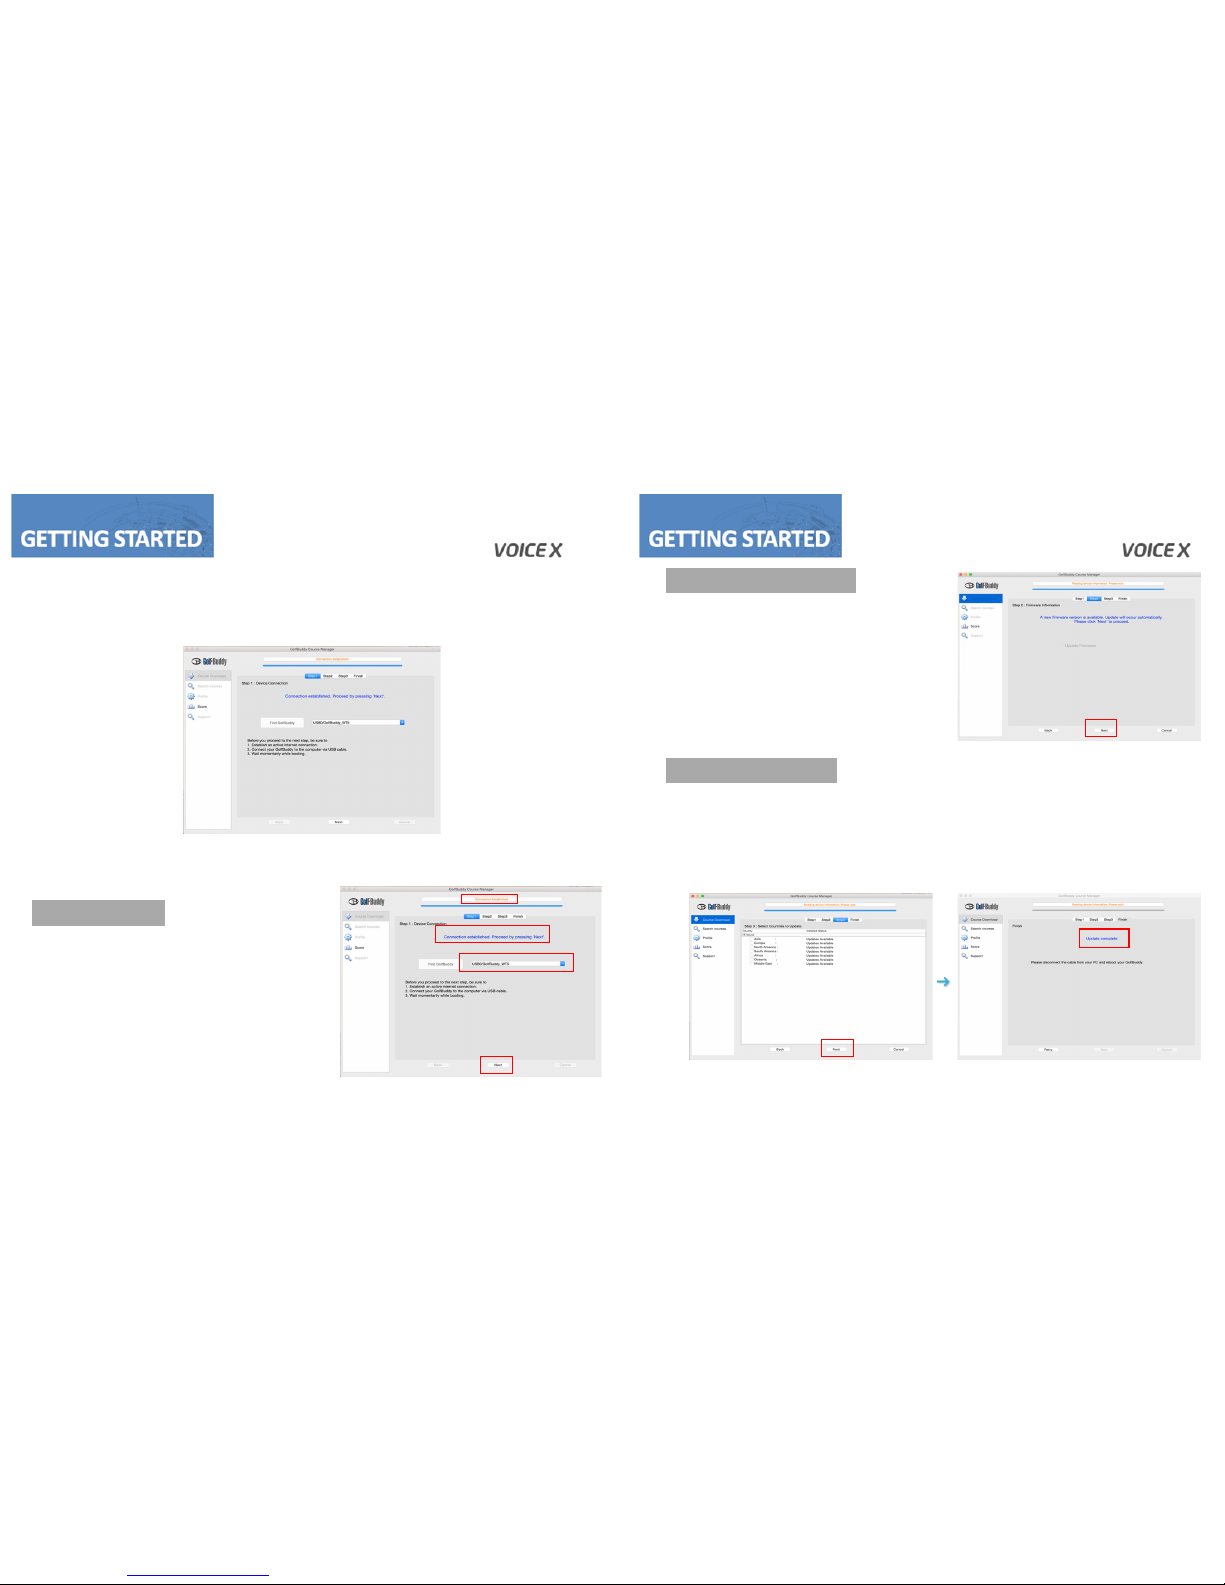
4. Updating your GolfBuddy VOICEX in four Steps
• Enter your User ID and Password. You should now see a panel that indicates the GB Manager is
searching for the device. After a short time, you will see “Connection Established”.
At this stage, your unit is successfully registered to the account that you created and you will not
be able to register your unit under a different account.
STEP 1 : Connection
• Once you get the “Connection Established”
message, please click “Next” to proceed to
Step 2: Firmware Update.
STEP 2 : Firmware Update
• At step 2, click “Next” to install
the latest firmware.
• If the firmware is already up-to-date,
click “Next” to proceed to step 3.
STEP 3 : Course Download
• Select the countries that you would like to update and click “Next”.
• You will see a panel that asks you to “Overwrite” or “Newly Updated Only”(default option
- already selected). Click “OK” to start the course update. Once all the courses have been
downloaded, you will receive a message “Update Complete”.
• Your GolfBuddy is now ready to go with the latest updates!
4
Page 4

7
STEP 4 : Disconnection
• After the message “Update Complete” is shown in Step 3, the VOICEX will need to be
disconnected from the computer
• Then, the firmware update will start automatically, and it will take about 2 mins to finish
the update.
• The firmware update of VOICEX will be finished by resetting it by itself.
Reset
6
Page 5

8
9
Connecting VOICEX to the Bluetooth headset
Bluetooth Headset
1. Turn the Bluetooth headset on.
2. Make it enter the pairing mode according to the user manual.
VOICEX
Press ① to enter BT settings.
Press ① to switch the Power.
1.Press ① to enter
BT headset.
1. Select ‘Search…’ with ③ and ④.
2. Press ① to search
your BT headset.
1. Select your headset from the list
with buttons ③ and ④.
2. Press ① to connect your BT headset.
1. The icon will appear
after connection.
(red box)
From the BT headset screen, search the BT headset by selecting the “Search…”.
•
On the BT Settings menu, turn the “Power” on by pressing button ①.
•
Once the BT headset is found, press button ① to connect it to your VoiceX.
•
Press button ① to disconnect your BT headset after selecting it with buttons ③ and ④.
•
Press button ① to remove the disconnected BT headset from the list
after selecting it with buttons ③ and ④.
•
Page 6

10
11
Selecting the green(only available if there are 2 Greens in the hole)
Page 7

12
13
Page 8

14
15
GPS TRACKER
Using the GPS Tracker
From the main menu screen, use toggle buttons ③ and ④ to
get to the Tracker icon and then press button ① to enter Tracker.
•
There are 3 menus such as Tracker, Record, and Lap in the Tracker.
•
Tracker
From the tracker menu, select “Tracker” by using the toggle buttons ③ and ④, and then
press button ① to enter the Tracker.
•
Tracker will show the travel time, distance, pace, and lap count by using GPS while outdoors,
and save the data.
•
From the Tracker mode, press button ②
to go the sub menu screen.
•
Resume Return to the Tracker mode
Stop Return to the main menu screen
TrackBack Repeat a path or to return to your
starting point on the same path. The dot marks
your position and the line shows the routes
you passed
1. Select ‘Tracker’ from the menu
with buttons ③ and ④.
2. Press ① to enter Tracker.
1. GPS Tracker Mode
Sub Menu
TrackBack
Page 9

1. Select ‘Record’ from the menu
with buttons ③ and ④.
2. Press ① to view the record list.
Sub Menus
1. Select one record from the list
with buttons ③ and ④.
2. Press ① to view the record in detail.
16
17
GPS TRACKER
SETTINGS
Record
From the tracker menu, select “Record” by using the toggle buttons ③ and ④, and then
press button ① to view the record list. Press button ② to return the previous screen.
•
From the record list, select one record by using the toggle buttons ③ and ④, and then
press button ① to view the record in detail. There are 4 sub menus such as Detail, Pace,
Altitude, and Track in the record screen.
When you want to return to the record list, press button ②.
•
Detail
⑴ Time : Travel time
⑵ Dist : Distance
⑶ Pace : Time/km
⑷ Lap : Lap count
Pace
⑴ AVG: Average pace
⑵ MAX: Maximum pace
⑶ MIN: Minimum pace
Altitude
⑴ AVG: Average
⑵ MAX: Maximum
⑶ MIN: Minimum
Track
The route you passed
③ : Zoom In
④ : Zoom Out
Lap
From the tracker menu, select “Lap” by using the toggle buttons ③ and ④, and then
press button ① to change the distance per lap. Press button ② to return the previous screen.
•
1. Select ‘Lap’ from the menu
with buttons ③ and ④.
2. Press ① to change the lap.
1. Select one lap from the list
with buttons ③ and ④.
2. Press ① to confirm your selection.
From the list of laps, select your preferred lap by using the toggle buttons ③ and ④, and then
press button ① to confirm your selection. Press button ② to cancel your selection and return
the previous screen.
•
Page 10

18
19
SETTINGS
Display
Color Theme : Sets the color for the screen.
① White : Light background / Dark text
② Black : Dark background / Light text
Clock
Unit
Language
Selects the language among English, French, Spanish, Deutsch, Italian, Korean, Japanese, Chinese.
Changing your preferred settings
From the main menu screen, use toggle buttons ③ and ④ to
get to the Settings icon and then press button ① to enter Settings.
•
You can change or view the settings of Display, Clock, Units,
Language, and About.
•
On Settings menu, press button ① to confirm your selection, and
Press button ② to cancel it and return to the previous screen.
•
About
View the device Information.
(Serial Number, Firmware version etc)
Orientation : Sets the screen orientation
① Normal : Default orientation
② Flipped : Invert the orientation
Sets the unit for distance.(Meter/Yard)
Sets the date, time, time format(12/24hour), and DST.
•
•
•
•
•
•
Page 11

20
21
 Loading...