

Page 1

1
Page 2

Language
English
中文
日本語
한글
0617pt4매뉴얼(Us)수정_레이아웃 1 14. 6. 26. 오후 4:28 페이지 2
Page 3
0617pt4매뉴얼(Us)수정_레이아웃 1 14. 6. 26. 오후 4:28 페이지 4
Page 4
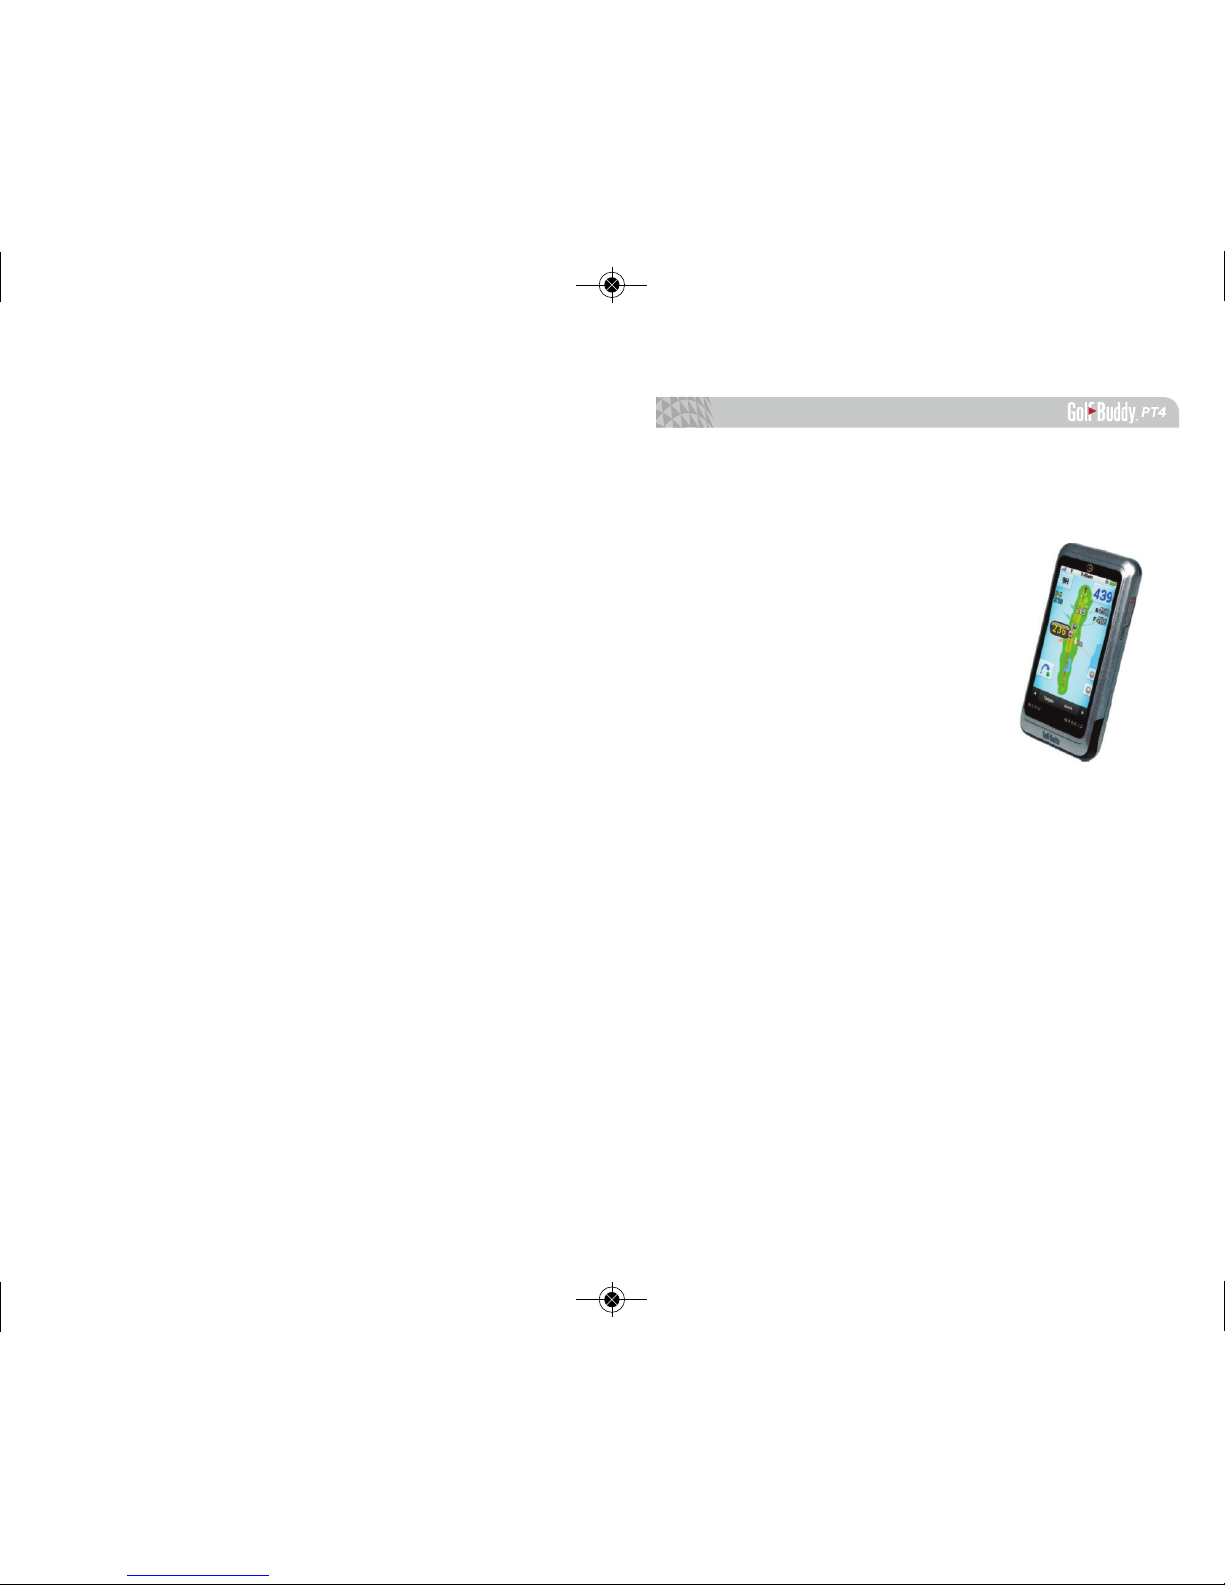
Thank you for choosing GolfBuddy!
The GolfBuddy PT4 provides you with the most accurate golf course distance information to enhance your
golng experience. The GolfBuddy PT4 is a premium
handheld golf GPS device with an enhanced 4” high resolution touch screen LCD and a slim body design. As with
all other GolfBuddy products, the PT4 comes preloaded
with over 37,000 course information in more than 130
countries around the world with free course updates.
7
GolfBuddy®PT4
0617pt4매뉴얼(Us)수정_레이아웃 1 14. 6. 26. 오후 4:28 페이지 6
Page 5
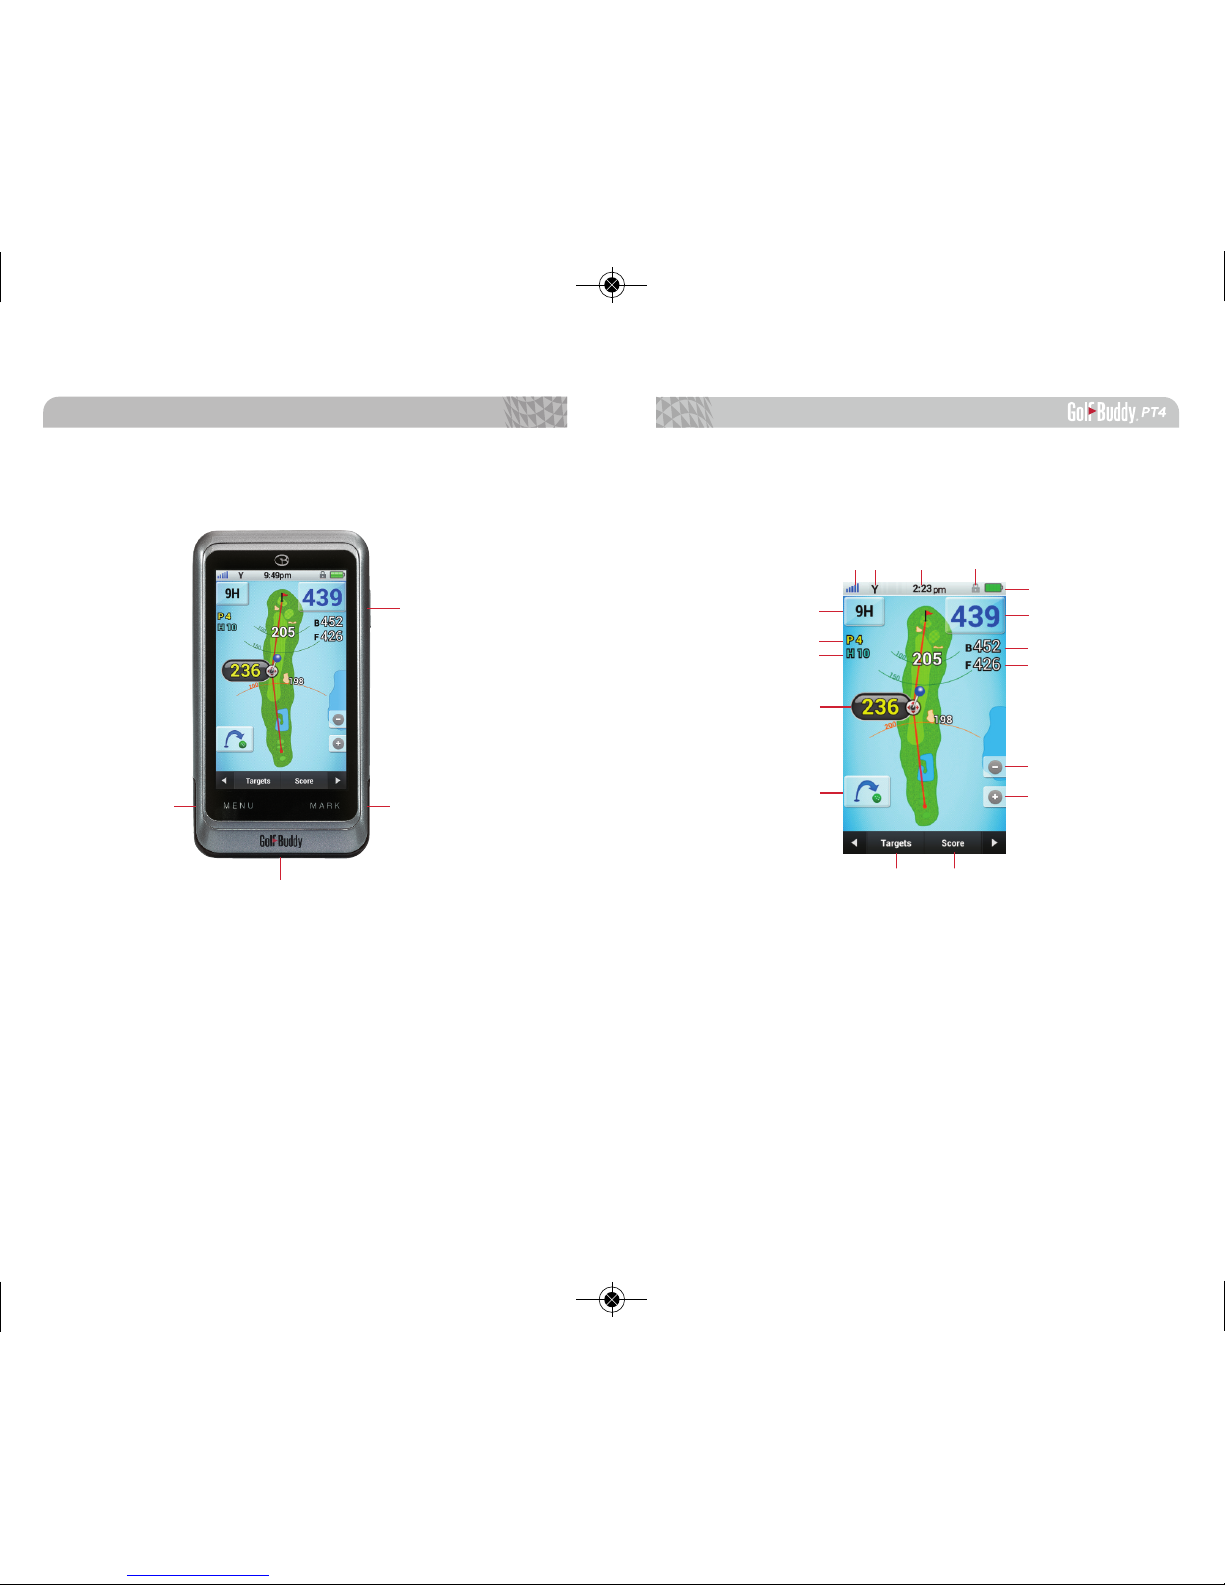
Play Screen Layout
98
① Menu
② Mark/Back
③ Power On/Off, Screen Lock/Unlock
④ USB Port
GolfBuddy PT4 Overview
①
①
⑥
⑦
⑧
⑩
⑨
②
②
③
③
④
④
⑤
⑪
⑫
⑬
⑭
⑭
⑮⑯
①
GPS Signal
②
Metrics (Yards/Meters)
③
Time
④
Screen Lock/Unlock
⑤
Battery Indicator
⑥
Hole Number
⑦
Par Information
⑧
Handicap Index
⑨
Mark (Measure Shot Distance)
⑩
Distance to Target Location
⑪
Distance to Center of the
Green
⑫
Distance to Back of the Green
⑬
Distance to Front of the Green
⑭
Zoom In/Out
⑮
Targets/Hazards Information
⑯
Scorecard
0617pt4매뉴얼(Us)수정_레이아웃 1 14. 6. 26. 오후 4:28 페이지 8
Page 6

Getting Started
0617pt4매뉴얼(Us)수정_레이아웃 1 14. 6. 26. 오후 4:28 페이지 10
Page 7
Getting Started
1312
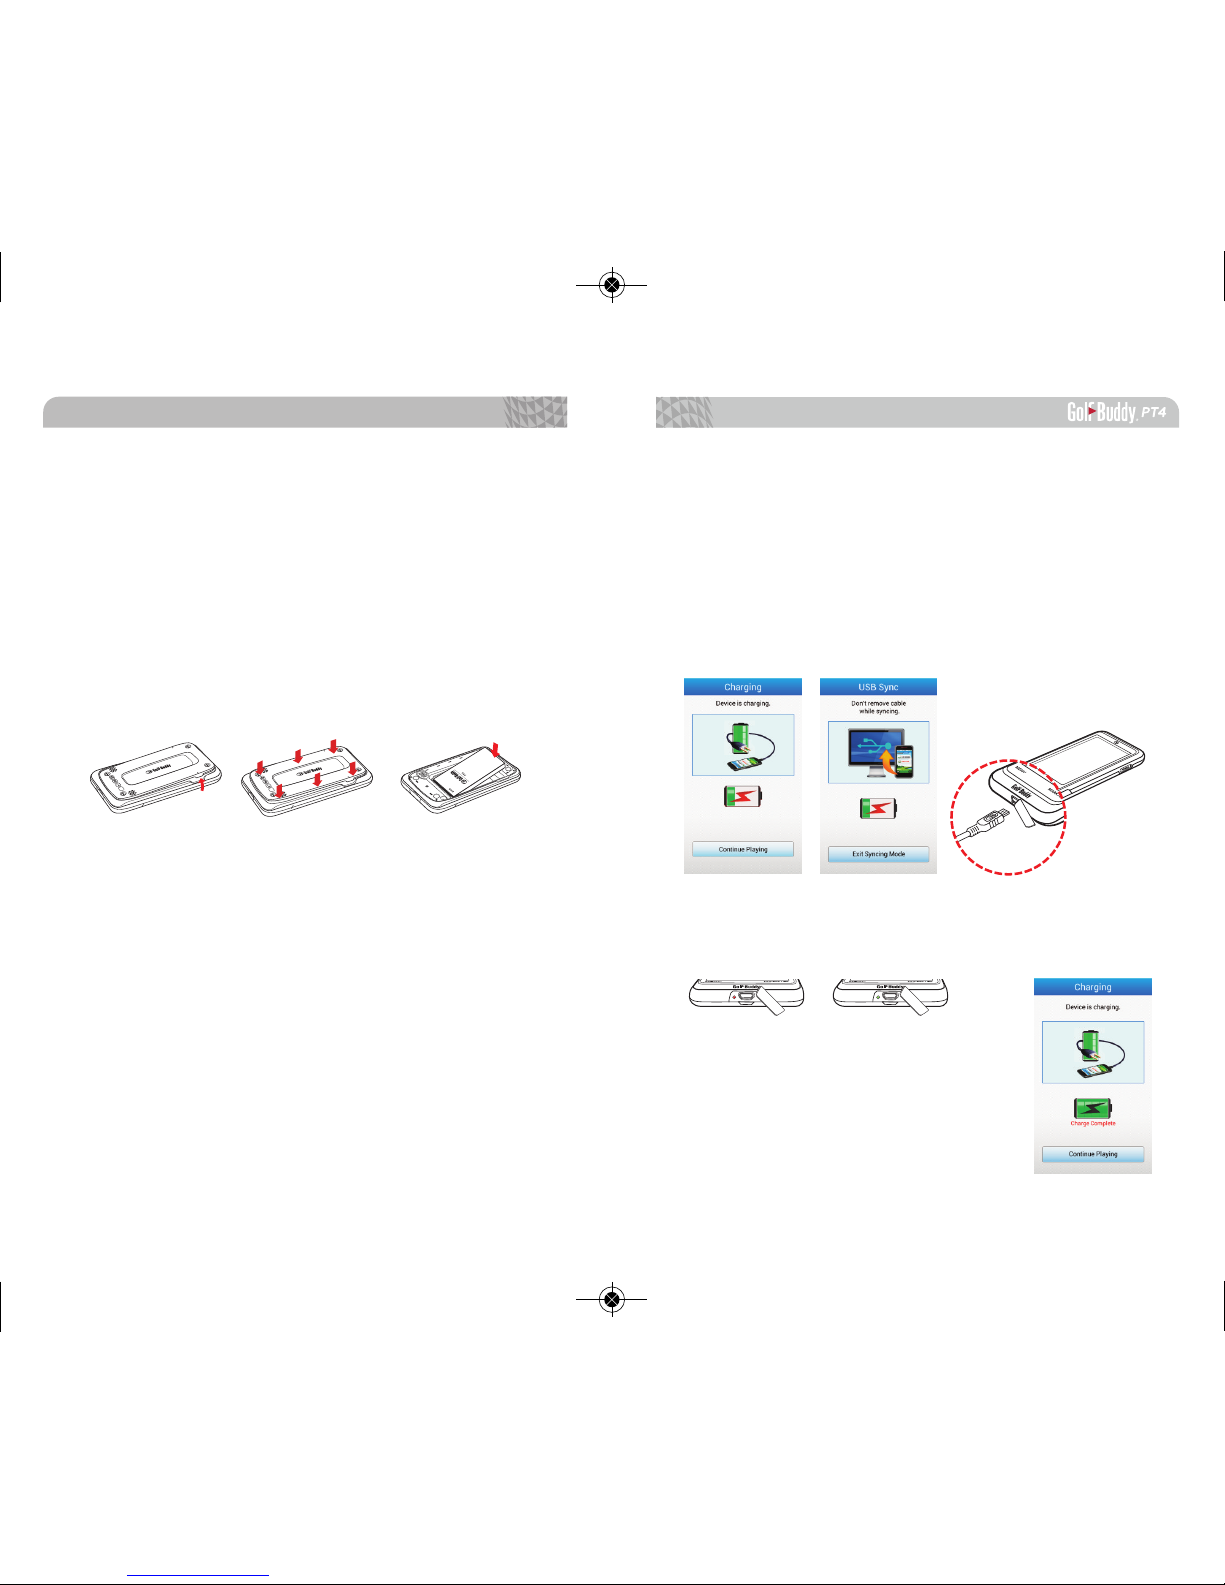
1.1. Installing the Battery
Remove the back cover by utilizing either slot on the
top side of your PT4. Lift the cover up and away from the
PT4. Insert the battery into the opening on the back of
the unit, making sure the connector is aligned. Press
down rmly to secure the battery. Place the battery cover
on to the back of the unit and press down. Press along
the edge of the back cover until you have a secure seal.
O
P
E
N
O
P
E
N
w
w
w
.
g
p
s
g
o
l
f
b
u
d
d
y
.
c
o
m
O
P
E
N
O
P
E
N
w
w
w
.
g
p
s
g
o
l
f
b
u
d
d
y
.
c
o
m
⇒⇒
1.2. Charging the Battery
Connect the PT4 to a power outlet using the included
cable and the USB wall charger. You can also charge your
PT4 by connecting the data cable to your computer.
<Note>
It is recommended that the battery is recharged before every round
of golf. When the battery is low, the PT4 will turn off automatically
The LED light by the USB port will turn red while it’s charging and
will turn green when the unit is fully charged. The screen will also
display “Charge Complete” underneath the battery icon.
0617pt4매뉴얼(Us)수정_레이아웃 1 14. 6. 26. 오후 4:28 페이지 12
Page 8

Getting Started
1514
1.3. Power On/Off
Power On: Press the power button
on the right side of the unit.
Power Off: Press and hold the power
button until the shut down screen
appears. Press yes to shut down or
no to cancel.
1.4. Screen Lock/Unlock
Press the power button to lock the screen. The message “Locked – Screen is locked. Press the power key to un-
lock.” will appear. The screen lock indicator will also appear
at the top of the screen. When the screen is locked, press
the power button again to unlock the screen. The message “Unlocked” will appear and the screen lock indicator
will no longer show at the top of the screen.
1.5. Initial Settings
When you rst turn on the PT4, an
Initial Settings menu will appear. You
can select your Language, Distance
Unit, and Time Zone. This menu option
will appear every time you turn on your
PT4. If you would like to opt out of this
menu, please select the Do not show
again option.
1.6. Main Menu
1.6.1. Play Round
Initiates the PT4 to start locating
nearest course(s) and to prepare you for
a round of golf.
0617pt4매뉴얼(Us)수정_레이아웃 1 14. 6. 26. 오후 4:28 페이지 14
Page 9
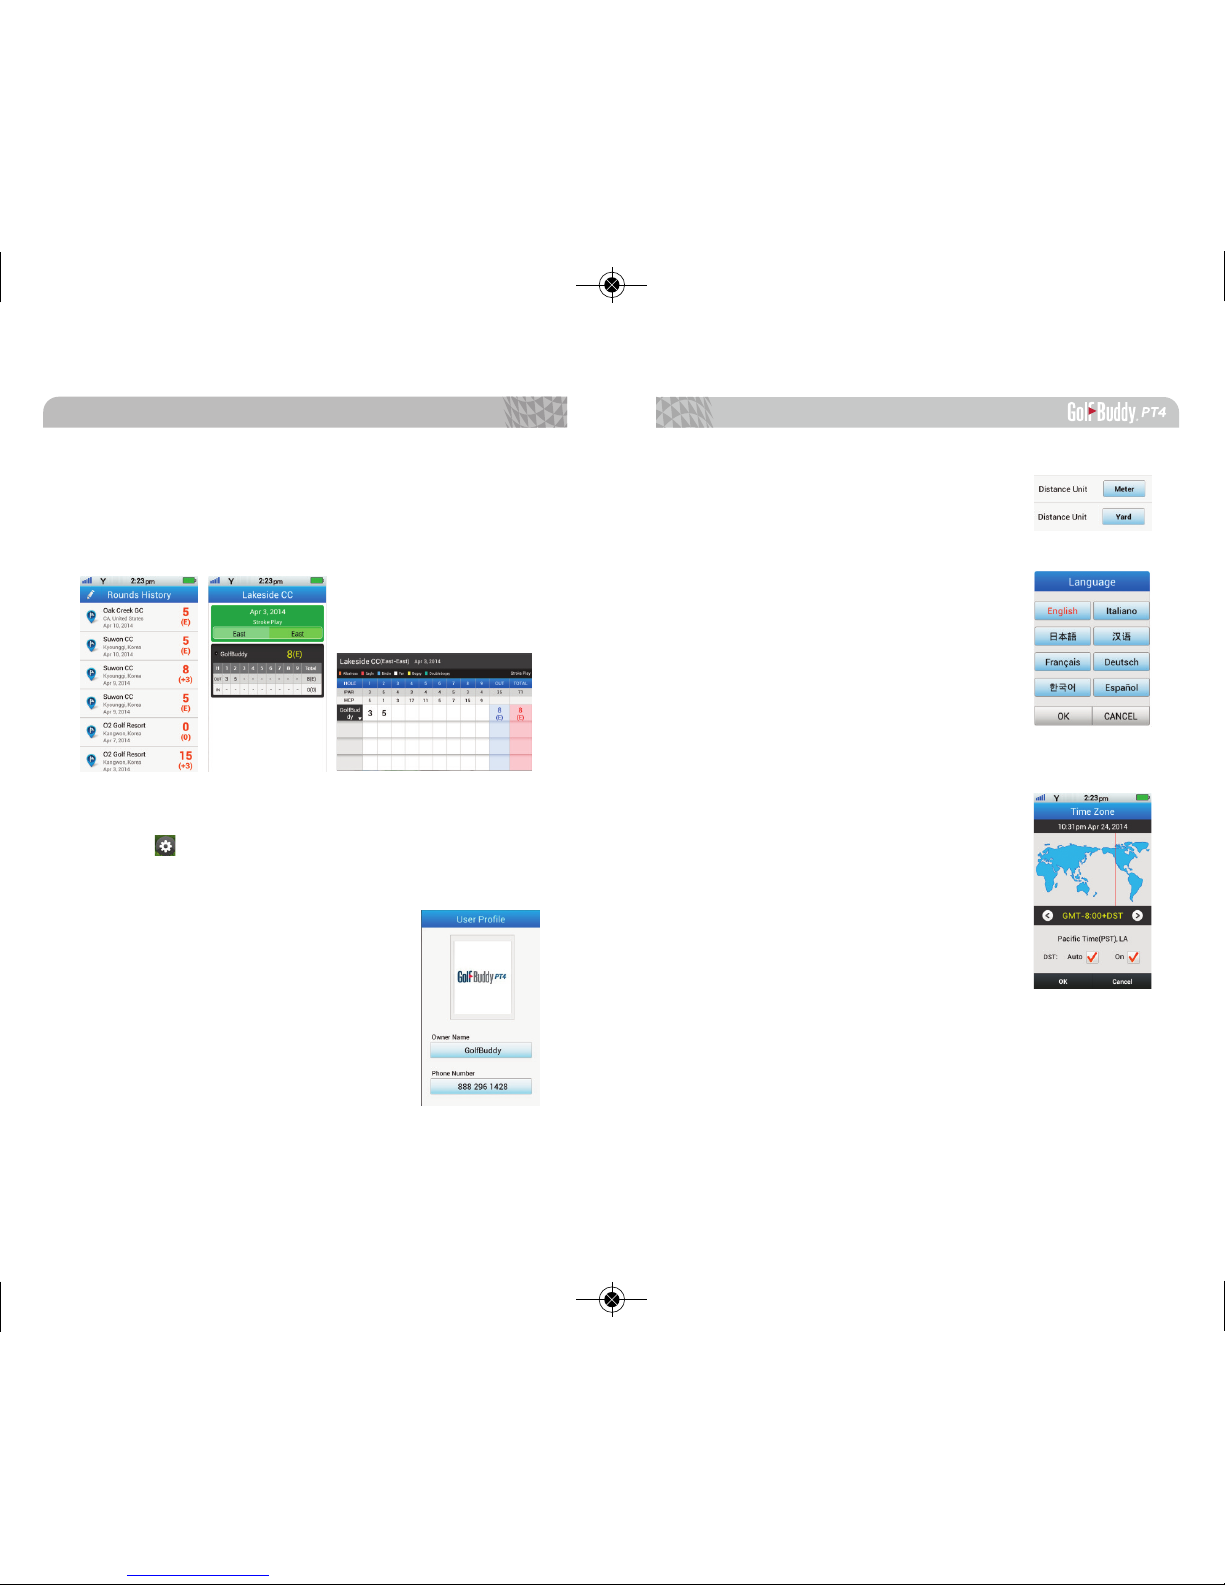
1.6.2. User Score
Shows the history of all saved scores.
※ Please see 3.3. User Score for more information.
1.7. Settings
Tap on icon to go into the settings option.
1.7.1. User Information
You can enter a user name and phone
number into the PT4. You can also
upload images through GB Manager to
have it appear on your device.
Getting Started
1716
1.7.2. Distance Unit
Select yards or meters.
1.7.3. Language Selection
Select a language of preference.
1.7.4. Select Time Zone
The time will set automatically after the
PT4 successfully connects to satellites. If
you want to set your time manually, you
can use the arrow icon or tap the location
on the map to navigate your time zone.
You can select the DST (Daylight Savings
Time) option for the time zone to be adjusted automatically.
0617pt4매뉴얼(Us)수정_레이아웃 1 14. 6. 26. 오후 4:28 페이지 16
Page 10
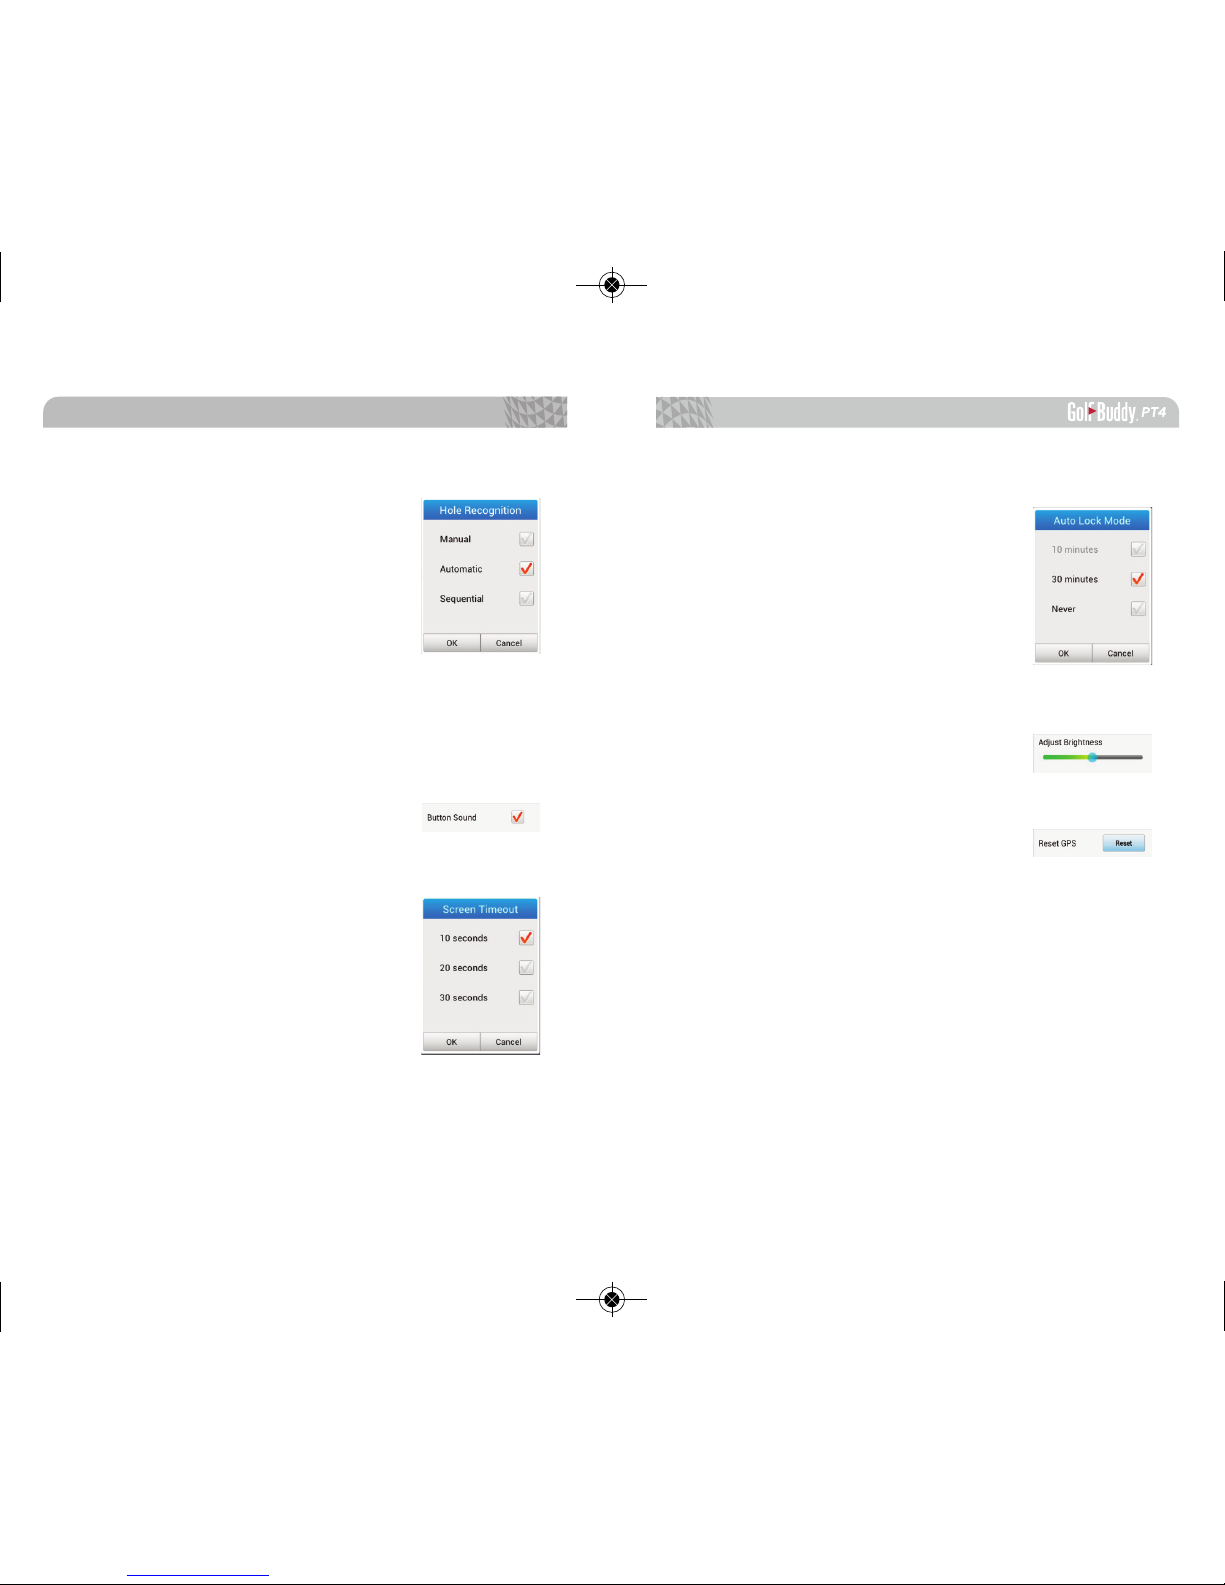
1.7.5. Hole Recognition
Manual: You will have to manually
select the course and change the hole
as you play.
Automatic: Your PT4 will auto
matically recognize the course and
change holes accordingly as you
move around the golf course.
Sequential: If you go to hole #1(front) or #9(back), your
unit recognize the next hole as long as played in chronological order.
1.7.6. Button Sound
Select to have the screen function
sounds turned on or off.
1.7.7. Screen Time Out
Select to have the back light on for
10 seconds, 20 seconds, or 30 seconds.
Getting Started
1918
1.7.8. Auto Lock Mode
Select to automatically lock the
screen after 10 minutes, 30 minutes, or
never.
1.7.9. Adjust Brightness
Drag the bar left or right to adjust
the brightness of the screen.
1.7.10. Reset GPS
If you do not have GPS signal or are
experiencing incorrect yardage issues,
you can reset the GPS to troubleshoot
the device.
※ When resetting the GPS, it is recommended to have the PT4 out-
side or if possible near a golf course.
0617pt4매뉴얼(Us)수정_레이아웃 1 14. 6. 26. 오후 4:28 페이지 18
Page 11
Basic Operations
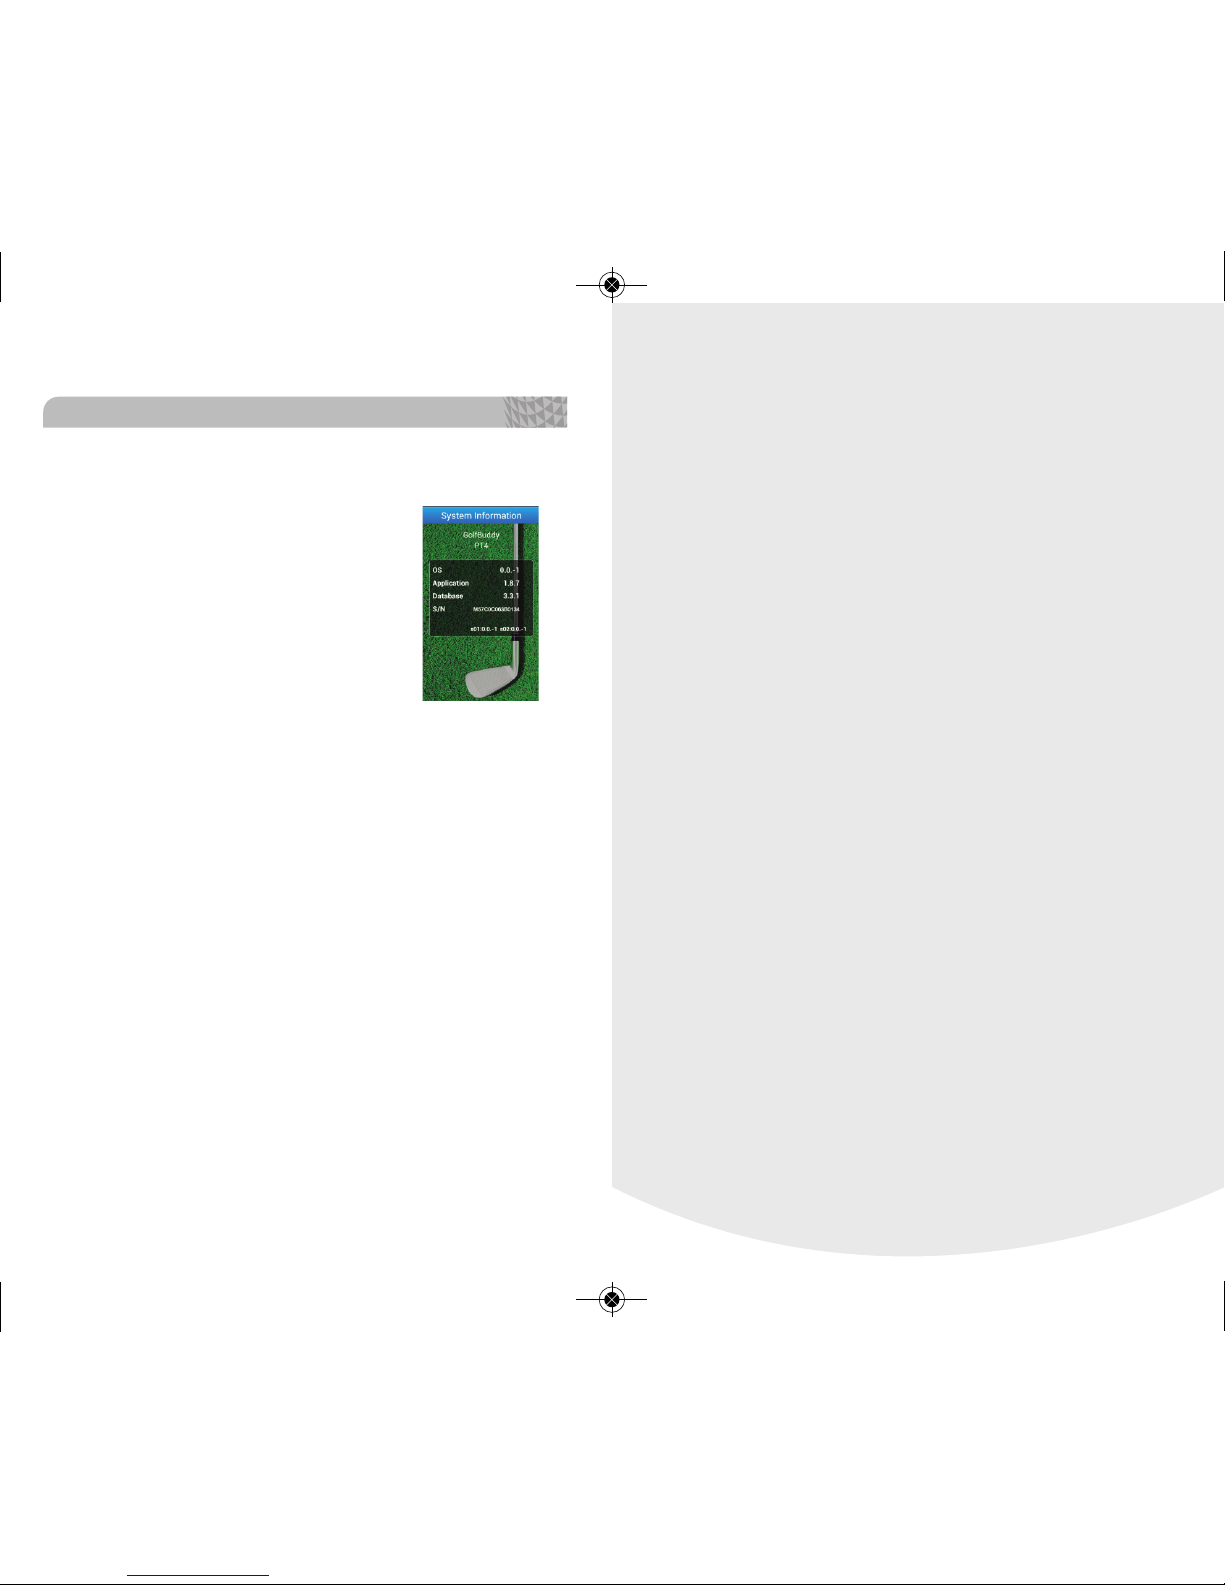
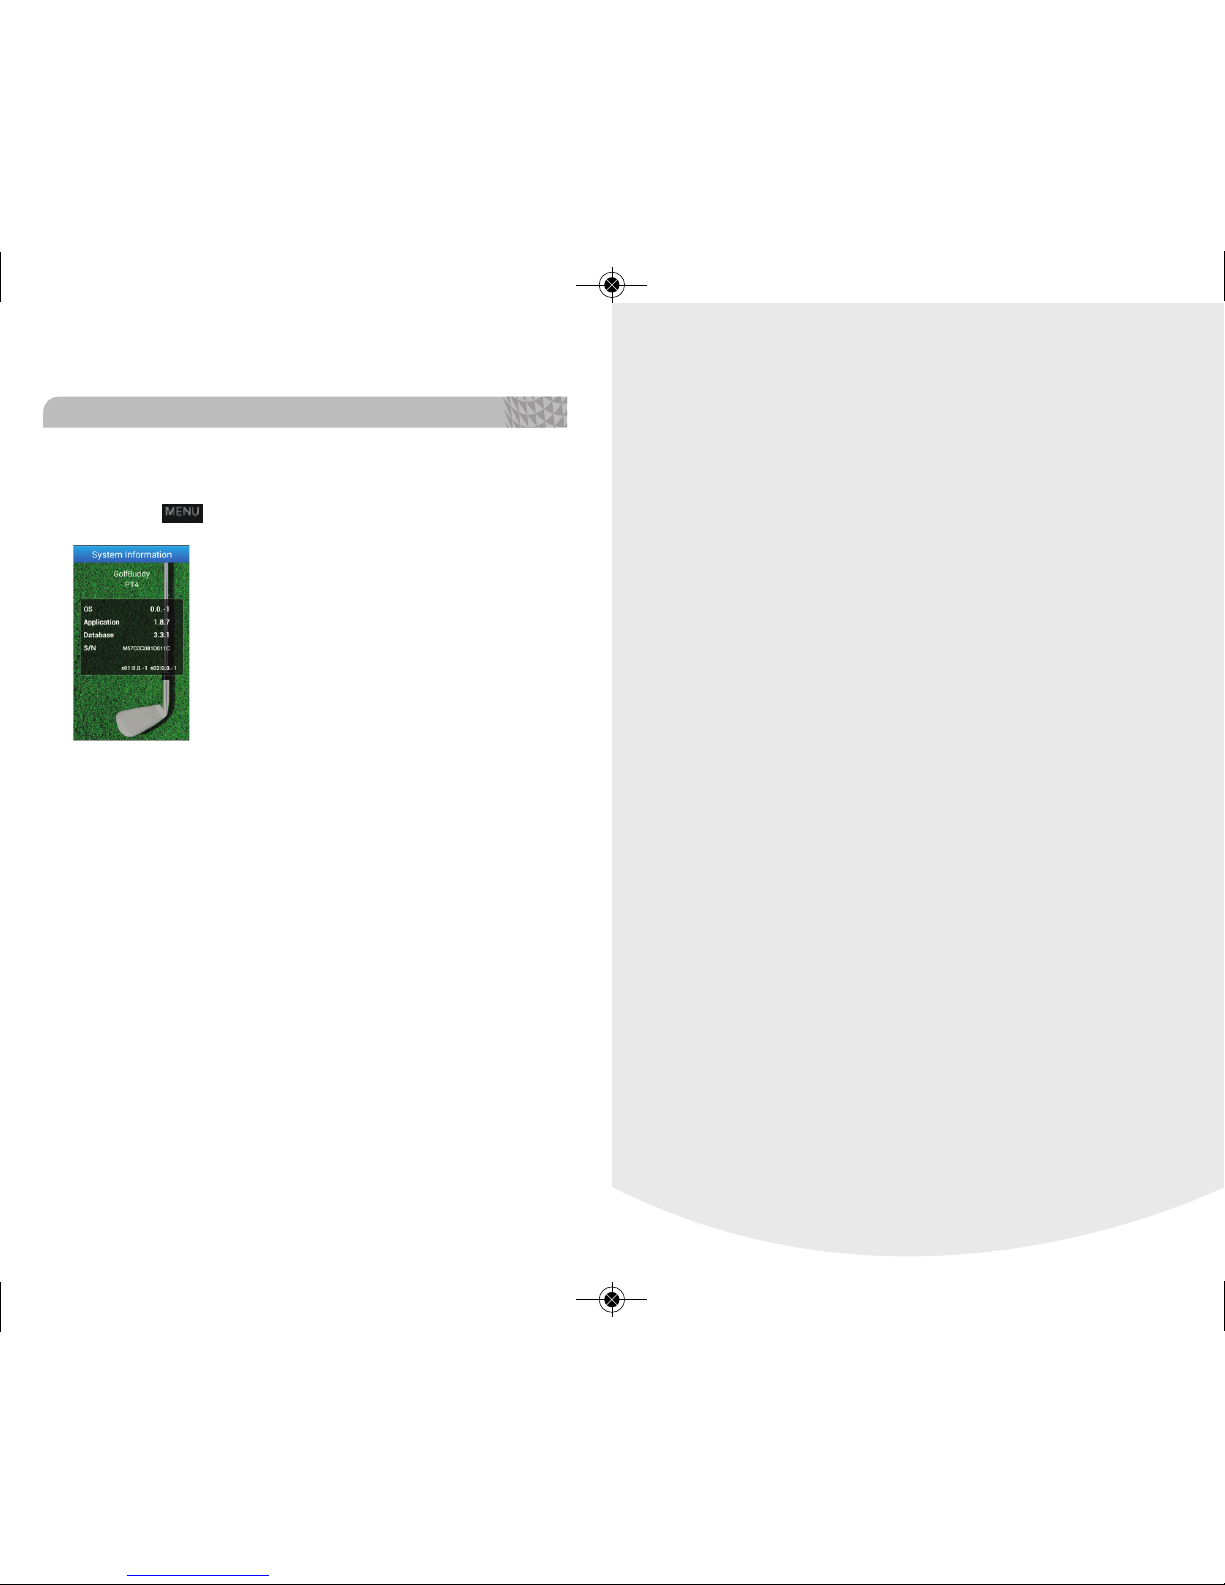
1.7.11. System Information
Detailed system information including
OS, application, data base, and serial
number are displayed.
Getting Started
20
0617pt4매뉴얼(Us)수정_레이아웃 1 14. 6. 26. 오후 4:28 페이지 20
Page 12
Basic Operations
2322
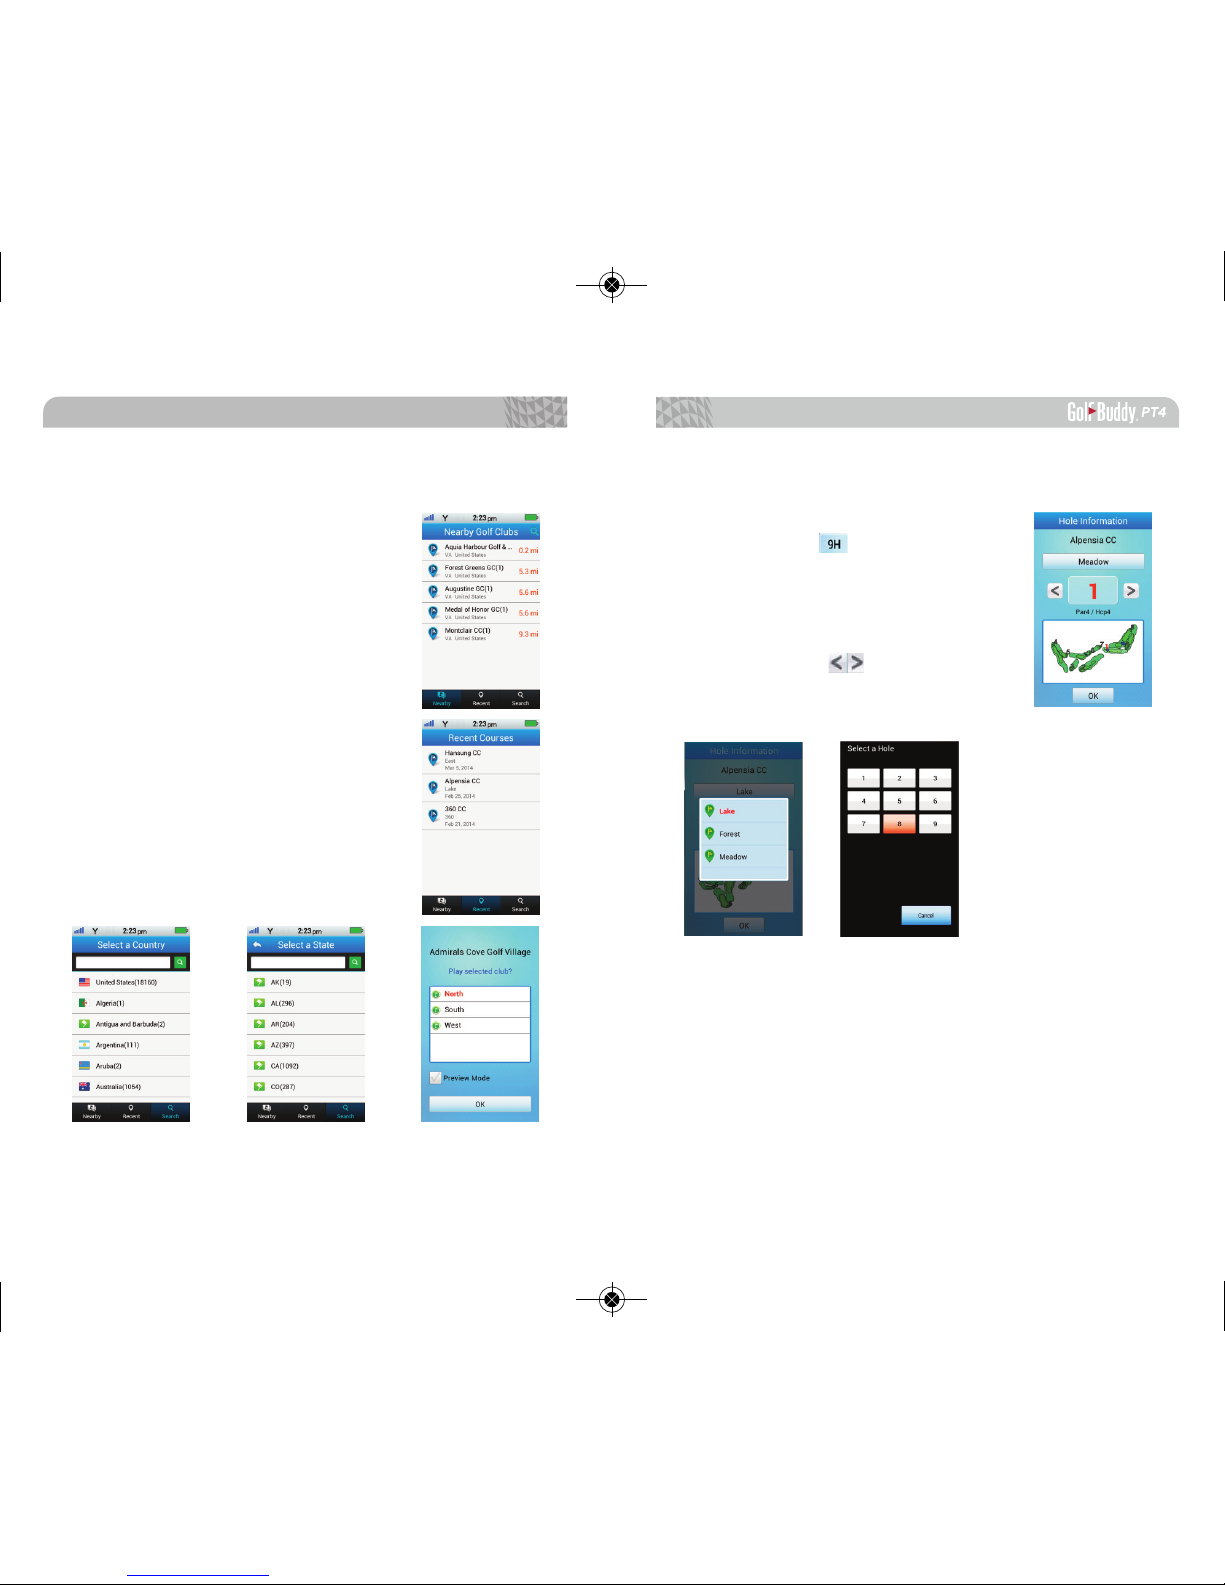
2.1. Course Recognition
2.1.1. Automatic Hole Recognition
After the PT4 acquires GPS signal, it
will automatically detect the nearest
course.
2.1.2. Hole Recognition Options
Nearby: The PT4 will list nearby
golf courses.
Recent: The PT4 will show you the
recently played courses.
Search: You can manually search
courses by typing the name of the golf
course or by manually selecting the
country and state where the golf
course is located.
2.2. Hole Information
You can view the hole information
by selecting the icon on the top left
of the screen.
2.2.1. Changing Holes Manually
You can change holes manually by
simply using the arrow keys or by
selecting a preferred hole number.
0617pt4매뉴얼(Us)수정_레이아웃 1 14. 6. 26. 오후 4:28 페이지 22
Page 13
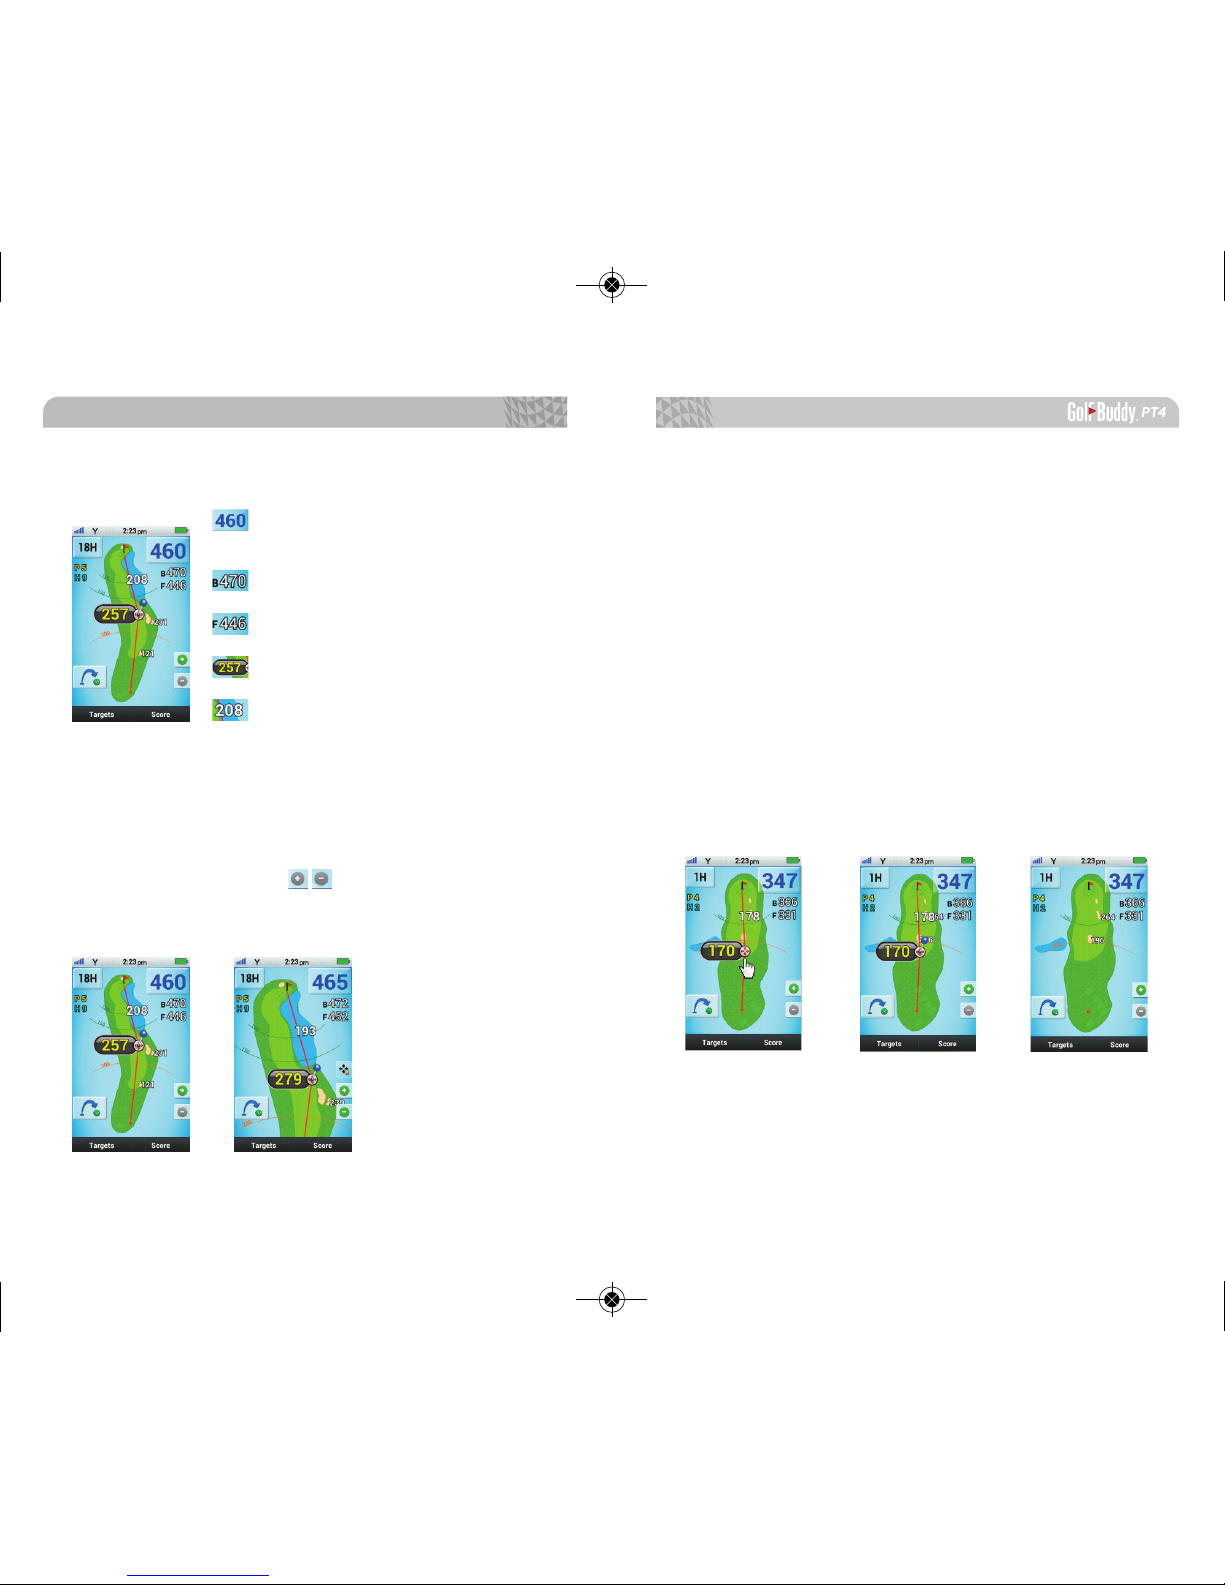
2.4.1. Touchpoint Indicator
When you tap the screen, you will see an indicator that
now gives you the distance to that point and also will display the distance from the targeted location to the center
of the green.
2.4.2. Touchpoint Indicator Set/Remove
Five seconds after tapping the targeted location, the
Touchpoint Indicator will show a blue pin at that point.
This is to keep the selected position in place. To move the
Touchpoint indicator again, tap the blue pin and select
another position. To remove the Touchpoint Indicator,
“double tap” the screen once the blue pin icon shows the
targeted distance is set.
2.3. Distance to the Green
Distance to the center of the
green
Distance to the back of the green
Distance to the front of the green
Distance to the targeted location
Distance from targeted location to
center of the green
2.4. Play Mode
The GolfBuddy PT4 will automatically display dis-
tances to the green as you go around the course.
You can zoom in or out from the full hole layout.
Basic Operations
2524
0617pt4매뉴얼(Us)수정_레이아웃 1 14. 6. 26. 오후 4:28 페이지 24
Page 14
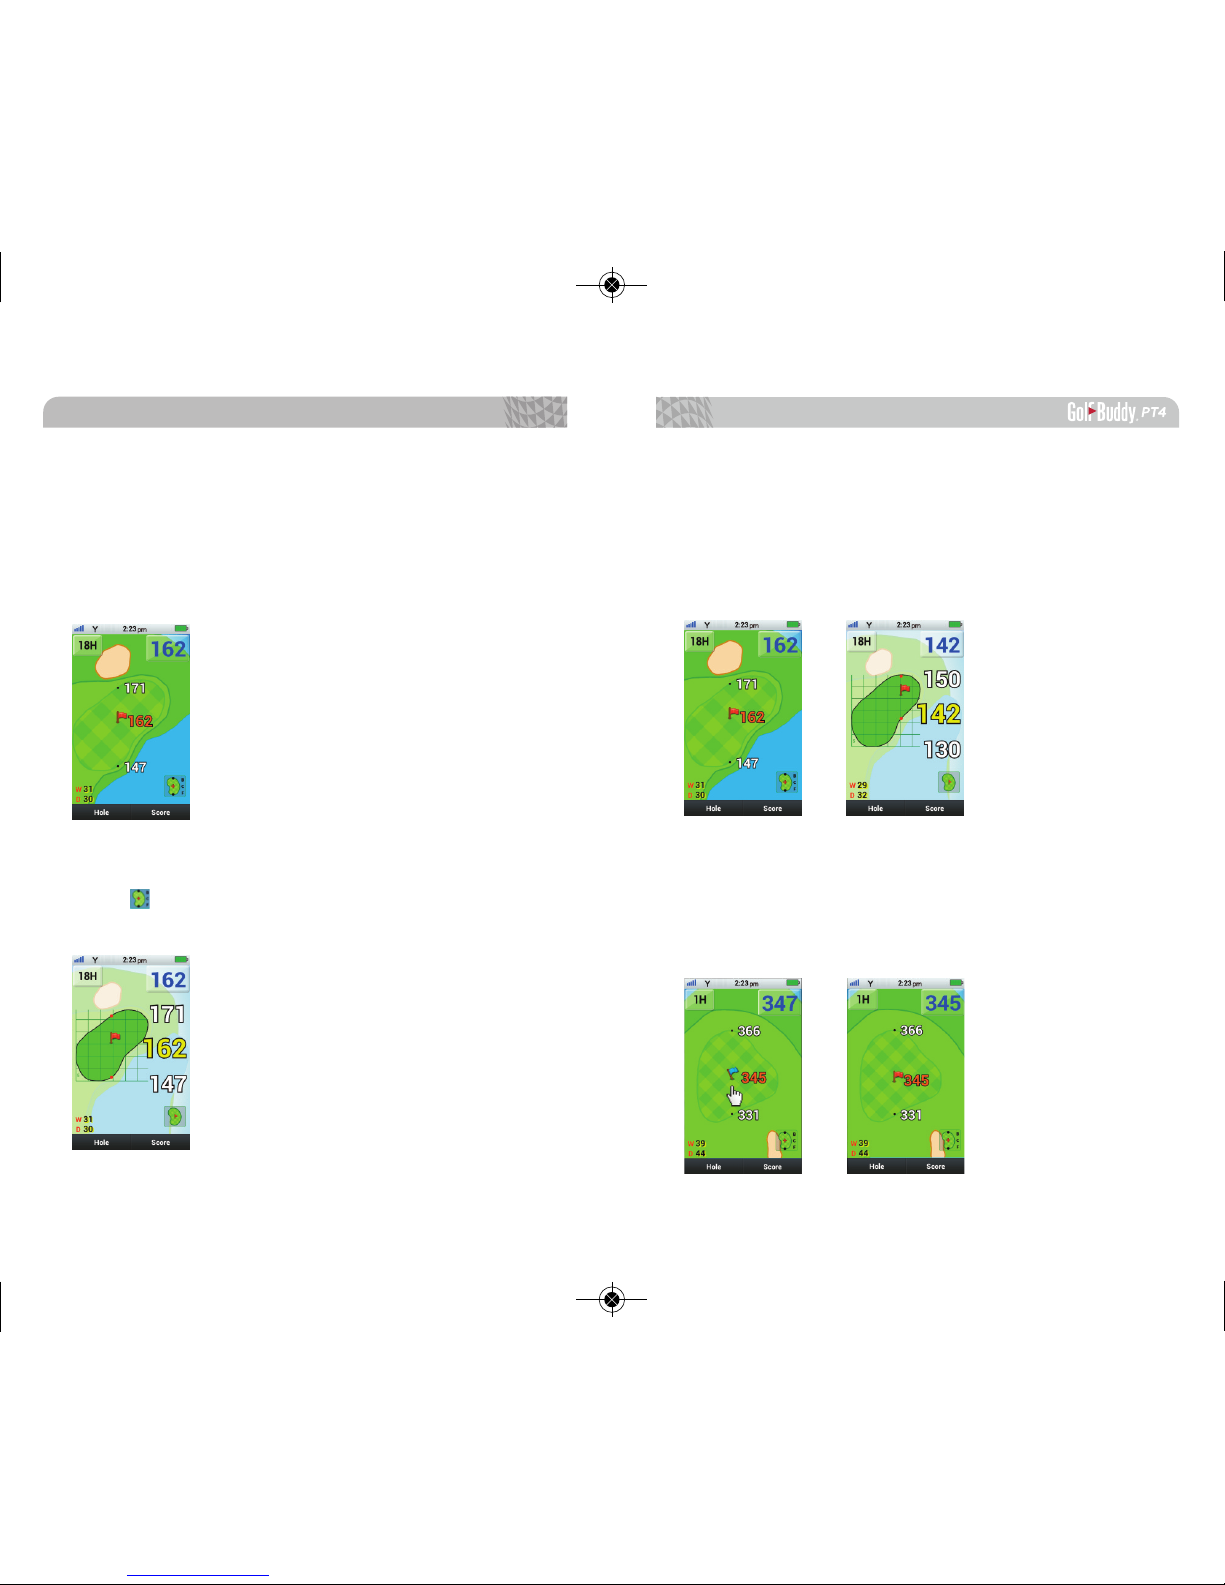
2.5. Green View Screen
From the hole layout, tap on the distance to the center
to switch to Green View Screen. The shape of the green
rotates with your angle of approach, giving you the real
distances to front, center and back of the green.
*W 31: Width of the green is 31 yards
*D 30: Depth of the green 30 yards
For higher contrast and larger numbers, you can tap
on the icon. The PT4 will always recognize the last setting of the pin placement in the Green View Screen.
Basic Operations
27
26
2.6. Pin Placement
You can place the pin anywhere on the green from the
Green View Screen by tapping the pin and dragging it
to the prefered location. As the pin moves, the distance
will change accordingly.
When the pin is blue, you are able to move the pin
freely around the green. When the pin is red, the pin will
be locked at its current location. Click the red pin to
switch back to the blue pin, if you would like to relocate
the pin.
0617pt4매뉴얼(Us)수정_레이아웃 1 14. 6. 26. 오후 4:28 페이지 26
Page 15
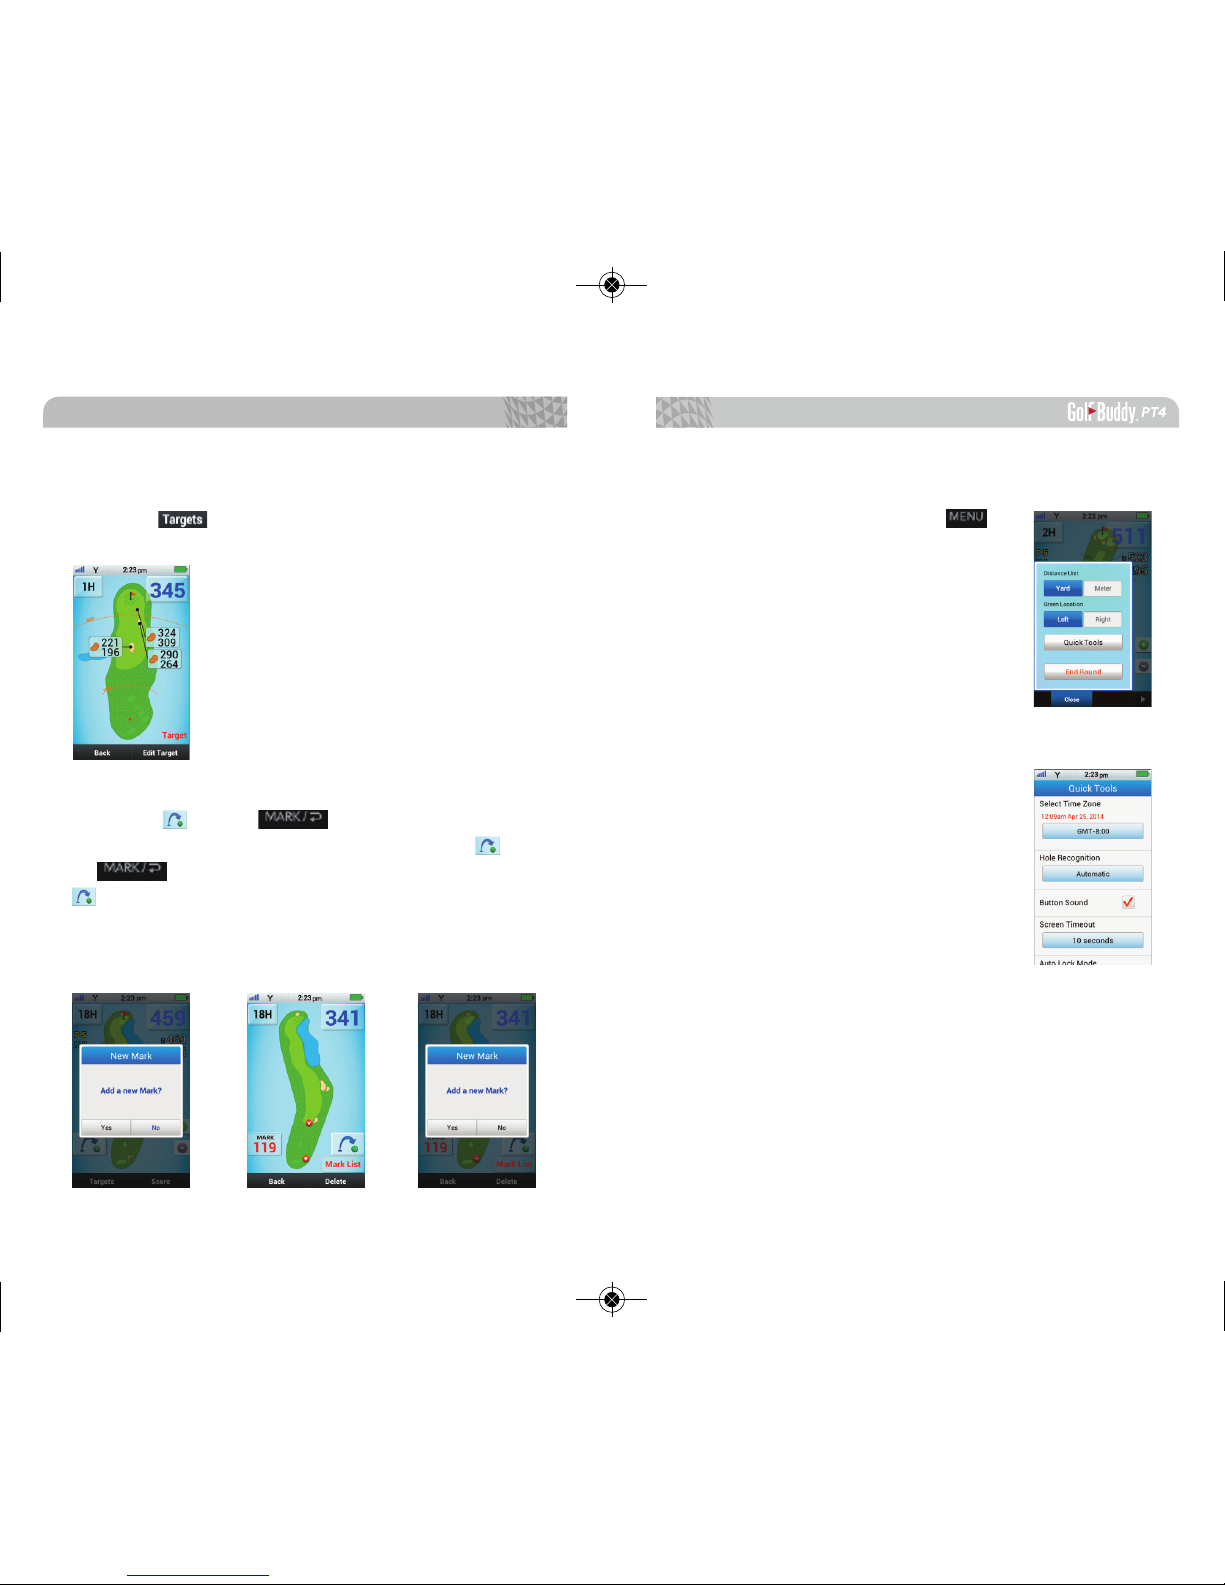
2.9. Quick Menu
From Play Mode, tap on the to
access the Quick Menu.
2.9.1. Distance Unit
Select yards or meters.
2.9.2. Green Locations
Select left or right green.
(if available)
2.9.3. Quick Tools
From the Quick Tools menu, you
can manage the Time Zone, Hole
Recognition, Button Sound, Screen
Time Out, Auto Lock Mode and Adjust
Brightness.
2.9.4. End Round
Exit Play Mode and go back to Main Menu. Select End
Round after nishing the round to save your scores and
statistics. If you do not End Round, your added scores
and targets will not be saved.
29
2.7. Targets and Hazards Information
Tap the to view distances to targets and Hazards
on the current hole.
2.8. Using Distance Measuring
Tap the icon or to mark your position to
start Measuring the distance to your ball. Tap the icon
or to see the mark list. In this screen, tab the
icon to mark your second Shot and repeat the process.
To view previously saved Marked distances, tap on the
Mark List icon.
Basic Operations
0617pt4매뉴얼(Us)수정_레이아웃 1 14. 6. 26. 오후 4:28 페이지 28
Page 16
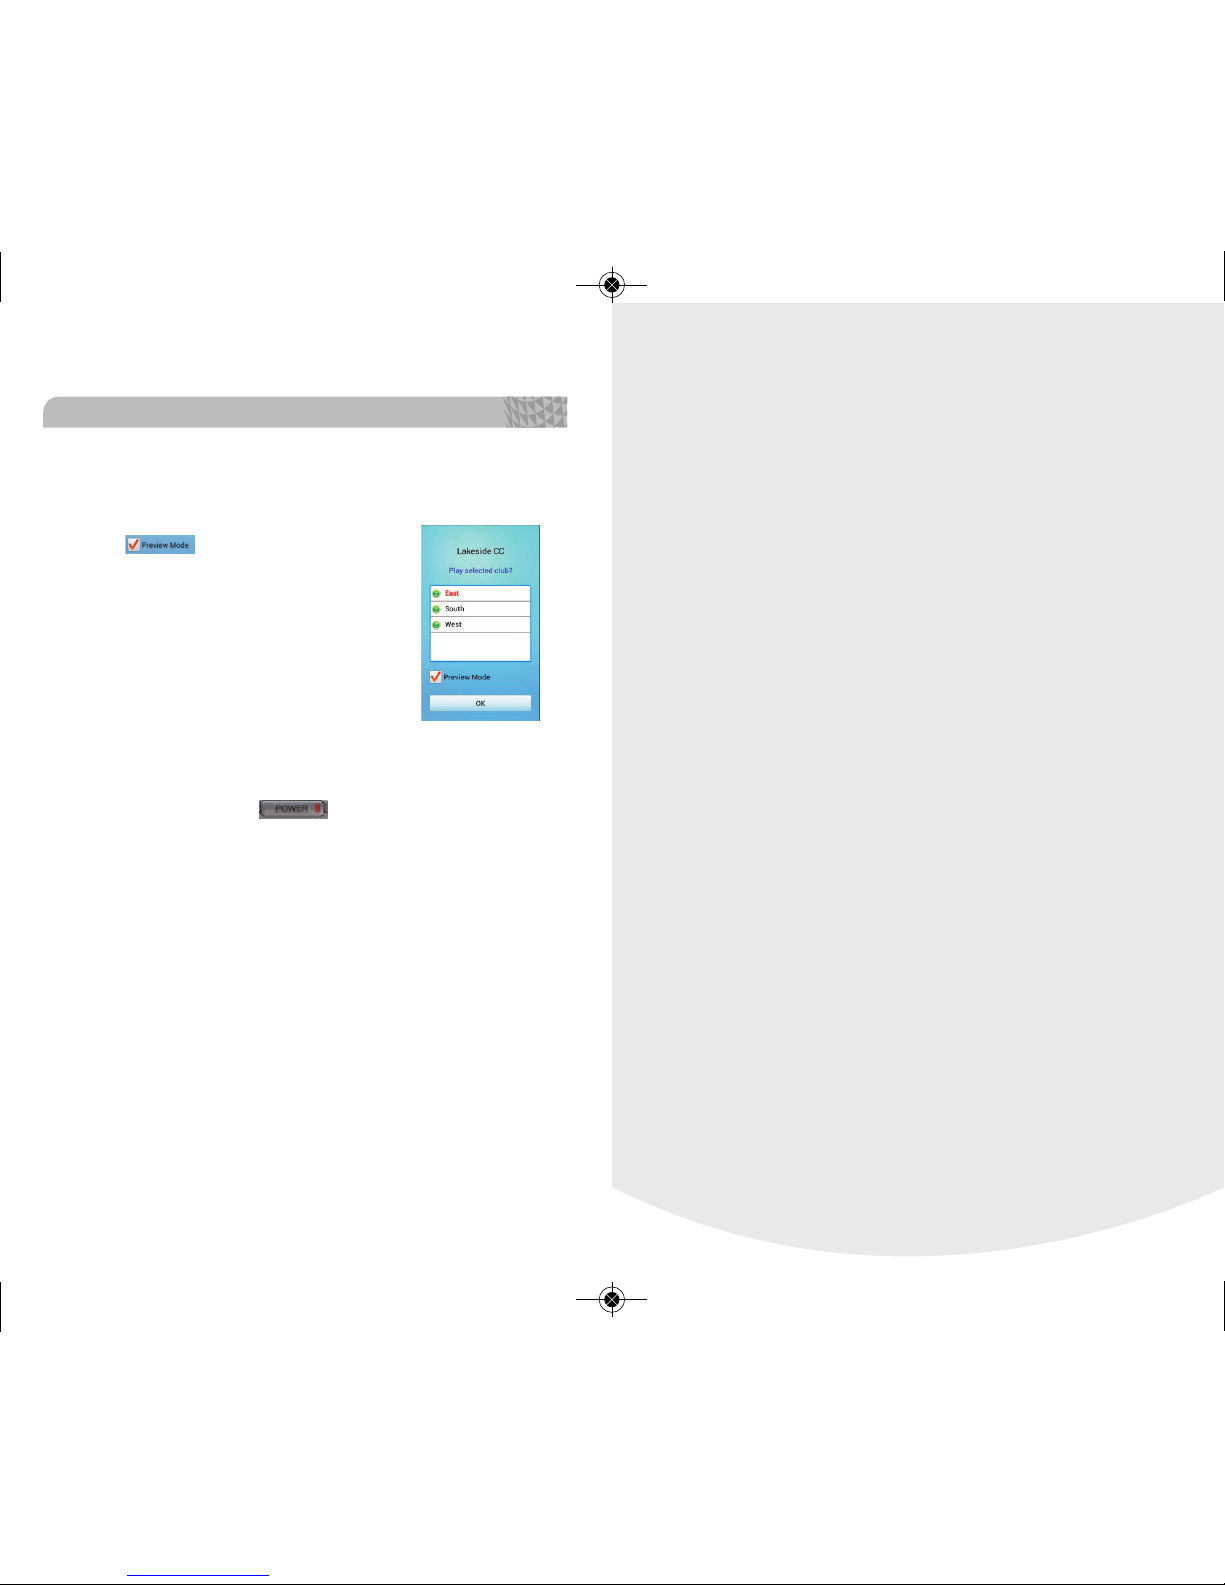
Advanced Operations
2.10. Preview Mode
Choose the golf course manually and
select to go into Preview Mode.
Preview Mode allows you to see all the
course information without having to
physically be at the course.
<NOTE>
Satellite connection not needed for Preview
Mode.
2.11. Troubleshooting
Option 1: Hold the button for 10 seconds to
reboot the unit. Please ignore the shut down screen
and continue to hold. Please proceed to option 2 if the
issues persist.
Option 2: Restart the device after removing and rein-
serting the battery.
*Please refer to section 1.1 for instructions
Option 3: If issues persist or you need assistance,
please contact our Customer Service department at
888.296.1428
Basic Operations
30
0617pt4매뉴얼(Us)수정_레이아웃 1 14. 6. 26. 오후 4:28 페이지 30
Page 17
Advanced Operations
3332
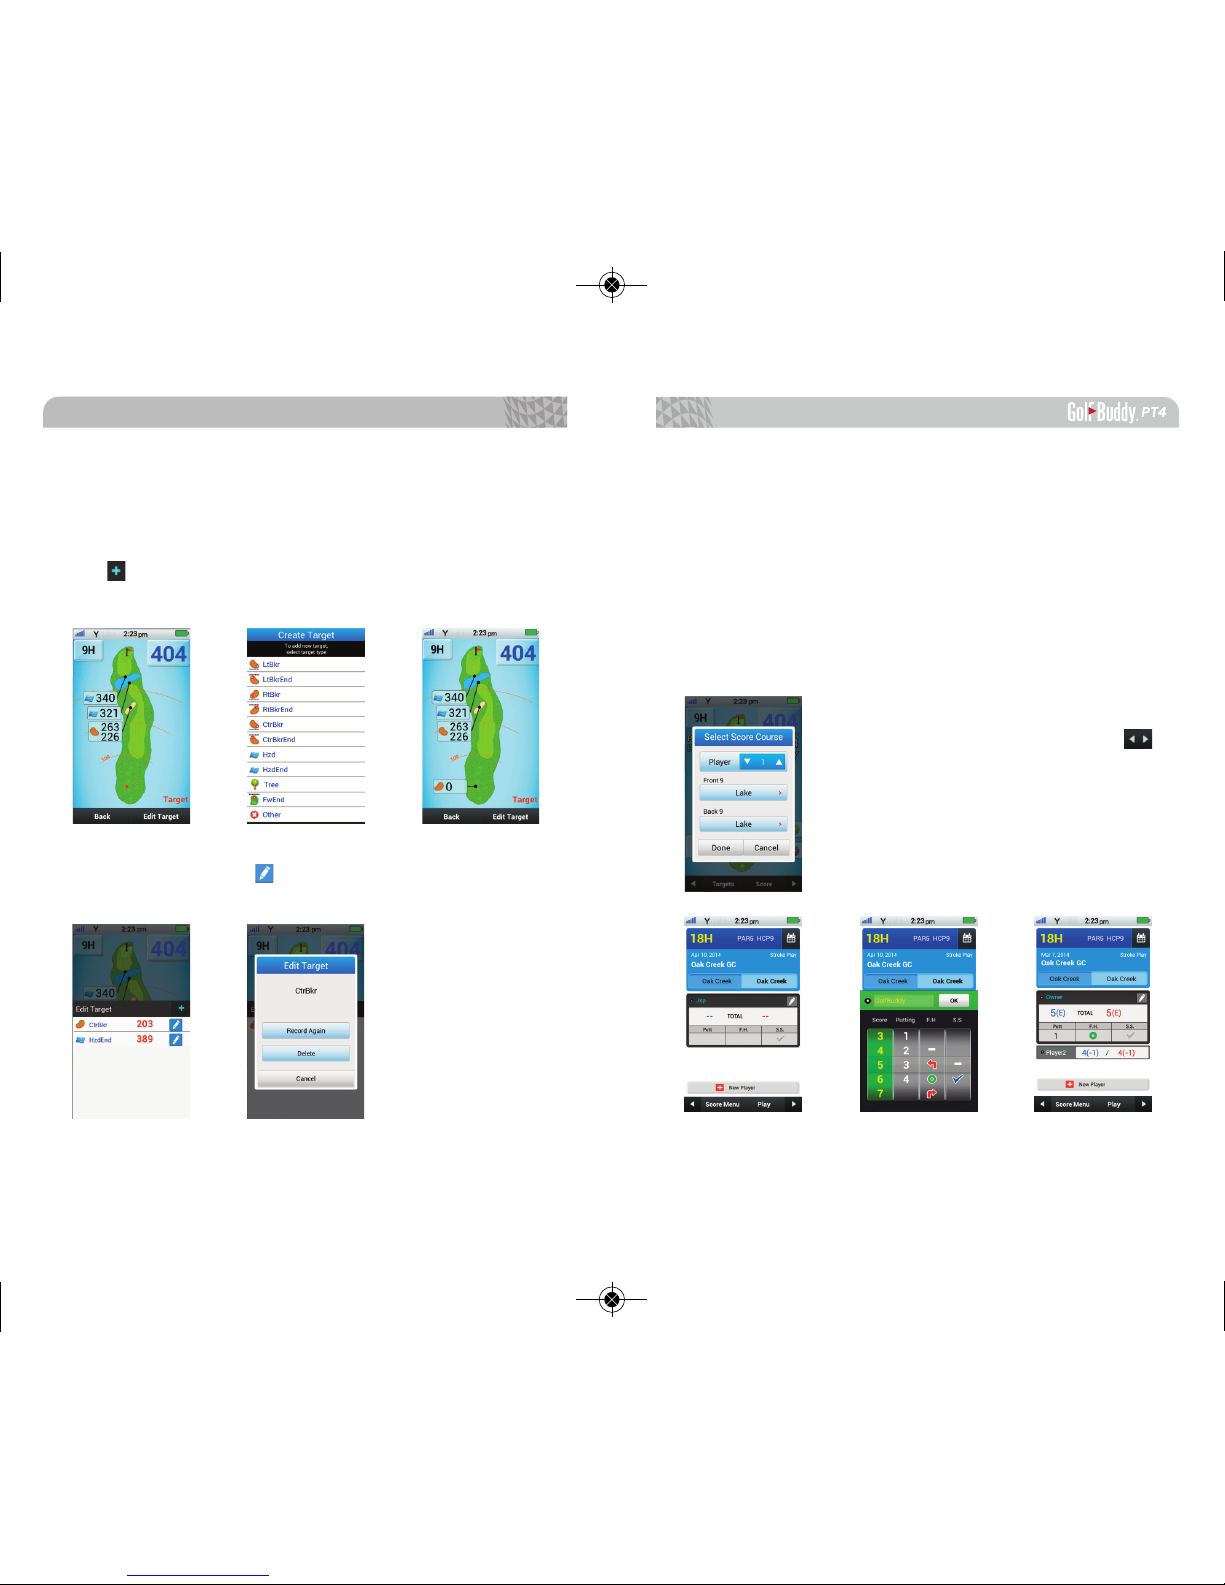
3.1. Create Custom Target
To add a custom target, select Targets, then select the
Edit Target option on the bottom of the screen. Select
the icon, then the type of target from the options
shown.
You can select the icon to edit or remove created
targets.
3.2. Scorecard Feature
The Scorecard Feature allows users to record a variety
of statistics which includes number of putts, fairway hits,
sand saves, and strokes.
3.2.1. Recording Score
Select Score from the bottom right hand of the play
screen to initiate the scorecard feature. You can record
scores for up to four (4) players.
Select the category you want to
record and tap OK to save. Use the
arrow key to navigate through different
holes to record scores and/or stats.
Note: Recording stats such as number of putts,
fairway hits, and sand saves is only available for
one (1) player. However, strokes can be recorded
for all other players.
0617pt4매뉴얼(Us)수정_레이아웃 1 14. 6. 26. 오후 4:28 페이지 32
Page 18
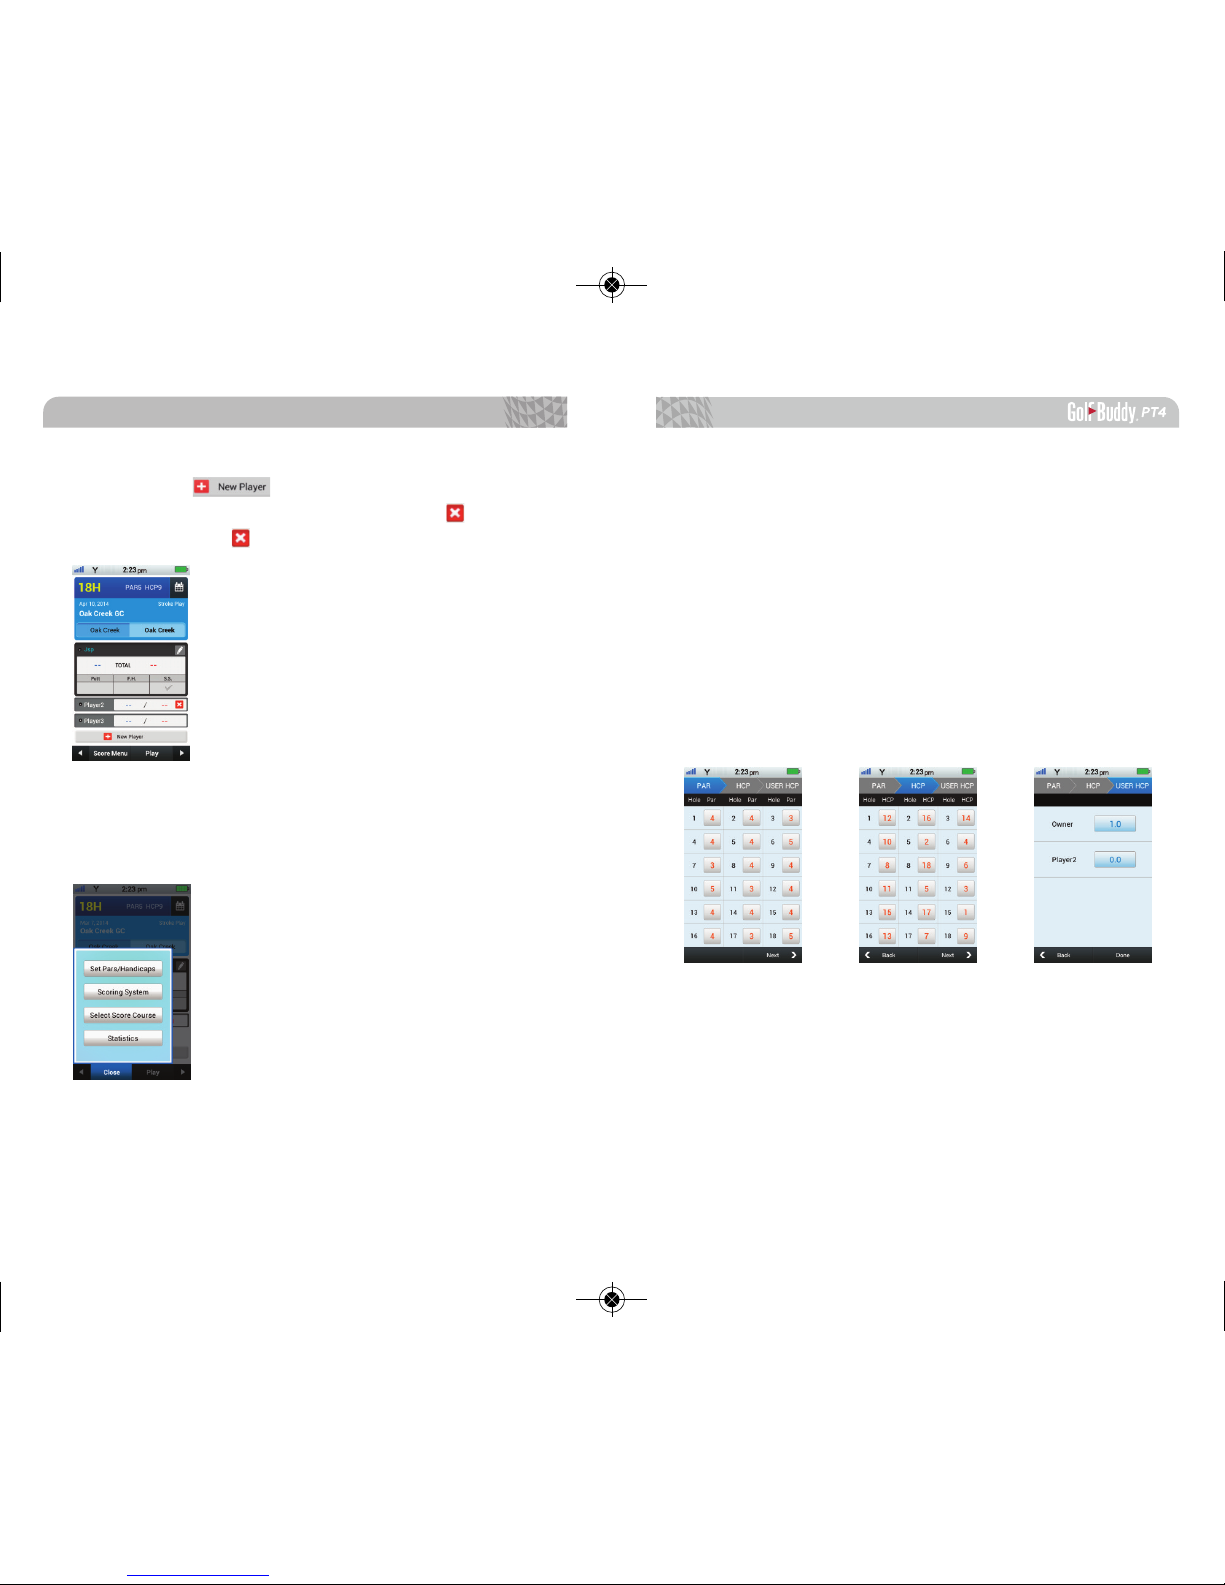
Set Pars/ Handicaps:
To set Par information by hole number, you can edit par
information by selecting the square box correlating with
the hole number.
To set handicap information, select the next arrow on the
bottom right hand corner. You can edit handicap information by selecting the square box correlating with the hole
number.
To set User Handicap, select the next arrow on the bottom right hand corner. You can edit User Handicap by selecting rectangular box.
Tap on the icon to add additional players.
Hold on to player’s name for 3 seconds and icon will
appear. Tap on the icon to delete.
3.2.2. Score Menu
Select from one of the four options: Set Pars/Handicaps,
Scoring System, Select Score Course, or Statistics.
Advanced Operations
3534
0617pt4매뉴얼(Us)수정_레이아웃 1 14. 6. 26. 오후 4:28 페이지 34
Page 19
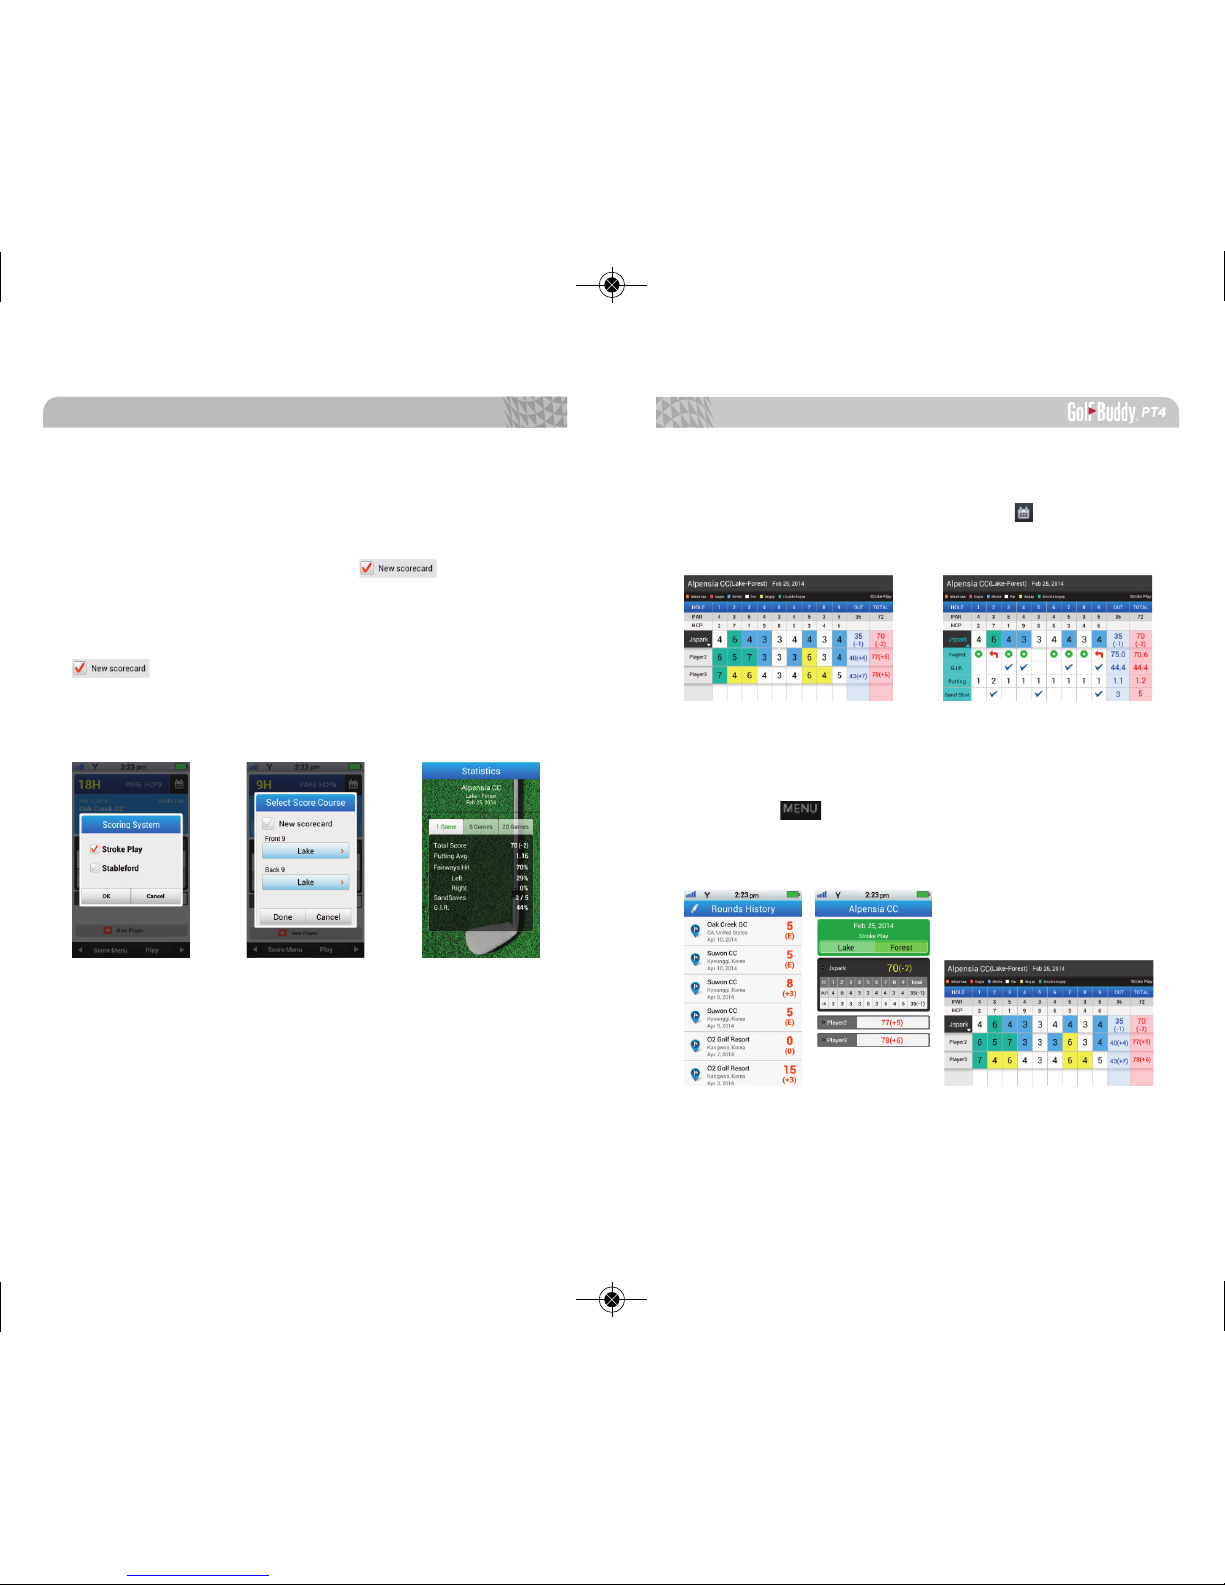
3.2.3. Scorecard
To view the full scorecard, tab the icon and the
recorded statistics will be shown in detail.
3.3. User Score
User Score shows history of all recorded scores. When
you tap the in the selected score cards, you can select
the scoring system, edit score, review mark history, and
view statistics.
Scoring System: Select Stroke Play or Stableford.
Select Score Course: In the Select Score Course menu,
you can edit the course you are playing on or you can
create a new scorecard. Select the icon to start
a new scorecard (*Please note that your previous scores
will be deleted). To keep the current scores and change
the course you are playing on, please ensure that the
icon is not selected.
Statistics: You can view statistics for one (1) game, ve
(5) games, or twenty (20) games.
Advanced Operations
3736
0617pt4매뉴얼(Us)수정_레이아웃 1 14. 6. 26. 오후 4:28 페이지 36
Page 20
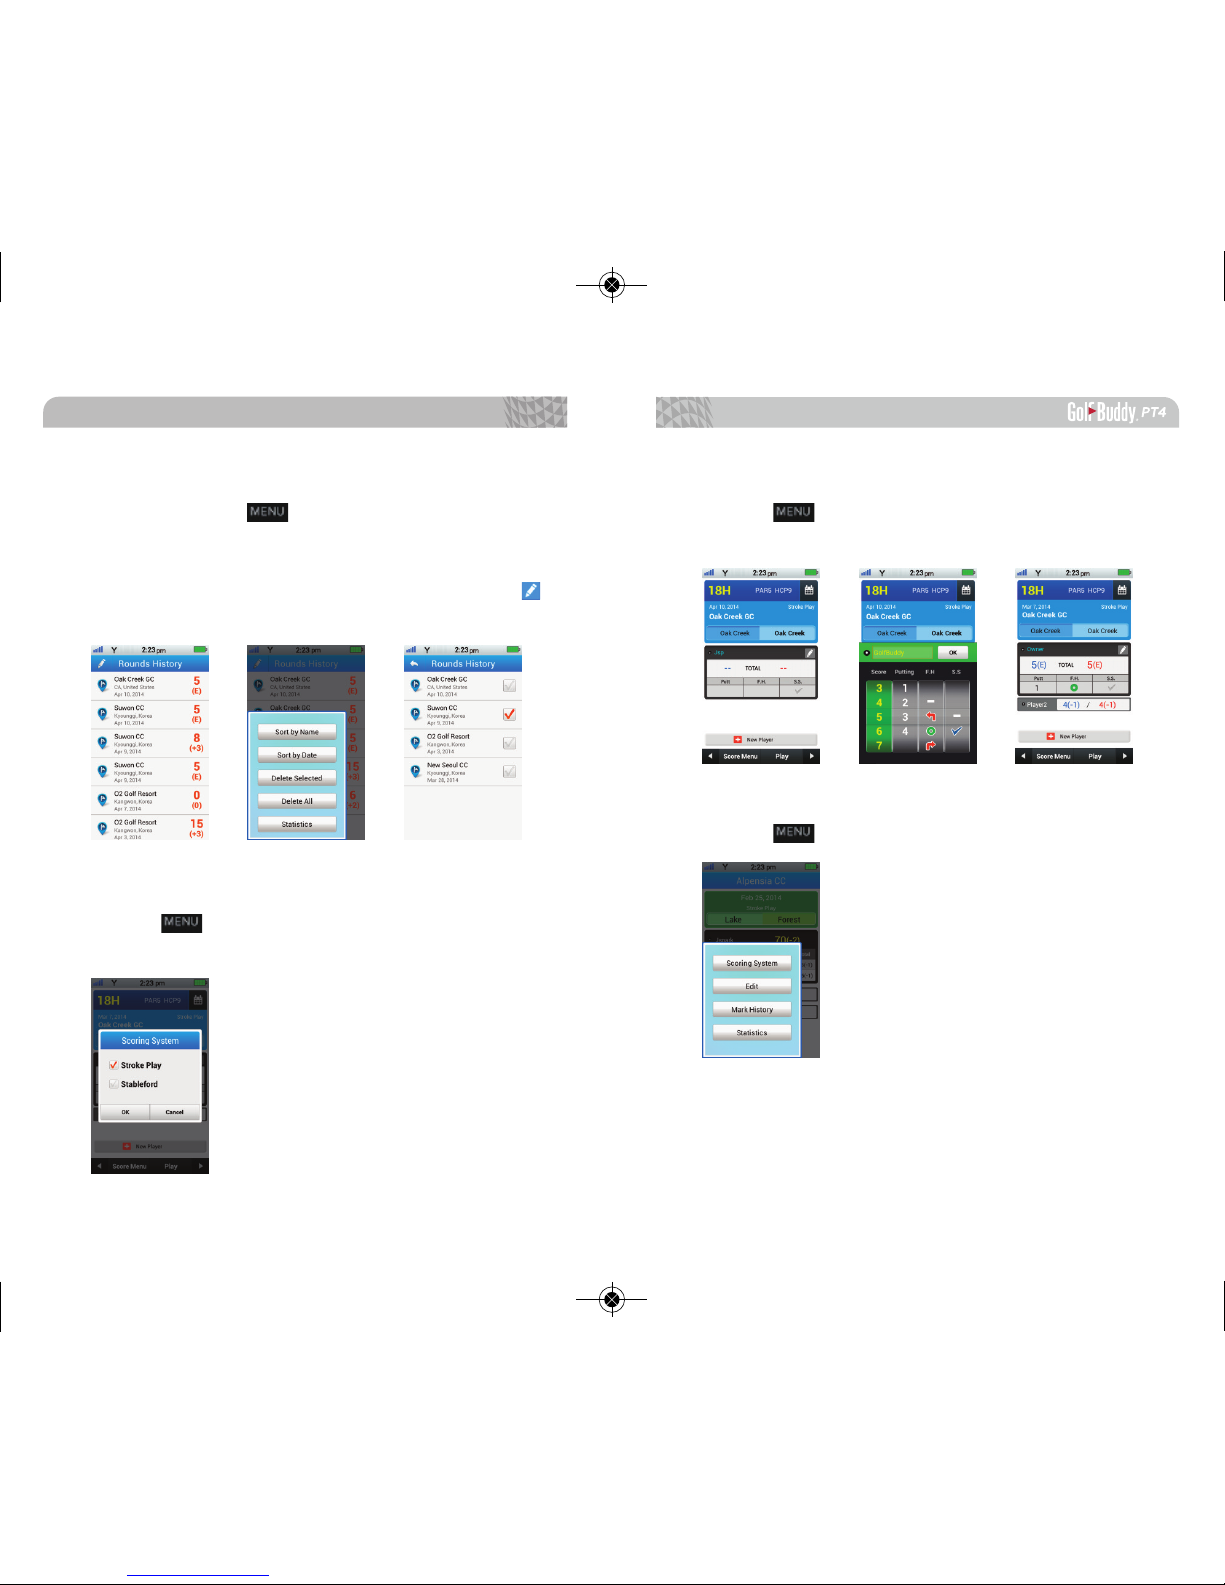
3.3.3. Edit
Tap the to edit score.
※ Reference section 3.2.
3.3.4. Mark History
Tap the to view and select Mark History.
3.3.1. Rounds History
Once you tap the in the Rounds History screen,
you will have the following options: Sort by Name, Sort
by Date, Delete Selected, Delete All, and Overall Stat
Analysis. You can select certain records by tapping the
icon.
3.3.2. Scoring System
Tap the to select Scoring System.
※ Reference section 3.2.
Advanced Operations
3938
0617pt4매뉴얼(Us)수정_레이아웃 1 14. 6. 26. 오후 4:28 페이지 38
Page 21
3.3.5. Statistics
Tap the to view and select Statistics.
Advanced Operations
40
Software Updates
0617pt4매뉴얼(Us)수정_레이아웃 1 14. 6. 26. 오후 4:28 페이지 40
Page 22
Your GolfBuddy PT4 unit has been pre-loaded with the
latest rmware and world-wide course maps available at
the time of manufacture, so it’s ready to play right out of
the box. For optimum performance and longer product
life, we do recommend you register your unit and keep
it updated with the latest levels of rmware. You can also
add the latest course maps and updates for free once you
have registered your unit.
The instructions below will provide you with a step-bystep guide on how to register and update your GolfBuddy
PT4.
1. Downloading the GolfBuddy Management
Software (GB Manager) to your computer:
• Please visit our website at www.gpsgolfbuddy.com
• Click on the panel titled “Download GB Course Manager” to download and install the GolfBuddy Manager
program. You will then see a screen with an option to
choose either Windows or Mac based software.
• Click on the correct version for your computer. Once
downloaded, you can run the application to install the
GB Manager on your computer.
• Once completed, you will see a blue icon on your desktop that you will use to access the GB Manager once
you have submitted the registration for your User ID
and Password.
Software Updates
2. Creating a User ID:
• Open the GB Manager application by clicking on the
blue icon on your desktop.
• You will see a Login Panel . Click on “Sign up for new
user” at the bottom. This will bring up a panel for you
to create your User ID and Password.
• Fill in all the details that are required (indicated by
“*”). Please note the instructions regarding no Caps,
Symbols or Spaces & 4-15 characters long. You will
need to click the “Check Availability” to verify your
selected User ID is valid and not already being used.
• Click “Submit” at the bottom of the form.
• You have now created your User ID and Password.
Make sure you write them down somewhere in
case you forget them!
4342
0617pt4매뉴얼(Us)수정_레이아웃 1 14. 6. 26. 오후 4:28 페이지 42
Page 23
4. Updating your GolfBuddy
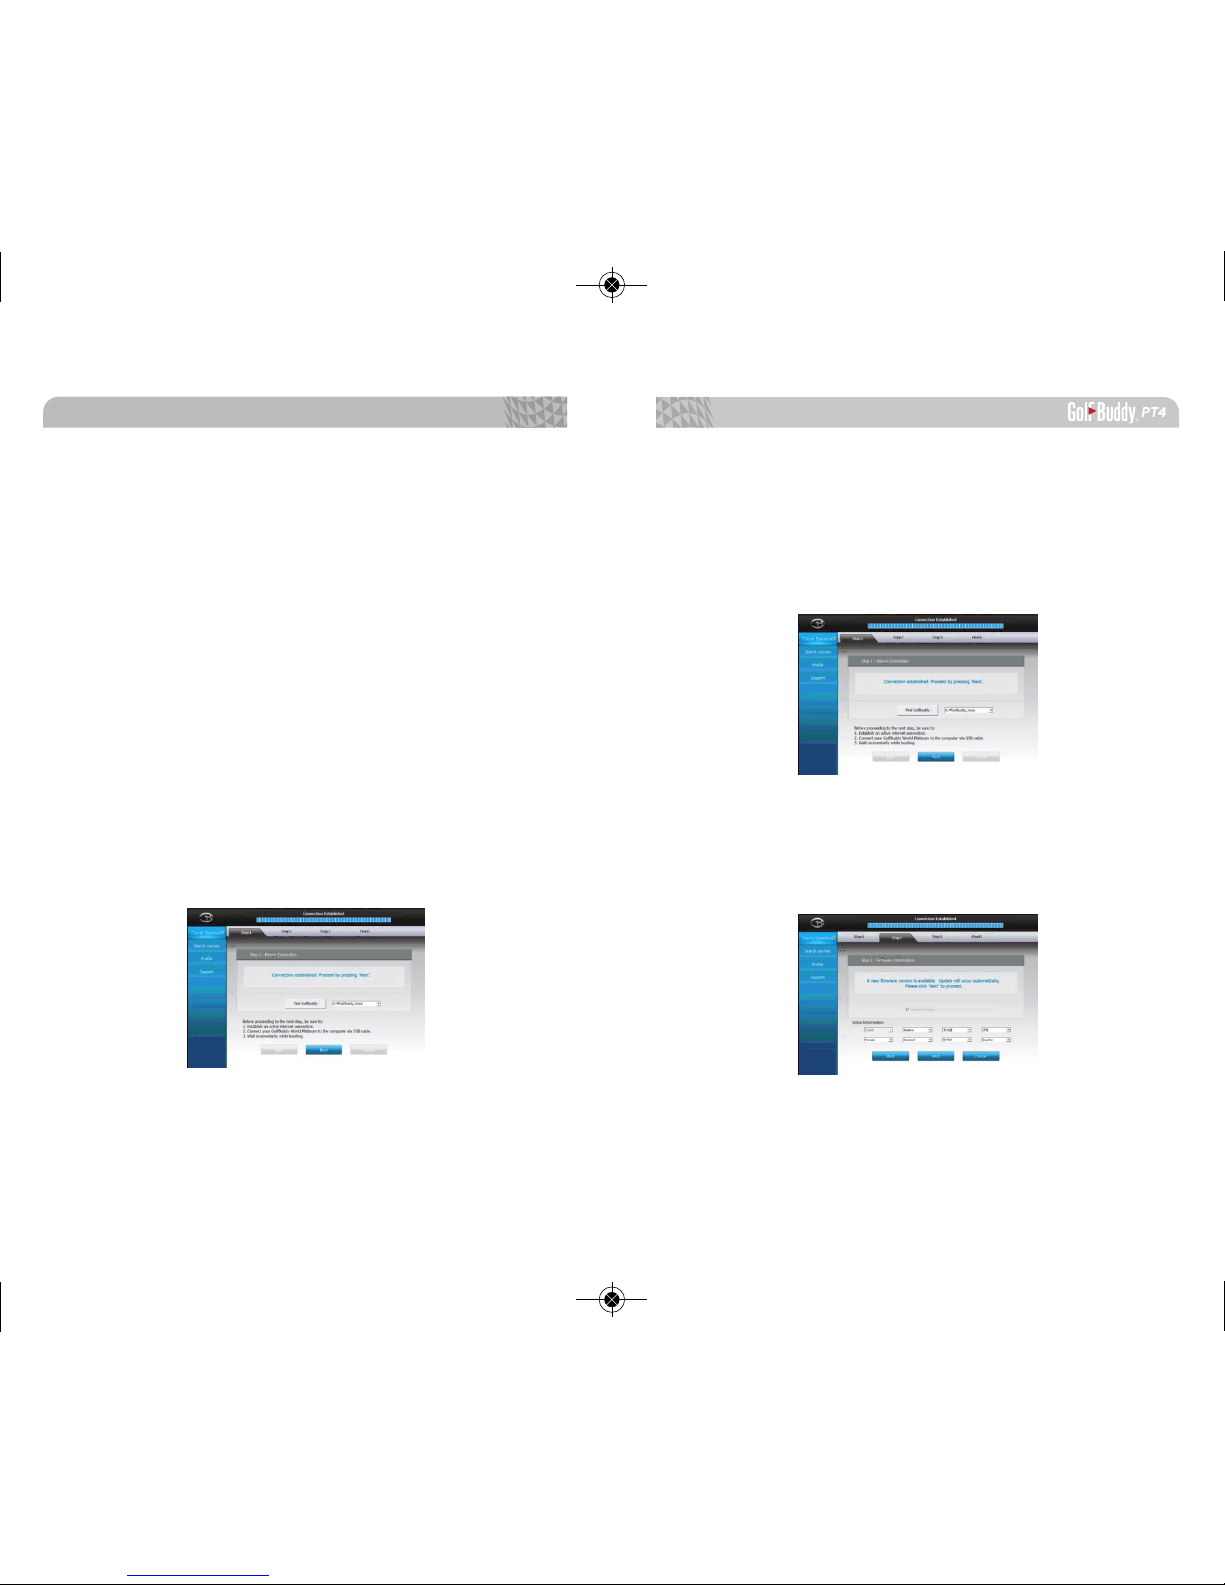
4.1. Step 1
Once you get the “Connection Established” message,
please click “Next” to proceed to Step2. Firmware Update.
4.2. Step 2 : Firmware Update
At step 2, click “Next” to install the latest rmware. If the
rmware is already at the latest level, click “Next” to
proceed to step 3.
3. Registering your GolfBuddy PT4:
• Connect your GolfBuddy unit to a USB port on your
computer using the USB cable provided with the unit.
• After a short time, your GolfBuddy unit should show
an icon on the screen indicating it is connected to
the computer
Notes: You can disregard any driver download requests that
your computer may say is required.
• Click on the blue GB icon on your desktop and open
the Login Panel.
• Enter your User ID and Password. You should now see
a panel that indicates the GB Manager is searching
for the device. After a short time, you will see “Connection Established”. At this stage, your unit is successfully registered to the User ID that you created
and will not be able to connect to any other User ID.
Software Updates
4544
0617pt4매뉴얼(Us)수정_레이아웃 1 14. 6. 26. 오후 4:28 페이지 44
Page 24
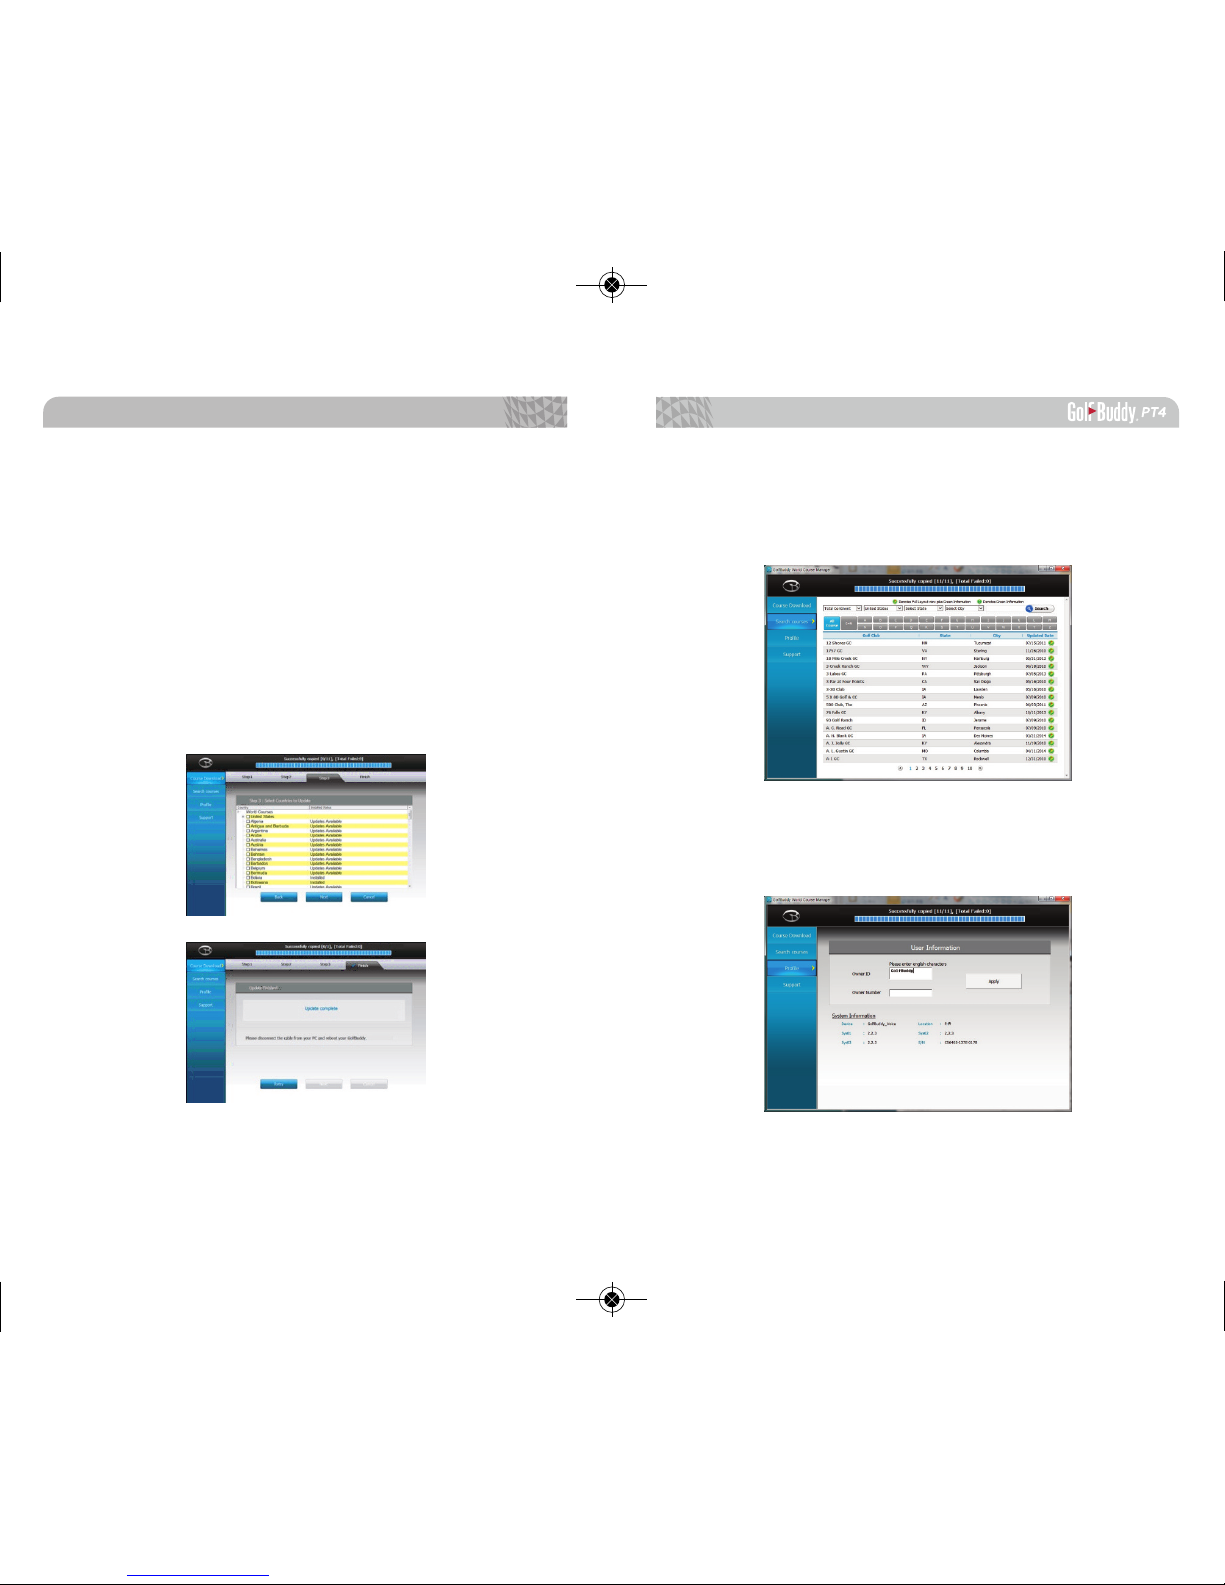
4.4. Search Courses
You can search courses by country, state, and city. You
can also view when the course was last updated.
4.5. Prole
System Information for user’s PT4 can be found here.
4.3. Step 3 : Course Download
Select the countries that you would like to be updated
from the list of countries. Click “Next”. You will see a panel
that asks you to select “Overwrite” or “Newly Updated Only”
(default option - already selected). Click “OK” to start the
course update.
Once all courses have been downloaded and your unit
updated, you will receive a message “Update Complete”. You
can now disconnect the unit. Your GolfBuddy is now ready
to go with the latest updates!
Software Updates
4746
0617pt4매뉴얼(Us)수정_레이아웃 1 14. 6. 26. 오후 4:29 페이지 46
 Loading...