

Page 1
Page 2
Thank you for choosing the GolfBuddy CT2.
The CT2 is a feature-rich GPS that brings functionality and
versatility to one device. Designed to be wearable, pocketable
or clipped to your golf bag, the CT2 caters
to every golfer’s preference and style. The
CT2 combines the great features found on
all GolfBuddy GPS wearables and handhelds
with advanced features and over 38,000
courses preloaded in 130 countries around
the world, making it a great addition to
your game.
TABLE OF CONTENTS PACKAGE INCLUDES
1. DEVICE OVERVIEW – page 3
2. GETTING STARTED – pages 4-5
3. PLAY GOLF – pages 6-8
4. SETTINGS & MENU – pages 9-10
5. ADVANCED OPERATIONS – page 11
6. SOFTWARE UPDATE – pages 12-15
1 – CT2 GPS
1 – Charging Clip
1 – Adjustable Lanyard
1 – CT2 Quick Start Guide
2
Page 3
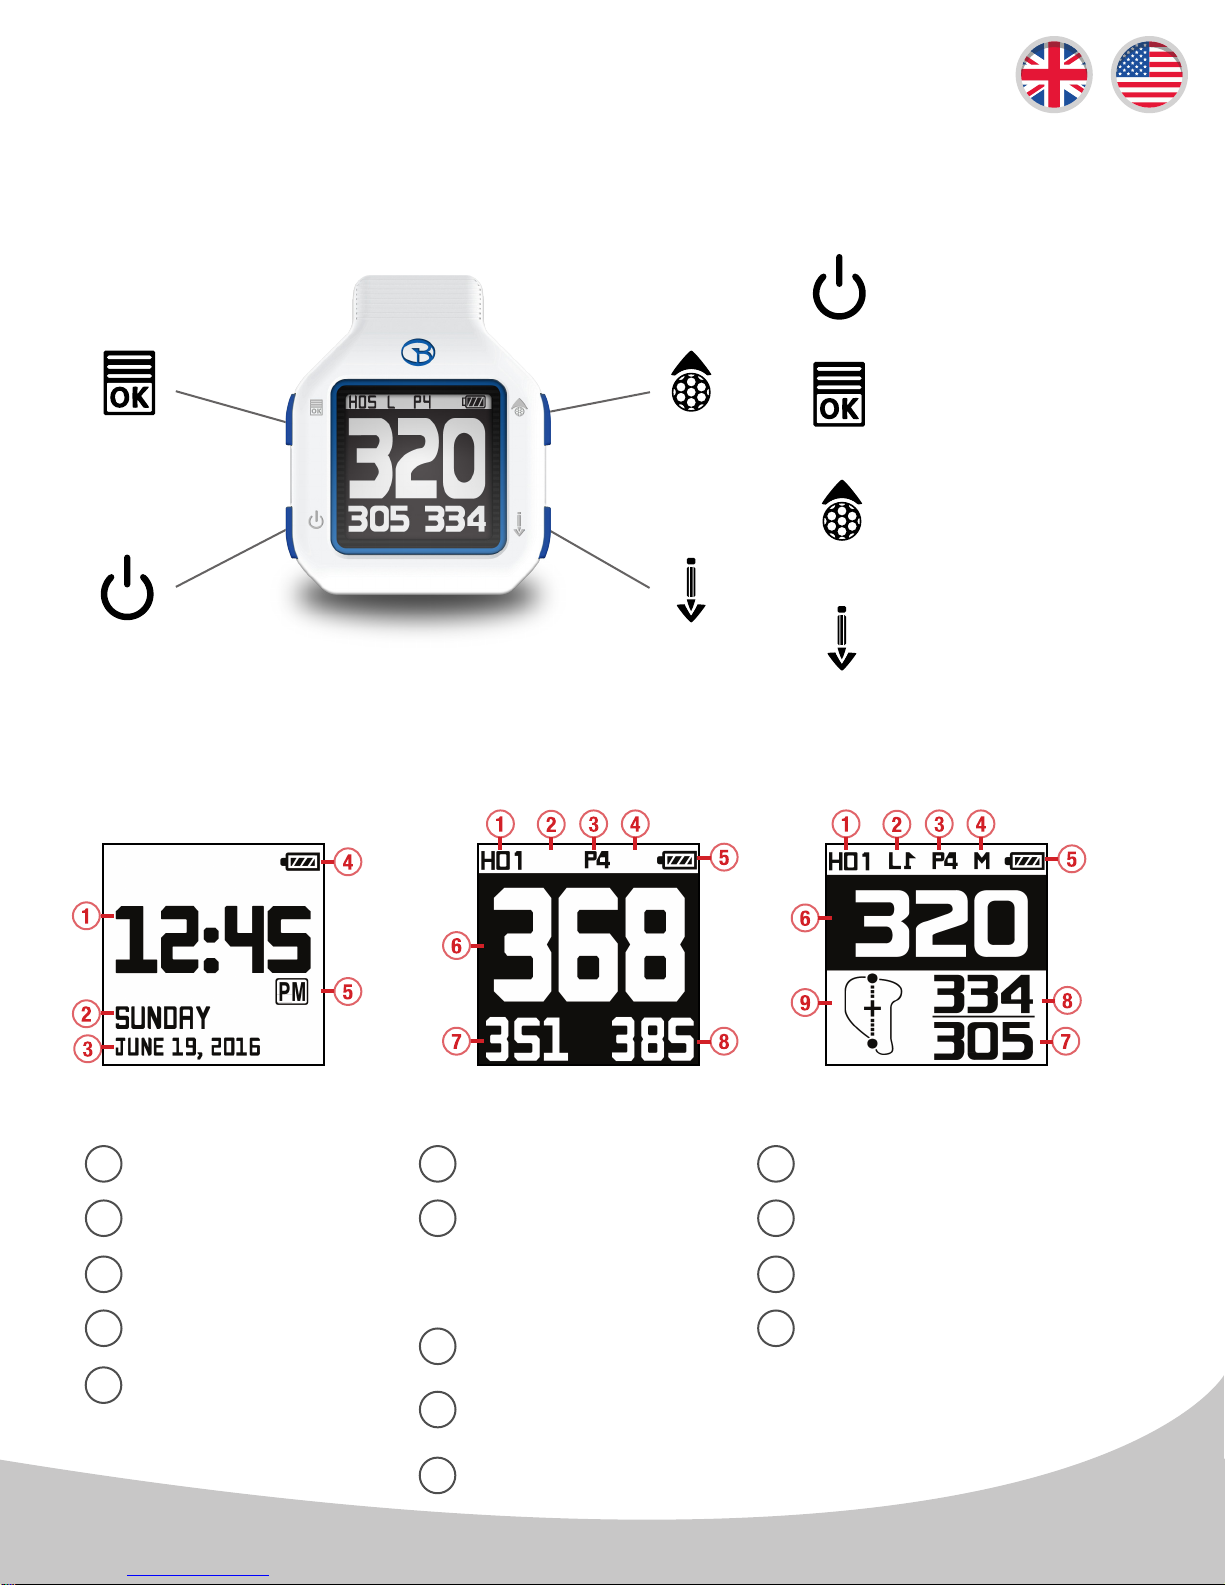
Button Overview
1. DEVICE OVERVIEW
- Power / ESC
- Menu / Select
- Up / Shot Distance
- Down / Scorecard
Screen Overviews
Time Screen B
1
Time
2
Day
3
Date
4
Battery Indicator
FCB screenshot A
Default Golf Screen Optional Golf ScreenTime/Date Screen
1
2
3
Hole Number
L/R Green Selection
*Note: Only present
when multiple greens
are present
Par Info
6
Distance to the Center of the Green
7
Distance to the Front of the Green
8
Distance to the Back of the Green
9
Dynamic Green View
AM / PM
5
4
5
Yards / Meters
*Note: In Yards if not indicated
Battery Indicator
3
Page 4
2. GETTING STARTED
2.1 Power ON / OFF
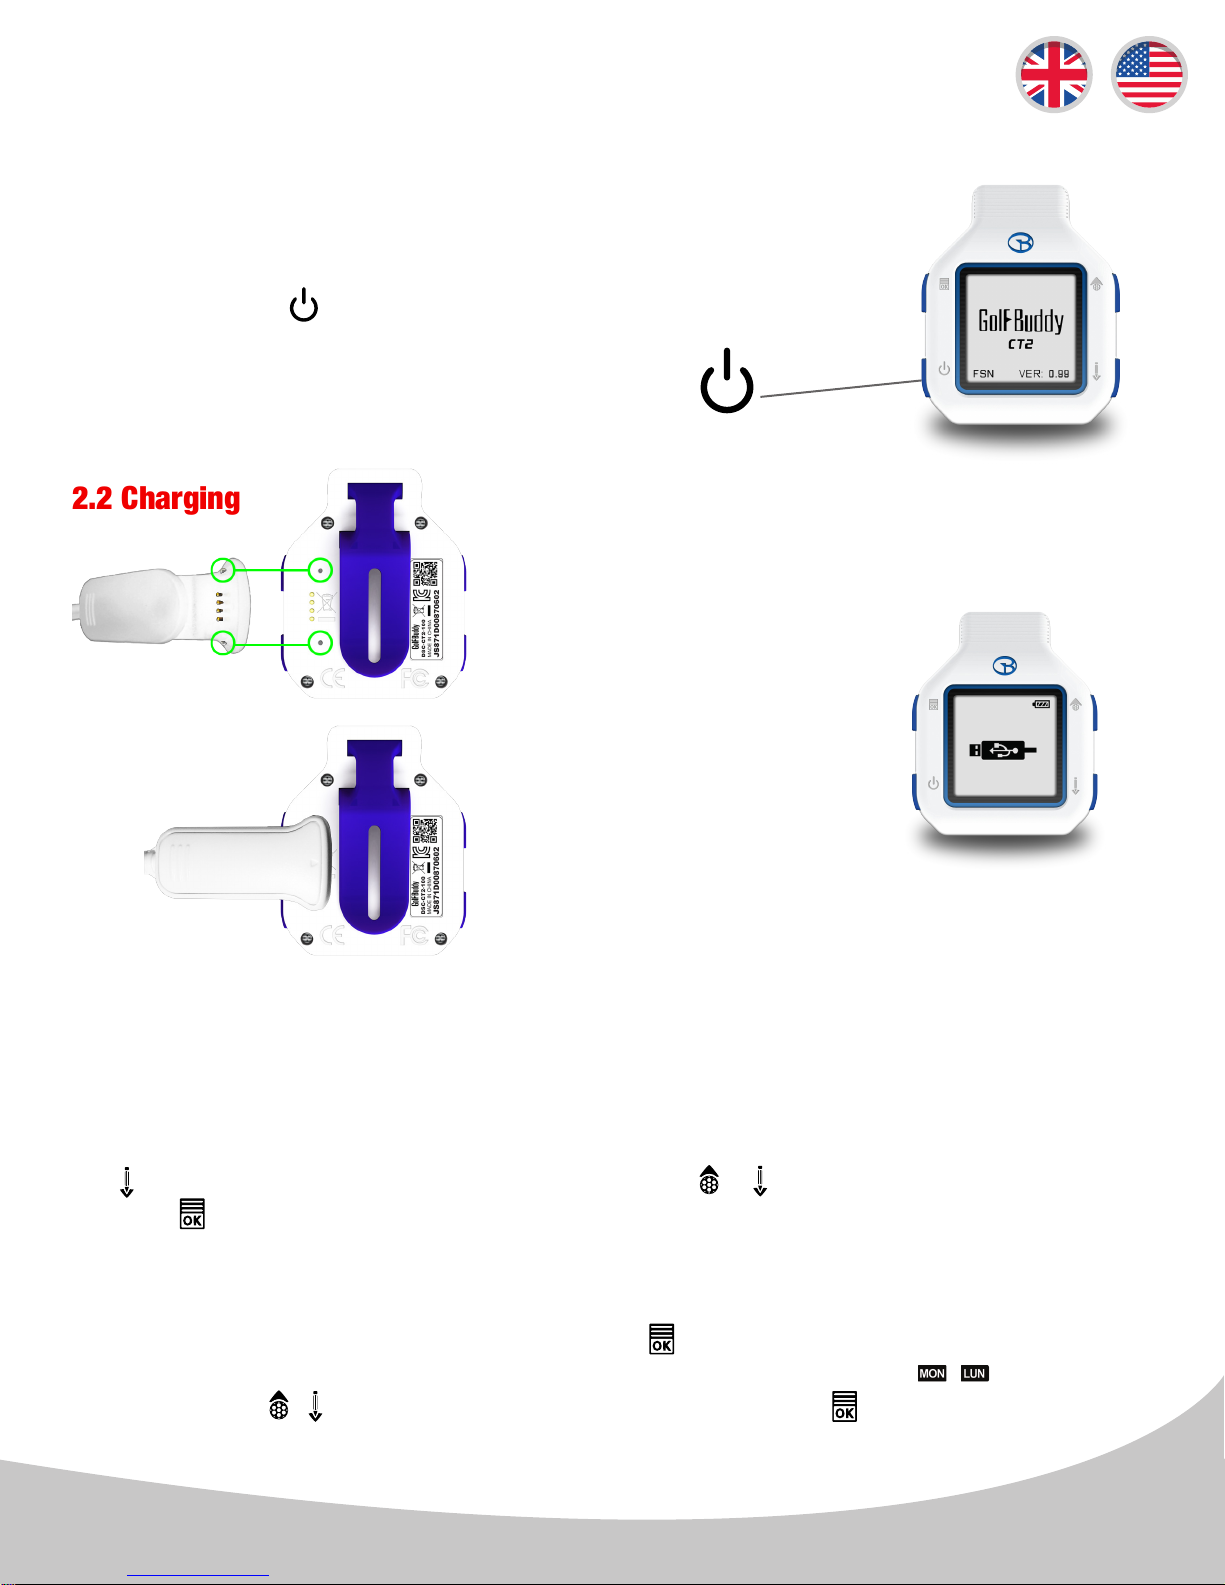
Press and hold the button for 3 seconds to power the CT2 ON/OFF
2.2 Charging
To charge the device, attach the USB clip as
depicted in the images to the left. Align the charger
guide posts with the
guide holes on the back
side of the CT2 unit to
clip in place. The battery
indicator will display while
charging as shown in the
image to the right. When
fully charged the battery
indicator will display as
a full battery. To disconnect the CT2, pinch
the charging clip and pull away from the unit.
2.3 Time Setting
The time will set automatically once the CT2 successfully connects to Satellite’s via GPS (please
note: you must be outdoors to connect to satellites); however, time zones and daylight savings will
need to be set accordingly. To set the clock manually (from the Time/Date screen), press and hold
the button to bring up the time setting mode. Press the or buttons to change the hour, then
press the button 4 times to apply the changes.
*Note: The minutes are set automatically upon successful satellite connection and cannot
be manually adjusted.
French Date Format: In time setting mode, press the button once to edit the Format. The default
Date Format is in English; the secondary option is French. When the blinking / icon appears,
navigate with the / buttons to select desired selection. Press the button three times to apply
the changes and return to time mode.
4
Page 5
2.3 Time Setting (continued)
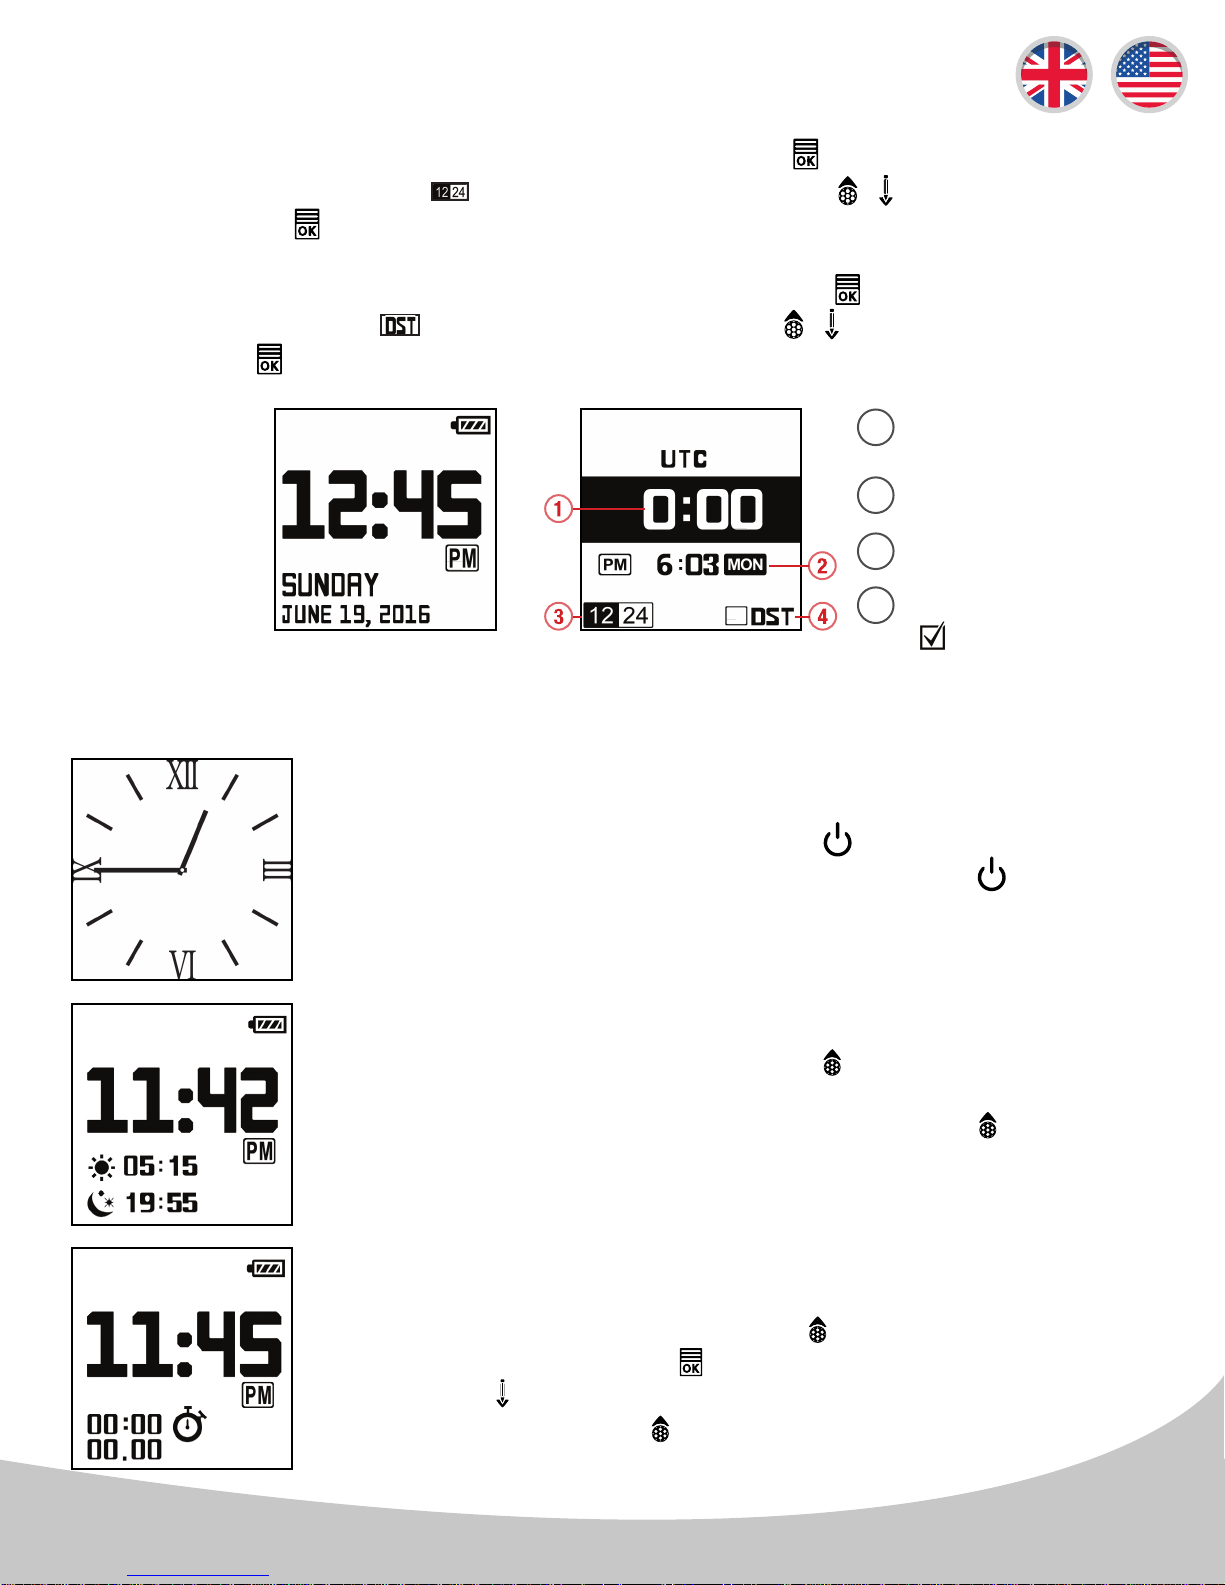
12/24 hour Format: After entering the time setting mode, press the button twice to edit the 12/24
Hour Format. When the blinking icon appears, navigate with the / buttons to the desired
selection. Press the button twice to apply the changes and return to time mode.
Daylight Savings Time: After entering the time setting mode, press the button three times to edit
the DST. When the blinking icon appears, navigate with the / buttons to turn on/o DST
mode. Press the button once to apply the changes and return to time mode.
UTC Zone Setting
1
Language
2
Time Format
3
Daylight Savings Time
4
( for ON)
Default Time/Date Time Settings
2.4 Time Mode Features
Time + Sunrise/
Sunset
Optional Analog Time Face
From the Time/Date screen, press the button to view the Analog
Timeface. To exit this analog timeface, just press the button once
again.
Sunrise/Sunset Time
From the Time/Date screen, press the button to view the Sunrise/
Sunset Time (CT2 automatically acquires GPS signal for this feature). To
exit this function and to return to time mode, press the button twice.
*Note: Sunrise and Sunset is in 24-hour format only.
Stop Watch
From the Time/Date screen, press the button twice to use the Stop
Watch Function. Press the button to start/stop the Stop Watch, and
press the button to reset the record. To exit this function and to return
to time mode, press the button.
5
Page 6
3. PLAY GOLF
3.1 Main Menu
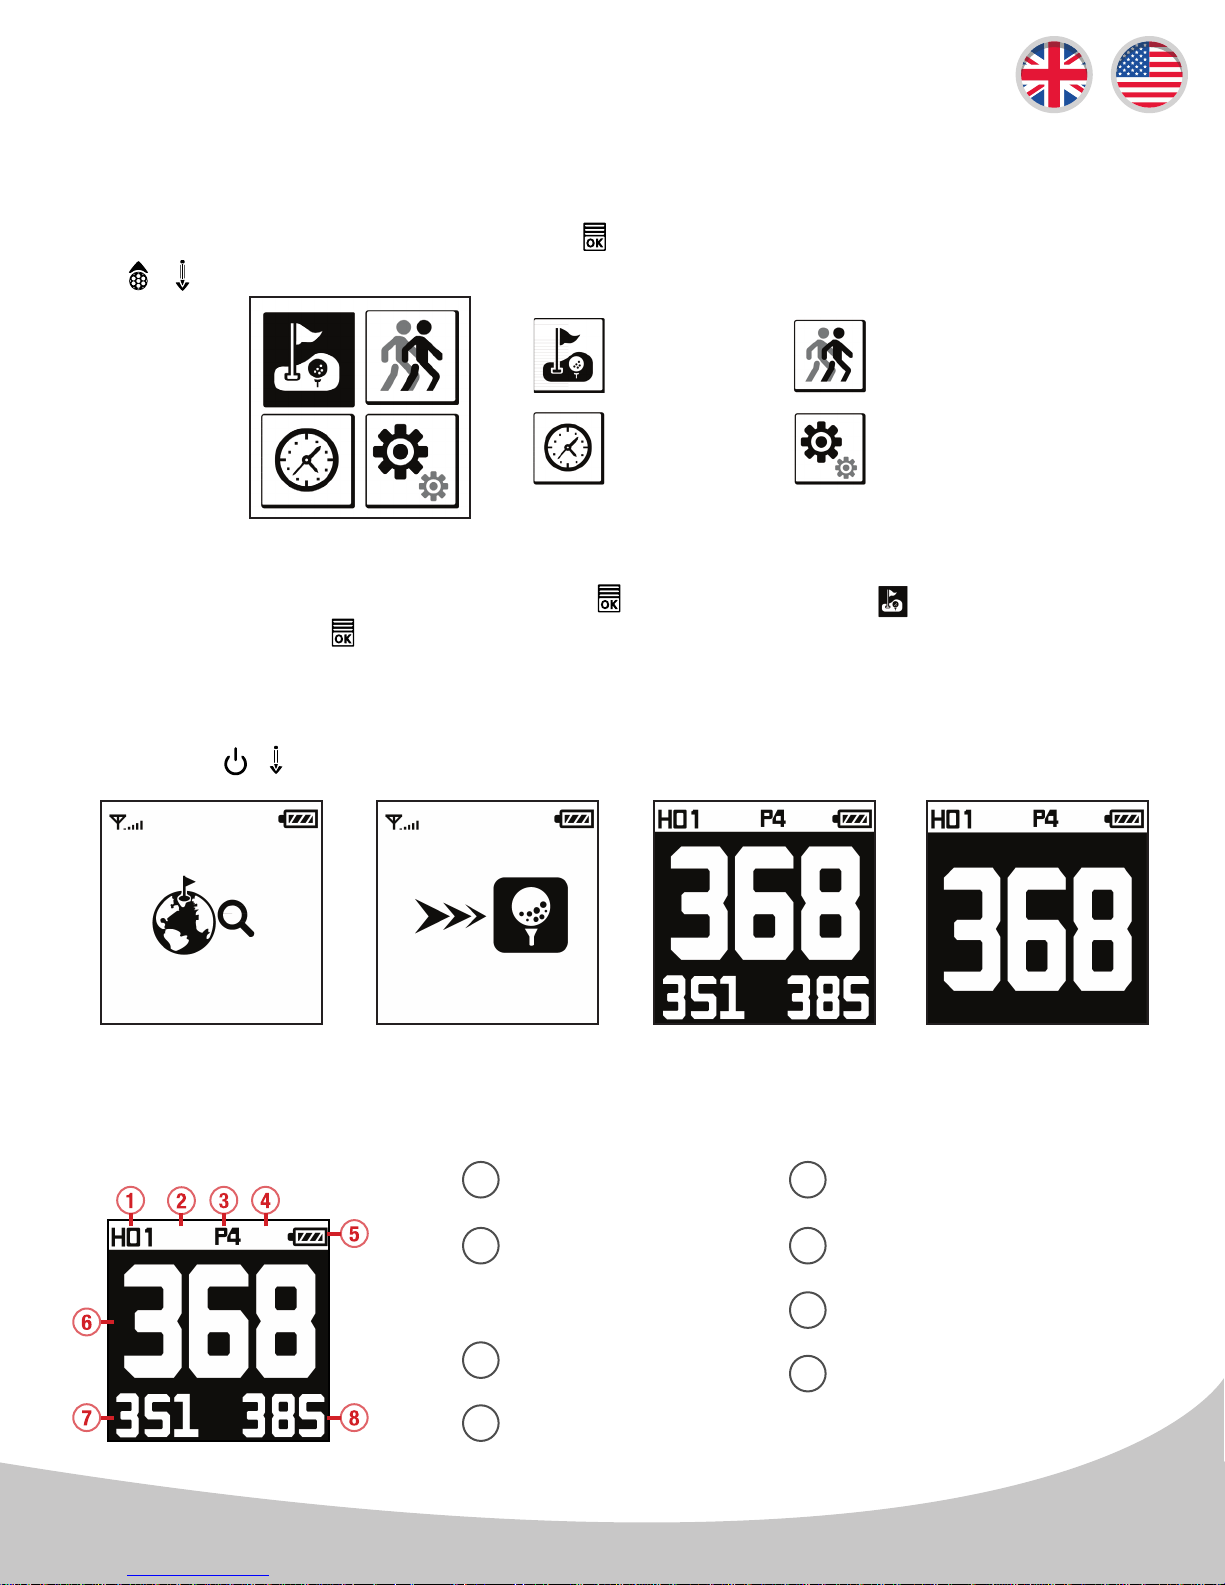
From the Time/Date screen, press and hold the button to view the Main Menu and navigate with
the / buttons.
PLAY GOLF
TIME
GPS / ODOMETER
DEVICE INFO
Play Golf Mode
From the Time/Date screen, press and hold the button. The Play Golf ( ) icon is automatically
highlighted; press the button once to select the Play Golf icon. After Play Golf is activated,
screen A is displayed. After satellite connection, screen B is displayed. Proceed to the Tee Box,
once you arrive at the Tee Box screen C or D will be displayed. Once the distance(s) are showing
on your device you have the option to switch preferred screen by pressing and holding the bottom
two buttons / simultaneously for 2 seconds.
A B C
D
Searching for Golf Course Proceed to Tee Box From the Tee Box
3.2 Play Golf Screen
Hole Number
1
L/R Green Selection
2
*Note: Only present
when multiple greens
are present
Par Info
3
Yards / Meters
4
*Note: In Yards if not indicated
Alternate Default Option
Battery Indicator
5
Distance to the Center of the Green
6
7
Distance to the Front of the Green
8
Distance to the Back of the Green
6
Page 7
3.3 In Round Information
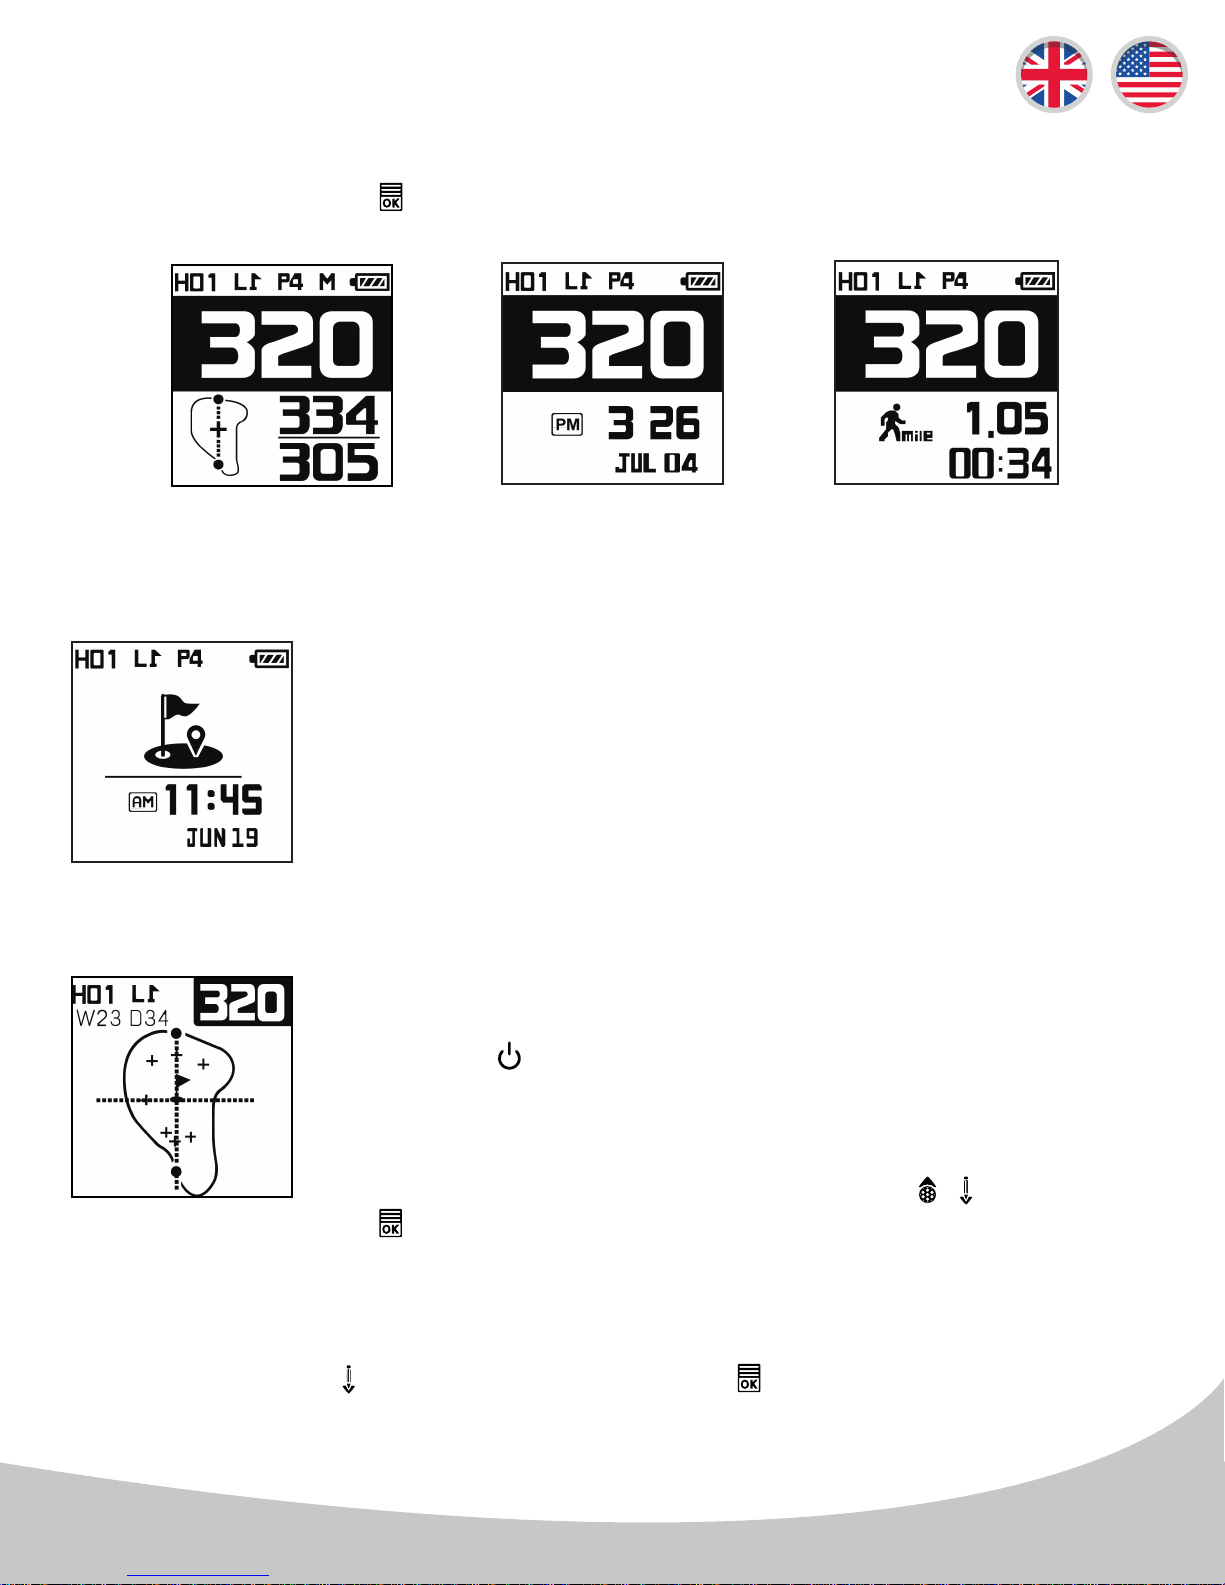
By repeatedly pressing the button you will scroll through Informative screens A, B, and C shown
below.
A
FCB screenshot A
Dynamic Green with
Distances
B C
Time with Center
Distance
The Auto Time Display is an automatic feature that displays the time and date
when the golfer is within 20 yards of the center of the green.
Time of play & total
distance walked
with Center Distance
Auto Time Display
You can access the Dynamic Green View & Pin Placement Mode by
pressing the button from the Play Golf Screen.
Pin Placement
From the Dynamic Green View screen, you may also change the placement
of the pin on the green image by navigating with the / buttons. Press
the button to return to Play Golf Sreen.
Dynamic Green View
& Pin Placement
*Note: If there are Left and Right Greens available on your fairway, you can quickly choose the green by
pressing and holding the button for 2 seconds then press the button to conrm your selection while
in Dynamic Green View & Pin Placement Mode.
7
Page 8
2.4 Measuring Shot Distance
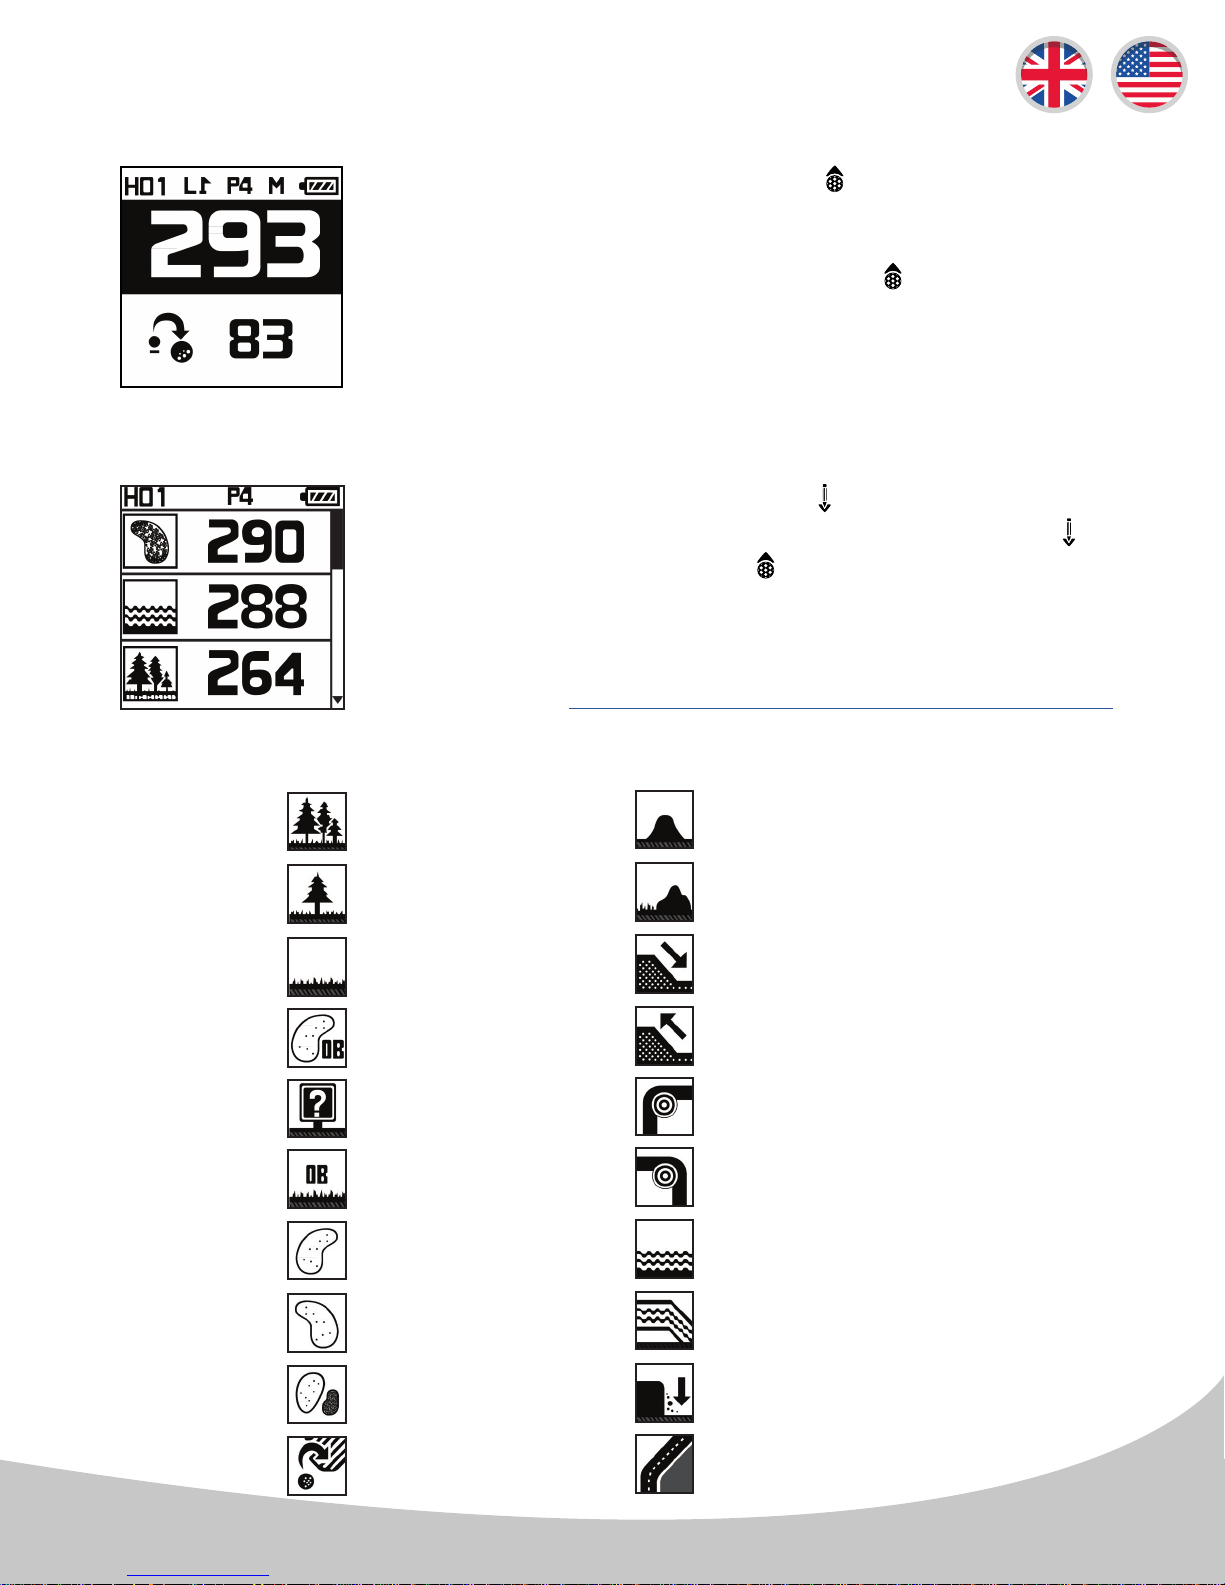
From Play Golf Mode, press and hold the button for 2 seconds to start
measuring your shot distance. The Shot Distance Mode will default back
to the Play Golf Screen and will measure distances in the background.
Once you have reached your ball, press the button again to nish
measuring and view the shot distance.
*Note: The Shot Distance screen will default back to the Play Golf Screen
after 15 seconds.
2.5 Hazard Information
From the Play Golf Mode, press the button to view the Hazard
information. When more than 3 hazards are available, press the button
to cycle through pages. Press the button to return to Play Mode.
*Note: If Hazards are unavailable for any given hole, the hazards feature is
inactive. If the course hazard information is incorrect, please contact our
support team at http://golfbuddyglobal.com/support/contactus.asp
Hazards Icon Denitions
Trees
Tree
Rough
OB + Bunker
Target
Out of Bounds
Left Bunker
Right Bunker
Hill
Rock
Downhill
Uphill
Right Dogleg
Left Dogleg
Water
Creek
Bunkers
Fairway
Cliff
Cart Path
8
Page 9
4. SETTINGS & MENU
4.1 Settings & Menu
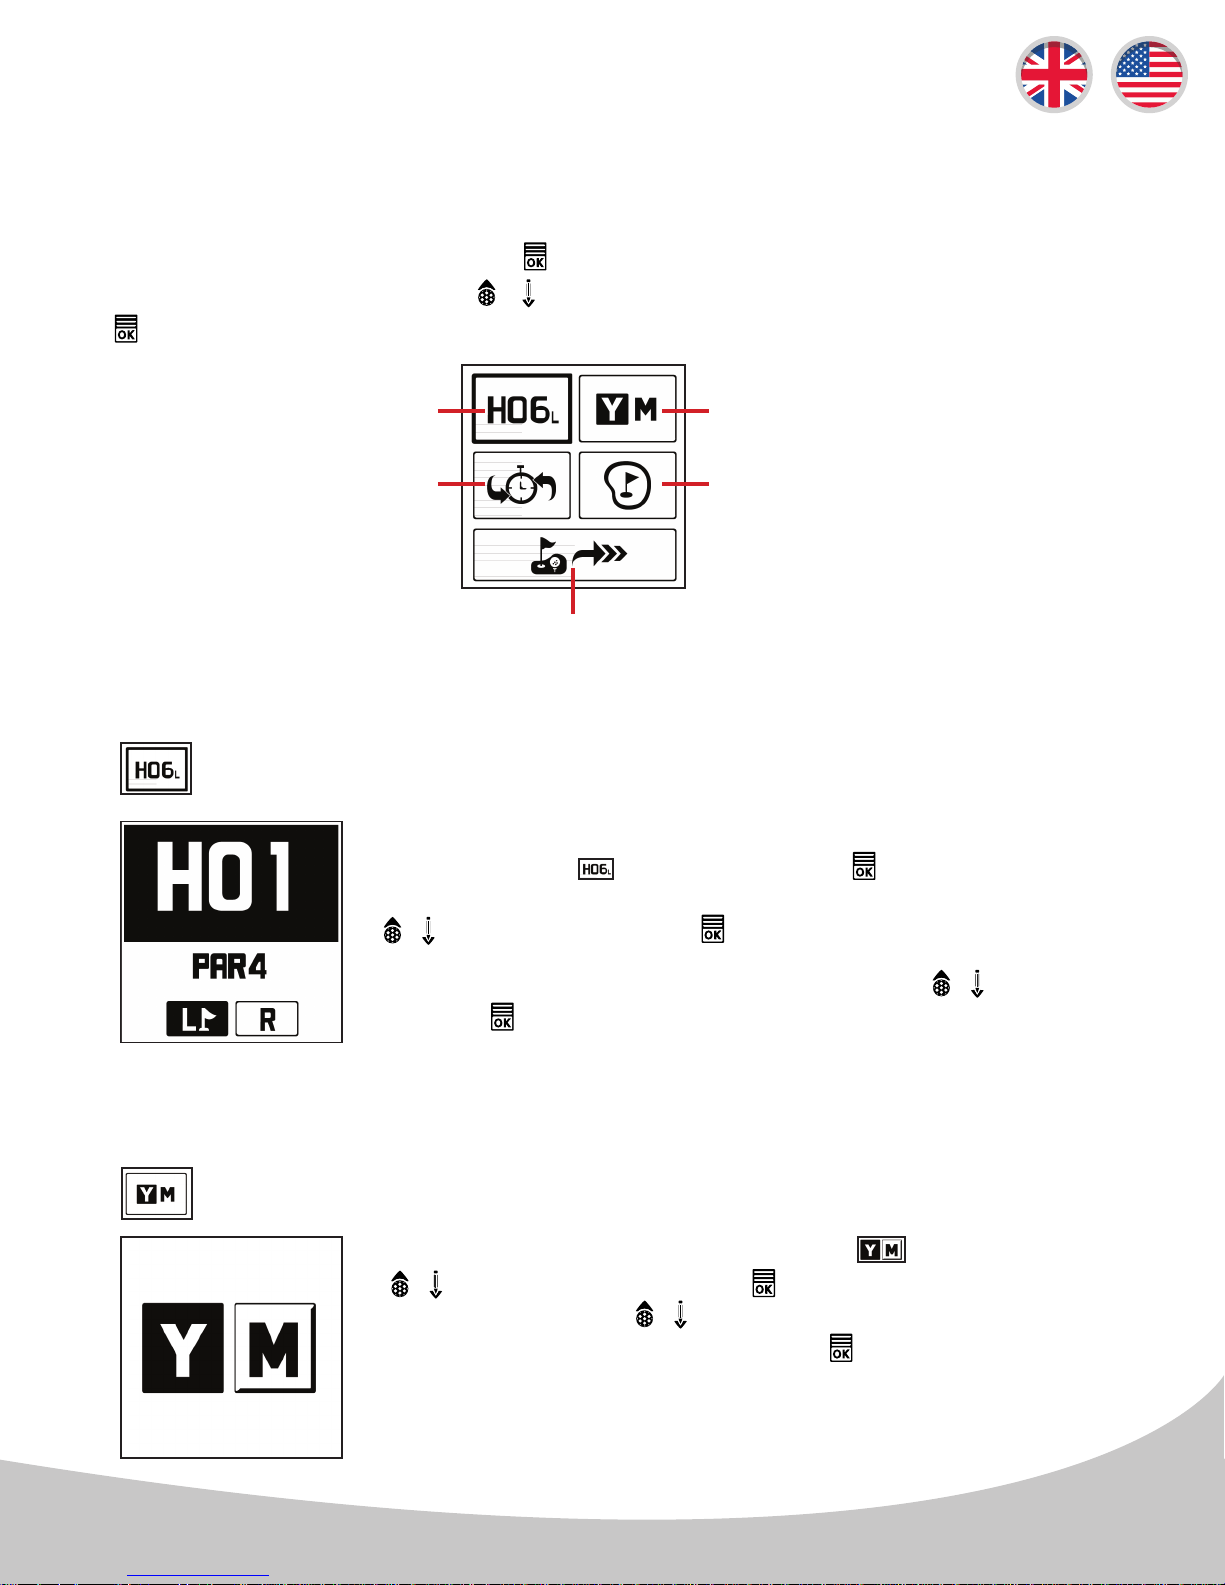
From Play Golf Mode, press and hold the button for 2 seconds to access the Play Golf Menu and
scroll through the selections with the / buttons. Select the highlighted menu option by pressing
the button.
Manual Hole Selection
and Left & Right Green
Quick Selection for Prior Hole
4.2 Settings & Selections
Manual Hole Selection or Left & Right Green
Left & Right
Green
Set Yards / Meters Measurements
*Note: Device Preset to Yards
Dynamic Green and Pin Placement
Exit Game
To change holes or to change the Left & Right Green from the Play Golf
Menu, select the icon by pressing the button. The Hole number
will be ashing when active, navigate to the desired Hole by using the
/ buttons, then press the button to select desired hole.
To select the left or right green* navigate with the / buttons then
press the button to conrm the selection.
*Note: The Left & Right Green selection is only available if there is a left &
right green on the course.
Set Yards / Meters Measurements
From the Play Golf Menu, highlight the option using the
/ buttons then press the button. Toggle between Yards
& Meters with the / buttons, and confirm the preferred
measurement setting by pressing the button.
*Note: Device is defaulted to Yards from packaging.
9
Page 10
4.2 Settings & Selections (Continued)
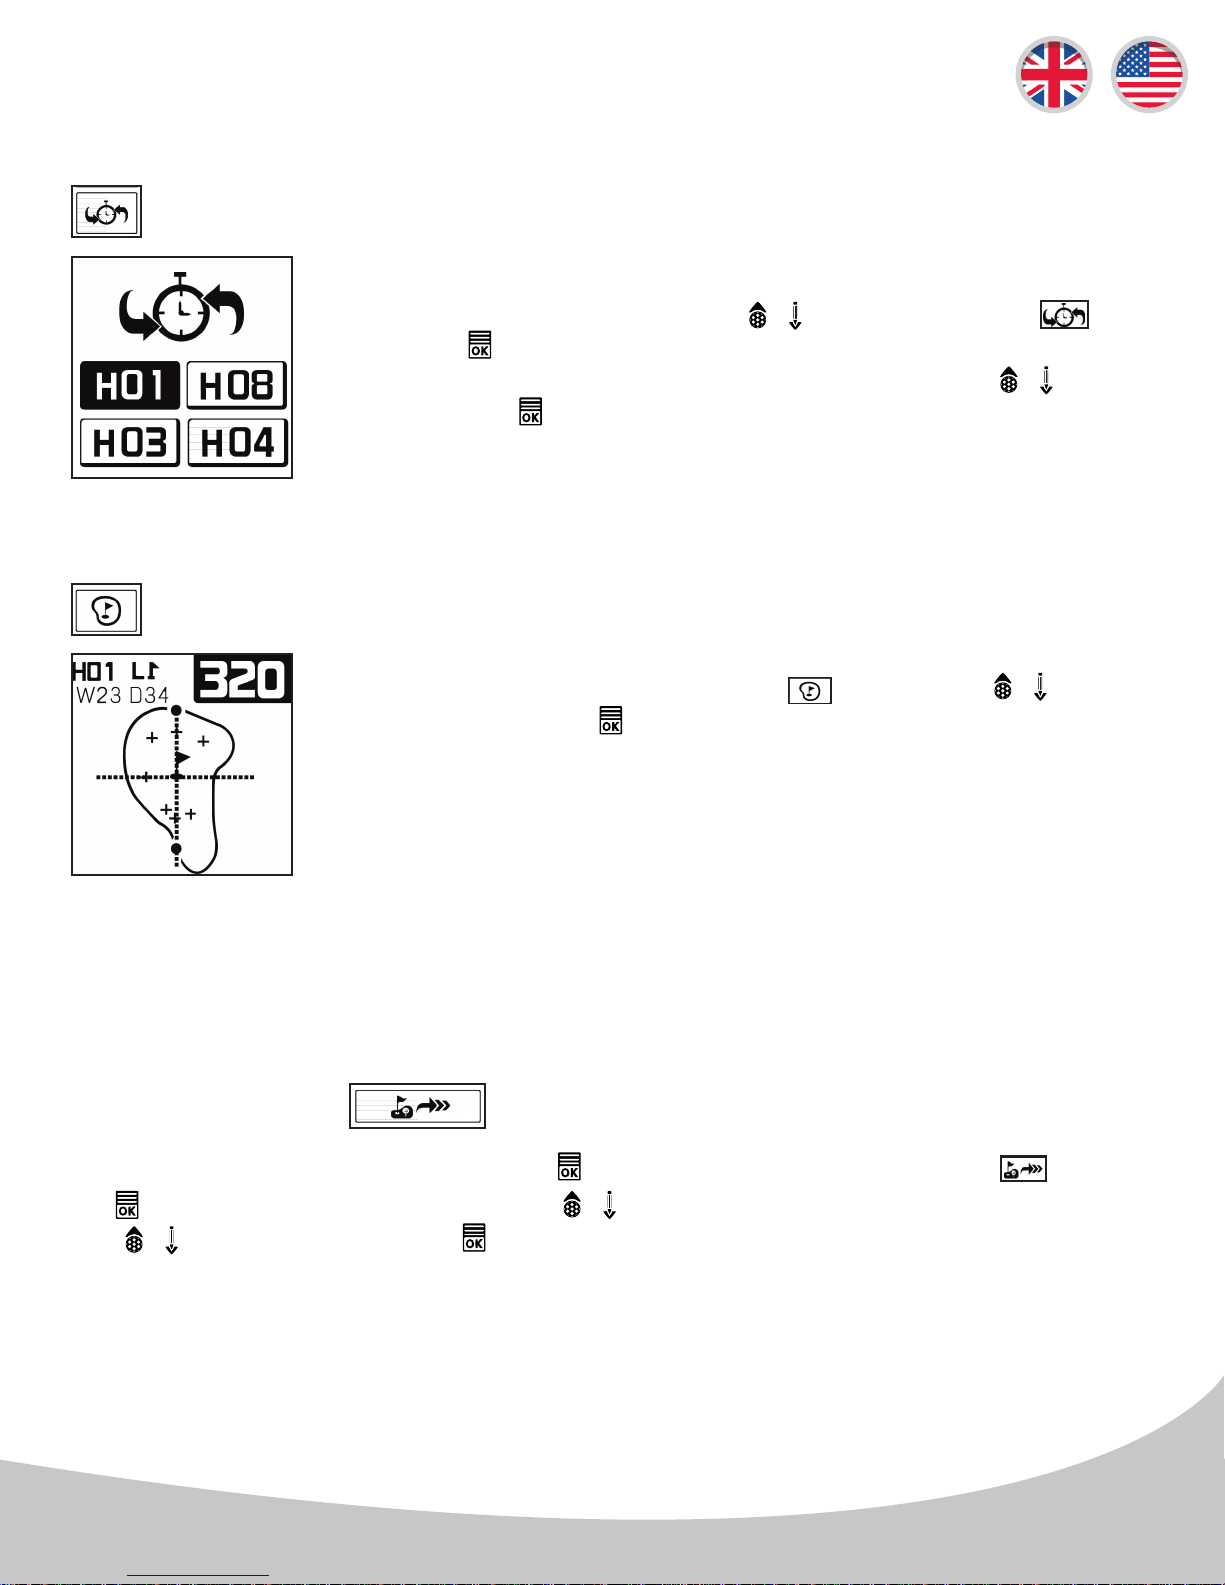
Quick Selection for Prior Hole
From the Play Golf Menu, scroll with the / buttons and select the icon,
press the button to enter the Quick Selection for Prior Hole screen.
Scroll through and select the prior hole by navigating with the / buttons,
then press the button to conrm the selection.
Dynamic Green View
You can also access the Dynamic Green View/ Pin Placement Mode from
the Play Golf Menu by navigating to the icon with the / buttons
and selecting with the button.
*Note: Dynamic Green View will allow you to always get the Front/Center/Back
distances to the green from your angle of approach.
*Note: You can also select the Left or Right Green if available from this menu
selection.
4.3 Exit Game
From the Play Golf Mode, press and hold the button for 2 seconds. Then Select the icon with
the button after scrolling to it with the / buttons. Select Yes or No by navigating with
the / buttons, then press the button if you would like to end the round.
10
Page 11
5. ADVANCED OPERATIONS
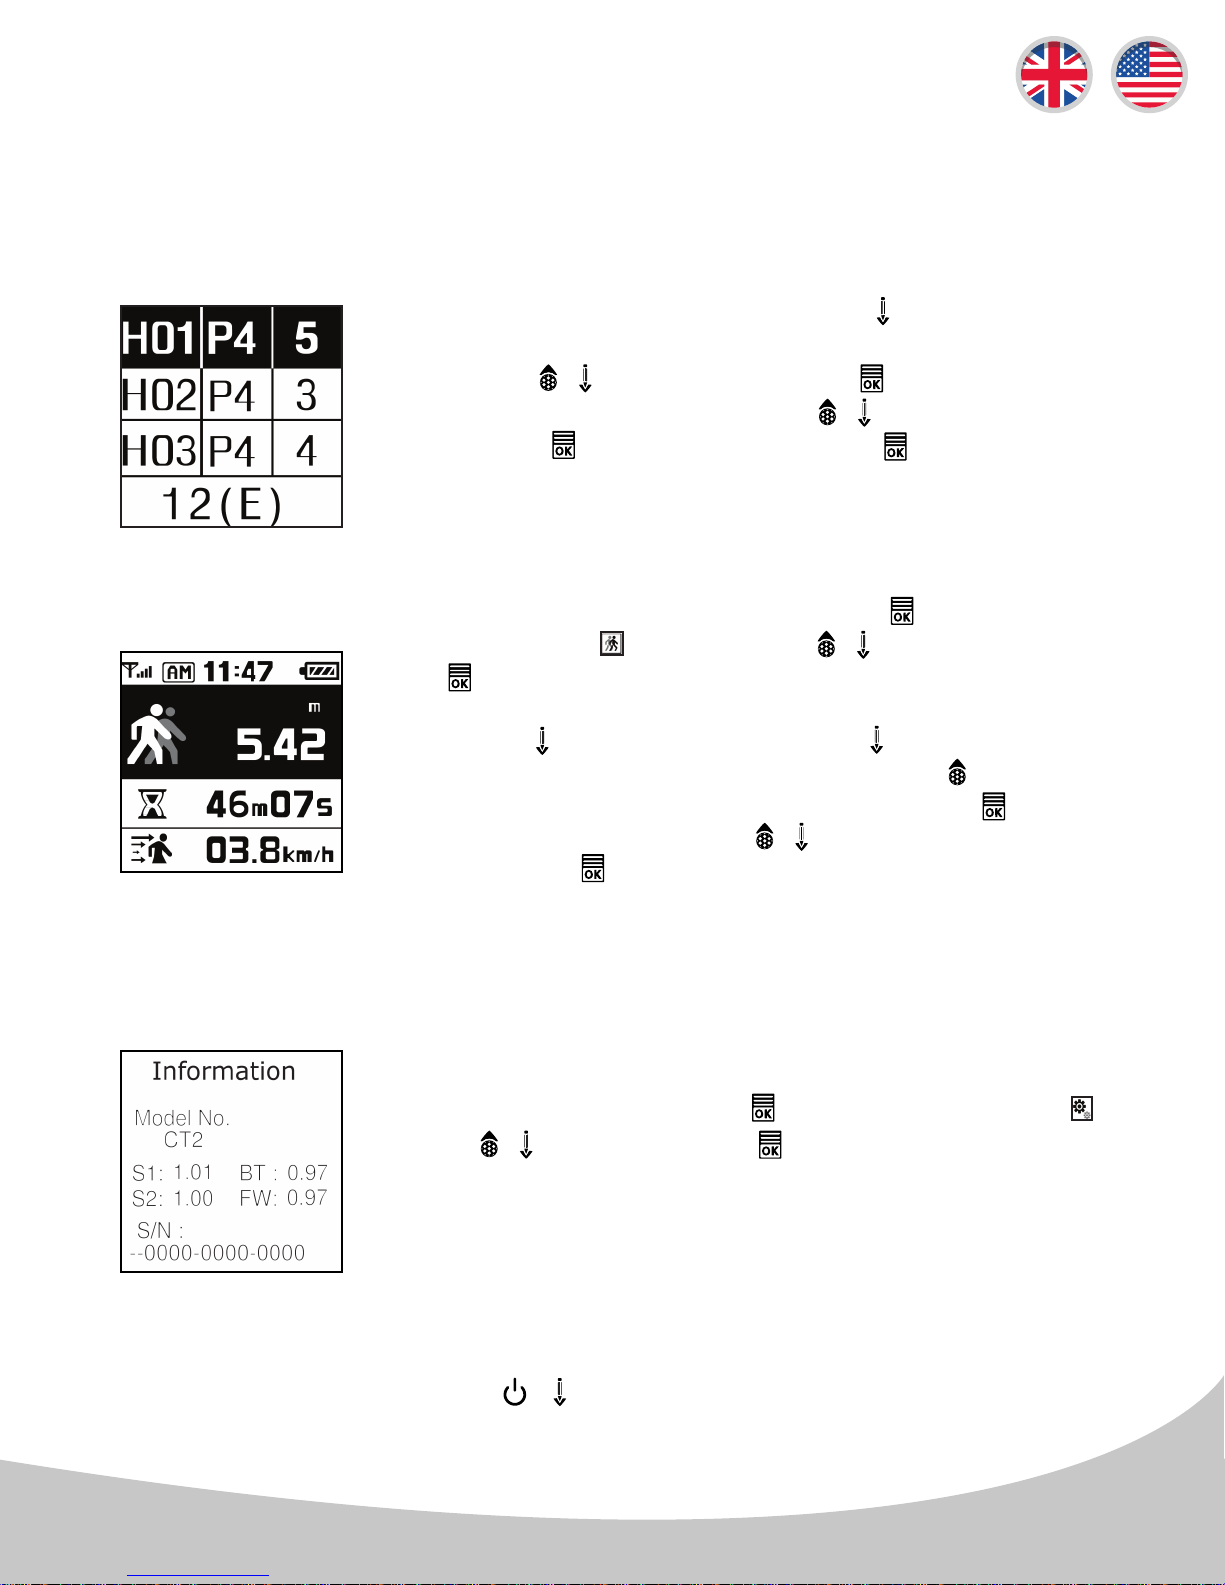
5.1 Recording Scores
From the Play Golf Mode, press and hold the button for 2 seconds to
access and record scores. To record your scores, navigate to the desired
hole using the / buttons, then press the button to select the hole.
You will then scroll to the score with the / buttons and conrm this
score with the button. Press and hold the button after recording
your Scores to return to Play Golf Mode.
*Note: When recording scores Par will be the default.
5.2 GPS Tracking
5.3 Systems Information
While in Time/Date Mode, press and hold the button for 2 seconds
then scroll to the icon with the / buttons and select with
the button. Once the GPS signal has been found the device
will automatically start recording. You can pause the Tracking feature by
pressing the button. Press and hold the button for 2 seconds to
delete the record when device is paused. Press the button to switch
between Yards / Meters. To Exit, press and hold the button for 2
seconds and then scroll with the / buttons to YES and select by
pressing with the button.
*Note: GPS tracking is activated automatically when the CT2 is in Play Golf
Mode (refer to Page 7).
While in Watch Mode, press the button then scroll to the icon
with the / buttons. Press the button to select and view detailed
system information, including model number and serial number.
5.4 How to Reset the CT2
To reset the device, press and hold the / buttons simultaneously for about 8 seconds to restart
the device.
11
Page 12

6. SOFTWARE UPDATES
Your GolfBuddy CT2 unit has been pre-loaded with the latest rmware and world-wide course maps
available at the time of manufacture, so it’s ready to play right out of the box. For optimum performance
and longer product life, we do recommend you register your unit and keep it updated with the latest
levels of rmware. You can also add the latest course maps and updates for free once you have
registered your unit. The instructions below will provide you with a step-by step guide on how to
register and update your GolfBuddy CT2.
1. Downloading the GolfBuddy Management Software (GB Manager) to your
computer:
• Please visit our website at www.golfbuddyglobal.com
• Click on the panel titled “Download GB Course Manager.” You will then see a screen with an option
to choose either Windows or Mac based software.
• Click on the correct version for your computer. Once downloaded, you can run the application to
install the GB Manager on your computer.
• Once completed, you will see a blue icon labeled "GolfBuddy World Course Manager" on your
desktop that you will use to access the GB Manager once you have registered.
2. Creating a User ID:
• Open the GB Manager application by clicking on the blue icon on your desktop.
• You will see a Login Panel . Click on “Sign up for new user” at the bottom. This will bring up a panel
for you to create your User ID and Password.
• Fill in all the details that are required ( indicated by " * " ). Please note the instructions regarding
no Caps, Symbols, Spaces, & 4-15 character-long requirement. You will need to click the “Check
Availability” to verify your selected User ID is valid and not already being used.
• Click “Submit” at the bottom of the form when nished.
• You have now created your User ID and Password...Make sure you write them down somewhere in case
you forget them!
12
Page 13
3. Registering your GolfBuddy CT2:
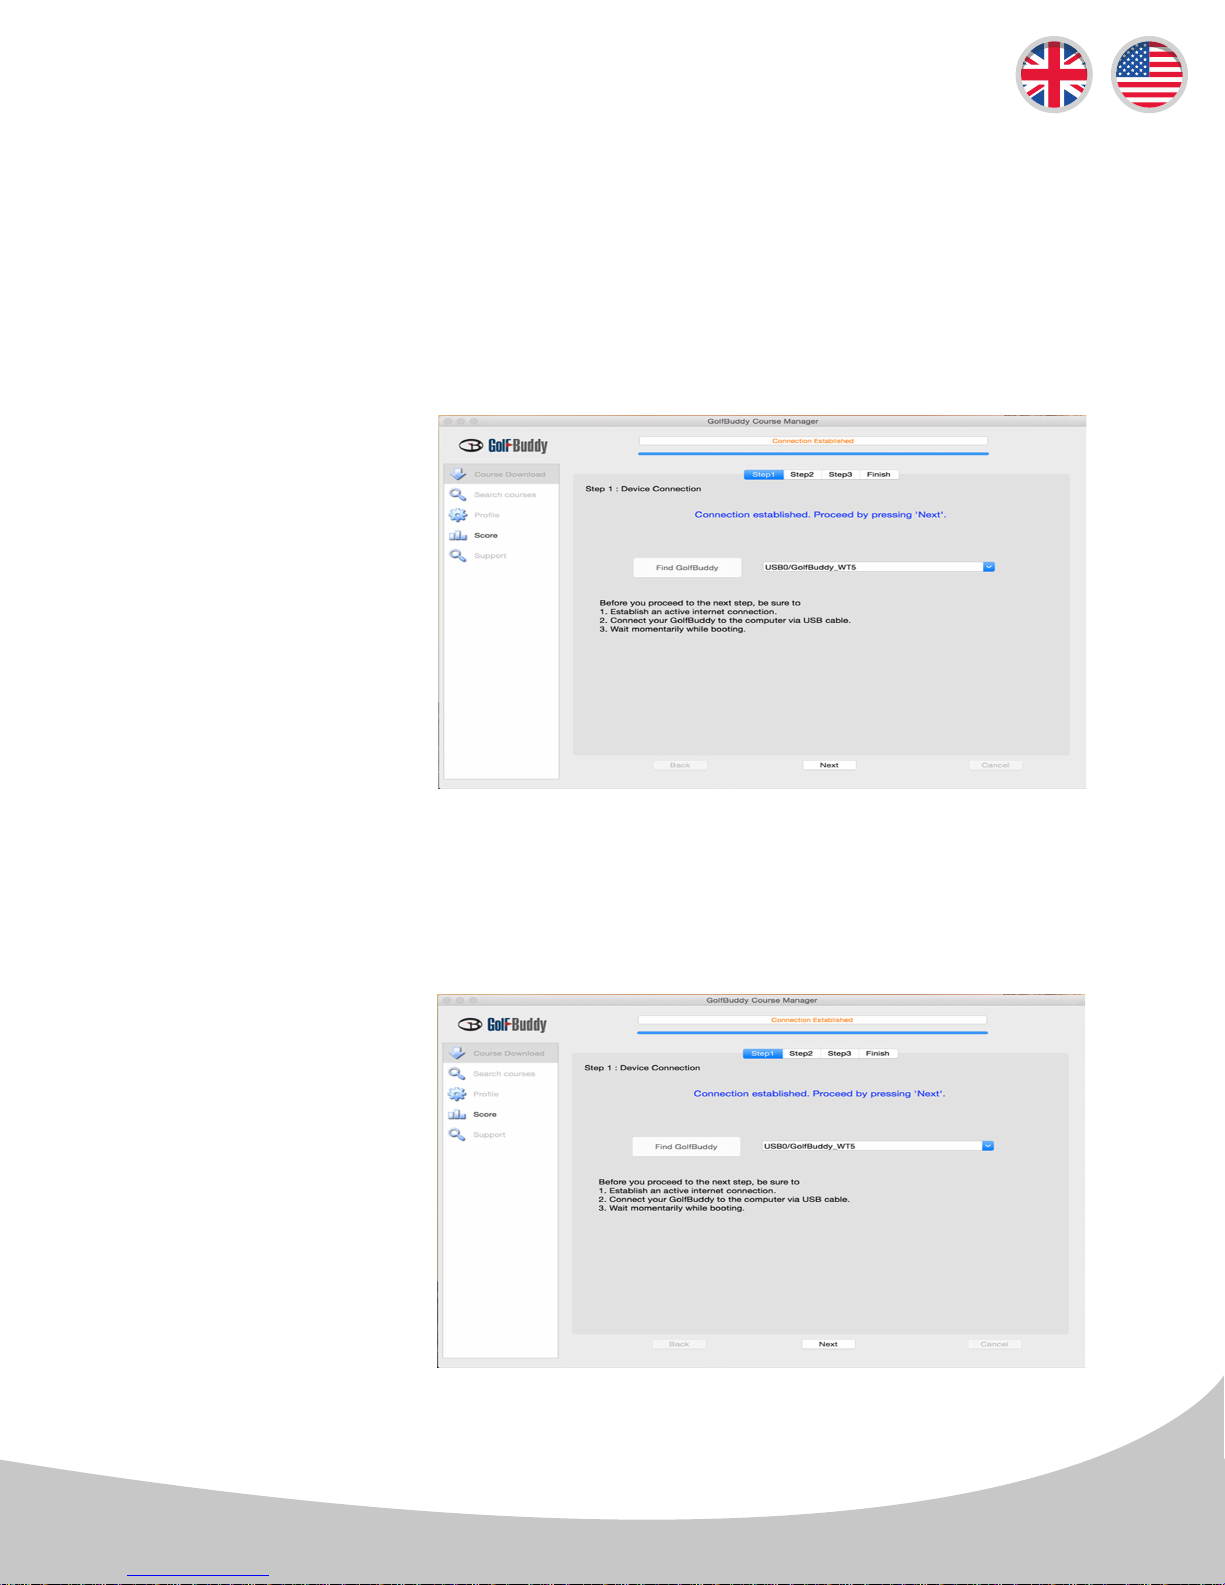
• Connect your GolfBuddy unit to a USB port on your computer using the USB cable provided with
the unit.
• After a short time, your GolfBuddy unit should show an icon on the screen indicating it is connected
to the computer.
Notes: You can disregard any driver download requests that your computer may say is required.
• Click on the blue GB icon on your desktop and open the Login Panel.
• Enter your User ID and
Password. You should
now see a panel that
indicates the GB Manager
is searching for the device.
After a short time, you
will see “Connection
Established”. At this stage,
your unit is successfully
registered to the account
that you created and you
will not be able to register
your unit under a dierent
account.
4. Updating your GolfBuddy CT2 in three Steps
Step #1
Once you get the
“Connection Established”
message, please click
“Next” to proceed to Step
#2. Firmware Update.
13
Page 14
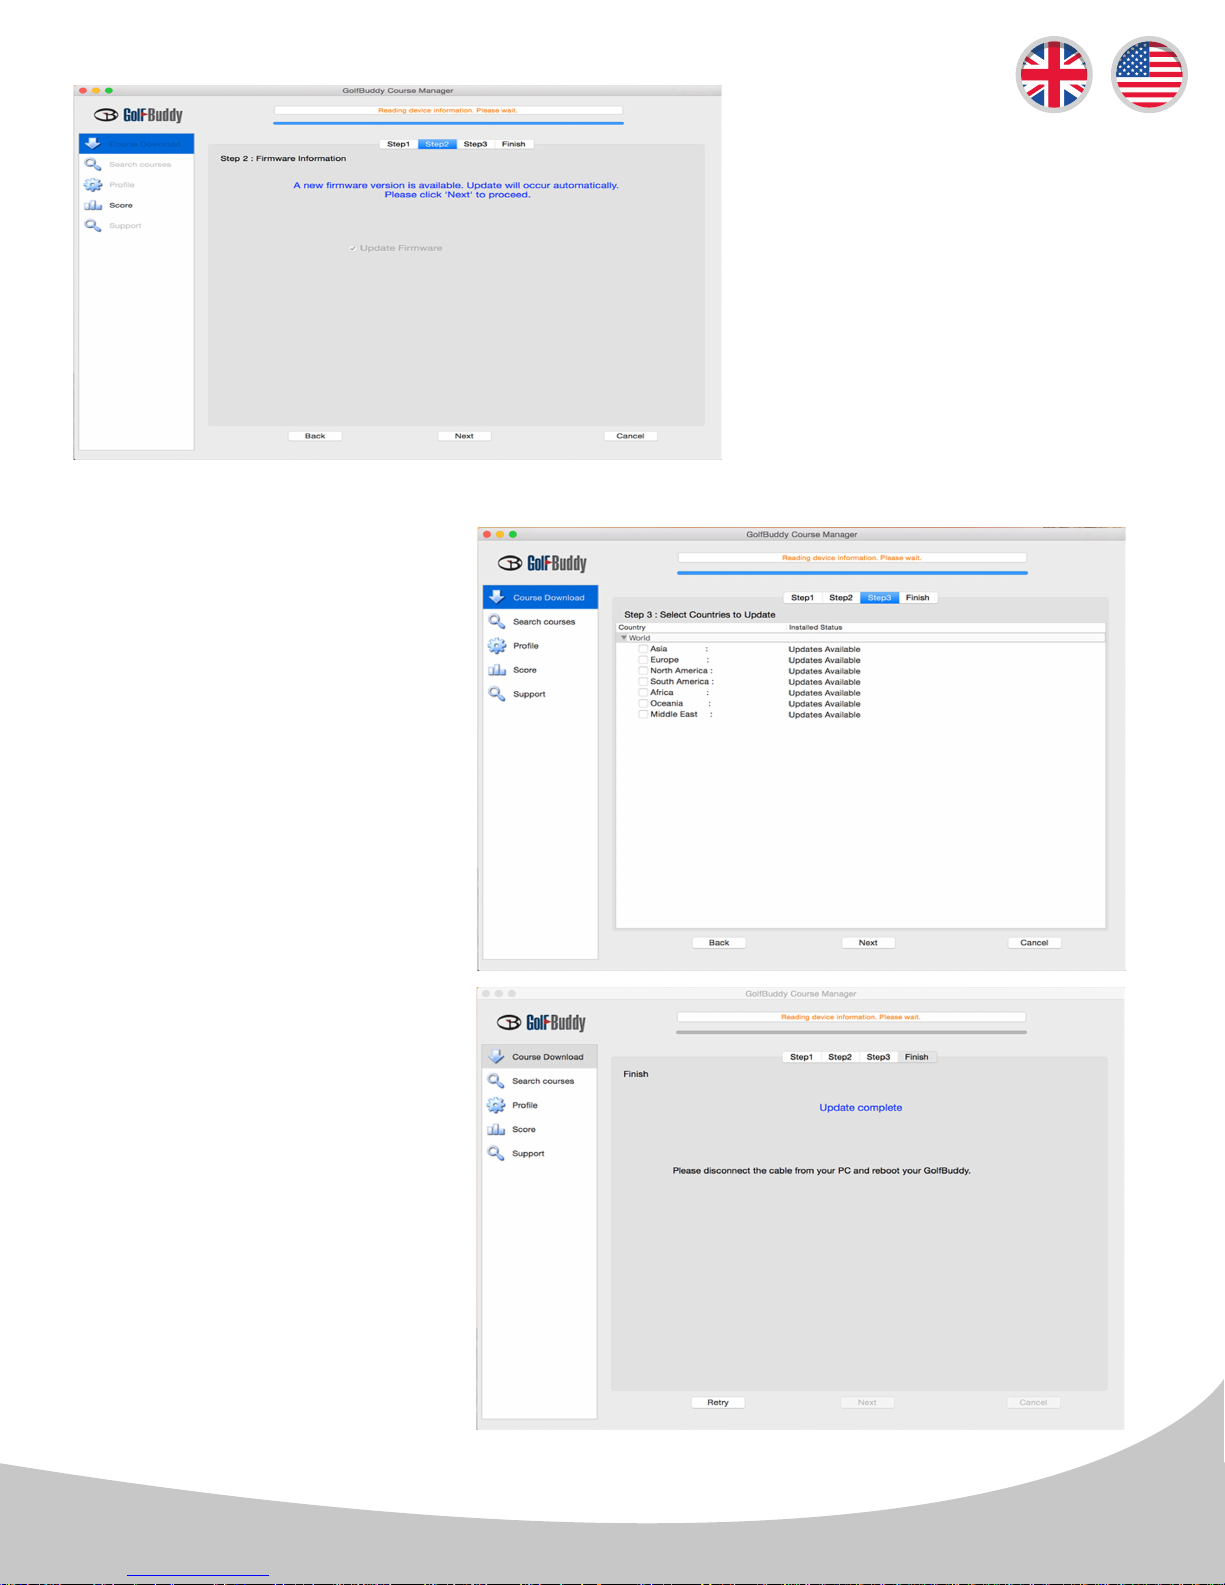
Step #3 : Course
Download
Step #2 :
Firmware Update
At step 2, click “Next” to install
the latest rmware. If the rmware
is already up to date, click “Next”
to proceed to step 3.
Select the countries that you
would like to update and click
“Next”. You will see a panel
that asks you to “Overwrite” or
“Newly Updated Only”(default
option - already selected). Click
“OK” to start the course update.
Once all the courses have been
downloaded you will receive a
message “Update Complete”.
You can now disconnect the
unit. Your GolfBuddy is now
ready to go with the latest
updates!
14
Page 15
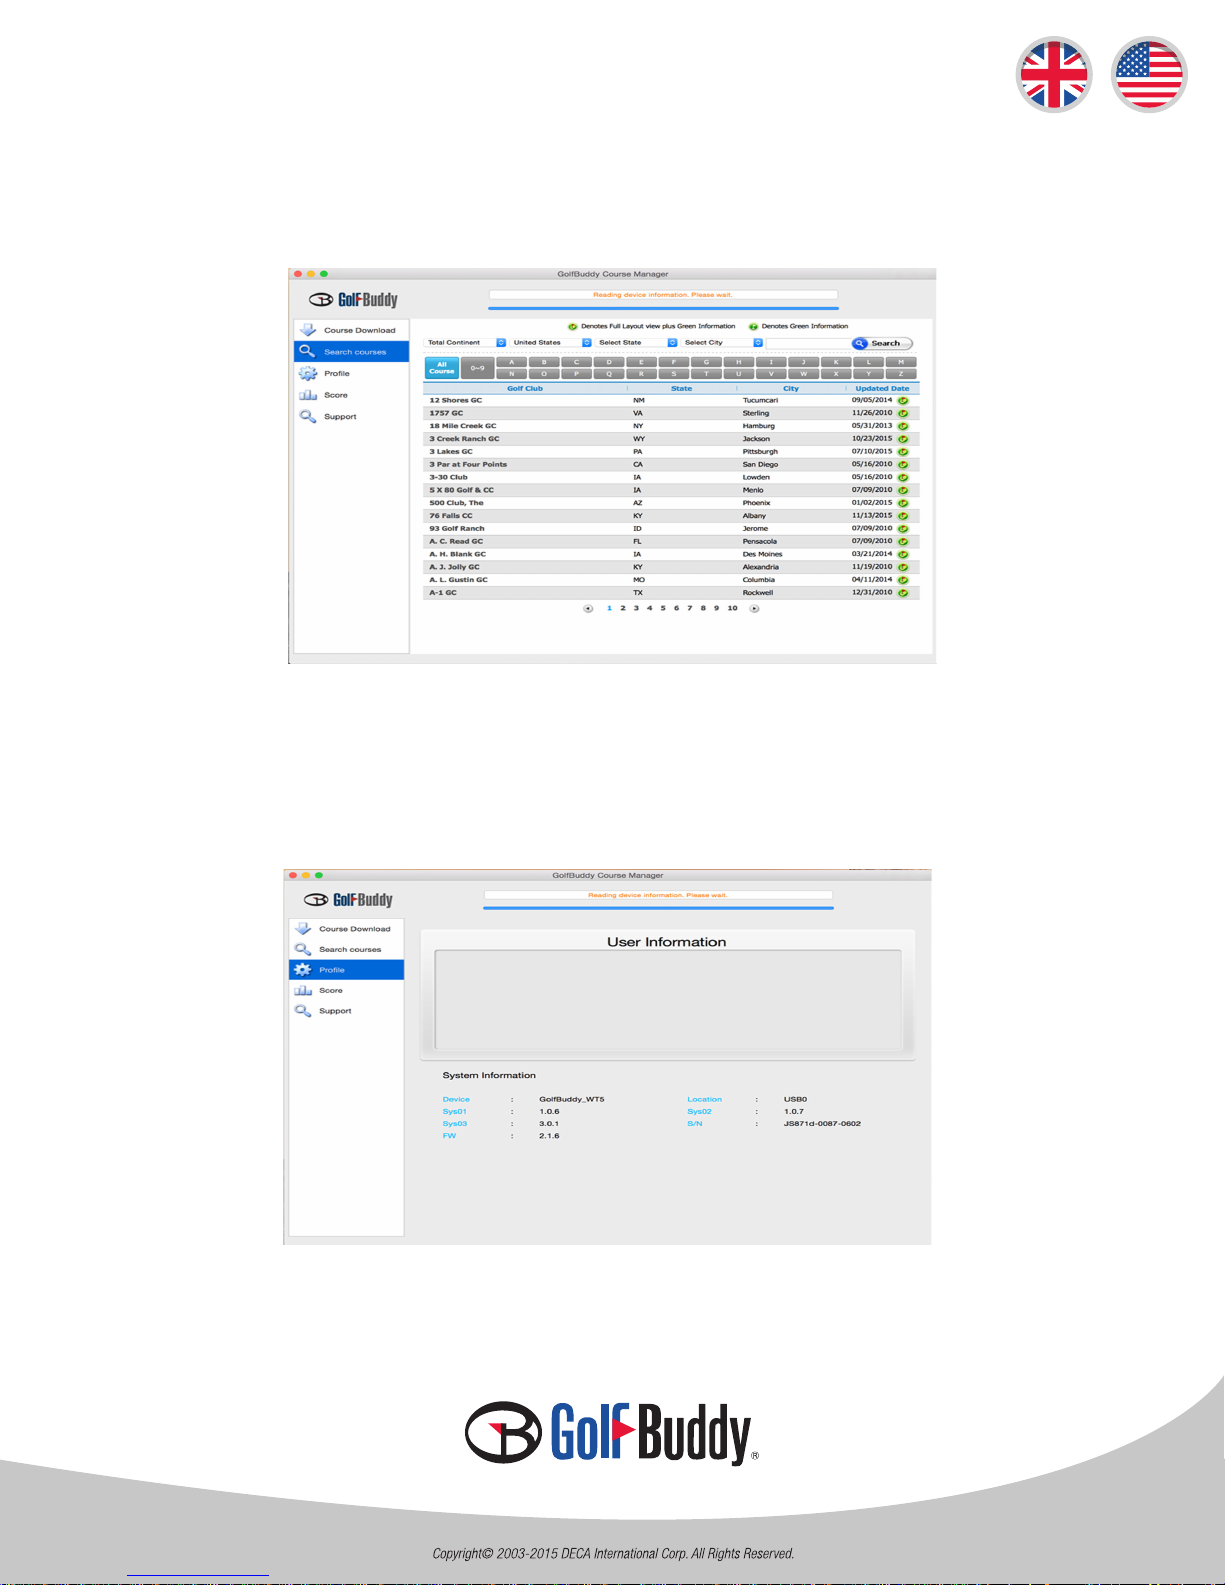
Updated Course Info
You can search courses by country, state, and city. You can also look up when the course was last
updated.
Prole Info
System Information for user’s CT2 can be found under the prole tab.
Thank you for purchasing our GolfBuddy Product.
15
 Loading...