

Goldweb GW-WR151N User Manual

150Mbps Wireless Router
GW-WR151N
User Manual
150
2W
Low Power
Consumption

GW-WR151N
i
Contents
1 Safety Precautions ............................................................................................. 1
2 Overview ............................................................................................................ 2
2.1 Product Introduction .............................................................................. 2
2.2 Packing list ............................................................................................ 2
3 Hardware Description and Hardware Installation............................................... 3
3.1 Front Panel and LED Status.................................................................. 3
3.2 Rear Panel and Interface Description ................................................... 4
3.3 Hardware Installation............................................................................. 5
3.3.1 System Requirements ................................................................5
3.3.2 Before You Begin........................................................................ 5
3.3.3 Connecting the Device ............................................................... 5
3.4 Operation Range ...................................................................................6
4 Configuring Your Computer and Wireless Connection....................................... 7
4.1 Configuring Your Computer ................................................................... 7
4.2 Configuring Wireless Configuration....................................................... 9
5 Logging In to the Web Page............................................................................. 11
6 Web Configuration ...........................................................................................12
6.1 Status................................................................................................... 12
6.1.1 System Information................................................................... 12
6.1.2 LAN Client List.......................................................................... 12
6.1.3 LAN Statistics............................................................................ 13
6.1.4 WAN Connection Status ...........................................................13
6.1.5 Wireless Connection Status...................................................... 14
6.1.6 Wireless Statistics..................................................................... 14
6.2 Wizard ................................................................................................. 15
6.3 Setup Configuration............................................................................. 19
6.3.1 LAN Basic Configuration .......................................................... 19
6.3.2 WAN Configuration ................................................................... 21
6.3.2.1 DHCP (Dynamic IP) ...................................................... 22
6.3.2.2 Static IP......................................................................... 25
6.3.2.3 PPPoE .......................................................................... 28
6.3.2.4 PPTP............................................................................. 32
6.3.2.5 L2TP ............................................................................. 35
6.3.2.6 Bridge............................................................................ 37

GW-WR151N
ii
6.4 Advanced Configuration ...................................................................... 37
6.4.1 ALG........................................................................................... 39
6.4.2 DHCP Filter............................................................................... 39
6.4.3 Parents Control......................................................................... 40
6.4.3.1 MAC Filter ..................................................................... 40
6.4.3.2 URL Filter...................................................................... 41
6.4.4 Anti Attack................................................................................. 42
6.4.5 IP Filter .....................................................................................44
6.4.6 Virtual Server ............................................................................ 46
6.4.7 Schedules................................................................................. 48
6.4.8 QoS........................................................................................... 49
6.4.8.1 QoS Interface................................................................ 49
6.4.8.2 QoS Flux ....................................................................... 51
6.4.9 Access Control.......................................................................... 53
6.4.10 IGMP ................................................................................... 54
6.4.10.1 IGMP Proxy................................................................. 54
6.4.10.2 IGMP Snooping........................................................... 55
6.4.11 UPnP ................................................................................... 56
6.4.12 SNTP................................................................................... 56
6.4.13 DMZ..................................................................................... 58
6.4.14 DDNS .................................................................................. 59
6.4.15 IP UNNumber ...................................................................... 60
6.5 Wireless Configuration ........................................................................ 62
6.5.1 Wireless Basic Configuration.................................................... 62
6.5.2 SSID Configuration ................................................................... 63
6.5.3 Wireless Advanced Configuration............................................. 68
6.5.4 Wireless Repeater .................................................................... 70
6.5.4.1 Configuring the Wireless Basic Station......................... 72
6.5.4.2 Configuring the Repeater.............................................. 73
6.6 Management........................................................................................ 74
6.6.1 System Management................................................................ 74
6.6.2 User Management .................................................................... 75
6.6.3 Diagnosis.................................................................................. 75
6.6.3.1 Ping Diagnosis .............................................................. 75
6.6.3.2 Traceroute Diagnosis.................................................... 76

GW-WR151N
iii
6.6.4 TR069 Configuration................................................................. 77
6.6.5 Configuration Upgrade ............................................................. 79
6.6.6 Firmware Upgrade .................................................................... 80
6.6.7 Log Configuration .....................................................................80
6.6.8 Log View ................................................................................... 81
7 Troubleshooting ...............................................................................................83

GW-WR151N
1
About User Manual
This user manual describes how to install and configure the GW-WR151N wireless
router.
Organization
This user manual is organized as follows:
Chapter Description
Chapter 1 : Safety
Precautions
Provides safety precaution information.
Chapter 2 : Overview
Provides a general overview of the
wireless router, and the packing list.
Chapter 3 : Hardware
Description and Hardware
Installation
Describes the front and rear panels of the
wireless router and the procedure for
hardware installation.
Chapter 4 : Configuring
Your Computer and
Wireless Connection
Describes how to set the TCP/IP for your
computer and how to connect to
GW-WR151N wirelessly.
Chapter 5 : Logging In to
the Web Page
Describes how to log in to the wireless
router.
Chapter 6 : Web
Configuration
Describes how to navigate through the
Web pages and how to configure the
parameters.
Chapter 7 : Troubleshooting Provides troubleshooting information.

GW-WR151N
2
Features
Support IEEE802.11b, IEEE802.11g, IEEE802.11n, IEEE802.3, IEEE802.3u,
IEEE802.11i, and IEEE802.11e
Transmission data rate is up to 150 Mbps
Support WEP and WPA for secure data transmission
Support DHCP server
Support manually configuring static routing
Support software upgrade through Web page
Support restoring factory default settings
Support demilitarized zone (DMZ)
Support DNS proxy and forwarding
Support QoS
Support UPnP
Support WPS
Support port mapping
Support wireless repeater
Support guest network
Support restricting IP bandwidth
Support filtering by MAC address and URL
Support wireless security authentication
Support 6 types of WAN connection modes, including DHCP, static IP,
PPPoE, PPTP, L2TP, and Bridge
Support remote access control
Support firewall
Support system status display
Support backing up and restoring configuration files
Support WMM

GW-WR151N
1
1 Safety Precautions
Before operating GW-WR151N, read the following precaution information carefully:
Use the type of power that user manual marks.
Use the power adapter that is packed within the device package.
Pay attention to the power load of the outlet or the prolonged lines. An
overburden power outlet or damaged lines and plugs may cause electric
shock or fire accident. Check the power cords regularly. If you find any
damage, replace it at once.
Leave proper space for heat dissipation to avoid damage caused by device
overheating. Heat dissipation holes enable the device to work normally. Do
not cover heat dissipation holes.
Keep the device away from heat outlets, high temperature places, and direct
sunlight.
Keep the device in dry places. Do not spill any liquid on this device.
Do not connect the device to any PC or electronic product unless our
customer engineer or your broadband provider instructs you to do this,
because any wrong connection may cause power or fire risks.
Do not place this device on an unstable surface.

GW-WR151N
2
2 Overview
2.1 Product Introduction
GW-WR151N is a high-performance network access device. It is fully compatible
with IEEE802.11b, IEEE802.11g and IEEE802.11n standards. It can provide
reliable and convenient access service for individual users and SOHO (Small
Office, Home Office). It features Web-based GUI, allowing users to easily modify
settings to connect the device to ISP (Internet Service Provider) and conveniently
perform upgrade using the WEB page.
2.2 Packing list
Please check that your packing list includes the following items:
1 x GW-WR151N
1 x Power adapter (12V DC, 500 mA)
1 x Ethernet cable
1 x Quick Installation Guide
1 x CD
1 x Warranty Card
GW-WR151N
3
3 Hardware Description and Hardware Installation
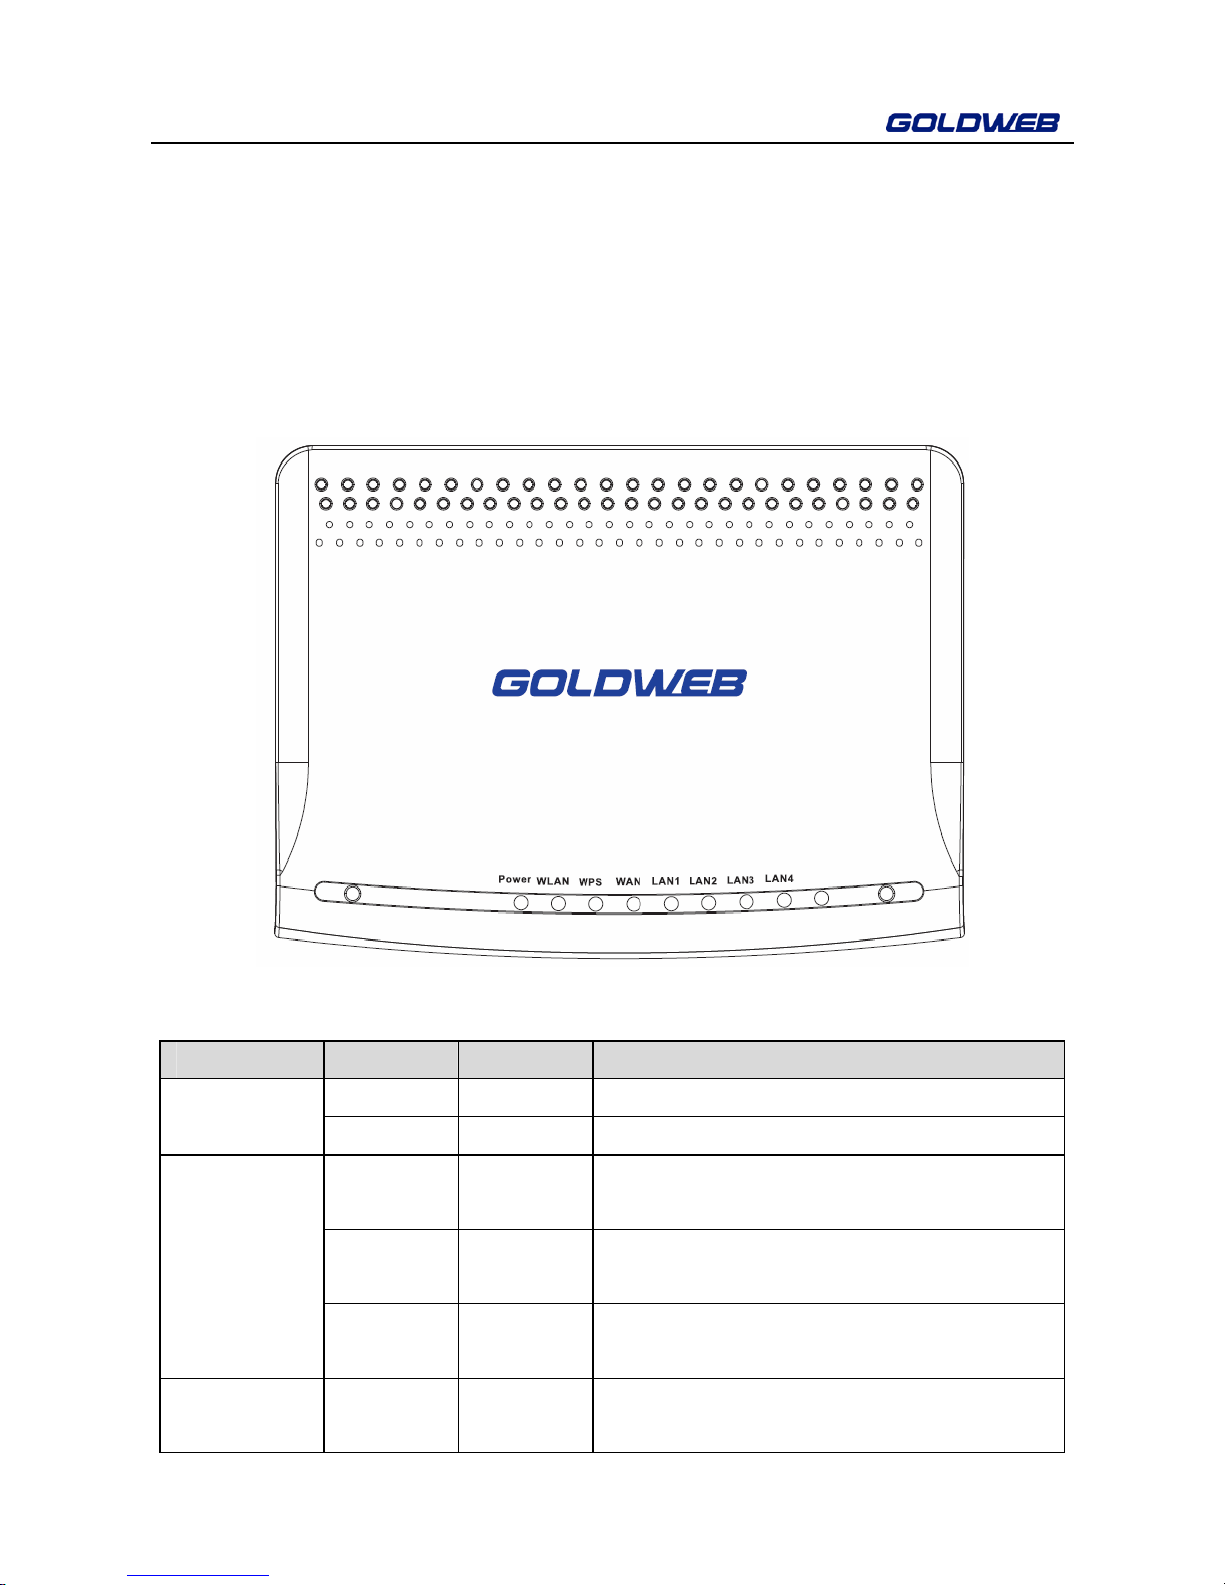
3.1 Front Panel and LED Status
There are 8 LED indicators on the front panel of GW-WR151N. By observing their
status, you can check whether the device runs normally.
The following table describes the status of LED indicators on the front panel.
Indicator Color Status Description
Green On Power is on.
Power
- Off Power is off or the device is down.
Green On
The WLAN connection is in the
communication state.
Green Blink
Data is being transmitted and received in
the WLAN.
WLAN
- Off
The WLAN connection is in the
non-communication state.
WPS
Green On
Connection succeeds under WPS (Wi-Fi
Protected Setup).

GW-WR151N
4
Green Blink Negotiation is in progress under WPS.
- Off WPS is disabled.
Green On WAN connection succeeds.
Green Blink Data is being transmitted.
WAN
- Off No WAN connection.
Green On LAN connection succeeds.
Green Blink Data is being transmitted.
LAN1/2/3/4
- Off No LAN connection.
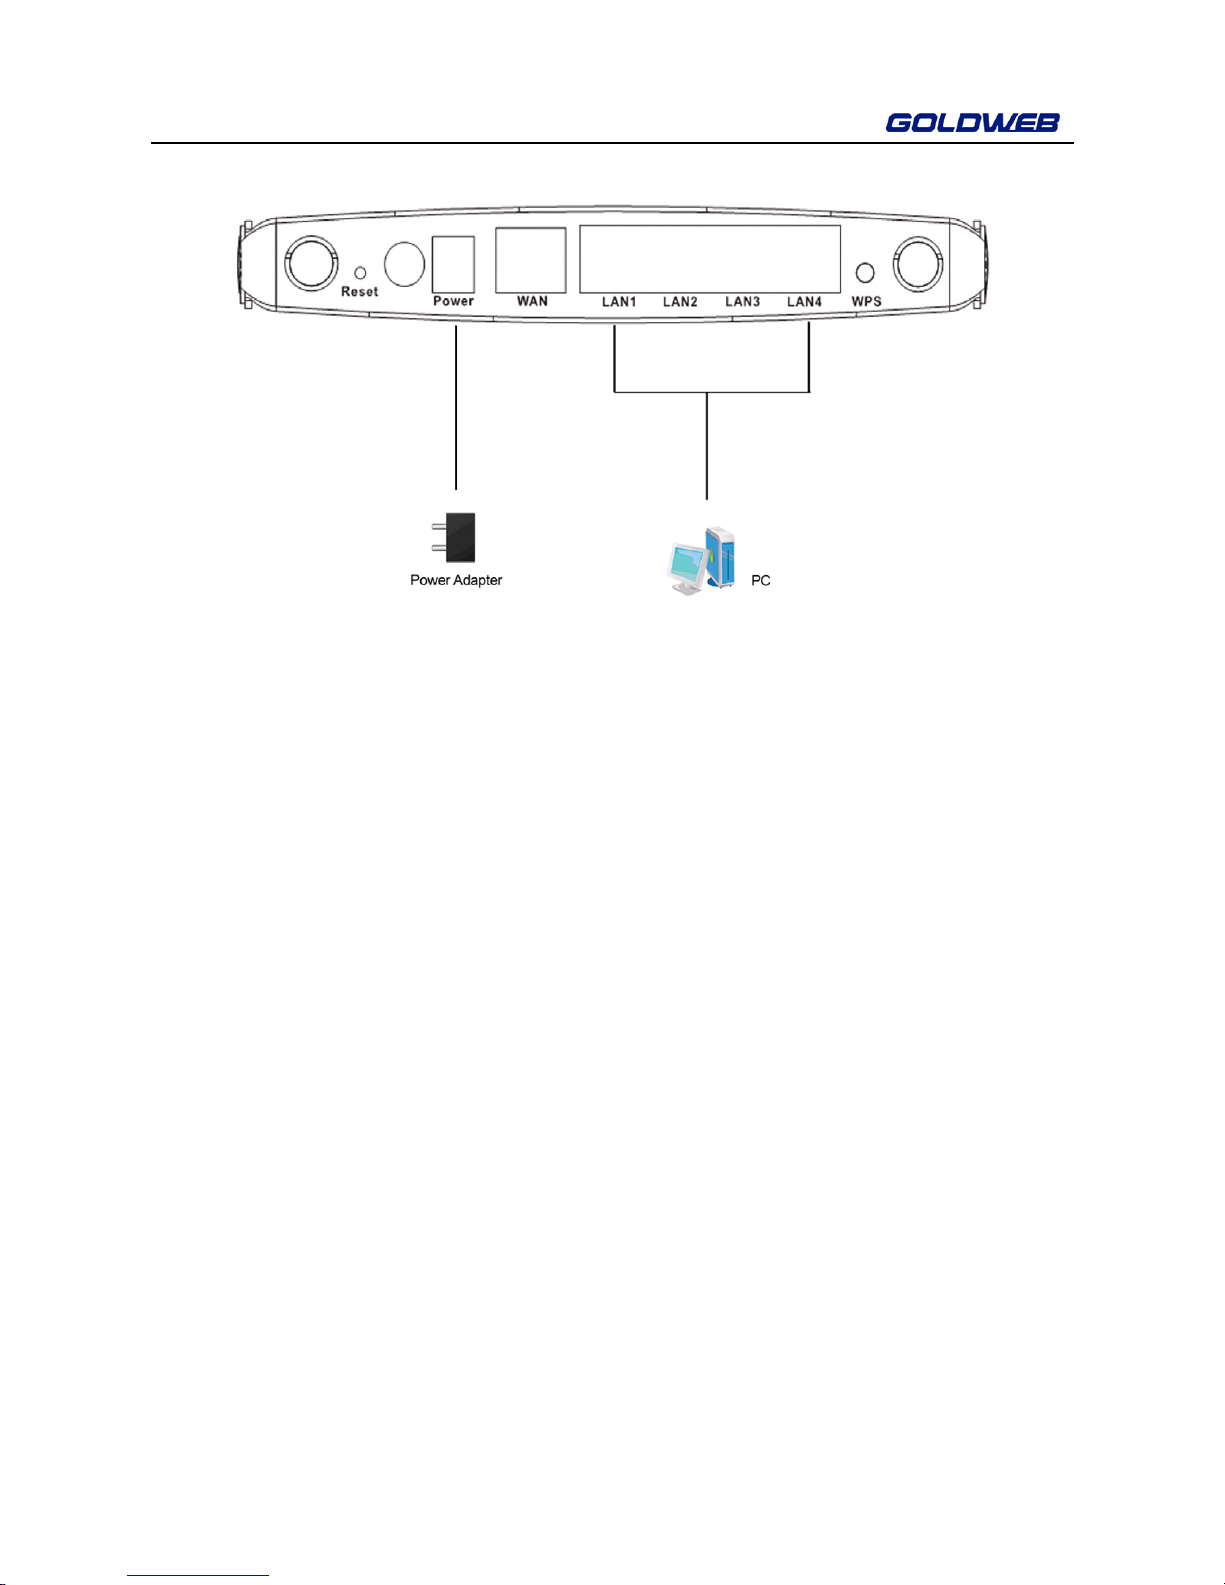
3.2 Rear Panel and Interface Description
The following table describes interfaces and buttons on the rear panel.
Interface/Button Description
Reset
Use a fine needle to press Reset gently for 5 seconds and
then release the button. The system reboots and restores to
the factory defaults.
PWR Power socket, for connecting the power adapter.
WAN
RJ45 WAN interface, for connecting WAN or the uplink
network devices.
LAN1/2/3/4
RJ45 LAN interfaces, for connecting hub, switch, or computer
in the LAN.
WPS
This button is used for enabling the WPS PBC mode. When
WPS is enabled, press this button, and the AP starts to
accept negotiation of PBC mode.

GW-WR151N
5
3.3 Hardware Installation
3.3.1 System Requirements
Before installing the device, please ensure that the following items are ready:
At least one Ethernet RJ45 cable (10Base-T/100Base-T)
One wireless router
A PC is already installed with the TCP/IP protocol and the PC can access
the Internet.
3.3.2 Before You Begin
Before you install the device, please pay attention to the following items:
When the device is connected to a computer, hub, router or switch, the
Ethernet cable should be less than 100 meters.
Do not place this device on an unstable surface or support. Do not put this
device on the ground.
Keep the device clean. Keep it away from direct sunlight. Avoid any metal in
the device.
Place the device in the center of the area, and try to optimize the wireless
coverage.
3.3.3 Connecting the Device
To connect the device, do as follows:
Step 1 Connect one end of the RJ45 cable to the LAN interface of
GW-WR151N.
Step 2 Connect the other end of the RJ45 cable to your PC.
Step 3 Connect the power adapter to the power socket of GW-WR151N.
GW-WR151N
6
3.4 Operation Range
The operation range of the wireless router depends on the actual environment. The
path and effect of signal transmission vary with the deployment in a house or an
office. For example, the outdoor straight transmission distance for a certain device
can be 300 meters and the indoor transmission distance can be 100 meters.

GW-WR151N
7
4 Configuring Your Computer and Wireless
Connection
4.1 Configuring Your Computer
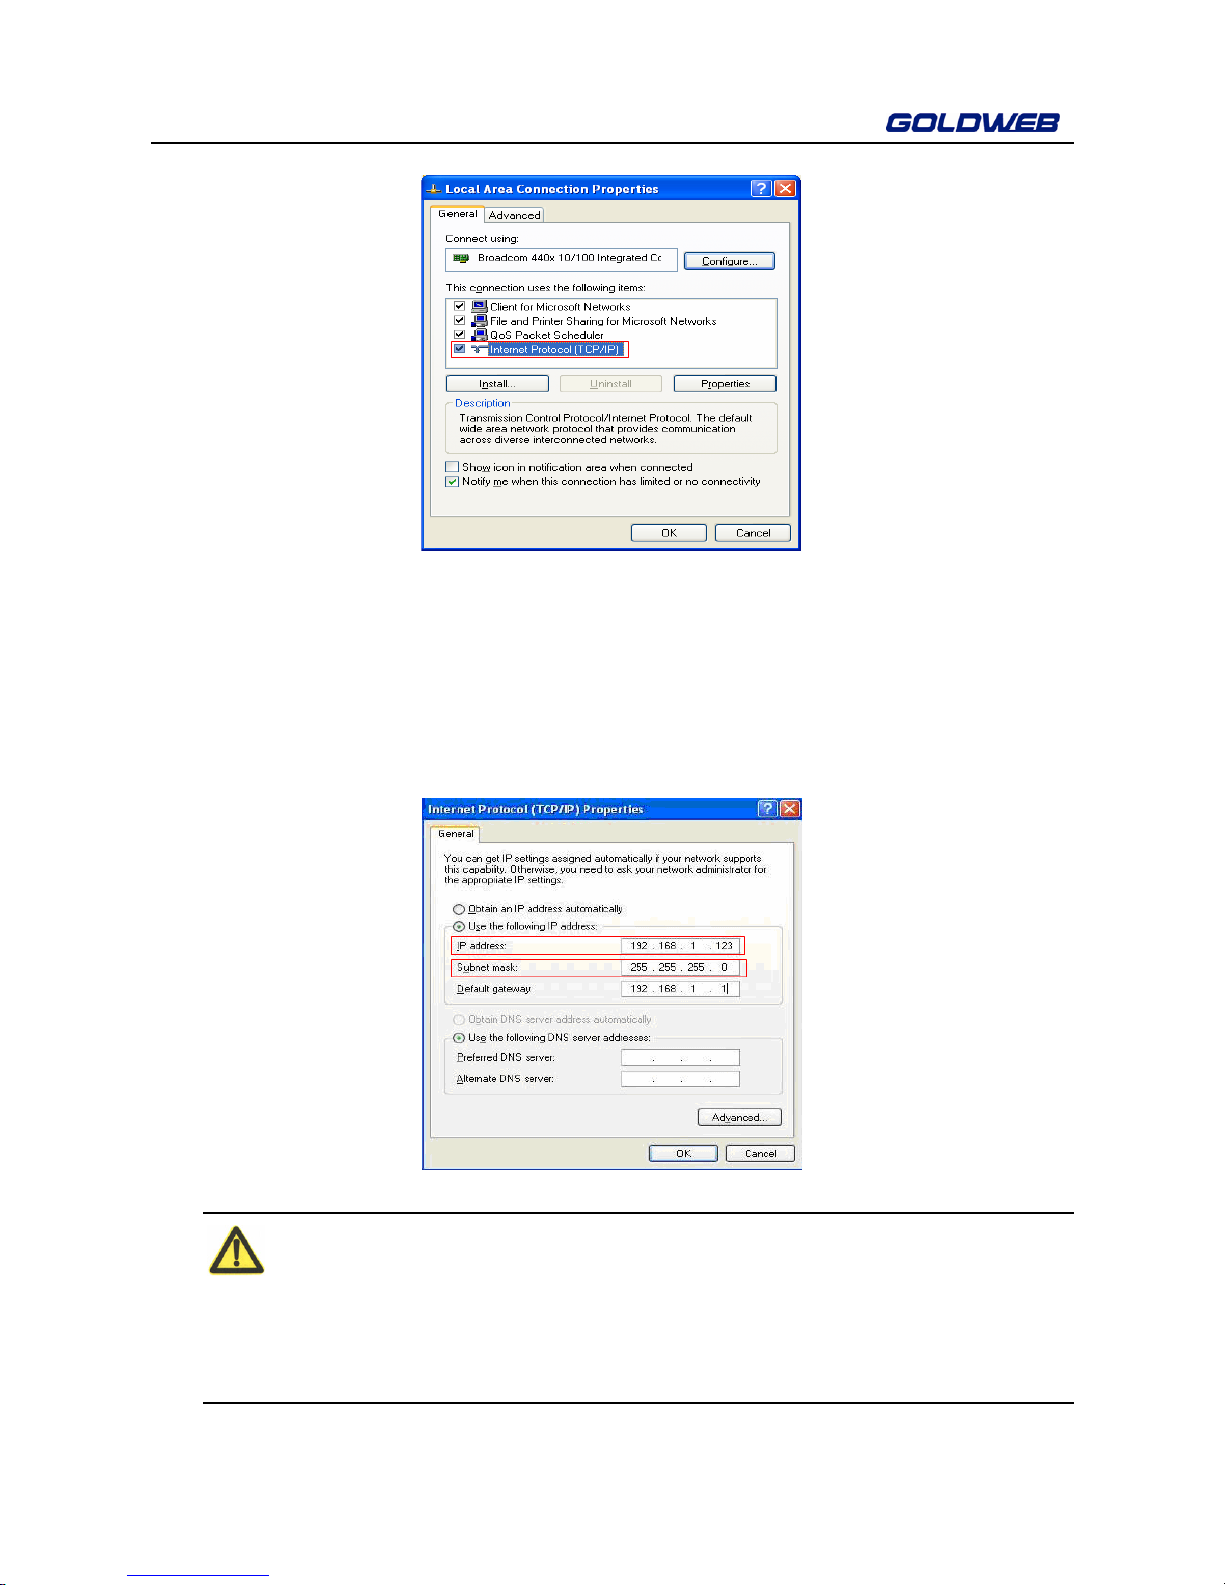
The following takes Windows XP as an example. Do as follows to manually set the
network adapter of your computer:
Step 4 Right-click the icon of My Network Places and choose Properties to
display the Network Connections window.
Step 5 Right-click the icon of a network interface card or wireless network
adapter and choose Properties.
Step 6 Double-click Internet Protocol (TCP/IP).
GW-WR151N
8
Step 7 Set the IP address of your computer to 192.168.1.X (X is an integer in
the range of 2 to 254), and the MAC address to 255.255.255.0. Set the
gateway and the IP address of the DNS server. You can leave them
blank if you do not know information about the gateway and DNS server.
Click OK.
Note:
After you finish configuring the GW-WR151N router, the domestic gateway can
set the Internet protocol for the PC’s network adapter. Set the IP address and
DNS server to Obtain an IP address automatically.
GW-WR151N
9
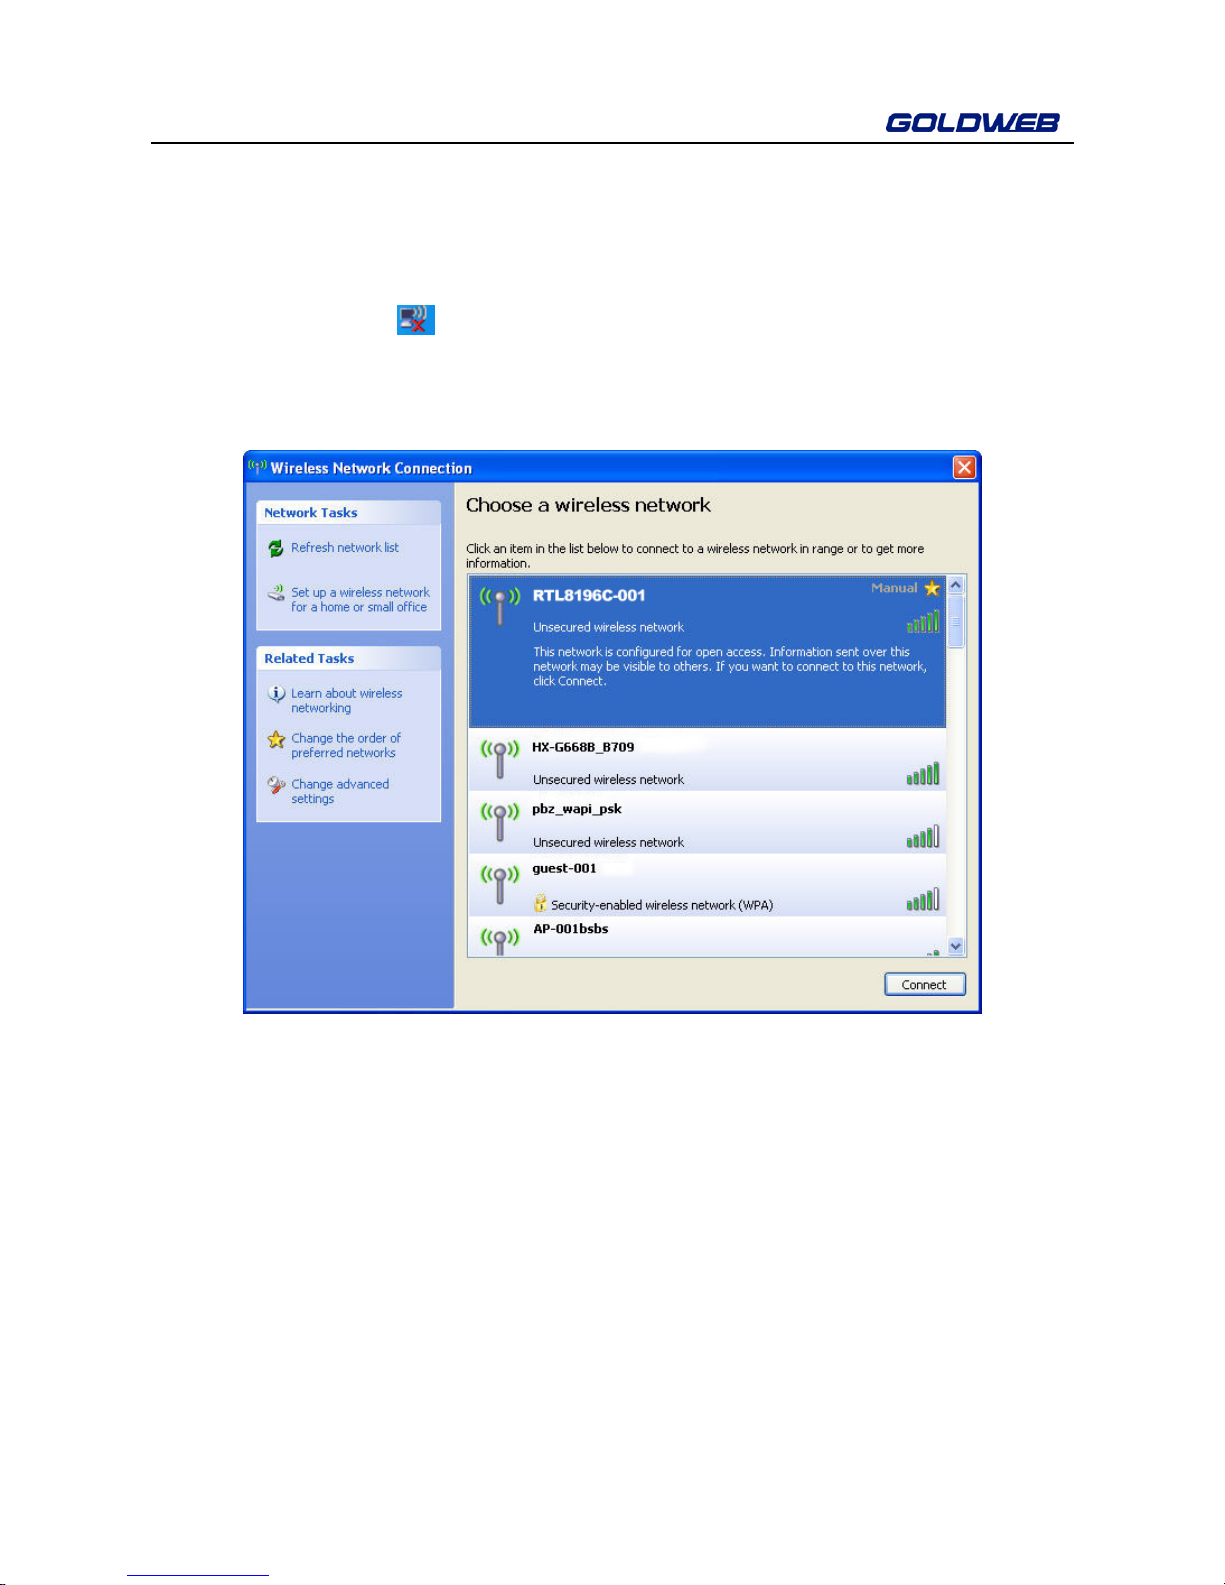
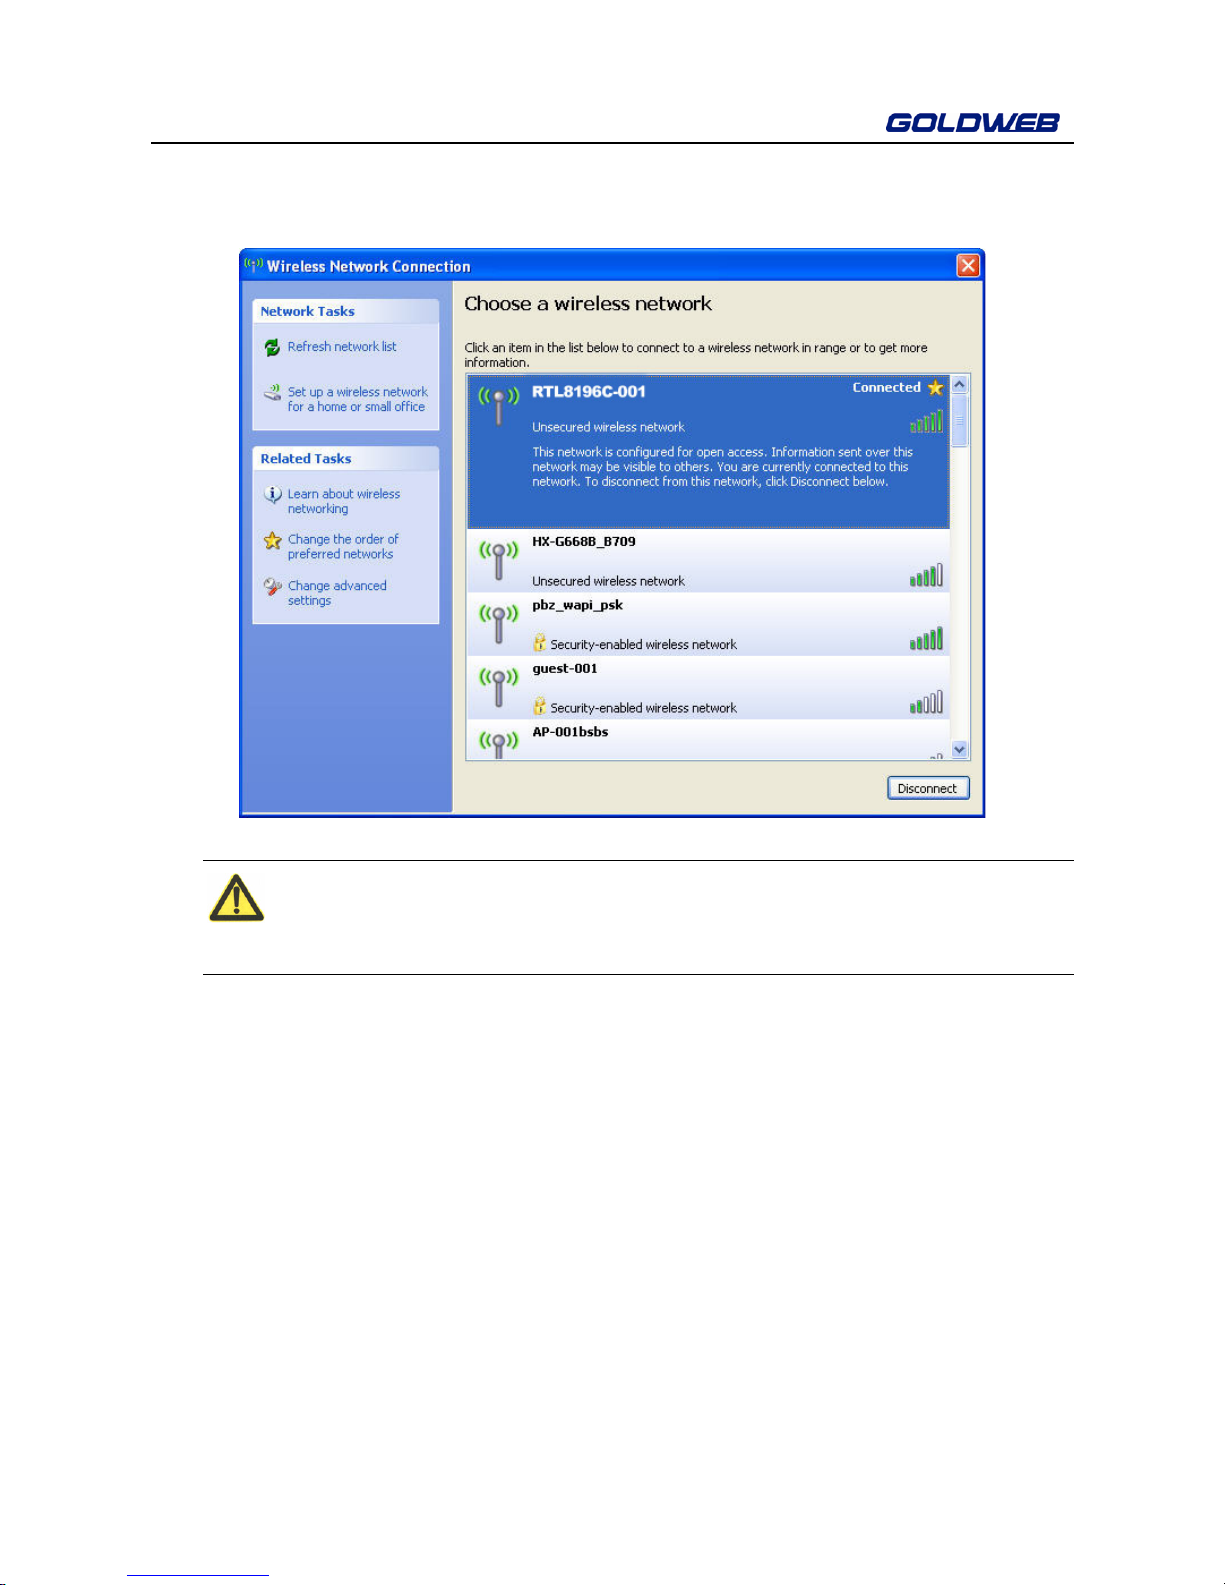
4.2 Configuring Wireless Configuration
The following takes Windows XP as an example. Do as follows to connect the
wireless network adapter of your PC to GW-WR151N:
Step 1 Click the
icon displayed at the right bottom corner of the desktop
(Note: Ensure that your PC is installed with a wireless network adapter).
Step 2 In the Wireless Network Connection page, double-click the desired
wireless network.
GW-WR151N
10
Step 3 Your computer successfully connects to the wireless network when
Connected is displayed on the right upper corner.
Note:
The default SSID of the GW-WR151N router is RTL8196C-001.
GW-WR151N
11
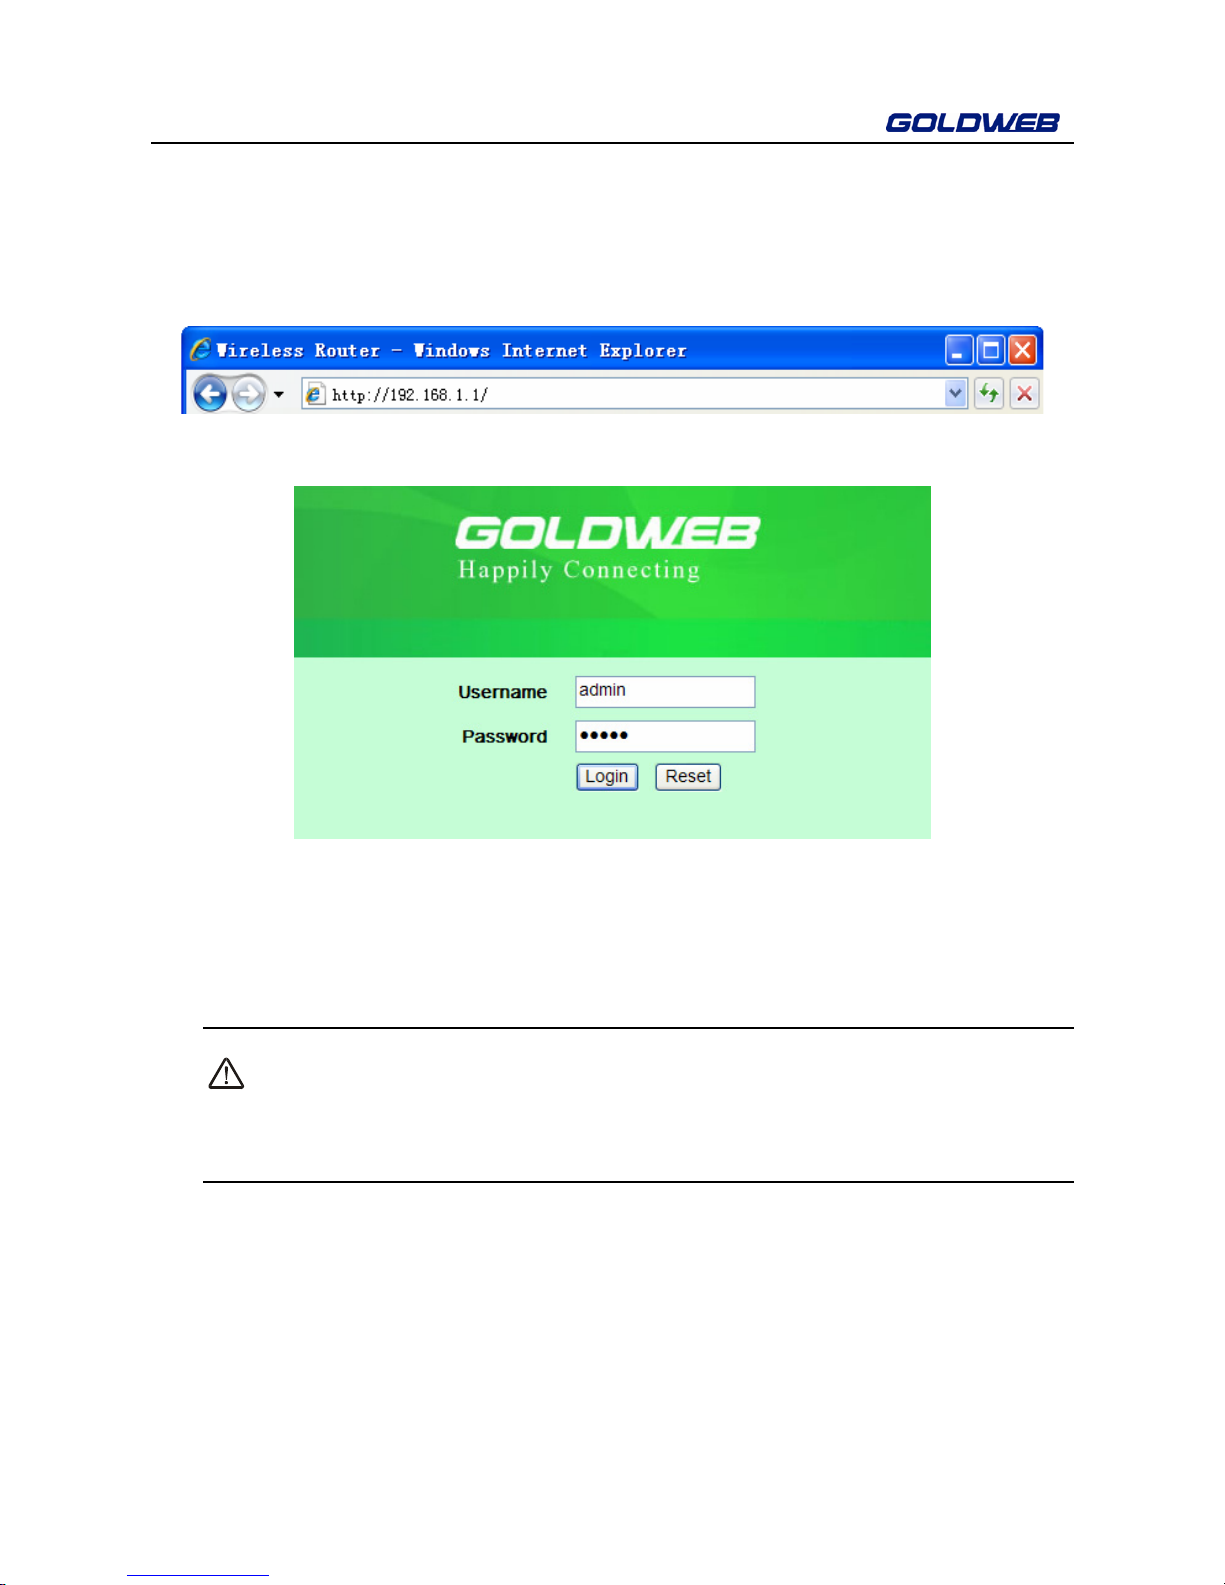
5 Logging In to the Web Page
Run the Internet Explorer (IE), enter http://192.168.1.1/ (the default IP address of
the wireless router) in the address bar, and press Enter.
In the displayed window as shown in the following figure, enter the user name and
password, and click Login. The default user name and password are admin.
After logging in to the Web page, you can view, configure and modify the router
settings. To make the settings and changes take effect, you need to reboot the
wireless router sometimes.
Caution:
If you are managing the wireless router through the Web page, do not cut
off the power supply. Otherwise, the device may be damaged.
GW-WR151N
12
6 Web Configuration
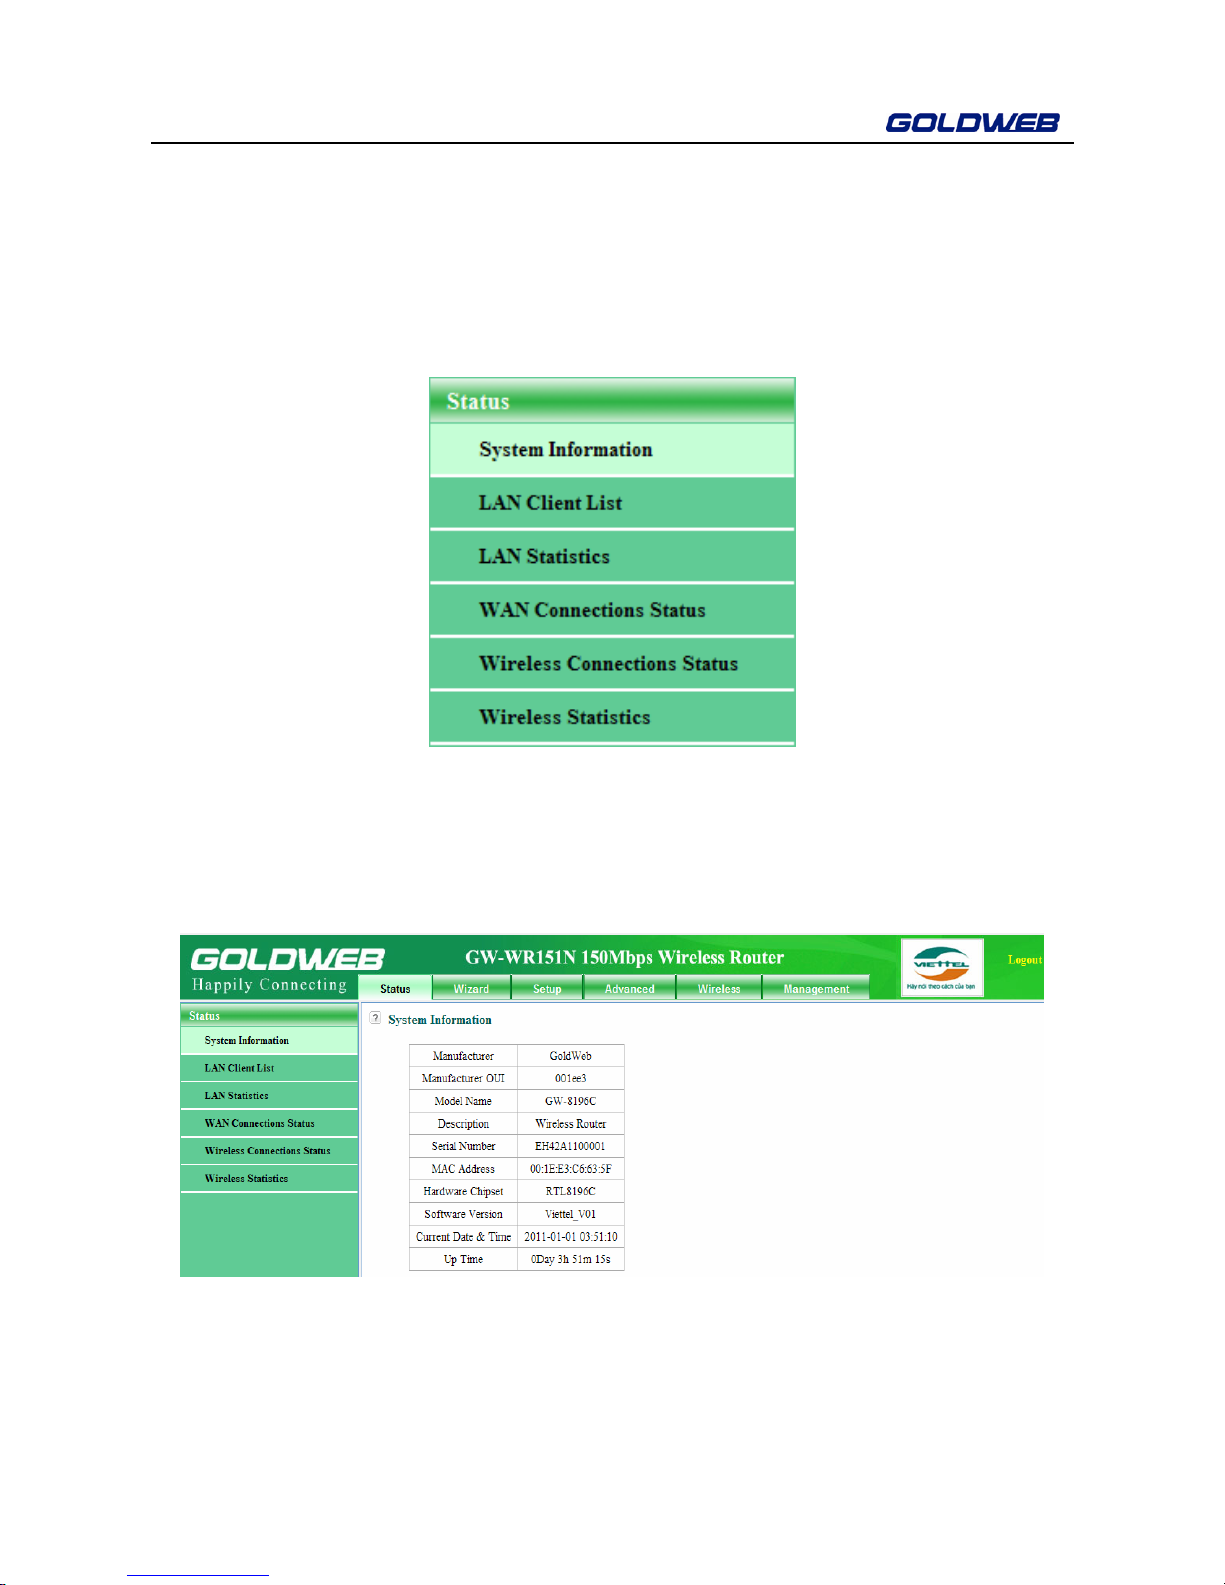
6.1 Status
Click Status and the extended navigation menu is shown as follows:
Click the submenu to enter a specific configuration page.
6.1.1 System Information
Choose Status > System Information to display the System Information page.
In this page, you can view device system information.
6.1.2 LAN Client List
Choose Status > LAN Client List to display the LAN Client List page.

GW-WR151N
13
This page displays information about clients connecting to the router, including the
host name, the IP address, and the MAC address.
6.1.3 LAN Statistics
Choose Status > LAN Statistics to display the LAN Statistics page.
This page displays LAN statistic information, including sent bytes, received bytes,
sent packets, and received packets.
6.1.4 WAN Connection Status
Choose Status > WAN Connections Status to display the WAN Connections
Status page.
GW-WR151N
14
This page displays information about WAN connection status, including the
connection name, the connection type, bitrate/duplex, the IP address/the subnet
mask, the status, default gateway, and DNS.
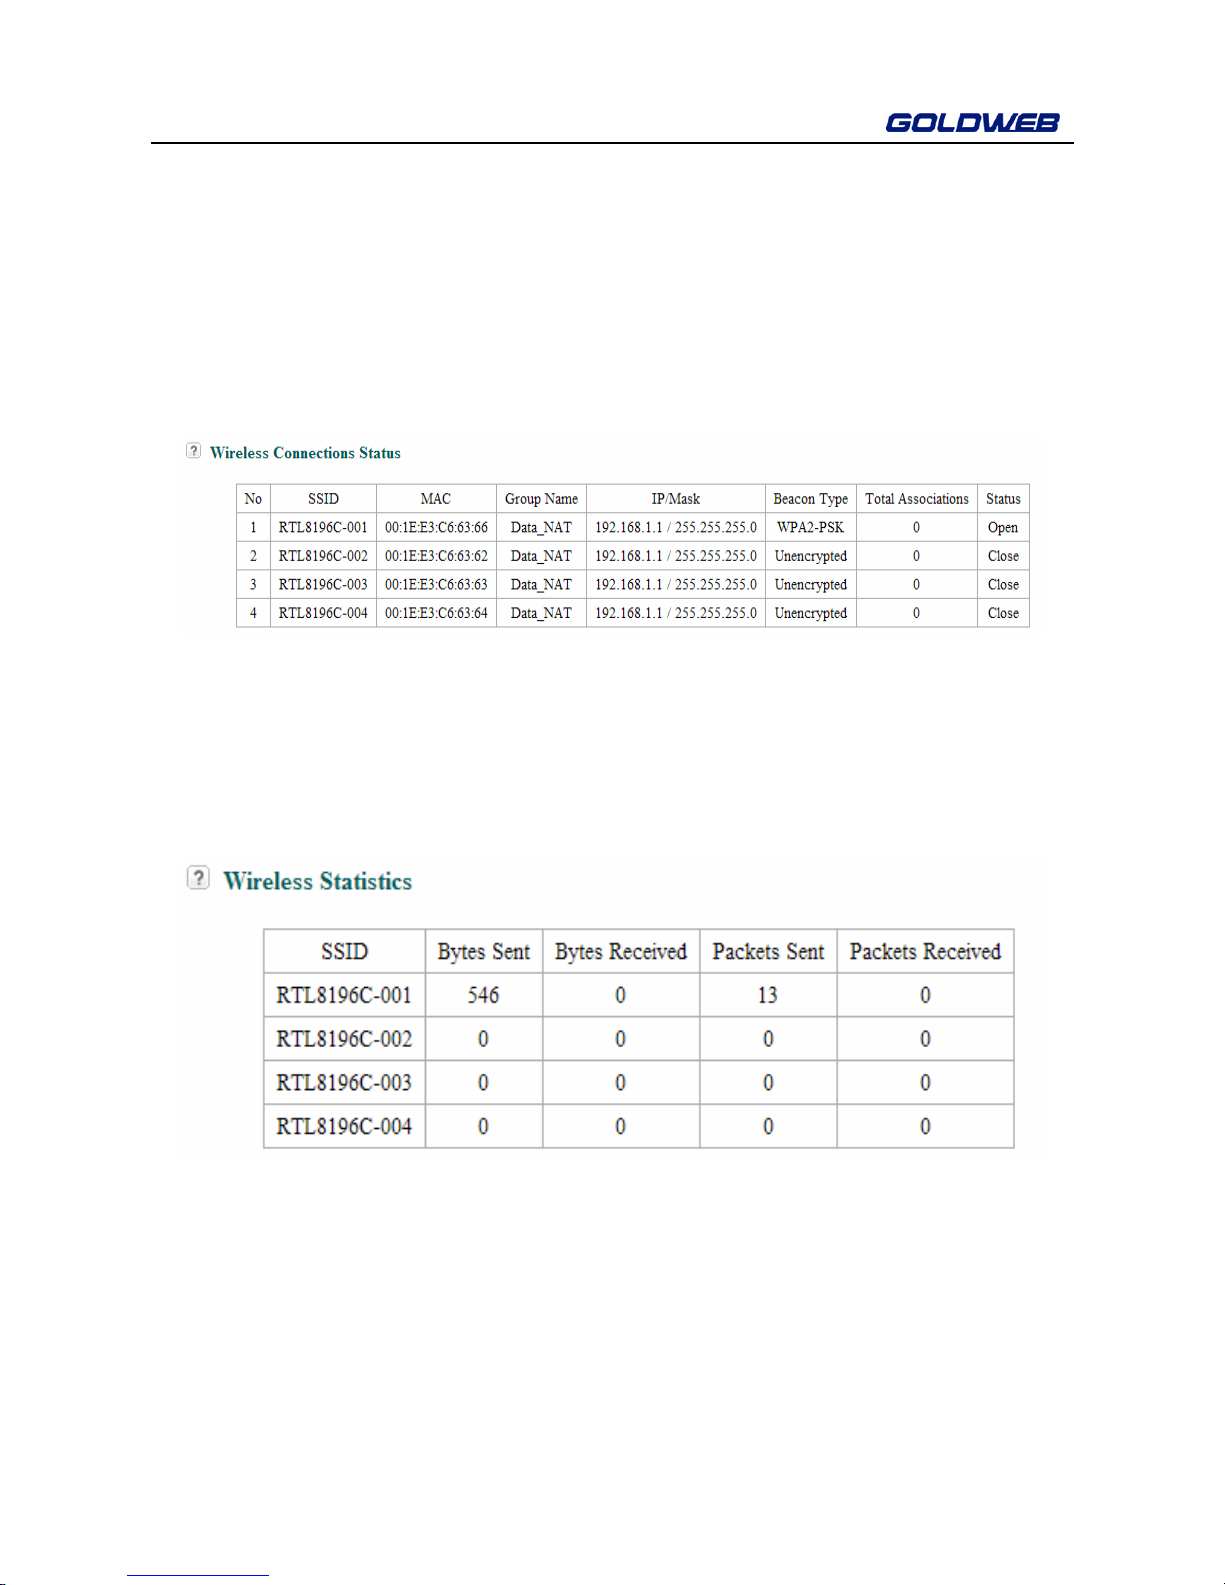
6.1.5 Wireless Connection Status
Choose Status > Wireless Connections status to display WLAN Connections
status page.
This page displays information about wireless connection status, including the
SSID, the MAC address, the group name, and the IP address/the subnet mask.
6.1.6 Wireless Statistics
Choose Status > Wireless Statistics to display the Wireless Statistics page.
This page displays the statistic information about VAP connection, including sent
bytes, received bytes, sent packets, and received packets.
GW-WR151N
15
6.2 Wizard
Choose Wizard > Quick Setup to display the Quick Setup page. In this page, you
can quickly complete the configuration of connection between a router and the
Internet. The wizard helps you to create an Internet connection step by step.
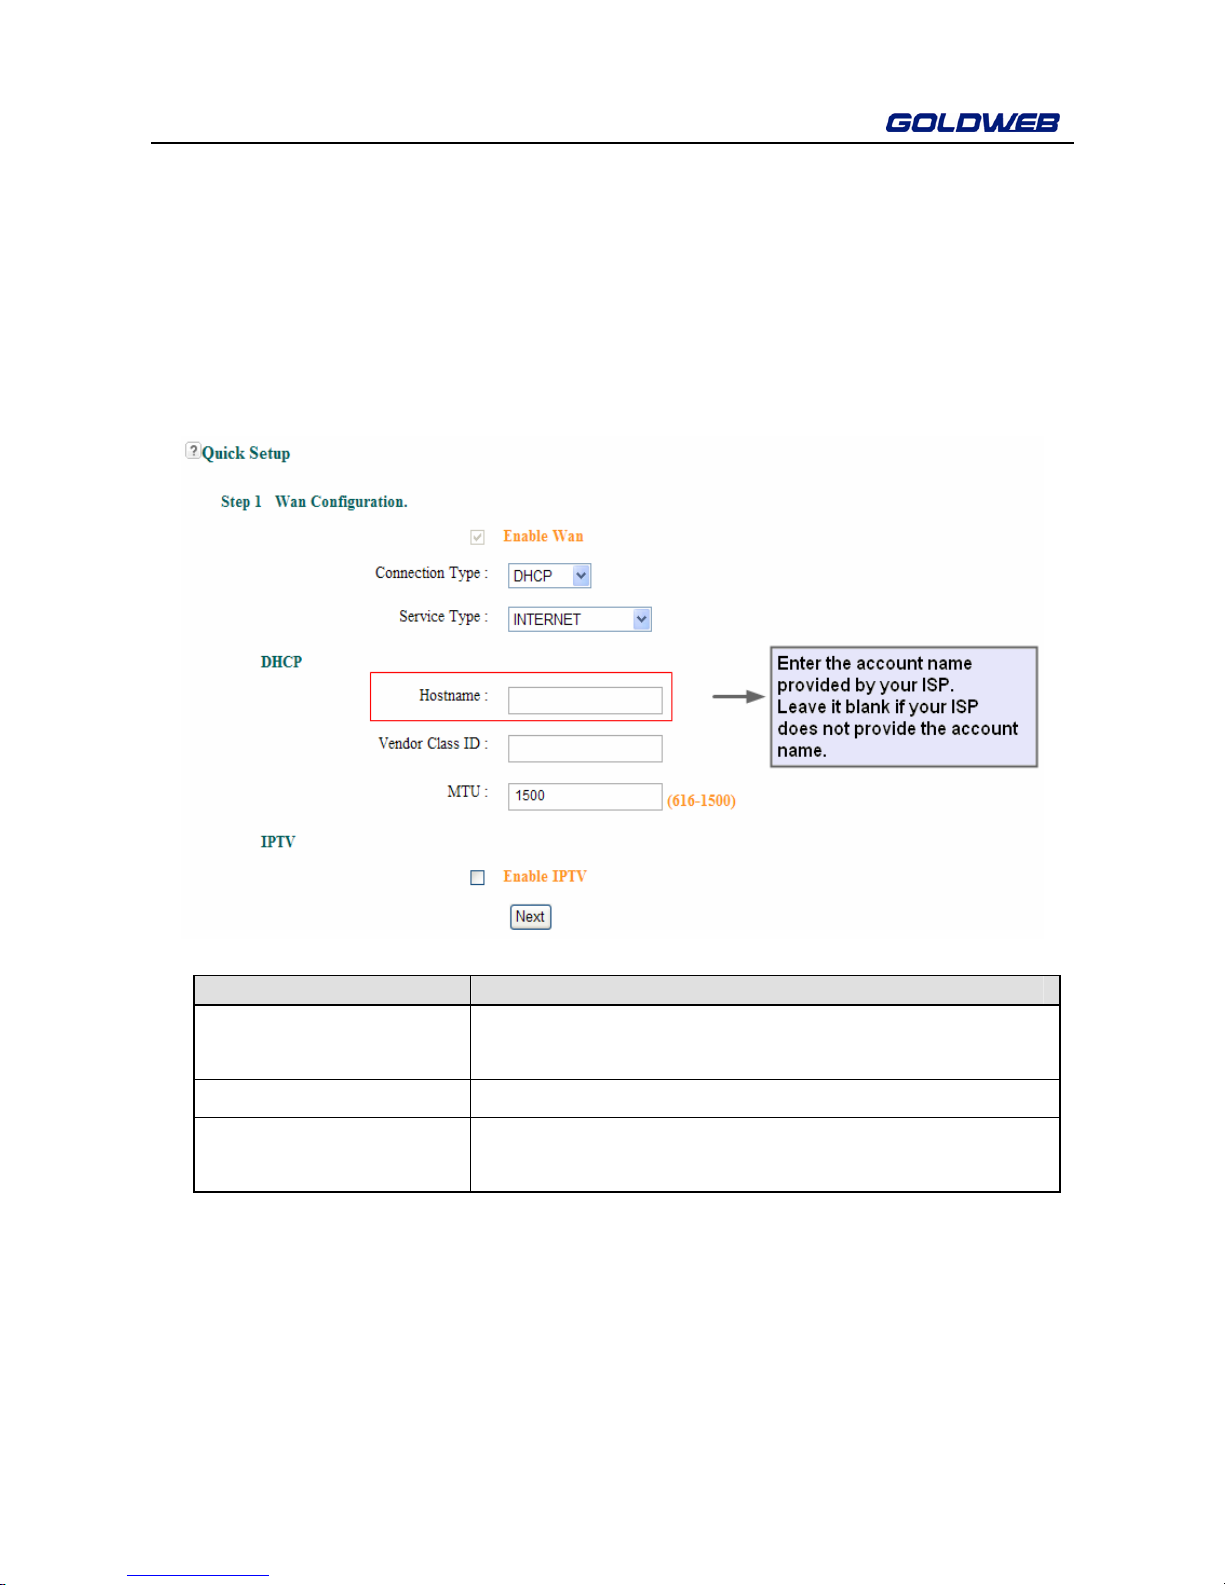
Step 1 Configure WAN connection.
WAN connection—DHCP
The following table describes the parameters.
Field Description
Service Type The service type can be set to: INTERNET, TR069,
or TR069_ INTERNET.
Vendor Class ID Enter the vendor class ID provided by your ISP.
MTU Set the maximum transmission unit. The default
value is recommended.
WAN connection—Static IP
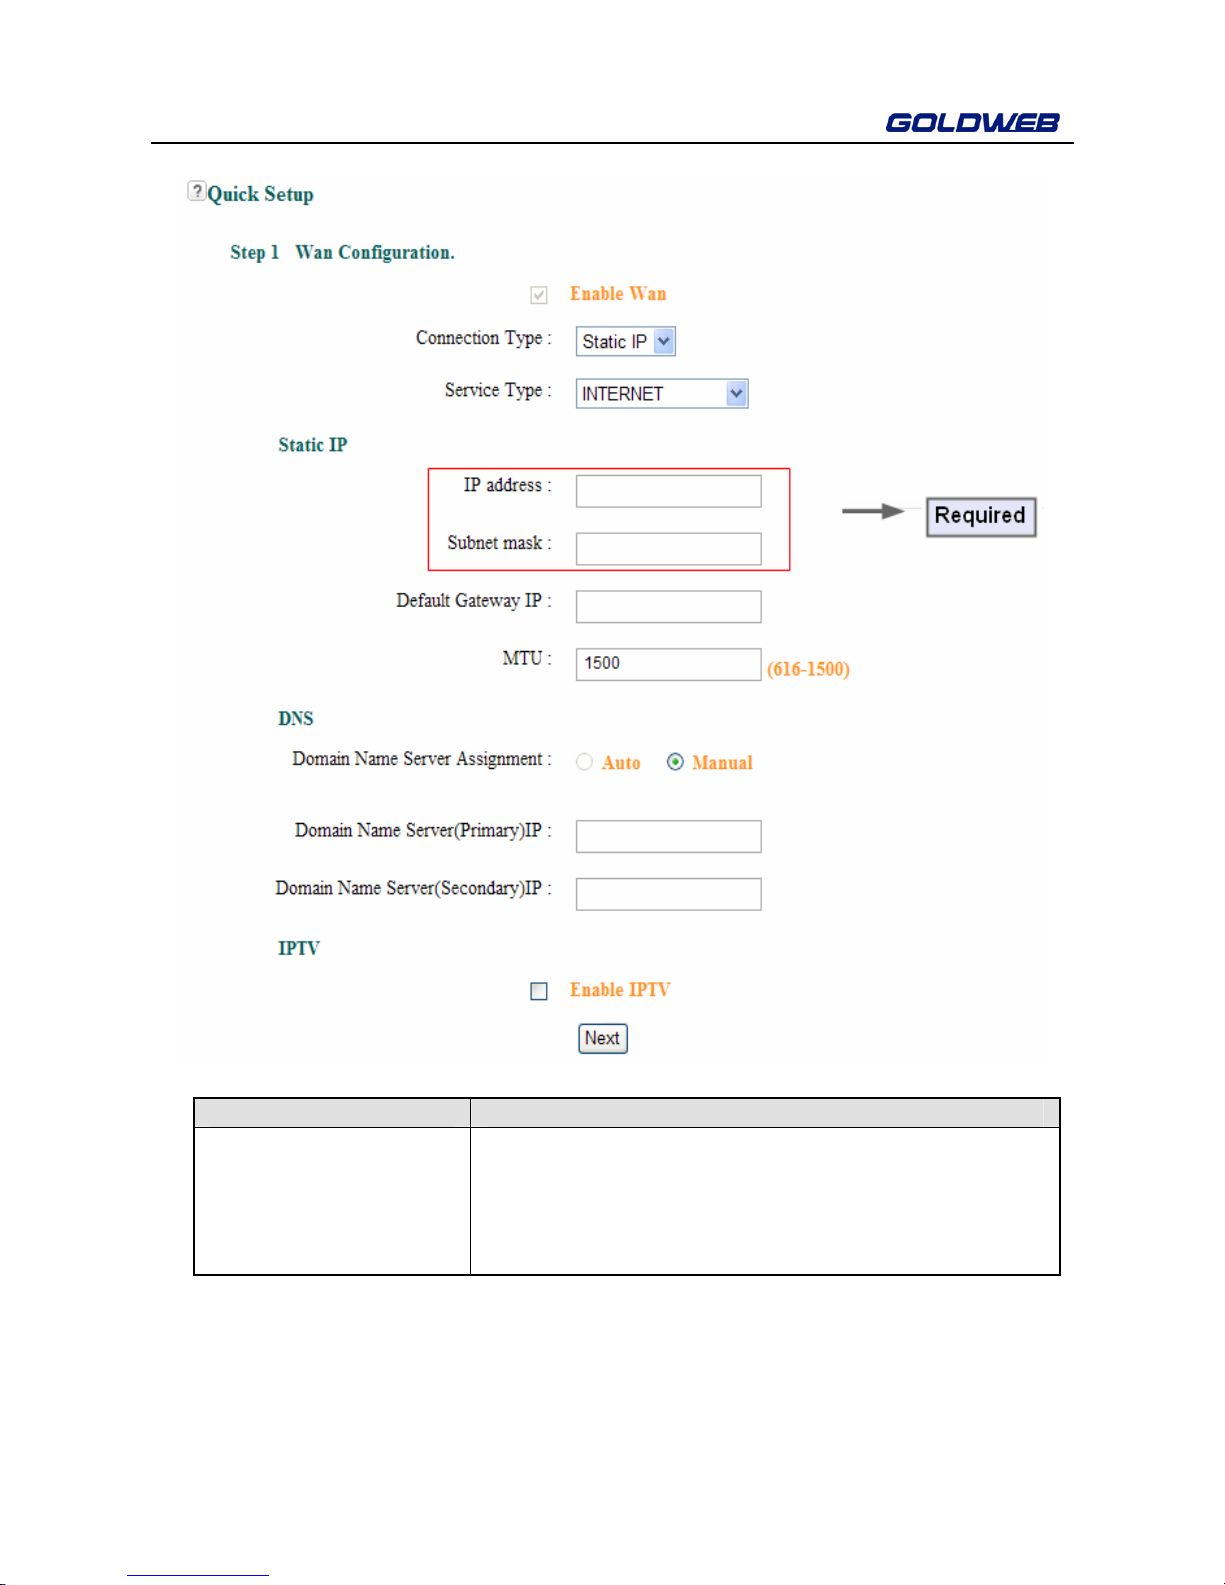
GW-WR151N
16
The following table describes the parameters.
Field Description
Domain Name Server
Assignment
Auto: Obtain a DNS IP address automatically.
Manual: Enter the IP address of the primary
DNS server provided by your ISP. Enter a
secondary DNS server address if available.
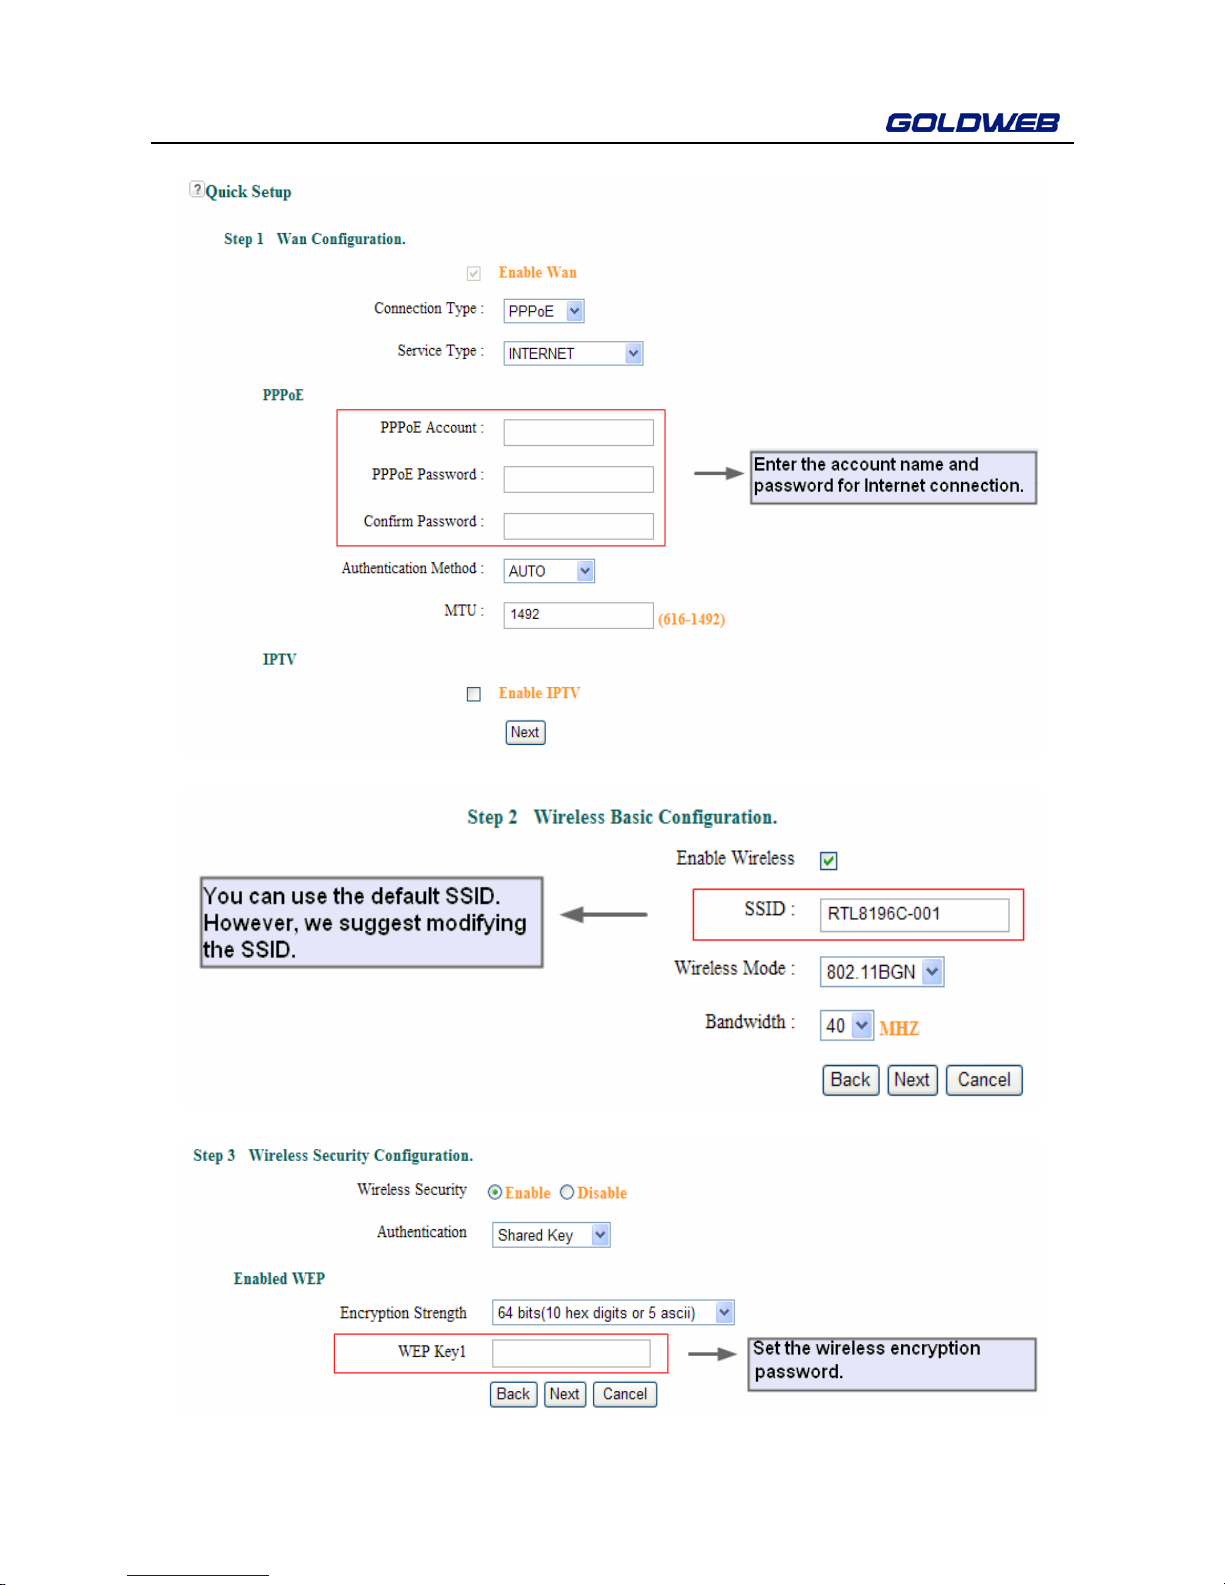
WAN connection—PPPoE
GW-WR151N
17
Step 2 Configure wireless basic parameters.
Step 3 Configure wireless security information.

GW-WR151N
18
The following table describes the parameters.
Field Description
Wireless Security Select Enable to use wireless security authentication.
Authentication Set the authentication type.
Open System: If Open System is selected, hosts
in the wireless network can pass the authentication
and connect to the wireless network without using
a password. However, the password is required if
you want to transmit data.
Shared Key: If Shared Key is selected, hosts in
the wireless network can pass authentication only
when the correct password is entered. Otherwise,
the hosts cannot connect to the wireless network.
WPA-PSK/WPA2-PSK: Preshared key Wi-Fi
protection access.
Encryption Strength If Encryption Strength is set to 64 bits, set the
key to 10 hexadecimal digits or 5 ASCII characters.
If Encryption Strength is set to 128 bits, set the
key to 26 hexadecimal digits or 13 ASCII
characters.
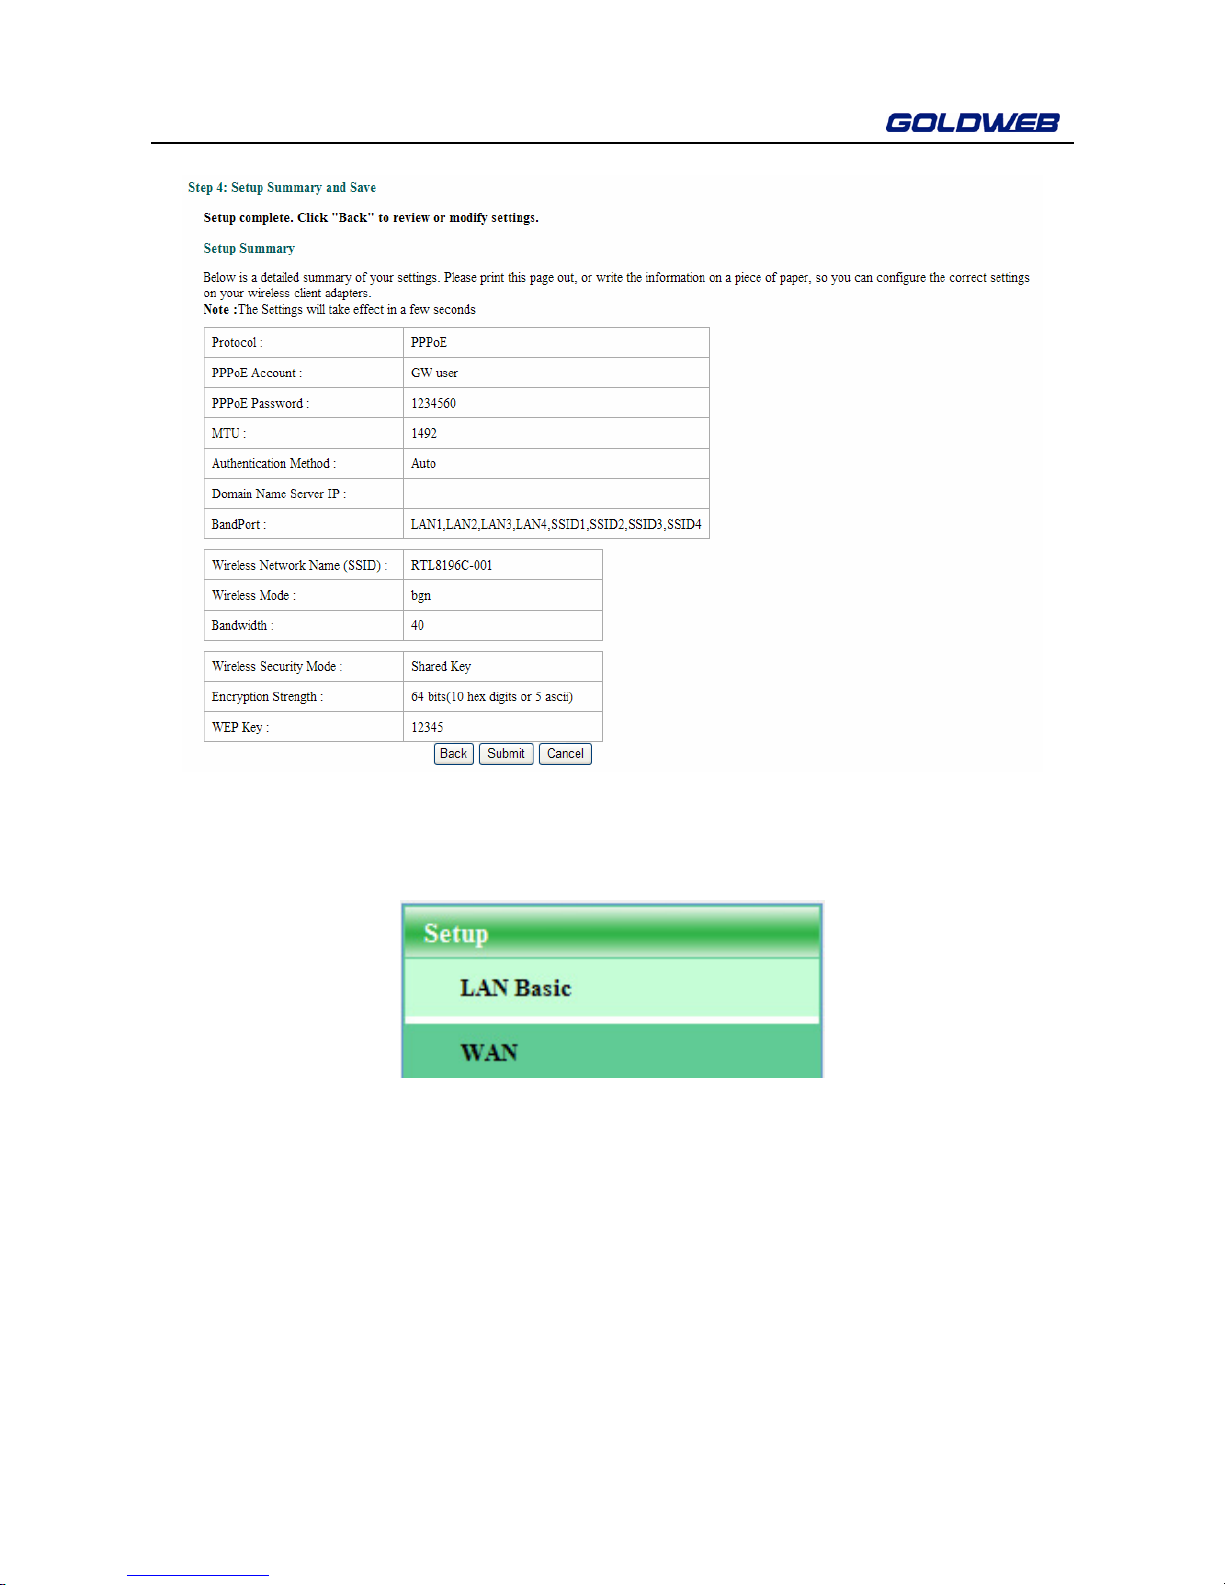
Step 4 Check whether the settings consistent with the settings provided by your
ISP. Click Submit to finish quick setup.
GW-WR151N
19
6.3 Setup Configuration
Click Setup and the extended navigation menu is shown as follows:
Click the submenu to enter a specific configuration page.
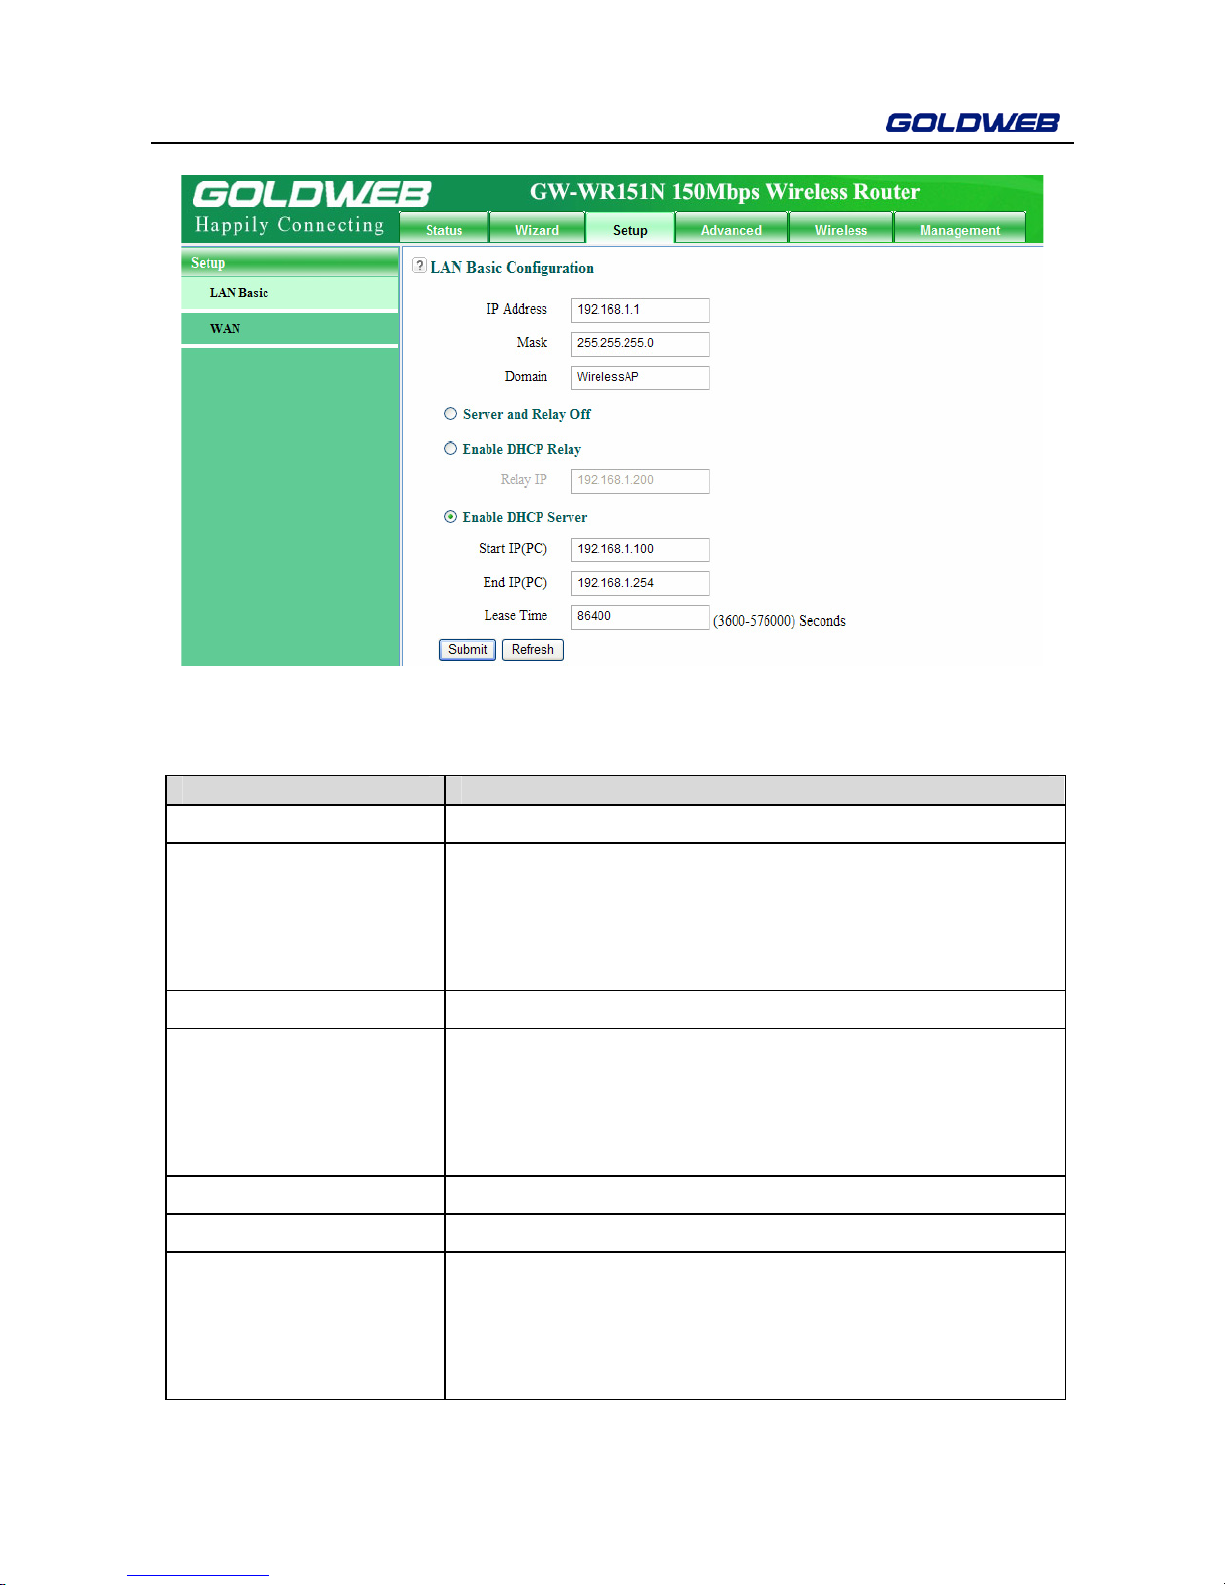
6.3.1 LAN Basic Configuration
Choose Setup > LAN Basic to display the LAN Basic Configuration page.
DHCP refers to Dynamic Host Configuration Protocol. If Use Device as DHCP
Service is selected, GW-WR151N automatically assigns IP addresses to
comupters in the LAN. Users do not need to configure TCP/IP protocol paramters
such as the IP address, the subnet mask, the gateway, and the DNS server
information for computers connected to the router’s LAN.
GW-WR151N
20
In this page, you can configure the IP address, DHCP relay, and DHCP server of
the LAN group.
The following table describes the parameters.
Field Description
IP Address Set the LAN IP address.
Mask
Set the LAN subnet mask. Combined with the IP
address, the IP subnet mask allows a device to know
which other addresses are local to it, and which must
be reached through a gateway or router.
Domain Set the domain name of your ISP.
Server and Relay Off
If not selected, you can enable either the DHCP server
or DHCP relay. If you do not want to use the DHCP
function, select the radio button of Server and Relay
Off.
Enable DHCP Relay Enable DHCP relay.
Relay IP The IP Address of the DHCP relay server.
Enable DHCP Server
If the radio button is selected, GW-WR151N serves as
a DHCP server to automatically assign IP addresses to
computers connected to it. By default, Enable DHCP
Server is selected.
GW-WR151N
21
Start IP(PC)/End
IP(PC)
Set the start and end IP addresses to specify a pool of
IP addresses to be assigned by the DHCP server.
After you set Start IP and End IP, hosts in the LAN
obtain IP addresses that are in the range of the start
and end IP addresses.
Lease Time
The valid time for an IP address that is automatically
assigned by the DHCP server to a host. The DHCP
server does not assign the IP address to other hosts
within the specified time.
Click Submit to save the settings.
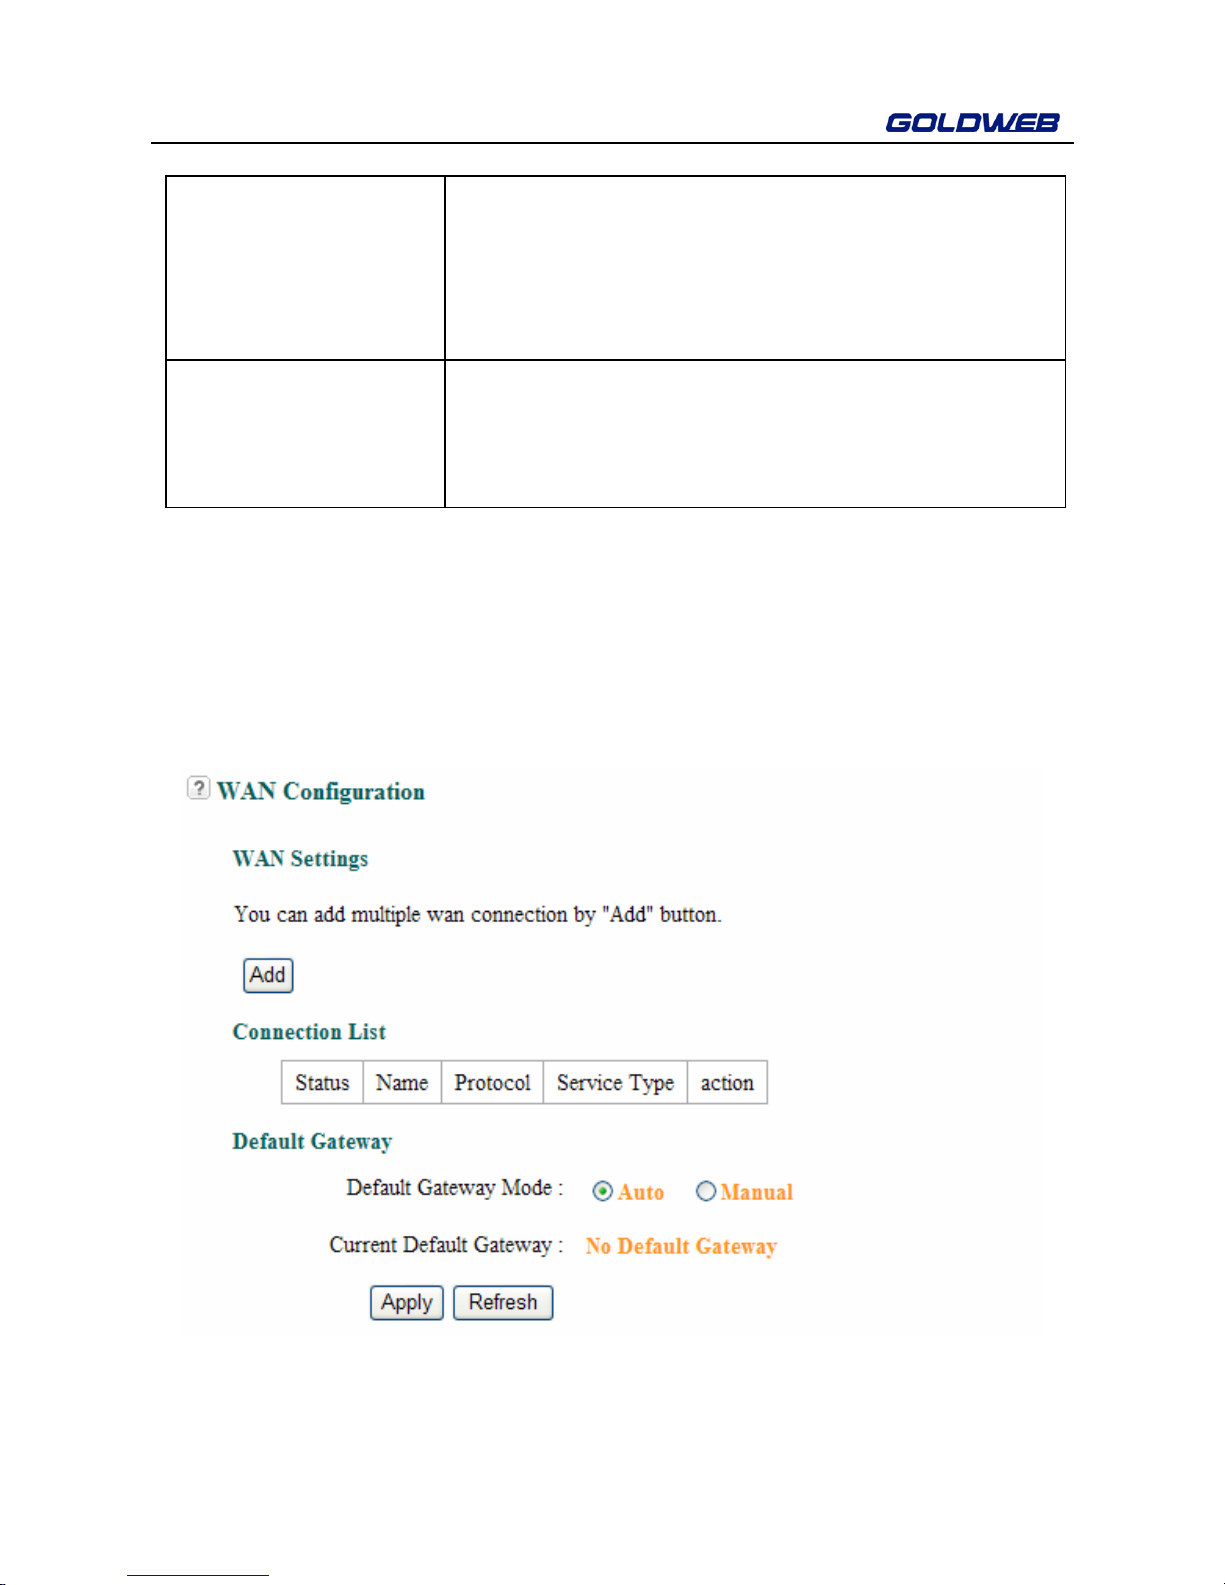
6.3.2 WAN Configuration
Choose Setup > WAN to display the WAN Configuration page.
WAN (Wide Area Network) Settings are used to connect to your ISP (Internet
Service Provider). The WAN settings are provided by your ISP.
Click Add to enter the WAN connection page.

GW-WR151N
22
The router supports 6 modes of WAN connection, including DHCP, Static IP,
PPPoE, PPTP, L2TP, and Bridge. Select the WAN connection you use. Contact
your ISP if you do not know your WAN connection mode.
6.3.2.1 DHCP (Dynamic IP)
If you select dynamic IP (DHCP), GW-WR151N automatically obtains the IP
address from the ISP automatically. Select dynamic IP (DHCP) when the ISP does
not provide any IP network parameters. See the following figure:
 Loading...