


galaxis
by
GOLDTOP
SX
SX Lite
For Easy S CI, Classic S CI and Matrix S receivers
I.
User’s manual
apri gli occhi sulla nostra realtà
[
Edited 23/08/2002]


Information
Information
Before installing your digital receiver, please read carefully the following
instructions!
Otherwise:
• You risk of damaging the receiver and the devices that are
connected to it because of wrong connections.
• You could hazard your safety and your life.
•
You could invalidate the product warranty.
•
The supplier is not responsible for the damages you could
cause.
Warning!
For your own safety
• Do not open the receiver!
parts that can be repaired by the user. Besides, there exists a
risk of fatal electric shock due to exposed live circuits.
• Always disconnect the power cord from the wall socket
cleaning
before
connectors
any
enough for your safety, as some components may still carry
mains voltage.
• In case of an approaching thunderstorm
not only the power cord plug, but also the satelllite signal cable.
This prevents the device from being damaged by lightning
striking in the surrounding area.
• Should a thunderstorm be near you, do not touch your
receiver!
Do not cover up the ventilation slots
•
TV guide), also when the device is switched to stand-by mode.
Otherwise the receiver may overheat and there would be a fire
!
hazard
the device or attempting to remove or replace
. Simply switching off your device is not
If lightning strikes there would be danger to life.
Inside the receiver there are no
always disconnect
(for example with your
Please note:
This digital receiver
is suitable
areas, trade areas and business
areas.
This digital receiver
is not suitable
industrial areas and also not
suitable for the installation on a
public telecommunication
network.
Foreword:
In order to receive digital
channels from satellite you need
a satellite antenna (dish)
installed by a satellite
technician, and perfectly
aligned.
The chapters concerning the
Installation” and the
Assembly
“
System setting
“
knowledge of the
among electronic devices and
the technical terminology
of
of the satellite digital
reception
If you do not own such a
knowledge it is recommended
that you leave the setting up of
the system to
The chapter “
receiver” does not require
specific knowledge on satellite
digital reception. You can use
your equipment as a normal
satellite receiver.
for use in living
for use in
”, as well as the
” require
connections
.
an expert
Using your
.
1

Connections
II. Connections
SCART
Connect the
supporting RGB input. In this way, by setting RGB in the configuration
menu, you will be able to benefit from a better image quality.
The VCR plug of the receiver can be connected to a VCR or a DVD
player. In case you own both a VCR and a DVD player, you can connect
the latter to the secondary plug of the VCR. In both cases the RGB
signal from the DVD player will not be used.
Antenna
Connect your satellite dish cable to the input IN. The OUT plug is a
bypass of the satellite dish signal and can be used to connect a
secondary (e.g. Analogue) receiver.
RS232
The RS232 serial port of the receiver can be used for receiver's software
update. It also provides a two ways link between the receiver and a
Personal Computer for future applications.
Audio
The receiver provides a digital audio output for PCM and AC-3 outputs. It
can be connected to a digital AC-3 audio amplifier.
The analogue audio outputs can be connected to an analogue audio
amplifier.
scart TV
plug of the receiver to a scart socket of your tv set
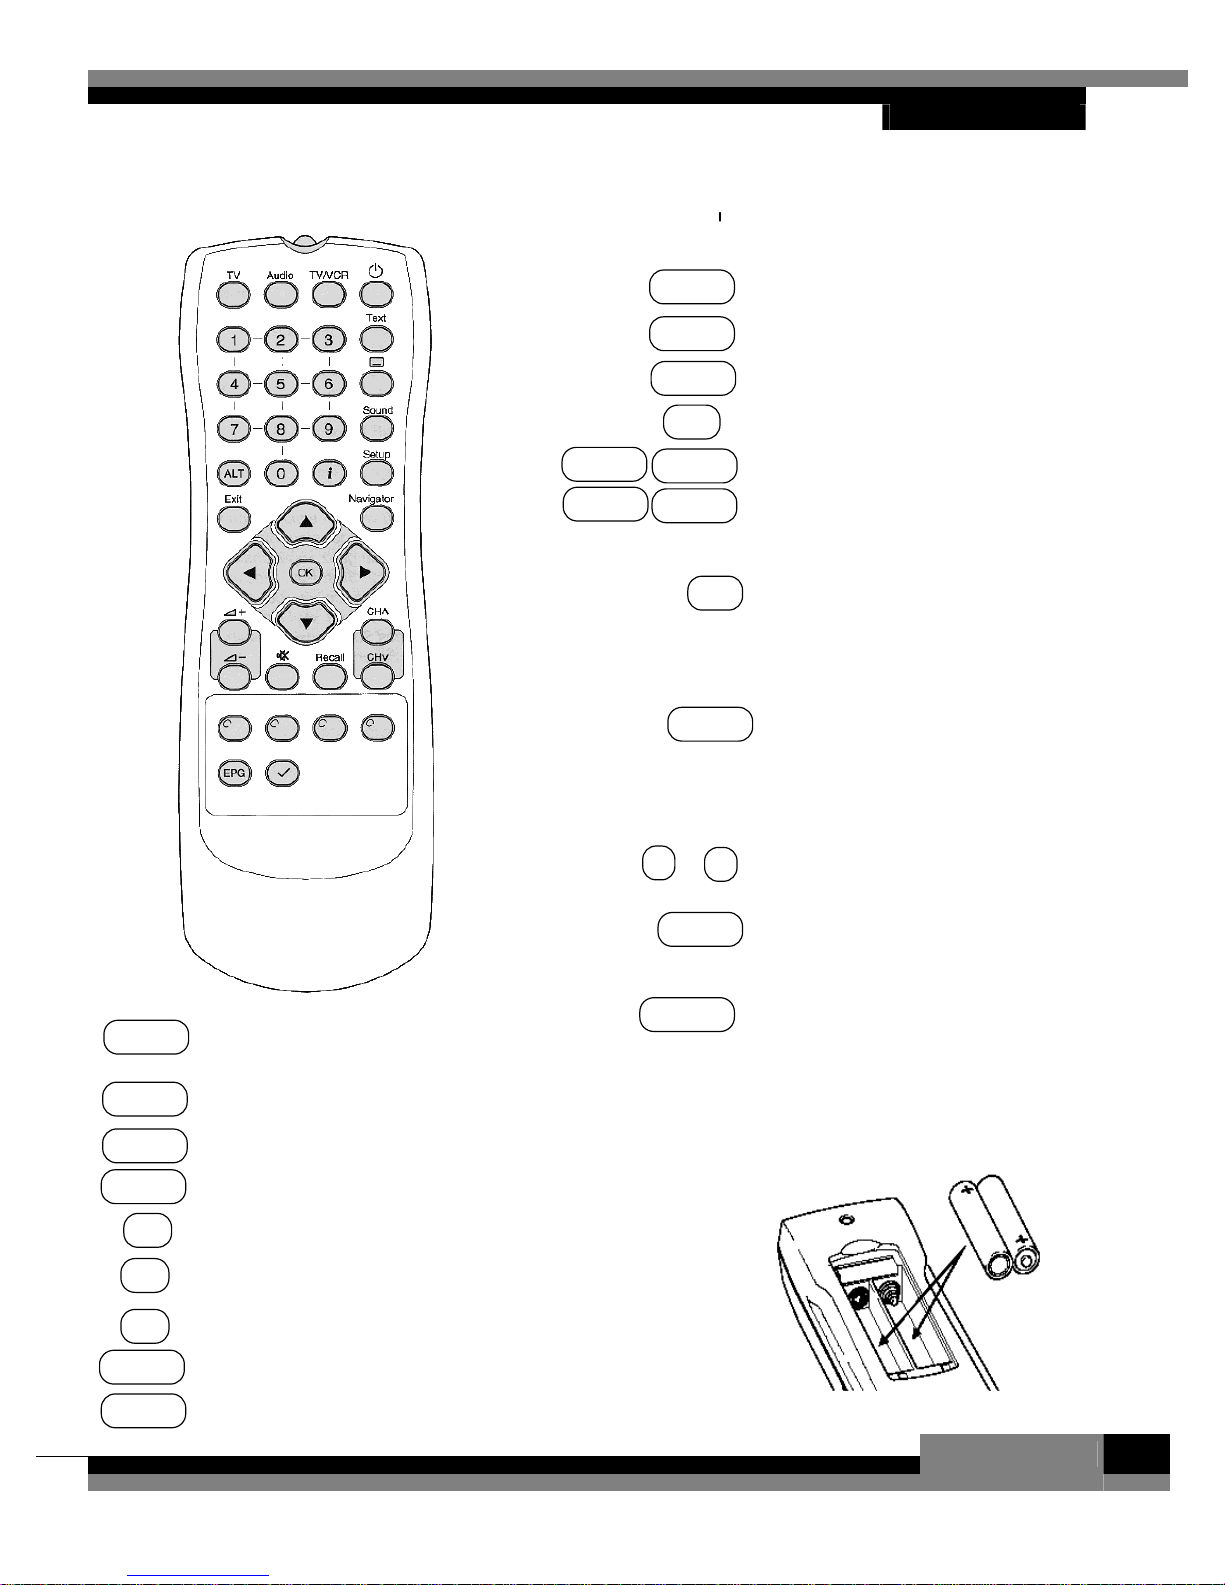
III. Remote control
RED GREEN
YELLOW BLUE
+ CH – Changes channel, scrolls pages
in «At a glance» mode
+ < – Changes volume
Mute Mutes / resumes l’audio
EPG Shows the on-air program guide (if transmitted)
ü
Activates 2X Zoom mode
i Shows information
___
Activates subtitles (if transmitted)
Setup Enters the system configuration mode
Sound Changes the audio language (if available)
O
TV/VCR
TextX.
Audiob
TV….
OK
Exit
t u
p q
0 … 9
Recall
Navigator
Remote control
I. Keys
Switches on / puts the receiver
in Stand-By
Switches reception from satellite
or from VCR
Not used yet
Switches to radio channels
Switches to tv channels
Coloured keys, they have a
different function depending on
the context.
Selects the highlighted menu
item, starts actions, confirms
input, displays the banner,
switches to the selected
channel
Exits from menu, closes
dialogue boxes
Switch lists, change values
Scroll lists
Numeric keys
Goes back to the last channel
selected
Enters «At a glance» mode
II. Inserting batteries
How to insert the batteries
3

Settings
IV. System settings (Setup)
This section describes how to change the receiver’s settings.
1. Enter system configuration mode
For all the functions in this section you need to enter the system
configuration mode,
• press the
• the main menu appears in a few seconds.
a) Navigate the menu.
• With the p q keys you can move the cursor up or down.
• With the t u keys you can move among the boxes of a screen.
b) Select the options.
• With the OK key you can select the menu item highlighted and
choose among the relative options.
c) Save the changes / exit.
• You can save all the changes by pressing the
• You can exit the system configuration mode by pressing the Exit
key or the
•
If you have made changes, and you didn’t save them with the
GREEN
changes. With the t u keys select Yes to confirm, No to cancel
the changes and press the OK key.
d) System Information.
• From the main menu, by pressing the
appear with all technical informations. To close it press OK.
e) Help windows.
• In every menu screen it is possible to open an help screen with
the contextual description by pressing the i key.
main menu
Setup
key.
RED
key.
key, a window will appear asking confirmation of the
. In this way…
GREEN
BLUE
key a box will
key.

2. Channel search
To perform a channel search, select the first entry from the main menu,
«Channel search», and press OK.
2.1 Manual search
From the «Channel search» menu select the first entry «Manual search»
and press OK. You will need to know some parameters on the channels
that you want to search for, that is…
a) Parameters setting
…The «Manual search» section requires the input of 9 parameters:
1. Satellite: is the satellite transmitting the channel. If you have a
multifeed system you can select the satellite by pressing the t
u
keys.
2. Frequency: here you need to input the frequency of the satellite
transponder the channel under search belongs to. You can use
the numeric keys to insert the frequency and the t key for
corrections.
3. Polarisation: by pressing the t u keys you can choose between
(linear) Horizontal and (linear) Vertical.
4. Symbol rate: you can insert the value by means of the numeric
keys or, alternatively, with the keys t u among the predefined
values.
5. FEC (Forward Error Correction): to select among the settings
“1/2”, “3/4”, “5/6” and “7/8” use the t u keys.
6. FTA (Free-To-air) only: select “yes” or “no” with the t u keys,
whether or not you want the restrict the search to the non-pay
channels.
7. Keep existing: select “yes” or “no” with the t u keys, whether
you want to append the new channels to the current list, or you
want to have only the new channels found.
8. Network search: select “yes” or “no” with the t u keys, to
choose whether or not to perform the search on the additional
transponders “linked” to the one under search.
9. Channel Type: with the p q keys you can search for TV
channels only,
or a combination of these three kind of channels.
Radio
channels only,
Interactive
channels only,
Settings
b) Start the channel search
Once the parameters are set, press the
A window will appear with the status of the search.
[
Edited 23/08/2002]
GREEN
key to start the search.
5

Settings
c) Abort the channel search
At any time, to abort the channel search, press the
channels that have been found will be lost.
d) Save the channels
At the end of the search the system will go back to the «Channel
search» menu. To go back to the main menu, press Exit.
• To save the search results, press the
2.2 Automatic search
The automatic search finds the channels of all the transponders of the
selected satellite.
•
From the «Channel search» menu select the second entry,
«Automatic search», and press OK.
You need to input four parameters.
a) Parameters setting
1. Satellite: is the satellite transmitting the channel. If you have
a multifeed system you can select the satellite by pressing
the t u keys.
2. FTA (Free-To-air) only: select “yes” or “no” with the t u
keys, whether or not you want the restrict the search to the
non-pay channels.
3. Keep existing: select “yes” or “no” with the t u keys,
whether you want to append the new channels to the current
list, or you want to have only the new channels found.
4. Channel Type: with the p q keys you can search for TV
channels only,
only or a combination of these three kind of channels.
Radio
channels only,
GREEN
RED
key.
Interactive
key. The
channels,
6
b) Start the channel search
Once the parameters are set, press the Green key to start the search. A
window will appear with the status of the search. At the end of the search
the system will go back to the «Channel search» menu.
c) Abort the channel search
At any time, to abort the channel search, press the
channels that have been found will be lost.
d) Save the channels
At the end of the search the system will go back to the «Channel
search» menu. To go back to the main menu, press Exit.
• To save the search results, press the
If you don’t want to do a channel search, press
main menu.
RED
key. The
GREEN
key.
Exit
to go back to the

3. Channel lists management.
You can edit the lists of the stored Radio and TV channels, change the
channels position or remove them definitively. Also, you can create up to
8 lists of favourite TV channels and 8 lists of favourite Radio channels.
Default settings come with four thematic lists. Each favourite list can be
edited and renamed.
To do this, select «Edit lists» from main menu and press OK.
Next menu presents four entries:
1. «Edit TV channels», to enter the complete list of TV channels.
2. «Edit radio channels», to enter the complete list of radio
channels.
3. «Edit TV favourites», to enter the favourite TV channels lists.
4. «Edit radio favourites», to enter the favourite radio channels
lists.
Select one entry and press OK.
Managing functions are the same for TV and radio channels.
Settings
a) Edit the complete channels lists
By choosing the first entry - or the second - you can edit the complete list
of TV - or radio - channels stored in memory. Changes to this list will be
reflected to memory, if, when exiting the main menu, you’ll choose to
save settings. In particular, channels removed from list will be deleted
from memory, and, in order to get them again, you’ll have to do a new
channel search.
From here, you can rename the channels.
a.1) List scrolling
Often, a list contains more channels than it can show at the same time in
its window. There are two way for scrolling a list:
• With the p q keys you move through the channels shown into
the window. Once you reach an extremity, a further key pressure
will show the next page into the window.
• With the t u keys you can directly go to the next or the
previous page.
a.2) Change position of one or more channels
• With the p q keys, select the channel you want to move and
press OK. The channel name color becomes yellow and the low
side of the screen shows «Selected channels:1». To move more
than one channel at once, select the first channel, then select
the last channel you want to move, and keep pressed OK for two
seconds.
• With the p q keys, go to the channel, above which you want to
paste the selected channel(s).
• Press the GREEN key.
[
Edizione del 23/08/2002]
7

Settings
a.3) Delete one or more channels from memory
•
With the p q keys, go to the channel you want to delete and
press OK. The channel name color becomes yellow and the low
side of the screen shows «Selected channels:1».
To delete more than one channel at once, select the first
channel, then select the last channel you want to delete, and
keep pressed OK for two seconds.
• Press the
a.4) Restore list
You can cancel the list changes. To do this…
•
Press the
a.5) Rename channels
•
With the p q keys, go to the channel you want to rename and
press the
on the right side.
• The t key deletes characters, from right to left, starting from the
end of the name.
•
The u key adds an “a” character to the right-side of the name.
• The p q keys change the character, by scrolling the alphabet
according to the order shown on the low side of the screen.
• Another way of inserting characters is by pressing the numeric
keys on remote control, according to the diagram shown on the
low-left side of the screen, just like you do with a mobile phone.
• With the
• With the GREEN key you insert special characters.
• The YELLOW key commutes between upper and lower case.
• OK
• Exit
RED
key.
YELLOW
BLUE
RED
key confirms changes.
key cancels changes.
key.
key. The channel name appears near the list,
key you accent a vowel.
a.6) Help window
By pressing the i key, a windows appears with the instructions on how to
edit lists. Press OK to close this window.

a.7) Exit the edit channels list section.
For exiting the edit channels list section…
• Press the
Note:
Changes will be available after saving settings on main menu.
Exit
key.
Settings
b) Edit the favourite channels lists
The third and the fourth entries of the «Edit lists» menu allow you to
enter the edit favourite TV or radio lists section. You can rename each
list.
Eight list names are shown on the screen.
•
With the p q keys, select the list to edit.
Here you can also rename the selected list, by pressing the
The characters insertion is the same as the one described at point a.5)
(see).
•
Press OK to edit the list.
You enter the edit list section.
b.1) Choose the list to edit
At first, the «Program list» is selected, which contains all the channels
stored in memory. Press the
Press the
You can edit the favourite list only.
b.2) List scrolling
Often, a list contains more channels than it can show at the same time in
its window. There are two way for scrolling a list:
BLUE
key again, to go back to the «Program list»…
•
With the p q keys you move through the channels shown into
the window. Once you reach an extremity, a further key pressure
will show the next page into the window.
• With the t u keys you can directly go to the next or the
previous page.
BLUE
key to pass to the favourite list.
BLUE
key.
b.3) Change position of one or more channels
•
With the p q keys, select the channel you want to move and
press OK. The channel name color becomes yellow and the low
side of the screen shows «Selected channels:1». To move more
than one channel at once, select the first channel, then select
the last channel you want to move, and keep pressed OK for two
seconds.
• With the p q keys, go to the channel, above which you want to
paste the selected channel(s).
[
Edizione del 23/08/2002]
9

Settings
•
Press the
b.4) Delete one or more favourite channels
• With the p q keys, go to the channel you want to delete and
press OK. The channel name color becomes yellow and the low
side of the screen shows «Selected channels:1». To delete more
than one channel at once, select the first channel, then select
the last channel you want to delete, and keep pressed OK for
two seconds.
• Press the RED key.
b.5) Restore list
You can cancel the list changes. To do this…
•
Press the
b.6) Insert channels into the favourite list
• On the «Program list», with the p q keys, select the channel
you want to add to the favourite list.
• Press the ü key.
GREEN
YELLOW
key.
key.
b.7) Help window
By pressing the i key, a windows appears with the instructions on how to
edit lists. Press OK to close this window.
b.8) Exit the edit favourite list section.
For exiting the edit favourite list section…
•
Press the
Note:
Changes will be available after saving settings on main menu.
Exit
key.
4. Programmed turning receiver on/off
The receiver can be programmed for turning on/off automatically at
defined times. You can use this function, for example, with a VCR –
programmed to turn on at a certain time – in order to record programmes
when you are not at home.
Up to 8 on/off events – called «Timers» - can be set.
• On
You enter the timers activation section.
main menu
select «Timer» and press OK.

a) Timer setting.
•
With the p q keys, select on the shown grid an empty slot
• Press, and keep pressed for two seconds, the OK key.
Note
: if there aren’t free slots, an event must be deleted. See below how
to remove a timer.
a.1) Choose a channel.
After releasing the OK key, on the leftmost column –named «Channel»appears the name of the channel, which the receiver was tuned on
before entering the Setup section.
•
Use the p q keys to change the channel.
a.2) Choose the starting day.
•
With the t u keys, set the focus on the second column from the
leftside, named «Day».
• Use the p q keys to change the starting day.
Settings
a.3) Choose the starting hour.
• With the t u keys, set the focus on the third column from the
leftside, named «Start».
•
Use the p q keys to change the starting hour, with 30 minutes
steps.
• Use the remote control numeric keypad to set the hour with
precision.
a.4) Choose the ending hour.
•
With the t u keys, set the focus on the fourth column from the
leftside, named «End».
• Use the p q keys to change the ending hour, with 30 minutes
steps.
• Use the remote control numeric keypad to set the hour with
precision.
a.5) Event repetition.
A timer can be set for turning on/off periodically at the same time.
• With the t u keys, set the focus on the fifth column from the
[
Edizione del 23/08/2002]
11

Settings
left-side, named «Frequency».
• Use the p q keys to change the event period.
a.6) Event duration.
On the rightmost column, named «Duration», the time length –in
minutes- of the event is shown. The value is calculated as the difference
between the ending time and the starting time of the event, and it can not
be modified directly by the user.
b) Edit a timer.
To edit, partially or totally, a timer…
•
With the p q keys, select the timer on the shown grid.
•
Press, and keep pressed for two seconds, the OK key.
a.1)
Modifications are brought as described on points
–
a.5)
.
c) Delete a timer.
•
With the p q keys, select the timer to be deleted.
•
Press the
d) Help window
By pressing the i key, a windows appears with the instructions on how to
set timers. Press OK to close this window.
e) Exit the «Timer» section.
To exit the «Timer» section…
• Press the
Note:
Changes will be available after saving settings on main menu.
Important:
be in «Stand-By» mode, that is, it must have been turned off from remote
control and
RED
key.
Exit
key.
in order to turn on at the established time, the receiver must
not
from front panel power button on the receiver.
5. Conditional Access
This receiver is ready for the vision of pay channels, of both subscription
and pay-per-view type. Despite there are numerous Conditional Access
systems being used, this receiver is virtually compatible with all of them
by means of the so-called CAM (Conditional Access Module). These
moduls, in PCMCIA standard format, handle the descrambling of the

pay-tv signal depending on the access conditions of the subscription
smart card, that is inserted in the CAM. The receiver has two CAM slots,
in order to handle up to two Conditional Access systems at the same
time. The CAM slots are of standard DVB Common Interface (CI) type.
To access the CAM menus:
• From main menu, select «Conditional access» and press OK.
The following menu will show the items «CI slot 1» and «CI slot 2». Next
to each slot item, in brackets, a status word is available. If no CAM is
present the status will be ‘empty’, if a CAM has just been inserted the
status will be ‘initializing’, or if the CAM is ready the status will be the
CAM name.
• To access the CAM menu select the slot and press OK.
If the CAM is ready you will enter the CAM’s menu. Each CAM type has
its own menu structure.
On the CAM menu…
• Press
• Press RED to go back to the «Conditional access» menu.
If the slot is empty or an error condition has occurred, in a few seconds
the system will go back to the «Conditional access» menu and will show
an error message at the bottom of the screen.
Exit
to navigate back
6. Security
In this section you can modify the PIN (Personal Identification Number)
code, limit the access to prohibite-to-children programmes, and protect
the access to one or more channels with a code.
• On
A panel appears, which asks for the insertion of the PIN code.
Note:
section (see below).
• With the remote control numeric keypad, insert the PIN code.
•
If the PIN code is correct, you enter another menu with the following
entries:
• Channel lock
• Change PIN
• Parental lock
main menu
The default PIN code is 0000. This number can be changed in this
Press OK.
select «Security» and press OK.
Settings
[
Edizione del 23/08/2002]
13

Settings
a) Channel lock.
It allows to protect the access to one or more TV or Radio channels with
a code.
• Select «Channel lock» and press OK.
You enter a menu, which allows you to choose between TV and Radio
channels.
• With the p q keys, select an entry and press OK.
The complete list of TV or Radio channels appears.
a.1) Lock one or more channels.
•
With the p q keys, select a channel to be locked.
• Press the ü key. A locked channel is marked with a Ï (padlock)
on the right side of the list.
• Repeat the operation for each channel you want to lock.
Note:
The unlock code is the same as the one used to enter the
«Security» section.
a.2) Unlock one or more channels.
• With the p q keys, select a channel to be unlocked (marked
with a Ï (padlock) on the right side of the list).
•
Press the ü key. The Ï on the right side of the list disappears.
•
Repeat the operation for each channel you want to unlock.
a.3) Lock all the channels at once.
• Press the
a.4) Unlock all the channels at once.
• Press the
a.5) Help window
By pressing the i key, a windows appears with the instructions on how to
set channel lock. Press OK to close this window.
RED
key.
GREEN
key.

a.6) Exit the «Channel lock» section.
To exit the «Channel lock» section…
•
Press the
Note: Changes will be available after saving settings on main menu.
b) Change pin.
It allows you to change the PIN (Personal Identification Number) code.
• Select «Change pin» and press OK.
You enter the change PIN code section.
b.1) Change the PIN code.
• New PIN
PIN code and press OK.
Repeat PIN
•
PIN code (for verification) and press OK.
Exit
key.
: With the remote control numeric keypad, insert a new
: With the remote control numeric keypad, repeat the
Settings
b.2) Help window
By pressing the i key, a windows appears with the instructions on how to
change the PIN code. Press OK to close this window.
b.3) Exit the «Change PIN» section.
To exit the «Change PIN» section…
•
Press the
Note:
Changes will be available after saving settings on main menu.
c) Parental lock.
It allows you to limit the access to prohibited-to-children programmes.
•
With the t u keys, select the least age value, for which it’s
allowed to access to all of the programmes. Programmes
prohibited to children younger than that age, will be locked by
the system. “no” does not set limits.
Exit
Press
to go back to the
Exit
key.
main menu
.
7. Further system settings
So far, the described main menu entries provide functions to search and
manage Radio and TV channels, set timers and security options. The
last menu entry allows you to enter 8 further options, to set graphics,
[
Edizione del 23/08/2002]
15

Settings
tuning parameters, and other things for the system.
• On main menu select «System settings» and press OK.
Another menu appears, with 8 entries:
1. AV settings
2. OSD settings
3. Language options
4. LNB Settings
5. Antenna settings
6. Software update
7. Reset to factory
8. Timezone
• To go back to
main menu
press OK.
8. AV settings
•
On «System settings» menu select «AV settings» and press OK.
• Use the p q keys to navigate among the options.
You can set the following parameters:
• TV format
format.
Letterbox
•
the letterbox option while watching 16:9 programmes on 4:3 TV
sets.
• Modulator
• TV scart
or “RGB”.
If you chose the “RGB” option, the screen could appear out of
center. To obviate this problem, you can set another parameter:
• Horizontal offset
default value until the screen is well centered again.
Channel switch
•
screen or a frozen frame while switching between channels.
• AC-3
audio AC-3 option, which will work only on qualified systems.
To go back to «System settings» menu, press Exit.
: With the t u keys, choose “4:3” or “16:9” video
: With the t u keys, choose whether to activate or not
: With the t u keys, choose “PAL B/G” or “PAL I”.
: With the t u keys, choose among “CVBS”, “S-VHS”
: With the t u keys, increase or decrease the
: With the t u keys, choose to show a
: With the t u keys, choose whether to activate or not the
blank
9. OSD (On Screen Display) settings
• On «System settings» menu select «OSD settings» and press
OK
.
•
Use the p q keys to navigate among the options.

• Press i key to get a helping window. Close it with OK.
You can set the following parameters to edit the graphic features of the
system:
OSD transparency
•
the default value to choose the system graphics transparency
level (1 = Highest, 15 = Lowest).
• Banner timeout
default value to choose the on-screen permanence duration –in
seconds- of the information windows.
• Lines in list
default value to choose how many channels shall be shown on a
list window, at once.
Tag notification
•
default value to choose how many seconds in advance shall be
notified a Timer event start, in case the receiver is already on.
To go back to «System settings» menu, press
: With the t u keys increase or decrease
: With the t u keys increase or decrease the
: With the t u keys increase or decrease the
: With the t u keys increase or decrease the
Exit
.
10. Language options
Settings
• On «System settings» menu select «Language options» and
press OK.
•
Use the p q keys to navigate among the options.
•
Press i key to get a helping window. Close it with OK.
You can set the following parameters to change the system language:
• Menu language: With the t u keys choose among “italiano”
(Italian), “español” (Spanish), “deutsch” (German) or “english”
the language used by system graphics and messages.
First sound
•
“spanish”, “arabic”, “russian”, “polish”, “dutch”, “japanese”,
“german”, “english” or “french” the first audio language.
• Second sound
“french”, “italian”, “spanish”, “arabic”, “russian”, “polish”, “dutch”,
“japanese” or “german” the second audio language.
• Subtitle language: With the t u keys choose among “german”,
“english”, “french”, “italian”, “spanish”, “arabic”, “russian”,
“polish”, “dutch” or “japanese” the subtitle language. Choose “no”
if you don’t want to pre-define a subtitle language.
Note
: Subtitles are seldom available in many languages. More often, a
programme is subtitled in one or two languages.
Note: Even if you chose the “no” option, you can always activate
programmes subtitles (if available) by pressing the appropriate key on
remote control.
: With the t u keys choose among “italian”,
: With the t u keys choose among “english”,
[
Edizione del 23/08/2002]
17

Settings
11. LNB settings
• On «System settings» menu select «LNB settings» and press
OK
.
•
Use the p q keys to navigate among the options.
•
Press i key to get a helping window. Close it with OK.
Three default settings are available for LNBs, and further three settings
are user-defined. You can set the following parameters:
• LNB name
“Single High”, “Single Low”, “1”, “2” or “3”. If you select one
among “Universal”, “Single High” or “Single Low”, you can not
change the other settings.
• Osc. 1
frequency for the low band oscillator.
Osc. 2
•
frequency for the high band oscillator.
• 22 kHz: With the t u keys choose “yes” or “no” whether you
want, or not, the receiver to send the oscillator selecting tone.
: With the t u keys choose among “Universal”,
: With the remote control numeric keypad insert a
: With the remote control numeric keypad insert a
12. Antenna settings
• On «System settings» menu select «Antenna settings» and
press OK.
• Use the p q keys to navigate among the options.
• Press i key to get a helping window. Close it with OK.
Depending on your system, you can choose between two configurations:
a) Direct feed
If you own a satellite antenna (dish) with only one LNB:
• Select the «Direct feed» entry and press OK.
You can set two parameters:
• Satellite
antenna is pointing to, among the twentyfour available.
LNB type
•
Note
your system.
: With the t u keys choose the satellite your
: With the t u keys choose a LNB setting name.
: In most cases the “Universal” setting will be good for

b) Multi/DiSEqC switch
If you own more LNBs (up to 4) linked to a DiSEqC switch:
• Select the «Multi/DiSEqC switch» entry and press OK.
• On the
LNBs in use, and press OK.
Next settings are:
Port
•
• Satellite: With the t u keys choose the satellite your antenna is
pointing to, among the twentyfour available.
• LNB type
Note
system.
Repeat these settings for each DiSEqC port in use.
Exit
Press
Now you can start a signal test:
• Select the «Signal quality and strength» entry and press OK.
A panel with signal strength and quality indicators appears.
Exit
Press
Satellites
: With the t u keys select a DiSEqC port.
: With the t u keys choose a LNB setting name.
: In most cases the “Universal” setting will be good for your
to go back to the previous menu.
to go back to the previous menu.
option, with the t u keys set the number of
13. Software update
•
On «System settings» menu select «Software update» and
press OK.
A panel wich ask for PIN (Personal Identification Number) code insertion
appears.
Note: The default PIN code is 0000. This number can be changed in
«Security» section.
•
With the remote control numeric keypad insert the PIN code.
• Press OK.
If the PIN code is correct, the system will check for a new software
version on satellite. If it is present, the system will download it.
Exit
Press
to go back to the previous menu.
Settings
[
Edizione del 23/08/2002]
19

Settings
14. Reset to factory
You can reset the system to its initial status:
•
On «System settings» menu select «Reset to factory» and press
OK
.
A panel wich ask for PIN (Personal Identification Number) code insertion
appears.
Note:
The default PIN code is 0000. This number can be changed in
«Security» section.
•
With the remote control numeric keypad insert the PIN code.
•
Press OK.
If the PIN code is correct, the system will be reset to factory default
settings.
Be careful
channels enclosed- will be lost.
Press
: All the changes previously brought to system -new added
Exit
to go back to the previous menu.
15. Timezone
In this section you can set your timezone compared to Greenwich
Meridian Time (GMT):
• On «System settings» menu select «Timezone» and press OK.
• Press i key to get a helping window. Close it with OK.
• Timezone: With the t u keys choose a timezone compared to
Greenwich Meridian Time (GMT).
Note
: Default value is GMT+1, which is the middle Europe timezone.
Exit
Press
to go back to the previous menu.
16. Advanced settings
From main setup menu you can enter two hidden screens:
• Software download settings
second the 0 (zero) key, you enter the satellite software update
parameters setting section. By correctly setting the parameters
and referring to the «Software update» section (see before), you
can update the receiver to the newest version available on
satellite.
• Advanced Gain Control: By keeping pressed for two second
the 1 (one) key, you enter the demodulator gain setting section.
: By keeping pressed for two

Negative values will reduce the gain and should be used in case of
too strong signals coming from the antenna. On the contrary,
positive values will increase the gain, in case of weak signals.
Settings
[
Edizione del 23/08/2002]
21

Banner
V. Banner
1. Switching on/off the receiver
You can switch on and off the receiver by pressing the top right red key
on the remote control.
Note
: just like a PC, switching on and off the receiver make some
complex operations to start.
receiver reacts to this key press. Please, don't press the red button
repeatedly
, otherwise the receiver may shut down again.
2. Programs selection
If your receiver doesn’t come with a pre-defined channel list, you should
perform one or more channel search in order to obtain a complete and
up to date channel list. See «Channel search» section.
a) Sequencial browsing
• Use 5 6 keys on receiver front panel or...
• …use CH+ and CH– keys on the remote control to select next or
previous channel.
In the setup configuration menu you can build up your own favourite lists
you can easily recall to screen by the RED key.
Some seconds
may be needed before the
b) Selection from a list
RED
The
key pressed causes
key allows you to recall the
favourite list
• use 5 6 keys to move cursor
• use 34 keys to move cursor
• OK selects the channel where the cursor is on.
• use CH+ and CH– to move cursor and select the channel at the
same time.
system channel list
to pop up, if any.
up and down by one
left and right by one page
. Further
;
RED
;
c) Direct selection...
... by pressing 0 to 9 keys on the remote control. Selected channel
number will be shown on receiver front display and on OSD.

d) Selection during browsing
•
With the 5 6 keys you can browse installed channels to see
event titles, if they have been received.
• Pressing OK when the screen shows the name of a channel
different from the one you're tuned on, causes the receiver to
switch to that channel.
e) Channel recall
After changing channel, the previous channel can be recalled by
pressing the
Recall
key.
3. Show/hide channel infos
Your receiver is capable to store DVB information associated with
programmes and to show them on user's request.
• Some event informations (name, start time, end time and
duration) are shown on the OSD which can be recalled to screen
by pressing OK, i or 5 6 keys.
• When the OSD is on the screen, and infos have been already
received, you can obtain further details by pressing the i key.
Pressing 4 will show informations on next event.
Active keys are contextually shown in the bottom right area under the
clock.
Some icons in the bottom left area of the banner show some
informations about the running program:
• indicates subtitles transmission (the information may be not
updated for all events of that channel);
•
• indicates that two or more audio languages are available;
•
• indicates that an EPG is delivered with this channel;
• indicates that this channel is locked.
Because a large number of channels are delivered via satellite, you may
find useful to store channels grouped by genre, for instance Movie,
Sport, News, Music for TV channels and for music genres for radio
channels. See «Edit lists» on
indicates that teletext is present;
indicates availability of an interactive OpenTV track;
Setup
section.
Banner
[
Edizione del 23/08/2002]
23

Banner
4. TV/Radio selection
With this feature you can access to TV and Radio channels separately.
• Press TV key to select TV channels.
•
Note
: Radio mode is allowed only if at least a radio channel is stored in
the receiver memory.
Press
Audio
key to select radio channels.
5. Input selection
This feature allows to choose if audio/video shown on your TV should be
delivered by the receiver or by an external device connected to second
SCART socket (a VCR, for instance).
• TV/VCR
external source.
Note: If your STB is equipped with a third SCART socket, you can select
the sequence internal/VCR/AUX source by pressing
key is used to switch between the internal or an
TV/VCR
key.
6. Language selection
When a channel transmits more than one language, it's possible to
quickly choose the language you would like to hear.
•
• Move the cursor with 5 6 keys to select the desired language.
• List is removed from screen by pressing either OK or
Note
: Icons at the bottom of language list show active keys.
Note
: Language selection performed this way is only temporary: if you
change channel, the audio track switches to the default favourite
language specified in the setup menu.
Press
Sound
key to show available languages list.
Exit
.
7. Volume control and Mute
You can change receiver audio volume level or mute the receiver.
• Mute key (X) set volume level to zero and shows an icon on the
top right corner of the screen.
• When Mute (
restored.
• Mute mode can be switched off by pressing the volume key
(+y-), which makes you control the audio level. OSD and front
panel display show volume level in the range from “0” to “max”
(12 levels can be selected).
X
) is pressed again, previous volume level is

Note
: If the VCR is connected to the proper SCART socket, volume level
won’t affect the recording audio level. That is, VCR socket is not affected
by volume level regulation.
Note
: Receiver volume level does not depend on the TV set volume
setting. When the STB is switched on, it restores volume level it had
before switching off. Anyway, to prevent too high volume level coming
out from your TV, keep in mind not to raise the receiver volume level if it
has been lowered down by TV remote and vice-versa.
8. Contextual help
• BLUE
Five different help modes are available:
•
• long event information panel help;
• system channel or favourite channel lists help;
• audio language list help;
• navigator screen help.
Contextual help can be closed with the
key, pressed at any time, shows a screen which shows
every keys function in that moment.
normal mode (banner only or nothing are on screen) help;
BLUE
or
Exit
keys.
9. Subtitles
• If the channel broadcasts teletext subtitles, subtitles key (_)
causes the subtitle languages list or subtitle types list to appear
(subtitle types can be: normal or special for not hearing people;
they are often shown simply with the language name).
• You can select the desired subtitle with 5 6 keys and choose it
with OK, which causes the same list to be removed from screen.
Note
: Subtitles selected this way are temporary: if you change channel,
default settings are restored and subtitles are switched off or default
subtitles language are chosen.
10. “At a glance”
With Navigator key you can run a screen which shows events titles
broadcasted over 8 channels. Depending upon the software version
installed on the STB, events shown can be now/next only or every event
programmed on the shown 8 channels, even broadcasted in the next
days (full EPG, where available).
• By moving cursor on an event title, it's possible to obtain further
details (when available) using i key.
• CH+ and CH– keys allows to change page and show
next/previous 8 channels.
Banner
[
Edizione del 23/08/2002]
25

Banner
•
Also in this mode a help screen is available, and can be
activated by pressing
BLUE
key.
11. Channel list
•
You can activate the channel list by pressing the
• The list can be browsed vertically, by channels, or horizontally,
by page.
• The YELLOW key is used to sort channel name alphabetically.
•
To restore numeric order you need to press
When the list is alphabetically ordered you can directly access to the list
position where channels starting with a specific letter are located. The
letter is selected with the remote numeric keypad used in a way similar
to the procedure to input alphabetic characters with an ordinary mobile
phone.
For example, to move cursor to the first channel which name starts with
“R”, you have to press “7” three times consecutively. Keys “0” and “1”,
non used for letters, are useful to show the numeric keypad icon with
letters-numbers association.
• Use the
• You can use both GREEN and YELLOW key in order to show
free-to-air channels alphabetically ordered.
GREEN
key to filter out channel marked as encrypted.
RED
YELLOW
key once.
again.
12. Favourite lists
• Pressing RED key more than one time favourite lists are brought
to screen (8 TV favourite lists and 8 Radio), if defined. You can
browse favourite lists just like system channel list.
13.
NaviZoom function allows you to zoom in a portion of the screen.
ZOOM function
Navi
•
NaviZoom is activated by pressing ü key on the remote. The
selection area is represented by a red frame shown on the
screen.
• Pressing OK the selected area is zoomed to full screen and you
can use cursor keys
•
If you press ü again the red frame is shown to allow selection
area to be repositioned.
• If you press
Exit
345 6
, zoom mode is switched off.
to pan across.

14. Freeze function
YELLOW
•
screen to freeze, while the audio track is played normally.
• Press YELLOW key again, to un-freeze the screen.
key, pressed when lists are not active, causes the
15. DVB info box
If you keep 0 (zero) key pressed for at least one second a popup panel
will activate showing some useful informations about the channel the
receiver is tuned on.
The channel name is shown at the top, followed by the provider name
and the satellite where the channel is broadcasted from:
• Frequency: frequency of the trasponder where the selected
channel is on.
• Polarization
transponder where the selected channel is on.
Symbol rate
•
channel is on.
• FEC
• Service ID
•
Following data are shown only if the channel is actualy tuned:
•
•
•
• Teletext PID
• TXT Subttl PID
• AC-3 PID
•
•
•
•
•
: FEC of the transponder where the selected channel is on.
trasponder.
ONID / TSID
trasponder.
Video PID
Audio PID
PCR PID
available;
the STB is equipped with a digital AC-3 audio output;
OpenTV PID
Frame
PAL standard 720 x 576 pixels) and video ratio (4:3 or 16:9);
Video bit rate
Signal strenght
Signal quality
: the polarization, vertical or horizontal, of the
: symbol rate of the transponder where the selected
: unique identificator of the channel within its
: original network ID and transport stream ID of the
: video stream ID (not available for audio channels);
: audio stream ID;
: Program Clock Reference;
: teletext ID, if telextext is available;
: teletext subtitles ID, if a teletext subtitle is
: AC-3 stream ID, if available; this item is present ony if
: interactive OpenTV track ID, if available;
: real size of video frame (before automatic rescale to
: video frame bits processed in real time;
: signal strenght related to tuned channel;
: signal quality related to tuned channel.
Banner
[
Edizione del 23/08/2002]
27
 Loading...