

Goldtop SX, SX Lite, Galaxis SX, Galaxis SX Lite User Manual

galaxis
by
GOLDTOP
SX
SX Lite
For Easy S CI, Classic S CI and Matrix S receivers
I.
User’s manual
apri gli occhi sulla nostra realtà
[
Edited 23/08/2002]


Information
Information
Before installing your digital receiver, please read carefully the following
instructions!
Otherwise:
• You risk of damaging the receiver and the devices that are
connected to it because of wrong connections.
• You could hazard your safety and your life.
•
You could invalidate the product warranty.
•
The supplier is not responsible for the damages you could
cause.
Warning!
For your own safety
• Do not open the receiver!
parts that can be repaired by the user. Besides, there exists a
risk of fatal electric shock due to exposed live circuits.
• Always disconnect the power cord from the wall socket
cleaning
before
connectors
any
enough for your safety, as some components may still carry
mains voltage.
• In case of an approaching thunderstorm
not only the power cord plug, but also the satelllite signal cable.
This prevents the device from being damaged by lightning
striking in the surrounding area.
• Should a thunderstorm be near you, do not touch your
receiver!
Do not cover up the ventilation slots
•
TV guide), also when the device is switched to stand-by mode.
Otherwise the receiver may overheat and there would be a fire
!
hazard
the device or attempting to remove or replace
. Simply switching off your device is not
If lightning strikes there would be danger to life.
Inside the receiver there are no
always disconnect
(for example with your
Please note:
This digital receiver
is suitable
areas, trade areas and business
areas.
This digital receiver
is not suitable
industrial areas and also not
suitable for the installation on a
public telecommunication
network.
Foreword:
In order to receive digital
channels from satellite you need
a satellite antenna (dish)
installed by a satellite
technician, and perfectly
aligned.
The chapters concerning the
Installation” and the
Assembly
“
System setting
“
knowledge of the
among electronic devices and
the technical terminology
of
of the satellite digital
reception
If you do not own such a
knowledge it is recommended
that you leave the setting up of
the system to
The chapter “
receiver” does not require
specific knowledge on satellite
digital reception. You can use
your equipment as a normal
satellite receiver.
for use in living
for use in
”, as well as the
” require
connections
.
an expert
Using your
.
1

Connections
II. Connections
SCART
Connect the
supporting RGB input. In this way, by setting RGB in the configuration
menu, you will be able to benefit from a better image quality.
The VCR plug of the receiver can be connected to a VCR or a DVD
player. In case you own both a VCR and a DVD player, you can connect
the latter to the secondary plug of the VCR. In both cases the RGB
signal from the DVD player will not be used.
Antenna
Connect your satellite dish cable to the input IN. The OUT plug is a
bypass of the satellite dish signal and can be used to connect a
secondary (e.g. Analogue) receiver.
RS232
The RS232 serial port of the receiver can be used for receiver's software
update. It also provides a two ways link between the receiver and a
Personal Computer for future applications.
Audio
The receiver provides a digital audio output for PCM and AC-3 outputs. It
can be connected to a digital AC-3 audio amplifier.
The analogue audio outputs can be connected to an analogue audio
amplifier.
scart TV
plug of the receiver to a scart socket of your tv set
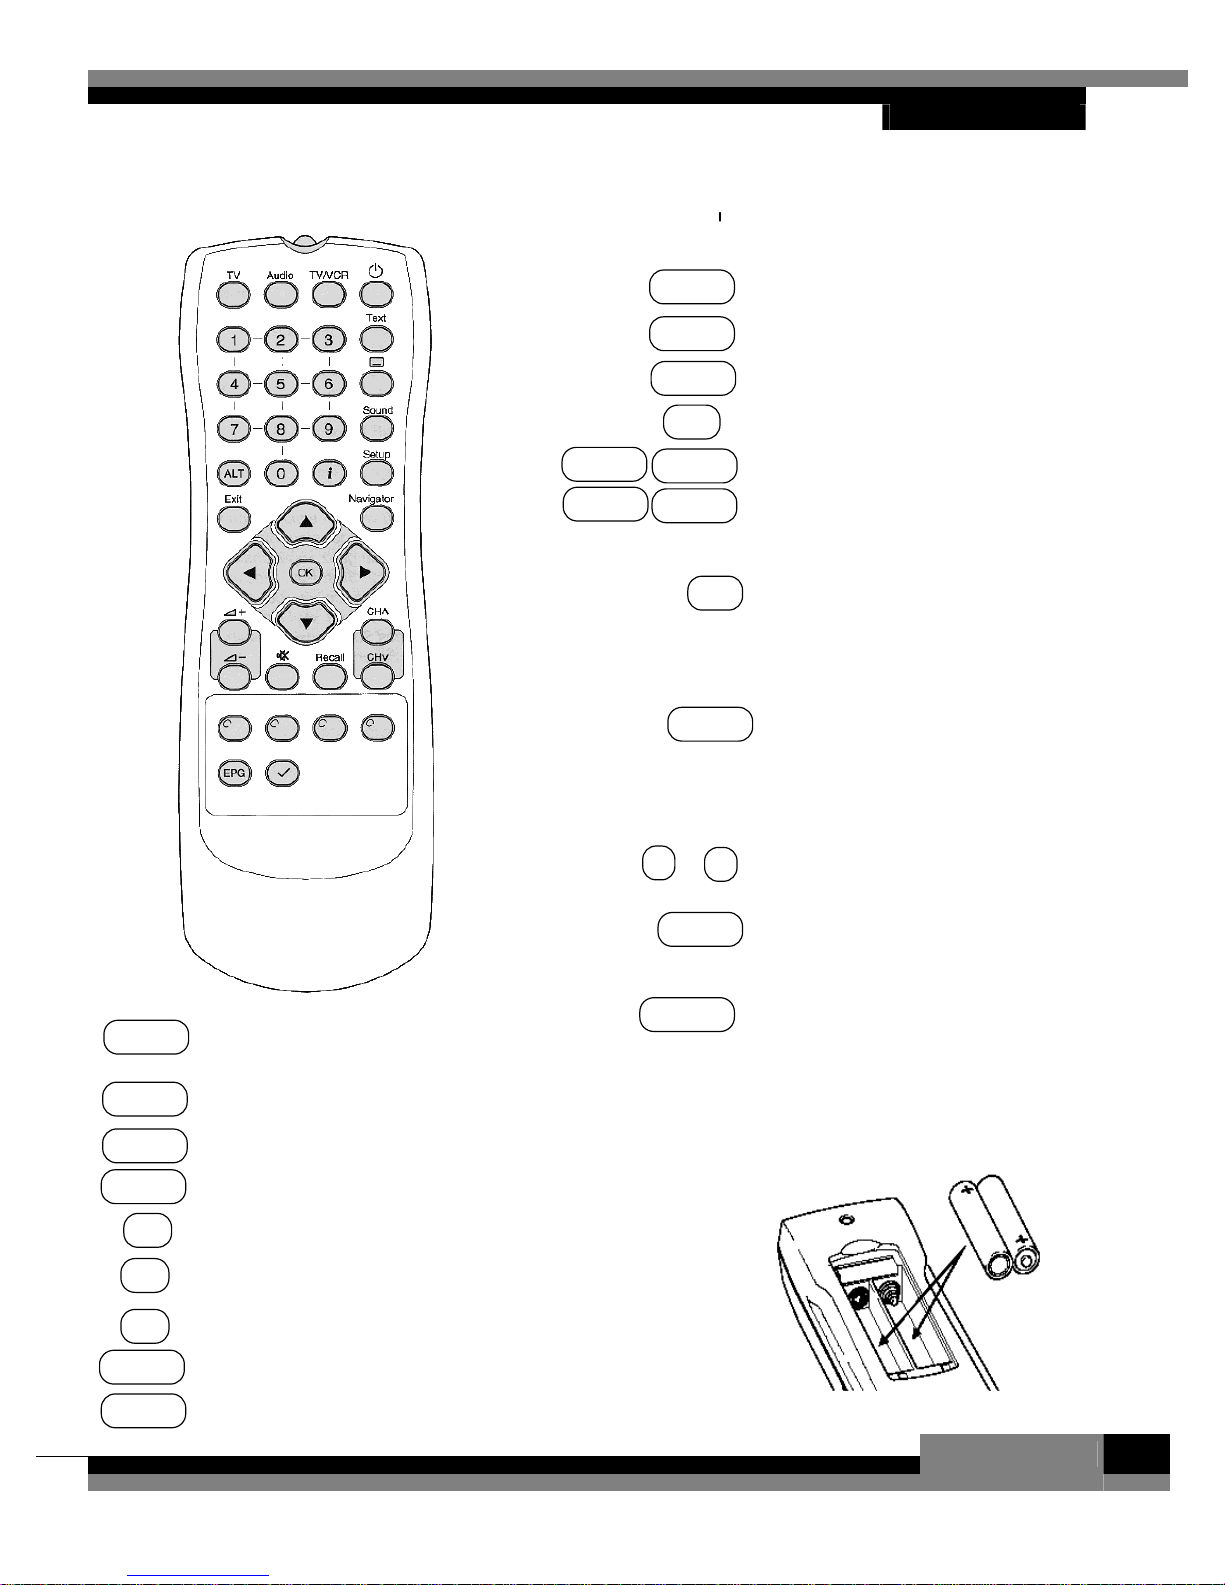
III. Remote control
RED GREEN
YELLOW BLUE
+ CH – Changes channel, scrolls pages
in «At a glance» mode
+ < – Changes volume
Mute Mutes / resumes l’audio
EPG Shows the on-air program guide (if transmitted)
ü
Activates 2X Zoom mode
i Shows information
___
Activates subtitles (if transmitted)
Setup Enters the system configuration mode
Sound Changes the audio language (if available)
O
TV/VCR
TextX.
Audiob
TV….
OK
Exit
t u
p q
0 … 9
Recall
Navigator
Remote control
I. Keys
Switches on / puts the receiver
in Stand-By
Switches reception from satellite
or from VCR
Not used yet
Switches to radio channels
Switches to tv channels
Coloured keys, they have a
different function depending on
the context.
Selects the highlighted menu
item, starts actions, confirms
input, displays the banner,
switches to the selected
channel
Exits from menu, closes
dialogue boxes
Switch lists, change values
Scroll lists
Numeric keys
Goes back to the last channel
selected
Enters «At a glance» mode
II. Inserting batteries
How to insert the batteries
3

Settings
IV. System settings (Setup)
This section describes how to change the receiver’s settings.
1. Enter system configuration mode
For all the functions in this section you need to enter the system
configuration mode,
• press the
• the main menu appears in a few seconds.
a) Navigate the menu.
• With the p q keys you can move the cursor up or down.
• With the t u keys you can move among the boxes of a screen.
b) Select the options.
• With the OK key you can select the menu item highlighted and
choose among the relative options.
c) Save the changes / exit.
• You can save all the changes by pressing the
• You can exit the system configuration mode by pressing the Exit
key or the
•
If you have made changes, and you didn’t save them with the
GREEN
changes. With the t u keys select Yes to confirm, No to cancel
the changes and press the OK key.
d) System Information.
• From the main menu, by pressing the
appear with all technical informations. To close it press OK.
e) Help windows.
• In every menu screen it is possible to open an help screen with
the contextual description by pressing the i key.
main menu
Setup
key.
RED
key.
key, a window will appear asking confirmation of the
. In this way…
GREEN
BLUE
key a box will
key.

2. Channel search
To perform a channel search, select the first entry from the main menu,
«Channel search», and press OK.
2.1 Manual search
From the «Channel search» menu select the first entry «Manual search»
and press OK. You will need to know some parameters on the channels
that you want to search for, that is…
a) Parameters setting
…The «Manual search» section requires the input of 9 parameters:
1. Satellite: is the satellite transmitting the channel. If you have a
multifeed system you can select the satellite by pressing the t
u
keys.
2. Frequency: here you need to input the frequency of the satellite
transponder the channel under search belongs to. You can use
the numeric keys to insert the frequency and the t key for
corrections.
3. Polarisation: by pressing the t u keys you can choose between
(linear) Horizontal and (linear) Vertical.
4. Symbol rate: you can insert the value by means of the numeric
keys or, alternatively, with the keys t u among the predefined
values.
5. FEC (Forward Error Correction): to select among the settings
“1/2”, “3/4”, “5/6” and “7/8” use the t u keys.
6. FTA (Free-To-air) only: select “yes” or “no” with the t u keys,
whether or not you want the restrict the search to the non-pay
channels.
7. Keep existing: select “yes” or “no” with the t u keys, whether
you want to append the new channels to the current list, or you
want to have only the new channels found.
8. Network search: select “yes” or “no” with the t u keys, to
choose whether or not to perform the search on the additional
transponders “linked” to the one under search.
9. Channel Type: with the p q keys you can search for TV
channels only,
or a combination of these three kind of channels.
Radio
channels only,
Interactive
channels only,
Settings
b) Start the channel search
Once the parameters are set, press the
A window will appear with the status of the search.
[
Edited 23/08/2002]
GREEN
key to start the search.
5

Settings
c) Abort the channel search
At any time, to abort the channel search, press the
channels that have been found will be lost.
d) Save the channels
At the end of the search the system will go back to the «Channel
search» menu. To go back to the main menu, press Exit.
• To save the search results, press the
2.2 Automatic search
The automatic search finds the channels of all the transponders of the
selected satellite.
•
From the «Channel search» menu select the second entry,
«Automatic search», and press OK.
You need to input four parameters.
a) Parameters setting
1. Satellite: is the satellite transmitting the channel. If you have
a multifeed system you can select the satellite by pressing
the t u keys.
2. FTA (Free-To-air) only: select “yes” or “no” with the t u
keys, whether or not you want the restrict the search to the
non-pay channels.
3. Keep existing: select “yes” or “no” with the t u keys,
whether you want to append the new channels to the current
list, or you want to have only the new channels found.
4. Channel Type: with the p q keys you can search for TV
channels only,
only or a combination of these three kind of channels.
Radio
channels only,
GREEN
RED
key.
Interactive
key. The
channels,
6
b) Start the channel search
Once the parameters are set, press the Green key to start the search. A
window will appear with the status of the search. At the end of the search
the system will go back to the «Channel search» menu.
c) Abort the channel search
At any time, to abort the channel search, press the
channels that have been found will be lost.
d) Save the channels
At the end of the search the system will go back to the «Channel
search» menu. To go back to the main menu, press Exit.
• To save the search results, press the
If you don’t want to do a channel search, press
main menu.
RED
key. The
GREEN
key.
Exit
to go back to the

3. Channel lists management.
You can edit the lists of the stored Radio and TV channels, change the
channels position or remove them definitively. Also, you can create up to
8 lists of favourite TV channels and 8 lists of favourite Radio channels.
Default settings come with four thematic lists. Each favourite list can be
edited and renamed.
To do this, select «Edit lists» from main menu and press OK.
Next menu presents four entries:
1. «Edit TV channels», to enter the complete list of TV channels.
2. «Edit radio channels», to enter the complete list of radio
channels.
3. «Edit TV favourites», to enter the favourite TV channels lists.
4. «Edit radio favourites», to enter the favourite radio channels
lists.
Select one entry and press OK.
Managing functions are the same for TV and radio channels.
Settings
a) Edit the complete channels lists
By choosing the first entry - or the second - you can edit the complete list
of TV - or radio - channels stored in memory. Changes to this list will be
reflected to memory, if, when exiting the main menu, you’ll choose to
save settings. In particular, channels removed from list will be deleted
from memory, and, in order to get them again, you’ll have to do a new
channel search.
From here, you can rename the channels.
a.1) List scrolling
Often, a list contains more channels than it can show at the same time in
its window. There are two way for scrolling a list:
• With the p q keys you move through the channels shown into
the window. Once you reach an extremity, a further key pressure
will show the next page into the window.
• With the t u keys you can directly go to the next or the
previous page.
a.2) Change position of one or more channels
• With the p q keys, select the channel you want to move and
press OK. The channel name color becomes yellow and the low
side of the screen shows «Selected channels:1». To move more
than one channel at once, select the first channel, then select
the last channel you want to move, and keep pressed OK for two
seconds.
• With the p q keys, go to the channel, above which you want to
paste the selected channel(s).
• Press the GREEN key.
[
Edizione del 23/08/2002]
7
 Loading...