

Goldstar GWHD6005R Owner’s Manual
OWNER'S MANUAL
MANUAL DEL PROPIETARIO
ROOM AIR CONDITIONER
AIRE ACONDICIONADOR
ModelslModelo GWHD6500R
w_¢,lgapplia nc_,com
!iiiiIiiIiiIiiIiiIiiIiiIiiIiiIiiIiiIiiIiiIiiIiiIiiIiiIiiIiiIiiiiiiiiiiiiiiiiiiiiiiiiiiiiiiiiiiiiii_ii_
Jventil_or
esta
_ra el futuro
SafetyPrecautions..........................3
BeforeOperation.................... 7
Inlroductlon .................................... 8
Sym_ls Used in this Manual ........8
Features ...................................... 8
Electrical Safety ........................... 9
TemporaryUse ofan
Adapter ........................................ 10
TemporaryUse of an
Extension Cord ...........................10
Installation...................................11
Window Requirements ................ 11
Size .........................................11
Clearance .............................. 12
Preparation of Chassis ...........13
Unit InstaJlaflen .................... 14
O_rating Instructions ................. 16
Location and Function
ofControls ...................................16
Remote Confzol Operations .....17
Remote Controller ............ 18
Additional Features ..................... 19
Air Direction .......................... 19
Dram Pipe ............................... 19
Removal from Window ........ 19
Maintenance and Service ............20
Air Filter .................................... 20
Cleaning the Air Conditioner ....,20
How to Remove the
F_ontGrille..........................21
Com_n Problemsand
Solutions.......................................22
Troubleshooting ...........................23
FOR YOUR RECORDS
Write the model and sedal numbers here:
Model #
Serial #
You can find the numbars on a I_el on the side of the
product.
Dealer's Na_
Date Purchased
[] Sta#e your receipt to this pa_ in tf"e event you need
to prove date of purchase or for wa_ra_y issues.
READ THIS MANUAL
Ins_e you will find many helpfuU hints al how to use and
maintain your air conditioner properly. Just a IAle preventive
care on your _rt can sa_ you a great dea_ of time and
money cycerthe life of your air conditioner.
You'll find many answers to common problems in the chart
of troubleshooting tips. If you rov_w our chart of
Troubleshooting Tips first, you may not need to call for
service at all.
PRECAUTION
• Contact an Authoriz_ Service Center for repair or
maintenance of this unit. Call 1-800-243-0000 to
locate the nearest ASC.
• This air conditioner is not intended for use by young
children or invalids without supervision,
• Young children should be su_rvis_ to ensu_ that
they do not play w_h the air conditioner.
• H the power cord requi_s replacement, have an
Authorized Servicer install an exact replacement part,
• Installation work must be pe_-formed in accordance
with the National Electric Code by qualified and
authorized per,_onne| only.
2 Room Air Conditioner
SafetyPrecautions
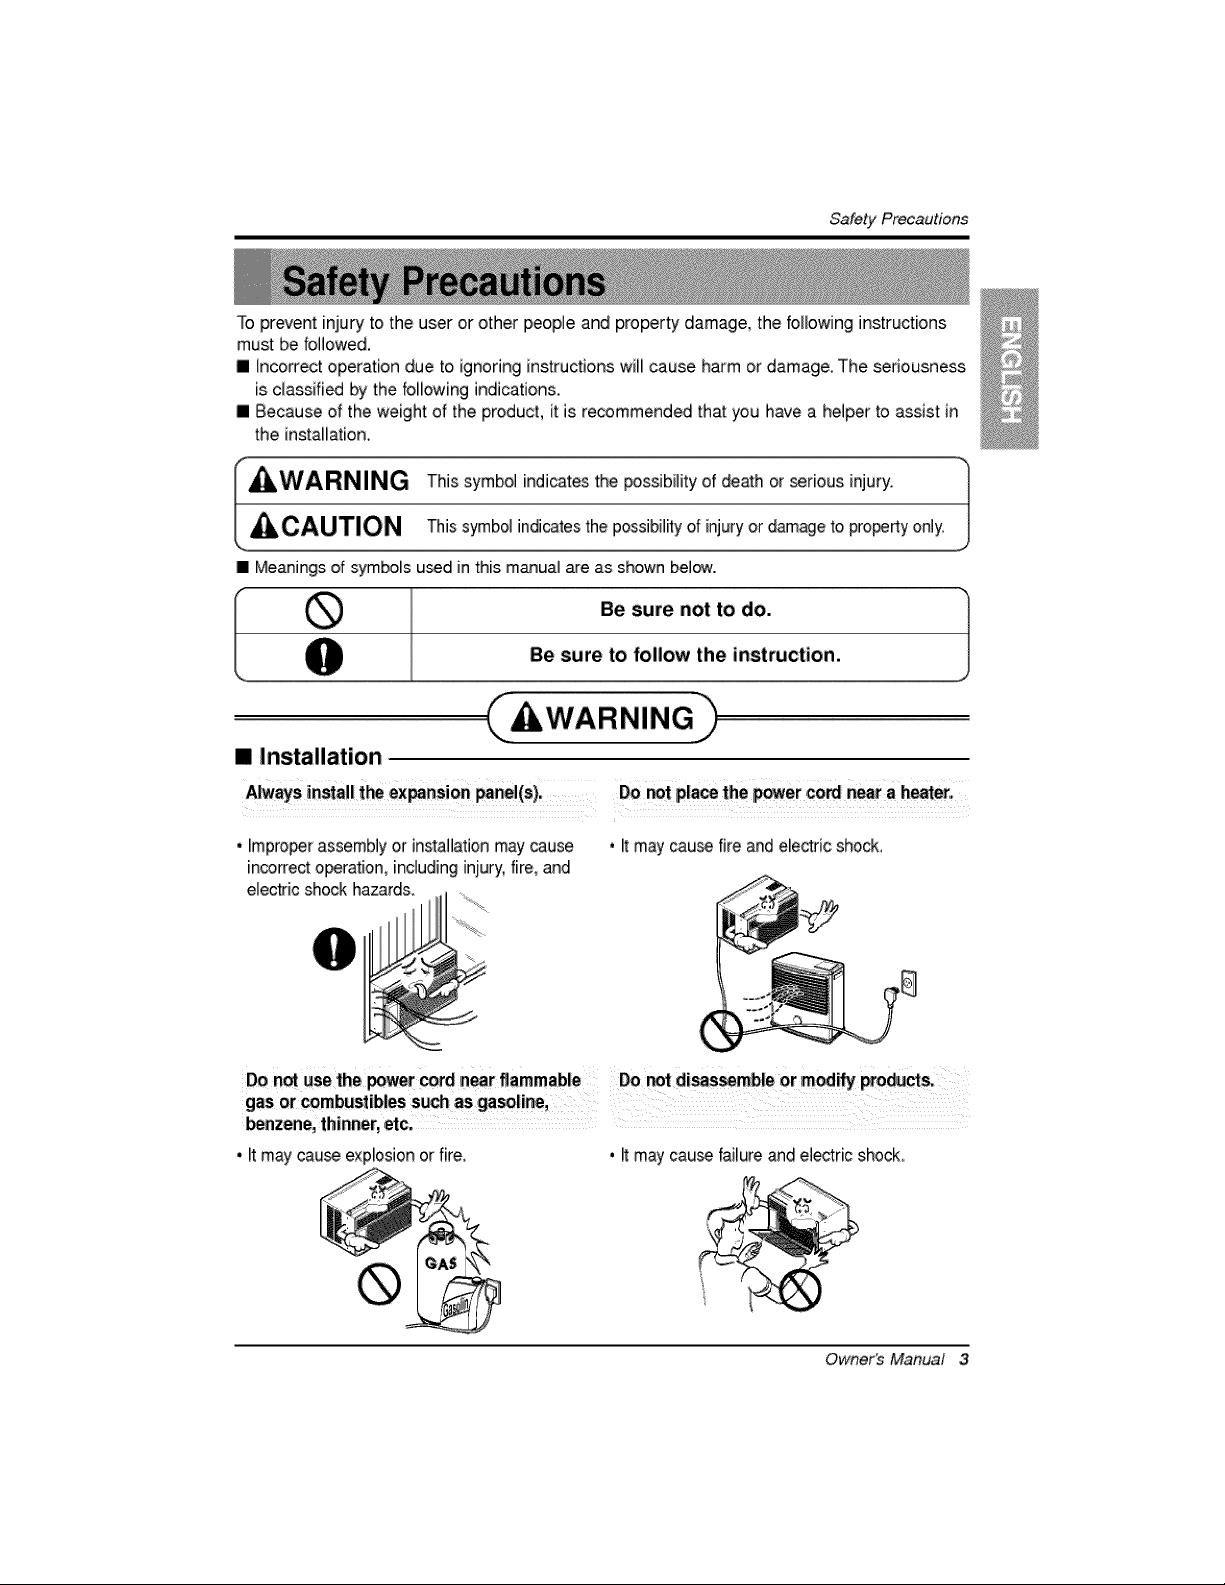
To prevent injury to the user or other people and property damage, the following instructions
must be followed.
m Incorrect operatbn due to ignoring instructions wi[[ cause harm or damage. The seriousness
is classified by the following indications.
m Because of the weight of the product, it is r_mmended that you have a helper to assist in
the insta[[atbn,,
WARNING This symbol indicates the possibility of death or _rious injury: |
ACAUTIONu__--- This symbol hdicates the possibilityof injury or d_age to property only. J
II Meanings of symbols u_d in this manual are as shown below.
Be sure not to do.
Be sure to follow the instruction,
[] Installation
AIw_s installt_ ex_asion _nei(s), Do r_ placethe Her cord n_ra heater,
. [mpro_r assembly or installationmaycause
incorrect o_ration, including injury, fire, and
electric shock hazards.
Do n_ ,usethepowercordnear flammable Do _t disas_mble or modify produ_s,
. It may cau_ fire and electric shock.
!
. _tmay cau_ explosion or fire, . _tmay cau_ failure and electric shock
Owner's Manual 3

_fety Precautions
[] Operation
Plug in the p_et plug Do not o_rate or stop the Do n_ dama,geor we an
• Otherwise, itwill cause
electric shock or fire due to
heat generation or electric
shock.
Do not m_ify _er cO_ Usetheairconditionero"
: otherappliances.
• it will cause electric sho_ or . It will cause electric shock or . No grounding may cause
fire due to heat generation, fire due to heat generation, electric shock (_e Installation
. It will cause electric shock or
fire due to heat generation.
. _twill cause eiectric shock or
fire.
A ayS .toa
Manual).
Unplug theunit if strange Donot u_ the _ck_ if it is Do n_ operatewffhwet
sour,Js__o_i or smoke I_se or damage,
comefromit. er,vironme_.
* Otherwise Rmay cause fire
and el_tric shock accident,
4 Room Air Conditioner
• it may cause fire and electric • Rwill _use electric shock.
shock,
SafetyPrecaudons
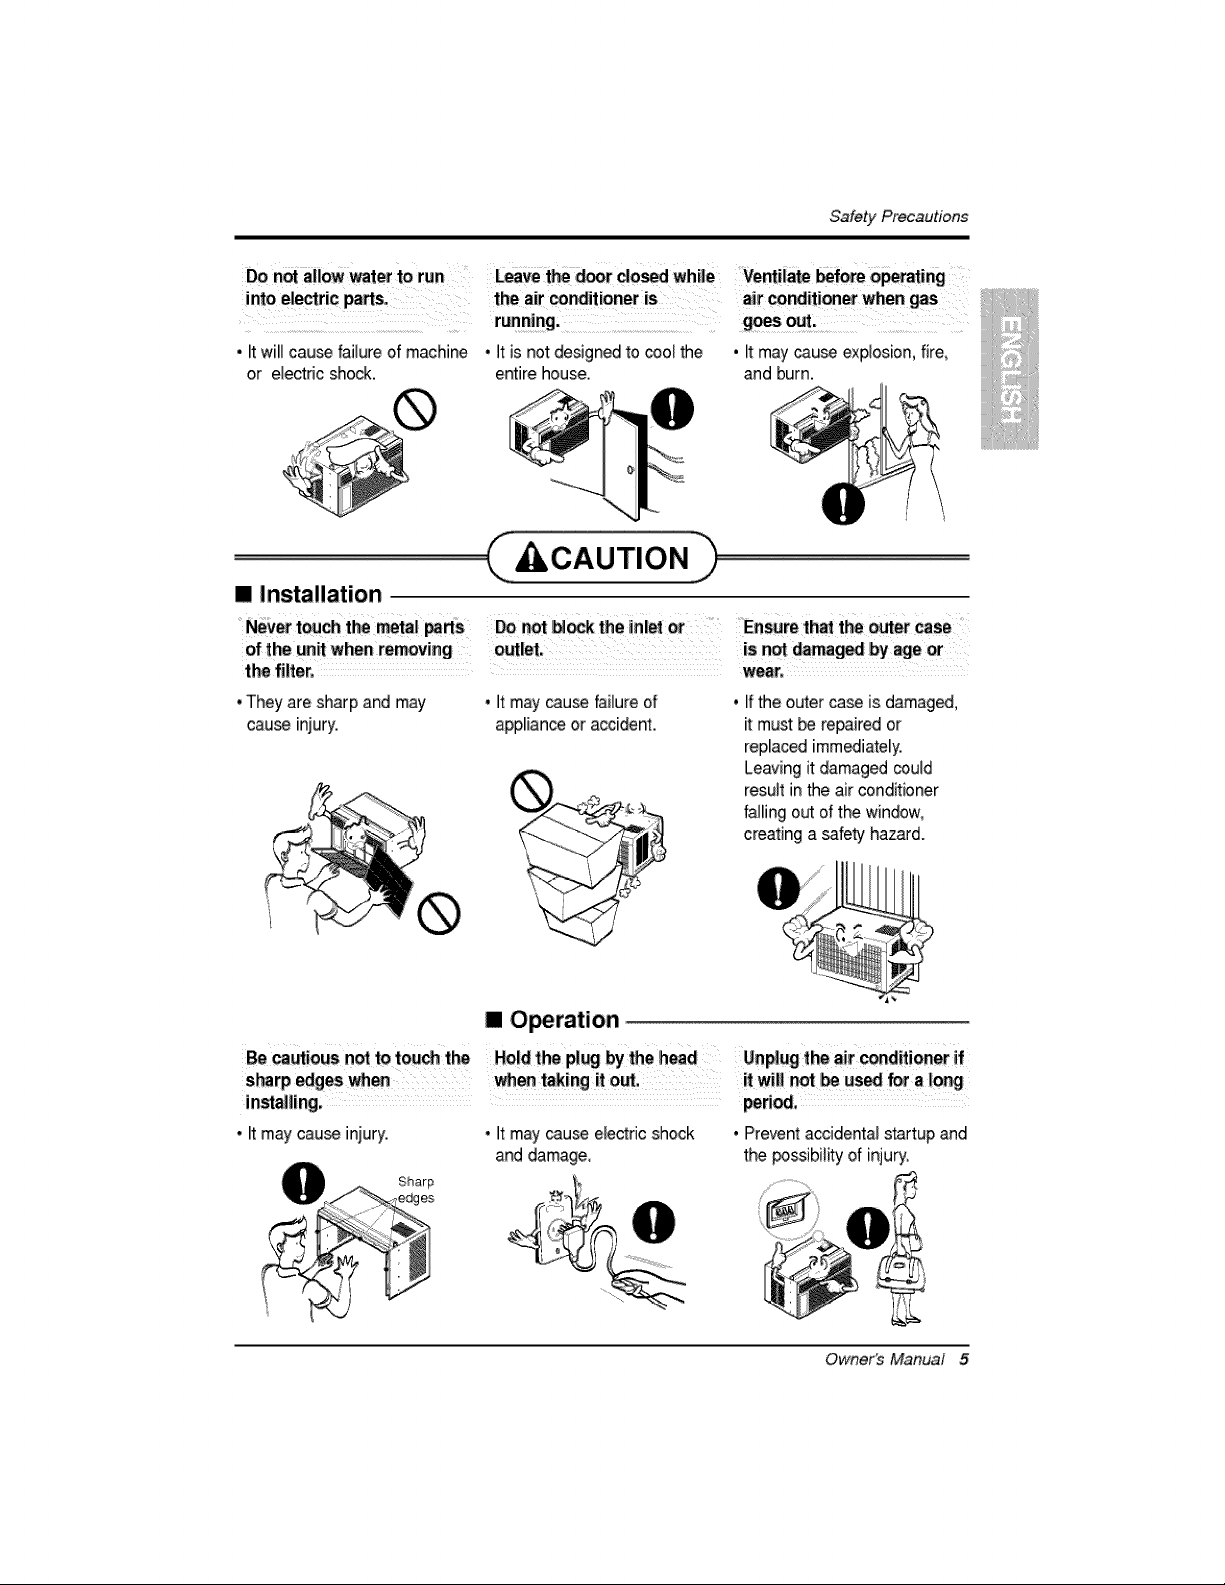
Do n_ allowwaterto run Leave|he ,d_r do_d while Ve_ii_e More O_t_ing
into el_ric parts, the airconditioner is airconditi_er whengas
running: g_s outi
, _twill cause failure of machine • Itis notdesigned to cool the
or electdc shock, entire house.
[] Installation
....Never touch the metal _S Do not _k the inlet,or Ensure that the o_er case ....
, It maycause expiosion, fire,
and burn.
!!Ii:I !!ii
•Theyaresharpandmay
causeinjury.
•It may _use failure of
appliance or accident.
• Ifthe outer _se is damaged,
it must be re_ired or
replaced immediately.
Leaving itdamaged could
result in the air conditioner
falling out of the window,
creating a safety hazard.
[] O_ration
Be cautious not to touch the Hole the p!_ by the head Unplug the air conditioner if
sharp _ges _en _en taking it o_, it will not _usa fora long
installing, pedocL
• _tmay cause injury.
Sharp
es
• Itmay_use electricshock
and damage
• Prevent accidental startup and
the _ssibility of injury
Owner's Manual 5
SafetyPrecautions
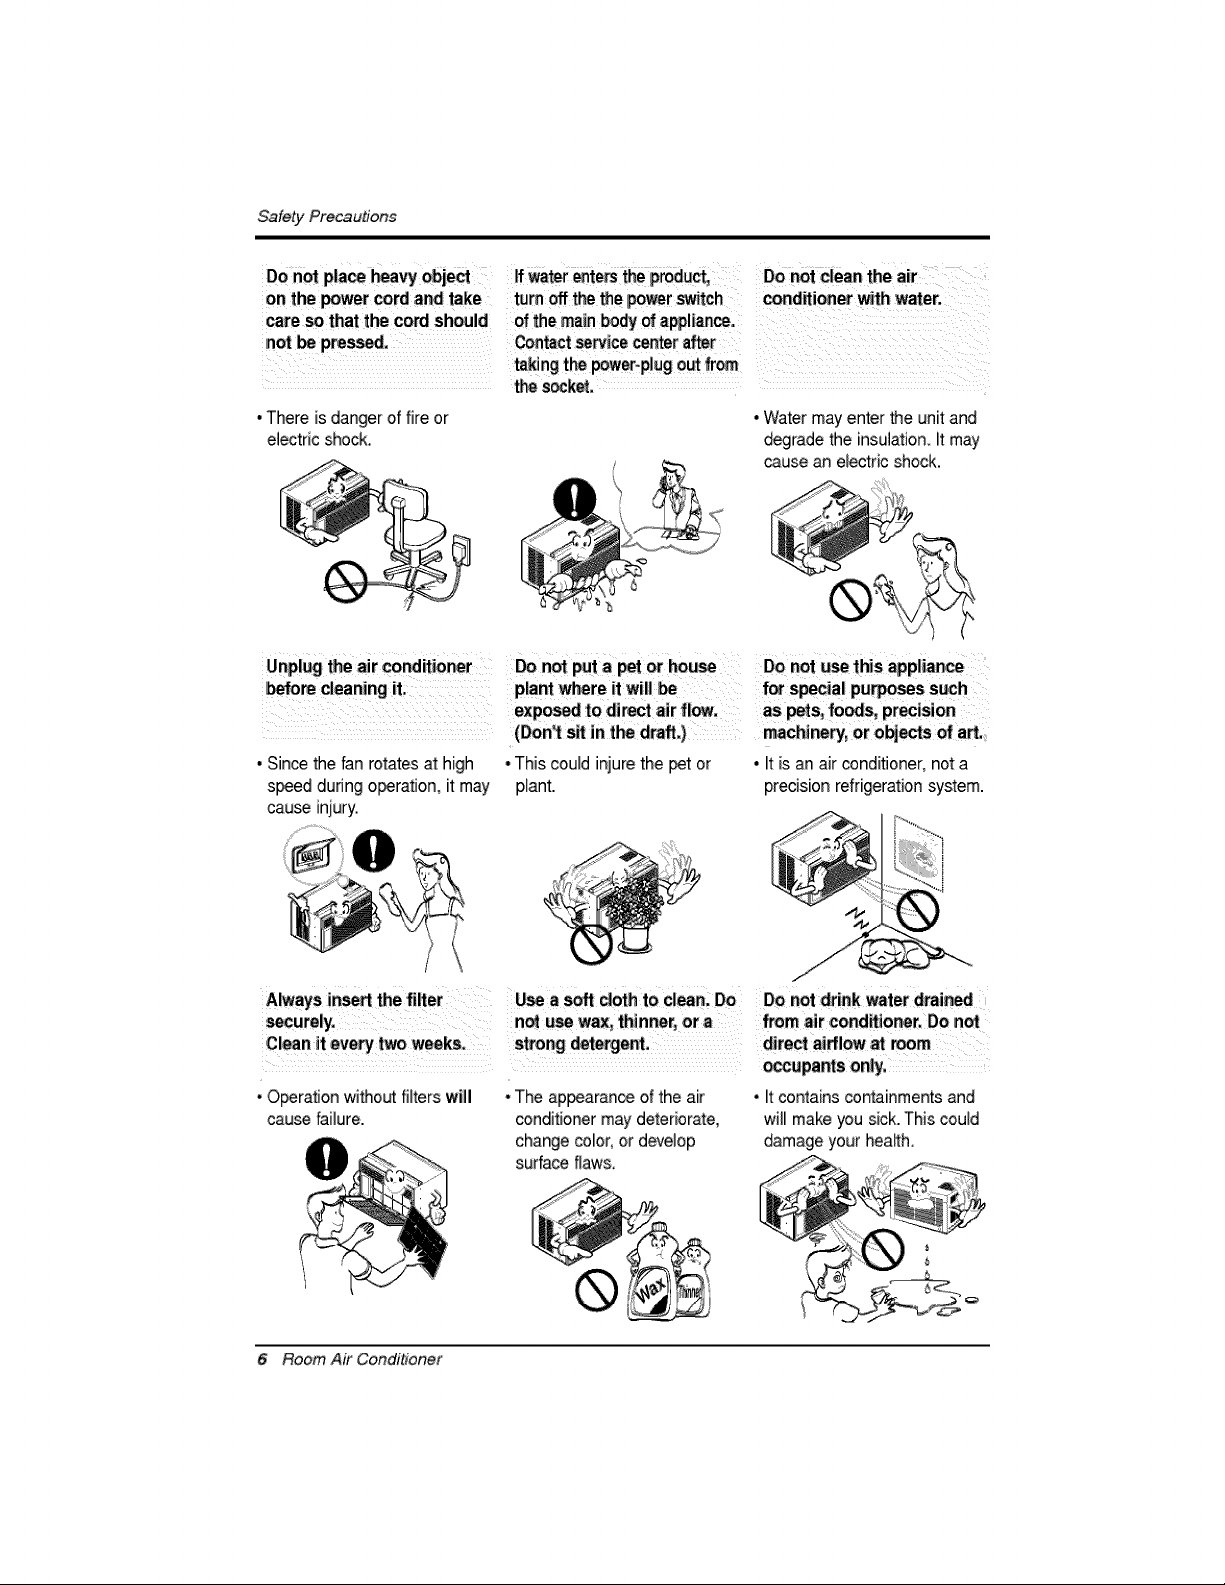
Do not placeheaw obje_ _fWaterente_thePmdec_ Do notdean the air
on the powercordand take turn offthe_e p_r uwitch cond_ionerwithw_er.
careso thatthecordshould ofthemainbodyofapplian_.
_king the powsroplugo_ from
the s_ket,
•There is danger of fire or
electric shock.
• Since the fan rotates at high
s_ed dudng o_rat[on, it may
ca,u_ injury,
(Don1 sk in the drY,)machinery, or o_e,_s of a_,
• This could injurethe pet or • It isan air conditioner, not a
plant, precision refrigeration system.
• Water may enter the unit and
degrade the insulation. Jtmay
cause an electric shock,
AlWaysin_ thefi,er U_a _ clothto c!_a; Do DOnet drinkwaterdrain_
securely, not usewax_thinner,era _om air,condkiener, Donot
strongd_ergent, direct airflow _ _m
.................... occupa_sonly'
• Operation without filters will
cause failure.
• The ap_arance of the air
conditioner may deteriorate,
change color, or develop
surface flaws,,
• Itcontains containments and
will make you sick. This could
damage your heaJth
®
6 Room Air Conditioner
BeforetoOperation
i. Plug in the power cord properly.
2. Use a dedicated circuit. Overloading the line could create a fire hazard.
3, Do not use an extension cord. See page 10 for more details.
4, Do not start/stop operation by plugging/unplugging the power cord.
5, If the power cord is damaged and requires replacement, have an Authorized
Servicer install an exact replacement part.
1. Being exposed to direct airflow for an extended period of time could be
hazardous to your health. Do not expose occupants, pets, or plants to direct
airflow for extended periods of time.
2. Due to the possibility of oxygen deficiency, ventilate the room when used
together with stoves or other heating devices
3, Do not use this air conditioner for non-specified special purposes (e.g.
preserving precision devices, food, pets, plants, and art objects). Such usage
could damage the items.
4. The air conditioner is a consumer comfort appliance, not a precision climate
control system.
1. Do not touch the metal parts of the unit when removing the filter. Injuries can
occur when handling sharp metal edges.
2. Do not use water to clean inside the air conditioner. Exposure to water can
destroy the insulation, leading to possible electric shock.
3, When cleaning the unit, first make sure that the power and breaker are turned
off. The fan rotates at a very high speed during operation, There is a
possibility of injury if the unit's power is accidentally triggered on while
cleaning inner parts of the unit
For repair and maintenance, contact an Authorized Service Center. See the
warranty page for details or call (800) 243-0000. Have your model number and
serial number available. They should be written on page 2 of this manual.
Owner's Manual 7
Introduction
This symbol alerts you to the risk of electric shock.
This symbol alerts you to hazards that could cause harm to the
air conditioner,
This symbol indicates special notes.
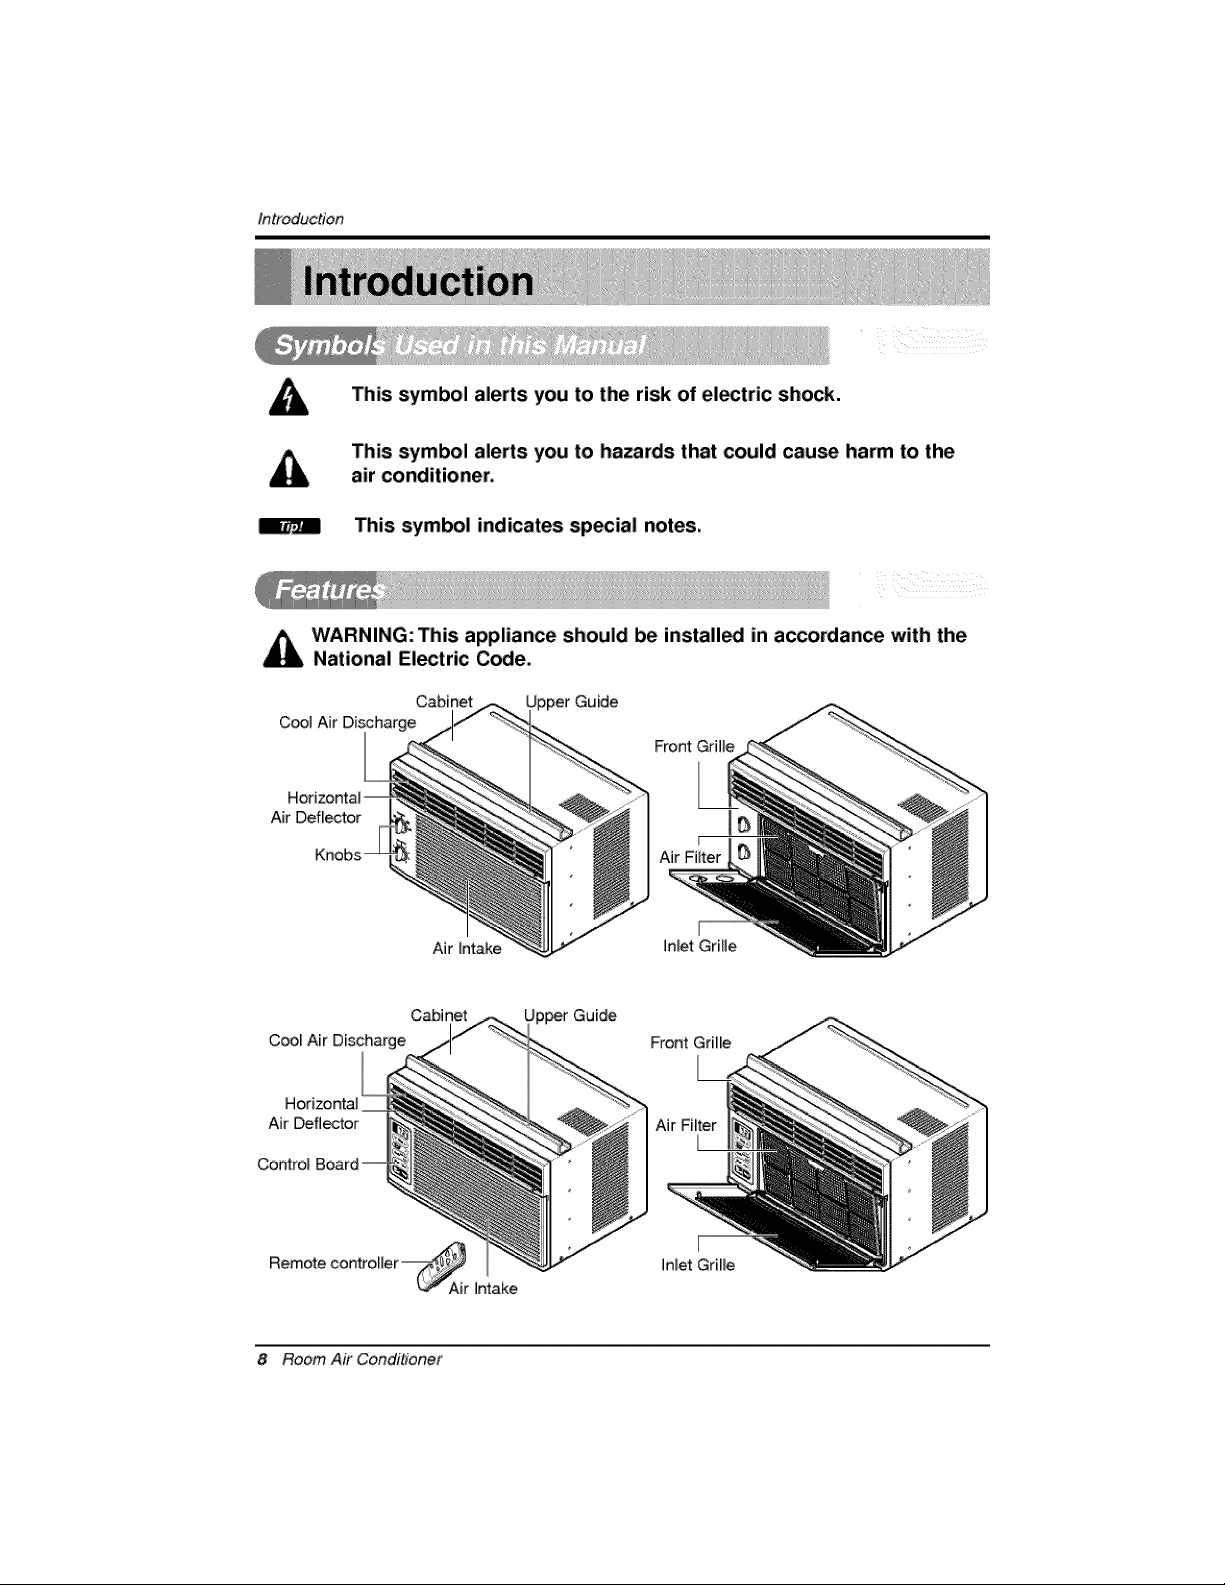
_ ARNING: This appliance should be install_ in accordance with the
National El_tric Code.
Cabinet
C_] Air
FrontGrille
Air Deflector
Air Intake
Cabinet
Cool Air Discharge
Horizontal
Air _flector Air
Control
Remote controller_
8 Room Air Conditioner
Air Intake
Guide
Front Grille
Power cord may include a currant inter_pter devico. A test and reset button is
provided on the plug case. _e device should be tested on a periodic basis by
first pressing the TEST button and then the RESET button. If the TEST button
does not trip or if the RESET button will not stay engaged, discontinue use
of the air cond_ioner and contact a qualified service technician.
Damaged power supply cord must be replaced with a new power supply cord
obtained from the product manufacture and not repaired.
WARNING: This appliance must be prow_ grounded,
The power cord of this applian_ is equipped w_h a three-prong grounding plug.
To minimize the dsk of electric shock, use _e plug with a standard _ree-slot
grounding wall _wer ouUet. If the _wer ouUet d_s not include a grounding slot,
have a qualified electrician repJace the ouUet before you use the room air
condi_oner.
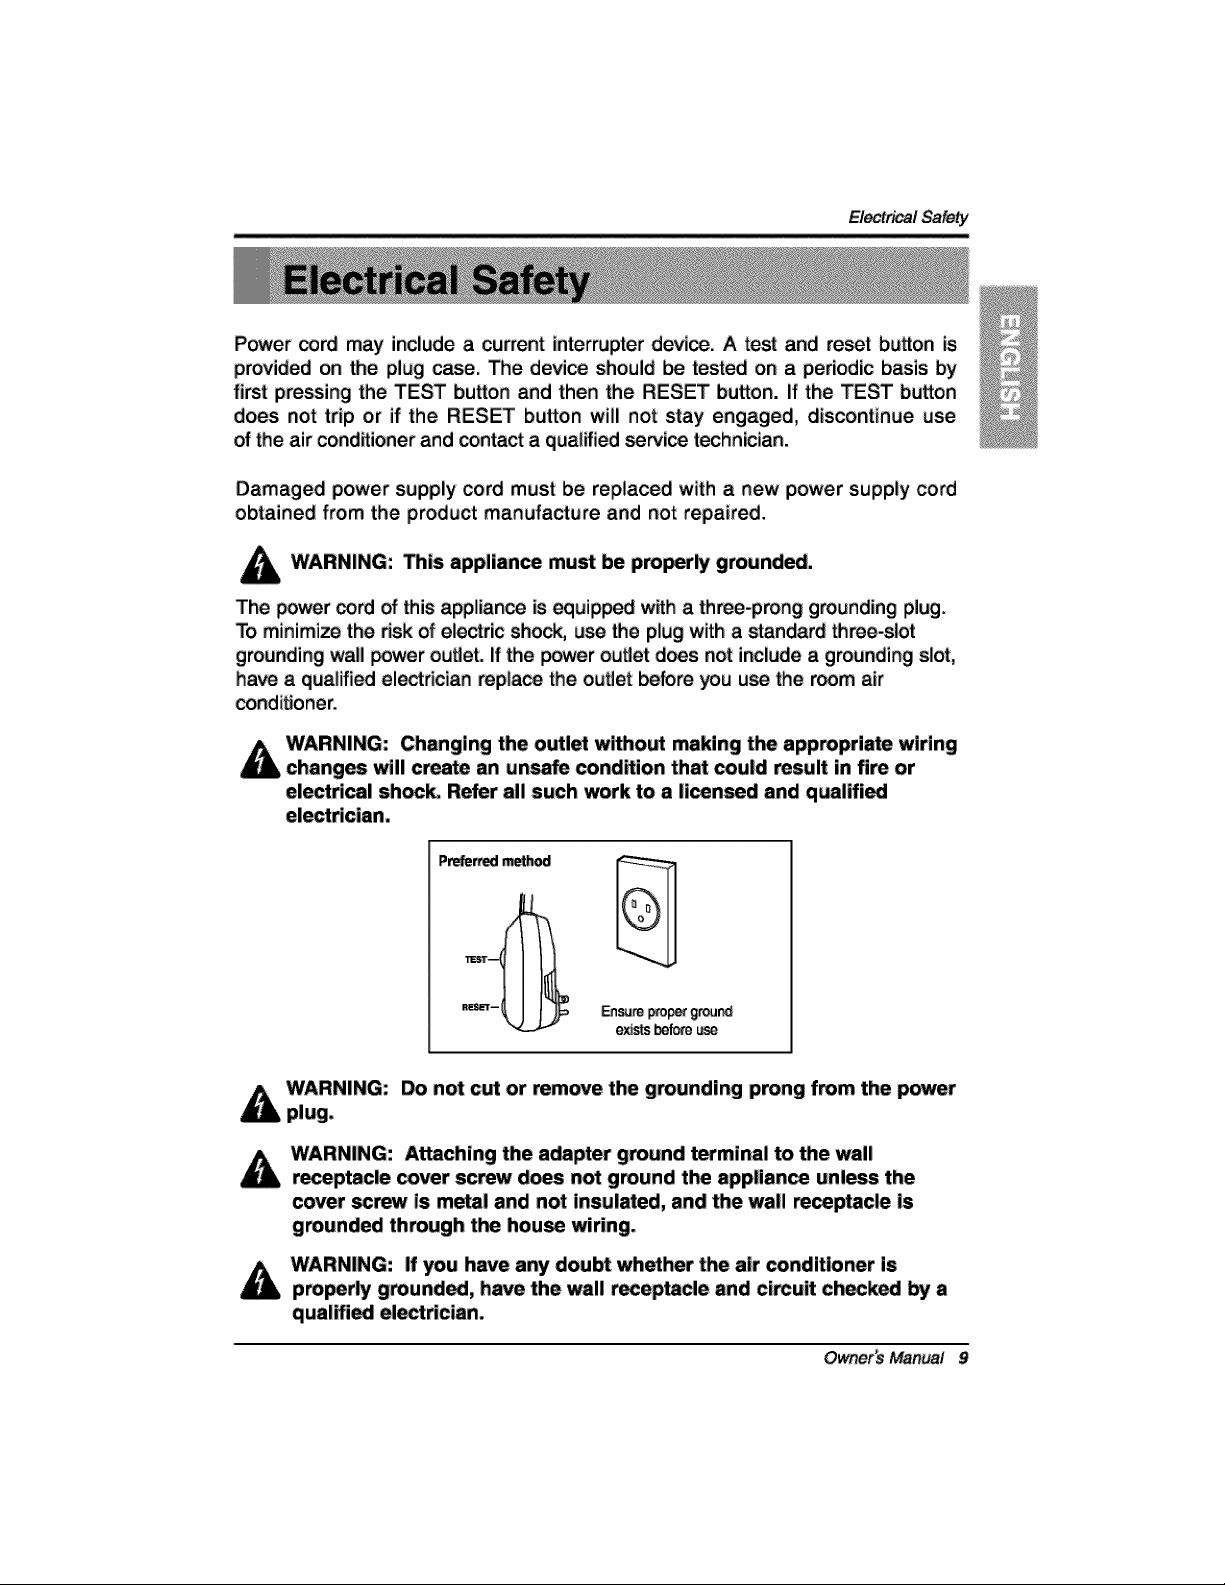
WARNING: Chmlging the outlet w_out n-rakingtim appropriate wiring
changes will create an unsafe condkion that could result In fire or
electricol shoc_ Refer all such work to a licensed and qualified
ele_rician.
_J ....
P_ m_hod
______ F_'lsu_pro_ grou_
existsbofo_
WARNING: Do not CL<or remove the grounding prong from the power
WARNING: Attaching the adapter ground terminal to the wall
receptacle cover screw d_s not ground the appliance unless the
cover _ is meta! and not insulated, and the wal! receptacle is
grounded through tim house wiring,
WARNING: If you have any doubt whether t_ air conditioner is
properly grounded, have the wall t_eptac4e and circuit choked by a
qualmed electrician,
Owner_ Manual 9
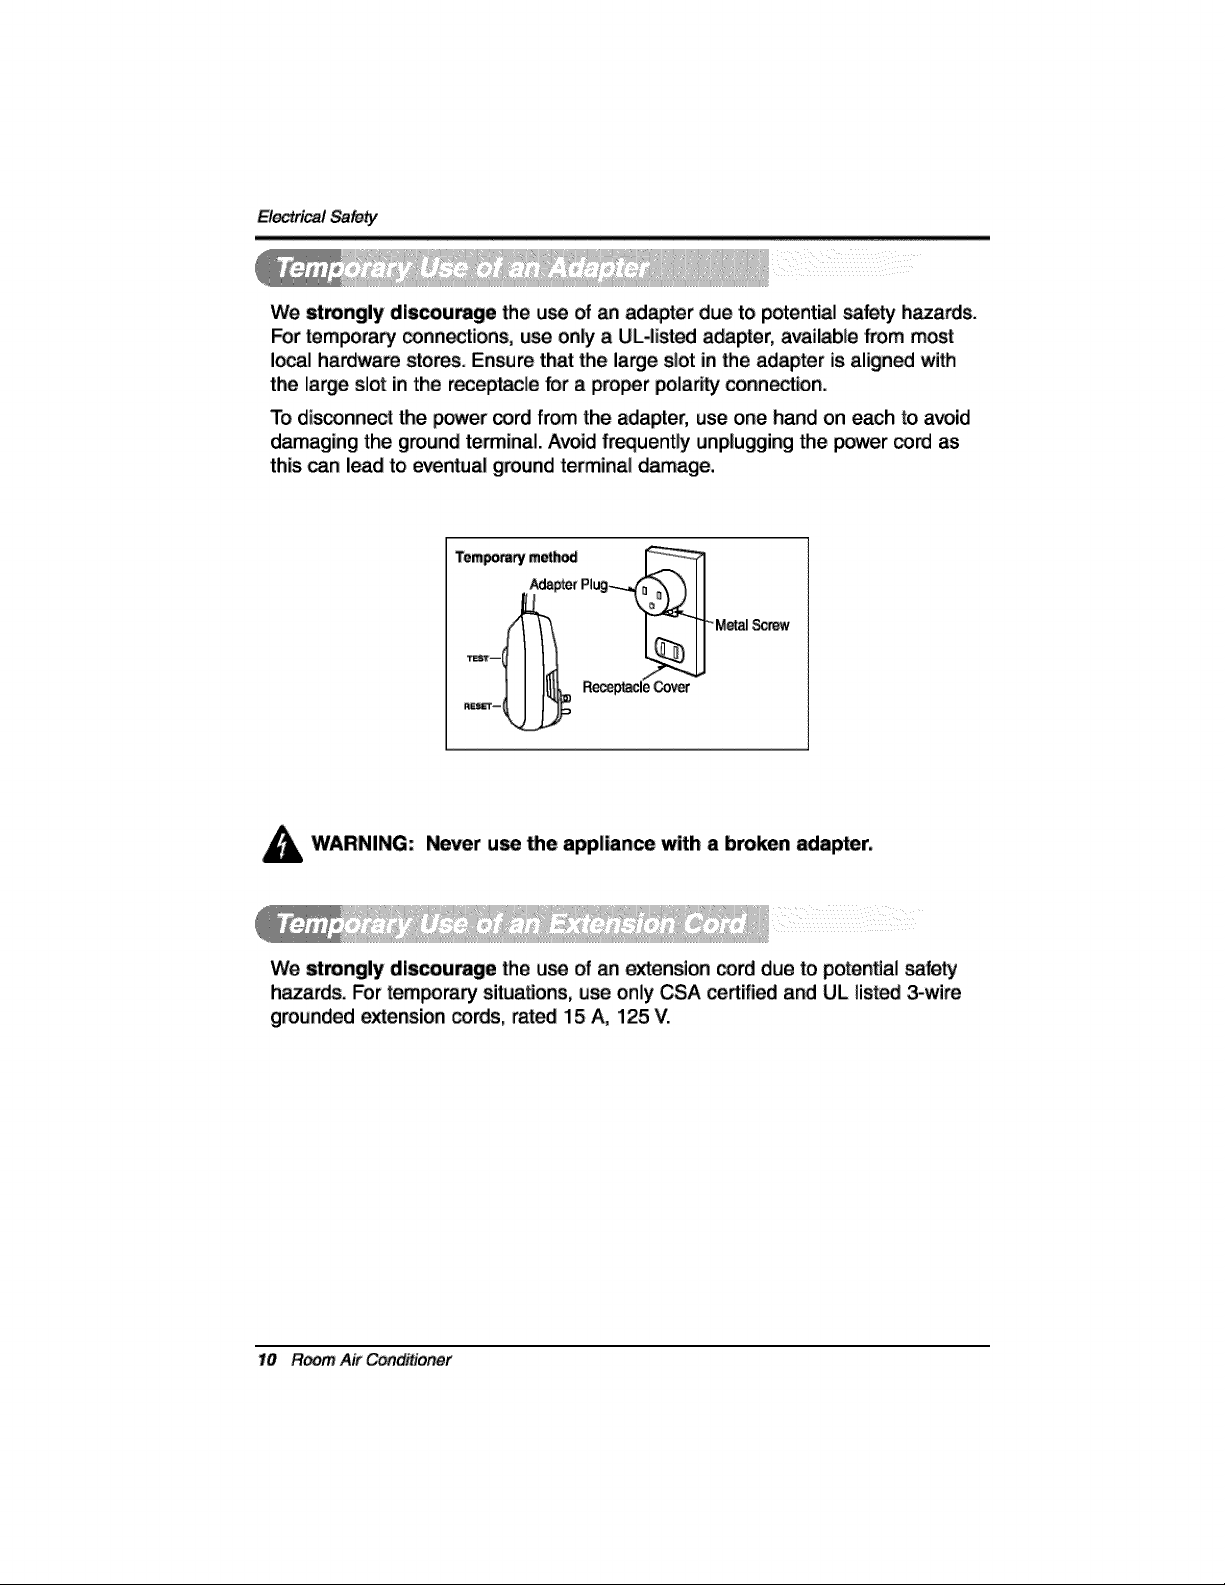
We strongly discourage the use of an adapter due to potential safety hazards.
For temporary connections, use only a UL-listed adapter, available from most
Io_1 hardware stores. Ensure that the large slot inthe adapter is aligned with
the large slot in the receptacle for a proper polar_ connection.
To disconnect the power cord from the adapter, use one hand on each to avoid
damaging the ground terminal. Avoid f_uently unplugging the power cord as
this can lead to eventual ground terminal damage.
Ternary A_hpt_ Plug
WARNING: Never use Me appliance with a broken adapter,
We strongly discou_e the use of an extension cord due to potenBal safety'
h_rds. For temporary situaUons, use only CSA cortffied and UL listed 3-wire
grounded _ension cords, rated 15 A, 125 V.
10 R_ Air Co_',ditioner
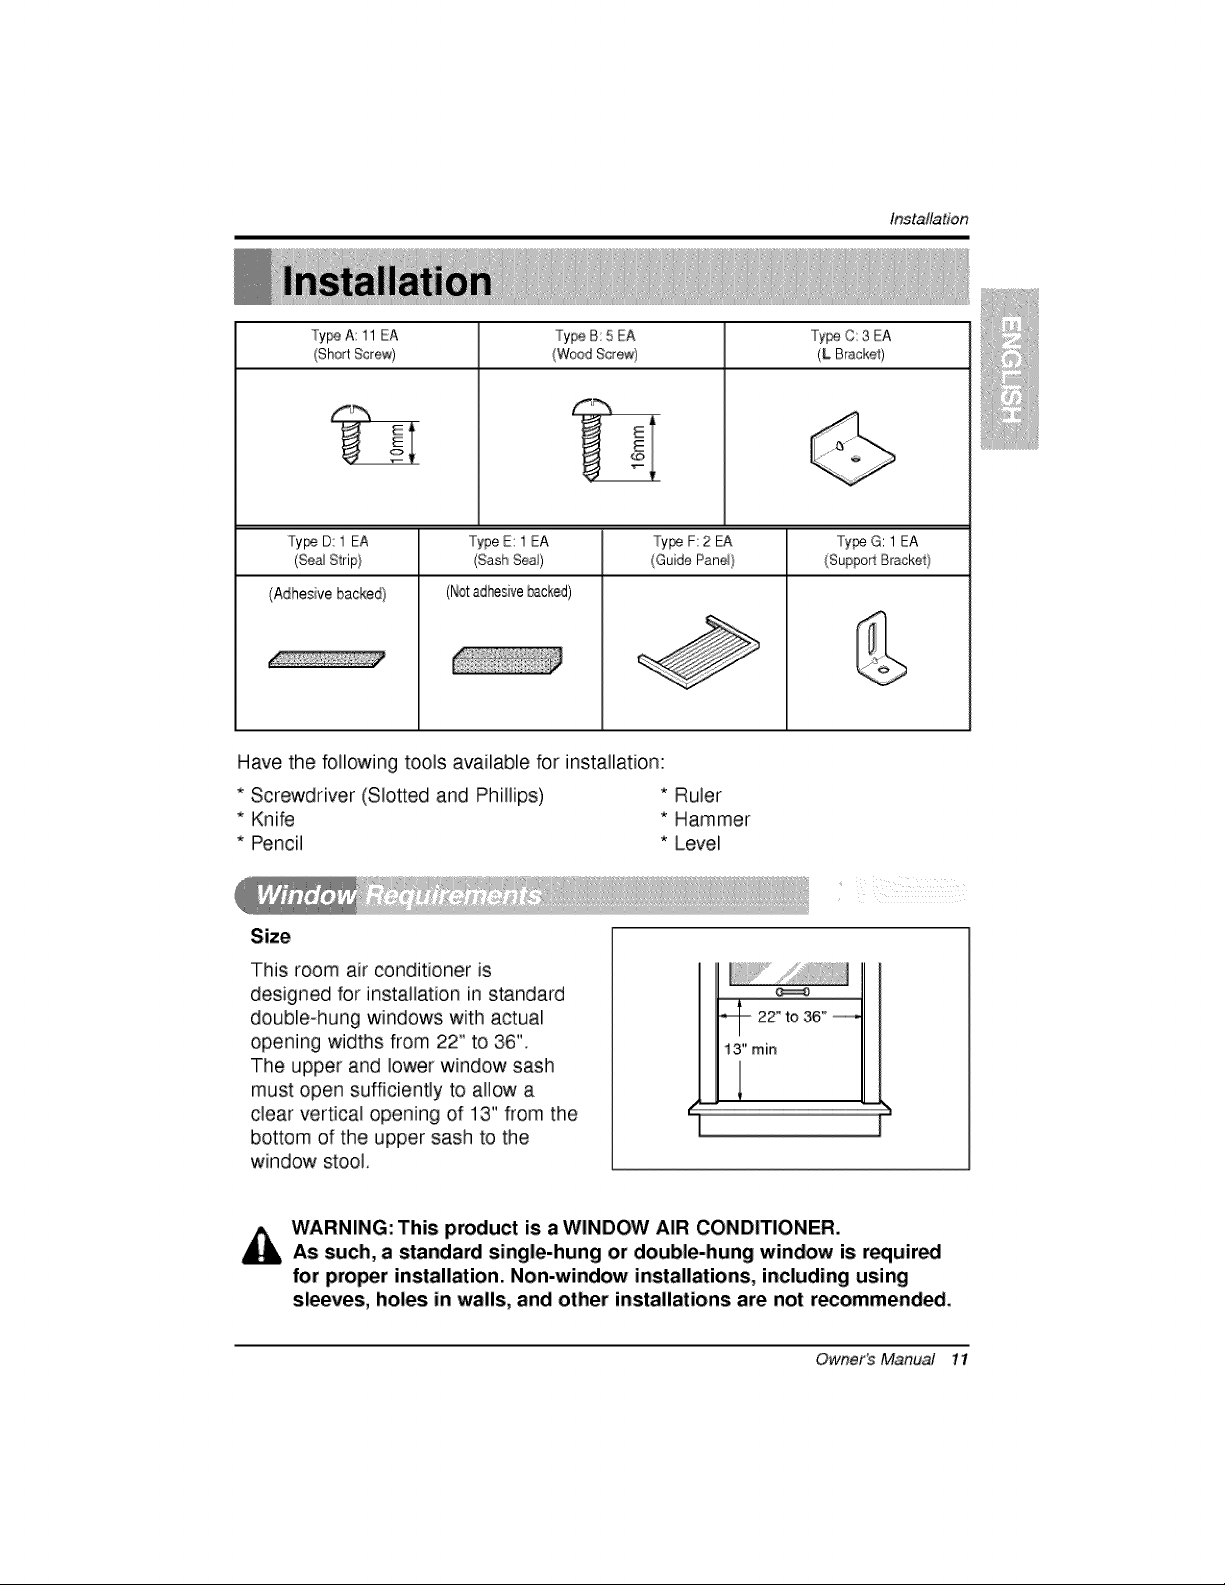
Ty_ A: 11 EA TypeB: 5 EA Ty_ C:3 EA
(Short Screw) (Wood Screw) (L Bracket)
....... E' /[
Ty_ D: i EA TypeE: i EA Ty_ F: 2 EA Ty_ G: 1 EA
(Sea/Strip} (Sash Sea!) (Guide Pane} (Support Bracket}
(Adhes ve backed)
Have the following tools available for insta]Bat[on:
* Screwdriver (Slotted and Phillips) * Ruler
* Knife * Hammer
* Pencil * Level
(Notad_sive _cked)
Installation
Size
This room air conditioner is
designed for installation in standard
double-hung windows with actual
opening widths from 22" to 36".
The upper and lower window sash
must open sufficiently to allow a
clear vertical opening of 13" from the
bottom of the upper sash to the
window stool
WARNING: This product is a WINDOW AiR CONDITIONER.
As such, a standard single-hung or double-hung window is required
for pro_r installation. Non-window installations, including using
sleeves, holes in walls, and other installations are not recommended.
Owner's Manual 11
Installation
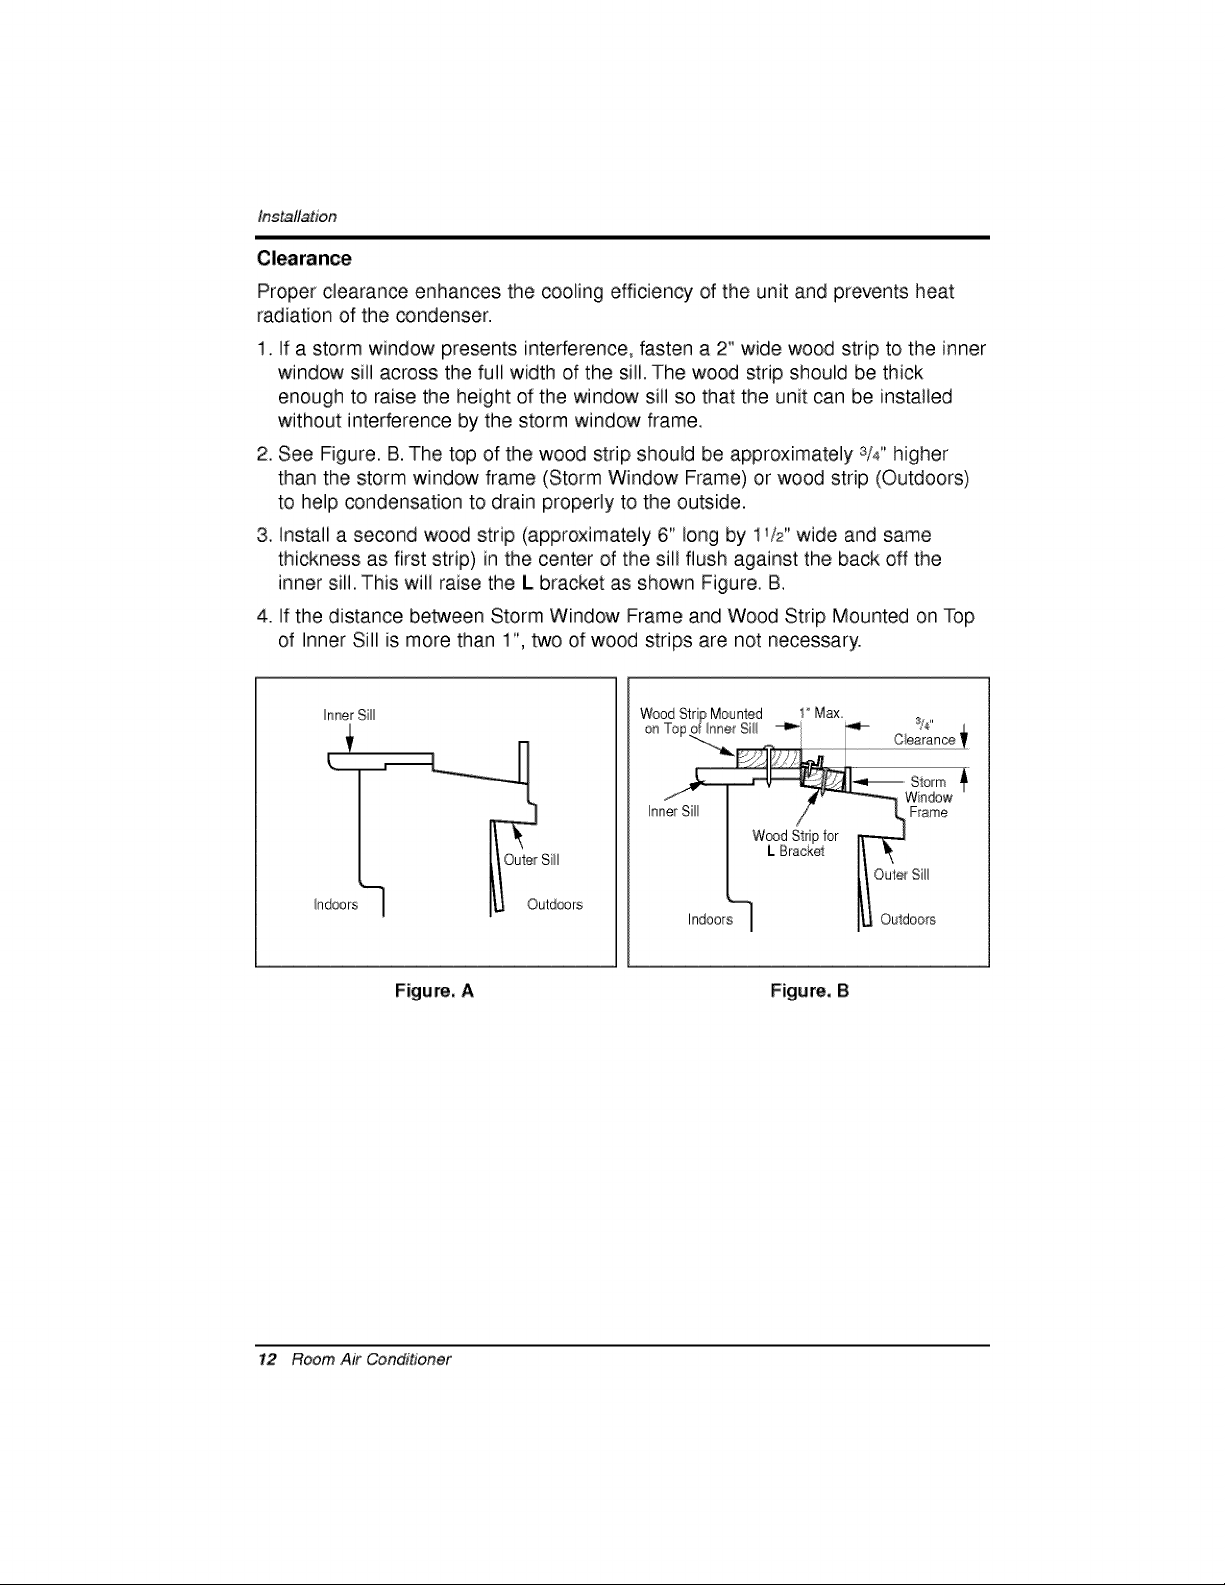
Clearance
Proper clearance enhances the cooling efficiency of the unit and prevents heat
radiation of the condenser.
1. if a storm window presents interference, fasten a 2" wide wood strip to the inner
window sill across the full width of the sill. The wood strip should be thick
enough to raise the height of the window sill so that the unit can be installed
without interference by the storm window frame.
2. See Figure. B. The top of the wood strip should be approximately 3/#, higher
than the storm window frame (Storm Window Frame) or wood strip (Outdoors)
to help condensation to drain properly to the outside.
3. install a second wood strip (approximately 6" long by 1V2"wide and same
thickness as first strip) in the center of the sill flush against the back off the
inner sill. This will raise the L bracket as shown Figure. B.
4. If the distance between Storm Window Frame and Wood Strip Mounted on Top
of inner Sill is more than 1", two of wood strips are not necessary.
Inner S_
In II_ Ou'td_rs
Figure, A Figure, B
Wood S1rp Mounted 1° Max
i2 Room Air Conditioner
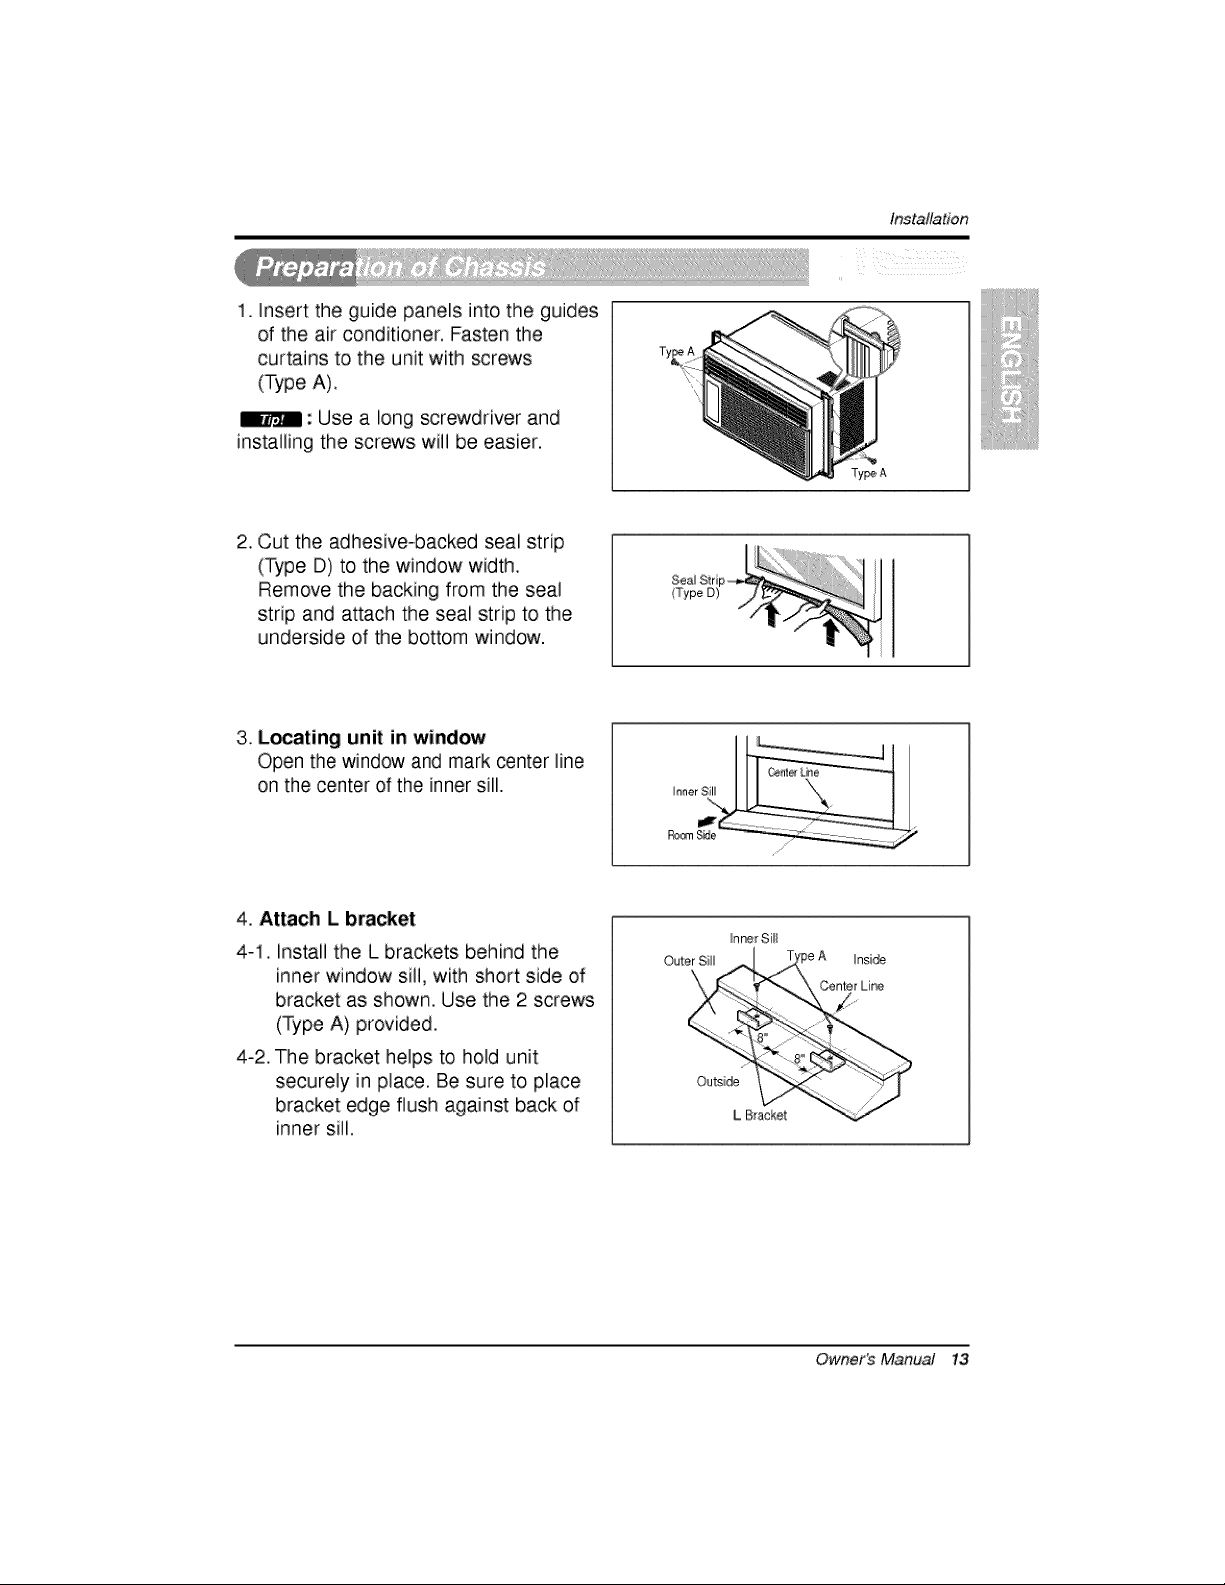
1, insert the guide panels into the guides
of the air conditioner, Fasten the
curtains to the unit with screws
(Type A).
: Use a long screwdriver and
installing the screws wifl be easier.
2. Cut the adhesive-backed seal strip
(Type D) to the window width.
Remove the backing from the seal
strip and attach the seal strip to the
underside of the bottom window.
3, Locating unit in window
Open the window and mark center line
on the center of the inner sill.
lnstalla#on
T_e,A
Sea_Stri
(Type
4. Attach L bracket
4-1, install the L brackets behind the
inner window sill, with short side of
bracket as shown, Use the 2 screws
(Type A) provided,
4-2. The bracket helps to hold unit
securely in place. Be sure to place
bracket edge flush against back of
inner sill,
Outer Sll
_nr_ Sill
Inside
Center Lir#
Outs de
L B_acket
Owner's Manual i3
Ins_Ha#on
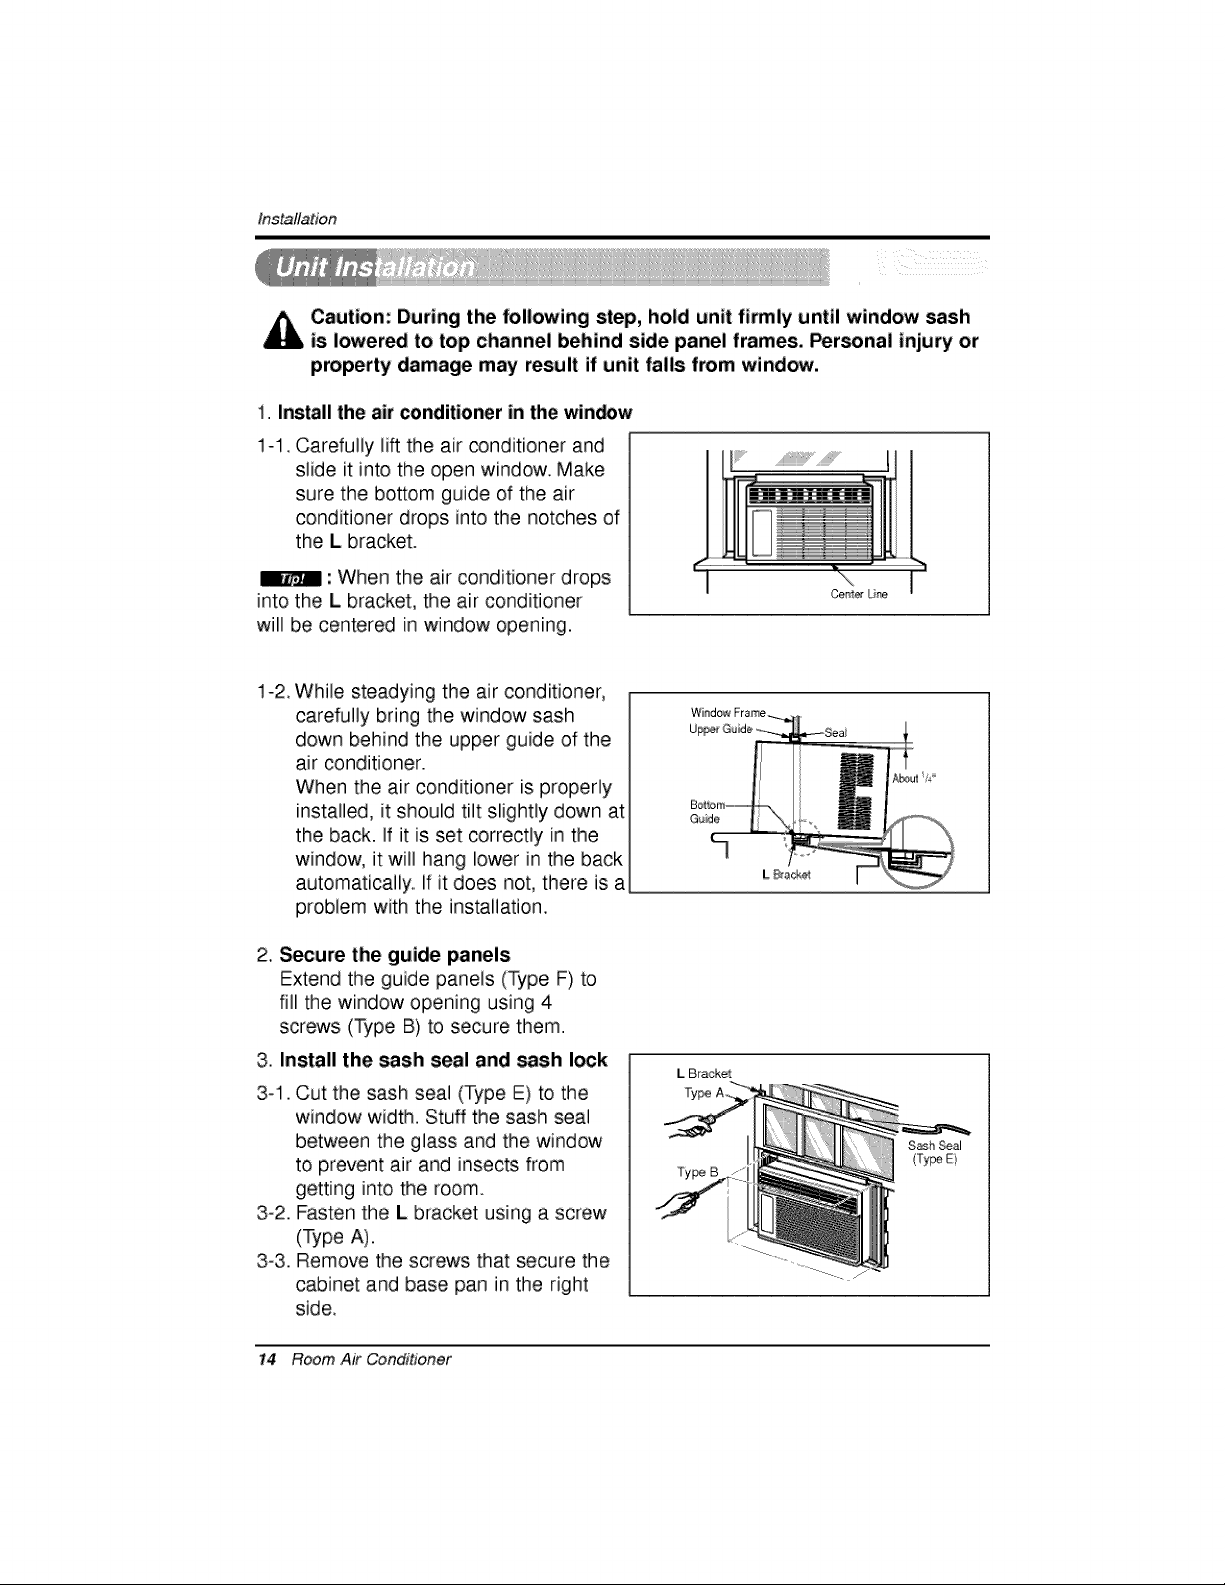
_ aution: During the following step, hold unit firmly until window sash
is Iower_ to top channel behind side panel frames. Personal injury or
property damage may result if unit falls from wind_,
i. Install the air conditioner in the win_w
1-1. Carefully li_ the air conditioner and
slide it into the open window,. Make
sure the bottom guide of the air
conditioner drops into the notches of
the L bracket.
: When the air conditioner drops
into the L bracket, the air conditioner
will be centered in window opening.
1-2. While steadying the air conditioner,
carefully bring the window sash
down behind the upper guide of the
air conditioner.
When the air conditioner is properly
installed, it should tilt slightly down at
the back. If it is set correctly in the
window, itwill hang lower in the back
automatically.. If it does not, there is a
problem with the installation,.
2. S_ure the guide panels
Extend the guide panels (Type F) to
fill the window opening using 4
screws (Type B) to secure them.
3. Install the sash seal and _sh lock
3-1. Cut the sash seal (Type E) to the
window width. Stuff the sash seal
between the glass and the window
to prevent air and insects from
getting into the room.
3-2. Fasten the L bracket using a screw
(Type A).
3-3. Remove the screws that secure the
cabinet and base pan in the right
side.
i4 Room Air Conditioner
L Bracket
Ty_
S_h Seal
(Ty_ E}
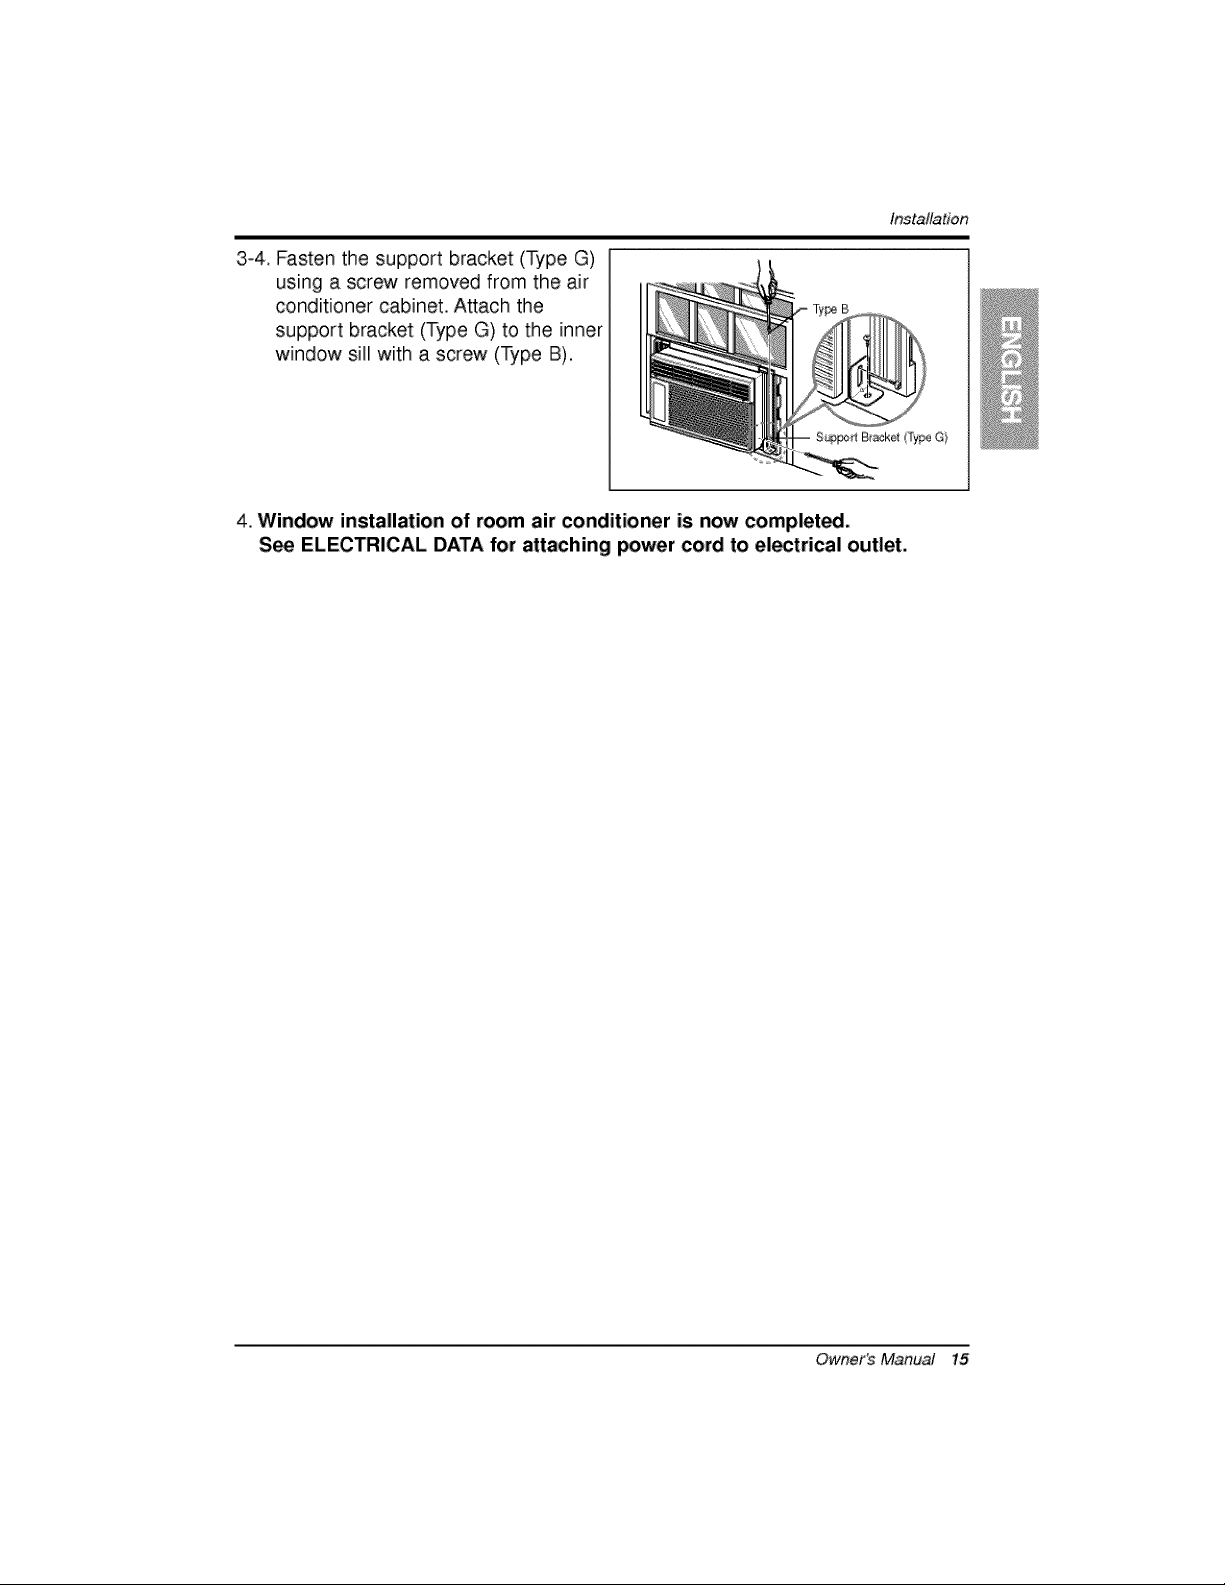
3-4. Fasten the support bracket (Type G)
using a screw removed from the air
conditioner cabinet. Attach the
support bracket (Type G) to the inner
window sill with a screw (Type B).
S_rt Bracket(Ty_ G}
4. Window installation of room air conditioner is now complete.
S_ ELECTRICAL DATA for attaching power cord to electrical outlet.
Installation
Owner's Manual i5
 Loading...