

Gold Standard Games HOME PRO, HOME PRO ELITE, MSG-LB-WW1-NG, MGS-LB-WW1, KGS-LB-EW1 Assembly Instructions Manual
...
HOME PRO/ HOME PRO ELITE
Assembly Instructions
Thank you for purchasing a Gold Standard Games product. All of us at Gold Standard Games want you to be
completely satisfied with your Home Pro Air Hockey game, so feel free to contact us for help with the
assembly of your product, Gold Standard Games parts, or other information you may require.
Tools Required:
1/2” Wrench or Socket
Phillips Head Screw Driver
Level
Step #1
Lift air hockey table out of the box and flip it upside down on a carpeted or smooth surface.
Remove and open both the leg box and the accessory box.
Contents Part Number Quantity
Air Hockey Cabinet
Legs & Mounting Hardware
HOME PRO
Model # MGS-LB-WW1 /MSG-LB-WW1-NG
Leg Assembly (Universal) MS-LEG-O 4
5 ½ ” x 5/16” Carriage Bolt 301-0002-0 16
5/16” Hex Nut 302-0002-0 16
5/16”USS Flat Washer 303-0002-0 16
HOME PRO ELITE
Model # KGS-LB-EW1/KGS-LB-EW1-NG
Leg Assembly (Left) AS-SSL-0 2
Right Assembly (Right) AS-SSR-0 2
5/16” Hex Nut 302-0002-0 8
5/16 USS Flat Washer 303-0002-0 8
Blower Motor 210-0112-0 1
Gasket – For Blower Motor 203-0038-0 1
¼ -20x1” Hex Head Bolt 301-0009-0 3
¼” AE Flat Washer 303-0004-0 3
¼” Split Lock Washer 303-0007-0 3
Electronic Scoring Unit 401-0023-0 1
8/32 x ½” Phillips Pan Head Screw 301-0021-0 2
#8 SAE Flat Washer 303-0015-0 2
Power Supply Adapter 401-0024-0 1
Nylon Cable Tie 205-0968-0 8
3 ¼” Puck 201-0093-0 2
Mallet 201-0293-0 2
Sand Disk 6” x 180 Grit 210-0351-0 1
Assembly Instructions
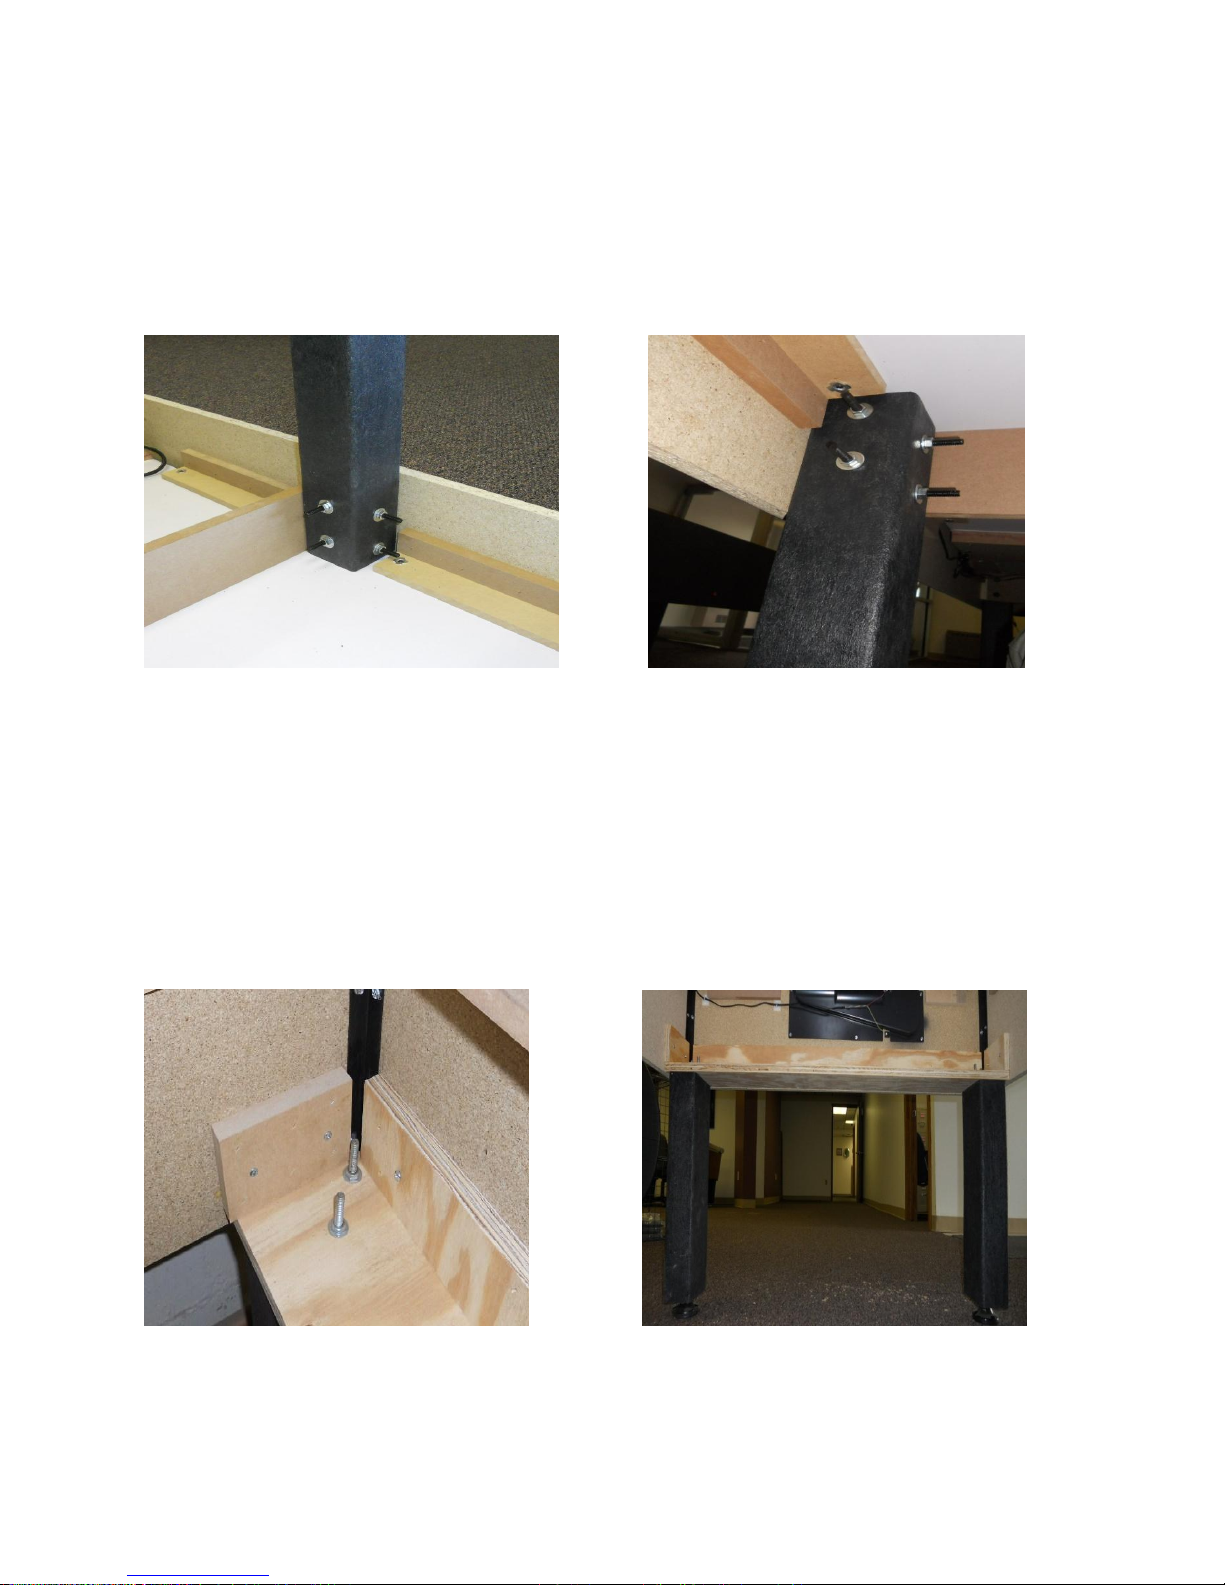
Step # 2 – Attach the Legs
Attach the legs using the enclosed carriage bolts, washers and nuts as seen below with a ½” wrench or
socket. For each leg attach two carriage bolts through the outside of the side apron and two through the
inside support frame. Tighten until bolt heads are snug with the table surface. Over tightening could
damage the side walls
(Note that the wide side of each leg should face the longest side of the table) Place Legs marked
(A) in position marked (A) and Legs marked (B) in position marked (B) then insert each leg‘s
threaded studs into and through the mounting pad holes. Then secure with a flat washer/splitlock washer/hex nut (as shown).
(Model # MGS-LB-WW1)
(Model # KGS-LB-EW1)

Step # 3 – Attach the Blower Motor
The plug from the blower motor and the AC
Adapter should be plugged into the power
strip mounted on the underside of the
table. Use the wire ties to help secure the
cables to the bottom of the table.
Leg Leveler
Locate the blower motor, gasket, and (3) mounting bolts. Place the gasket in between the blower and the table surface.
Line up the holes of the blower with the predrilled holes and tighten.
Step # 4 – Level the Table
Flip the table over and place in desired location. Level the air hockey game by placing a level across, lengthwise and
diagonally into the four corners and raise or lower the appropriate leg leveler. Or the table can be leveled by turning the
air on and placing the puck in the center of the table. If it consistently floats to one side or the other, adjust the beg
levelers until the puck stays mainly in the center of the table.
Step # 5 – Plug in Power Strip
The plug from the power cord should then be plugged into a standard 110/120 volt wall socket. Turn on and off using
the power switch located on the side of the table.
Step # 6 – Attach the Electronic Scoring Unit

Thread the two wires from the infrared sensors through the large hole on the side top- rail. The AC adapter should plug
Scoring Wires
Line up the holes of the scoring
unit with the smaller holes on
the side rail. Fasten with a bolt
in each hole with a Philips head
in to the power strip attached to the bottom of the table. Thread the smaller end through the same hole as other wires.
Plug all three wires into the scoring unit as shown. If scored goals credit the wrong player, simply switch the two
identical wires as they were plugged into the wrong position.
Step # 7 – Operating the Scoring Unit
Turn the power switch to “on”. Select desired game options. By default, it begins with the 15 minute game option. To
change the game option, push the “select” button. There are seven total options including “Free Play” which has no
time limit or scoring limit. After choosing a game option, push “Start” button to begin. To start over press the
“Reset/Start” button again. The volume switch has three settings: High, Low and Off.
Graphics/Labels:
The graphics on the side of the table are designed to be easily removed by the consumer if you perfer the table without
them. Simply peel off the adhesive labels and remove.
Maintenance:

The table surface should be Cleaned using rubbing alcohol or a window cleaner. Be sure to have blower running to help
IR Sensors
333 Morton Street
Bay City, MI 48706
Phone: 989 893-1739
Fax: 989 893-1809
www.gold-standard-games.com
info@gold-standard-games.com
For complete rules, tips, and information on ranking, rating, tournaments and more, go
to www.goldstandardairhockey.com
keep air holes clear while cleaning. Do not use wax base cleaners as they will clog up the holes.
Do not clean the rails where the puck hits because this will cause the puck to not bank properly.
If the puck gets nicked, slows down, or stops floating, sand the puck lightly using fine to extra fine sandpaper (150 to 240
grit).
Trouble Shooting:
If the puck does not score properly on either end of the game, check to make sure that the IR Sensors are pointing
directly at each other.
 Loading...