

Goldstain Ezybake EZ-26 User Manual
CONVECTION OVEN
INSTALLATION PROCEDURE – USER MANUAL
SERVICE INSTRUCTION
MODEL EZ-26
Ezybake
ESTABLISHED 1911
The Cooking Equipment Professionals
www.goldsteineswood.com.au

TABLE OF CONTENTS
1. INTRODUCTION Page 3
2. INSTALLATION Page 4
3. CONTROL Page 5
4. OPERATING INSTRUCTIONS Page 6,7,8,9&10
5. MAINTENANCE & SERVICING Page 11
6. COOKING REFERENCE Page 12 & 13
7. TROUBLE SHOOTING Page 14
8. WIRING DIAGRAM Page 15
9. DRAWINGS Page 16-17
10. WARRANTY Page 18
11. BRANCHES Page 19
IMB084B1/P2

1. INTRODUCTION
Congratulations for purchasing your Goldstein
appliance.
J. Goldstein & Co. is a wholly owned Australian company and has been
operating since 1911. The information in this manual will assist your installer and
ensure correct location and connection. Thoroughly read the user instructions and
the user maintenance sections, as understanding your products, its operation, and
its cleaning and service requirements will provide you with long and satisfactory
service. Failure to do so could shorten the life of the product and decrease its
efficiency. Please ensure only authorised service technicians are called to any
difficulties that may arise.
Ezybake
commercial cooking
INTRODUCTION
MODEL
Ezybake
EZ-26
GOLDSTEIN CONVECTION OVEN is designed to give long and satisfactory service and
incorporate the best possible materials and workmanship. Proper installation, adjustment
and preventative maintenance are vitally important if efficiency and appearance are to be
maintained.
Read these instructions carefully as they contain important safety information regarding
the installation, use and maintenance of the appliance.
RECEIVING INSPECTION
•
Check crates for handling damage. After carefully uncrating, check for “concealed”
damage. Report any damage immediately to carrier and to dealer.
•
Remove check all loose items from unit and check contents as found on back of
warranty cards.
NOTICE
PLEASE RETURN YOUR WARRANTY CARD
FAILURE TO DO SO WILL VOID
WARRANTY ON THE EQUIPMENT
IMB084B1/P3

r
2. INSTALLATION
INSTALLATION OF THE OVEN
It is most important that this oven is installed correctly and that operation is checked before
use.
Installation must comply with local electrical, health and safety requirements.
Before Connection to Power Supply
• Remove all packing.
• Check equipment and parts for damage. Report any damage
immediately to the carrier and distributor
• Remove protective plastic coating from the side panels.
• Check that the following parts have been supplied with your oven: 4 x Legs
4 x Oven racks
Report any deficiencies to the distributor who supplied the oven.
Fit the legs to the oven.
Check that the available power supply is correct to that shown on the rating plate located
on the right -hand side panel
230-240V AC 50Hz, 13.OA, 3.1 kW @ 240V.
Location
• To ensure correct ventilation for the motor and controls the following minimum
installation clearances must be adhered to:
Top 200mm .
Rea
Sides 25mm .
Position the oven in its working position.
Use a spirit level to ensure oven is level from side to side and front to back. (If this is not
carried out, uneven cooking could occur). The feet/legs used with bench/floor mounting or
provided with stands are adjustable and will require adjusting in levelling the unit.
The unit should be positioned such that the operating panel and oven shelves are easily
reachable for loading and unloading.
Important:
THE VENT LOCATED ON THE OVEN TOP MUST NEVER BE OBSTRUCTED
Electrical Connection
Ensure unit is fitted with appropriate cord and plug.
To access the electrical connection terminal block,and grounding lug (marked with green),
remove the back panel (4 screws).
WARNING - THIS APPLIANCE MUST BE GROUNDED
Before Use
• Operate the oven for about 1 hour at 200°C (400°F) to remove any fumes or odours
which may be present.
25mm .
IMB084B1/P4
(c)
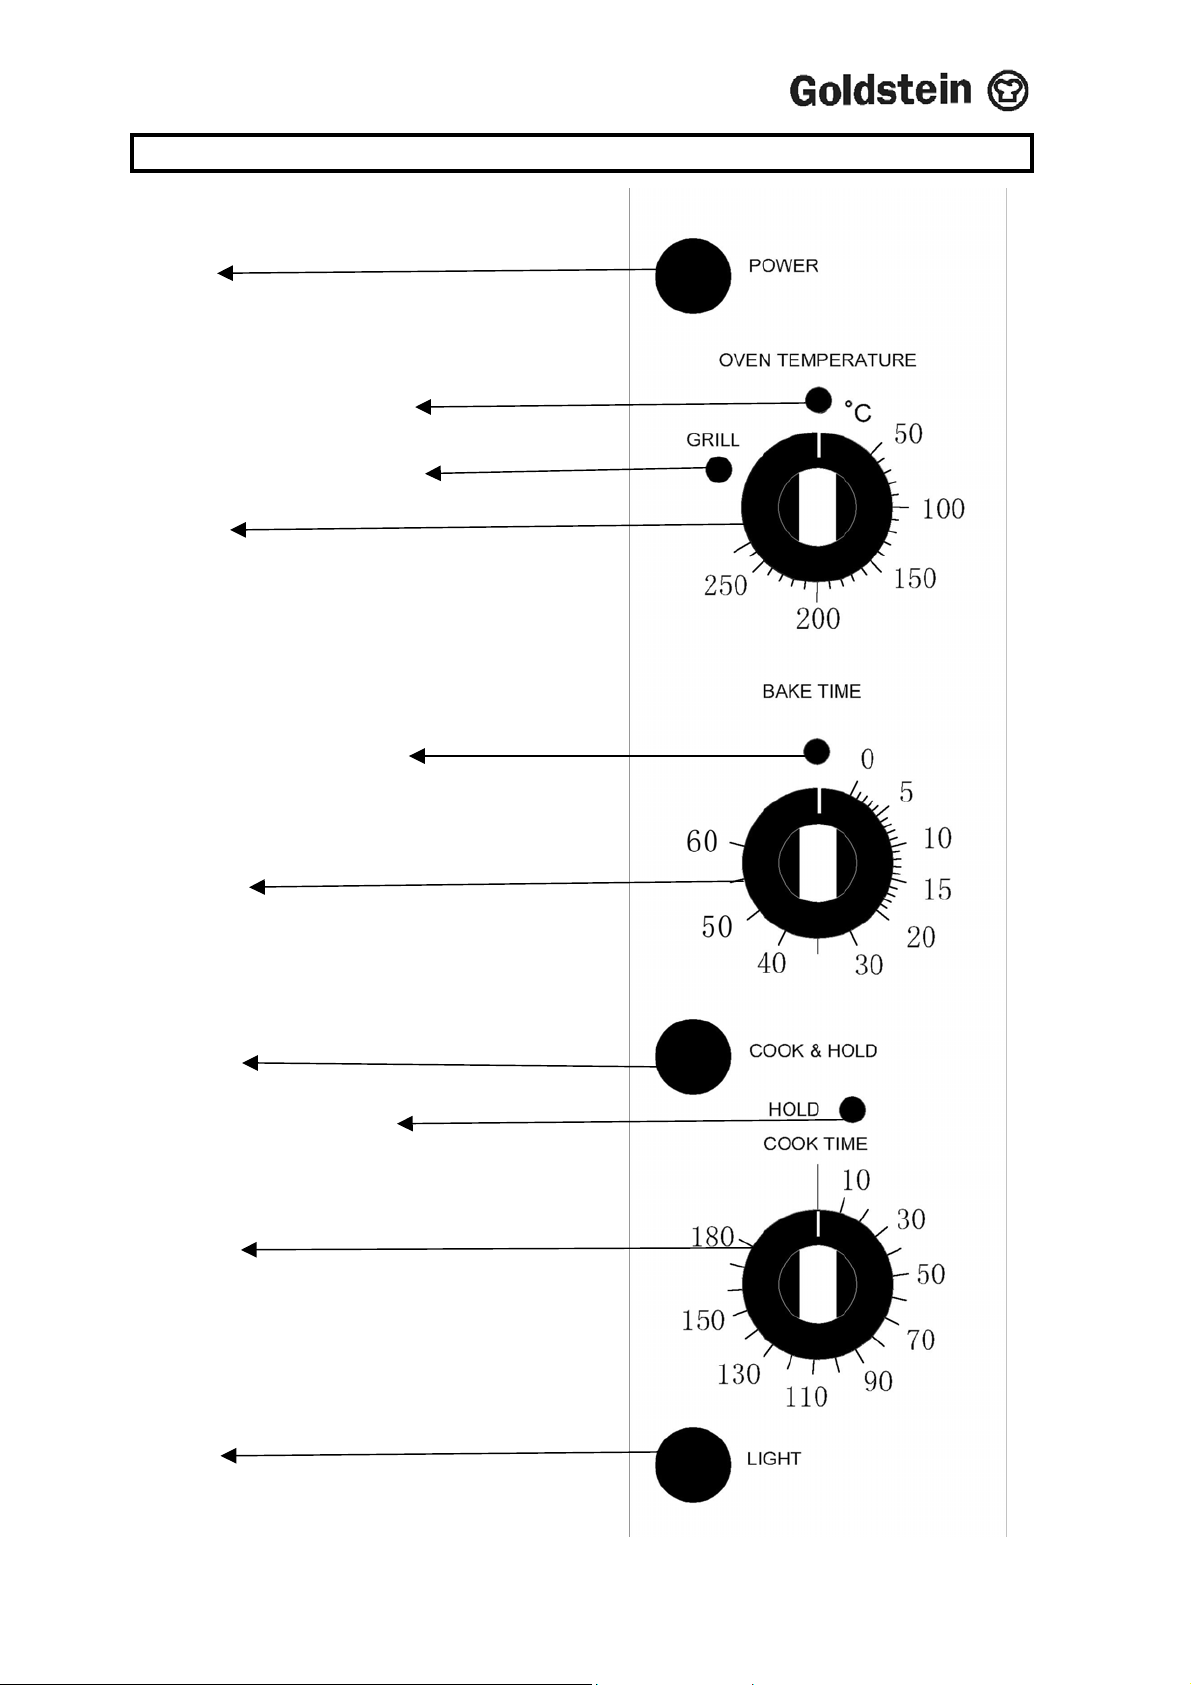
3. CONTROL
(A)
(B)
(D
(E)
(F)
(1)
(2)
(3)
(4)
IMB084B1/P5

4. OPERATING INSTRUCTIONS
1. Turn power on (A)
Power switch illuminates when it is depressed and locked in the down position.
2. Set thermostat to desired temperature (B)
The heating indicator light (1) will illuminate whenever the elements are cycling on
to maintain the set temperature.
3. Load oven
Once the oven is up to temperature, open the door and load the oven with product.
Avoid delays in loading the oven with the door open as this will delay the oven's
temperature recovery.
NOTE:
The oven's fan will switch off and the oven light will illuminate when the door is opened.
4. Set bake timer (B) to desired time
To set timer, turn knob clockwise to the required time. At any stage, the time can be
adjusted in either direction.
For settings less than 10 minutes, first set to greater setting, then turn down to the
required time period.
NOTE:
This 60 minute timer is completely independent of the oven control.
5. Light
To view the product while baking, depress the light switch on the control panel. The
light will stay on while the switch is locked in the down position.
6.. Time up.
When the timer reaches 0 minutes the buzzer sounds and indicator illuminates. To
cancel the buzzer turn the timer to the off position.
8. Unload oven
Open the door and unload the oven .
NOTE:
The oven's fan will switch off and the oven light will illuminate when the door is opened.
IMB084B1/P6
 Loading...