

Page 1
Part No. 69006
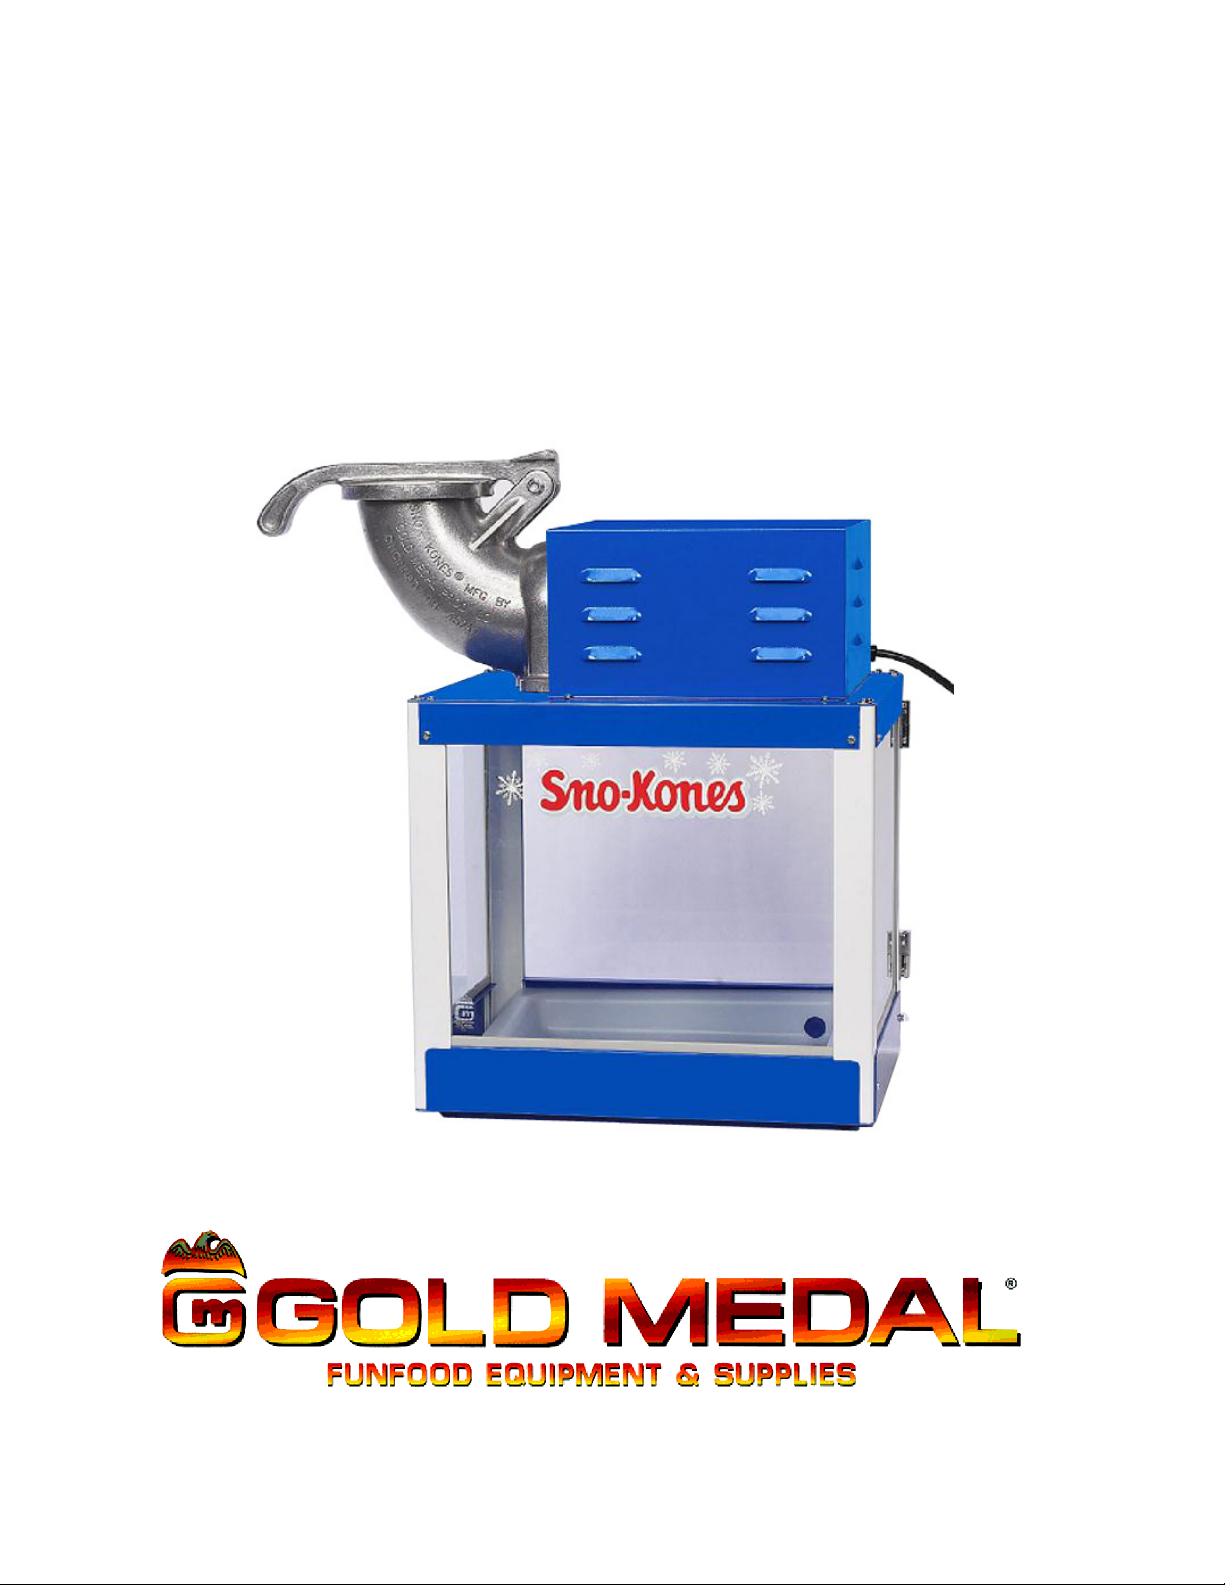
Shav A Doo
Instruction Manual
Model: 1203, 1203D
Cincinnati, OH 445241-4807 USA
Page 2

Shav A Doo
2
DANGER
DANGER
WARNING
WARNING
WARNING
WARNING
SAFETY PRECAUTIONS
Machine must be properly grounded to prevent electrical shock to personnel.
Failure to do so could result in serious injury, or death.
DO NOT immerse any part of this equipment in water.
DO NOT use excessive water when cleaning.
Keep cord and plug off the ground and away from moisture.
Always unplug the equipment before cleaning or servicing.
Make sure all machine switches are in the OFF position before plugging the
equipment into the receptacle.
Improper installation, adjustment, alteration, service, or maintenance can
cause property damage, injury, or death. Any alterations to this equipment
will void the warranty and may cause a dangerous condition. This appliance
is not intended to be operated by means of an external timer or separate
remote-control system. NEVER make alterations to this equipment. Read the
Installation, Operating, and Maintenance Instructions thoroughly before
installing, servicing, or operating this equipment.
008_051514
014_020416
This machinery contains sharp blades. Keep hands and body parts clear
at all times.
037_103114
NEVER put your fingers into the shaver body (the goose-neck, ice chute, or
hopper). Serious injury may occur.
017_103114
ALWAYS wear safety glasses when servicing this equipment.
010_010914
No user serviceable parts inside. Refer servicing to qualified service
personnel.
011_051514
Page 3
Shav A Doo
3
WARNING
WARNING
WARNING
SAFETY PRECAUTIONS (continued)
Read and understand operator’s manual and all other safety instructions
before using this equipment. To order copies of the operator’s manual go to
gmpopcorn.com or write to Gold Medal Products Co., 10700 Medallion Drive,
Cincinnati, OH 45241 USA 1-(800)-543-0862
DO NOT allow direct contact of this equipment by the public when used in
food service locations. Only personnel trained and experienced in the
equipment operation may operate this equipment.
Carefully read all instructions before operation.
022_060215
012_010914
This machine is NOT to be operated by minors.
007_010914
Note: Improvements are always being made to Gold Medal’s equipment. This information
may not be the latest available for your purposes. It is critical that you call Gold
Medal’s Technical Service Department at 1-800-543-0862 for any questions about
your machine operations, replacement parts, or any service questions. (Gold Medal
Products Co. does not assume any liability for injury due to careless handling and/or
reckless operation of this equipment.)
Page 4

Shav A Doo
4
INSTALLATION INSTRUCTIONS
Inspection of Shipment
After unpacking, check thoroughly for any damage which may have occurred in transit. Claims
should be filed immediately with the transportation company. The warranty does not cover
damage that occurs in transit, or damage caused by abuse, or consequential damage due to the
operation of this machine, since it is beyond our control (reference warranty in back of
manual).
Manual
Read and understand the operator’s manual and all other safety instructions before using this
equipment. To order copies of the operator’s manual go to gmpopcorn.com or write to Gold
Medal Products Co., 10700 Medallion Drive, Cincinnati, OH 45241 USA 1-(800)-543-0862.
Setup
This unit has been tested at the factory.
1. Remove all packaging and tape prior to operation.
2. Place unit on a sturdy, level base which can withstand accidental dripping of water and
ice.
3. Locate the pusher handle (packed in a separate box). Connect the pusher handle to the
shaver body using the bolt and nut provided.
4. Connect the drain hose (provided with unit) to funnel excess water to floor drain or
basin tub. Drained water is not intended for human consumption.
5. After setup, the unit should be cleaned prior to use (see Care and Cleaning section of this
manual).
Note: The door kit is not included with 1203. Order model 1215 for door kit. Model 1203D
includes the door pre-installed.
Page 5
Shav A Doo
5
DANGER
CAUTION
Electrical Requirements
The following power supply must be provided:
1203, 1203D: 120 V~, 972 W, 60 Hz
Machine must be properly grounded to prevent electrical shock to personnel.
Failure to do so could result in serious injury, or death.
DO NOT immerse any part of this equipment in water.
DO NOT use excessive water when cleaning.
Keep cord and plug off the ground and away from moisture.
Always unplug the equipment before cleaning or servicing.
Make sure all machine switches are in the OFF position before plugging the
equipment into the receptacle.
A certified electrician must furnish sufficient power for proper machine operation and install
any supplied receptacle. We recommend this equipment be on a dedicated and protected
circuit. Failure to wire properly will void the warranty and may result in damage to the
machine. It is Gold Medal Products Co.’s recommendation that this machine be plugged directly
into a wall outlet. The use of extension cords is not recommended due to safety concerns, and
may cause sacrificed and/or reduced performance. Make sure cord is located to prevent a trip
hazard or unit upset.
008_051514
Before You Plug In Machine
1. Make sure all machine switches are in the OFF position before plugging the equipment
into the receptacle.
2. Make sure the wall outlet can accept the grounded plugs (where applicable) on the
power supply cord.
3. The wall outlet must have the proper polarity. If in doubt, have a competent electrician
inspect the outlet and correct if necessary.
4. DO NOT use a grounded to un-grounded receptacle adapter (where applicable).
5. Install the unit in a level position.
If the supply cord is damaged, it must be replaced by Gold Medal Products Co.,
its service agent or similarly qualified persons in order to avoid a hazard.
039_080614
Page 6

Shav A Doo
6
OPERATING INSTRUCTIONS
Ice Requirements
The Shav A Doo can take ice cubes small or medium in size. If using a block of ice, break into
pieces approximately 2 to 3 inches in size. The ice will not enter the shaving chute if the pieces
are too large
Note: Harder ice will result in finer snow; while soft ice will result in coarser snow.
Shav A Doo Operation
1. Fill the hopper to within an inch of the top with ice cubes (no larger than 3" to 4").
Softened ice makes better snow and prolongs blade life.
2. Toggle the POWER switch to the ON position.
3. While pushing the MOMENTARY switch, apply downward pressure to the pusher handle.
Apply firm and even pressure to make the best snow. Practice will allow you to gauge
when to stop pressing. This allows the ice to resettle against the shaver head. Too much
pressure will result in snow that is coarse; too little pressure will make the snow mushy.
Note: Never allow any foreign or metallic objects around the shaver area. Ice picks, scoops,
and debris in the ice will damage blades.
Page 7

Shav A Doo
7
WARNING
Care and Cleaning
DANGER
Machine must be properly grounded to prevent electrical shock to personnel.
DO NOT immerse in water.
Always unplug the equipment before cleaning or servicing.
This machinery contains sharp blades. Keep hands and body parts clear
at all times.
Good sanitation practice demands that all food preparation equipment be cleaned regularly
(only use non-toxic, food grade cleaners). A clean looking, well-kept machine is one of the best
ways of advertising your product.
Follow the directions below to clean and sanitize the unit after each day of use.
025_020314
037_103114
1. With the machine OFF, unplug the unit before attempting to clean.
2. Empty water from pans and clean using appropriate cleaners for the type of machine;
review all manufacturer’s instructions and warnings on cleaning product prior to use.
DO NOT use oven cleaners or abrasive materials as they will damage parts of the
machine.
DO NOT use Ammonia cleaners, they will damage plastic panels.
Page 8

Shav A Doo
8
DANGER
DANGER
WARNING
CAUTION
MAINTENANCE INSTRUCTIONS
Machine must be properly grounded to prevent electrical shock to personnel.
Failure to do so could result in serious injury, or death.
DO NOT immerse any part of this equipment in water.
DO NOT use excessive water when cleaning.
Keep cord and plug off the ground and away from moisture.
Always unplug the equipment before cleaning or servicing.
Make sure all machine switches are in the OFF position before plugging the
equipment into the receptacle.
Improper installation, adjustment, alteration, service, or maintenance can
cause property damage, injury, or death. Any alterations to this equipment
will void the warranty and may cause a dangerous condition. This appliance
is not intended to be operated by means of an external timer or separate
remote-control system. NEVER make alterations to this equipment. Read the
Installation, Operating, and Maintenance Instructions thoroughly before
installing, servicing, or operating this equipment.
008_051514
014_020416
No user serviceable parts inside. Refer servicing to qualified service
personnel.
011_051514
THE FOLLOWING SECTIONS OF THIS MANUAL ARE INTENDED ONLY
FOR QUALIFIED SERVICE PERSONNEL WHO ARE FAMILIAR WITH
ELECTRICAL EQUIPMENT. THESE ARE NOT INTENDED FOR THE
OPERATOR.
027_010914
Page 9

Shav A Doo
9
WARNING
Installing New Shaver Blades
This machinery contains sharp blades. Keep hands and body parts clear
at all times.
The section describes the procedure to replace the shaver blades. ALWAYS turn the machine
OFF and unplug unit from the power supply prior to blade inspection or replacement. Use a
flashlight to examine the blades in the shaver body. If the blades appear to be nicked or bent,
then the blades should be replaced.
037_103114
Blade Replacement
1. With the machine OFF, unplug the unit from the power supply.
2. Remove motor cover (keep all fasteners as they will be used to reinstall the cover).
3. Use a permanent marker and put a guide mark on the motor shaft where the shaver
head stops; also place a small guide mark on the cabinet where the motor sets (reference
shaver cut away view on next page).
4. To remove the shaver head from the motor shaft, loosen the motor mounting bolts. (If
unit has a hopper support and guide, it must also be removed).
5. Pull motor back until the (2) Allen head set screws on the shaver head are visible.
Loosen the (2) set screws (do not remove set screws).
6. Carefully guide the shaver head off of the motor shaft and through the hopper. If the
shaver head is frozen to the shaft, pull the motor back trapping the shaver head against
the inside of the hopper, until the shaver head disengages.
7. After removing the shaver head, check the motor shaft for burrs and corrosion (use a
fine tooth file to remove any burrs or corrosion).
8. Remove blades from shaver head. Replace old blades with a new set (blades may be re-
sharpened).
9. Position new blades on shaver head and insert blade mounting screws until finger tight.
10. Set the blade thickness to 1/32” using a height gauge (thickness of a dime), reference Set
Blade Height illustration shown on next page. Make sure the blade height is even across
the shaver head.
11. Tighten the blade mounting screws completely. Check the blade height again to ensure
the blades did not move while tightening the screws.
12. Carefully guide the shaver head through the hopper and back onto the motor shaft;
realign head with guide mark made on the shaft in Step 3 above. (The pusher handle
may be used to help press the shaver head onto the shaft.)
Page 10

Shav A Doo
10
With a permanent marker, mark
(2) Set Screws (fasten on
With a permanent marker, mark
Motor
Height Gauge 1/32”
Set top of blade flush with
height gauge, as shown.
Blade Mounting Screw
Shav
er Blade
Shaver Head
Set Blade Height
13. The shaver head set screws must be on the flat side of the motor shaft. Once aligned,
fasten set screws securely.
14. Adjust the motor to realign with guide mark made on the cabinet in Step 3, then refasten
motor mounting bolts (if unit has a hopper support and guide, it must also be
reinstalled). Check the shaver head to make sure it is not rubbing against the back of the
hopper and the blades are not touching the pusher handle or sides of hopper; adjust as
needed.
Note: Replace any shims that were between the motor base and the mounting surface.
15. Reinstall motor cover.
Cut Away View of Shaver Head on Motor Shaft
General shaver image shown for reference only (models may vary).
Shaver Head
flat side of motor shaft)
shaft where shaver head stops.
Mounting
Bolts
cabinet where motor sets.
(thickness of a dime)
Page 11

Shav A Doo
11
ORDERING SPARE PARTS
1. Identify the needed part by checking it against the photos, illustrations, and/or
parts list.
2. Use only approved replacement parts when servicing this unit.
3. When ordering, please include part number, part name, and quantity needed.
4. Please include your model number, serial number, and date of manufacture (located on
the machine nameplate/data plate) with your order.
5. Address all parts orders to:
Parts Department
Gold Medal Products Co.
10700 Medallion Drive
Cincinnati, Ohio 45241-4807
Or, place orders by phone or online:
Phone: (800) 543-0862
(513) 769-7676
Fax: (800) 542-1496
(513) 769-8500
E-mail: info@gmpopcorn.com
Web Page: gmpopcorn.com
Page 12

Shav A Doo
12
Drive Motor
Lighted Rocker
Female Hinge (2)
Male Hinge (2)
Lead
-
In Cord
Sno Pan
Door Knob
P/N 75267
Momentary Switch
Hopper
Pusher Handle
Motor Cover
Door (OPTIONAL)
Glass Side
Glas
s, Front
Magnetic Catch
Instruction Label
Hose Fitting
Rubber Feet (4)
Bolt
Strain Relief
P/N 76026
Cabinet Exterior
P/N 61111B
P/N 55448
P/N 44019
Switch
P/N 42798
P/N 61359
P/N 41349
P/N 25301
Picture shows door accessory #1215
Included with Model 1203D
P/N 22038
P/N 87247
P/N 22701
FRONT PANEL P/N 69018 (Units Without Door)
¼” X 3 ¼” X 15 ½”
P/N 22062
Nut (x2)
P/N 49132
P/N 22068
P/N 22009
P/N 38971
P/N 47561
P/N 47120
Tee Bolt
P/N 22705
P/N 22706
P/N 23235
Page 13

Shav A Doo
13
Shaver Head
P/N 22015
Set Screw
P/N 74127
2 Hole Blade
P/N 22017
Drain
Hose
P/N 12159
Dipper
P/N 1088
Hose Clamp
P/N 41163
Dipper
P/N
39068
Shaver Head - 22015
(5/16 x 3/8)
Casting
Replacement Set
Page 14

Shav A Doo
14
ELECTRICAL SCHEMATIC
Page 15

Shav A Doo
15
10700 Medallion Drive, Cincinnati, Ohio 45241
-
4807 USA
Phone:
(800) 543
-
0862
Fax: (800) 542
-
1496
WARRANTY
Gold Medal Products Co. warrants to the original purchaser each item of its manufacture to
be free of defects in workmanship and material under normal use and service. Gold Medal
Products Co.’s obligation under this warranty is limited solely to repairing or replacing parts,
f.o.b. Cincinnati, Ohio, which in its judgment are defective in workmanship or material and
which are returned, freight prepaid, to its Cincinnati, Ohio factory or other designated point.
Except for “Perishable Parts” on specific machines, the above warranty applies for a period
of two (2) years from the date of original sale to the original purchaser of equipment when
recommended operating instructions and maintenance procedures have been followed. These
are packed with the machine. Parts warranty is two (2) years, labor is six (6) months.
THIS WARRANTY IS IN LIEU OF ALL OTHER WARRANTIES EXPRESSED OR
IMPLIED, AND OF ALL OTHER OBLIGATIONS OR LIABILITIES ON OUR PART,
INCLUDING THE IMPLIED WARRANTY OF MERCHANTABILITY. THERE ARE
NO WARRANTIES WHICH EXTEND BEYOND THE DESCRIPTION ON THE FACE
HEREOF. In no event shall Gold Medal Products Co. be liable for special, incidental or
consequential damages. No claim under this warranty will be honored if the equipment covered
has been misused, neglected, damaged in transit, or has been tampered with or changed in any
way. No claim under this warranty shall be honored in the event that components in the unit at
the time of the claim were not supplied or approved by Gold Medal Products Co. This warranty
is effective only when electrical items have been properly attached to city utility lines only at
proper voltages. This warranty is not transferable without the written consent of Gold Medal
Products Co.
The term “Original Purchaser” as used in this warranty shall be deemed to mean that person,
firm, association, or corporation who was billed by the GOLD MEDAL PRODUCTS CO.,
or their authorized distributor for the equipment.
THIS WARRANTY HAS NO EFFECT AND IS VOID UNLESS THE ORIGINAL
PURCHASER FIRST CALLS GOLD MEDAL PRODUCTS CO. AT 1-800-543-0862 TO
DISCUSS WITH OUR SERVICE REPRESENTATIVE THE EQUIPMENT PROBLEM,
AND, IF NECESSARY, FOR INSTRUCTIONS CONCERNING THE REPAIR OR
REPLACEMENT OF PARTS.
NOTE: This equipment is manufactured and sold for commercial use only.
gmpopcorn.com
(513) 769-7676 (513) 769-8500
© 2016 – The text, descriptions, graphics, layout, and other material in this publication are the exclusive property of
Gold Medal Products Co. and shall not be used, copied, reproduced, or published in any fashion, including website
display, without its express written consent.
 Loading...