

Gold Medal Shavatron 1020, Shavatron 1020EX, Shavatron 1020TEX, Shavatron 1020T Instruction Manual
Page 1

Shavatron
Instruction Manual
Model # Domestic: 1020, 1020T
Export: 1020EX, 1020TEX
Part No. 39099
Cincinnati, OH 45241-4807 USA
Page 2
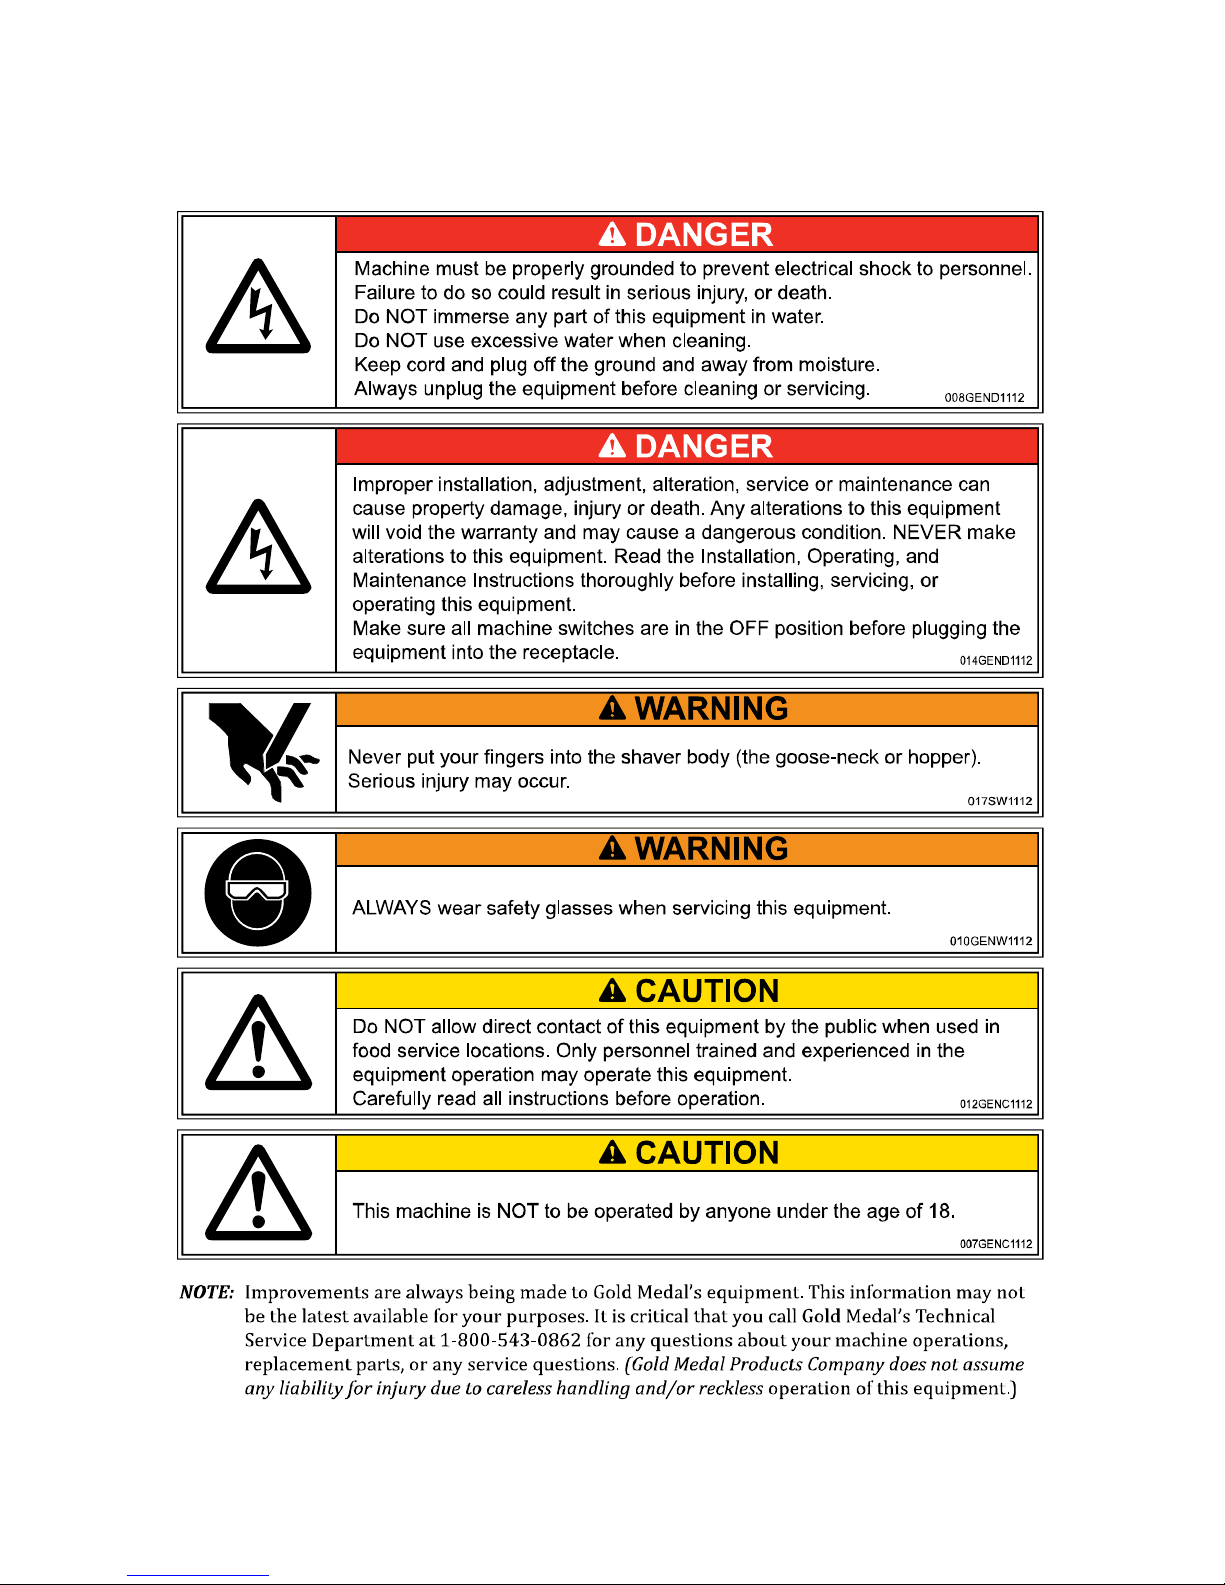
SAFETY PRECAUTIONS
Page 3
Installation Instructions
Inspection of Shipment:
Unpack all cartons and check thoroughly for any damage that may have occurred during transit. Damage
claims should be filed immediately with the transportation company. Gold Medal is not responsible for
damage that occurs in transit.
Setup:
Your new Shavatron Ice Shaver Machine is completely assembled and tested at the factory.
Remove all packing material and tape before starting operation.
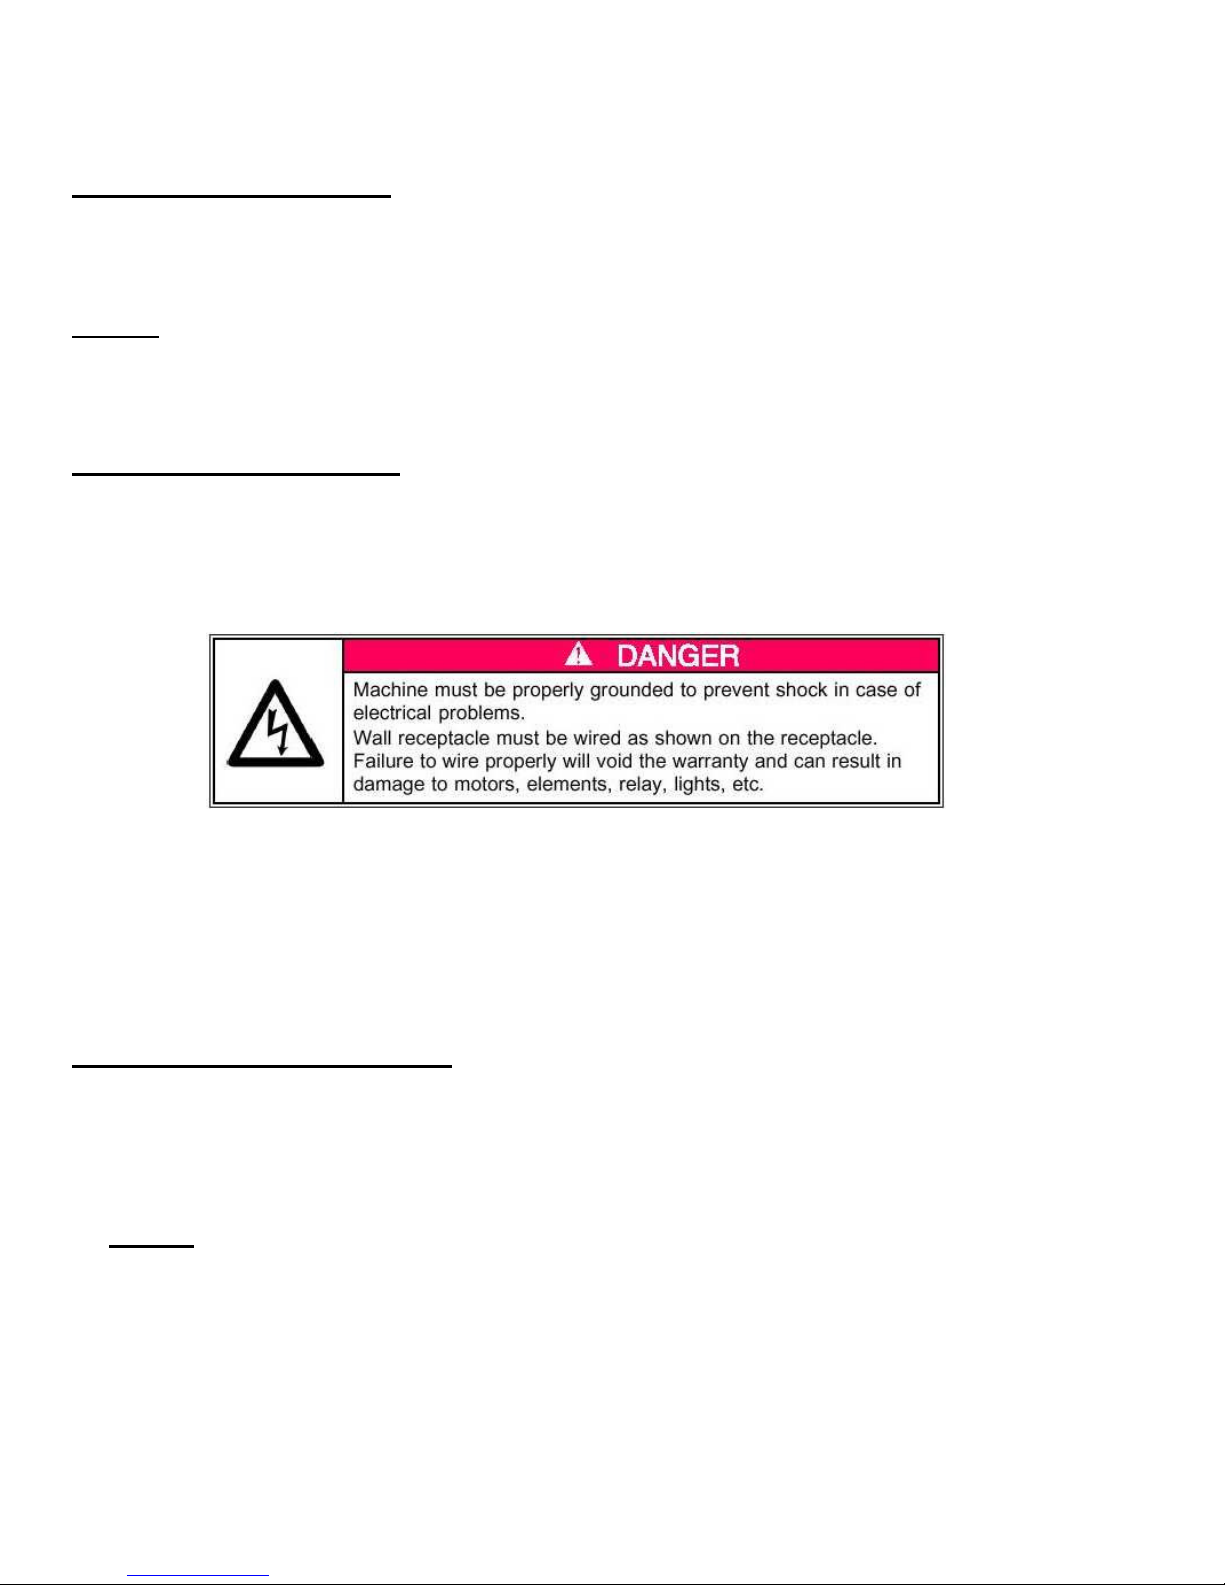
Electrical Requirements:
The following power supply must be provided:
Model No. 1020, 1020T: 120 Volts, 970 Watts, 60 Hz.
Model No. 1020EX, 1020TEX: 230 Volts, 820 Watts, 50Hz.
.
Your electrician must furnish sufficient current for proper machine operation. We recommend this ice shaver
machine be on a dedicated and circuit protected line. Failure to wire properly will void the warranty and can
result in damage to the light, motor and etc.
It is Gold Medal Products Company’s recommendation that this machine be plugged directly into a wall outlet.
The use of extension cords is not recommended due to safety risks and the ice shaver’s performance will be
sacrificed/reduced.
Before You Plug In Machine:
1. Make sure that the wall outlet can accept the three (3) prong grounded plug on the power supply cord.
2. The wall outlet must have the proper polarity. If in doubt, have a competent electrician inspect the outlet
and correct if necessary.
3. DO NOT use a three (3) prong grounded to two (2) prong un-grounded adapter.
4. If the optional 1078HD Chute is attached to your machine, follow the installation instructions provided
with the 1078HD Chute before operation.
Page 4
Shavatron
Ice Shaver
Operating Instructions
Make sure the hopper is clear of obstructions, then secure a supply of ice (either blocks, cubes or
rough crushed ice) and fill the hopper. Ice chunks should be no larger than a baseball for maximum
capacity (large ice chunks take more time to shave).
1. Move the toggle power switch into the “ON” position to illuminate the lights.
2. Fill the hopper with ice. Be careful not to overfill.
3. Close the hopper lid. The unit will not operate if the lid is not completely closed.
4. Push the momentary motor switch.
Metal or foreign objects will ruin the shaving blades instantly.
Make sure that both the hopper and ice supply are free of debris
including: Ice picks, scoops, nails, nuts, bolts, etc.
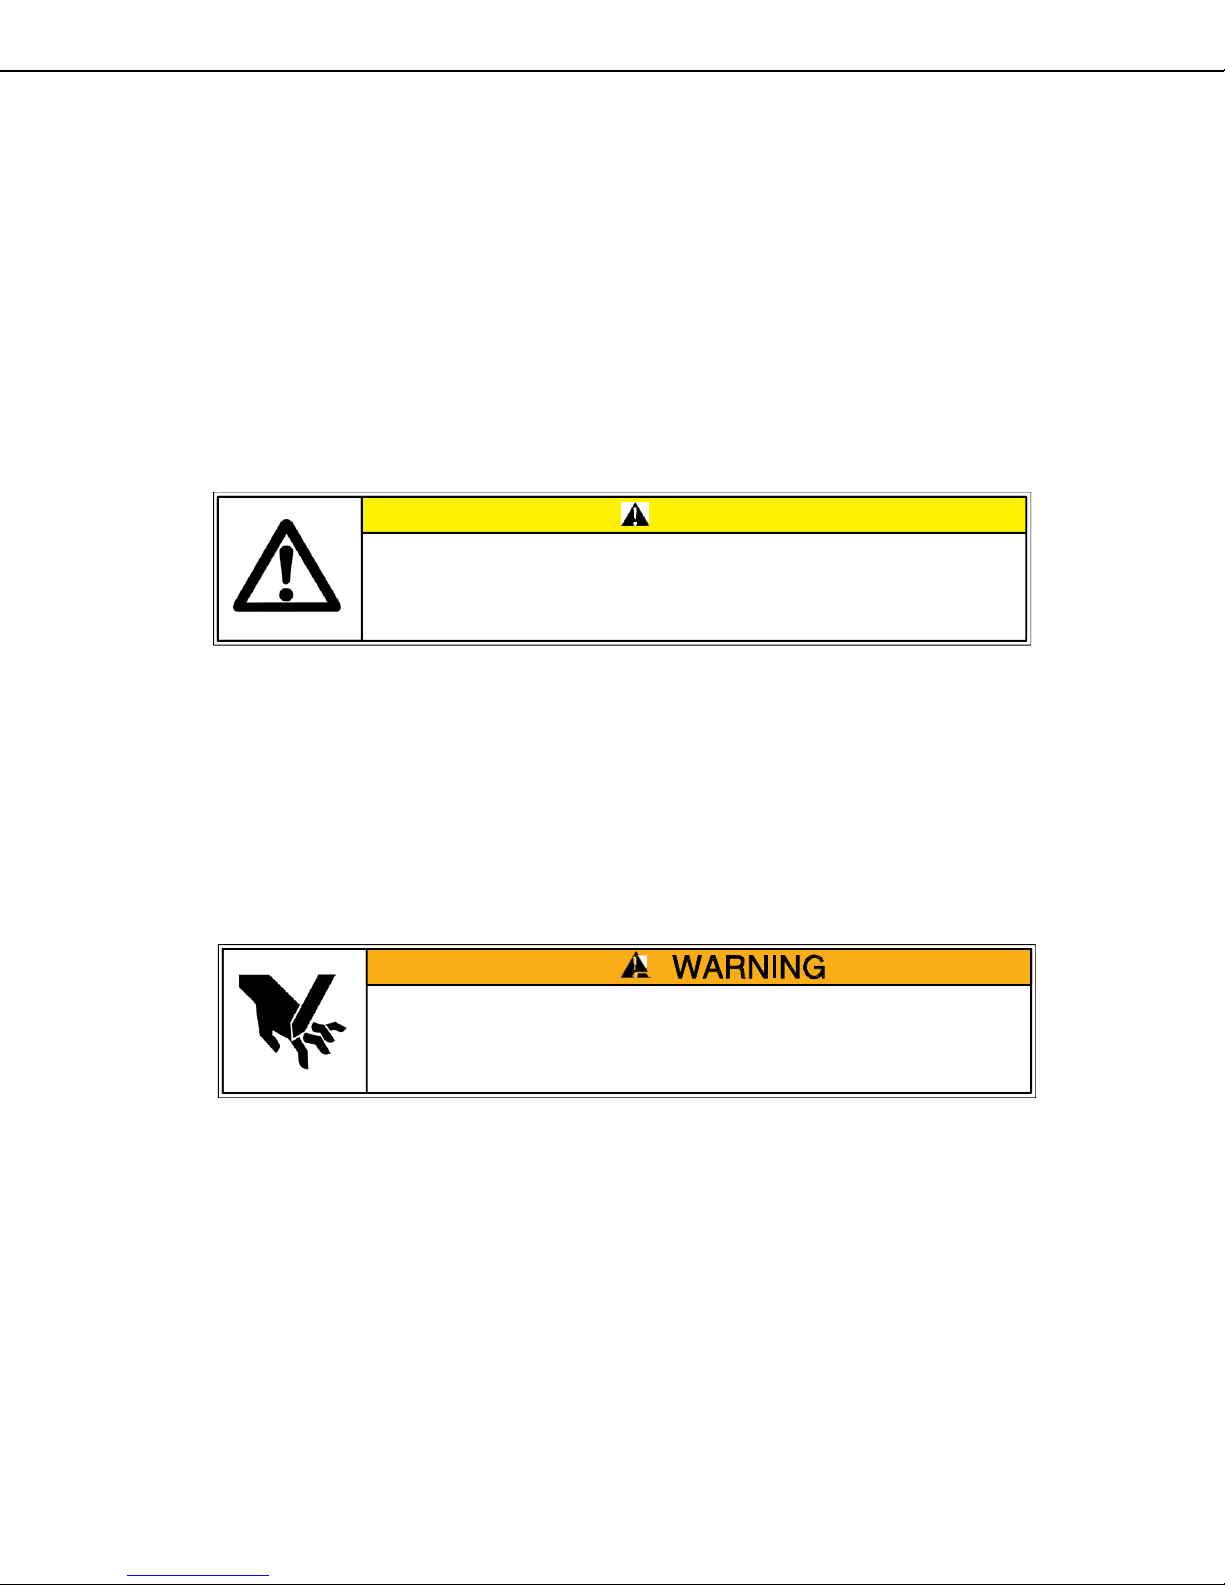
Safety Cut-Off Switch
CAUTION
on, the machine will not operate with the hopper lid open. This is to prevent accidental injury while
loading or cleaning the hopper. Be careful not to overfill the hopper to the extent that the hopper lid
stays open. The lid must be closed and you must press the momentary motor switch in order for the
machine to operate.
Your Shavatron is equipped with a safety cut-off switch. With the momentary motor switch pressed
Never put your fingers or any object into the shaver body while the unit
is running. Since you can be seriously hurt by not following these
instructions, Gold Medal does not assume any liability for injury due to
careless handling or operation of this unit.
Page 5

Shavatron
Ice Shaver
MAINTENANCE INSTRUCTIONS
Page 6

Shavatron
Ice Shaver
Blade Adjustment
Inspect your equipment before adjusting the blades. With the machine unplugged, use a flashlight to examine
the blades in the shaver body. If the blades appear to be nicked or bent, then the blades should be replaced.
Follow this procedure:
1. Set the blade thickness equal to a dime. (See illustration below.) Make sure that the height is even
across the shaver head.
2. Tighten the blade screws completely. Check the blades again with a dime to ensure the blades did
not move while tightening the screws.
SET TOP OF BLADE
FLUSH WITH HEIGHT
GAGE, AS SHOWN
HEIGHT GAGE
(USE A DIME)
SHAVER HEAD
SHAVER BLADE
BLADE MOUNTING SCREW
Page 7

Shavatron
Ice Shaver
Motor Lubrication
The drive motor bearings are sealed and require no lubrication. Do not oil the motor, it will
cause more harm than good.
Changing Fluorescent Lights
Remove the sign retaining angle from the top of the dome, by removing the four screws that
hold it into place, and then slide the sign out to access the light tube. Replace the light tube
and then reassemble in reverse order.
Changing Belts
on the right hand side can be lifted out of its slot in the hinge bracket. Slide the lug on the left
hand side out of the hinge bracket, and remove the hopper lid. Remove the two bolts which
hold the hinge bracket to the machine. The dome can now be removed. (On units
manufactured after 3-1-95). Remove the four dome hold down screws. Loosen the four motor
hold down bolts and slide the motor toward the center of the hopper, loosening the belt.
Remove the old belt and install a new one.
Unplug your machine. (On units manufactured before 3-1-95.) Raise the hopper lid until the lug
NEVER STRETCH THE BELT WHEN INSTALLING THE PULLEY.
ALWAYS LOOSEN THE HOLD DOWN BOLTS. After the new belt is
installed, move the motor to the left by hand as far as possible, making
sure the belt is tight. Re-tighten the motor hold down bolts. NEVER
USE A PRY BAR OR BOARD TO MOVE THE MOTOR.
Lubrication Of Thrust Bearing and Adjustment Of End Play
The small thrust bearing should be lubricated approximately once per season. Unplug your
machine. Remove the dome. To do this, remove the two screws which hold the bracket in
place, and carefully lay the bracket face down on the top frame. A large hex adjustment nut is
located below the pulley on the shaver shaft. Loosen the set screw in the side of the hex nut.
Loosen the adjustment nut as much as possible, so it is up against the pulley. NOTE: This
nut is of the airplane locking type, therefore, it will turn hard on its threads at all times. By
grasping the pulley, hold the shaft upward as much as you can, and press some grease into
the thrust bearing located below the adjustment nut. Use any variety of sticky type grease,
such as water pump grease or Alpha Molykote Corp., No. 505 “Whitekote” lubricant
(recommended by the bearing manufacturer). After the grease has been applied, screw the
adjusting nut downwards until all play up and down is removed. Do not tighten any further.
Now tighten the set screw and reassemble your machine.
Removal and Replacement Of Glass
To remove glass from the frame, grip the retaining vinyl with needle nose pliers at a corner
and pull. Repeat for each corner of glass. With the vinyl remove the glass will come out
easily. To install new glass, place the glass in the frame, making sure the glass does not enter
the channel intended for the vinyl. Starting at a corner, install the vinyl into the channel (make
sure it locks into place). A knife handle with a rounded point is useful in pushing the vinyl into
position. Obtain Tempered glass from a local hardware store, in the following sizes:
Front Glass (1 required) — 20" x 24" x 1/8"
Side Glass (2 required) — 16" x 20" x 1/8"
Page 8

Shavatron
Ice Shaver
ORDERING SPARE PARTS
* Always speak to a Gold Medal Products Technical Service Advisor before ordering any
parts to help ensure accuracy for your product. Included diagrams may not be the latest
information.
1. Identify the needed part by checking it against the photos, illustrations, and/or parts list.
2. When ordering, please include part number, part name, and quantity needed.
3. Please include your model name, serial number, and date of manufacture (located on the machine
nameplate) with your order.
4. Address all parts orders to:
Parts Department
Gold Medal Products Co.
10700 Medallion Drive
Cincinnati, Ohio 45241-4807
Or, place orders by phone or online:
(800) 543-0862
(513) 769-7676
Fax: (513) 769-8500
E-mail: info@gmpopcorn.com
Web Page: www.gmpopcorn.com
Page 9

Shavatron
Ice Shaver
1
2
3
4
5
6
7, 8
Parts Breakdown
Item Part No. Description
1 39112 Dome Assembly
2 39933 Sign
3 39052 Decal, Front
4 39043 Drain Pan Assembly
5 39019 Ice Drain Board
6 41282 Rubber Feet (x4)
7 39040 Strain Relief
8
22038 (Domestic) Lead-In Cord, 15 Amp Plug
42369 (Export) Power Supply Cord
Page 10

1, 2
3
5
6
7, 8 9
4
Item Part No. Description
1 39113 Magnet Holder
2 87207 Set Screw 10-32 x 3/16 KCP w/Locking Patch
3 47155 Rubber Foot 3/4" High
4 39111 Lid, Weld Assembly
5 41013 Knob, Door
6 41020 Light Tube Holder (x4)
7 55292 Flourescent Light Tube
8 12502 Flourescent Tube Lock (x2)
9 55291 T8 Electronic Ballast
Page 11

2
1
3
4
5
6
7
8
9
Item Part No. Description
1
2 38971 Momentary Switch
3 39053 Decal, Side (x2)
4 12045 Door Catch (x2)
5 41011 Door Catch
6 39002 Door Assembly
7 39134 Baffle
8 39120 Ice Shield
47201 (Domestic) Switch, Toggle SPST
74087 (Export) DPST Toggle Switch
Page 12

1
2 3 4, 5, 6, 7, 8, 9, 10
Item Part No. Description
1
2 39023 Drive Motor Pulley
3
4 39024 Cutter Head Pulley
5 39027 Shaft Retaining Nut
6 39028 Thrust Bearing
7 39029 Thrust Bearing Shims
8 12091 Ball Bearing
9 39032 Bushing
39022 (Domestic) Motor, 115/230 60 Hz *
39022EX (Export) 1/3 HP 50/60 Hz Motor*
39025 Drive Belt (Manufactured Before 3-95)
39122 Drive Belt (Manufactured Between 3-95 and 8-08)
67865 Drive Belt (Manufactured After 8-08)
Page 13

1
2, 3, 4
4
5, 6, 7
8 9
10
Item Part No. Description
1 39118 Hopper and Bushing Assy.
2
3 55288 Standoff, .75 IN. 4-40 (x2) (Manufactured After 6-07)
4 12186 4-40 x 3/4" PH Pan 18-8 M/S (x2) (Manufactured After 6-07
55289 Switch, Lever 15A 1/2 HP (Manufactured After 6-07)
75036 Switch, Lever 15A 1/2 HP (Manufactured Before 6-07)
Item Part No. Description
4 39038 Shaver Head Assy.
5 39037 4-Hole Shaver Blade (x3)
6 47131 8-32 x 3/8 Rd Slot M/S (x12)
7 12019 Flat Washer (x12)
8 39018 6 oz Cup Dispenser w/Bracket
9 1088 Plastic Sno Dipper
10 39068 Ice Scoop
Page 14

Electrical Schematic – 1020 & 1020T
Page 15

Electrical Schematic – 1020EX & 1020TEX
Page 16

10700 Medallion Drive, Cincinnati, Ohio 45241
-
4807 USA
WARRANTY
Gold Medal Products Co. warrants to the original purchaser each item of its manufacture to
be free of defects in workmanship and material under normal use and service. Gold Medal
Products Co.’s obligation under this warranty is limited solely to repairing or replacing parts,
f.o.b. Cincinnati, Ohio, which in its judgment are defective in workmanship or material and
which are returned, freight prepaid, to its Cincinnati, Ohio factory or other designated point.
Except for “Perishable Parts” on specific machines, the above warranty applies for a period
of two (2) years from the date of original sale to the original purchaser of equipment when
recommended operating instructions and maintenance procedures have been followed. These
are packed with the machine. Parts warranty is two (2) years, labor is six (6) months.
THIS WARRANTY IS IN LIEU OF ALL OTHER WARRANTIES EXPRESSED OR
IMPLIED, AND OF ALL OTHER OBLIGATIONS OR LIABILITIES ON OUR PART,
INCLUDING THE IMPLIED WARRANTY OF MERCHANTABILITY. THERE ARE
NO WARRANTIES WHICH EXTEND BEYOND THE DESCRIPTION ON THE FACE
HEREOF. In no event shall Gold Medal Products Co. be liable for special, incidental or
consequential damages. No claim under this warranty will be honored if the equipment covered
has been misused, neglected, damaged in transit, or has been tampered with or changed in any
way. No claim under this warranty shall be honored in the event that components in the unit at
the time of the claim were not supplied or approved by Gold Medal Products Co. This warranty
is effective only when electrical items have been properly attached to city utility lines only at
proper voltages. This warranty is not transferable without the written consent of Gold Medal
Products Co.
The term “Original Purchaser” as used in this warranty shall be deemed to mean that person,
firm, association, or corporation who was billed by the GOLD MEDAL PRODUCTS CO.,
or their authorized distributor for the equipment.
THIS WARRANTY HAS NO EFFECT AND IS VOID UNLESS THE ORIGINAL
PURCHASER FIRST CALLS GOLD MEDAL PRODUCTS CO. AT 1-800-543-0862 TO
DISCUSS WITH OUR SERVICE REPRESENTATIVE THE EQUIPMENT PROBLEM,
AND, IF NECESSARY, FOR INSTRUCTIONS CONCERNING THE REPAIR OR
REPLACEMENT OF PARTS.
NOTE: This equipment is manufactured and sold for commercial use only.
gmpopcorn.com
Phone: (800) 543-0862 Fax: (800) 542-1496
(513) 769-7676 (513) 769-8500
© 2013 – The text, descriptions, graphics, layout, and other material in this publication are the exclusive property of
Gold Medal Products Co. and shall not be used, copied, reproduced, or published in any fashion, including website
display, without its express written consent.
 Loading...