

Page 1

© 2019 Gold Medal Products Co.
Part No. 110241
Instruction Manual
10700 Medallion Drive, Cincinnati, Ohio 45241-4807 USA
PopClean® Elite PopperTM
-600 Series (Touch Screen Control)
For -6XX Series PopClean Models beginning with:
2011, 2848, 2860, 2872, and 2873 (32 oz. Pop-O-Golds)
2911, 2948, 2960, 2972, and 2973 (52 oz. Medallions)
72” Updraft Model
72” Downdraft Model
Page 2

Instruction Manual - Touch Screen 2011, 2848, 2860, 2872, and 2873 (32 oz. Pop-O-Golds)
PopClean Elite Popper -600 Series 2911, 2948, 2960, 2972, and 2973 (52 oz. Medallions)
Page 2
gmpopcorn.com
Table of Contents
SAFETY PRECAUTIONS .................................................................................................................................................... 3
INSTALLATION INSTRUCTIONS .................................................................................................................................... 5
Inspection of Shipment ................................................................................................................................................................................. 5
Manual .................................................................................................................................................................................................................. 5
Model Description ........................................................................................................................................................................................... 6
Items Included with this Unit .................................................................................................................................................................... 7
Setup ..................................................................................................................................................................................................................... 8
Chute Installation .......................................................................................................................................................................................... 10
Electrical Requirements ............................................................................................................................................................................. 11
Fire Suppression System (some Exports excluded) .................................................................................... 14
System Operation and Maintenance ..................................................................................................................................................... 14
Connecting to a Building Alarm System .............................................................................................................................................. 15
Components for the Fire Suppression System ................................................................................................................................. 16
Nozzle and Fusible Link Locations ........................................................................................................................................................ 17
Filter System ............................................................................................................................................................... 19
Filter Types ...................................................................................................................................................................................................... 19
Filter System Error Code Explanation Table .................................................................................................................................... 20
Updraft Filters ................................................................................................................................................................................................ 22
Downdraft Filters .......................................................................................................................................................................................... 23
OPERATING INSTRUCTIONS ....................................................................................................................................... 24
Controls and Their Functions .................................................................................................................................................................. 24
Introduction to the Touch Screen Control ....................................................................................................... 25
Initial Startup – User Configuration ................................................................................................................... 28
QUICK Reference Popping Instructions ............................................................................................................ 31
EXPANDED Reference Popping Instructions .................................................................................................. 32
Navigating the Touch Screen Control ................................................................................................................ 35
N1 Cook (Recipe Selection) ...................................................................................................................................................................... 36
N2 Training ...................................................................................................................................................................................................... 38
N3 Cleaning/ Oil Pump ............................................................................................................................................................................... 38
N4 Reports ....................................................................................................................................................................................................... 39
N5 Home Screen ............................................................................................................................................................................................ 39
N6 Equipment Controls Screen ............................................................................................................................................................... 40
N7 Settings Screen ........................................................................................................................................................................................ 42
N7.1 Oil Level Cal. ........................................................................................................................................................................................ 43
N7.2 Oil Pump Cal. ....................................................................................................................................................................................... 44
N7.3 Recipes ................................................................................................................................................................................................... 46
N7.4 Load Count Reset ............................................................................................................................................................................... 48
N7.5 Upload Recipes ................................................................................................................................................................................... 48
N7.6 Download Recipes .............................................................................................................................................................................. 49
N7.7 View Cook .............................................................................................................................................................................................. 49
N7.8 Upload Cook .......................................................................................................................................................................................... 50
N7.10 User Configuration .......................................................................................................................................................................... 50
N7.11 User Configuration .......................................................................................................................................................................... 52
Care and Cleaning ..................................................................................................................................................... 53
Troubleshooting ....................................................................................................................................................... 57
Error Code Explanation Table ................................................................................................................................................................. 57
General Unit Troubleshooting ................................................................................................................................................................. 59
AGITATOR SET COLLAR ADJUSTMENT ................................................................................................................... 62
ORDERING FILTERS AND ACCESSORIES ................................................................................................................. 63
WARRANTY ....................................................................................................................................................................... 65
Page 3
Instruction Manual - Touch Screen 2011, 2848, 2860, 2872, and 2873 (32 oz. Pop-O-Golds)
PopClean Elite Popper -600 Series 2911, 2948, 2960, 2972, and 2973 (52 oz. Medallions)
Page 3
gmpopcorn.com
SAFETY PRECAUTIONS
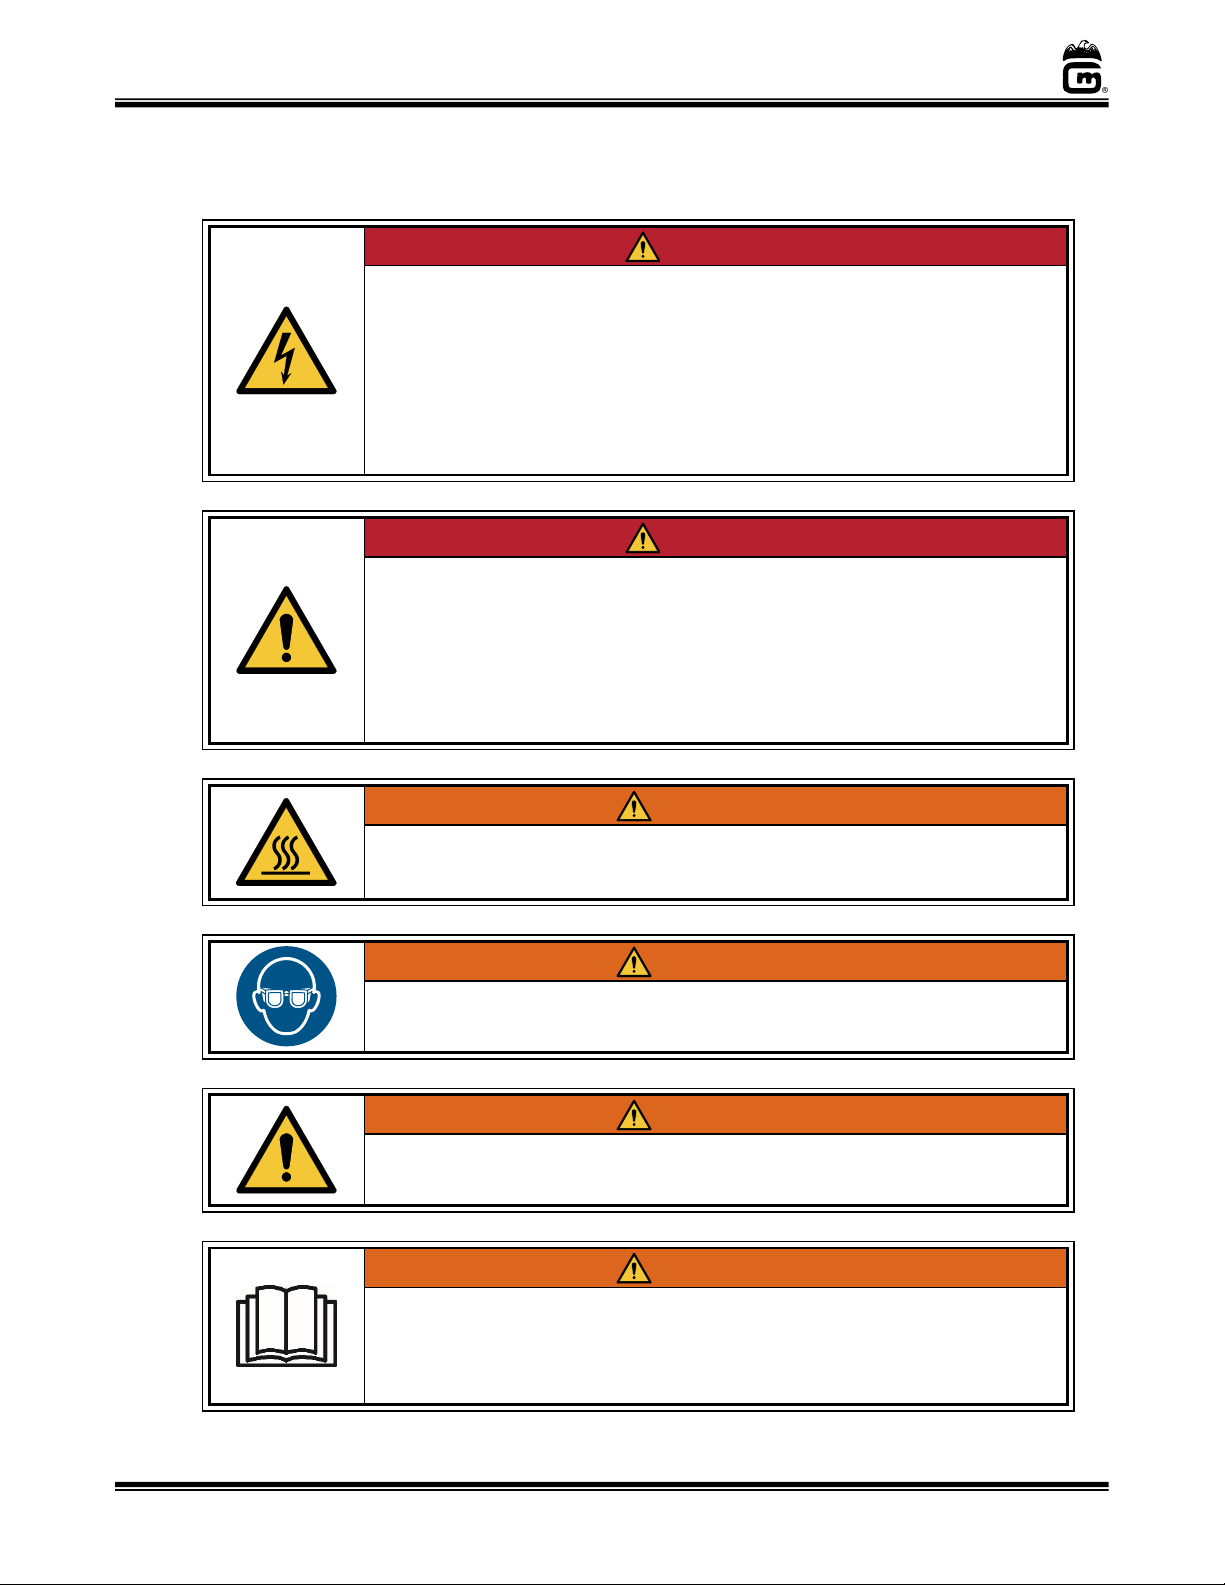
DANGER
Machine must be properly grounded to prevent electrical shock to personnel.
Failure to do so could result in serious injury, or death.
DO NOT immerse any part of this equipment in water.
DO NOT use excessive water when cleaning.
Keep cord and plug off the ground and away from moisture.
Always unplug the equipment before cleaning or servicing.
Make sure all machine switches are in the OFF position before plugging the
equipment into the receptacle.
008_051514
DANGER
Improper installation, adjustment, alteration, service, or maintenance can
cause property damage, injury, or death. Any alterations to this equipment
will void the warranty and may cause a dangerous condition. This appliance
is not intended to be operated by means of an external timer or separate
remote-control system. NEVER make alterations to this equipment. Read the
Installation, Operating, and Maintenance Instructions thoroughly before
installing, servicing, or operating this equipment.
014_020416
WARNING
To avoid burns, DO NOT touch the kettle or any heated surface.
DO NOT place or leave objects in contact with heated surfaces.
013_092414
WARNING
ALWAYS wear safety glasses when servicing this equipment.
010_010914
WARNING
No user serviceable parts inside. Refer servicing to qualified service
personnel.
011_051514
WARNING
Read and understand operator’s manual and all other safety instructions
before using this equipment. To order copies of the operator’s manual go to
gmpopcorn.com or write to Gold Medal Products Co., 10700 Medallion Drive,
Cincinnati, OH 45241 USA 1-(800)-543-0862
022_060215
Page 4
Instruction Manual - Touch Screen 2011, 2848, 2860, 2872, and 2873 (32 oz. Pop-O-Golds)
PopClean Elite Popper -600 Series 2911, 2948, 2960, 2972, and 2973 (52 oz. Medallions)
Page 4
gmpopcorn.com
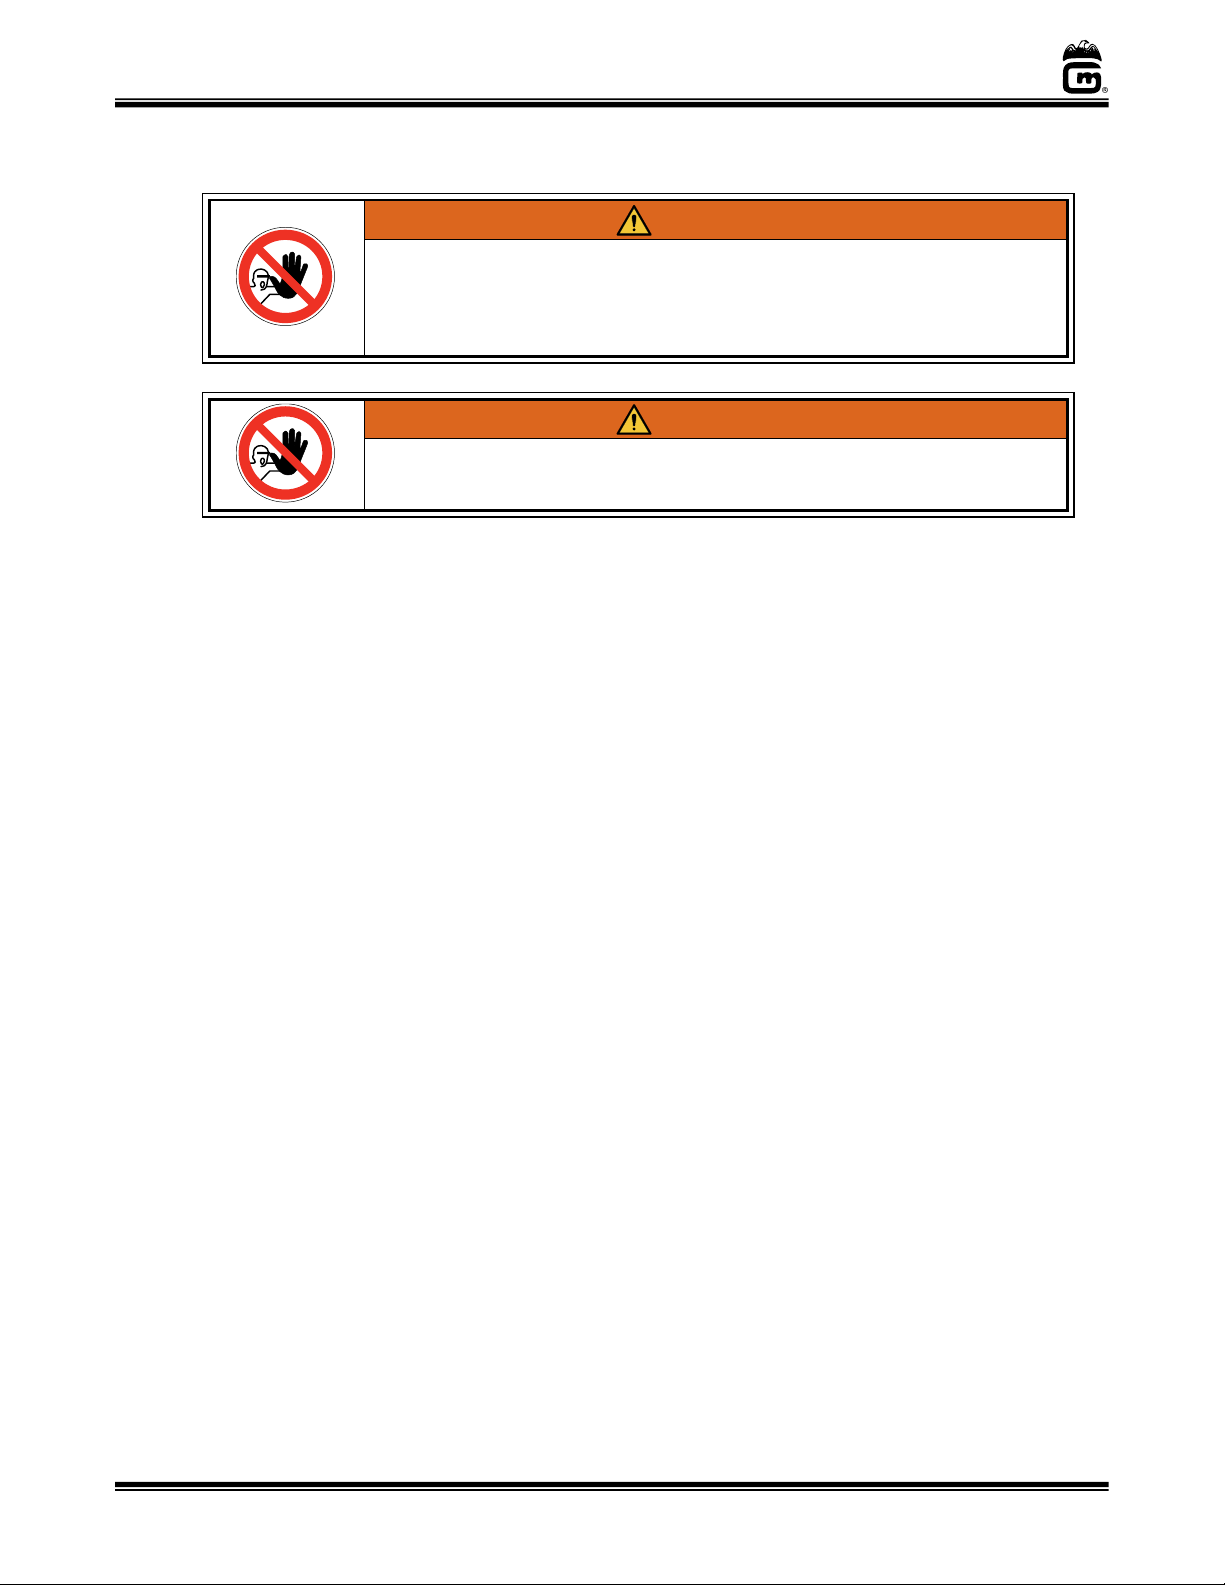
WARNING
DO NOT allow direct contact of this equipment by the public when used in
food service locations. Only personnel trained and experienced in the
equipment operation may operate this equipment.
Carefully read all instructions before operation.
012_010914
WARNING
This machine is NOT to be operated by minors.
007_010914
This appliance is not intended for use by persons (including children) with reduced
physical, sensory or mental capabilities, or lack of experience and knowledge, unless they
have been given supervision or instruction concerning use of the appliance by a person
responsible for their safety.
Note: Improvements are always being made to Gold Medal’s equipment. This information
may not be the latest available for your purposes. It is critical that you call Gold Medal’s
Technical Service Department at 1-800-543-0862 for any questions about your
machine operations, replacement parts, or any service questions. (Gold Medal
Products Co. does not assume any liability for injury due to careless handling and/or
reckless operation of this equipment.) General images may be used in manual for
reference only.
Page 5
Instruction Manual - Touch Screen 2011, 2848, 2860, 2872, and 2873 (32 oz. Pop-O-Golds)
PopClean Elite Popper -600 Series 2911, 2948, 2960, 2972, and 2973 (52 oz. Medallions)
Page 5
gmpopcorn.com
INSTALLATION INSTRUCTIONS
Inspection of Shipment
After unpacking, check thoroughly for any damage which may have occurred in transit. Claims
should be filed immediately with the transportation company. The warranty does not cover
damage that occurs in transit, or damage caused by abuse, or consequential damage due to the
operation of this machine, since it is beyond our control (reference warranty in back of manual).
Manual
Instruction Manual (Part No. 110241) and Parts Manual (Part No. 110242) are provided with
each unit. The manuals cover -600 Series PopClean Elite Poppers beginning with the Model
Series shown below and features a Touch Screen Control Panel:
2011, 2848, 2860, 2872, and 2873 (for 32 oz. Pop-O-Golds)
2911, 2948, 2960, 2972, and 2973 (for 52 oz. Medallions)
The Instruction Manual contains initial setup, installation, and operating instructions for the unit.
Read and understand the Instruction Manual and all other safety instructions before using this
equipment. To order copies of the Instruction Manual (Part No. 110241) or Parts Manual (Part
No. 110242), go to gmpopcorn.com or write to Gold Medal Products Co., 10700 Medallion Drive,
Cincinnati, OH 45241 USA 1-(800)-543-0862.
The Parts Manual contains maintenance and spare parts information intended for qualified
service personnel only; it is not intended for the operator. Qualified service personnel must use
the Parts Manual in combination with the Instruction Manual when servicing the unit for all
installation, operating, cleaning, maintenance, and spare parts replacement information.
Keep the manuals accessible, local inspectors may need to reference the information when
inspecting the popper unit.
This manual covers units with a Touch Screen Control Panel
Page 6
Instruction Manual - Touch Screen 2011, 2848, 2860, 2872, and 2873 (32 oz. Pop-O-Golds)
PopClean Elite Popper -600 Series 2911, 2948, 2960, 2972, and 2973 (52 oz. Medallions)
Page 6
gmpopcorn.com
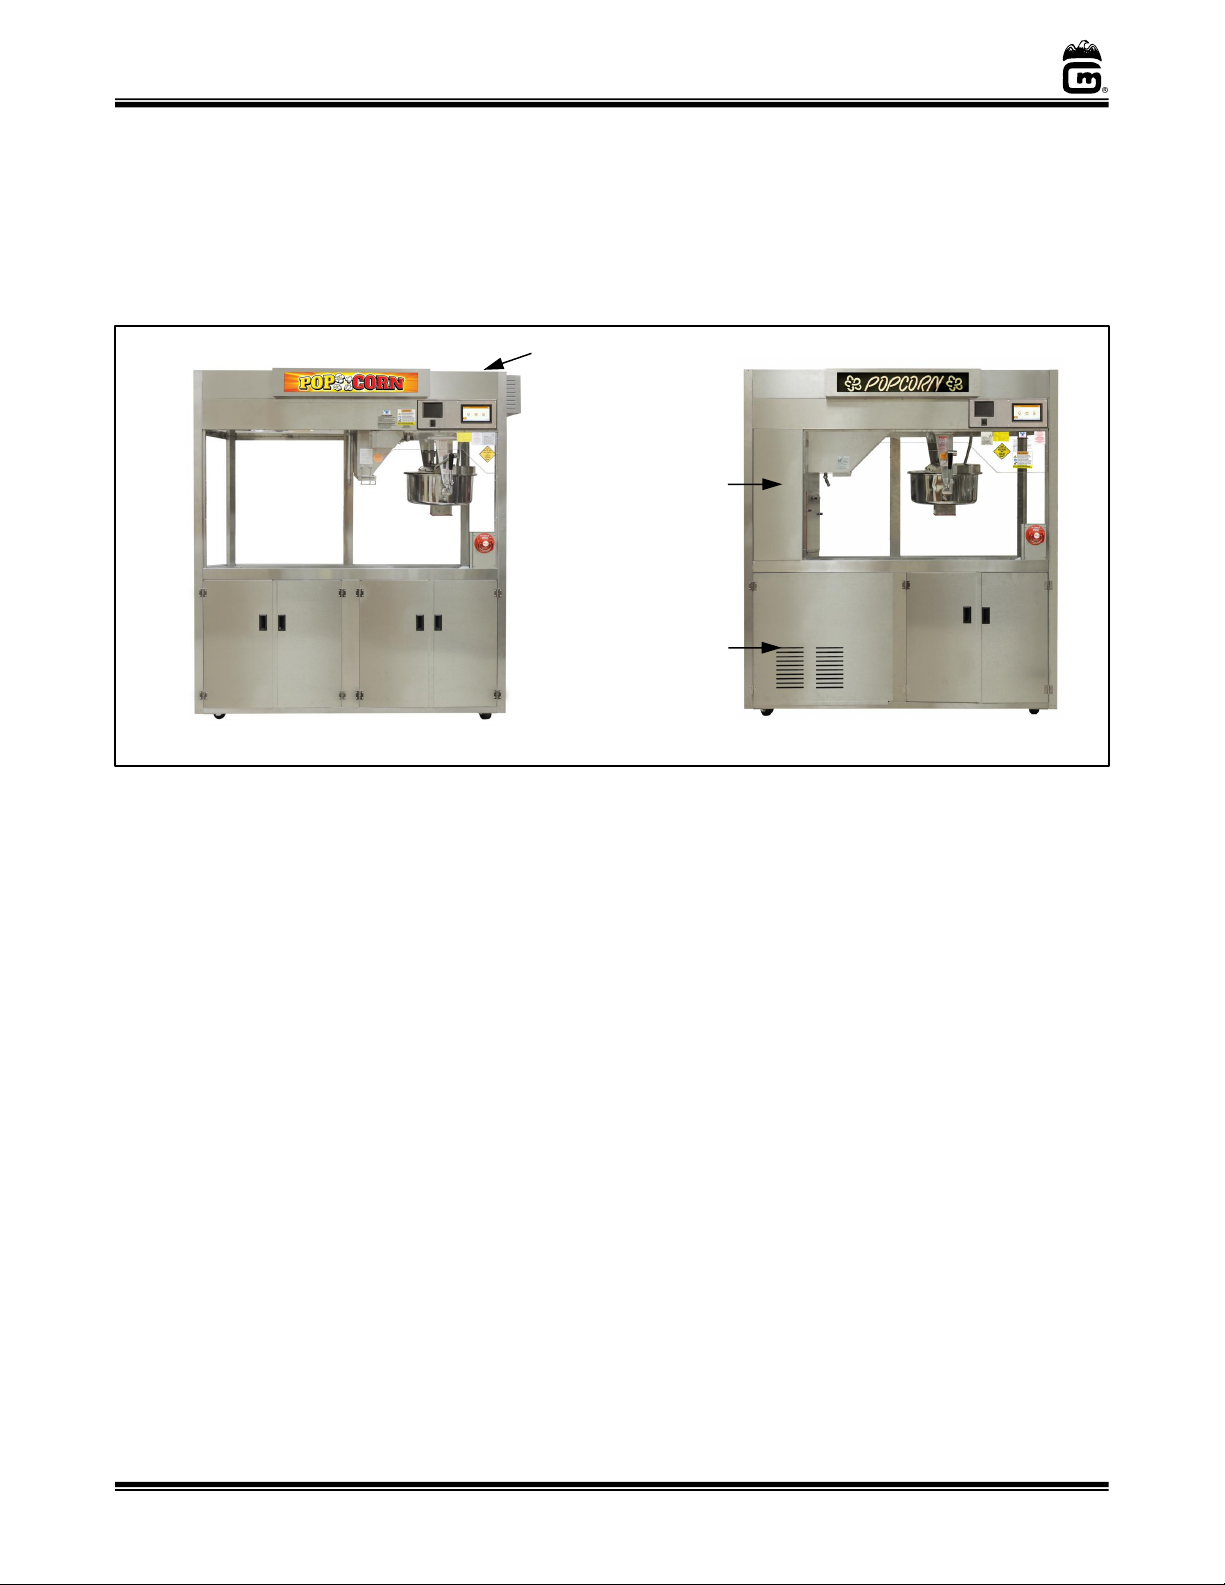
Model Description
The Elite Series PopClean Popper has a uni-body, stainless steel construction, available as an
Updraft or Downdraft Model with either a 32 oz. or 52 oz. Kettle. The Updraft Model exhausts out
the top of the unit. The Downdraft Model exhausts through ductwork which extends down the
side of the unit and vents out a large exhaust door in the cabinet base.
Elite Series PopClean Poppers equipped with an automatic Fire Suppression System have a
manual pull station (some Exports exclude Fire Suppression System). Individual popper features
vary by model, thus images provided throughout the manual are for general overall model
reference only.
Other features and options:
• Touch Screen Control Panel.
o Butterfly or Mushroom Recipes – standard on all units.
o Salt/Sweet (pop in salt or sweet mode) – standard on all units.
o Ability to pop a large or small size batch of popcorn – standard on all units.
• Oil Dispense Unit option (B.I.B or Bucket Pump).
• Butterfly Corn Screen or Mushroom Corn Screen option.
• Sign option (LED or LED Neon) reversible from Front Counter (customer side) to Back
Counter (operator side) of popper.
• Deep Well (ability to adjust corn storage area) – standard on units over 36” (not
available on 36” units).
The 32 oz. and 52 oz. popper units are available in the sizes listed below. Twin Models have 2
kettles, a dual updraft system, and 2 linked Fire Suppression Systems (some Exports excluded).
32 oz. Kettle Model Series: 2011 (36”), 2848 (48”), 2860 (60”), 2872 (72”), 2873 (72” Twin)
52 oz. Kettle Model Series: 2911 (36”), 2948 (48”), 2960 (60”), 2972 (72”), 2973 (72” Twin)
Updraft Unit
Downdraft Unit
Exhaust duct
on side of unit.
Exhaust vents out
cabinet base.
Exhaust vents
out top of unit.
Page 7
Instruction Manual - Touch Screen 2011, 2848, 2860, 2872, and 2873 (32 oz. Pop-O-Golds)
PopClean Elite Popper -600 Series 2911, 2948, 2960, 2972, and 2973 (52 oz. Medallions)
Page 7
gmpopcorn.com
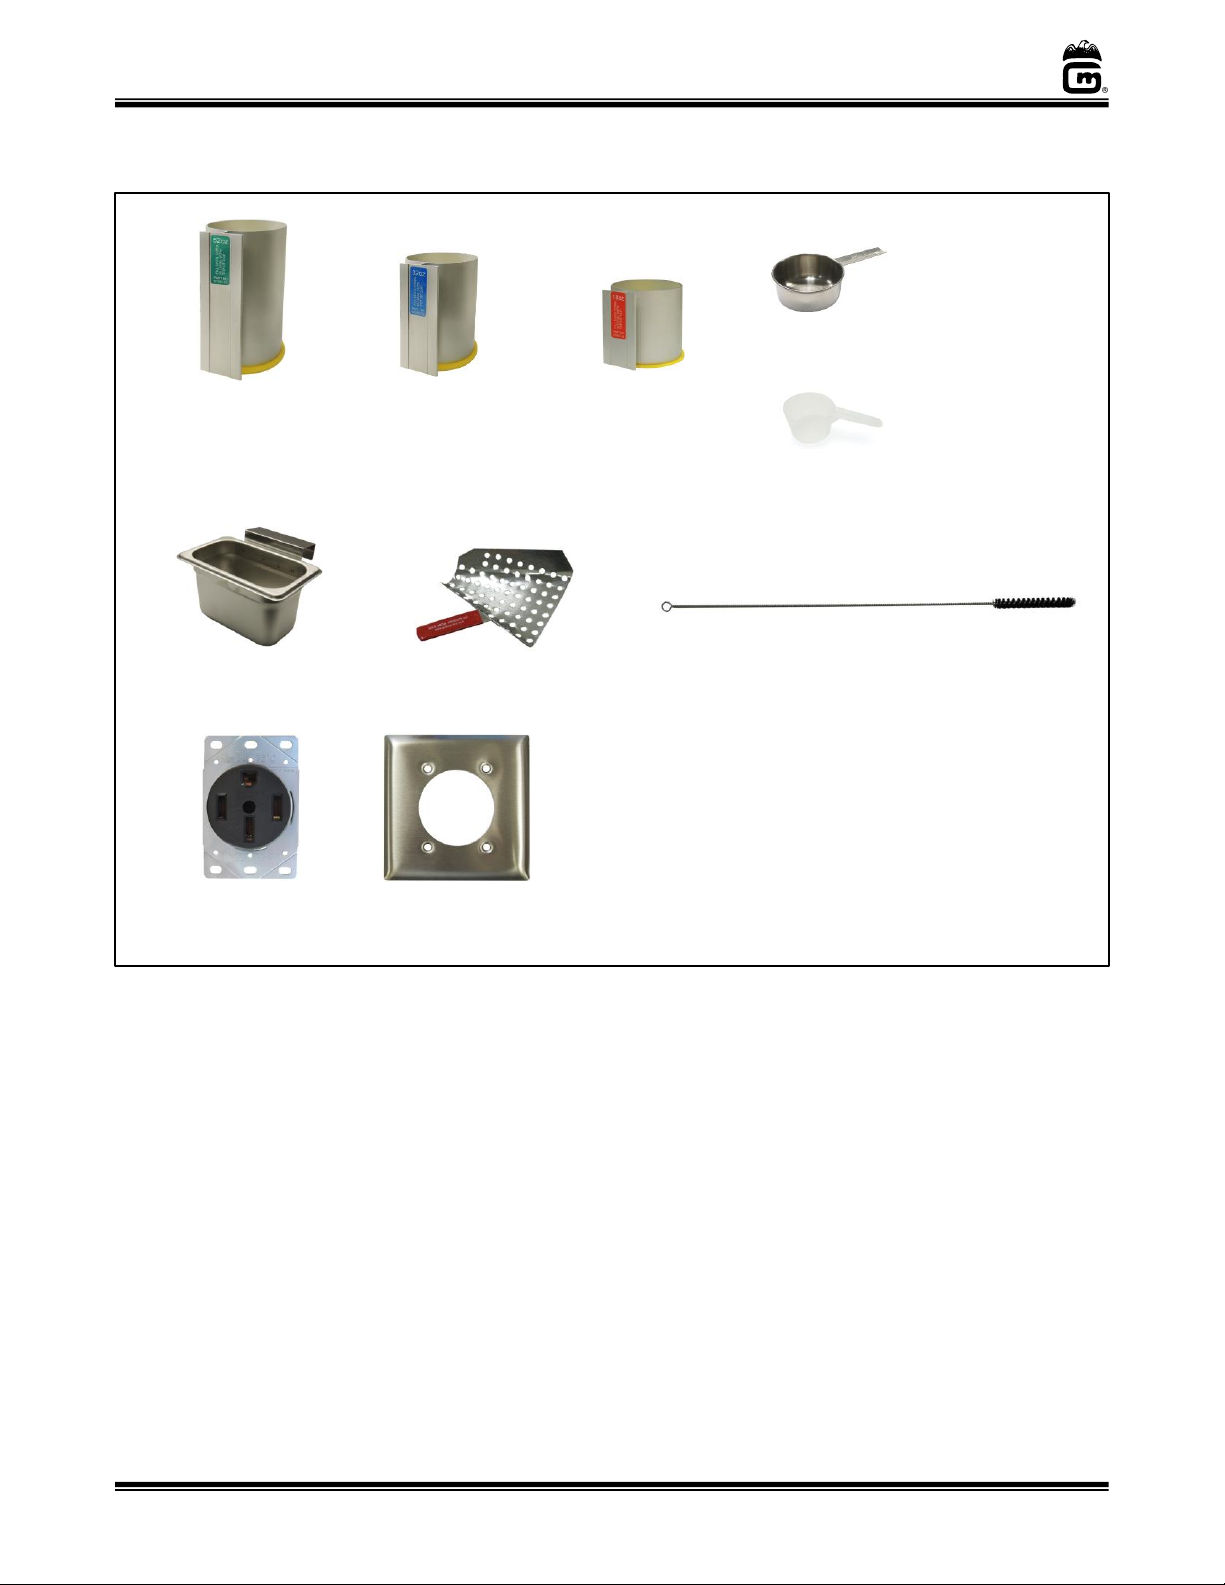
Items Included with this Unit
29.6 cc Flavacol
Measure (PN 47681)
Incl. with 32 oz. units,
and 52 oz. units for
Flexi-Pop.
32 oz. Corn Cup
(PN 67905-32)
Incl. with 32 oz. units,
and 52 oz. units for
Flexi-Pop.
18 oz. Corn Cup
(PN 67905-18)
Incl. with 32 oz. units
for Flexi-Pop.
52 oz. Corn Cup
(PN 17757-52)
Incl. with 52 oz.
units only.
Tube Brush (PN 47380)
Flavacol Container
(PN 41752)
1/4 Cup Flavacol
Measure (PN 47169)
Incl. with 52 oz. units.
Jet Scoop
(PN 2072)
50 AMP Receptacle
(PN 82920)
Receptacle Cover
(PN 82922)
Receptacle and Cover included
with Domestic units ONLY.
Page 8

Instruction Manual - Touch Screen 2011, 2848, 2860, 2872, and 2873 (32 oz. Pop-O-Golds)
PopClean Elite Popper -600 Series 2911, 2948, 2960, 2972, and 2973 (52 oz. Medallions)
Page 8
gmpopcorn.com
Setup
The Elite Series PopClean popper has been adjusted, inspected, and tested at the factory. The
Kettle is hard wired in the unit, and the exhaust filters are pre-installed and ready for use.
Installation of popper should be performed by qualified service personnel. Read and perform all
Setup steps prior to operating the unit.
1. Remove all packaging and tape.
2. Install unit on a level surface. Sufficient clearance is needed on the side of the popper
with the power supply cord routed from the base.
Units WITH Fire Suppression: A minimum 18” (457.2 mm) clearance is required
between any opening or exhaust duct and a combustible surface, per NFPA 96
Version 2017.
Units WITHOUT Fire Suppression: The Popper must be installed with a minimum 6”
(152.4 mm) clearance to combustible surfaces on the operator’s side and on
top of machine. Updraft models require a minimum of 13” (330.2 mm)
clearance on top of unit for filter access (or appropriate space for popper unit to
be moved to access filters).
3. The unit is equipped with rolling casters. The two casters on the operator (controls)
side have a locking/unlocking feature.
4. The main power cord is located in the cabinet base. Domestic units have a wall
receptacle provided (Twin Models have 2 plugs and 2 receptacles). A secondary,
smaller power cord, located in the cabinet base, is provided for powering the oil
dispense unit (discussed in Step 7).
Before plugging in machine, have a certified electrician install the wall receptacle and
follow all requirements listed in the Electrical Requirements section of this manual.
Units WITHOUT Fire Suppression: Skip to Step 7.
Units WITH Fire Suppression:
With power to the unit, the popper will NOT operate until the ANSUL
system has been charged and activated by an ANSUL Certified
Representative. If connecting the system to the building alarm, see next step
prior to having the ANSUL system activated.
5. If the Fire Suppression System is to be connected to the building alarm, contact a
qualified alarm system technician to make the connection prior to having the Fire
Suppression System armed. (Reference Connecting to a Building Alarm System in the
Fire Suppression System section of this manual.)
6. Have an Ansul Certified Representative charge and activate the Fire Suppression
System (reference the Fire Suppression System section of this manual).
For a local representative, go to www.Ansul.com.
When system is activated, and the Power Switch is turned ON, the cabinet lighting and
sign will turn on. (The unit will not turn on if the fire suppression system is not activated.)
Note: As the popper unit is plugged in (when the Fire Suppression System is armed) a
distinct click can be heard as the Fire Suppression relay kicks in.
Page 9
Instruction Manual - Touch Screen 2011, 2848, 2860, 2872, and 2873 (32 oz. Pop-O-Golds)
PopClean Elite Popper -600 Series 2911, 2948, 2960, 2972, and 2973 (52 oz. Medallions)
Page 9
gmpopcorn.com
7. The small power cord (6 pin Jones Plug) is the oil pump harness which supplies power
to the oil dispense unit. The load cell wire harness connects the oil level indicator on
the Touch Screen Control to the load cell sensor for the oil dispense unit.
8. To connect the oil dispense system to the popper, refer to the Bag-in-a-Box or Bucket
Pump Instruction Manual included with the unit. (Generally, poppers with a Bag-in-aBox option are shipped with the oil dispense unit pre-installed. Bucket Pump units are
shipped separately and must be installed during setup of the unit).
Note: Once popper installation is complete, and the oil dispense unit is attached, the
Oil Level (located on the digital display) can be calibrated. Reference Initial
Startup – User Configuration section of this manual.
9. Open the cabinet base and remove all accessory items from the pull out corn drawer.
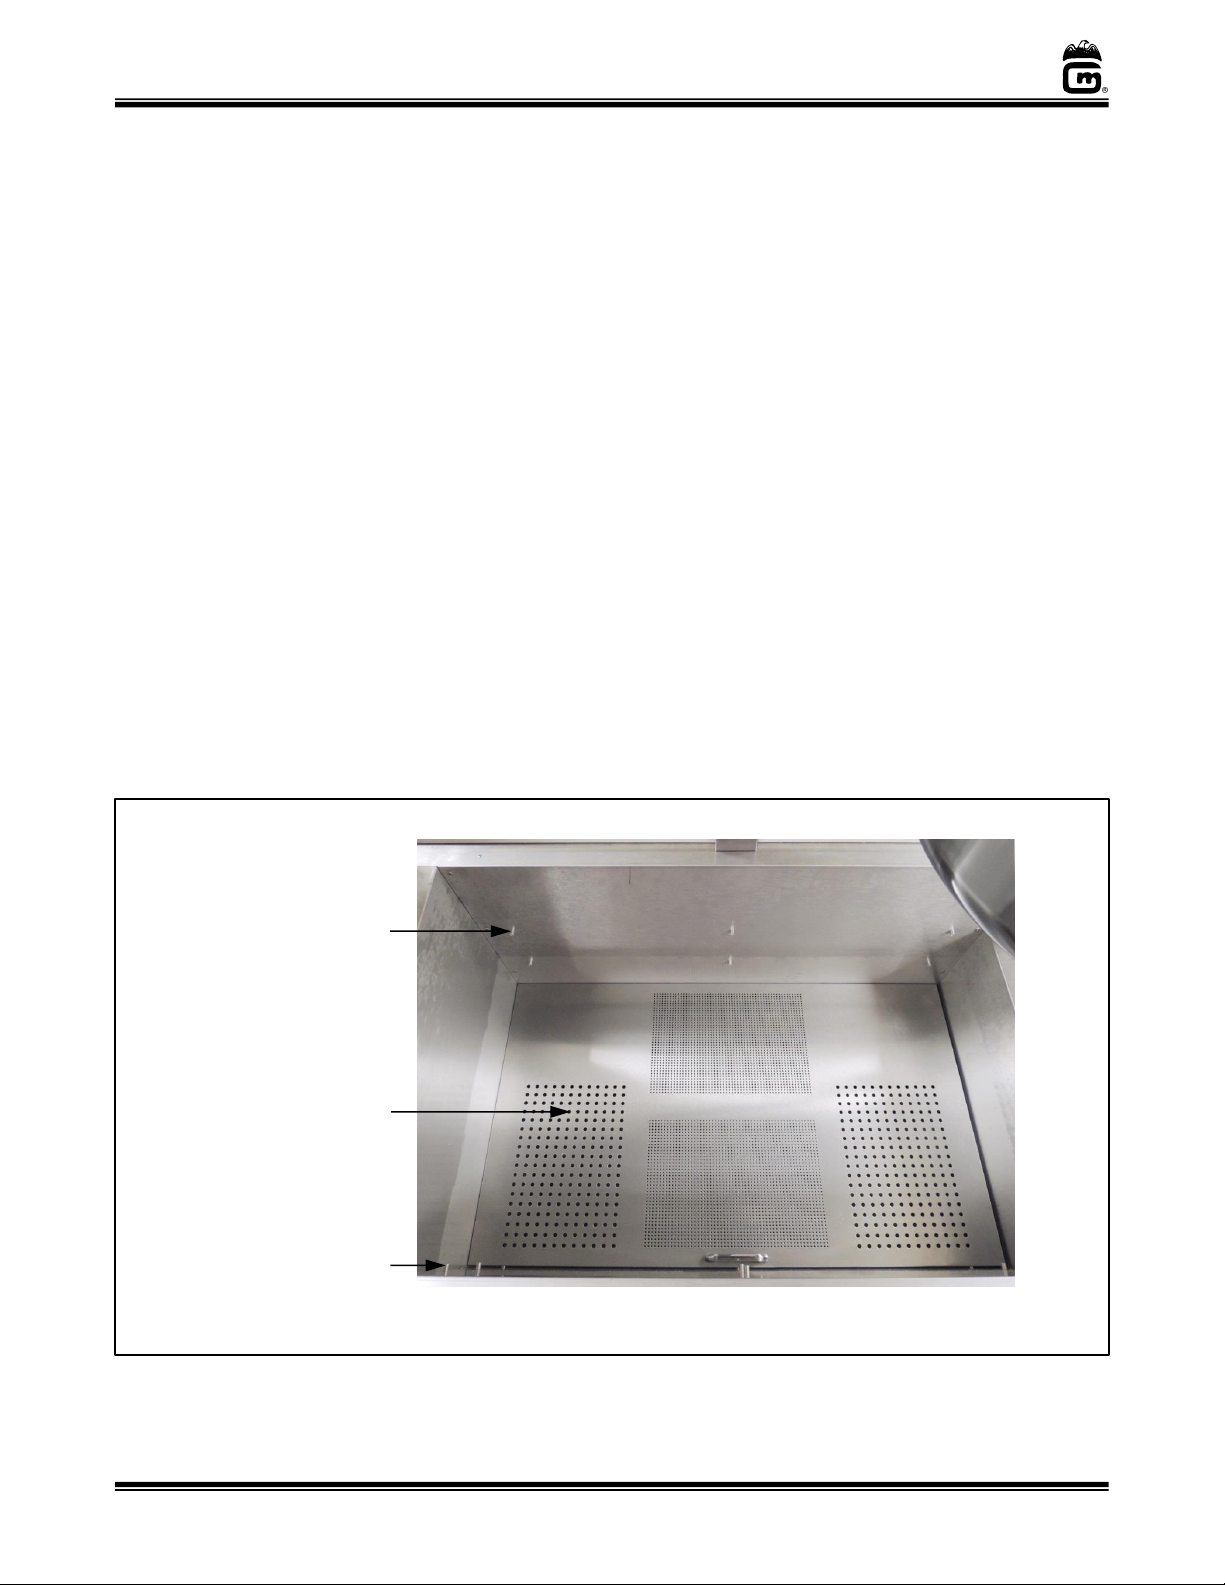
10. Units with a Deep Well (48”, 60”, 72” Models only): By default, the unit is shipped
from the factory with the corn pan in a deep well position. If needed, the corn pan may
be raised to an elevated position using the 3 front pins and the 3 back pins as a rest
(see image below).
11. Units with a RH or LH Chute Option: Reference next section for chute installation.
12. After setup, the unit should be cleaned. The kettle has a food grade protective coating
applied to the cooking surfaces, this coating must be removed prior to operating the
unit (see Care and Cleaning section of this manual).
Corn Pan
Deep Well Corn Bin View
3 Back Pins
Used to elevate the Corn Pan
for a shallower Corn Bin.
3 Front Pins
Used to elevate the Corn Pan
for a shallower Corn Bin.
Page 10

Instruction Manual - Touch Screen 2011, 2848, 2860, 2872, and 2873 (32 oz. Pop-O-Golds)
PopClean Elite Popper -600 Series 2911, 2948, 2960, 2972, and 2973 (52 oz. Medallions)
Page 10
gmpopcorn.com
Chute Installation
RH or LH Chute option - General RH images shown for installation reference only. Install Chute
Plate in popper cabinet (reference images below).
To install the Chute, position it in the plate opening as shown below, then slide the chute down
into the holding brackets. For use, have a holding bin in place to accept the popped corn from the
chute.
RH Chute shown
installed
Step 1: Position chute end into the side plate as shown.
Step 2: Slide Chute down into the brackets to install.
1
2
Chute Plate
Chute
Brackets
Chute Plate Installation
Chute Brackets
Top channel to
hold glass.
Use bracket holes
to mount Chute to
popper corner
posts.
Chute Plate View
To install Chute Plate:
Remove 2 corner post
screws on each side,
then reuse screws to
fasten the Chute Plate
in position as shown.
Corner Post
Chute Installation
Page 11
Instruction Manual - Touch Screen 2011, 2848, 2860, 2872, and 2873 (32 oz. Pop-O-Golds)
PopClean Elite Popper -600 Series 2911, 2948, 2960, 2972, and 2973 (52 oz. Medallions)
Page 11
gmpopcorn.com
Electrical Requirements
Emissions listing for Updraft and Downdraft units:
Updraft: 3.6 mg particulates/cubic meter of exhaust air
Downdraft: 1 mg particulates/cubic meter of exhaust air
The following power supply must be provided:
Note: Twin Models have two kettles, a dual updraft system, and two linked fire
suppression systems (some Exports exclude Fire Suppression System). Two plugs,
one for each side of popper, are supplied with Twin Models (Domestic units
include two wall receptacles).
DOMESTIC UNITS: 120/208 or 120/240 V~, 60 Hz
(reference unit Data Plate for Wattage requirement)
Twin Models are supplied with two plugs, one for each side of popper.
Domestic units are designed to operate on single phase, 50 AMP, 4 wire supply, 120/208
or 120/240 V~ (2 Hot, 1 Neutral, 1 Ground). All electrical components in this machine are
120 V (motors, heat elements, lights, etc.) and therefore require “Hot to Neutral” connection
(NOT “Hot to Hot”). A 50 AMP wall receptacle (NEMA 14-50) is supplied with the machine.
The receptacle will accept the attachment plug on the machine and must be used; reference
the Receptacle Wiring Diagram for NEMA 14-50 for receptacle installation instructions.
EXPORT UNITS: 220-230 V~, 50/60 Hz (reference unit Data Plate for Wattage requirement)
Potential Electrical Variations: 220 V~, 60 Hz
Twin Models are supplied with two plugs, one for each side of popper.
Export units are designed to operate on single phase, 16 AMP, 4 wire supply, 230 V~
(2 Hot, 1 Neutral, 1 Ground). All electrical components in this machine are 230 V (motors,
heat elements, lights, etc.) and therefore require “Hot to Neutral” connection (NOT “Hot to
Hot”). A certified electrician must supply and install the wall receptacle for this unit;
reference the Receptacle Wiring Diagram for Export Units.
Australia - 52 oz. units are designed to operate on single phase, 36 AMP, 2 wire supply,
plus ground. All electrical components in machine are 230 V (motors, heat elements,
lights, etc.) A certified electrician must supply and install the wall receptacle for this unit.
DANGER
Machine must be properly grounded to prevent electrical shock to personnel.
Failure to do so could result in serious injury, or death.
DO NOT immerse any part of this equipment in water.
DO NOT use excessive water when cleaning.
Keep cord and plug off the ground and away from moisture.
Always unplug the equipment before cleaning or servicing.
Make sure all machine switches are in the OFF position before plugging the
equipment into the receptacle.
008_051514
A certified electrician must furnish sufficient power for proper machine operation and install any
supplied receptacle (reference unit Data Plate for model specific Volts AC, Hertz, and Wattage
Page 12
Instruction Manual - Touch Screen 2011, 2848, 2860, 2872, and 2873 (32 oz. Pop-O-Golds)
PopClean Elite Popper -600 Series 2911, 2948, 2960, 2972, and 2973 (52 oz. Medallions)
Page 12
gmpopcorn.com
requirements). We recommend this equipment be on a dedicated and protected circuit. Failure
to wire properly will void the warranty and may result in damage to the machine. It is Gold Medal
Products Co.’s recommendation that this machine be plugged directly into a wall outlet. The use of
extension cords is not recommended due to safety concerns, and may cause sacrificed and/or
reduced performance. Make sure cord is located to prevent a trip hazard or unit upset.
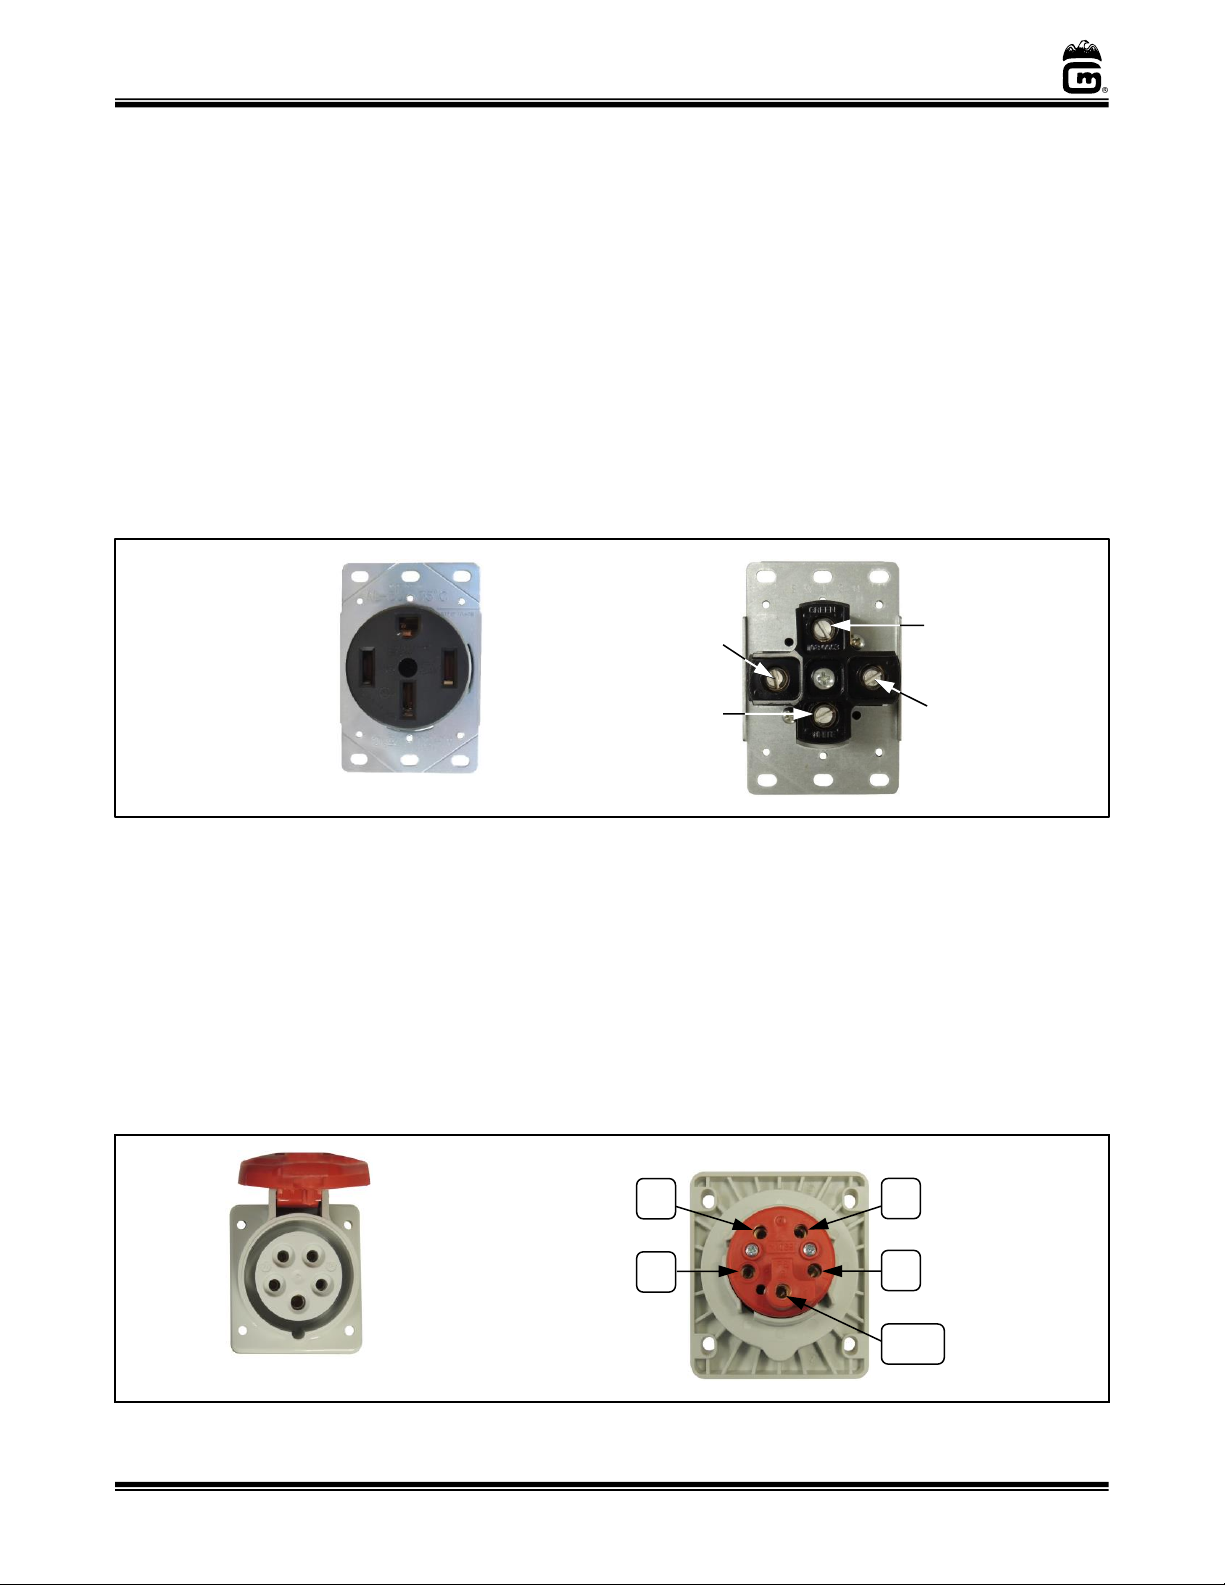
Receptacle Wiring Diagram for NEMA 14-50 (Domestic)
A certified electrician must follow the IMPORTANT instructions below for installation of the
NEMA 14-50 Receptacle (Gold Medal Item No. 82920) provided with the unit.
If the receptacle is wired incorrectly, the heat elements/kettle and other electrical components
could be at 208 or 240 V potential instead of the needed 120 V, resulting in excessive temperatures
in the heat elements (i.e.: kettle) and possible fire, and/or damage to electrical components.
Receptacle Wiring Diagram (for Export Units – except Australia)
A certified electrician must supply and install the required wall receptacle for this unit, follow
the IMPORTANT instructions shown.
This unit is designed to operate on single phase, 16 AMP, 4 wire supply. All electrical
components in this machine are 230 V. If the receptacle is wired incorrectly, the heat
elements/kettle and other electrical components could be at 400 V potential instead of the
needed 230 V, resulting in excessive temperatures in the heat elements (i.e.: kettle) and possible
fire, and/or damage to electrical components.
3P+N+E IEC 309 Receptacle - Front and Back View
PE-G
L2
L1
Connect to Black
(Hot) Wire
Connect to Brown
(Hot) Wire
Connect to
Green/Yellow
(Ground) Wire
Connect to Blue
(Neutral) Wire
L3
N
Not Used
(If 5 wires provided,
connect Grey here.)
NEMA 14-50 Receptacle - Front and Back View
Connect to Green
(Ground) Wire
Connect to Red
(Hot) Wire
Connect to Black
(Hot) Wire
Connect to White
(Neutral) Wire
Page 13
Instruction Manual - Touch Screen 2011, 2848, 2860, 2872, and 2873 (32 oz. Pop-O-Golds)
PopClean Elite Popper -600 Series 2911, 2948, 2960, 2972, and 2973 (52 oz. Medallions)
Page 13
gmpopcorn.com
Before You Plug In Machine
1. Make sure all machine switches are OFF before plugging equipment into receptacle.
2. Make sure wall outlet can accept the grounded plugs (where applicable) on the power
supply cord.
3. The wall outlet must have the proper polarity. If in doubt, have a competent
electrician inspect the outlet and correct if necessary.
4. DO NOT use a grounded to un-grounded receptacle adapter (where applicable).
5. Install unit in a level position.
CAUTION
If the supply cord is damaged, it must be replaced by Gold Medal Products Co.,
its service agent or similarly qualified persons in order to avoid a hazard.
039_080614
Page 14

Instruction Manual - Touch Screen 2011, 2848, 2860, 2872, and 2873 (32 oz. Pop-O-Golds)
PopClean Elite Popper -600 Series 2911, 2948, 2960, 2972, and 2973 (52 oz. Medallions)
Page 14
gmpopcorn.com
Fire Suppression System
(some Exports excluded)
Information in this section is intended for reference use by an Ansul Certified Representative ONLY,
for units equipped with a Fire Suppression System (some Exports exclude Fire Suppression System).
The Elite Series PopClean Poppers must be properly installed observing all minimum clearances
(reference Setup section) and have all electrical requirements met prior to the activation of the
Fire Suppression System (reference Electrical Requirements section). If the system is to be
connected to the building alarm, contact a qualified alarm system technician to make the
connection prior to having the Fire Suppression System activated (reference below Connecting
to a Building Alarm System).
The Elite Series Popper is equipped with an ANSUL R-102 Fire Suppression System. All
components are in accordance with the Ansul R-102 specifications and are tested and approved
by Intertek-ETL to U.L. Standard 710B.
The Fire Suppression System is fully assembled and a tank is provided for the liquid fire
suppressant agent, ANSULEX (the tank must be charged with agent by an Ansul Certified
Representative ONLY). The unit will not turn on if the Fire Suppression System is not activated.
As the popper unit is plugged in (when the Fire Suppression System is armed) a distinct click can
be heard as the Fire Suppression System relay kicks in.
Note: Machine will not operate until the Ansul System has been charged and
activated by an Ansul Certified Representative. For a local representative, go
to www.Ansul.com. If connecting to the building alarm system, this “tie-in”
must be made prior to activating the Fire Suppression System.
System Operation and Maintenance
In the event of a fire, the system will automatically activate the Fire Suppression System;
however, if the operator chooses, they can operate the system by pulling the manual pull. The
automatic system utilizes temperature rated fusible links found throughout the Fire Suppression
System. A link (or multiple links) will break in a fire and trigger the automatic Fire Suppression
System to deploy. These links must be inspected and/or serviced by an Ansul Certified
Representative ONLY.
Maintenance must be routinely performed on this system (and in the event of a fire), by an Ansul
Certified Representative; they will advise on the frequency of inspections required. The
representative will thoroughly inspect the entire Fire Suppression System, replace any needed
components, then recharge the system, and ensure it is operational. In the event the system has
been discharged, the Ansul Certified Representative will need to flush the pipes and reactivate
the system.
Page 15
Instruction Manual - Touch Screen 2011, 2848, 2860, 2872, and 2873 (32 oz. Pop-O-Golds)
PopClean Elite Popper -600 Series 2911, 2948, 2960, 2972, and 2973 (52 oz. Medallions)
Page 15
gmpopcorn.com
Connecting to a Building Alarm System
The Fire Suppression System is equipped with the necessary components to be connected into
the building’s alarm system (optional). Have a qualified alarm system technician make the
connection. Once “tied in”, the building alarm will be activated if the Fire Suppression System is
triggered.
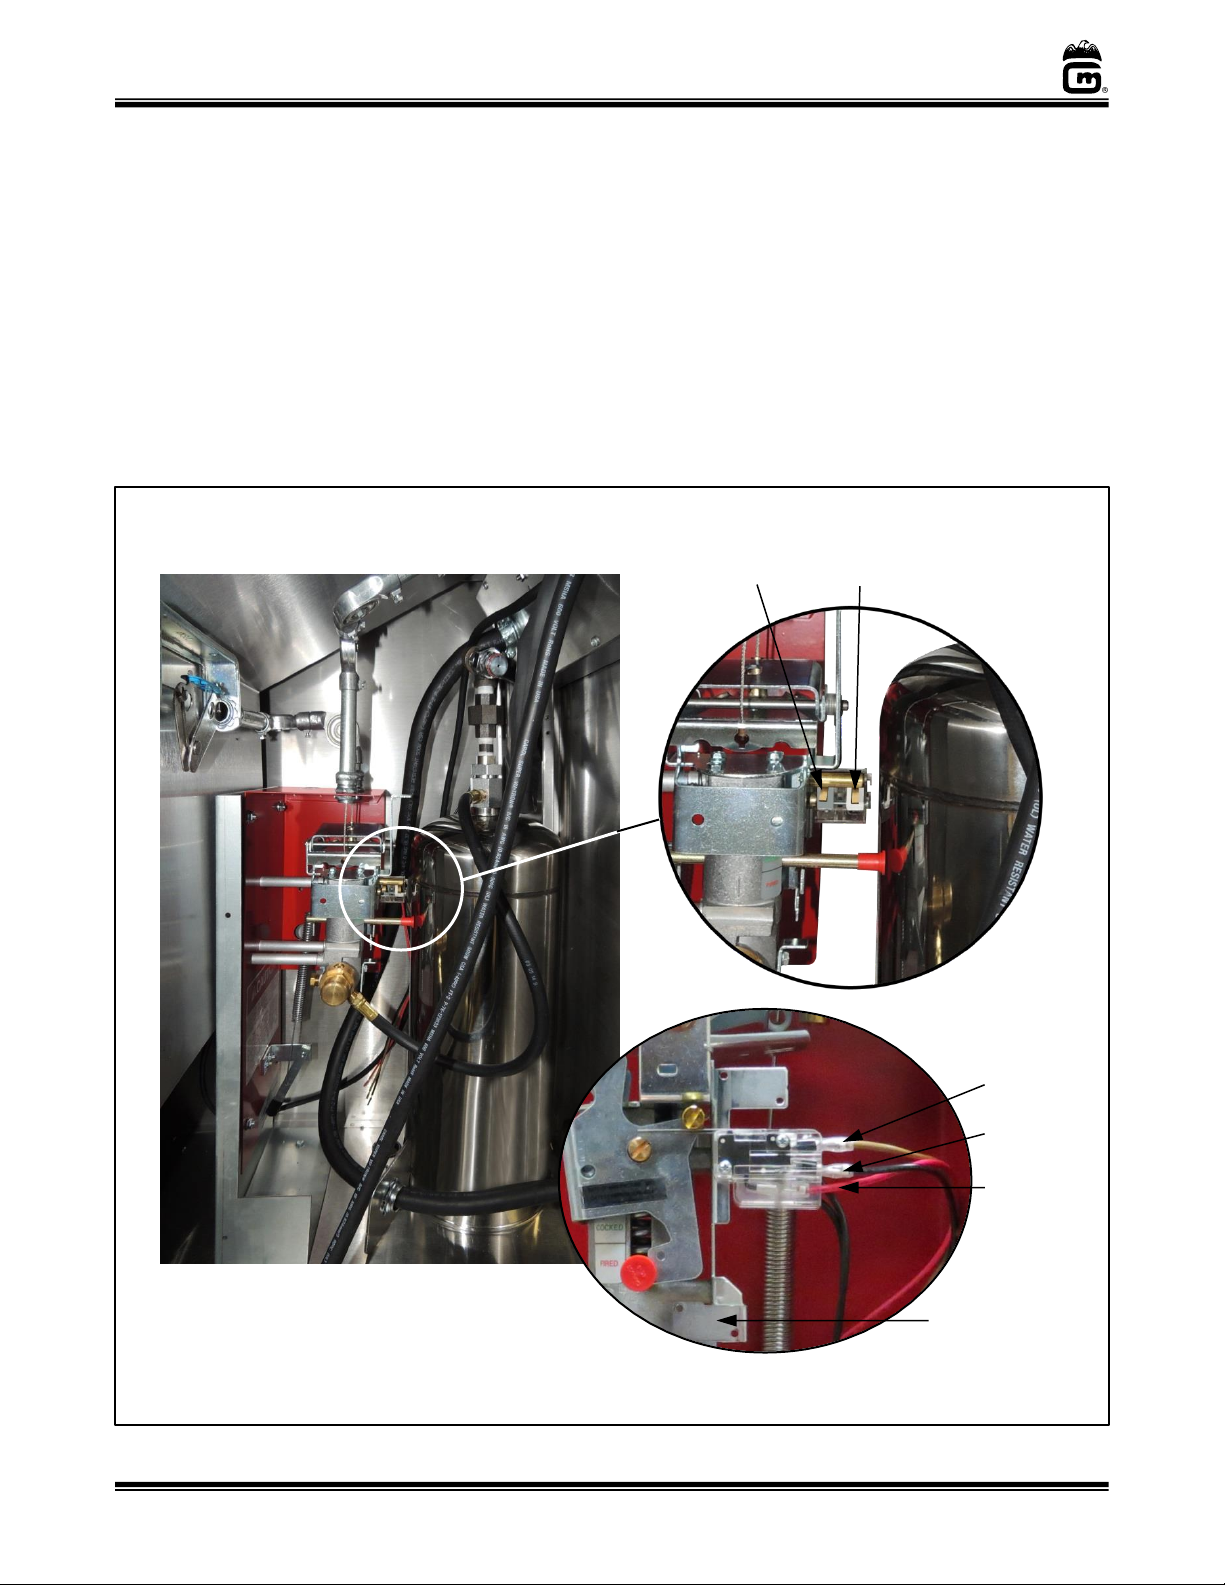
The alarm system connections are located in the fire suppression components compartment in
the base of the popper. To access this compartment, remove the oil dispense unit, then remove
the cover plate to view the limit switches. The left limit switch is for the popper, the right switch
is for wiring the building alarm (optional). Once the alarm connection is complete, the unit can
be charged and activated.
Limit Switch
for Popper
Connecting to a Building Alarm
Limit Switch for Building
Alarm Connection
Normally
Closed
Normally
Open
Common
Limit Switch Side View
Fire Suppression Components
Compartment – Interior View
CO2 Cartridge
Interlock Switch
(this switch is not
used)
Page 16

Instruction Manual - Touch Screen 2011, 2848, 2860, 2872, and 2873 (32 oz. Pop-O-Golds)
PopClean Elite Popper -600 Series 2911, 2948, 2960, 2972, and 2973 (52 oz. Medallions)
Page 16
gmpopcorn.com
Components for the Fire Suppression System
The following information is intended for reference use by an Ansul Certified Representative ONLY.
Spray Nozzles – Two types used (1N and 2W). Nozzles located near the kettle, in filter system,
and near oil dispense unit. Reference Nozzle and Fusible Link Locations section for
individual nozzle type and location on either an Updraft or Downdraft Model.
1N Spray Nozzle (Gold Medal Part No. 62001; Ansul Part No. 419346)
2W Spray Nozzle (Gold Medal Part No. 62786; Ansul Part No. 439840)
All nozzles must be equipped with a blow off cap to protect the spray opening (Gold
Medal Part No. 62004; Ansul Part No. 433208). Cap should be kept on nozzle at all times,
unless forced off during a system deployment.
280°F High Temperature Fusible Link (Gold Medal Part No. 62064; Ansul Part No. 439087) -
Reference Nozzle and Fusible Link Locations section for individual link location on either
an Updraft or Downdraft Model.
Updraft Models (single kettle) – 2 high temperature links used (one for the kettle)
Updraft Models (twin kettle) – 3 high temperature links used (one for each kettle)
Downdraft Models (single kettle) – 3 high temperature links used (one for the kettle)
3 Gallon Tank (Gold Medal Part No. 62513; Ansul Part No. 429862) – Agent tank is located in
the fire suppression component’s compartment, behind the oil dispense unit in the cabinet
base. To open compartment, remove the oil dispense unit, then remove the access panel.
CO2 Cartridges
Ansul Part No. 101-20 is the CO2 cartridge used on single kettle, Elite Series Poppers.
Ansul Part No. 101-30 is the CO2 cartridge used on twin kettle, Elite Series Poppers.
Manual Pull Station – (Gold Medal Part No. 62009; Ansul Part No. 434618)
Page 17
Instruction Manual - Touch Screen 2011, 2848, 2860, 2872, and 2873 (32 oz. Pop-O-Golds)
PopClean Elite Popper -600 Series 2911, 2948, 2960, 2972, and 2973 (52 oz. Medallions)
Page 17
gmpopcorn.com
Nozzle and Fusible Link Locations
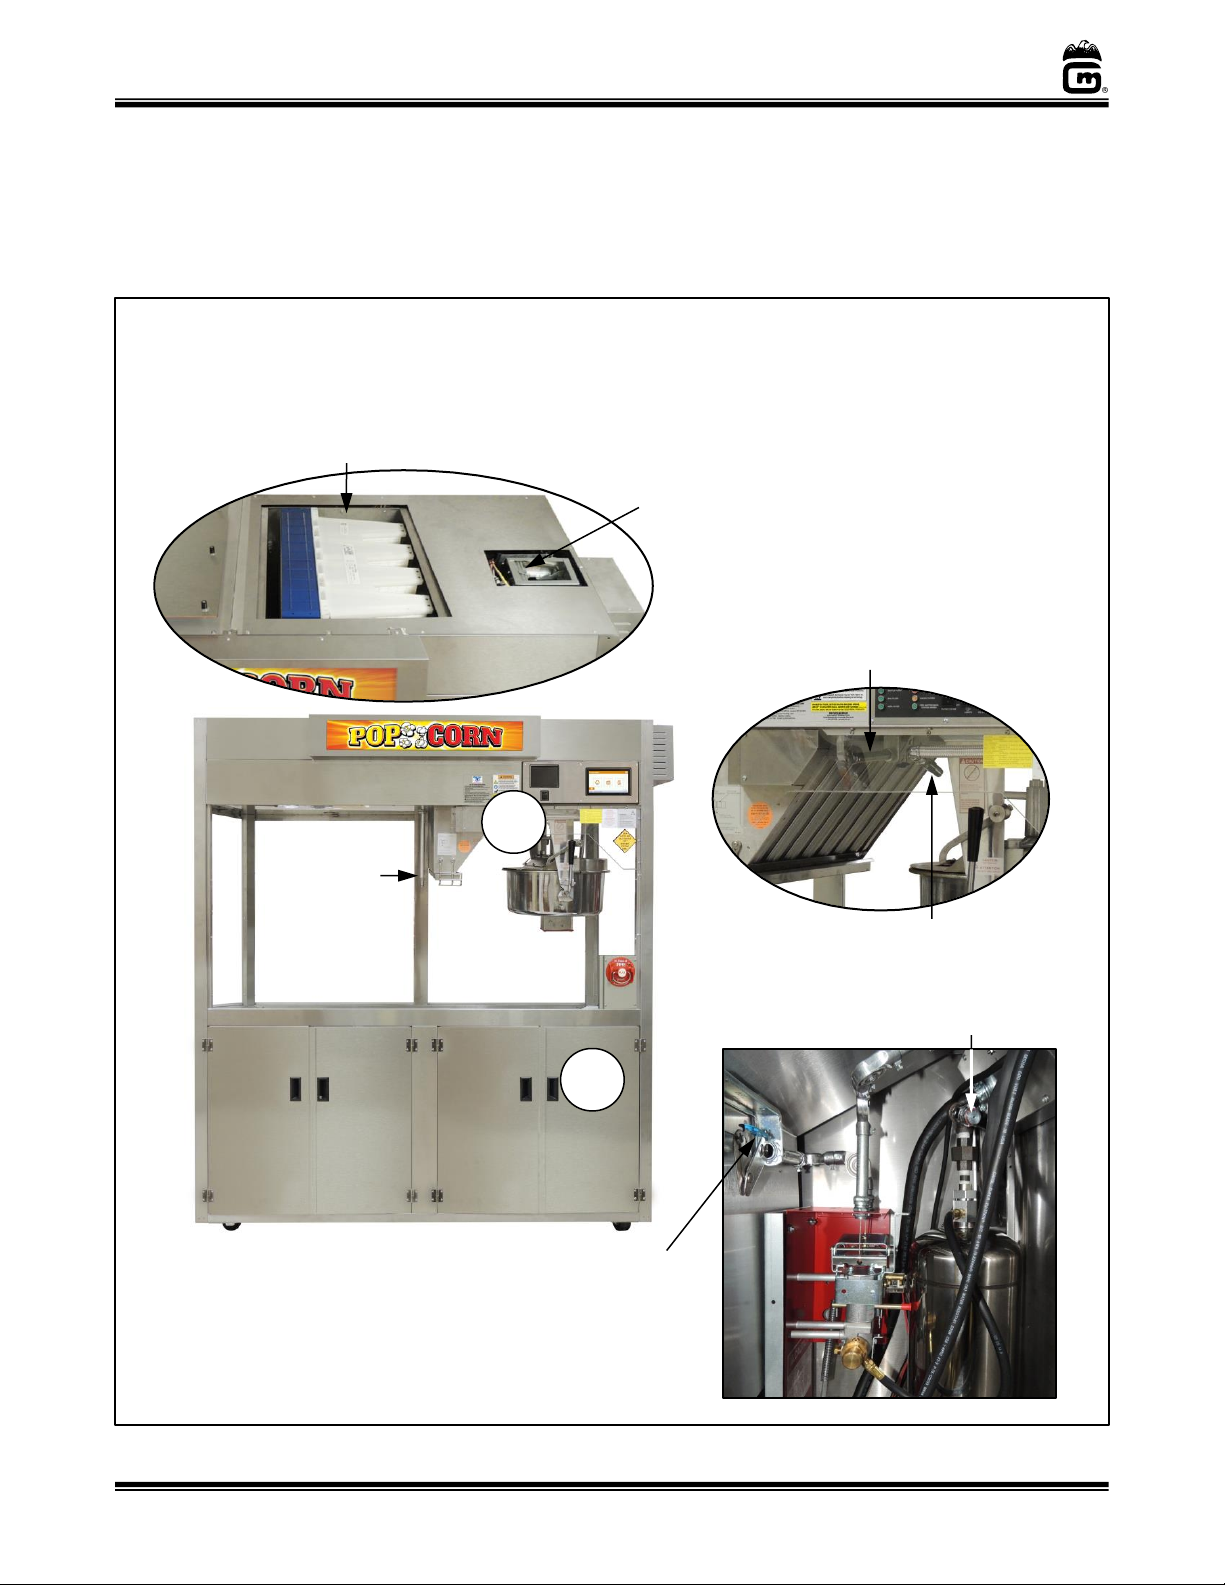
Each Updraft and Downdraft PopClean Popper is equipped with spray nozzles and temperature
rated fusible links located throughout the Fire Suppression System. This section describes the
nozzle and link types and locations on Updraft and Downdraft Models.
280°F Fusible Link
High temperature rated link
for first response to a kettle
fire (one for each kettle).
Fire Damper
In the event of a fire in the blower compartment,
the Fire Damper will close to prevent flames
from escaping the unit.
Updraft Models – Spray Nozzle and Fusible Link Locations
Updraft units have 2 Fusible Links (3 Fusible Links on Twin Models) and 5 Spray Nozzles (9 Spray
Nozzles on Twin Models).
2W Spray Nozzle
(two nozzles used
for each kettle)
2W Spray Nozzle
2W Spray
Nozzle
Link
1
Link
2
280°F Fusible Link
High temperature rated
link (located in cabinet
base) for oil supply fire
detection. To access,
remove oil dispense unit.
1N Spray Nozzle
Page 18
Instruction Manual - Touch Screen 2011, 2848, 2860, 2872, and 2873 (32 oz. Pop-O-Golds)
PopClean Elite Popper -600 Series 2911, 2948, 2960, 2972, and 2973 (52 oz. Medallions)
Page 18
gmpopcorn.com
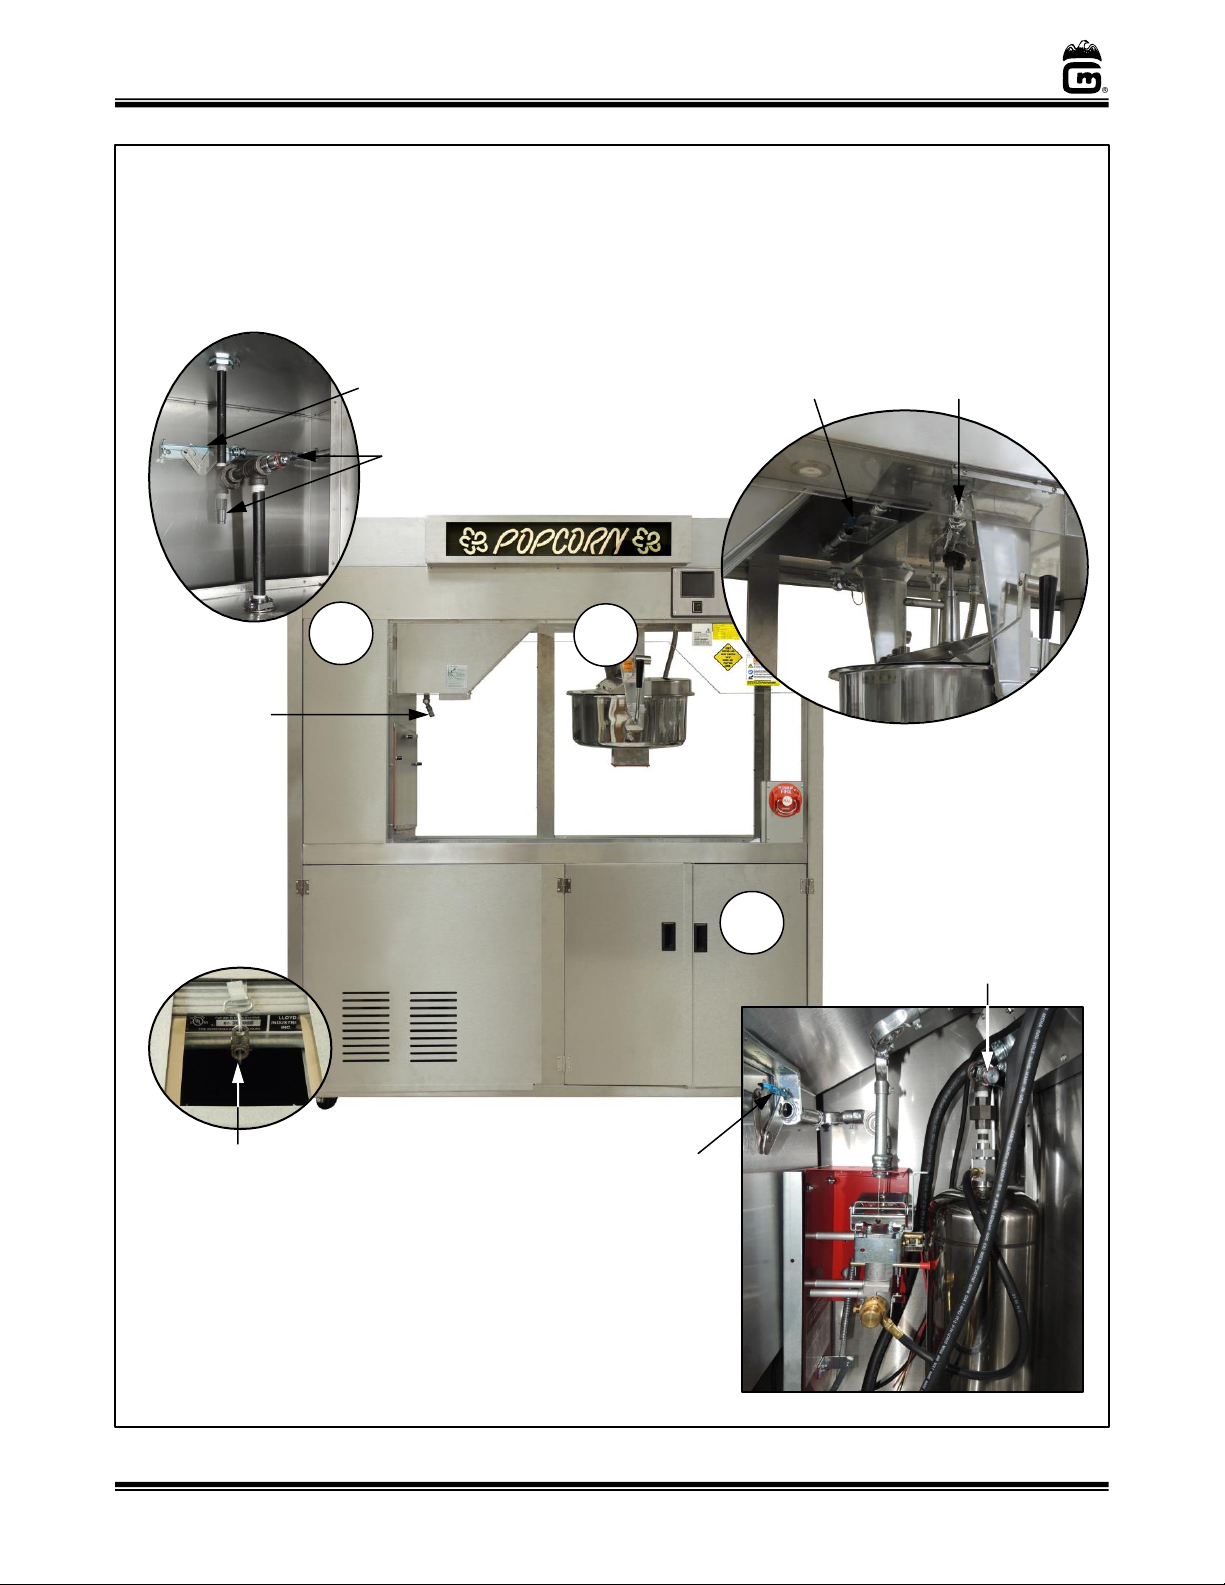
Downdraft Models – Spray Nozzle and Fusible Link Locations
Downdraft units have 3 Fusible Links and 6 Spray Nozzles.
280°F Fusible Link
High temperature rated
link for first response
to a kettle fire (located
above kettle).
2W Spray Nozzle
(two nozzles used
for kettle)
2W Spray Nozzles
2W Spray
Nozzle
280°F Fusible Link
High temperature rated link
(located in ductwork) for filtration
system fire detection. To access,
remove the Baffle Filter.
Link
1
Link
2
280°F Fusible Link
High temperature rated
link (located in cabinet
base) for oil supply fire
detection. To access,
remove oil dispense
unit.
Fire Damper
In the event of a fire in the blower
compartment, the Fire Damper
will close to prevent flames from
escaping the unit. To access, open
the vented panel door.
1N Spray Nozzle
Link
3
Page 19
Instruction Manual - Touch Screen 2011, 2848, 2860, 2872, and 2873 (32 oz. Pop-O-Golds)
PopClean Elite Popper -600 Series 2911, 2948, 2960, 2972, and 2973 (52 oz. Medallions)
Page 19
gmpopcorn.com
Filter System
The popper is equipped with an efficient 3 stage filtration system. All filters must be installed
correctly, the filter door must be closed, and NO filter system errors shown on the display for the
Filter System and Kettle Heat to operate.
Note: Unit has a Filter Timeout feature which automatically shuts the Filter System off
after an allotted period of idle time (no popcorn popped). Default timeout is 15
minutes (to adjust the timeout setting, refer to Navigating the Touch Screen
Control section N7.10 User Configuration).
Each filter and the filter door have a corresponding interlock switch which must be engaged for
the kettle to heat. A filter/interlock issue will be indicated on the display (reference the Filter
System Error Code Explanation Table on next page).
Always keep a spare set of filters on hand. When the display shows a Change Filter Error (indicating
insufficient filter efficiency), THE FILTER SYSTEM AND KETTLE HEAT WILL NOT OPERATE
until the Box and/or HEPA Filters are changed.
Generally, the HEPA Filter will last longer than the Box Filter. When the display indicates Change
Filter, replace the Box Filter; the next time Change Filter is indicated, replace both filters
(depending on usage, this scenario may not always occur). Reference the Updraft or Downdraft
Filter section accordingly for filter access and installation.
Note: Popping sugar corn will greatly reduce the life of the filters.
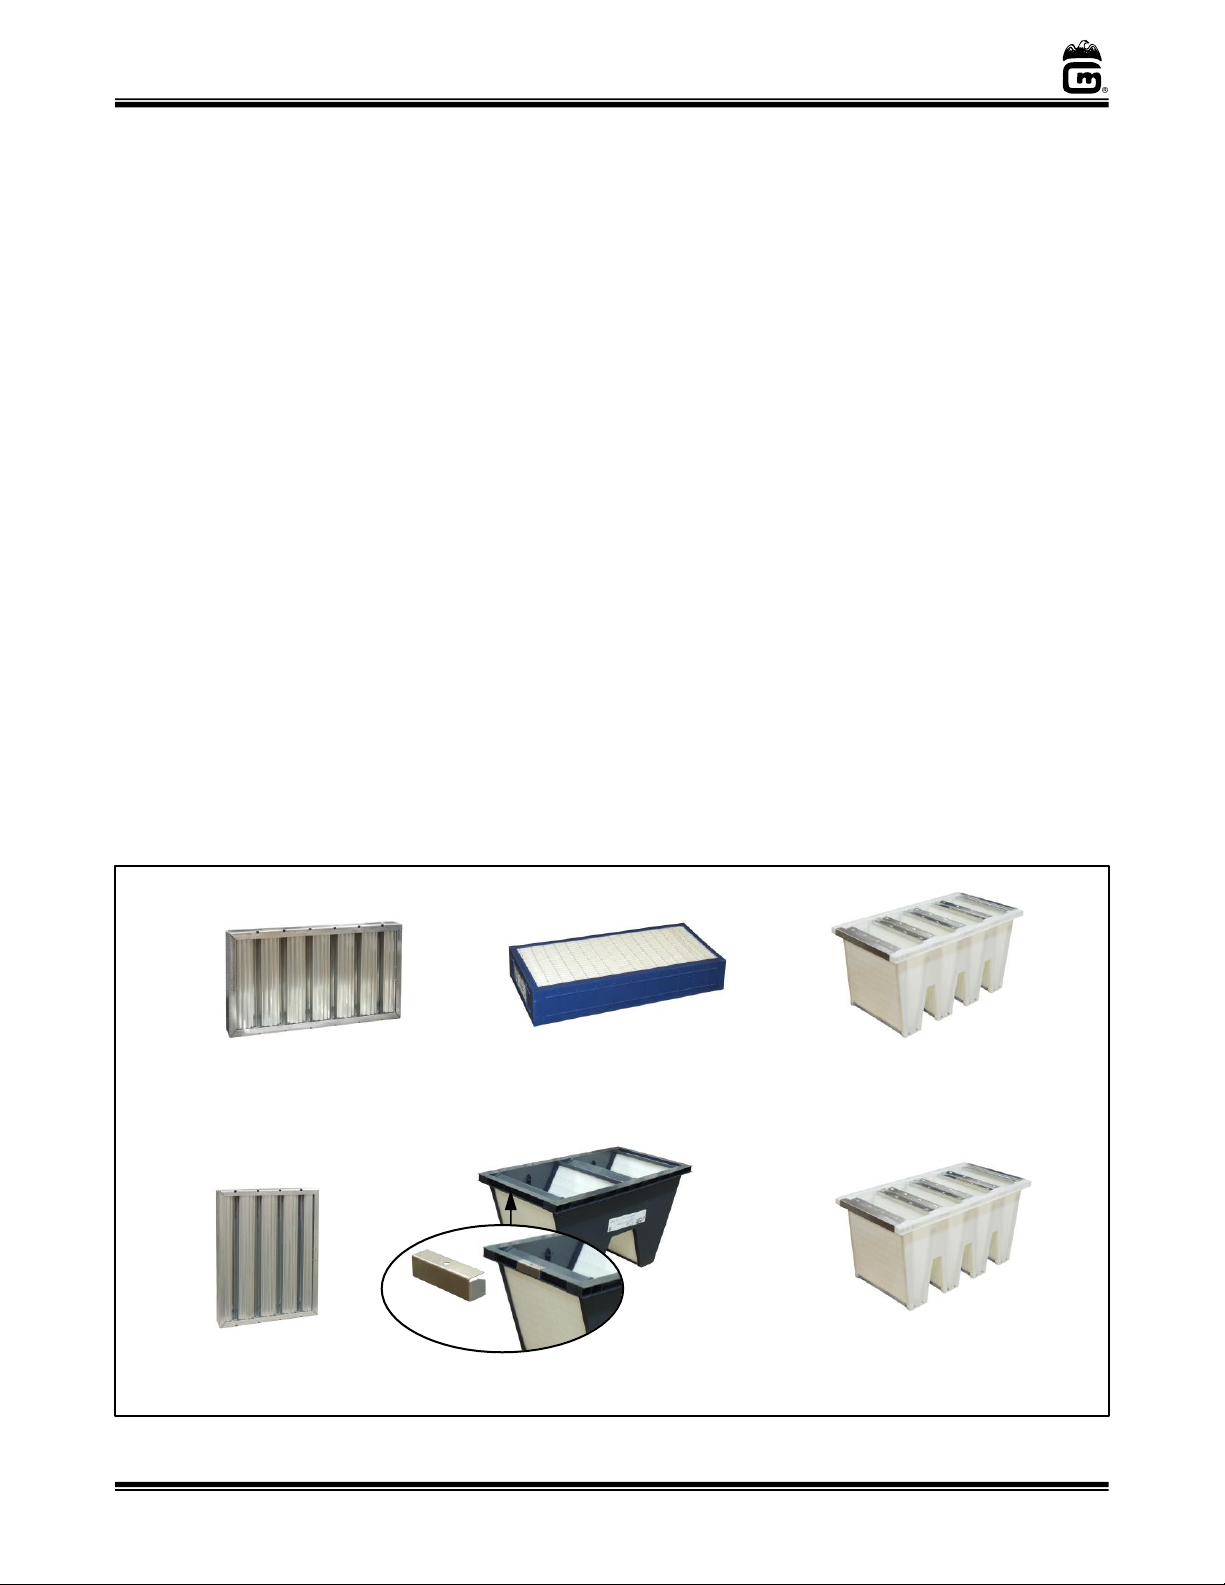
Filter Types
Updraft Filters
Baffle Filter
(Filter is washable.)
Updraft Box Filter (12x24x4)
(Replaceable ONLY, DO NOT
attempt to clean this filter.)
HEPA Filter
(Replaceable ONLY, DO NOT
attempt to clean this filter.)
Baffle Filter
(Filter is washable.)
Filter Plug shown installed.
Filter Plug is reusable.
Downdraft Filters
(Replaceable ONLY,
DO NOT attempt to
clean this filter.)
Filter Plug
HEPA Filter
(Replaceable ONLY, DO NOT
attempt to clean this filter.)
Downdraft
Box Filter
Page 20
Instruction Manual - Touch Screen 2011, 2848, 2860, 2872, and 2873 (32 oz. Pop-O-Golds)
PopClean Elite Popper -600 Series 2911, 2948, 2960, 2972, and 2973 (52 oz. Medallions)
Page 20
gmpopcorn.com
Filter System Error Code Explanation Table
After changing a filter(s) or correcting a filter system error code, turn the Power Switch OFF
then back ON to reset the display screen.
Error Code
Display View
Explanation - Solution
Error Code 10
Check Filter
E10
Error: Check Filter
(Filters need to be cleaned
soon.)
Indicates pressure switch detects Box and HEPA Filter
efficiency is reduced to less than 80%. Unit will still operate
but have replacement filters available for use when needed.
• Press (OK) to return to cooking screen.
• Otherwise, error screen goes away when cooking screen
advances to the next phase.
Error Code 11
Change Filters
Change Filters
Air filters need to be
changed!
Indicates pressure switch detects Box and HEPA Filter
efficiency is reduced to less than 75%. When a Change Filter
error is displayed, THE FILTER SYSTEM AND THE KETTLE
HEAT WILL NOT OPERATE until the Box and/or HEPA Filters
are changed.
If the Change Filters error occurs during a popping cycle, THE
FILTER SYSTEM AND KETTLE HEAT ARE SHUT OFF AND
COOKING IS STOPPED.
• Press (OK) to go to Settings screen (for service
technician or manager only, passcode required to access
additional screens).
• Otherwise, turn machine OFF, change the Box and HEPA
Filters, then turn machine back ON. Reference the Updraft
or Downdraft Filter section accordingly.
Error Code 12
Filter Door Open
E12
Error: Filter Door open
(Turn machine OFF and
check filter door on top of
machine. If problem
persists, call Service.)
Indicates the Filter Door interlock switch is NOT engaged.
• Press (OK) to go to Settings screen (for service
technician or manager only, passcode required to access
additional screens).
• Otherwise, turn machine OFF, fix issue as noted below, then
turn machine back ON.
To fix a Filter Door issue (reference the Updraft or
Downdraft Filter section accordingly):
• Make sure the door is closed so the door tab engages
the interlock switch.
• Make sure EACH compression knob is fully twisted
clockwise to lock it in place.
Error Code 13
Baffle Filter
E13
Error: Baffle Filter
(Turn machine OFF and
verify baffle filter is in
place. If problem persists,
call Service.)
Indicates the Baffle Filter is not installed, or the interlock
switch is NOT engaged.
• Press (OK) to go to Settings screen (for service
technician or manager only, passcode required to access
additional screens).
• Otherwise, turn machine OFF, install the baffle filter or
make sure it engages the interlock, then turn machine back
ON. Reference the Updraft or Downdraft Filter section
accordingly for instructions on filter installation.
Page 21

Instruction Manual - Touch Screen 2011, 2848, 2860, 2872, and 2873 (32 oz. Pop-O-Golds)
PopClean Elite Popper -600 Series 2911, 2948, 2960, 2972, and 2973 (52 oz. Medallions)
Page 21
gmpopcorn.com
Error Code 14
Box Filter
E14
Error: Box Filter
(Turn machine OFF and
verify baffle filter is in
place. If problem persists,
call Service.)
Indicates the Box Filter is not installed, or the interlock switch
is NOT engaged.
• Press (OK) to go to Settings screen (for service
technician or manager only, passcode required to access
additional screens).
• Otherwise, turn machine OFF, install the box filter or make
sure it engages the interlock, then turn machine back ON.
Reference the Updraft or Downdraft Filter section
accordingly for instructions on filter installation.
Error Code 15
HEPA Filter
E15
Error: HEPA Filter
(Turn machine OFF and
verify HEPA filter is in
place. If problem persists,
call Service.)
Indicates the HEPA Filter is not installed, or the interlock
switch is NOT engaged.
• Press (OK) to go to Settings screen (for service
technician or manager only, passcode required to access
additional screens).
• Otherwise, turn machine OFF, install the HEPA filter or
make sure it engages the interlock, then turn machine back
ON. Reference the Updraft or Downdraft Filter section
accordingly for instructions on filter installation.
Page 22

Instruction Manual - Touch Screen 2011, 2848, 2860, 2872, and 2873 (32 oz. Pop-O-Golds)
PopClean Elite Popper -600 Series 2911, 2948, 2960, 2972, and 2973 (52 oz. Medallions)
Page 22
gmpopcorn.com
Updraft Filters
After changing filter(s) or correcting a filter system error code, turn the Power Switch OFF then
back ON to reset the display screen. Allow kettle to cool completely before accessing filters.
BAFFLE FILTER
To Remove the Baffle Filter:
1. Lift filter towards top of popper.
2. Swing bottom end clear of mounting
brackets and remove filter.
3. Reinstall in reverse order. Filter
holes should face outward to properly
drain into grease tray; make sure a
clean grease tray is in place. Ensure the
filter engages the interlock switch.
4. RESTART popper to clear error.
BOX FILTER and HEPA FILTER
To remove the Box Filter:
1. Rotate the six Compression Knobs counter-
clockwise, then lift off the Filter Door (door
MUST be reinstalled, so tab engages interlock,
then FULLY turn knobs clockwise to close).
2. Lift Box Filter out to remove (see image above).
To reinstall: Carefully slide the Box Filter in and
ensure the filter engages the interlock switch.
All filters MUST be properly installed, and all interlocks MUST be engaged for the popper to
operate. The display will show a filter system issue - to continue operation, recheck the indicated
filter or filter door and ensure the interlocks are engaged (reference images below).
2
1
Install Filter with
holes facing out.
Baffle Filter
Grease Tray
Baffle Filter Interlock
Compression Knob
Filter Door (Door Tab MUST engage Interlock)
Box Filter
HEPA Filter
Box Filter
Interlock
Filter Door Interlock
(Door Tab MUST engage)
HEPA Filter Interlock
To remove the HEPA Filter:
3. With the Box Filter removed, shift the
HEPA Filter over until it clears the door
opening, then lift out to remove.
4. Carefully reinstall in reverse order
and ensure filters engage interlock
switches.
5. RESTART popper to clear error.
Page 23

Instruction Manual - Touch Screen 2011, 2848, 2860, 2872, and 2873 (32 oz. Pop-O-Golds)
PopClean Elite Popper -600 Series 2911, 2948, 2960, 2972, and 2973 (52 oz. Medallions)
Page 23
gmpopcorn.com
Downdraft Filters
After changing filter(s) or correcting a filter system error code, turn the Power Switch OFF then
back ON to reset the display screen. Allow kettle to cool completely before accessing filters.
08
All filters MUST be properly installed, and all interlocks MUST be engaged for the popper to
operate. The display will show a filter system issue. To continue operation, recheck the indicated
filter or filter door and ensure the interlocks are engaged.
BAFFLE FILTER
To remove the Baffle Filter:
1. Lift filter towards top of popper.
2. Swing bottom end clear of mounting
brackets and remove filter.
3. Reinstall in reverse order. Filter
holes should face outward to
properly drain into grease tray; make
sure a clean grease tray is in place.
Ensure the filter engages the interlock
switch.
4. RESTART popper to clear error.
BOX FILTER and HEPA FILTER
To remove the Box Filter:
1. Rotate the three Compression
Knobs counter-clockwise to open
the Filter Door (close door to
engage interlock, then FULLY turn
knobs clockwise).
2. Slide Box Filter out to remove.
When reinstalling Box Filter: The
Filter Plug must be oriented on the
side shown to activate the Interlock
Switch. Carefully slide filter in along
guide rails ensuring the Filter Plug
correctly engages the interlock
switch.
To remove the HEPA Filter:
3. With the Box Filter removed, lift the
HEPA Filter up until it clears the
door opening, then remove.
4. Carefully reinstall in reverse order;
ensure filters engage interlock
switches.
5. RESTART popper to clear error.
2
1
Baffle Filter
Install Filter with
holes facing out.
Compression Knobs
Filter Door
Filter Plug (When reinstalling, ensure Interlock
Switch correctly engages Filter plug.)
Grease Tray
Box
Filter
Baffle Filter Interlock
HEPA Filter Interlock
HEPA Filter
Box Filter Interlock
Door
Interlock
Page 24

Instruction Manual - Touch Screen 2011, 2848, 2860, 2872, and 2873 (32 oz. Pop-O-Golds)
PopClean Elite Popper -600 Series 2911, 2948, 2960, 2972, and 2973 (52 oz. Medallions)
Page 24
gmpopcorn.com
OPERATING INSTRUCTIONS
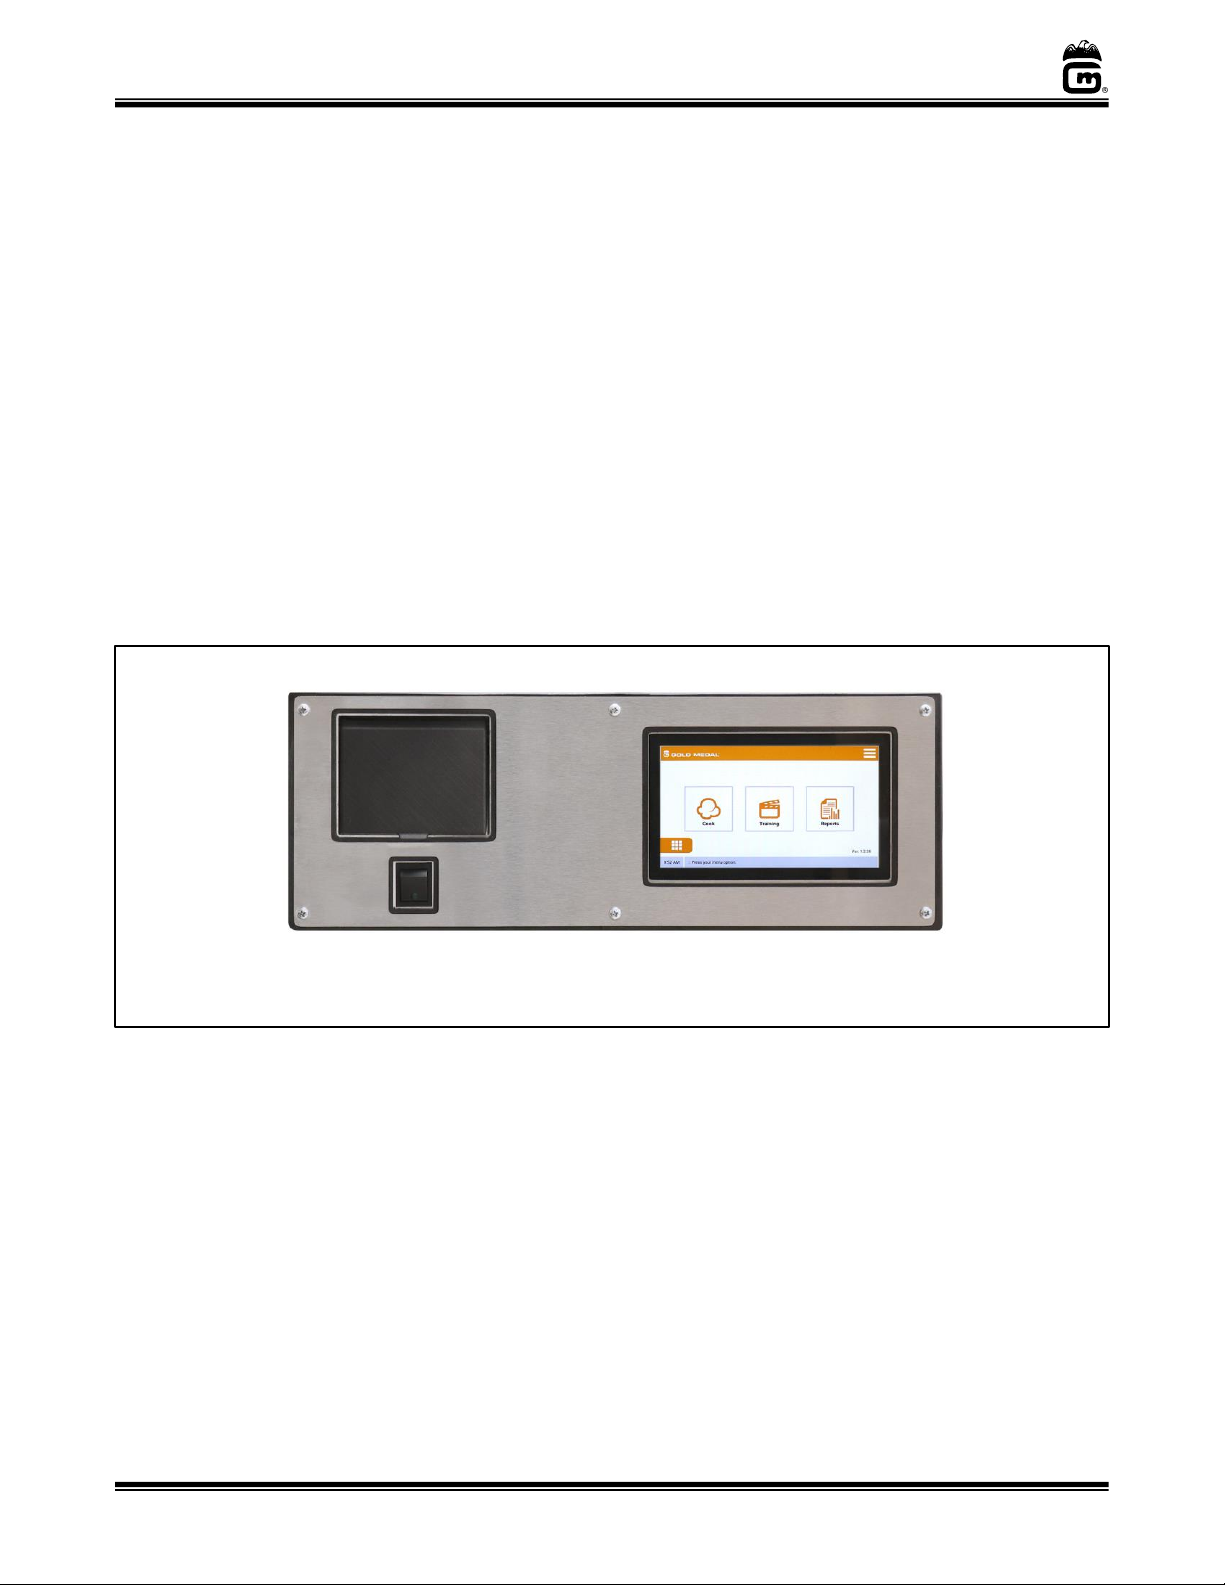
Controls and Their Functions
MAIN POWER SWITCH
Two position, ON/OFF rocker switch - supplies power to the display, sign, and interior
cabinet lights. LED switch light ON indicates there is power to these features. (Twin
Models have an additional left hand side Power Switch and Touch Screen to control the
LH Kettle, LH Oil Unit, and LH Filter System.)
CIRCUIT BREAKERS
Two mini Circuit Breakers are located on the control panel, to protect the popper unit from
an overload condition. If unit is plugged in, but the kettle agitator or oil system does not
come on when activated, then the circuit breaker(s) may be tripped. (Reference the
Troubleshooting section of this manual).
USB PORT
Used for updating software and to upload/download information for the machine ONLY. This
is NOT a charging port!
TOUCH SCREEN CONTROL PANEL
The Touch Screen Control Panel provides easy screen navigation through popper functions
to pop popcorn and adjust unit settings. Reference Introduction to the Touch Screen
Control section on the next page for a basic description of the equipment and controls.
MANUAL PULL (for Fire Suppression System – some Exports excluded)
Pull Station for the operator to manually activate the Fire Suppression System.
Note: In the event of a fire, the system will automatically activate the Fire Suppression
System; however, if the operator chooses, they can operate the system by pulling
the manual pull.
Control Panel View
Fire Suppression Manual Pull
(if equipped)
Circuit Breakers
Touch Screen Control
USB Port
(this is NOT a charging port)
Main Power
Switch
Page 25

Instruction Manual - Touch Screen 2011, 2848, 2860, 2872, and 2873 (32 oz. Pop-O-Golds)
PopClean Elite Popper -600 Series 2911, 2948, 2960, 2972, and 2973 (52 oz. Medallions)
Page 25
gmpopcorn.com
Introduction to the Touch Screen Control
The popper is equipped with a Touch Screen Control Panel. This section introduces the control
and provides basic screen descriptions to navigate the control for general operation. For an
expanded description and for programming needs, reference Navigating the Touch Screen
Control section.
The control can be set up for use in STANDARD MODE or THEATER MODE.
• Standard Mode (default setting): Allows menu access to operator for screen navigation
and programming.
• Theater Mode: Allows operator access to popping corn functions only; selecting a recipe
and access to all other functions requires a Manager’s passcode.
Splash Screen: Screen viewable upon turning the Power Switch ON (shows countdown for
initializing system).
Home Screen: Customized for STANDARD or THEATER Mode
To change mode, reference Navigating the Touch Screen Control section N7.10 User Configuration. (Theater
Mode requires a Manager’s Passcode to access the Main Menu.)
Equipment Button
Manually turn
equipment OFF/ON
(reference next page)
Status Bar (reference for operation
prompts and popper status)
Clock
Software Version
Function Selection
(Operations available
within a Mode – blocked
operations are dimmed)
Menu Button
(Standard Mode)
Lock Button
(Theater Mode)
Requires Manager’s
Passcode to access.
Page 26

Instruction Manual - Touch Screen 2011, 2848, 2860, 2872, and 2873 (32 oz. Pop-O-Golds)
PopClean Elite Popper -600 Series 2911, 2948, 2960, 2972, and 2973 (52 oz. Medallions)
Page 26
gmpopcorn.com
Equipment Controls Screen: Manually activate/deactivate an equipment selection.
The Equipment Control screen is accessible from various screens to manually activate or deactivate an
equipment selection. To manually change a selection, reference the information below. For a full
description of each equipment control, reference Navigating the Touch Screen Control section N6
Equipment Controls.
FILTER SYSTEM – Equipped with a timeout feature which automatically shuts the Filter System off after an
allotted period of idle time (no popcorn popped). If the Filter System is turned off during a cook cycle,
the kettle heat will shut off.
KETTLE HEAT – Automated by the cooking cycle (blocked from manual operation, selection is always dimmed).
STIR MOTOR (in kettle) – If the Stir Motor is turned off during a cook cycle, the kettle heat will shut off.
POPCORN CRISPER – Powers crisper in corn staging area (for Twin Units - RH Touch Screen controls the crisper).
OIL MASTER – Supplies power to the oil unit (Bag-in-a-Box or Bucket Pump).
Important Note: To stop oil flow at any time, turn Oil Master OFF.
To Pop Corn:
When a recipe is selected the equipment is automatically turned ON. The Kettle Heat, Stir Motor, and
Filter System MUST BE ON to pop corn. To manually turn the crisper OFF for a cook cycle, reference
the instructions below.
Manually turn Popcorn Crisper OFF/ON and continue a cook cycle:
Any manual adjustments made on this screen will revert to the default setting after each batch of
popcorn is popped.
1. Select desired recipe (on Recipe Selection screen).
2. Press OK to proceed to Cook screen and begin kettle heating.
3. Once on the Cook screen, press the Equipment Button.
4. Press Popcorn Crisper button to turn it OFF/ON, then exit to return to cook screen with kettle
heating.
IF Filter System or Stir Motor is turned OFF during a cook cycle, the kettle heat will shut OFF
and the cook cycle will stop (on exit, the screen reverts to Recipe Selection).
Exit Button
(returns to
previous screen)
Selection Indicator
Light (ON indicates
selection is active)
Equipment Selection
(press to activate/
deactivate)
Blocked selection(s) are
dimmed.
Note: For ALL selections, allow adequate time for the
selection(s) to register prior to exiting the screen.
If Filter System or Stir Motor are
turned OFF during a cook cycle,
the kettle heat will shut OFF!
Page 27

Instruction Manual - Touch Screen 2011, 2848, 2860, 2872, and 2873 (32 oz. Pop-O-Golds)
PopClean Elite Popper -600 Series 2911, 2948, 2960, 2972, and 2973 (52 oz. Medallions)
Page 27
gmpopcorn.com
Cook (Recipe Selection Screen):
Standard Mode – Press button to select a Corn Type, Flavoring, and Load Size, then press OK to proceed.
Theater Mode – (Recipe selections are preset) Press OK to proceed.
Recipe Selected
(Displays corn type,
flavor, load size, and oil
volume.)
To adjust oil volume:
Reference Navigating
the Touch Screen
Control section N7.3
Recipes.
OK (Accept
recipe, proceed
to Cook screen)
Select a Corn Type
(Butterfly or Mushroom)
Select a Flavoring
(Salt or Sweet)
Select a Load Size
(Large or Small)
Cook Screens: A cook cycle is started, kettle begins heating.
Pause Button
(Stops heating and
returns to Recipe
Selection screen)
Current Temp
(Displays the
current kettle
temperature)
Popping Cycle Status (Visual indicator of cycle
progression from preheating through kettle dump)
Oil Reserve
(Displays approx.
percentage of oil
remaining)
Equipment Button
(Manually turn
equipment OFF/ON)
Cook Screens Progress through the Cook Cycle
Press OK to proceed through the cook cycle, otherwise a warning signal may be indicated, then kettle
heat will shut down.
Dump Kettle
Prepare
Ingredients
Add Corn &
Flavacol
Dispense Oil
Add Flavoring
(Sweet Mode Only)
Page 28

Instruction Manual - Touch Screen 2011, 2848, 2860, 2872, and 2873 (32 oz. Pop-O-Golds)
PopClean Elite Popper -600 Series 2911, 2948, 2960, 2972, and 2973 (52 oz. Medallions)
Page 28
gmpopcorn.com
Initial Startup – User Configuration
The Elite Touch Screen PopClean Popper has been programmed at the factory with default
system settings for operation mode, oil calibration, recipe settings, and additional unit settings.
For Initial Startup of a New Unit
1. User Configuration - For initial setup of a new unit (or for replacement software boards)
review the default settings shown below and adjust (if needed). For a full description of each
setting, reference Navigating the Touch Screen Control section N7.10 User Configuration.
To open User
Configuration
Screens:
Operation (Default Setting)
Option
User Config.
Screen 1
1. Unit Name:
Enter name for unit, if desired.
2. Operational Mode: (default is Standard)
• STANDARD Mode: Allows menu access to the
operator for screen navigation, recipe selection, and
programming.
• THEATER Mode: Allows operator access to popping
corn functions ONLY; selecting a recipe and access
to all other functions requires a Manager’s password.
Standard or Theater
3. Temperature Mode: (default is °F)
°F or °C
4. Screensaver: (default is ON)
ON or OFF
5. Screensaver timeout (minutes): (default is 15 min.)
Press ▲ or ▼ to adjust.
6. Filter timeout (minutes): (default is 15 min.)
(number of minutes without a cook cycle, before filter
system is automatically shut OFF).
Press ▲ or ▼ to adjust.
7. Crisper System ON/OFF: (default is Automatic)
(Crisper turns ON automatically when a cook cycle is
started).
Manual or Automatic
8. Time: (preset at factory, displayed in Status Bar).
Select to enter time (00:00).
9. Date: (preset at factory)
Select to enter date
(00/00/0000).
10. Clock Type: (default is 12 Hour)
12 Hour or 24 Hour
11. Beep Volume: (preset at factory)
Slider adjusts from low to high.
12. Brightness: (preset at factory)
Slider adjusts from low to high.
13. Cook Log Date: (synchronizes the cook cycle date
when any user configuration date change is made)
Press Set Cook Log – Today
To EXIT Config.
Press Menu button , then select Home.
3 1 4 5 2
Press to
show User
Config. Screen 2
Page 29

Instruction Manual - Touch Screen 2011, 2848, 2860, 2872, and 2873 (32 oz. Pop-O-Golds)
PopClean Elite Popper -600 Series 2911, 2948, 2960, 2972, and 2973 (52 oz. Medallions)
Page 29
gmpopcorn.com
2. Oil System Calibration - Allows popper to display percentage of oil remaining in oil unit. For a
full description, reference Navigating the Touch Screen Control section N7.1 Oil System Calibration.
To open OiL level
Calibration Screen:
Bag-In-A-Box
Oil Calibration:
1. Load 1 FULL box of oil, then
press OK (sets oil at 0%).
2. Load 2nd FULL box of oil, then
press OK (sets oil at 100%).
3. Press OK to confirm
calibration complete.
Bucket Pump
Oil Calibration:
1. Have an EMPTY bucket of oil
in unit, then
press OK (sets oil at 0%).
2. Load a FULL bucket of oil
in unit, then
press OK (sets oil at 100%).
3. Press OK to confirm
calibration complete.
3. Oil Pump Calibration - Sets oil volume dispensed in 10 seconds of pump run time. For a full
description, reference Navigating the Touch Screen Control section N7.2 Oil Pump Calibration.
Bag-In-A-Box - On Settings screen, select Oil Pump Calibration.
Allow kettle to cool completely prior
to taking volume measurements.
Calibrate B.I.B.
Oil Pump:
1. Hold a cup under the oil delivery
tube in popper, press OK.
2. Press OK to dispense oil
(hold cup till dripping ends).
3. Compare oil measurement to
volume shown.
4. If correct, press OK; RESTART unit.
If needed, adjust vol. shown,
press ▲ or ▼ to match volumes,
then press OK, then RESTART unit.
1 2 3
Press ▲ or ▼ to adjust.
OK Button
OK Button
Page 30

Instruction Manual - Touch Screen 2011, 2848, 2860, 2872, and 2873 (32 oz. Pop-O-Golds)
PopClean Elite Popper -600 Series 2911, 2948, 2960, 2972, and 2973 (52 oz. Medallions)
Page 30
gmpopcorn.com
Bucket Pump - On Settings screen, select Oil Pump Calibration.
Allow kettle to cool completely prior
to taking volume measurements.
Calibrate Bucket
Pump:
1. Hold a cup under the oil delivery
tube in popper, press OK.
2. Press OK 1 to begin dispensing oil.
Press OK 2 when oil STARTS flowing
(hold cup till dripping ends). Button
shows time it took to prime the
oil line.
3. Compare oil measurement to
volume shown.
4. If correct, press OK; RESTART unit.
If needed, adjust volume shown.
Press ▲ or ▼ to match volumes,
then press OK; RESTART unit.
Press ▲ or ▼ to adjust.
Seconds to prime oil
line (ex: 19 = 1.9 sec.).
Page 31

Instruction Manual - Touch Screen 2011, 2848, 2860, 2872, and 2873 (32 oz. Pop-O-Golds)
PopClean Elite Popper -600 Series 2911, 2948, 2960, 2972, and 2973 (52 oz. Medallions)
Page 31
gmpopcorn.com
QUICK Reference
Popping Instructions
This is a QUICK reference for popping instructions. For a full description of each cooking screen,
reference EXPANDED Instructions on next page.
1. Turn Power Switch ON.
2. On Home Screen, press Cook.
Note: Reference Status Bar for operation prompts.
3. Theater Mode (Recipe is preselected): Press OK to proceed.
Standard Mode: Select recipe desired.
Press OK.
4. Kettle begins preheating.
5. Prepare Corn and Flavacol
(DO NOT add Flavacol for SWEET Mode.)
On prompt, load corn and Flavacol, then close lid.
Press OK
6. Press OK to dispense oil automatically, OR
Manually pour in oil (DO NOT press OK if oil is added manually).
7. If applicable, add Sweet Flavoring.
Press OK
Caution: Do not open kettle lid to add sugar if popping has
started as injury may result.
8. Dump the kettle.
Press OK
9. To repeat the same recipe: Press OK for YES;
Press X for NO
1
3
2
Page 32

Instruction Manual - Touch Screen 2011, 2848, 2860, 2872, and 2873 (32 oz. Pop-O-Golds)
PopClean Elite Popper -600 Series 2911, 2948, 2960, 2972, and 2973 (52 oz. Medallions)
Page 32
gmpopcorn.com
EXPANDED Reference
Popping Instructions
This section provides a full description for each cooking screen shown in the Popping Instruction
Quick Reference on the previous page. Use the corn, salt, and oil measure provided to prepare
ingredients per Gold Medal recommendations below.
Popcorn popped in coconut oil stays fresh longer and does not leave black deposits in the kettle
like other oils. Use only top quality, fresh popcorn from reputable suppliers.
Salted Popcorn: Use flavored and colored coconut oil.
Glaze Pop: Use white coconut oil (colored oil can change the popcorn color). Glaze Pop cooks
directly in the kettle. DO NOT use popcorn seasoning salt when popping Glaze Pop.
Raw Popcorn Charge:
Use large or small corn measure provided according to load size (reference
Step 3 below for 52 oz. Sweet Mode notes).
Oil Volume:
Oil volume is approx. 30% of corn amount.
Flavacol (Salt) Amount:
Use large or small Flavacol scoop provided (DO NOT add Flavacol for SWEET Mode)
Glaze Pop/Sugar Amount:
Use amount equal to 1/2 the quantity of corn (reference instructions on product).
Note: When using coconut oil, be sure the oil is liquid. To check oil, reference Navigating
the Touch Screen Control section N3 Cleaning/Oil Pump.
1.
Turn Power Switch ON.
2.
On Home Screen, Press Cook.
(Theater Mode – blocked selections are greyed out/locked.)
Note: Reference Status Bar for operation prompts and
popper status information.
3.
Theater Mode (Recipe is preselected): Press OK to proceed.
Standard Mode: Select Recipe desired.
3.1 Select a Corn Type (Butterfly or Mushroom)
3.2 Select a Flavoring (Salt or Sweet)
3.3 Select a Load Size (Large or Small)
3.4 Press OK to proceed.
Raw Corn used per Load Size:
Kettle Size
Large Load
Small Load
52 oz. Kettle
52 oz.
32 oz.
32 oz. Kettle
32 oz.
18 oz.
Notes for 52 oz. Kettles ONLY:
• In Mushroom-SWEET Recipe, a LARGE LOAD uses 32 oz. of corn; SMALL LOAD uses 20 oz. of corn.
• Tip for Mushroom-SALT Recipe: If desired popping result is not being achieved when popping a
large 52 oz. load, then try popping a small 32 oz. load.
1 3 2
For 52 oz. SWEET,
see note below.
Page 33

Instruction Manual - Touch Screen 2011, 2848, 2860, 2872, and 2873 (32 oz. Pop-O-Golds)
PopClean Elite Popper -600 Series 2911, 2948, 2960, 2972, and 2973 (52 oz. Medallions)
Page 33
gmpopcorn.com
4.
Kettle begins preheating (the Filter System, Kettle Heat, Stir Motor,
Popcorn Crisper, and Oil Master automatically turn ON).
4.1 If desired, manually turn Popcorn Crisper OFF(ON),
reference steps below.
4.2 To stop the cycle, press Pause Button.
Manually turn Popcorn Crisper OFF(ON):
1. Press Equipment Button to bring up Equipment Controls.
2. Press Popcorn Crisper button to turn it OFF(ON), then
press X to return to cook screen with kettle heating.
IF Stir Motor or Filter System are turned OFF during a
cook cycle, the kettle heat will shut off and cycle will stop.
5.
Corn and Flavacol
5.1 Prepare Corn for load size (see table in Step 3) and
Flavacol (use large or small scoop provided accordingly).
DO NOT add Flavacol/salt for SWEET Mode.
5.2 On prompt, Load corn and Flavacol (for Salt Mode only);
then close lid.
• If corn is not loaded, Status Bar turns yellow and beep
becomes a solid tone to indicate action is needed.
• If corn is still not loaded, Status Bar turns red
indicating kettle will be shut down (after a kettle
shutdown error, press lock button to exit and
return to Home Screen).
5.3 Press OK, to continue the popping cycle.
6.
Add Oil.
6.1 On prompt: Press OK to dispense oil automatically, OR
manually pour in oil, then close lid. DO NOT press OK if
oil is added manually (the kettle will sense that oil has
been added and cooking will continue).
• If oil is not loaded, Status Bar turns yellow and beep
becomes a solid tone to indicate action is needed.
• If oil is still not loaded, Status Bar turns red
indicating kettle will be shut down (after a kettle
shutdown error, press lock button to exit and
return to Home Screen).
6.2 Press OK, to continue the popping cycle.
Notes for Oil Volume and Oil Reserve Amount:
• Oil volume dispensed for each recipe is preset. To adjust the default oil volume setting, refer to
Navigating the Touch Screen Control section N7.3 Recipes.
• As you are popping corn, note the approximate oil reserve remaining. To reload oil, reference the
Instruction manual for the oil unit.
Oil Reserve
(approx. percent remaining)
Equipment Button
Pause Button
Page 34

Instruction Manual - Touch Screen 2011, 2848, 2860, 2872, and 2873 (32 oz. Pop-O-Golds)
PopClean Elite Popper -600 Series 2911, 2948, 2960, 2972, and 2973 (52 oz. Medallions)
Page 34
gmpopcorn.com
7.
If applicable, add Sweet Flavoring.
7.1 On prompt, add Glaze Pop, then close lid (use amount
equal to half the quantity of raw corn or reference
recommended amount on product).
Caution: Do not open kettle lid to add sugar if popping has
started as injury may result.
If popping has started, finish the cycle without
sugar. Then, on following batches, add sugar
right after adding oil (this scenario may require
extra cleaning).
When using sugar, use Compound “S” to help keep the
kettle clean.
• If flavoring is not loaded, Status Bar turns yellow to
indicate action is needed.
• If flavoring is still not loaded during the prompt,
screen returns to popping cycle and FLAVORING
SHOULD NOT BE ADDED.
7.2 Press OK, to continue the popping cycle.
8.
Dump the kettle.
8.1 On prompt, dump the kettle.
• If kettle is not dumped, Status Bar turns yellow and
beep becomes a solid tone to indicate action is needed.
• If kettle is still not dumped, Status Bar turns red
indicating kettle will be shut down (after a kettle
shutdown error, press lock button to exit and
return to Home Screen).
8.2 Press OK.
9.
Screen prompts to repeat recipe, YES or NO?
To repeat the same recipe, press OK.
To change recipe or stop cooking, press X
If no selection is made the screen reverts to the Home
screen.
10.
When finished popping for the day, turn off any un-needed equipment (if needed, Oil Master may be left on to
prevent coconut oil from congealing).
Page 35

Instruction Manual - Touch Screen 2011, 2848, 2860, 2872, and 2873 (32 oz. Pop-O-Golds)
PopClean Elite Popper -600 Series 2911, 2948, 2960, 2972, and 2973 (52 oz. Medallions)
Page 35
gmpopcorn.com
Navigating the Touch Screen Control
Navigation instructions on operating the Touch Screen Control Panel can be set up for use in
STANDARD MODE or THEATER MODE.
• Standard Mode (default factory setting): Allows menu access to screen navigation and
programming.
• Theater Mode: Allows operator access to popping corn functions ONLY, and blocks
access to all other popper functions without a Manager’s Passcode.
This section expands on the introductory section which provided general instructions to turn
equipment ON/OFF and introduced the cook screens. (Reference Introduction of the Touch
Screen Control located at the beginning of the Operating Instructions).
This Navigation section covers the in-depth information on each control feature, on adjusting
default unit settings, calibrating oil, etc.
Navigating the Touch Screen Control
Menu Screen: Overall control navigation.
For each selection, reference the corresponding Navigation section (ex: N1 for Cook)
in the navigation index shown on next page.
N1
N2
N3
N4
N5
N6
N7
Home Screen
Menu Button
Theater Mode: Press
and enter Manager’s
Passcode (4653) to access
the main menu.
Menu Screen
Standard Mode: Press to access the main menu.
Page 36

Instruction Manual - Touch Screen 2011, 2848, 2860, 2872, and 2873 (32 oz. Pop-O-Golds)
PopClean Elite Popper -600 Series 2911, 2948, 2960, 2972, and 2973 (52 oz. Medallions)
Page 36
gmpopcorn.com
Navigation Section Index
N1 Cook (Recipe Selection Screen)
N1.1 Cook Screens (Cooking Cycle)
N2 Training (Training Videos)
N3 Cleaning / Oil Pump (Pump Purging)
N4 Reports
N4.1 Cook Cycle - Past 7 Days
N5 Home
N6 Equipment Controls
• Filter System
• Kettle Heat
• Stir Motor
• Popcorn Crisper
• Oil Master
N7 Settings
N7.1 Oil System Calibration (Oil Level Cal.)
N7.2 Oil Pump Calibration
N7.3 Recipes
N7.4 Load Count Reset
N7.5 Upload Recipes
N7.6 Download Recipes
N7.7 View Cook
N7.8 Upload Cook
N7.9 N/A
N7.10 User Configuration
Unit Name
Operational Mode (Standard or Theater)
Temperature Mode (°F or °C)
Screensaver (ON or OFF)
Screensaver Timeout (Minutes)
Filter Timeout (Minutes)
Crisper System ON/OFF
Time
Date
Beep Volume
Brightness
Cook Log Date
N7.11 Maintenance
N7.12 Corporate Engineering
N1
Cook
(Recipe
Selection)
Cook (Recipe Selection Screen):
Standard Mode – Press button to select a Corn Type, Flavoring, and Load Size, then
press OK to proceed.
Theater Mode – (Recipe selections are preset) Press OK to proceed.
Recipe Selected
(Displays corn type,
flavor, load size, and
oil volume.)
To adjust oil volume:
Reference Navigating
the Touch Screen
Control section N7.3
Recipes.
OK (Accept
recipe, proceed
to Cook screen)
Select a Corn Type
(Butterfly or Mushroom)
Select a Flavoring
(Salt or Sweet)
Select a Load Size
(Large or Small)
Page 37

Instruction Manual - Touch Screen 2011, 2848, 2860, 2872, and 2873 (32 oz. Pop-O-Golds)
PopClean Elite Popper -600 Series 2911, 2948, 2960, 2972, and 2973 (52 oz. Medallions)
Page 37
gmpopcorn.com
N1.1
Cook Screens: A cook cycle is started, kettle begins heating.
Pause Button
(Stops heating and
returns to Recipe
Selection screen)
Current Temp
(Displays the
current kettle
temperature)
Popping Cycle Status (Visual indicator of cycle
progression from preheating through kettle dump)
Oil Reserve
(Displays approx.
percentage of oil
remaining)
Equipment Button
Manually turn
equipment OFF/ON
(reference section N6,
Equipment Control
Screen)
Cook Screens Progress through the Cook Cycle
Press OK to proceed through the cook cycle, otherwise a warning signal may be
indicated, then kettle heat will shut down.
Dump Kettle
Prepare
Ingredients
Add Corn &
Flavacol
Dispense Oil
Add Flavoring
(Sweet Mode
Only)
Page 38

Instruction Manual - Touch Screen 2011, 2848, 2860, 2872, and 2873 (32 oz. Pop-O-Golds)
PopClean Elite Popper -600 Series 2911, 2948, 2960, 2972, and 2973 (52 oz. Medallions)
Page 38
gmpopcorn.com
N2
Training
Training: Preloaded instruction videos provided by manufacturer (video content and
video quantity may vary).
To View a Video:
1. Press to select a video.
2. Press Play Button to start video (reference
image below).
3. Press Back Button to return to Training screen
to select another video, or
4. On Training screen, press Back or Menu Button
to exit Training.
N3
Cleaning/
Oil Pump
Cleaning / Oil Pump: Preloaded cleaning videos provided by manufacturer (video content and
video quantity may vary). Oil Pump Button for use in cleaning and priming the oil line.
Oil Pump Button is used to manually operate the oil pump—allow kettle to cool completely prior to
cleaning unit, purging/priming the oil pump, or checking if oil is liquid.
To View a Video: Press to select a video
(reference Navigation section N2 Training, for
control descriptions to view a video).
To Manually Operate the Oil Pump:
1. Turn Oil Master ON (provides power to pump).
2. PRESS and HOLD Oil Pump Button to dispense.
3. Release button to stop dispensing.
4. Press Back or Menu Button to exit Cleaning.
To Clean the Oil System: Reference the Oil Dispense
Unit Manual and use the Oil Pump Button when
directed to dispense while cleaning or priming.
To Prime Oil Line (or check if oil is in liquid form):
• Hold a cup under the oil delivery tube in popper.
• PRESS and HOLD the Oil Pump Button until oil
flows steadily.
Restart Video
Volume Control (-/+) (for Video use
ONLY, adjustments here do not affect
the User Configuration volume setting)
Back Button
(in 1 sec. intervals)
Play Button (converts to
Pause Button when started)
Fast Forward
(in 1 sec. intervals)
Progress Bar
(press bar to skip
ahead or go back to
a video location)
Touch anywhere on
screen area to
show/hide controls
during a video.
Back Button
(return to
previous screen)
Oil Pump Button
(PRESS and HOLD to dispense)
Pump Indicator Light
(light ON indicates pump is active)
Page 39

Instruction Manual - Touch Screen 2011, 2848, 2860, 2872, and 2873 (32 oz. Pop-O-Golds)
PopClean Elite Popper -600 Series 2911, 2948, 2960, 2972, and 2973 (52 oz. Medallions)
Page 39
gmpopcorn.com
N4
Reports
Reports: Screen view of reports for popper functions and information (report content and
report quantity may vary).
To View a Report:
1. Press to select a report (reference example
report view shown below).
2. Press Back Button to return to Report screen.
3. On Reports screen, press Back or Menu
Button to exit Reports.
Example Report View:
Cook Cycles: Past 7 Days
N5
Home
Screen
Home Screen: Customized for STANDARD or THEATER Mode
To change mode, reference section N7.10 User Configuration. (Theater Mode requires a Manager’s
Passcode to access the Main Menu, reference section N8 Theater)
Number of Cook Cycles
(per calendar day shown)
Total Cycle Count (total number of cycles made to date)
Note: Count is reset to zero if relay board is replaced.
Back Button
(return to
previous screen)
Equipment Button
Manually turn
equipment OFF/ON
(reference section N6,
Equipment Controls
on next page)
Status Bar (reference
for operation prompts
and popper status
information)
Clock (reference
User Configuration
section N7.10 to
set clock)
Software Version
(reference for version
information)
Function Selection
(Operations available
within a Mode – blocked
operations are dimmed)
Lock Button
(Theater Mode)
Enter Manager’s
Passcode (4653) to
access.
Menu Button (Standard Mode)
Page 40

Instruction Manual - Touch Screen 2011, 2848, 2860, 2872, and 2873 (32 oz. Pop-O-Golds)
PopClean Elite Popper -600 Series 2911, 2948, 2960, 2972, and 2973 (52 oz. Medallions)
Page 40
gmpopcorn.com
N6
Equipment
Controls
Screen
Equipment Controls Screen: Manually activate/deactivate an equipment selection.
The Equipment Control screen is accessible from within various screens to activate or deactivate an
equipment selection. To manually change a selection for a popping cycle, reference the information
below.
Control Descriptions:
To pop corn - when a recipe is selected the equipment is automatically turned ON. The Kettle Heat,
Stir Motor, and Filter System MUST BE ON to pop corn. To manually turn the crisper OFF for a cook
cycle, reference the instructions on next page.
FILTER SYSTEM (must be ON for the kettle to heat) – Supplies power to the blower and initializes a
check of the 3 filter interlocks, the filter door interlock, and the 2 pressure switches (detecting
filter efficiency).
When finished popping, allow unit to sufficiently vent, then turn Filter System OFF, to preserve
filter life if not popping for long periods of time.
Note: The Filter Timeout feature automatically shuts the Filter System off after an allotted
period of idle time (no popcorn popped). Default timeout is 15 minutes (to adjust the
timeout setting, refer to Navigating the Touch Screen Control section N7.10 User
Configuration).
For further information on the filtration system, reference the Filter System section (located in
the Installation section of this manual).
KETTLE HEAT – Kettle heat turns ON once a cook cycle begins (stir motor is automatically turned ON).
(Stir motor will remain on after kettle heat is turned OFF, until the stir motor is turned OFF.)
Note: Kettle Heat button is always dimmed on Equipment Control screen, it is controlled
automatically by the popper through the cooking cycle (or cleaning).
STIR MOTOR (must be ON for the kettle to heat) – Supplies power to the kettle stir motor. The stir
motor MUST be ON at all times when there is popcorn (popped or un-popped) in the kettle.
POPCORN CRISPER – Supplies power to the popcorn crisper (for Twin Units, the RH Touch Screen
controls the crisper). To adjust the default setting for the crisper so it does not automatically
turn on, refer to Navigating the Touch Screen Control section N7.10 User Configuration.
Exit Button
(returns to
previous screen)
Selection Indicator
Light (ON indicates
selection is active)
Equipment
Selection
(press to activate/
deactivate)
Blocked selection(s)
are dimmed).
Note: For ALL selections, allow adequate time for the
selection(s) to register prior to exiting the screen.
If Filter System or Stir Motor are
turned OFF during a cook cycle,
the kettle heat will shut OFF!
Page 41

Instruction Manual - Touch Screen 2011, 2848, 2860, 2872, and 2873 (32 oz. Pop-O-Golds)
PopClean Elite Popper -600 Series 2911, 2948, 2960, 2972, and 2973 (52 oz. Medallions)
Page 41
gmpopcorn.com
OIL MASTER – Supplies power to the oil unit (either a Bag-in-a-Box or Bucket Pump model).
Important Note: To stop oil flow at any time, turn the Oil Master switch OFF.
Bag-in-a-Box Model: Turning Oil Master ON - provides power to the oil dispense unit,
activates the warmer/blower, and the heated line kit (if equipped). Reference the Instruction
Manual for the Bag-in-a-Box Unit.
Note: Coconut oil will congeal at temperatures below approximately 76°F (24°C). For
machines used daily, leave the Oil Master Switch on at all times and keep the cabinet
doors closed to prevent the oil from becoming solid. If the machine has not been used for
several days, turn the Oil Master ON the night before it is expected to be used.
Bucket Pump Model: Turning Oil Master ON - activates the heating element on the bucket
pump to provide minimal heat to keep the coconut oil liquid. Reference the Instruction Manual
for the Bucket Pump Unit.
Manually turn Popcorn Crisper OFF/ON and continue a cooking cycle:
Any manual adjustments made on this screen will revert to the default setting after each batch
of popcorn is popped.
1. Select desired recipe (on Recipe Selection screen).
2. Press OK to proceed to Cook screen and begin kettle heating.
3. Once on the Cook screen, press the Equipment Button.
4. Press Popcorn Crisper button to turn it OFF/ON, then exit to return to cook screen with
kettle heating.
IF Filter System or Stir Motor is turned OFF during a cook cycle, the kettle heat will
shut OFF and the cook cycle will stop (on exit, the screen reverts to the Recipe Selection).
Page 42

Instruction Manual - Touch Screen 2011, 2848, 2860, 2872, and 2873 (32 oz. Pop-O-Golds)
PopClean Elite Popper -600 Series 2911, 2948, 2960, 2972, and 2973 (52 oz. Medallions)
Page 42
gmpopcorn.com
N7
Settings
Screen
Settings Screen:
The Settings screen provides button access to unit functions. Protected button functions require
passcode entry as indicated by the button title (reference image shown below).
Note: Generally, in Theater Mode the Settings screen is not accessible without a Manager’s
passcode, but under some circumstances (ex: an error condition), the screen is
automatically made available for quick access to correct an issue.
Select a Setting Button and reference the individual button descriptions in the N7 Sub-Section
indicated for each button (ex: for Oil System Calibration, see N7.1 on next page).
Greyed out title indicates
button is passcode
protected by a Manager,
Technician, or Corporate
Engineering.
Button Title (button is
accessible if title is NOT
greyed out)
Back Button
(return to
previous screen)
Remember: Reference Status Bar for action required.
N7.10
N7.7
N7.4
N7.1
N7.11
N7.8
N7.5
N7.2
N7.12
N7.9
N7.6
N7.3
N/A
Page 43

Instruction Manual - Touch Screen 2011, 2848, 2860, 2872, and 2873 (32 oz. Pop-O-Golds)
PopClean Elite Popper -600 Series 2911, 2948, 2960, 2972, and 2973 (52 oz. Medallions)
Page 43
gmpopcorn.com
N7.1
Oil Level
Cal.
Oil System Calibration (Oil Level Calibration)
An oil level sensor allows the display to show the approx. percentage of oil remaining in a bag or bucket
of oil. After initial configuration, the unit should not need recalibration for normal use (it may be
recalibrated periodically, as needed, to ensure accuracy). For instructions on how to setup an oil unit
and load oil, reference the Instruction Manual for the oil unit.
To Calibrate a Bag-In-A-Box:
The B.I.B. holds a maximum of (2) 35 pound boxes of oil; one for use and a second box being staged
for use when the first box is empty. Calibrate the Oil Level to indicate when the first oil box is
getting low, thus informing operator to watch oil level/change connection to the second box.
Replace the empty box with a new full box of oil. The oil level indicator will NOT show FULL
unless a new full box of oil is loaded.
For ANY calibration issues (ex: ERROR or caught in
a loop), turn unit OFF/ON and restart calibration.
1. With NO boxes in unit, load 1 FULL box of oil.
2. Press OK (sets oil level at 0%).
3. Load 2nd FULL box of oil.
4. Press OK (sets oil level to 100%).
5. Press OK to confirm calibration complete.
To Calibrate a Bucket Pump:
The Bucket Pump is used with a 50 pound bucket of oil. The oil level indicator is programmed to
show when the bucket is getting low, thus informing operator to watch oil level/load a new bucket.
For ANY calibration issues (ex: ERROR or caught in
a loop), turn unit OFF/ON and restart calibration.
1. Place an EMPTY bucket in unit.
2. Press OK (sets oil level at 0%).
3. Load a FULL bucket of oil in unit.
4. Press OK (sets oil level to 100%).
5. Press OK to confirm calibration complete.
ERROR Screen - Oil System Calibration:
There must be a MINIMUM of 10 pounds weight difference between the FULL level and EMPTY
level for the system to recognize the settings. If there is not enough weight difference, or if the
EMPTY level setting is greater than the FULL level setting, the Oil Level Indicator will display an
error. The indicator must be out of error mode to correctly reset the levels.
Press OK to return to Oil System Calibration.
For ANY calibration issues (ex: ERROR
or caught in a loop), turn unit OFF/ON
and restart calibration.
Press X to EXIT Oil System Calibration.
Press OK after each step to continue.
Press OK after each step to continue.
Page 44

Instruction Manual - Touch Screen 2011, 2848, 2860, 2872, and 2873 (32 oz. Pop-O-Golds)
PopClean Elite Popper -600 Series 2911, 2948, 2960, 2972, and 2973 (52 oz. Medallions)
Page 44
gmpopcorn.com
N7.2
Oil Pump
Cal.
Oil Pump Calibration
Sets the oil volume dispensed in 10 seconds of pump run time. The oil pump must be calibrated to
ensure accurate oil volume is dispensed. After initial configuration, the unit should not need
recalibration for normal use.
Bag-In-A-Box - Oil Pump Calibration:
For ANY calibration issues (ex: ERROR or caught in a loop), turn unit OFF/ON and restart calibration.
Allow kettle to cool completely prior to taking volume measurements.
1. Hold a cup under oil delivery tube
in popper.
2. Press OK to confirm cup is in place.
3. Press OK to dispense oil.
(Oil dispenses for 10 seconds,
continue holding cup for 1 minute
to catch drips)
Note: If oil does not flow steadily
the first time, repeat the
process to ensure oil pump is
primed to provide an accurate
measurement.
4. Compare oil measurement to
volume displayed.
5. If correct amount is shown:
Press OK; then RESTART unit.
If needed, adjust the oil volume
shown, then Press OK and RESTART unit.
Press ▲ to increase oil volume in 0.5 oz.
steps (up to 25.5 oz.) or,
Press ▼ to decrease oil volume in 0.5 oz.
steps (down to 0.5 oz.)
For Bucket Pump instructions, see next page.
2 3
5
Adjustment
Buttons
4
1
Page 45

Instruction Manual - Touch Screen 2011, 2848, 2860, 2872, and 2873 (32 oz. Pop-O-Golds)
PopClean Elite Popper -600 Series 2911, 2948, 2960, 2972, and 2973 (52 oz. Medallions)
Page 45
gmpopcorn.com
Bucket Pump - Oil Pump Calibration:
For ANY calibration issues (ex: ERROR or caught in a loop), turn unit OFF/ON and restart calibration.
Allow kettle to cool completely prior to taking volume measurements.
1. Hold a cup under oil delivery tube
in popper.
2. Press OK to confirm cup is in place.
3. Press OK 1 to begin dispensing oil.
Press OK 2 when oil STARTS flowing
(button then shows time it took to
prime the oil line).
Oil dispenses for 10 seconds,
continue holding cup for 1 minute
to catch drips.
4. Compare oil measurement to
volume displayed.
5. If correct amount is shown:
Press OK; then RESTART unit.
If needed, adjust the oil volume
shown, then press OK and RESTART unit.
Press ▲ to increase oil volume in 0.5 oz.
steps (up to 25.5 oz.) or,
Press ▼ to decrease oil volume in 0.5 oz.
steps (down to 0.5 oz.)
For Bag-In-A-Box instructions, see previous page.
2
6
Adjustment
Buttons
5
1
Seconds to prime oil
line (ex: 19 = 1.9 sec.).
3
Page 46

Instruction Manual - Touch Screen 2011, 2848, 2860, 2872, and 2873 (32 oz. Pop-O-Golds)
PopClean Elite Popper -600 Series 2911, 2948, 2960, 2972, and 2973 (52 oz. Medallions)
Page 46
gmpopcorn.com
N7.3
Recipes
Recipes
Recipe values are preset with factory defaults for a 52 oz. or 32 oz. kettle. Each recipe category is
preprogrammed for Popcorn Type and Flavoring for a LARGE and SMALL Load (per kettle size).
Load Size - Raw Corn Amount Required Per Kettle Size:
Kettle Size
Large Load
Small Load
52 oz. Kettle
use 52 oz. corn
use 32 oz. corn
32 oz. Kettle
use 32 oz. corn
use 18 oz. corn
Sample screen shown below for a 52 oz. kettle for general reference.
On the Default Value screen – recipe values CANNOT be edited.
Make recipe changes on the Actual Value screen.
To Change OIL VOLUME (oz.):
1. Press to select an oil volume to adjust
(pop-up window shows current setting).
2. Enter new oil amount, or press ▲ or ▼ to
adjust amount in 1 oz. increments.
52 oz. Unit - Oil Volume
Large Load: default is 17 oz. oil (adj. range 5-25 oz.)
Small Load: default is 11 oz. oil (adj. range 1-23 oz.)
Notes for 52 oz. Kettles (for Mushroom-SWEET ONLY):
Large Load: default is 11 oz. oil (adj. range 1-23 oz.)
Small Load: default is 7 oz. oil (adj. range 1-19 oz.)
Press to switch
screens between
Default Values/
Actual Values.
To reset Recipes to factory default:
1. Press to reset values to default.
2. Press OK to confirm, OR
press Back or Menu Button to exit
without resetting.
Oil Volume, Load Temp, and
Dump Temp are the ONLY
user configurable values (see
full description below).
Notes for 52 oz. Kettles ONLY:
• In Mushroom-SWEET Recipe ONLY, a LARGE LOAD only
uses 32 oz. of corn; a SMALL LOAD only uses 20 oz. of corn.
• Tip for Mushroom-SALT Recipe: If desired popping result
is not being achieved when popping a large 52 oz. load, then
try popping a small 32 oz. load.
17
Clear
Enter
Default Value
Screen
Actual Value
Screen
Page 47

Instruction Manual - Touch Screen 2011, 2848, 2860, 2872, and 2873 (32 oz. Pop-O-Golds)
PopClean Elite Popper -600 Series 2911, 2948, 2960, 2972, and 2973 (52 oz. Medallions)
Page 47
gmpopcorn.com
32 oz. Unit - Oil Volume
Large Load: default is 11 oz. oil (adj. range 1-23 oz.)
Small Load: default is 6 oz. oil (adj. range 1-18 oz.)
3. Press ENTER to accept the change (press X to
exit screen and leave value unchanged).
If a volume outside the adjustment range
is entered, the value remains unchanged.
To Change LOAD Temperature:
1. Select a Load Temp to adjust
(pop-up window shows current setting).
2. Enter the new temperature, or press ▲ or ▼ to
adjust amount in 1 degree increments.
For ALL Kettle Sizes
Butterfly Corn: default temp is 420°F (215°C);
[adj. range 390-450°F (199-232°C)]
Mushroom Corn: default temp is 440°F (227°C);
[adj. range 390-450°F (199-232°C)]
3. Press ENTER to accept the change (press X to
exit screen and leave value unchanged).
Load Temp ERROR - Auto-Corrections:
• If a temperature outside the adjustment range is entered, the value remains unchanged.
• The load temperature CANNOT be lower than the dump temperature. (Attempting to
move the load temperature below the dump temperature will result in the dump temperature
automatically adjusting to correct the error.)
To Change DUMP Temperature:
1. Select a Dump Temp to adjust.
(pop up window shows current setting)
2. Enter the new temperature, or press ▲ or ▼ to
adjust the amount in 1 degree increments.
For ALL Kettle Sizes
Butterfly Corn: default temp is 410°F (210°C);
[adj. range 380-440°F (193-227°C)]
Mushroom Corn: default temp is 420°F (215°C);
[adj. range 380-440°F (193-227°C)]
3. Press ENTER to accept the change (press X to
exit screen and leave value unchanged).
Dump Temp ERROR - Auto-Corrections:
• If a temperature outside the adjustment range is entered, the value remains unchanged.
• The dump temperature CANNOT be higher than the load temperature. (Attempting to
move the dump temperature above the load temperature will result in the load temperature
automatically adjusting to correct the error.)
Clear
Enter
400
Clear
Enter
Page 48

Instruction Manual - Touch Screen 2011, 2848, 2860, 2872, and 2873 (32 oz. Pop-O-Golds)
PopClean Elite Popper -600 Series 2911, 2948, 2960, 2972, and 2973 (52 oz. Medallions)
Page 48
gmpopcorn.com
N7.4
Load
Count
Reset
Load Count Reset (total number of batches cooked)
1. To reset the load count, press OK.
2. On Reset Load Count confirmation
screen, press OK to reset load count (press X to
exit screen and leave count unchanged.)
N7.5
Upload
Recipes
Upload Recipes (saves the recipe.txt file to a USB flash drive)
1. On Menu screen, insert USB drive.
(USB must be inserted BEFORE selecting
Settings.)
2. Select Settings button.
3. On Settings screen, select Upload Recipes.
(if Status Bar prompts no USB detected, go
back to Menu screen and reinsert USB).
4. The recipe.txt file is uploaded to USB.
5. When upload is complete, remove USB
(reference Status Bar for action needed).
Recipe file can be opened on a computer to
review or adjust recipe as needed. (This is
helpful when updating multiple
poppers/locations.)
To change a recipe using the recipe.txt
file on a computer:
5.1 Open the file.
5.2 Make recipe adjustments needed.
(Reference Navigation section N7.3 for
adjustment ranges available for each
recipe parameter.)
5.3 Resave the recipe.txt file on the USB in
the root directory (DO NOT change
the filename).
Settings
(insert USB BEFORE selecting)
Upload Recipes
(press to upload recipe.txt file to a USB)
File MUST be in root directory on USB
Page 49

Instruction Manual - Touch Screen 2011, 2848, 2860, 2872, and 2873 (32 oz. Pop-O-Golds)
PopClean Elite Popper -600 Series 2911, 2948, 2960, 2972, and 2973 (52 oz. Medallions)
Page 49
gmpopcorn.com
N7.6
Download
Recipes
Download Recipes (saves the recipe.txt file to the Touch Screen Control)
1. On Menu screen, insert USB drive.
(USB must be inserted BEFORE selecting
Settings.)
2. Select Settings button.
3. On Settings screen, select Download
Recipes
(if Status Bar prompts no USB detected, go
back to Menu screen and reinsert USB).
4. The recipe.txt file is automatically
downloaded to the Touch Screen Control
(the new file overwrites the previous
information). The recipe.txt file must be
in the root directory of USB.
5. When download is complete, remove USB
(reference Status Bar for action needed).
N7.7
View Cook
View Cook (report view of each cook cycle)
Settings
(insert USB BEFORE selecting)
Download Recipes
(press to download new recipe.txt file
to the touch screen control)
Back Button
(back 1 RECORD)
Forward Button
(forward 1 RECORD)
Skip Back
(back 1 SCREEN)
Skip Forward
(forward 1 SCREEN)
Clear Logs
(Press to delete ALL
records, screen will
prompt to confirm.)
Temp. when
sweet was
added.
Date
Time
Cycle
Popcorn Type
(Butterfly vs.
Mushroom)
Flavoring
Load
Size
Oil
Amount
Record of individual cook cycle information (data can be saved to a USB
for back-of-the-house data analysis, reference Upload Cook on page).
Temp. when
corn was added.
Temp. when
dumped.
Temp. when
oil was added.
Page 50

Instruction Manual - Touch Screen 2011, 2848, 2860, 2872, and 2873 (32 oz. Pop-O-Golds)
PopClean Elite Popper -600 Series 2911, 2948, 2960, 2972, and 2973 (52 oz. Medallions)
Page 50
gmpopcorn.com
N7.8
Upload Cook
Upload Cook (saves the cook_log.txt file to a USB flash drive)
1. On Menu screen, insert USB drive.
(USB must be inserted BEFORE selecting
Settings.)
2. Select the Settings button.
3. On Settings screen, select Upload Cook.
(if Status Bar prompts no USB detected, go
back to Menu screen and reinsert USB).
4. The cook_log.txt is uploaded to USB.
5. When upload is complete, remove USB
(reference Status Bar for action needed).
The file can be opened on a computer to
review the cook log as needed for back of
the house data analysis.
N7.9
N/A
N7.10
User
Configuration
User Configuration
The User Configuration screens allow the popper to be customized for use. Review the factory default
setting for each of the following categories and adjust the configuration as needed. There are two
screens to allow configuration, reference images below.
Back Button
(return to previous
screen)
Next Button
(advance to next screen)
Screen 1 (User Configuration)
Screen 2 (User Configuration)
Press the Next Button or Back Button to navigate
between the User Configuration screens.
Settings
(insert USB BEFORE selecting)
Upload Cook
(press to upload cook_log.txt file to a USB)
Page 51

Instruction Manual - Touch Screen 2011, 2848, 2860, 2872, and 2873 (32 oz. Pop-O-Golds)
PopClean Elite Popper -600 Series 2911, 2948, 2960, 2972, and 2973 (52 oz. Medallions)
Page 51
gmpopcorn.com
User Configuration Screen 1
1. Unit Name: Enter a unit name if desired – press
to select (a unit name is helpful for printing
diagnostic reports and unit reference).
2. Operational Mode - Press to select:
• STANDARD Mode: (Default) Allows menu access to the operator for screen navigation, recipe
selection, and programming.
• THEATER Mode: Allows operator access to popping corn functions ONLY; selecting a recipe
and access to all other functions requires a Manager’s passcode.
3. Temperature Mode: (Default is °F)
Press to select °F (Fahrenheit) or °C (Celsius).
4. Screensaver: (Default is ON)
Press to select ON or OFF.
5. Screensaver timeout (minutes): (Default is 15
minutes - number of minutes unit is idle before
screensaver is activated.)
Press ▲ or ▼ to adjust time in 1 minute intervals.
6. Filter timeout (minutes): (Default is 15 minutes
- number of minutes without a cook cycle, before
filter system is automatically shut OFF).
Press ▲ or ▼ to adjust time in 1 minute intervals.
7. Crisper System ON/OFF: (Default is Automatic -
Crisper turns ON automatically when a cook
cycle is started.)
Press to select Manual or Automatic.
User Configuration Screen 2
8. Time: Press to select; then on pop up window:
a. Select AM or PM
b. Enter time as 4 digits (ex: 08:34 or 11:59)
c. Press ENTER to accept the change (press X
to exit screen and leave time unchanged).
9. Date: Press to select - on pop up window:
a. Enter date as 8 digits (ex: 01/23/2019)
b. Press ENTER to accept the change (press X
to exit screen and leave date unchanged).
c. Press Set Cook Log to update log file date.
10. Clock Type: (Default setting is 12 Hour) Press to
select 12 Hour or 24 Hour.
11. Beep Volume: Drag slider to adjust the volume
from low to high.
12. Brightness: Drag slider to adjust the screen
brightness from low to high.
13. Cook Log Date: Press to synchronize the cook
cycle date when any user configuration date
change is made.
08:16
Clear
Enter
PM
AM
07/20/2019
Clear
Enter
1 Minute min. to 30 max.
5 Minute min. to 30 max.
Page 52

Instruction Manual - Touch Screen 2011, 2848, 2860, 2872, and 2873 (32 oz. Pop-O-Golds)
PopClean Elite Popper -600 Series 2911, 2948, 2960, 2972, and 2973 (52 oz. Medallions)
Page 52
gmpopcorn.com
N7.11
User
Configuration
Maintenance
For Qualified Service Technicians ONLY - access to the Maintenance screen requires a Technician’s
passcode (if needed, contact Gold Medal Technical Support for the passcode).
For service or parts, call Gold Medal at (800) 543-0862 or (513) 769-7676.
N7.12
Corporate Engineering
Corporate Engineering use only. For service or parts, call Gold Medal at (800) 543-0862 or
(513) 769-7676.
Page 53

Instruction Manual - Touch Screen 2011, 2848, 2860, 2872, and 2873 (32 oz. Pop-O-Golds)
PopClean Elite Popper -600 Series 2911, 2948, 2960, 2972, and 2973 (52 oz. Medallions)
Page 53
gmpopcorn.com
Care and Cleaning
DANGER
Machine must be properly grounded to prevent electrical shock to personnel.
DO NOT immerse in water. DO NOT clean appliance with a water jet.
Always unplug the equipment before cleaning or servicing.
025_111616
WARNING
To avoid serious burns, DO NOT touch the kettle while it is hot!
028_082715
Good sanitation practice demands that all food preparation equipment be cleaned regularly (only
use non-toxic, food grade cleaners). A clean looking, well-kept machine is one of the best ways of
advertising your product.
For surfaces needing further cleaning or degreasing, Watchdog Stainless Cleaner (Item No. 2088)
or Watchdog Concession Equipment Degreaser (Item No. 2580) is available for use accordingly.
For any cleaning products used, follow the manufacturer’s instructions on the product. DO NOT
use oven cleaners or abrasive materials as they will damage parts of machine.
Note: It is extremely important to follow all cleaning procedures, otherwise parts
damage and equipment failure will result. The warranty does not cover parts that
are damaged due to improper cleaning.
Daily Kettle Cleaning Instructions
Under no circumstances should the kettle be removed from the machine for cleaning.
1. Turn the power switch OFF and unplug the unit.
CAUTION: A hot kettle will cause burns if you touch it. Allow kettle to cool at least 1
hour before attempting to clean. DO NOT use ice or water to cool down a hot
kettle! Severe kettle damage will result and steam burns may occur!
2. When cool, wipe outside of kettle clean using a clean, soft cloth and Gold Medal
Watchdog Stainless Cleaner (Item No. 2088). DO NOT use oven cleaners or abrasive
materials as they will damage the kettle.
3. Mix 2 tablespoons (29.6 ml) of Gold Medal’s Heat’n Kleen (Item No. 2095) in 1 gallon
(3.8 L) of water.
4. Only pour enough of the Heat’n Kleen pre-mixed solution into the kettle to fill it 1/2 inch
(12.7 mm) deep (it is not necessary to use the entire gallon at once).
5. Plug in the unit and turn the power switch ON.
6. Start a cooking cycle to turn kettle heat ON. When solution starts to boil, turn kettle
heat OFF.
Page 54

Instruction Manual - Touch Screen 2011, 2848, 2860, 2872, and 2873 (32 oz. Pop-O-Golds)
PopClean Elite Popper -600 Series 2911, 2948, 2960, 2972, and 2973 (52 oz. Medallions)
Page 54
gmpopcorn.com
7. Allow kettle to cool at least 1 hour, then turn the power switch OFF, and unplug unit.
8. Dump solution into a bucket, do not spill any in the interior of machine.
9. Rinse kettle interior with clean water and a clean cloth.
10. Dump any water remaining into a bucket (do not spill any in the interior of machine),
then wipe the kettle interior clean with a clean dry cloth.
For an extra dirty kettle, the process may be repeated; or, after turning kettle heat OFF,
allow solution to sit in kettle overnight. The next morning, finish the cleaning steps.
11. A Clean-In-Place Hook is located behind the kettle support arm (on operator side).
This feature safely holds the kettle in place for cleaning purposes, and allows access to
hard to reach places without removing the kettle. To remove the lid and agitator
assembly, tilt kettle into the dump position, and swing the hook into position (see
image below).
12. With unit OFF and unplugged, use a clean SLIGHTLY damp cloth (wring ANY EXCESS
water from cloth before use) and wipe the kettle lead cord clean. DO NOT get moisture
into the kettle lead-in cord, severe damage will result.
13. After kettle cleaning, check to be sure the crossbar fasteners are securely tightened.
Daily Unit Cleaning Instructions
1. Turn machine OFF, unplug unit and allow it to cool before attempting to clean.
2. Remove any remaining popcorn.
3. Remove the grease tray under the baffle filter and take it to the sink to clean with soap
and water, then rinse and dry.
4. Remove the Baffle Filter and take it to the sink to clean with warm soapy water, then
rinse and allow to drain and air dry. (Reference the Filter System section for
instructions to remove and install filters.)
Clean-In-Place Hook
Page 55

Instruction Manual - Touch Screen 2011, 2848, 2860, 2872, and 2873 (32 oz. Pop-O-Golds)
PopClean Elite Popper -600 Series 2911, 2948, 2960, 2972, and 2973 (52 oz. Medallions)
Page 55
gmpopcorn.com
Note: DO NOT attempt to clean the Box Filter or HEPA Filter. These filters are
replaceable ONLY. (Reference the Filter System section for instructions to
change the Box and HEPA filters.)
5. Remove all pans/accessories and take them to the sink to clean with soap and water,
then rinse and dry.
6. Clean under corn pan to remove all popcorn bits and seeds with a vacuum as needed,
then wipe the area with a clean dry cloth to remove any grease.
7. Wipe clean the area above the corn pan and exterior surfaces using a clean, SLIGHTLY
damp cloth to remove any grease from the glass and cabinet (cloth may be SLIGHTLY
dampened with soap and water, then wipe again with clean water to remove any
remaining cleaner).
8. Clean glass panels with glass cleaner. Gold Medal Watchdog Glass Cleaner (Item No.
2588) is recommended.
Ammonia cleaners will damage plastic doors/panels. Only use a non-ammonia cleaner,
such as Gold Medal Watchdog Glass Cleaner (Item No. 2588).
9. Reinstall the clean and dry baffle filter, grease tray, and pans/accessories.
Sanitizing the Oil System (Tubing and Pump)
Reference the Oil Dispense Unit manual for oil system cleaning instructions. When prompted,
activate the oil pump using the Oil Pump Button located on the Cleaning / Oil Pump screen (see
images below).
Oil Pump Button
(PRESS and HOLD
to dispense)
Pump Indicator Light
(light ON indicates pump is active)
Press Menu Button
Home Screen
Menu Screen
1
3
Press Cleaning/
Oil Pump
2
To Locate the Oil Pump Button:
Cleaning / Oil
Pump Screen
Page 56

Instruction Manual - Touch Screen 2011, 2848, 2860, 2872, and 2873 (32 oz. Pop-O-Golds)
PopClean Elite Popper -600 Series 2911, 2948, 2960, 2972, and 2973 (52 oz. Medallions)
Page 56
gmpopcorn.com
Weekly Clean the Crisper/Blower Filters
1. Turn machine OFF, unplug unit and allow it to cool before attempting to clean.
2. Lift off the corn pan to view the blower assembly.
3. Remove each filter guard from the filter assembly (reference filter image shown), then
lift filters out and clean using warm soapy water (or replace if needed). Rinse filters
thoroughly and allow to dry, before reinstalling.
Clean the Crisper/Blower Compartment
The blower compartment MUST be inspected/cleaned every 3-4 months by Qualified Service
Personnel to maintain proper operation.
1. Turn machine OFF, unplug unit and allow it to cool before attempting to clean.
2. Lift off the corn pan to view the blower assembly.
3. Remove the blower cover and if required, carefully clean the blower compartment,
and underneath the element with a vacuum only (reference image shown).
4. After cleaning, reassemble blower cover and corn pan.
Blower Compartment - located under
the Corn Pan; shown with blower cover
removed. (Cover to be removed by
Qualified Service Personnel only.)
Filter Guard
Remove guard to
access filter.
Filter
Filter
Assembly
Page 57

Instruction Manual - Touch Screen 2011, 2848, 2860, 2872, and 2873 (32 oz. Pop-O-Golds)
PopClean Elite Popper -600 Series 2911, 2948, 2960, 2972, and 2973 (52 oz. Medallions)
Page 57
gmpopcorn.com
Troubleshooting
The troubleshooting section covers error code descriptions which may be seen on the display
and general machine issues that may not be covered by an error code.
Error Code Explanation Table
After addressing an error code, turn the Power Switch OFF then back ON to reset the display
screen.
Error Code
Display View
Explanation - Solution
Error Code 1
Reversed T/C
E1
Error: Reversed T/C
(Turn machine OFF and
then ON. If problem
persists, contact Service.)
For a Reversed Thermocouple error code, turn machine OFF
and then ON. If problem persists, contact a qualified service
person for inspection/repair.
Note for Twin Units: It is best to turn on both kettles and use
them equally throughout the day. If only one kettle is being
used for a long period of time, then when the second kettle is
turned on, the temperature variation can initiate a Reversed
T/C error code.
To fix the error, allow the first kettle to cool down before
starting the second kettle. Turn the Power Switch OFF then
back ON to reset the display and clear the error. If the error
persists, contact a qualified service person for
inspection/repair.
Error Code 2
Open T/C
E2
Error: Open T/C
(Turn machine OFF and
then ON. If problem
persists, contact Service.)
Turn machine OFF and then ON. If problem persists, contact a
qualified service person for inspection/repair.
Error Code 4
Runaway Heat
E4
Error: Kettle Heat
(Turn machine OFF and
then ON. If problem
persists, contact Service.)
Turn machine OFF and then ON. If problem persists, contact a
qualified service person for inspection/repair.
Error Code 5
Kettle Mismatch
E5
Error: Kettle Mismatch
(Turn machine OFF and
then ON. If problem
persists, contact Service.)
Turn machine OFF and then ON. If problem persists, contact a
qualified service person for inspection/repair.
Error Code 7
Hi Kettle Current
E7
Error: Kettle Current
(Turn machine OFF and
then ON. IF problem
persists, contact Service.)
Turn machine OFF and then ON. If problem persists, contact a
qualified service person for inspection/repair.
Page 58

Instruction Manual - Touch Screen 2011, 2848, 2860, 2872, and 2873 (32 oz. Pop-O-Golds)
PopClean Elite Popper -600 Series 2911, 2948, 2960, 2972, and 2973 (52 oz. Medallions)
Page 58
gmpopcorn.com
Error Code 8
Hi Limit Fault
E8
Error: Kettle HL trip
(Turn machine OFF and
let it cool. If problem
persists, contact Service.)
Turn the Power Switch OFF and let the kettle cool down, then
turn the Power Switch back ON. If the error still shows a Hi
Limit Fault, turn the unit back OFF and allow the kettle to cool
longer.
This error can happen if the kettle is not turned off at the end
of the last cooking cycle.
If the error code persists, contact a qualified service person for
inspection/repair.
Error Code 9
Kettle Short
Circuit
E9
Error: Kettle Short Circuit
(Turn machine OFF and
then ON. If problem
persists, contact Service.)
Turn machine OFF and then ON. If problem persists, contact a
qualified service person for inspection/repair.
Error Code 10
Check Filter
E10
Error: Check Filter
(Filters need to be cleaned
soon.)
Indicates pressure switch detects Box and HEPA Filter
efficiency is reduced to less than 80%. Unit will still operate
but have replacement filters available for use when needed.
• Press (OK) to return to cooking screen.
• Otherwise, error screen goes away when cooking screen
advances to the next phase.
Error Code 11
Change Filters
Change Filters
Air filters need to be
changed!
Indicates pressure switch detects Box and HEPA Filter
efficiency is reduced to less than 75%. When a Change Filter
error is displayed, THE FILTER SYSTEM AND THE KETTLE
HEAT WILL NOT OPERATE until the Box and/or HEPA Filters
are changed.
If the Change Filters error occurs during a popping cycle, THE
FILTER SYSTEM AND KETTLE HEAT ARE SHUT OFF AND
COOKING IS STOPPED.
• Press (OK) to go to Settings screen (for service
technician or manager only, passcode required to access
additional screens).
• Otherwise, turn machine OFF, change the Box and HEPA
Filters, then turn machine back ON. Reference the Updraft
or Downdraft Filter section accordingly.
Error Code 12
Filter Door Open
E12
Error: Filter Door open
(Turn machine OFF and
check filter door on top of
machine. If problem
persists, call Service.)
Indicates the Filter Door interlock switch is NOT engaged.
• Press (OK) to go to Settings screen (for service
technician or manager only, passcode required to access
additional screens).
• Otherwise, turn machine OFF, fix issue as noted below, then
turn machine back ON.
To fix a Filter Door issue (reference the Updraft or
Downdraft Filter section accordingly):
• Make sure the door is closed so the door tab engages
the interlock switch.
• Make sure EACH compression knob is fully twisted
clockwise to lock it in place.
Page 59

Instruction Manual - Touch Screen 2011, 2848, 2860, 2872, and 2873 (32 oz. Pop-O-Golds)
PopClean Elite Popper -600 Series 2911, 2948, 2960, 2972, and 2973 (52 oz. Medallions)
Page 59
gmpopcorn.com
Error Code 13
Baffle Filter
E13
Error: Baffle Filter
(Turn machine OFF and
verify baffle filter is in
place. If problem persists,
call Service.)
Indicates the Baffle Filter is not installed, or the interlock
switch is NOT engaged.
• Press (OK) to go to Settings screen (for service
technician or manager only, passcode required to access
additional screens).
• Otherwise, turn machine OFF, install the baffle filter or
make sure it engages the interlock, then turn machine back
ON. Reference the Updraft or Downdraft Filter section
accordingly for instructions on filter installation.
Error Code 14
Box Filter
E14
Error: Box Filter
(Turn machine OFF and
verify box filter is in
place. If problem persists,
call Service.)
Indicates the Box Filter is not installed, or the interlock switch
is NOT engaged.
• Press (OK) to go to Settings screen (for service
technician or manager only, passcode required to access
additional screens).
• Otherwise, turn machine OFF, install the box filter or make
sure it engages the interlock, then turn machine back ON.
Reference the Updraft or Downdraft Filter section
accordingly for instructions on filter installation.
Error Code 15
HEPA Filter
E15
Error: HEPA Filter
(Turn machine OFF and
verify HEPA filter is in
place. If problem persists,
call Service.)
Indicates the HEPA Filter is not installed, or the interlock
switch is NOT engaged.
• Press (OK) to go to Settings screen (for service
technician or manager only, passcode required to access
additional screens).
• Otherwise, turn machine OFF, install the HEPA filter or
make sure it engages the interlock, then turn machine back
ON. Reference the Updraft or Downdraft Filter section
accordingly for instructions on filter installation.
Error Code 16
Communication
Error
E16
Error: Communication
error
(Turn machine OFF and
ON. If problem persists,
call Service.)
Turn machine OFF, wait 10 seconds, then turn it back ON. If the
error persists, contact a qualified service person for
inspection/repair.
General Unit Troubleshooting
Issue
Possible Cause
Solution
Power to the Unit
A. Power to the Unit
A. Make sure the unit’s power cord is plugged in.
B. Mini Circuit Breaker(s) on
popper tripped
B. Mini Circuit Breakers supply power to all unit
features. The Mini Circuit Breakers are located
on the control panel of the popper. If breaker(s)
is reset, then trips again, the unit must be
inspected/repaired before going any further.
C. Fire Suppression System
(if equipped)
C. The unit will not turn on if the Fire
Suppression System is not activated
(reference the Fire Suppression System
section of this manual).
Page 60

Instruction Manual - Touch Screen 2011, 2848, 2860, 2872, and 2873 (32 oz. Pop-O-Golds)
PopClean Elite Popper -600 Series 2911, 2948, 2960, 2972, and 2973 (52 oz. Medallions)
Page 60
gmpopcorn.com
Issue
Possible Cause
Solution
Kettle Does Not Heat
A. Equipment selections
turned off
A. The Kettle Heat, Stir Motor, and Filter
System MUST BE ON to pop corn. If any of
these features are turned off during a cooking
cycle, the kettle heat is shut off.
B. Heating Element
B. Heating element in the kettle may be burned
out. Check with a qualified service person for
inspection/repair.
Oil Pump Does Not Deliver
Oil to Kettle
A. Oil Master Switch
A. Check to make sure Oil Master Switch is ON.
B. Pump is not operating
B. Check to make sure the power cord from the
popper is FIRMLY plugged into the oil unit. If
unit is plugged in, but not operating, the pump
may need to be replaced. Check with qualified
service personnel.
C. Mini Circuit Breaker(s) on
popper tripped
C. Check the Mini Circuit Breaker(s); if reset,
then trips again, the unit must be inspected/
repaired by qualified service personnel.
D. Pump Fuse
D. The Dispense Oil indictor on the control panel
of the popper will NOT light up if the oil
dispense unit fuse is blown. Check the 1 AMP
Fuse located on the control box of the oil
dispense unit and replace if needed. If
replaced and blows again, have a qualified
service person inspect/repair the unit.
E. Pump is operating, but oil
is not dispensed.
E. Check that the oil has not solidified in the
lines. Check for air leaks into the oil line; be
sure the filter in the line is not loose. Check to
make sure oil supply is not low.
F. Timer
F. On the Dispense Oil Cook Screen, if oil is not
dispensed when you press OK, then control
board may be set to manual (have qualified
service personnel reference the Factory
Equipment Configurations section in the
Maintenance section.
If wrong oil amount is dispensed, oil pump
calibration may need to be reconfigured,
reference Navigating the Touch Screen Control
section N7.2 Oil Pump Calibration.
If popper still dispenses wrong amount, have a
qualified service person inspect the control
board.
Long Popping Cycles
(Longer than 4 minutes for
Salt Popcorn)
A. Heating Element
A. One of the heating elements in the kettle may
be burned out. This would result in the kettle
never reaching the proper operating
temperature. Check with a qualified service
person for inspection/repair.
B. Low Voltage
B. If unit is operated on low voltage, kettle may
not reach proper operating temperature.
Check with a qualified electrician.
Page 61

Instruction Manual - Touch Screen 2011, 2848, 2860, 2872, and 2873 (32 oz. Pop-O-Golds)
PopClean Elite Popper -600 Series 2911, 2948, 2960, 2972, and 2973 (52 oz. Medallions)
Page 61
gmpopcorn.com
Issue
Possible Cause
Solution
C. Inadequate Supply Lines
C. Inadequately sized electrical supply lines, in
addition to being a fire hazard, would also
prevent the kettle from reaching the proper
operating temperature. Check with a qualified
electrician.
D. Inferior Corn
D. Inferior quality corn would result in longer
popping cycles. Use only top quality hybrid
popcorn from reputable suppliers. Even then,
if you let your corn pick up moisture or dry
out, your popping cycles will be slow.
E. Bent Stir Rod (Unit must
be OFF, unplugged and
cool prior to checking
the stir rod.)
E. The stir rod should sit parallel to the kettle
cook surface to properly stir the corn during a
popping cycle. Reference the Agitator Set
Collar Adjustment section.
Kettle Agitator Shaft not
Rotating
If the agitator shaft is not
rotating, DO NOT pop corn.
A. Mini Circuit Breaker(s) on
popper tripped
A. Check the Mini Circuit Breaker(s); if reset,
then trips again, the unit must be inspected/
repaired by qualified service personnel.
B. Kettle Stir Motor
B. Make sure the Stir Motor is ON. If Stir Motor is
ON, but the shaft is not rotating, the stir motor
may be faulty, contact qualified service
personnel for inspection/repair.
C. Kettle Agitator Shaft/Stir
Blade not rotating. (Unit
must be OFF, unplugged
and cool prior to
checking or adjusting
the agitator assembly.)
C. Check the clearance between the shaft with
welded stir blade and the kettle bottom; it
should be a minimum of 1/32” (1 mm)
(thickness of a dime).
To make shaft adjustments, reference the
Agitator Set Collar Adjustment section.
Poor Crisper/Blower
Performance (Blower is
working, but air not
circulating properly.)
A. Crisper/Blower Filters
A. Clean or replace blower filters as needed
(reference Cleaning and Care section).
B. Popcorn chaff build up
B. Have Qualified Service Personnel clean any
popcorn chaff build up from the blower
compartment (reference Cleaning and Care
section).
(Blower not working)
C. Crisper System set to
Manual
C. Make sure the Crisper System is set to
automatically turn on when a cook cycle is
started. Reference Navigating the Touch
Screen Control section N7.10 User
Configuration.
Page 62

Instruction Manual - Touch Screen 2011, 2848, 2860, 2872, and 2873 (32 oz. Pop-O-Golds)
PopClean Elite Popper -600 Series 2911, 2948, 2960, 2972, and 2973 (52 oz. Medallions)
Page 62
gmpopcorn.com
Agitator Set Collar Adjustment
The following instructions describe how to properly adjust the set collars on a 32 or 52 oz. kettle
agitator assembly.
Steps to Adjust Set Collars on a 32 or 52 oz. Agitator Assembly
Agitator assembly is adjusted while fastened to the kettle (image shown for general reference only).
Step 1. Turn machine OFF, unplug unit, and allow it to cool completely before attempting to
adjust the agitator height.
Step 2. Loosen the set screw in the set collar above the crossbar and below the crossbar.
Step 3. Place a 1/32” (1 mm) gauge (thickness of a dime) under the base of the agitator shaft to
adjust clearance between the kettle cook surface and the shaft; reference image shown. Once
adjusted, re-tighten the set screw in the set collar above the crossbar to secure shaft in place.
Step 4. Adjust clearance between the
bottom of the crossbar and the lower
set collar to 1/32” (1 mm) (thickness
of a dime); reference image shown.
Once adjusted, re-tighten set screw to
secure in place.
Step 5. To check for proper
adjustment, make sure the stir rod is
parallel to the kettle cook surface (it
should be close - but not touching).
Step 6. Spin the agitator shaft by
hand to ensure it spins freely and
is not dragging the bottom of the
kettle.
Step 3: Adjust clearance to
1/32” (1 mm)
(thickness of a dime)
Kettle Cook
Surface
52 oz. Agitator shown for
general image reference only
(lids not shown for clarity).
Set Collar w/Set Screw
above Crossbar
Lower Set Collar
Agitator Shaft
Step 4: Adjust clearance to 1/32” (1 mm)
(thickness of a dime)
Crossbar
*Stir Rod (52 oz. SINGLE
Stir Rod shown - rod is
welded to shaft)
*NOTE: EXPORT MODELS
have 2 stir rods installed on
the agitator hub, with the
option to have 4 stir rods.
(Order PN 100390 for each
additional Stir Rod needed).
Page 63

Instruction Manual - Touch Screen 2011, 2848, 2860, 2872, and 2873 (32 oz. Pop-O-Golds)
PopClean Elite Popper -600 Series 2911, 2948, 2960, 2972, and 2973 (52 oz. Medallions)
Page 63
gmpopcorn.com
ORDERING FILTERS AND ACCESSORIES
This section is a quick reference guide to order replacement filters and accessories. For a
complete spare parts guide, have qualified service personnel reference the Parts Manual for the
popper unit.
To order filters and accessories:
1. Identify the needed part by checking it against the photos, illustrations, and/or
parts list. (General images may be used in manual for reference only.)
2. Use only approved replacement parts when servicing this unit.
3. When ordering, please include part number, part name, and quantity needed.
4. Please include your model number, serial number, and date of manufacture (located
on the machine nameplate/data plate) with your order.
5. Address all parts orders to Parts Department, Gold Medal Products Co., 10700
Medallion Drive, Cincinnati, Ohio 45241-4807
or place orders by phone or online:
Phone: (800) 543-0862
(513) 769-7676
Fax: (800) 542-1496
(513) 769-8500
E-mail: info@gmpopcorn.com
Web Page: gmpopcorn.com
Maintenance and Spare Parts:
Qualified Service Personnel reference Parts Manual (Part No. 110242).
Page 64

Instruction Manual - Touch Screen 2011, 2848, 2860, 2872, and 2873 (32 oz. Pop-O-Golds)
PopClean Elite Popper -600 Series 2911, 2948, 2960, 2972, and 2973 (52 oz. Medallions)
Page 64
gmpopcorn.com
Filters
Accessories
Downdraft Filters (reference the Filter Access and Installation section)
Filter Plug
Baffle Filter
(PN 62709)
Filter Plug
(PN 63300)
Downdraft Box Filter
(PN 62710)
HEPA Filter
(PN 62711)
Baffle Filter
(PN 63222)
Updraft Box Filter (12x24x4)
(PN 63304)
Crisper/Blower Filters (reference Cleaning
the Crisper/Blower Compartment section)
HEPA Filter
(PN 62711)
Updraft Filters (reference the Filter Access and Installation section)
52 oz. Corn Cup
(PN 17757-52)
Tube Brush
(PN 47380)
29.6 cc Measure
(PN 47681)
Flavacol Container
(PN 41752)
32 oz. Corn Cup
(PN 67905-32)
1/4 Cup Measure
(PN 47169)
Jet Scoop
(PN 2072)
18 oz. Corn Cup
(PN 67905-18)
Pack of 5 Filters
(PN 63633)
Page 65

Instruction Manual - Touch Screen 2011, 2848, 2860, 2872, and 2873 (32 oz. Pop-O-Golds)
PopClean Elite Popper -600 Series 2911, 2948, 2960, 2972, and 2973 (52 oz. Medallions)
Page 65
gmpopcorn.com
WARRANTY
© 2019 – The text, descriptions, graphics, layout, and other material in this publication are the exclusive property of
Gold Medal Products Co. and shall not be used, copied, reproduced, or published in any fashion, including website
display, without its express written consent.
WARRANTY
Gold Medal Products Co. warrants to the original purchaser each item of its manufacture to
be free of defects in workmanship and material under normal use and service. Gold Medal
Products Co.’s obligation under this warranty is limited solely to repairing or replacing parts,
f.o.b. Cincinnati, Ohio, which in its judgment are defective in workmanship or material and
which are returned, freight prepaid, to its Cincinnati, Ohio factory or other designated point.
Except for “Perishable Parts” on specific machines, the above warranty applies for a period
of two (2) years from the date of original sale to the original purchaser of equipment when
recommended operating instructions and maintenance procedures have been followed. These
are packed with the machine. Parts warranty is two (2) years, labor is six (6) months.
THIS WARRANTY IS IN LIEU OF ALL OTHER WARRANTIES EXPRESSED OR
IMPLIED, AND OF ALL OTHER OBLIGATIONS OR LIABILITIES ON OUR PART,
INCLUDING THE IMPLIED WARRANTY OF MERCHANTABILITY. THERE ARE
NO WARRANTIES WHICH EXTEND BEYOND THE DESCRIPTION ON THE FACE
HEREOF. In no event shall Gold Medal Products Co. be liable for special, incidental or
consequential damages. No claim under this warranty will be honored if the equipment covered
has been misused, neglected, damaged in transit, or has been tampered with or changed in any
way. No claim under this warranty shall be honored in the event that components in the unit at
the time of the claim were not supplied or approved by Gold Medal Products Co. This warranty
is effective only when electrical items have been properly attached to city utility lines only at
proper voltages. This warranty is not transferable without the written consent of Gold Medal
Products Co.
The term “Original Purchaser” as used in this warranty shall be deemed to mean that person,
firm, association, or corporation who was billed by the GOLD MEDAL PRODUCTS CO.,
or their authorized distributor for the equipment.
THIS WARRANTY HAS NO EFFECT AND IS VOID UNLESS THE ORIGINAL
PURCHASER FIRST CALLS GOLD MEDAL PRODUCTS CO. AT 1-800-543-0862 TO
DISCUSS WITH OUR SERVICE REPRESENTATIVE THE EQUIPMENT PROBLEM,
AND, IF NECESSARY, FOR INSTRUCTIONS CONCERNING THE REPAIR OR
REPLACEMENT OF PARTS.
NOTE: This equipment is manufactured and sold for commercial use only.
10700 Medallion Drive, Cincinnati, Ohio 45241-4807 USA
gmpopcorn.com
Phone: (800) 543-0862 Fax: (800) 542-1496
(513) 769-7676 (513) 769-8500
 Loading...