

Page 1

Part No. 78017
Instruction Manual
Models: 2410E & 2411E
Cincinnati, OH 45241-4807 USA
Page 2

2410E and 2411E
2
DANGER
Machine must be properly grounded to prevent electrical shock to personnel.
Failure to do so could result in serious injury, or death.
DO NOT immerse any part of this equipment in water.
DO NOT use excessive water when cleaning.
Keep cord and plug off the ground and away from moisture.
Always unplug the equipment before cleaning or servicing.
008_010914
DANGER
Improper installation, adjustment, alteration, service, or maintenance can
cause property damage, injury, or death. Any alterations to this equipment will
void the warranty and may cause a dangerous condition. NEVER make
alterations to this equipment. Read the Installation, Operating, and
Maintenance Instructions thoroughly before installing, servicing, or operating
this equipment. Make sure all machine switches are in the OFF position
before plugging the equipment into the receptacle.
014_010914
WARNING
To avoid burns, DO NOT touch the kettle or any heated surface.
DO NOT place or leave objects in contact with heated surfaces.
013_010914
WARNING
ALWAYS wear safety glasses when servicing this equipment.
010_010914
WARNING
No user serviceable parts inside. Refer servicing to qualified service
personnel.
011_010914
WARNING
Read and understand operator’s manual and all other safety instructions
before using this equipment. To order copies of the operator’s manual go to
gmpopcorn.com or write to Gold Medal Products Co., 10700 Medallion Drive,
Cincinnati, OH 45241 USA 1-(800)-543-0862
022_010914
Safety Precautions
MODEL # 2410E AND 2411E
Page 3
2410E and 2411E
3
WARNING
DO NOT allow direct contact of this equipment by the public when used in
food service locations. Only personnel trained and experienced in the
equipment operation may operate this equipment.
Carefully read all instructions before operation.
012_010914
WARNING
This machine is NOT to be operated by minors.
007_010914
Safety Precautions (continued)
Note: Improvements are always being made to Gold Medal’s equipment. This information
may not be the latest available for your purposes. It is critical that you call Gold Medal’s
Technical Service Department at 1-800-543-0862 for any questions about your machine
operations, replacement parts, or any service questions. (Gold Medal Products Co. does
not assume any liability for injury due to careless handling and/or reckless operation of
this equipment.)
MODEL # 2410E AND 2411E
Page 4
2410E and 2411E
4
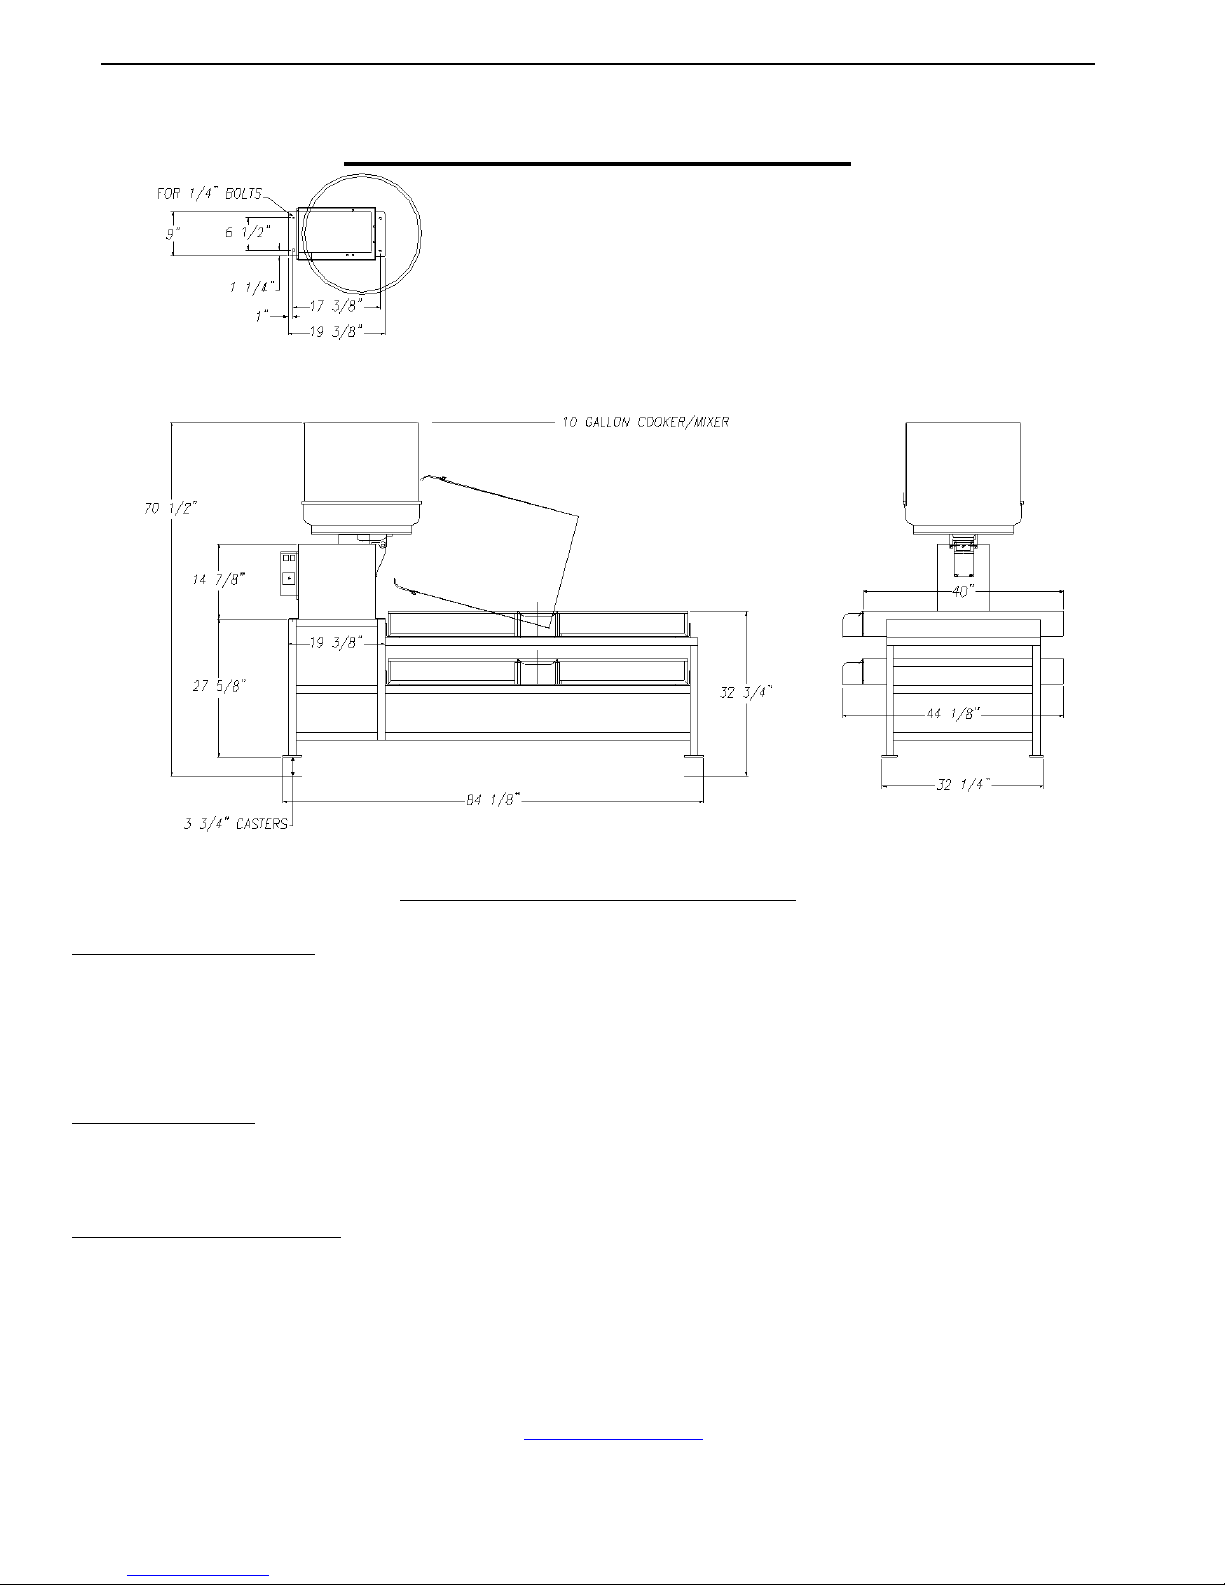
Mark 10 and 2622 Rolling Truck
Left Hand Mark 10 (2411E) on 2622 truck shown
Electrical Specifications:
Mark 10 (2410E - RH, 2411E - LH) - 120/208v or 120/230v 4 wire (2 hot, 1 neutral, 1 ground) 60
Hz.
5520 watts 30 amp plug & receptacle ( NEMA L14-30P & L14-30R )
Mark 10 (2410XE - RH, 2411XE - LH) -230v 50 Hz.
Other Dimensions:
As shown.
40´x 60” Cooling Pan should be located approximately 3-5” below the Corn Treat Mixer Base
Model 2622 (Rolling Table)
Includes Casters
Includes (1) cooling pan ( order p/n 48845 for extra cooling pan)
Gold Medal Products Co.
10700 Medallion Drive
Cincinnati, Ohio 45241-4807
Phone: 513-769-7676 fax: 513-769-8500
e-mail: www.gmpopcorn.com
MODEL # 2410E AND 2411E
Page 5
2410E and 2411E
5
INSTALLATION
CHECKING SHIPMENT
Unpack the shipping crate and check thoroughly for any damage which may have occurred in
transit. Any claims should be filed immediately with the transportation company.
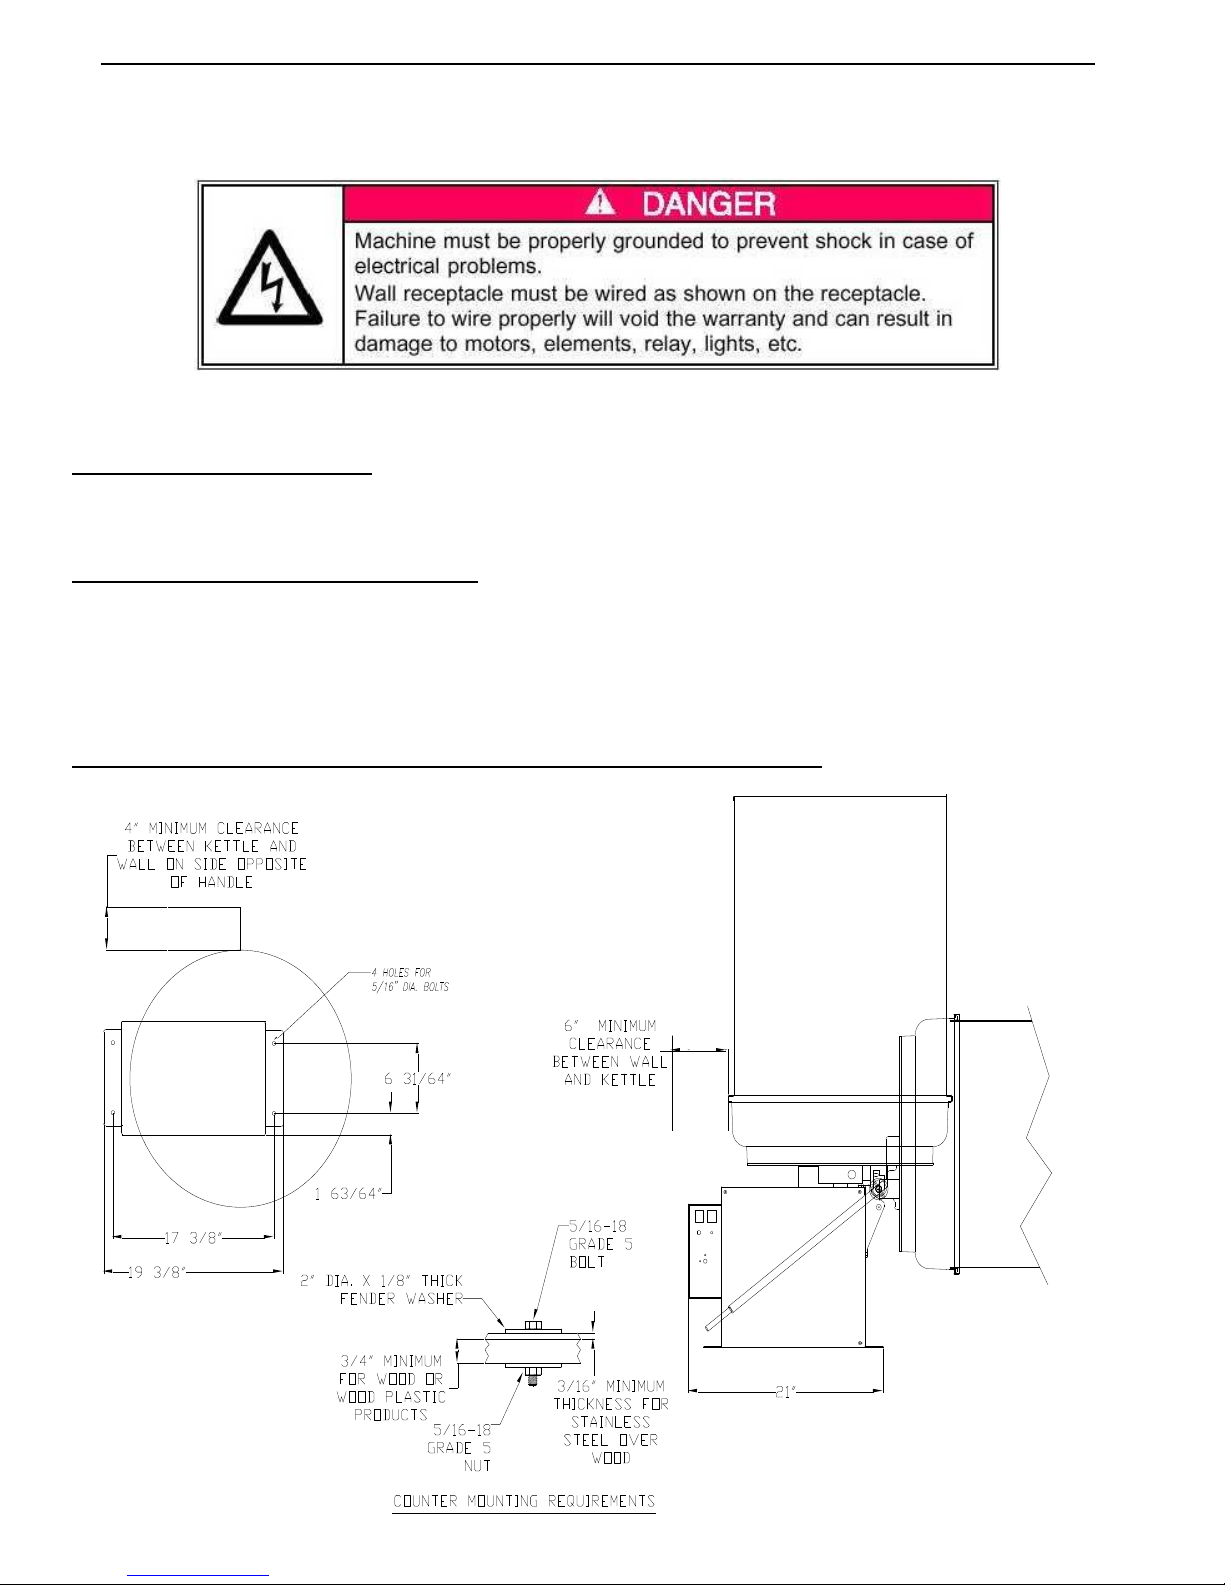
ELECTRICAL REQUIREMENTS
Voltage for the 2410E AND 2411E is 208 volt, 3-WIRE ( 2 HOT, 1 NEUTRAL) 60 cycle single phase. A
wall receptacle is supplied with the machine. This receptacle will accept the attachment plug on your
machine and must be used. The machine will draw a maximum of 23 amps. Your electrician must furnish
sufficient current for the proper operation of your machine. We recommend that this machine be fused on a
line by itself.
COUNTER MOUNTING REQUIREMENTS/INSTRUCTIONS
MODEL # 2410E AND 2411E
Page 6

2410E and 2411E
6
CONTROLS AND THEIR FUNCTION
HEAT/MOTOR SWITCH
This rocker switch in the “ON” position energizes the heating elements in the bottom of the kettle, and also
operates the motor for 15 seconds out of every minute.
MOTOR ONLY SWITCH
With this rocker switch in the “ON” position, the agitator motor will run continuously.
Note: The main function of this switch is for mixing the product/popcorn at the end of the cooking
cycle with the kettle in the tilt position. It is also used for “cleaning mode”.
HEAT CONTROL
The machine comes from the factory preset at 280°F. If more or less heat is required, remove the silver hole
plug or cover plate, located on the front panel of the control box. This will allow you to access the heat
control adjustment potentiometer. Turn the potentiometer clockwise to increase the temperature, and
counter-clockwise to decrease.
To calibrate the heat control for corn treat, Fill the mixing bowl with a one inch depth of corn oil. Use an
accurate thermometer to measure the temperature of the oil in the mixing bowl. Turn the motor on to stir the
oil while it heats. When the oil reaches 280F slowly turn the potentiometer counter clockwise until the
buzzer sounds. If the buzzer sounds before the temperature reaches 280F, slowly turn the potentiometer
clockwise until the buzzer stops and continue to turn an additional 1/8 of turn.
Note: The sound of the buzzer always signals temperature cut-off.
MODEL # 2410E AND 2411E
Page 7

2410E and 2411E
7
Making Carmel Corn
Instructions for Making Carmel Corn (Mark 10)
Always remember to leave the lid on the kettle during the first part of the batch. Once steam starts to
“roll-up” from underneath the lid, then carefully remove the lid for the remainder of the cooking cycle.
CAUTION: Beware of rising steam, and make sure to keep face and hands clear of the rising
steam.
1. Turn the Heat/Motor Switch ON (do not turn on the Motor Only Switch).
2. Add (2) 22 ounce packages of Gold Medal Caramel Corn Mix (Item No. 2094), 8 cups of
granulated sugar (brown or white), and 16-22 ounces of water (add water last).
Note: When using the Gold Medal “One Step” Carmel Corn Mix, DO NOT add granulated sugar.
3. Turn the Motor Only Switch ON and mix for approximately one minute, then turn the Motor Only
Switch OFF. (With the Heat/Motor Switch ON, the motor will run for 30 seconds every minute.)
4. Add 2 sticks (8 ounces) of coconut oil or vegetable oil.
5. Allow the mix to cook until the buzzer sounds at 280°F product temperature.
6. Turn the Heat/Motor Switch OFF.
7. Turn the Motor Only Switch ON.
8. Add 10 gallons of pre-popped corn.
9. Allow the corn to mix for approximately 10 seconds with the kettle in the upright position.
10. Move the kettle to the mix position and spray 10-15 “squirts” of GOLD Medal Free-N-Easy (Item
No. 2250) for proper corn separation, and mix the popcorn until it is thoroughly coated.
11. Dump the caramel corn into the cooling pan, and mix/separate the caramel corn using two
popcorn scoops.
12. After dumping caramel corn, turn Motor Only Switch OFF.
13. Allow the finished product to cool before packaging.
During normal operation, sugar build-up will occur in the cooking area. This build-up must be removed by
steaming out the kettle every 3-4 batches. It is important that this is done, especially before the machine is
turned off for the day. If making single batches, with the machine turned off between batches, the kettle
must be steamed out after each batch has been completed. Follow the Proper Kettle Cleaning Procedure in
the Care and Cleaning section of this manual.
MODEL # 2410E AND 2411E
Page 8

2410E and 2411E
8
DANGER
Machine must be properly grounded to prevent electrical shock to personnel.
DO NOT immerse in water.
Always unplug the equipment before cleaning or servicing.
025_020314
WARNING
To avoid serious burns, DO NOT touch the kettle while it is hot!
028_020314
Care and Cleaning
Good sanitation practice demands that all food preparation equipment be cleaned regularly (only use nontoxic, food grade cleaners). A clean looking, well-kept machine is one of the best ways of advertising your
product.
Corn Treat Cleaning Instructions
Note: It is extremely important to follow all of the cleaning procedures, otherwise parts damage
and equipment failure will result. The warranty does not cover parts that are damaged due
to improper cleaning.
Proper Kettle Cleaning Procedure
Follow the procedure below to steam the sugar build-up out of the kettle every 3-4 batches during regular
operation and before the machine is turned off for the day. The kettle must also be steamed out after
making single batches, if the machine is turned off between batches.
1. After all product has been removed, and the kettle has cooled for 15-20 minutes, carefully pour
24 oz. of water into the kettle.
CAUTION: Beware of rising steam; make sure to keep face and hands clear of the rising
steam.
2. Place the lid on the kettle, and turn the Heat/Motor Switch ON.
3. When water starts to boil, turn Heat/Motor Switch OFF.
4. Turn the Motor Switch ON; allow the machine to cool, then remove the lid and carefully pour the
contents of the kettle into a pan or bucket. Steam the kettle twice to remove all traces of product.
5. Turn the Motor Switch OFF.
6. With all switches OFF, wipe out any excess sugar build-up from the kettle using a damp rag,
then the kettle is ready to begin another batch.
7. Do not leave water in the pans overnight.
Daily Unit Cleaning Procedure
Follow the directions below to clean and sanitize the unit each day after use.
1. With the machine OFF, unplug the unit and allow it to cool before attempting to clean.
2. Make sure to clean all pans/accessories in order to sanitize them before each use.
MODEL # 2410E AND 2411E
Page 9

2410E and 2411E
9
Agitator Shaft
Mixing Paddle
Wing Bolt
(Mixing Paddle
Lock Stud Assy.)
Hub Seal
Assembly
O-Ring
3. Release the draw latch to easily remove the mixing drum, then remove paddles. The mixing
drum and paddles can be taken to the sink to clean.
4. Wipe the kettle lead cord with a clean SLIGHTLY damp cloth. DO NOT get moisture into the
kettle lead-in cord, severe damage will result.
5. The cabinet of your machine should be wiped clean daily (or more, depending on usage) with a
clean soft cloth, SLIGHTLY dampened with soap and hot water.
Wipe the stainless steel parts with a clean cloth and cleaner designed for stainless steel, such as
Gold Medal Watchdog Stainless Cleaner (Item No. 2088).
DO NOT use oven cleaners or abrasive materials as they will damage parts of the machine.
Proper Hub Seal Assembly Cleaning Procedure
1. Unscrew the wing bolt (Mixing Paddle Lock Stud Assy.) and remove the mix paddles.
2. Remove any burrs on the shaft using a fine grit emery paper to lightly sand the surface. If the burrs are
not removed, damage may occur to the o-ring/oil seal during removal/installation.
3. Remove the hub seal assembly and soak it in hot water to clean.
4. Clean the area around the center hub. Remove any product residue. (Units manufactured prior to Jan.
2014, see Kettle Shaft Maintenance section for note on lubricating kettle bushings.)
5. Lightly lubricate the center hub of the kettle with a small amount of vegetable oil to allow for easy
installation of the hub seal assembly.
6. Slide the clean hub seal assembly down the agitator shaft. Apply pressure to ease the assembly over
the center hub of the kettle until it seats properly (see diagram below.)
7. Slide the hub seal assembly down the agitator shaft. Apply pressure to ease the assembly over the
center hub of the kettle until it seats properly. (See diagram below.)
8. After the hub seal assembly has been properly installed, re-install the mix paddles onto the agitator
shaft.
9. Replace the wing bolts and finger tighten.
MODEL # 2410E AND 2411E
Page 10

2410E and 2411E
10
DANGER
Machine must be properly grounded to prevent electrical shock to personnel.
Failure to do so could result in serious injury, or death.
DO NOT immerse any part of this equipment in water.
DO NOT use excessive water when cleaning.
Keep cord and plug off the ground and away from moisture.
Always unplug the equipment before cleaning or servicing.
Make sure all machine switches are in the OFF position before plugging the
equipment into the receptacle.
008_051514
DANGER
Improper installation, adjustment, alteration, service, or maintenance can
cause property damage, injury, or death. Any alterations to this equipment will
void the warranty and may cause a dangerous condition. NEVER make
alterations to this equipment. Read the Installation, Operating, and
Maintenance Instructions thoroughly before installing, servicing, or operating
this equipment.
014_051514
WARNING
No user serviceable parts inside. Refer servicing to qualified service
personnel.
011_051514
CAUTION
THE FOLLOWING SECTIONS OF THIS MANUAL ARE INTENDED ONLY
FOR QUALIFIED SERVICE PERSONNEL WHO ARE FAMILIAR WITH
ELECTRICAL EQUIPMENT. THESE ARE NOT INTENDED FOR THE
OPERATOR.
027_010914
MAINTENANCE INSTRUCTIONS
MODEL # 2410E AND 2411E
Page 11

2410E and 2411E
11
Agitator Shaft
Mixing Paddle
Wing Bolt
(Mixing Paddle
Lock Stud Assy.)
Hub Seal
Assembly
p/n 46646
O-Ring p/n 46641
(inc. w/ p/n 46646)
NEW PADDLE & HUB SEAL KIT INSTALLATION
and Kettle Shaft Maintenance
1. Unscrew the wing bolt (Mixing Paddle Lock Stud Assy.) and remove the mix paddles.
2. Remove the old hub seal assembly.
3. Clean the area around the center hub. Clean up all food and carbon residue.
Note: For units manufactured prior to Jan. 1, 2014 only (kettle bushings have an
o-ring groove and o-ring). For these units, the kettle’s agitator shaft should be removed
monthly and the bushings lubricated with Never Seez® (use White Food Grade ONLY). To
do this, loosen the set screw in the Jaw Coupling and remove the shaft. DO NOT lose the
shaft key; this must be reset into place when reassembling.
4. Remove any burrs on the top edge of the center hub. Use a fine grit emery paper to lightly sand the
surface. If the burrs are not removed, damage may occur to the hub assembly during installation.
5. Lightly lubricate the center hub of the kettle with a small amount of vegetable oil to allow for easy
installation of the hub seal assembly.
6. Slide the hub seal assembly down the agitator shaft. Apply pressure to ease the assembly over the
center hub of the kettle until it seats properly. (See diagram below.)
7. After the hub seal assembly has been properly installed, place the new mix paddles on the top of the
agitator shaft.
8. Replace the wing bolts and finger tighten.
MODEL # 2410E AND 2411E
Page 12

2410E and 2411E
12
ORDERING SPARE PARTS
1. Identify the needed part by checking it against the photos, illustrations, and/or the parts list.
2. When ordering, please include part number, part name, and quantity needed.
3. Please include your model name, serial number, and date of manufacture (located on the machine
nameplate) with your order.
4. Address all parts orders to:
Parts Department
Gold Medal Products Co.
10700 Medallion Drive
Cincinnati, Ohio 45241-4807
or, place orders at:
(800) 543-0862
(513) 769-7676
Fax: (513) 769-8500
E-mail: info@gmpopcorn.com
Web Page: www.gmpopcorn.com
MODEL # 2410E AND 2411E
Page 13

2410E and 2411E
13
Terminal Block
p/n 42006
Buzzer Signal
p/n 46118
Circuit Breaker, 15
AMP p/n 47364
Switch, Rocker DPDT
Lighted (2) p/n 48616
Potentiometer, 500
Ohm p/n 46326
Relay, 40A DPST,
120V p/n 55219
Timer, Percentage 60
sec. p/n 48688
Resistor, 750 k, ½ W
(rear, “Off”) p/n 48690
Resistor, 240 k, ½ W
(front, “On”) p/n 48689
Temperature Control,
RTD p/n 55057
Potentiometer, 500
Ohm p/n 46326
Switch, Rocker DPDT
Lighted (2) p/n 48616
Circuit Breaker, 15
AMP p/n 47364
Corn Treat System Controller
MODEL # 2410E AND 2411E
Page 14

2410E and 2411E
14
Grip, Handle
Bar p/n 46028
2 Position Bracket
p/n 46153
Tilt Lever, Mark 10
CTC p/n 46488
Kettle Lead Assy,
Mark 10 p/n 46546
Mixing Drum Mark
10 p/n 48833
Drum Seal Mark 10
p/n 48834 (not
visible, between
Drum & Kettle)
Retaining Ring
Mark 10 p/n 48835
Spring Retainer
Rod p/n 82551
Kettle Mounting Bracket
Machined p/n 48812
Quad Skate Toe
Stop p/n 70047
Lid Assembly
p/n 67526
Drive Coupling
p/n 48826
Plastic Handle 3/8-16
Tap p/n 76075
Shaft for handle: P/N
56045 – Nut for
handle: P/N 46000
MODEL # 2410E AND 2411E
Page 15

2410E and 2411E
15
Lead-In Cord
Assy. p/n 32112
Mixing Drum Mark
10 p/n 48833
Collar (2) p/n 74661
Hub p/n 48839
Left Dump Shaft
Weldment p/n 48881
Right Dump Shaft
Weldment p/n 48841
Torsion Spring (2)
p/n 74660
LG Spacer (Customer
Side) p/n 74690
Spacer, Large (Dump
Side) p/n 74659
Spacer (4) (beneath
Spring, 2 per
Spring) p/n 74658
MODEL # 2410E AND 2411E
Page 16

2410E and 2411E
16
H.D. Motor 1/4 HP
p/n 48880
Mix Paddle Lock Stud
Assy. (2) p/n 46203
Mix Paddle, Mark
10 (2) p/n 46475
Motor & Agit Mount
Plate p/n 48818
Agitator Shaft,
Mark 10 p/n 48825
RTD Heat Sensor
p/n 46299
Bottom Plate
p/n 46211
Blending Strip
p/n 46702
Kettle Rest
p/n 46152
Kettle Rest Crutch
Tip p/n 82911
MODEL # 2410E AND 2411E
Page 17

2410E and 2411E
17
Heat Element Clamp
Mark 10 (8) p/n 46492
10-24 x 1 in Stud
w/Nuts (16)
p/n 46327
Tubular Element,
1800W p/n 48650
Heat Element 120V,
2700W p/n 46491
Thermostat, Kettle
L-510 (2) p/n 82219
RTD Heat Sensor
p/n 46299
Mix Bowl Bushing (2) p/n 46484
Bushing on bottom (shown)
Casting, Mark
10 Kettle
p/n 46472
Kettle Bottom
MODEL # 2410E AND 2411E
Page 18

2410E and 2411E
18
ELECTRICAL SCHEMATIC
MODELS 2410E & 2411E
MODEL # 2410E AND 2411E
Page 19

2410E and 2411E
19
© 2014 – The text, descriptions, graphics, layout, and other material in this publication are the exclusive property of
Gold Medal Products Co. and shall not be used, copied, reproduced, or published in any fashion, including website
display, without its express written consent.
WARRANTY
Gold Medal Products Co. warrants to the original purchaser each item of its manufacture to
be free of defects in workmanship and material under normal use and service. Gold Medal
Products Co.’s obligation under this warranty is limited solely to repairing or replacing parts,
f.o.b. Cincinnati, Ohio, which in its judgment are defective in workmanship or material and
which are returned, freight prepaid, to its Cincinnati, Ohio factory or other designated point.
Except for “Perishable Parts” on specific machines, the above warranty applies for a period
of two (2) years from the date of original sale to the original purchaser of equipment when
recommended operating instructions and maintenance procedures have been followed. These
are packed with the machine. Parts warranty is two (2) years, labor is six (6) months.
THIS WARRANTY IS IN LIEU OF ALL OTHER WARRANTIES EXPRESSED OR
IMPLIED, AND OF ALL OTHER OBLIGATIONS OR LIABILITIES ON OUR PART,
INCLUDING THE IMPLIED WARRANTY OF MERCHANTABILITY. THERE ARE
NO WARRANTIES WHICH EXTEND BEYOND THE DESCRIPTION ON THE FACE
HEREOF. In no event shall Gold Medal Products Co. be liable for special, incidental or
consequential damages. No claim under this warranty will be honored if the equipment covered
has been misused, neglected, damaged in transit, or has been tampered with or changed in any
way. No claim under this warranty shall be honored in the event that components in the unit at
the time of the claim were not supplied or approved by Gold Medal Products Co. This warranty
is effective only when electrical items have been properly attached to city utility lines only at
proper voltages. This warranty is not transferable without the written consent of Gold Medal
Products Co.
The term “Original Purchaser” as used in this warranty shall be deemed to mean that person,
firm, association, or corporation who was billed by the GOLD MEDAL PRODUCTS CO.,
or their authorized distributor for the equipment.
THIS WARRANTY HAS NO EFFECT AND IS VOID UNLESS THE ORIGINAL
PURCHASER FIRST CALLS GOLD MEDAL PRODUCTS CO. AT 1-800-543-0862 TO
DISCUSS WITH OUR SERVICE REPRESENTATIVE THE EQUIPMENT PROBLEM,
AND, IF NECESSARY, FOR INSTRUCTIONS CONCERNING THE REPAIR OR
REPLACEMENT OF PARTS.
NOTE: This equipment is manufactured and sold for commercial use only.
10700 Medallion Drive, Cincinnati, Ohio 45241-4807 USA
gmpopcorn.com
Phone: (800) 543-0862 Fax: (800) 542-1496
(513) 769-7676 (513) 769-8500
MODEL # 2410E AND 2411E
 Loading...