

Page 1
© 2018 Gold Medal Products Co.
Part No. 110172
Instruction Manual
10700 Medallion Drive, Cincinnati, Ohio 45241-4807 USA
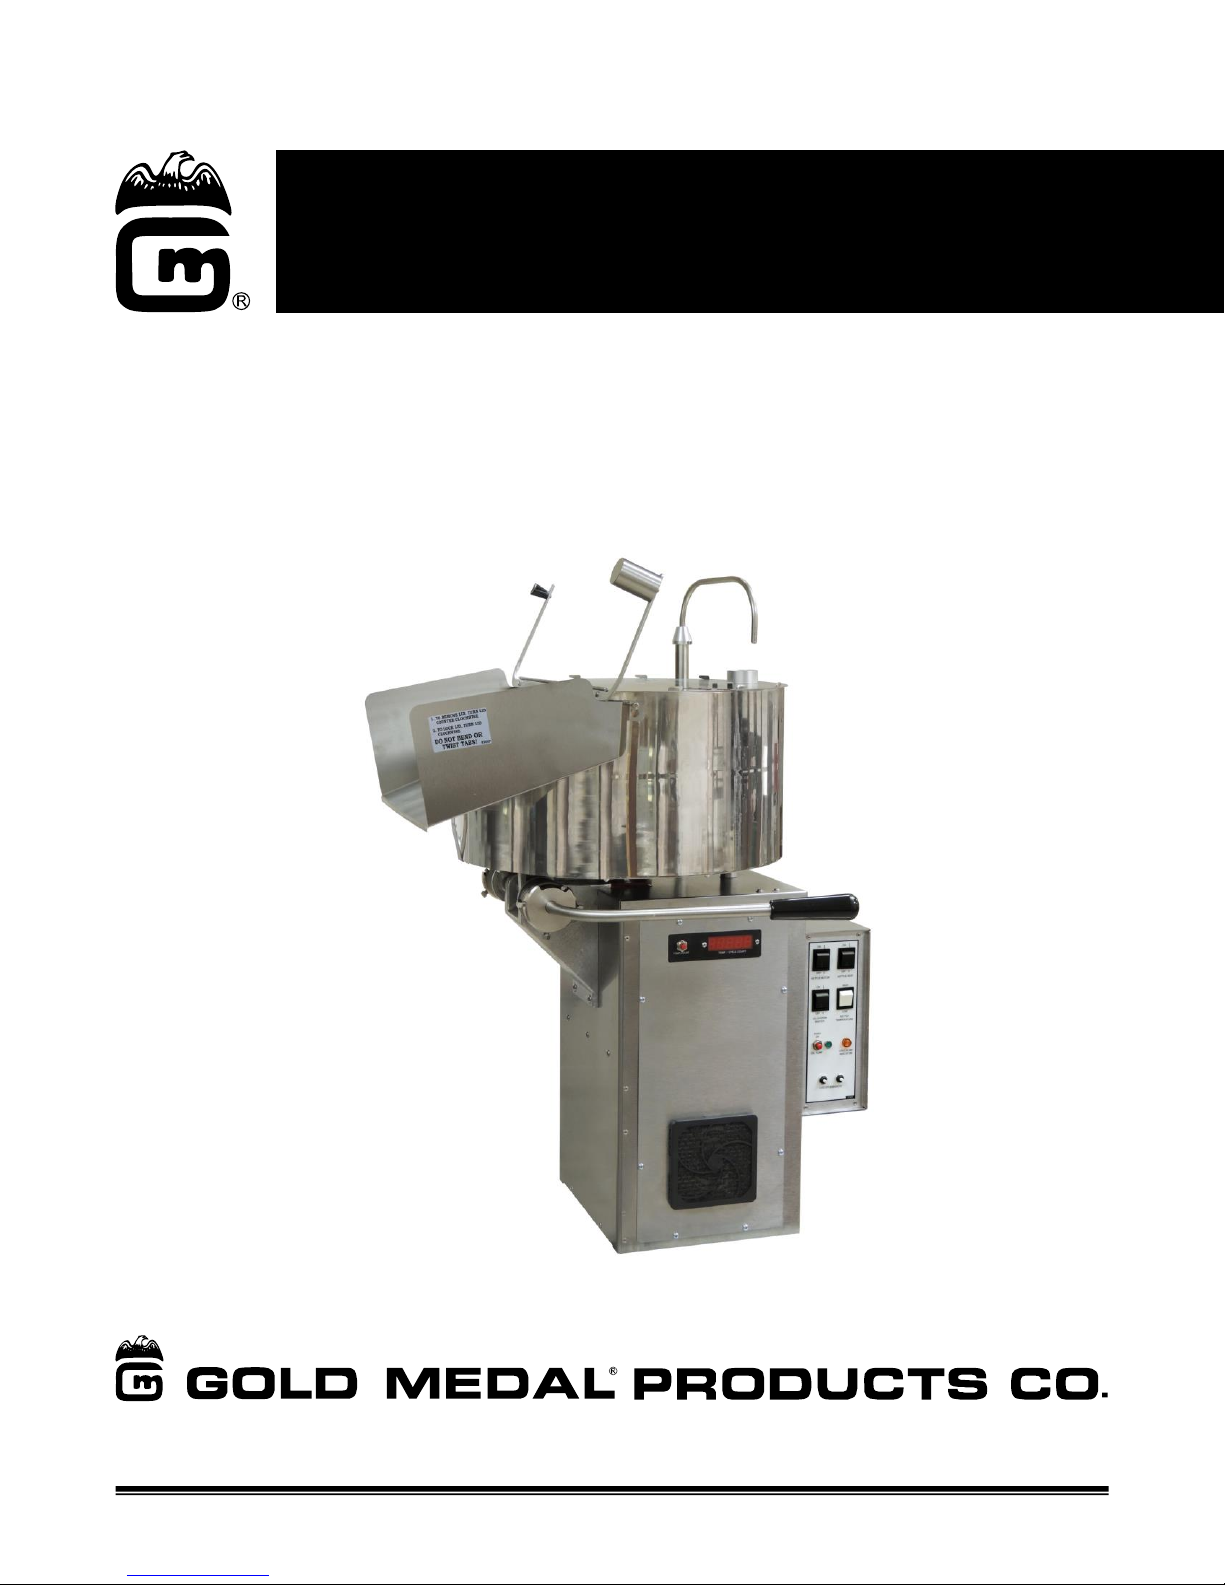
36, 48, & 60 oz. Cornados
Export Model Series 2149, 2258, and 2297
(100, 110, and 101, 111)
48 oz. Unit Shown
Page 2

36, 48 & 60 oz. Export Model Series 2149, 2258, and 2297
Cornados (100, 110, and 101, 111)
Page 2
gmpopcorn.com
Table of Contents
SAFETY PRECAUTIONS ................................................................................................................................... 3
INSTALLATION INSTRUCTIONS ................................................................................................................... 5
Inspection of Shipment ....................................................................................................................................... 5
Manual ....................................................................................................................................................................... 5
Model Description ................................................................................................................................................. 5
Items Included with this Unit ........................................................................................................................... 5
Setup ........................................................................................................................................................................... 6
Electrical Requirements ..................................................................................................................................... 7
Before You Plug In Machine .............................................................................................................................. 8
OPERATING INSTRUCTIONS ......................................................................................................................... 9
Controls and Their Functions ........................................................................................................................... 9
Program the E-Z Set Timer .................................................................................................................... 12
Popping Corn Instructions .................................................................................................................... 13
Care and Cleaning .................................................................................................................................... 15
Troubleshooting ....................................................................................................................................... 18
MAINTENANCE INSTRUCTIONS ................................................................................................................ 20
Removing Agitator Assembly and Shaft Maintenance ............................................................... 21
Replacing the Packing Cord on Kettle Hub...................................................................................... 22
Kettle and Drive Shaft Alignment ....................................................................................................... 23
Electronic Temperature Control (Export)....................................................................................... 24
Operation ............................................................................................................................................................... 24
Control Description ........................................................................................................................................... 24
Probe LED Indicator Light – Thermocouple Error Condition ........................................................... 25
Kettle Circuit Breaker ............................................................................................................................. 26
ORDERING SPARE PARTS ............................................................................................................................ 27
Model Variations (Voltage Specific Parts) ................................................................................................ 27
Unit Exterior – Front View – Filter .............................................................................................................. 28
Unit Exterior – Rear View - Oil Line ............................................................................................................ 29
Unit Exterior – Kettle Mount – Parts Breakdown .................................................................................. 30
Kettle Assembly (36, 48, and 60 oz.) – Parts Breakdown ................................................................... 32
36 oz. Kettle Bottom – Element View ......................................................................................................... 34
48 oz. Kettle Bottom – Element View ......................................................................................................... 35
60 oz. Kettle Bottom – Element View ......................................................................................................... 36
Pedestal Interior – Motor and Shaft ............................................................................................................ 37
Pedestal Interior – Electrical – Parts Breakdown .................................................................................. 38
Control Box/Control Panel – Parts Breakdown...................................................................................... 40
Safety Labels ......................................................................................................................................................... 41
Accessories ........................................................................................................................................................... 42
Wiring Diagram ........................................................................................................................................ 43
WARRANTY ...................................................................................................................................................... 44
Page 3
36, 48 & 60 oz. Export Model Series 2149, 2258, and 2297
Cornados (100, 110, and 101, 111)
Page 3
gmpopcorn.com
SAFETY PRECAUTIONS
DANGER
Machine must be properly grounded to prevent electrical shock to personnel.
Failure to do so could result in serious injury, or death.
DO NOT immerse any part of this equipment in water.
DO NOT use excessive water when cleaning.
Keep cord and plug off the ground and away from moisture.
Always unplug the equipment before cleaning or servicing.
Make sure all machine switches are in the OFF position before plugging the
equipment into the receptacle.
008_051514
DANGER
Improper installation, adjustment, alteration, service, or maintenance can
cause property damage, injury, or death. Any alterations to this equipment
will void the warranty and may cause a dangerous condition. This appliance
is not intended to be operated by means of an external timer or separate
remote-control system. NEVER make alterations to this equipment. Read the
Installation, Operating, and Maintenance Instructions thoroughly before
installing, servicing, or operating this equipment.
014_020416
WARNING
To avoid burns, DO NOT touch the kettle or any heated surface.
DO NOT place or leave objects in contact with heated surfaces.
013_092414
WARNING
ALWAYS wear safety glasses when servicing this equipment.
010_010914
WARNING
No user serviceable parts inside. Refer servicing to qualified service
personnel.
011_051514
WARNING
Read and understand operator’s manual and all other safety instructions
before using this equipment. To order copies of the operator’s manual go to
gmpopcorn.com or write to Gold Medal Products Co., 10700 Medallion Drive,
Cincinnati, OH 45241 USA 1-(800)-543-0862
022_060215
Page 4
36, 48 & 60 oz. Export Model Series 2149, 2258, and 2297
Cornados (100, 110, and 101, 111)
Page 4
gmpopcorn.com
WARNING
DO NOT allow direct contact of this equipment by the public when used in
food service locations. Only personnel trained and experienced in the
equipment operation may operate this equipment.
Carefully read all instructions before operation.
012_010914
WARNING
This machine is NOT to be operated by minors.
007_010914
This appliance is not intended for use by persons (including children) with reduced
physical, sensory or mental capabilities, or lack of experience and knowledge, unless they
have been given supervision or instruction concerning use of the appliance by a person
responsible for their safety.
Note: Improvements are always being made to Gold Medal’s equipment. This information
may not be the latest available for your purposes. It is critical that you call Gold
Medal’s Technical Service Department at 1-800-543-0862 for any questions about
your machine operations, replacement parts, or any service questions. (Gold Medal
Products Co. does not assume any liability for injury due to careless handling
and/or reckless operation of this equipment.) General images may be used in
manual for reference only.
Page 5
36, 48 & 60 oz. Export Model Series 2149, 2258, and 2297
Cornados (100, 110, and 101, 111)
Page 5
gmpopcorn.com
INSTALLATION INSTRUCTIONS
Inspection of Shipment
After unpacking, check thoroughly for any damage which may have occurred in transit. Claims
should be filed immediately with the transportation company. The warranty does not cover
damage that occurs in transit, or damage caused by abuse, or consequential damage due to the
operation of this machine, since it is beyond our control (reference warranty in back of manual).
Manual
Read and understand the operator’s manual and all other safety instructions before using this
equipment. To order copies of the operator’s manual go to gmpopcorn.com or write to Gold
Medal Products Co., 10700 Medallion Drive, Cincinnati, OH 45241 USA 1-(800)-543-0862.
Model Description
This manual covers 2149 (36 oz.), 2258 (48 oz.), and 2297 (60 oz.) Series, tall pedestal, Cornado
units (motor is located in pedestal). See below for series specific RH, LH, and Pass Thru Handle
descriptions.
Model Series
100: Right Hand Dump
110: Left Hand Dump
101: Right Hand Dump, Pass Thru Handle
111: Left Hand Dump, Pass Thru Handle
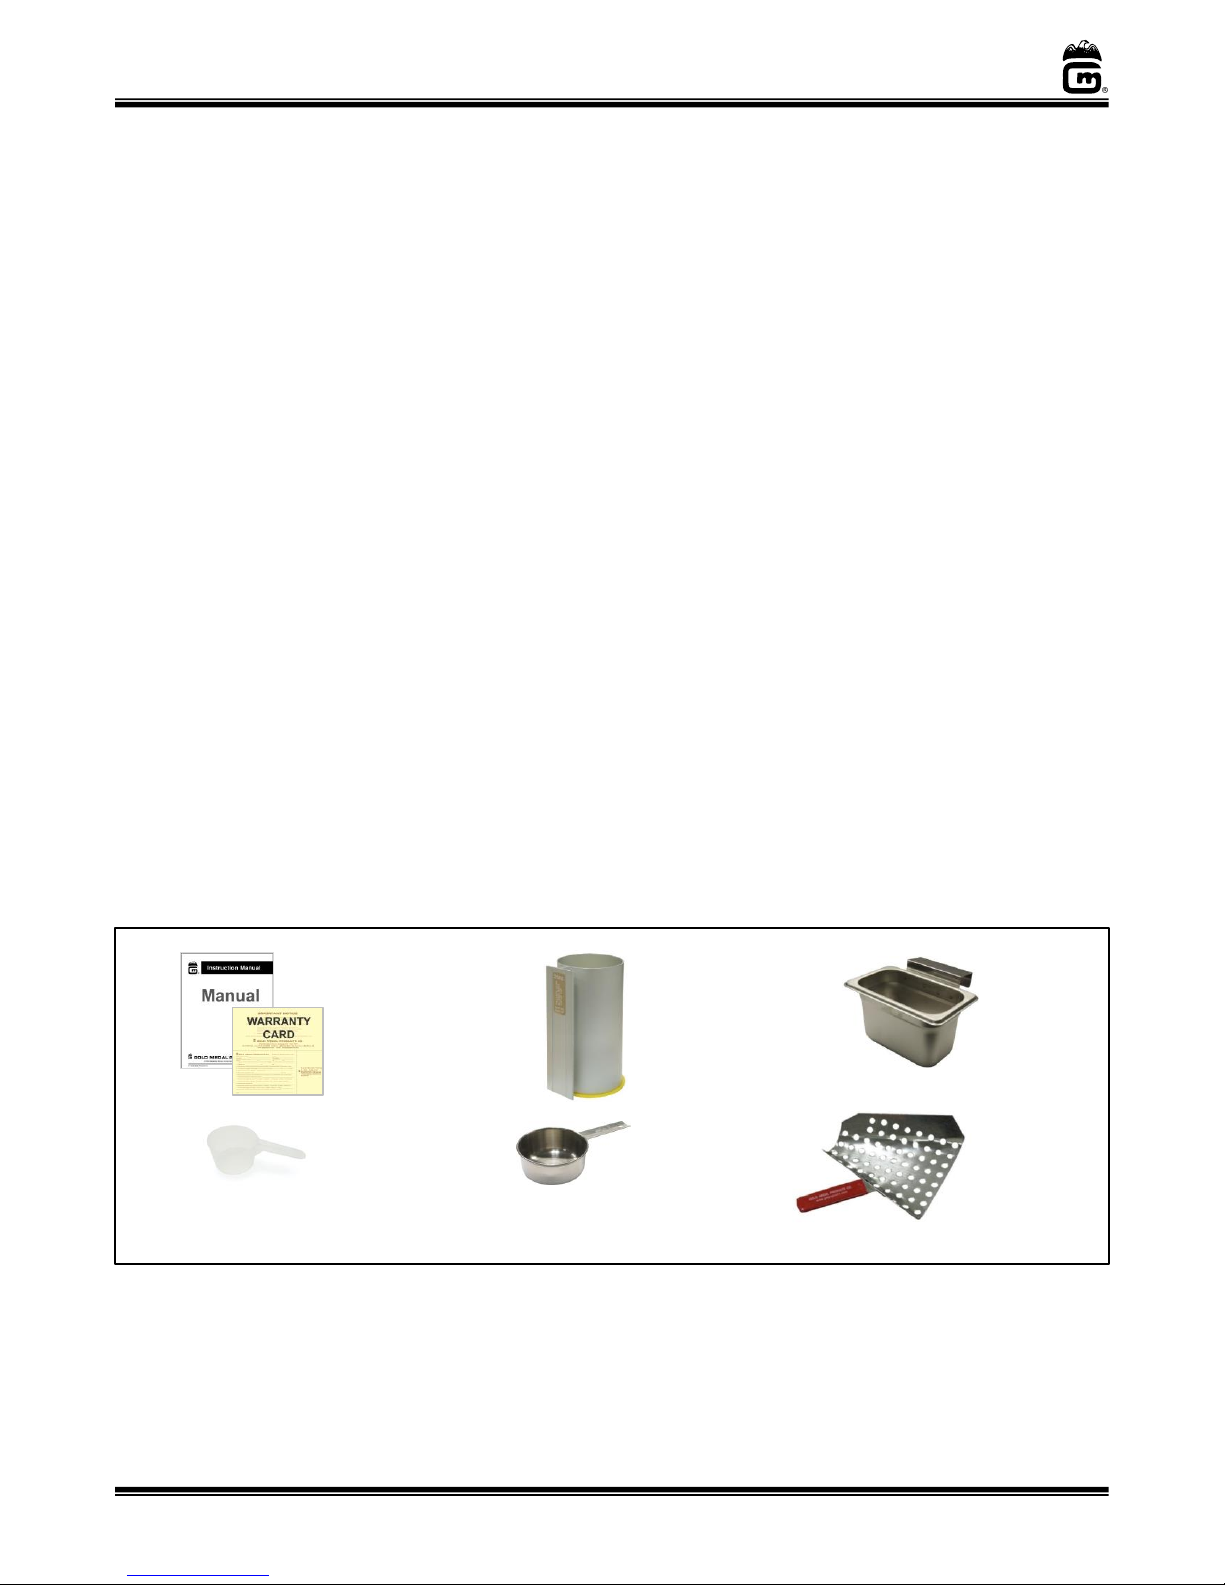
Items Included with this Unit
2 TBS. Flavacol Measure
36 oz. Units (PN 47681)
Corn Cup
Unit specific:
36 oz. (PN 67905-36),
48 oz. (PN 17757-48),
60 oz. (PN 17757-60)
RH Jet Scoop
(PN 2072)
Flavacol
Container
(PN 41752)
Instruction Manual
Registration
Warranty Card
1/4 Cup Flavacol Measure
48 and 60 oz. Units (PN 47169)
Page 6

36, 48 & 60 oz. Export Model Series 2149, 2258, and 2297
Cornados (100, 110, and 101, 111)
Page 6
gmpopcorn.com
Setup
The Cornado Popper has been inspected and tested at the factory. Installation of the popper
should be performed by qualified service personnel. Read and perform all Setup steps prior to
operating the unit.
1. Remove all packaging and tape.
2. Install unit on a level surface; the popper must have an 8” minimum clearance
required between the popper kettle and any combustible surface. See counter
mounting requirements and hole locations below.
Mounting Instructions: 8” minimum clearance required between kettle and
any combustible surface.
Pedestal Interior
(4) Mounting Locations
Secure Pedestal to table or counter.
Counter Mounting Requirements
2” Dia. X 1/8” Thick
Fender Washer
3/4” Minimum
for Wood or
Wood Plastic
Products
5/16-18
Grade 5 Bolt
5/16-18
Grade 5 Nut
3/16” Minimum
Thickness for
Stainless Steel
over Wood
Oil Tube
35.9”
(36 & 48 oz.)
38.9”
(60 oz.)
16.03” (36 oz.)
18.03” (48 oz.)
19.51” (60 oz.)
8.437”
12.072”
6.5”
5.221”
0.878”
10.472”
Ø.375 Dia.
Suggested Table
Hole Ø.500
Hole Locations
Remove front panel to access mounting
holes on bottom of pedestal interior.
Page 7
36, 48 & 60 oz. Export Model Series 2149, 2258, and 2297
Cornados (100, 110, and 101, 111)
Page 7
gmpopcorn.com
3. The main power cord extends out the bottom of the cabinet base. A secondary, smaller
power cord, is provided for powering the oil dispense unit.
Before plugging in machine, have a certified electrician follow all requirements listed
in the Electrical Requirements section of this manual.
4. The small power cord (6 pin Jones Plug) is the oil pump harness which connects the
popper to the oil dispense unit. To connect/calibrate the oil dispense system to the
popper; refer to the Instruction Manual included with the oil dispense unit (reference
the Program the EZ-Set Timer section to set the oil dispense timer(s).
5. After setup, the unit should be cleaned. The kettle has a food grade protective coating
applied to the cooking surfaces, this coating must be removed prior to operating the
unit (see Care and Cleaning section of this manual).
Electrical Requirements
The following power supply must be provided (reference unit Data Plate):
220-230 V~, 50/60 Hz
Potential Electrical Variations: 220 V~, 60 Hz
Export units are designed to operate on single phase, 16 AMP, 4 wire supply, 230 V~
(2 Hot, 1 Neutral, 1 Ground). All electrical components in this machine are 230 V (motors,
heat elements, lights, etc.) and therefore require “Hot to Neutral” connection (NOT “Hot to
Hot”). A certified electrician must supply and install the wall receptacle for this unit;
reference the Receptacle Wiring Diagram for Export Units.
DANGER
Machine must be properly grounded to prevent electrical shock to personnel.
Failure to do so could result in serious injury, or death.
DO NOT immerse any part of this equipment in water.
DO NOT use excessive water when cleaning.
Keep cord and plug off the ground and away from moisture.
Always unplug the equipment before cleaning or servicing.
Make sure all machine switches are in the OFF position before plugging the
equipment into the receptacle.
008_051514
A certified electrician must furnish sufficient power for proper machine operation and install any
supplied receptacle. We recommend this equipment be on a dedicated and protected circuit.
Failure to wire properly will void the warranty and may result in damage to the machine. It is Gold
Medal Products Co.’s recommendation that this machine be plugged directly into a wall outlet. The
use of extension cords is not recommended due to safety concerns, and may cause sacrificed
and/or reduced performance. Make sure cord is located to prevent a trip hazard or unit upset.
Page 8
36, 48 & 60 oz. Export Model Series 2149, 2258, and 2297
Cornados (100, 110, and 101, 111)
Page 8
gmpopcorn.com
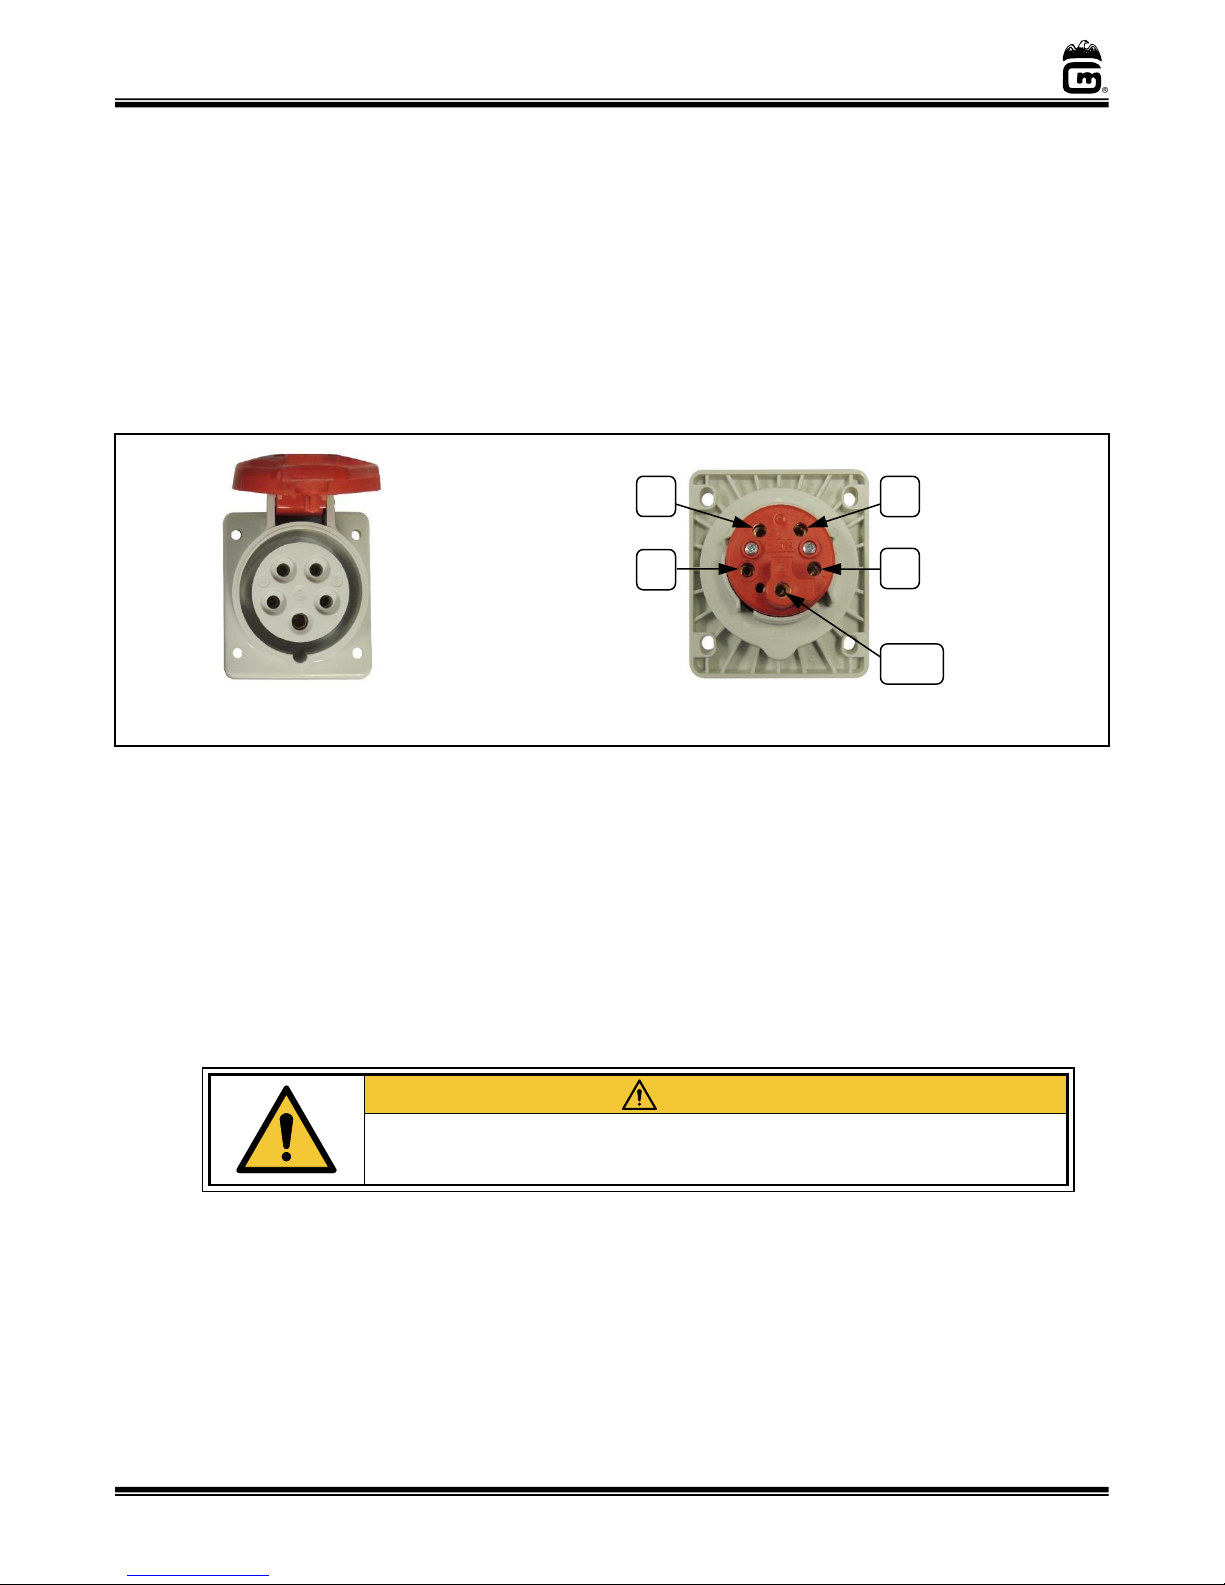
Receptacle Wiring Diagram (for all Export Units)
A certified electrician must supply and install the required wall receptacle for this unit, follow
the IMPORTANT instructions shown.
This unit is designed to operate on single phase, 16 AMP, 4 wire supply. All electrical
components in this machine are 230 V. If the receptacle is wired incorrectly, the heat
elements/kettle and other electrical components could be at 400 V potential instead of the
needed 230 V, resulting in excessive temperatures in the heat elements (i.e.: kettle) and possible
fire, and/or damage to electrical components.
Before You Plug In Machine
1. Make sure all machine switches are OFF before plugging equipment into receptacle.
2. Make sure wall outlet can accept the grounded plugs (where applicable) on the power
supply cord.
3. The wall outlet must have the proper polarity. If in doubt, have a competent
electrician inspect the outlet and correct if necessary.
4. DO NOT use a grounded to un-grounded receptacle adapter (where applicable).
5. Install unit in a level position.
CAUTION
If the supply cord is damaged, it must be replaced by Gold Medal Products Co.,
its service agent or similarly qualified persons in order to avoid a hazard.
039_080614
3P+N+E IEC 309
(Front View)
3P+N+E IEC 309
(Back View)
PE-G
L2
L1
Connect to Black
(Hot) Wire
Connect to Brown
(Hot) Wire
Connect to
Green/Yellow
(Ground) Wire
Connect to Blue
(Neutral) Wire
L3
N
Not Used
(If 5 wires provided,
connect Grey here.)
Page 9
36, 48 & 60 oz. Export Model Series 2149, 2258, and 2297
Cornados (100, 110, and 101, 111)
Page 9
gmpopcorn.com
OPERATING INSTRUCTIONS
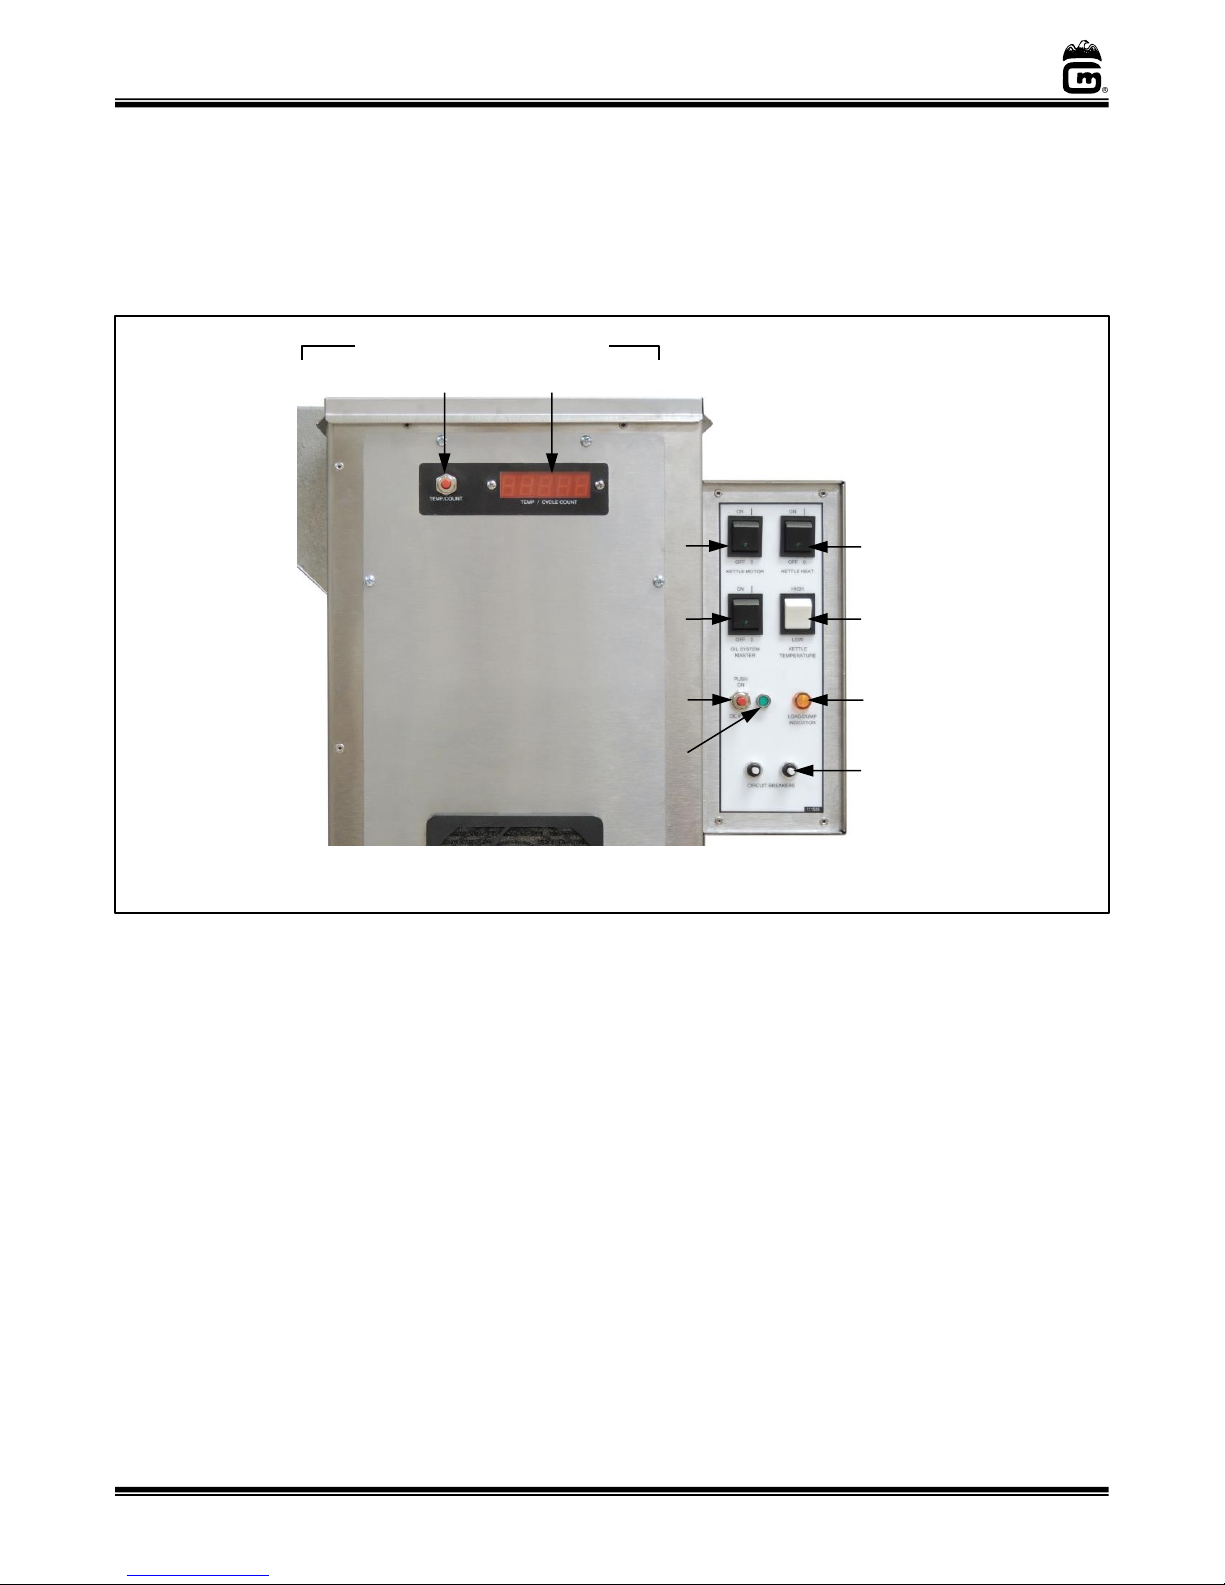
Controls and Their Functions
This section describes the unit controls (reference image below).
KETTLE HEAT SWITCH (Kettle Circuit Breaker)
Two position, ON/OFF lighted rocker switch - supplies power to the heating elements in the
popping kettle by sending power to the “Big Eye” Electronic Temperature Control System.
IMPORTANT NOTE: The Kettle Heat Switch is inactive if the Kettle Circuit Breaker is
tripped. If unit is plugged in, but green Heat Switch light does not come on when
activated, then the Kettle Circuit Breaker may be tripped. Reference the Kettle
Does Not Heat section in the Troubleshooting section of this manual.
KETTLE MOTOR SWITCH
Two position, ON/OFF lighted rocker switch - supplies power to the kettle agitator motor.
The Kettle Motor Switch MUST be ON at all times when there is popcorn (popped or unpopped) in the kettle.
HIGH/LOW KETTLE TEMPERATURE SWITCH
Two position rocker switch – adjusts kettle temperature for Salt (HIGH) or Sweet (LOW)
popping mode.
Control Panel View
Circuit Breakers
Push Button Switch
Temperature/Cycle Count
Digital Display
High/Low Kettle
Temperature Switch
Kettle Heat Switch
Load/Dump Indicator
Kettle Motor Switch
Oil PB Switch
Green Oil Light
Oil System
Master Switch
Page 10

36, 48 & 60 oz. Export Model Series 2149, 2258, and 2297
Cornados (100, 110, and 101, 111)
Page 10
gmpopcorn.com
LOAD/DUMP INDICATOR LIGHT & AUDIBLE SIGNAL
During normal popper operation, the yellow Load/Dump light and audible sound (if
engaged), are used to signal Load/Dump. If the yellow indicator light is ON, and the
buzzer is sounding, one of the following actions should be taken:
• Load the corn and oil or
• Dump the popped corn from the kettle or
• Turn the Kettle Heat Switch OFF if you are finished popping corn.
During calibration of the oil dispense unit, the indicator light (Oil Light or Load/Dump
Light) is used to indicate when the oil dispense unit is in program mode.
OIL SYSTEM MASTER SWITCH
Two position, ON/OFF lighted rocker switch - supplies power to the oil pump (either the
Bag-in-a-Box or Bucket Pump model). Reference the Instruction Manual for the oil
dispense unit.
Bag-in-a-Box Model: Oil System Master Switch ON, provides power to the oil dispense
unit, activates the warmer/blower, and the heated line kit (if equipped).
Note: Coconut oil will congeal at temperatures below approximately 76°F (24°C). For
machines used daily, leave the Oil System Master Switch on at all times and keep
the cabinet doors closed to prevent the oil from becoming solid. If the machine has
not been used for several days, turn the Oil System Master Switch ON the night
before it is expected to be used.
Bucket Pump Model: Oil System Master Switch ON, activates the 30 watt heating
element on the bucket pump to keep the coconut oil liquid.
RED OIL DISPENSE PUSH BUTTON (PB) SWITCH & GREEN OIL LIGHT
Red Push Button Switch - dispenses a predetermined amount of oil into the kettle when
pressed. The Oil System Master Switch must be ON for the Oil Dispense PB Switch to activate.
The Oil Light on the popper will light continuously when oil pump is dispensing. Reference
the Instruction Manual for the oil dispense unit.
During calibration of the oil dispense unit, the indicator light (Oil Light or Load/Dump
Light) is used to indicate when the oil dispense unit is in program mode.
CIRCUIT BREAKERS
Two mini Circuit Breakers are located on the control panel, to protect the popper unit from
overload condition. If unit is plugged in, but the kettle motor or oil system does not come
on when activated, then the circuit breaker(s) may be tripped. (Reference the
Troubleshooting section of this manual).
TEMPERATURE/CYCLE COUNT (Digital Display and RED Push Button Switch)
The Digital Display shows the popping temperature of the kettle and number of popcorn
cycles completed by the unit. Set the Digital Display to show the cycle count. The
temperature portion is for troubleshooting purposes for qualified service personnel
reference (temperature has degree (°) symbol after the number). To alternate between
popping temperature and cycle counts, press the RED Temp/Count Push Button Switch.
Page 11

36, 48 & 60 oz. Export Model Series 2149, 2258, and 2297
Cornados (100, 110, and 101, 111)
Page 11
gmpopcorn.com
To reset the popcorn cycle count, press and hold the RED Temp/Count Push Button Switch
for 5 seconds, the display count will start to blink to warn the user the count is about to be
reset to zero. Continue to hold the push button 3 more seconds and the count will reset to zero.
Note: Display is selectable to show either °F or °C Temperatures (unit is preset at
installation, replacement display must be set by qualified service personnel only).
Page 12

36, 48 & 60 oz. Export Model Series 2149, 2258, and 2297
Cornados (100, 110, and 101, 111)
Page 12
gmpopcorn.com
Program the E-Z Set Timer
The oil dispense volume is set using the programmable timer in the oil dispense unit (reference
the Oil Dispense Unit manual). The number of timer settings available for the popper can be
determined as follows:
If using a DUAL TIMER oil unit: 2 internal timer settings are available in the oil dispense unit.
If using a SINGLE TIMER oil unit: 1 internal timer setting is available in the oil dispense unit.
Follow the steps below to program the timer to dispense the oil amount needed to pop a batch of
popcorn. It is recommended to set the oil volume to approx. 30% of the raw popcorn charge used.
To program, use the Oil Dispense Switch and the Oil System Master Switch located on the control
panel of the popper.
Note: Take volume measurements from oil delivery tube located in popper above the
kettle. Allow kettle to cool completely prior to taking volume measurements.
Priming the Unit:
1. Turn Oil System Master Switch ON.
2. Hold a cup under the oil delivery tube in popper, PUSH and RELEASE the Oil Dispense
Switch to START dispensing oil.
3. As soon as oil flows steady, turn Oil System Master Switch OFF; unit is now primed.
Wait 30 seconds to allow oil to settle/drain before programming.
Programming the Unit:
4. Hold down Oil Dispense Switch and turn Oil System Master Switch ON, continue to hold
Oil Switch for 5 seconds until the indicator light (OIL Light or LOAD/DUMP Light) on
popper starts to blink ON-OFF, then release switch; unit now in program mode.
5. Hold a measuring cup under the oil delivery tube in popper; PUSH and RELEASE the
Oil Dispense Switch to START oil flow.
6. When correct amount of oil has been dispensed, PUSH and RELEASE Oil Dispense
Switch again to STOP oil flow. The Oil Switch may be pushed ON/OFF as many times as
needed to finalize (“top off”) the oil amount.
7. Turn Oil System Master Switch OFF, then back ON to SAVE the setting. Unit will now
dispense the “programmed” amount of oil when the Oil Dispense Switch is pushed. The
Oil Light on the popper will light continuously when oil pump is dispensing.
8. Wait 30 seconds to allow oil to settle/drain, then re-check the oil quantity.
Dual Timer Note: Units with two oil timer settings available must be set for Flexi-Pop, if
available on the unit (Flexi-Pop option not available on Cornado units). Otherwise, the
two settings must be used for Salt/Sweet (High/Low) option. Select one corn amount and
program the first timer; then select the other corn amount and program the second
timer. (Pumps with a single timer will only remember the last setting programmed.)
Manual Mode (Oil only dispenses when the Oil Dispense Switch is held IN):
OPTIONAL - Use to manually dispense oil, or for cleaning. Follow Step 4 then skip to Step 6.
To use a timer setting after using Manual Mode, the unit MUST be reprogrammed.
Page 13

36, 48 & 60 oz. Export Model Series 2149, 2258, and 2297
Cornados (100, 110, and 101, 111)
Page 13
gmpopcorn.com
Popping Corn Instructions
This section describes popping instructions for Salted Popcorn and Sweet Popcorn (if equipped with
Salt-Sweet or High-Low temperature option).
Remember (for all popping modes): When the Load/Dump Light comes ON, and Audible
Signal (if enabled) is sounding, one of the following actions should be taken:
• Load the corn and oil or
• Dump the popped corn from the kettle or
• Turn OFF the Kettle Heat if you are finished popping corn.
The popper is equipped with a corn, salt, and oil measure. We recommend flavored and colored
coconut oil. Popcorn popped in coconut oil stays fresh longer and does not leave black deposits in
the kettle like other oils. Use only top quality, fresh popcorn from reputable suppliers.
Popping Salted (Standard) Popcorn
Raw Popcorn Charge:
Use corn measure provided (ex: for 36 oz. Kettle, use 36 oz. corn)
Recommended Oil Volume:
Oil volume is approx. 30% of corn amount (ex: for 36 oz. corn, use 10.8 oz. oil)
Flavacol (Salt) Amount:
Use small Flavacol scoop provided
Note: When using coconut oil, be sure the oil is liquid. As a check, dispense oil into a
measuring cup first, then use that oil for the first popping cycle.
1. Turn all switches ON; set popping temperature option (if equipped) to Salt (High)
mode.
2. Kettle is ready to pop (about 5-8 minutes), when the yellow Load/Dump Light and
Audible Signal (beeper, if enabled) turn ON.
3. Lift kettle lid and pour in pre-measured popcorn and Flavacol; close lid.
4. Press the “Red” Oil Dispense PB Switch to add oil (if equipped), or add oil manually
before closing lid (light and beeper will turn OFF in approx. 20 seconds).
5. When the light and beeper come on again, gently dump the kettle.
Note: The signal “To Dump” was factory set based on Gold Medal popcorn and oil. If,
after 3 consecutive batches, the signal occurs before or after popping has
stopped, then the signal timing can be adjusted by a qualified service person
(reference Electronic Temperature Control section).
Popping Tip: On final batch, turn Kettle Heat Switch OFF just as lids are forced open
by the popping corn (kettle has plenty of heat to finish popping). This helps
eliminate smoke/odor from any oil residue remaining in kettle. With the Heat
Switch OFF, the light and beeper will not activate for the last batch.
6. When finished popping, turn KETTLE HEAT and KETTLE MOTOR switches OFF.
NEVER LEAVE THE HEAT ON WHEN YOU ARE NOT POPPING CORN!
Page 14
36, 48 & 60 oz. Export Model Series 2149, 2258, and 2297
Cornados (100, 110, and 101, 111)
Page 14
gmpopcorn.com
Popping Sweet Popcorn
Gold Medal recommends white coconut oil for popping Glaze Pop (colored oil can change the
popcorn color). Glaze Pop cooks directly in the kettle. DO NOT use popcorn seasoning salt when
popping Glaze Pop.
Raw Popcorn Charge:
Use corn measure provided (ex: for 36 oz. Kettle, use 36 oz. corn)
Recommended Oil Volume:
Oil volume is approx. 30% of corn amount (ex: for 36 oz. corn, use 10.8 oz. oil)
Glaze Pop/Sugar Amount:
Use amount equal to 1/2 the quantity of corn (ex: for 36 oz. corn, use
18 oz. Glaze Pop)
Note: When using coconut oil, be sure the oil is liquid. As a check, dispense oil into a
measuring cup first, then use that oil for the first popping cycle.
1. Turn all switches ON; set popping temperature option (if equipped) to Sweet (Low)
mode.
2. Kettle is ready to pop (about 5-8 minutes), when the yellow Load/Dump Light and
Audible Signal (beeper, if enabled) turn ON.
3. Lift kettle lid and pour in pre-measured popcorn and Flavacol; close lid.
4. Press the “Red” Oil Dispense PB Switch to add oil (if equipped), or add oil manually
before closing lid (light and beeper will turn OFF in approx. 20 seconds).
5. Add pre-measured amount of Glaze Pop or Sugar (when using sugar, we recommend
using Compound “S” to help keep kettle clean); close lid.
6. When the light and beeper come on again, gently dump the kettle.
Note: The signal “To Dump” was factory set based on Gold Medal popcorn and oil. If,
after 3 consecutive batches, the signal occurs before or after popping has
stopped, then the signal timing can be adjusted by a qualified service person
(reference Electronic Temperature Control section).
Popping Tip: On final batch, turn Kettle Heat Switch OFF just as lids are forced open
by the popping corn (kettle has plenty of heat to finish popping). This helps
eliminate smoke/odor from any oil residue remaining in kettle. With the Heat
Switch OFF, the light and beeper will not activate for the last batch.
7. When finished popping, turn KETTLE HEAT and KETTLE MOTOR switches OFF.
NEVER LEAVE THE HEAT ON WHEN YOU ARE NOT POPPING CORN!
8. Clean kettle when finished popping Glaze Pop or sugar corn, and prior to switching to
salted popcorn.
Page 15

36, 48 & 60 oz. Export Model Series 2149, 2258, and 2297
Cornados (100, 110, and 101, 111)
Page 15
gmpopcorn.com
Care and Cleaning
DANGER
Machine must be properly grounded to prevent electrical shock to personnel.
DO NOT immerse in water. DO NOT clean appliance with a water jet.
Always unplug the equipment before cleaning or servicing.
025_111616
WARNING
To avoid serious burns, DO NOT touch the kettle while it is hot!
028_082715
Good sanitation practice demands that all food preparation equipment be cleaned regularly (only
use non-toxic, food grade cleaners). A clean looking, well-kept machine is one of the best ways of
advertising your product.
Note: It is extremely important to follow all cleaning procedures, otherwise parts
damage and equipment failure will result. The warranty does not cover parts that
are damaged due to improper cleaning.
Daily Kettle Cleaning Instructions
CAUTION: A hot kettle will cause burns if you touch it with your hand. Allow kettle to cool
at least 1 hour before attempting to clean. DO NOT use ice or water to cool
down a hot kettle! Severe kettle damage will result!
1. When cool, wipe outside of kettle with a clean, soft cloth. DO NOT use oven cleaners or
abrasive materials as they will damage the kettle.
2. Every night, mix Gold Medal’s Heat’n Kleen solution (Item No. 2095), 2 tablespoons
per gallon of water. It is not necessary to use the entire gallon at once; only use
enough to fill the kettle 1/2 inch deep.
3. Turn kettle heat ON. When water starts to boil, turn kettle heat OFF.
4. Allow to cool at least 1 hour, then dump solution into a bucket and wipe inside of
kettle with a clean cloth. Make sure all solution goes into the bucket; do not spill any in
the interior of machine.
For an extra dirty kettle, the process may be repeated; or, after turning kettle heat
OFF, allow solution to sit in kettle overnight. The next morning, dump solution into a
bucket and wipe inside of kettle with a clean cloth.
5. With unit OFF and unplugged, wipe kettle lead cord with a clean SLIGHTLY damp cloth.
DO NOT get moisture into the kettle lead-in cord, severe damage will result.
Page 16

36, 48 & 60 oz. Export Model Series 2149, 2258, and 2297
Cornados (100, 110, and 101, 111)
Page 16
gmpopcorn.com
Daily Unit Cleaning Instructions
1. Turn machine OFF, unplug unit and allow it to cool before attempting to clean.
2. Clean all pans/accessories in order to sanitize them before each use.
3. Take a clean, SLIGHTLY damp cloth and wipe excess grease from unit.
4. Wipe stainless steel parts with a clean cloth and cleaner designed for stainless steel,
such as Gold Medal Watchdog Stainless Cleaner (Item No. 2088).
DO NOT use oven cleaners or abrasive materials as they will damage parts of machine.
Sanitizing the Tubing and Pump
Reference the Oil Dispense Unit manual for oil system cleaning instructions.
To Remove/Install Kettle Lid (if needed)
To Remove Kettle Lid:
Lift TAB slightly, rotate lid assembly to
disengage raised hooks; then lift lid off.
(Reverse steps to install lid.)
1
2
Page 17

36, 48 & 60 oz. Export Model Series 2149, 2258, and 2297
Cornados (100, 110, and 101, 111)
Page 17
gmpopcorn.com
Weekly Agitator and Hub Seal Assembly Cleaning Instructions
Important: For proper machine performance, keep agitator and hub assembly clean.
Follow the steps below weekly to ensure proper machine performance.
Step 3: Leave the Packing Cage and
Packing Cord intact. ONLY wipe hub
assembly surfaces to remove product
residue, and clean the inside of the
agitator hub to remove any nicks and
carbon build-up.
If packing cage is removed, then the
packing cord should be replaced (see
Replacing the Packing Cord on Kettle
Hub in the Maintenance section of this
manual.)
Step 4: Reinstall agitator assembly.
Step 1: Turn unit OFF, and allow it to cool
completely before attempting to remove
agitator shaft.
On the bottom side of the kettle, hold the
Agitator Shaft firmly with Channel Lock
pliers.
NOTE: The shaft has a left handed thread.
Steps to Clean Agitator and Hub Assembly
Agitator Assy’s
Welded Bar
Tap bar in a
CLOCKWISE
direction
Step 2: To loosen the Agitator Assembly,
tap the agitator’s welded bar with a
rubber mallet in a CLOCKWISE direction,
and unscrew to remove.
Packing Cage
Kettle Hub
Packing Cord
Kettle Bushing
Page 18

36, 48 & 60 oz. Export Model Series 2149, 2258, and 2297
Cornados (100, 110, and 101, 111)
Page 18
gmpopcorn.com
Troubleshooting
Issue
Possible Cause
Solution
Power to the Unit
A. Power to the Unit
A. Make sure the unit’s lead-in cord is plugged in.
B. Mini Circuit Breaker(s) on
popper tripped
B. Mini Circuit Breaker(s) supplies power to all
unit features. The Mini Circuit Breaker(s), will
be located on the control panel of the popper.
If breaker(s) is reset, then trips again, the unit
must be inspected/repaired before going any
further.
Kettle Does Not Heat
A. Kettle Circuit Breaker
A. If unit is plugged in, and the Kettle Heat Switch
is ON, but the small green indicator switch
light is off, then the Kettle Circuit Breaker may
be tripped.
Have a qualified service person check if the
breaker has tripped (breaker is located behind
the front cover plate). The Kettle Circuit
Breaker may trip during transit; if reset then
trips again, the unit must be inspected/
repaired before going any further (reference
the Kettle Circuit Breaker in the Maintenance
section).
B. Kettle Heat Switch
B. Have a qualified service person check the
voltage to and from the Kettle Heat switch;
and if the switch is defective replace it.
C. Temperature Control
Board
C. A defective thermocouple lead will cause the
kettle not to heat. Check for control error
conditions and have a qualified service person
check for good connections from the kettle to
the control. (Reference the Error Conditions of
the Electronic Temperature Control in the
Maintenance section.)
Oil Pump Does Not Deliver
Oil to Kettle
A. Mini Circuit Breaker(s) on
popper tripped
A. Check the Mini Circuit Breaker(s); if reset,
then trips again, the unit must be inspected/
repaired by qualified service personnel.
B. Oil Dispense Unit
C. Check for air leaks into the oil line; be sure the
filter in the line is not loose.
For additional possible causes/solutions,
reference the Troubleshooting section of the
Oil Dispense Unit Manual.
Page 19

36, 48 & 60 oz. Export Model Series 2149, 2258, and 2297
Cornados (100, 110, and 101, 111)
Page 19
gmpopcorn.com
Issue
Possible Cause
Solution
Long Popping Cycles
(Longer than 4 minutes for
Salt Popcorn)
A. Heating Element
A. One of the heating elements in the kettle may
be burned out. This would result in the kettle
never reaching the proper operating
temperature. Check with a qualified service
person for inspection/repair.
B. Low Voltage
B. If the machine is operated on low voltage, this
could cause the kettle not to reach the proper
operating temperature. Check with a qualified
electrician.
C. Inadequate Supply Lines
C. Inadequately sized electrical supply lines, in
addition to being a fire hazard, would also
prevent the kettle from reaching the proper
operating temperature. Check with a qualified
electrician.
D. Inferior Corn
D. Inferior quality corn would result in longer
popping cycles. Use only top quality hybrid
popcorn from reputable suppliers. Even then,
if you let your corn pick up moisture or dry
out, your popping cycles will be slow.
Kettle Agitator Shaft not
Rotating
A. Kettle Motor Switch
A. If the kettle agitator shaft is not rotating, DO
NOT pop corn. Check to make sure the Kettle
Motor Switch is ON. If the switch is ON, and
the shaft is not rotating, the switch or motor
may be faulty, contact qualified service
personnel for inspection/repair.
B. Mini Circuit Breaker on
popper tripped
B. Check the Mini Circuit Breaker(s); if reset,
then trips again, the unit must be inspected/
repaired by qualified service personnel.
Kettle Shaft “binds” when
dumped.
A. Shaft Misalignment
A. The upper and lower shafts must align with
one another, and the two shafts must not
“bind” when the kettle is dumped. Have
qualified service personnel adjust alignment
(reference the Kettle Drive Shaft Alignment
section of this manual).
Page 20

36, 48 & 60 oz. Export Model Series 2149, 2258, and 2297
Cornados (100, 110, and 101, 111)
Page 20
gmpopcorn.com
MAINTENANCE INSTRUCTIONS
DANGER
Machine must be properly grounded to prevent electrical shock to personnel.
Failure to do so could result in serious injury, or death.
DO NOT immerse any part of this equipment in water.
DO NOT use excessive water when cleaning.
Keep cord and plug off the ground and away from moisture.
Always unplug the equipment before cleaning or servicing.
Make sure all machine switches are in the OFF position before plugging the
equipment into the receptacle.
008_051514
DANGER
Improper installation, adjustment, alteration, service, or maintenance can
cause property damage, injury, or death. Any alterations to this equipment
will void the warranty and may cause a dangerous condition. This appliance
is not intended to be operated by means of an external timer or separate
remote-control system. NEVER make alterations to this equipment. Read the
Installation, Operating, and Maintenance Instructions thoroughly before
installing, servicing, or operating this equipment.
014_020416
WARNING
No user serviceable parts inside. Refer servicing to qualified service
personnel.
011_051514
CAUTION
THE FOLLOWING SECTIONS OF THIS MANUAL ARE INTENDED ONLY
FOR QUALIFIED SERVICE PERSONNEL WHO ARE FAMILIAR WITH
ELECTRICAL EQUIPMENT. THESE ARE NOT INTENDED FOR THE
OPERATOR.
027_010914
Page 21

36, 48 & 60 oz. Export Model Series 2149, 2258, and 2297
Cornados (100, 110, and 101, 111)
Page 21
gmpopcorn.com
Removing Agitator Assembly
and Shaft Maintenance
The kettle’s agitator shaft should be removed every 3 months and lubricated with Never Seez®
(Item No. 68751). See below for steps to remove and lubricate the agitator shaft.
Step 3: Remove the agitator shaft and
lubricate with Never Seez® (Item No.
68751). Apply a small amount on the slope
and side of pin on the matching shaft.
Step 4: Reinstall agitator assembly for use.
Step 1: Turn unit OFF, and allow it to cool
completely before attempting to remove
agitator shaft.
On the bottom side of the kettle, hold the
Agitator Shaft firmly with Channel Lock
pliers.
NOTE: The shaft has a left handed thread.
Steps to Remove the Agitator Assembly
and Lubricate Shaft
Tap bar in a
CLOCKWISE
direction
Step 2: To loosen the Agitator Assembly,
tap the agitator’s welded bar with a rubber
mallet in a CLOCKWISE direction, and
unscrew to remove.
Leave the Packing Cage/ Packing Cord
on the kettle hub intact. If packing cage is
removed, then the packing cord should be
replaced (see next page, Replacing the
Packing Cord on Kettle Hub.)
Agitator Shaft
Agitator Assy’s.
Welded Bar
Apply Never Seez®
to Agitator Shaft
Apply a small amount of Never Seez®
on slope and pin of the matching shaft.
Page 22

36, 48 & 60 oz. Export Model Series 2149, 2258, and 2297
Cornados (100, 110, and 101, 111)
Page 22
gmpopcorn.com
Replacing the Packing Cord on Kettle Hub
The kettle hub assembly (Packing Cage and Packing Cord) is designed for long use if not disturbed.
When the unit is properly maintained, the packing cord should not need to be changed. If it is
removed, or if the kettle bushings are replaced, then the packing cord should be replaced. Follow
the steps below to replace the packing cord.
Step 3: Wind the new packing cord on the
hub. Start at the bottom, and wind up in a
CLOCKWISE direction.
Steps to Replace Packing Cord
Step 1: Remove agitator assembly (see
Removing Agitator Assembly section), then
remove the packing cage and the old packing
cord.
For older models which have an oil seal,
remove the oil seal from inside the agitator
hub and replace with the Cornado Packing
Kit (Item No. 69305) as described here.
Kettle Hub
(Packing Cord will ride
on this surface)
Step 4: Push packing cage down onto the
packing cord and rotate CLOCKWISE.
Step 5: Before reinstalling agitator assembly,
clean the inside of the agitator hub to remove
all nicks and carbon build-up.
Step 2: Clean the surfaces of the kettle hub
with a Scotch Brite pad or fine sandpaper.
Packing Cage
Kettle Hub
Packing Cord
Page 23

36, 48 & 60 oz. Export Model Series 2149, 2258, and 2297
Cornados (100, 110, and 101, 111)
Page 23
gmpopcorn.com
Kettle and Drive Shaft Alignment
Step 2: Adjust the plate back and forth,
and side-to-side, until the lower shaft
lines up with the upper shaft in the
kettle.
It is important to have the two shafts
align with one another, and that the two
shafts do not “bind” when the kettle is
dumped.
Step 3: Once properly aligned,
re-tighten the two hex bolts on the
adjusting plate.
Step 1: To adjust the lower agitator
shaft, loosen the two hex bolts for the
adjusting plate. It may be necessary to
use a socket/wrench on the hex nuts
(located inside the pedestal).
Loosen (2) Hex Bolts
Adjusting Plate
Lower Agitator Shaft
Lower Agitator Shaft
(attached to motor)
Upper Agitator Shaft
(attached to kettle)
Steps to Adjust the Kettle Drive Shaft
Page 24

36, 48 & 60 oz. Export Model Series 2149, 2258, and 2297
Cornados (100, 110, and 101, 111)
Page 24
gmpopcorn.com
Electronic Temperature Control (Export)
Operation
The temperature control is factory set to stop the power to the kettle when the thermocouple
reaches set point. This is also the ideal point to dump the popped corn out of the kettle. On the
first start-up, this is the ideal time to load the corn and oil. Therefore, if the Kettle Heat Switch is
turned ON, the yellow light and buzzer are ON, one of the following actions should be taken:
• Load the corn and oil or
• Dump the popped corn from the kettle or
• Turn OFF the Kettle Heat Switch if you are finished popping corn.
Control Description
This unit has an electronic kettle heat control with 2 thermocouples (TC), one for set point control
and one for fixed high limit. There are no mechanical thermostats in this kettle.
There are (4) factory settings on the control (see descriptions below). If needed, adjustments
may be made to the Kettle Dump and Audible Signal to Dump. The remaining settings are
factory set for the unit, DO NOT adjust.
1. Control Set Point Temperature – This is factory set, DO NOT adjust.
2. The Overshoot circuit is tuned for the kettle at the factory, DO NOT adjust.
It does not matter which TC goes
to A or B; it DOES matter that the
yellow leads go to the positive
terminals.
Remove this
jumper for
no sound.
Remove this
jumper for
lower volume.
Control Setpoint Temperature
This is factory set, DO NOT ADJUST.
Audible Signal to Dump
Probe Fault LED – LED light ON
indicates a thermocouple issue.
Overshoot – This is factory set,
DO NOT ADJUST.
Kettle Dump - This is factory set
to signal when kettle is ready to
dump. Turn CW to signal sooner;
CCW to signal later. ONLY make
small adjustments if needed.
L2 Neutral Lead
L1 Hot Lead
Jumper Wire C for 230 VAC
Page 25

36, 48 & 60 oz. Export Model Series 2149, 2258, and 2297
Cornados (100, 110, and 101, 111)
Page 25
gmpopcorn.com
3. Kettle Dump – The Kettle Signal to Dump (yellow light/buzzer) is factory set. For the
signal to dump to be a little sooner or later, adjust the Kettle Dump potentiometer
(reference image shown). Turn clockwise (CW) to signal sooner, counterclockwise
(CCW) to signal later.
4. Audible Signal to Dump - The buzzer has three options; full volume, half volume, or
no sound (yellow light only). Unit is preset at the factory to full volume. Adjustments
are made by jumper positions (reference image shown).
Probe LED Indicator Light – Thermocouple Error Condition
The Dump Light on the Popper will be on steady and the unit will beep (if Audio Signal engaged)
when there is a Probe issue (the kettle will not heat enough to pop corn). Check the control
board, the red Probe LED light ON will indicate one of two thermocouple error conditions.
• Reversed Probe – Indicates the thermocouple probe has been connected in reverse. (The
yellow leads must go to the positive terminals.)
If the kettle heats for a short time and then stops, and the red Probe LED light is ON,
then one (or both) Thermocouple is wired in reverse. Check TC-A and TC-B; make sure
the yellow leads go to the positive terminals.
• Open Probe – Indicates the thermocouple probe is disconnected.
If the kettle does not heat and/or the beeper sounds continuously, and the red Probe
LED light is ON, there is an issue with the Thermocouple wiring.
For removable kettles - make sure the kettle lead-in cord is plugged in
completely and the locking ring is fully screwed onto the kettle receptacle.
For hard wired kettles - A loose kettle lead-in connection can cause a
thermocouple lead issue. Check the terminal blocks for a loose connection, and
check the kettle wiring for a loose or broken thermocouple.
For more in-depth Temperature Control Board troubleshooting, for Qualified Service Personnel
ONLY, please reference Gold Medal Service Bulletin 0074.
Page 26

36, 48 & 60 oz. Export Model Series 2149, 2258, and 2297
Cornados (100, 110, and 101, 111)
Page 26
gmpopcorn.com
Kettle Circuit Breaker
This machine is equipped with a Kettle Circuit Breaker. The circuit breaker may trip during
shipment of the unit due to vibrations encountered in transit. If the breaker is tripped the kettle
will not heat. The circuit breaker must be reset by qualified service personnel only.
IMPORTANT NOTE: Various issues may prevent the kettle from heating. Prior to
checking the Kettle Circuit Breaker, reference the Troubleshooting section of the
Instruction Manual to check for other possible issues.
Checking the Kettle Circuit Breaker
Note for PopClean Units: The Heat Switch is inactive unless the Filter Switch is ON, all
filter lights are GREEN, and the Change Filter light is OFF.
To check if the Kettle Circuit Breaker has tripped, turn the Kettle Heat Switch ON. The small
green indicator light on the Kettle Heat Switch should turn ON. If the green indicator light is OFF,
when the Kettle Heat Switch is in the ON position, the circuit breaker is tripped. (For Flexi-Pop
units with a combined Flexi-Pop/Kettle Heat Switch, the green light on the Kettle Motor Switch is
used to indicate the Kettle Circuit Breaker is tripped.)
• For hanging kettle machines – On Standard Poppers, the Kettle Circuit Breaker is
located under the dome. An additional cover must be removed to reset the circuit breaker.
On PopClean Poppers, the side dome panel must be removed to access the circuit breaker
located on the vertical controls panel in the dome interior (reference images below).
• For pedestal mounted kettle machines - the front cover plate must be removed to
access the Kettle Circuit Breaker (reference image below).
The circuit breaker should only be reset after a qualified service person has checked the
complete kettle circuit for faults. The limit and heating contactors/relays should be checked to
ensure that the contacts are not welded together. The kettle receptacle and plug (if equipped)
should be checked for loose contacts or shorted wiring. The popcorn kettle bottom must be
examined to ensure there is no loose hardware or other items causing a short circuit. All wiring
in the kettle circuit should be checked for fraying wires, short circuits, and loose connections.
PopClean Poppers
Kettle Circuit Breaker is located on
Vertical Controls Panel in dome interior;
remove breaker cover to access CB.
Hanging Kettle Poppers
Cornado Poppers (Pedestal Style)
Kettle Circuit Breaker is
located behind front cover
plate; remove breaker cover
to access the CB.
Standard Poppers
Kettle Circuit Breaker is
located under dome, remove
breaker cover to access CB.
Page 27

36, 48 & 60 oz. Export Model Series 2149, 2258, and 2297
Cornados (100, 110, and 101, 111)
Page 27
gmpopcorn.com
ORDERING SPARE PARTS
1. Identify the needed part by checking it against the photos, illustrations, and/or
parts list. (General images may be used in manual for reference only.)
2. Use only approved replacement parts when servicing this unit.
3. When ordering, please include part number, part name, and quantity needed.
4. Please include your model number, serial number, and date of manufacture (located
on the machine nameplate/data plate) with your order.
5. Address all parts orders to Parts Department, Gold Medal Products Co., 10700
Medallion Drive, Cincinnati, Ohio 45241-4807
or place orders by phone or online:
Phone: (800) 543-0862
(513) 769-7676
Fax: (800) 542-1496
(513) 769-8500
E-mail: info@gmpopcorn.com
Web Page: gmpopcorn.com
Model Variations (Voltage Specific Parts)
Kettle Model
Part Description and Part Number (PN)
111606-14 and
111606L-14
KETTLE LEAD ASSY - 10 GA (PN 111596-14)
(used for Australian 60 oz. Kettle)
111607-14 and
111607L-14
KETTLE LEAD ASSY - 10 GA (PN 111596-14)
(used for Australian 48 oz. Kettle)
111608-14 and
111608L-14
KETTLE LEAD ASSY – 12 GA (PN 111601-14)
(used for Australian 36 oz. Kettle)
Kettle Lead
Assembly
Page 28

36, 48 & 60 oz. Export Model Series 2149, 2258, and 2297
Cornados (100, 110, and 101, 111)
Page 28
gmpopcorn.com
Unit Exterior – Front View – Filter
Item
Part Description
Part Number
All Models
1
TEMP/CYCLE COUNT LABEL
111529
2
6-32 X 3/8 PHIL PAN M/S
39000
3
GLIDE SCREW #8-32X3/8 PAN HD PH
74141
4
8-32 X 3/4 PHIL FLAT M/S
47125
5
FILTER AND GUARD ASSY (includes Guard,
Filter, and Cover)
63707
6
FILTERS(BAG OF 5)
69917
See Control Box
section.
See Kettle Assembly
section.
See Unit Exterior,
Kettle Mount section.
For Labels, see
Safety Label Section.
4 5 6
3
2
1
See Pedestal Interior,
Electrical section.
2258-00-100
General image shown for
parts reference only.
Page 29

36, 48 & 60 oz. Export Model Series 2149, 2258, and 2297
Cornados (100, 110, and 101, 111)
Page 29
gmpopcorn.com
Unit Exterior – Rear View - Oil Line
Item
Part Description
Part Number
36 and 48 oz.
60 oz.
1
CONTROL BOX COVER
111528
111528
2
SCREW #8-32X3/8 PAN HD PH
74141
74141
3
OIL DELIVERY TUBE
111517
111518
4
SPOUT SET COLLAR
17891
17891
5
8-32 X 1/4 PHIL PAN M/S
87314
87314
6
26 IN SS TUBE
17900
17900
7
HEATED OIL LINE BRACKET
111537
111537
8
BUSHING, SNAP 1.125 IN
82221
82221
9
TOP LID
17899
17899
10
8-32 X 1/2 PHIL PAN M/S
47141
47141
11
JUNCTION BOX BOTTOM
111536
111536
12
JUNCTION BOX TOP
111535
111535
13
BOTTOM JUNCTION BOX LID
17672
17672
14
8-32X3/8 FL HD PH MS
20065
20065
15
STRAIN RELIEF T&B 3302
89045
89045
16
16W FOIL HEAT ELEMENT
17898EX
17898EX
17
8-32 X 3/8 PAN HD PH M/S
12389
12389
18
8-32 SERRATED FLANGE NUT
61151
61151
19
3/4" EMT CONNECTOR
17892
17892
20
PEDESTAL EXHAUST COVER
111539
111539
21
PEDESTAL REAR COVER
111538
111538
3
4, 5
6
Data Plate
8 1 2
7
2258-00-100
21
20
9
10
11
17, 18
19
15
12
13, 14
16
General image shown for
parts reference only.
Page 30

36, 48 & 60 oz. Export Model Series 2149, 2258, and 2297
Cornados (100, 110, and 101, 111)
Page 30
gmpopcorn.com
Unit Exterior – Kettle Mount – Parts Breakdown
5
6
7
10
4
8
9
15, 16
14
2, 3
1
18
19
20
17
21
8
24
22*
23
*NOTE: Concave side of Large Spacer fits up
against bracket weld on Dump Bar Shaft.
12
11
13
See Unit Exterior,
Oil Line section.
2258-00-100
2297XE RH Dump Lever
RH Dump Handle shown for parts reference
(see next page for Pass Thru Handle)
General images shown for parts reference only.
Page 31

36, 48 & 60 oz. Export Model Series 2149, 2258, and 2297
Cornados (100, 110, and 101, 111)
Page 31
gmpopcorn.com
Item
Part Description
Part Number
RH Units
LH Units
RH Pass Thru
LH Pass Thru
1
BOT KETTLE PIVOT MACHINED
106060
106060
106060
106060
2
1/4-20x3/4 BUTTON HD SC
67927
67927
67927
67927
3
HEX NUT 1/4-20 ESLOK
42361
42361
42361
42361
4
ADJUSTING PLATE,WELD ASSY (includes Flat
Plate, Agitator Seal, and Formed Bottom Plate)
82099
82099
82099
82099
5
PLATE/FLAT
82328
82328
82328
82328
6
AGITATOR SEAL
79437
79437
79437
79437
7
FORMED BTM PLATE
83300
83300
83300
83300
8
1/4-20 X 3/4 GRADE 5 BOLT
74520
74520
74520
74520
9
FLAT WASHER 1/4 STAINLESS
87261
87261
87261
87261
10
1/4-20 SERRATED LOCK NUT
46311
46311
46311
46311
11
KETTLE REST BUMPER
83111
83111
83111
83111
12
KETTLE REST (aluminum)
83110
83110
83110
83110
13
1/4-20X3/4 LG HEX HD BOLT
13164
13164
13164
13164
14
SPRING RETAINER ROD
82551
82551
82551
82551
15
SET COLLAR 1/2ID X 7/8OD
47326
47326
47326
47326
16
SET SCREW 1/4-20 X 3/16 (1 req’d. per collar)
47751
47751
47751
47751
17
COLLAR
74661
74661
74661
74661
18
5/16-18 X 1.25 SQ HD CP
40785
40785
40785
40785
19
TORSION SPRING
74660
74660
74660
74660
20
SPACER
74658
74658
74658
74658
21
SPACER,LARGE (CUSTOMER SIDE)
74690
74690
74690
74690
22
SPACER,LARGE (DUMP SIDE) - Concave side fits
up against bracket weld on Dump Bar Shaft
74659
74659
74659
74659
23
DUMP LEVER ASSY, RIGHT
82253
DUMP LEVER ASSY, LEFT
82276
24
PLASTIC HANDLE
57028
57028
57028
57028
25
DUMP HANDLE RH PASS THRU
82685
82685
DUMP HANDLE LH PASS THRU
82686
82686
26
COUPLING DUMP LEVER
82688
82688
27
SET SCREW 1/4-20 X 1/4
46610
46610
Models w/Vertical
Pass Thru Handle
Dump Handle
For 60 oz. (PN 115076)
27
24
26
Models w/Pass
Thru Handle
2258-00-100
27
25
24
26
Models w/Vertical Handle
24
Dump Handle
For 36 and 48 oz. (PN 56116)
For 60 oz. (PN 69873)
Page 32

36, 48 & 60 oz. Export Model Series 2149, 2258, and 2297
Cornados (100, 110, and 101, 111)
Page 32
gmpopcorn.com
Kettle Assembly (36, 48, and 60 oz.) – Parts Breakdown
15
16, 17
19
18
Cornado Kettle Complete
(36 oz. Kettle shown for general parts reference only)
Kettle Bottom/Junction Box View
21, 22
23
20
24
5
1
2, 3
4, 3
6
7
2149XES - 69550EX Kettle images
9
11
12
13
Agitator Drive Assembly
(includes Agitator, Packing Kit,
Thrust Washer, and Shaft)
8
10
14
To Remove Kettle Lid:
Lift TAB slightly, rotate lid assembly to
disengage raised hooks; then lift lid off.
(Reverse steps to install lid.)
28
27
25
26
29
3, 29
1
2
Page 33

36, 48 & 60 oz. Export Model Series 2149, 2258, and 2297
Cornados (100, 110, and 101, 111)
Page 33
gmpopcorn.com
Kettle Assembly (36, 48, and 60 oz.) – Parts List
Item
Part Description
Part Number
Right Hand Kettle
Left Hand Kettle
36 oz.
111608-01
48 oz.
111607-01
60 oz.
111606-01
36 oz.
111608L-01
48 oz.
111607L-01
60 oz.
111606L-01
1
KETTLE LID ASSEMBLY
83044
83046
83320
83044
83046
83320
2
KNOB LID LIFT
47120
47120
47120
47120
47120
47120
3
8-32 X 1/2 PHIL PN M/S SS
42226
42226
42226
42226
42226
42226
4
COUNTER WEIGHT
83114
83114
83114
83114
83114
83114
5
CORNADO KETTLE BOTTOM (see
Element View for additional parts
breakdown)
69551EX
69554EX
83318EX
69551EX
69554EX
83318EX
6
KETTLE DUMP CHUTE ASSY
82636
82830
83304
82636
82830
83304
7
KETTLE LEAD ASSY
111601
111596
111596
111601
111596
111596
8
AGITATOR DRIVE ASSY (includes
Agitator, Packing Kit, Thrust
Washer, and Agitator Shaft)
83348
83346
83348
83346
9
AGITATOR WELDMENT
83347
83344
83313
83347
83344
83313
10
CORNADO PACKING KIT (includes
Packing Cage and Packing Cord)
69305
69305
69305
69305
69305
69305
11
PACKING CAGE CORNADO AGIT
69302
69302
69302
69302
69302
69302
12
PACKING CORD 7 IN
69304-7
69304-7
69304-7
69304-7
69304-7
69304-7
13
THRUST WASHER
67852
67852
67852
67852
67852
67852
14
AGITATOR SHAFT
83287
83287
83287
83287
83287
83287
15
KETTLE BASE PLATE
83258
83264
83302
83258
83264
83302
16
ACORN NUT 1/4-20
49068
49068
49068
49068
49068
49068
17
FLAT WASHER 1/4 STAINLESS
87261
87261
87261
87261
87261
87261
18
THERMOSTAT COVER
83267
83267
83267
83267
83267
83267
19
8-32 x 5/16 SLOTTED HEX
49594
49594
49594
49594
49594
49594
20
HEX JAM NUT
82137
82137
82137
82137
82137
82137
21
TOP PIVOT CASTING MACHINED
83281
83281
83281
83281
83281
83281
22
HEX BOLT 3/8-16 X 3/4 (fastens
Pivot Casting)
20051
20051
20051
20051
20051
20051
23
10-32 X 1 UNSL NON-IND
49376
49376
24
8-32 X 1/2 SLOTTED H W H (Screw)
49379
49379
49379
49379
49379
49379
25
JUNCTION BOX TERMINAL SIDE
83261
83261
83261
83261
83261
83261
26
JUNCTION BOX LEAD SIDE
83260
83260
55313
83260
83260
55313
27
8-32 SERRATED FLANGE NUT
61151
61151
61151
61151
61151
61151
28
TERMINAL BLOCK KETTLE
41129
41129
41129
41129
41129
41129
29
8-32 HEX M/S NUT
74149
74149
74149
74149
74149
74149
For Model variations or country specific part variations, reference the Model Variations section
on the Order Spare Parts page.
Page 34

36, 48 & 60 oz. Export Model Series 2149, 2258, and 2297
Cornados (100, 110, and 101, 111)
Page 34
gmpopcorn.com
36 oz. Kettle Bottom – Element View
Item
Part Description
Part Number
111608-01
1
36 oz. CORNADO KETTLE (weldment)
69552
2
KETTLE GASKET
83279
3
TRANSFER PLATE
69337
4
SPACER
83278
5
BEARING, KETTLE HUB (2 required)
82079
6
TOP BEARING
83252
7
ELEMENT SHIM (optional, only used as needed)
68787
8
ELEMENT CLAMP (8 required)
68778
9
1/4-20 X 1.25 SET SCREW
69140
10
1/4-20 RND TOP SQ NUT
69156
11
HEX NUT 1/4-20
74133
12
NUT RETAINER
50190
13
1/4-20 X 1.75 SET SCREW
76444
14
HEAT ELEMENT,1350W
82386
15
TUBULAR ELEMENT, 1800W
48650EX
16
TUBULAR ELEMENT, 1250W
48801EX
17
RETAINING NUT (fastens lead to kettle bottom)
41434
11
12
9
10
Hand tighten snug; then
tighten one full turn. DO
NOT use a torque wrench.
Form a tab UP on flat of
nut to retain nut position.
Element Bracket
Heat Transfer Plate
14
15
16
1
5*, 6
2
8
7
3
*Bottom Bearing
shown.
4
69553EX Element View
69550EX Clamping Views
Form a tab UP on
flat of nut to retain
nut position.
Form tab
DOWN.
11
13
10
12
36 oz. Kettle Element View
(General image shown for parts reference only.)
17
Page 35

36, 48 & 60 oz. Export Model Series 2149, 2258, and 2297
Cornados (100, 110, and 101, 111)
Page 35
gmpopcorn.com
48 oz. Kettle Bottom – Element View
Item
Part Description
Part Number
111607-01
1
48 oz. CORNADO KETTLE (weldment)
69555
2
KETTLE GASKET
83280
3
TRANSFER PLATE
69336
4
SPACER
83278
5
BEARING, KETTLE HUB (2 required)
82079
6
TOP BEARING
83252
7
ELEMENT SHIM (optional, only used as needed)
68787
8
ELEMENT CLAMP (8 required)
68780
9
1/4-20 X 1.25 SET SCREW
69140
10
1/4-20 RND TOP SQ NUT
69156
11
HEX NUT 1/4-20
74133
12
NUT RETAINER
50190
13
1/4-20 X 1.75 SET SCREW
76444
14
HEAT ELEMENT, 2700W
82598
15
TUBULAR ELEMENT, 1500W
48800EX
16
TUBULAR ELEMENT, 1050W
48651EX
17
RETAINING NUT (fastens lead to kettle bottom)
41434
11
12
9
10
Hand tighten snug; then
tighten one full turn. DO
NOT use a torque wrench.
Form a tab UP on flat of
nut to retain nut position.
Element Bracket
Heat Transfer Plate
14
15
16 1 5*, 6
2
8
7
3
*Bottom Bearing
shown.
4
69553EX Element View
69550EX Clamping Views
Form a tab UP on
flat of nut to retain
nut position.
Form tab
DOWN.
11
13
10
12
17
48 oz. Kettle Element View
(General image shown for parts reference only.)
Page 36

36, 48 & 60 oz. Export Model Series 2149, 2258, and 2297
Cornados (100, 110, and 101, 111)
Page 36
gmpopcorn.com
60 oz. Kettle Bottom – Element View
Item
Part Description
Part Number
111606-01
1
60 oz. CORNADO KETTLE (weldment)
83301
2
KETTLE GASKET
83315
3
TRANSFER PLATE
68053
4
SPACER
83278
5
BEARING, KETTLE HUB (2 required)
82079
6
TOP BEARING
83252
7
ELEMENT SHIM (optional, only used as needed)
68787
8
ELEMENT CLAMP (medium clamp; 6 required)
83317
9
ELEMENT CLAMP (large clamp; 8 required)
83316
10
ELEMENT CLAMP (small clamp; 2 required)
83349
11
1/4-20 X 1.25 SET SCREW
69140
12
1/4-20 RND TOP SQ NUT
69156
13
HEX NUT 1/4-20
74133
14
NUT RETAINER
50190
15
1/4-20 X 1.75 SET SCREW
76444
16
TUBULAR ELEMENT 2300W
68052EX
17
TUBULAR ELEMENT 1850W
68051EX
18
500W HEAT ELEMENT
68106EX
19
TUBULAR ELEMENT, 1050W
48651EX
20
RETAINING NUT (fastens lead to kettle bottom)
41434
60 oz. Element View
69550EX Clamping Views
Form a tab UP on
flat of nut to retain
nut position.
Form tab
DOWN.
13
15
12
14
13
14
11
12
Hand tighten snug; then
tighten one full turn. DO
NOT use a torque wrench.
Form a tab UP on flat of
nut to retain nut position.
Element Bracket
Heat Transfer Plate
9
10
16
17
18
19
20
1
5*, 6
2
8
7
3
*Bottom Bearing
shown.
4
60 oz. Kettle Element View
(General image shown for parts reference only.)
Page 37

36, 48 & 60 oz. Export Model Series 2149, 2258, and 2297
Cornados (100, 110, and 101, 111)
Page 37
gmpopcorn.com
Pedestal Interior – Motor and Shaft
Item
Part Description
Part Number
36 oz.
48 and 60 oz.
1
LOWER AGIT DR SHAFT ASSY (complete assy.
includes coupler, set screw, spring, shaft and pin)
82496
82496
2
SET SCREW 1/4-28 X 1/4
82067
82067
3
COUPLING, DRIVE MOTOR
82287
82287
4
SPRING OUTPUT COUPLING
74013
74013
5
SPRING PIN 3/16 X 7/8
82421
82421
6
LOWER AGIT DRIVE SHAFT
82447
82447
7
8-32 X 1 PH PAN M/S S.S. (ground fastener)
12219
12219
8
#8 INT. TOOTH L/W 410SS (ground fastener)
12132
12132
9
HEX NUT #8-32 STAINLESS (ground fastener)
89129
89129
10
1/4-20 X 1 1/4 PH PAN MS
51030
51030
11
WASHER 1/4 INTERNAL TOOTH
12383
12383
12
FLAT WASHER 1/4 STAINLESS
87261
87261
13
1/4-20 SERRATED LOCK NUT
46311
46311
14
KETTLE DRIVE MOTOR (includes motor spacers)
82413R
82413R
15
BAFFLE
111909
111909
16
8-32 X 3/8 PAN HD PH M/S
12389
12389
17
8-32 SERRATED FLANGE NUT
61151
61151
18
POWER SUPPLY CORD ASSEMBLY
82943
82943
19
STRAIN RELIEF T&B 3304
82227
82227
20
WIRE HARNESS,OIL PUMP
41499
41499
21
STRAIN RELIEF T&B 3302
89045
89045
22
EXHST BLOWER PLUG & CORD
47199
47199
5
6
4 3 2
1
14
15, 16, 17
10, 11, 12, 13
7, 8, 9
See, Pedestal Interior
Electrical section.
Power Cord
Strain Relief
Oil Power Cord
Strain Relief
*CAUTION: If supply cord
is damaged, it must be
replaced by Gold Medal
Products Co., its service
agent, or similarly
qualified persons in
order to avoid a hazard.
2258-00-100 Pedestal
36oz Shaft View
22
18*
20
19
21
General image shown for
parts reference only.
Page 38

36, 48 & 60 oz. Export Model Series 2149, 2258, and 2297
Cornados (100, 110, and 101, 111)
Page 38
gmpopcorn.com
Pedestal Interior – Electrical – Parts Breakdown
Pedestal Interior (Front Cover Removed) - General images shown for parts reference only.
2258-00-100
20
21
22
18
12, 13
19
25
26
23
24
12, 13
9
14
15
16
17
10, 11
3
*Jumper set to
Fahrenheit
*Jumper set
to Celsius
2 4 3
5
6 7 8
1
*Temp/Cycle Count Board displays
either Fahrenheit (°F) or Celsius (°C)
depending on jumper placement
(qualified service personnel set
jumper placement when board is
installed).
27
28, 12, 13
12, 13
Page 39

36, 48 & 60 oz. Export Model Series 2149, 2258, and 2297
Cornados (100, 110, and 101, 111)
Page 39
gmpopcorn.com
Pedestal Interior – Electrical – Parts List
Item
Part Description
Part Number
All Models
1
PEDESTAL FRONT COVER
111540
2
COUNT AND TEMP DISPLAY
55185
3
FEMALE CONNECTOR
111628
4
SWITCH OIL PUMP
41031
5
EXHST BLOWER PLUG & CORD
47199
6
EXHAUST BLOWER
48037
7
FINGER GUARD
47200
8
10-24 X 5/8 PHIL PAN M/S
76000
9
MALE CONNECTOR W/FLANGES
111627
10
3-48X1/2 SS SLOTTED SCREW
111804
11
3-48 SS HEX NUT
111805
12
8-32 X 3/8 PAN HD PH M/S
12389
13
8-32 SERRATED FLANGE NUT
61151
14
TRANSFORMER, 12/24 VOLT
39459
15
5 POSITION WIRE CONNECTOR
55245
16
3 POSITION WIRE CONNECTOR
55244
17
2 POSITION WIRE CONNECTOR
55621
18
CAPACITOR 5 MFD
82217
19
CAPACITOR STRAP
48301
20
CIRCUIT BREAKER COVER
55253
21
CB WARNING LABEL
55252
22
SCREW #8-32X1/4 PAN HD PH
74142
23
CIRCUIT BREAKER BRACKET
114176
24
CB INFORMATION LABEL
55251
25
CIRCUIT BREAKER, 13A
55225
26
6-32 X 3/16 PH PAN M/S
38149
27
IEC CONTACTOR 3 POLE 25A
55564
28
DIN RAIL
48604
Page 40

36, 48 & 60 oz. Export Model Series 2149, 2258, and 2297
Cornados (100, 110, and 101, 111)
Page 40
gmpopcorn.com
Control Box/Control Panel – Parts Breakdown
15
Control Box Interior View
Control Panel Exterior View
12, 13
14
9
10
11
2
4
6
3
1
5
7
8
7 2 5
8
16
3
6
2258-00-100
12
General images shown for parts reference only.
General image shown,
reference Electronic
Control section for
control board view.
Page 41

36, 48 & 60 oz. Export Model Series 2149, 2258, and 2297
Cornados (100, 110, and 101, 111)
Page 41
gmpopcorn.com
Control Box/Control Panel – Parts List
Item
Part Description
Part Number
RH Units
LH Units
1
CONTROL BOX (includes supports; order cover
and label separately)
111519
111520
2
SWITCH, LIGHTED ROCKER GR
42798
42798
3
SWITCH, ROCKER DPDT
48615
48615
4
5 POSITION WIRE CONNECTOR
55245
55245
5
SWITCH OIL PUMP
41031
41031
6
PILOT LIGHT, GREEN
48660EX
48660EX
7
PILOT LIGHT, AMBER
55039EX
55039EX
8
CIRCUIT BREAKER, 10A
48659
48659
9
4IN DIN RAIL
111532
111532
10
RELAY, DPDT
89086
89086
11
RELAY SOCKET 2 POLE
89085
89085
12
6-32 X 1/2 PHIL PAN M/S
42237
42237
13
6-32 GRIP NUT ZINC PLATED
47517
47517
14
SCREW #8-32X3/8 PAN HD PH
74141
74141
15
TEMPERATURE CONTROL
41001
41001
16
LABEL, CORNADO CONTROLS
111526
111526
Safety Labels
Item
Part Description
Part Number
All Models
1
UNIVERSAL ELEC LABEL
105007
2
WARNING LABEL
68805
3
KETTLE LABEL
83047
4
CB INFORMATION LABEL
55251
5
CB WARNING LABEL
55252
6
MAIN GROUND LABEL
42375
7
WARNING LABEL CORD
68720
Unit Interior Label
7
Power Cord Label
4
Unit Exterior Labels
1 2 3 5 6
Page 42

36, 48 & 60 oz. Export Model Series 2149, 2258, and 2297
Cornados (100, 110, and 101, 111)
Page 42
gmpopcorn.com
Accessories
Item
Part Description
Part Number
36 oz.
48 oz.
60 oz.
1
36OZ CORN CUP ASSEMBLY
67905-36
48OZ CORN CUP ASSEMBLY
17757-48
60OZ CORN CUP ASSEMBLY
17757-60
2
FLAVACOL CONT WELDMENT
41752
41752
41752
3
PERF JET SCOOP REGULAR RH
2072
2072
2072
4
MEASURE 2 TBS, 29.6cc (Flavacol measure)
47681
5
MEASURE 1/4 CUP (Flavacol measure)
47169
47169
1
5
2
3
4
Page 43

36, 48 & 60 oz. Export Model Series 2149, 2258, and 2297
Cornados (100, 110, and 101, 111)
Page 43
gmpopcorn.com
Wiring Diagram
For wiring information, please reference
the Wiring Diagram shipped with the popper.
Page 44

36, 48 & 60 oz. Export Model Series 2149, 2258, and 2297
Cornados (100, 110, and 101, 111)
Page 44
gmpopcorn.com
WARRANTY
© 2018 – The text, descriptions, graphics, layout, and other material in this publication are the exclusive property of
Gold Medal Products Co. and shall not be used, copied, reproduced, or published in any fashion, including website
display, without its express written consent.
WARRANTY
Gold Medal Products Co. warrants to the original purchaser each item of its manufacture to
be free of defects in workmanship and material under normal use and service. Gold Medal
Products Co.’s obligation under this warranty is limited solely to repairing or replacing parts,
f.o.b. Cincinnati, Ohio, which in its judgment are defective in workmanship or material and
which are returned, freight prepaid, to its Cincinnati, Ohio factory or other designated point.
Except for “Perishable Parts” on specific machines, the above warranty applies for a period
of two (2) years from the date of original sale to the original purchaser of equipment when
recommended operating instructions and maintenance procedures have been followed. These
are packed with the machine. Parts warranty is two (2) years, labor is six (6) months.
THIS WARRANTY IS IN LIEU OF ALL OTHER WARRANTIES EXPRESSED OR
IMPLIED, AND OF ALL OTHER OBLIGATIONS OR LIABILITIES ON OUR PART,
INCLUDING THE IMPLIED WARRANTY OF MERCHANTABILITY. THERE ARE
NO WARRANTIES WHICH EXTEND BEYOND THE DESCRIPTION ON THE FACE
HEREOF. In no event shall Gold Medal Products Co. be liable for special, incidental or
consequential damages. No claim under this warranty will be honored if the equipment covered
has been misused, neglected, damaged in transit, or has been tampered with or changed in any
way. No claim under this warranty shall be honored in the event that components in the unit at
the time of the claim were not supplied or approved by Gold Medal Products Co. This warranty
is effective only when electrical items have been properly attached to city utility lines only at
proper voltages. This warranty is not transferable without the written consent of Gold Medal
Products Co.
The term “Original Purchaser” as used in this warranty shall be deemed to mean that person,
firm, association, or corporation who was billed by the GOLD MEDAL PRODUCTS CO.,
or their authorized distributor for the equipment.
THIS WARRANTY HAS NO EFFECT AND IS VOID UNLESS THE ORIGINAL
PURCHASER FIRST CALLS GOLD MEDAL PRODUCTS CO. AT 1-800-543-0862 TO
DISCUSS WITH OUR SERVICE REPRESENTATIVE THE EQUIPMENT PROBLEM,
AND, IF NECESSARY, FOR INSTRUCTIONS CONCERNING THE REPAIR OR
REPLACEMENT OF PARTS.
NOTE: This equipment is manufactured and sold for commercial use only.
10700 Medallion Drive, Cincinnati, Ohio 45241-4807 USA
gmpopcorn.com
Phone: (800) 543-0862 Fax: (800) 542-1496
(513) 769-7676 (513) 769-8500
 Loading...