

Page 1
1
GoldMaster
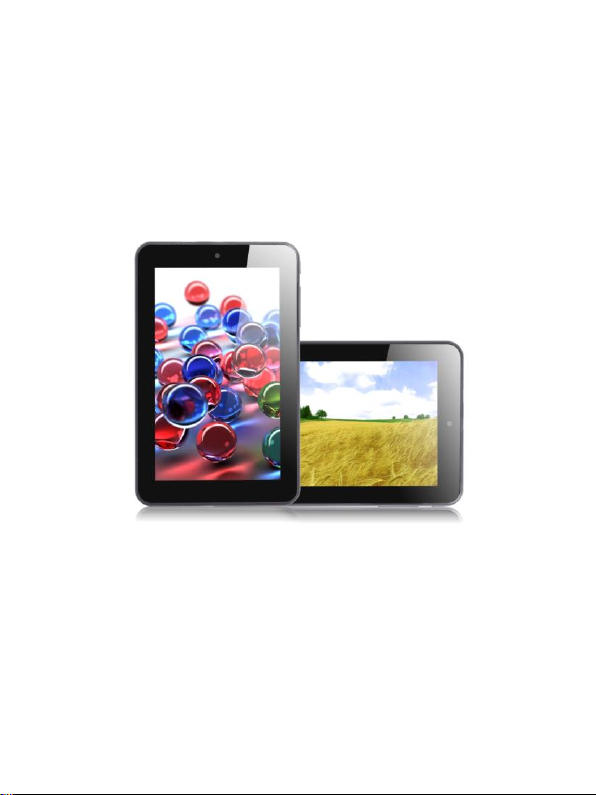
TAB-728 A Tablet PC
Ürün görseli sadece temsilidir. Ürününüz ile farklılık gösterebilir. REV:1.1
Page 2

2
Önsöz
Ürünümüzü satın aldığınız için teşekkür ederiz.
Kullanıcı için gereken operasyonel kurallar, size ürünümüzü rahat ve hızlı
kullanmanızı sağlayacaktır lütfen önce bu kullanım kılavuzunu ve talimatları
okuyunuz. Bu taşınabilir ürün olağanüstü fonksiyonları olan kaliteli uzman bir
üründür. Bu metnin içeriğinde haber vermeksizin değişiklik yapılabilir.
Biz firma olarak ürünlerimize yeni fonksiyonlar eklemek için çalışmalarımıza devam
edeceğiz ve ayrıca yapılacak hiçbir değişiklik satın aldığınız üründe fonksiyonel ve
performans olarak olumsuz bir değişiklik yaşanmayacaktır. Bu üründe dâhili bir hafıza
bulunmaktadır, Bu yüzden cihazınız daki bilgileri bu hafzaya yedekleyebilirsiniz
herhangi bir durumda bilgilerize gelebilecek bir zarardan fimamız sorumlu
tutulamaz.
Satın aldığınız bu üründeki uygulama ve kurulum yöntemleri bu kılavuzdakilerle
aynı değilse Asıl kurulum ve uygulama yöntemlerini firmamızın internet sitesinden
takip edebilirsiniz
Page 3

3
İçindekiler
Önsöz-----------------------------------------------------------------------------------------------2
İçindekiler-----------------------------------------------------------------------------------------3
Teknik Özellikler---------------------------------------------------------------------------------4
Kolay Kullanım-----------------------------------------------------------------------------------5
Önemli Noktalar---------------------------------------------------------------------------------7
Ana Arayüz----------------------------------------------------------------------------------------8
Uygulama (APK)Yüklemek-------------------------------------------------------------------10
Uygulama (APK)Kaldırmak-------------------------------------------------------------------10
Video Oynatıcı----------------------------------------------------------------------------------12
Ses Oynatıcı-------------------------------------------------------------------------------------14
Resimler------------------------------------------------------------------------------------------16
Ayarlar--------------------------------------------------------------------------------------------17
OTG-----------------------------------------------------------------------------------------------20
Bilgisayara Bağlama --------------------------------------------------------------------------21
Takvim--------------------------------------------------------------------------------------------22
Hesap Makinası--------------------------------------------------------------------------------23
Saat------------------------------------------------------------------------------------------------23
Fabrika Ayarlarına Dönmek -----------------------------------------------------------------24
Sürücü Güncelleme---------------------------------------------------------------------------25
Genel Sorun Giderme-------------------------------------------------------------------------25
Özellikler-----------------------------------------------------------------------------------------27
Page 4

4
Teknik Özellikler
7.0" 1024*600 5 noktadan Kapasitif dokunmatik ekran
1.5GHZ Çifte çekirdekli işlemci AML8726-MXS Cortex A9
Mali 400 GPU;
Desteklenenler WIFI, Ön 0.3mp,Arka 2.0mp ağ üzerinden video konuşma
desteği ve fotoğrafçılık fonksiyonu;
Android 4.1 jelly bean; İşletim Sistemi
Otomatik olarak yatay ve dikey ekran döndürme desteği;
İnternet tarayıcı, Canlı mesajlaşma, Canlı Video, Oyun, Yükleme vs. Desteği;
Onbinlerce oyun ve program indirme ve yükleme desteği;
APE MP3 OGG; gibi birden fazla ses formatını destekleme
3GP AVI MP4 Desteği
JPG, BMP and PNG, vs; Resim tarama, Döndürme ve Slayt desteği
PDF gibi birden fazla formatta e-kitap oynatma fonksiyonu
USB2.0 ile yüksek hızlı very iletimi;
Dâhili mikrofon ile uzun süre kayıt yapabilme
Mikro SD kart ve OTG fonksiyonu;
Page 5

5
Kolay Kullanım
Açma
Cihazı açmak için " " butonuna 3 saniye basılı tutun
Kapatma
Cihazı kapatmak için " " butonuna uzun süre basılı tutun ekrana gelen
pencereden kapatma seçeneğine dokunun.
Uyku modu
Cihazınızı kısa bir süreliğine kullanmayacaksanız " " işaretli kapatma butonuna bir
kere basın cihazınız uyku moduna geçecektir yani ekran kapanacaktır aynı butona
tekrar bastığınızda ci hazınız normal çalışma moduna dönecektir. Cihazınız uzun süre
kullanılmadığında kendi kendine otomatik olarak uyku moduna geçmesini istiyorsanız
Ayarlar menüsünden bu seçeneği aktif hale getirin.
Ekran Zaman Aşımı
Belirlediğiniz bir zamanda cihaza herhangi bir bağlantı ve dokunma olmadığında
ekranın kapanmasını istiyorsanız, Ayarlar bölümündeki ekran seçeneğinden bu süreyi
ayarlayabilirsiniz ekranı tekrar açmak istediğinizde " " işaretli açma butonuna bir
kere basınekran tekrar aktif olacaktır. İçeriğe erişmek için ekrandaki kilit simgesine
dokunun ve açık kilit simgesine doğru parmağınızı kaydırın. Ekran zaman aşımını
kullanmak istemiyorsanız, Ayarlar bölümündeki ekran seçeneğinden zaman aşımı
seçeneklerinden hiçbiri seçeneğini seçin
Mikro SD Kart Kullanımı
Mikro SD kart ile bu özelliği kullandığınızda cihazınızda 2 adet disk olacaktır.
Bunlardan biri cihazın dâhili hafızası diğeri ise cihaza taktığınız harici mikro SD karttır.
Eğer kart kullanmazsanız cihazınızdaki 2. Disk seçeneğini açamazsınız. Mikro SD
kartınız cihazınızda 4GB dan 32 GB a kadar desteklemektedir.
Page 6

6
Micro SD kartı cihaza takmak ve cihazdan çıkarmak
Micro SD kartın Takılması:
Mikro SD kartı cihazın arka üst kısmında bulunan kapağı açarak içindeki İnsert TF
Kart yuvasına hafifçe bastırarak takabilirsiniz. Artık Mikro SD Kartınızın içindeki bütün
dosyalarınızı çalıştırıp oynatabilirsiniz.
Mikro SD kartın Çıkarılması:
Mikro SD kartı cihazınızdan çıkarmak için hafifçe bastırın kartın bir kısmı yuvadan
dışarı çıkacaktır ve artık kartınızı çekerek cihazdan tamamen çıkarabilirsiniz.
Dikkat:
Mikro SD Kartınızı cihazınızdan çıkartmak istediğinizde cihazın kapalı olmasına
dikkat edin aksi halde cihazınız çalışır durumdayken Mikro SD Kartınızı çıkarmaya
çalışırsanız Mikro SD Kartınızdaki bilgiler zarar görebilir veya silinebilir.
Pil:
Bu cihazda yüksek kapasiteli polymer pil kullanılmıştır.
Pil gücü cihazınızda çalıştırdığınız program, video ve oyunların kalitesine süresine
gore değişiklik gösterir. Cihaz kapanmadan önce pil bitiş uyarı ve kapanma süresini
ayarlayabilir ve kaydedebilirsiniz.
Şarj:
Bu cihazı DC şarj cihazı veya USB kablosuyla şarj edebilirsiniz:
DC şarj cihazı AC 220Volt girişli 2000 mA DC 5V~5.2Volt çıkışlı olması gerekir.
Şarj için Uyarılar:
1. Cihazı satın aldığınızda pil boş olabilir bu yüzden önce tam olarak şarj etmeniz
gerekmektedir. En az 8 saat şarj ediniz.
2. Cihazı uzun süre kullanmayacaksanız cihazınızın pilini 2-3 ayda bir tam
olarakşarj etmeniz gerekmektedir.
Şarj cihazı (Güç Adaptörü) bu cihazın önemli bir bileşenidir, Bu cihazı
Kullanırken önemli bir hususda cihazın güvenle kullanılmasıdır, Satış sonrası
teknik servislere gelen bu tür cihazların birçoğunda görülen arızanın sebebleri cihaza
Page 7

7
uygun olmayan aksesuarlarla kullanılmasıdır, Özelliklede güç adaptörünün kesinlikle
cihaza uygun olması gerekmektedir.
Güç adaptörünü kullanım standartlarının dışında uzun süre kullanırsanız güç
adaptörünüzün ömrü kısalır, Güç adaptörünü kullandığınız yerde voltaj istikrarsızlığı
cihazınızda kalıcı hasarlar bırakabilir, Güç adaptörünü kullandığınız yere dikkat edin
aksi halde güç adaptörünüz patlayabilir ve kullanıcılara zarar verebilir.
Önemli Noktalar
1. Bu tür ürünleri çok soğuk, Çok sıcak, Nemli ve tozlu ortamlarda kullanmayın.
2. Ürünü kullanırken düşürmemeye dikkat edin.
3. Lütfen kullanmadan önce cihazınızın pilini şarj edin.
a. Cihazınızın pili bittiğinde pil simgesi boş görünür;
b. Cihaz otomatik olarak kapanır;
c. Eğer cihazınızda herhangi bir faliyet yoksa yeniden başlatın.
4. Cihazınıza format atarken veya bir uygulama yüklerken cihazınızı kapatmayın
aksi halde cihazınızda kalıcı sorunlar oluşabilir.
5. Bu cihazı taşınabilir bir disk olarak kullanmak isterseniz dosyalarınızı uygun
formatta kaydedin, Herhangi bir yanlışlıkda dosyalarınız zarar görebilir,
bundan dolayı firmamız sorumlu tutulamaz.
6. Lütfen cihazı sökmeyin veya kapağını açmayın teknik bir sorun varsa yetkili
teknik servisimize başvurun.
7. Firmamız bu cihazın fonksiyonlarında ve performansında haber vermeksizin
değişiklik yapabilir.
Page 8
8
Ana Arayüz
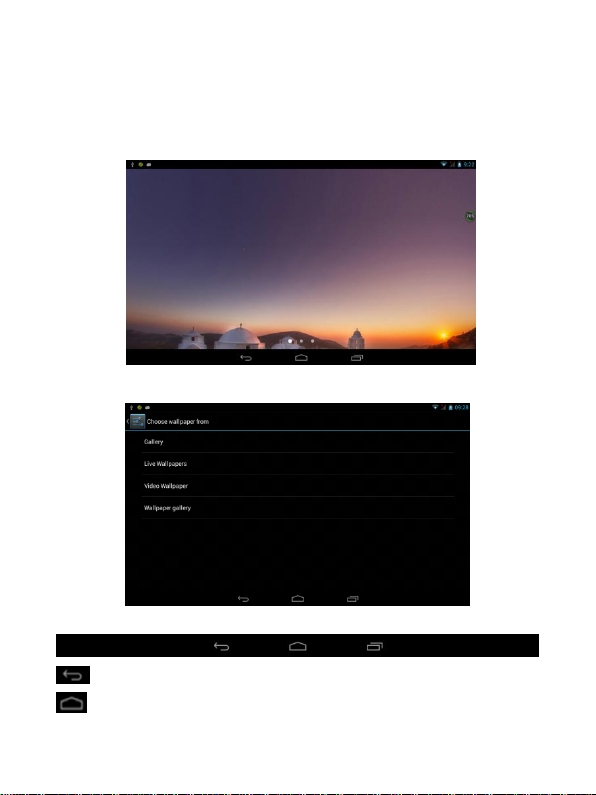
Ana Arayüz: Bu üründe ilk çalıştırdığınızda 3 ekran vardır bunlar arasında
parmağınızı ekranda sağa veya sola kaydırarak geçiş yapabilirsiniz.
Duvar Kâğıdı Değiştirmek: Cihazınızın duvar kâğıdını istediğiniz gibi değiştirebilirsiniz.
Yazılım menüsü işlevleri:
:Herhangi bir ara yüzden bir öncekine dönmek için bu ikona dokunun.
:Herhangi bir arayüzdeyken ana arayüze dönmek için bu ikona dokunun
Page 9
9
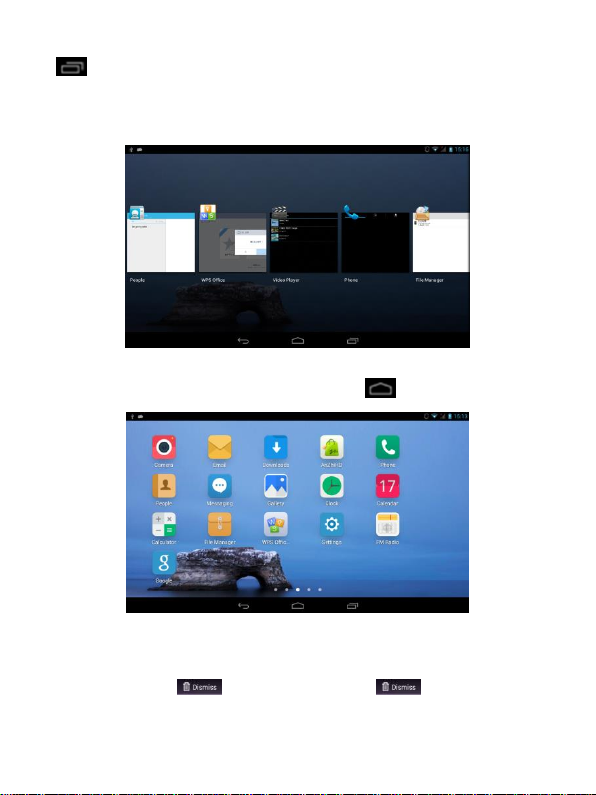
:Herhangi bir ara yüzdeyken arka planda çalışan programları görmek için bu
ikona dokunun ekrana çalışan programların listesi gelecektir bu ikonlardan
dilediğinize dokunarak geçiş yapabilir veya çalışan programları kapatabilirsiniz.
Bütün Uygulamaları Göstermek:
Cihazınızda yüklü bütün Uygulamaları görmek için bu , ikona dokunun.
Programları masaüstüne eklemek için ikona uzun süre dokunun.
Program kısayollarını masaüstünden kaldırmak için ikona dokunup basılı tutun.
Ekranın üst tarafında simgesi belirecektir. İkonu simgesi içine
sürükleyip bıraktığınızda program kısayolu silinecektir.
Page 10
10
Uygulama (APK) Yüklemek
1. İndirip yüklemek istediğiniz APK formatındaki dosyayı TF Hafıza kartına
kaydedin.
2. Dosya yöneticisi ikonuna tıklayıp yüklemek istediğiniz APK dosyasını seçin.
3. Yönergeleri izleyip yükleyi seçerek APK'nin kurulumunu gerçekleştirebilirsiniz.
Uygulama(APK) kaldırmak
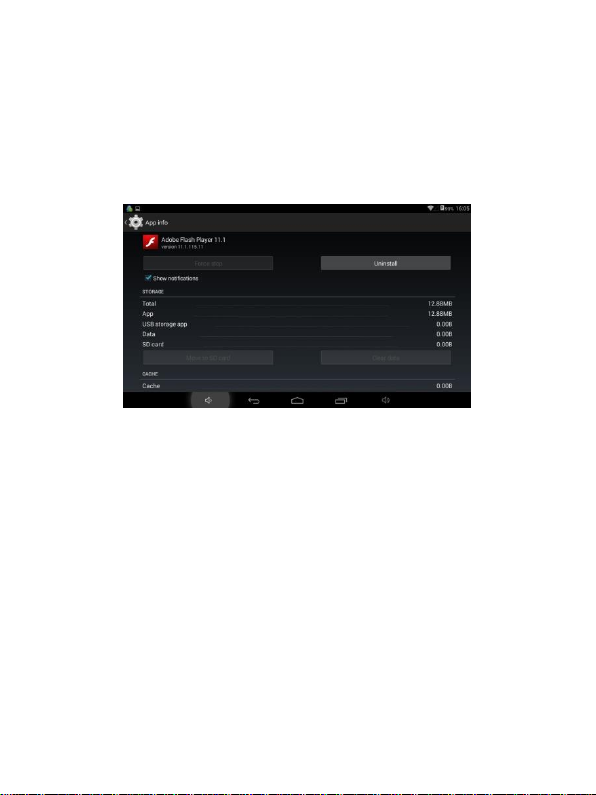
1. Masaüstünde “Ayarlar”a tıklayın. Ayarlar ekranında “Uygulamalar”ı seçerek
kaldırmak istediğiniz uygulamayı bulup seçin.
Page 11

11
2. “Kaldır” düğmesine tıklayarak, program kaldırıcıyı çalıştırabilirsiniz.
Video Oynatıcı
Video klasörüne ulaşmak için, ana menüde "4k video tablet PC" seçeneğini seçin.
Page 12
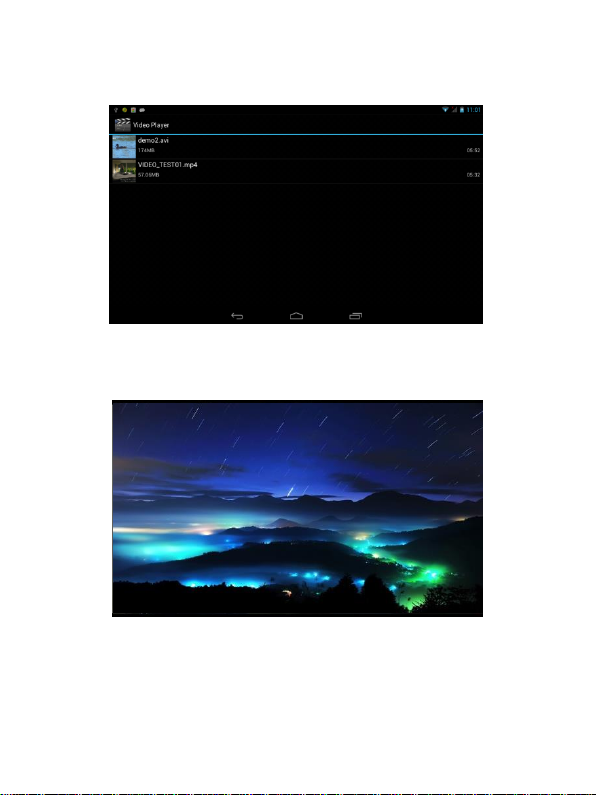
12
Dosya listesi arayüzü
Video oynatıcı arayüzü
Page 13

13
Tuş Fonksiyonları
'' / ": Oynat/duraklat butonu
'' '' :Videoyu ileri/geri al
'' '':Ekran boyutu kontrolü
'' '':Başka uygulamalara gönder/paylaş
Notlar:
1、 Bu Video oynatıcı, 4K(3840*2160)boyutuna kadar olan MP4 dosyalarını
destekler.
2、 Altyazı
Bu oynatıcı, “*.SRT” uzantılı altyazı dosyalarını destekler. Kullanıcı, videoya uygun
(senkron) alyazı dosyasını internetten indirmelidir.
İndirdiğiniz srt uzantılı altyazı dosyasını videonun yer aldığı klasöre, video dosyasıyla
aynı adda kaydettiğiniz takdirde video oynatıcı hangi alyazıyı kullanıcağını bulabilir.
3、 Video oynatıcı, RMVB,AVI,MKV, VOB, MOV, FLV, MP4, H.264 gibi farklı
formatlarda ve yüksek çözünürlükteki dosyaları destekler. . İnternetten indirilen
dosyalarda video formatı, kodlama modu, tanımı ve video akış hızı gibi parametler
farklılık gösterdiğinden, video oynatıcı, tüm bu farklı durumlara uyum
sağlayamayabilir. Özellikle çok yüksek çözünürlüklü dosyalar, oynatıcının desteklediği
sınırların üzerindeyse oynatılmaları mümkün olmayacaktır. Bu durumda, indirilen
video dosyasını önceden uygun bir programla, tabletin desteklediği boyut ve
formatlara dönüştürmek gerekecektir. Bilgisayarınıza kuracağınız video dönüştürücü
programlarıyla bu dönüşümü gerçekleştirebilirsiniz.
Videoyu ileri/geri almak için çubuk üzerindeki düğmeyi Kaydırabilirsiniz.
Page 14
14
Ses Oynatıcı
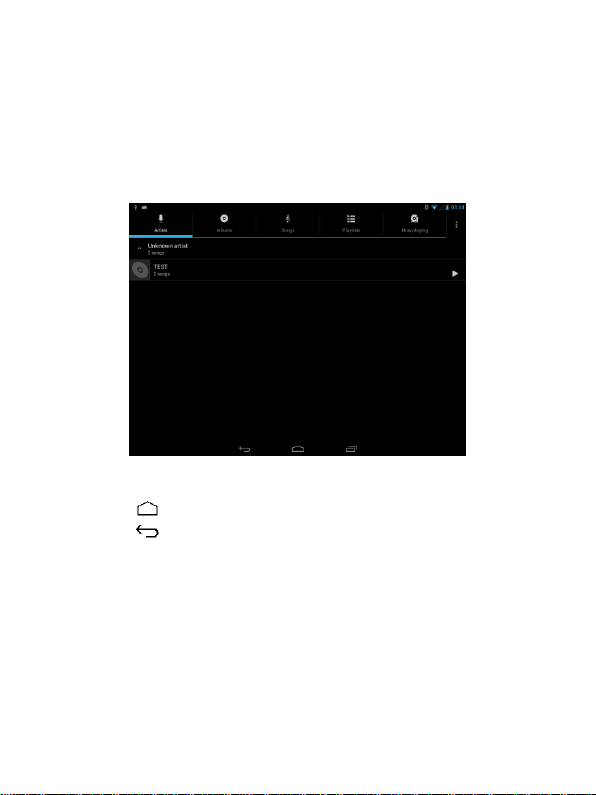
Ana menüde “Müzik” ikonuna tıklayarak kayıtlı tüm ses dosyalarına ulaşabilirsiniz.
Müzik klasörü arayüzü
Tuş fonksiyonları
'' '': Ana ekrana geri dön
'' '': Bir üst ekrana geri dön
Listelerde gezinmek için listeyi aşağı/yukarı sürükleyin
Sanatçılar: Müzik dosyalarını şarkıcıya göre listeler
Albümler: Müzik dosyalarını albüme göre listeler
Şarkılar: Bütün müzik dosyalarını listeler
Şarkı listeleri: Şarkı listelerini listeler
Şimdi yürütülüyor: Arka planda oynayan müziği gösterir
Page 15
15
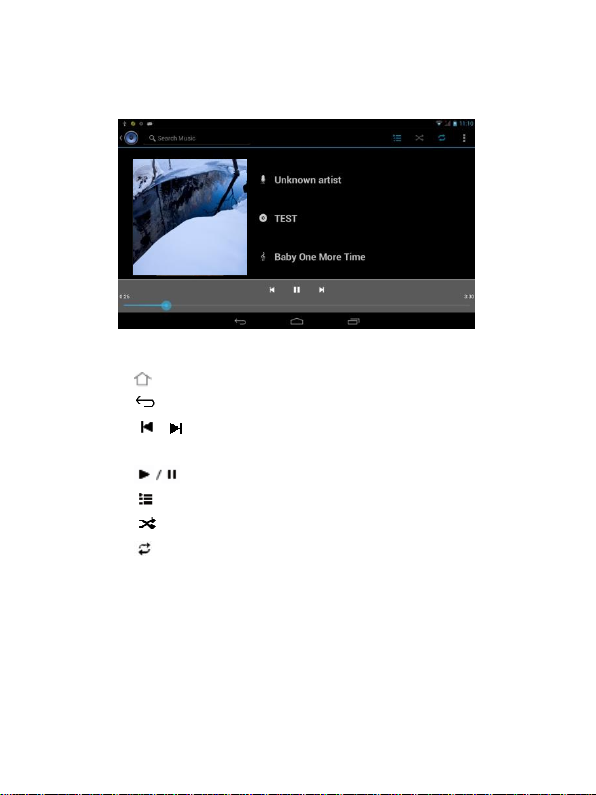
Müzik oynatma arayüzü
Tuş fonksiyonları
'' '': Ana ekrana geri dön
'' '': Bir üst ekrana geri dön
'' / ": önceki/sonraki müziğe geçiş için kısa süreli tıklayın. Şarkıyı
ileri/geri almak için, uzun süre basılı tutun.
'' '': Müziği oynatıp/duraklatmak için tıklayın
'' " : Şarkı listelerini görüntülemek için tıklayın
" ": Rastgele şarkı seçimi modunu açıp kapamak için tıklayın
" " Bir üst ekrana dönmek için tıklayın
Şarkı sözleri
Müzik dosyasıyla aynı klasörde, aynı adda bir şarkı sözü dosyası varsa müzik oynatıcı,
dosyaya doğrudan erişecek ve şarkı sözlerini arayüzde gösterecektir.
Bu müzik oynatıcı, "*.Lrc" uzantılı şarkı sözü dosylarını destekler. “LRC şarkı sözü” ya
da ingilizce şarkı sözleri için “LRC lyric” şeklinde arama yapıp müzik dosyanıza
senkronize bir şarkı sözü dosyası indirebilirsiniz.
Page 16
16
Resimler
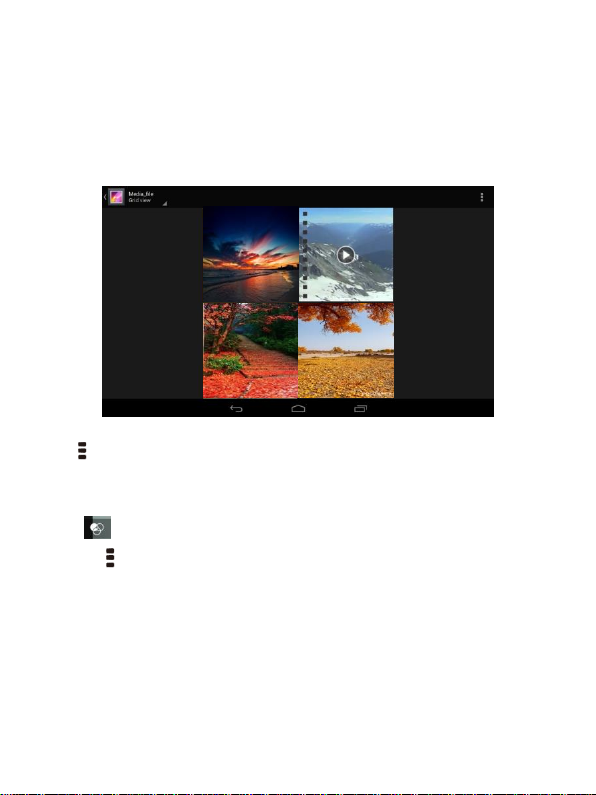
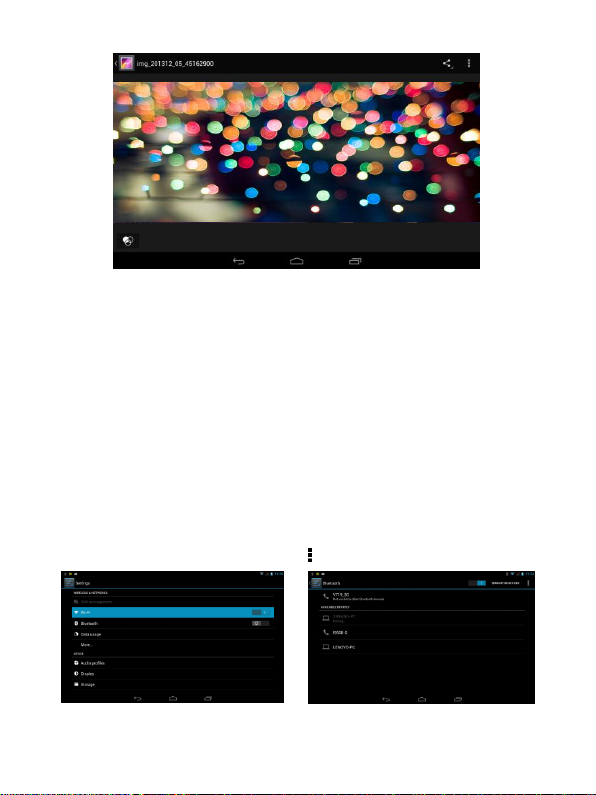
Ana menüde “Süper HD Oynatıcı” yı seçerek tabletinizde kayıtlı tüm fotoğraf ve
resimleri görüntüleyebilirsiniz.
Resim görüntüleme arayüzü
Tuş fonksiyonları
● '' '' : Bu ikon aracılığıyla, resimler üzerinde yapılan silme, sağa sola döndürme gibi
işlemleri çok sayıda resim üzerinde gerçekleştirebilirsiniz.
Fotoğraflarınızı konum, saat, kişi ve etiketlerine göre de gruplayabilirsiniz.
'' '': Fotoğraflarınızı düzenlemek için buraya tıklayın
'' '': Bu ikon aracılığıyla resim özellikleri hakkında bilgi edinebilir, sağa/sola
döndürme, kırpma, adını değiştirme gibi değişikliklerle resmi düzenleyebilir
ve slayt gösterisi yapabilirsiniz.
Page 17
17
Ayarlar
Ana menüden “Ayarlar” seçeneğine tıklayarak sistem ayarlarına
ulaşabilirsiniz.(Farklı programlar üzerinden girdiğiniz ayarlar, sadece o programa
ilişkin ayarları gösterir. )
Fonksiyon açıklamaları:
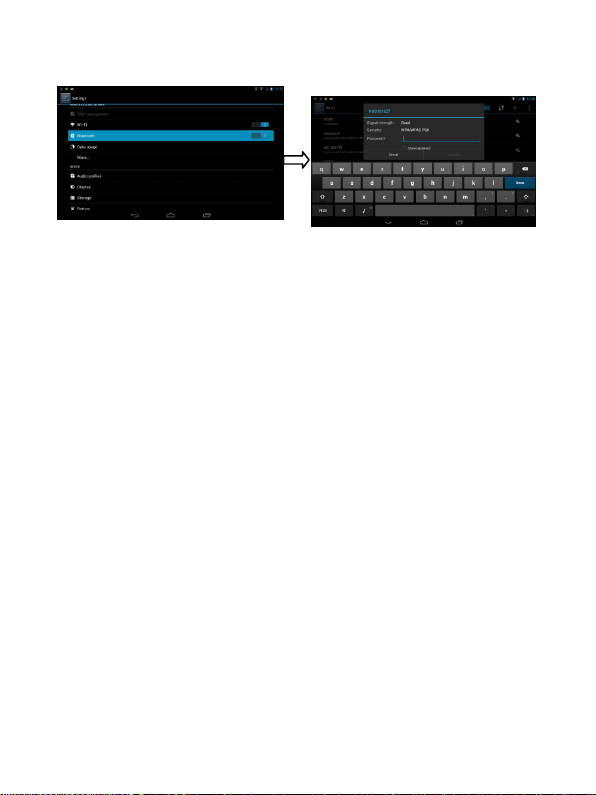
1.Kablosuz(WiFi)
Wi-Fi: Kabalosuz bağlantıyı aç/kapa
Kablosuz ayarları: Kablosuz ekranındayken " " ikonuna dokunarak, gelişmiş kablosuz
ayarlarına ulaşabilirsiniz.
Page 18
18
Bağlanmak istediğiniz kablosuz ağa listeden seçip şifresini girerek bağlanabilirsiniz.
2.Veri Kullanımı
Farklı uygulamalara ait veri kullanım bilgilerini gösterir.
3.Ses Ayarı
Ses düzeyleri: müzik/video bildirim ve alarm ses düzeyini ayrı ayrı ayarlayabilirsiniz.
Varsayılan bildirim: hBildirim Ses tonunu listeden seçebilirsiniz
Dokunma sesleri: Af Seçili olduğu takdirde, dokunmatik ekrana dokunuşunuzda ses
çıkarır.
Ekran kilidi sesi: Seçiliyse, tabletin açılış/kapanış ekranında kilit ses çıkarır.
4.Ekran Ayarları
Parlaklık: Ekran parlaklık ayarı
Duvar kâğıdı: Süper-HD oynatıcıdan resim seçerek duvar kâğıdı atayabilirsiniz.
Uyku: Ekran güç tüketimini azaltmak için otomatik kapanacak ve bekleme moduna
geçecektir. Bu otomatik beklemenin süresini listeden seçerek ayarlayabilirsiniz.
Ekran kapanıp bekleme moduna geçtikten 10 saniye sonra kablosuz(WİFİ) de güç
tüketimini azaltmak için kapanacaktı. Yazı tipi boyutu: Küçük, normal, büyük, çok
büyük yazı tiplerinden birini seçebilirsiniz.
Açı sensörü koordinat sistemi: Tabletin eğim açısını ölçen sensörünsörün koordinat
sitemini seçebilirsiniz.
Ekran uyumu: Bazı oyunlar için ekran boyutu ayarlaması gerektiğinde kullanılır
Page 19

19
5.Depolama
Harici ve dâhili hafıza birimlerinin toplam kapasitesi ve kullanım miktarını gösterir.
6.Uygulamalar
Yüklü uygulamaları listeler ve uygulamaların yönetimini sağlar.
7.Güvenlik
Ekran kilidi: Kaydırma, şekil, PİN, şifre gibi farklı türlerdeki güvenlik yöntemlerinden
birini seçebilirsiniz.
Şifreleri görünür yap: Seçiliyse, şifre kutusuna gireceğiniz şifre karakterleri görünür
olur.
Bilinmeyen kaynaklar: Google Play Market dışındaki kaynaklardan indirilen
uygulamaların da tabletinize kurulabilmesini sağlar. Varsayılan değeri açıktır.
8.Dil ve giriş
Dil ve bölge ayarlarını değiştirebilir, giriş yöntemini seçebilirsiniz vb.
9.Yedekle ve sıfırla
Veilerinizi ve ayarlarınızı yedekleyebilir, daha önceden aldığınız yedekleri geri
yükleyebilirsiniz.
10.Tarih ve saat
Tarih, saat, saat dilimini ve tarihle saatin gösterim biçiminiz ayarlayabilirsiniz.
11.Tablet hakkında
Tabletinizin yazılım versiyonu ve diğer bilgilerini görünteleyebilirsiniz.
OTG
On-The-Go'nun kısaltmasıdır. Taşınabilir cihazlar arasında, bilgisayara gerek
kalmadan veri transferi yapılabilmesi için geliştirilmiş bir teknolojidir. MP3 oynatıcı,
flash disk, harici sabit disk gibi cihazları, arada bilgisayar olmadan, doğrudan
tabletinize bağlayıp dosya transferi yapabilmenizi sağlar.
OTG Bağlantı Adımları:
Page 20
20
1.Kullanmak istediğiniz cihazı tabletinize uygun bir OTG kabloyla bağlayın.
2.Ana menüden dosya yöneticisini seçip mobil disk klasörü üzerinden
dosyalarınıza erişebilirsiniz.
Uyarılar:
1.Taşınabilir cihazlardaki büyük çeşitlilik nedeniyle bazılarının tanınmaması
mümkündür.
2.Yazılım güncellemeleri sayesinde artan sayıda cihazla uyum sağlanacaktır.
3.OTG ile bir cihaz bağladığınız takdirde, gerekli enerji tabletinizin bataryasından
kullanılacaktır. Bu nedenle tabletinizin pili %30 'un altındaysa ve kullanmak istediğiniz
cihaz yüksek güç tüketimine sahipse bağlantıda sorun yaşayabilirsiniz. Bu gibi
durumlarda temin edeceğiniz “Y kablosu” aracılığıyla cihazı harici bir güç kaynağına
bağlayabilirsiniz.
4.Şimdilik OTG sadece tek yönlü dosya transferi yapabilmektedir. Yani harici
cihazınızdaki dosyaları okuyup tabletinize kopyalayabilirsiniz ancak dosyalar üzerinde
değişiklik yapıp silemezsiniz.
Bilgisayara Bağlama
Tabletinizdeki dosyalarınızı silmek ya da kopyalamak için, bilgisayarınıza USB
kablosu aracılığıyla aşağıdaki adımları izleyerek bağlayabilirsiniz.
Page 21
21
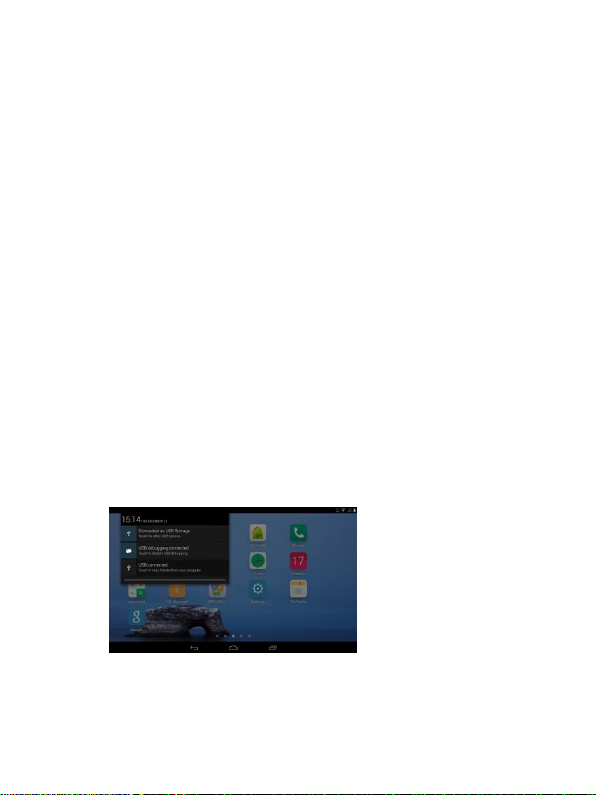
1. Tabletinizi bilgisayarınız USB portuna USB kablosuyla bağladığınız takdirde,
Tabletinizin ekranında “USB bağlandı” bildirimi gözükecektir.
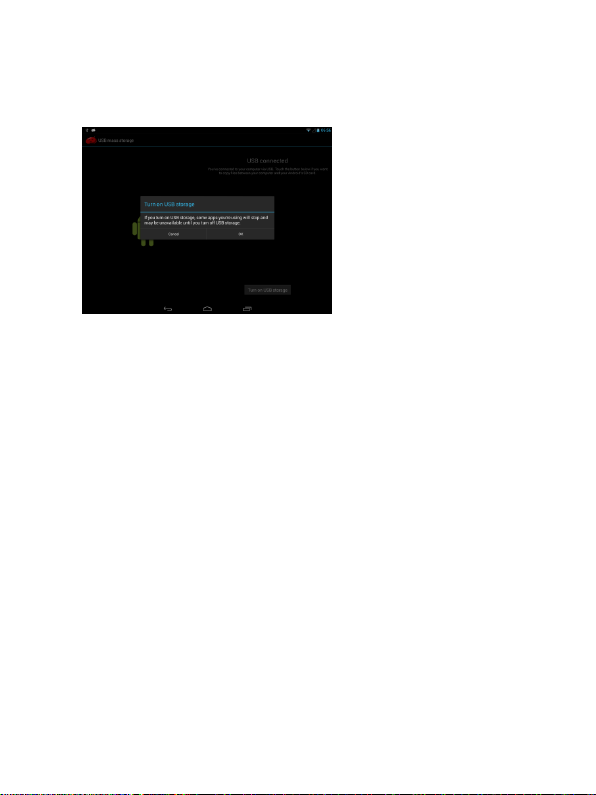
2.USB bağlandı bildirimine
tıklayıp “USB depolama ünitesini
aç”'ı seçin. Tabletinizin depolama
ünitesi bilgisayarınızda flash disk
olarak gözükecektir.
Bilgisayarınızın dosya yöneticisini
tabletinize dosya taşımak,
kopyalamak için kullanabilirsiniz.
3G Şebeke Ayarları
1. 3G modeminizi tabletinizin USB portuna takın
2. 3G ve kablosuz(WİFİ) aynı anda kulanılmadığından, ayarlardan
Kablosuz (WİFİ)'yi kapatın.
【Notlar】
1. 3G modem cihazlarındaki çeşitlilik ve haberleşme sistemlerindeki farklar
nedeniyle tüm cihazlarla uyum sağlamak mümkün olmamaktadır.
2. 3G modemlerin güç tüketimi yüksek olduğundan, harici güç kaynağı kullanınız
ve tabletinizin pili yeterince dolu olduğundan emin olunuz.
Takvim
Page 22
22
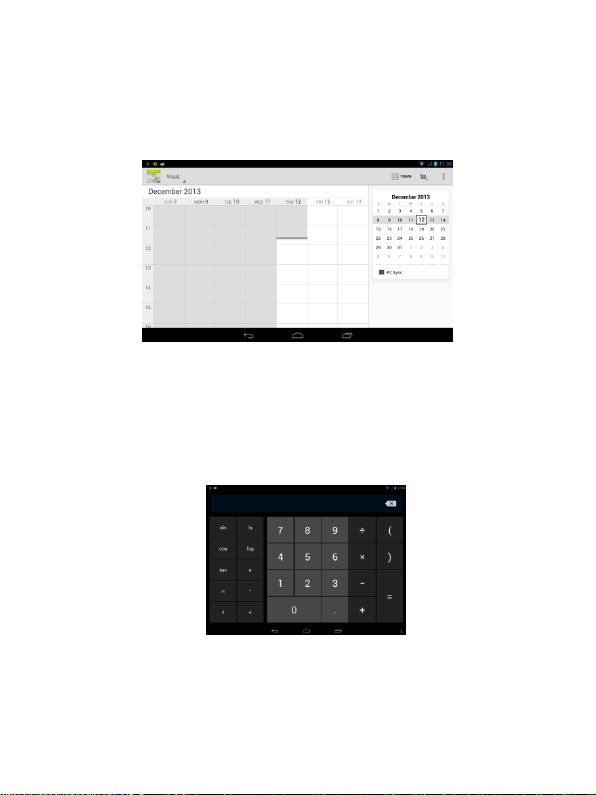
Ana menüde takvim ikonuna dokunarak, takvim arayüzüne erişebilirsiniz.
Bu menü altında ekranı sağa sola kaydırarak ayı arttırıp azaltabilirsiniz.
Takvime kaydetmeniz gereken bir durum varsa cihazınıza önceden bir takvim hesabı
ekleyin ve tahkvimi görünür hale getirin.
Hesap Makinesi
Hesap makinesi açmak için ana menüden “Hesap makinesi” ikonunu seçiniz.
İhtiyaçlarınız doğrultusunda, normal hesap makinelerini kullandığınız gibi
kullanabilirsiniz.
Saat
Page 23
23
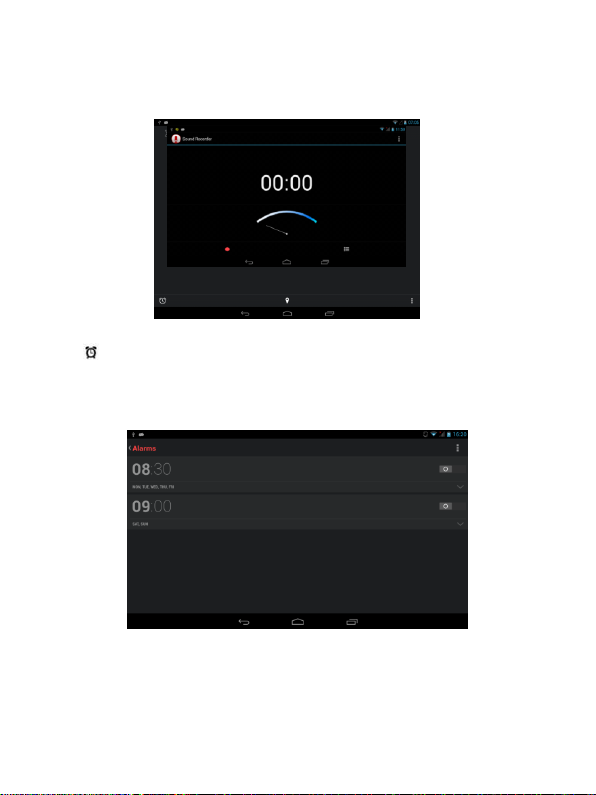
Günlük yaşam içinde sıkça kullanacağınız bir araç olan saat fonksiyonuna ana
menüden “Saat” ikonunu seçerek ulaşabilirsiniz.
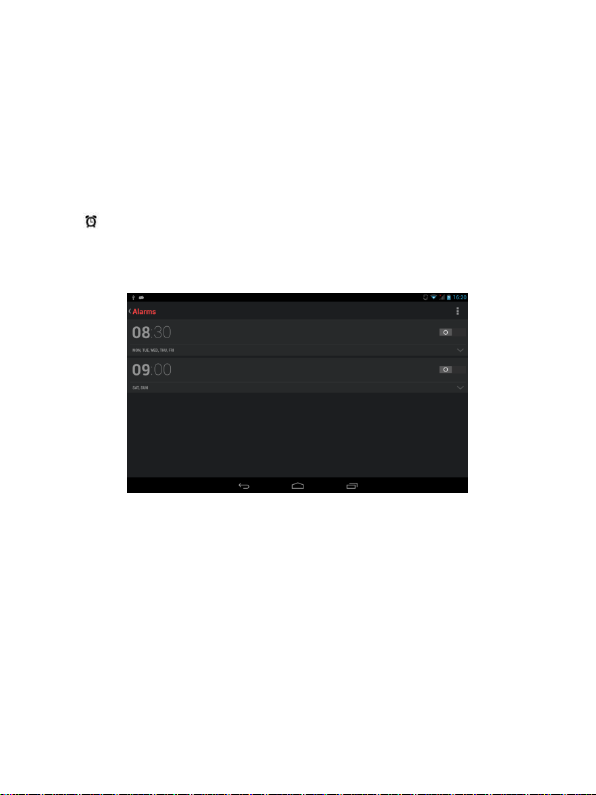
1、”Saat” ikonunu seçtiğinizde aşağıdaki arayüzle karşılaşacaksınız.
2、" ":Alarmı ayarlamak için bu ikona tıklayınız.
Zamanı geldiğinde otomatik olarak alarm zili çalacaktır.
Alarmın gün ve saatini, zil tonunu ve tekrar seçeneklerini her alarm için
Ayarlayabilirsiniz.
Fabrika Ayarlarına Dönmek
Cihazınıza virüs bulaştığını düşünüyorsanız ya da dışarıdan yüklediğiniz bir
uygulama beklenmedik şekilde çalışıyorsa, cihazınıza format atmak isteyebilirsiniz.
Page 24
24
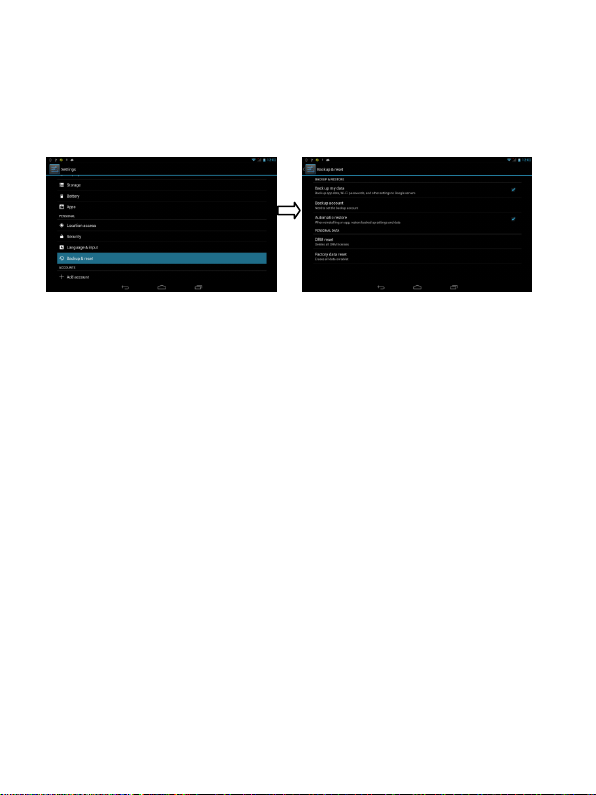
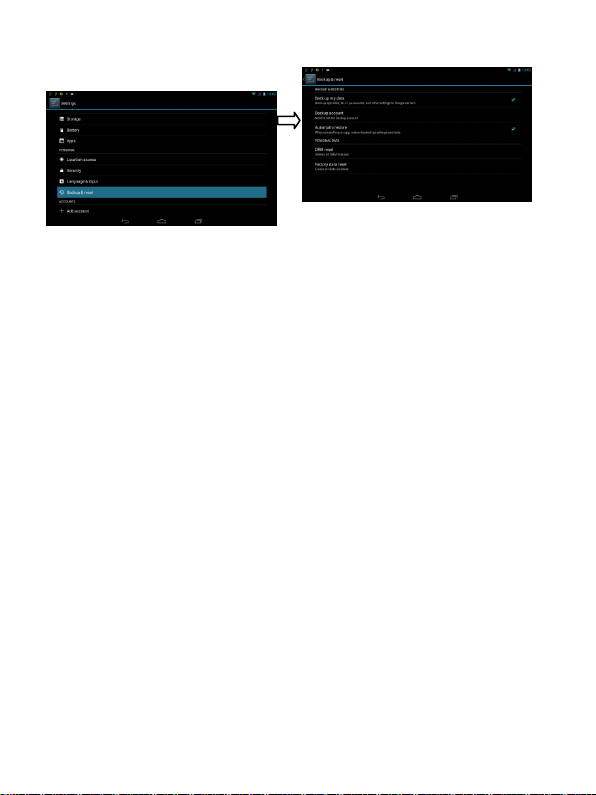
Ayarlar üzerinden “Yedekle ve sıfırla” sonra da “Fabrika verilerine sıfırla” 'yı
seçtiğinizde tablete sonradan yüklediğiniz bütün uygulmalar silinecek ve tabletiniz ilk
aldığınız günkü durumuna gelecektir.
Sürücü Güncelleme
Sürücü yazılımları cihazınız üzerindeki donanım üniteleriyle işletim sisteminin
haberleşmesi sağlayan düşük seviyeli yazılımlardır. Sürücü yazılımında yapılacak
güncellemeler, cihazınızın donanım üniteleri aynı olmasına rağmen performansında
gözle görülür bir artışa olanak sağlar. Sürücü güncellemek cihazınızın normal
çalışmasını etkilemez.
Ancak güncelleme sırasında bir hata oluşursa cihazınızın düzgün çalışamaz hale
gelebilir. Bu nedenle güncelleme yapmadan önce lütfen yönergeleri dikkatlice
okuyun.
【Notlar】
1. Güncelleme yapmadan önce lütfen pi seviyesinin en az % 60 olduğundan
emin olun. Güncelleme sırasında pilin bitmesi tabletinizin açılmasın engel
olabilir.
Page 25

25
2. Güncelleme işlemi sırasında tabletinizi kapatmayınız ya da resetlemeyiniz.
Güncelleme işlemi sırasında kesintiye gitmek cihazınızın açılmasına engel
olacaktır.
3. yazılım güncellemesi sırasında belirli özellikler kalkabilir ve değişebilir.
Değişiklikler önceden haber verilmeden yapılabilir.
4. Uygulamaların kayıtlı verileri güncelleme sırasında silinecektir. Bu nedenle
güncelleme yapmadan önce bütün verilerinizi yedeklediğinizden emin olun.
5. Sürücüler yazılımları başka ürünlere uygun değildir. Karşılaşılacak
sorunlardan firmamız sorumlu tutulamaz.
Genel sorun giderme
1. APK dosyası nedir? Android PMP ile ne gibi bir ilişkisi vardır?
A: APK, Android paketinin kısaltmasıdır, yani Android kurulum paketi anlamına gelir.
APK dosyalarıyla, uygulamalar, Android PMP sistemine doğrudan yüklenebilir.
2. APK dosyası nasıl alınır
A: İster APK dosyasını bilgisayırınıza indirip, tabletinize taşıyarak kurulum yapabilir,
isterseniz de “Google Play Store” üzerinden indirip yükleme yapabilirsiniz.
3. Kablosuz(WİFİ) bağlantısı neden kopuyor?
A: Ekran uyku moduna girdiğinde kablosuz bağlantısı da güç tüketimini düşürmek
için kapanacaktır. Uyku modundan çıkıldığında ise yani cihazınızı yeniden kullanmaya
başladığınızda kablosuz bağlantınız 5 saniye içinde ototmatik olarak bağlanacaktır.
4. Neden indirilen bazı APK dosyaları düzgün çalışmıyor?
A: APK dosyalarının, yükleme yapabilmek için bazı donanım ve yazılım şartları vardır.
Dışarıdan indirilen dosyalar bu yazılım ve donanım şartlarını yerine getirmeyebilir. Bu
karşılaştığınız sorun cihazınızdaki bir probleme değil, indirdiğiniz dosyadaki
uyumsuzluk sorununa işaret eder.
5. Neden şarj aleti takılı olmasına rağmen şarj oluyor durumu gözükmüyor?
Page 26

26
A: Pil çok düşük seviyede ise şarj oluyor durumunun gözükmesi için yarım saate
kadar şarj süresi geçmesi gerekebilir.
6. Yerçekimi yönünü algılama özelliği neden çalışmıyor.
A: Cihazınız yer çekimi yönününü algılama özelliğini desteklemektedir. Cihazınızı
hafiçe sallamanız gerekebilir. Ancak bazı uygulamalar bu özelliği desteklemiyor
olabilir. Bu durum tabletinizin özellikleriyle değil, ilgili uygulamanın yazılımıyla
ilgilidir.
7. Tablet açılmıyor
1)Pili bitmiş mi kontrol ediniz.
2)Şarj aletini takın
3)Şarjda bir süre beklemenize rağmen hala açılmıyorsa, müşteri hizmetlerine
başvurunuz.
8. Kulaklıktan ses gelmiyor.
1)Ses seviyesini kontrol ediniz
2)Kulaklığın yerine düzgünce oturduğundan emin olunuz.
9. Şarj ederken yaşanan sorunlar
1) Kullandığınız şarj aletinin tabletinizin şarj gereksinimleriyle uyumlu olduğundan
emin olun.
1- 2) USB üzerinden şarj ederken, PC ye bağlayarak şarj etmeyiniz.
Neden indirdiğim bazı video dosyalarını oynatamıyorum?
Tabletiniz internetten indirdiğiniz video dosyalarını genel olarak destekler. Ancak
internette yer alan video formatları, çözünürlüğü ve akış hızı gibi parametlerin büyük
farklılık göstermesi, bazı videoların oynatılamamasına yol açabilir. Böyle bir durumla
karşılaştığınızda videoyu bilgisayarınızda uygun bir programla tabletinizin
Page 27
27
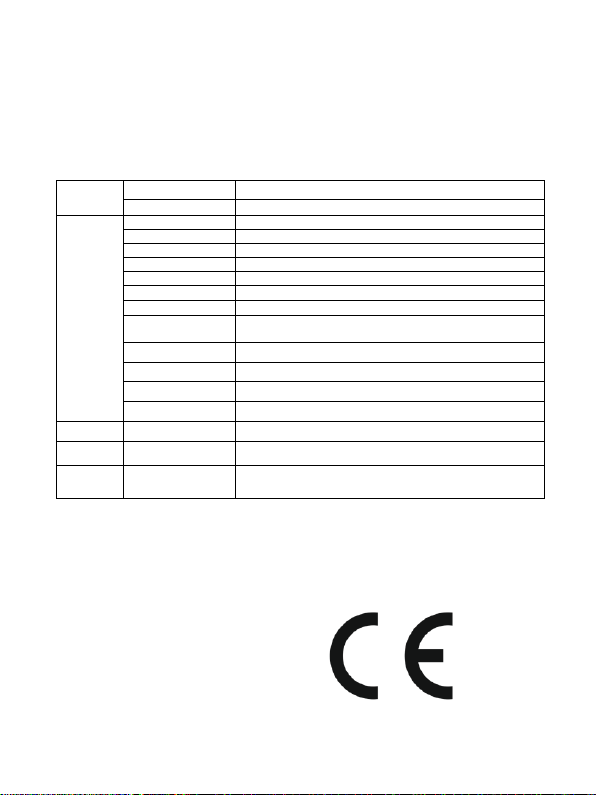
Hafıza
Hafıza Arttırma
Micro SD
Dahili Hafıza
8GB
Genel
Solution
AML8726-MXS Cortex A9
Ekran
7.0" 1024*600 (G+G)TN
GPU
Mali 400@286MHZ
İşletim Sistemi
Android 4.1
İşlemci
cortex-A9*2,Çift Çekirdek
DDR
1GB DDR3
Dâhili Kablosuz
4 Saat Kullanım
Fonksiyon
MIC, ATA, RTC (Gerçek zamanlı saat), G-sensörü, Hoparlör
Kamera
0.3 M Ön/2.0M Arka
Kablosuz Bağlantı
802.11 b/g/n
Çalışma Sıcaklığı
-5~40
Dil
Çoklu Dil
Türkçe, English, Chinese, Russia, French, German, Spanish, Indian etc.
Güç Kaynağı
Pil
3100mAh
O/S
Supported OS
Windows, Mac and Linux
oynatabildiği standart formatlardan birine dönüştürüp tabletinize taşımak
sorununuzu çözecektir.
Özellikler
Merkez Servis iletişim Bilgisi
Bakır ve Pirinççiler Sanayi Sitesi, Karanfil Cad. No:1 Beylikdüzü / İstanbul
Hatırlatma; Daha iyi hizmet ve hızlı hizmet için lütfen merkez servis ile iletişime geçerek sorun ve sorularınızı bildiriniz.
Kullanım Ömrü : 7 Yıldır
Garanti süresi: 2 yıldır.
Made in P.R.C
Page 28

28
Foreword
Thank you for purchasing of our product.
These operational guidelines for the user, to ensure you a quick and convenient
to use, read the instructions carefully before use.
This player is a specialized top quality portable player product with a series of
remarkable functions. There will be no separate notice in the case of any change in
content of this text.
This company will continue to provide new functions for the development of the
product, and there will be no separate change in the case of any change in the
product’s performance and functions. While this unit is used as a mobile hard disk,
this company will not be held liable for the security of files saved in the disk.
If the actual setup and the application methods are not identical to those as set
forth in this manual, please access to the latest product information of this company's
website.
Page 29

Contents
Foreword………………………………………………………………..……..28
Contents ……………………………………………………………………….29
Key Functions …………………………………………………………..30
Basic Operation……………………………………………………………….31
Points for Attention…………………………………………………………...34
Main interface…………………………………………………………….…....35
Installed APK…………………………………………………………….…….37
Uninstall APK application………………………………………………..……37
Video Player………………………………………………………………..….38
Audio Player………………………………………………………………..….40
Pictures………………………………………………………………………...42
Settings...............................................................................................................44
OTG……………………………………………………………………………46
Connect the computer…………………………………………………………47
3G network Settings…………….…………………………………………..…48
Calendar……………………………………………………………….……….49
Calculator …………………………………………………………………..49
Clock ……………………………………………………………………..…..50
Factory data reset …………………………………………………………..50
Upgrade Player Driver………………………………………………………. .51
Common troubleshooting……………………………………………………...52
Specification ………………………………………………………………….54
29
Page 30

Key Functions
7.0" 1024*600 capacitive touch screen, 5 points touch, with cover lens;
AML8726-MXS Cortex A9 dual Core
ARM Cortex –A9 *2, faster 1.2 GHz
Mali 400 GPU;
Support WIFI
Front 0.3 million pixel,rear 2.0 million pixel network video conversation and
support photography function;
Adopt Android 4.1 jelly bean;
Support auto rotation the screen horizontally or vertically;
Support Web browsing, chat online, online video, online games and download
etc.;
Support ten thousands games and programs download and install;
Supporting multiple audio formats such as APE MP3 OGG;
Supporting 3GP AVI MP4
Supporting picture browsing, rotation and lantern slide playing in the formats
of JPG, BMP and PNG, etc.;
Support E-book function, playing in multiple formats as PDF etc.;
USB2.0 high rate transmission;
Built-in microphone and long-time recording;
Supporting Micro SD Card; Support OTG function;
30
Page 31

Basic Operation
Power on
In the shutdown state, long press " " button boots
Power off
In the power on state, long press the " " key 3 seconds then pop-up device
options, select " Power off " for shut down.
Sleep
The machine under normal operating conditions, Short press the power button,
Into hibernation, Now, Screen will close. Short press the power button again, Be able
to resume normal mode. When the time being use this MID can enable this feature
when, To reduce power consumption.
Power reset
If there is shutdown to the player in the process of operation, you can turn off
and restart the player by pressing "reset" key.
Screen time out
If you do not contact the player within the set time, and do no operate by the
button, the contact screen will be automatically turns off.
In any state, short press " " button and for activation; Then skid the lock
upwards to the green of spotted which will accomplish to access to the upper
interface.
If it is necessary to deactivate the contact screen time out function, you can set
the [Screen time out] option under [display] function into "Never ".
Using the Micro SD card
After this unit is connected with the computer, you will find two moving disks.
The first one is the built-in memory disk for this unit and the other is the disk for the
31
Page 32

Micro SD card. If no card is inserted, the second disk can’t be opened. This unit
supports the extension of the Micro SD card from4GB to 32GB.
Inserting and Pulling out the Micro SD card
Inserting:
Put the Micro SD card face up (side with words), and slightly force the card into
the socket of the card, i.e. connecting the unit. Under this state, you can play the
content in the Micro SD card.
Pulling:
Slightly push the Micro SD, and it will bounce by a section, and then you can
take it out.
Caution:
Please perform inserting and pulling operation when power is off! Otherwise, it
will lead to the loss or damage to the files within the unit! If no card is inserted, the
computer will be unable to perform read and write operation for the disk notes of the
later removable disk (Micro SD card).
Battery:
High capacity Polymer battery is used for this unit.
The duration available of the battery power depends on volume, types of playing
files and operation of batteries. The player can be set up by the user as "user define
power off time" or "display setup" to save batteries.
Charging:
This unit can be recharged by USB port, you can also use DC Charger:
Take out the DC charger, plug it into the wall outlet with AC 220V(output
current 2000mA,output voltage 5V~5.2V)), then plug in the DC jack into the device
DC-in jack.
Warnings for charging:
1. A new battery may be empty and not charged before you get the device.
32
Page 33

2. If the device is not used for long time, it is better to charge it to full capacity
every 2 or 3 months during storage.
Power adapter is a key component of the portable player, which play a crucial
role in keeping the portable player’s normal work and protecting your security when
using the player, a long-term customer surveys and after-sales service Practice shows
that the malfunction of the portable player In many cases were caused by using
inappropriate accessories, in particular the power adapter.
Use the substandard power adapter will shorten the life of the portable player by
considerably, the voltage instability will seriously affected the normal work of the
portable player and bring permanent damage on the player’s performance and
reliability, Use the substandard power adapter will also reduced the vocal quality of
the players, shutdown the player when you using it, In addition, Use the substandard
power adapter will cause combustion and explosion which will disserve the safety of
the consumers.
33
Page 34

Points for Attention
1. Do not use the player in exceptionally cold or hot, dusty, damp or dry
environments.
2. Do not allow the player to fall down while using it.
3. Please charge your battery when
A. Battery power icon shows an empty icon;
B. The system automatically shuts down and the power is soon off when
you switch on the unit once again;
C. There is no response if you operate on any key
4. Please do not disconnect power abruptly when the player is being formatted or
in the process of uploading or downloading. Otherwise it may lead to the
error in the program.
5. When this unit is used as a moving disk, the user shall store or export files in
the proper file management operation method. Any improper operation
method may lead to the loss of files, for which this Company will be held
no liable.
6. Please do not dismantle this unit by yourself. If there is any inquiry, please
contact the dealer.
7. There will be no separate notice in the case of any change in the functions and
performance of this product.
34
Page 35
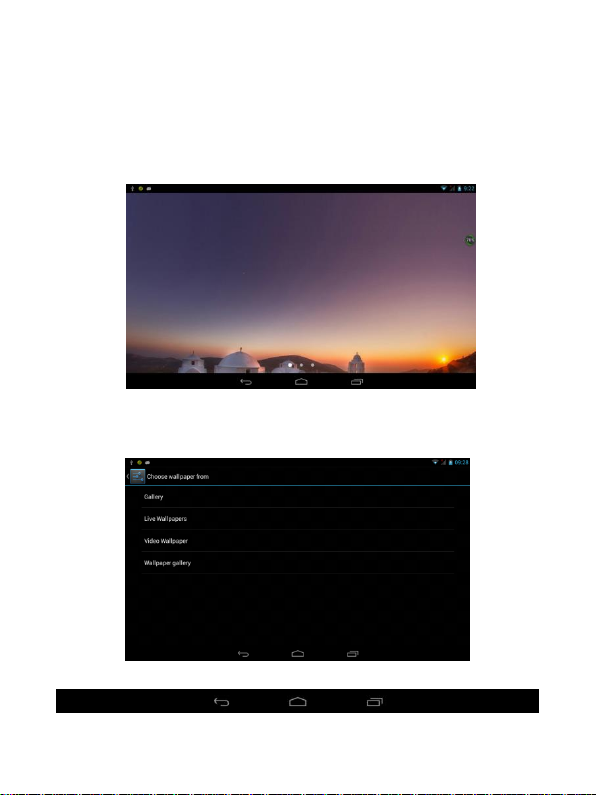
Main interface
Main interface: A total of 3 pages can slide to the left/right touch screen switch
desktop display.
Change desktop wallpaper: Can change the wallpaper in the set, specific operation
is: set up—show—wallpaper.
Software menu function declaration:
35
Page 36
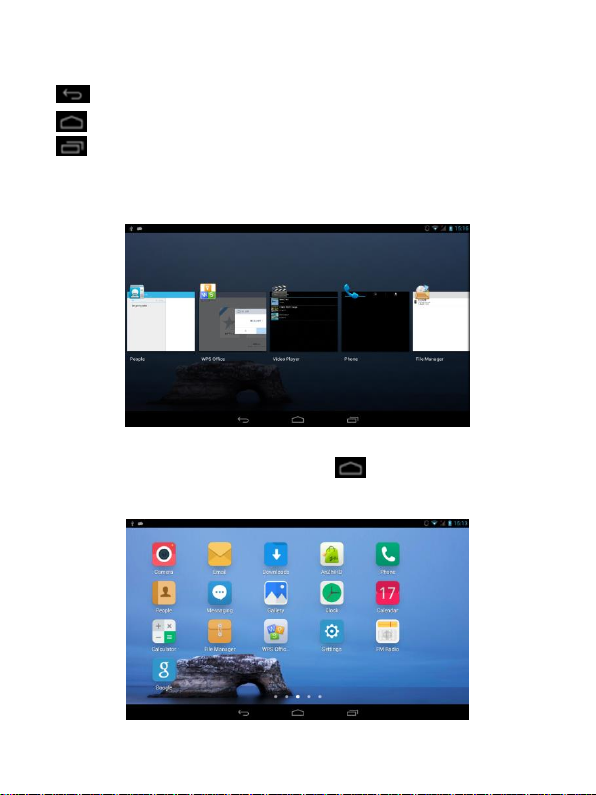
:Any interface click the icon to return to previous interface.
:Any interface click the icon that is to return to main interface
:Any interface click the icon can pop-up background running program list.
Click on the program icon can switch to background open program interface. To the
right sliding program icon, you can close this program in the background operation.
Show all application:
Click on the main interface control icon , can show all installed a
application.
36
Page 37
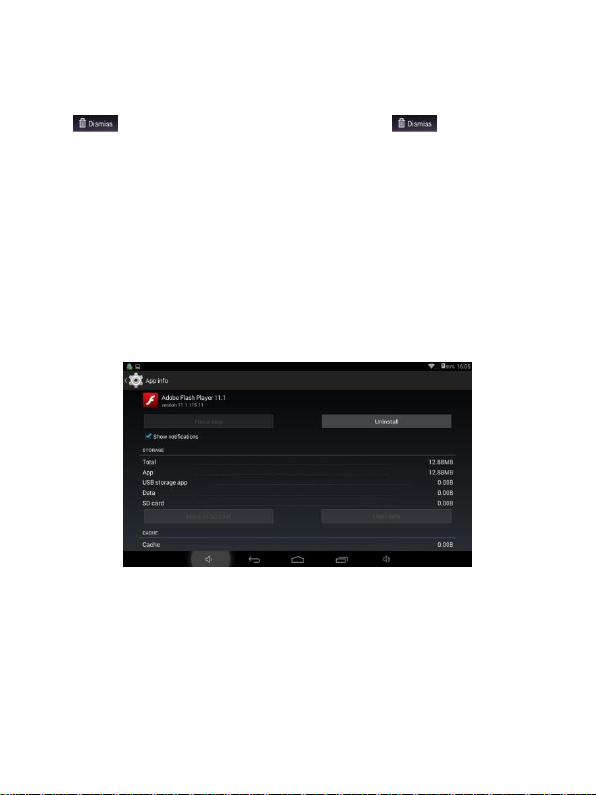
Long press program icon, but the program shortcut added to the desktop.
In the desktop shortcut icon long press program, the screen will appear above
the icon and drag long hold program shortcut icon to icon can delete
this shortcut icon.
Installed APK
1. take the need to install the software of the APK format downloaded to the
player or TF card
2. Click "file manager" icon and select the need to install the APK application
3. Choose the path of the APK is application, click on the APK program to
install, to start the installation
Uninstall APK application
1. Click on the desktop "Settings", into the "Settings"-" application ", select and
click on the need to uninstall program
37
Page 38
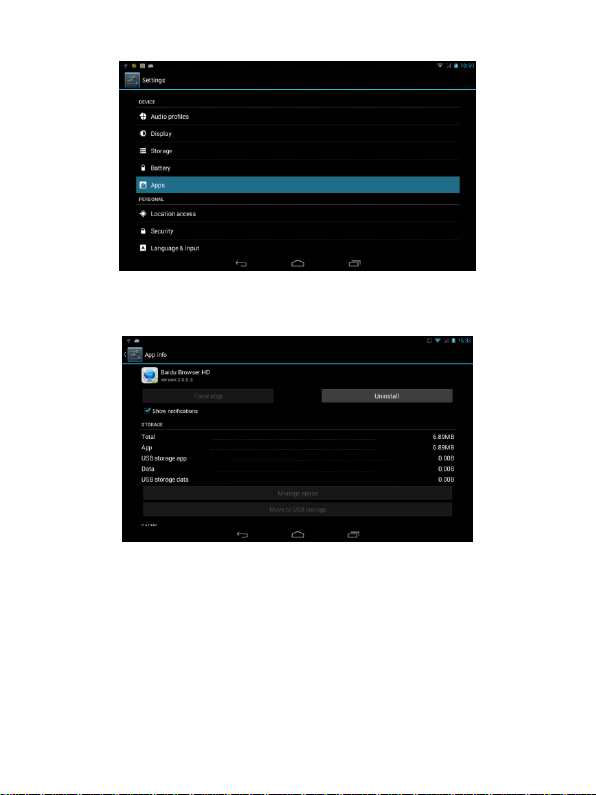
2. Click on the "uninstall" icon to start program the unloading
Video Player
In the main menu, select the option of "4k video tablet PC" to be able to access video
folder.
38
Page 39
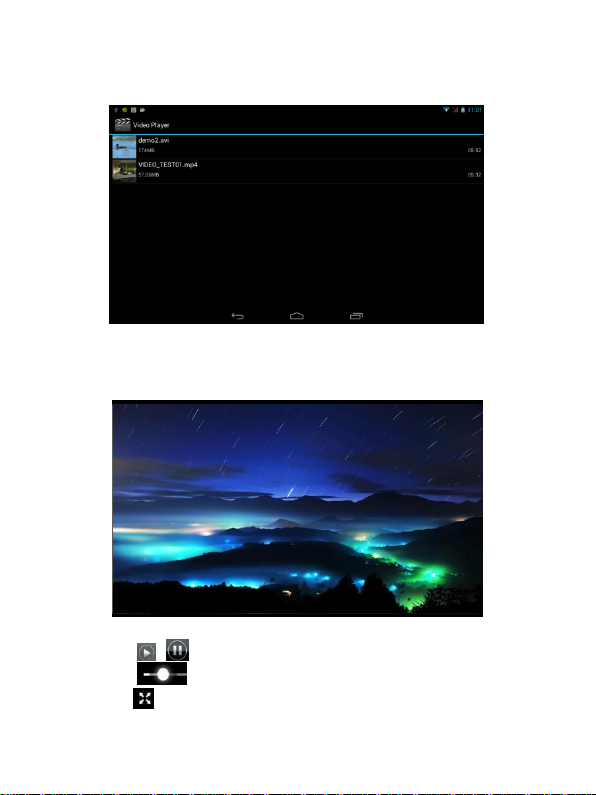
File list interface
Video playing interface
Function of keys
'' / ": Play/pause switch button
'' '' :Adjust video progress
'' '':Control the size of the screen
39
Page 40

'' '':Can be sent to other applications
Tips:
This MP4 player support maximum 4K(3840*2160) resolution video files.
、
1
2、 Subtitle display
This player supports "*.SRT" subtitle files (The user can download it from the
website) for the synchronous playing of subtitle and video.
When there is any subtitle file with the same name in the folder for playing
video, the player will be able to achieve synchronous subtitle display
3、 It’s supports video playing in multiple formats such as, RMVB,AVI,MKV,
VOB, MOV, FLV and MP4, H.264 encoding high-definition video etc. As parameters
such as formats, coding modes, definition and code flow rates of video files provided
by the internet differ, the player is unable to be compatible with all video files
(especially those video files with high definition or high code rates). If the
downloaded video files are out of the range supported by the player, which renders it
impossible to play normally in the player, it is recommended that the video
conversion software from a third party be used, and file formats be converted via
computers into the ones within the range supported by the player before the same are
duplicated into the player for playing.
Player Progress, Drag the line to change the player progress.
Audio Player
In the main menu, select the option of "Music" to be able to access music folder.
Music folder interface
40
Page 41
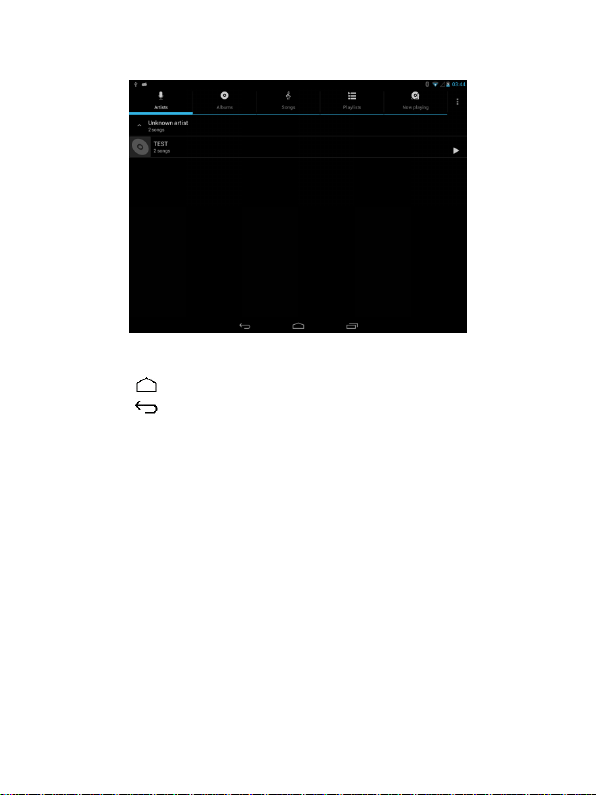
Function of keys
'' '': Return to main interface
'' '': Return to upper interface
Up/down to touch screen, can realize the file list to scroll function
Artist: according to the singer classification music files
Album: according to album classification music files
Song: display all music files
Playlist: to display the play music files in the list
Now playing: into the background music played interface
Music playing interface
41
Page 42
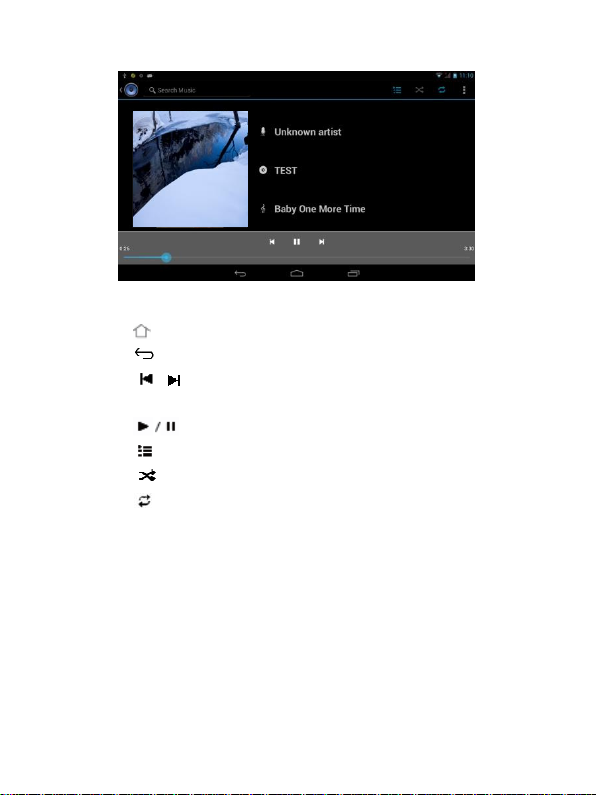
Function of keys
'' '': Return to main interface
'' '': Return to upper interface
'' / ": shot press to play the last /next music, long press for fast
rewind / forward;
'' '': Click start/stop playing music
'' " : Click into play lists
" ": Click on open/close songs random play mode
" " key: short press it to return to the upper interface
Lyric Display
When there is any lyric file with the same name in the folder for playing music,
the player will directly access the lyric display interface.
This player supports "*.Lrc" lyric files (The user can download it from the
website of "http://www.51lrc.com", or search "LRC Lyric" to have the lyric file) for
the synchronous playing of lyrics and music.
Pictures
42
Page 43
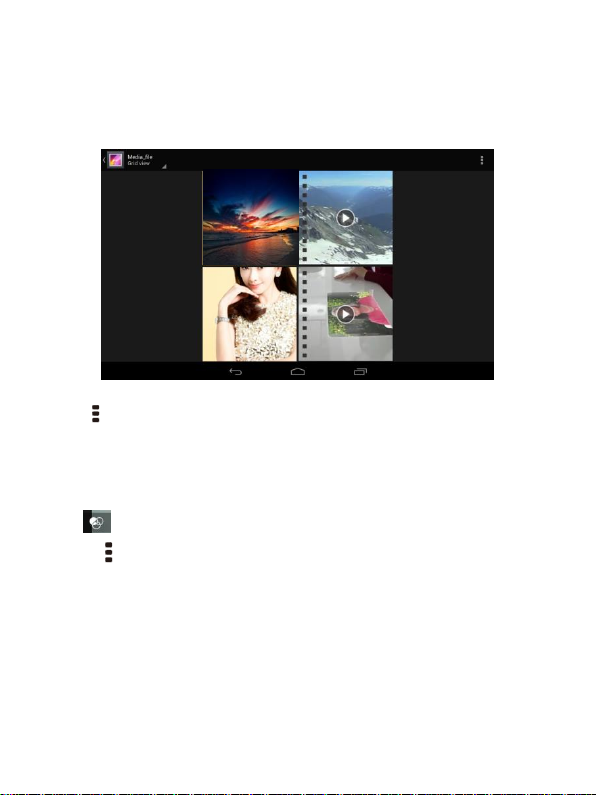
In the main menu, select the option of "super-HD player " to be able to access
Photo folder.
Picture viewing interface
Function of keys
● '' '' :Can through this icon, images batch management, For example: delete,
Rotate left, Rotate right,
you can also according to the location, time, people and tags setting picture
group.
'' '': Click here to edit photos
'' '': Through you can click on the icon to set and understand pictures
information, including: Slideshow, Edit, Rotate left, Rotate right, Crop,
Details, Set picture as
43
Page 44
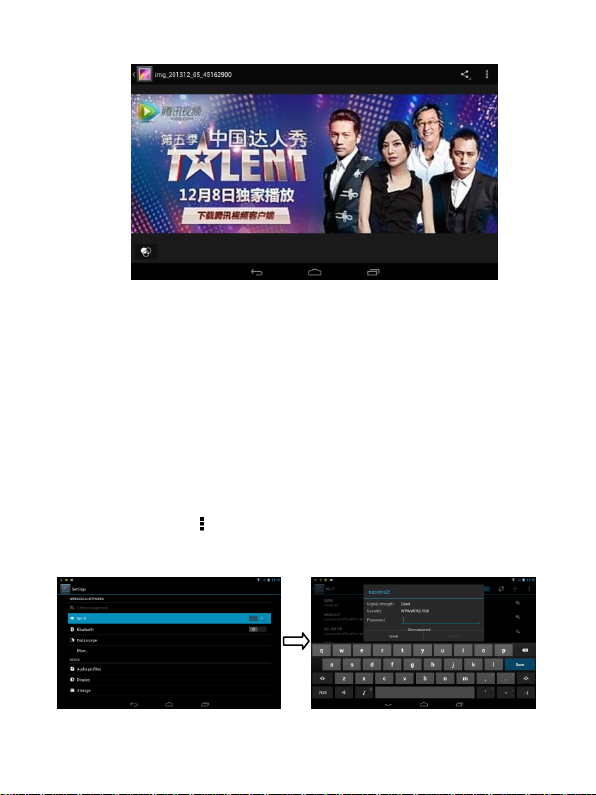
Settings
In the main menu, select the option of "settings" to be able to access the System
Set fold. Directly click can assess picture set options interface.
Description of functions:
1. WiFi
Wi-Fi: Open/close the wireless connection
Wi-Fi setting: touch the " " icon, can enter WIFI senior set items
Open the wi-fi, select the user, enter the password, can be used.
44
Page 45
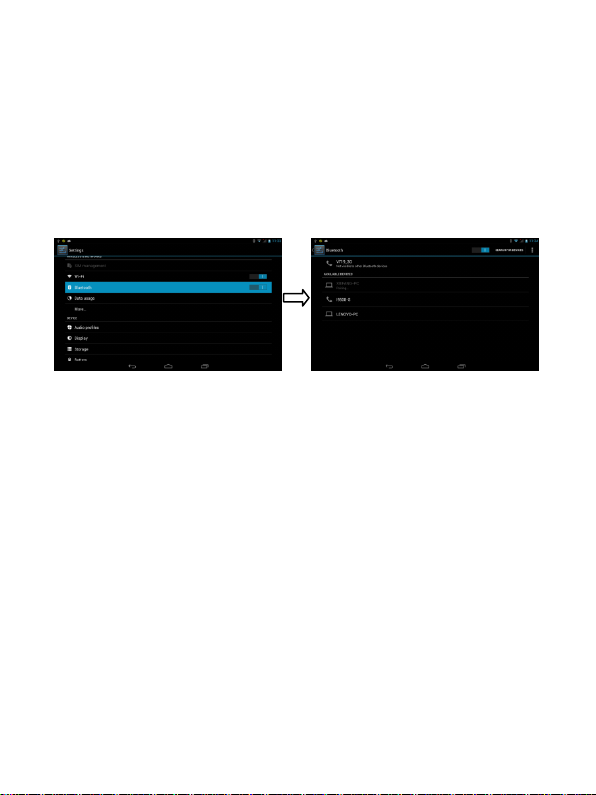
3. Date usage
Display Date usage
4. Sound setting
Volumes: set the Notice, the media and the alarm clock volume.
Default notification: Click to open notification bell menu, select the item is set to
default notification bell
Touch sounds: After checked, Touch screen will make sound
Screen lock sound: After checked, Touch screen will make sound
5. Display settings
Brightness: Set adjust brightness of the screen
Wallpaper: you can choose wallpaper from Super-HD player and wallpaper
Sleep: Set off the screen saver standby time. When the player in the standby screen
saver, WIFI function will be closed to save electricity purpose; When sensei player,
WIFI function will be in 10 seconds to be automatic recovery
Font size: Set shows the font size
Accelerometer coordinate system: you can set Accelerometer coordinate system
Screen adaption: Used to adjust size of some games display screen
8. Storage
Check the PMP memory and available storage
9. Apps
45
Page 46

Can display and management of the installation applications
10. Security
Screen lock: Settings screen lock way, slide, Pattern, PIN, and password and so on
many kinds of mechanisms.
Make password visible: After the check, in the password input box, can show the
input password.
Unknown source: allow installation of non- Google Market applications, the default
setting is open
10. Language & input
Setting language and area, input method etc., function storage
11. Backup & reset
Can backup, restore the machine Settings and data
12. Date & time
Set the date, time, time zone and time display format
13. About device
Check the machine software version and other information
OTG
OTG is the On-The-Go abbreviation. It is a technology that realizes data
transmission between portable devices without a host. Specifically, computers are not
needed to act as a medium when share data with or transfer documents from other
portable devices to your player such as flash disk, mp3 player and portable hard disk.
OTG Connection Steps:
1. Would U disk or move hard disk, and other USB devices through OTG
connected to the machine turned connection to the USB interface.
2. For external USB device display machine after state, to return to the
machine desktop, click "file manager" icon, choose the "mobile disk", can
46
Page 47
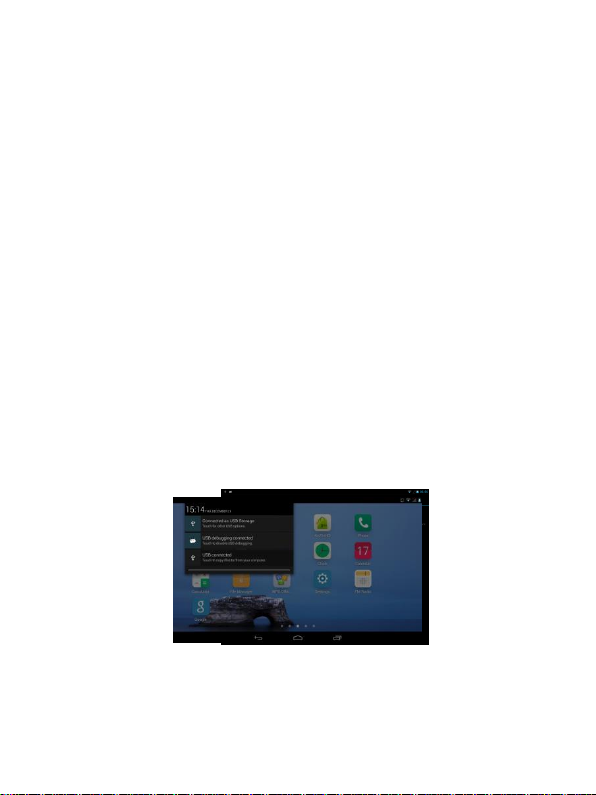
access the connection USB device files in the content.
Remarks:
1. Due to large varieties of portable devices, the player might not recognize some of
them.
2. Compatibility with more and more portable devices will be realized through
firmware improvement.
3. While using OTG connection, the other portable device relies on the player’s
power supply. Thus if your player maintains less than 1/3 battery or the other device
is a heavy electric consumer, OTG connection might not be proceeded successfully.
As an alternative, please provide power supply to the other device exclusively
4. Currently the OTG only supports one-way operation. That is, documents in other
devices can be read or copied to your player. But files in your player can’t be pasted
to the other device. Nor could you delete files in the other device.
Connect the computer
This machine can be through the USB cable to connect to a personal
computer, the data is copied or delete operation. The specific procedure is as follows.
1.will the machine through the USB cable connected to the PC's USB port, this
47
Page 48

machine is the screen Notification will have a "USB already connected" notice
options
2. Click "USB already connected" notice options, and choose the "open USB
storage devices", and then in the personal computer see mobile operators disk
dish, can as U disk the use of the machine disk data operation.
3 G network Settings
1. Will be 3G wireless card through the conversion line into USB interface
2. Into the machine "Settings" under a "wireless and network", will be closed
Wifi option, Wifi and 3G not used at the same time.
【Note】
1. Due to the different communication systems 3 G equipment is more, this
machine is 3 G function can't ensure that is compatible with all the outer 3 G
equipment.
2. 3G equipment should be due to external from the machine to the USB
interface take electricity, so in 3 G connection, please ensure that the battery power in
one case above.
Calendar
In the main menu, touch "calendar" icon to be able to access the calendar
interface.
48
Page 49
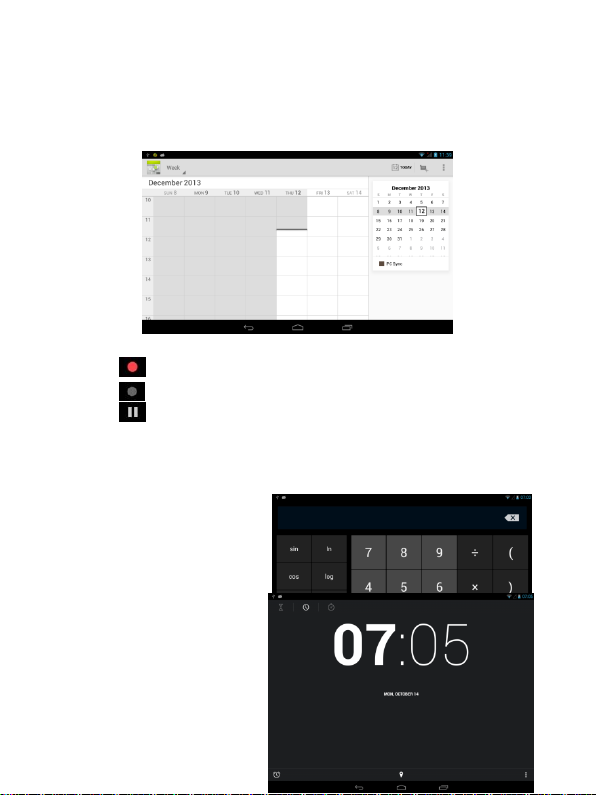
Under this menu, Touch & slide screen left and right which will accomplish to
flip increase or decrease month by month. If you need record new event before you
can add an event, you must add at least one Calendar account to the device and make
a calendar visible.
Keys of functions:
" " : Start or pause record
" " : Stop current record and select save the current record.
" ":Play the recording content
Calculator
In the main menu, touch
"Calculator" icon to be able to
activate the function of Calculator.
The calculators can be used like
normal others. It’s a good
assistant for your work and study.
Clock
In the main menu, touch
"Clock" icon to be able to activate
49
Page 50
the function. It’s a good assistant for your everyday life.
1、Click "clock" appear as follows interface
2、" ":Click on it you can set alarm
It’s will be automatically alarming when you set time.
You can setting Time , ring tone, repeat options for every alarm clock.
Factory data reset
If this machine is infected, or third party software installed to run this machine
is unusual, but through the recovery factory Settings, remove the third party software,
and restore the state out by default.
Into this machine "Settings"-" privacy ", select " Factory data reset" item,
confirmed, will remove all of the data
50
Page 51
Upgrade Player Driver
The firmware is a built-in program, by which you can run various hardware
functions. By upgrading the firmware, you can improve or enhance the performance
and functions of the player. No upgrading the firmware will not affect the normal
operation of the player itself.
The upgrading of firmware may lead to the unit unable to work properly due to
error operation. Please read carefully the instructions for upgrading before upgrading.
【Note】
1. Please make sure that players have the upgrading at more than 60% of the
battery power. Avoid because the battery power leads to upgrade failure to boot.
2. The upgrade process do not reset or shutdown operation, avoid accident
interrupt upgrade can't boot.
3. Through our company provide formal or test versions of the firmware update,
but without notice in the premise of the function of the products and the menu
changes.
4. When the firmware upgrade stored in all the data in the player will be
deleted. So in the firmware upgrade will be stored in the user must be before the
important data within the player for backup.
5. The machine firmware does not apply to other types of products, resulting
51
Page 52

from the negative consequences; our company does not undertake any related
responsibility.
Common troubleshooting
1. What is the APK file? It and Android PMP have what relation?
A: APK is the abbreviation of Android Package, that Android installation Package.
Through the APK files directly to Android system can be installed in execution PMP
players.
2. How to get the APK application
A: You can download via PC-side installation, you can also “Android market” online
to download and install.
3. Why WIFI connection will interrupt
A: If set "screen time", when the player overtime in standby screen saver, WIFI
function will be closed to save electricity purpose; When sensei player, WIFI function
will be in about 5 seconds to resume automatic connection.
4. Why some download APK program, not working properly
A: Download the APK software, mostly by the user to development, without the
platform compatibility testing, and part of the hardware and software for Android
system version has a special requirements, so there could be downloaded APK
documents not compatible, not the normal operation of the phenomenon, the player
itself quality problems
5. Why connected the charger not show charging state
A: When the battery is extremely low, need to use DC charger charging half an hour
or more to show charging status
6. Why can't realize the gravity induction function
52
Page 53

A: This machine support gravity feeling function, can be through the shaking to
switch the screen machine did show, but some of the application does not support the
gravity induction function, it can't realize the screen of switching function, this is the
software support question, the functionality of the player.
7. Players can't boot
1)Check the battery no electricity
2)Connect the ac adapter after inspection again
3)If after charging still unable to boot, please contact our customer service
8. Can’t Hear the voice in the headset
1)Please check the volume is set to 0
2)Please check whether the connection headphones
9. Player charging abnormalities
1) Please confirm that the use of the equipment complies with the charger of the
player charger requirements
2) Such as connection USB charging, please do not connect to computers lead USB
interface
10. Why some download video can't normally broadcast
This player can be compatible with the Internet video files of the play, but
because the Internet provide video format, coding method, the resolution, code flow
rate in the parameters are different, and may result in part of the video file cannot be
played or play anomaly, it is recommended to use a third party video conversion
software, in the computer support convert player within the scope of the file format
and then copied to the player to play.
53
Page 54
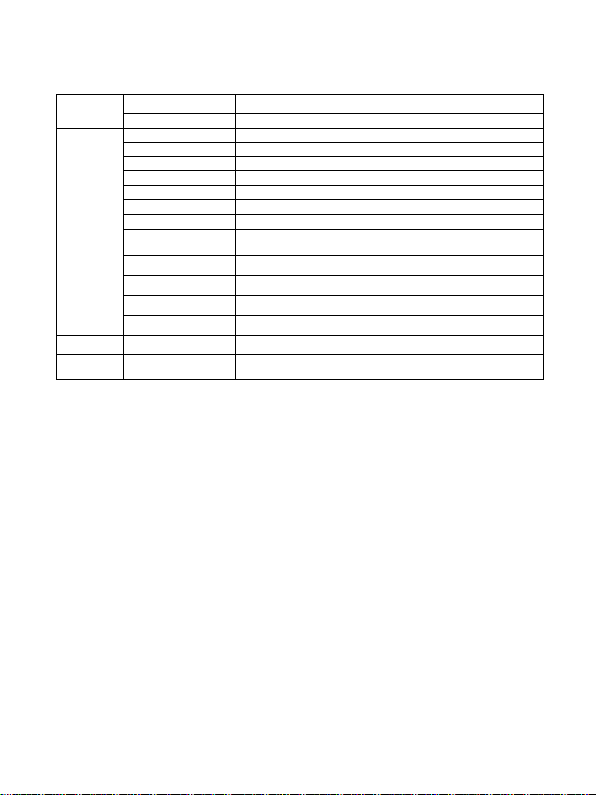
Memory
Memory Extension
Micro SD
Built-in flash Memory
8GB
General
Solution
AML8726-MXS Cortex A9
Display
7.0" 1024*600 (G+G)TN
GPU
Mali 400@286MHZ
Operation system
Android 4.1
Processor
cortex-A9*2,dual-core
DDR
1GB DDR3
Built-in WiFi
4 hours' surfing time
function
Mic, Speaker
Camera
0.3 M front/2.0M back
WiFi- connection
802.11 b/g/n
Operational Temperature
-5~40
Multi-language
English, Chinese, Russia, French, German, Spanish, Indian etc.
Power
supply
Battery
3100mAh
O/S
Supported OS
Windows, Mac and Linux
Specification
54
 Loading...