

Page 1
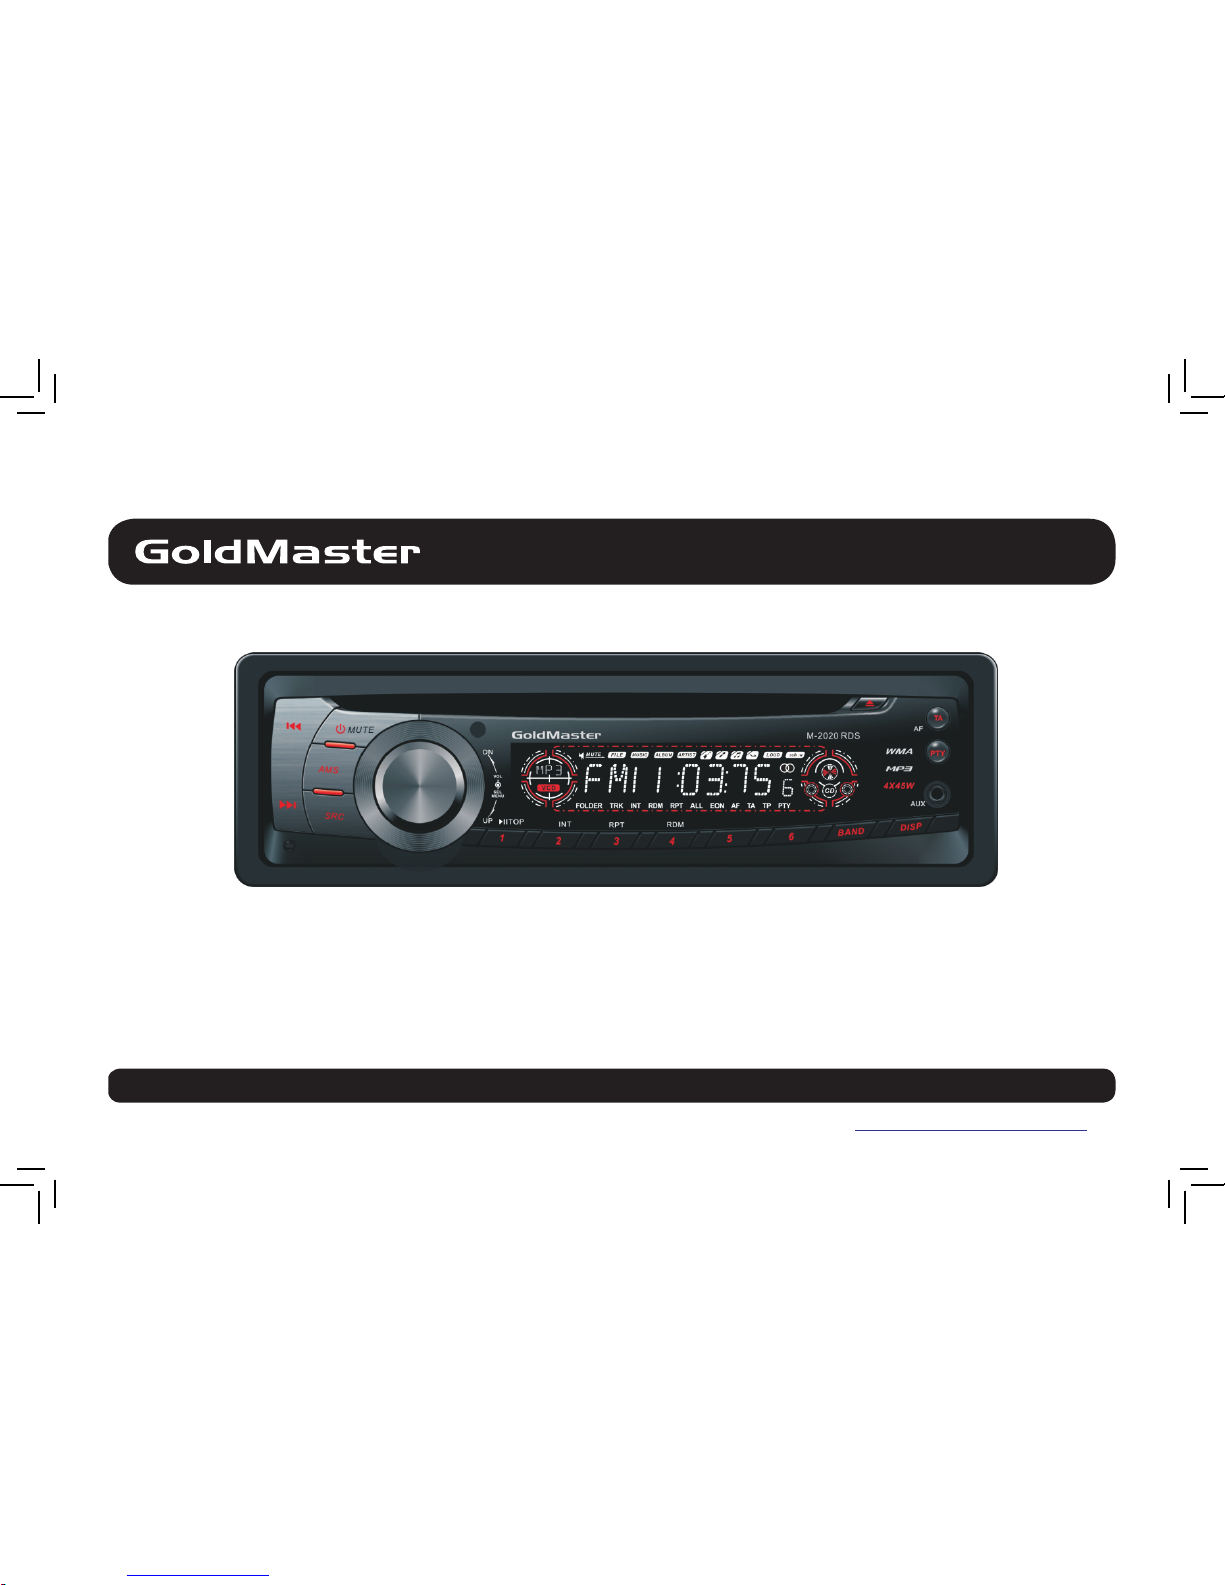
M-2020 RDS
FM/AM Radyolu, CD/MP3/USB/SD/MMC Çalar Oto Teybi
Kullaným Kýlavuzu
www.goldmaster.com.tr
Page 2
2
Sadece 12V DC negatif-topraklý elektrik sistemi
kullanýnýz.
GÜVENLÝK BÝLGÝSÝ
ÝÇÝNDEKÝLER
Radyo Kullanýmý ........................................7
RDS(Radyo Bilgi Sistemi) .......................7-8
MP3/WMA Dosyalarý Oynatma ...............8-9
Menü Fonksiyonu .............. ......................10
Elektriksel Baðlantýlar ...............................11
Kurulum ........... ........................................12
Anti-Theft Sistem ......................................12
Pratik Çözümler ........................................13
Teknik Özellikler ........................................14
Bu ürünü tercih ettiðiniz için teþekkür ederiz.
Ürünü uygun þekilde kullanmak için lütfen
kullanma talimatlarýný okuyunuz. Okumanýz
bittikten sonra kýlavuza tekrar baþvurmak için
güvenli bir yerde saklayýnýz.
Baðlama ve montaj etme sýrasýnda, aracýn
negatif batarya terminalini baðlamayýnýz.
Sigorta deðiþtirilirken, uygun amper deðerini
kullanýnýz.Yüksek amper deðeri olan sigortanýn
kullanýmý, ciddi hasarlara yol açabilir.
Üniteyi sökmeye çalýþmayýnýz. Optik kýsýmdaki
lazer gözünüze zarar verebilir.
Ünite içerisine herhangi yabancý bir nesnenin
girmesine izin vermeyiniz. Bu cihaza zarar
verebilir.
Araç park durumunda iken, uzun süre sýcaða
ya da soðuða maruz kalmýþ ise, üniteyi
çalýþtýrmadan önce, aracýn sýcaklýðýný
dengeleyiniz.
Çevredeki sesleri de duyabilmek için ses
seviyesini alçak seviyede tutunuz.(korna,
siren sesi gibi)
Kirli veya tozlu CD kullanmak sesin iyi
çýkmamasýna neden olabilir.
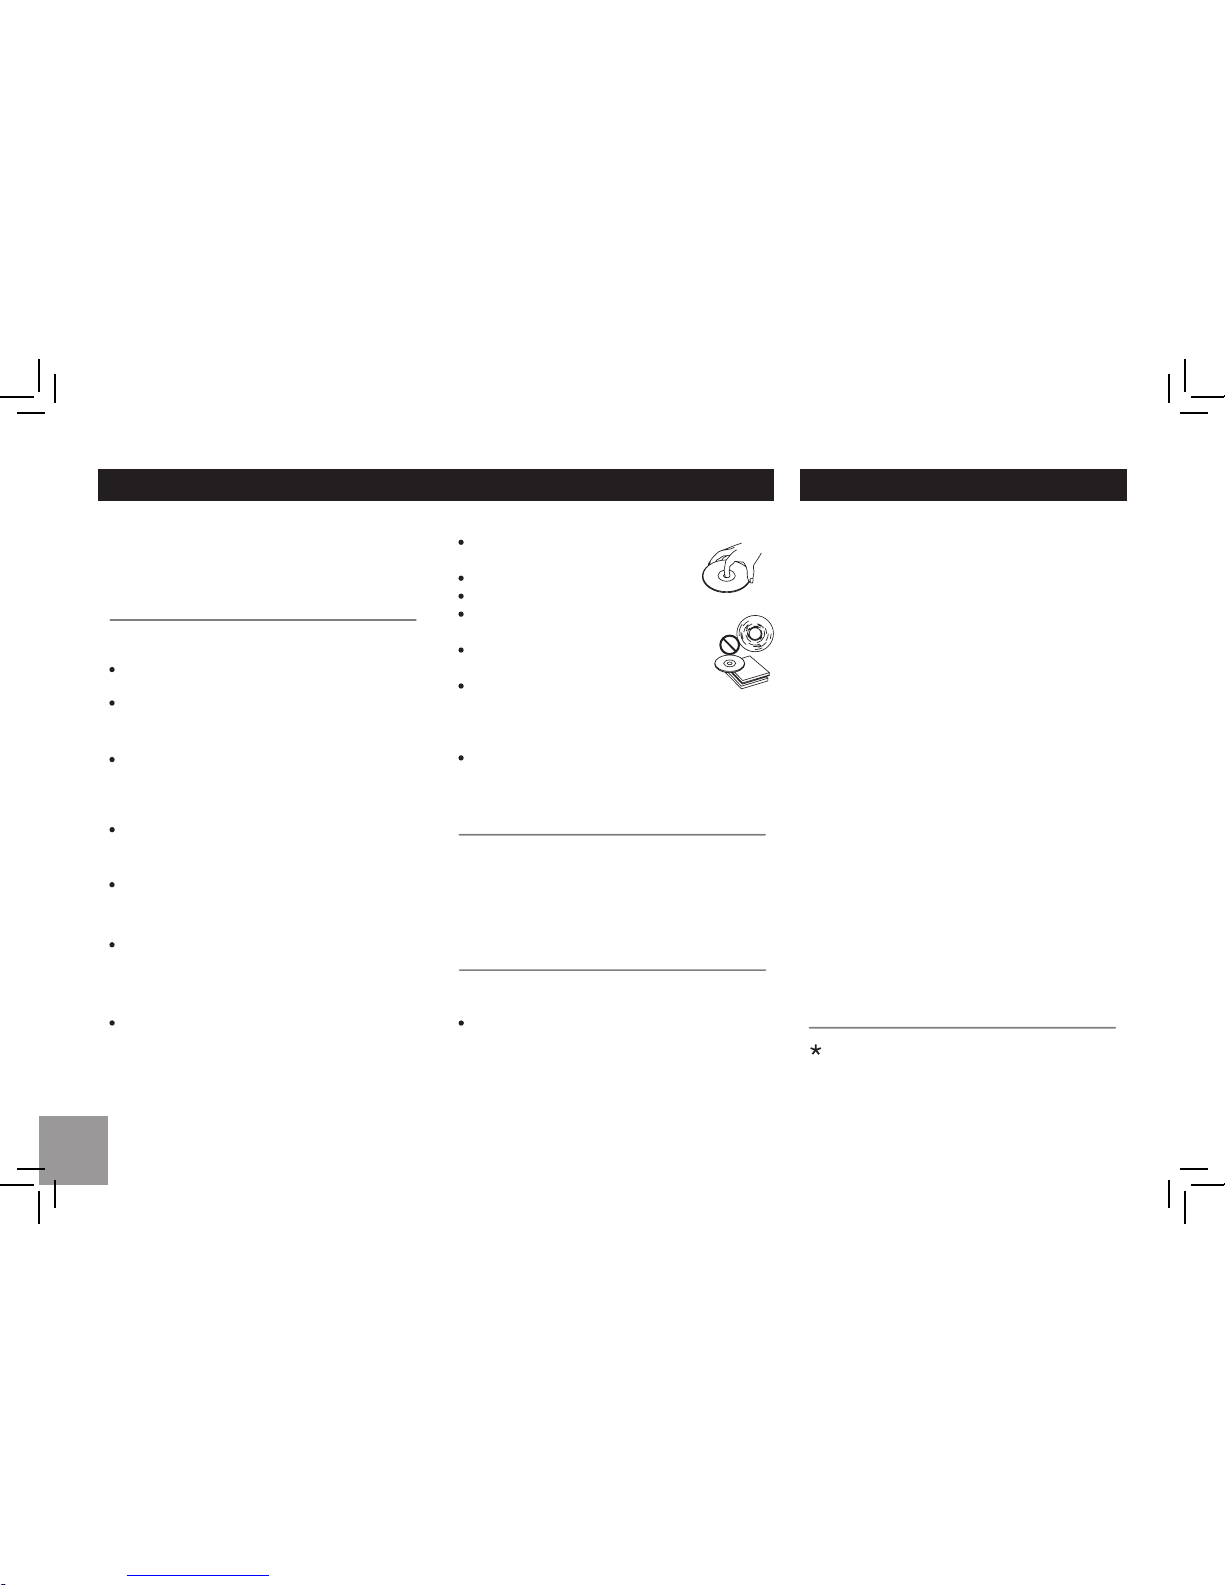
CD 'leri юekildeki gibi tutunuz.
CD 'nin etiketsiz yьzьne dokunmayэnэz.
CD 'nin herhangi bir yerine etiket,
kaрэt vb. gibi юeyler yapэюtэrmayэnэz.
CD'lerinizi direkt gьneю эюэрэna veya
aюэrэ sэcaрa maruz bэrakmayэnэz.
Kirli CD'lerin yьzeylerini temiz bir bezle
merkezden dэюa doрru siliniz. Asla benzin
veya alkol gibi зцzьcь maddeler
kullanmayэnэz.
Cihaza asla 3 inзlik bir CD iзeren CD
adaptцrь veya dьzensiz юekilde bir CD
takmayэnэz. Cihaz CD'yi dэюarэ зэkaramayabilir
sonuз olarak cihaz kullanэlamaz.
Uyarýlar
CD Notlarý
Çalýþtýrmadan Önce
Araç kullanýmý esnasýnda, ses seviyesini çok
fazla artýrmayýnýz. Sakýncalý durumda, arabayý
durdurunuz
Uyarý
Cihazý kendi kendinize tamir etmeyiniz, cihazý
sökmeyiniz. Tamir gerektiði zaman servise
baþvurunuz.
Güvenlik Bilgisi ...........................................2
Panel Kontrolü ...........................................3
Kumanda Kontrolü .....................................4
Genel Kullaným ..........................................5
CD çalar kullanýmý .....................................6
Sýradan Cd’lere ek olarak CD-R/CD-RW/MP3
/UDF/CDTEXT Cd’leri de oynatabilirsiniz.
Page 3
3
PANEL KONTROLÜ
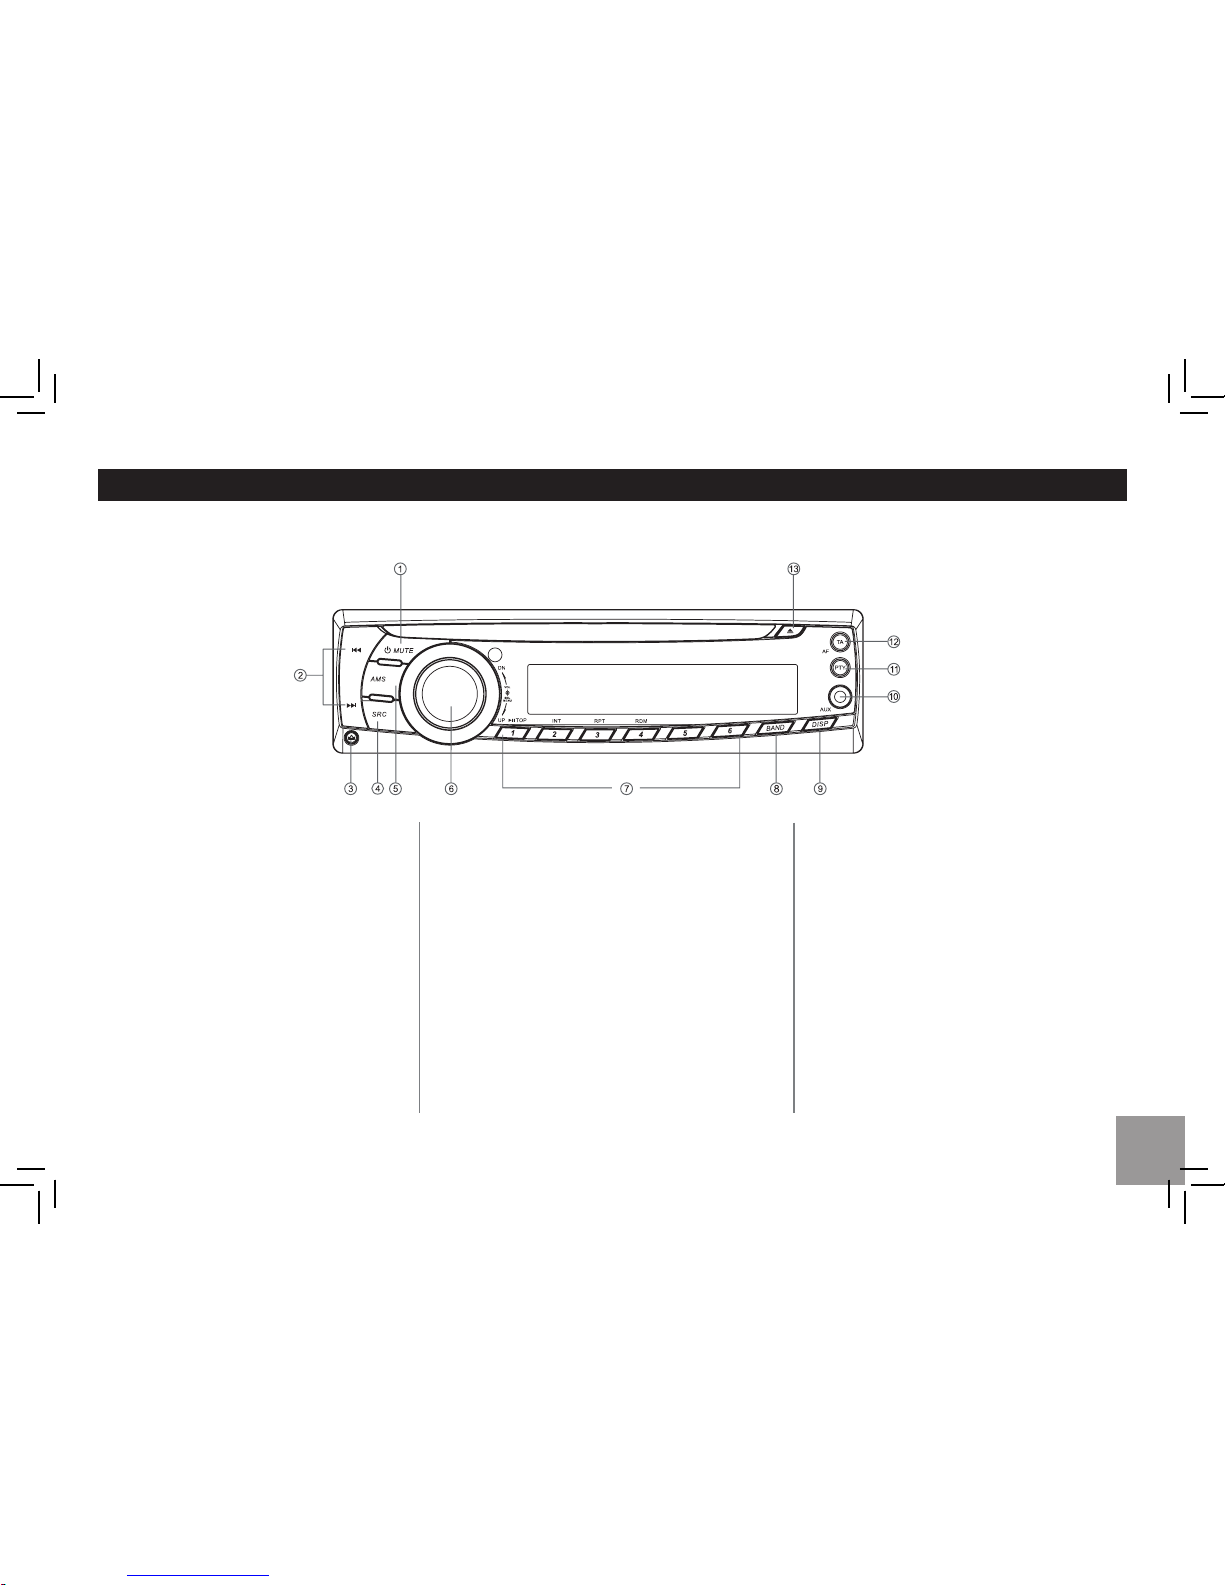
1. - Açma/Kapama (uzun basýnýz)
- Sessiz
2.
- Radyo ayarlama
- Parça arama
3.
- Panel açýlmasý
4.
SRC
- Radyo
- CD Çalma (CD takýldýðýnda)
- Aux-in
5.
- AMS: Radyo otomatik kayýt/ Radyo
- ARAMA : Mp3 parça/dosya/karakter
6.
- Sesi ayarlamak için düðmeyi döndürünüz.
7. Disk oynatma
Tuþ 1: - Oynat/Beklet
- (2 saniyeden fazla basýnýz.) Üst oynatma
Tuþ 2: - Tanýtým oynatmasý (10 sn)
Tuþ 3: - Tekrar oynatma
Tuþ 4: - Karýþýk oynatma
Tuþ 5: - MP3 klasörü aþaðý (eðer birden
- (uzun basýnýz)Mp3 parçasý -10 aþaðý
Tuþ 6: - MP3 klasörü yukarý (eðer birden
fazla klasör var ise)
- (uzun basýnýz)Mp3 parçasý +10 yukarý
1~6 tuþlarý radyo kayýdý
- Kayýtlý istasyonlarý dinlemek için tuþlarý kullanýnýz.
- Ýstasyon kaydetmek için istediðiniz tuþa 2 saniyeden
fazla basýlý tutunuz.
8.
- Band geçiþi:
FM1 -> FM2 -> Fm3 -> MW1 -> MW2
9.
- Ekran tuþu/Zaman ayarý
10. - Aux-in jack
11. - Program tipi
- REG açýk/kapalý (uzun basýnýz)
12. - Alternatif Frekans
- Trafik Duyuru Tanýmlamasý (uzun basýnýz)
13. - Eject (Disk kapaðýný açma)
otomatik tarama
arama
- VOL/BAS/TRE/BAL/FAD 'i seçmek için
düðmeye basýn, seviyeyi ayarlamak için
düðmeyi çeviriniz.
- 2 saniyeden daha fazla basýlý tutarsanýz menü
moduna girersiniz.
fazla klasör var ise)
Page 4
4
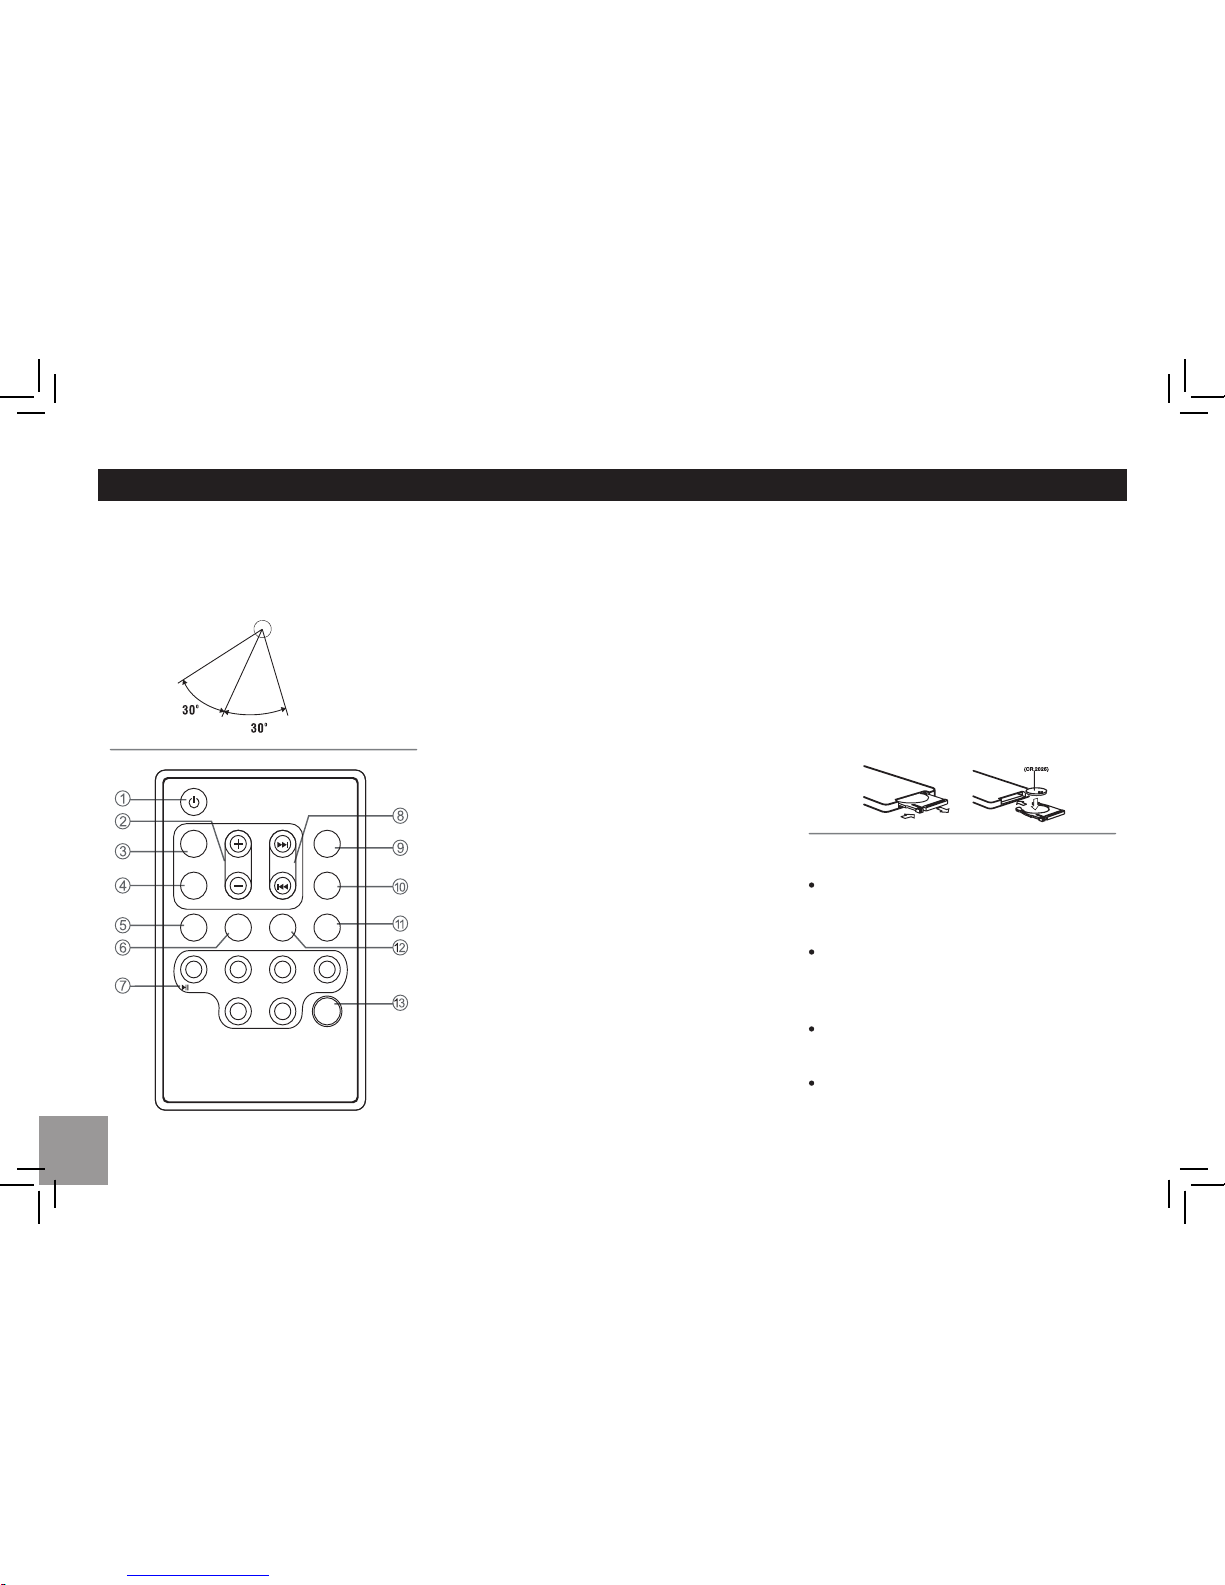
1. - Açma/Kapama
2. - Ses seviyesi
3.
- Sessiz
4.
6.
- Alternatif frekans
- REG açýk/kapalý (uzun basýnýz)
7. - Disk Oynatma
Tuþ1: - Oynat/Beklet
- (2 saniyeden fazla basýnýz.)Üst oynatma
Tuþ 2: - Tanýtým oynatmasý (10 sn)
Tuþ 3: - Tekrar oynatma
Tuþ 4: - Karýþýk oynatma
Tuþ 5: - MP3 klasörü aþaðý
- (uzun basýnýz)Mp3 parçasý -10 aþaðý
Tuþ 6: - MP3 klasörü yukarý
- (uzun basýnýz)Mp3 parçasý +10 yukarý
- Radyo Kayýdý
Kayýtlý istasyonu dinlemek için basýnýz.
Ýstasyon kaydetmek için basýlý tutunuz.
8.
- Radyo ayarlama/Parça arama
9.
- Radyo/Di sk (Disk takýlý iken)/USB (USB
takýlý iken)/Kart (SD/MMC kart takýlý iken)
/Aux-in
10. - AMS: Radyo otomatik kayýt/Radyo kayýt taramasý
-ARAMA:Mp3 parça/dosya/karakter arama
11. - Band geçiþi: FM1, FM2, FM3, AM1, AM2
12. - Program tipi
13. - Ekran tuþu
SEARCH
MUTE
SEL
MENU
RDMRPT
INT
/
TOP
DISP
4
3
21
65
VOL
BAND
SRC
AMS
TA
AF/REG
PTY
KUMANDA KONTROLÜ
© R 2025 )
Uzaktan Kumanda çalýþma aralýðý
Uzaktan kumanda 3~5m mesafe aralýðýnda
çalýþýr.
Kumanda sensörü
- VOL/BAS/TRE/FAD ‘ý seçmek için basýnýz,
seviyesini ayarlamak için ses tuþlarýný kullanýnýz.
- Menüye girmek için tuþa 2 sn basýlý tutunuz.
5. - Trafik Duyuru Tanýmlamasý
Uzaktan Kumandanýn Pillerini Deðiþtirme
Uzaktan kumanda uygun menzilde gerekli
fonksiyonlarýný yerine getiremiyorsa pili yeni bir
lityum pil ile deðiþtirini. Pil kutuplarýnýn doðru yönde
yerleþtirildiðinden emin olunuz.
1. Pil tutacaðýný açma kýsmýný iterek dýþarý
çýkartýnýz.
2. Düðme tipi pili (+) iþaretli kýsmý üste gelecek
þekilde yerleþtiriniz. Pil tutacaðýný kumandanýn
içine doðru yerleþtiriniz.
UYARI:
Pili çocuklarýn ulaþamayacaðý yerlerde
muhafaza ediniz, eðer çocuðunuz yanlýþlýkla
pili yutarsa hemen bir doktora baþvurunuz.
Pili þarj etmeyin, kýsa devre yapmayýn, içini
açmayýn, ýsýtmayýn veya ateþe atmayýn.
Bu olay pilin ýsýnmasýna bozulmasýna veya
kývýlcým çýkarmasýna sebep olabilir.
Pili herhangi bir metal malzemeye
dokundurmayýn ve ayný yerlerde muhafaza
etmeyin.
Pili çöpe atarken veya saklarken bir bantla
sararak yalýtýnýz aksi halde metal cisimlere
deðerek ýsýnabilir, patlayabilir veya yangýn
çýkarabilir.
Page 5
5
GENEL KULLANIM
Aracýnýz çalýþýr durumda iken cihazý açmak için
tuþa basýnýz. Cihazý kapamak içinse tuþa basýlýlý
tutunuz.
Açma/Kapama Tuþu
Ses seviyesini ayarlama
Ses seviyesini ayarlamak için VOL/MENÜ
düðmesini döndürünüz. Düðmeyi saat yönünde
çevirdiðinizde ses artacak, saat yönünün tersine
çevirdiðinizde ise ses azalacaktýr.
Sessiz
Cihazýn sesini tamamen kapatmak için MUTE
tuþuna basýnýz. Ekranda MUTE simgesi
görünecek ve ses tamamen kapanacaktýr.
MUTE tuþuna tekrar basarak ya da VOL/MENU
düðmesi çevirerek sesi tekrar açabilirsiniz.
Ses Kontrolü
Bass, treble, balance ve fader ses modlarını
seçmek için VOL/MENU düðmesine ekranda
bu ses kontrol modlarý görünene kadar basılı
tutunuz. Seçilen fonksiyon için VOL/MENU
düðmesini çevirerek ses ayarlarýný yapabilirsiniz.
SRC Tuþu
Radyo, Disk (Disk takýlý iken), AUX oynatýcý
arasýnda geçiþ yapmak için bu tuþa basýnýz.
AUX-in
Harici cihaza baðlanmak için:
1. Harici müzik çalarý ön panelde bulunan
AUX-in giriþine baðlayýnýz.
2. AUX-in modunu seçmek için SRC tuþuna basýnýz.
AUX-in modundan ayrýlmak için SRC tuþuna tekrar
basarsanýz bir sonraki moda geçersiniz.
DISP Modu
DISP modu ile saat ya da radyo frekans/CD oynatýcý
fonksiyonlarýný ekranda görebilirsiniz. Normalde
radyo frekansý ya da CD parça bilgileri ekranda
gösterilmektedir. Fakat zamaný DISP tuþuna
basarak görebilirsiniz. Zaman bilgilerini ekranda
5 saniye gösterir ve tekrar radyo frekans ya da CD
parça bilgilerini ekranda göstermeye devam eder.
Saat Ayarý
Saati ayarlamak için DISP tuþu kullanýlmaktadýr.
Saati ayarlamak için aþaðýdaki adýmlarý uygulayýnýz:
1. Aracýnýzý ve radyoyu açýnýz.
2. Saat görünene kadar DISP tuþuna basýnýz.
3. Zaman ekranda yanýp sönene kadar DISP tuþuna
basýnýz.
4. 5 saniye içinde, VOL/MENU düðmesini saat yönünün
tersine çevirerek istediðiniz dakikayý ayarlayabilirsiniz,
VOL/MENU tuþunu saat yönününe çevirerek istediðiniz
saati ayarlayabilirsiniz.
Page 6
6
CD ÇALAR KULLANIMI
Disk Takma
Diskin etiketli yüzü üstte kalacak þekilde
diski cihazýn disk yuvasýna yerleþtiriniz.
Cihaz diski içeri çekecektir. Diskte bulunan
ilk parça otomatik olarak oynamaya
baþlayacaktýr.
UYARI: Disk yuvasý sadece standart 5”(12cm)’lik
disklere göre tasarlanmýþtýr. Baþka boyutlardaki
diskleri uyarlayýcý parçasý olmadan kullanmaya
teþebbüs etmeyiniz. Aksi halde disk yuvasýna,
cihaza ciddi zararlar verebilirsiniz.
Disk Eject Tuþu
Eject tuþuna basarsanýz cihaz diski oynatmayý
durdurur, diski çýkarýr. Ve cihaz radyo iþlemine
döner. Aracýnýzý çalýþtýrýken ya da durdururken
de diski eject yapabilirsiniz. Eðer eject yaptýðýnýz
diski 10 saniye içinde disk yuvasýndan
almazsanýz cihaz otomatik olarak diski içine
çekecektir.
UYARI: Herhangi bir arýzaya yol açmamak için
kullanmadýðýnýz diski cihazýn içerisinden çýkarýnýz.
CD Oynat/Beklet
>/|| tuþuna basarsanýz disk oynatmasýný durdurur.
>/|| tuna tekrar basarsanýz disk yeniden
oynatmaya baþlar.
Sonraki Parça
Disk oynadýðý sürece bir sonraki parçaya gitmek
için >>| tuþuna basýnýz.
Sonraki Parça
Disk oynadýðý sürece |<< tuþuna bir kere
basarsanýz geçerli parçanýn baþýna gelirsiniz,
tuþa iki kere basarsanýz da önceki parçaya
gidersiniz.
Hýzlý ileri/geri alma
Parçayý hýzlý ileri almak için >>| tuºuna basılı
tutunuz, istediðiniz bölüme geldiðinizde tuþu
býrakýnýz. Parçayý hýzlý geri sardýrmak içinse
|<< tuþuna basýlý tutunuz, istediðiniz bölüme
geldiðinizde tuþu býrakýnýz.
Tanýtým Oynatmasý
Disk oynatma süresince, INT ON seçmek için
2/INT tuþuna basýnýz, böylece disk içindeki
parçalar herbirinin ilk 10 saniyesi olmak üzere
sýrasýyla oynayacaktýr. INT FOLD seçmek için
2/INT tuþuna tekrar basýnýz, böylece geçerli
dosyadaki parçalar herbirinin ilk 10 saniyesi
olmak üzere sýrasýyla oynayacaktýr. Ýstediðiniz
parçaya ulaþýp oynatmak için 2/INT tuþunu
kullanarak INT OFF yapmanýz yeterli olacaktýr.
Tekrar Oynatma
Disk oynadýðý sürece, RPT ON seçmek için
3/RPT tuþuna basýnýz, böylece geçerli parçayý
sürekli oynatabilirsiniz. RPT FOLD seçmek için
3/RPT tuþuna tekrar basýnýz, böylece geçerli
dosyadaki bütün parçalarý art arda oynatabilirsiniz.
3/RPT tuþunu kullanarak RPT OFF seçene kadar
tekrar oynatma devam edilecektir.
Karýþýk Oynatma
Disk oynadýðý sürece, RDM ON seçmek için 4/RDM
tuþuna basýnýz, böylece tüm parçalar karýþýk olarak
oynayacaktýr. RDM FOLD seçmek için 4/RDM tuþuna
tekrar basýnýz, böylece dosyadaki tüm parçalar karýþýk
olarak oynayacaktýr. Karýþýk oynatma modunda iken
sonraki ya da önceki tuþuna basýldýðýnda bir sonraki
ya da bir önceki parça yerine karýþýk olarak sonraki
ya da önceki parçayý oynatacaktýr. Bu moddan çýkmak
için 4/RDM tuþunu kullanarak RDM OFF seçebilirsiniz.
Page 7
7
RADYO KULLANIMI RDS (Radyo Bilgi Sistemi)
Radyo oynadýðý sýrada, 3 FM ve 2 AM bandlarý
arasýnda seçim yapmak için BAND tuþuna
basýnýz. Seçiminize göre FM ya da AM modlarý
ekranda görünecektir.
FM/AM Bandý
Yukarý ayarlama
>>| tuºuna basarsanız istasyon frekansı
adým adým artacaktýr. Ekranda frekans numarasý
görünecektir. >>| tuþuna basýlý tuttuðunuzda
mevcut istasyonlara sýrasýyla ilerleyecektir.
Aþaðý ayarlama
>>| tuºuna basarsanız istasyon frekansı
adým adým azalacaktýr. Ekranda frekans numarasý
görünecektir. >>| tuþuna basýlý tuttuðunuzda
mevcut istasyonlarý geriye doðru gösterecektir.
Otomatik Hafýza
Geçerli istastonlarý taratmak için AMS tuþuna
basýnýz. Bu tuþa basýlý tutarsanýz, cihaz en güçlü
6 istasyonu 1-6 tuþlarýna kaydedecektir.
RDS servis hizmeti bölgelere göre deðiþiklik
gösterebilir. Eðer bölgenizde RDS servisi yoksa
aþaðýdaki servis özellileri kullanýlamaz.
RDS Temelleri
AF(Alternatif Frekans Listesi) yayýn frekanslarýnýn
düþük olduðu bölgelerde benzer programlar
otomatik olarak listelenir ve dinlemeniz için daha
güçlü olanlar ayarlanýr.
PS (Program Servis Ýsmi): Radyo frekanslarýnýn
yerine radyolarýn isimleri ekrana gelir.
AF Modu: AF fonksiyonuna basarsanýz AF modu
açýlýr veya kapanýr.
AF on: AF fonksiyonu aktiftir.
AF off: AF fonksiyonu kapalýdýr.
Remark: LCD 'eki AF göstergesi RDS bilgisi
alýnana kadar yanýp söner. Bölgenizde RDS
servisi yoksa AF modunu kapatýnýz.
REG Modu: AF düðmesine 2 sn den fazla
basýlarak REG modu on veya off yapýlabilir.
REG on: AF fonksiyonu bölgesel kodlara göre
çalýþýr ve sadece bulunduðuz bölgedeki
istasyonlar otomatik olarak ayarlanýr.
REG off: AF fonksiyonu bölge kodlarýna bakmaz
ve diðer bölgelerdeki istasyonlar da otomatik
olarak ayarlanýr.
CT servis (saat)
RDS istasyon yayýný alýndýðýnda CT servisi
saati otomatik olarak ayarlar.
Trafik Duyurularý
Bazý RDS FM istasyonlarý periyodik olarak
trafik bilgisi verirler. TP ( Trafik Program Kimliði )
Trafik bilgisinin yayýný.
TA ( Trafik Duyurusu Kimliði )Trafikteki radyo
duyurularý.
TA Modu: TA fonksiyonu açmak/kapatmak için
TA 'ya basýnýz. TA modu açýldýðýnda, TA göstergesi
yanýp sönecektir. Trafik duyurusu alýndýðýnda
TA göstergesi gözükecektir. Teyp otomatik olarak
radyo moduna geçecektir (þu anki moda bakmaksýzýn)
ve TA ses seviyesinde trafik duyuru yayýna
baþlayacaktýr. Trafik anonsu bittikten sonra, önceki
moda onun ses seviyesine dönecektir. TA açýldýðýnda,
SEEK, SCAN, AMS fonksiyonu (anons alma ve
kaydetme) sadece trafik program(TP) kodu
alýndýðýnda yapýlabilecektir.
EON (Geliþmiþ Diðer Aðlar)
EON bilgisi alýndýðýnda, EON göstergesi
yanar ve TA ve AF fonksiyonlarý artar.
Page 8

8
RDS (Radyo Bilgi Sistemi) MP3/WMA DOSYA OYNATMA
TA: Trafik bilgisi o andaki istasyondan veya
baþka bir aðdaki istasyondan alýr.
AF: Kayýtlý RDS kanallarýnýn frekans listesi
EON bilgisi ile güncellenir. EON, radyonun
RDS bilgilerinin tam kapasiteyle kullanýlmasýný
saðlar. EON sürekli olarak kayýtlý AF kanal
listesini günceller. Buna þu anda ayarlanmýþ
olan kanallar da dahildir. Eðer bulunduðunuz
bölgedeki bir istasyonu ayarlarsanýz, daha
sonra ayný istasyonu baþka frekansta da
alabilirsiniz veya benzer yayýnlar yapan diðer
istasyon. Ayrýca EON bölgedeki TP
istasyonlarýnýn bilgilerini da hýzlý eriþim için
saklar.
PTY (Program Tipi)
RDS FM istasyonlarý program tipi tanýmlama
sinyali saðlar.
Ör: haberler, rock, bilgi, spor, vs
PTY Modu
Program tipi bilgisini almak için PTY 'ye basýnýz.
Önceki PTY tipi görüntülenir. MÜZÝK tipine girmek
için PTY 'ye bir kere daha basýnýz veya ikinci kez
basýnýz ve KONUÞMA tipine giriniz, sonra 1 - 6
numaralý düðmeleri kullanarak istediðiniz program
tipini seçiniz. Seçilen PTY tipi görüntülenir ve iki
saniye içinde baþka bir fonksiyon seçilmezse
kanal arama baþlar. Eðer uygun tipte bir program
yoksa NO PTY mesajý gözükür ve cihaz normal
moduna döner.
Ekran Bilgisi
Oynatma sýrasýnda, ID3 etiket bilgileri ekranda
listelenir: FOLDER(klasör), FILE(dosya),
ALBUM(albüm), TITLE(parça ismi), ARTIST
(sanatçý ismi), Parça Numarasý, Geçen Süre
Önceki/sonraki Klasör
5/DN tuþuna basarsanýz bir önceki klasöre
gidebilirsiniz. 6/UP tuþuna basarsanýz da
bir sonraki klasöre gidebilirsiniz.
Direkt parça eriþimi
TRACK SCH” moduna girmek için AMS 'ye
basýnýz. VOL/MENU kontrol düðmesine basýn
LCD 'de ”001” görünecektir. Seçmek istediðiniz
parçanýn numarasý 100 den daha aþaðýda ise
VOL/MENU kontrol düðmesini çevirerek ilk
haneyi seçin VOL/MENU kontrol düðmesine
tekrar basýnýz sonra VOL/MENU kontrol
düðmesini çeviriniz ve parçanýn onluk hanesini
ayarlayýnýz. Þarkýyý çalmak için düðmeye 2
saniyeden daha uzun süre basýlý tutunuz.
Ýstediðiniz þarkýnýn numarasý 100 'den büyükse,
VOL/MENU kontrol düðmesi ile sýrasýyla birler,
onlar ve yüzler hanesini seçiniz VOL/MENU
kontrol düðmesini çevirerek istediðiniz þarkýnýn
numarasýný giriniz. Þarkýyý çalmak için tekrar
VOL/MENU kontrol düðmesine basýnýz.
Girdiðiniz parça numarasý maksimum parça
sayýsýndan fazla ise, parçayý çalmak için tekrar
VOL/MENU kontrol düðmesine basýnýz.
Dosya arama
"FILE SCH" moduna girmek için AMS düðmesine
iki defa basýnýz. Girmek için VOL/MENU kontrol
düðmesine basýnýz, klasör seçmek için düðmeyi
çeviriniz. Bu klasördeki ilk þarkýyý oynatmak için
VOL/MENU kontrol düðmesine 0.5 sn den daha
fazla süre basýnýz. Ýstediðiniz bir þarkýyý oynatmak
için VOL/MENU kontrol düðmesine basýnýz ve
düðmeyi çeviriniz, düðmeye tekrar basarak
parçayý oynatýnýz.
CHAR-SCH’’ modunu seçmek için AMS tuþuna
3 kez basýnýz. VOL/MENU kontrol düðmesine
bastýðýnýzda ‘A’ simgesi görülecektir. Bu düðmeye,
2 saniyeden fazla bastýðýnýz zaman, A harfi ile
baþlayan parça oynatýlacaktýr. Eðer farklý
harflerle baþlayan bir parça seçmek isterseniz,
VOL/MENU kontrol düðmesini çeviriniz ve istediðiniz
harfe geldiðiniz zaman onaylamak için basýnýz.
Seçeceðiniz parçanýn diðer harfi için ayný iþlemi
tekrarlayýnýz. VOL/MENU kontrol düðmesine 2
saniyeden fazla basýnýz ve parçayý oynatmaya
baþlayýnýz.
Parça karakter aramasý (CHAR-SCH)
Page 9
9
MP3/WMA DOSYA OYNATMA
Mp3" teknolojisi( MPEG audio layer3 ) audio
CD 'lerinin dijital verilerini ses kalitesini koruyarak
önemli ölçüde küçültür.
· MP3 bir müzik sýkýþtýrma teknolojisidir,
MP3 ( MPEG audio layer3 ) , CD 'deki þarkýlarýn
ses kalitesini koruyarak dosya boyutunu önemli
ölçüde küçültür.
· Bu ürün CD-R, CD-RW disklerdeki MP3
dosyalarý dinlemenize olanak tanýr.
· Cihaz ISO 9660 uyumlu formatta yazýlmýþ MP3
dosyalarýný okuyabilir. Bunun yanýnda paket yazma
þeklinde yazýlan MP3 dosyalarýný okuyamaz.
· Cihaz, uzantýsý “.mp3” den farklý olan MP3
dosyalarýný okuyamaz.
· MP3 dosyasý olmadýðý halde “.mp3” uzantýlý bir
dosyayý çalmaya çalýþýrsanýz bazý sesler
duyabilirisiniz.
· Bu kýlavuzda kullanýlan PC terminolojisindeki
"MP3 dosyasý" ve "dizin " ayrýca "track" ve
"Album" kelimelerine sýrayla bakýnýz.
· Maksimum dizin sayýsý 128, maksimum alt dizin
sayýsý 8,CD baþýna maksimum MP3 dosya
sayýsý 256 'dýr.
· Cihaz maksimum sayýdan fazla olan parçalarý
çalamayabilir.
· Cihaz MIXED & EXTRA formatýndaki
multisession CD 'leri destekler, fakat öncelikli
olarak MP3 parçalarýný çalar. MIXED formatý: CD
yapýsý ilk olarak MP3 verisi, ikinci olarak audio
verisidir. EXTRA formatý: CD yapýsý ilk olarak
audio verisi, ikinci olarak MP3 verisidir.
· Cihaz “MPEG 1 audio layer 3” ü de içeren bütün
MPEG bit oranýný destekler. Sadece MPEG bit oraný
8kbps ve “free format for MPEG 2 audio layer 3”
dosyalarýný desteklemez.
· Cihaz “MPEG 1 audio layer 3” için 32/44.1/48kHz
örnekleme oranýný, “MPEG 2 audio layer 3” için
32/44.1/48kHz ve 16/22.05/24kHz örnekleme
oranlarýný ve VBR (Variable Bit Rate) için 44.1kHz
örnekleme oranýný destekler.
Mp3 Notlarý
MP3 dosyalarý içeren kendi
CD-R 'lerinizi oluþturma
· Yüksek kalitede müzik keyfini yaþayabilmeniz
için MP3 dosyalarýný 44.1 kHz örnekleme frekansý
ve 128 kbps sýkýþtýrma oranýnda çeviriniz.
· Bir CD 'ye 447 'den fazla þarký yüklemeyiniz.
· ISO 9660 – uyumlu formatlar için en üst dizin
dahil alt dizin sayýsý en fazla 8 olmalýdýr.
· Sadece sonlandýrýlmýþ CD-R disklerin oynatýlmasý
mümkündür.
· Yazdýðýnýz MP3 CD-R 'sinin data diski formatýnda
olduðundan emin olunuz, audio format olmasýn.
· MP3 dosyalarýnýzý yazdýðýnýz CD 'ye MP3 den
farklý dosyalarýn konmasý tavsiye edilmez. Aksi
takdirde MP3 müziklerinin çalmaya baþlamasý
uzun sürer.
· Bazý düþük kaliteli CD-R medyalarla yazma iþlemi
düzgün olmayabilir. Bu nedenle yüksek kaliteli
CD-R medyalar kullanmanýzý tavsiye ederiz.
· Cihaz ID3 tag versiyon 1.XX ve 2.XX destekler.
16 karaktere kadar ekranda þarký, albüm ve artist
adý gösterilebilir. Bir MP3 CD 'si çalarken klasör
dizin adý ve ID3 tag (Þarký adý, Albüm ve Artist adý)
LCD ekraný kaplayacak þekilde kayarak geçer.
· Cihaz kesilip kaydedilmiþ þarkýlarý çalamaz.
Page 10
10
MENÜ FONKSÝYONLARI
Menü moduna girmek için SEL/MENU düðmesine
2 saniye basýlý tutunuz, her bir basýþýnýzda modlar
deðiþecektir.
TA Modu
TA ALARM veya TA SEEK modunu seçmek
için ses düðmesini çeviriniz. TA (Trafik Duyurularý)
açýldýðýnda belirli bir süre herhangi bir trafik
programý tanýmlama kodu alýnamazsa, ekranda
NO TA/TP görüntülenir ve TA ALARM veya
TA SEEK den biri aktif edilir.
TA ALARM modu : Alarm açýlmýþ.
TA SEEK modu: TA SEEK otomatik olarak
aktif olmuþ.
Ses kontrol düðmesini çevirerek MASK DPI
ya da MASK ALL kýsmýný seçiniz. Bazý durumlarda,
AF fonksiyonu, parazitlenmelerin etkisinde olabilir.
Örnekler, RDS bilgisi olmayan güçlü alan
sinyalleridir. Bu sebeple, ünitenin parazitlenmeyi
önlemesi için, iki yolu vardýr.
MASK DPI modu: Yalnýzca, kimliði gizlenmiþ
programlara sahip olan AF.
MASK ALL modu: Farklý kimlikli programlara sahip
olan AF ve yüksek alan kuvvetli gizlenmiþ NORDS
sinyalleri.
Mask Modu
TA VOL Modu
TA ses seviyesini ayarlamak için ses düðmesini
kullanýnýz.
Kontrol düðmesini RETUNE-S veya RETUNE-L
seçmek için çeviriniz.
RETUNE Modu
RETUNE-S: Kýsa, TA SEEK tekrar ayarlama
aralýðý 45 sn.
RETUNE-L: Uzun, TA SEEK tekrar ayarlama
zaman aralýðý 180 sn.
Not:TA için yapýlan RETUNE modu fonksiyonlarý
sadece TA SEEK modunda geçerlidir.
DSP ses efektlerini kontrol kolu ile seçiniz:
DSP Modu
POP-ROCK-CLASSIC-FLAT-DSPOFF
ESP 12s: CD-ESP zamaný 12 sn, MP3-ESP
zamaný>100 sn.
ESP 45s: CD-ESP zamaný 45 sn, MP3-ESP
zamaný >100 sn.
EPS Modu
Multi Sesion ON/OFF.(Multi session OFF:
Karýþýk CD, bir session CD; Multi session ON:
Karýþýk, Extra, multi session CD)
MULT ON/OFF
LOUD Modu
Ses gürlüðünü açmak/kapatmak için kontrol
düðmesini kullanýnýz.
BEEP on/off Modu
Beep sesini açmak /kapatmak için kontrol
düðmesini kullanýnýz.
SEEK Modu
SEEK 1: Ýstasyon arama yeni istasyon
bulunduðunda durur.
SEEK 2: Ýstasyon arama ve tuþlarýna
duracaktýr ve yeni kanal alýnacaktýr.
Stereo/Mono Modu
Kontrol düðmesiyle FM stereo veya monoyu
seçiniz.
LOCAL/DX Modu
Tuner hassasiyetini kontrol düðmesiyle lokal
veya uzak olarak ayarlayýný.
VOL LAST/ADJ Modu
Volume modunu seçmek için ses düðmesini
çeviriniz.
VOL LAST: Açýk olan ses seviyesini kapatýr.
VOL ADJUST: A-VOL modunu seçtikten sonra
ses seviyesi ses düðmesini çevirerek ayarlanýr.
12/24 SAAT
Saat formatýný seçmek için ses düðmesini
çeviriniz.
Page 11
11
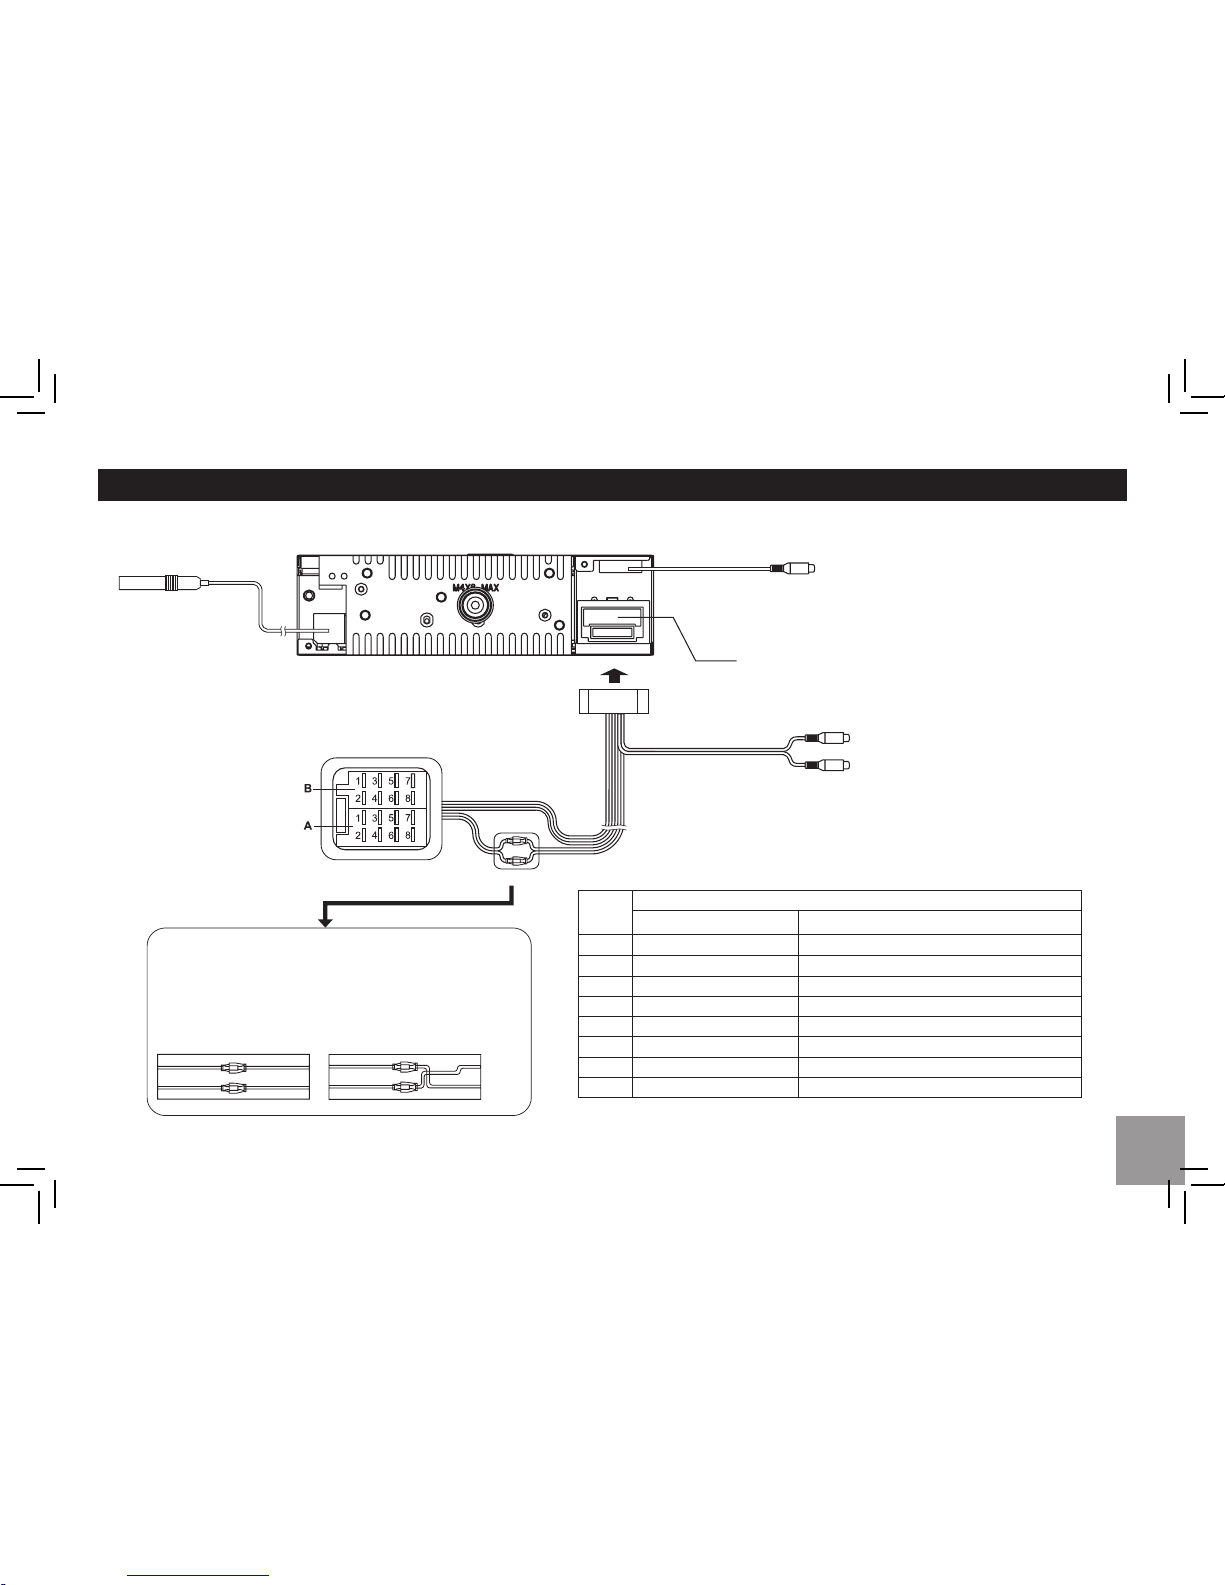
Elektriksel Baðlantýlar
Arka kablo çýkýþý
(Gri)
R(Kýrmýzý)
L(Beyaz)
Yeþil
Sub-woofer çýkýþý
1
2
3
4
5 ANT/AMP kontrol / Mavi
6
7
ACC+ / Kýrmýzý
8
Toprak / Siyah
Sigorta 15A
Anten
Konnektör
ISO Konnektör
VW/Audi ya da Opel(Vauxhall) gibi bazý araç modelleri
için sekilde gösterilen kablolama modifiyesi yapmaniz
gerekebilir, yoksa araç durduktan sonra cihazin hafizasi
gidebilir. Cihaz kurulumunu yapmadan önce yetlkili
araç saticisina basvurunuz.
Orjinal Baðlantý
Modifiyeli Baðlantý
SarýSarý
Kýrmýzý
Kýrmýzý
Sarý
Sarý
Kýrmýzý Kýrmýzý
Pin
Fonksiyon
Konnektör A Konnektör B
Arka Sað (+) / Mor
Arka Sað (-) / Siyah þeritli Mor
Ön Sað (+) / Gri
Ön Sað (-) / Siyah þeritli Gri
Ön sol (+) / Beyaz
Ön sol (-) / Siyah þeritli Beyaz
Arka sol (+) / Yeþil
Arka sol (-) / Siyah þeritli Yeþil
Batarya 12V(+) / Sarý
Baðlantý Diyagramý
Page 12
KURULUM
Anti-Theft Sistem
2
1
2
2
1
2
2
1
Reset
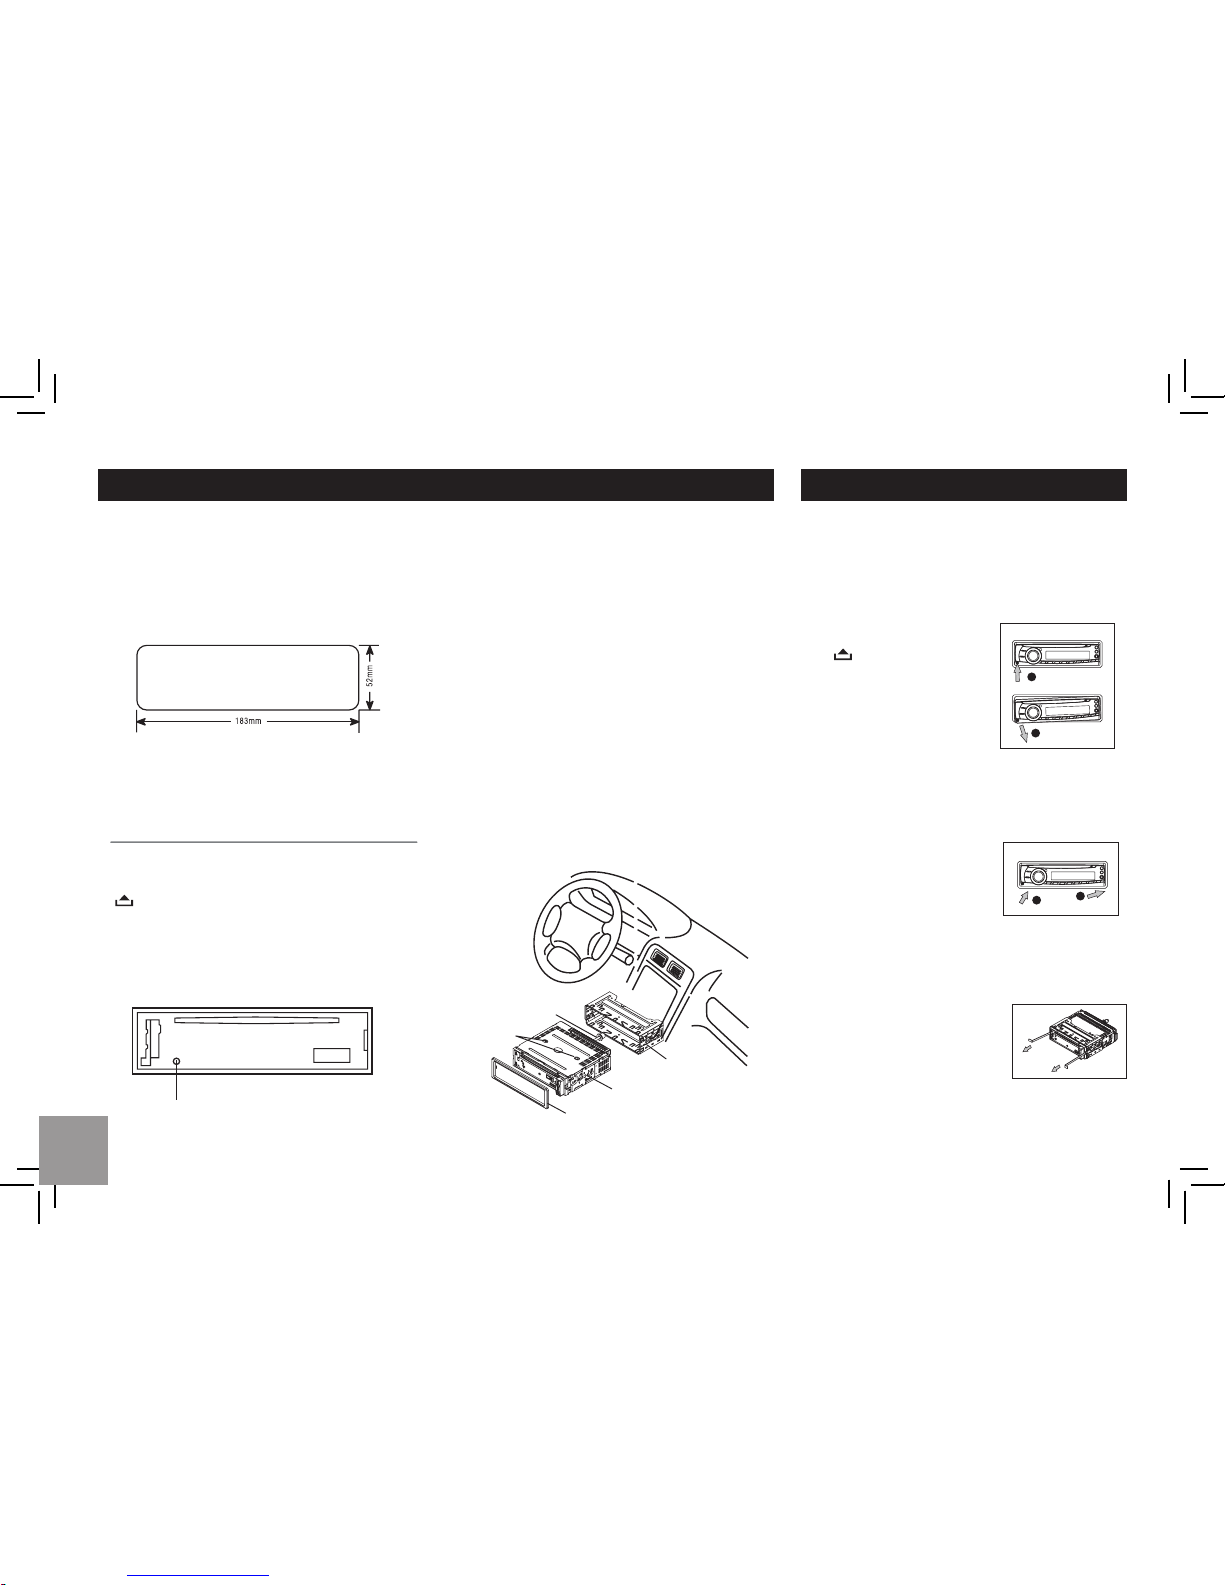
Kuruluma Baþlama
Bu cihaz aþaðýdaki ölçülerdeki herhangi bir
kýzaða takýlabilir.
183mm(W)x52mm(H) þekli aþaðýdadýr.
Cihazýn sýðmasý için kýzak 4.75mm - 5.56mm
aralýðýndaki kalýnlýkta olmalýdýr.
Düðmesine basýn ve paneli aþaðý doðru
indiriniz. Cihazýn fabrika ayarlarýna dönmesi
için sivri bir cisimle RESET düðmesine basýnýz.
Not: RESET düðmesine basmak saat ve kayýtlý
istasyonlarýn silinmesine sebep olacaktýr.
Kurulum Ýþlemleri
1. Cihaz kullanýma uygun hale getirildi ise,
baþka bir ses sistemini aracýnýzdan kaldýrýnýz.
2. Montaj vidasýný yarým kýzaða takýn ve baðlantý
demirini bir tornavida ile bükün.Kilit kolunun
montaj vidasýný sýkýþtýrýldýðýndan emin olunuz.
(Cihazýn dýþarý çýkmamasý için).
3. Gereken elektrik baðlantýlarýný yapýnýz.
4. Montaj yapmadan önce herþeyinin çalýþtýðýný
kontrol ediniz.
5. Kurulumdan önce bu cihazýn üst kýsmýndaki iki
vidayý sökünüz. Aksi takdirde, CD/MP3 player
çalýþmayacaktýr.
6. Cihazýn arkasýný güvenliðe alýnýz. Montaj
vidasýný ve güç konnektörünü taktýktan sonra
cihazýn arkasýna verilen lastik yastýðý takarak
yerine yerleþtiriniz.
7. Saç çerçeveyi yerleþtiriniz.
Cihazýn doðru montajlandýðýndan emin
deðilseniz, yetkili teknisyene baþvurabilirsiniz.
Kaldýrýlmasý gereken
iki vida
Sürgü montaj
lastik yastýðý
Yarým kýzak
Cihaz gövdesi
Saç plaka
Bu teyp çýkarýlabilir ön panele sahiptir.
Ön paneli yanýnýza alýp gidebilirsiniz,
hýrsýzlar ön paneli olmayan teybi çalmak
istemediði için teybinizin çalýnma riski azalýr.
Ön Paneli Çýkarma
1. düðmesine basýnýz.
2. Cihaz ön paneli attýktan
sonra ön paneli çýkarýnýz.
Ön Paneli Yerleþtirme
1. Paneli yüzü size gelecek þekilde
tutunuz ve panelin sað köþesini
bastýrarak yerleþtiriniz.
2. Panel kilitlenene kadar sol
köþesini de bastýrýnýz.
Cihazý çýkartma
1. Cihazý kapatýnýz.
2. Ön paneli ve çerçeveyi çýkarýnýz.
3. L demirlerini cihazýn
önündeki deliklere
kilitlenene kadar takýnýz.
4. Cihazý dýþarý doðru çekip
çýkartýnýz.
Montaj yeri çok küçük ise el kesilmelerini önlemek
için cihazý yerine dikkatlice yerleþtiriniz. Cihaza
fazla kuvvet uygulamayýnýz aksi takdirde montaj
kollarýný eðebilirsiniz. Cihazýn arka kýsmýnda
yeterli boþluðun olduðunu kontrol ediniz.
Reset
2
1
1
1
12
Page 13
13
PRATÝK ÇÖZÜMLER
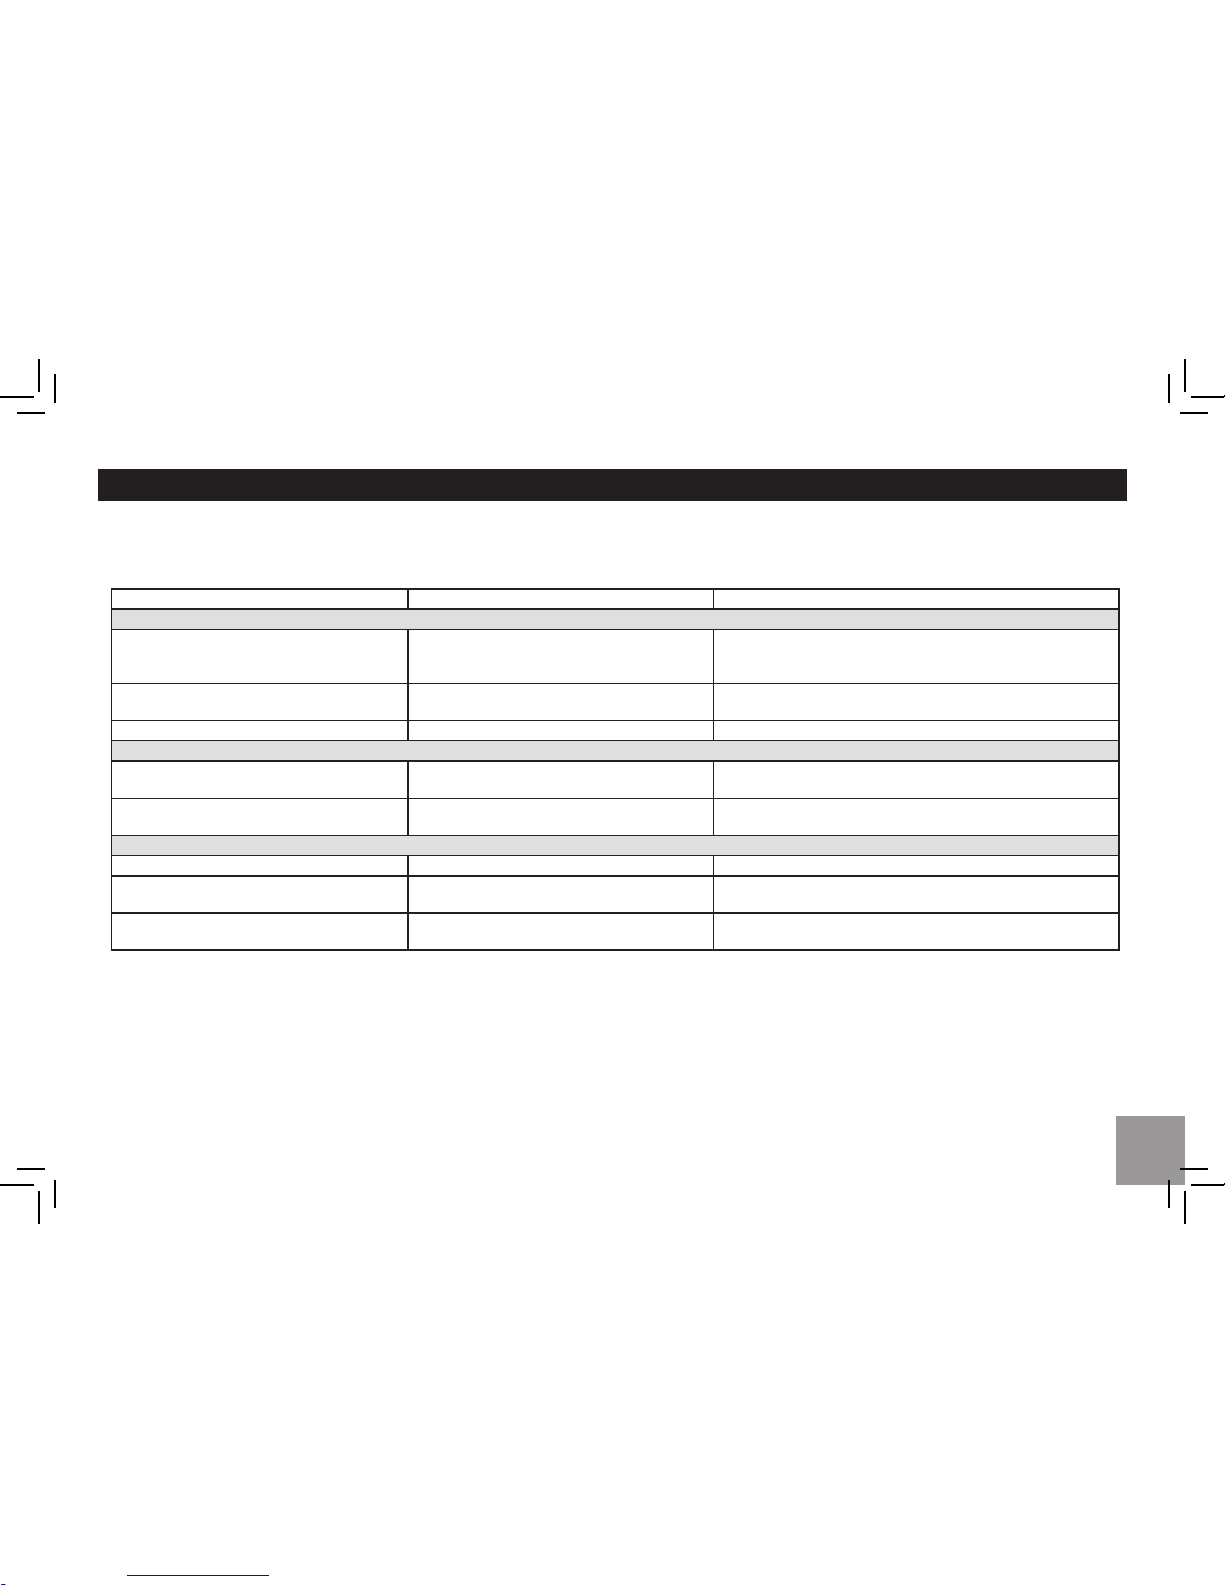
Problem Olasý Neden Çözüm
Genel
Cihaz açýlmýyor.
Aracýn kontaðý açýk deðildir.
Kablo uygun bir þekilde baðlý deðildir.
Sigorta yanmýþtýr.
Aracýn kontak anahtarýný çeviriniz.
Kablo baðlantýlarýný kontrol ediniz.
Ayný deðerdeki yeni bir sigorta ile deðiþtiriniz.
Ses yok
Ses seviyesi minumumda ya da sessiz
olarak ayarlanmýþtýr.
Ses seviyesini kontrol ediniz ya da sessiz modunu kapatýnýz.
Cihaz ya da ekran normal çalýþmýyor.
Cihaz sistemi sabit deðildir.
Cihazý RESET tuþu ile resetleyiniz.
DISK modu
Cihaz disk oynatmýyor
Disk hatalý yerleþtirilmiþtir.
Disk kirli ya da hasarlýdýr.
Diskin etiketli yüzü üst tarafa gelecek þekilde takýlmalýdýr.
Diski temizleyiniz ya da hasarlý olmadýðýný kontrol ediniz.
Ses kesintili geliyor.
Montaj 30° ‘nin üzerindedir.
Montaj sabit deðildir.
Montaj açýsýný 30°’den daha az ayarlayýnız.
Cihazýn gereken parçalarýný sabitleyiniz.
RADYO Modu
Yayýn almýyor
Anten düzgün baðlý deðildir. Anteni düzgün baðlayýnýz.
Kötü kalitede yayýn alma
Anten tamamen uzatýlmamýþtýr ya da
kýrýktýr.
Anteni tamamen uzatýnýz, anten kýrýksa yenisi ile
deðiþtiriniz.
Mevcut yayýnýn kaybolmasý
Batarya kablosu düzgün baðlý deðildir.
Cihazýn sabit parçalarýný aracýn sabit bir yerine
yerleþtiriniz.
Aþaðýdaki kontrol listesi size cihazý kullanýrken karþýlaþabileceðiniz bazý sorunlarý çözmeye yardýmcý olabilir. Herhangi birþeye danýþmadan önce
baðlatýlarýný kontrol ediniz ve kullaným kýlavuzunda bulunan talimatlarý uygulayýnýz.Cihazý olaðandýþý durumlarda çalýþtýrmayýnýz, mesela sesin
çýkmamasý veya duman ve kötü kokulu yayýlmasý durumunda yangýn çýkabilir veya elektrik arklarý oluþabilir. Hemen cihazý kapatýn ve cihazý aldýðýnýz
yeri arayýnýz. Cihazý kendiniz tamir etmeye çalýþmayýnýz çünkü bu tehlikeli olabilir.
Page 14
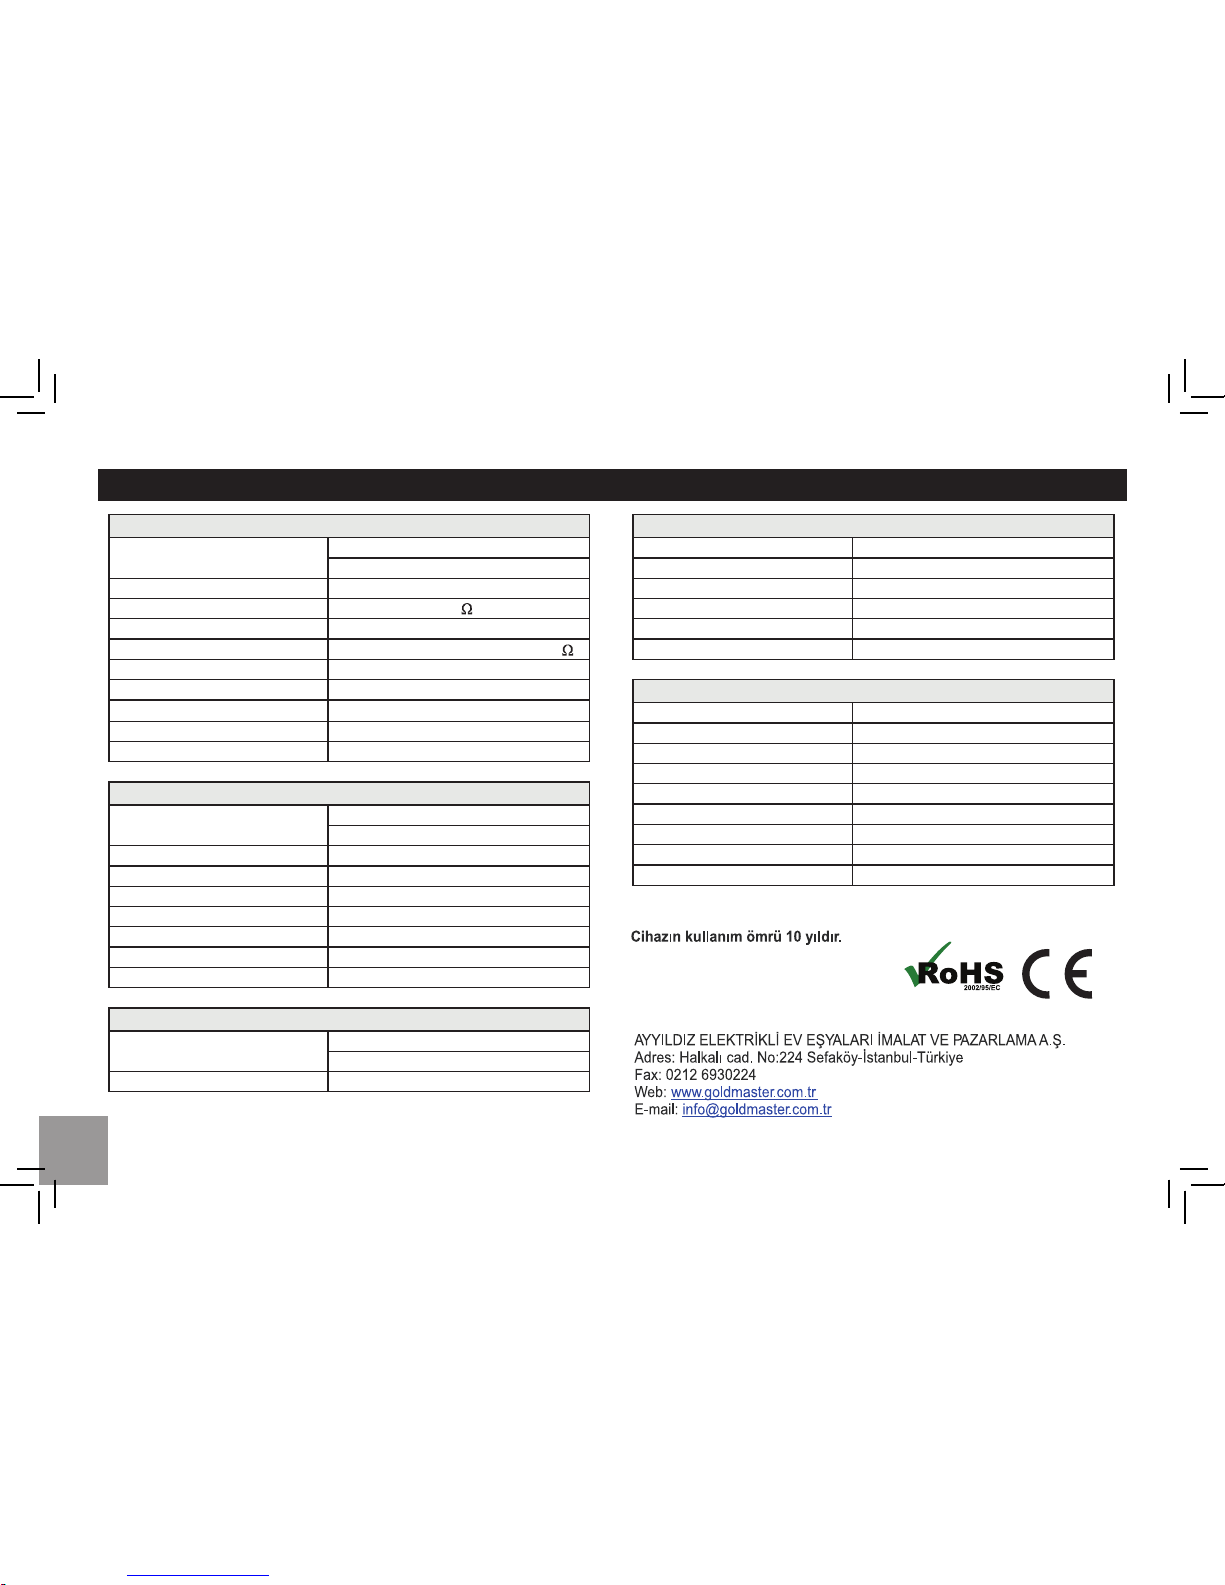
TEKNÝK ÖZELLÝKLER
14
12V DC (11V-16V)
Test voltajý 14.4V, negatif toprak
Maksimum güç çýkýþý: 45Wx4 kanal
Sürekli güç çýkýþý:
20Wx4 kanal (4
,10% T.H.D.)
Uygun hoparlör empedansý: 4-8 ohm
Pre-Amp çýkýþ gerilimi:
2.0V (CD oynatma modu: 1KHz, 0 dB, 10K )
Sigorta:
15A
Boyutlar(WxHxD):
178x50x160mm
Aðýrlýk:
1.7kg
Aux-in: ≥300mV
Sub-woofer çýkýþý
87.5-108.0 MHz (Avrupa )
8 dBì
Sessizlik hassasiyeti(S/N=50dB)
12 dBì
Frekans tepkisi: 30Hz-15kHz
Stereo ayýrma:
30dB (1kHz)
Görüntü tepki oraný:
50dB
IF tepki oraný:
70dB
Sinyal/gürültü oraný:
522-1620 KHz (Avrupa)
530-1710 K Hz (Amerika)
Hassasiyeti(S/N=20dB): 30 dBì
Disk dijital ses sistemi
Frekans tepkisi: 20Hz-20kHz
Sinyal/gürültü oraný: >80 dB
Toplam harmonik gürültü: Less than 0.20% (1kHz)
Ses bozulmasý: Ölçülebilir alt limiti
Kanal ayýrma:
1
Cihaz vidalarý M5x6mm 4
Montaj somunu (50mm) 1
Konnektör kablosu 1
Çýkarýlabilir plaka kasa yüzü 1
Saç plaka 1
L-anahtar 2
Kullaným kýlavuzu 1
Plastik lastik 1
Genel
Güç Kaynaðý
87.5-107.9MHz (Amerika)
Kullanýlabilir hassasiyeti:
Frekans aralýðý:
FM Stereo Radyo
2V
MW(AM) Radyo
55dB
Frekans aralýðý:
Disk Oynatýcý
Sistem:
Cihaz Parçalarý
Montaj halkasý
>55 dB
Not: Tasarýmý ve teknik özellikleri haber verilmeksizin deðiþtirilebilir.
EEE Yönetmeliðine uygundur.
PCB (Poliklorlu bifenil) madde içermez.
Firma Bilgileri
Page 15
2
Thank you for purchasing this product. Please
read thr ough these oper ating inst ructi ons
so you will know how to operate your model
properly. After you have finished reading th e
instructions, keep this ma nual in a safe place
for future reference.
PRECAUTIONS
Use only in a 12-volt DC negative-ground
electrical system.
Disconnect the vehicle’s negative battery
terminal while mounting and connecting the
unit.
When replacing the fuse, be sure to use
one with an identical amperage rating.
Using a fuse with a higher amperage rating
may cause serious damage to the unit.
DO NOT attempt to disassemble the unit.
Laser beams from the optical pickup are
dangerous to the eyes.
Make sure that pins or other foreign objects
do not get inside the unit;
they may cause malfunctions, or create
safety hazards such as electrical shock or
laser beam exposure.
If you have parked the car for a long time
in hot or cold weather, wait until the
temperature in the car becomes normals
before operating the unit.
Keep the volume at a level at which you
can hear outside warning sounds
CD NOTES
(horns sirens, etc.).
Playing a defective or dusty CD can cause
dropouts in sound.
Hold CDs as illustrated.
Do not touch the unlabeled side.
Do not attach any seal, label or data
protection sheet to either side of a disc.
Do not expose a CD to direct sunlight or
excessive heat.
Wipe a dirty CD from the center outward
with a cleaning cloth.
Never use solvents such as benzine or
alcohol.
This unit cannot play 3-inch (8cm) CDs.
Never insert a 3-inch CD contained in the
adapter or an irregularly shaped
CD. The unit may not be able to eject it,
resulting in a malfunction.
Before Operation
Do not raise the volume level too much, as
this will block outside sounds, making driving
dangerous. Stop the car before p erforming
any complicated operation.
CAUTION
DO NOT open covers and do not repair
yourself. Consult the dealer or an
experienced technician for help.
*
In addition to ordinary CDs, this unit can
play back a CD-R or CD-RW,MP3.
SAFETY INFORMATION
CONTENTS
Safety Information ........................................2
Panel Controls ..............................................3
Remote Controls...........................................4
General Operation ........................................5
CD Player Operation ....................................6
Tuner Operation ...........................................7
RDS(Radio Data System)..........................7-8
Playing MP3/WMA Files ............................8-9
Menu Function ............................................10
Electrical Connections ................................11
Installation Guide ........................................12
Anti-Theft System .......................................12
Troubleshooting ..........................................13
Specifcations .............................................14
Page 16
3
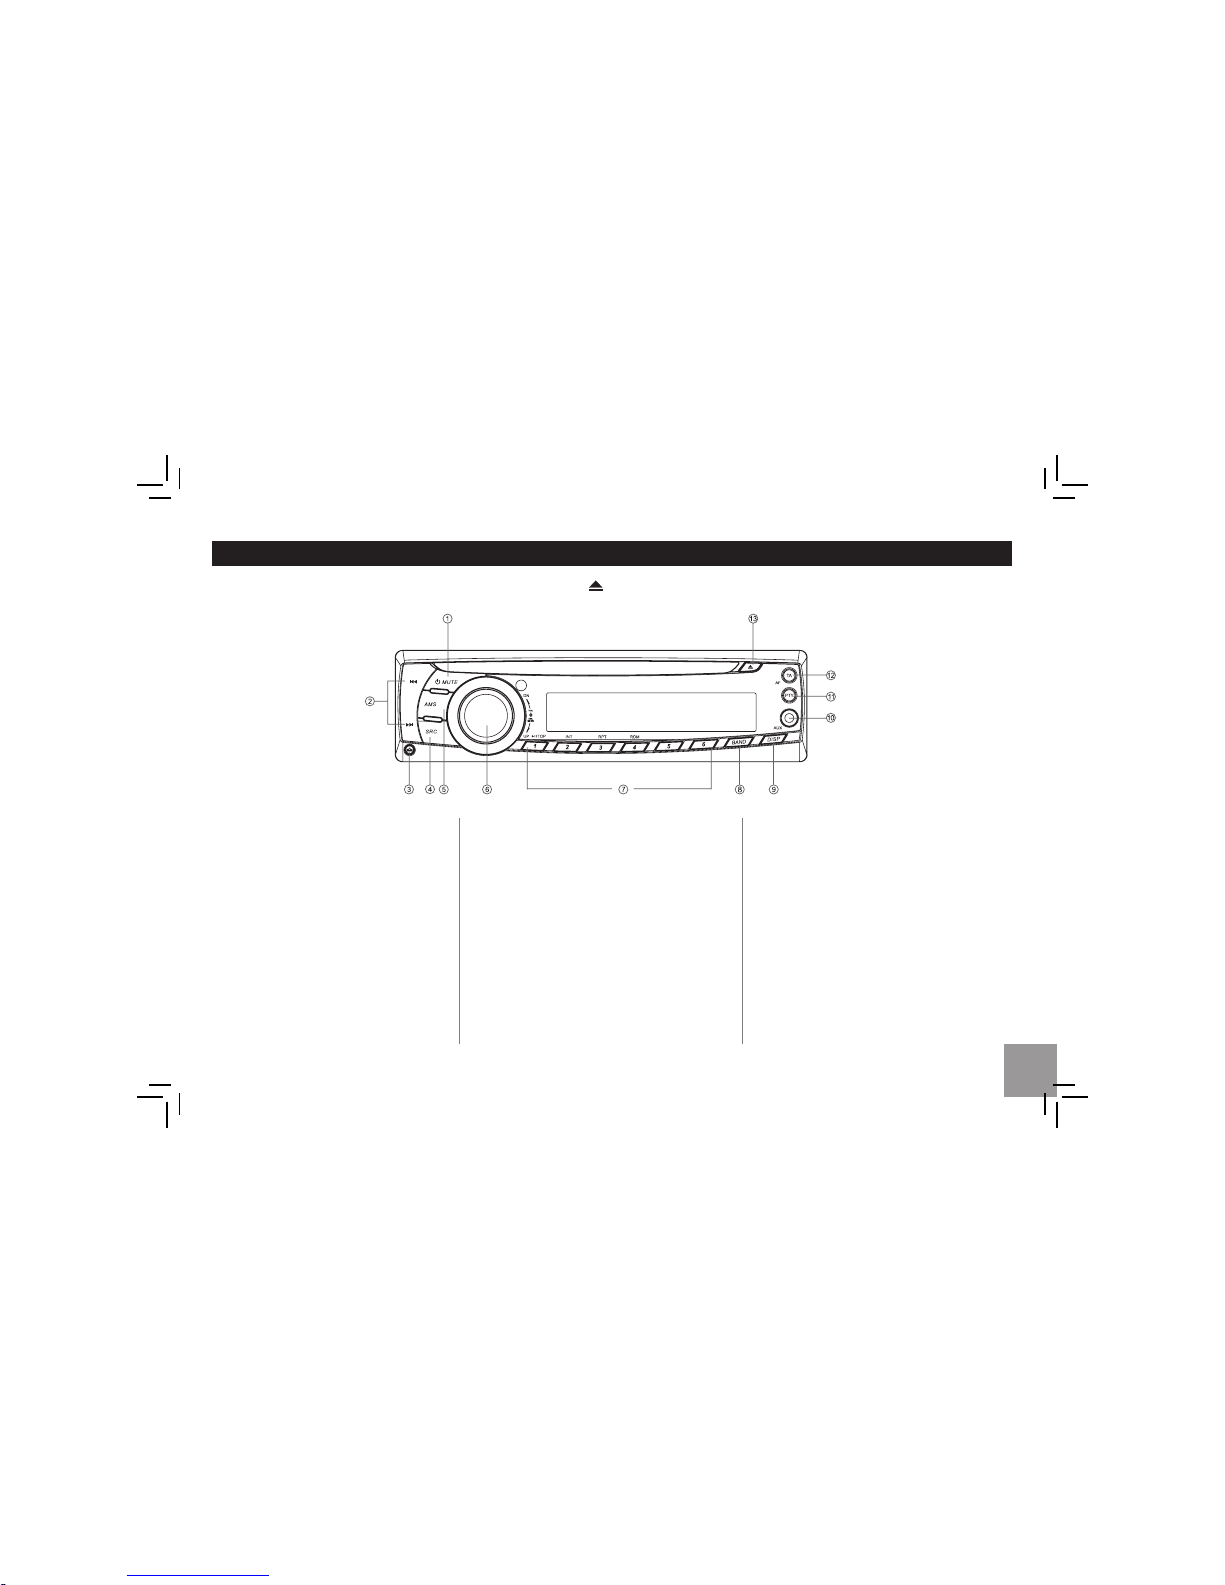
Panel Controls
Power on : Press any button on the panel exceptand to turn on the unit.
1.
- Power on / Power off (long press)
- Mute
2. - Radio tune
- Track seek
3. - Panel release
4. SRC
- Radio
- Disc play (when disc inserted)
- Aux-in
5. - AMS: Radio p reset scan /Radio auto
preset
- S EARCH : M P3 trac k/ file/ char acter
search
6. - Rotate the knob to adjust volume level.
- Push to sele ct VOL /BA S/T RE/BAL/
FAD, rotate the knob to adjust level.
- Pr ess more than 2 se conds to enter menu
mode.
7. Disc playback
Button 1: - Play/Pause
- Top play (press more than 2 sec.)
Button 2: - Intro play (10 sec.)
Button 3: - Track repeat play
Button 4: - Track random play
Button 5: - MP3 folder down (If there are more
than 1 folders)
- MP3 track -10 down (long press)
Button 6: - MP3 folder up (If there are m ore
than 1 folders)
- MP3 track +10 up (long press)
Radio preset 1~6
- Press to tune in a preset station.
- Hold for mor e than 2 seconds to store
station.
8. - Band switch:
FM1 -> FM2 -> FM3 -> MW1 -> MW2
9. - Display switch/Time adjust
10. - Aux-in jack
11. - Program type
- REG on/off (long press)
12. - Alternative frequency
- Traffic announcements identification (long
press)
13. - Disc eject
Page 17
4
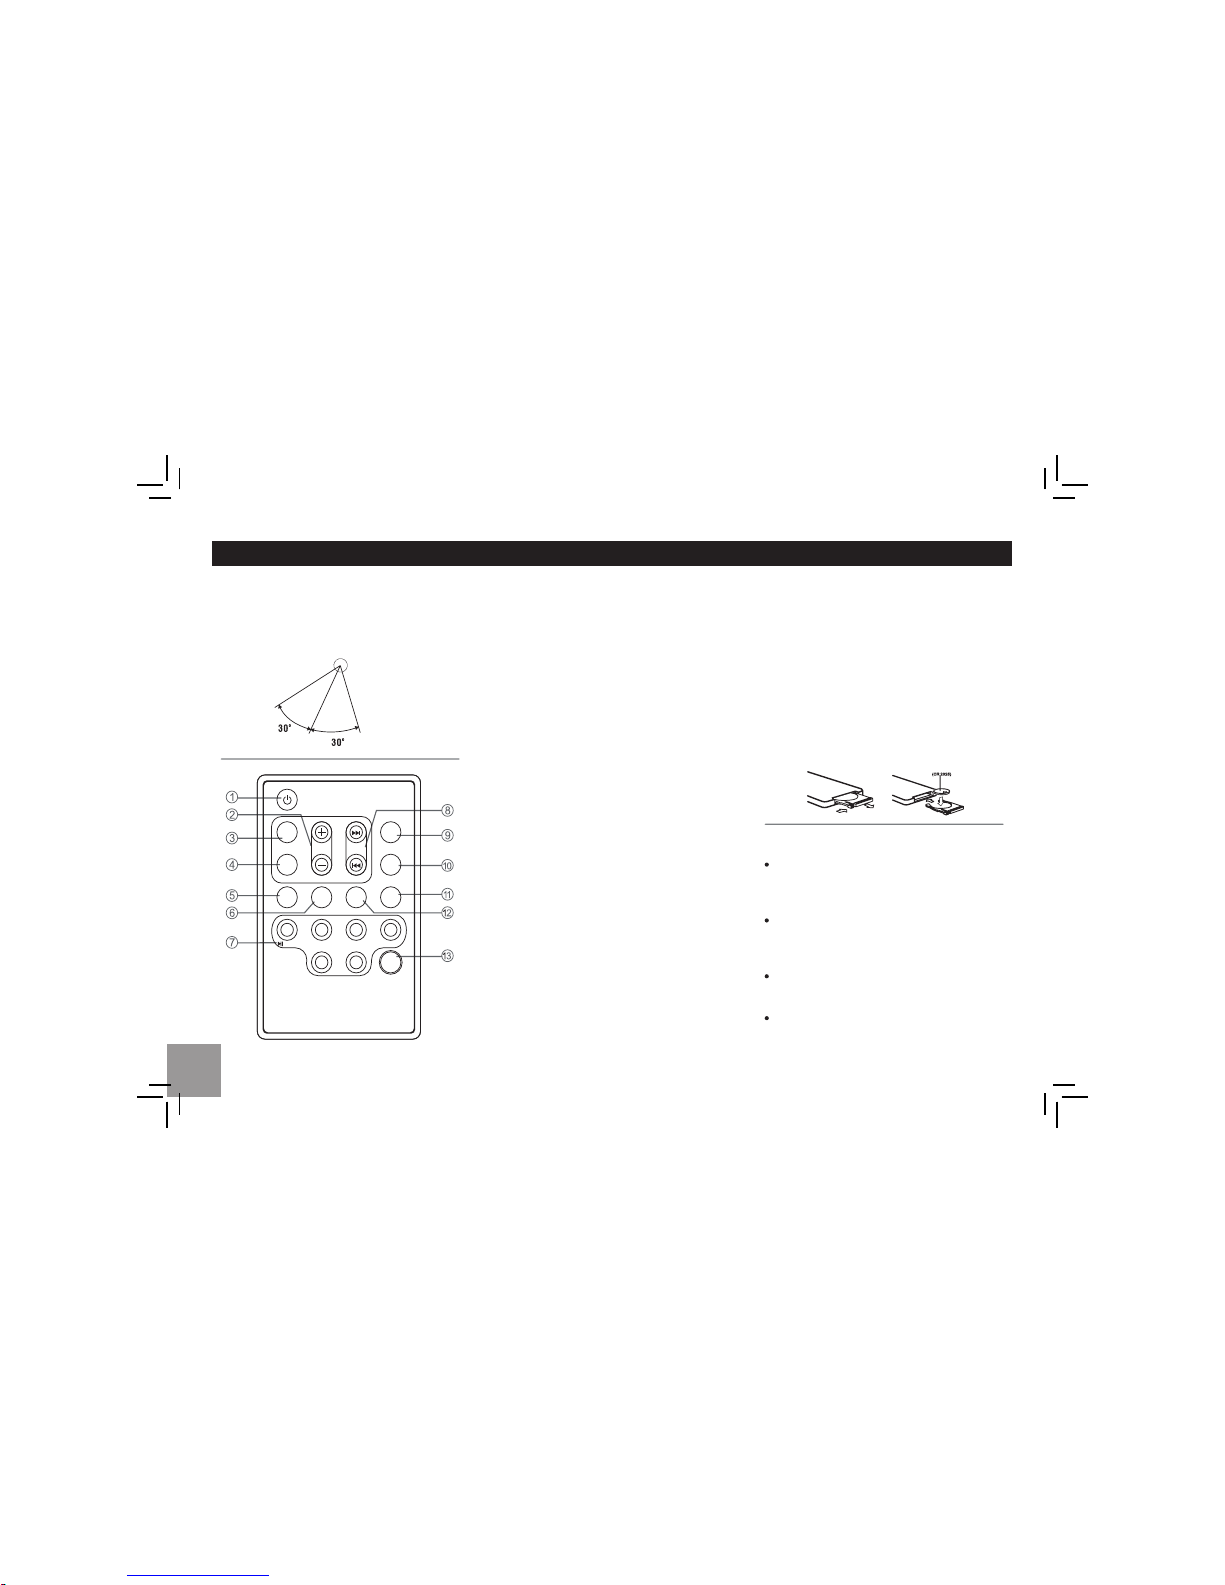
1. - Power on/off
2. - Volume
3. - Mute
4. - Press to s elec t VOL/BAS/TRE/BA L/FAD,
use volume button to adjust level.
- Press and hold it to enter Menu mode.
5. -Traffcannouncementsidentifcation
6. - Alternative frequency
- REG on/off (long press)
7. - Disc Playback
Button 1: - Play/Pause
- Top play (press more than 2 sec)
Button 2: - Intro play (10 sec)
Button 3: - Track repeat play
Button 4: - Track random play
Button 5: - MP3 folder down
- MP3 track -10 down (long press)
Button 6: - MP3 folder up
- MP3 track +10 up (long press)
- Radio Preset
Press to listen to a preset station.
Press and hold to store station.
8. - Radio tune/Track seek
9. - Rad io/Disc (when disc i s in)/USB (when
USB is connec ted) /C ard(S D/ MMC card
inserted)/Aux-in
10. - AMS: Radio preset scan/Radio auto preset
-SEARCH:MP3track/fle/charactersearch
11. - Band switch: FM1, FM2, FM3, AM1, AM2
12. - Program type
13. - Display switch
SEARCH
MUTE
SEL
MENU
RDMRPT
INT
/
TOP
DISP
4
3
21
65
VOL
BAND
SRC
AMS
TA
AF/REG
PTY
REMOTE CONTROLS
Re plac ing t he li thi um bat ter y of
remote control unit.
When the range of th e operation of the card
remote control becomes short or no functions
while o perating. Replace the battery with a
new lithium battery. Make sure the battery
Polarity replacement is correct.
1. P ull out the battery holder while pressing
the stopper.
2. I n sert the butt on-type batt ery wit h the
stamped(+) mark facing upward.
Insert the battery holder into the remote
control.
WARNING:
Store the battery in place where children
ca nn ot reach. If a chi ld acc id ental ly
swallowed the battery, consult a doctor
immediately.
Do not rechar ge, short, d isassemble or
heat the batt ery or dispo se it in a fire .
Doing this may cause the battery to give
offheat,crackorstartafre.
Do not leave the battery with other metallic
materials or poke the battery with tweezers
or similar tools.
When throwing away or saving the battery,
wrap it in tape and insulate.
(CR 2025 )
RemoteSensor
Operating range
Point the remote control unit to the remote
sensor when you operate with it.
The remo te contr ol can op erat e within a
distance of 3~5m.
Page 18
5
GENERAL OPERATION
Power On/Off Button
Press the POWER button to turn the unit on
when the vehicle ignition switch is on. Press
and hold the button to turn the unit off.
Adjust Volume level
Ro ta te th e VOL /MENU control to adj ust
volume level. Rotate it clockwise to increase
and anticlockwise to decrease the volume.
Audio Mute
Press the MUTE button to mute the volume
from the system. “MUTE” will appear on the
display panel and the volume will be muted.
Pres s the MUTE button again, or rotate or
pres s the V OL/M ENU control to r etur n the
volume level to the setting in use before the
Mute function was activated.
Audio Controls
To adj ust the bass, tr eb le , bal ance and
fader, press the VOL/MENU control until the
app rop riate aud io con tro l appe ars on the
displaypanel.Withinfveseconds,rotatethe
VOL/MENU control to adjust the audio settings
for the selected function.
Mode Button (SRC)
Press the SRC button to chang e betwee n
Auxiliary Input
To access an auxiliary device:
Radio, DISC (when disc is in) or AUX play.
1. C onnect the portable audio player to the
AUX interface on the front panel.
2. P ress t he SRC butto n to sele ct Aux-In
mode.
Press SRC again to cancel Aux-In mode and
go to the next mode.
Display Selector (DISP)
This unit can displ ay either the c lock time
or radi o fr eq ue nc y/ CD pl ay er functions.
Or di na ri ly, th e ra dio fr eque ncy or CD
playe r track indicat ion is di splayed, but the
unit wil l dis play the ti me when the DISP
button is pressed. T he time will d ispla y for
approximately 5 seconds then return to th e
radio or CD player function display.
Setting the Clock
The correct time of day can be set by pressing
and holding the DISP button.
To set the clock, perform the following steps:
1. Turn the vehicle ignition and radio on.
2. P ress the DISP button to view the clock.
3. W ith the clock visible on the display, press
and hold the DISP button until the time
displayfashes.
4. W it hin 5 seconds, rotate the VOL/MENU
control coun ter c lockwis e to a djust the
minutes to the desired setting. To change
the hour, rotate t he VOL/MENU control
clockwise to adjust the hour to the desired
time.
Page 19
6
CD PLAYER OPERATION
Inserting a Disc
With the label surface facing up, fully insert
a compact disc i nto the disc slot until t he
mech anis m engages a nd pulls the disc in.
Play will auto mati cally begin from the first
track on the disc.
NO TE : The unit is des ig ne d fo r play of
standard 5” (12 cm.) compact discs only. Do
not attempt to use 3” (8 cm.) CD singles in
this unit, either with or witho ut an adaptor,
as damage to the player and/or the disc may
occur.
Disc Eject Button
Press the eject button to stop disc play and
eject the disc . The unit will revert to r adio
ope rat ion. Discs may be ejec ted wit h the
vehicle ignition switch on or off. If an ejected
disc is not removed from the disc slot within
10 seconds of being ejected, the disc will be
re-inserted automatically.
NOTE: To prevent a disc from accidentally
being damaged, always remove the disc from
theunitwhendiscplayisfnished.
CD Play/Pause Selector
Press the 1 >/|| button to freeze disc playback.
Seek Up/Next Track
Press t he next track >>| button durin g disc
Press 1 >/|| again to resume disc playback.
play to select the beginning of the next track.
Seek Down/Previous Track
Pres s the previ ous track |<< button durin g
disc play to select the beginning of the current
track. Press twice to select the beginn ing of
the previous track.
Cue/Review Functions
High-speed audible search to any section of
the disc can be made by the Cue and Review
functions. Press and hold the next track >>|
butto n t o a dvan ce rapid ly in the for ward
direction or the previous track |<< button to
advance rapidly in the backward direction.
Intro Play Selector
During disc play, press the 2/INT button to
select“INTON”andplaythefrst 10seconds
of each track. Press 2/INT again to select “INT
FOLD”andplaythefrst10secondsofeach
track in the current folde r. When a desired
track is reached, press the 2/INT b utton to
Track Repeat Play Select
During disc play, press the 3/RPT button to
select “INT OFF” and play the current track.
sel ect “RP T ON” and repeatedl y play t he
selected track. Press 3/RPT again to select
“RPT FOLD” and repeatedly play all tracks in
the current folder. Repeat play will continue
until 3/RPT is pressed to select “RPT OFF”.
Random Play Select
During disc play, press the 4/RDM button to
select “RDM ON” and play all tracks on the
discinrandom,shuffedorder.Press4/RDM
again t o select “RDM FOLD” and randomly
play all songs in the current folder. In Random
Pla y m ode, you can pre ss the tun e/tra ck
butt ons to select tracks in a ra ndom order
instead of the normal progression. Press 4/
RDM again to select “RDM OFF” and cancel
Random Play mode.
Page 20
7
CT Service ( Clock Time )
When receiving an RDS station, the CT (Clock
Time) service automatically adjusts the time.
Traffc Announcements
Some RDS FM stations periodically provide
traffcinformation.
TP(TraffcProgramIdentifcation)
Broadcastingoftraffcinformation.
TA(TraffcAnnouncementsIdentifcation)
Radioannouncementsontraffcconditions.
TA Mo de : Pres s and hol d TA /AF to turn
on/ off the TA function. When TA mode is
turned on, the TA indicator will blink. When
tra ffic ann oun cemen t is recei ved, the TA
indicator will display. The unit will temporarily
switch to t he tuner mode (regardless of the
current m ode) and begin broadcas ting the
announcement at TA volum e level. After the
traffic announcement is over, it will return to
the previous mode and volume level. When
TA is turned on, SEEK, SCAN, AMS function
can only be re ceive d or saved when traffi c
programidentifcation(TP)codeisreceived.
EON (Enhanced Other Networks)
Wh en EO N da ta i s rece ive d, th e EO N
indicator lights and the TA and AF functions
are enhanced.
RDS servi ce availability varies with areas.
Pleas e und ersta nd if RDS serv ice is not
available in you area, the following service is
not available.
RDS Basics
AF (Alternative Frequency): When the radio
si gnal stren gth is poor, ena blin g the AF
func tion will allow the unit to automatical ly
searc h a noth er sta tion with the same PI
(ProgramIdentifcation)asthecurrentstation
but with stronger signal strength.
PS (Program Service name): The name of
station will be display instead of frequency.
AF Mode: Press TA/AF button to switch AF
mode on and off.
AF on: AF function is activated.
AF off: AF function is disabled.
Remark: AF indicat or on LCD will flash until
RDS information is received. If RDS ser vice
is not available in your area, turn off the AF
mode.
RE G M od e : Pres s PTY for mo re th an 2
seconds to switch REG mode on and off.
RE G on: AF functio n will imple ment t he
regional code (of the PI) and only stations in
the current region can be tuned automatically.
REG off: AF function will ignore the regional
code( of the PI) and statio ns in the ot her
regions can also be tuned automatically.
TUNER OPERATION
FM/AM Band
During radio play, press the BAND button to
choose between three FM and two AM bands.
The indication “AM” or “FM” appears on the
display panel according to your selection.
Up Tuning
Press the seek up >>| button to tune stations
upward step-by-step. The current frequency
will be shown in digital format on the display
panel.
Press and hold the seek >>| button to the next
available station.
Down Tuning
Press the seek down |<< button to tun e
stations downward step-by-step.
Press and hold the seek down |<< button to
the previous available station.
Auto Store
Press the AMS button to scan preset stations
1-6. Hold it to automatically select six strong
stations and store them in the current band.
The n ew stati ons r eplace stations alre ady
stored in that band.
RDS (Radio Data System)
Page 21
8
TA: Traffc informationcanbereceivedfrom
the current station or stations in other network.
AF: T he f req uen cy li st of pre set R DS
st ati on s is upd at ed by EO N da ta. EON
enables the radio to make fuller use of RDS
inf ormat ion. It cons tan tly upda tes the A F
list of preset stations, including the one that
currently tuned into. If y ou preset a sta tion
around the area at your home, you will later
be able t o recei ve the same s tation a t an
alternative frequenc y, or any other stati on
serving the same pr ogram, EON also keeps
track of locally available TP stations for quick
reception.
PTY Reception ( Program Type )
RDS FM stat ion s provide a progr am type
identifcationsignal.
Example: news, rock, info, sport, etc.
PTY Type Preset
Press PTY button once to enter the MUSIC
ty pe or pre ss “ PT Y ” tw ic e to en te r the
SP EECH type. Th en use number button
to select the desired program type. The
selected PTY type is shown and searching
star ts if n o other functio n is select ed for 2
seconds. If there is no corresponding program
type, NO PTY is shown and the unit will
return to normal mode.
RDS (Radio Data System) PLAYING MP3/WMA FILES
Display Information
During playback, ID3 tag information display
sc rolli ng on the sc reen: FOLDER , FIL E,
ALBUM, TITLE, ARTIST and Track Number/
Elapsed Time.
Folder Up/Down
Press the 5/DN button to go to the previous
folder. Press the 6/UP button to go to the next
folder.
Direct Song/File Access
1.
Press the AMS button once and press the
knob to enable direct track searching.
2. R otate the VOL/MENU control to select a
digit.
3. P ress the VOL/MENU control to confirm
entryandthetensdigitwillfash.
4. R otate the VOL/MENU control to select
digit.
5. R epeat above steps to enter the hundreds
and thousands digit, if necessary.
NOT E: The u nit wi ll only a ll ow t he
selection of digits that correspon d with
thenumberofflesonthemediayouare
searching.
6. O nce the track n umbe r appears on the
screen, long press the VOL/MENU control
Searching Folders/Files
1.
toplaytheselectedsong/fle.
Press the AMS button twice and press the
knobtoaccesstheflesearchoption.
2. R otate the VOL/MENU control to select
the desired directory/song.
3. P ress the VOL/MENU control to view the
flesinsidetheselecteddirectory.
4. R otate the VOL/MENU control to select
the song/file. Long press the VOL/MENU
controltoplaytheselectedsong/fle.
Searching by Name (CHAR-SCH)
1.
Press the AMS butt on three time s and
press the knob to a ccess the character
search option.
2. R otate the VOL/MENU control to select
the characters A-Z, _ , - , + , and 0-9 for
thefrstcharacter.
3. P ress the VOL/MENU control to confirm
entr y of the charac ter and move to the
next position.
4. R epeat for up to eight characters.
5. P ress and hold the VOL/MENU control for
2 seconds to begin the search.
6. I f a directo ry is found, rotate the VOL/
MENUcontroltoselectthesong/fleinthis
directory/folder.
7. P ress and hold the VOL/MENU control for
2 seconds to play the selected song/file.
“NO MATCH” appears if there i s no file
beginning with the search string entered.
Page 22
9
MP3 Overview
MP3 is short for MPEG Audio Layer 3 and
refers to an audio compression technology
standard.
ThisproductallowsplaybackofMP3fles
on CD-R or CD-RW discs.
TheunitcanreadMP3fleswritteninthe
format compliant with ISO 9660. However
it does not support the MP3 data written by
the method of packet write.
TheunitcannotreadanMP3fle thathas
afleextensionotherthan".mp3".
If you play a non-MP3 file that has the
".m p3" e xte nsi on, yo u may h ear so me
noise.
In this manual, we refer to what are called
"MP3file"and"folder"inPCterminolog y
as"Track"and"Album",respectively.
Maximum number of directory level is 8,
inc ludin g the roo t directo ry. Maximum
numberofflesandfoldersperdiscis256.
The unit may not play tracks in the order of
track numbers.
The unit plays only the audio tracks if a
disc contains both audio tracks and MP3
fles.
PLAYING MP3/WMA FILES
When playing a disc of 8kbps or VBR*, the
elapsed playing time in the display window
will not be correct and also the intro play
may not function properly.
*VBR: Variable Bit Rate.
Note on creating your own CD-Rs or
CD-RWs containing MP3 fles
To en jo y h ig h q ua li ty so un d, we
recommend converting to MP3 files with
a sampling frequency of 44.1 kHz and a
fxedbitrateof128kbps.
DO NOT store more than 256 MP3 files
per disc.
Fo r ISO 9 660 -c omp li ant f orm at , the
maximum allowable depth of nested folders
is 8, including the root directory(folder).
Wh en CD- R disc is us ed, play bac k i s
possible only for di scs which have been
fnalized.
Make sure that when MP3 CD-R is burned
that it is formatted as a data disc and NOT
as an audio disc.
You shou ld not write non-MP3 files or
unneededfoldersalongwithMP3fleson
the CD-R otherw ise it takes a long t ime
until the unit starts
toplayMP3fles.
With some CD-R media, dat a may not
be properly wri tten depending on their
manufacturing quality. In this case, data
may n ot be reprod uced correct ly. High
quality CD-R disc is recommended.
Up to 16 characters are displayed for the
name of an Album or a Track. ID3 TAG
version 1.x is required.
Note that the unit may not play tracks in
the order that you wrote them to the disc.
Page 23
10
SEEK 1 / 2 mode
SEEK 1: Searching station will stop when the
next station is received.
SEEK 2: Searching station will stop when |<<
or >>| button is relea sed and next station is
received.
STEREO/MONO mode
Rotate to choose FM stereo or mono.
LOCAL/DX mode
Rotat e the knob to choose tuner sensitivity
local or distant.
VOL LAST/ADJ mode
Rotate the knob to choose power on volume
mode.
VOL LAST: The turn on volume level is the
volume level of latest power off.
VOL ADJUST: press to enter A-VOL mode,
then rotate to set the turn on volume level.
12/24 HOUR
Rotate the knob to choose clock format.
Press SEL/MENU button more than 2 seconds
to enter menu mode, then each press changes
the mode, rotate the knob to adjust.
TA mode
If
theTA(Traffc Announcements)isturnedon
and there is no traffic program identification
code received in the specified time, no TA/
TP will display and either TA ALARM or TA
SEEK will be activated.
TA ALARM : Alarm is turned on.
TA SEEK: TA SEEK is automatically activated.
MASK mode
In so me ca se s, th e AF fun ctio n may be
influenced b y some interference, examp les
are signals with strong field but wi thout the
RDS data. For this reason, the unit has two
options to avoid the above interference.
MASK DPI mode : Only AF which has different
programidentifcationismasked.
MASK ALL mode : The AF which has different
programidentifcationandNORDSsignalwith
highfeldstrengthismasked.
TA VOL mode
Rotate the knob to adjust TA volume level.
RETUNE mode
RE TUNE-S or RETUNE- L i s tim e lengt h
selection of TA SEEK retune interval.
RETUNE-S: short, TA SEEK retune interval is
45 seconds.
RETUNE-L: long, TA SEEK retune interval is
180 seconds.
Rem ark : R ETU NE mode functions for TA
during TA SEEK mode only.
DSP mode
Rot ate the cont rol to choose DSP sound
effect: POP - ROCK - CLASSIC - FLAT - OFF
EPS mode
ES P 12s: Se le cted as CD -E SP time 12
seconds, MP3-ESP time >100 seconds.
ES P 45s: Se le cted as CD -E SP time 45
seconds, MP3-ESP time >100 seconds.
MULT ON/OFF
Multi Session on/off (Multi session off: mixed
CD , ONE session CD; Multi sessio n on:
Mixed, Extra, multi session CD)
LOUD ON/OFF
Rotate the knob to choose loudness on or off.
BEEP ON/OFF
Rotate the knob to choose button beep sound
on or off.
MENU FUNCTION
Page 24
11
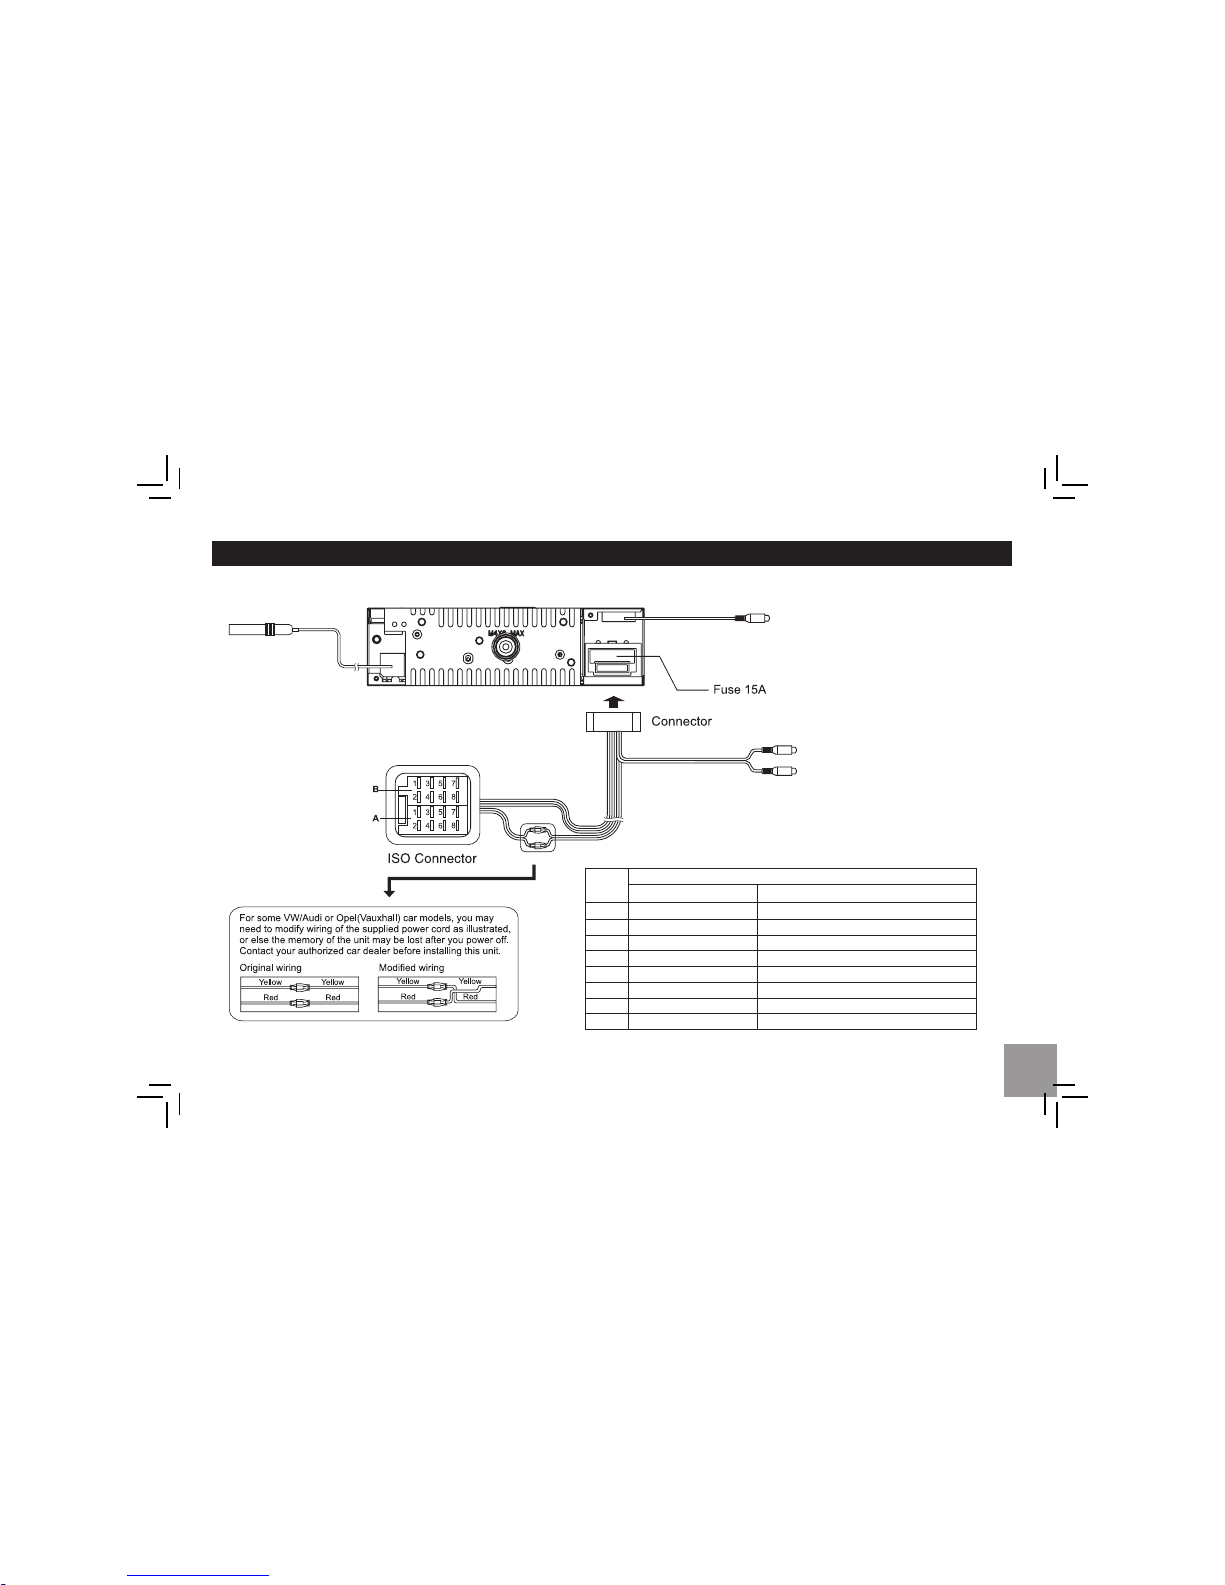
Electrical Connections
Wiring Diagram
ANTENNA
Rearlineout
(Gray)
R(Red)
L(White)
Green
Sub-woofer out
Function
Location
Connector A Connector B
1 Rear Right (+) / Purple
2 Rear Right (-) / Purple with Black Stripe
3 Front Right (+) / Gray
4 Battery 12V(+) / Yellow Front Right (-) / Gray with Black Stripe
5 ANT/AMP control / Blue Front Left(+) / White
6 Front Left(-) / White with Black Stripe
7 ACC+ / Red Rear Left (+) / Green
8 Ground / Black Rear Left (-) / Green with Black Stripe
Page 25
12
INSTALLATION GUIDE
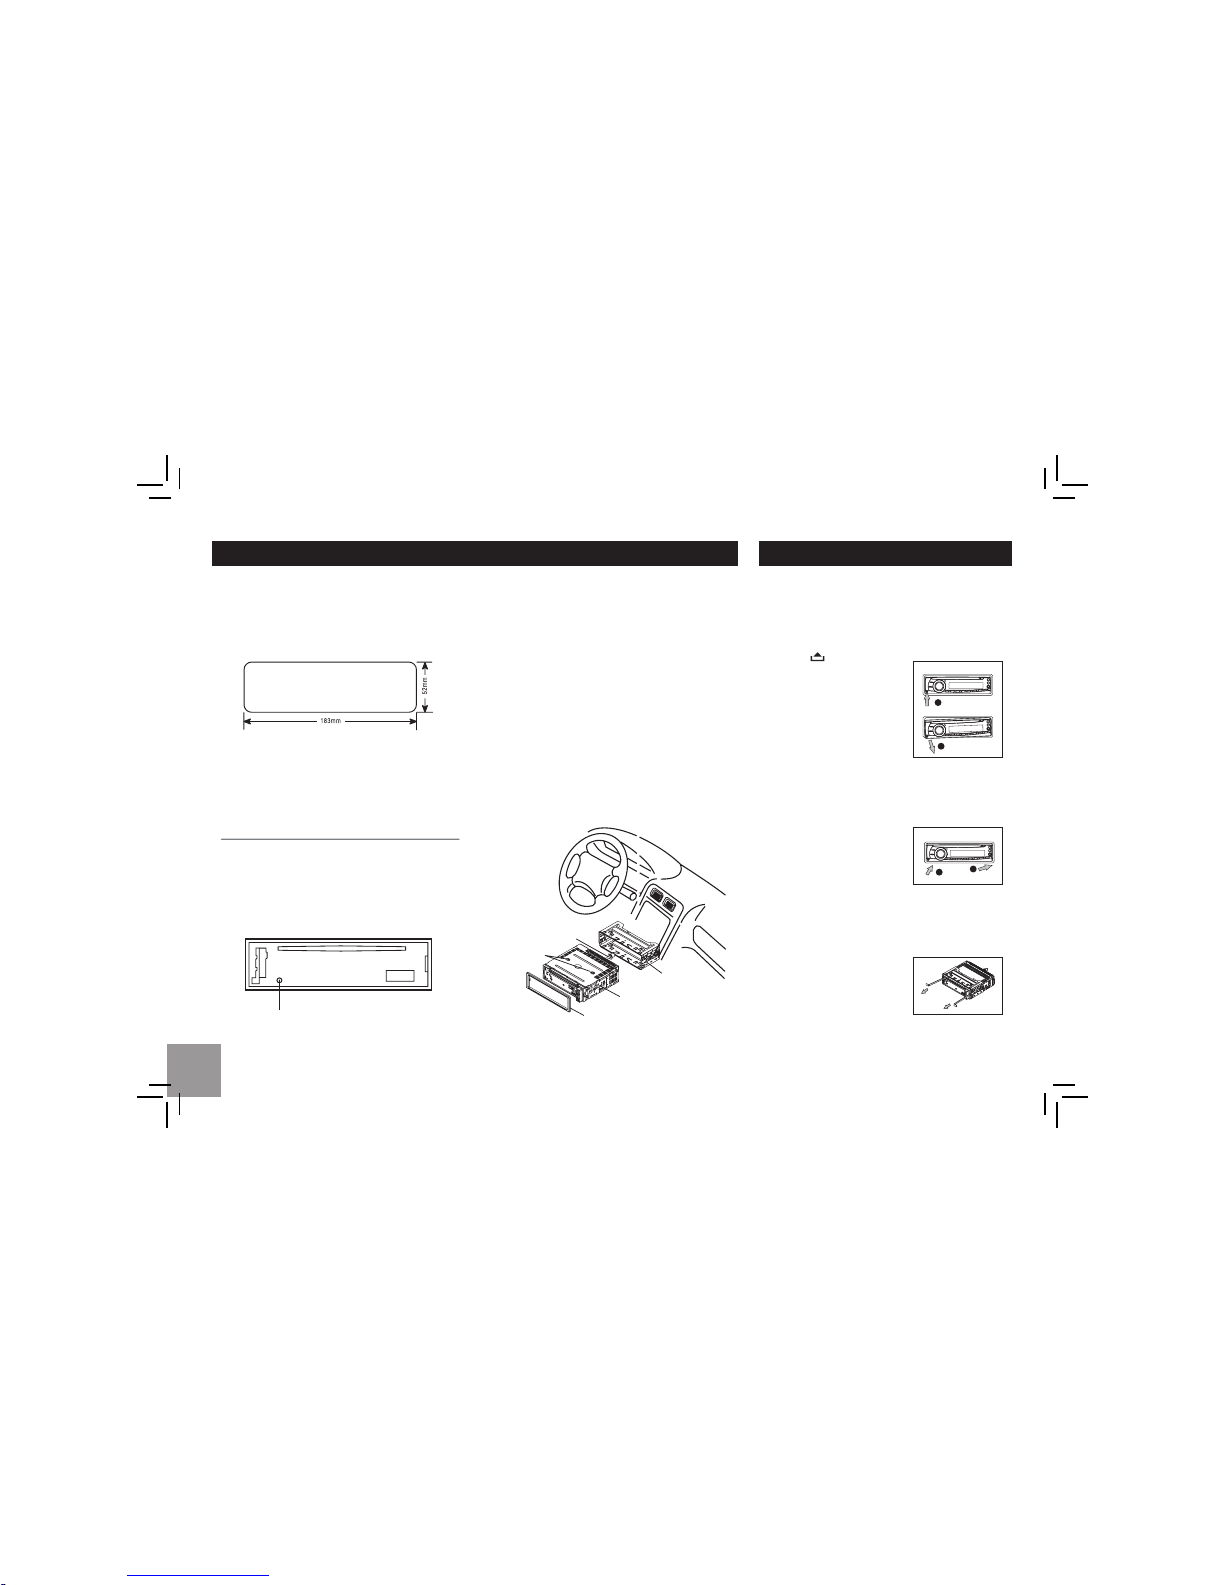
Installation Opening
This unit can be installed in any dashboard
havin g an open ing as show n b elow. The
dashboard should be 4.75mm - 5.56mm thick
in order to be able to support the unit.
Iftheopeningistoosmall,carefullycutorfle
as necessary until the sleeve easily slides into
the opening. Do not force the sleeve into the
opening or cause it to bend or bow. Check for
suffcientspacebehindthedashboardforthe
unit chassis.
Reset
Press the RESET button with a pointed object
to reset the unit to the original status.
Note: Press the RESET button will erase the
Installation Procedures
1.
clock setting and stored stations.
If relevant, remove any other audio system
from the car.
2. I nse rt t he mo unt ing s lee ve in to th e
dashboard.Fixitfrmly inplacebyfolding
down the metal tabs.
3. P e r f or m t he re q ui r e d e l e ct r i ca l
connections.
4. T hen check that everything works before
installing the main unit.
5. R emove the two screws on the top of the
unit, otherwise, the unit will not work.
6. I nstall the car radio in the dashboard using
the supplied screws (M5x6mm).
7. Attach the outer trim frame.
If you are not sure how to install this unit
correctly,contactaqualifedtechnician.
Mounting sleeve
Main unit
Trim plate
Remove the
two screws
Mounting bolt
Rubber cushion
Anti-Theft System
This unit is equipped with a detachable panel.
Removing this panel makes the radio totally
inoperable.
Remove the detachable panel
1.
Press button.
2. Hold the part popped out
and pull the panel out.
3. Gently press the button
of the case and open the
cove r. Plac e the pane l
into the case and take it
with you when you leave
the car.
Install detachable panel
1.
Fi x ri ght pa rt of fac e
plate in the panel slot of
the unit.
2. Press down the left side
of the face plate until it
clicks into the panel slot.
Remove the unit
1.
Switch off the power of the unit.
2. Remove the panel and
the trim plate.
3. Insert both L-Keys into
the hole on the front of
the set until they lock.
4. Pull out the unit.
2
2
1
1
2
2
1
1
2
2
1
1
Res et
Page 26
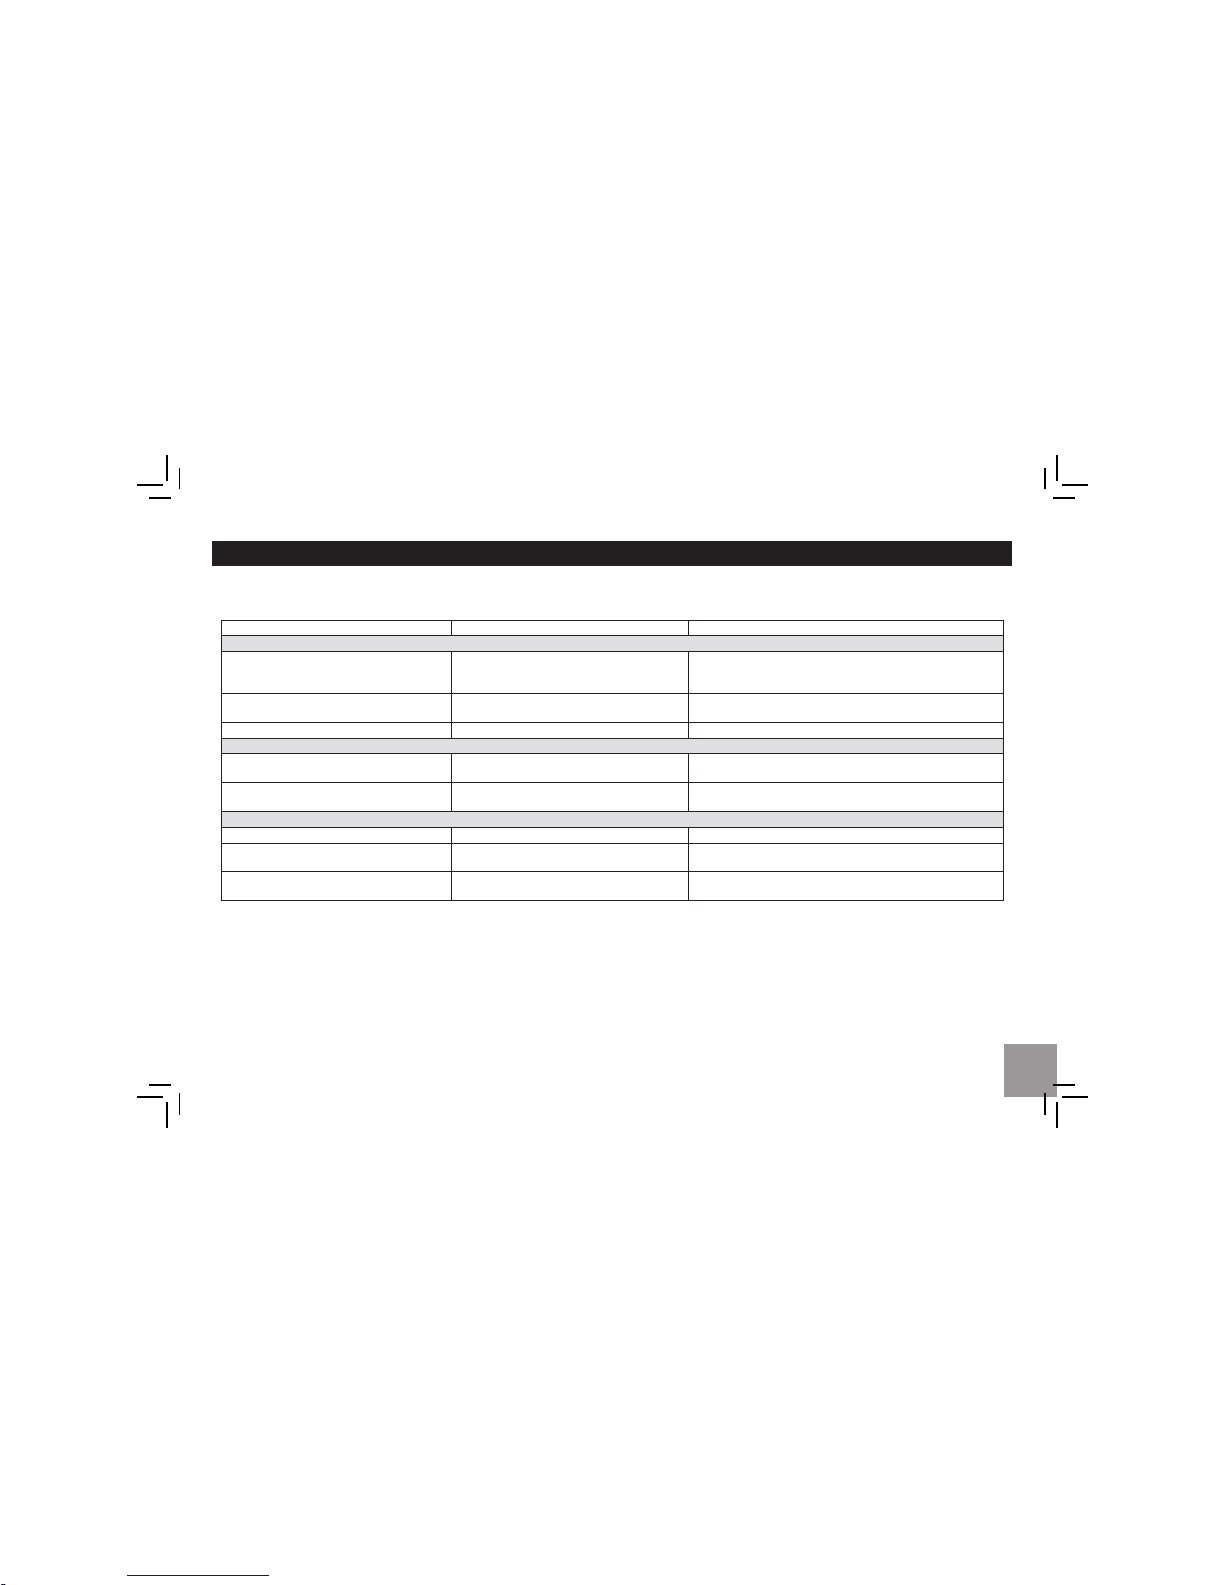
13
TROUBLESHOOTING
The following checklist can help you solve some problems which you may encounter when using the unit. Before consulting it, check the connections
and follow the instructions in the user manual. Do not use the unit in abnormal condition, for example without sound, or with smoke or foul smell can
causefreorelectricshock,immediatelystopusingitandcallthestorewhereyoupurchasedit.
Problem Possible cause Solution
General
The unit will not switch on.
Car ignition is not on.
Cable is not properly connected.
Fuse is burnt.
Turn your car key in the ignition.
Check cable connection.
Replace fuse with a new fuse of the same capacity.
No sound
Vol ume is set at min imum or the mute
function is on.
Check the volume or switch the mute function off.
The unit or screen does not work normally. The unit system is unstable. Press the RESET button.
DISC mode
The appliance will not play discs.
The disc is inserted incorrectly.
The disc is dirty or damaged.
Disc must be inserted with the label side facing up. Clean
the disc and check for damage. Try another disc.
Sound skips due to vibration.
Mountingangleisover30°.
Mounting is unstable.
Adjustmountingangletolessthan30°.
Mount the unit securely with the supplied parts.
TUNER mode
Unable to receive stations. The antenna is not connected properly. Connect the antenna properly.
Poor quality reception of radio station.
The antenna is not fully extend ed or it is
broken.
Fully extend the antenna and if broken, replace it with a
new one.
Preset stations are lost. The battery cable is not properly connected.
Connect the permanent live on the unit to the permanent
live on the vehicle.
Page 27
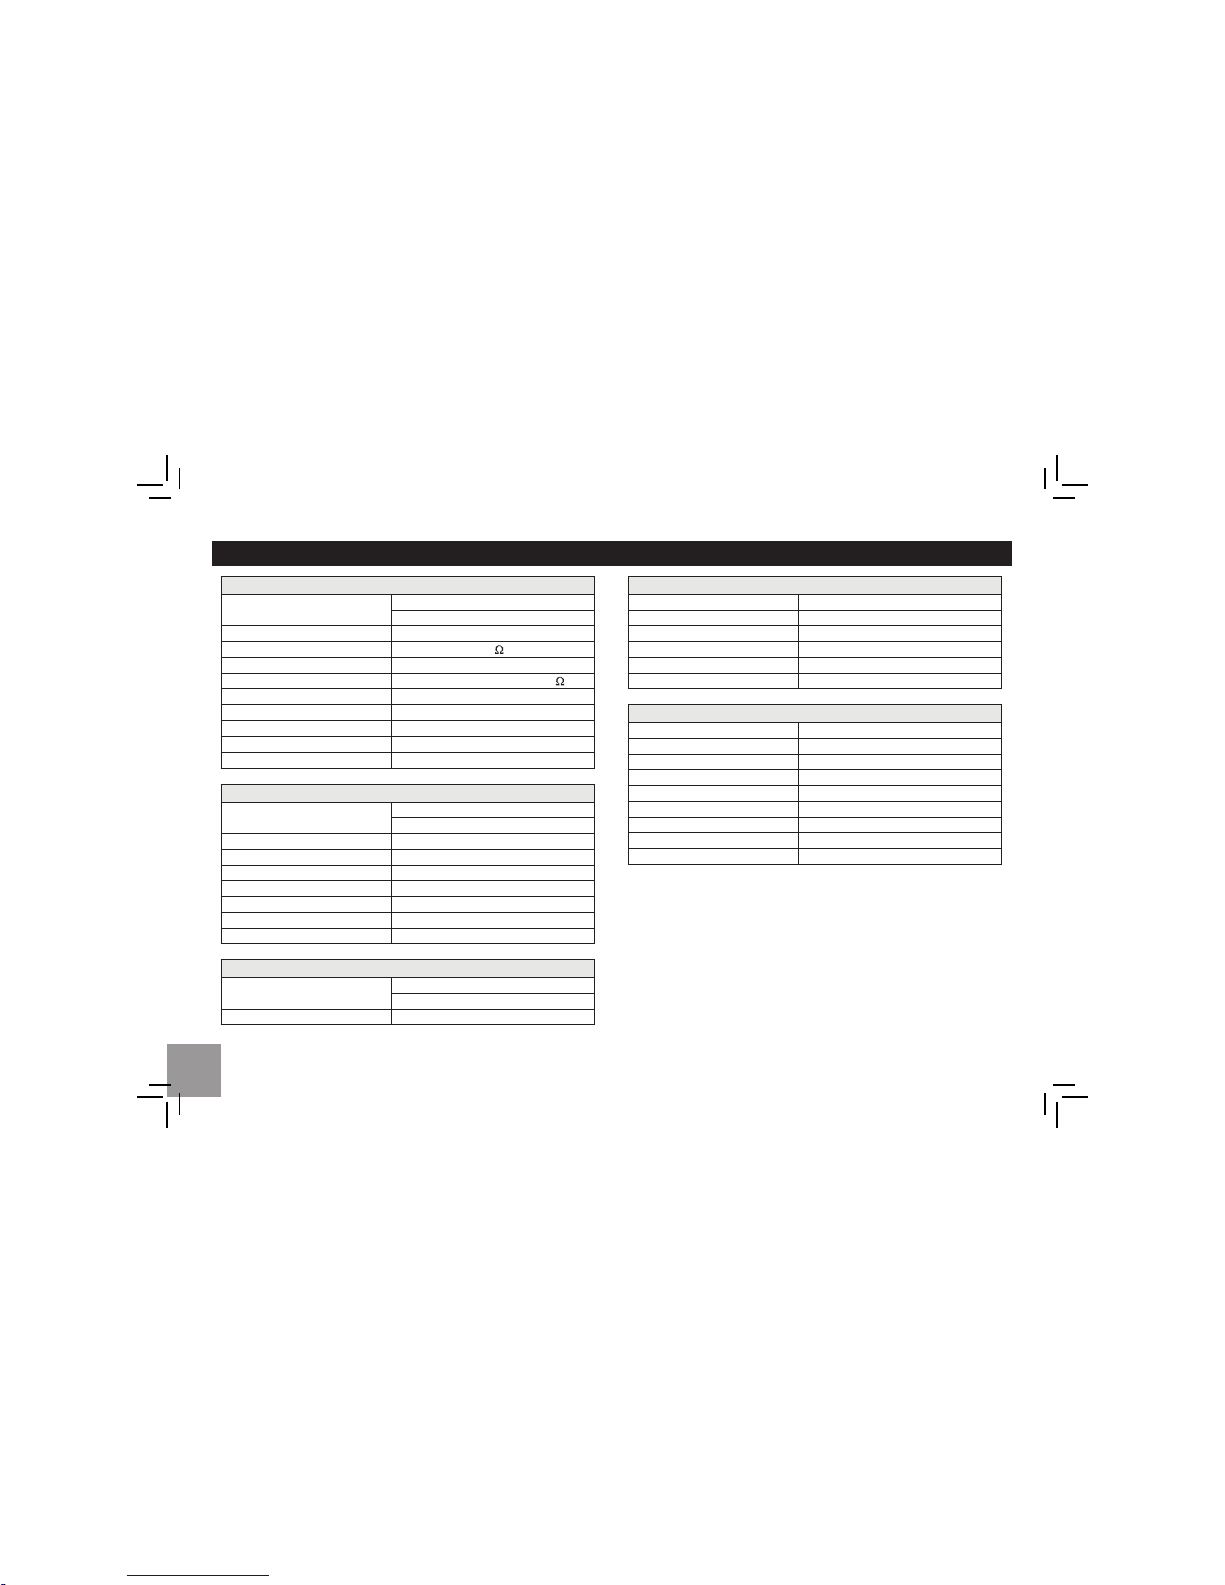
SPECIFICATION
14
General
Power supply:
12V DC (11V-16V)
Test voltage 14.4V, negative ground
Maximum power output: 45Wx4 channels
Continuous power output: 20Wx4 channels (4
,10% T.H.D.)
Suitable speaker impedance: 4-8 ohm
Pre-Amp output voltage:
2.0V (CD play mode: 1KHz, 0 dB, 10 K load)
Fuse:
15A
Dimensions(WxHxD): 178x50x160mm
Weight: 1.7kg
Aux-in: ≥300mV
Sub-woofer out 2V
FM Stereo Radio
Frequency range:
87.5-108.0 MHz (EUROPE )
87.5-107.9MHz (America)
Usable sensitivity:
8 dBì
Quieting sensitivity(S/N=50dB): 12 dBì
Frequency response: 30Hz-15kHz
Stereo separation: 30dB (1kHz)
Image response ratio: 50dB
IF response ratio: 70dB
Signal/noise ratio: 55dB
MW(AM) Radio
Frequency range:
522-1620 KHz (EUROPE)
530-1710 K Hz (America)
Usable sensitivity(S/N=20dB): 30 dBì
Note:Specifcations andthedesignaresubjecttochangewithoutnotice
due to improvements in technology.
Disc Player
System:
Disc digital audio system
Frequency response: 20Hz-20kHz
Signal/noise ratio: >80 dB
Total harmonic distortion: Less than 0.20% (1kHz)
Wowandfutter: Below measurable limits
Channel separation: >55 dB
Components
Mounting collar
1
Machine screws M5x6mm 4
Mounting bolt (50mm) 1
Wire connector 1
Removable face plate case 1
Trim plate 1
L-key 2
Operating instructions 1
Rubber cushion 1
Page 28

GoldMaster
12
 Loading...