

GOLDEN STATE INSTRUMENT CO GS-32CH264 User Manual
V1.2
User Manual
Final Assembly in USA
GS-32CH264
32 Channel H.264 DVR
User Manual
Golden State Instrument Co
This document contains preliminary information and subject to change without notice.
3002 Dow Ave Ste 228
Tustin, CA 92780 USA
Phone: 888-808-0909
www.goldenstateinst.com
2012.08.22 User Manual v1.2
1
WARNING
TO REDUCE THE RISK OF FIRE OR
ELECTRIC SHOCK, DO NOT EXPOSE
THIS APPLIANCE TO RAIN OR
This symbol is intended to
alert the user to the presence
of unprotected “Dangerous
voltage" within the product's
enclosure that may be strong
enough to cause a risk of
electric shock.
This symbol is intended to
alert the user to the presence
of important operating and
maintenance (servicing)
instructions in the literature
accompanying the appliance.
Disposal of Old Electrical & Electronic Equipment (Applicable in the European
This symbol on the product or on its packaging indicates that this product shall not be treated
as household waste. Instead it shall be handed over to the applicable collection point for the
recycling of electrical and electronic equipment. By ensuring this product is disposed of
correctly, you will help prevent potential negative consequences for the environment and
human health, which could otherwise be caused by inappropriate waste handling of this
product. The recycling of materials will help to conserve natural resources. For more detailed
information about recycling of this product, please contact your local city office, your household
waste disposal service or the shop where you purchased the product.
Union and other European countries with separate collection systems)
MOISTURE.
NOTE: This equipment has been tested
and found to comply with the limits for a
class digital device, pursuant to part 15 of
the FCC Rules. These limits are designed
to provide reasonable protection against
harmful interference when the equipment is
operated in a commercial environment.
This equipment generates, uses, and can
radiate radio frequency energy and, if not
installed and used in accordance with the
instruction manual, may cause harmful
interference to radio communications.
Operation of this equipment in a residential
area is likely to cause harmful interference
in which case the user will be required to
correct the interference at his own expense.
Notice: Ghosting or fractured images may occur on the screen when there is a suddenly surge
or lightning stroke which cause damage on IC in the DVRs.
2012.08.22 User Manual v1.2
2

Table of
Contents
Chapter 1 LIVE
Chapter 2 MAIN MENU
2-1 Auto
2-2 Backup
2-2.1
2-2.2 Select Backup
2-3
Configure ......................................................................................................................
2-4 Time
2-5 System
2-5.1 Search Criteria
2-6 PTZ
2-7
SPOT............................................................................................................................
2-8 Zoom
2-9 Shortcut
2-9.1
2-9.2 Network stream
Chapter 3 CONFIGURATION
3-1 Record Setup
3-1.1 Continuous
3-1.2 Schedule
3-1.3 Network
3-2 Event
3-2.1 Video
3-2.2 Motion
3-2.3
3-2.4 System
3-3 Camera
3-3.1 PTZ Setup
3-4 Account
3-4.1
3-4.2 Other
3-5 Network
3-5.1 Networking
3-5.2 HTTP
3-5.3 DDNS
3-5.4 NTP
3-5.5 Mail Setup
OPERATIONS .............................................................................................. 5
SETUP ............................................................................................ 7
Sequential ............................................................................................................
.........................................................................................................................
Selection............................................................................................................
Device......................................................................................
Search .................................................................................................................
Logs.................................................................................................................
.................................................................................................
Operation..............................................................................................................
............................................................................................................................
toolbar ............................................................................................................
Options ..............................................................................................................
quality.....................................................................................
MENU................................................................................... 26
...............................................................................................................
Record...........................................................................................
3-1.1.1 Video Settings 27
3-1.1.2 Event Recording 28
Recording .........................................................................................
3-1.2.1 Configuration 30
3-1.2.2 Holiday Configuration 30
Stream ................................................................................................
Setup..................................................................................................................
Loss ........................................................................................................
3-2.1.1 Configuration 32
3-2.1.2 Event Handling 32
3-2.1.3 Receiver Setup 33
Detection..............................................................................................
3-2.2.1 Configuration 33
3-2.2.1.1 Motion Area Setup 34
3-2.2.2 Event Handling 35
3-2.2.3 Receiver Setup 35
Sensor ...............................................................................................................
3-2.3.1 Configuration 35
3-2.3.2 Event Handling 35
3-2.3.3 Receiver Setup 36
..............................................................................................................
3-2.4.1 Receiver Setup 36
Setup ..............................................................................................................
........................................................................................................
Setup ..............................................................................................................
Administrator .....................................................................................................
Users ......................................................................................................
3-4.2.1 Permission 40
Setup..............................................................................................................
Setup .............................................................................................
3-5.1.1 DHCP Setup 41
3-5.1.2 Static IP Setup 41
3-5.1.3 PPPoE Setup 43
3-5.1.4 3G Setup 43
Setup ......................................................................................................
Setup .....................................................................................................
Setup ........................................................................................................
........................................................................................................
10
11
11
12
13
13
17
18
19
21
21
22
24
25
26
26
28
31
32
32
33
35
36
37
38
38
38
39
41
41
44
45
45
46
2012.08.22 User Manual v1.2
3

3-6 Storage Setup
3-6.1 HDD Setup
3-6.2 USB Flash Derive
3-6.3 DVD-RW Setup
3-7 System
3-7.1 Auto Lock
3-7.2 Auto Reboot
3-7.3 Date/Time
..............................................................................................................
.......................................................................................................
Setup .................................................................................
................................................................................................
Setup ...............................................................................................................
.........................................................................................................
.....................................................................................................
Setup...............................................................................................
46
46
47
47
48
48
48
49
3-7.3.1 Time zone 49
3-7.3.2 Daylight Saving Time Setup 50
3-7.3.3 Change Date and Time 50
3-7.4 Monitor
3-7.5 Input
Setup ...................................................................................................
Setup .......................................................................................................
51
52
3-7.5.1 Remote Control Setup 52
3-7.5.2 Panel Setup 53
3-7.5.3 Mouse Setup 53
3-7.5.4 PTZ Keyboard Setup 54
3-7.5.5 Touch Screen Setup 54
3-7.6 Utility Setup
......................................................................................................
55
3-7.6.1 Export Configuration 55
3-7.6.2 Import Configuration 56
3-7.6.3 Reset Configuration 57
3-7.6.4 Export Logs 57
3-7.6.5 Clear Logs 58
3-7.6.6 Upgrade Firmware 58
3-8 System
3-8.1 DVR
3-8.2 Network
3-8.3 HDD
3-8.4 S.M.A.R.T
Chapter 4 REMOTE SOFTWARE INSTALLATION and
4-1 Application Software Connection
4-2 IE
4-3 AP Software and IE Connection
Information ......................................................................................................
Information ...............................................................................................
Information .........................................................................................
Information...............................................................................................
Information ......................................................................................
SETUP .......................................
.................................................................................
Connection...............................................................................................................
Operation ..................................................................
59
60
60
60
60
61
61
63
65
2012.08.22 User Manual v1.2
4
Note: The number of channel, sensor, relay, split screen, and resolution in the following
graphs are just for reference. The real graphs differ from different models.
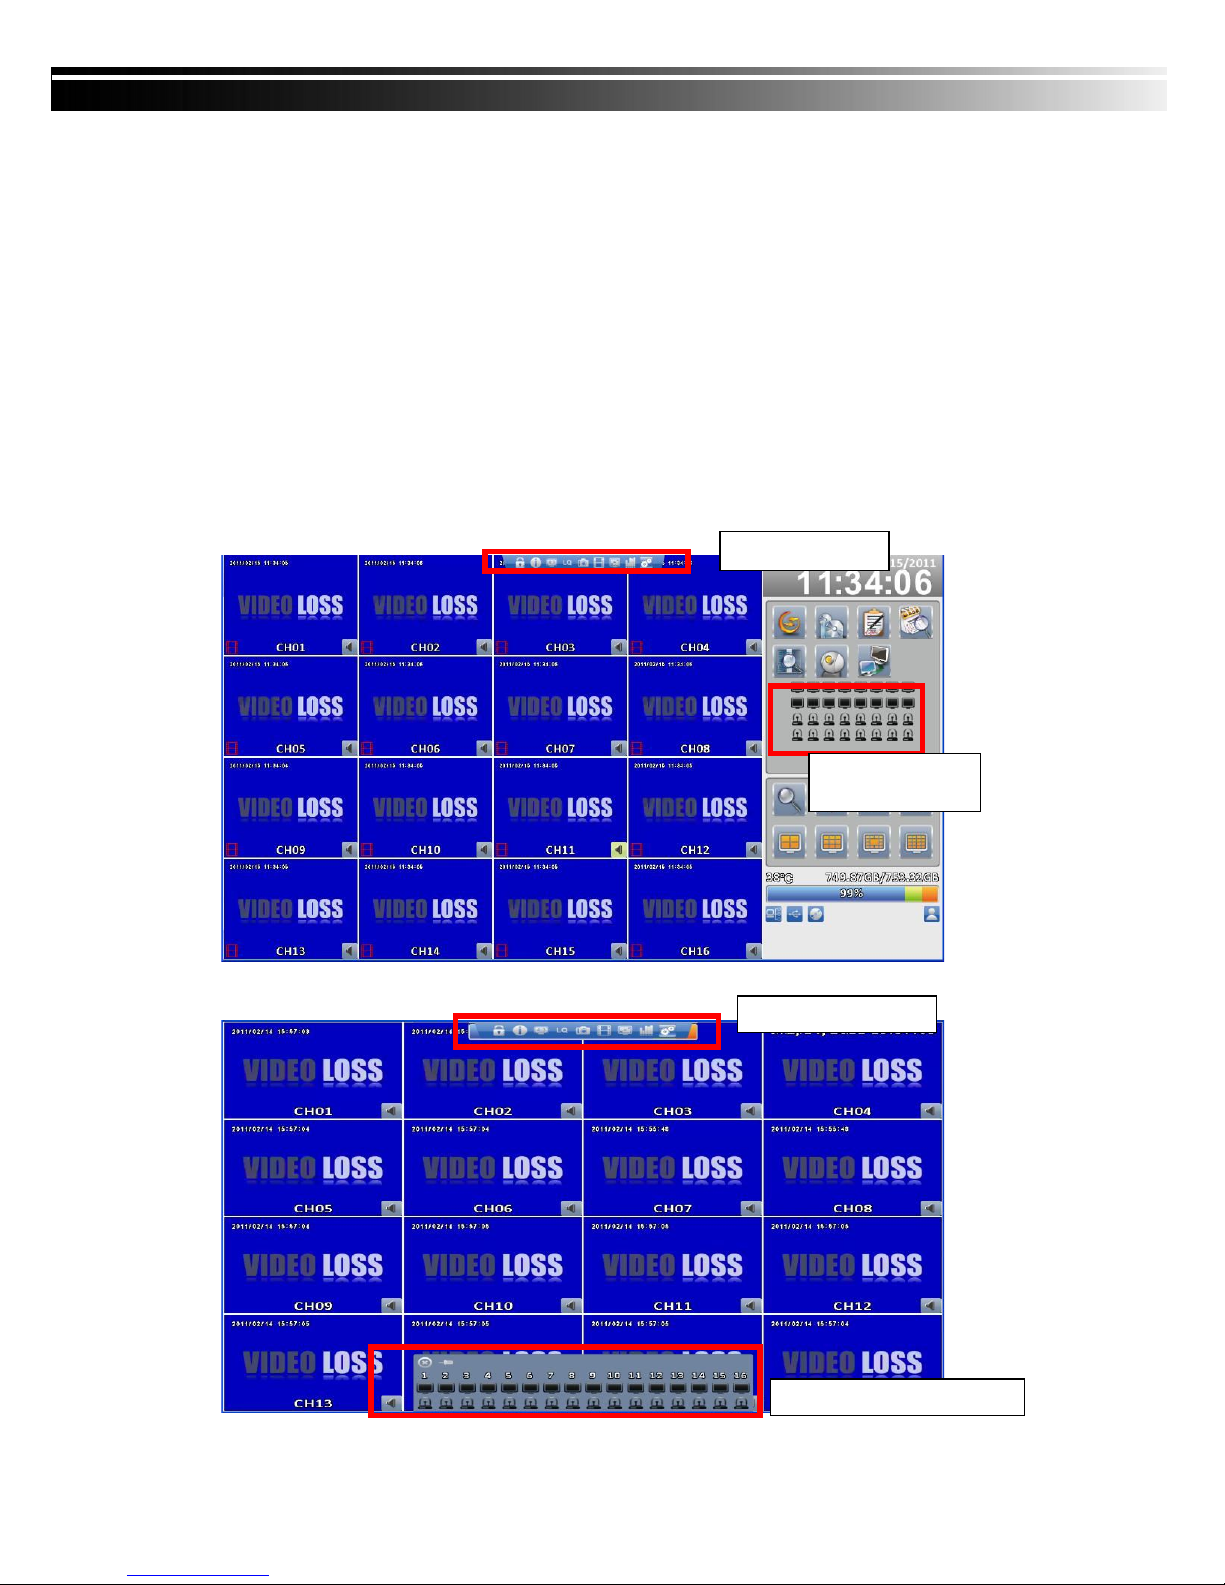
Chapter 1 LIVE OPERATIONS
In live mode, you can monitor all the channels screen, listen to live audio, as well as the
operation of the screen, and provide support for 4:3, 16:9 screen aspect ratio. In live mode, you
can monitor all the channels screen, listen to live audio, as well as the operation of the screen,
and provide support for 4:3, 16:9 screen aspect ratio. 16:9 display mode: the main menu and
the DVR system state appears in the right; 4:3display mode: Right-click to display the main
menu. Under any of the display, move the mouse above the screen, the shortcut toolbar will
appear. In 4:3 mode, move the mouse below the screen, there will be prompt window of the
channel state. The following describes the live mode, the remote control operation with the
mouse, and screen prompt may appear.
16:9 diplay - Operation screen
4:3 display - Operation screen
Shortcut toolbar
Shortcut toolbar
Channel status window
Channel status
window
2012.08.22 User Manual v1.2
5
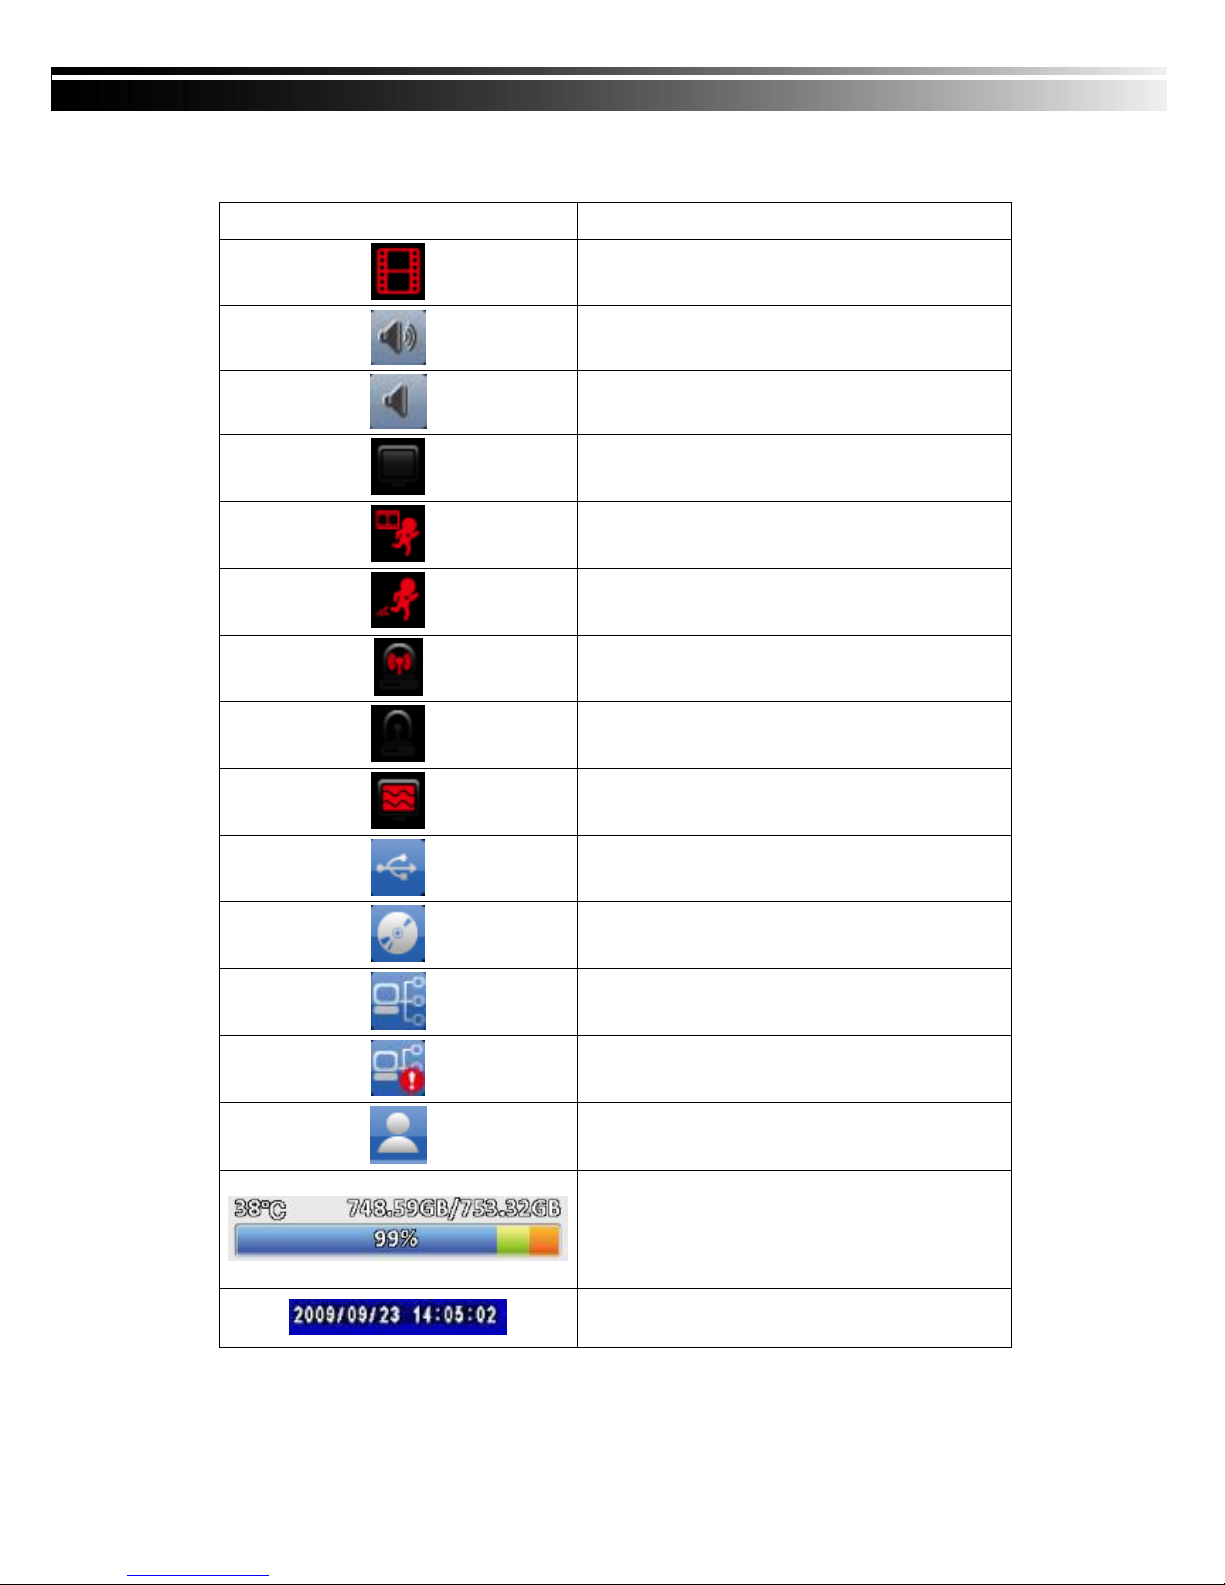
Table 1-1 Icon description in live mode
Icon Description
Recording is activated
Live audio is activated
Live audio is not activated
Video signal is Normal
Event recording is active in this channel
Motion detection is triggered in this channel
Alarm is triggered in this channel
Alarm is not triggered in this channel
The channel video loss alarm has been triggered
USB device has been detected
DVD device has been detected
Network has been detected
Network has not been detected
Displays the current user
Displays the current disk space has been used
(99% of the representatives have to use 99%,
and the remaining 1%), upper left corner is
the hard disk temperature
Local playback, remote live, remote playback,
backup video, each channel will display the time
2012.08.22 User Manual v1.2
6
Chapter 2 MAIN MENU SETUP
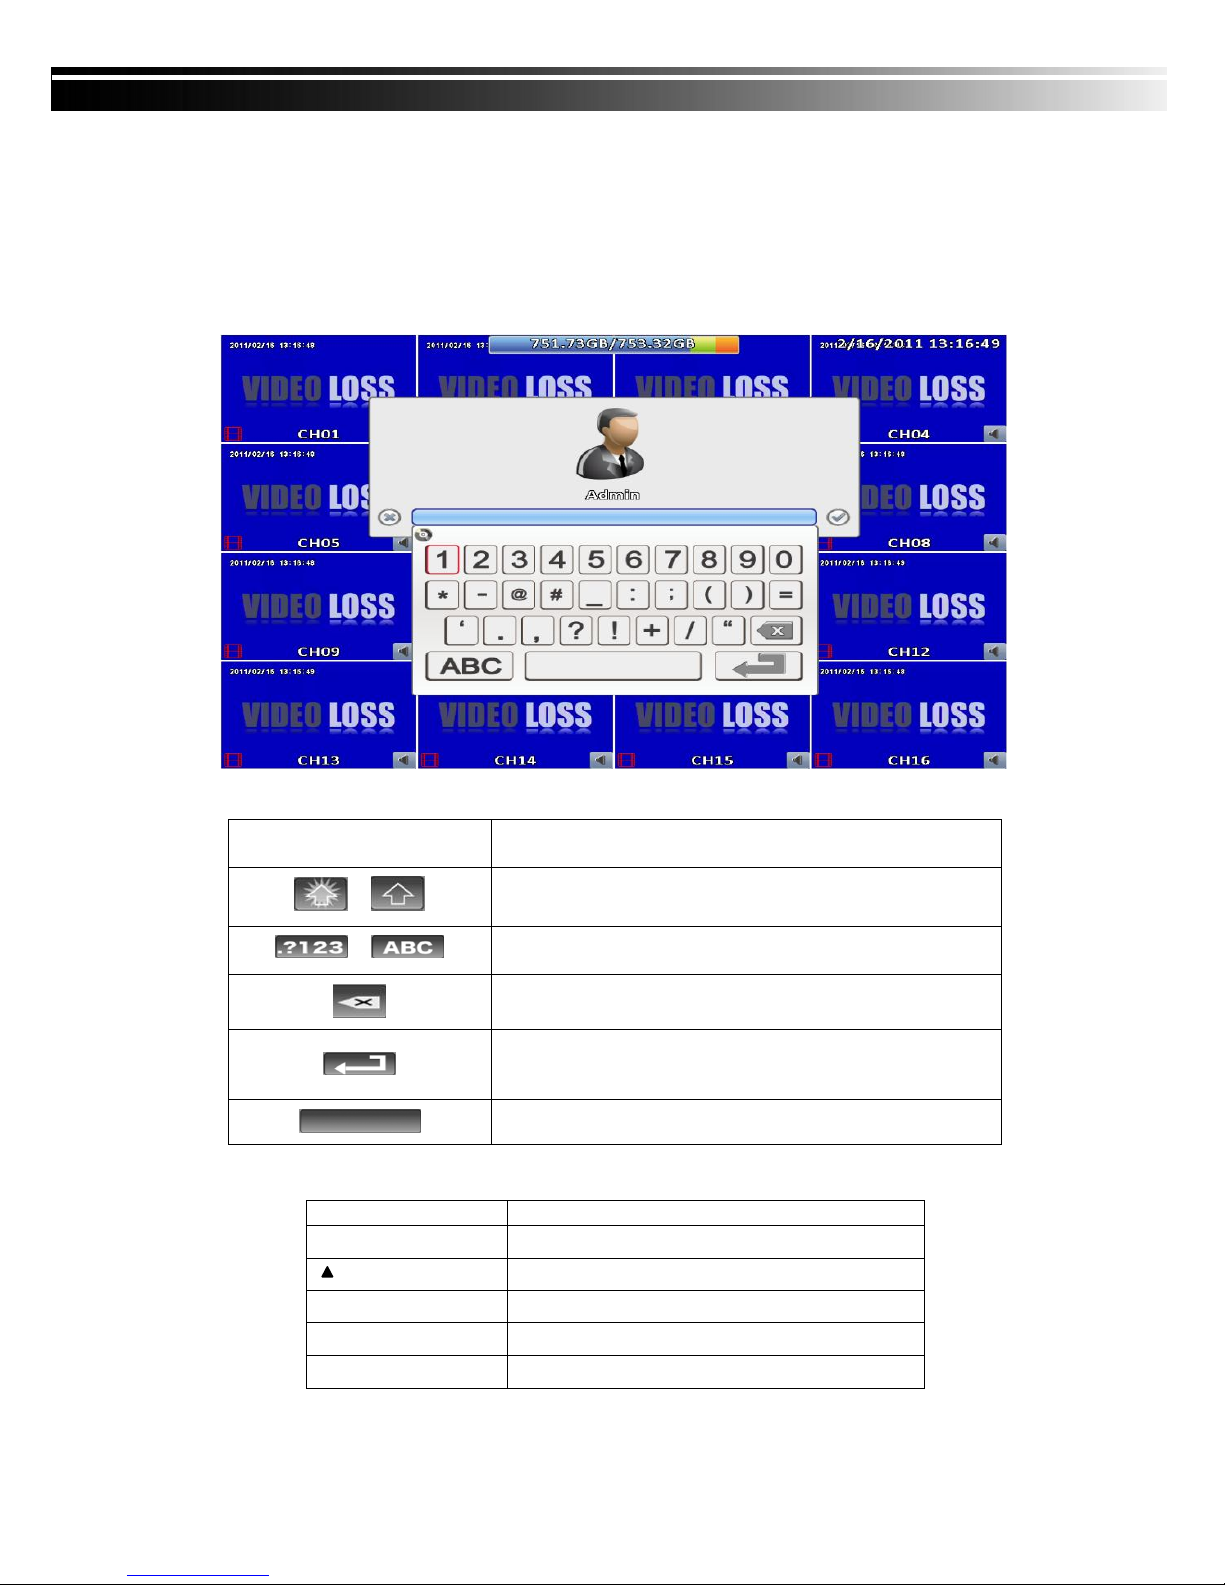
To enter the main menu and set up DVR, log-in account and user password are required.
The default password of the administrator is “123456”. Please check the “Account Setup” for
related setup of other log-in users.
Table 2-1 Some definition of virtual keyboard
Icon
/
/
Description
Switch between capital and small letters.
Switch between numbers and letters
Delete the last character。
Enter to identify the password. It will enter the setup menu,
Table 2-2 The operation of remote control under the setting menu
Item
MENU
ESC
ENTER
If the password is verified
Space key
Description
Switch to different options under one item
Switch to different items
Save setup and back to LIVE mode
Back to Upper level of menu without saving
Enter the menu, or display virtual keyboard
2012.08.22 User Manual v1.2
7
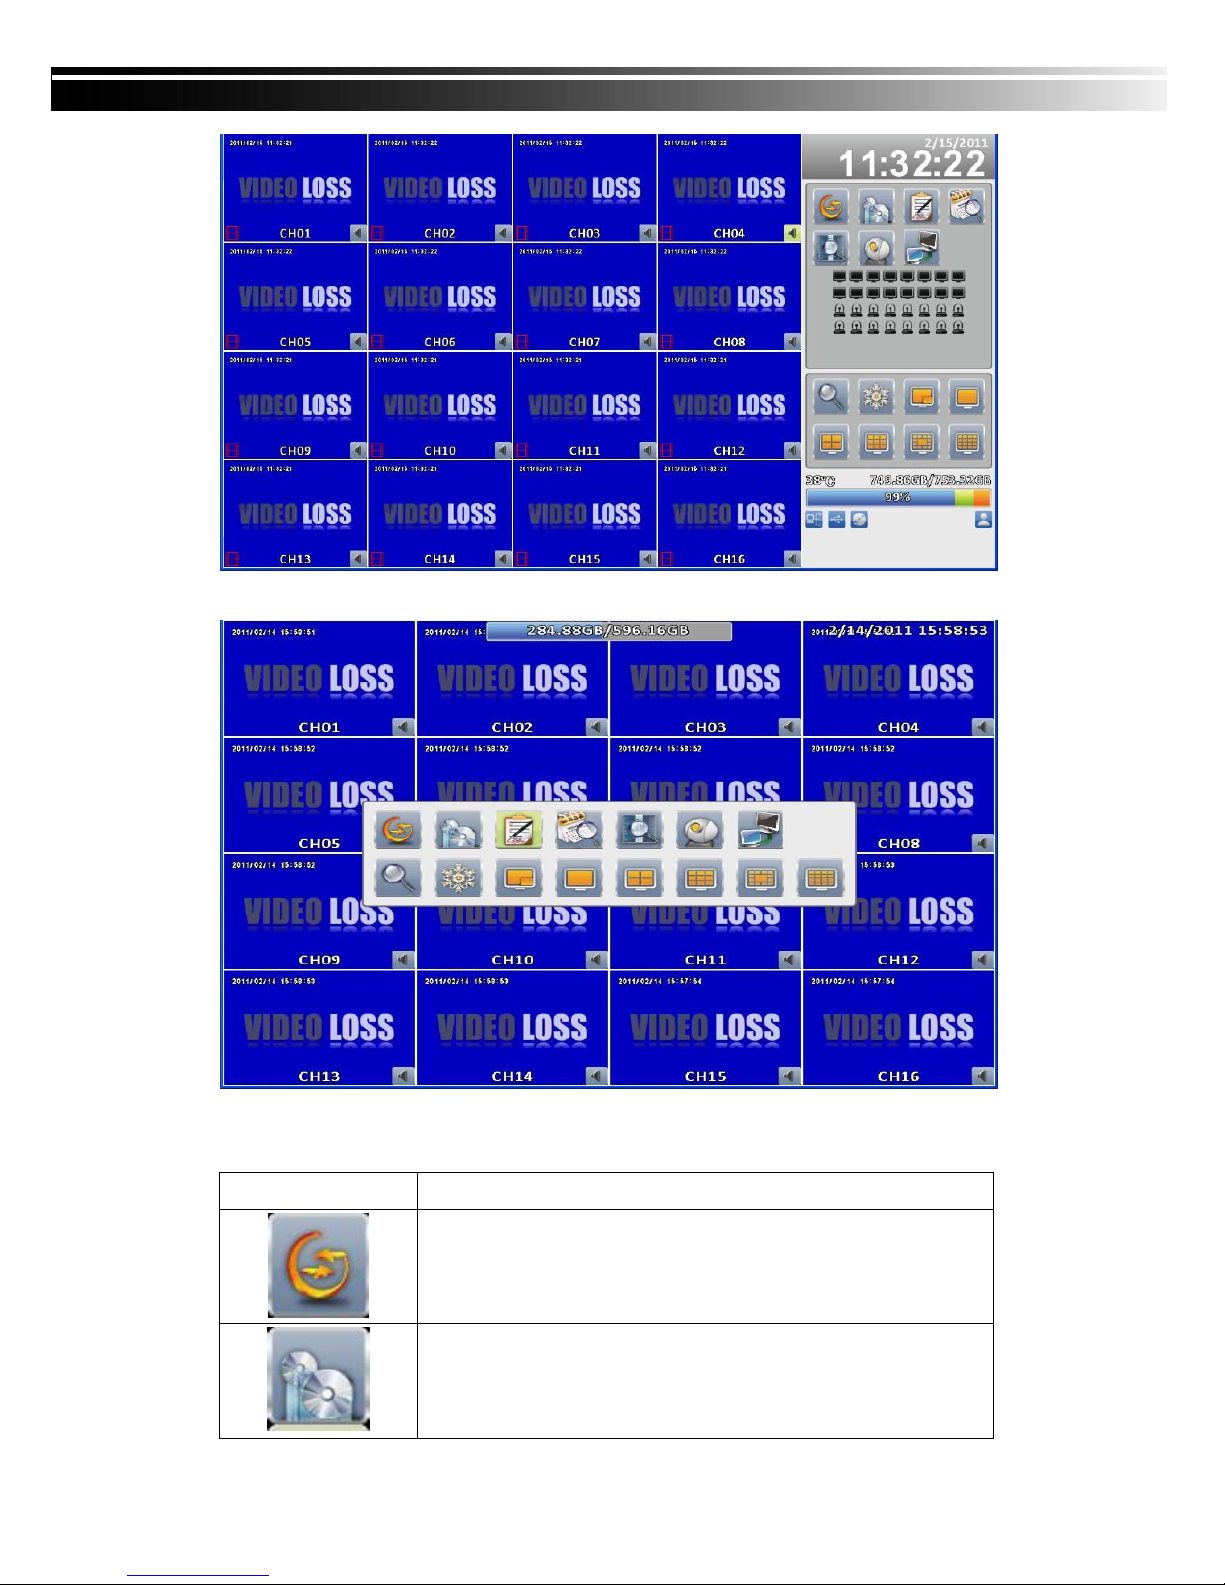
16:9 display, the main menu on the right of the screen
4:3 display, right-click on the screen to display the main menu
Table 2- 3 Function descriptions
Icon Description
Auto channel switch menu
Backup menu
Backup video data from DVR HDD
2012.08.22 User Manual v1.2
8

Configuration menu
Recording settings, event settings, camera settings, account
settings, network settings, storage settings, system configuration,
and information
Time search menu
Choose a specific time of the video data playback
Event search menu
DVR will automatically record the event. The event list
will show the event occurred time, event category,
channel events, and other information.
Enable PTZ mode
SPOT mode。SPOT on the second monitor
Zoom in
Enlarge video image, 2x to 8x digital zoom
Enable image freeze function
Disable image freeze function
Enable/Disable PIP
Switch to single screen
Switch to 4-split display
2012.08.22 User Manual v1.2
9
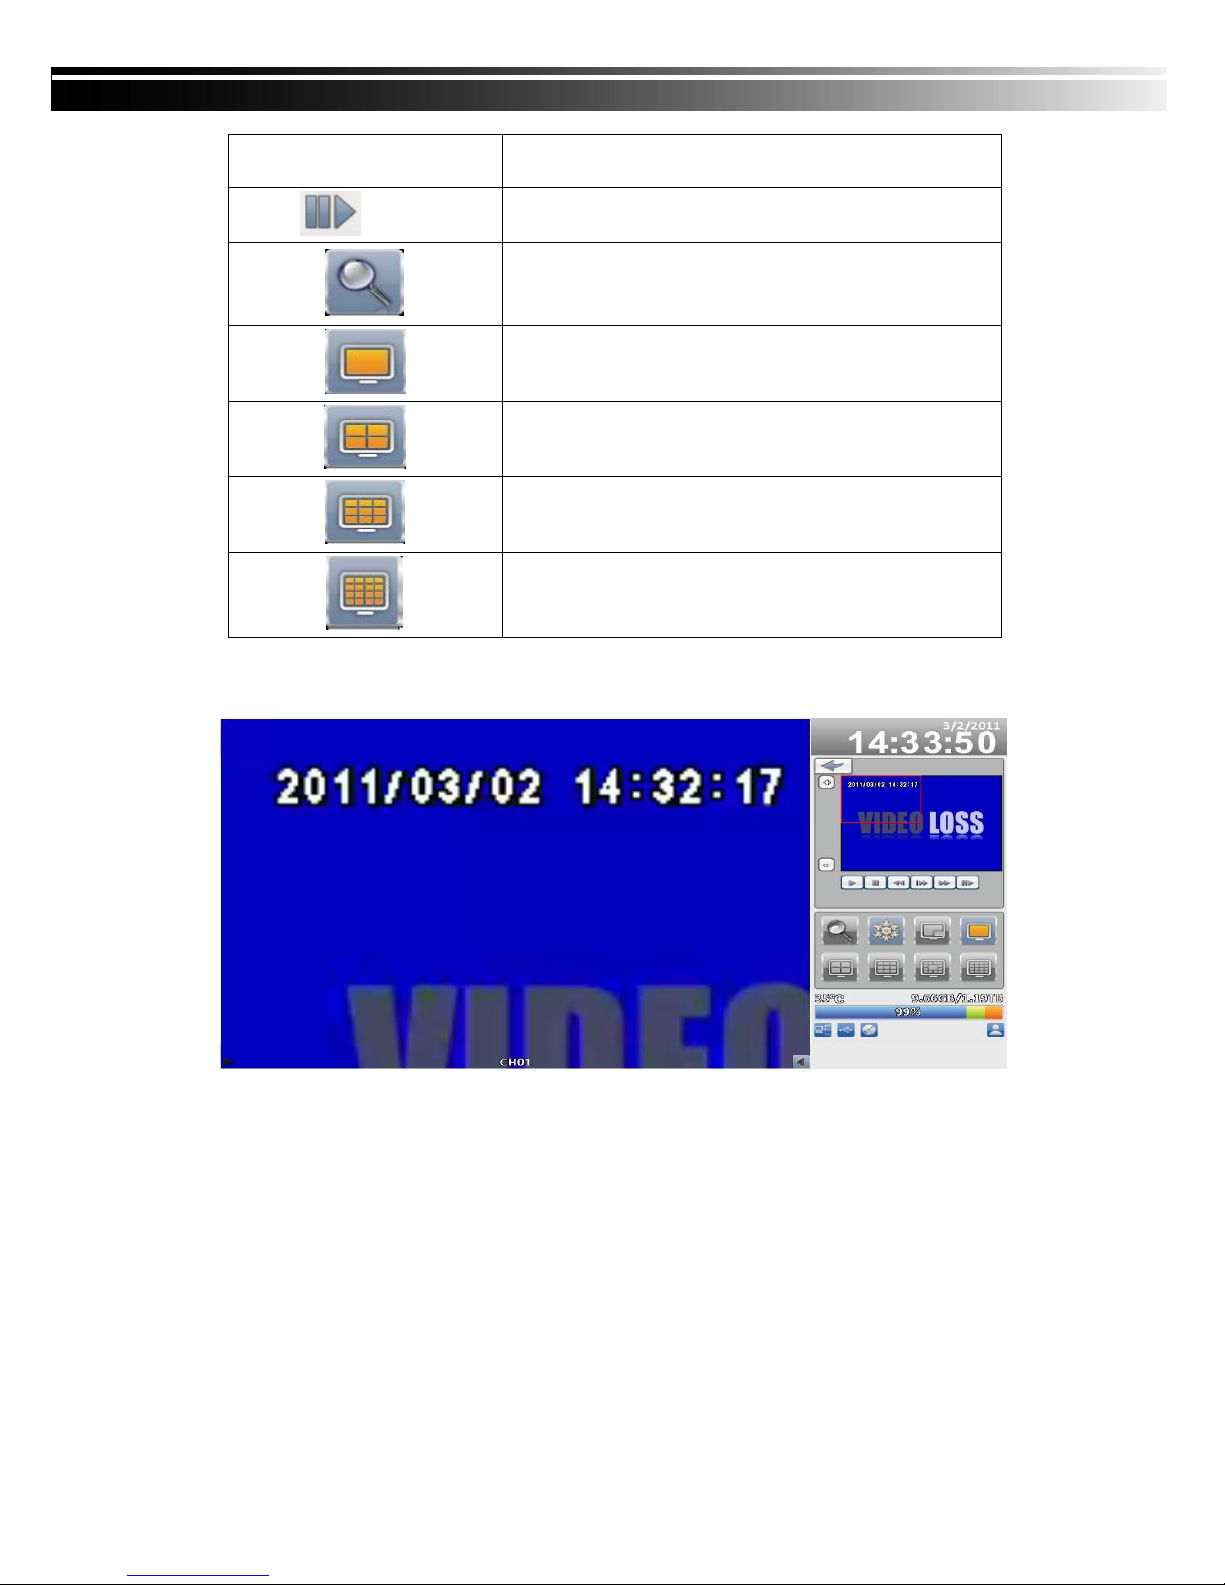
Switch to 9-split display
Switch to 13-split display
Switch to 16-split display
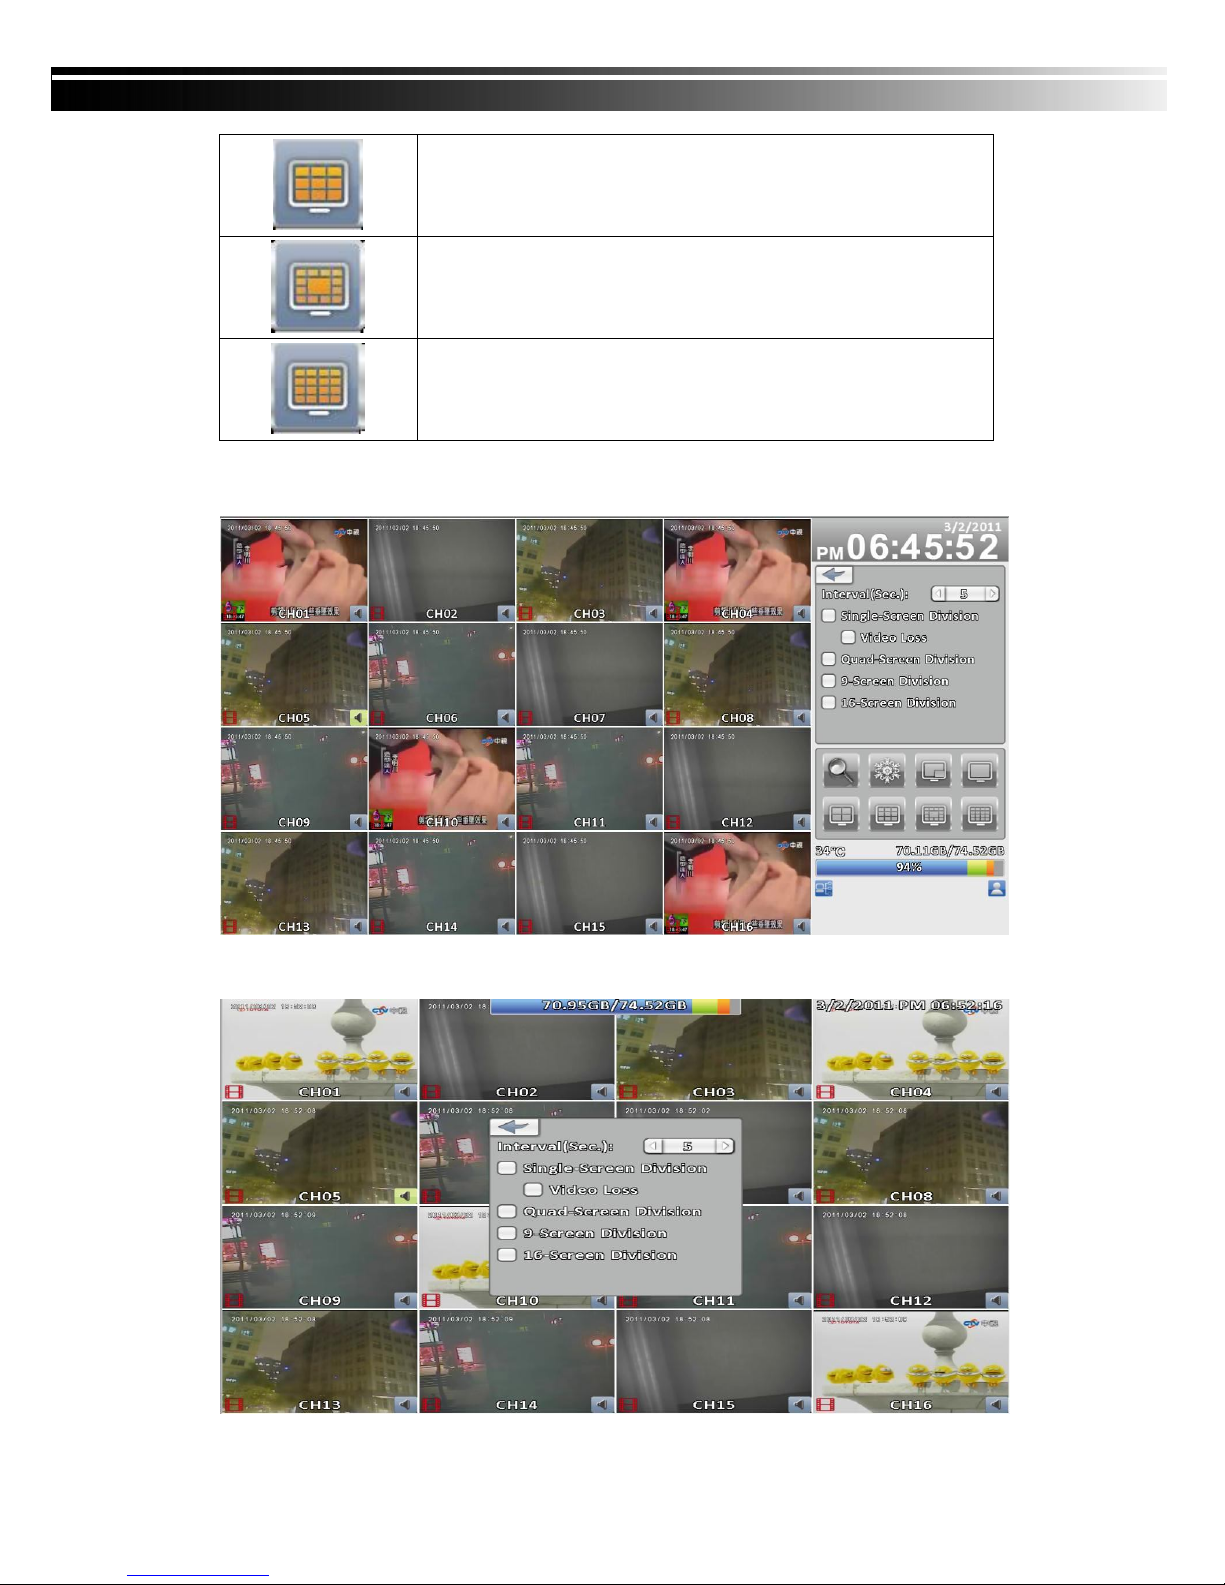
2-1 Auto Sequential
16:9 display
4:3 display
2012.08.22 User Manual v1.2
10
Item Description
Interval In SPOT mode, the number of seconds to stay
Single Screen
Division
Video Loss
Quad-Screen
Division
9-Screen Division
16-Screen Division
Automatic sequential switch channel by setting the number of
seconds, each channel is displayed in a single screen
In single screen switch, whether mask the loss channel
Automatic sequential switch channel by setting the number of
seconds, displays in quad-screen division
Automatic sequential switch channel by setting the number of
seconds, displays in 9-screen division
Automatic sequential switch channel by setting the number of
seconds, displays in 16-screen division
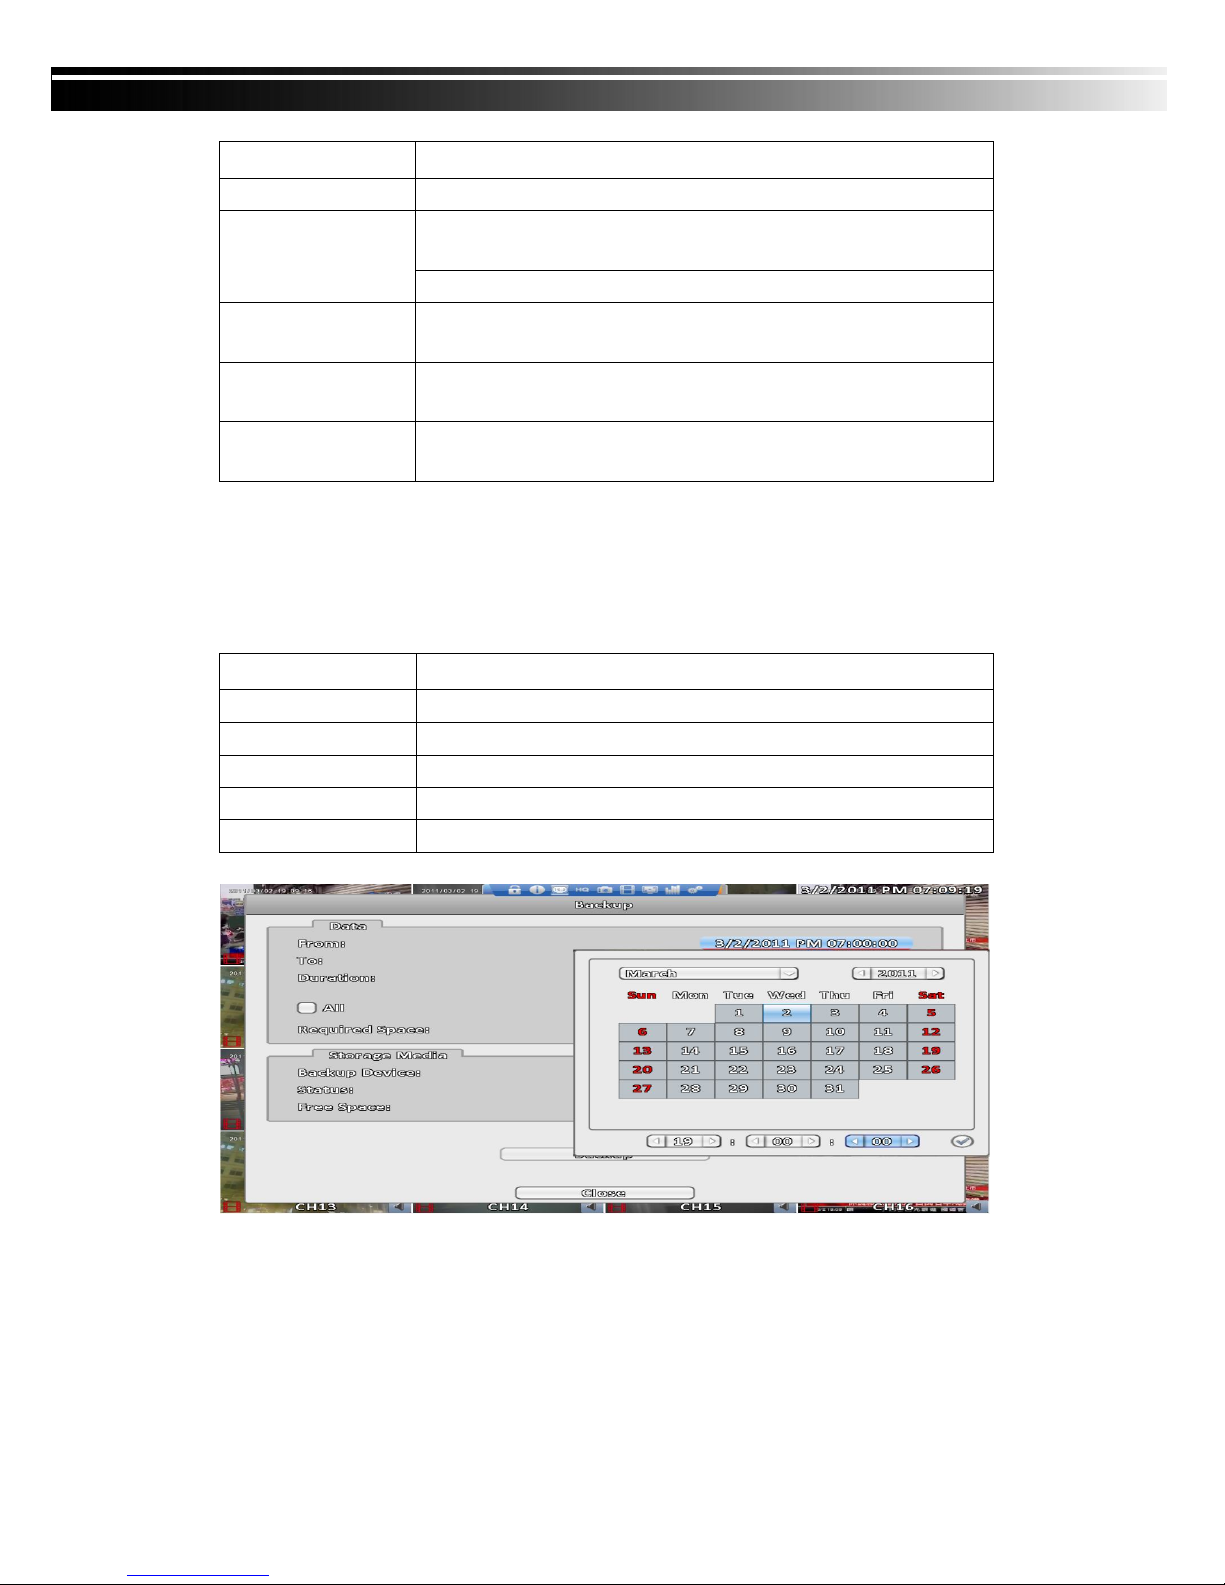
2-2 Backup
User can back up any segment of recorded data in a specified time frame. To do so, either a CD
R/W or storage device, like USB, must be connected to the DVR
2-2.1 Selection
Item Description
From The start time of backup file
To The end time of backup file
Duration The time of backup file
All It can select the desired all or part of the channel to backup
Required Space Show the size of the backup file
2012.08.22 User Manual v1.2
11
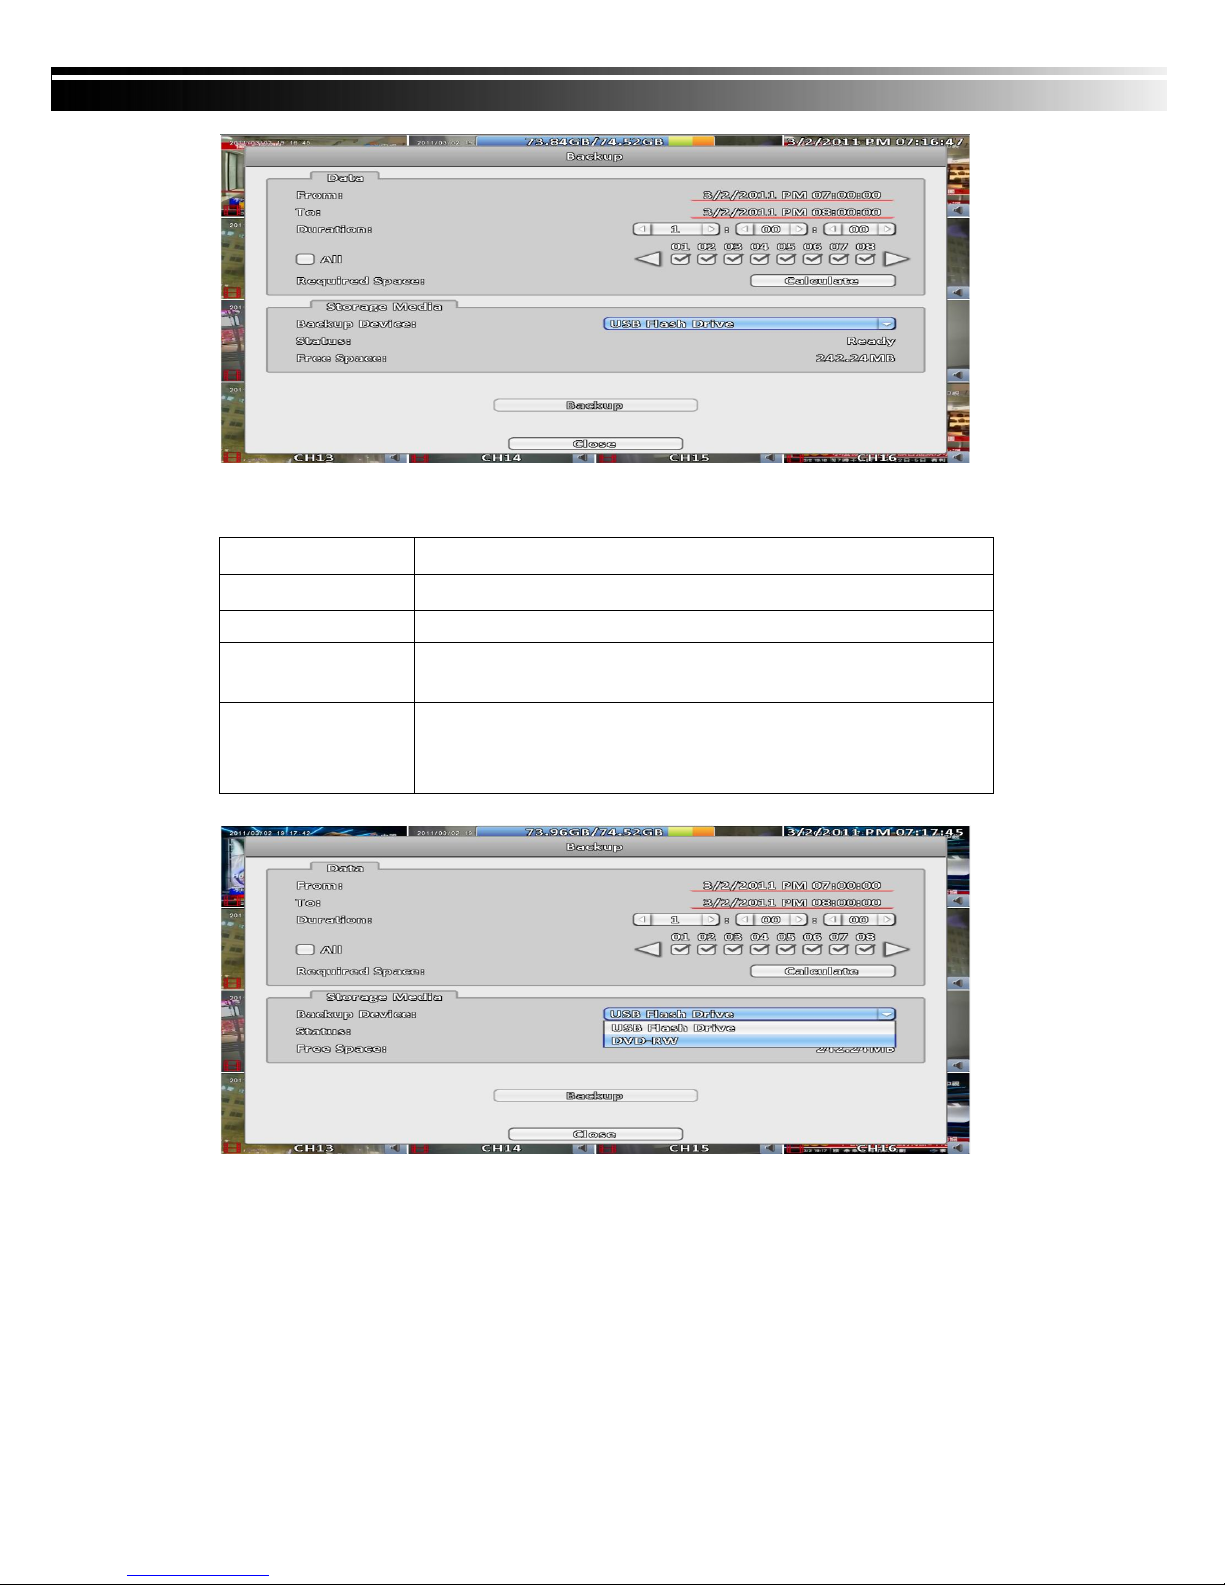
2-2.2 Select Backup Device
Item Description
Backup Device
Select backup device (USB/DVD-RW) 。
Status Backup device status
Free Space
Backup
The available space in your backup device. (not available for PC
backup)
Start backup operation.
Be sure to calculate the size of backup file BEFORE operating
backup.
2012.08.22 User Manual v1.2
12
Do not unplug the USB device or turn off the DVR during the backup process to avoid
unrecoverable error.
2-3 Configure
Enter to configuration menu, recording settings, event settings, camera settings,
account settings, network settings, storage settings, system configuration, and
information. Please refer to chapter 3 for detail.
2-4 Time Search
TIME SEARCH can search for the specific time of recording data to playback.
Note that dates with recording data are marked with a blue square. System will
start playing back according to the date you selected. Calendar will be shown
by using mouse to click on “year” and “month”.
Click “date” to display recording time of that specific date with time bar. You can
change time (hour/minute/second) or click on a specific time of time bar by
mouse then press “ok”. DVR will playback the selected recording data.
2012.08.22 User Manual v1.2
13
ICONS
Playback button, start
playback.
Select playback time, the
timeline scale of 24 for 24
hours, by sliding the position
of the cursor to the specified
time, a blue box represents
video data.
16:9 playback
2012.08.22 User Manual v1.2
14
4:3 playback
Table 2-4 Remote control functions under the PLAYBACK mode
Button Description
ENTER/ MODE
MENU /
PLAY
/ SLOW Play back at slower speed. The speed will be slowed to 1/2, 1/4, 1/8, by
/ Fast rewind. Each press increases the speed to the next level. There are
/ Fast forward. Each press increases the speed to the next level. There
/
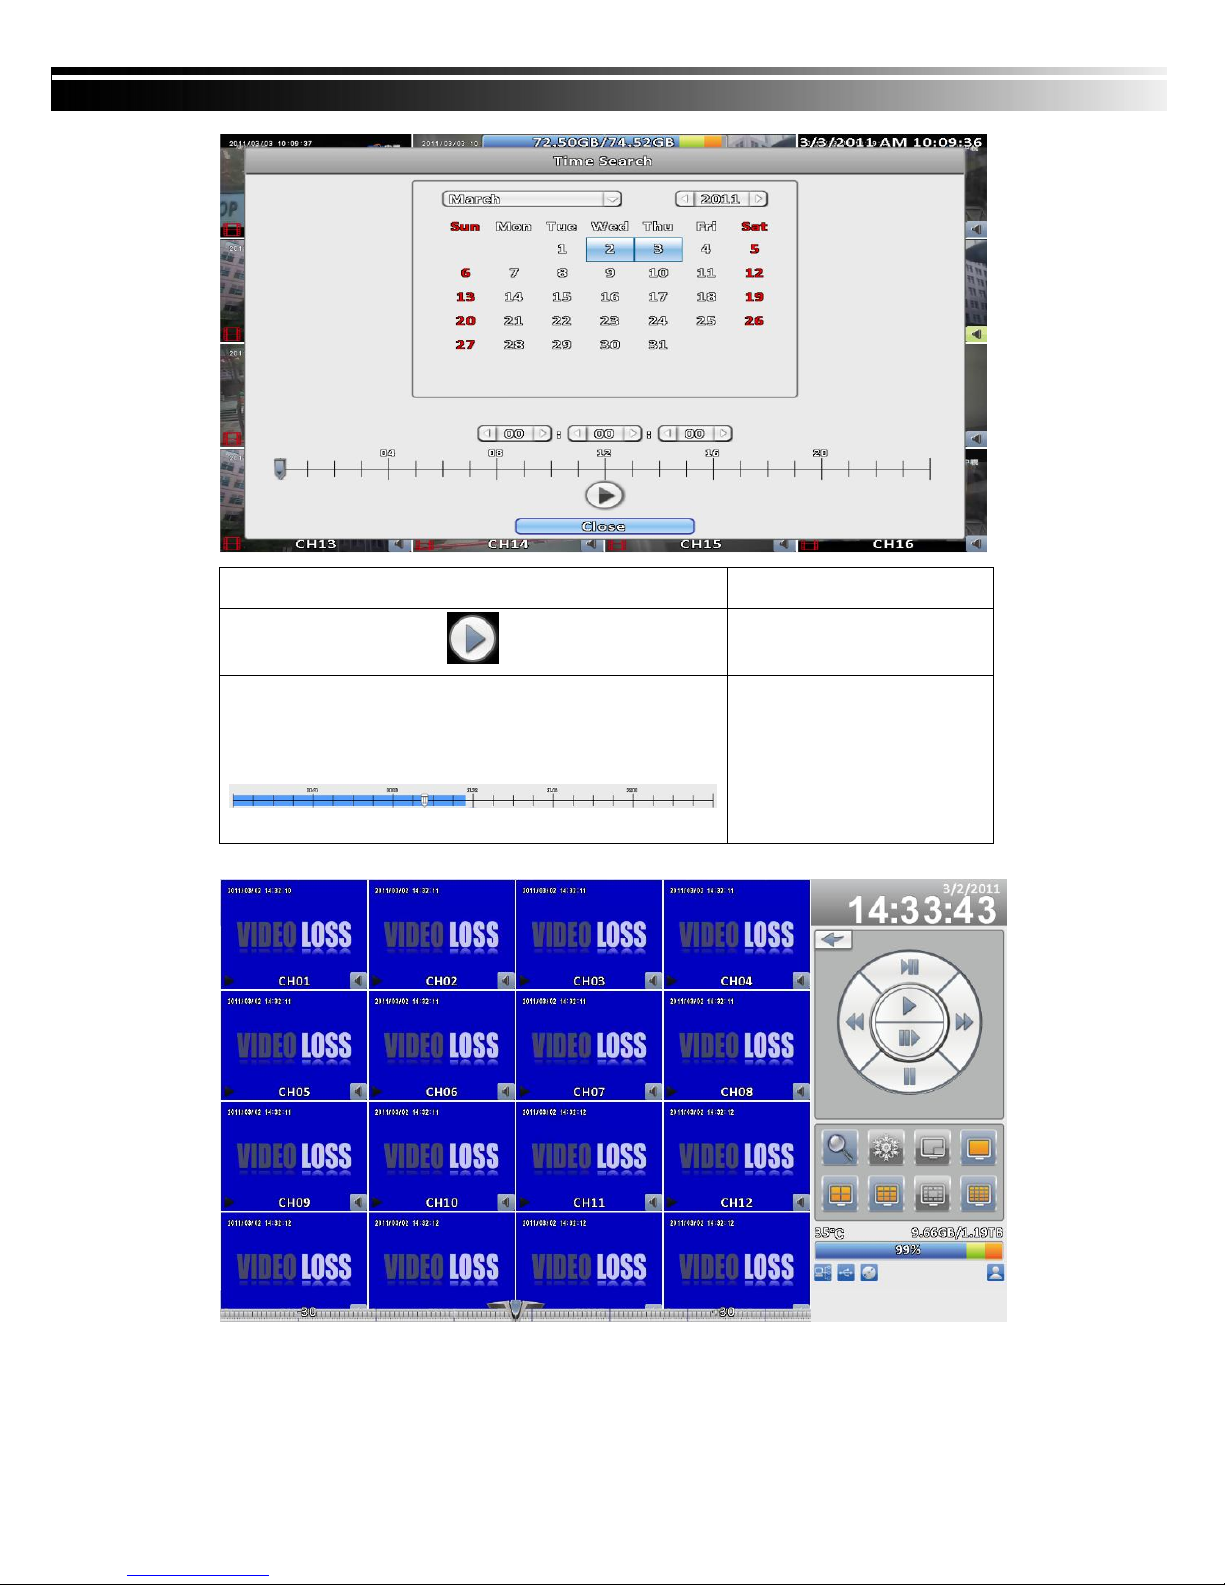
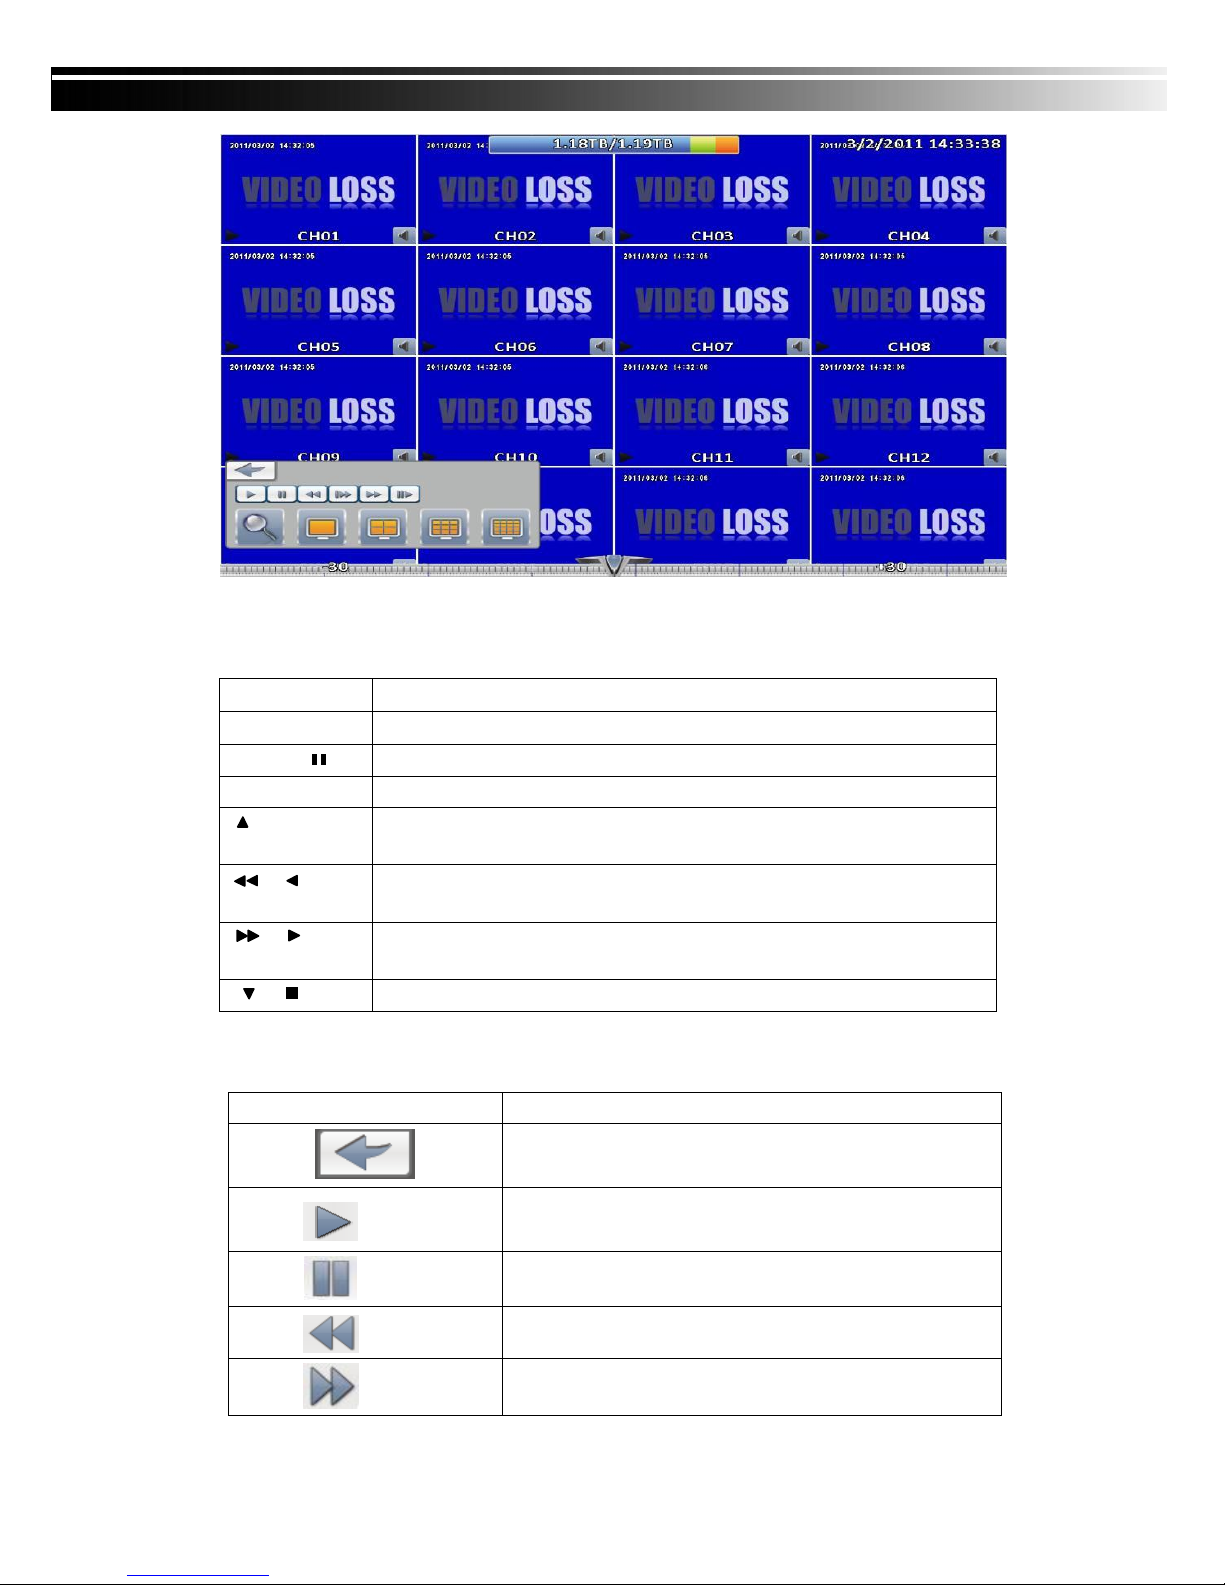
2-5 The mouse operation under the PLAYBACK mode.
Switch to full screen or multi split display.
Turn on/off PAUSE.
Play back at normal speed.
each pressing of the button till the slowest limitation of the normal speed.
six speeds: 2x, 4X, 8X, 16x, 32X and 64X.
are six speeds: 2x, 4X, 8X, 16x, 32X and 64X.
Stop playback.
Icon
Stop play, back to previous page
Description
Play
Pause
Fast rewind, speed 4x, 8x, 16x, 32x
Fast forward, speed 4x, 8x, 16x, 32x
2012.08.22 User Manual v1.2
15
Slow playback, speed 1/2x, 1/4x, 1/8x
Single Frame Playback
Zoom-in display, 2x~8x digital zoom
Full screen display
Quad display
9 screen display
16 screen display
If you want to monitor single channel, please choose a channel and click left button of
mouse two times.
16:9 enlarged playback screen
2012.08.22 User Manual v1.2
16
4:3 enlarged playback screen
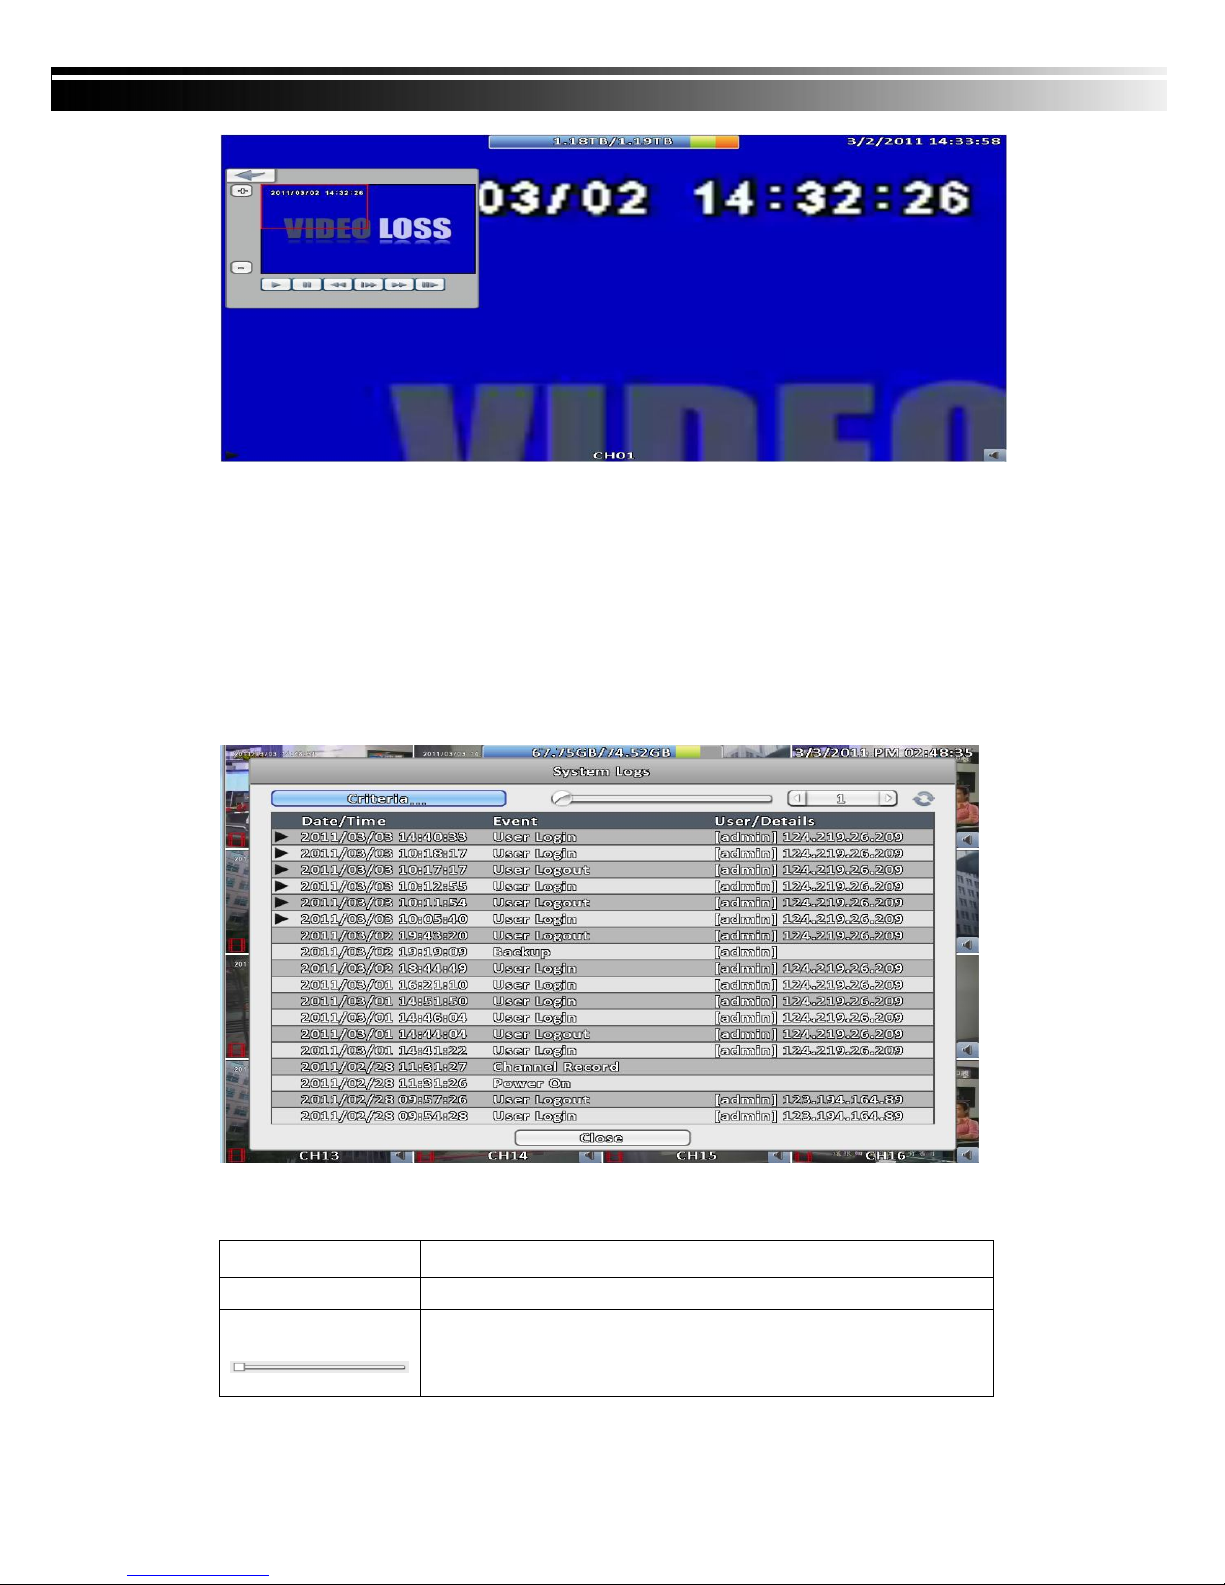
2-5 System Logs
DVR will record the event automatically. The event list will show the incident
occurred at a time, event category, and channel events and other information. If
the event video recorded, there is a gray video symbol " " on the left of the
date. Move the cursor to the line and press "ENTER", or left click mouse button,
DVR playback this record video.
Note: Hard disk is not installed or not start recording, it will produce the event record,
but it cannot play after the click
Item Description
Criteria
Set the conditions for the event search
Hold down the control box and sliding the event log the number of
pages to display. The right numbers will show the
corresponding page numbers
2012.08.22 User Manual v1.2
17
Press left and right arrow keys or enter the page number directly. It
will go to the event log of the specified number of pages
Refresh system log
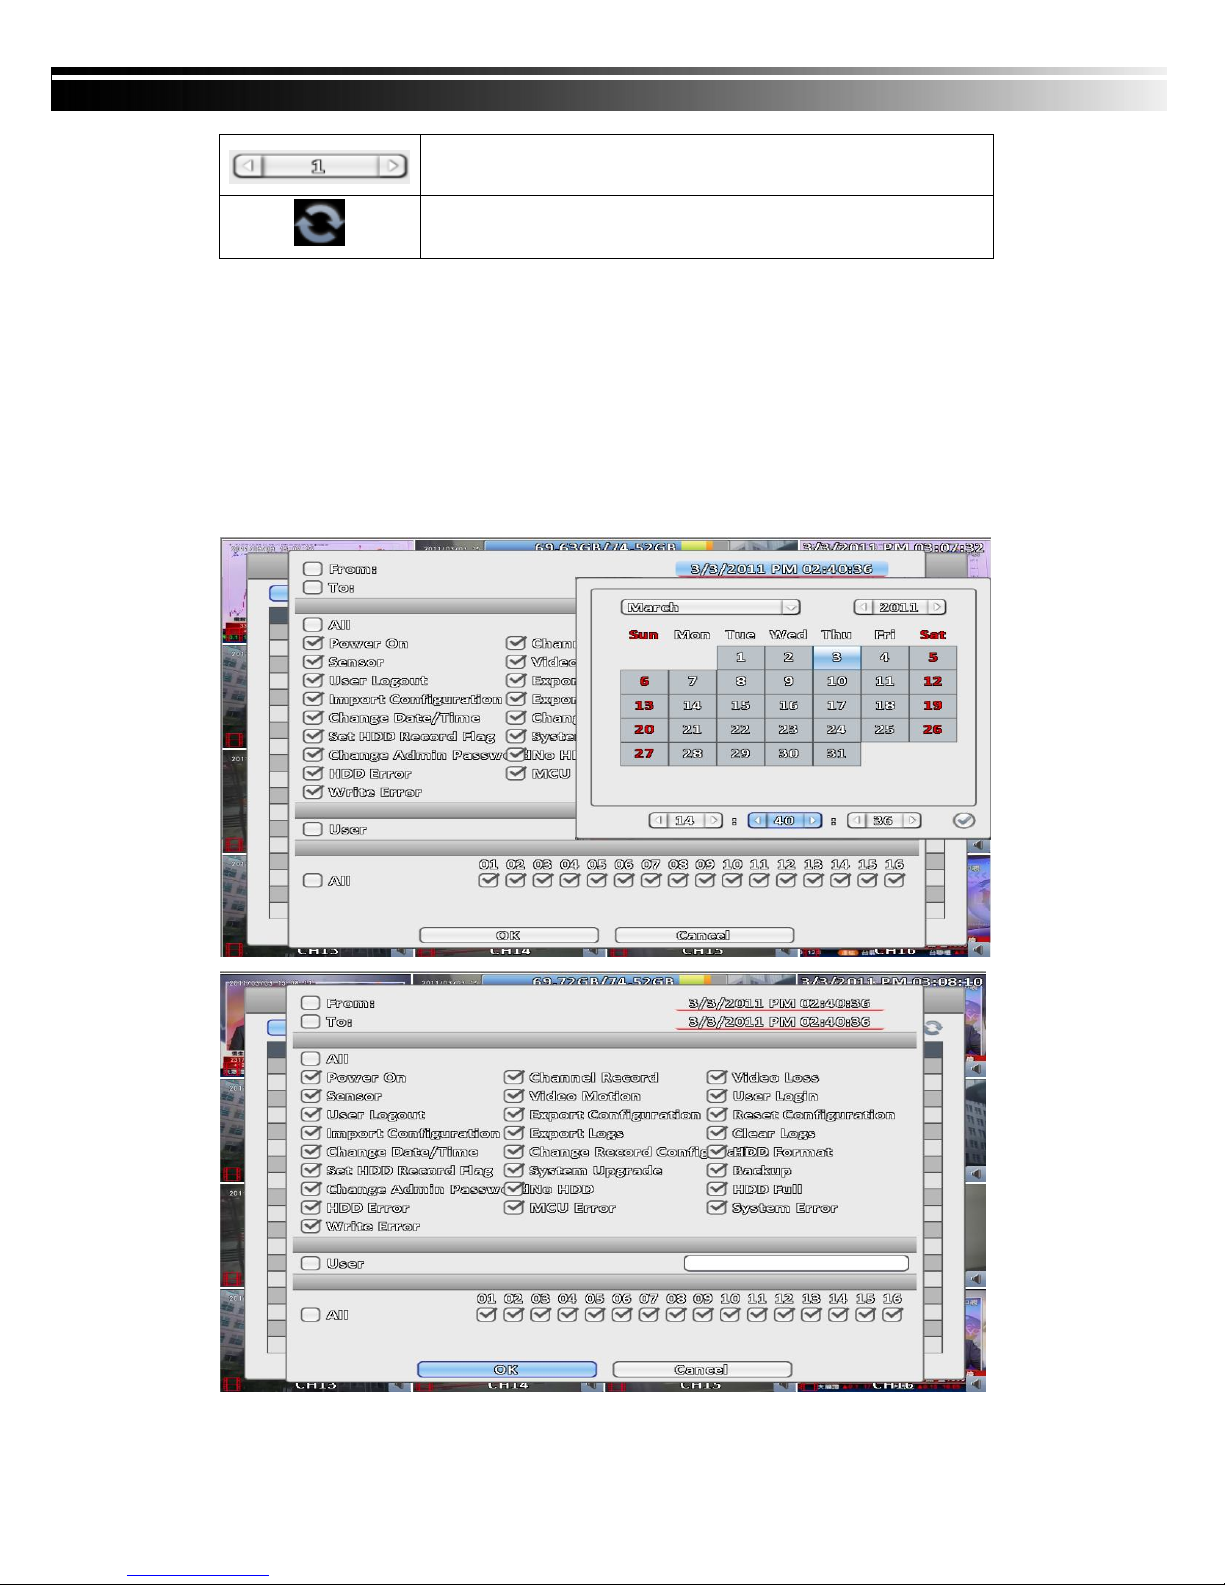
2-5.1 Search Criteria
The number of event is up to thousands, therefore, to set "conditions” to
facilitate rapid classification of events. If the start time and end time is checked,
the event list will only display the events within the time record. If you uncheck
the event and press the "OK ", the lists will only appear at this time which has
been checked the event log. If you uncheck the channels, the event list will filter
out uncheck the channels automatically.
2012.08.22 User Manual v1.2
18
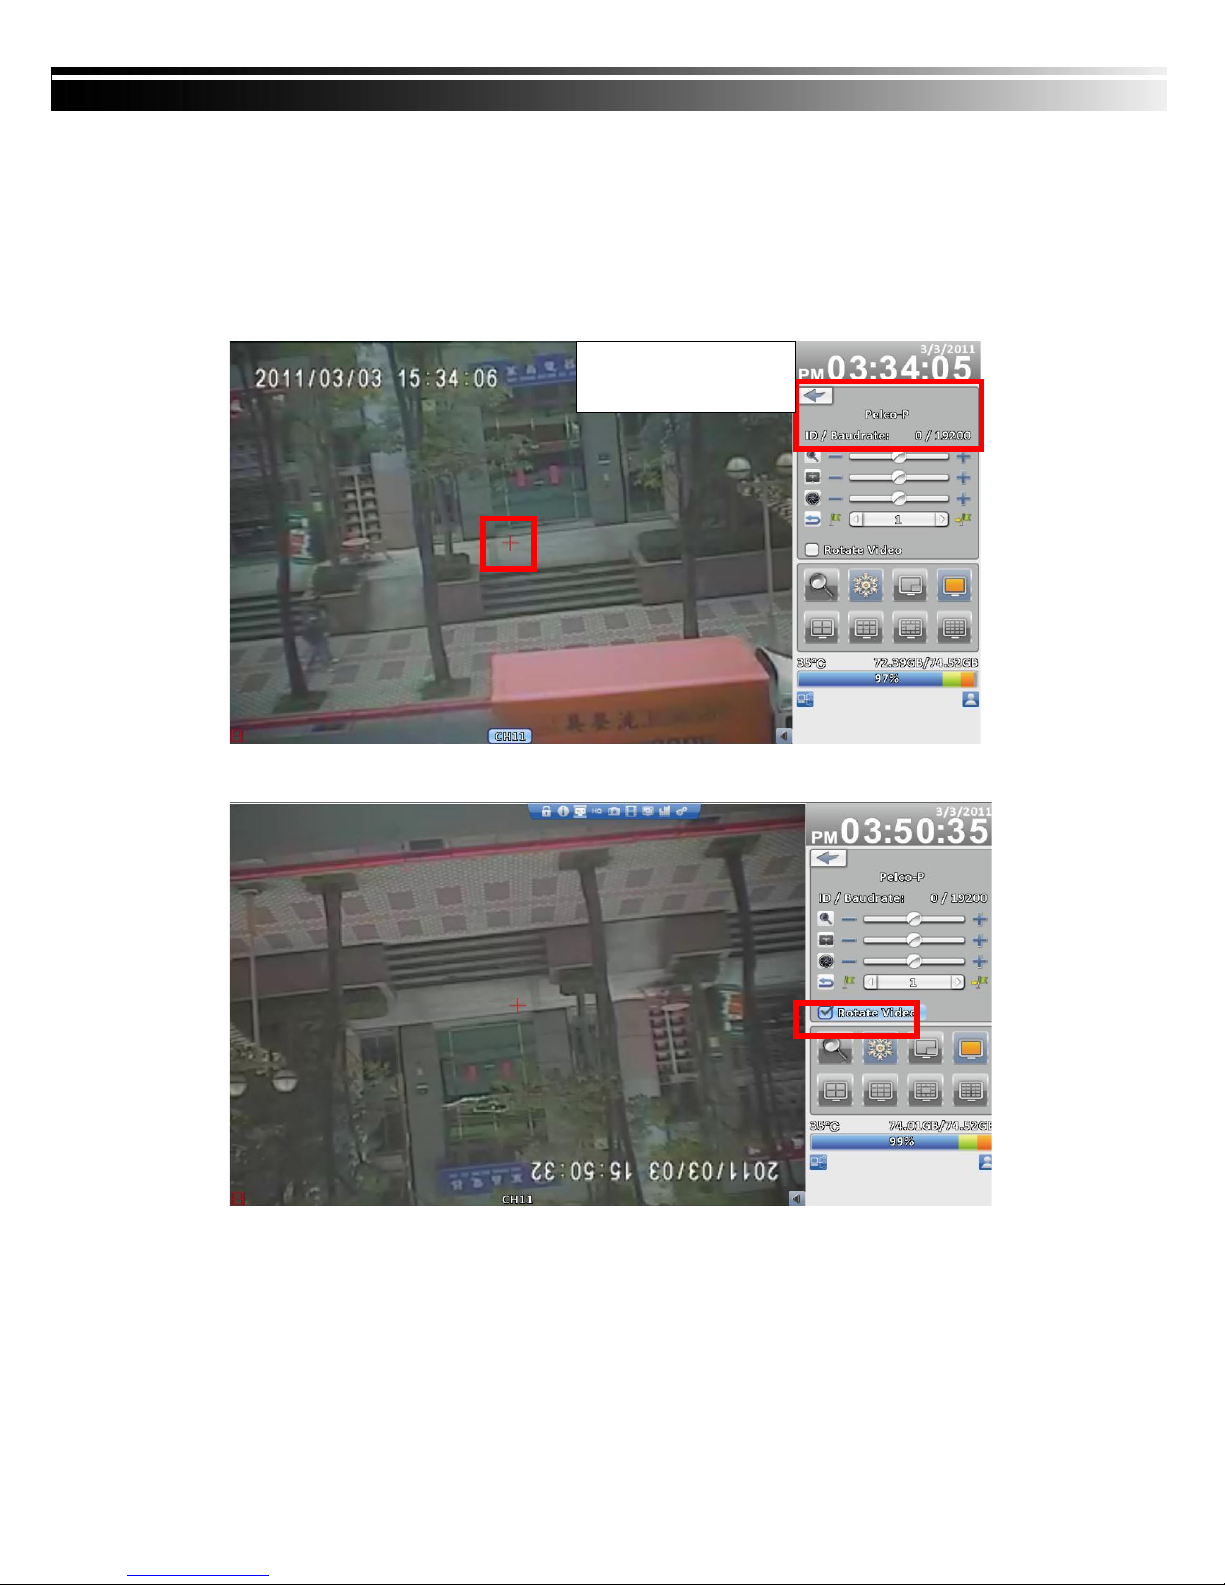
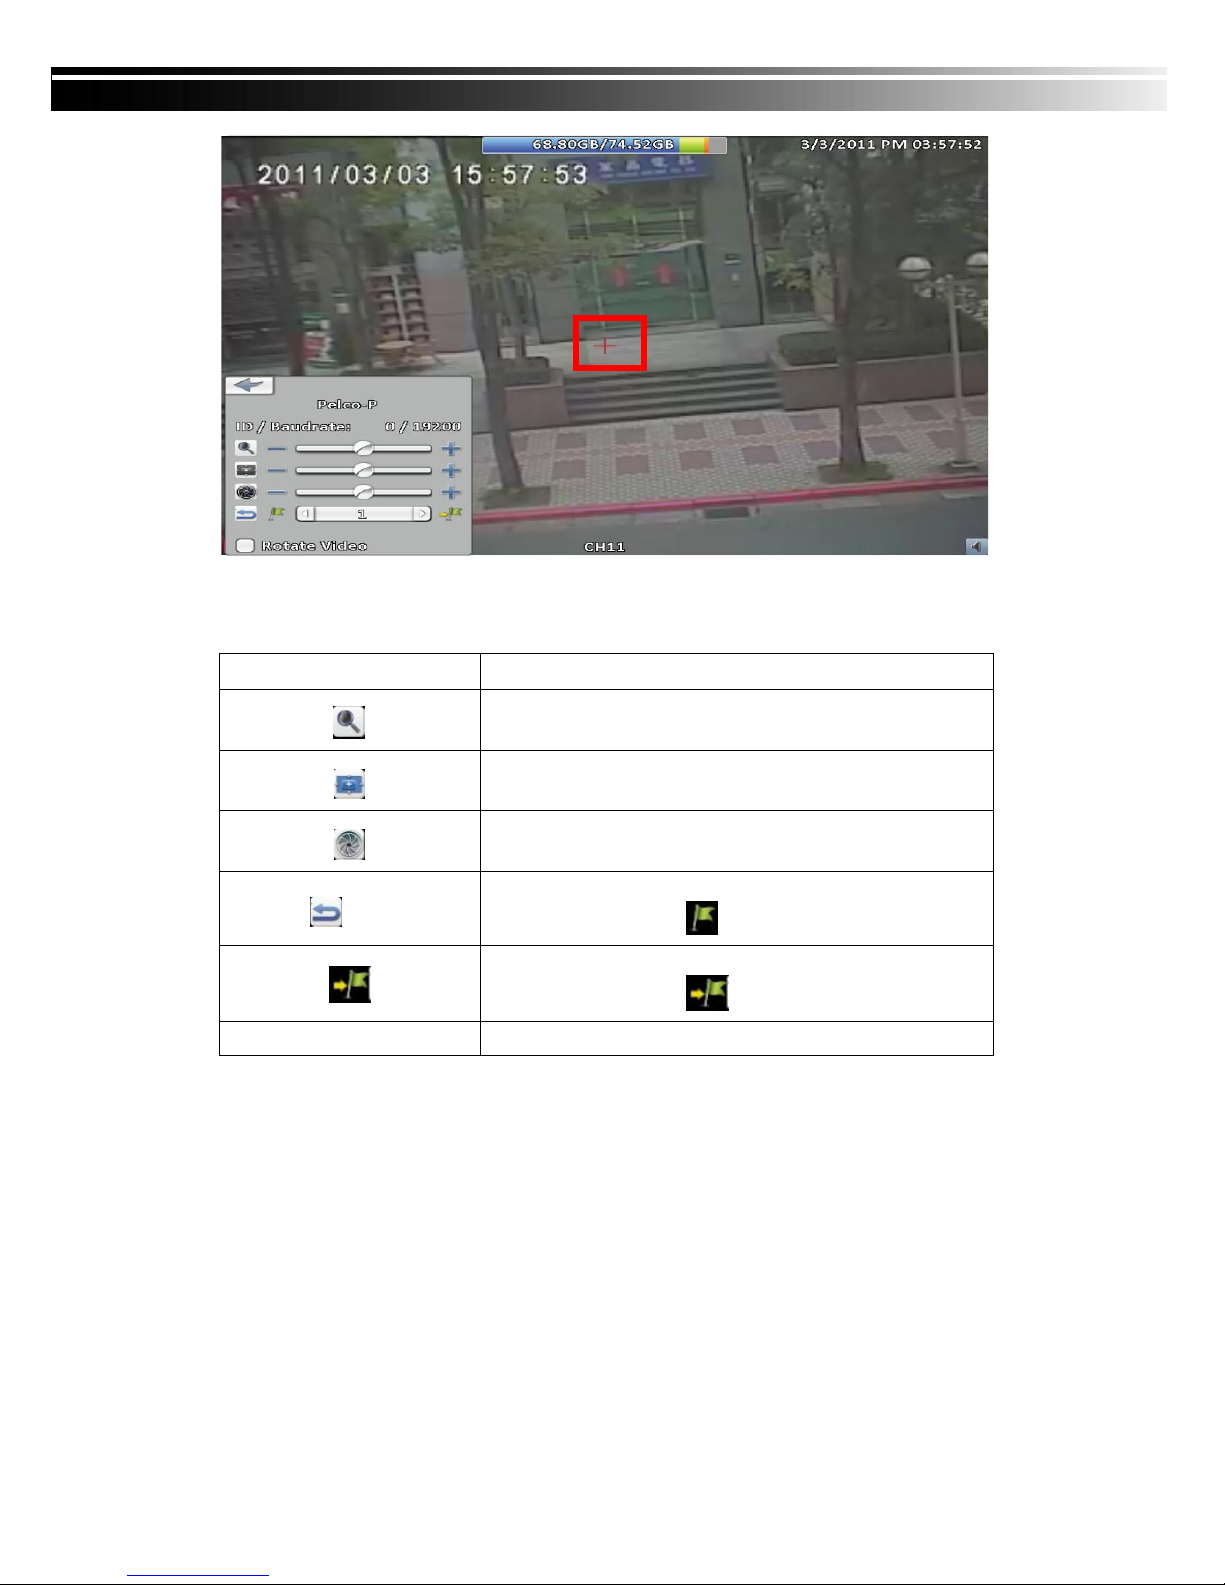
2-6 PTZ Operation
Set up the camera PTZ settings in advance (refer to 3-3.1). Enter
the PTZ mode, PTZ control panel will appear the camera PTZ setting. There is
a red cross on the center of the screen. Move the mouse and hold down the left
mouse button on the screen to move in any direction. It can control
the PTZ camera in the direction.
PTZ setting in
camera
Rotate Video
16:9 display mode of operation of PTZ functions
2012.08.22 User Manual v1.2
19
4:3 display mode of operation of PTZ functions
Table 2-6 Function description
Item Description
ZOOM. Press + / - or move the circle to
adjust the PTZ focal length
FOCUS. Press + / - or move the circle to
adjust the PTZ focus
IRIS. Press + / - or move the circle to
adjust the PTZ iris
Press left and right arrow keys to select the default point
number, and then press to set the default point
Press left and right arrow keys to the preset points,
Rotate Video Image upside down
and then press forward to the default point
2012.08.22 User Manual v1.2
20
 Loading...