

Golden Lighting 9903-5P MSI User Manual
INSTALLATION INSTRUCTIONS
Fixture Name: AUTU MN TWILIGHT 9903-5P
For Pendant Light F ixt ure
WARNING! SHUT POWER OFF AT FUSE OR CIRCUIT BREAKER
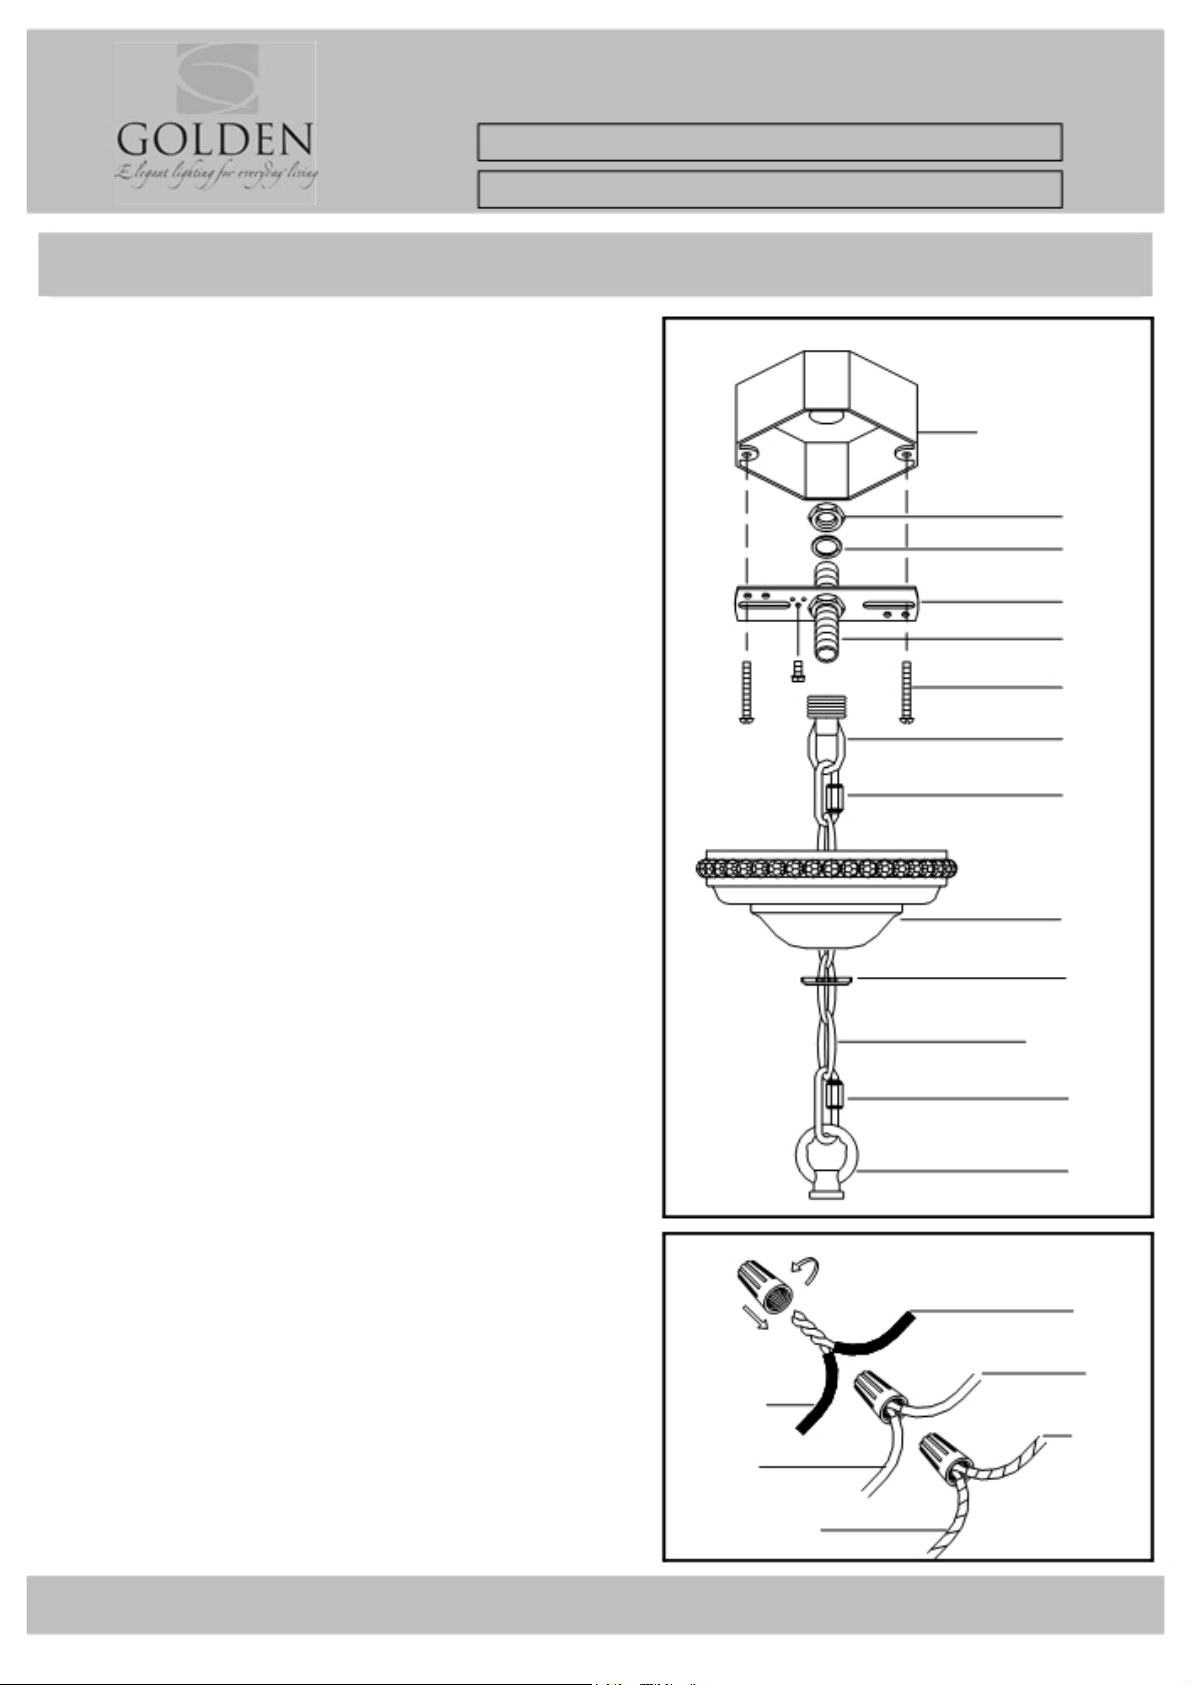
HANGING THE FIXTURE(Fig.1)
1. Carefully remove the new fixture from the carton and the yellow
bag that holds al l parts. Che ck that all par ts are include d as shown
in the illustrations and Parts and Assembly Sheet.
2. Shut off the power at the circuit breaker and completely remove
the old fixture from the ceiling, including the old mounting st rap.
3. Thread Nipple(C) into Canopy Loop (F) until snug, then thread into
Mounting Strap (D).
4. Place Lock Washer (B) and Hex Nut (A) over end of Nipple (C) and
thread onto the nipple until tight.
5. Take this mounting strap asse mbly and mount to ceiling junction
box using Junction Box Scre ws (E). Tighten screws securel y with a
screw driver.
6. Unscrew the Canopy Loo p Collar (H) from the canopy loop. Pass
the canopy over the canopy loop leaving some threads exposed.
Adjust Nipple(C) until desired height is reached. *the Canopy loop
collar should fit snugly . Remove the canopy and cano py lock
collar.
7. Assemble the fixture and by measuring, determine the correct
number of links needed for proper hanging height. Use a pair of
pliers to open one link of chain to remove and discard the excess.
8. Use one Chain C onnector (I) to at tach one end of the chai n to Top
Loop (J) and close the chain connector.
9. Feed the fixture wire s through the chain (every three links) an d pull
the wires until taut.
* Make sure the weight of the fixture will be supported by the
chain-not by the electrical wire.
10. Slip Canopy Loop Collar (H) over the chain. Then do the same
with the Canop y (G). Atta ch the chain to the Canopy Lo op (F) with
Chain Connector (I).
11. Thread the fixture wires and ground wire of the assembled fixture
through the canopy loop (F) and nipple(C) into the outlet box.
Fig.1
JUNCTION BOX
(CEILING)
C
G
CHAIN
CONNECTING THE WIRES (Fig.2)
12. Attach the power supply wires to the fixture lead w ires by
connecting BLACK to BLACK (or SMOOTH) and WHITE to WHITE (or
RIBBED).
13. Attach the gro un d wire ( G RE EN o r COP PE R) from the junction box
and the fixture ground wire to the green ground screw on the
Mounting Bracket (B) or connect both wires together using t he
correct size of wire conn ectors.
Fig.2
HOUSE WIRES
NOTE: Twist the wires together in the same direction you
twist the wire connector onto the wires.
14. Tuck these wire connections neatly into the Junction Box.
15. Raise Canopy ( G) to the ceil ing and se cure i n pla ce by t ightening
the Canopy Loop Collar (H) into the Canopy Loop (F).
16. Install the light bulb s an d glass shade as per the fixture assembl y
sheet.
YOUR INSTAL LATION IS NOW COMPL ETE. TURN POWER ON A T
TO THE JUNCTION BOX & TEST THE FIXTURE.
FIXTURE WIRES WHITE
SMOOTH (Neutral)
(or Black)
RIBBED (Ground)
(or W hite)
BARE COPPER
(or Green)
For Customer Service, contact the place of purchase to arrange for replacement parts.
CS A 0 5 5 3 0 5 D AL G 1
A
B
D
E
F
I
H
I
J
BLACK
(Hot)
GREEN
PARTS & ASSEMBLY SHEET
Fixture Name: AUTU MN TWILIGHT 9903-5P
This fixture assembled PO: Date:
Notice: Please review the parts listing and check for all parts before assembling the fixture. If any parts are missing or
damaged, please note on this sheet and contact the place of purchase to arrange for replacement parts.
Company Name:______________________Co Account#:__________
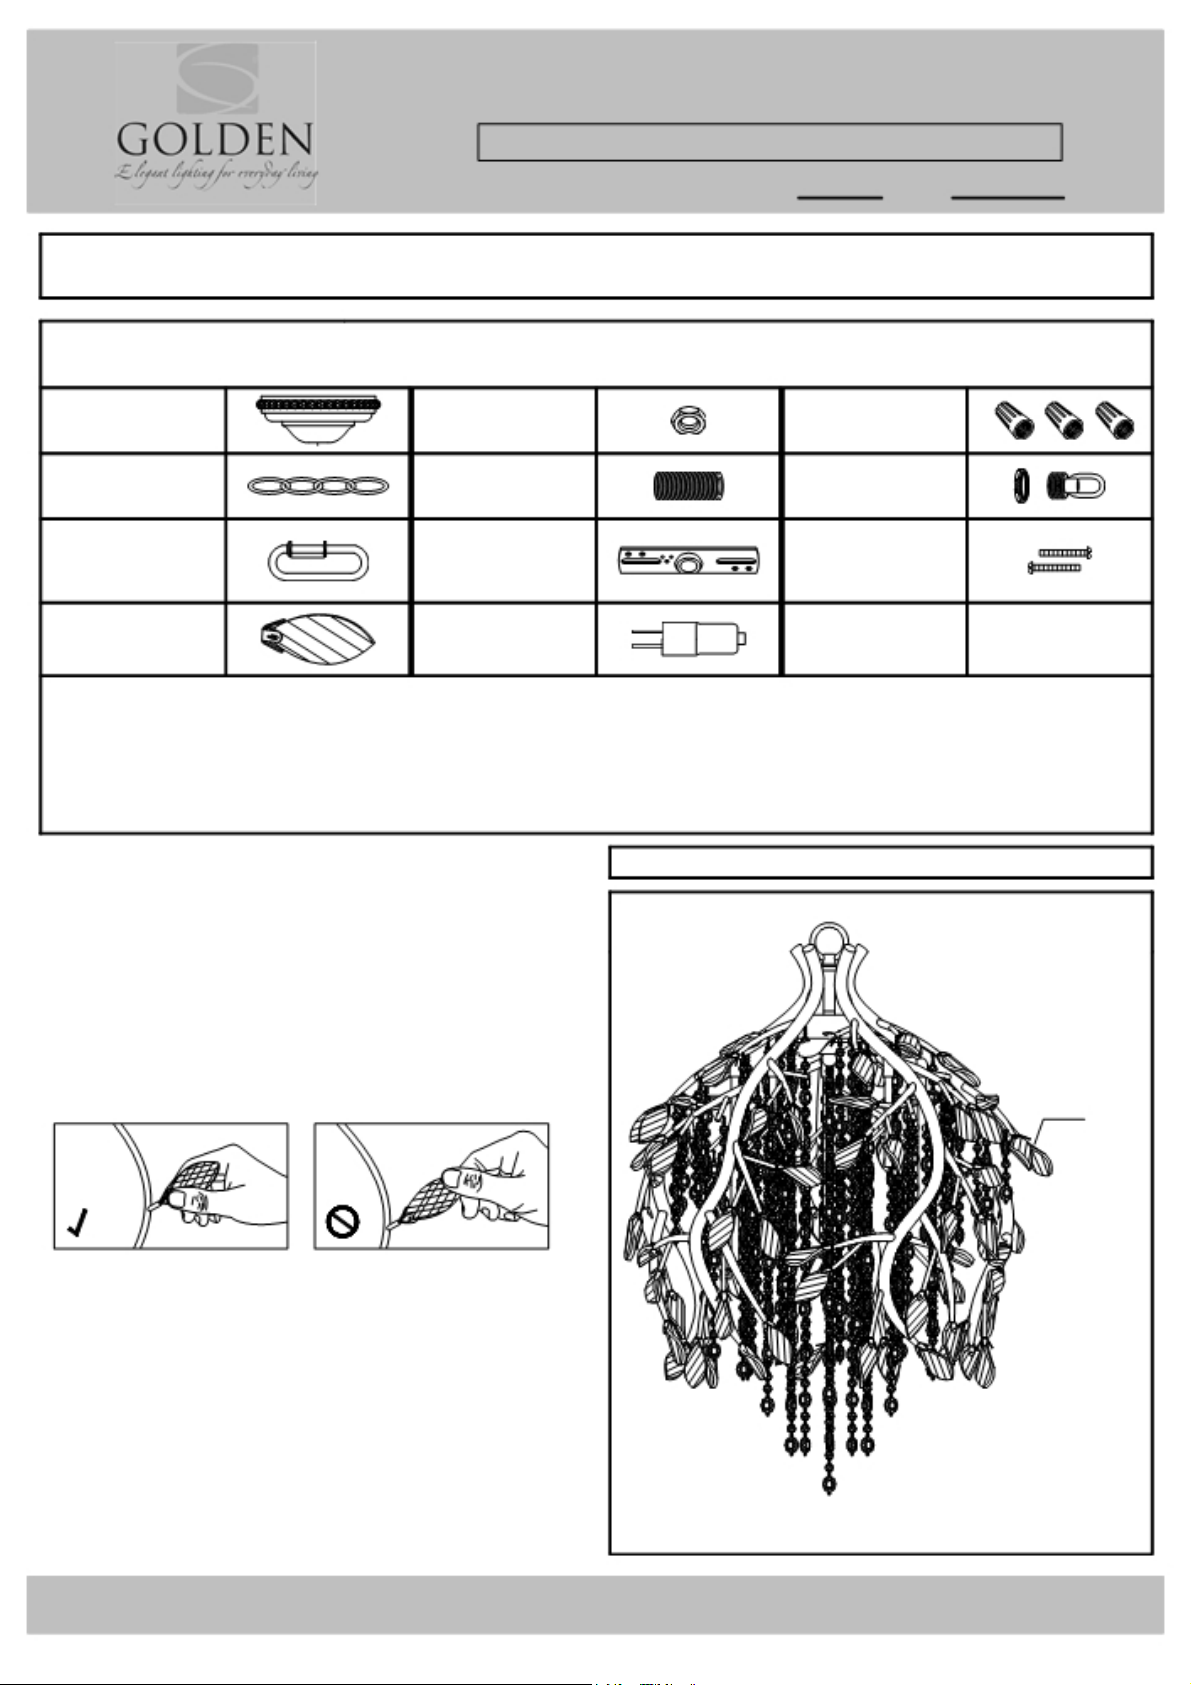
PARTS LIST
Canopy Hex Nut Wire Connectors
1ea Φ175*H68 ㎜ 2ea NPS-1/4-18 3ea Orange
Chain
1ea Φ3.8*6ft 1ea NPS 1/4-18*90 ㎜ 1ea NPS 1/4-18*H41 ㎜
Link Mounting Strap Mounting Screws
2ea W19*H54 ㎜ 1ea W103*T2.0 ㎜ 2ea G8/32*H32 ㎜
Crystal Leaf
(PT-CRYSTAL-9903 LEAF) 5ea Halogen,
75ea W27*H65 ㎜
below to be filled out by retailer
Nipple Canopy Loop
Bulbs
Type G4 20W
Part Needed ______________________________ Quantity _________________________________
Part Needed ______________________________ Quantity _________________________________
Reason why (missing , scra t ched, broken glass, bent, bad finish)
Comments
FIXTURE ASSEMBLY INSTRUCTIONS
Read and review installation instruction sheet
Fig.3
9903-5P
before assembling the fixt ure
1. Open bag on the arm and carefully arrange the
bead strings.
2. Screw Crystal Lea f ( A) on the ar m. See the att ac hed
Crystal installation diagram. Hold carefully by the
metal base to preve nt t he cry sta l fro m cra ck ing.
3. Install the light bulbs in accordance with the
fixture's specification.
Bulb note: Use a tissue or paper towel to hold the
bulb and push down into socket. Oils or dirt can
cause th e bu lb li fe to short e n. R ub b i ng a lc o h ol is
recommended to clea n t he bulb s if dirt y .
A
For Customer Service, contact the place of purchase to arrange for replacement parts.
CS A 0 5 5 3 0 5 D AL G 1
 Loading...