

Page 1
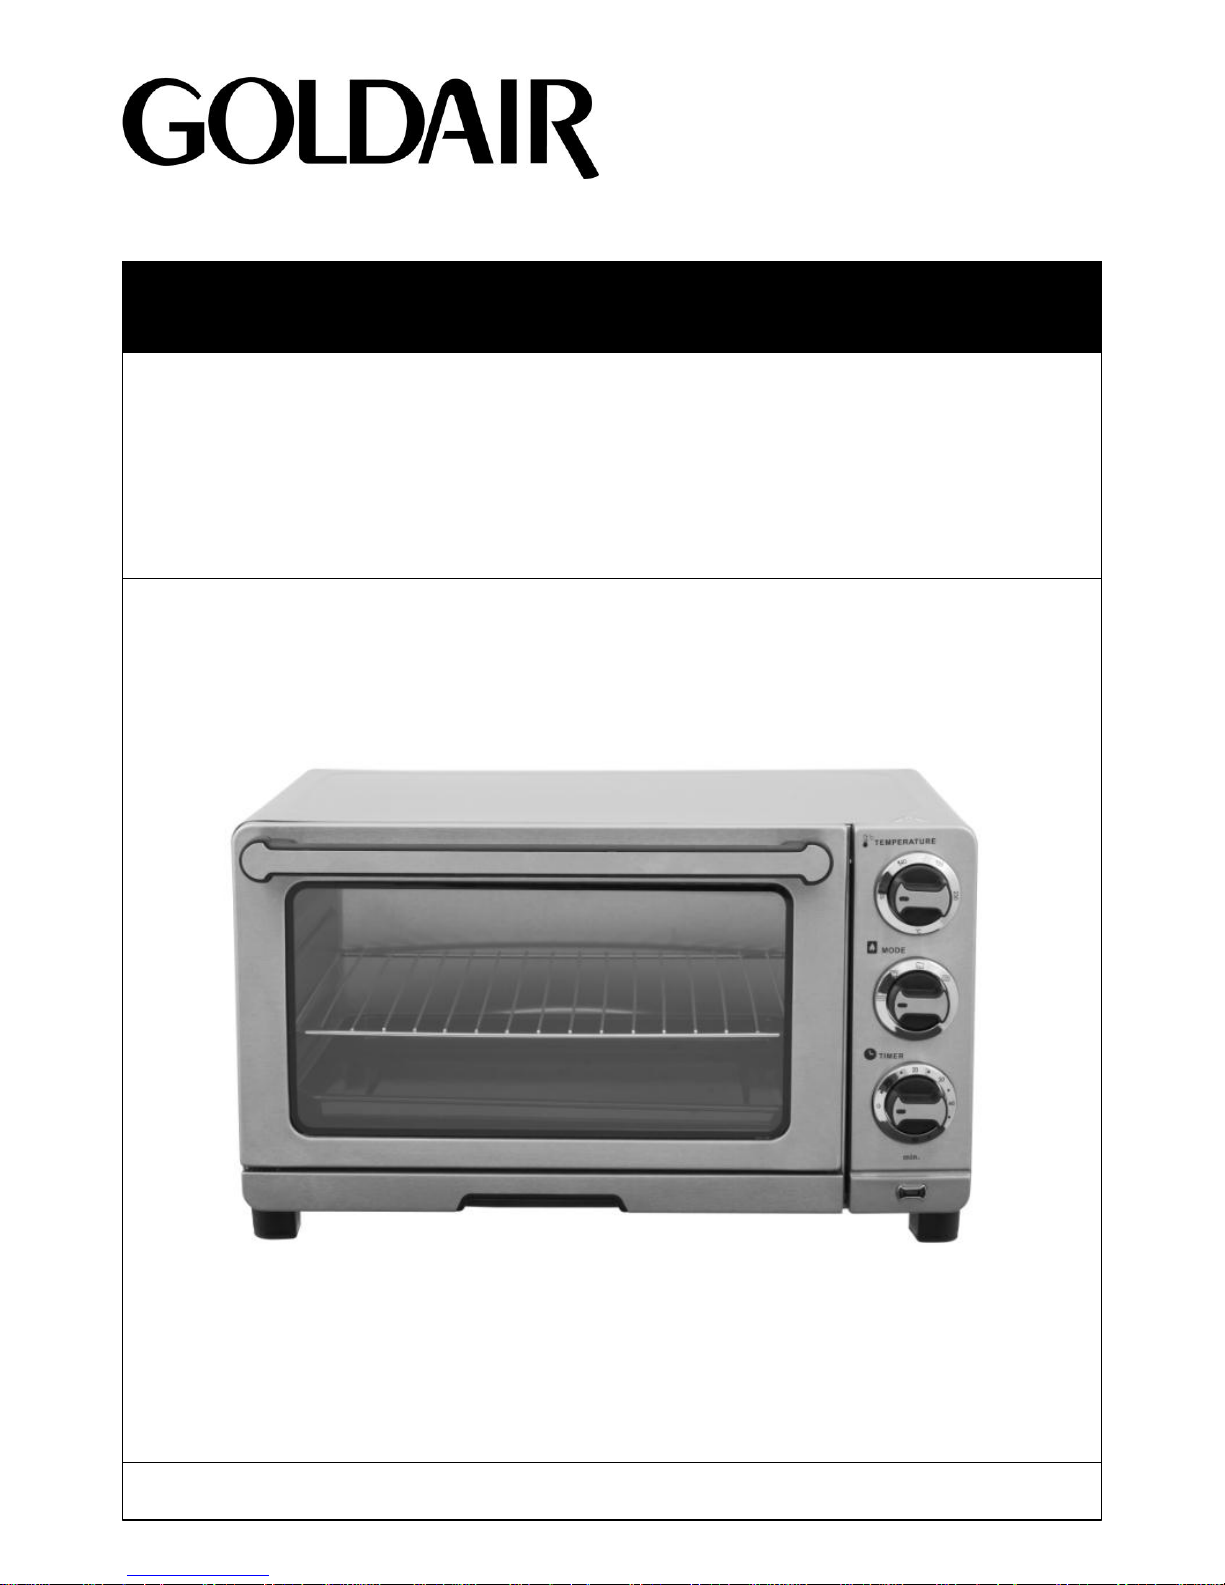
Mini Oven
Model: FMO310
Operating Instructions
Page 2

Thank you for choosing this GOLDAIR Mini Oven. This GOLDAIR
appliance has been designed and manufactured to high standards
of engineering and with proper use and care, as described in this
leaflet, will give you years of useful service. Please read these
instructions carefully and keep them for future reference.
ALWAYS
✔ Always ensure hands are dry before
handling the plug or the Mini Oven
✔ Always operate the Mini Oven on a secure,
dry, level surface, keeping the edge clear of the
wall.
✔ Always use oven mitts when removing items
from the Mini Oven
✔ Always allow adequate air space – at least
10cm - above and on all sides for air
circulation. Do not allow the Mini Oven to touch
curtains, wall coverings, clothing, dishtowels or
other flammable materials during use. Do not
use under cupboards or curtains.
✔ To disconnect, always turn the timer to OFF,
then switch off at the power outlet and remove
the plug. Always grasp the plug when removing
from the power outlet; do not remove the plug
from the power outlet by pulling the cord.
✔ Always be sure to unplug from the socket
when not in use and before cleaning.
✔ Always allow the Mini Oven to cool before
cleaning and storing, or before adding or
removing attachments.
✔ Carry out regular checks of the supply cord
to ensure no damage is evident.
✔ Return the Mini Oven after a malfunction, or
if it has been damaged in any manner, to an
authorised electrical service technician for
examination, repair or adjustment as special
purpose tools are required.
✔ Children should be supervised to ensure
that they do not play with the appliance.
✔ Always exercise extreme caution when
using containers constructed of anything other
than metal or oven-proof Pyrex.
✔ Always exercise extreme caution when
moving an appliance containing hot oil or any
other hot liquid.
✔ Always protect yourself from burns by using
the tray removal handle and oven mitts.
CAUTION
The temperature of accessible surfaces may
be high when the appliance is operating;
exercise caution.
Care and safety instructions continued on
next page.
General care and safety guide
TECHNICAL SPECIFICATION
Model No: FMO310
Power Supply: 220-240V~, 50Hz
Power: 1300W
Page 3

NEVER
✘ Never use this appliance outdoors.
✘ Never use this appliance for any purpose
other than its intended use. This appliance is
intended for household use only or in similar
applications such as:
• Staff kitchen areas in shops, offices and
other working environments;
• Farm houses
• By clients in hotels, motels and other
residential type environments;
• Bed and breakfast type environments.
✘ This appliance is not intended for use by
persons (including children) with reduced
physical, sensory or mental capabilities or lack
of experience and knowledge, unless they are
closely supervised or have been given
instruction concerning the use of the Mini Oven
by a person responsible for their safety.
✘ Close supervision is necessary when the
appliance is near children.
✘ Never leave the appliance unattended when
in use.
✘ Never allow the power cord to overhang the
edge of a table or bench top or to touch any hot
surface as this is a hazard.
✘ Never place this appliance on or near a hot
gas or electric burner or where it could touch a
heated oven or microwave oven.
✘ To protect against electrical hazards, never
immerse the Mini Oven cord set and plug in
water or any other liquid.
✘ Never place the Mini Oven in a dishwasher.
✘ Never use harsh, abrasive or caustic
cleaners to clean this appliance.
✘ Never operate the appliance with a
damaged cord or plug, after it malfunctions, or
if it has been damaged in any manner. Return
the appliance to the nearest authorised service
centre for examination, repair, or adjustment.
Regularly inspect the appliance, supply cord
and plug for any damage. If the appliance is
damaged in any way, stop use immediately and
return to the place of purchase or an
authorised service centre.
✘ The Mini Oven is not intended to be
operated by means of an external timer or
separate remote-control system. The use of an
extension cord is not recommended.
✘ Never place the following materials in the
Mini Oven: cardboard, plastic, paper or similar
materials.
✘ Never store any item in the Mini Oven during
operation.
✘ Never store any materials, other than the
manufacturer’s recommended accessories in
the Mini Oven when it is not in use.
✘ Never clean the Mini Oven with metal
scouring pads. Pieces can break off the pad
and touch electrical parts, creating a risk of
electric shock.
✘ Do not touch hot surfaces; always use the
handle or knobs. The temperature of the door
or outer surfaces will be higher when the
appliance is operating. Never place hands
inside the Mini Oven during operation.
✘ Never cover the Crumb Tray or any part of
the Mini Oven with metal foil. This may cause
the Mini Oven to overheat.
✘ The use of accessories or attachments not
recommended by the appliance manufacturer
may cause hazard or injury.
✘ Do not leave the oven door open for
extended periods of time.
✘ Avoid scratching door surfaces or nicking
edges. This Mini Oven has a tempered safety
glass door. The glass is stronger than ordinary
glass and more resistant to breakage however
tempered glass can still break and can be
weakened by scratches and nicks. Broken
pieces will not have sharp edges.
General care and safety guide
CAUTION: THE MINI OVEN’S SURFACES WILL BECOME HOT
DURING AND AFTER USE. ALWAYS WEAR PROTECTIVE,
INSULATED OVEN GLOVES WHEN TOUCHING A HOT OVEN, HOT
DISHES OR FOOD AND WHILE INSERTING RACKS, PANS OR
BAKING TRAYS.
Page 4
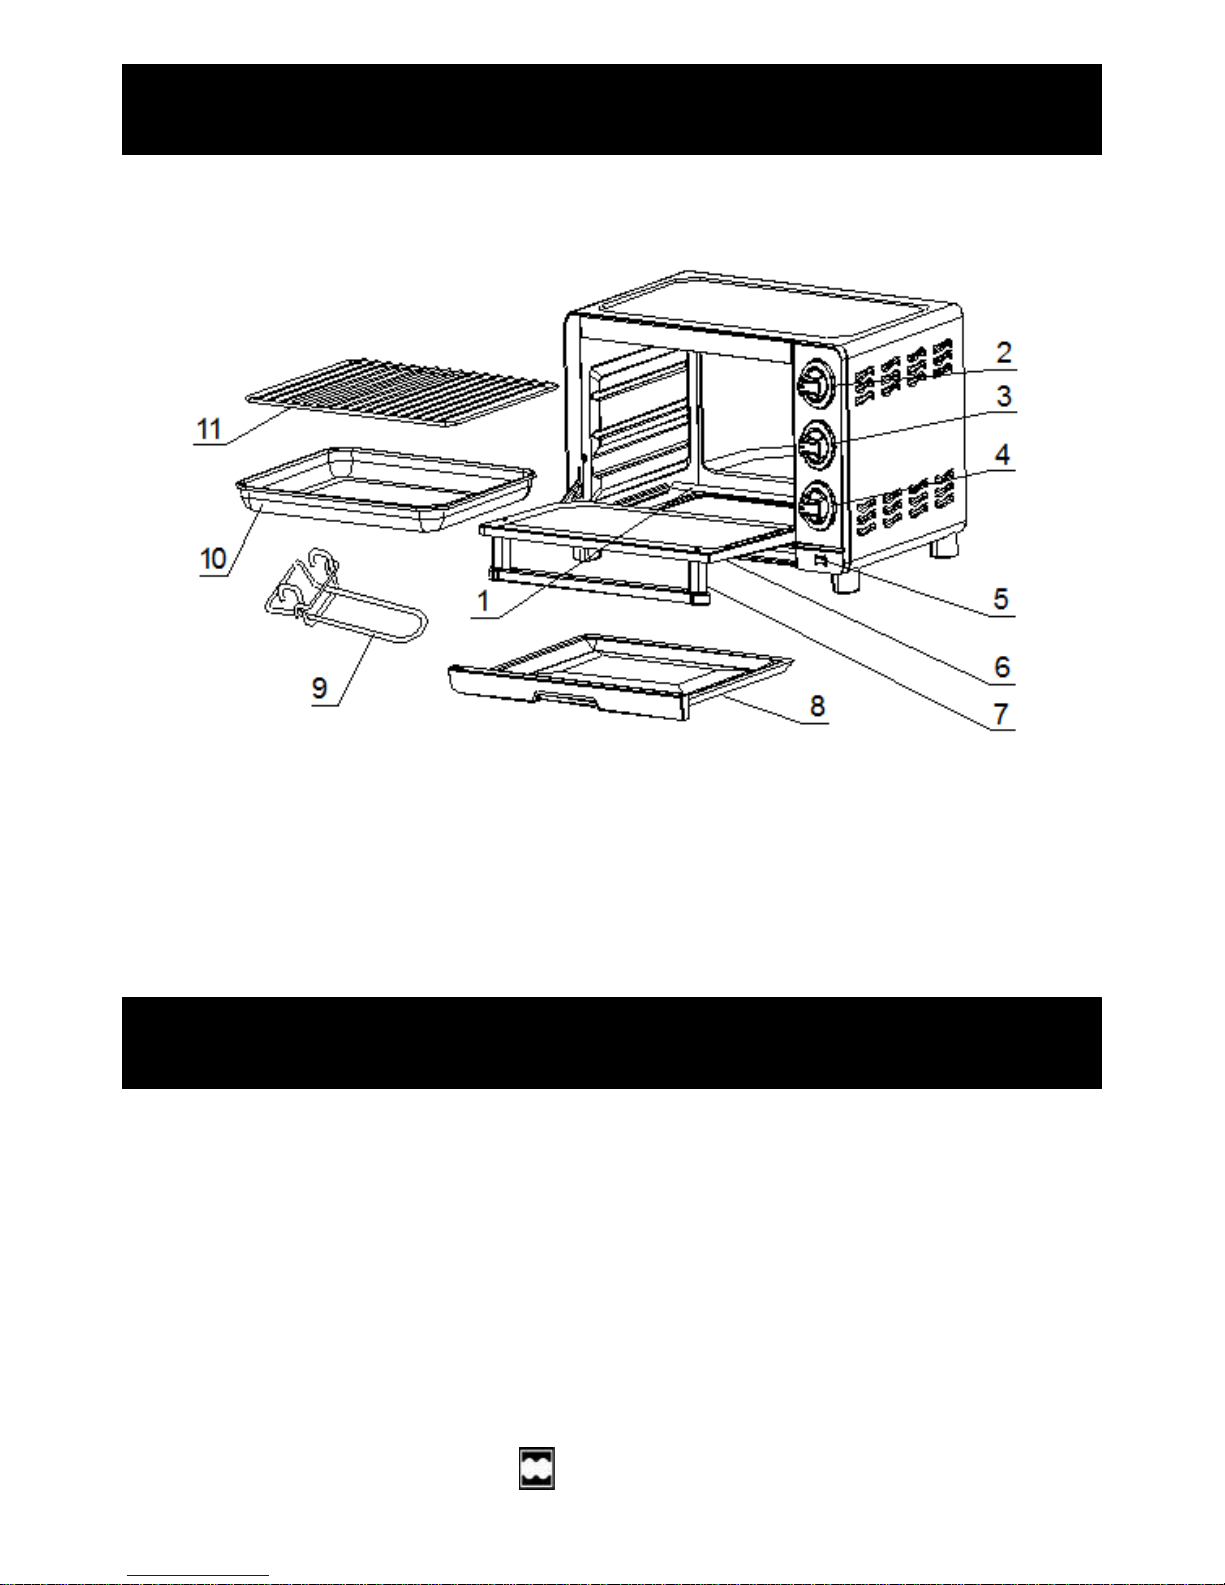
Components
1. Heating Element
2. Thermostat Control
3. Function Control
4. Timer Control
5. Thermostat Pilot Light
6. Oven Door
7. Door Handle
8. Crumb Tray
9. Tray Handle
10. Drip Tray
11. Wire Rack
Before first use
1. Read all instructions carefully.
2. Ensure any labels or protective
film that may be attached to your
Mini Oven are removed.
3. Ensure the Mini Oven is
unplugged at the power outlet.
4. Remove the Crumb Tray, Grill
Rack and wash in warm soapy
water. Dry thoroughly.
5. Fully unwind the power cord.
6. Set the function control to
.
7. Set the temperature to 230oC.
8. Use the timer to let the appliance
run (without any food or
accessories in it) for about 15
minutes. It may slightly emit
smell and smoke. This is normal
and only lasts for a short time.
Make sure to use the appliance
in a well ventilated area
9. Your Mini Oven is now ready to
use.
Page 5

Operating your Mini Oven
Cooking tips
When baking or grilling, it is advisable
to always pre-heat the oven to the
desired temperature, to get the best
possible cooking results.
Oil the grilled exterior before placing
food in the oven to be grilled.
Place the baking tray under the wire
rack in order to avoid oil dropping
down to the bottom and bottom heater.
If the food to be cooked is oily or
greasy, you can use two pieces of oilaluminum foils. Place one piece on the
baking tray and use the other piece to
cover the foods. This avoids oil/grease
splashing during cooking.
Keeping food warm
Set the function selector knob to
position .
Set the temperature to 100oC.
Insert the wire rack, and place the food
on top of it.
If the food needs to be kept warm for
longer than 20~30 minutes, it should
be covered with tinfoil, to prevent it
from becoming too dry.
Do not leave the food in the oven
for a long time as it may become
too dry!
Baking
This function is ideal for flans, fruit
puddings, quiche, pies, etc.
Insert the wire rack to the bottom
position.
Turn the function selector knob to
position .
Set the thermostat at required
temperature.
Set the timer knob to the required
cooking time.
Wait for the oven to reach the set
temperature (the pilot light goes off),
then put the food in.
If cooking is completed before the end
of the set time, please manually turn
the timer knob to position “O”.
Page 6

Operating your Mini Oven, continued
Care and cleaning
Traditional oven cooking
This function is ideal for cooking great
pizzas, lasagne, first courses au gratin,
small fowl, all kinds of fish, stuffed
vegetables au gratin and different
kinds of cakes.
Insert the wire rack to the bottom
position.
Turn the function selector knob to
position .
Set the thermostat at required
temperature.
Set the timer knob to the required
cooking time.
Wait for the oven to reach the set
temperature (the pilot light goes off),
then put the food in.
If cooking is completed before the end
of the set time, please manually turn
the timer knob to position “O”.
Grilling
This function is ideal for grilling
hamburgers, chops, frankfurters,
sausages, etc. In addition, this function
may be used for browning foods:
coquilles saint-jacques, etc.
Insert the wire rack to the top position
and the baking tray onto the bottom
heating element.
Hint: We suggest pouring two glasses
of water into the baking tray so as to
avoid smoke and bad stains resulting
from burning fat, and for easy cleaning.
Set the function selector knob to
position .
Set the thermostat at required
temperature.
Set the timer knob to the required
cooking time.
Preheat the oven for about 5 minutes
with slight ajar of the door.
Place the food on the wire rack, and
close the door, leaving it ajar, and
remember to turn the food half way
during cooking.
If cooking is completed before the end
of the set time, please manually turn
the timer knob to position “O”.
NOTE
This appliance is intended to be used
in household and similar applications
such as:
– staff kitchen areas in shops, offices
and other working environments;
– farm houses;
– by clients in hotels, motels and other
residential type environments;
– bed and breakfast type
environments.
Page 7

SUPPORT AND TECHNICAL ADVICE
North Shore City, Auckland, New Zealand
Monday – Friday 8am-5pm
Phone: 0800 232 633
Website: www.goldair.co.nz
Care and cleaning
After sales service
This appliance is built to a very high standard.
There are no user-serviceable parts.
Follow these steps if the unit fails to operate:
1. Check instructions have been followed
correctly.
2. Check mains supply is functional.
3. If the appliance will not operate, contact
the Support and Technical Advice Team
before returning it to the retail outlet you
purchased it from.
PLEASE NOTE: Light bulbs are not
covered under the warranty for this
product.
THIS APPLIANCE IS INTENDED
FOR HOUSEHOLD USE ONLY. THE
WARRANTY DOES NOT COVER
COMMERCIAL USE.
After use, set timer knob counter
counterclockwise to “0” position.
Allow the appliance to cool completely
before cleaning. Unplug cord from the
socket.
Remove the plug from the power socket.
Cool the oven down to the room
temperature.
Remove all accessories from inside the
oven.
The wire rack and baking tray may be
washed as other kitchenware, either by
hand or by dishwasher.
You can always use a moist sponge to
clean the outside surfaces. Avoid using
abrasive products that could damage the
finish. Ensure water or soap does not
penetrate the oven inside through the
vents of the oven.
Clean the oven surface and interior with
a damp cloth or a sponge and take the
tray, rack out to wash.
Aluminum interior. Never use aluminumcorrosive products (spray detergents) to
clean the inside aluminum walls and
never scrape the walls with sharp or
pointed objects.
Non-sticking coating interior. The Walls
on the inside of the oven feature a nonsticking coating for easy cleaning. To
clean any spattering that may occur
while cooking, wipe the walls with a soft,
damp sponge. A non-abrasive liquid
cleanser or mild spray solution may be
used to avoid build-up of stains. Apply
the cleanser to the sponge, not the oven
surface, before cleaning.
Warning: ON NO ACCOUNT should
water be allowed to get inside the
oven!
Page 8

Your Goldair product has been inspected and
tested and is guaranteed subject to the
following for a period to two years from the
date of purchase against defects in
workmanship and materials. During this
period, such defects will be rectified by repair
or replacement of the product purchased.
Your product contains no user serviceable
components and this warranty becomes
invalid if in our opinion the product has been
misused, abused, incorrectly installed,
tampered with, connected to an electrical
supply not corresponding with the name plate
specification, or subjected to power surges.
The warranty does not include any labour or
other associated expense that may be
involved in removal or installation of the
product. Normal wear and tear is expressly
excluded.
If your Goldair product fails to operate
satisfactorily, please return it to the retailer
from whom it was purchased. To obtain a
repair or replacement product under this
warranty, you will need to produce satisfactory
evidence of date of purchase. The completed
warranty and purchase receipt must be
presented with the product. The warranty
should be filled out at the time of purchase. It
is in your interest to make sure this is done.
If the product is to be replaced (cannot be
repaired) then that replacement will be of the
same or similar product or accessory
excluding packaging, instruction card etc.
Where a replacement product is supplied, this
shall be guaranteed for the balance of the
original warranty period.
Any model that is no longer available will be
replaced by a model of a value and with such
features as we consider appropriate in the
circumstances. Goldair Ltd is not responsible
for freight forwarding charges, losses or
damage in transit.
If service is required after the warranty period
has expired, the product should be returned to
a qualified electrical technician. Service
outside of the warranty period will be at your
cost.
Consumers Guarantee Act (1993).
In accordance with the above act consumers
are advised that: The manufacturer does not
undertake that repair facilities and parts are
necessarily available for this product.
If any of the provisions of the foregoing are
contrary to any relevant legislation, then that
provision shall be deemed to be excluded from
the warranty and the rest of the provisions will
continue to apply.
Name ………………………………………………
Address ……………………………………………
……………………………………………………….
Suburb ……………………………………………
Purchased from …………………………………
Date of purchase …………………………………
Name of product …………………………………
Model no ……………………………………………
IMPORTANT: Please retain this warranty card
Two year warranty
 Loading...