

Go Kiddo T7 Owner's Manual
Go Kiddo T7 Carving Scooter Owner’s Manual - V1 - 01/22/2015
Owner’s
Manual
Go Kiddo T7 Carving Scooter Owner’s Manual - V1 - 01/22/2015 - Page 02
If you have never carved down the road on one of our 3-wheeled cambering vehicles before, you
are about to have a great, new experience. You will discover an entirely new way to propel across
pavement. But you'll do it in an engaging, ergonomic, non-impactful way… that just happens to
give you a phenomenal full-body, calorie-burning, fat-shedding workout.
And. It's fun.
If it's just the thrill of the ride you're after (and you could care less about the fitness side-effects)
you will not be disappointed. After more than ten years, we are still always discovering nuance in
the ride. New combinations. New senses of flow. Arm punch-drive to handlebar pry to toe-kick
whipper. Relax. Breathe. Punch-the-bag sprint to a nice-and-easy cruise. Ahhh. We're enjoying
with more passion than ever before. Go ahead. Have a blast in a parking lot - for hours - it's
common. Take long nature rides or rediscover your neighborhood - recommended.
You'll learn all the riding subtleties with time. Going effortlessly, or going hard. The T7 is a great
place to start.
When you are ready to graduate to the next riding level, your T7 is ready to convert to a full air tire
ride – a ride that can take you smoothly into a world of more varied pavement – broadening your
carving universe…
Remember to relax as you learn. Allow your body to be active but relaxed. When learning anything
new, we believe that you will learn much quicker if you quiet the mind and let your body do what it
knows how to do best. That's not to say to go ahead and check out. You're not getting a massage
here…. Remain aware and alert and active, but relaxed. You want to get into the flow. The better
you flow, the easier and smoother you'll go. And for speed? Just add power = driving with the arms
and pumping with the legs. The more power you add, the faster you will go.
We recommend that you give a look to the instructional DVD, or go online to www.go-
kiddo.net/how-to-ride and review our videos. Watch and imitate. Let your body imitate the
flowing motion.
Thanks for taking this step with us. You're part of something new and good for you.
OWNER’S MANUAL
CONGRATULATIONS ON YOUR PURCHASE OF A
NEW Go Kiddo T7 Carving Scooter!

Go Kiddo T7 Carving Scooter Owner’s Manual - V1 - 01/22/2015 - Page 03
IMPORTANT MUST READ WARNINGS, SAFETY
INFORMATION AND RIDING TIPS
Thank you for purchasing a Go Kiddo™ product. This owner’s manual is designed to
help you make the most of your Go Kiddo Carving Scooter. Instructions and warnings have
been carefully prepared to make your experience as safe and enjoyable as possible. Use
common sense while riding and enjoy your new Go Kiddo Carving Scooter. Read additional
information on page 15.
READ AND UNDERSTAND the assembly, maintenance and safety sections of
the owner’s manual before riding. Always follow the instructions and pay attention to all
warnings.
Ÿ Always wear proper safety equipment when riding the Go Kiddo Carving Scooter
including an ANSI, SNELL, CPSC, ASTM or DIN EN 1078 approved helmet. Use proper
footwear and secure laces on shoes before riding.
Ÿ Avoid water, bumps, gravel, sand, cracks, uneven surfaces or obstacles that may stop
you suddenly or cause you to lose control. The Go Kiddo Carving Scooter is not intended
for off-road use. Avoid riding at night.
Ÿ Hands free riding can be dangerous. Use both hands to hold the handlebars firmly at all
times. Do not push too hard on or apply uneven pressure to either side of the
handlebars. Do not make sudden sharp turns or apply your body weight to the
handlebars when turning. Such actions may cause the vehicle to “jack-knife” or to stop
suddenly, which can cause serious injury to the rider.
Ÿ Stunt riding, riding backwards and/or extreme riding are not recommended on the T7
Carving Scooter. Riding in this fashion may damage the product and voids the
warrranty and may result in injury or death.
Ÿ Do not lean back or pull back on the handlebars. Doing so can cause the rider to fall off
the back of the vehicle possibly resulting in serious injury or death.
Ÿ Polyurethane wheels do not perform well on wet pavement or any other wet surface.
Polyurethane loses traction on most wet surfaces, and water on the wheels can
dramatically reduce the effectiveness of the brakes. If you must ride in wet conditions be
very careful to avoid sliding out and do not carve hard turns.
Ÿ Downhill riding is not recommended, especially for novice riders. The Go Kiddo Riding
!

Go Kiddo T7 Carving Scooter Owner’s Manual - V1 - 01/22/2015 - Page 04
Toys is designed primarily for use on flat dry pavement. Riding on steep hills or doing
prolonged downhill rides is not recommended. Prolonged use of the brakes will
causethe rear polyurethane wheels to wear down prematurely, dramatically reducing
the effectiveness of the brakes or even causing them to fail. Extreme caution should be
used when riding on any hill.
Ÿ We recommend that you do not exceed the recommended maximum rider weight limit
- Go Kiddo T7 Carving Scooter weight limit: 250 lbs (114 kg).
Ÿ Always inspect the vehicle before each ride and make sure that the handlebar quick
release and the folding mechanisms are securely locked in the proper riding position.
Read the assembly section of the Owner’s Manual for important assembly and
maintenance information.
Ÿ Test the brakes for proper function before each ride and do not turn the handlebars
o
more than 180 . The brake cables can wrap around the steering column and possibly
engage the brakes. Make sure that your brake cables are not wrapped around the
steering column before each riding session. Always apply both brakes evenly with your
weight distributed evenly over each rear wheel.
Ÿ Children should always be supervised by an adult when riding. It is the parent or
guardian’s responsibility to properly maintain and inspect the vehicle before each riding
session. The Go Kiddo Carving Scooter is not recommended for children under 7 years of
age.
Ÿ Always exercise extreme caution when you are riding in proximity to other vehicles,
pedestrians, and especially in proximity to cars if you are riding on a street. Be sure to
obey all rules of the road. Please be courteous to riders of other vehicles and all
pedestrians. Share the path!
Ÿ Do not modify your Go Kiddo Carving Scooter. Only use Go Kiddo Riding Toys, Inc.
Approved parts or accessories. See the limited warranty for other use restrictions.

Go Kiddo T7 Carving Scooter Owner’s Manual - V1 - 01/22/2015 - Page 05
Ÿ If you do not have the proper tools or find that you are unable to understand the
assembly instructions, have a qualified Go Kiddo dealer assemble the Go Kiddo Riding
Toys for you.
Ÿ If a Go Kiddo dealer assembles the vehicle for you, be sure to read the Riding and Safety
sections of the owner’s manual before riding for the first time.
Ÿ Immediately stop riding if you suspect that any part of the vehicle is not functioning
properly. Inspect the vehicle closely to confirm what the problem is. Contact your dealer
or Go Kiddo Riding Toys, Inc. directly if you suspect that a malfunctioning or defective
part is affecting its safe operation.
Ÿ The front wheel is turned exactly 180 degrees to that of a bicycle. Unlike a bike, a carving
vehicle’s front wheel actually trails behind the fork. Altering this wheel position will
change the intended performance of the vehicle. See the photo on page 6 of this manual
to see the proper position of the front fork.
Ÿ Riders performing in Go Kiddo Riding Toys, Inc. produced videos and photos are highly
skilled and specially trained professionals. Do not try these tricks yourself or you may
lose control and fall causing serious injury and even death.
GENERAL WARNINGS
Go Kiddo T7 Carving Scooter Owner’s Manual - V1 - 01/22/2015 - Page 06
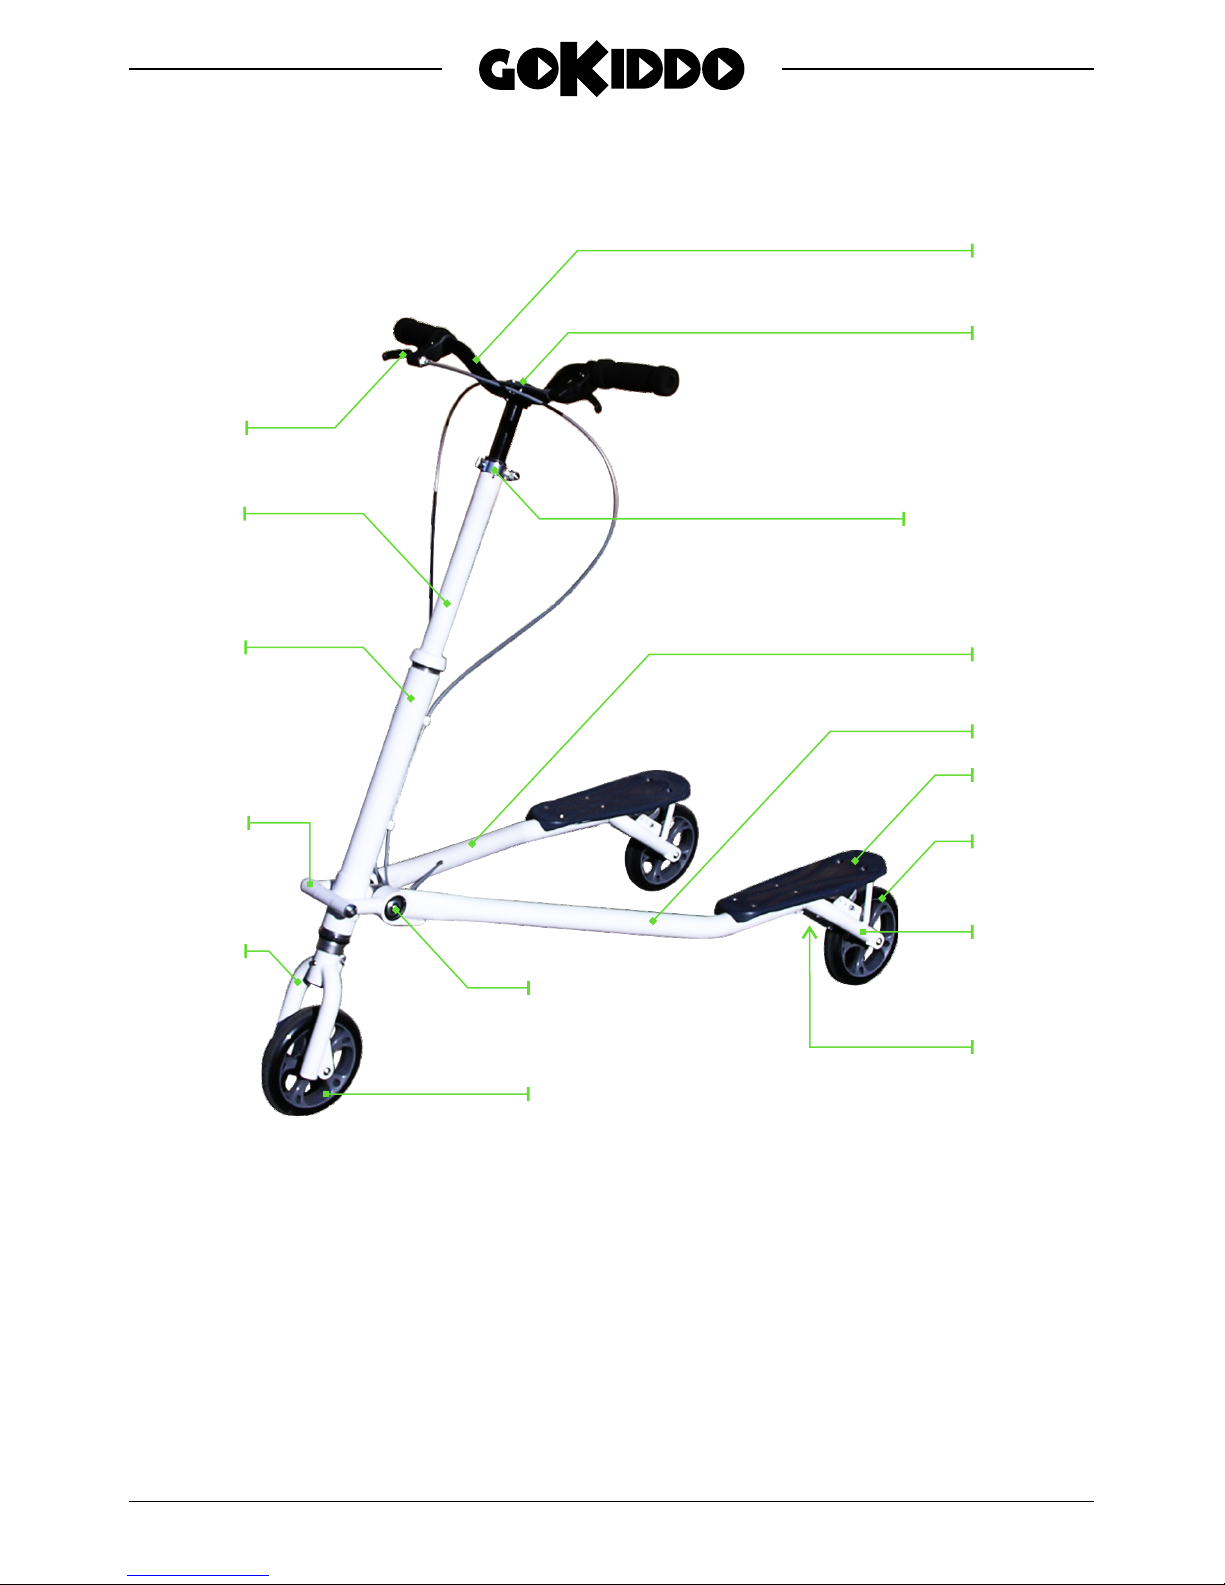
KNOW THE GO KIDDO CARVING SCOOTER
HANDLEBAR
STEM
STEERING
AXLE
FRONT TUBE
CAMBERING
AXLE
BRAKE
LEVER
FRONT
FORK
FRONT WHEEL
CAMBERING JOINT
REAR FORK
REAR
WHEEL
DECK
BRAKE PAD
HANDLEBAR HEIGHT
ADJUSTMENT QUICK
RELEASE
LEFT ARM
RIGHT ARM
Go Kiddo T7 Carving Scooter Owner’s Manual - V1 - 01/22/2015 - Page 07
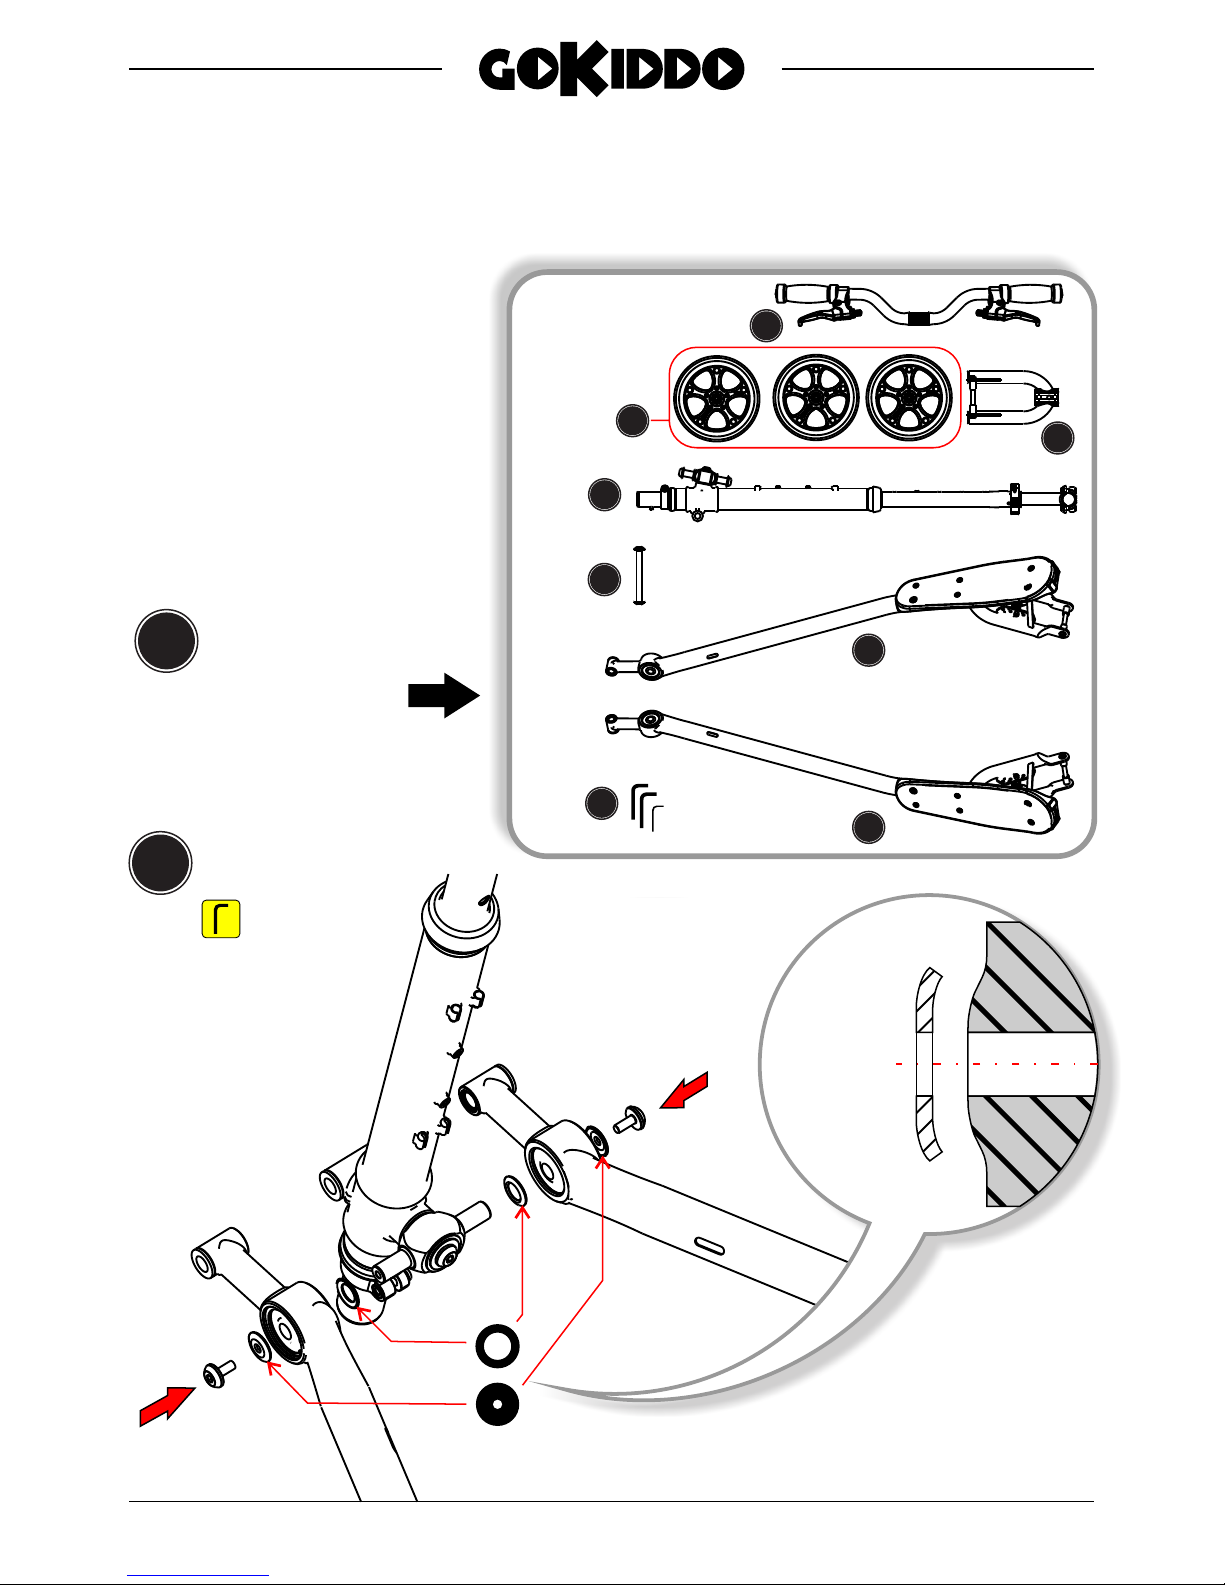
Go Kiddo ASSEMBLY
Remove the T7 Carving Scooter from the box:
A. Left Arm (with brake cable)
B. Right Arm (with brake cable)
C. Handlebar
D. Front Structure
E. Front Fork
F. Wheels (3x)
G. Main Axle
H. Tolls
I. Manual
A
B
C
D
E
F
G
Arrange the parts
this way on the floor
or over a table.
1
H
2
Attach the arms
to the yoke.
Concave
face fowards
bushing
Allen wrench
5mm
Go Kiddo T7 Carving Scooter Owner’s Manual - V1 - 01/22/2015 - Page 08
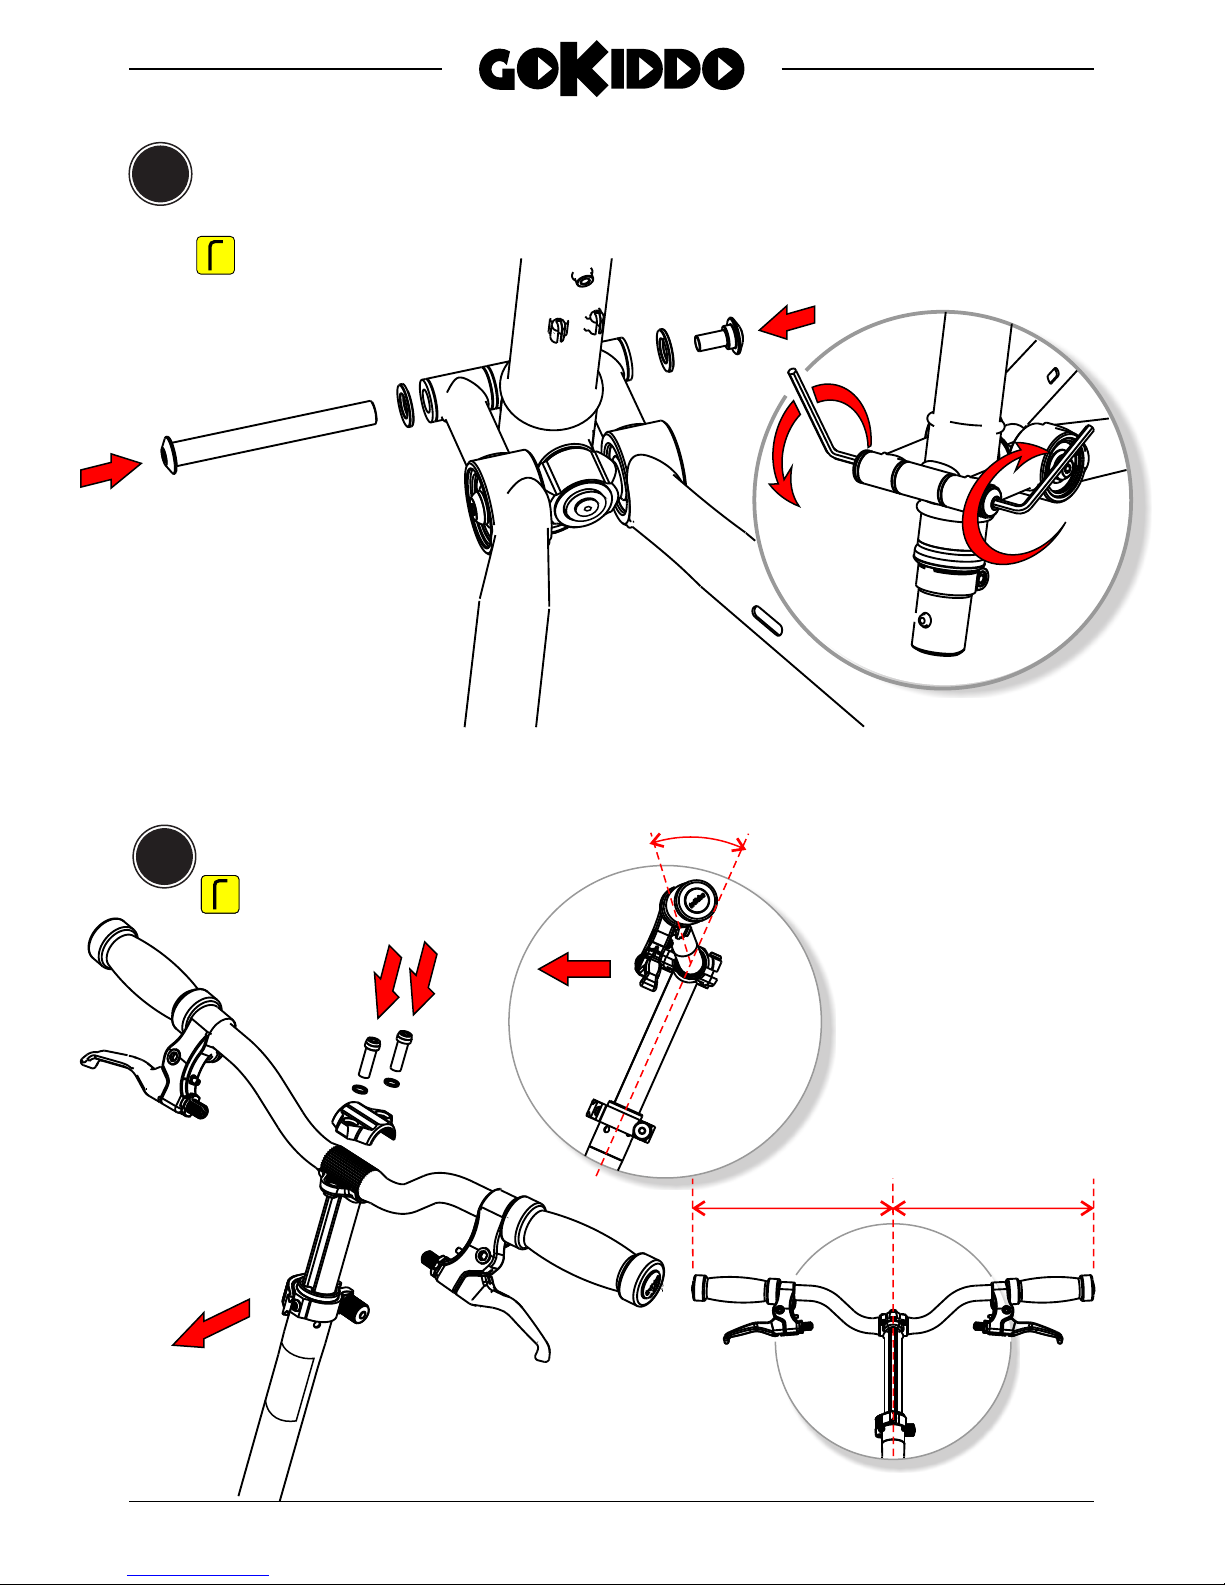
3
Insert the main axle through the 3 main frame
parts and tighten the bolts using two 5mm allen
wrench.
Allen wrench
5mm
Lock
Lock
Install the handlebar.
4
O
40
= =
Allen wrench
5mm
FRONT
FR
ONT
Go Kiddo T7 Carving Scooter Owner’s Manual - V1 - 01/22/2015 - Page 09
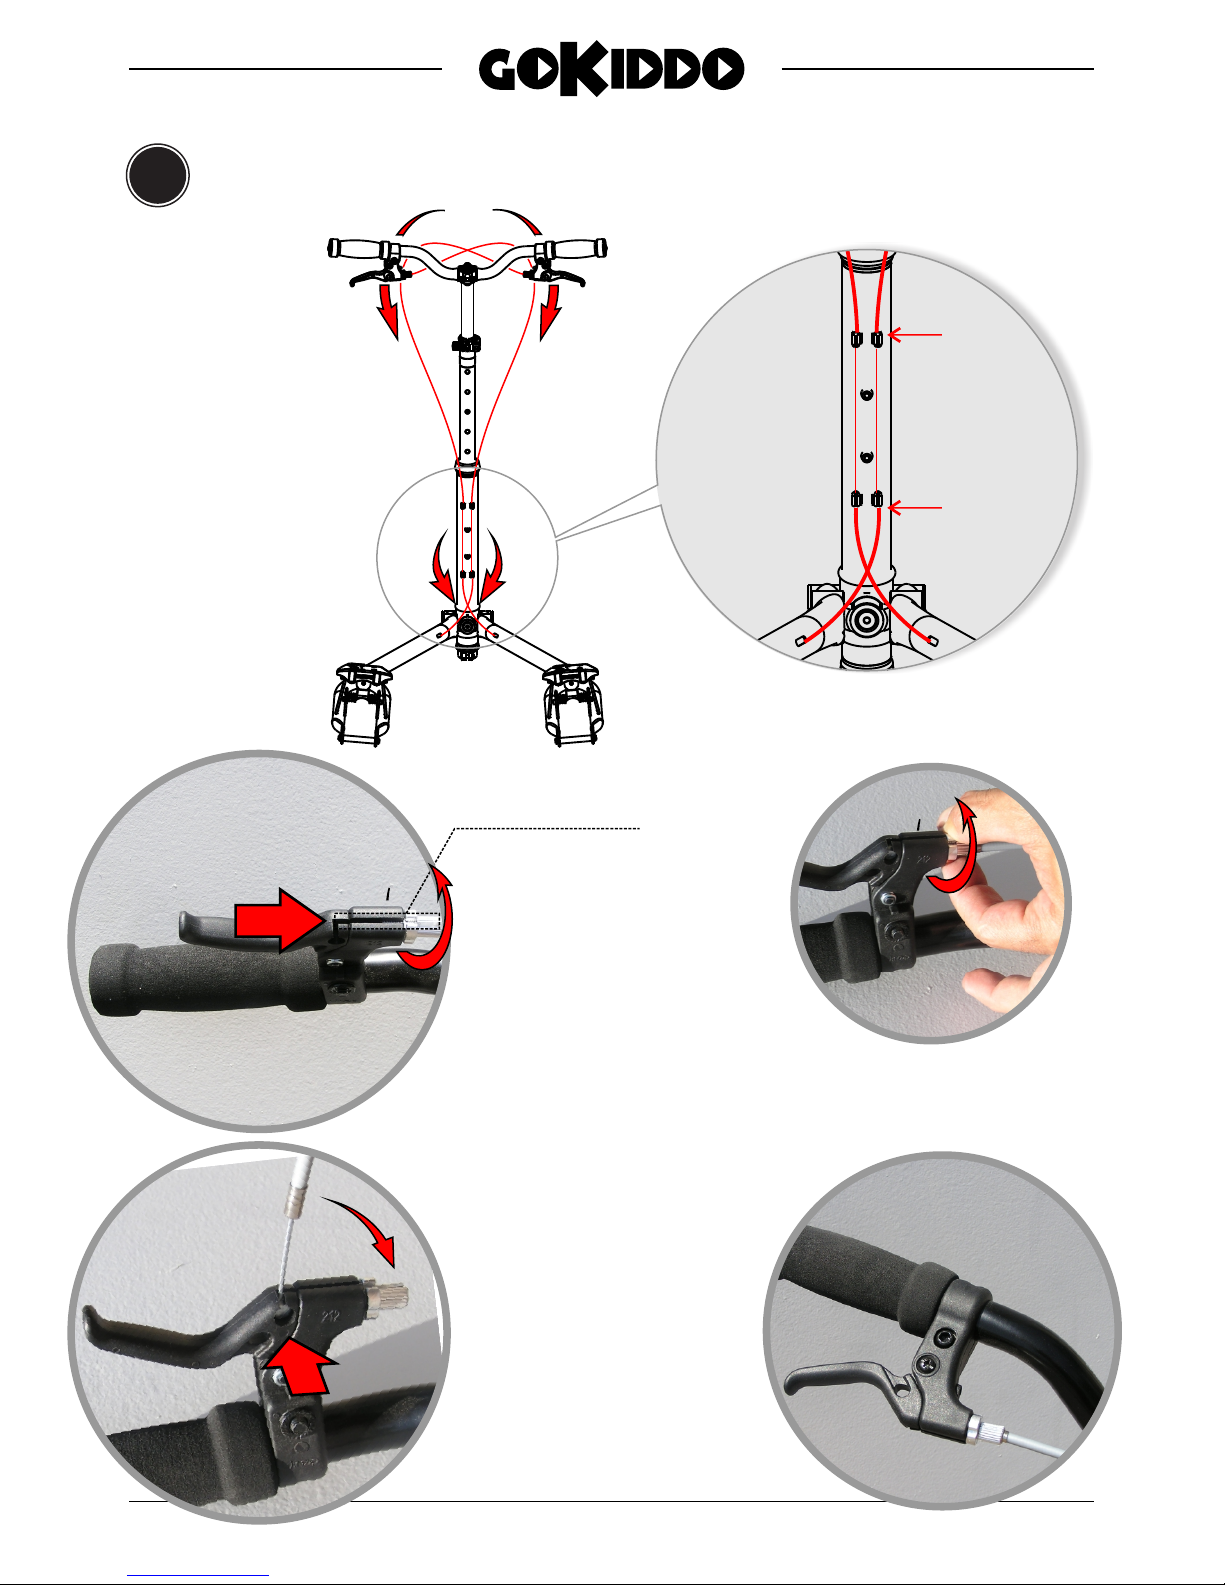
Install brake cables.
5
2
2. ATTACH BRAKE
CABLE END AND
SLIDE THROUGH
SLOTS.
STAY
STAY
PAY ATTENTION TO THE
PROPER CABLE ROUTING
1
3
3. TIGHTEN THE
ADJUSTING SCREW
AND LOCK-NUT
1. ALIGN SLOTS
TURN THE ADJUSTER
SCREW AND LOCK-NUT
UNTIL THEY MATCH
THE SLOT ON THE BODY
OF THE BRAKE LEVER.
 Loading...