

GoHigh EP310-H Series User Manual

User Manual
User Manual
EP310-H Series
IP Phone
Version 2.1
Gohigh Data Networks Technology Co.,LTD
Tel: 86-10-62302956 Fax: 86-10-62301900
Website: www.gohigh.com.cn

User Manual
CONTENT
1 INTRODUCTION................................................................................................................. 3
2 INSTALLATION.................................................................................................................. 4
2.1 Appearance ..................................................................................................................................4
2.2 Package list..................................................................................................................................4
2.3 Installation....................................................................................................................................5
2.4 Check Installation by ICON of LCD........................................................................................5
3 PRODUCT OVERVIEW..................................................................................................... 6
3.1 Software Features.......................................................................................................................7
3.2 Hardware Specifications...........................................................................................................7
4 BASIC OPERATIONS....................................................................................................... 8
4.1 Get Familiar with Keypad..........................................................................................................9
4.2 Dialing and Making Calls........................................................................................................10
4.2.1 Dialing General PSTN Phone or Extension. ...........................................................10
4.2.2 IP to IP Calling ................................................................................................................10
4.3 Answering Calls........................................................................................................................11
4.4 Call Hold......................................................................................................................................12
4.5 Call Transfer...............................................................................................................................12
4.6 Three-Way Calling.....................................................................................................................12
5 CONFIGURATI ON GUIDE.............................................................................................. 14
5.1 Config IP Phone through Keypad.........................................................................................14
5.1.1 Menu Structure:.............................................................................................................14
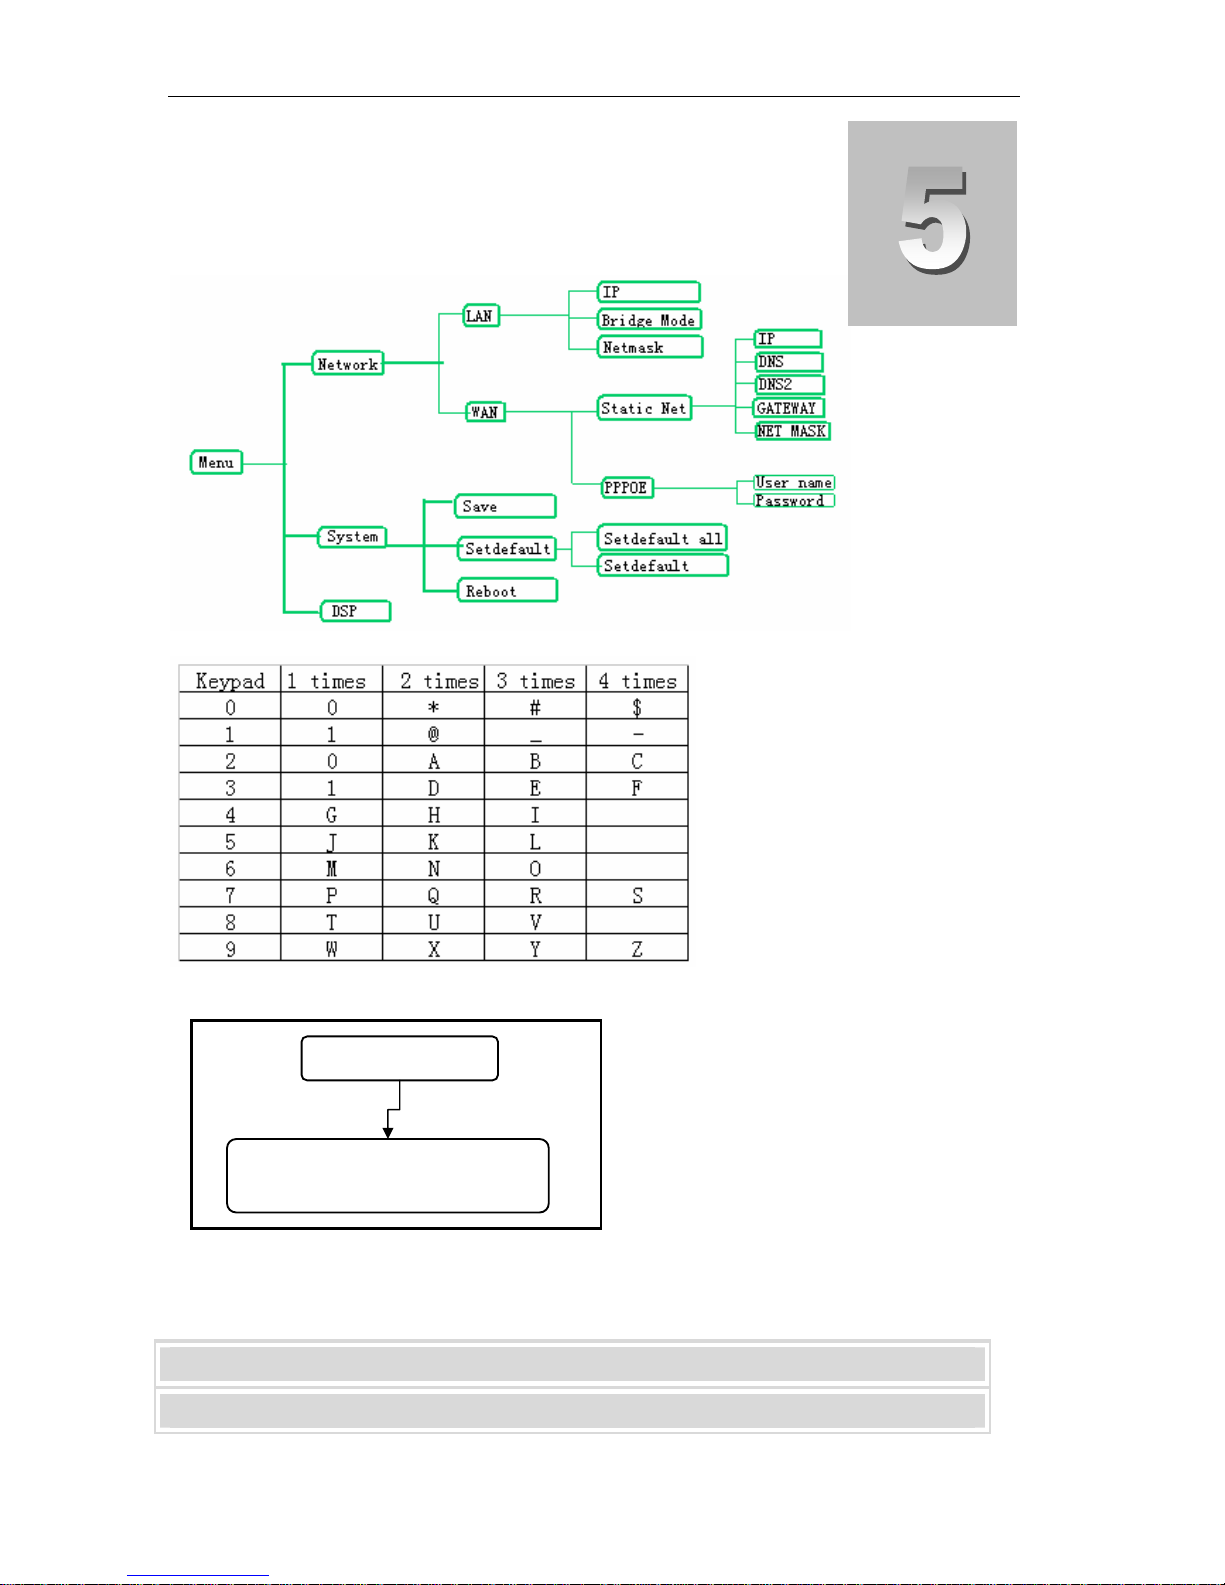
5.1.2 Keypad Corresponding Symbol Table.....................................................................14
5.2 Configuration Procedure for Basic Operations:...............................................................14
5.3 Minimum Configuration..........................................................................................................14
5.3.1 Network Configuration by Keypad............................................................................14
5.3.2 Common Shortcut Keys...............................................................................................16
5.4 Reboot IP Phone.......................................................................................................................17
6.0 WEB CONFIGUR ATION.............................................................................................. 18
6.1 Physical Connection................................................................................................................18
6.2 Preparation for Web Configuration......................................................................................18
6.3 User verification........................................................................................................................19
6.4 Current State..............................................................................................................................20
6.5 Network Configuration............................................................................................................20
6.5.1 WAN Configuration .................................................................................................20
6.5.2 LAN Configuration...................................................................................................22
6.6 VOIP Configuration..................................................................................................................24
6.6.1 IAX2 Configuration................................................................................................254
6.6.2 SIP 1 Configuration....................................................................................................25
6.7 Advance.......................................................................................................................................27
6.7.1 DHCP server Configuration ........................................................................................27
6.7.2 NAT Configuration.........................................................................................................27
6.7.3 NAT Service Configuration .........................................................................................28
6.7.4 Firewall.............................................................................................................................30
6.7.5 QOS 802.1p Configuration ..........................................................................................31
6.7.6 Advance SIP Configuration.........................................................................................31
6.7.7 Digital Map Configuration............................................................................................33
6.7.8 Call Service Configuration..........................................................................................34

User Manual
6.7.9 MMI Filter.........................................................................................................................37
6.7.10 DSP Configuration ......................................................................................................37
6.7.11 VPN Configuration ......................................................................................................37
6.8 Dial Peer......................................................................................................................................39
6.9 Config Manage (Save and Clear configuration)................................................................42
6.9.1 Save Config.....................................................................................................................42
6.9.2 Clear Config....................................................................................................................42
6.10 Upgrade.....................................................................................................................................43
6.10.1 Web Update...................................................................................................................43
6.10.1.1 Firmware update.....................................................................................43
6.10.1.2 Config file update...................................................................................43
6.10.1.3 user-defined web logo update............................................................43
6.10.2 FTP or TFTP Update....................................................................................................44
6.10.3 Auto Update..................................................................................................................46
6.11 Sy stem Manage.......................................................................................................................47
6.11.1 Account Manage (maximum 5 accounts ).............................................................47
6.11.2 Phone Book Configuration .......................................................................................49
6.11.3 Syslog Configuration..................................................................................................50
6.11.4 Time Set.........................................................................................................................50
6.11.5 System Reboot.............................................................................................................51
7 DEFAULT FACTORY SETTING.................................................................................. 52
8 TELNET ......................................................................................................................... 52
8.1 Config Procedure......................................................................................................................53
8.2 Telnet Basic Introduction........................................................................................................53
8.2.1 Basic Structure ..............................................................................................................53
8.2.2 Basic Command.............................................................................................................53
8.3 Global Command......................................................................................................................54
8.4 Net Configuration .....................................................................................................................55
8.4.1 LAN interface Settings.................................................................................................55
8.4.2 WAN Interface Settings................................................................................................55
8.5 Net Service .................................................................................................................................55
8.6 Port Settings..............................................................................................................................56
8.7 SIP Settings................................................................................................................................56
8.8 User Management..................................................................................................................56
8.9 Debug (Level 0~7)..................................................................................................................57
8.10 Show System Running Info.................................................................................................57
8.1 1 Logo ut........................................................................................................................................58
8.12 Tracert Trace Network Path Info. .....................................................................................58
8.13 Update........................................................................................................................................58
8.14 Upload Configure File............................................................................................................58
8.15 Download Configure to Flash......................................................................................58
8.16 Password..................................................................................................................................58
8.17 Reload........................................................................................................................................58
8.18 Network Diagnosis.................................................................................................................58
8.19 Restore to Factory Default...................................................................................................59
8.20 POST Mode(safe mode)........................................................................................................59
8.20.1 Access Post Mode Process......................................................................................59
8.20.2 Post Mode Clear........................................................................................................59
8.20.3 Post Mode FTP Update Firmware............................................................................59
9.0 ACCESSORIES VPN USER MANUAL ............................................................. 52

User Manual
1 Introduction
CHAPTER
About This Manual
his Manual provides basic information on how to install and connect EP310-H
IP Phone to the network. It also includes features and functions of EP310-H
T
Before Getting Started
Before you can connect EP310-H to the network and use it, you must have a
high-speed Internet connection installed. A high-speed connection includes
environments such as DSL, cable modem, and a leased line.
EP310-H IP Phone
EP310-H IP phone is a stand-alone device, which requires no PC to make Internet
calls. EP310-H IP phone supports both data and voice thru IP network, and also
provides all the features and functionalities of conventional phone and more. Our
IP phone guarantees clear and reliable voice quality on IP network, which is fully
compatible with SIP and industry standard and able to interoperate with many other
IAX2 compliant devices and software on the market.
Notice
This publication describes the instruction for EP310-H series IP phone functions only.
We reserve the rights to do any changes or make enhancements of this publication
without further notice. The most updated electronic revision of user manual can be
downloaded from Gohigh’s website: www.gohigh.com.cn
understanding and continuous support.
IP phone components, and how to use them correctly. We sincerely hope
you could enjoy the convenience and capabilities brought forward by our
products.
timely, thanks for your

User Manual
2 Installation
2.1 Appearance
EP310-H series IP phone are designed to look like the
conventional telephones. The following photo illustrates
the appearance of EP310-H IP phone.
CHAPTER
2.2 Package list
1) One EP310-H IP phone (Main body + Handset + Cord)
2) One Straight Ethernet cable
3) One universal power adapter
4) One User Manual
Warning: Although the adapter of EP310-H series IP Phone is compliant with UL
standard, please do not attempt to use other difference power adapter or cut off
power supply during configuration or updating phone. Using other powe r adapter
may damage EP310-H series phone and will void the manufacturer warranty.
Caution: All operations of our product must abide by the instructions provided
by IP Phone manufacturer. Any Changes or modifications to this product
without formal authorization by manufact urer, or operation of EP310-H series
phone in any way other than the instructions stated on this user manual will void

User Manual
the manufacturer warranty.
2.3 Installation
1) Insert handset cord into the handset jack and left jack of IP Phone
2) Insert the power adapter’s plug into the phone front Power jack (DC 5V) and
the 2-prong plug end of which into grounded power outlet
3) Start up the IP phone by turning the front switch stated ‘ON’ & ‘OFF’ to ‘ON’
4) Remove the LAN cable for Internet connection from your PC and connect it to
WAN port of EP310-H, then follow below installation checking way
5) If need to set up small LAN network, find the LAN cable in the box and
connect between LAN port and your PC (PC is not required to set up for
making a call)
2.4 Check Installation by ICON of LCD
EP310-H IP Phone has a 74mmx28mm LCD that can display three lines of below
characters each. Here is the display when all segments illuminate:
The LCD is equipped with a backlight. When the phone is in the normal idle state, the
backlight is off. Whenever an event occurs, the backlight turns on automatically and
brings the user’s attention. The definitions for each character displayed on LCD
described as below table.
User Manual
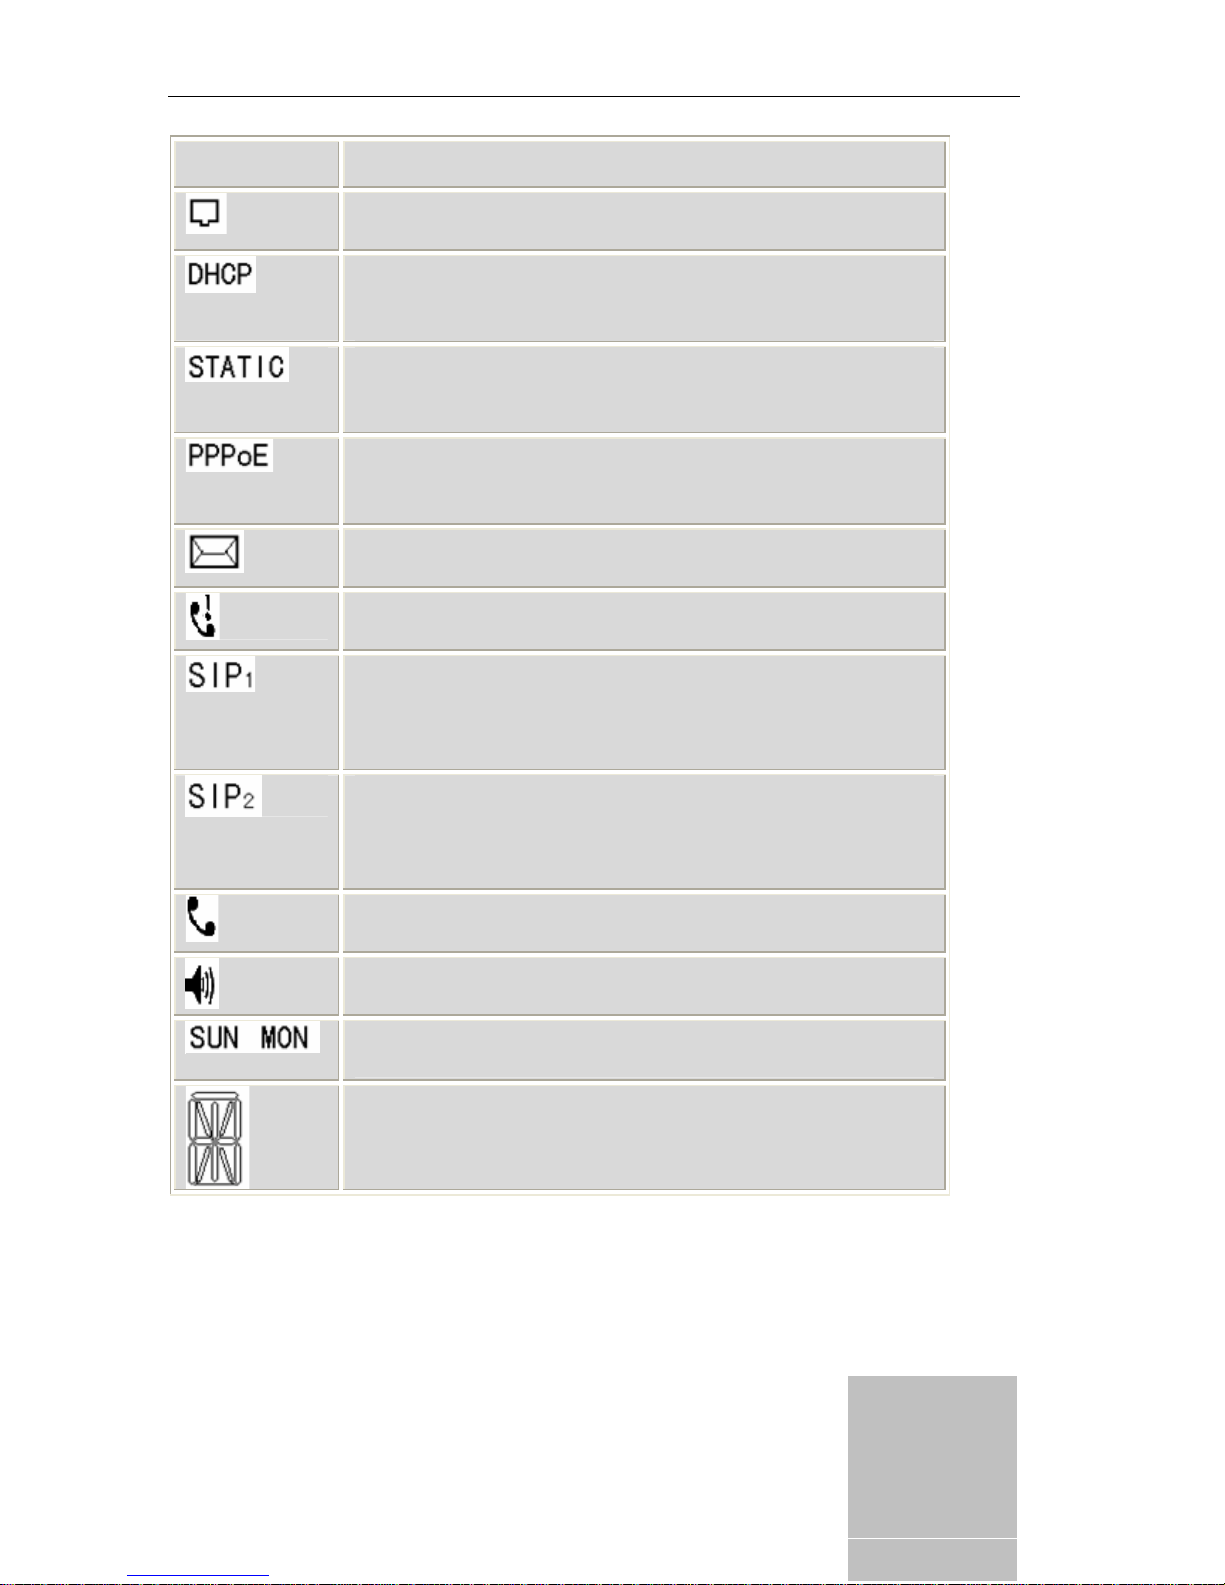
Icon LCD Icon Definitions
Network Status Icon: FLASH in the case of Ethernet link
failure or the phone is not registered properly.
Network Status Icon: ON when Phone work on DHCP
mode and FLASH when DHCP client is not registered
successfully. OFF when Phone is work on another mode.
Network Status Icon: ON when Phone work on Static
mode and FLASH when IP address is disable. OFF when
Phone is work on another mode.
Network Status Icon: ON when Phone work on PPPoE
mode and FLASH when PPPoE is not registered
successfully. OFF when Phone is work on another mode.
Message Status Icon: ON and Flash if Phone has new
message include text message or voice record
Missed call display ON and Flash if Phone has missed call
and not be read.
SIP1 (Public SIP server) register Status: Flash when
enable register and can not register successfully, ON
when enable register and register successfully, OFF
when disable register
…
SIP2 (Private SIP server) register Status Icon: Flash when
enable register and can not register successfully, ON
when enable register and register successfully, OFF
when disable register
Handset Status Icon: ON when off-hook OFF when
on-hook
Hand-free Status Icon: ON when phone work on hand-free
mode OFF when IDLE or work on handset mode
Weekday Status Icon: Show the correct weekday
according to the phone current date
Numerical Numbers and Characters: 0 - 9 * # @ A, B,
C, D, E, F, G, H, I, J, K, L, M, N, O, P, Q, R, S, T, U, V, W,
X, Y, Z
3 Product Overview
CHAPTER

User Manual
e
r
EP310-H IP Phone is a next generation IP network telephone
based on industry open standard SIP (Session Initiation
Protocol).EP310-H series IP Phone offer customer superb
sound quality and rich functionalities at mass-affordable price.
z 3.1 Features
VoIP SoC Single Chip SoC
Embedded
CPU150M,DSP100M
(
Flash 16Mbytes NOR Flash
RAM 64Mbytes SDRAM
Audio Codec
Protocols
G.711 (A-Law, µ-Law)
G.723.1
G.729A/B
Autoadjust Jitter Buffer
Voice Activity Detection
Comfort Noise Generation
Acoustic Echo Cancellation: Support G.168
, Hands-free can support 96ms
SIP (RFC3261)
Backward Compatible with RFC2543
SDP (RFC2327)
RTP/RTCP (RFC1889 and RFC1890)
NAPTR for SIP URI Lookup (RFC2915)
STUN (RFC 3489)
ARP/RARP (RFC 826/903)
SNTP (RFC 2030)
DHCP/PPPoE
HTTP Server for Web Management
TFTP/HTTP for Auto Provisioning
Message Waiting Indicator (RFC3842)
DHCP Option Codes for SIP (RFC3361)
802.1P Diffser
802.1Q VLAN
3.2 Hardware Specifications
The below table describes the hardware specifications of EP310-H Phone
Infineon PSB21553
), PBGA package
Management
Call Features
Applications Voice Mail Integration
Firmware Upgradeable
Upgrade firmware thro ugh boot monitor
Config through Web, keypad, Telnet
Upgrade firmw are and con figuratio n file
through HTTP, FTP, TFTP
Support Syslog
Support 2 SIP carrier
3-way Conference
Auto Answer
Call History
- Most Recently Missed Calls
- Most Recently Received Calls
- Most Recently Dialed Numbers
Call Hold
Call Forwarding
Call Mute
Call Transfer
Flexible dial map and dial rule
Call Waiting
Caller ID
Do Not Disturb (DND)
DTMF Relay
- In-band, Out-band and SIP Info
Full-duplex Speakerphone
Hotline
support SIP domain, DNS name of s
Multiple Proxy, Registrar, Redirect Servers
Supports 2 service domains
Redial
Speed Dial
Volume Adjustment
- Handset/Headset, Speaker and Ringe
English, language custom-tailor
NAT Traversal
-
Static NAT Route
-
Traversal by STUN/UPNP
100 Entries Address Book
Support DMZ
Support Firewall
Support Route/Bridge mode

User Manual
Item EP310-H
Power Adapter Input: 100-240VAC 50~60Hz
Output: +5VDC, 1200mA
CPU Infineon PSB21553 150MHz
WAN 10/100Base T RJ-45 for LAN Port
LAN 10/100Base T RJ-45 for PC
Power Consumption Idle:1.4W / Active:1.8W
LCD size 3 inch (74×28mm)
Operating Temperature 0~40℃(32°~104℉)
Storage Temperature -10°~60℃(14°~140℉)
Relative Humidity 10~65% (Non-condensing)
Dimension (W×H×D) 11.6× 8× 3 inch (29.5×20.5×7.5cm)
Weight (packaging
included)
Certification CE / FCC Part 15 Class B
2.07 lb. (0.94kg)
4 Basic Operations
CHAPTER

User Manual
4.1 Get Familiar with Keypad
EP310-H phone has a 28-button keypad. Definitions of each state
as below
Key Button Mode Definitions
0 -9
In the dial-up
mode
In the keypad
configure mode
*
In the dial-up
mode
In the call hold
mode
In the keypad
configure mode
# In the dial-up
mode
SYSINFO In the IDLE mode Continuous thrice press display assigned
ENTER In the keypad
configure mode
Exit In the keypad
configure mode
MENU In the IDLE mode Enter menu mode and display the tree
HOLD In the keypad
configure ode
Transfer In the keypad
configure mode
REDIAL/SEND In the dial-up
mode
SPEAKER In the IDLE mode Enter hands-free mode
UP In the keypad
configure mode
DOWN In the keypad
configure mode
Decimal digit number 0-9, star and pound
keys are usually used to make phone
calls
Rapid first button press display the digit
number 0-9,rapid second button press
display the English character or others
As one part of phone number when call
out
Ready to call a third party’s number to
make three-way (or conference) calling
Equal to the dots notation when input IP
address
As one part of phone number when “#” is
the first dialed number. otherwise as the
ending symbol to end up dialing
IP address of WAN Port, gateway’s IP
address and the phone number
registered on public server
Confirm configuration or enter submenu
mode
Cancel configuration or exit submenu
mode
menu system
Temporarily hold the active call
Transfer the active call to another party
or Enter three-way (or conference)
calling.
Redial the number last dialed, or force a
call to go out immediately before timeout
Go back to previous menu item or
increase handset/speakerphone volume
Go down to lower menu items or reduce
handset/speakerphone volume

User Manual
DEL
In the dial-up
mode
In the keypad
configure mode
Delete a key entry, call log, voice mail
and etc.
Modify the current configuration
parameter or delete input info
MUTE In the IDLE mode Mute an active call;
OUT In the keypad
configure mode
IN In the keypad
configure mode
Browse the outgoing call records
(maximum saving 100 records)
Browse the incoming call
records(maximum saving 100 records)
REC In the IDLE mode Enter voice mail submenu (maximum
saving 5 records)
PBOOK In the IDLE mode Access to phone book.(maximum saving
100 records)
Note:
1 Outgoing , Incoming ,Missed call support maximum 100 records, but power off will
lose the record.
2 Support 5 records: one for local message ,one for welcome message ,three for
incoming call leaving message
4.2 Dialing and Making Calls
4.2.1 Dialing General PSTN Phone or Extension.
There are three dialing modes:
1. Pick up handset or press SPEAKER button, and then enter the phone
numbers, IP phone will send out the numbers with the DTMF tones.
2. In the off hook mode or Hands-free mode, Press the REDIAL/SEND button
directly to redial the number last called. Once pressed, the last dialed number
will be displayed on the LCD with DTMF tones and an outgoing call is sent.
3. Make use of Speed dialing mode: enter PBOOK→SPEED DIAL→INPUT
INDEX submenu to input the index which correspond to the phone number you
want to dial, then the phone could automatically dial the number.
Process: PBOOKENTER—INPUT INDEX (1,2,3…) + #
4.2.2 IP to IP Calling (SIP support, IAX2 not support)
Making IP to IP calling is nearly same as dialing general PSTN Phone, there
are three ways to set IP phone number and domain (more details please refer to 5.2.4)
1. “Peer to Peer” calling mode: direct make calls and no need to set phone
number thru proxy server (user could refer to Dial peer setting on web
configuration charter).The phone should be operated under following
condition (satisfy one option)
z Requirement 1 both two phones are assigned the public IP address
individually
User Manual
z Requirement 2 both two phones using private IP address should be on
the same LAN.
2. Dialing the IP number configured by public agency, both two phones should
be already registered on the public server.
3. Dialing the IP number configured by private agency, both two phones
should be already registered on the private server.
Examples:
To dial a number on the proxy, such as 1001, simply pick up handset or press
speakerphone, dial 1001 and then press the REDIAL/SEND button.
To dial a PSTN number such as 62281486, you might need to enter in some prefix
number followed by the phone number. Please check with your VoIP service provider
to get the information. If your phone is assigned with a PSTN-like number such as
62281493, most likely you just follow the rule to dial 62281486 as if you were calling
from a regular analog phone, followed by pressing the REDIAL/SEND button.
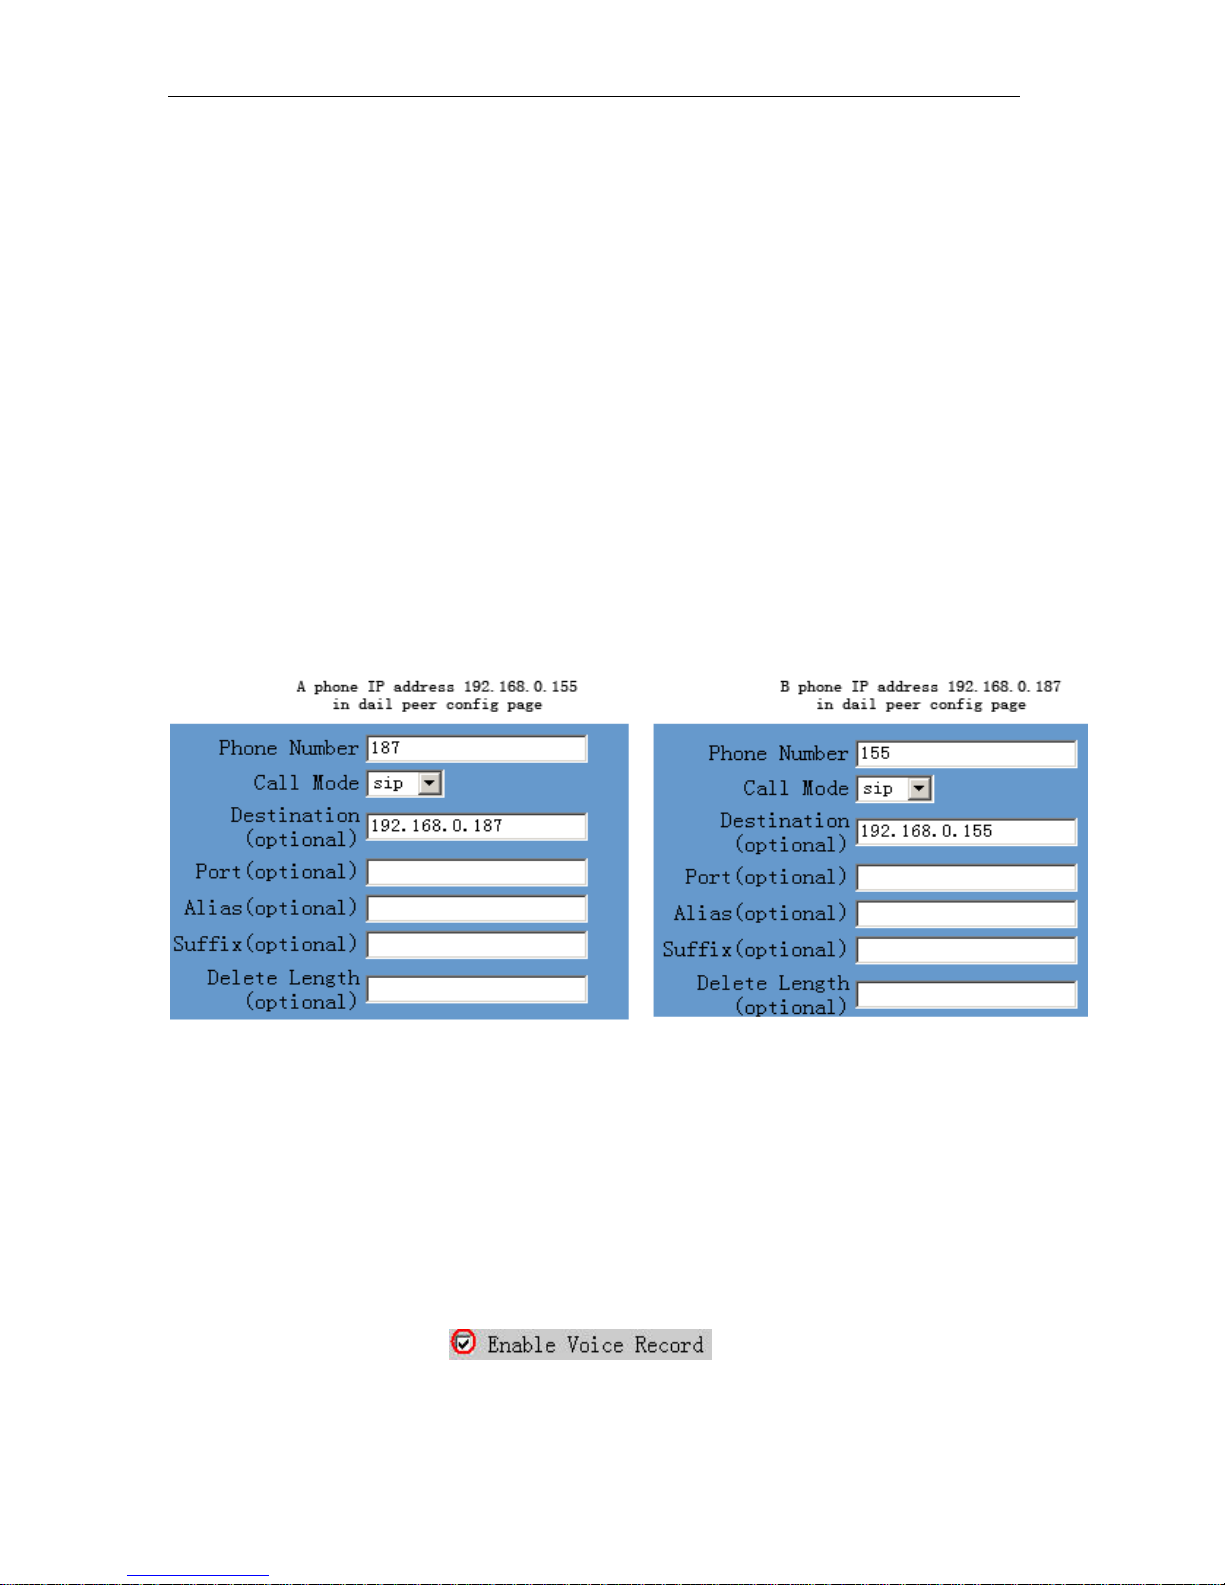
Example 1
If A dial number 187 , A can talk with B . If B dial number 155 , B can talk with A
4.3 Answering Calls
There are three ways to receive incoming calls:
z Pick up handset to receive incoming calls
z Press the SPEAKER button to receive incoming calls
z Start-up the voice message function to record the incoming calls, afterwards
listen to voice messages thru phone audio play .
Operations: Enter REC→RECEIVED→NEW→UP OR DOWN to the LIST NO
submenu (maximum is 3 message) 。
Precondition : must enable
in Advance /Call service
User Manual
Note: User can switch from a hands-free call to handset by picking up the handset.
To switch from a handset call to a hands-free call, press hands-free button, and then
hang up the handset.
4.4 Call Hold
Pressing the HOLD button during current conversation enables you put an active
calling on hold temporarily while a second call is answered or made, press this button
again will go back to the previous call.
Precondition : must enable
in Advance /Call service
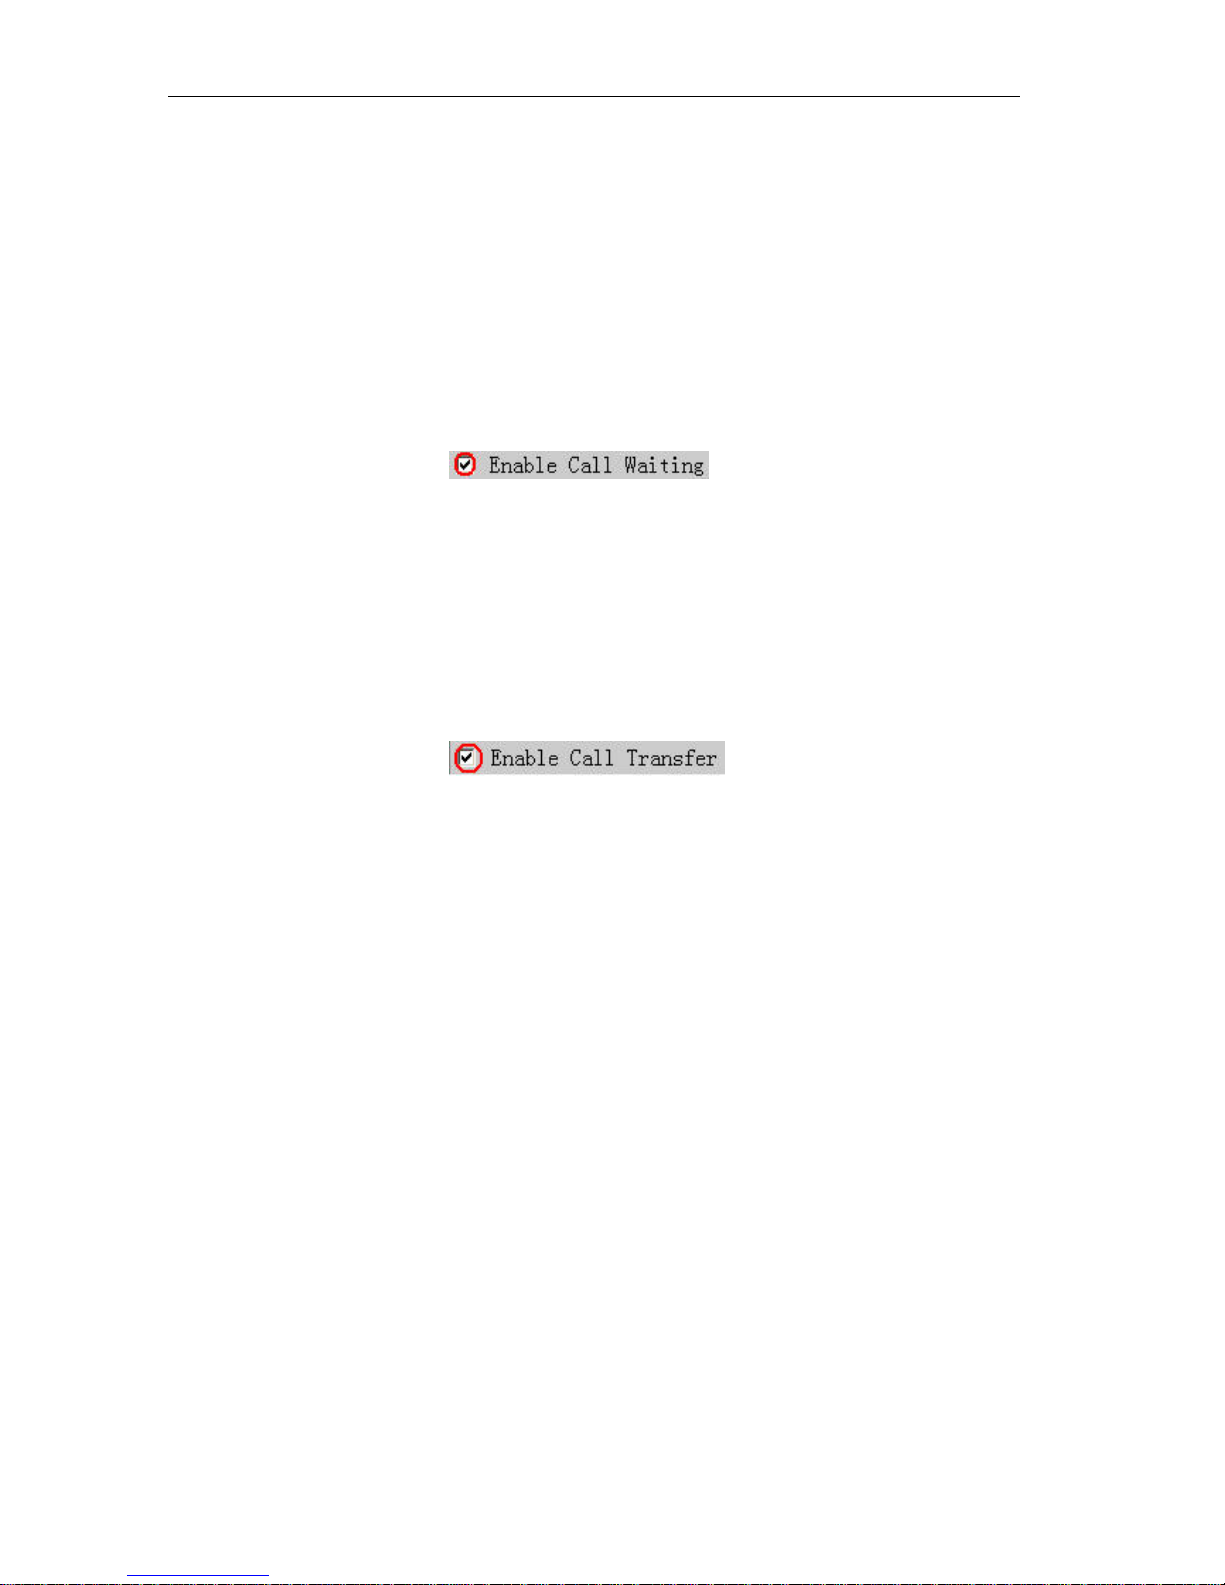
4.5 Call Transfer
Press the TRANSFER button enables users could transfer an incoming call to the
third party’s number. When user A and user B both sides are on conversation,
Users A press <TRANSFER > button ,and then dial the thid party user C . User
A will hand up . User C ring , User B is on Hold state. User C pick
up ,and talk with user B .
Precondition : must enable
in Advance /Call service
Process: Transfer button + the third party number
Example:A is talking with B , A press <Transfer> button and dial C number. A line
break, then B will talk with C.
4.6 Three-Way Calling
EP310-H IP phone support three-way (or conference) Calling. That is users could talk
to more than one person (up to two) at the same time.
Process: press HOLD button →Dial third party’s number->put through→ press HOLD
button again →Press * button
Once the three-way initiator concludes the three-way calling, the other two sides can
not continue the conversation call and hand up automatically.
Example: A are talking with B. A press HOLD button for holding B line , and dial the
third party`s number , so A will talk with C . A press HOLD button again for holding C
line , A dial * , make three-way (or conference) calling successfully.
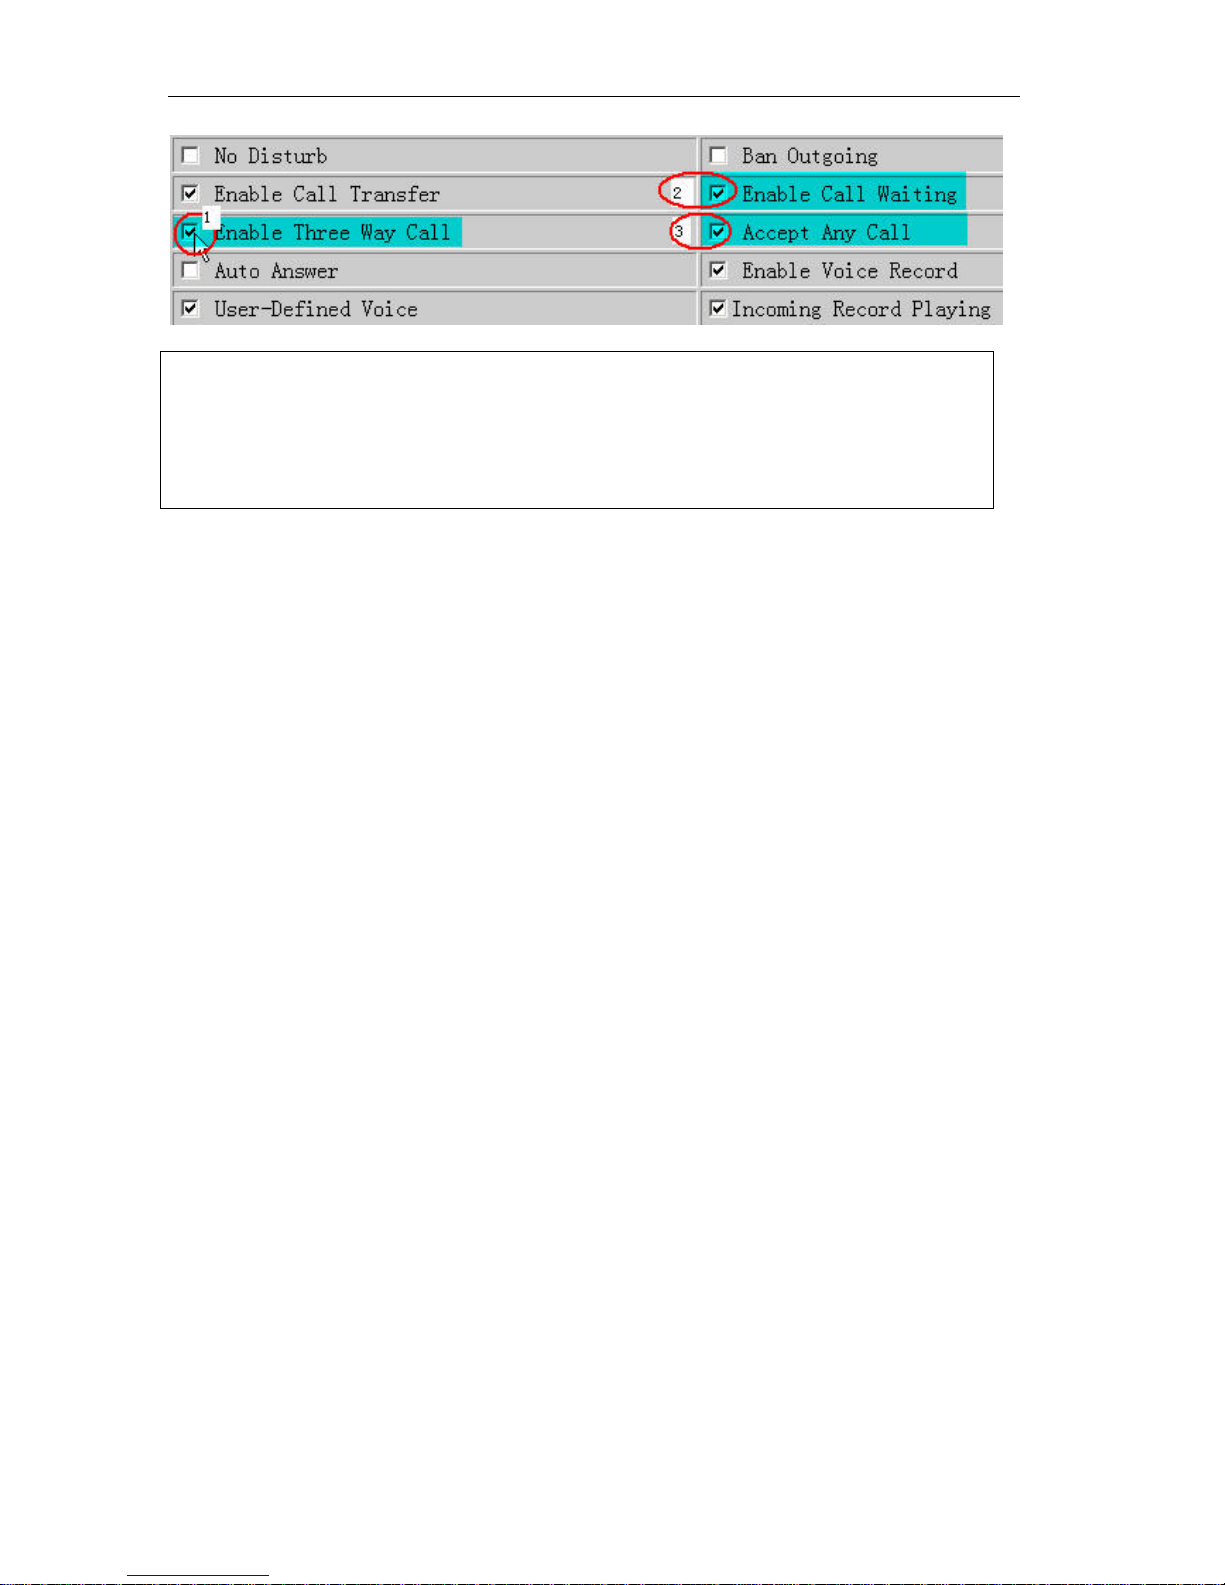
Pro-condition: enable the three functions as below picture.
User Manual
Note:
The function 4.4 & 4.5 & 4.6 could be started or closed thru system setting, so
when you need to use above three functions please make sure of opening these
functions.
User Manual
5 Configuration Guide
5.1 Config IP Phone through Keypad
5.1.1 Menu Structure:
5.1.2 Keypad Corresponding Symbol Table
CHAPTER
5.2 Configuration Procedure for Basic Operations:
Setup WAN Port
Config VOIP Phone protocol
(e.g. config SIP protocol)
5.3 Minimum Configuration
5.3.1 Network Configuration by Keypad
Press MENU button→Input password “123”→Press ENTER button to confirm.
Configure WAN Port IP address: NETWORK→WAN→STATIC NET→IP

User Manual
If using DHCP or PPPoE to get IP address dynamically, find user name on
NETWORKÆWANÆPPPoEÆUSER NAME
If using DHCP or PPPoE to get IP address dynamically, find password on
NETWORKÆWANÆPPPoEÆPASSWORD
Configure WAN Netmask: NetworkÆWANÆ STATIC NET ÆNETMASK
Configure WAN Gateway: NetworkÆWANÆ STATIC NET ÆGATEWAY
Configure WAN DNS address: NetworkÆWANÆ STATIC NETÆDNS
Finished all above network configuration, Users can connect IP phone to internet
successfully.
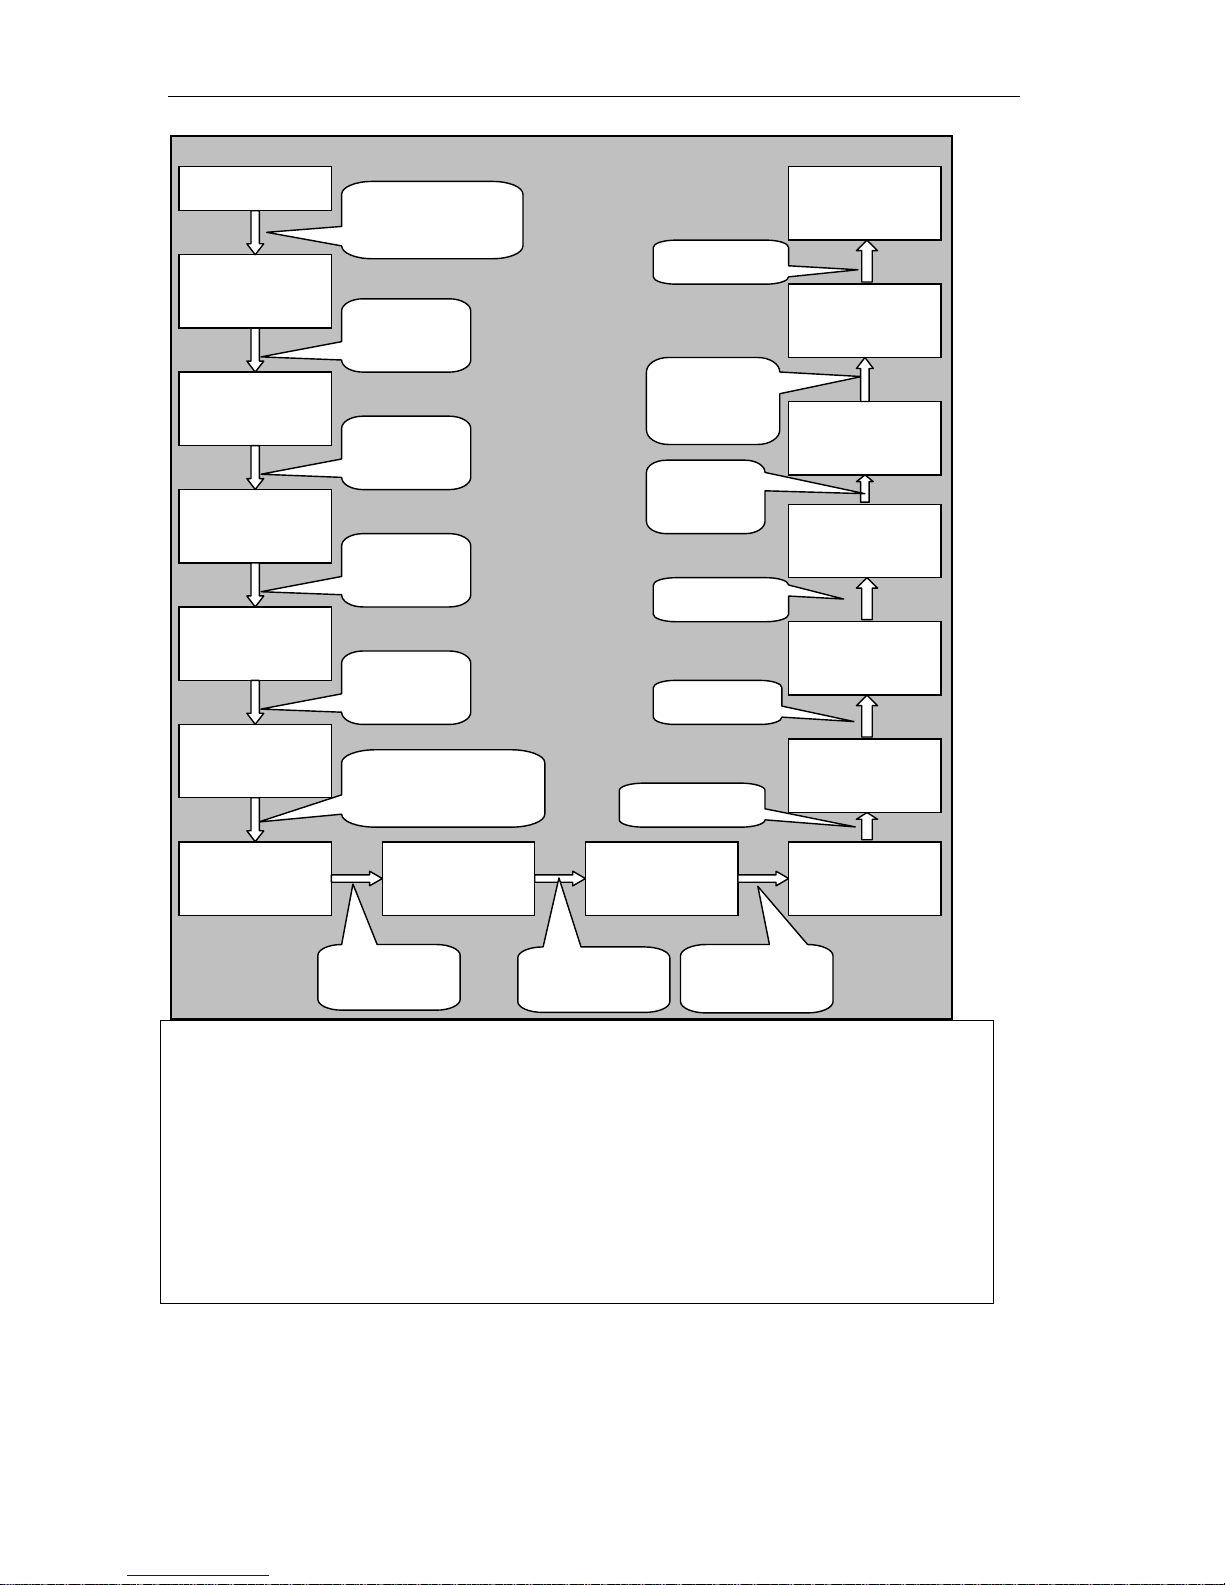
EP310-H IP Phone supports to modify IP address using keypad; Users could refer to
the following flow chart to get a clear picture.
Configuration Example:
Set IP address of Phone WAN port to 192.168.1.70 and LAN port to 192.168.20.1
User Manual
MENU
Network
LAN
IP
IP
192.168.10.1
Input Value:
1.INPUT “123”+
ENTER Key
2. ENTER
Key
3. ENTER
Key
4. ENTER
Key
5.DEL
Key
6.Input
192.168.20.1
IP
192.168.1.70
15.ENTER
Input Value:
192.168.1.70
14.Input
192.168.1.70
Input Value:
13.DEL
Key
IP
192.168.1.179
12.ENTER
IP
11.ENTER
Static net
10.ENTER
Input Value:
192.168.20.1
7.ENTER
Key
IP
192.168.20.1
8.Press EXIT
twice
LAN WAN
9.UP/DOWN
Note:
IP Phone must config the correct WAN port IP address and Gateway IP address
before connecting to internet. Due to EP310-H Phone Default mode is router,
(bridge mode is disable) so the WAN port IP could not be set to the same segment
with LAN Port IP address whe n you modif y WAN Port IP. Otherwise the, EP310-H
can not get into internet. But, if you had set wan port and LAN port to same ip
segment , you need to set EP310-H to factory default.
Process: power off ,and press # ,then power on ,input *#168 , and restart the
EP310-H
Default factory setting of WAN configuration is DHCP Client model
Default LAN Port IP=192.168.10.1 (Users could get them by pressing SYSINFO
Key)
5.3.2 Common Shortcut Keys
z Keep pressing 1 key for three seconds, Wan port IP switch to static.
z Keep pressing 2 key for three seconds, Wan port IP switch to DHCP.

User Manual
z Keep pressing 3 key for three seconds, Wan port IP switch to PPPOE
5.4 Reboot IP Phone
Enter MENU→SYSTEM→REBOOT submenu to reboot EP310-H IP Phone
Note: if no responding on phone, please cut off power supply to reboot phone.
User Manual
6.0 Web Configuration
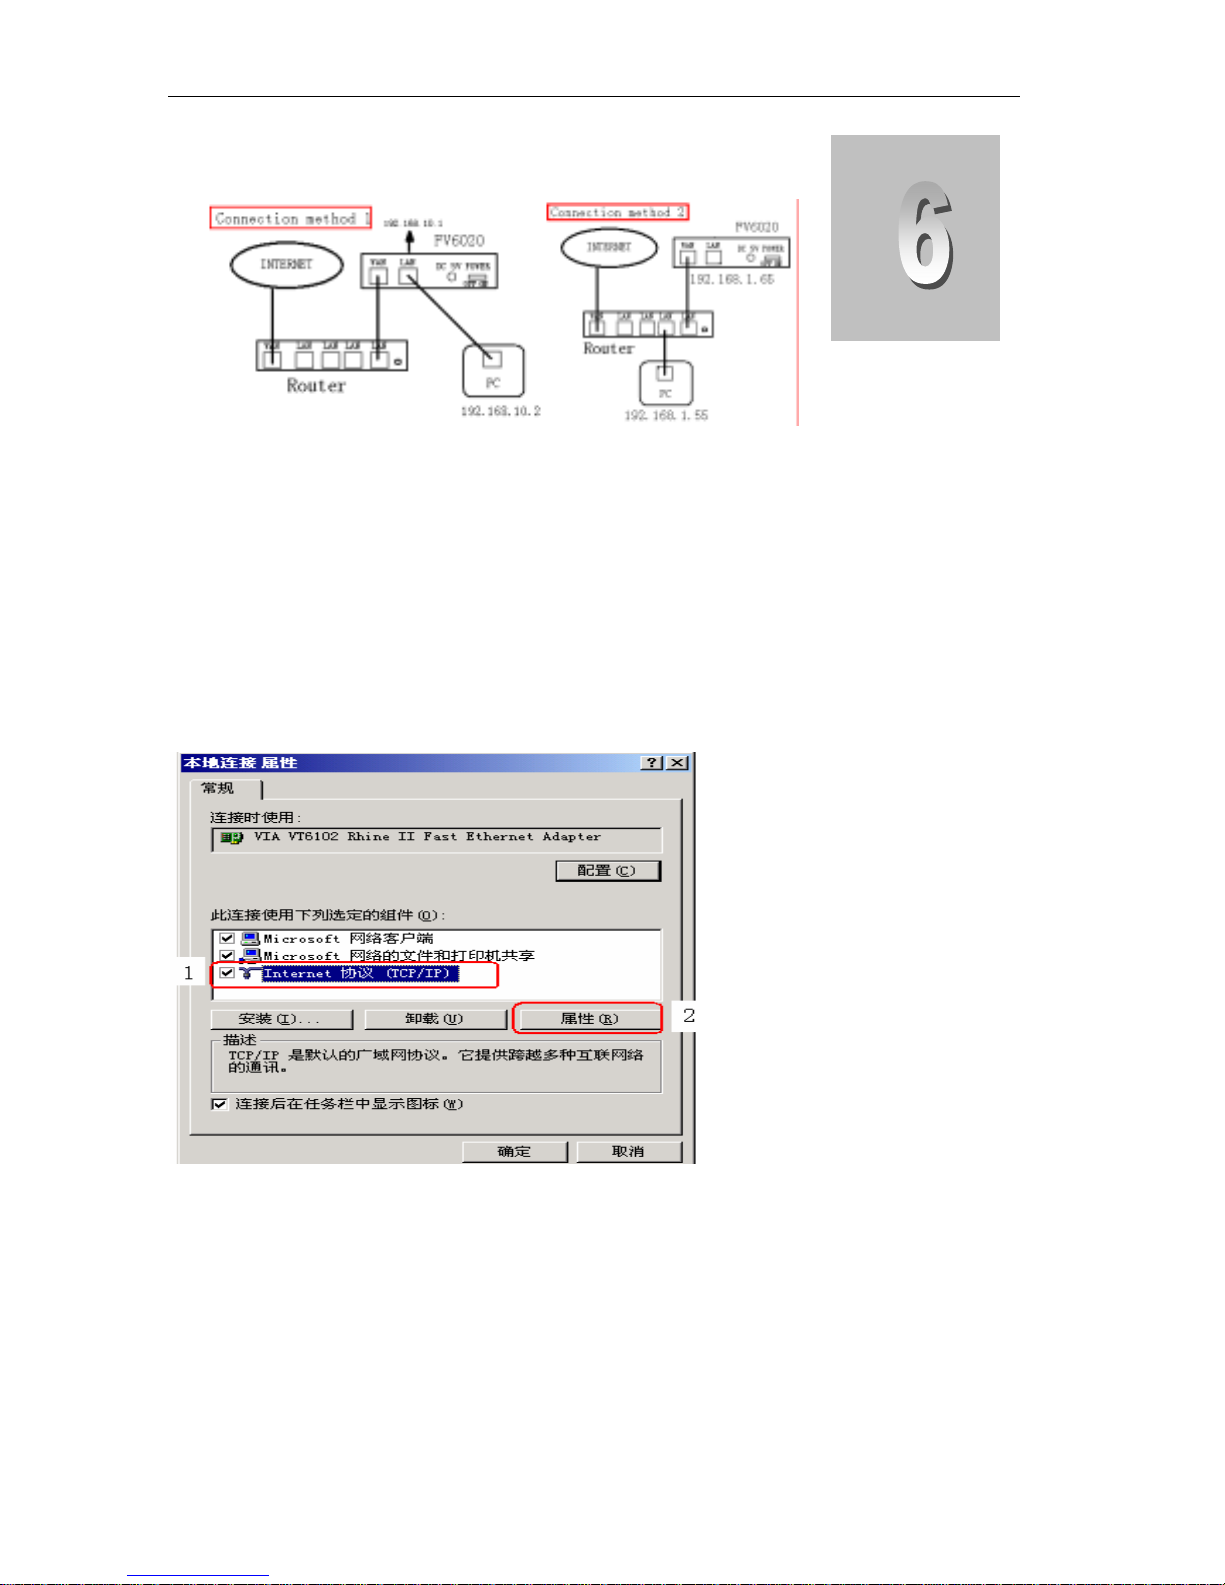
6.1 Physical Connection
CHAPTER
6.2 Preparation for Web Configuration
The IP Phone Web Configuration Menu can be accessed by the following URI:
http://Phone-IP-Address. The IP address can be set to either WAN IP address or LAN
IP address, default factory setting of WAN configuration is DHCP Client model,
default LAN IP address is “192.168.10.1”.
If connect PC with IP Phone LAN port and config to obtain IP address automatically,
you could check the default gateway IP namely LAN IP address of IP Phone. The
procedure as below
a) Access to “Property of local area connection” dialog box
b) Select “Internet Protocol (TCP/IP)”,click “Property” button
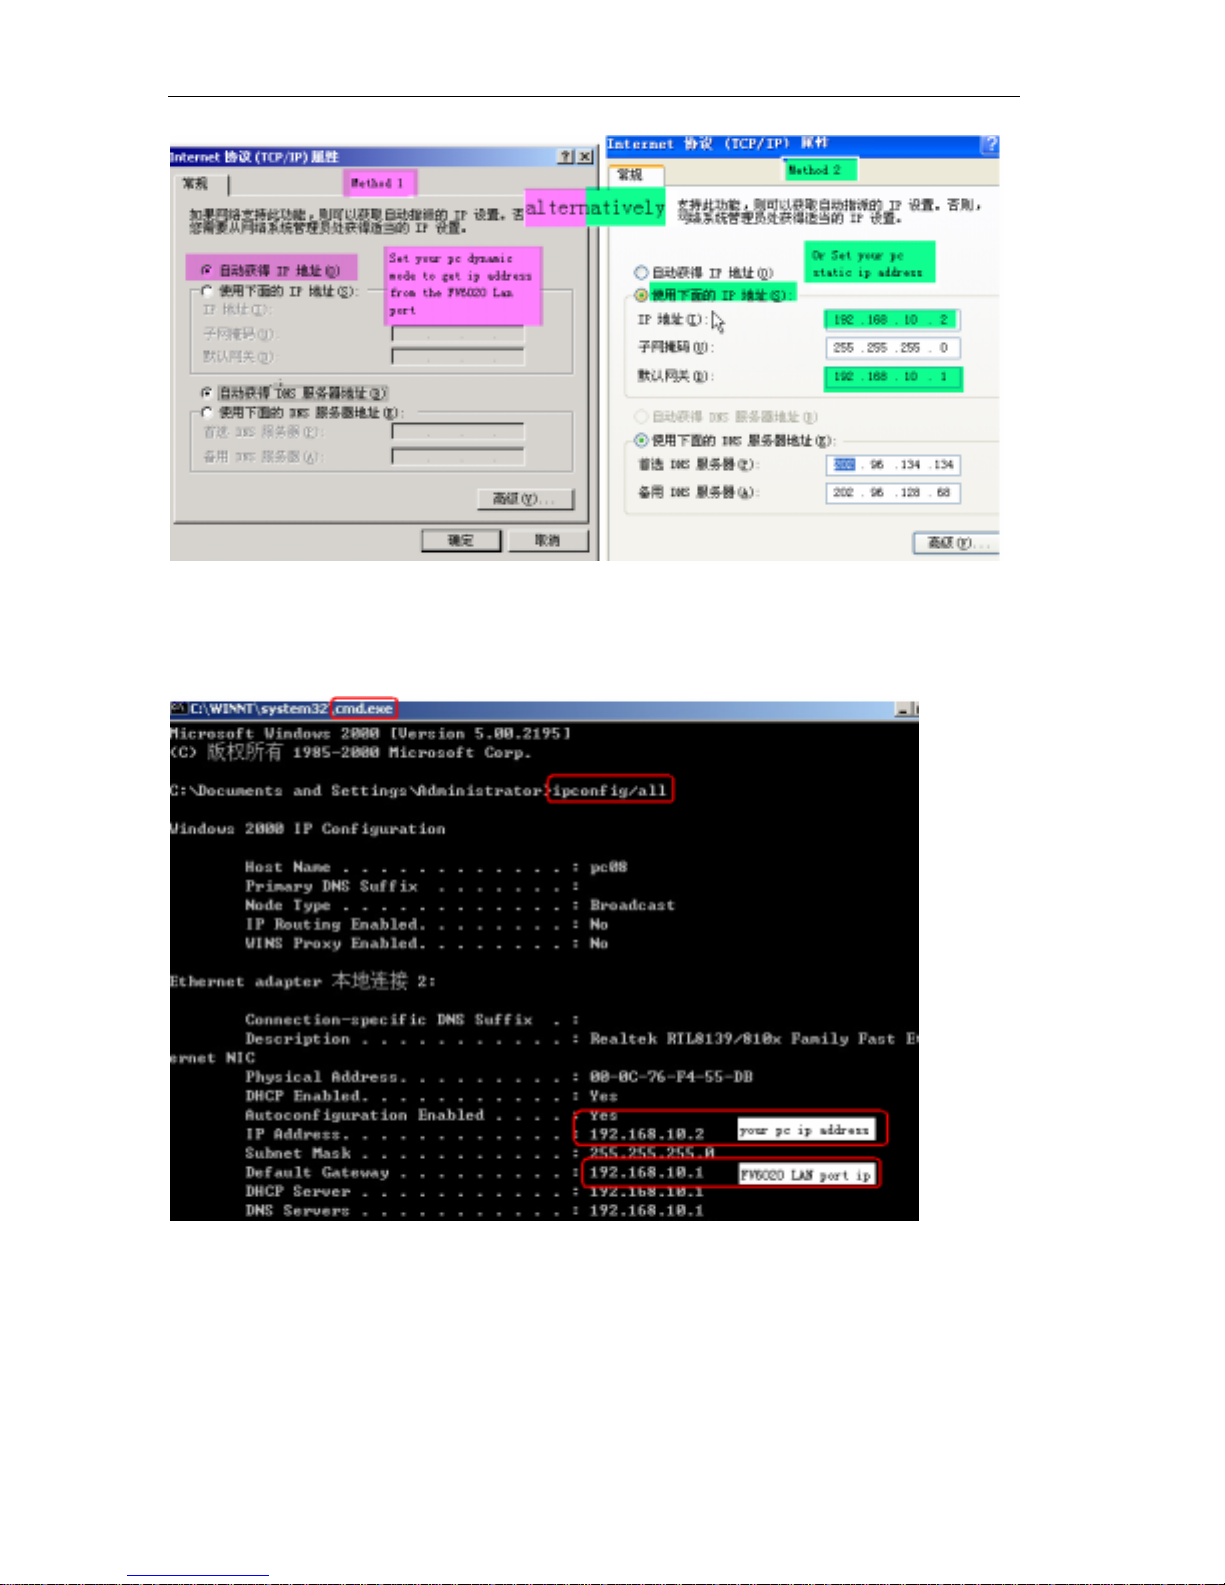
c) Setting refers to below dialog box, and then click “OK” button, PC will obtain IP
address automatically.(or set your pc static ip 192.168.10.2)
User Manual
Method 1 Method2
d) Input “cmd” command on the RUN submenu under PC START, key in “ipconfig/all
on the command lines dialog box to find the default gateway IP address, which is
LAN IP address of IP Phone.
6.3 User verification
Users are requested to make verification when config or browse the IP phone thru
web pages, users can direct login the config menu by inputting username and
password as below:
Default username and password is:
Administrator: Username=admin password= admin high level user interface
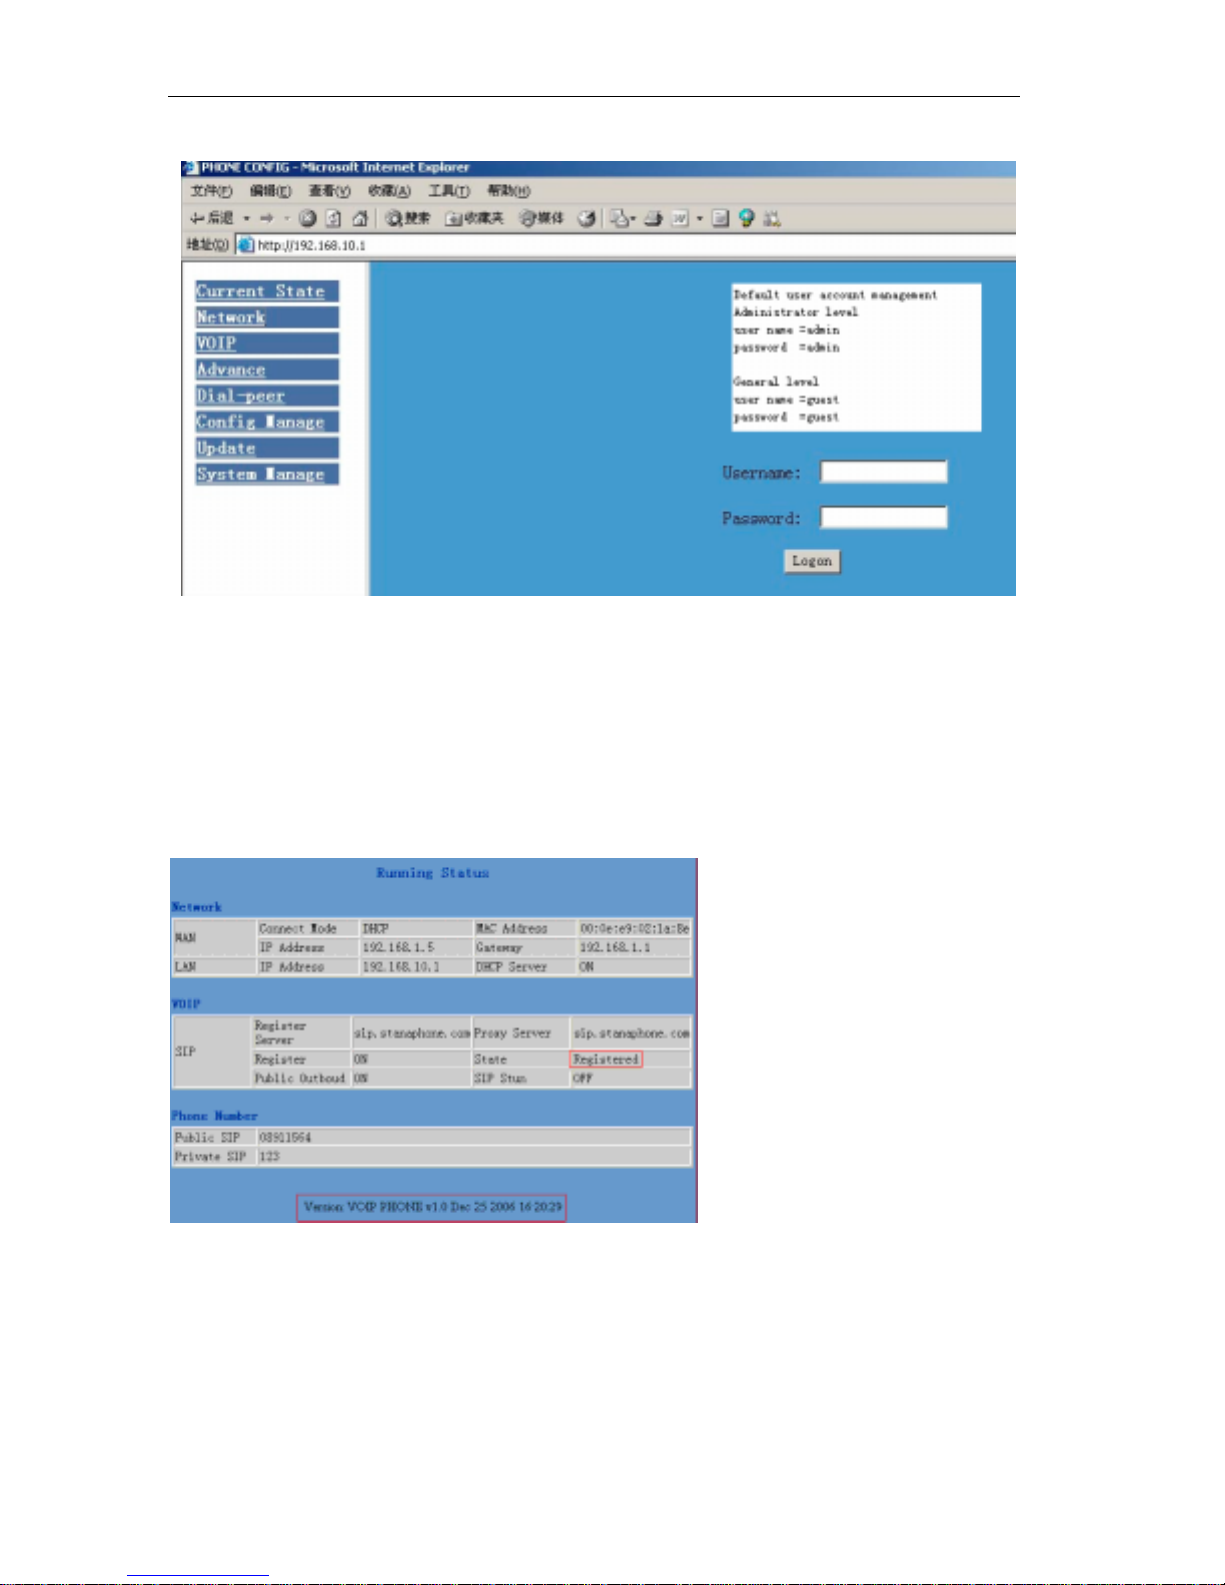
User Manual
User: Username=guest password=guest low level user interface
6.4 Current State
On this page user can gather information of each commonly-used parameter of the
phone, it is shown as the following figure:
z Network section: Display the current WAN, LAN configurations of the phone
z VoIP section: Display the current default signaling protocol in use,and server
parameter in use of each protocol
z Phone Number section: Display the phone number against each protocol
z The version number and date of issue have been shown at the end of this page
6.5 Network Configuration
Network configuration includes WAN Config and LAN Config.
6.5.1 WAN Configuration
This web page displays the WAN parameter configuration.
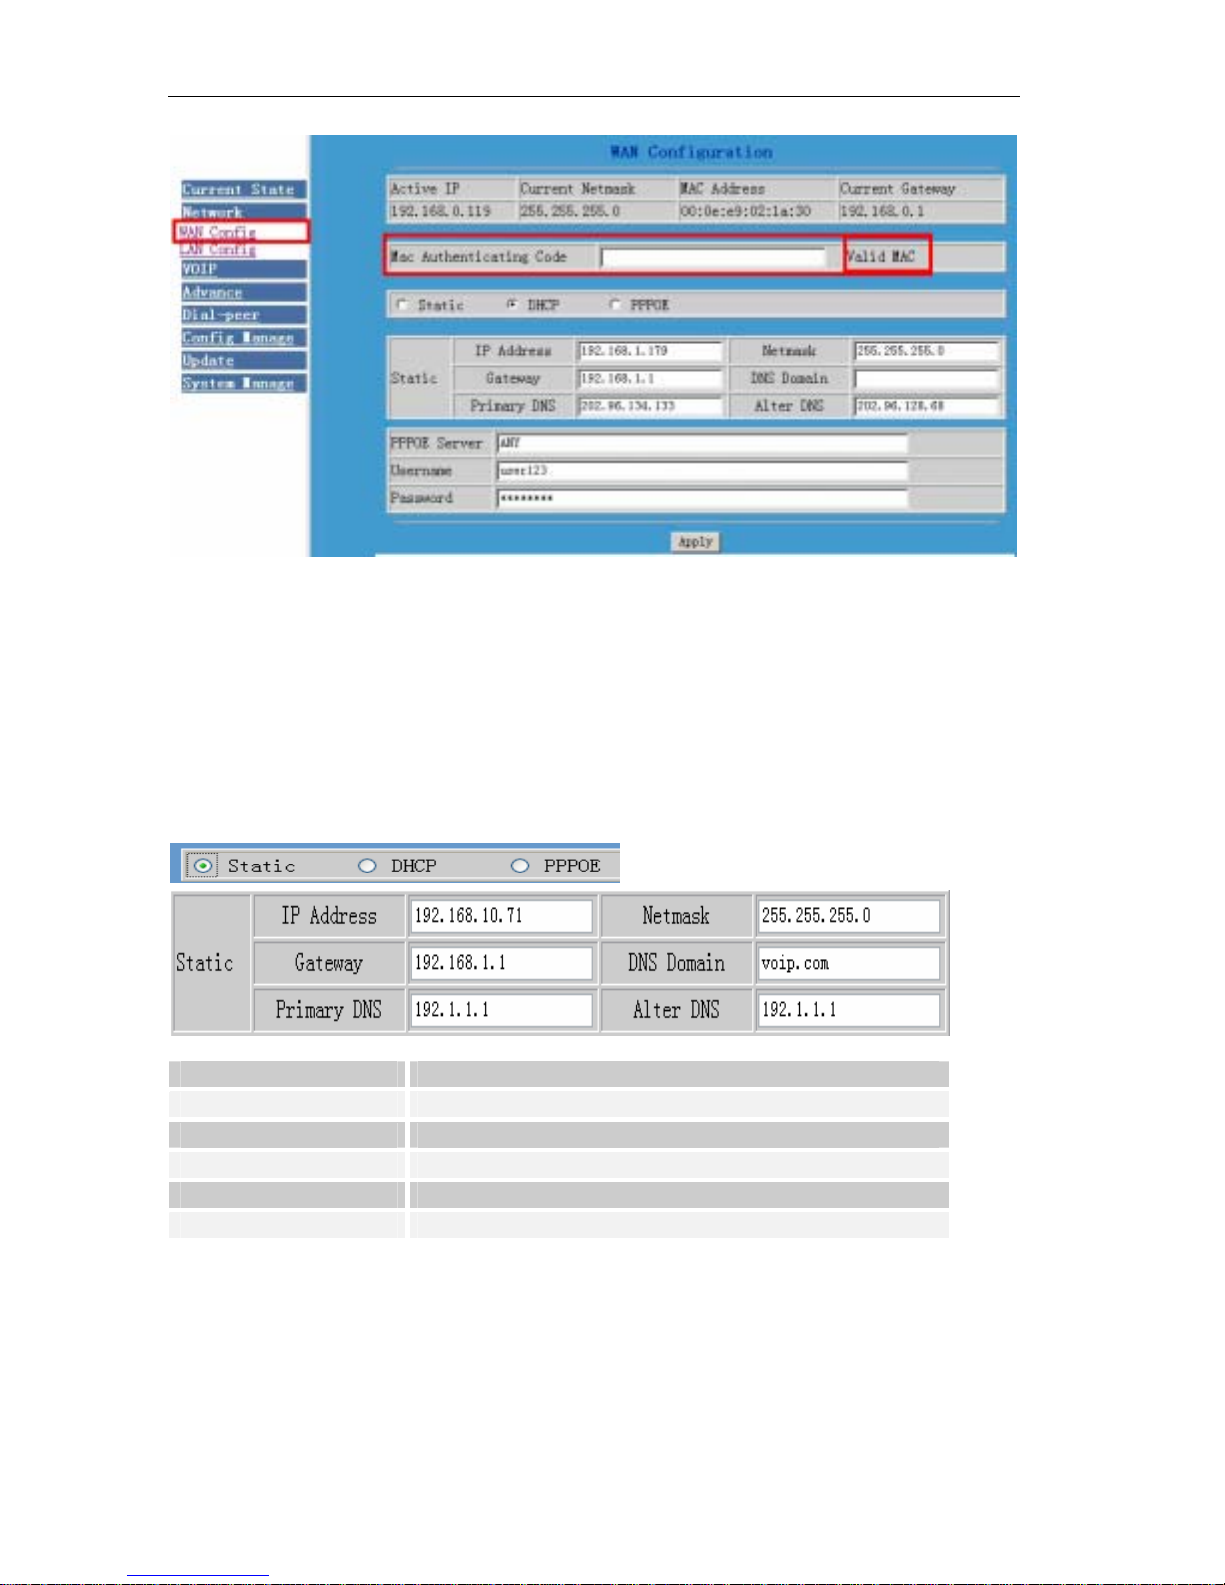
User Manual
Display <valid MAC >, that means the phone had been certificated.
Display <invalid MAC>, that means the phone need a Mac Authenticating Code .(get
it from Gohigh or your provider )
Display <invalid MAC, that means the phone can not work normally.
WAN port support Static /DHCP/PPPoE. Users can set the right model base on actual
requirements.
z Connect network to internet thru Static mode
WAN default network config is DHCP model; So Users need to set below parameters
IP Address WAN IP address
Netmask Network mask
Gateway Default gateway IP address
DNS Domain Option configuration
Primary DNS IP address for primary Domain Name Server
Alter DNS Option configuration
Click “Apply” button after finished above setting, IP Phone will save the setting
automatically with immediate effect.
If users visit IP Phone thru WAN, it need to input “ipconfig” command to get the new
IP address and copy it to web browser bar to visit IP Phone.
 Loading...