

Page 1

USER MANUAL
VERSION 7 · 25/07/2013
Page 2
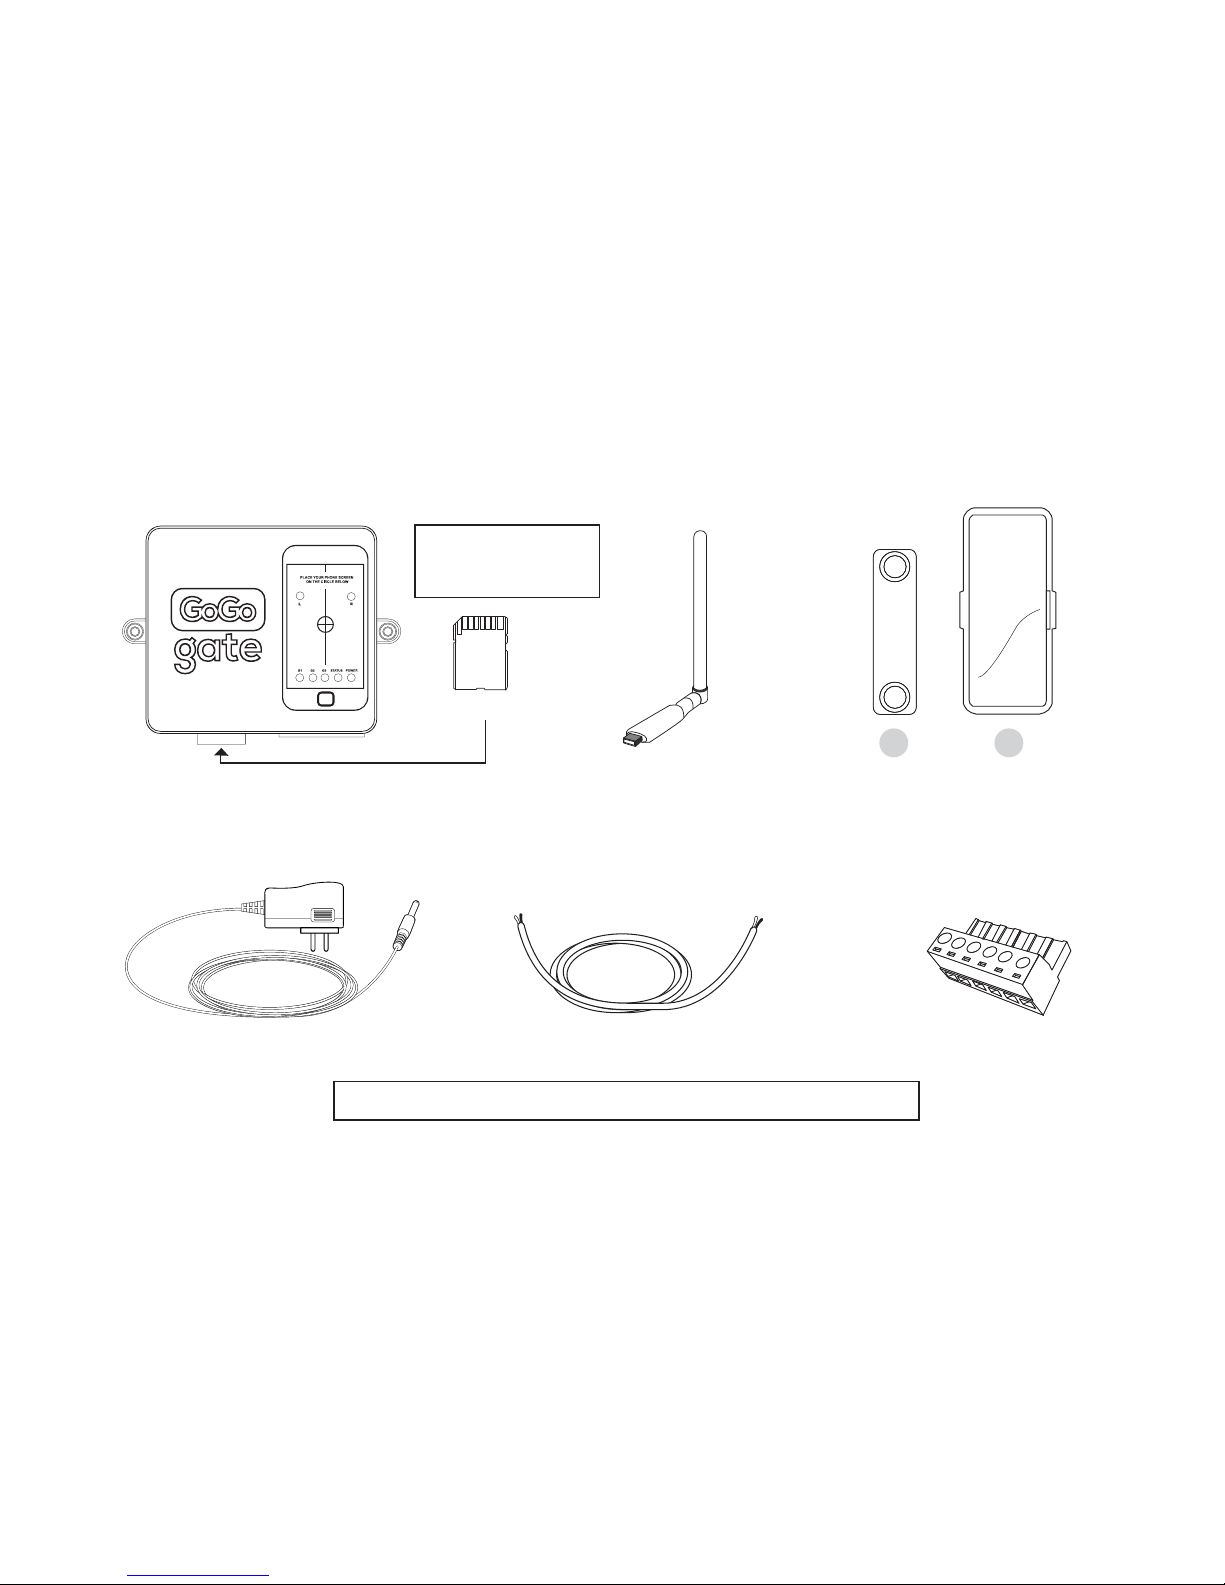
GOGOGATE DEVICE WIRELESS ADAPTER
1. What’s in the Box:
POWER SUPPLY
ONE WIRELES DOOR SENSOR
( 2 parts A +B)
CABLE CONNECTOR
x 3
NOTE: Cables have been pre-connected to the cable connector for your convenience.
CABLES
Memory Card
NOTE: The memory card
is already inserted
in your GOGOGATE
A
B
Page 3
1
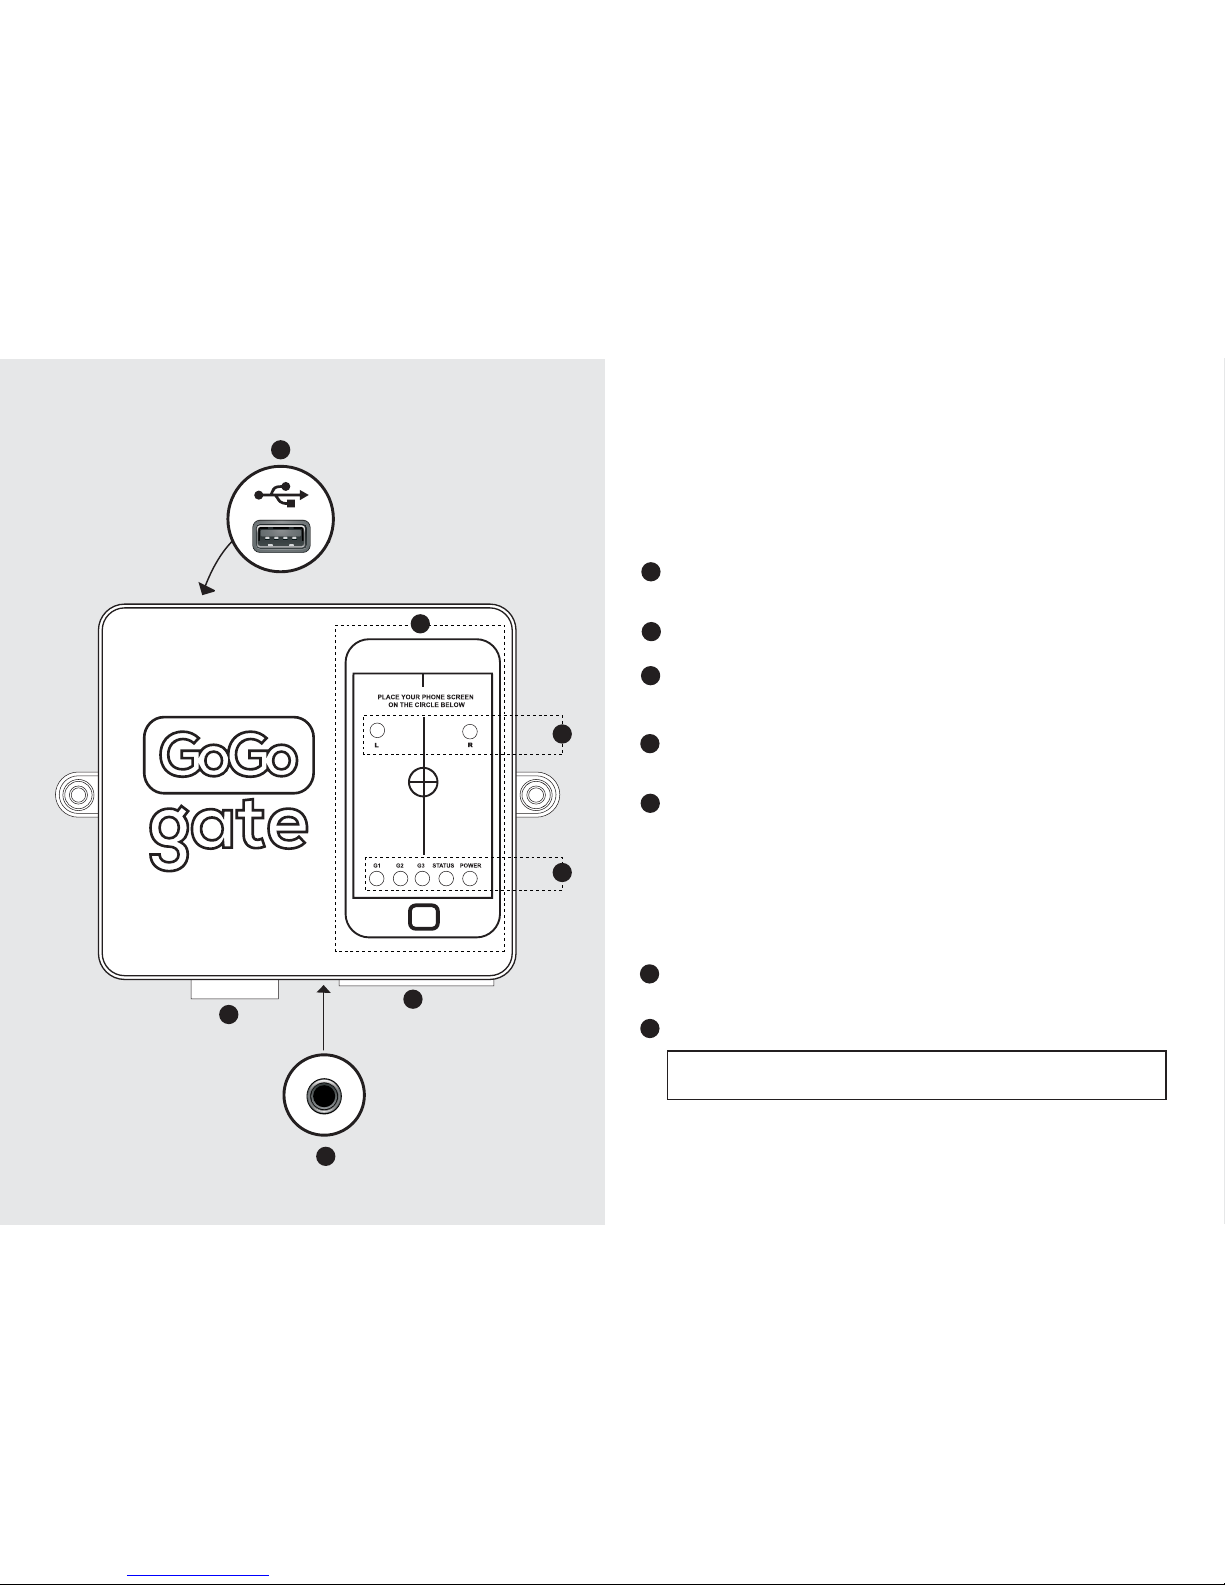
SD Memory card Slot: The card is used to operate your GOGOGATE and also for
future Software upgrades. IT SHOULD NOT BE REMOVED while the device is powered on.
2
Cable slot: Connects the 3 pre-assembled garage cables to your garage door wall buttons.
Power outlet: Connects the 5VDC power supply to the device.
3
WiFi Port: This is where you will insert the Wireless USB adapter supplied with your product.
Once inserted do not remove. This is needed to connect to your wireless home network.
5
5 Led Indicators:
G1 , G2, G3 indicates the status of garage door # 1,2 and 3. These LEDs will display a fixed
green light when a specific door is activated.
The STATUS LED will blink green when the device is operating properly. When connecting the wireless
sensors to the GoGoGate, the status LED will blink fast twice to indicate that the GoGoGATE device is
receiving the signals from the wireless door sensors.
The POWER LED will be a solid Green light when the device is connected to the power source.
4
Left (L) and Right (r) light receiver. These light receivers are used to program all functions
of your smartphone.
6
Programming AREA: This is where you will place your Smartphone
(SCREEN FACING DOWN) to program your GoGogate device.
NOTE: your GOGOGATE has no power on/off switch. The device consumes very little power
and needs to be always on for your app to open and close your garage when you need it.
2. Understanding your GoGoGate:
1
2
3
6
7
7
4
5
Page 4
3. What do you need for installation:
· A screw driver
· The GoGogate app installed on your smartphone.
· Your home Network name (also called SSID) and password
· About 20m of your time
A) Start Your Initial Installation : STEP 1
See our installation video at www.gogogate.com for more information.
Steps below are to connect 1 garage door. Just repeat these steps to connect more garage doors.
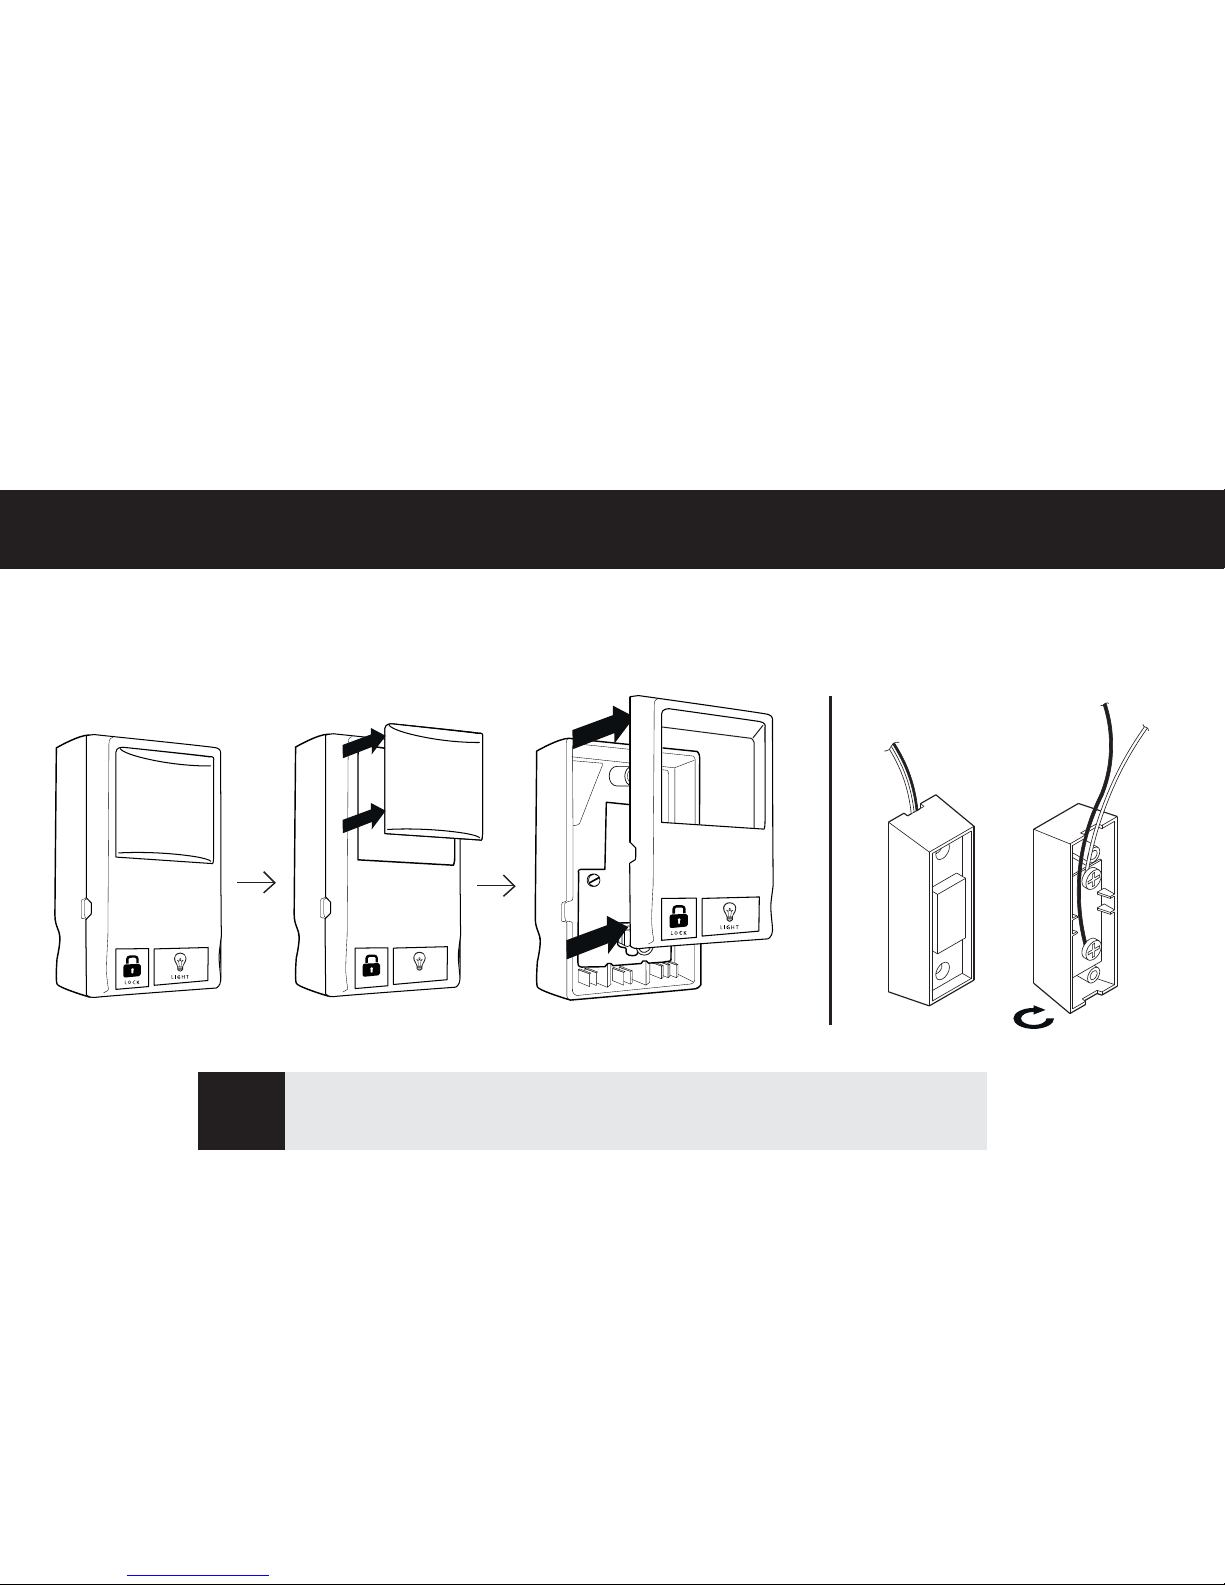
Use a screw driver to open or unscrew your garage door wall button. (You may have 1
,2 or 3 wall mounted buttons depending on the number of garage doors you have. The
GOGOGATE works with up to 3 garages. )
1
GARAGE OPENER
WALL BUTTON EXAMPLE 1
GARAGE OPENER
WALL BUTTON EXAMPLE 2
PUSH BUTTON
Page 5
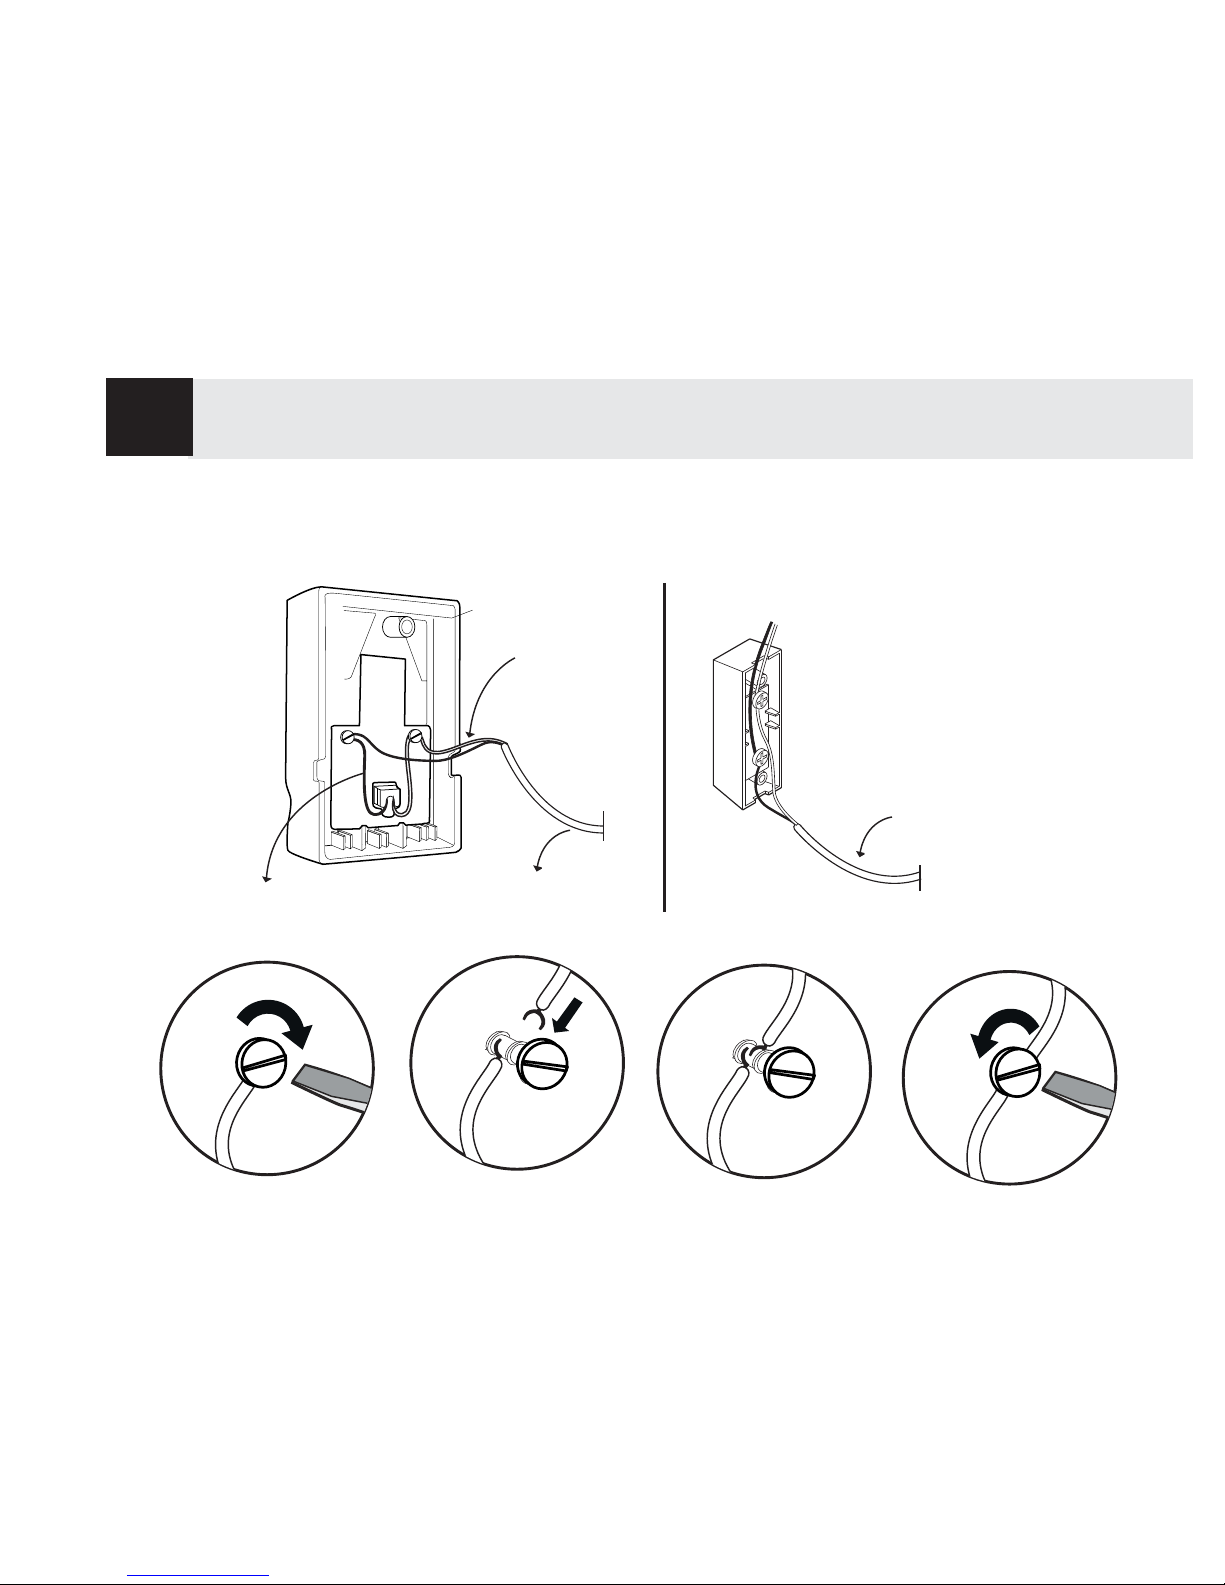
Connect the cable provided in the box to your garage door buttons. (See drawings).You will have to loosen the 2 screws to
connect the cables. Although these are low voltage connectors, we always recommend turning off power to wall mounted
buttons prior to installation.
2
GOGOGATE CABLE
GOGOGATE
CABLE
GOGOGATE
CABLE
GOGOGATE CABLE
Red Cable
White Cable
GARAGE OPENER
WALL BUTTON EXAMPLE 1
GARAGE OPENER
WALL BUTTON EXAMPLE 2
Page 6
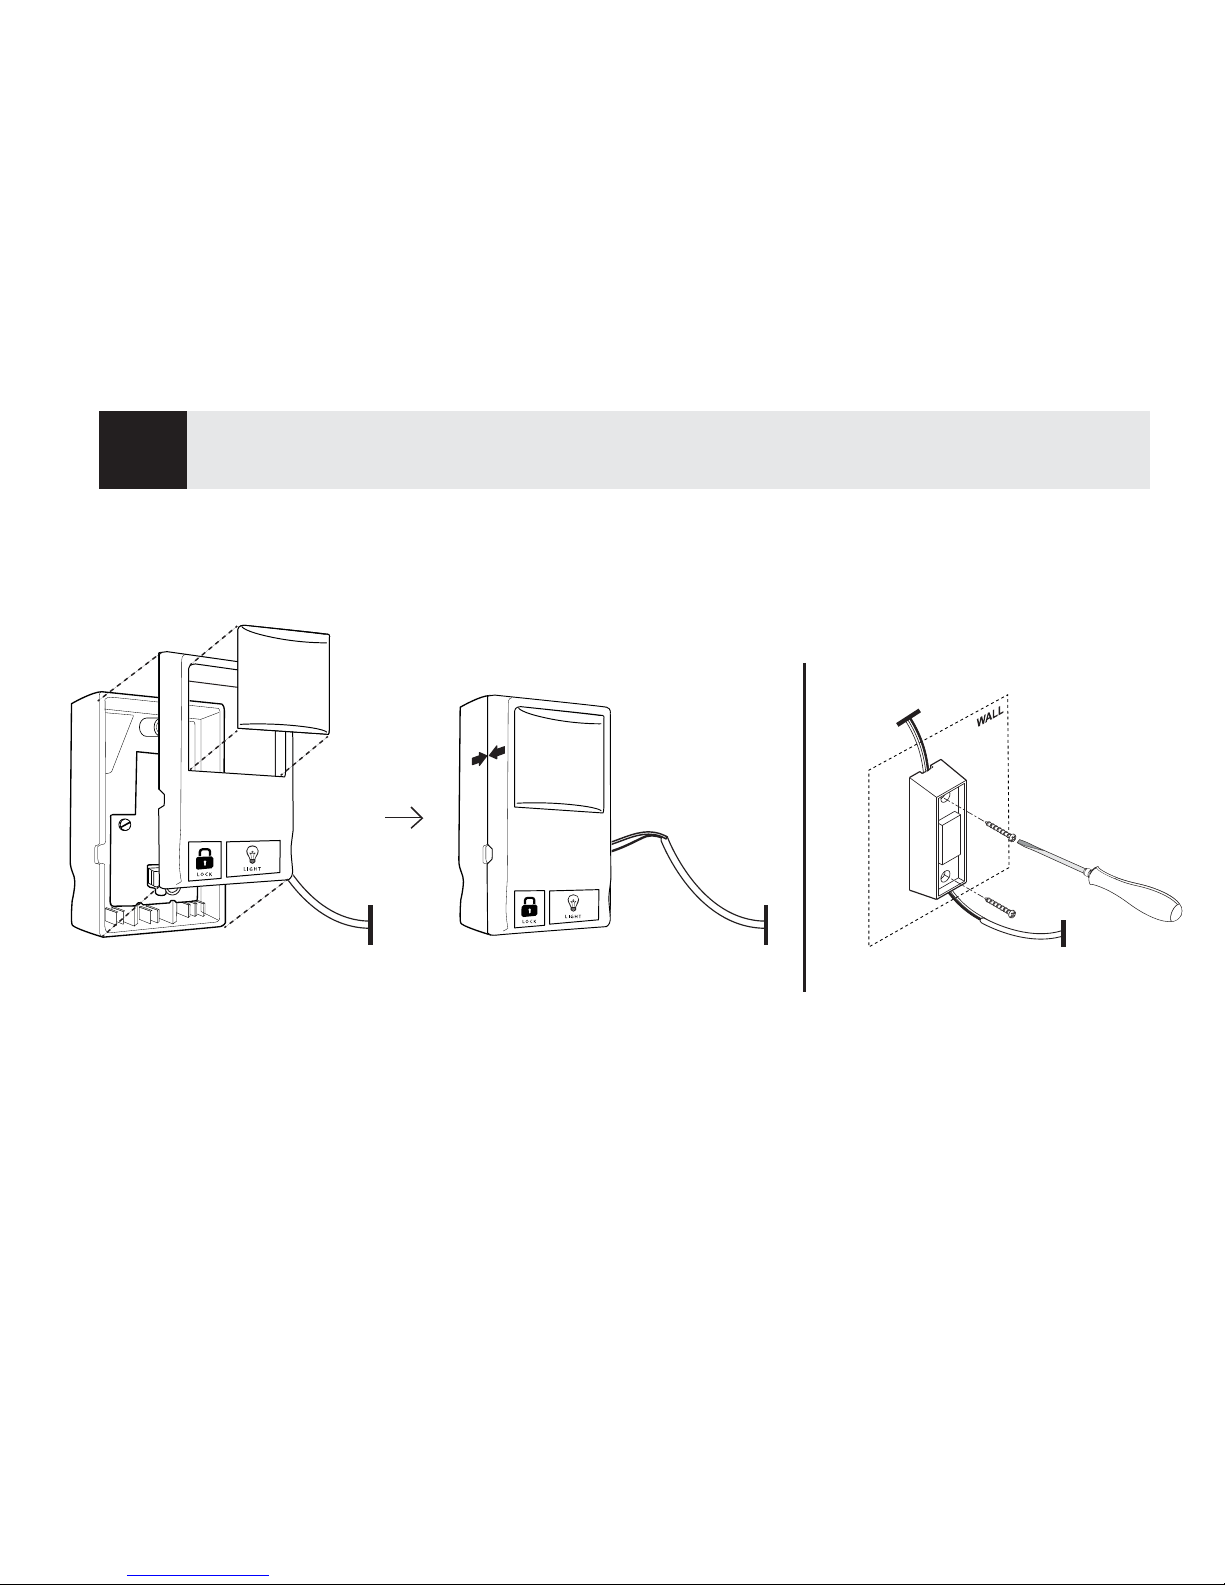
Reconnect your wall mount button to the wall. (show photo)
3
3
PUSH BUTTON
GARAGE OPENER
WALL BUTTON EXAMPLE 1
GARAGE OPENER
WALL BUTTON EXAMPLE 2
PUSH BUTTON
Page 7
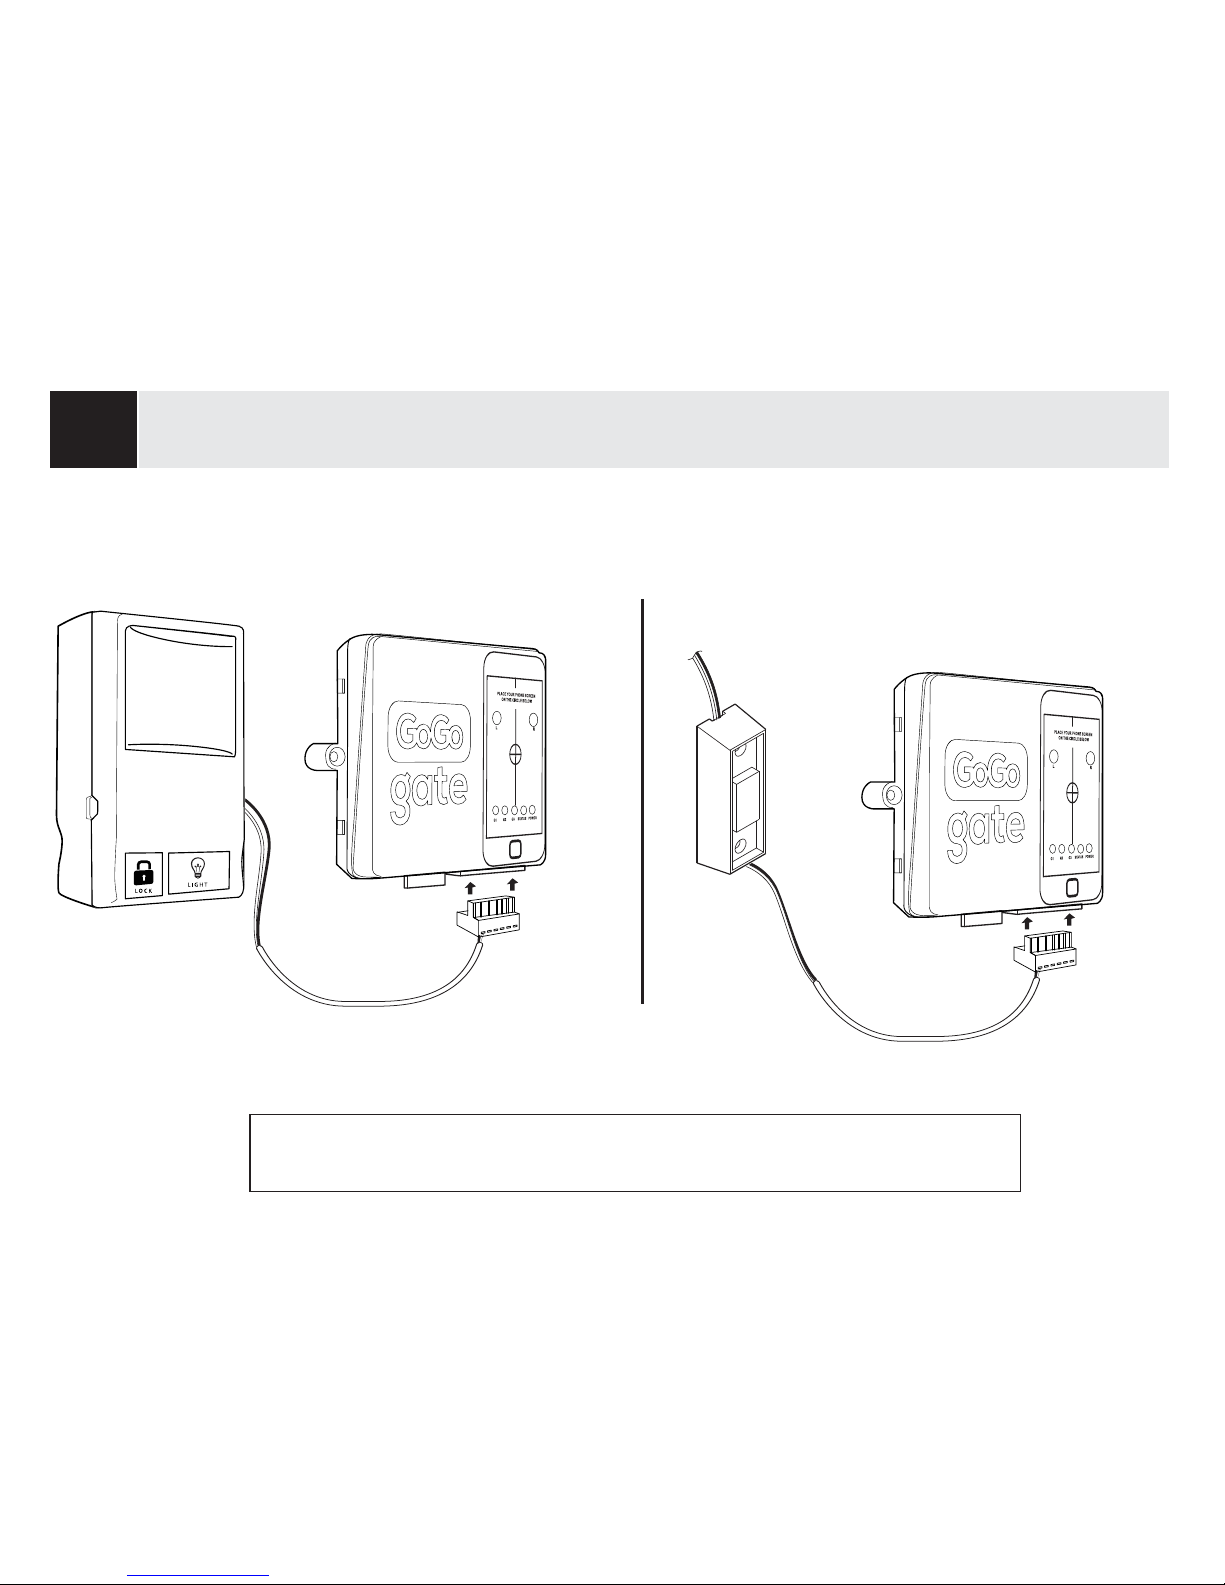
3
YOUR GARAGE DOOR CONTROL
GOGOGATE DEVICE
MAKE SURE CONNECTOR IS
PUSHED IN ALL THE WAY.
4
Snap the green cable connector (provided) into the GOGOGATE cable slot.
NOTE:
IF YOU ARE CONNECTING MULTIPLE GARAGE DOOR WALL BUTTONS TO YOUR GOGOGATE, COMPLETE STEP 2 WITH ALL WALL
BUTTONS BEFORE INSERTING THE CABLE CONNECTOR INTO THE GOGOGATE DEVICE.
GOGOGATE DEVICE
MAKE SURE CONNECTOR IS
PUSHED IN ALL THE WAY.
GARAGE OPENER
WALL BUTTON EXAMPLE 2
GARAGE OPENER
WALL BUTTON EXAMPLES 1
PUSH BUTTON
Page 8
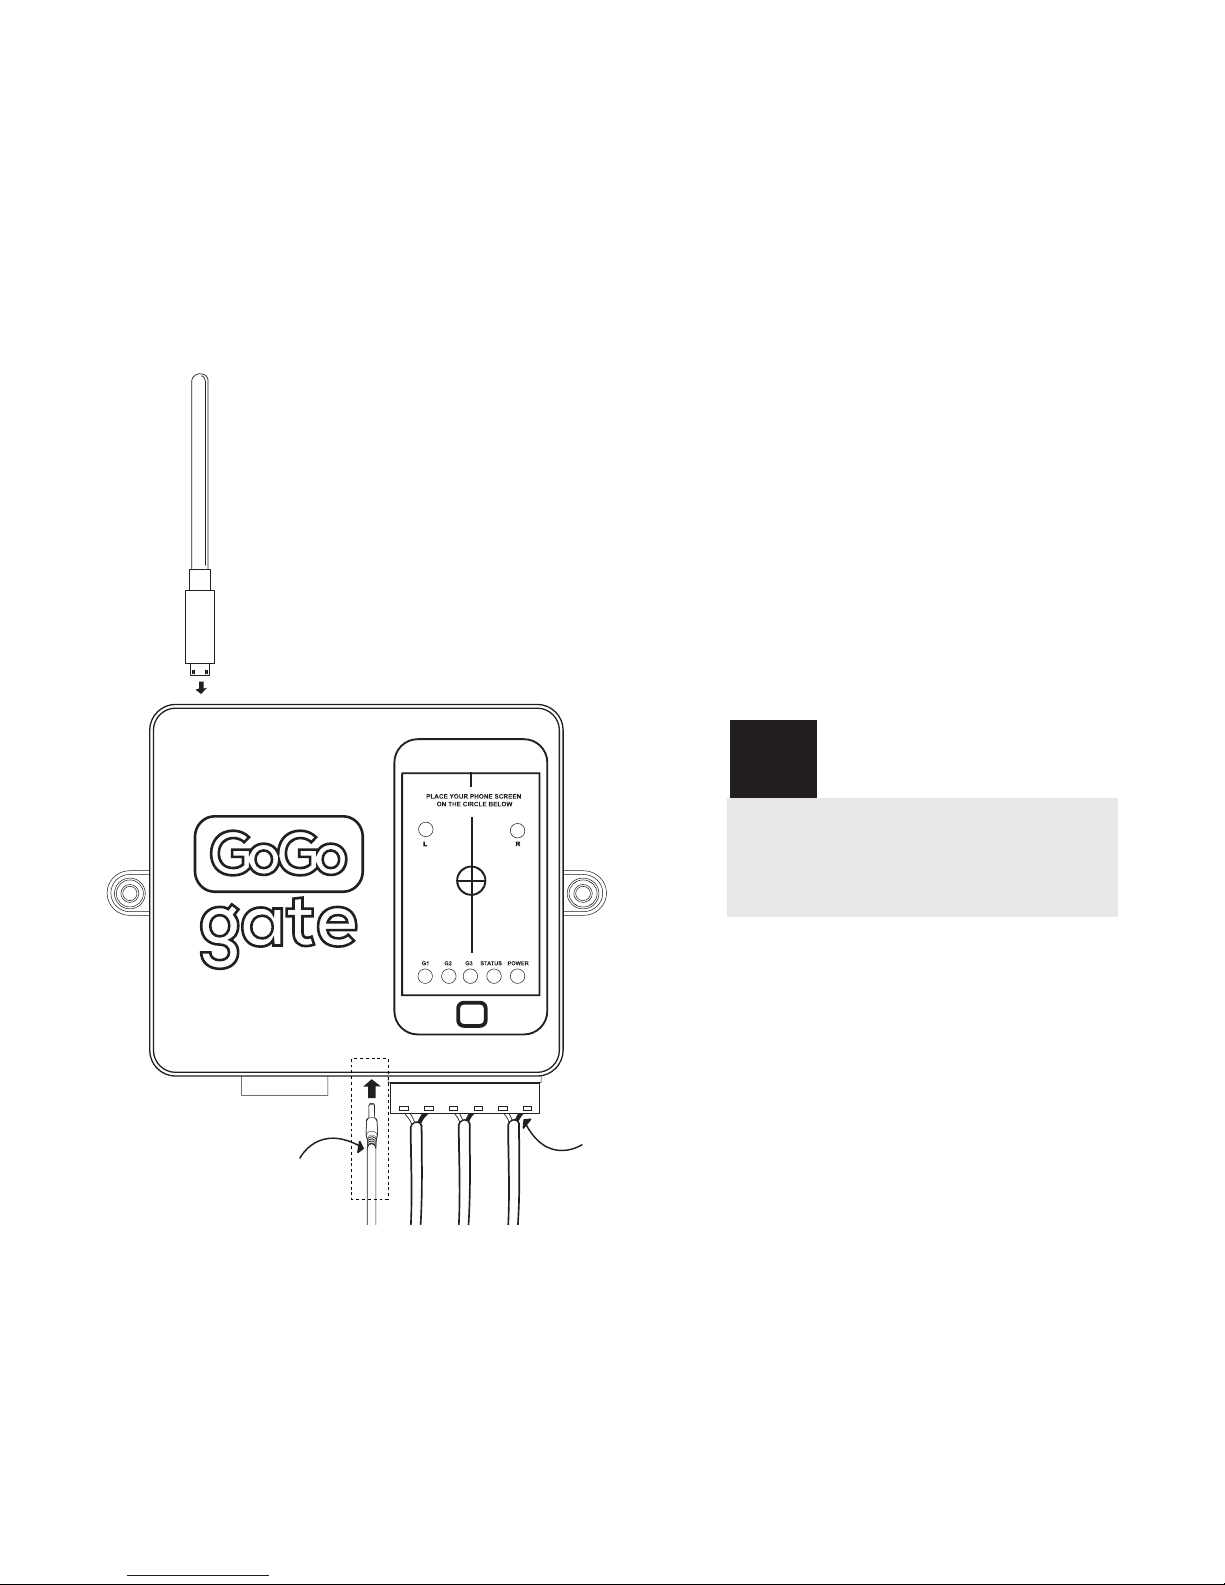
5
Plug your wireless adapter antenna in your
gogogate and then connect your gogogate
to the power supply outlet . See drawing.
WIRELESS ADAPTER
CABLE CONECTOR
POWER SUPPLY
G1 G2 G3
Page 9
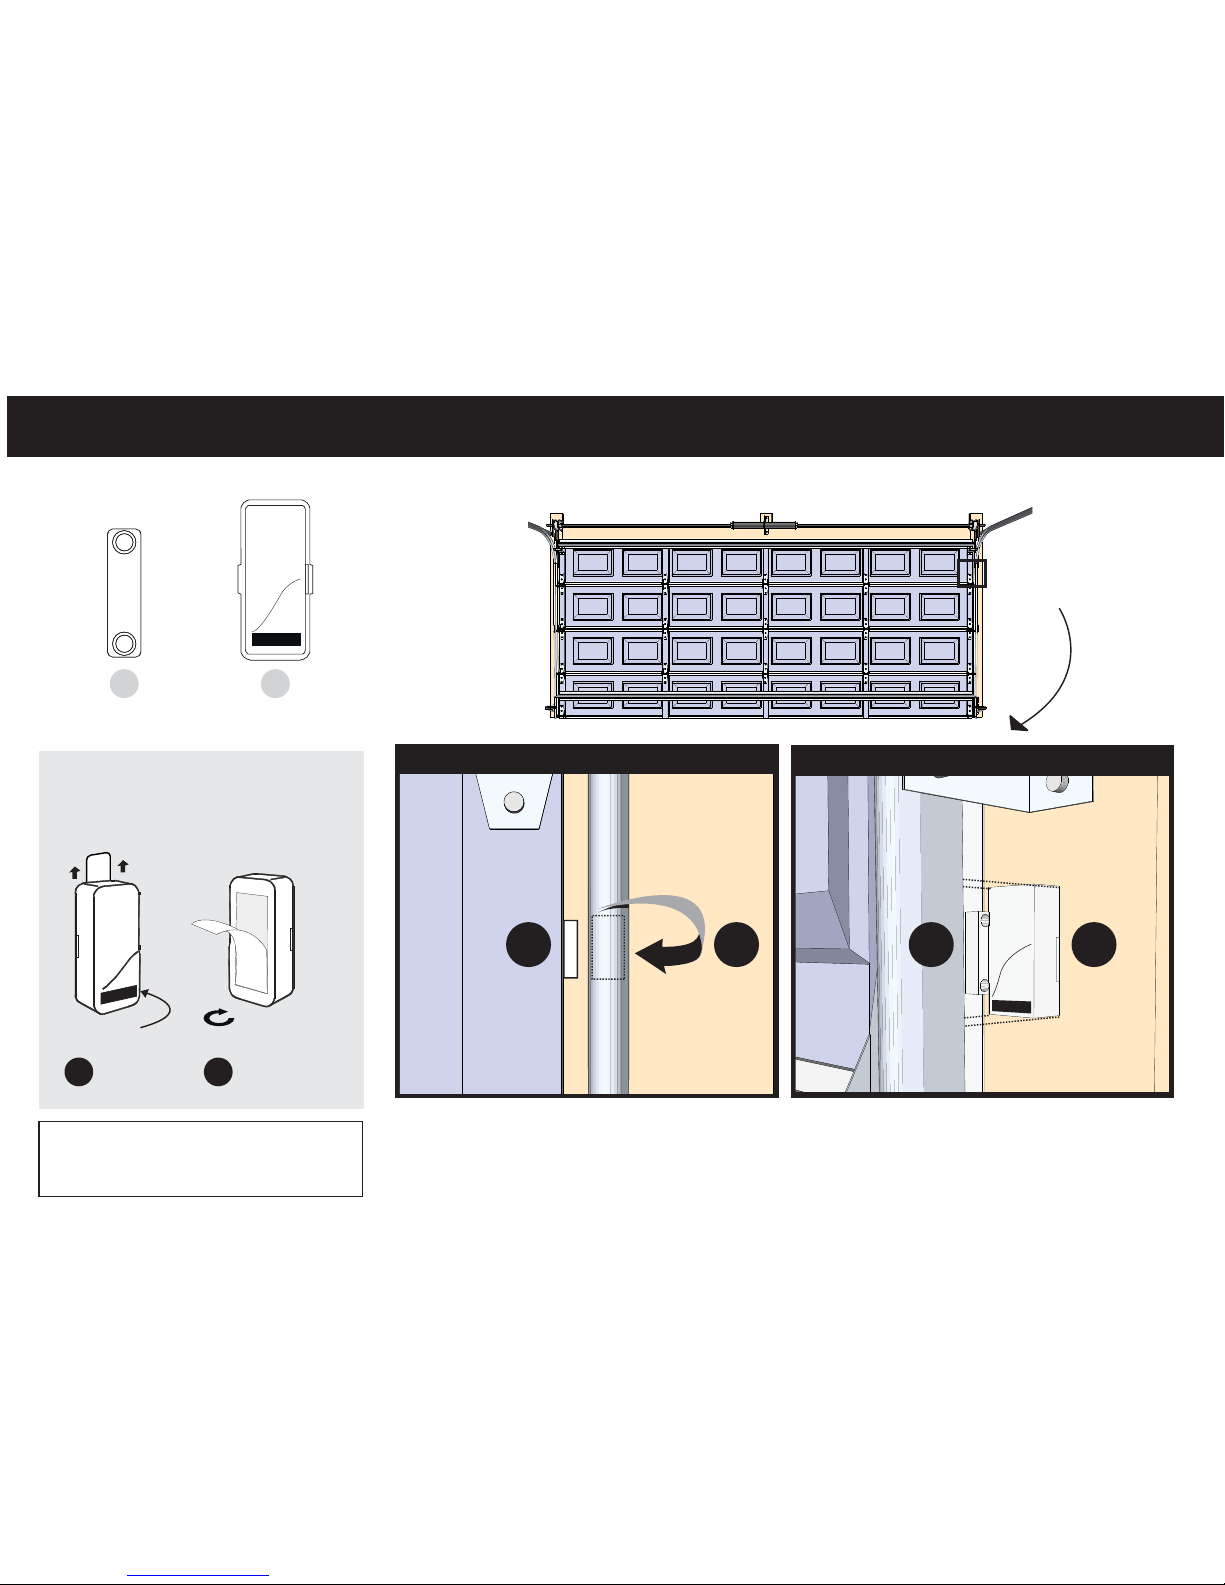
Installation STEP 2:
Attach your wireless sensors to your garage door as per drawing below.
PLACE THIS PART
ON GARAGE DOOR
A
B
WIRELESS DOOR SENSOR
PLACE THIS PART
ON THE WALL
Always install your wireless door sensors
with the garage doors in a closed position.
Please be sure to remove the tape covering
the battery prior to installation.
Place on the wall
with the double-sided
fastening strip.
21
Remove Battery
protector tape
4 DIGIT CODE
NOTE:
WRITE DOWN AND STORE IN A SAFE LOCATION
THE 4 DIGIT CODE LOCATED ON THE FRONT
OF YOUR SENSOR.
PLACE THE SENSORS ON THE
UPPER PART OF YOUR
GARAGE DOOR WALL.
A
B
WALL
WALL
GARAGE
DOOR
GARAGE
DOOR
PLACE SENSOR A & B AS CLOSE TO EACH
OTHER AS POSSIBLE WITHOUT TOUCHING
FRONT VIEW
SIDE VIEW
A
B
SENSOR SENSOR
SENSOR SENSOR
Page 10
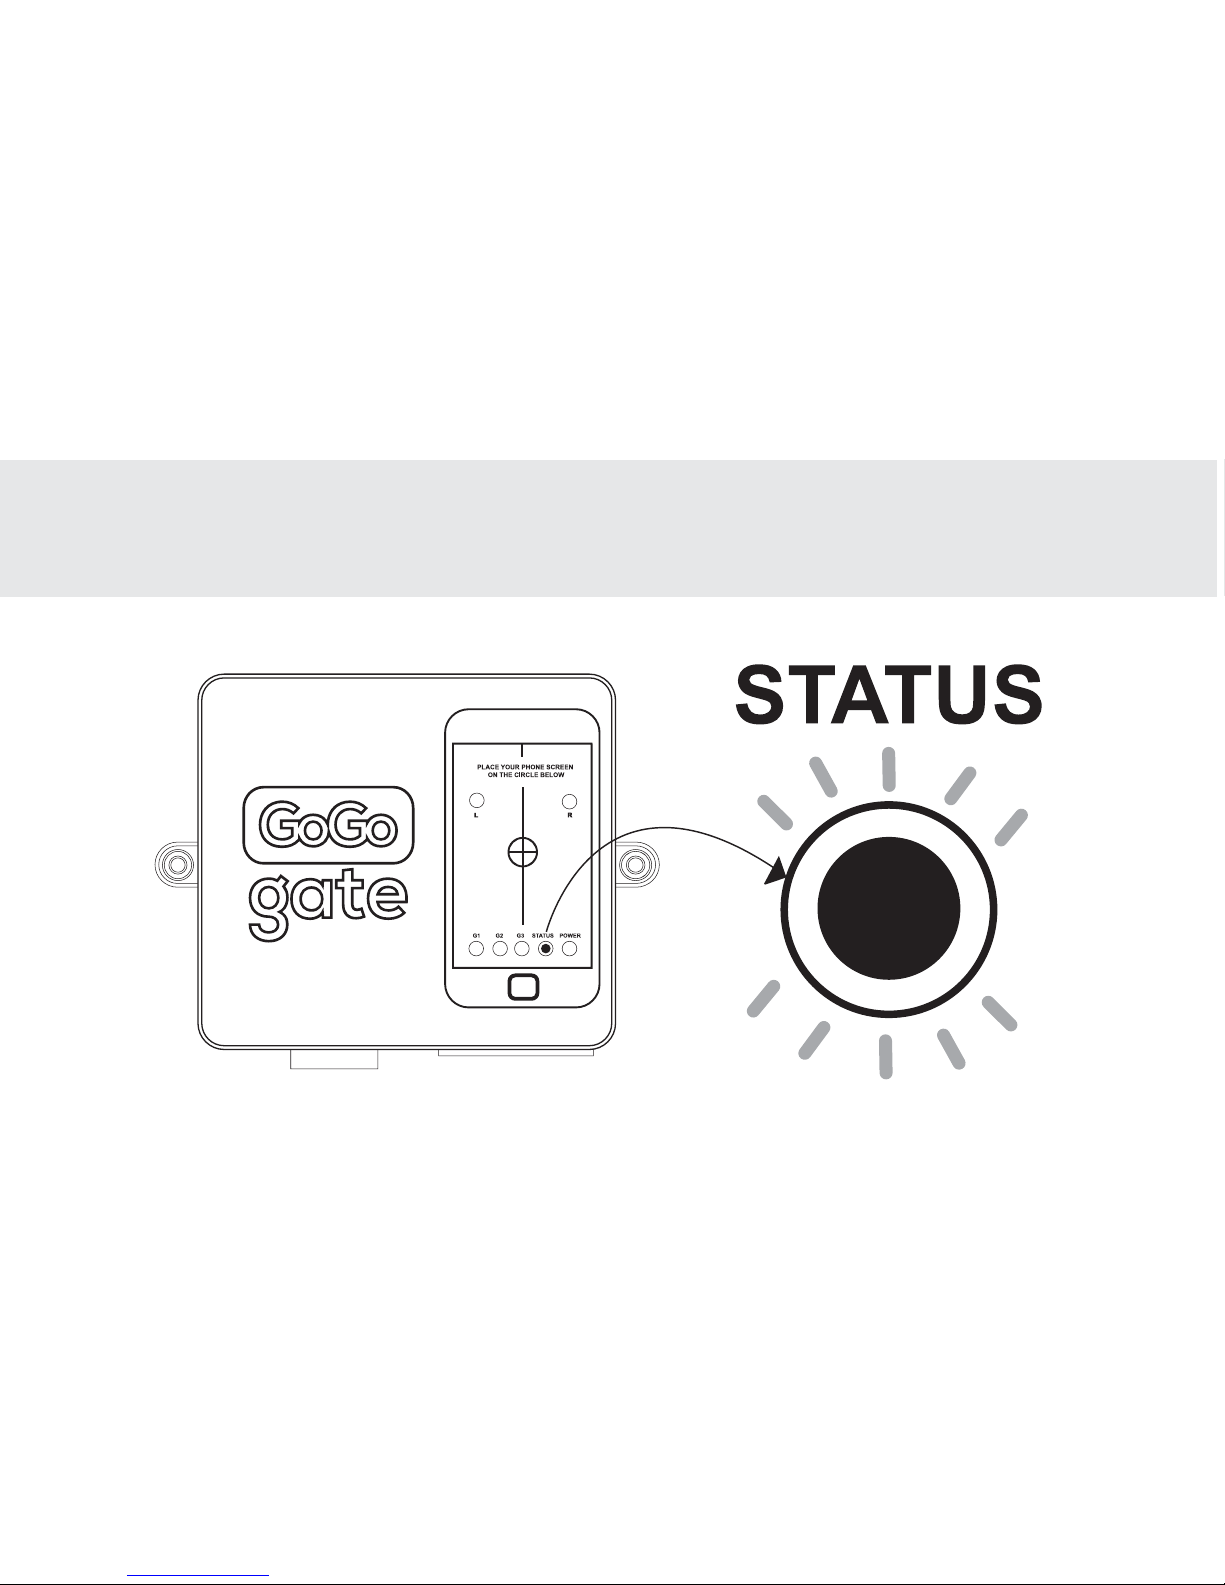
CHECK THE OPERATION OF YOUR WIRELESS DOOR SENSOR:
Once your wireless sensors are properly positioned on the garage door, open your garage door via your existing pushbutton. Make sure
that when the garage door opens the STATUS light of your gogogate is blinking fast during 1-2 seconds. The LED should also blink fast for
2 seconds when you close the garage.
The STATUS light of your gogogate is
blinking fast during 1-2 seconds when
garage door opens or close.
Page 11
Download our FREE GOGOGATE app on your smartphone or ipad .
You will find our APP at:
Apple products:
Look for the Apple store Icon on your phone and ipad and search for GOGOGATE
On Android:
Look for the Google Play Icon on your android device and search for GOGOGATE
Page 12
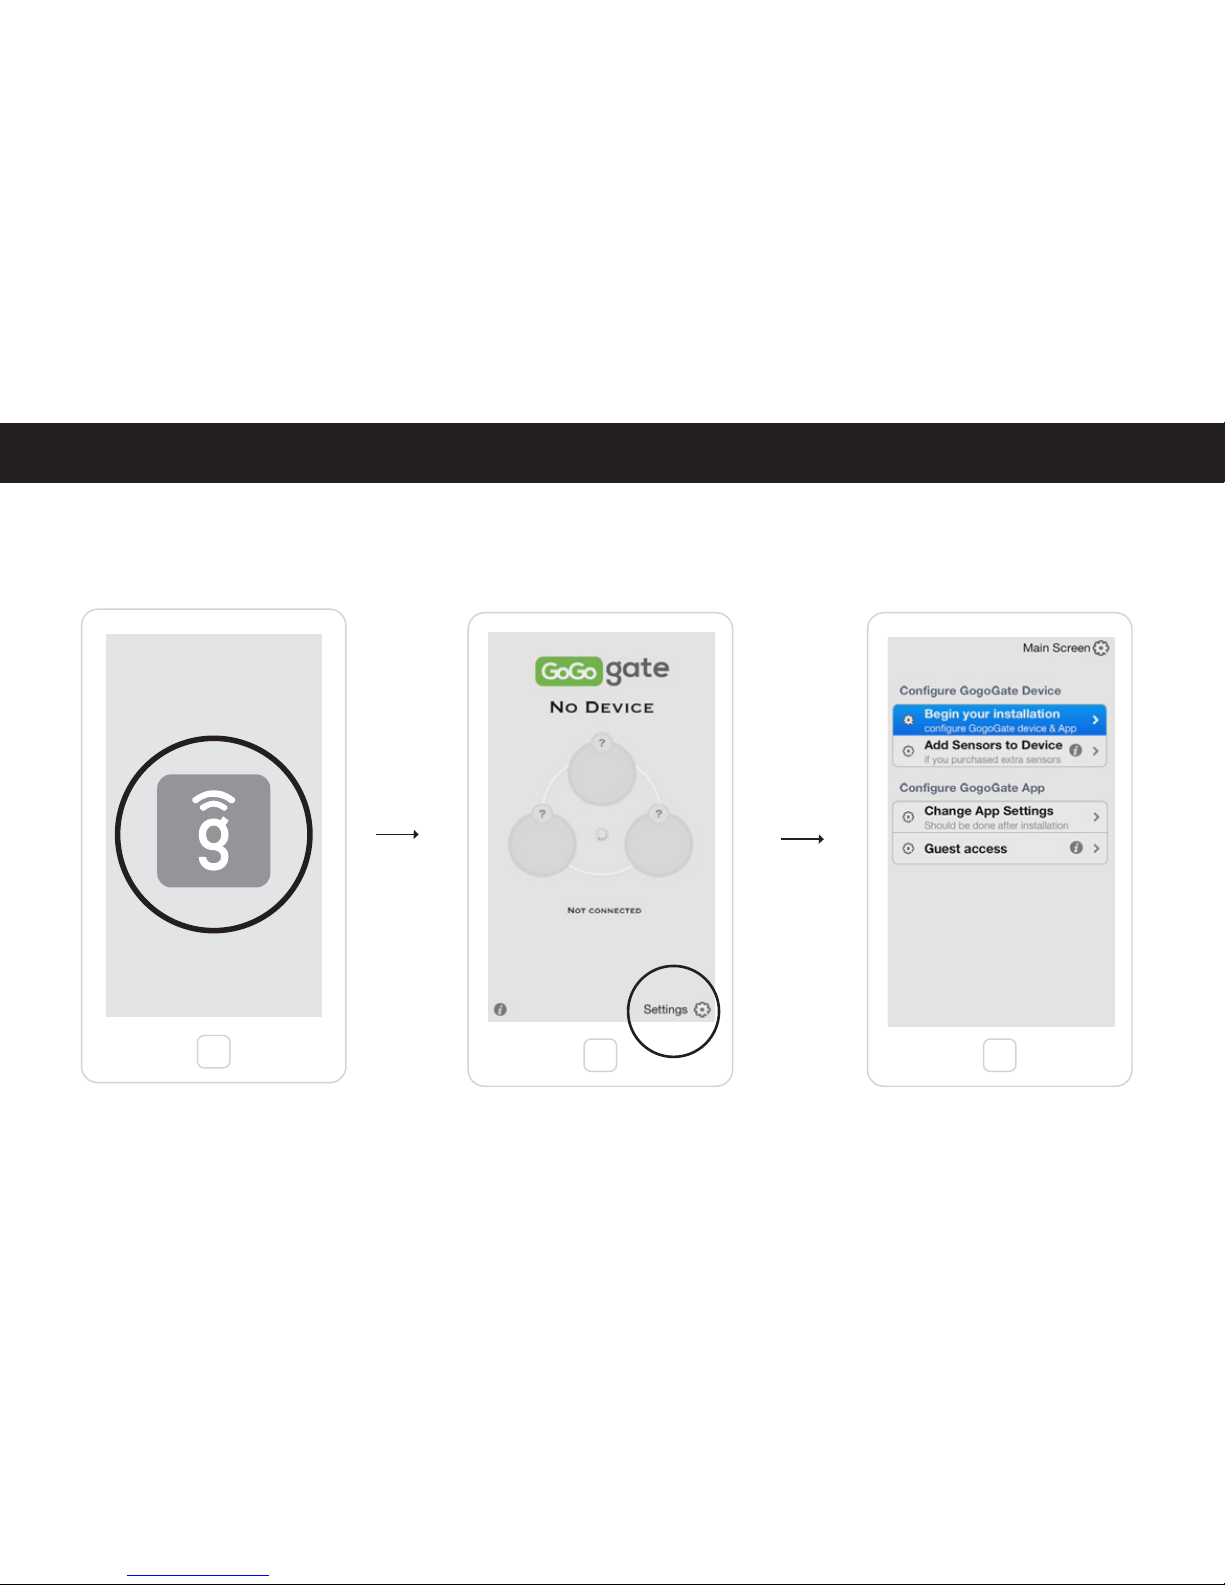
Installation STEP 3: Program your GOGOGATE in 3 simple steps
Double click to open your app Press the settings button
(buttom right of screen)
Select “BEGIN YOUR INSTALLATION”
Page 13
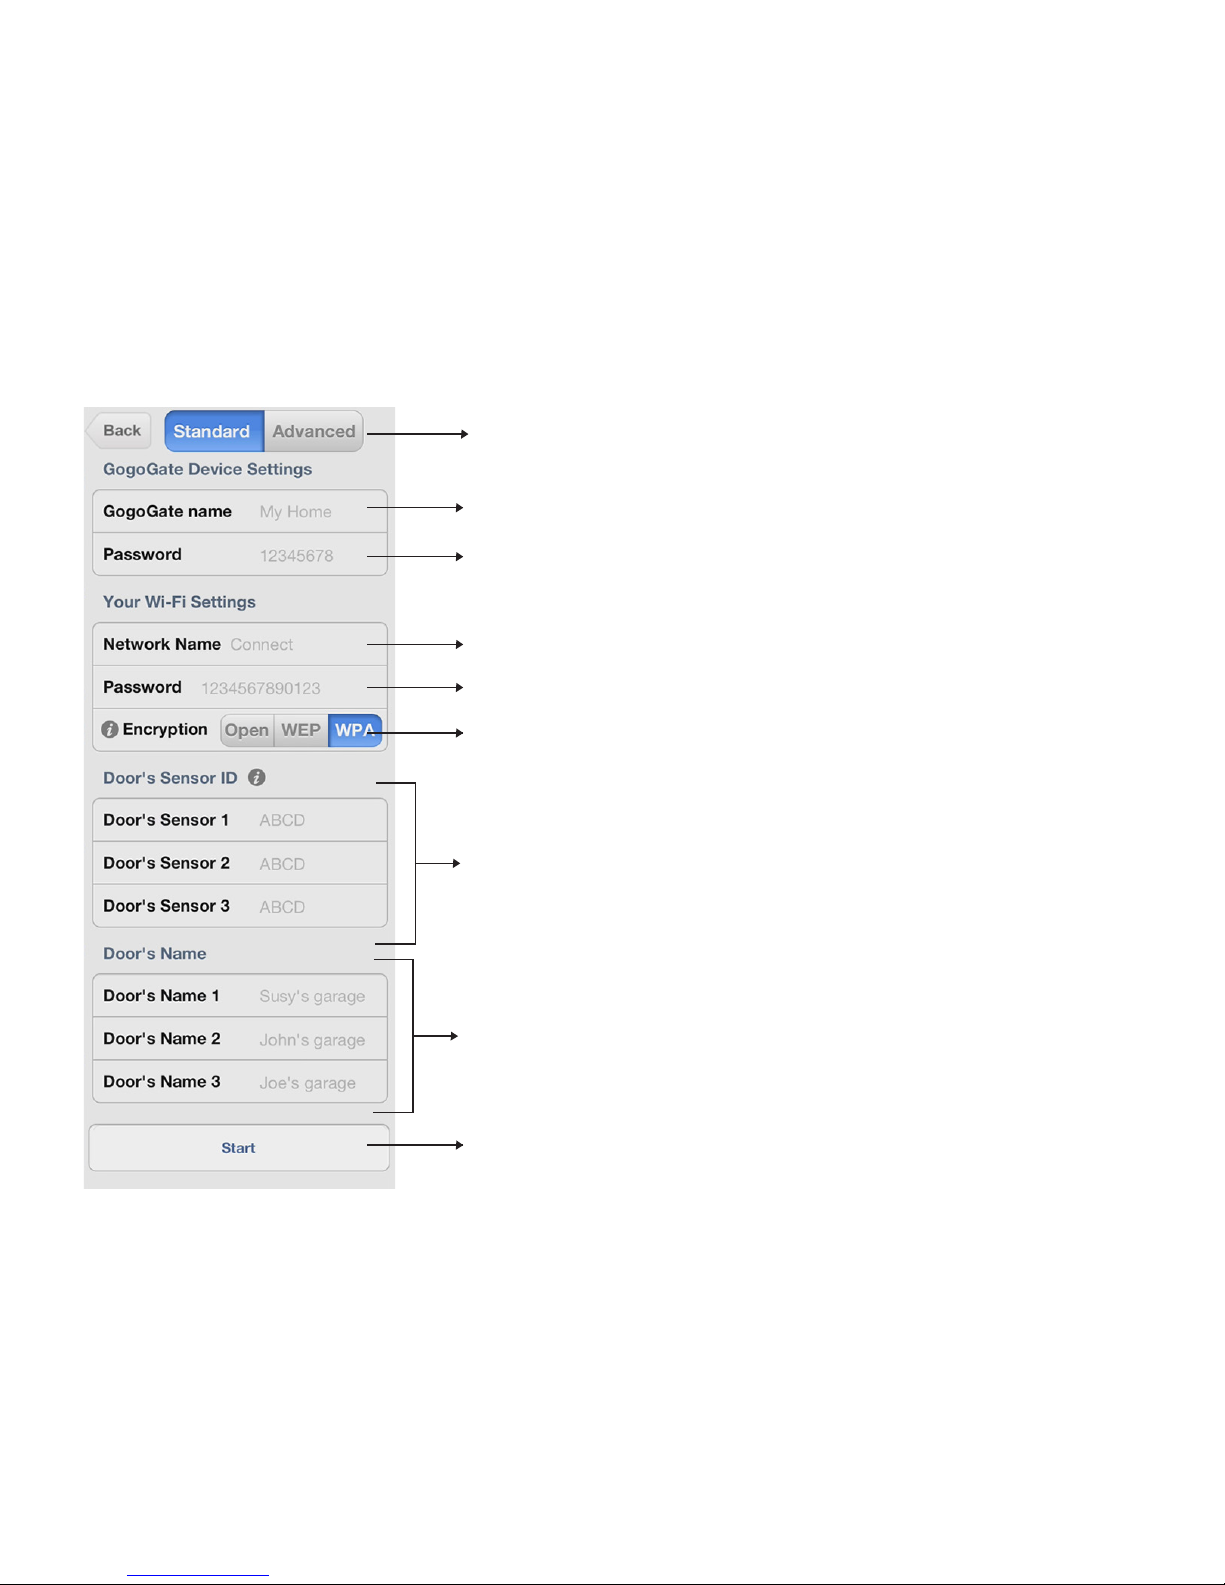
-COMPLETE THE FIELDS BELOW ON YOUR SMARTPHONE:
We recomend Standard configuration.
Choose a name for your device like “My house”.
GoGoGate should automatically detect your network/SSID name.
If not please input your current network/SSID name.
Input your exsiting home network password.
Choose a password (numers only) up to 8 characters in length.
We have pre-selected WPA which is the most common used settings.
You may want to try WEP if your installation fails. Select “Open” if your
home network is not password protected.
There is a 4 digit code on the front of your Wireless door sensor (inlcuded). This is your
door sensor ID. Input code here (IN CAPS LETTER). GOGOGATE comes standard
with 1 sensor. If you bought more sensors, you can input the codes of door 2 and 3.
Give your garage door a name. You can personalize it.
Press “Start” to begin programming the GoGogate Device
Page 14
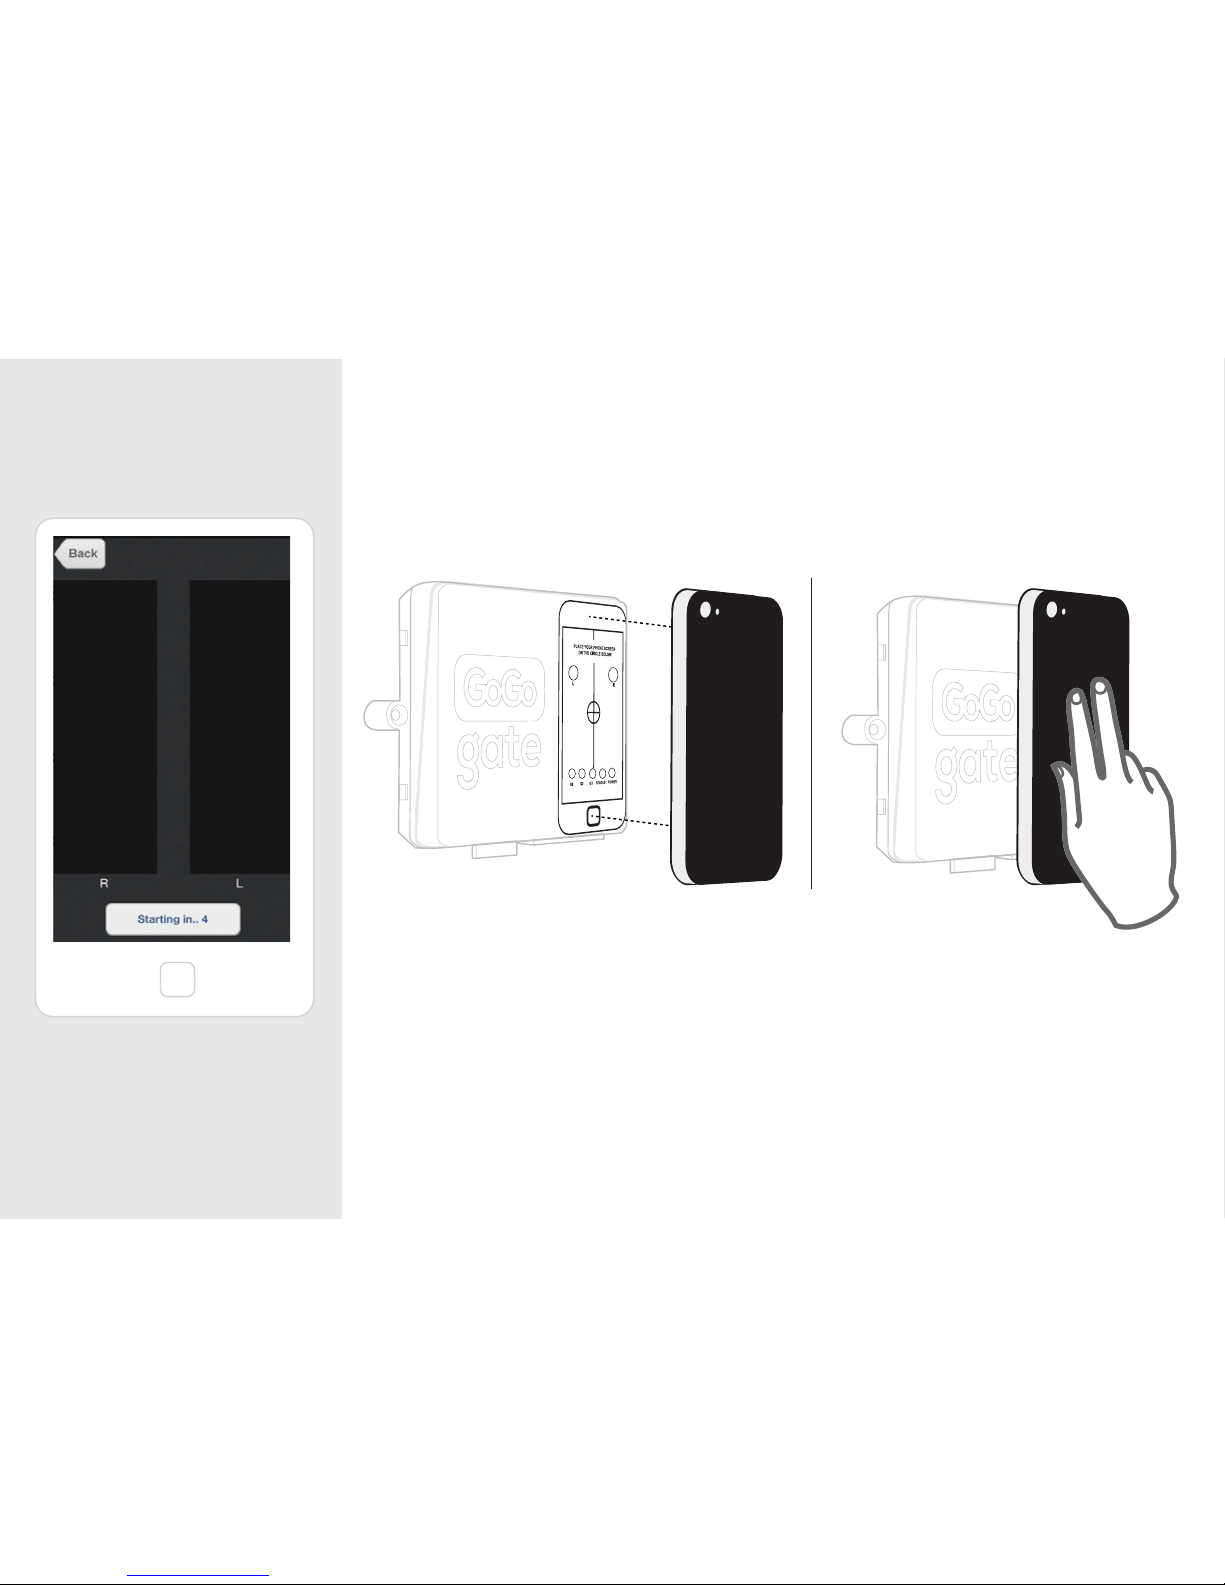
Press the start button when you
have completed the above
sections, and follow
the instructions.
WARNING: You have 5 seconds to
place your phone on the GOGOGATE device. This will start your
programing sequence.
KEEP YOUR PHONE PLACED ON THE GOGOGATE DEVICE UNTIL YOU HEAR 3 BEEPS.
AT THAT POINT YOU MAY REMOVE YOUR PHONE. YOU ARE DONE.
During the programming of your GoGoGate you will hear an automated voice saying “programming”,
“programming “ until the sequence is completed. Upon successful completion of the programming sequence
you will hear 3 beeps.
If any problems occurred during the programming sequence you will hear 1 long beep. In this case start the
programing sequence again.
MAKE SURE YOUR SMARTPHONE IS CONNECTED TO YOUR HOME NETWORK VIA WIFI.
Page 15
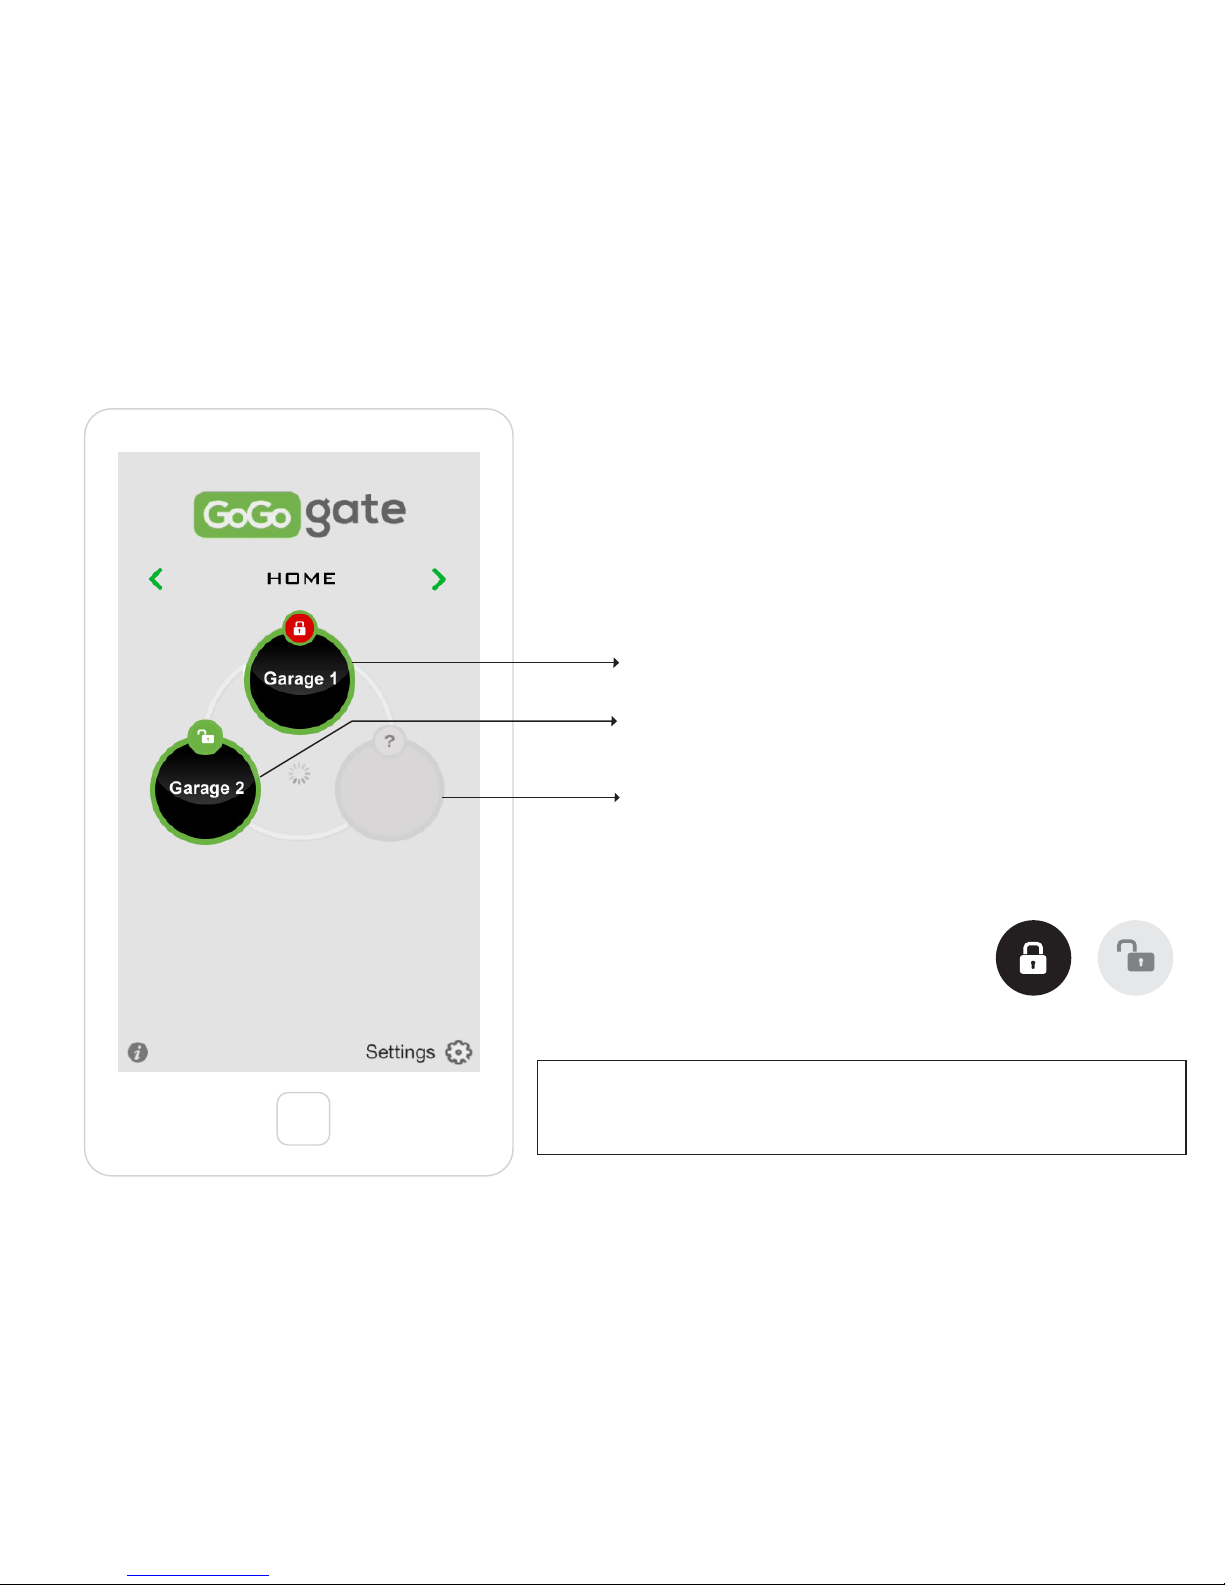
You are all done!! It’s time to try it out.
Your garage doors should now be displayed in green if they are connected
and shaded if they are not connected. (See drawing)
You may now press the garage door button on your Phone to open/close the
garage.
If you have properly installed the wireless sensors on your
garage door, you should see a red (locked sign) if your
garage is closed or green (open sign) if garage door is
open.
PLEASE NOTE: You may have to open and close your garage door via the
GOGOGATE app “once” to synchronize the wireless sensors with the actual
status of your garage door.
CONNECTED & CLOSED
CONNECTED & OPEN
NOT CONNECTED
Page 16
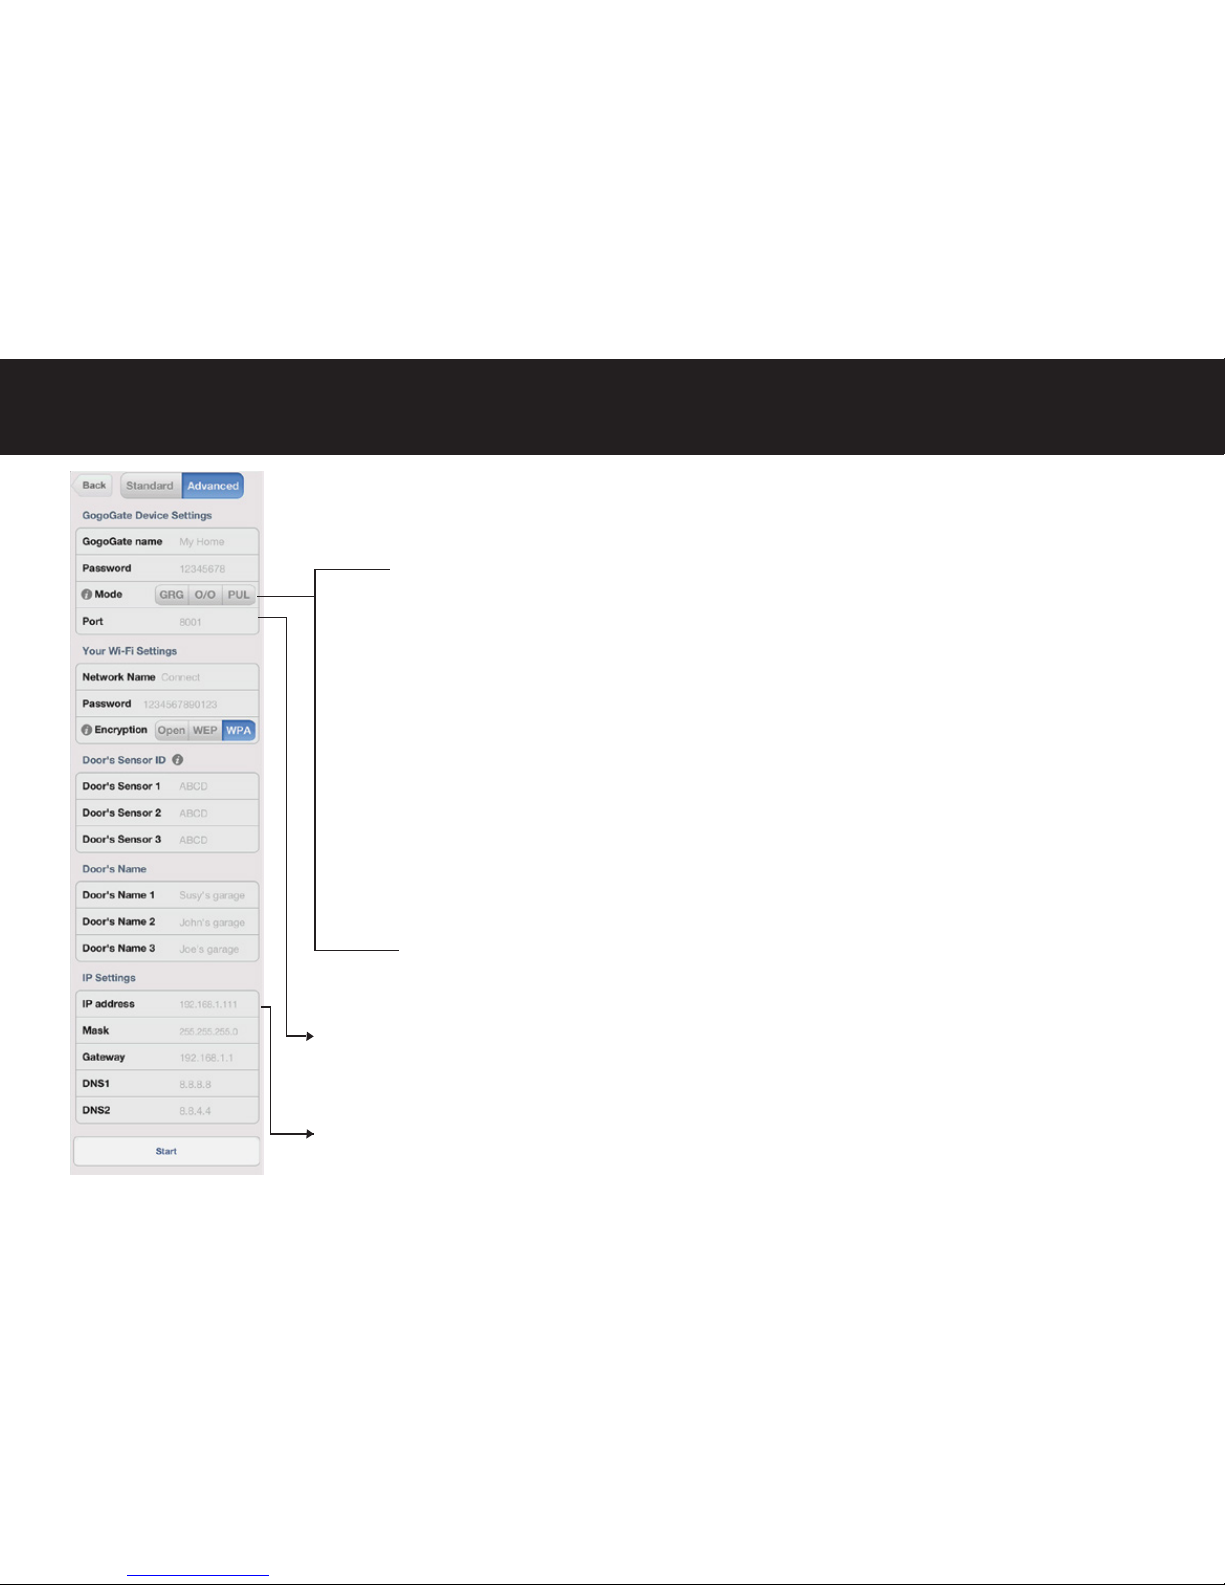
ADVANCED INSTALLATION OPTION – Recommended for installers
MODE:
Your GOGOGATE is capable of controlling many others devices such as electric blinds or sprinkler systems.
Depending on the devices you are connecting you may need to choose the transmission mode suitable for
that application. We recommend that this type of installation be completed by a professional installer.
GRG
This is the default Garage mode which enables you to open or close the garage door. One click on the
garage 1 button and the output relay of G1 closes during 5 seconds. The relay will re-open after that delay.
PUL
The PULSE mode should be used to control things like electrical blinds. It allows for continuous control
while a button is pressed. For example: If you press and hold the device 1 button to open your blinds,
the output relay G1 will remain closed (and your blinds will continue to open) until the button is released.
The same applies when you want to close your blinds. Press and hold the device 1 button. Release
button to stop.
ON/OFF
The ON/OFF mode is made to activate things like exterior lights. Under this setting, if you press and
release the device 1 button, the output relay G1 will remain closed. (ie lights will go on). If you click another time the same button, output relay G1 will close (ie lights will turn off) .
PORT
By default, GOGOGATE uses port 8001, but, if you want to install more than one GOGOGATE in the
same Network, you can choose another port. The available ports are between 8001 and 65534.
IP SETTINGS
In advanced mode, you have to put a static IP for GOGOGATE, DHCP is disabled.
By default, in Standard settings, DHCP is enabled.
Page 17
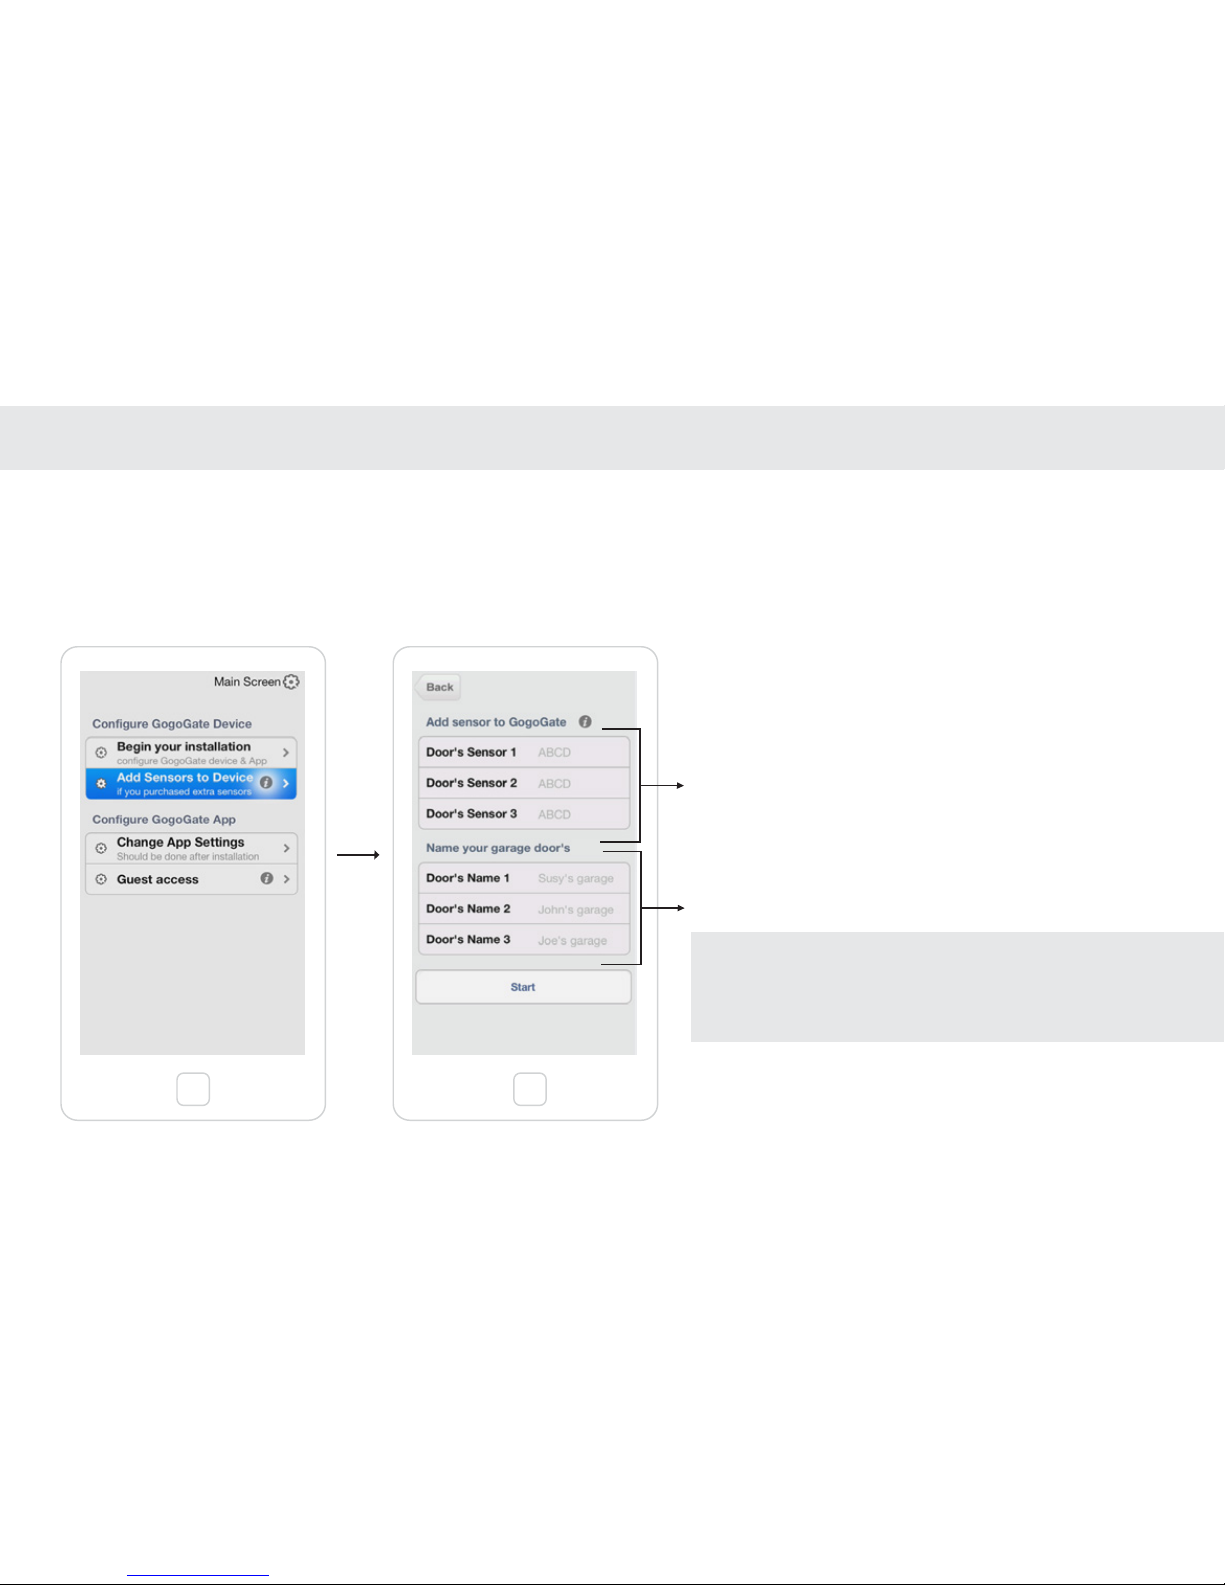
ADD MORE WIRELESS DOOR SENSORS TO YOUR GOGOGATE
If you decided later on to buy a few more door sensors, don’t worry. They are easy to configure.
Just follow the instructions below.
SELECT THE ADD SENSOR MENU PRESS START WHEN DONE
Input here the 4 digit code found on the front of your
Wireless Sensors
Give your garage doors a Name
Please note that if you had already programmed garage door 1 when you
bought your GoGoGate and are now adding 1 or 2 more door sensors, you
will need to re-enter the information (4 digit code and name) of your door
sensor 1. Leaving any field BLANK is equivalent to ERASING your previous
settings .
WARNING: AFTER YOU PRESS START you have 5 seconds to
place your phone on the GOGOGATE device. This will start your
programming sequence. KEEP YOUR PHONE PLACED ON THE
GOGOGATE DEVICE UNTIL YOU hear 3 beeps. AT THAT POINT
YOU MAY REMOVE YOUR PHONE. YOU ARE DONE.
Page 18
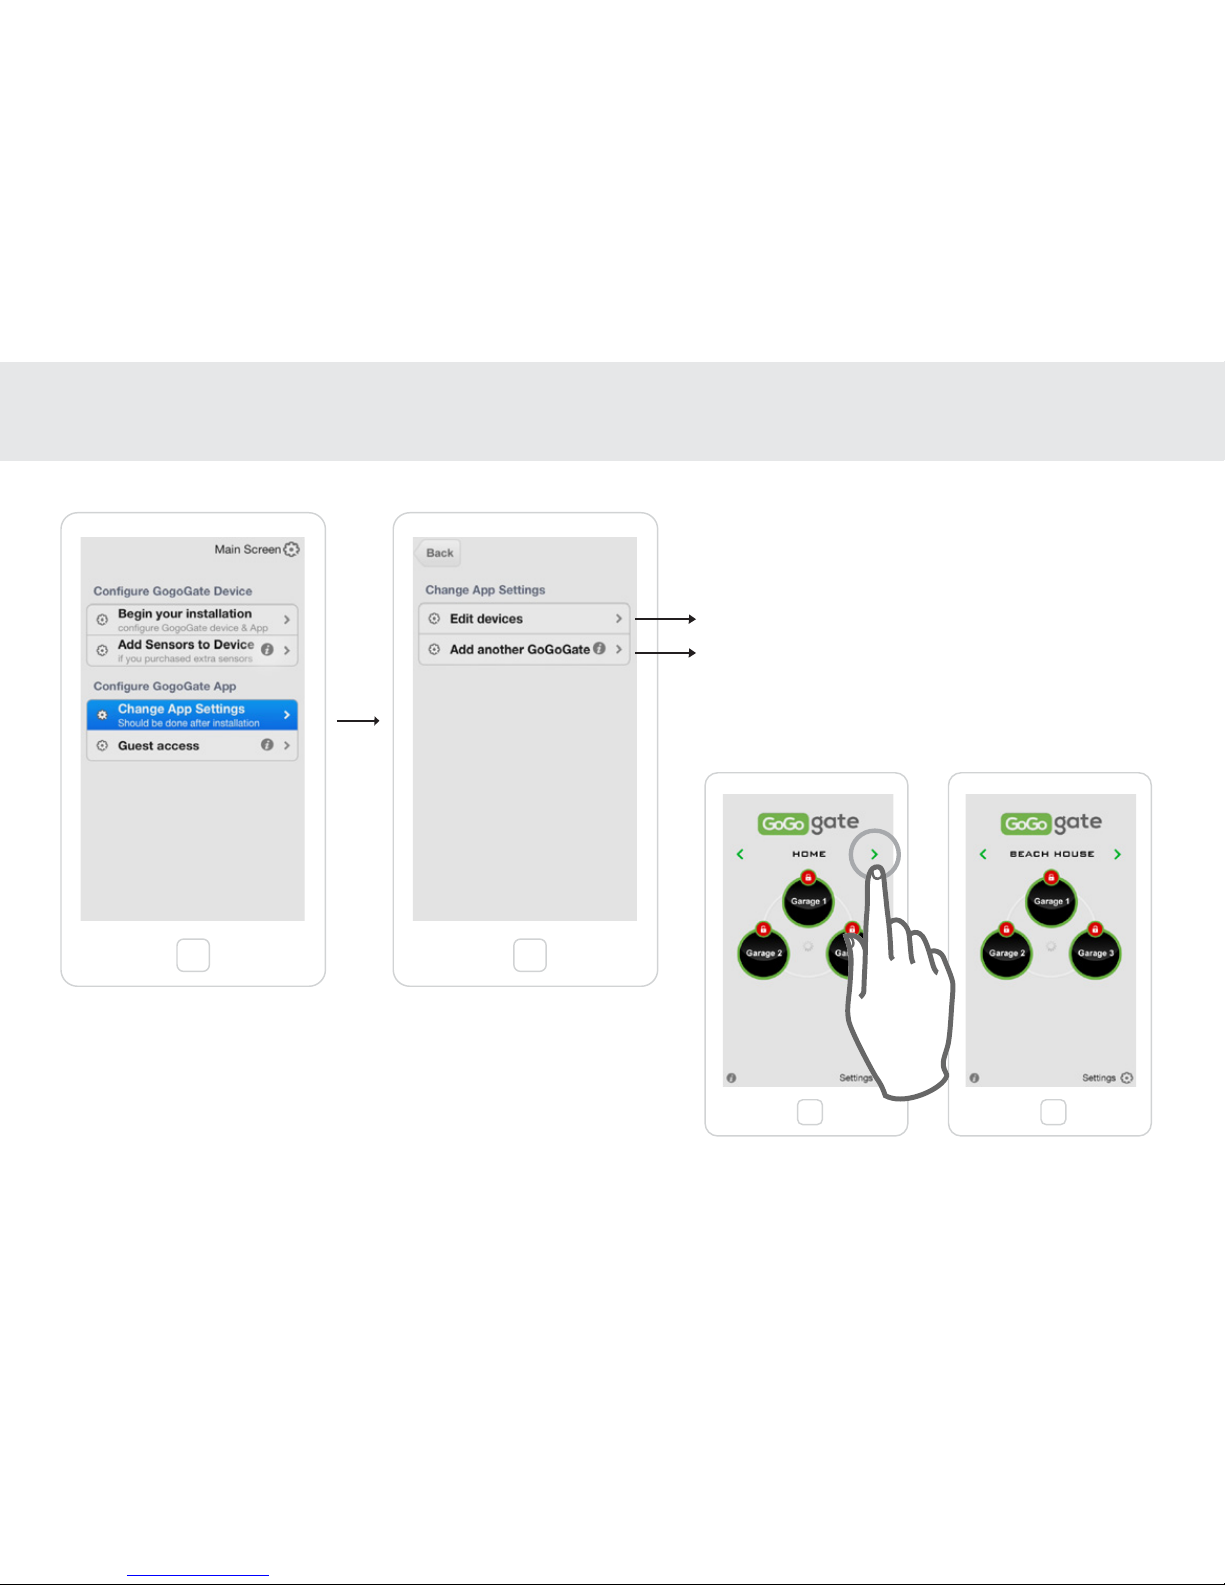
CHANGE APP SETTINGS:
We know that with time things may change. The Change App Settings menu will give you the flexibility you need.
SELECT “CHANGE APP SETTINGS”
Change your device or door name.
You should use this option if you bought a 2nd GOGOGATE
device and installed it in another location (eg beach house).
This allows you to create another window to access
the garages in your 2nd location. You can access the
other window by swapping your fingers on the main screen
from right to left.
Home Beach house
Page 19
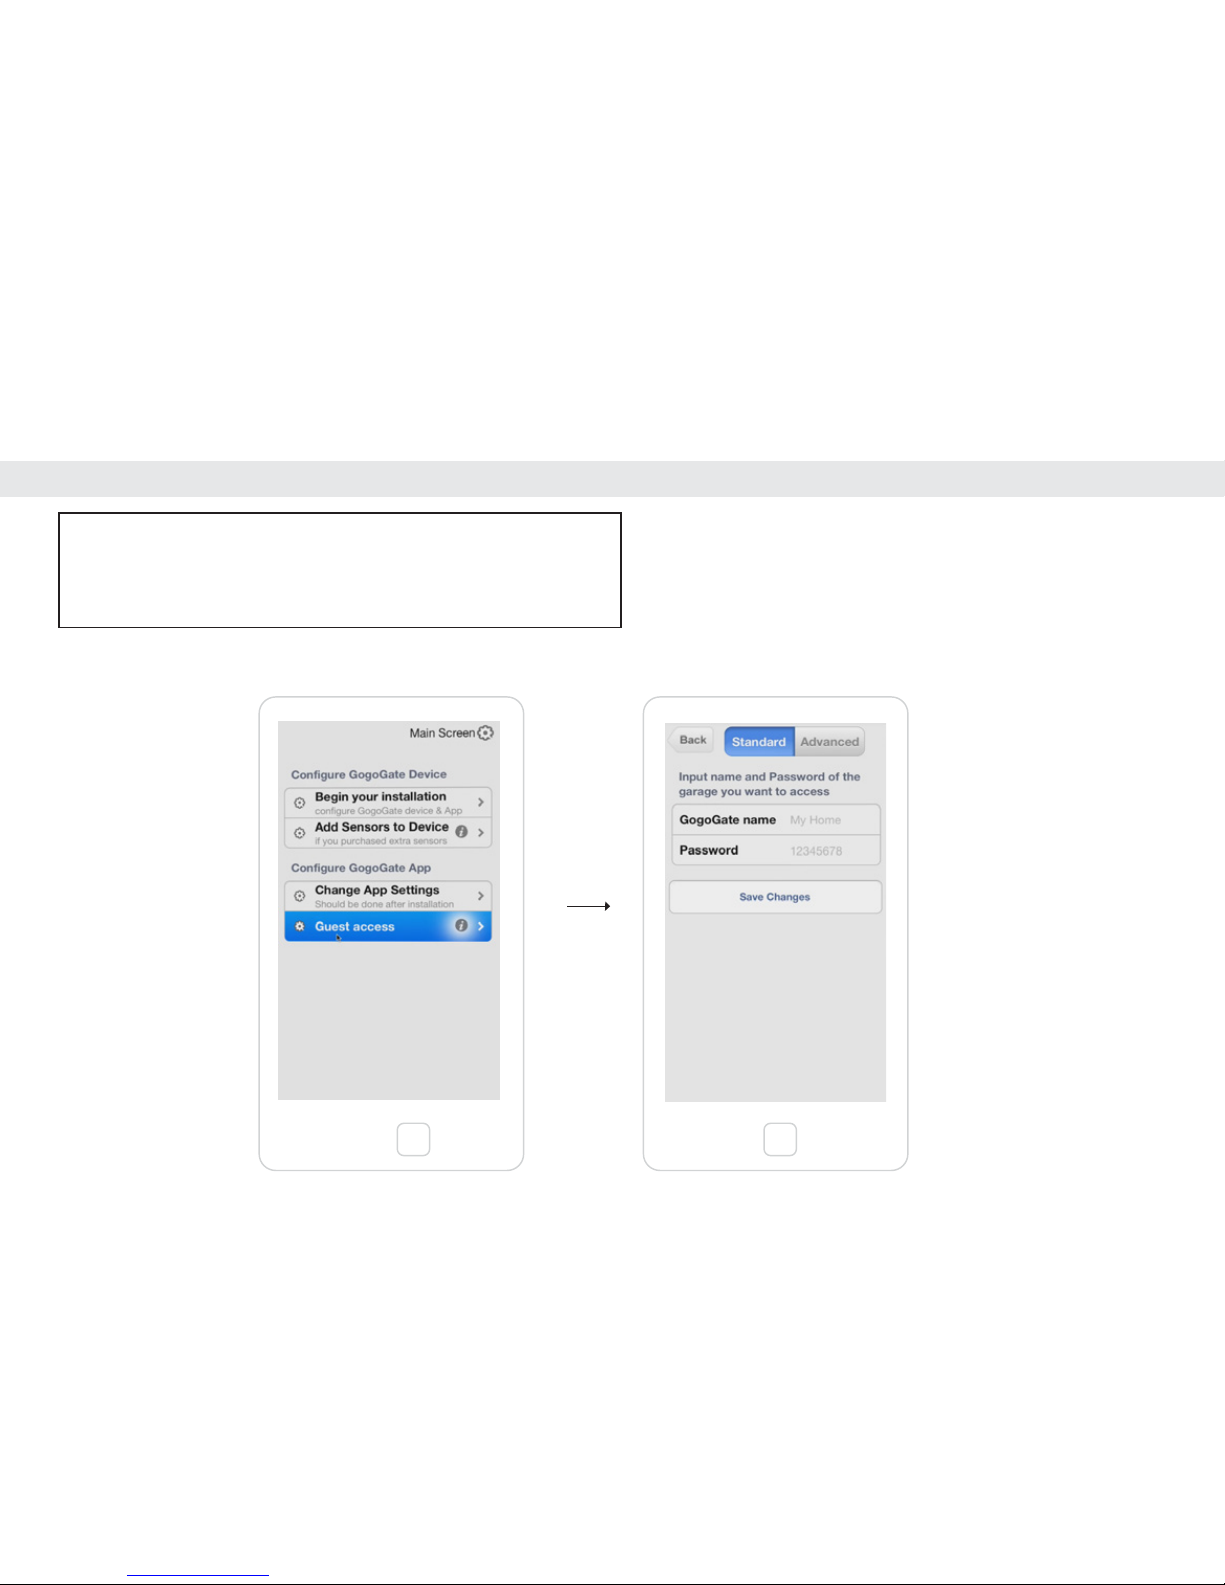
GUEST ACCESS APP
Give access to your garage to a friend or relative
SELECT “GUEST ACCES” STANDARD MODE
NOTE: To access your garage, your friends will have to:
1) Download the GOGOGATE app on the smartphone
2) They will need to have access to your home network via wifi
3) They will need your GOGOGATE name and password.
Page 20
4) Troubleshooting:
Having difficulties with your installation. See if the information below will help.
Programming of the gogogate does not work.
- make sure your network name and password are correct. (password can be case sensitive)
- change the setting from WPA to WEP and restart the installation sequence
- Did you hear the 3 beeps after placing your phone on the GOGOGATE device? Moving your phone before the sound is heard will impact the
programming. You may have to re-start your installation by pressing “begin your installation” and “start”.
My garage door does not open:
- make sure the cables provided are connected properly on the back of your garage wall mount buttons
- make sure that the green cable adapter is inserted properly on the gogogate cable slot.
I can not see if my garage door is open or closed
- make sure you have installed the garage door sensors properly and according to the drawings provided
- make sure you have taken the battery protector tape out off the device prior to attempting to program the garage door sensors
- make sure you have entered the correct 4 digit code found on the front of the sensors when programming the app.
- make sure your wireless sensors are within range. Range is approximately Xxx ft or xxxx meters in open space. Distance maybe reduced by
interference or type of walls. Open or Close your garage door while looking at the STATUS LED on the GOGOGATE device. When you
open/close your garage door the STATUS LED LIGHT of the device should blink fast within 2 seconds.
Still having issues. No problem.. Watch our installation video at www.gogogate.com or contact us at: >>>>>>>>>>>>
Page 21
5) Limited warranty and return policy
The gogogate product comes with a one (1) year warranty against mechanical and electrical defects provided the products have been used in accordance
with the documentation provided. The 1 year warranty period begins as of the purchase date by the user of the device. If customer does not have original
proof of purchase, REMSOL will determine warranty eligibility via the manufacturing date.
If our product fails we will either 1) replace or repair your product or 2) decide to refund you the purchase price paid for the product and the foregoing will
be the customer sole remedy for breach of this warranty. Products may be replaced by refurbished units or by different models of similar functionality. You
also understand that above options will be implemented at the complete discretion of REMSOL LLC.
Our limited warranty is transferable from original customer to subsequent owner but the warranty period will not be extended in duration or coverage as a
consequence of this transfer in ownership.
REMSOL assumes no warranty obligation with regards to a) normal wear and tear, b) products with no workmanship or product defects, c) misuse, abuse,
negligence accidents, fraud, c) use of improper voltage (this is a low voltage device), d) acts of God, e) non authorized or non intended use of the product,
f) consumable parts such as batteries.
Your Right to Return and Returns Policy
You may return purchased Products for any reason for a full refund of the Product purchase price actually paid within 15 working days following the date
you receive the Products, subject to compliance with the following:
· You must obtain a REMSOL return reference number. This number may be obtained from REMSOL by calling us on designated telephone numbers
mentioned on the REMSOL websites or by requesting the number via email: [email protected].
· The REMSOL return reference number must be prominently displayed on the outside of the parcel in which the Products are returned.
· Your REMSOL invoice must be enclosed with the returned Products. Products must be returned in the original packaging, in “as new condition”, and with
all component products, parts, accessories, guarantee cards, manuals and other documents and items. Customer is expected to re-package the product
properly in order to avoid damage during transportation and to ship the product to REMSOL at Customer’s own cost.
If you return Products (1) which have been damaged or used, (2) after the 15 working days returns period (or other longer period specified by applicable
law), (3) parts of which, including components, included products, accessories, packaging, boxes, documents and/or other items are damaged or missing,
or (4) without pre-paid delivery, REMSOL retains the right either to refuse to refund Product purchase price (subject to applicable local law), or to charge
you repair, restocking or related fees and delivery charges. REMSOL may in that case deduct those fees and charges from any payments to be refunded
to you.
Please refer to our website for more detailed information on product warranty and returns.
Page 22

Safety information
WARNING! ELECTRIC SHOCK HAZARD: TO REDUCE THE RISK OF FIRE OR ELECTRIC SHOCK, DO NOT EXPOSE THIS PRODUCT TO WATER.
Read and follow these instructions, heed all warnings, and keep this document for future reference,
· Set up your product in accordance with REMSOL product documentation, and place your product in a stable location so it will not fall and cause product
damage or bodily harm.
· Do not use your product near water including dripping or splashing sources (e.g., indoor fountains), or near objects filled with liquids, such as flower
vases or fish tanks.
· Do not use your product near heat sources (eg, radiators. heat registers, stoves,open flames, such as lighted candles, brother heat-producing devices,
such as audio amplifiers or TVs).
· Do not, under any circumstance, modify your products power supply, if one has been included. lf the plug does not fit into yourAC outlet, have a certified
electrician replace your obsolete AC outlet.
· The AC outlet (receptacle) should be near the product and easily accessible.
· Refer all servicing and repair to qualified service personnel. Servicing is required when your product does not operate normally or the power cord/plug
has been damaged, the product has been exposed to water rain, liquid, or moisture, the product has been dropped, or an object has been inserted into a
product port or vent.
· For portable products or products weighing less than 7 kg (15 lbs), the product label may be found on the product stand, under a lid, or on the bottom of
the product itself.
· Clean your product using only a dry cloth and no water or liquid,
Page 23

Power supply warning:
Caution electric shock/tire hazard! For indoor use only. Do not expose to moisture, Liquid, or heat. Do not use any other power supply with your product.
· Install the wires connecting to your garage door wall buttons with all equipment powered off (garage door opener and gogogate).
· Please read carefully all these instructions before installing and starting to use GoGogate.
· Please follow all the instructions in detail in order to avoid personal injuries or damage to third party devices.
· The gogogate is not adequate for really sensible installations or to control very precise products or processes.
· Failure of the WI-FI network or a power failure will affect control and functionality of the device.
· The gogogate must not be used for medical applications or in any location where explosive materials are located.
FCC Statements
This device complies with Partl5 of the FCC Rules. Operation is subject to the following two conditions:
(1) This device may not cause harmful interference, and (2) this device must accept any interference received, including interference that may cause
undesired operation.
This equipment has been tested and found to comply with the limits for a Class B digital device, pursuant to Part 15 of the FCC Rules. These limits are
designed to provide reasonable protection against harmful interference in a residential installation. This equipment generates, uses and can radiate radio
frequency energy and, if not installed and used in accordance with the instructions, may cause harmful interference to radio communications. However
there is no guarantee that interference will not occur in a particular installation. If this equipment does cause harmful interference to radio or television
reception, which can be determined by turning the equipment off and on, the user is encouraged to try to correct the interference by one or more of the
following measures:
· Reorient or relocate the receiving antenna.
· Increase the separation between the equipment and receiver.
· Connect the equipment into an outlet on a circuit different from that to which the receiver is connected.
· Consult the dealer or an experienced radio/TV technician for help.
WARNING: Where shielded interface cables or accessories have been provided with the product or specified additional components or accessories elsewhere defined to be used with the installation of the product, they must be used in order to ensure compliance with FCC. Changes or modifications to
product not expressly approved by REMSOL could void your right to use or operate your product.
Page 24

Canada I IC Statement:
This Class B digital apparatus complies with Canadian ICES-003. (Cet appareil numerique de categorie B est conforme a la norme canadienne
ICES-O03.)
· This device complies with lndustry Canada licence-exempt RSS standard 2IO.
· Operation is subject to the following two conditions: (l) this device may not cause interference, and (2) this device must accept any interference, including
interference that may cause undesired operation of the device.
(Ce dispositif est conforme a la norme CNR-210 d'lndustrie Canada applicable aux
appareils radio exempts de licence,. Son exploitation est autorisee aux deux conditions suivantes (I) le dispositif ne doit pas produire de brouillage prejudicable, et (2) ce dispositive doit accepter tout brouillage recu, y compris un brouillage susceptible de provoquer un fonctionnement indesirable.)
exempts de licence. Son fonctionnement est sujet aux deux conditions suivantes: (1) le dispositif ne doit pas produire de brouillage prejudiciable, et (2) ce
dispositif doit accepter tout brouillage recu, y compris un brouillage susceptible de provoquer un fonctionnement indesirable.
Safety Precautions
This product has been designed with the highest concern for safety. However, any electrical device, if used improperly, has the potential for causing fire,
electrical shock or personal injury. To help ensure accident-free operation, follow these guidelines:
· Observe all warnings, precautions and instructions.
· Regularly inspect the AC power adapter for damage.
· Stop use, unplug the AC power adapter from the electrical outlet and disconnect any other cables immediately if the device functions in an abnormal
manner produces unusual sounds or smells or becomes too hot to touch,
· For more information on product safety and troubleshooting, please go to www.gogogate.com/support.
CAUTION:
Risk of explosion if battery is replaced by an incorrect type. Dispose of used batteries according to the instructions
Use and Handling
· Do not touch the Player or connected cables during an electrical storm.
· Do not allow liquid, small particles or other foreign objects to get into the device or accessories.
· Do not expose the device to smoke or steam.
· Do not expose the device or accessories to high, temperatures, high humidity or direct sunlight.
· Do not place the device on the floor or in a place Where they may cause someone to trip or stumble.
Page 25

MORE INFO
WWW.GOGOGATE.COM
 Loading...