

Go! Gater 1-1-16453-TP02, 1-1-16455-TP02 Assembly Instructions Manual
FOLDABLE LADDERBALL
Assembly Instructions
Model 1-1-16453-TP02, 1-1-16455-TP02
CONTACT INFO
Hours
Monday to Friday
(9am to 5pm EST)
Technical Support
Email us at: consumerservice@eastpointsports.com
Visit us at: www.eastpointsports.com
Call: 973-585-4747
www.eastpointsports.com

How to use the PARTS IDENTIFIER
Before you begin assembly, please make sure that
you have all the parts listed and in the correct
quantities. This will ensure the quickest and most
organized assembly.
Be sure to work on the assembly on a soft
non-marring surface such as carpet or the inside of
the corrugate box top to prevent causing damage
to the product during assembly.
1
STEP 1
Part Name
x2
Instructions Parts ID #
Part Name
Part Image
Part Quantity
Step
Used In
PARTS IDENTIFIER
x4
Pole - XL - Grey
STEP 6, 7
1
x2
Pole - XL - Yellow
STEP 5
2
x2
Pole - XL - Blue
STEP 8
3
x8
Pole - Large - Grey
STEP 2
4
x4
Pole - Medium - Grey
STEP 9
5
x4
Pole - Small - Grey
STEP 8
6
x2
Pole - Small - Green
STEP 8
7
x4
Connector - 4 Way - Yellow
STEP 1
8
x4
Leg - Support
STEP 3
9
x4
Scorer - Slider
PRE-INSTALLED
13
x3
Bolo - Yellow
83
x1
Bolo - Bag
STEP 6
80
x4
Ground Stake
STEP 6
81
x3
Bolo - Red
82
x8
Connector - Elbow
STEP 7
10
x4
Connector - T - Blue
STEP 8
11
x4
Scorer
STEP 8
12
1
2
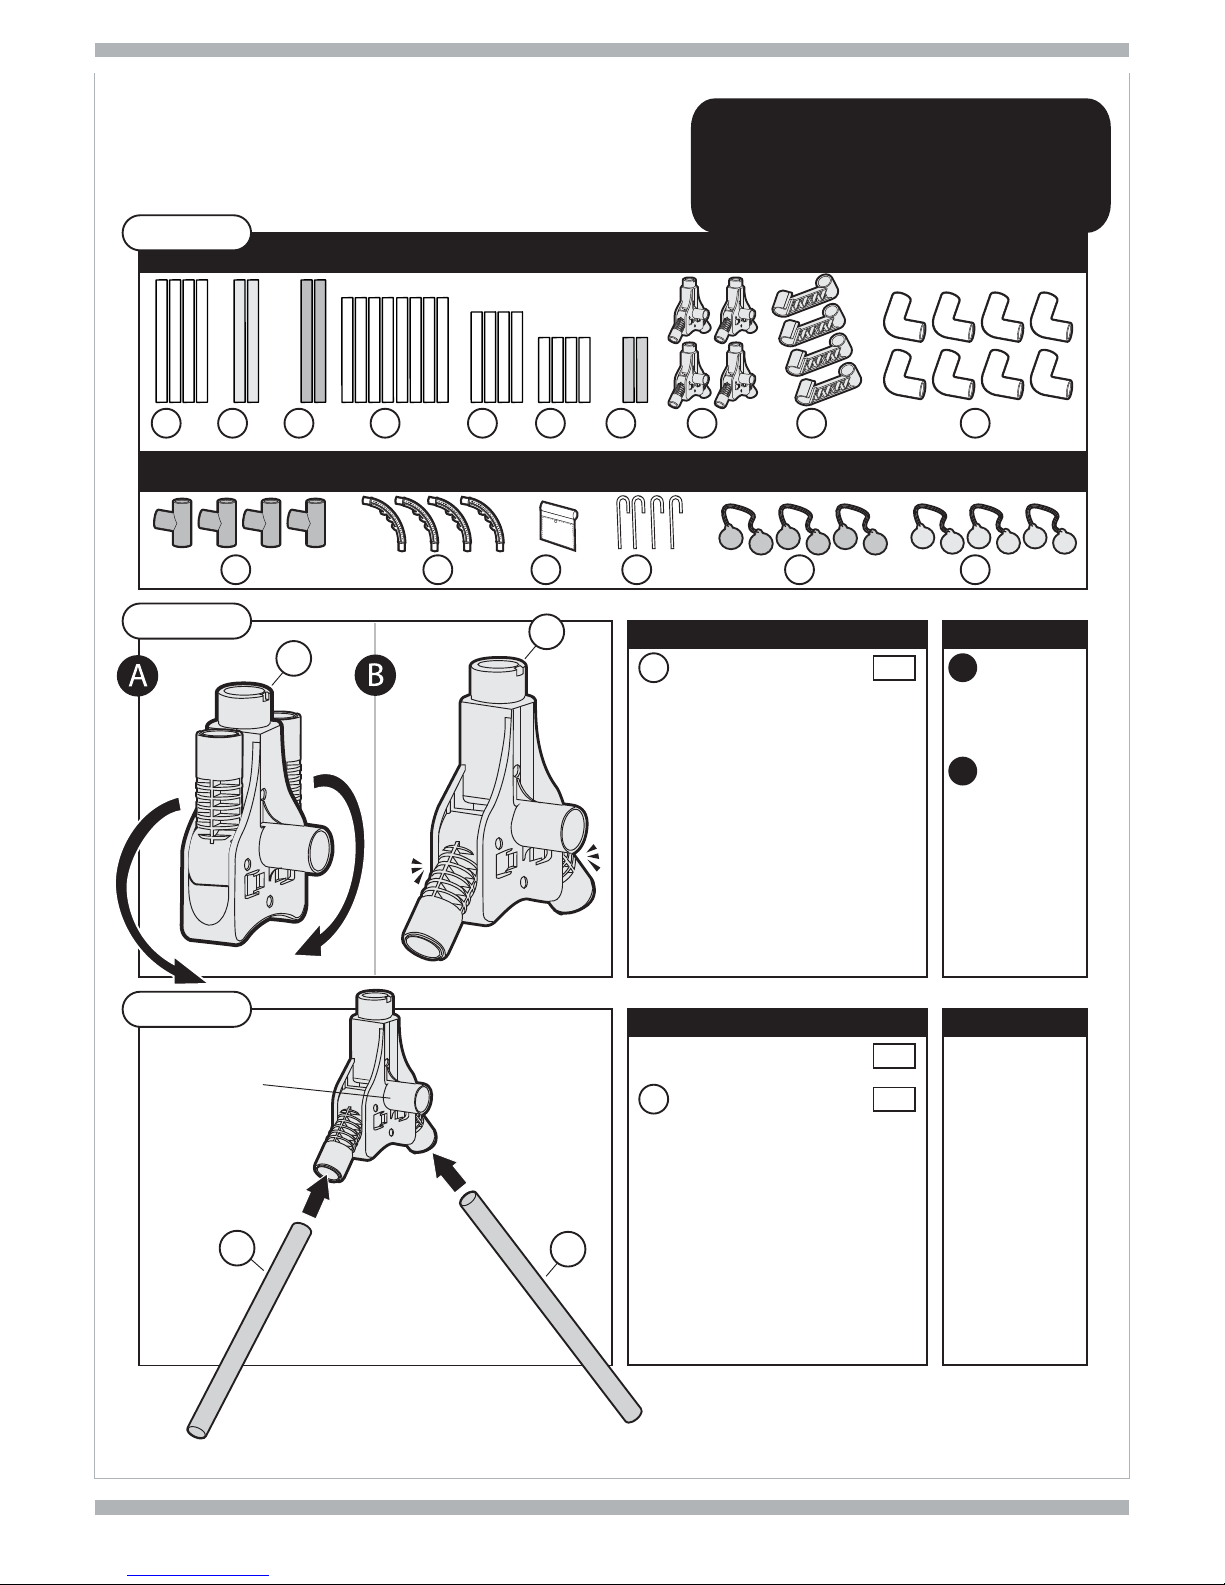
BEFORE BUILDING - Please inspect and layout all your PARTS
NOTE - All parts are NOT to scale with each other
START
Game Construction
ASSEMBLY INSTRUCTIONS
Swing the
tubes on the
Connector
down.
Make sure
the tubes on
the Connector
are locked in
place.
NOTE:
STEP 1
COMPONENTS QTY.
Connector - 4 Way - Yellow
x4
8 A
B
Insert Poles.
Repeat for
all 4 Way
Connectors.
NOTE:
STEP 2
COMPONENTS QTY.
Step 1 Assembly
x4
Pole - Large - Grey
x8
4
Helpful Hint!
Before building, lay out all the poles in numerical
order as shown below. This will help you find the
correct pole for each step and make assembly
much easier.
1
x4
2
x2
3
x2
4
x8
5
x4
6
x4
7
x2
8
x4
9
x4
10
x8
11
x4
12
x4
80
x1
81
x4
82
x3
83
x3
Step 1 Assembly
8
8
44
 Loading...