

Page 1
Operation Manual
Read before
ying!
IMPORTANT
Easy Drone
easyaerial.com
Easy Drone
Page 2

Contents
01 This is Easy Drone
03 Parts
04 Charger
06 Frame Assembly
07 Learn to Fly
11 Safety
12 Altitude Hold Mode
13 First Flight
18 Stabilize Mode
18 Loiter Mode
19 Return-to-Launch Mode
19 Autonomous Mode and Missions
21 Specications and Resources
22 Learn More and Support
Page 3
01
This is Easy Drone
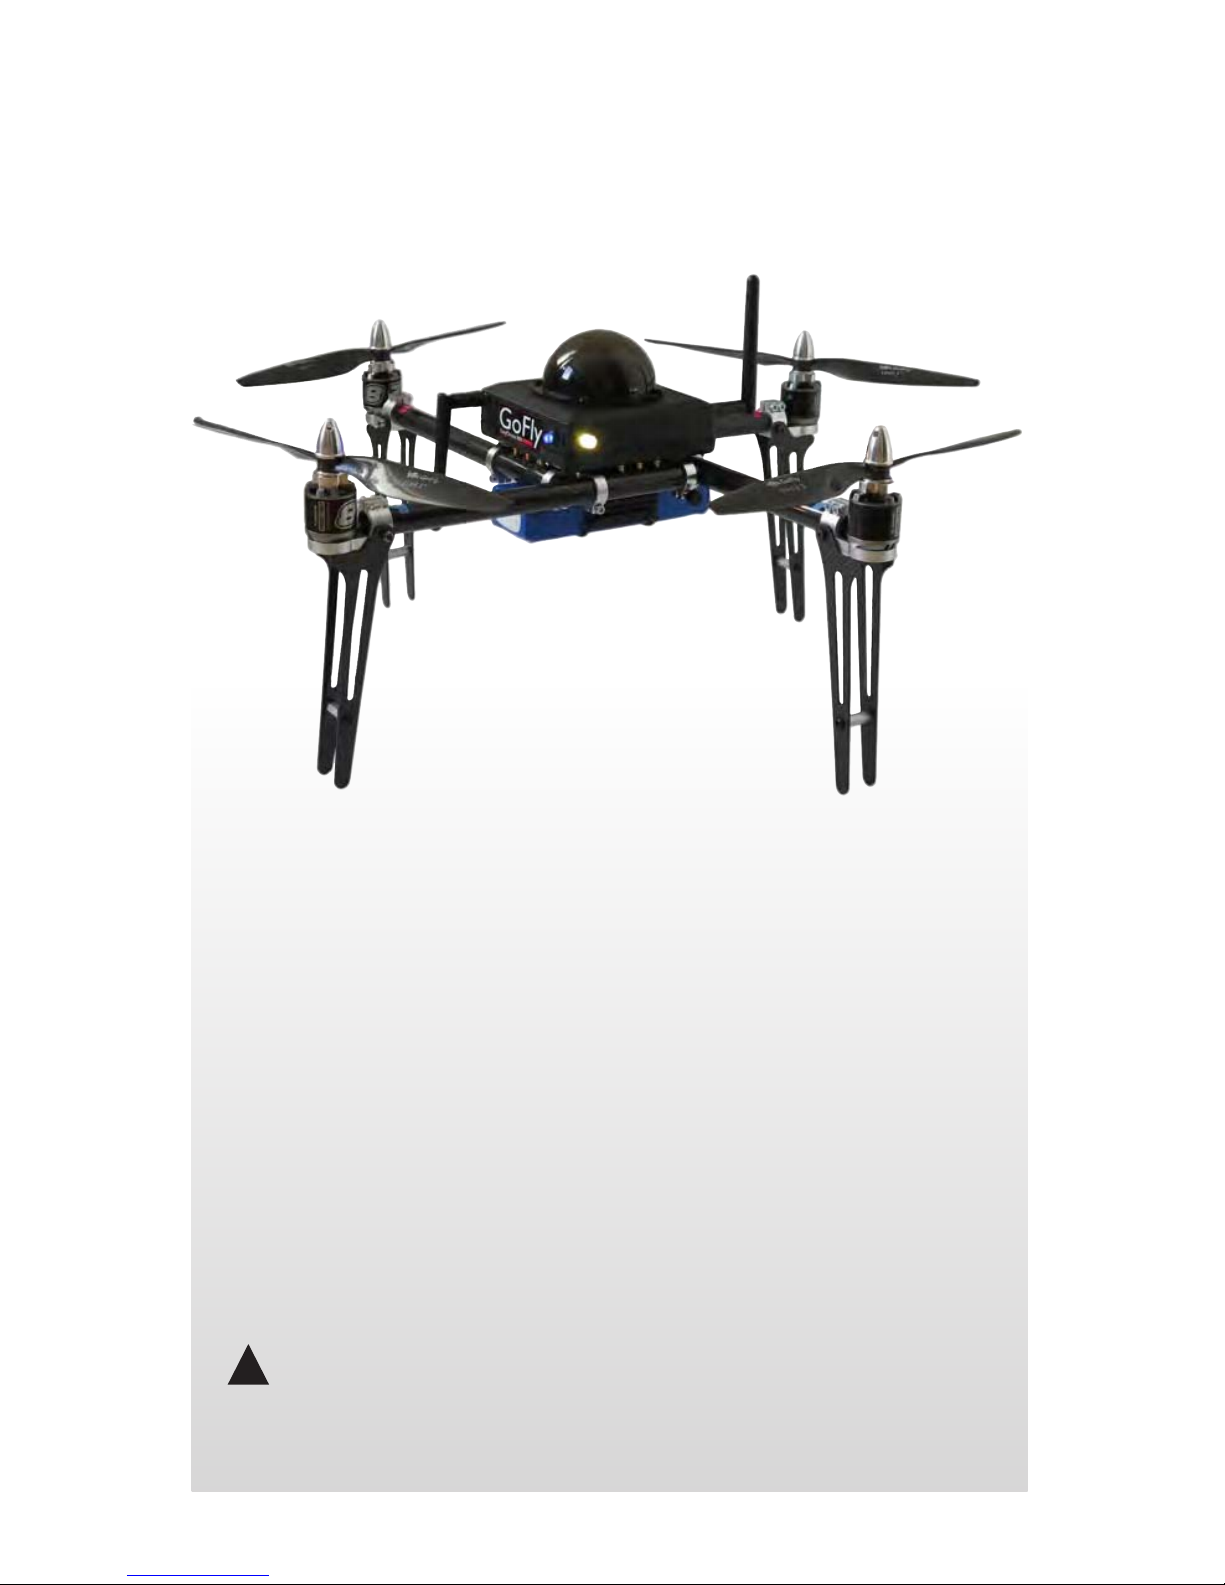
Congratulations on getting your Easy Drone!
Easy Drone is an autonomous quadcopter powered by open-source
hardware, software, and rmware. Please read this manual carefully
before your rst ight and pay close attention to safety information.
Happy ying!
!
Important note : When using a GoPro always ensure
that the WiFi on the GoPro is turned OFF .
Page 4
02
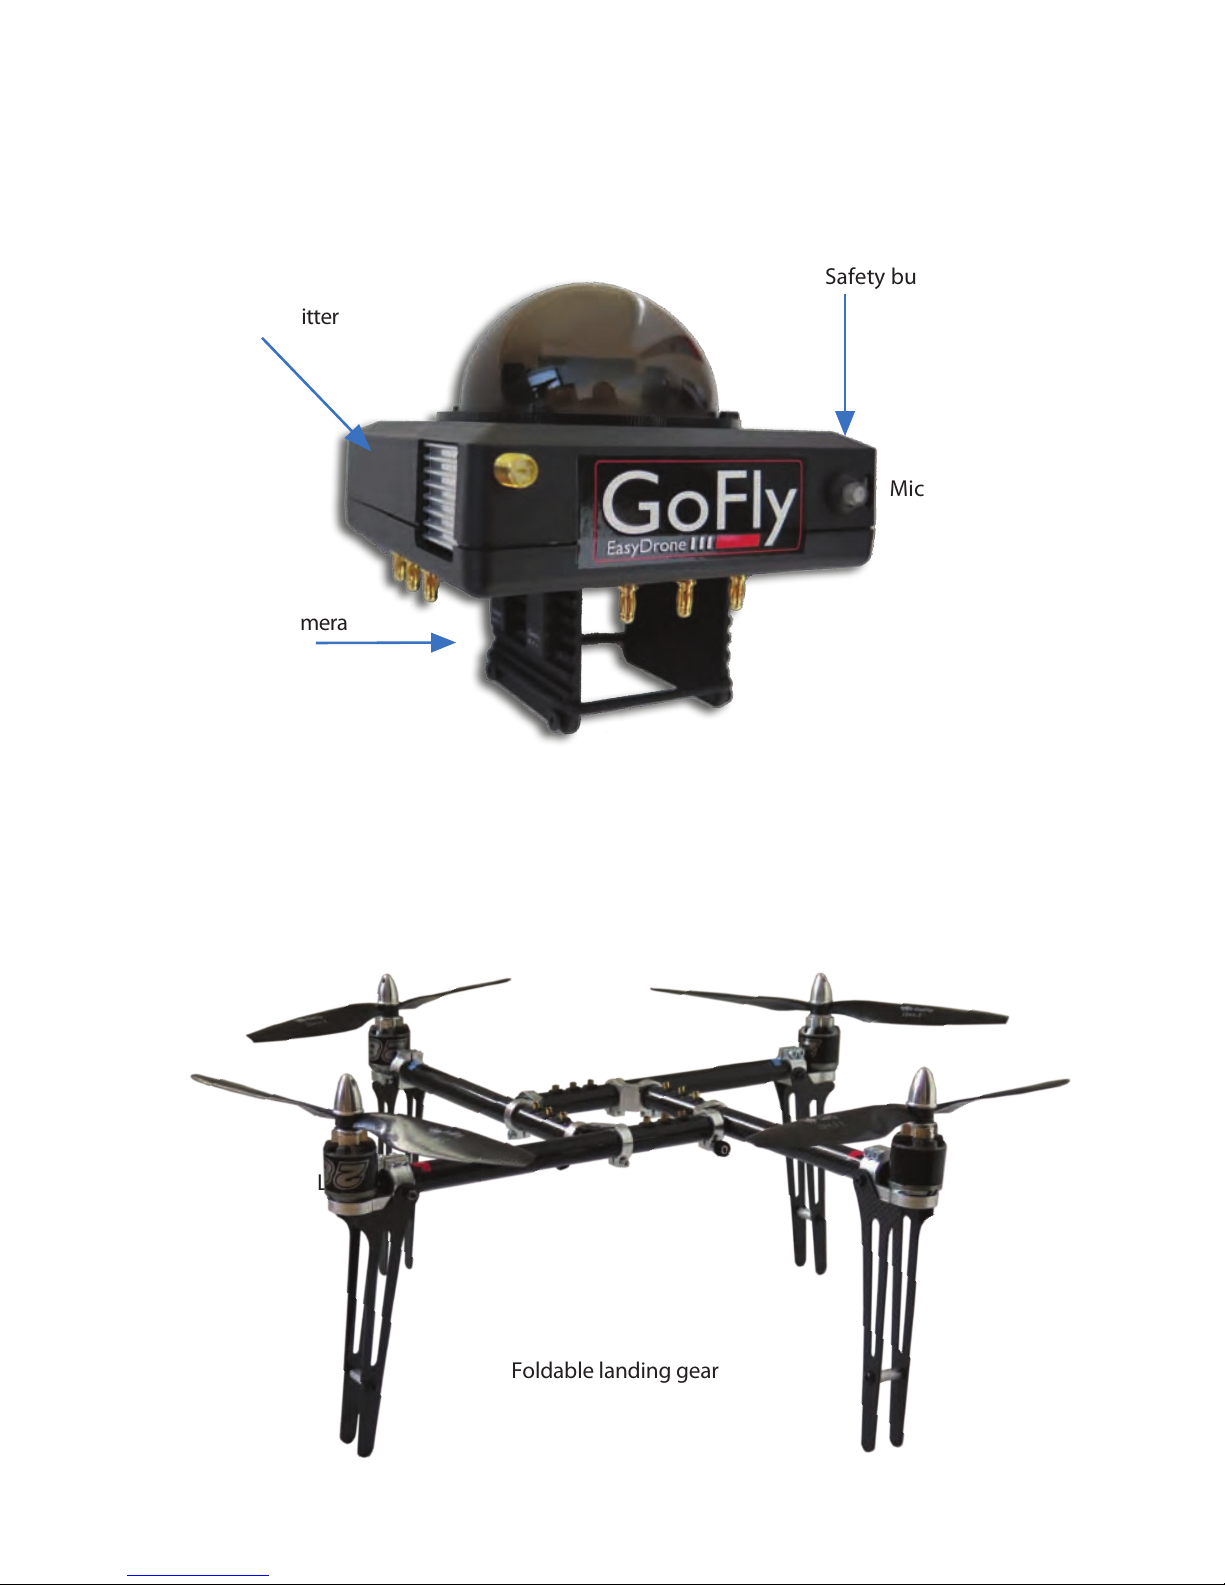
Flybot
Frame
L
Video transmitter
Easy Drone consists of two components
Gimbal and camera
ports
Safety button
Micro USB Port
Foldable landing gear
Page 5
03
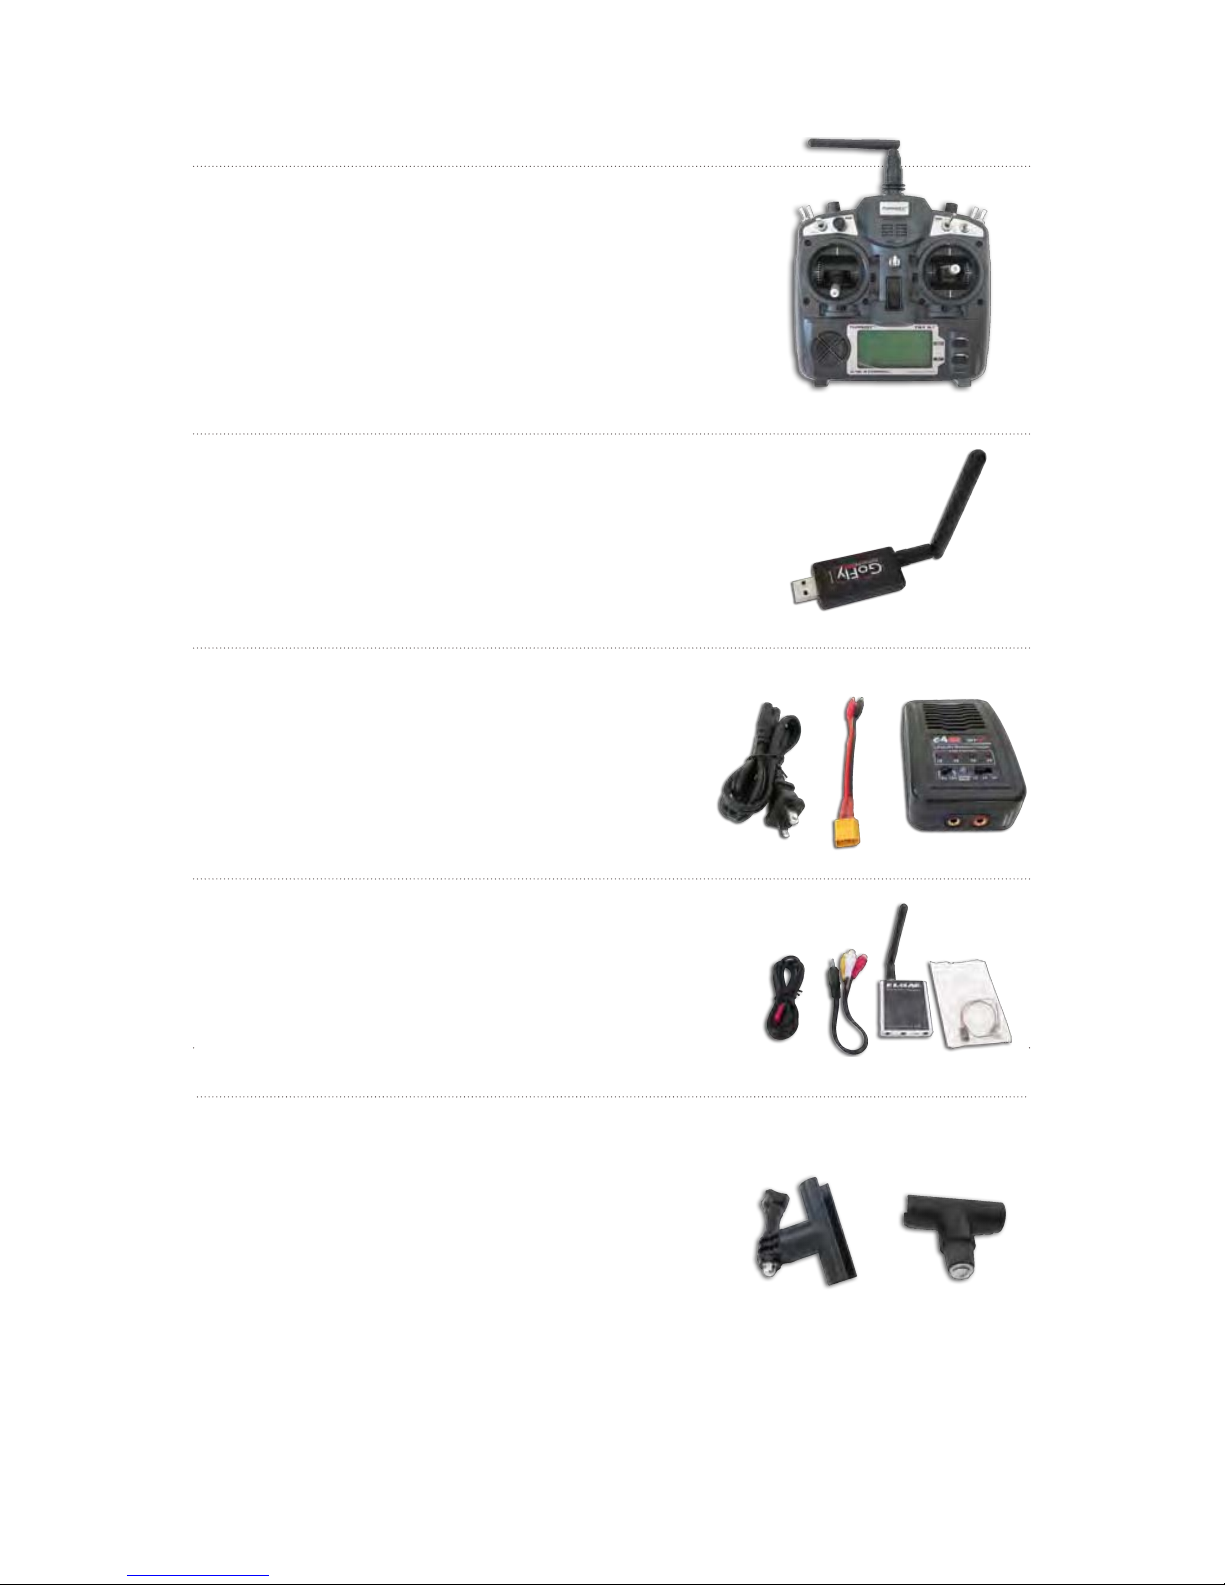
Parts
RC transmitter
Your direct link to Easy Drone
Telemetry Radio
Wirelessly change settings from computer or tablet
Also used for “Follow me” mode
Battery kit
4S Battery, charger, and contacts
Video receiver kit
Plug your screen or head mounted display
to get video feed from your camera
(requires 12V power source)
Quick snap-on adapters for gimbal and GoPro camera
Page 6
04
Charger
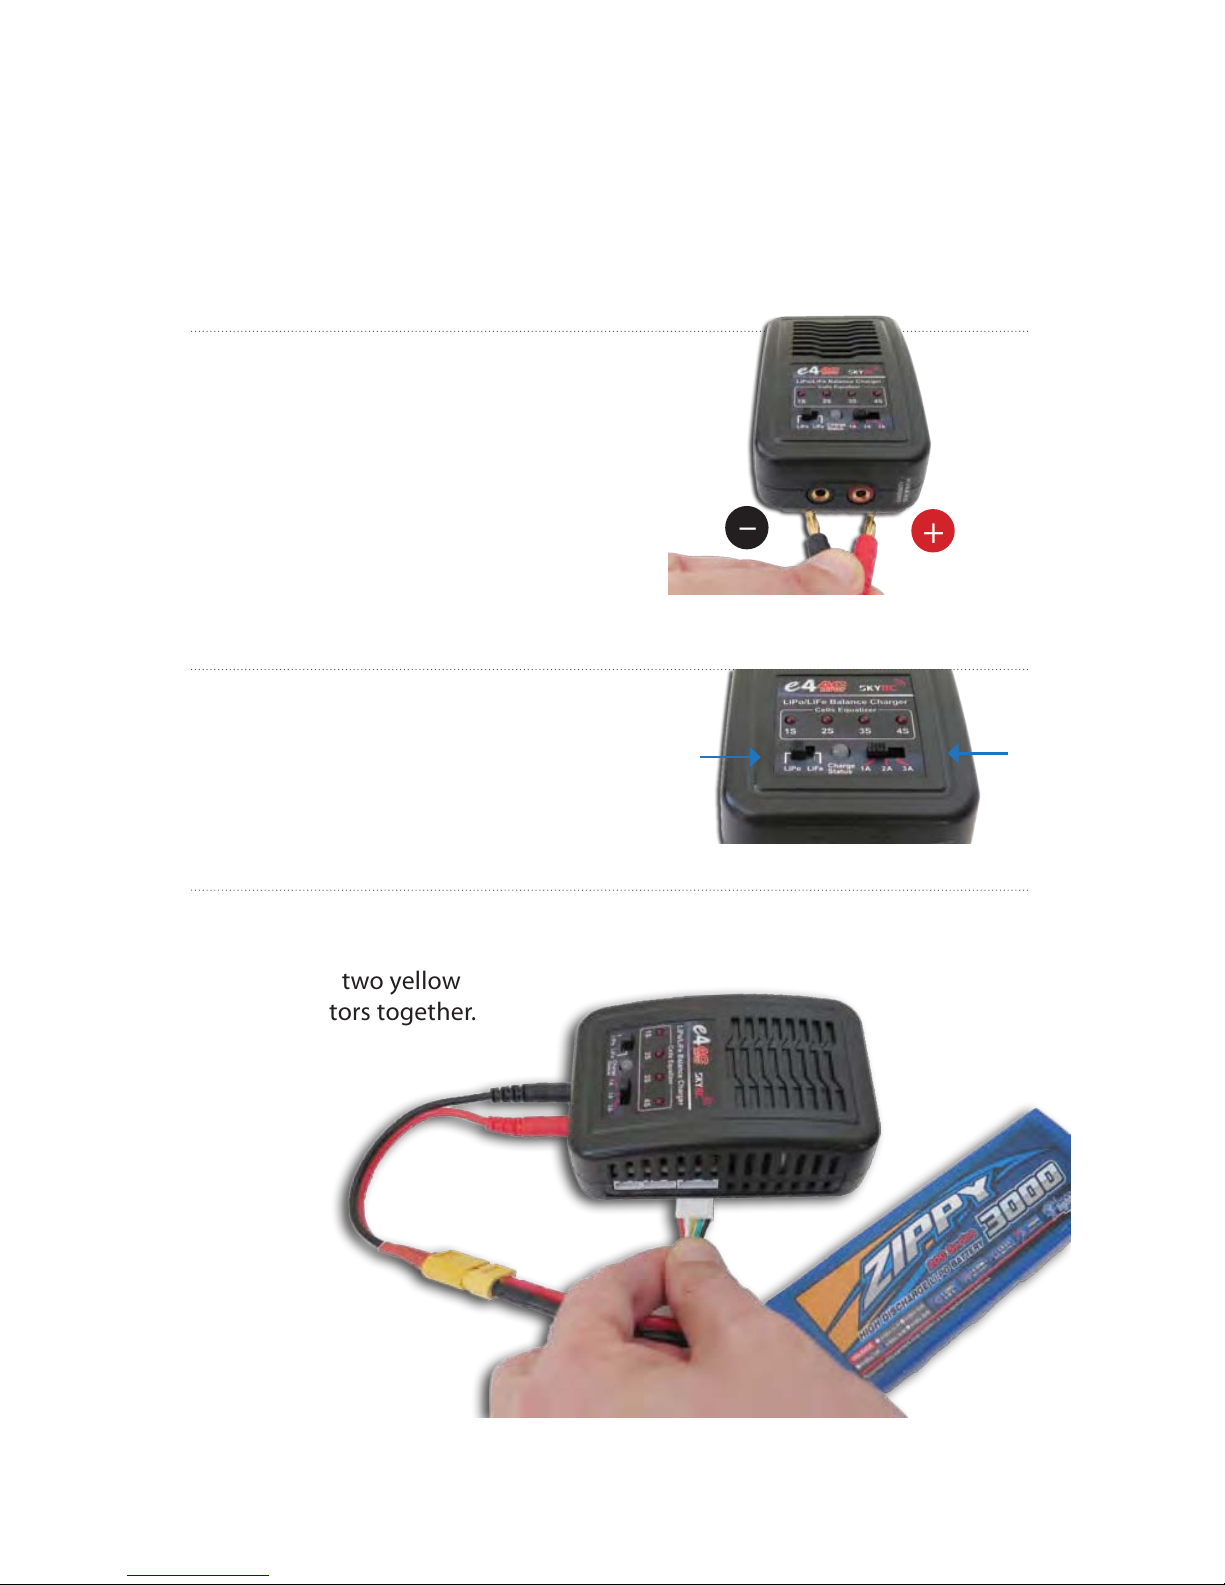
Easy Drone is powered by a rechargeable lithium polymer (LiPo) battery.
Store battery at half charge then charge fully before ying. Batteries must
ship at half charge, so please charge before your rst ight. Each full battery
provides 10 to 13 minutes of ight time.
Connect charger to the
power adapter cable and
a wall outlet.
Connect the red cable to the
+ port and the black cable
to the - port.
Set the charger to
LiPo and 3A.
Connect the white
connector to the 4S port.
Join the two yellow
connectors together.
1
2
+
–
LiPo
3A
3
Page 7
05
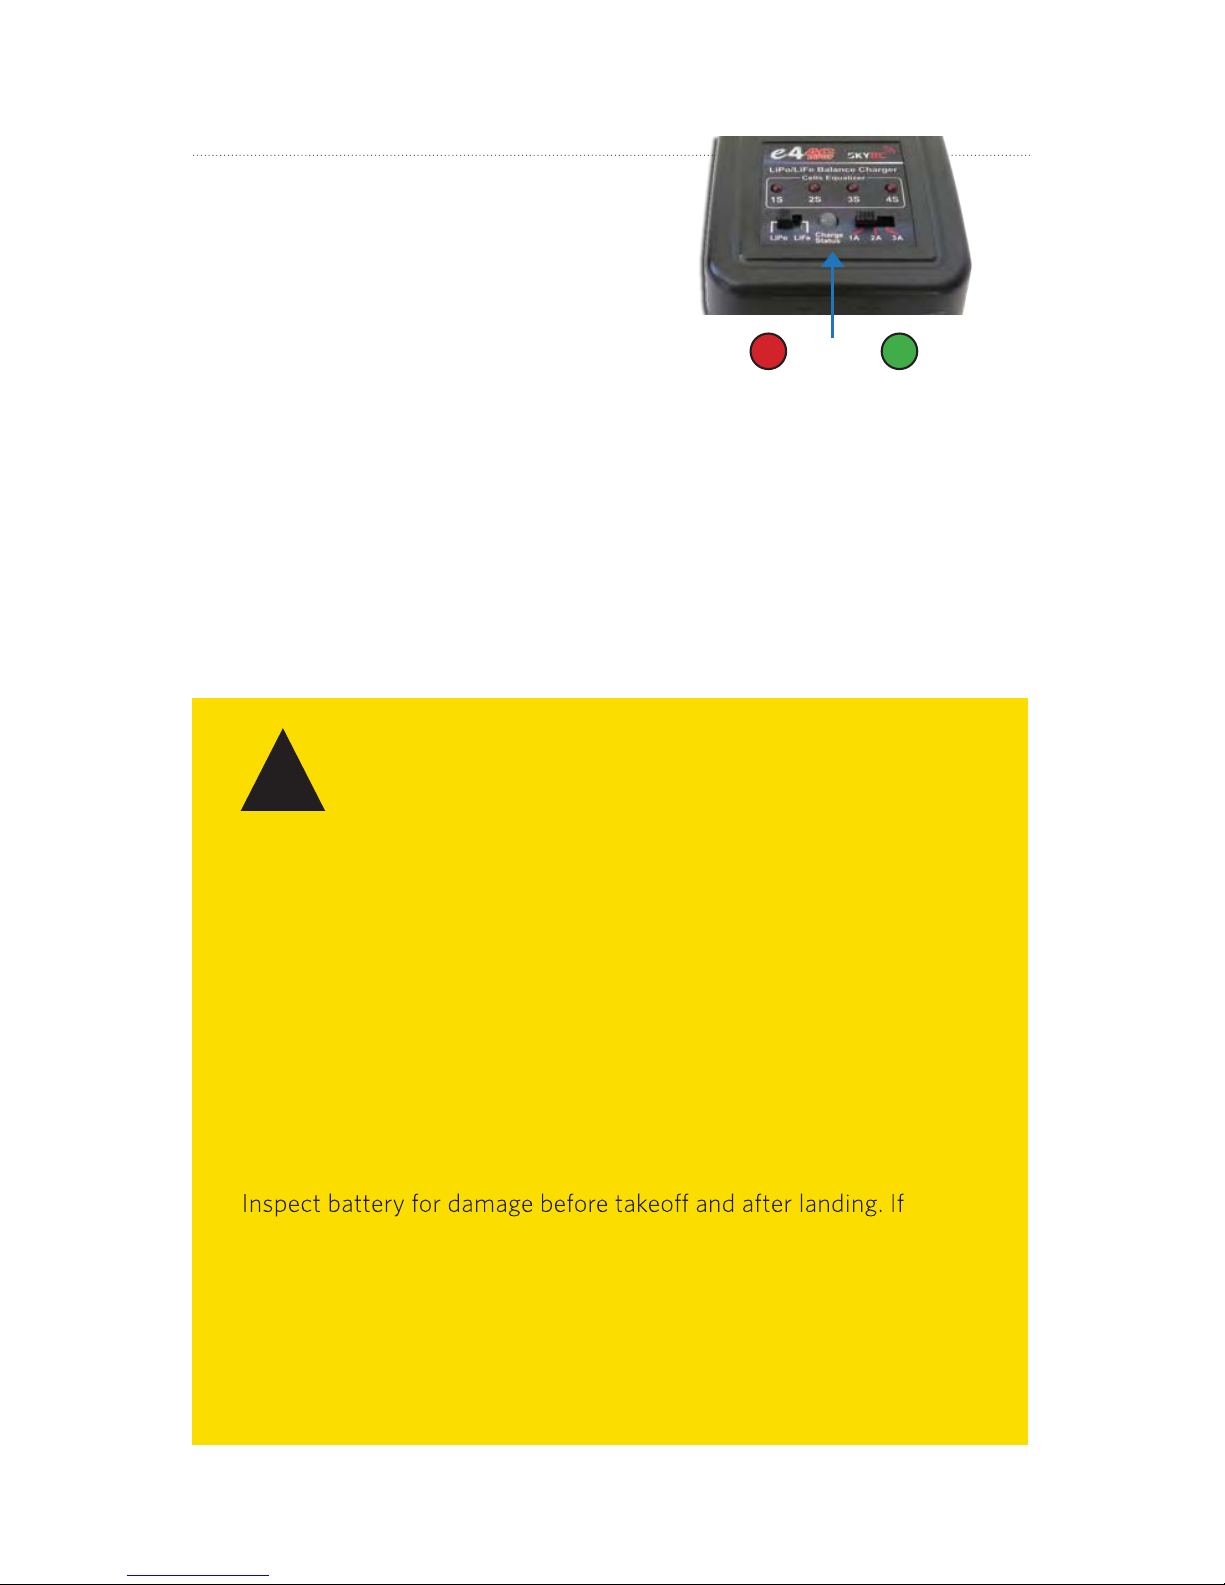
Charge until the status
indicator displays green.
Charging Complete
4
Protect battery from extreme heat, extreme cold, puncturing,
and ammable surfaces.
Charge battery using a designated LiPo balance charger only.
Always monitor battery while charging.
Flying with a low battery is a safety risk and can render the battery
unusable. Always discontinue use when you receive a low battery
notication, and always y with a fully charged battery.
you observe any swelling of the package or the battery ceases to
function, locate your local battery recycling center to dispose of
the battery. In the US and Canada, visit call2recycle.org to nd a
location. Do not dispose of the battery in the trash.
!
Battery Safety
Page 8
06
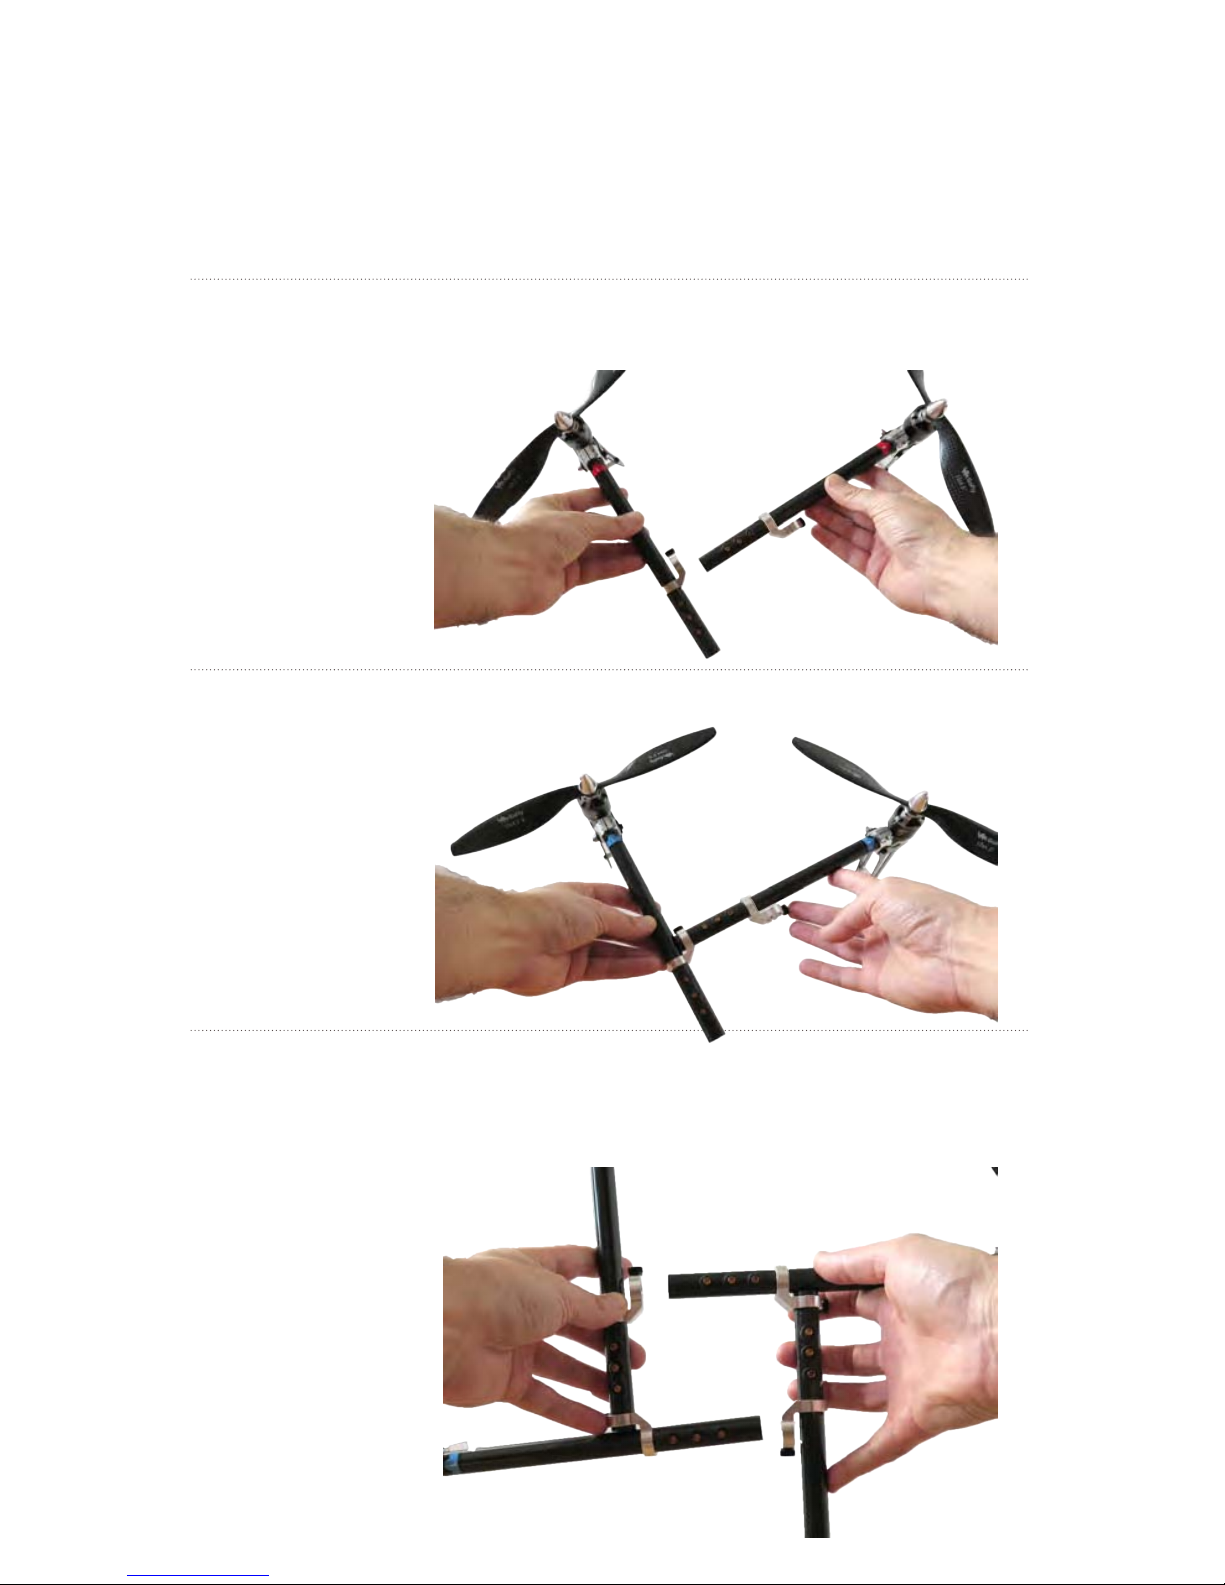
Easy Drone frame consists of four color coded arms with motors and
propellers. Follow the easy steps below to assemble the frame.
Frame Assembly
Repeat the process with the other two arms.
Take the two sub-assemblies and put them together to nish your frame.
Look at it from the side to make sure it’s straight and hand-tighten the
black thumbscrews.
Take the left arm in your left hand and the (same color) right arm in
your right hand and plug the end of the right arm into the ring on
the left arm.
1
2
3
Page 9
07
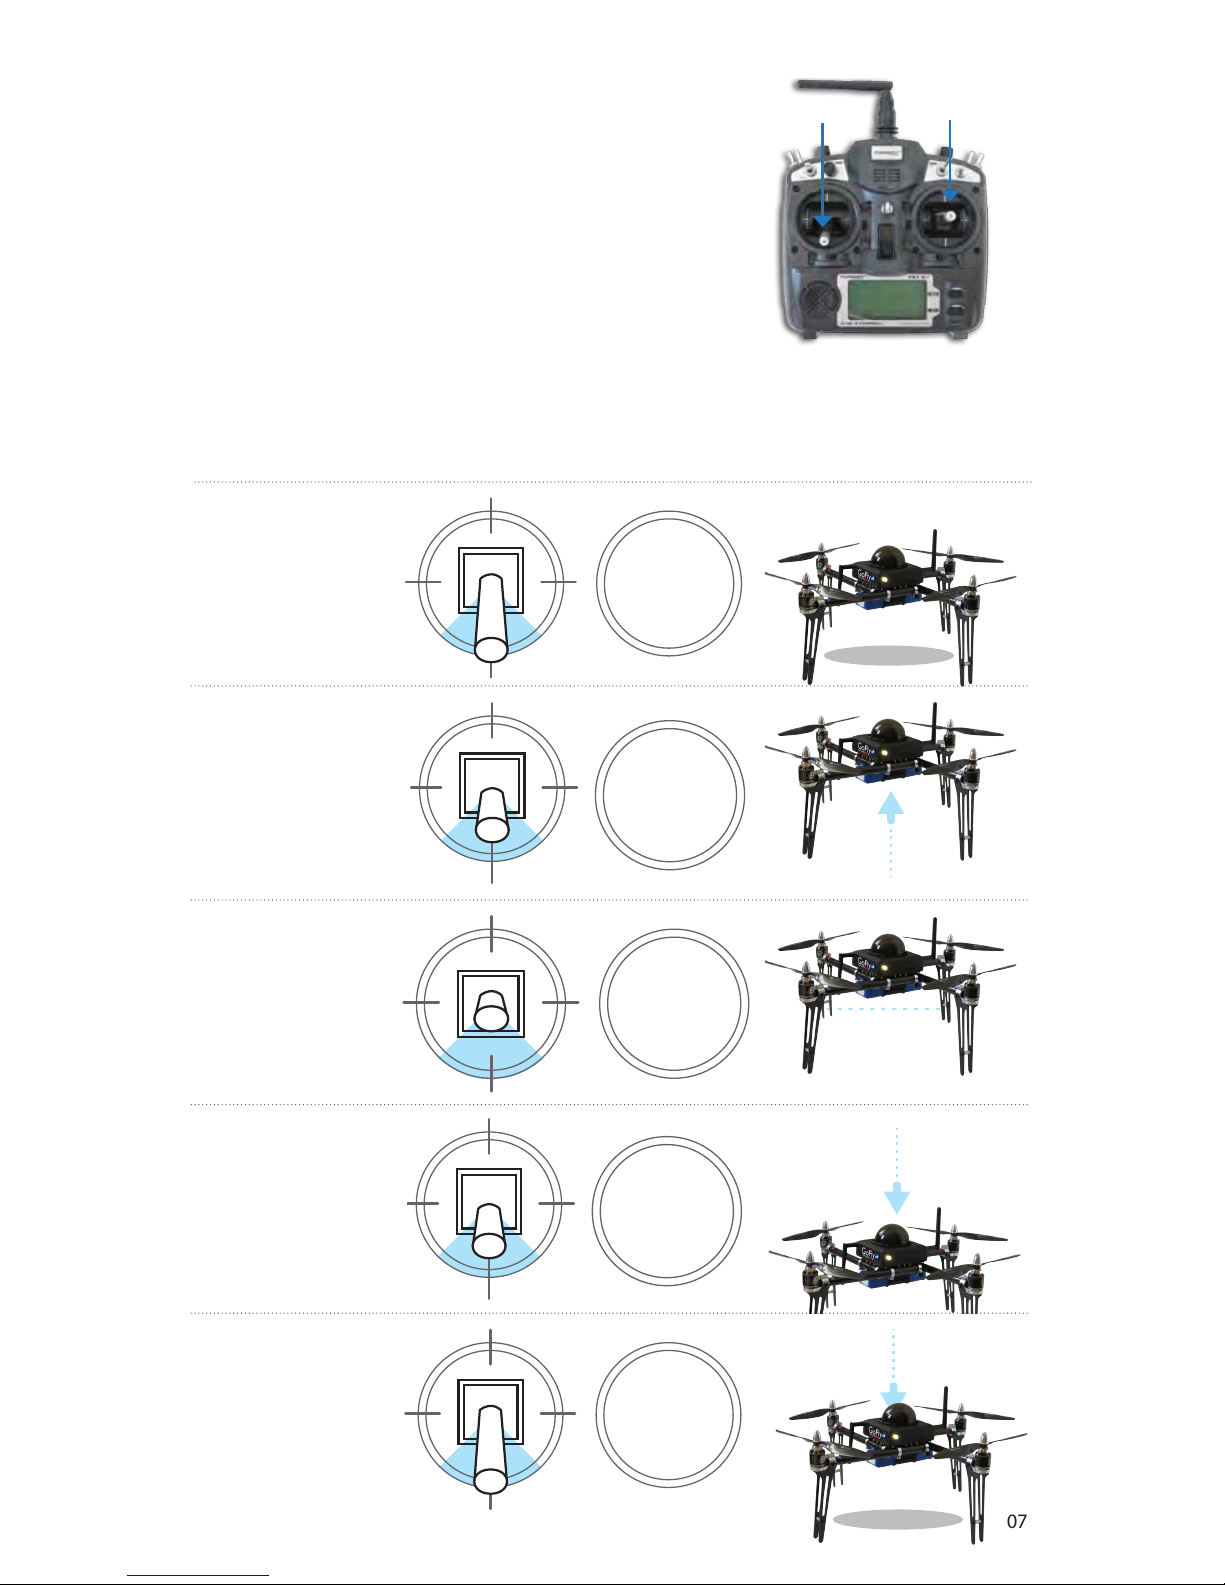
Control Easy Drone in ight using the transmitter’s
left and right sticks.
left stick
right stick
Lower stick
to decrease
altitude.
Before takeo, set
stick fully down.
To maintain altitude,
set stick to center
position.
Take o by raising stick
halfway to center.
To increase altitude, raise
stick slowly.
left stick
Move the left stick forward and backward to control altitude and acceleration.
Throttle
Learn to Fly
Land by setting stick
fully down once Easy
Drone is a few inches
above the ground.
Page 10
08
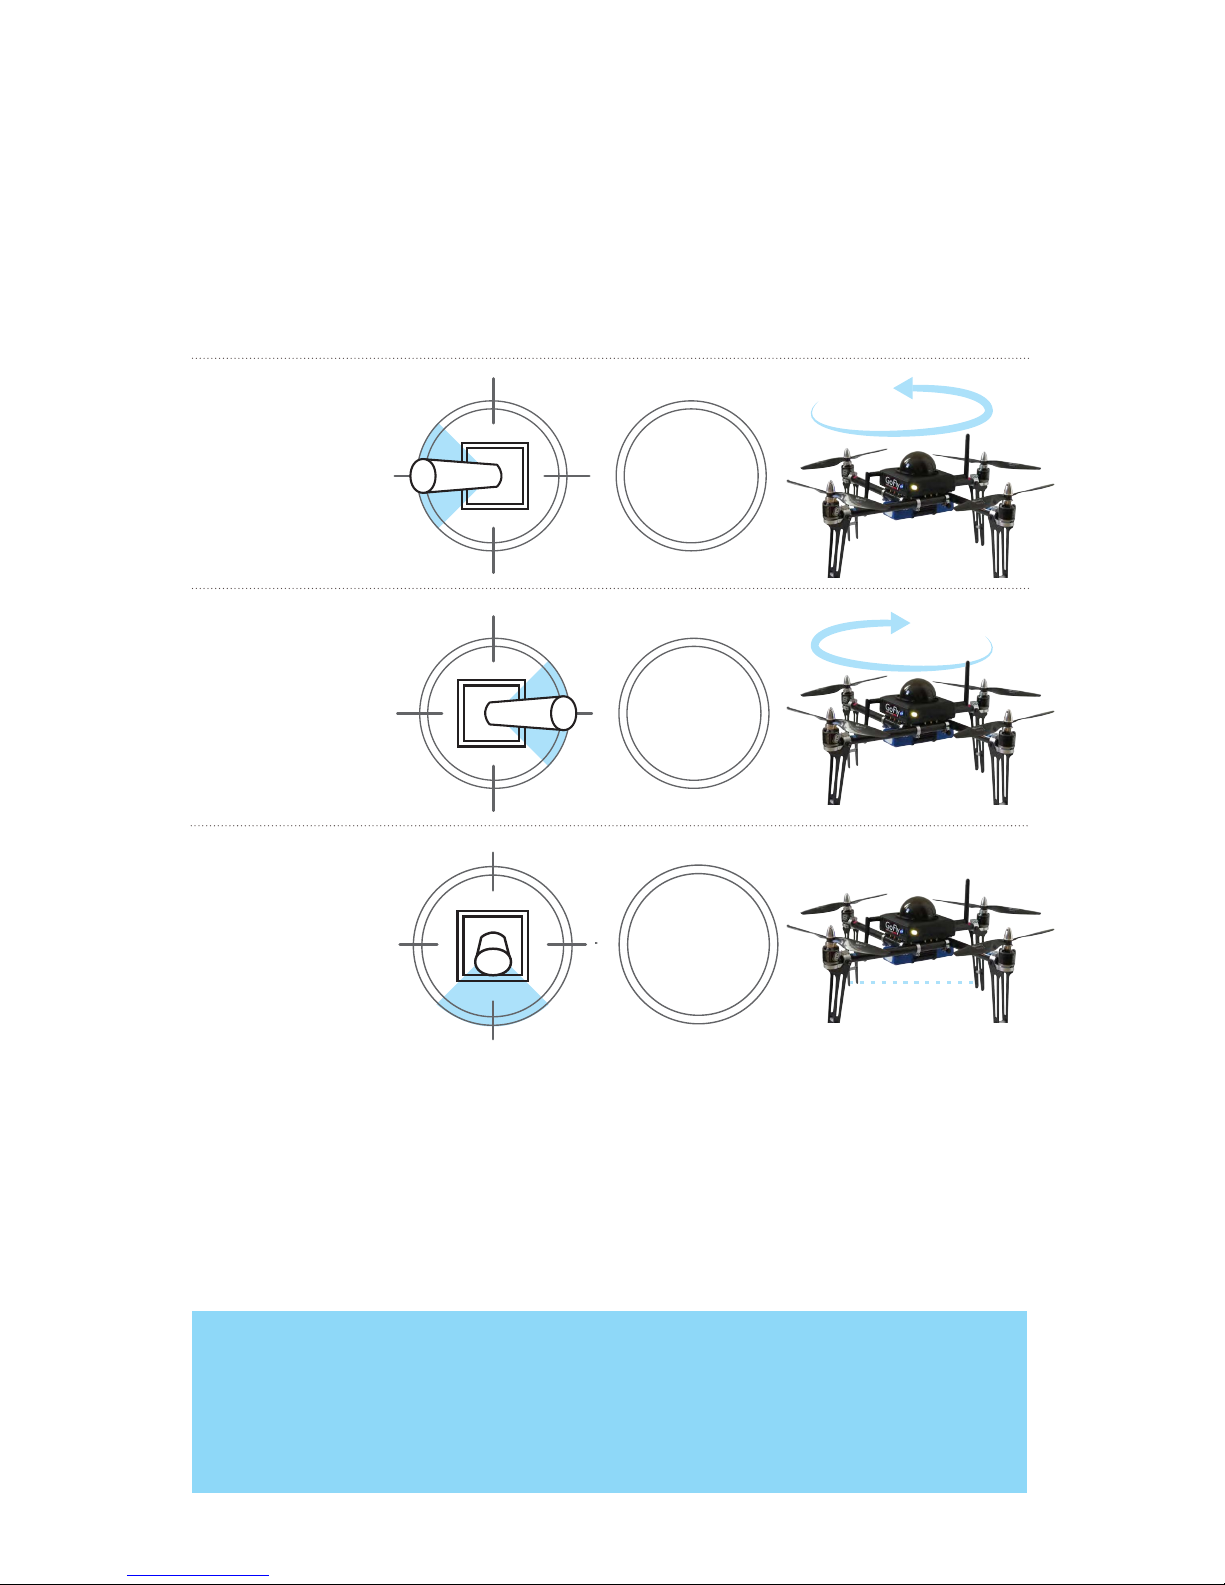
Flight Tip
When adjusting orientation, move the left stick horizontally without changing its
vertical position.
Move stick to the
left to rotate
counterclockwise.
Move stick to
the right to
rotate clockwise.
left stick
Release stick to
stop rotating and
maintain current
orientation.
Move the left stick horizontally to rotate Easy Drone and change orientation.
For a slow rotation, move the stick slightly away from the center
in either direction. Moving the stick farther from the center creates
a faster rotation.
Yaw
Page 11
09
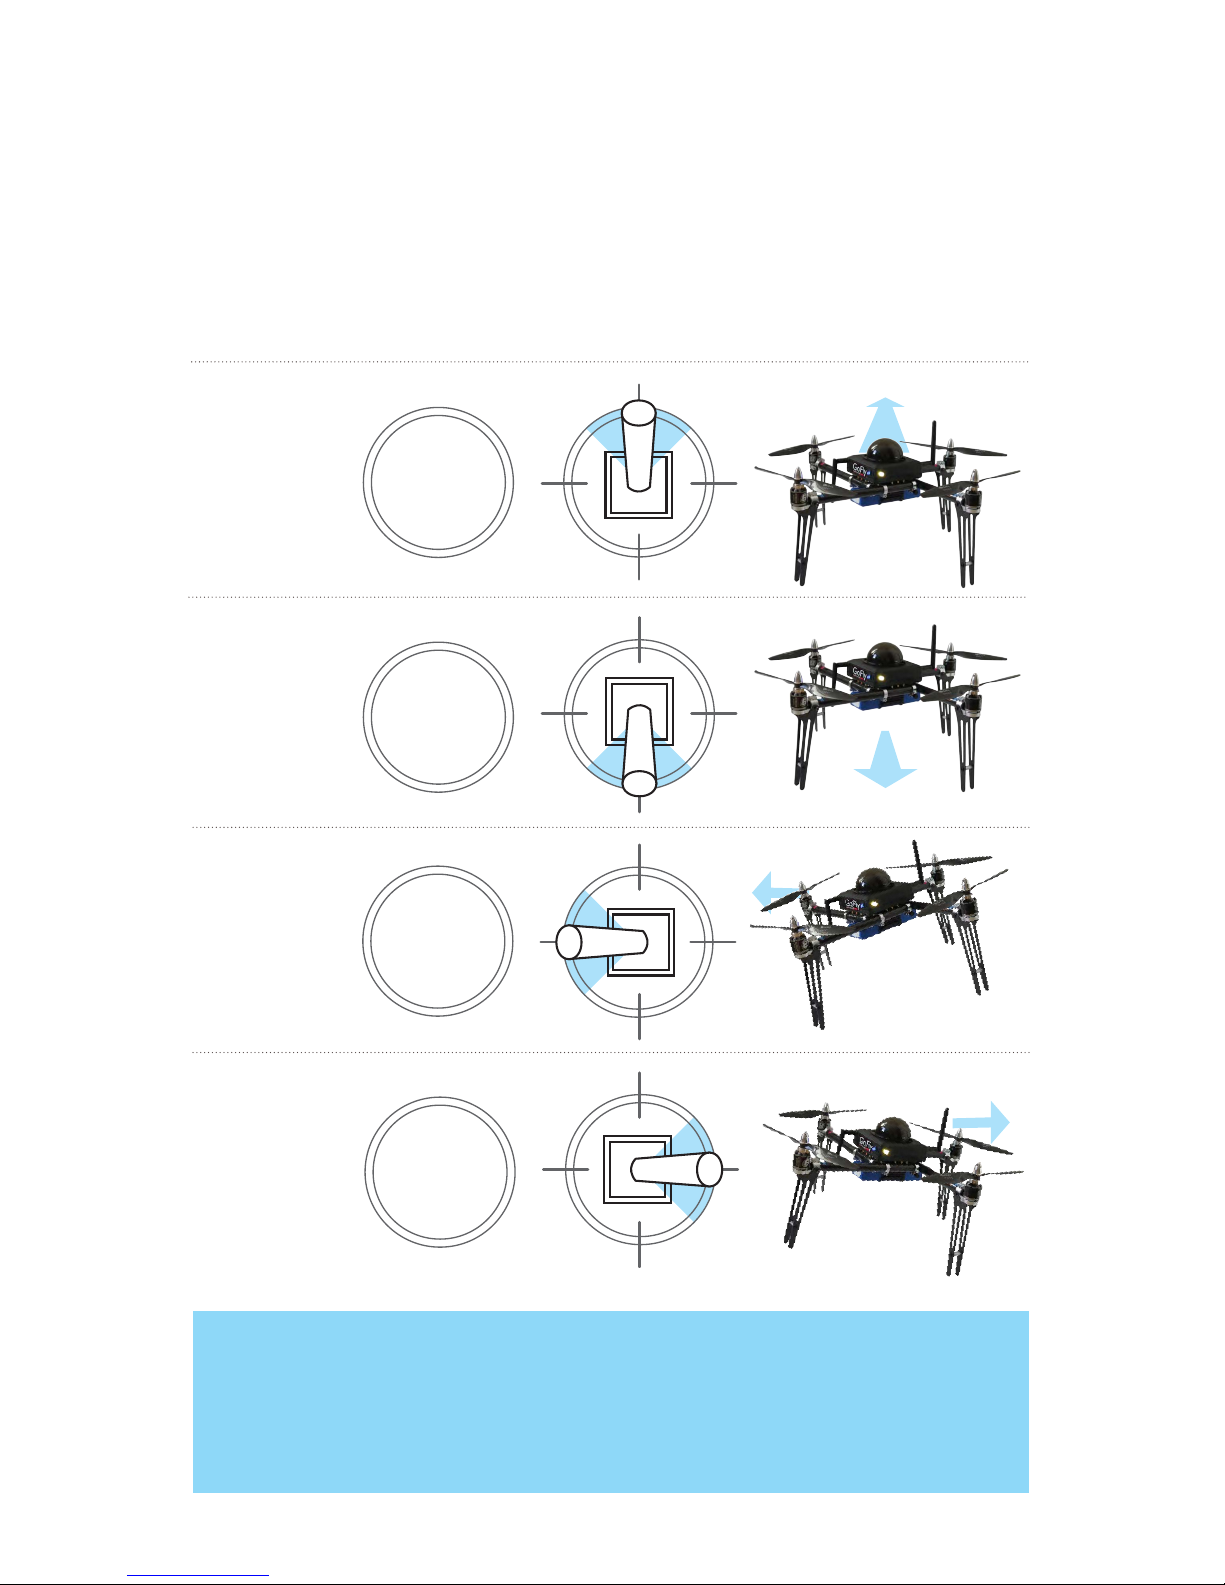
Move stick
forward to y
forward.
right stick
Move stick back
to y backward.
The right stick allows you to control Easy Drones’ position in the air.
Move the right stick to tell it to move in that direction: forward, back , left
or right. Further the stick is from the center faster the Easy Drone will move.
Pitch and Roll
Move stick left
to y left.
Move stick right
to y right.
Flight Tip
Always start ying with Easy Drone facing away from you and do not change
your remote orientation while ying. It’s default setting is “Simple” mode which
means it will always go forward and back based on its original orientation.
In this mode you can spin the craft around while maintaining innitial direction.
Page 12
10
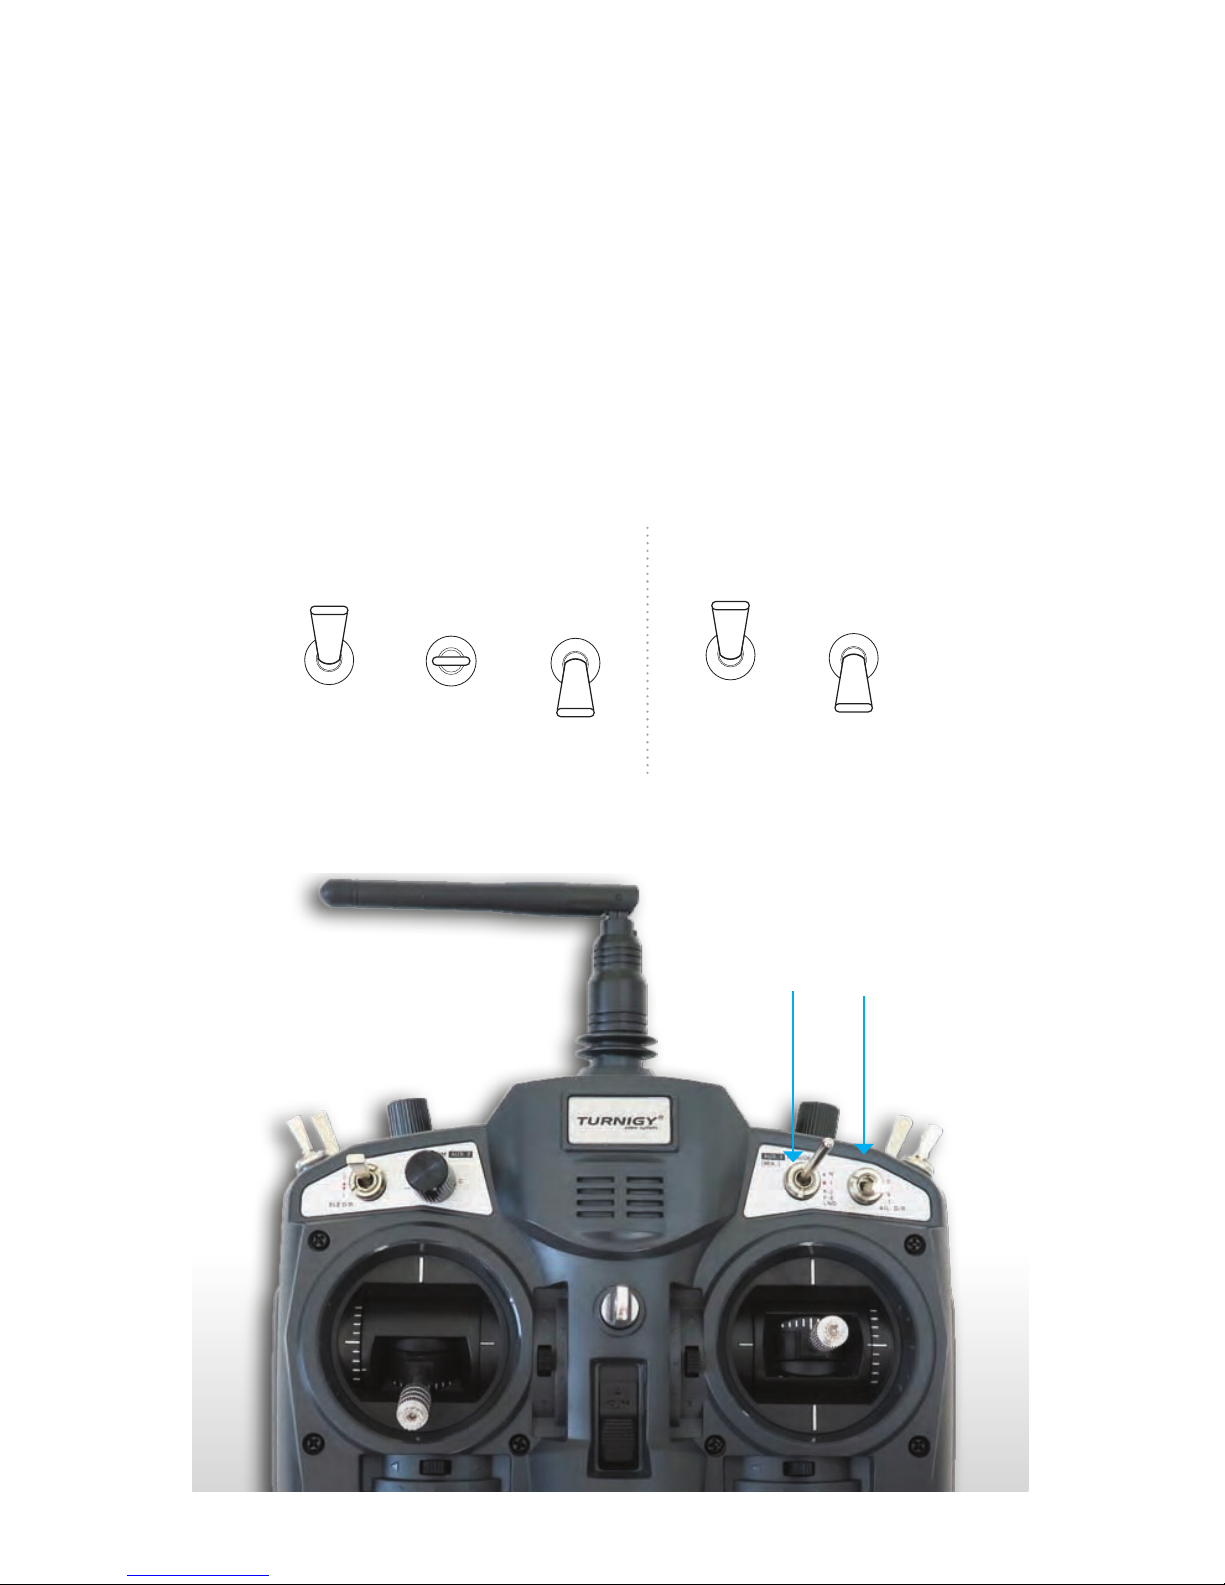
left
left mode switch
up downcenter
right mode switch
Mode switches
up down
right
Use the two switches above the right stick to select a ight mode.
There are six dierent combinations each triggering a dierent mode
(Up/Up, Down/Up, etc.) and they are customizable through Mission
Planner. Default modes are illustrated on the next pages it is recommended
that you learn about each before trying to use them in the eld.
Both switches must be set to the correct position to select a mode.
In this manual, the position of the left switch is specied rst, followed by
the position of the right switch. For the example center/down, set the left
switch to center and the right switch to down.
Flight Modes
Page 13
11
Easy Drone has powerful motors and carbon ber propellers.
Never place your hands near propellers while the craft is armed.
Always y in an open area away from people and buildings; do not attempt to
y indoors or in a conned space. Do not y over people, near airports, or in any
situation that could pose a hazard to those around you. Always y within your
line of sight and in compliance with local regulations. Easy Drone will not avoid
obstacles on its own. As the operator, it is your job to recognize and avoid
obstructions while ying. Always follow the preight and postight steps in the
order described in this manual, and remain attentive at all times while ying.
Environmental factors, such as wind and GPS irregularities, can cause instability
in ight. Easy Drone will attempt to compensate for these factors by automatically
landing if it detects an unsafe ying condition due to loss of RC signal, loss of
GPS signal, or low battery. To avoid potential hazards due to environmental
factors, identify the boundaries of your ying area before takeo, and recover
Easy Drone manually by switching into stabilize mode if it moves outside your
designated ying area.
Always use an RC transmitter as a primary or backup control system when
ying. Ensure that the transmitter is turned on any time Easy Drone is powered.
If contact with the transmitter is lost during ight, it will land and display
a blinking yellow light. If Easy Drone is more than 2 meters (6 5 feet) from the
launch point, it will return to launch (RTL) before landing. (See page 19 for more
information about RTL.)
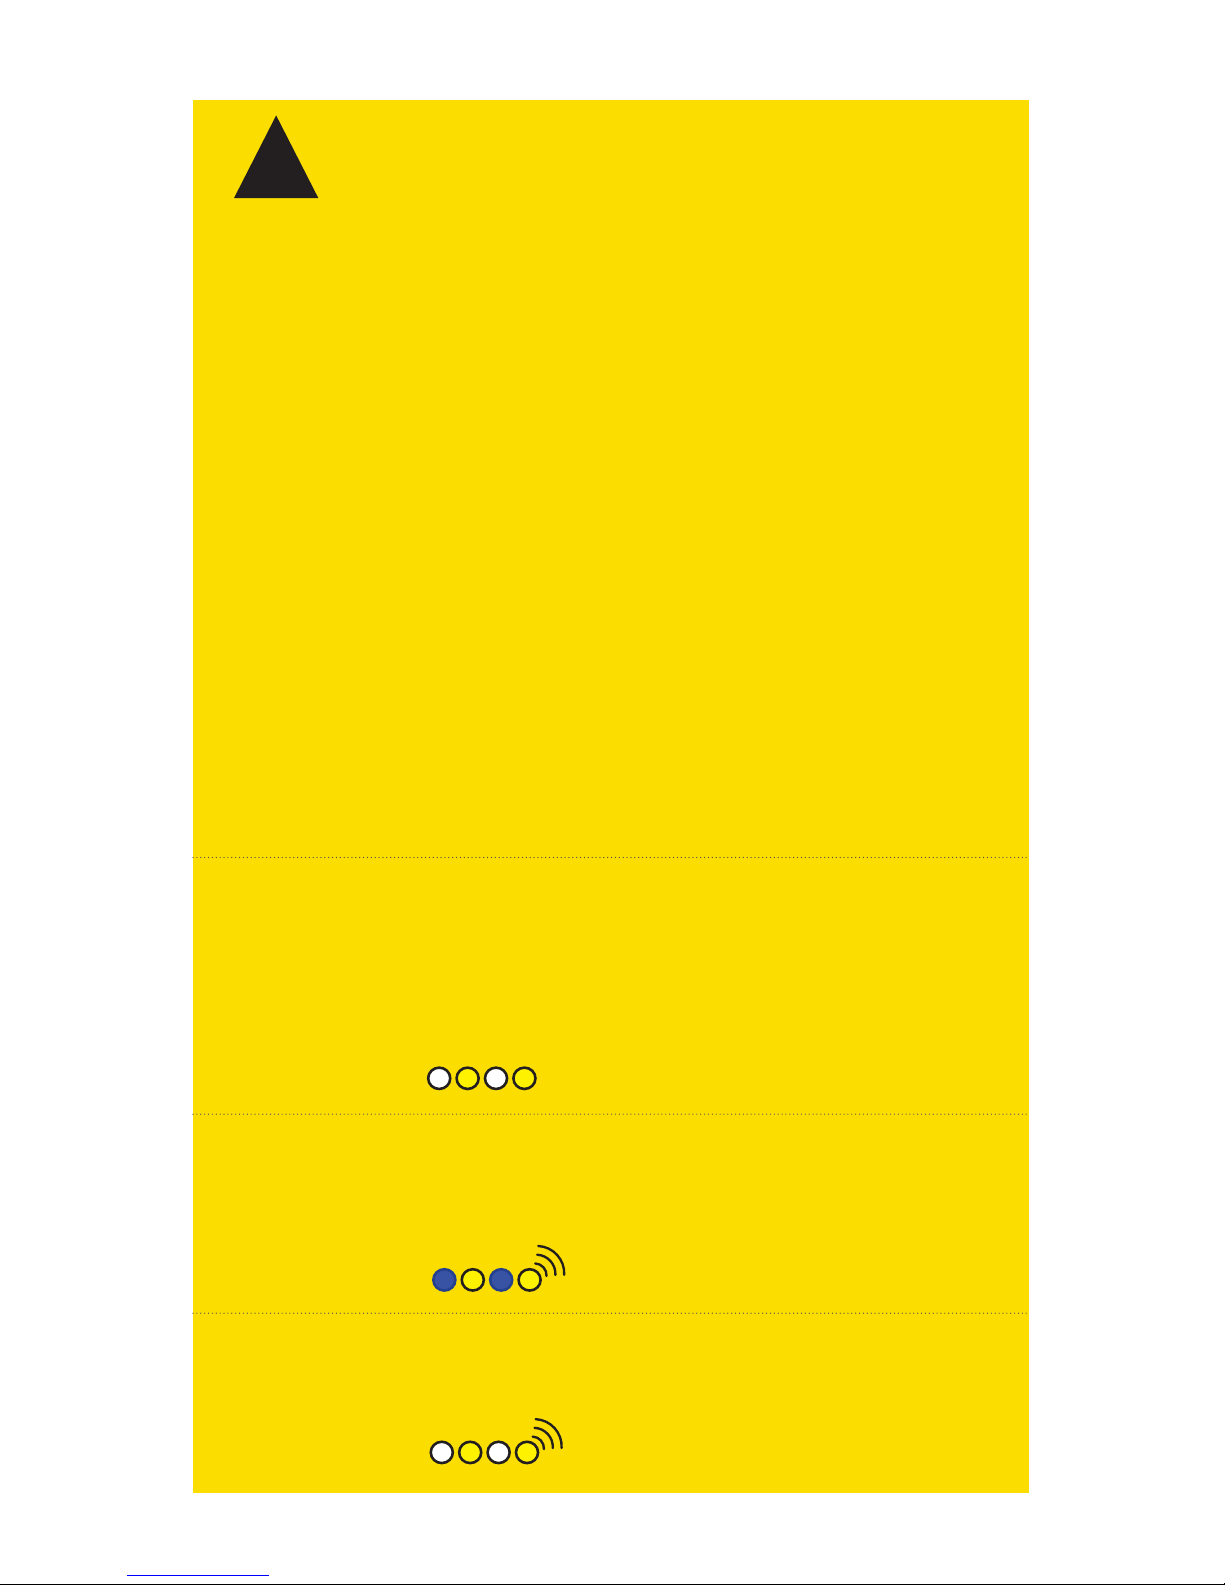
Loss of RC signal
Autopilot-positioned ight modes (loiter, autonomous, and return to launch)
require an active GPS signal. If GPS signal is lost during ight, Easy Drone will
land and display a blinking blue and yellow light with a high-high-high-low tone.
Always choose an unobstructed ying area to improve signal strength.
Loss of GPS signal
When the battery reaches 25% of its remaining charge, it will land and display
a blinking yellow light with a quick repeating t
one. If Easy Drone reaches the low
battery limit during a mission, it will return to the launch point before landing.
Low battery
!
Flight Safety
Page 14
12
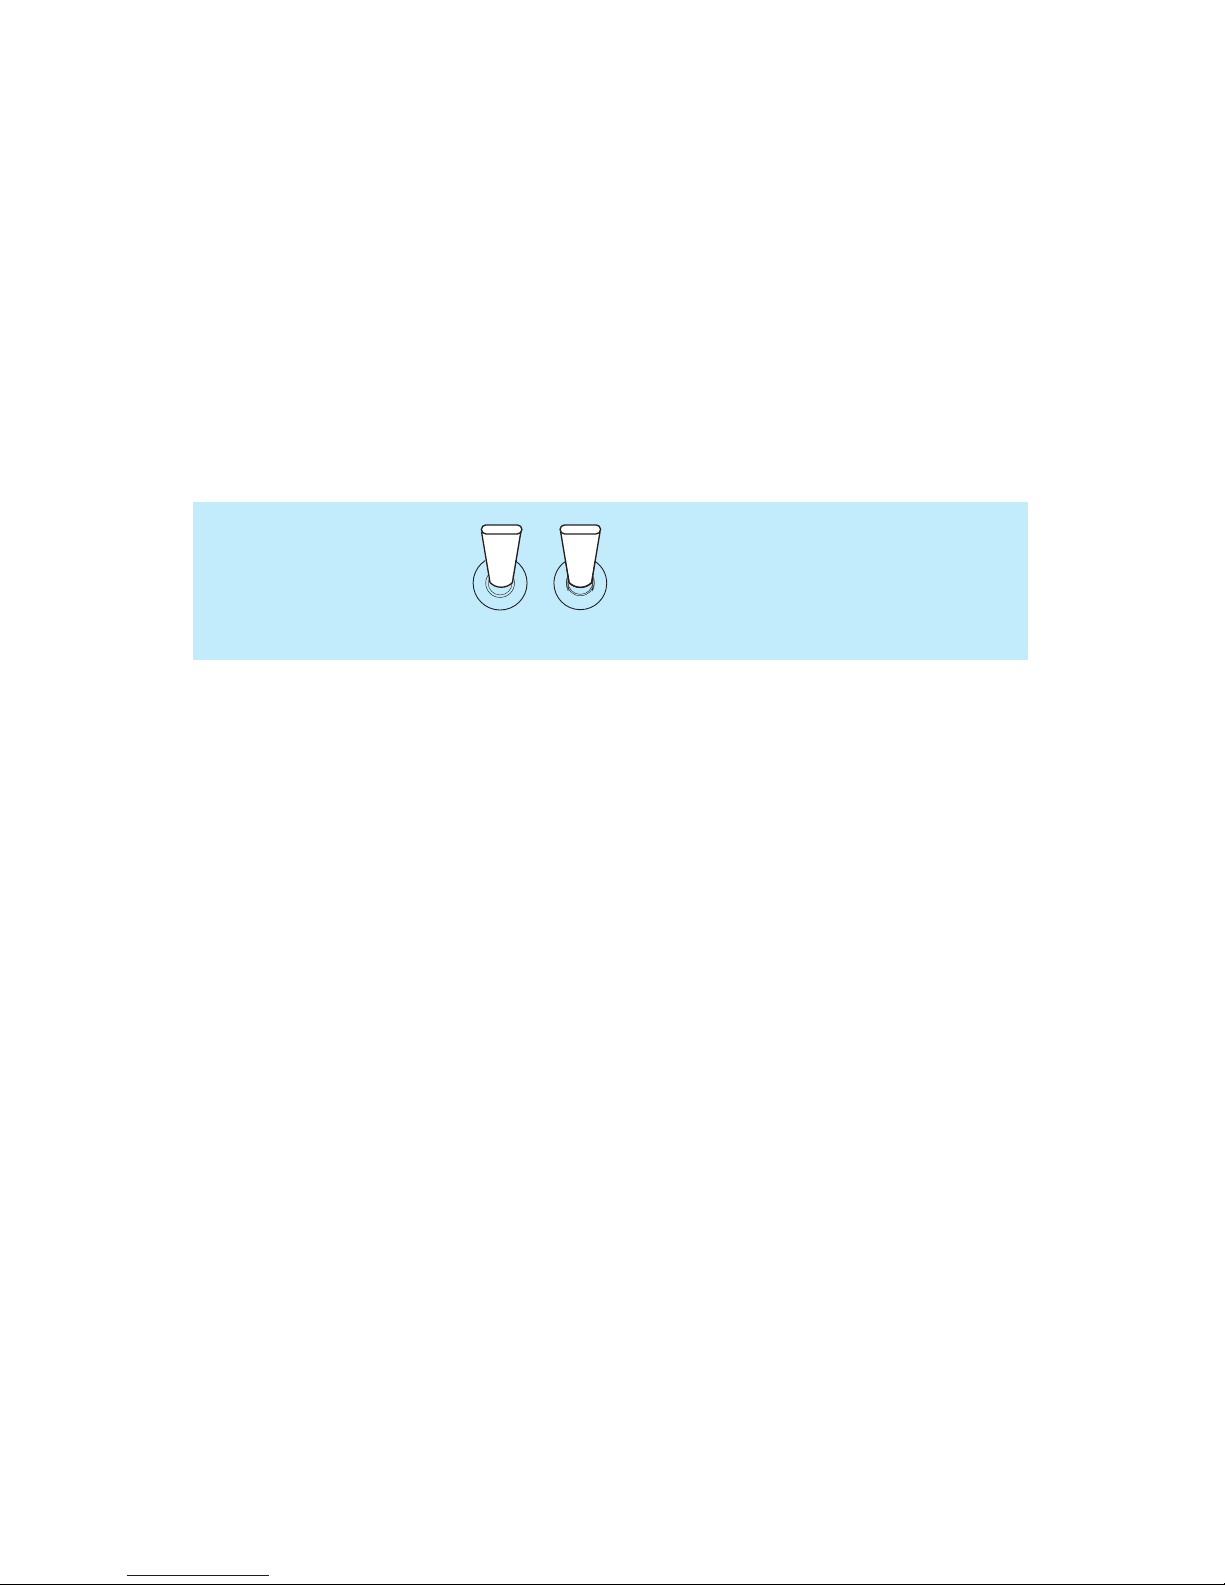
Once you feel comfortable ying in altitude hold, try out other ight
modes for GPS-positioned and autonomous ight.
Altitude Hold Mode (ALTH)
Allow Easy Drones’ autopilot to help you y by engaging altitude hold mode
This autopilot-assisted ight mode maintains altitude automatically.
ALTH is your default start mode and it makes it really easy to take o and land.
Set both sticks up, and craft will hover at the current altitude. Adjust altitude
and orientation with the left stick, and navigate with the right stick.
Altitude hold (ALTH)
up/up
» Autopilot-assisted altitude control
» Great for new iers
Page 15
13
First Flight
Select an open area for ying, away from people and buildings, and remember
to bring the Flight Checklist and a fully charged battery. Determine the
boundaries of your ying area before takeo, and select a level, unobstructed
space as a launch point. Follow these preight and postight steps in the order
shown here and on the Flight Checklist every time you y.
1
L
Preight
Check
Easy Drone
Check that
transmitter antenna
is oriented horizontally for
the strongest signal.
Check that the frame and the propellers
are tight. Tighten if necessary.
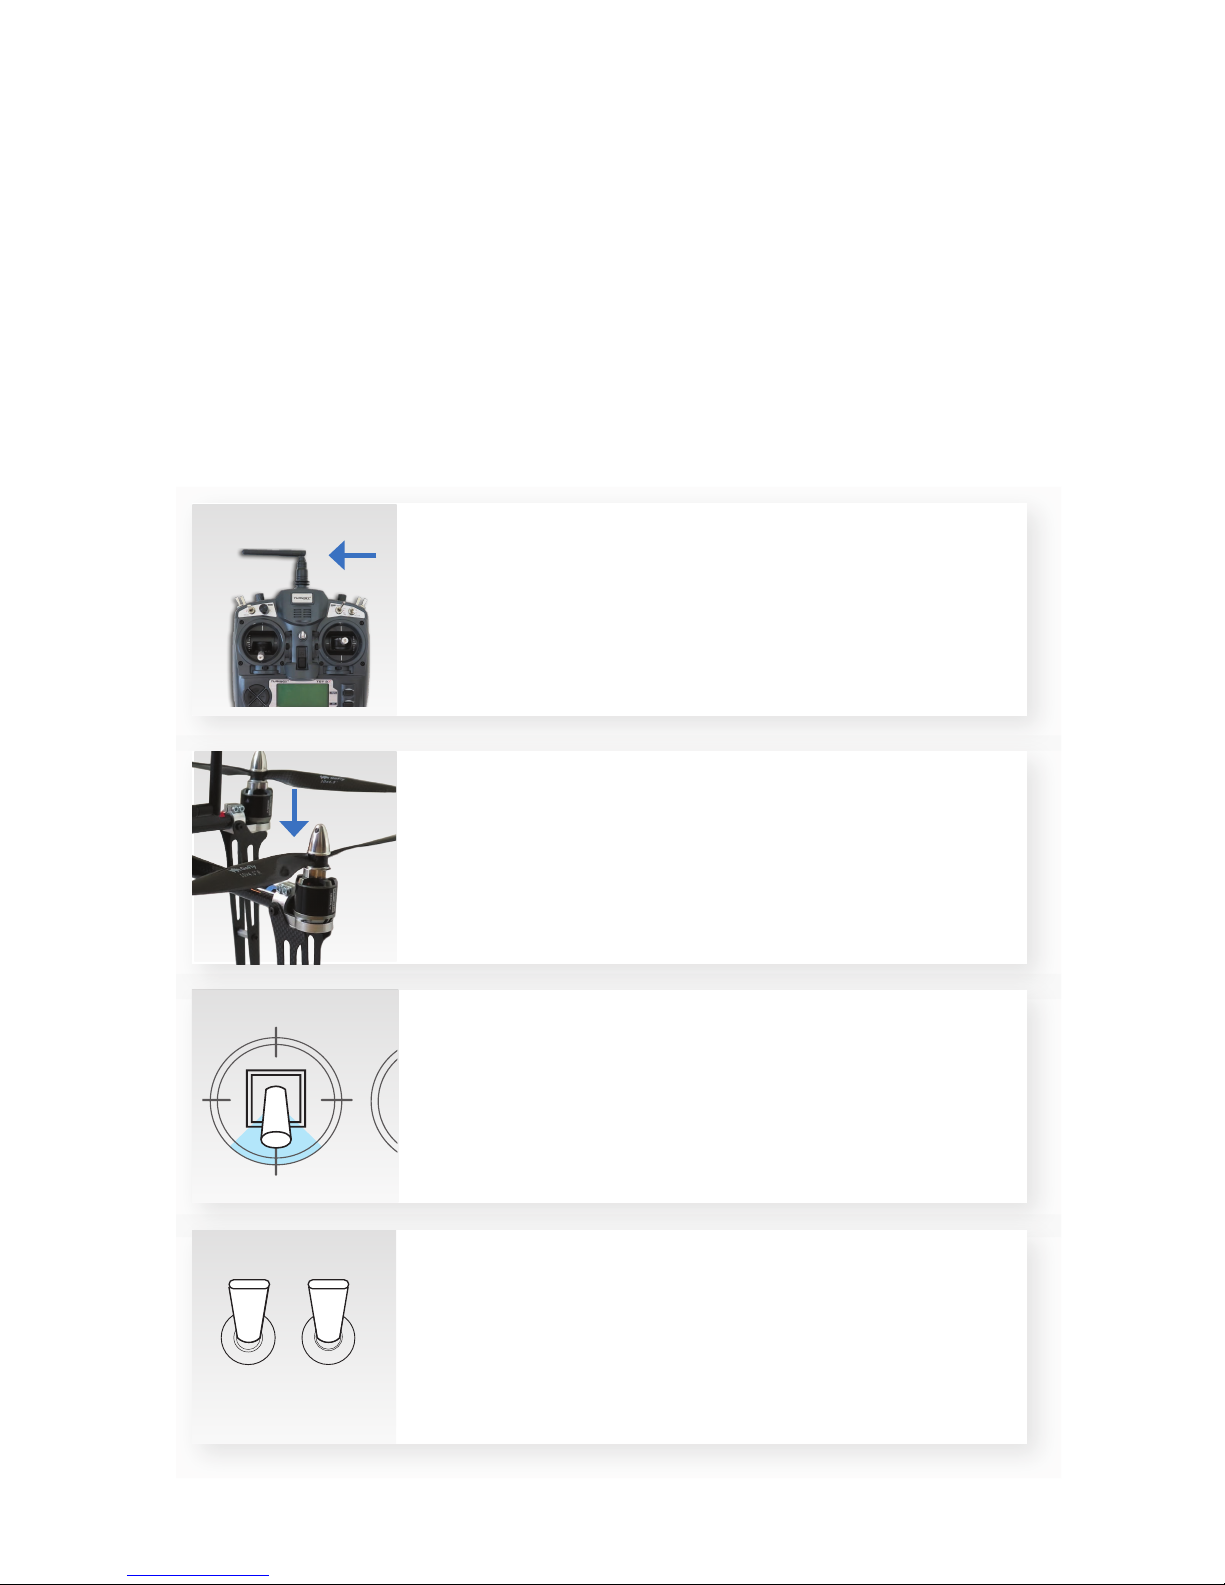
Set the switches to select
a ight mode. For your rst
ight, select altitude hold
mode (shown here).
Check that the left stick
on the transmitter is
set fully down.
Altitude hold
(ALTH)
up/up
Page 16
14
2
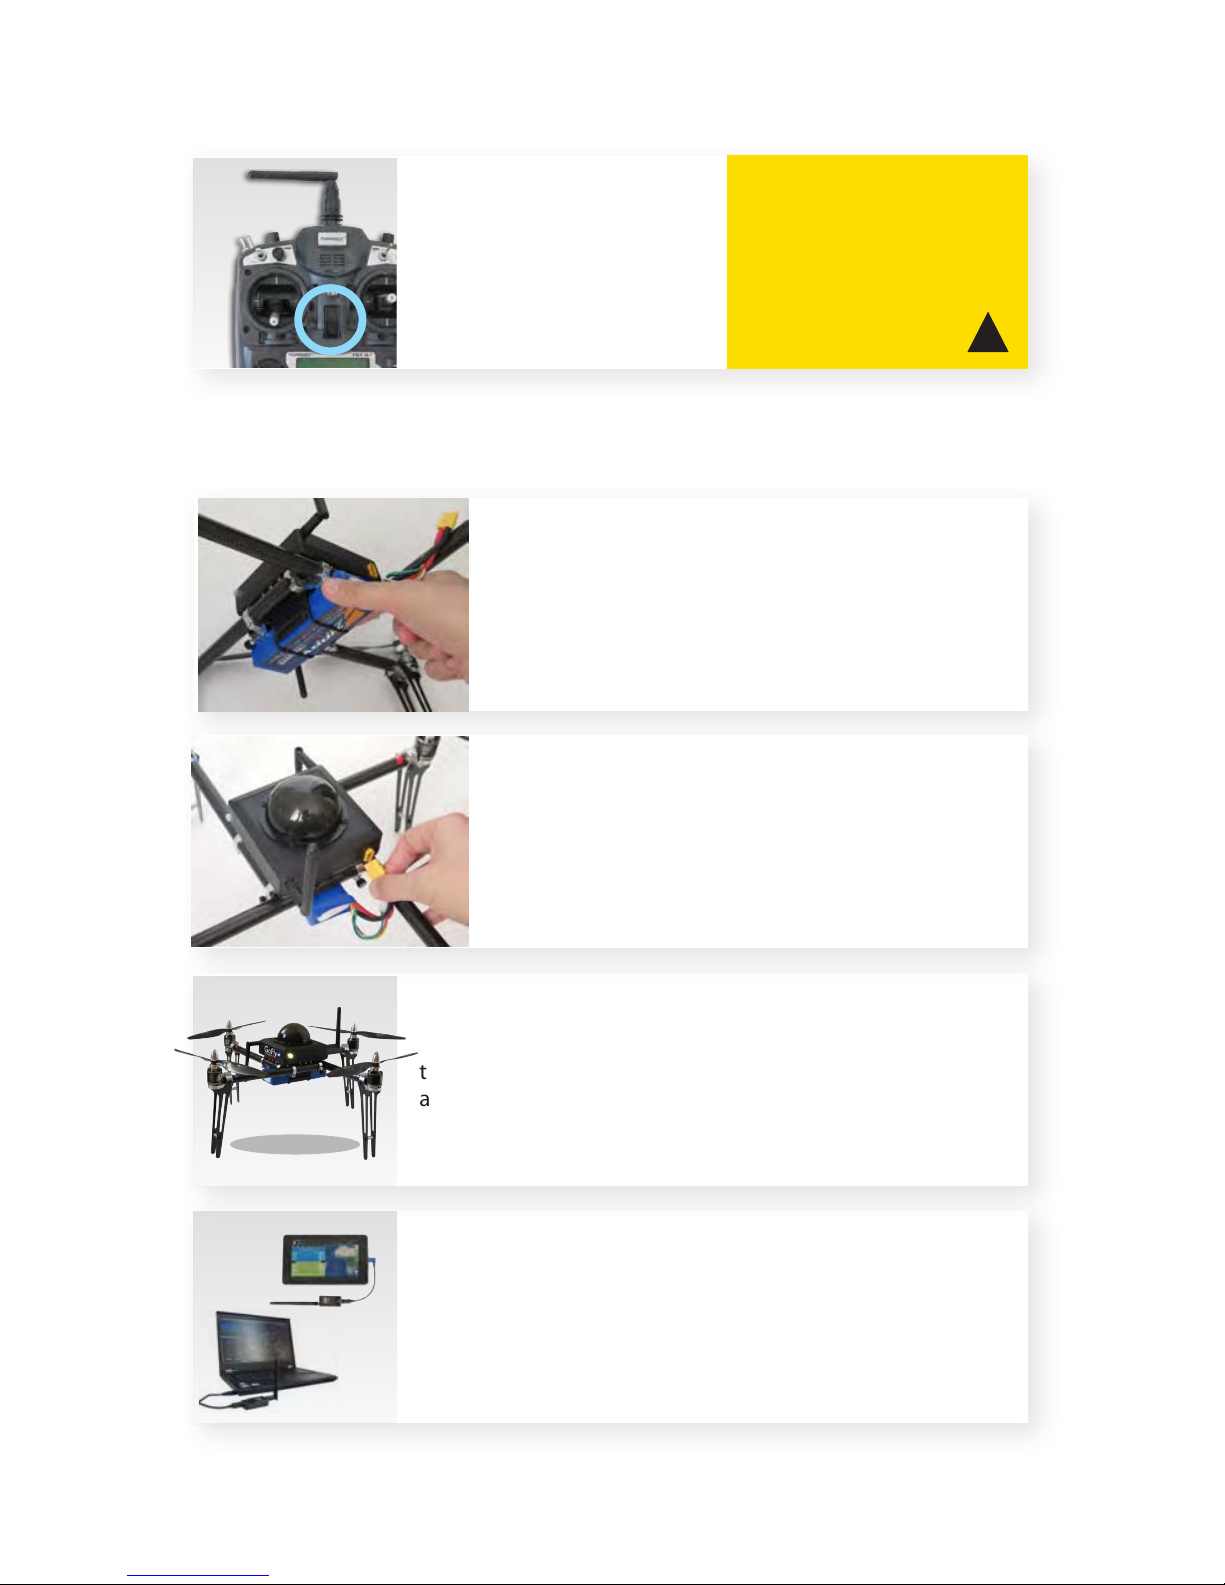
Power on
transmitter.
If the left stick is not fully
down, the transmitter will
display an alert message.
3
Connect battery.
Insert battery underneath the frame.
Make sure the cable on the battery is closer to
the yellow connector on the FlyBot.
Connect battery and hold the
Safety Switch.
You will hear two musical tones - one
for the autopilot check and another for
the motor controllers.
Place Easy Drone at the launch point
with the side with the lights facing
towards you and remember that the motors form
a square that should inform the orientation.
If you are using a ground station to navigate, select Connect.
For Mission Planner or APM Planner, select COM or USB and
set the rate to 57600 before connecting. To learn about
using a ground station in ight, visit www.easyaerial.com.
!
Ensure the transmitter is always
turned on while Easy Drone
is powered. If communication
with the transmitter is lost,
it will initiate an automatic
recovery landing.
Page 17
15
Do not handle Easy Drone while
the safety button is solid color
and it is live. It should only be
connected when you are ready
to y.
!
!
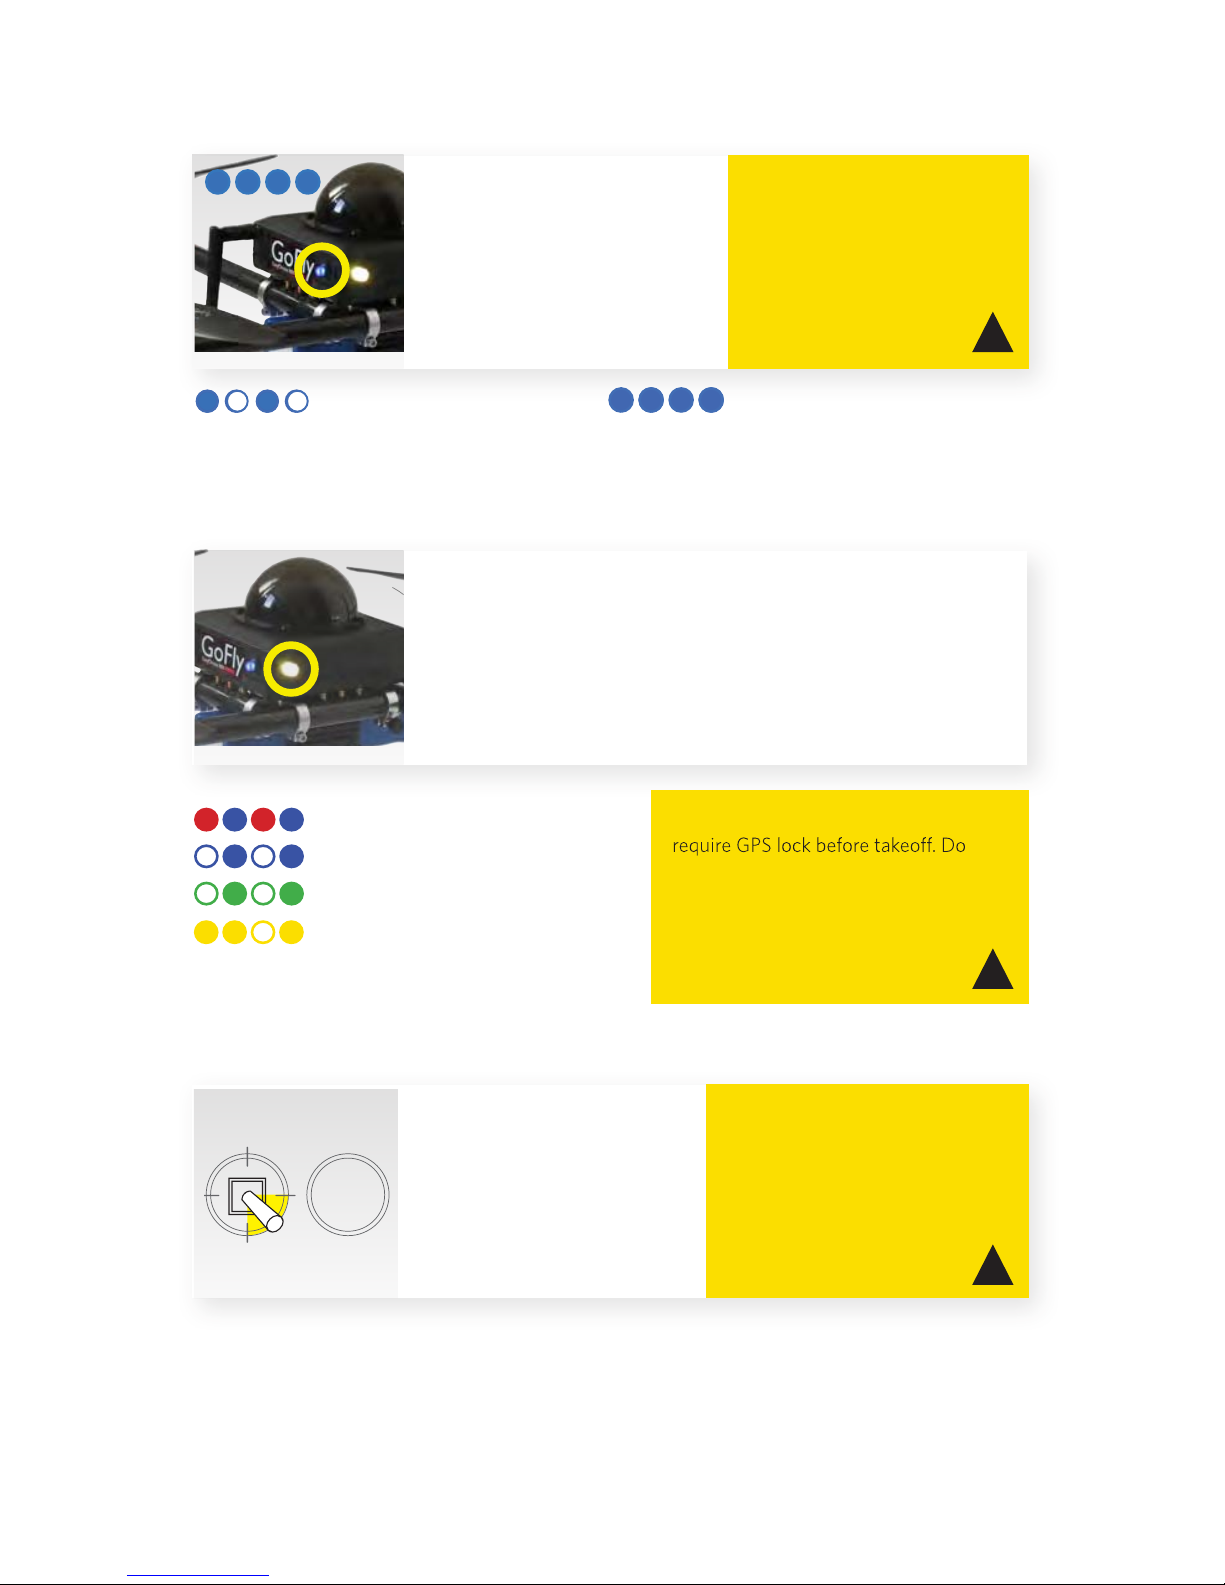
Autopilot ready, GPS locked
Autopilot ready, no GPS
Initializing, please wait.
Easy Drone is ready to be armed
Safety button should
be solid color (red or blue)
Stand back!
Check LED.
Check the LED to view the status of Easy Drone.
Wait to proceed until you see the blinking blue light
indicating that you’re ready to y. If you plan to
use loiter, RTL, or autonomous modes during your
ight, please wait to see the blinking green light
indicating that the craft has acquired GPS lock.
Error, disconnect battery and restart
ight procedure.
6
5
4
To activate the motors,
hold the left stick down-right
until the motors spin.
Now you’re ready for takeo!
L
Arm motors.
Easy Drone will NOT start spinning
propellers when armed.
Only when throttle is raised.
Ensure that the launch point
is clear of obstructions before
arming. Always disarm the
motors before approaching.
Inactive, motors beeping
Active, ready to arm
!
RTL, loiter, and autonomous modes
not initiate these modes during ight
unless you observed a blinking green
light prior to takeo. It may take
a few minutes to acquire GPS lock
depending on your ying location.
Page 18
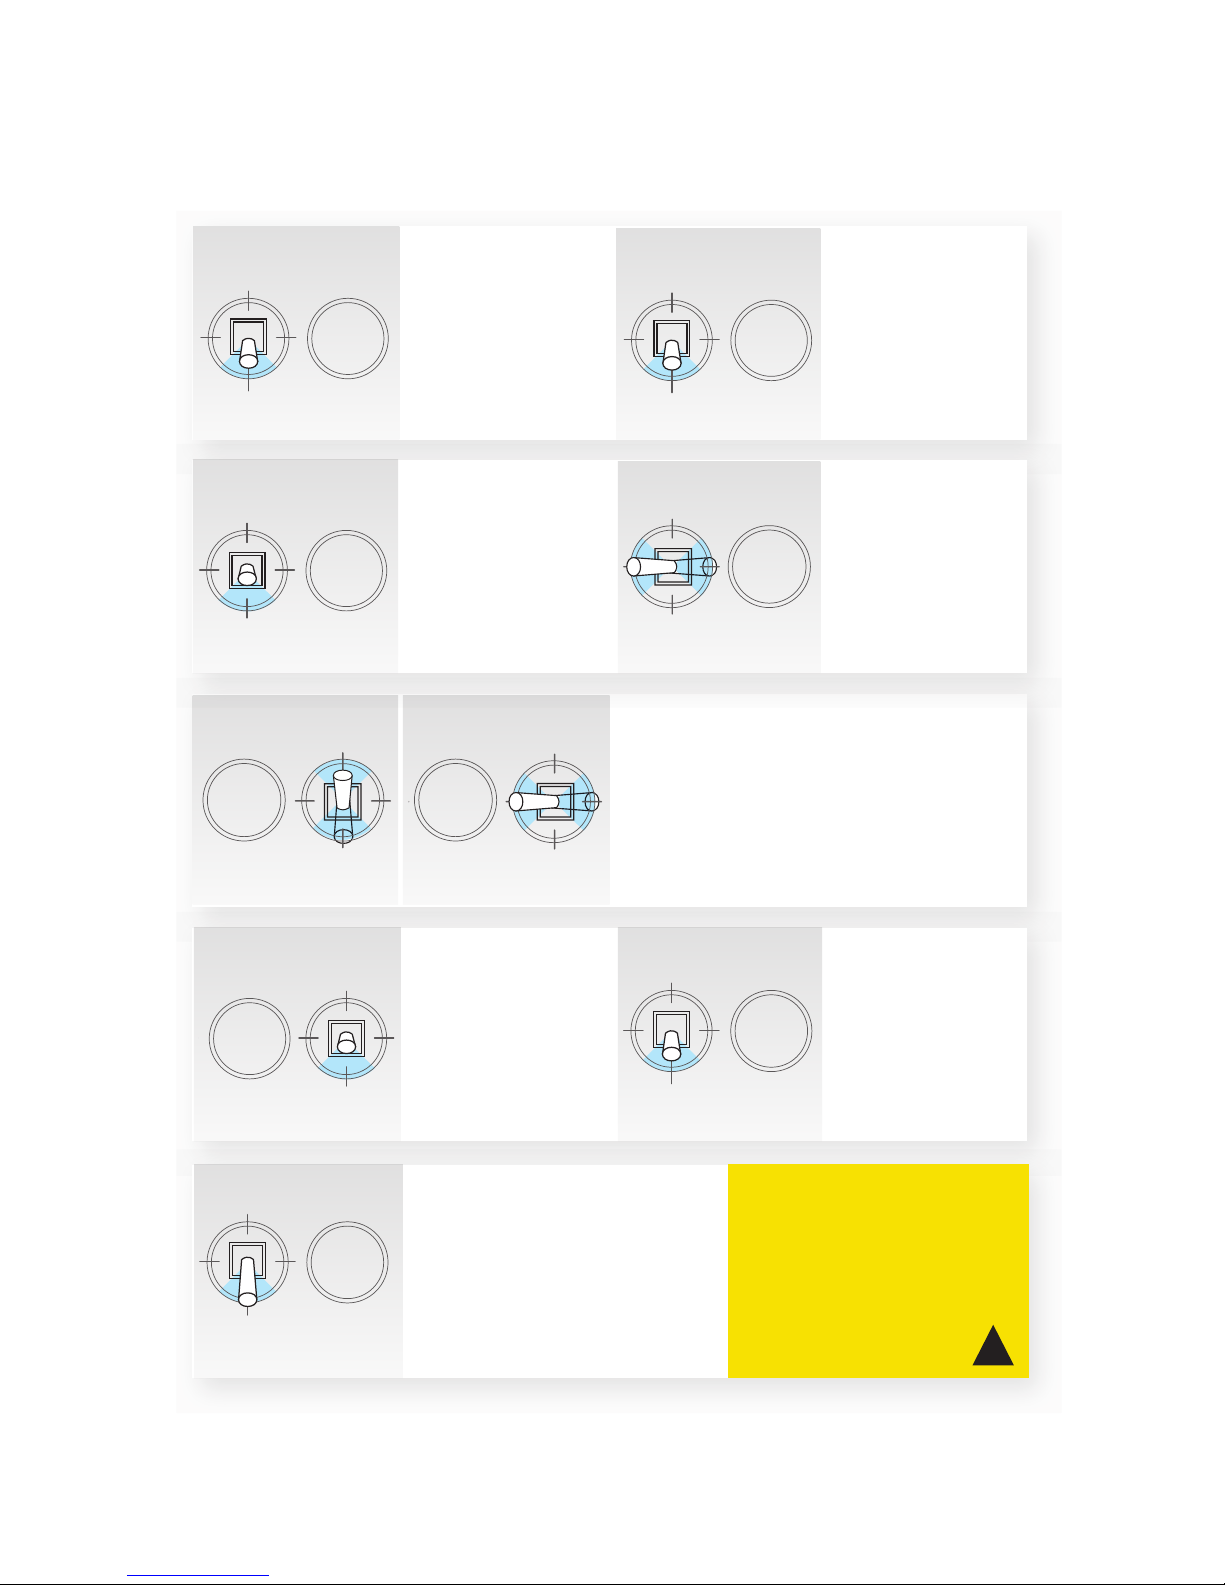
16
Flight
L
Take o by
raising the left
stick halfway to
center.
L
Nudge it over the
center line to
take o.
R
L
R
Fly forward, backward, left, or right
by moving the right stick in the
direction you want to y.
Release the right
stick to level.
R
Slowly lower
the left stick to
descend.
L
Hover by setting
the left stick to
center.
Rotate counterclockwise and
clockwise by
moving the left
stick left and right.
!
Easy Drone is a powerful
ier. Move the sticks in small
increments until you feel
comfortable with how it
responds in each ight mode.
L
Set the left stick fully
down to land once drone
is a few inches above
the ground.
L
Page 19
17
Postight
L
1
Disarm
motors.
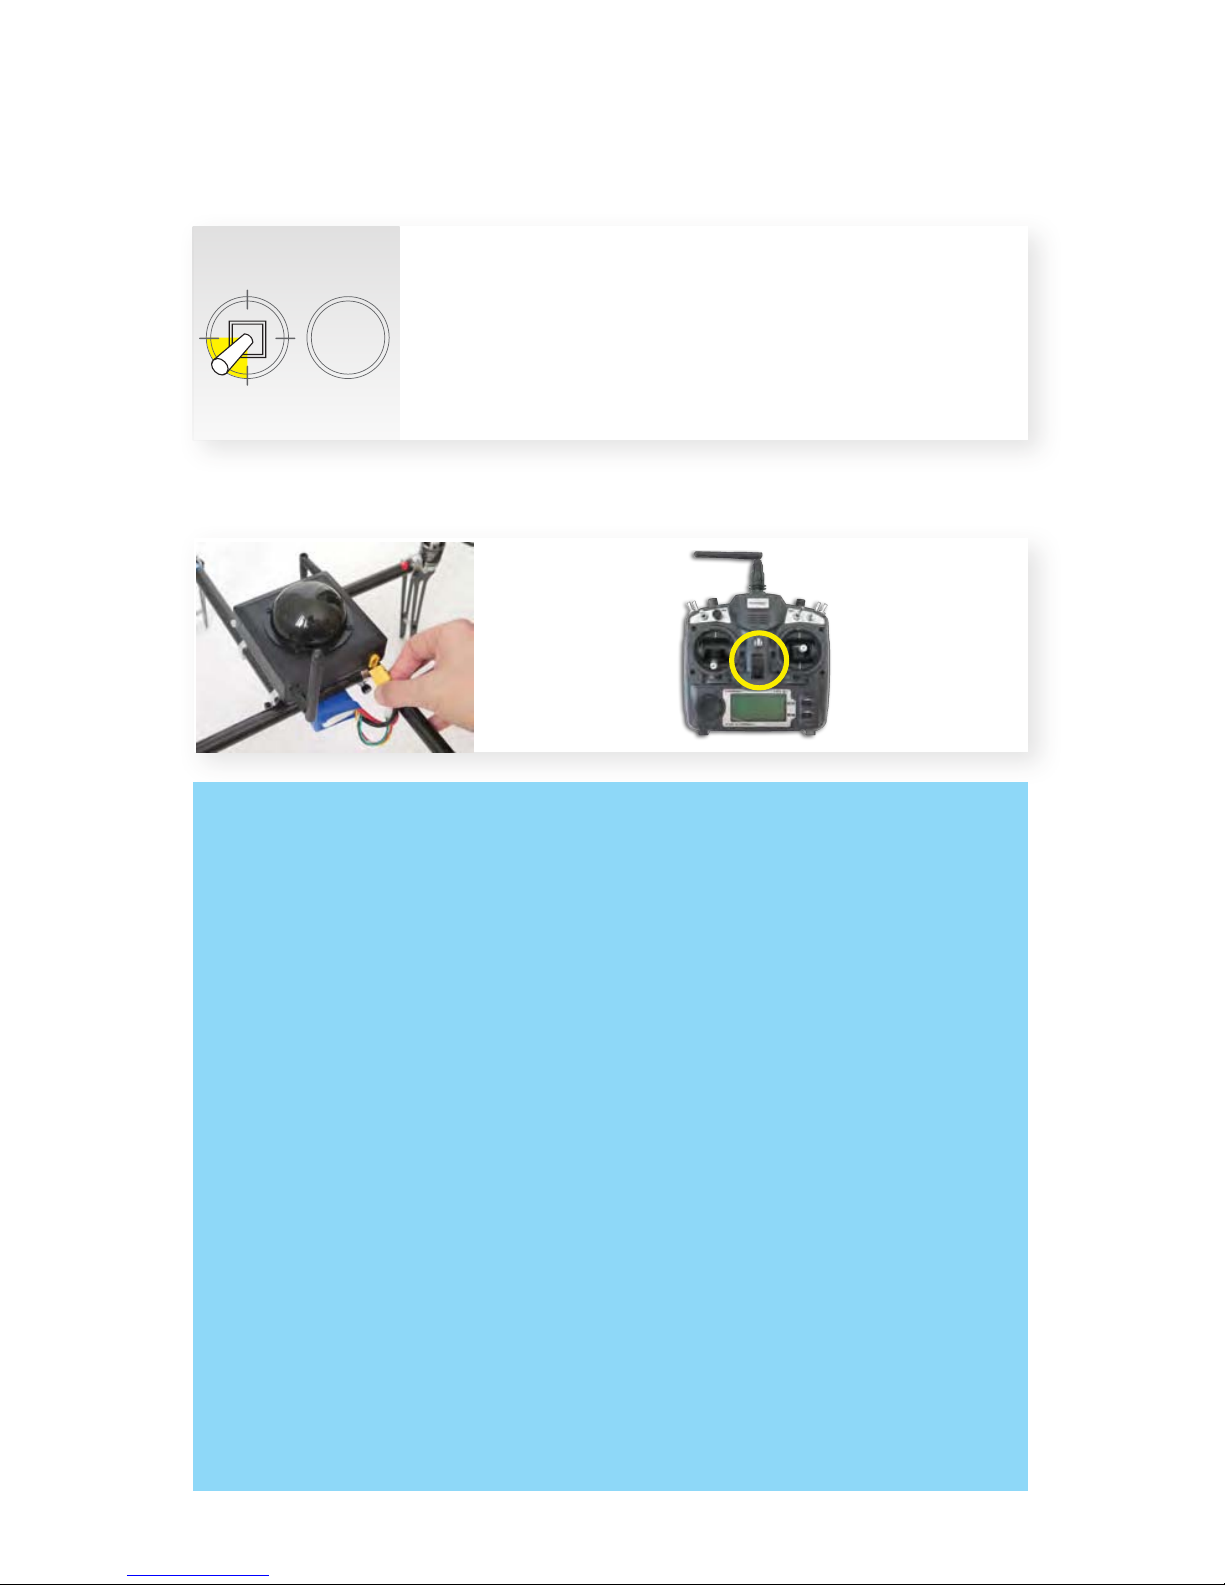
After landing, hold the left stick down-left until you hear
a double, disarming tone.
2
Disconnect
battery.
3
Power o
transmitter.
Tips for New Fliers: Practice these exercises to help you master ight controls.
Skill 1: Hover (Simple Mode)
Your rst step is to maintain a consistent altitude while keeping Easy Drone
oriented away from you. Use Stabilize mode for this exercise (center/up)
Practice taking o, rising to a comfortable hovering altitude, and keeping in place
without allowing for any changes in orientation or position. If it drifts forward,
backward, left, or right, or rotates clockwise or counterclockwise, use the
corresponding stick controls to correct.
Skill 2: Box (Normal Mode)
When you feel comfortable with your ability to maintain a consistent hovering
altitude, try ying a box pattern. To practice this, take o, reach your hovering
altitude, then y forward, right, backward, and left by making small adjustments
to the right stick. Make sure to y the box in front of you and not around you.
Use the left stick to rotate Easy Drone knowing that the lights are always back.
Skill 3: Figure Eight (Normal Mode)
When you can condently navigate a box while maintaining altitude and
orientation, try ying a gure-eight pattern. Once again, make sure to y the gure
eight in front of you and not around you. Use the right stick to create a smooth
ight path while using the left stick to correct orientation and maintain altitude.
Page 20
18
Stabilize Mode (STB)
Stabilize mode (STB) is the most acrobatic ight setting. In stabilize, the
autopilot provides basic stabilization while allowing full manual control of both
sticks. In this mode, you’ll need to make continuous, small adjustments to the
left and right sticks to maintain a hovering altitude, navigate, and maintain
orientation without autopilot assistance.
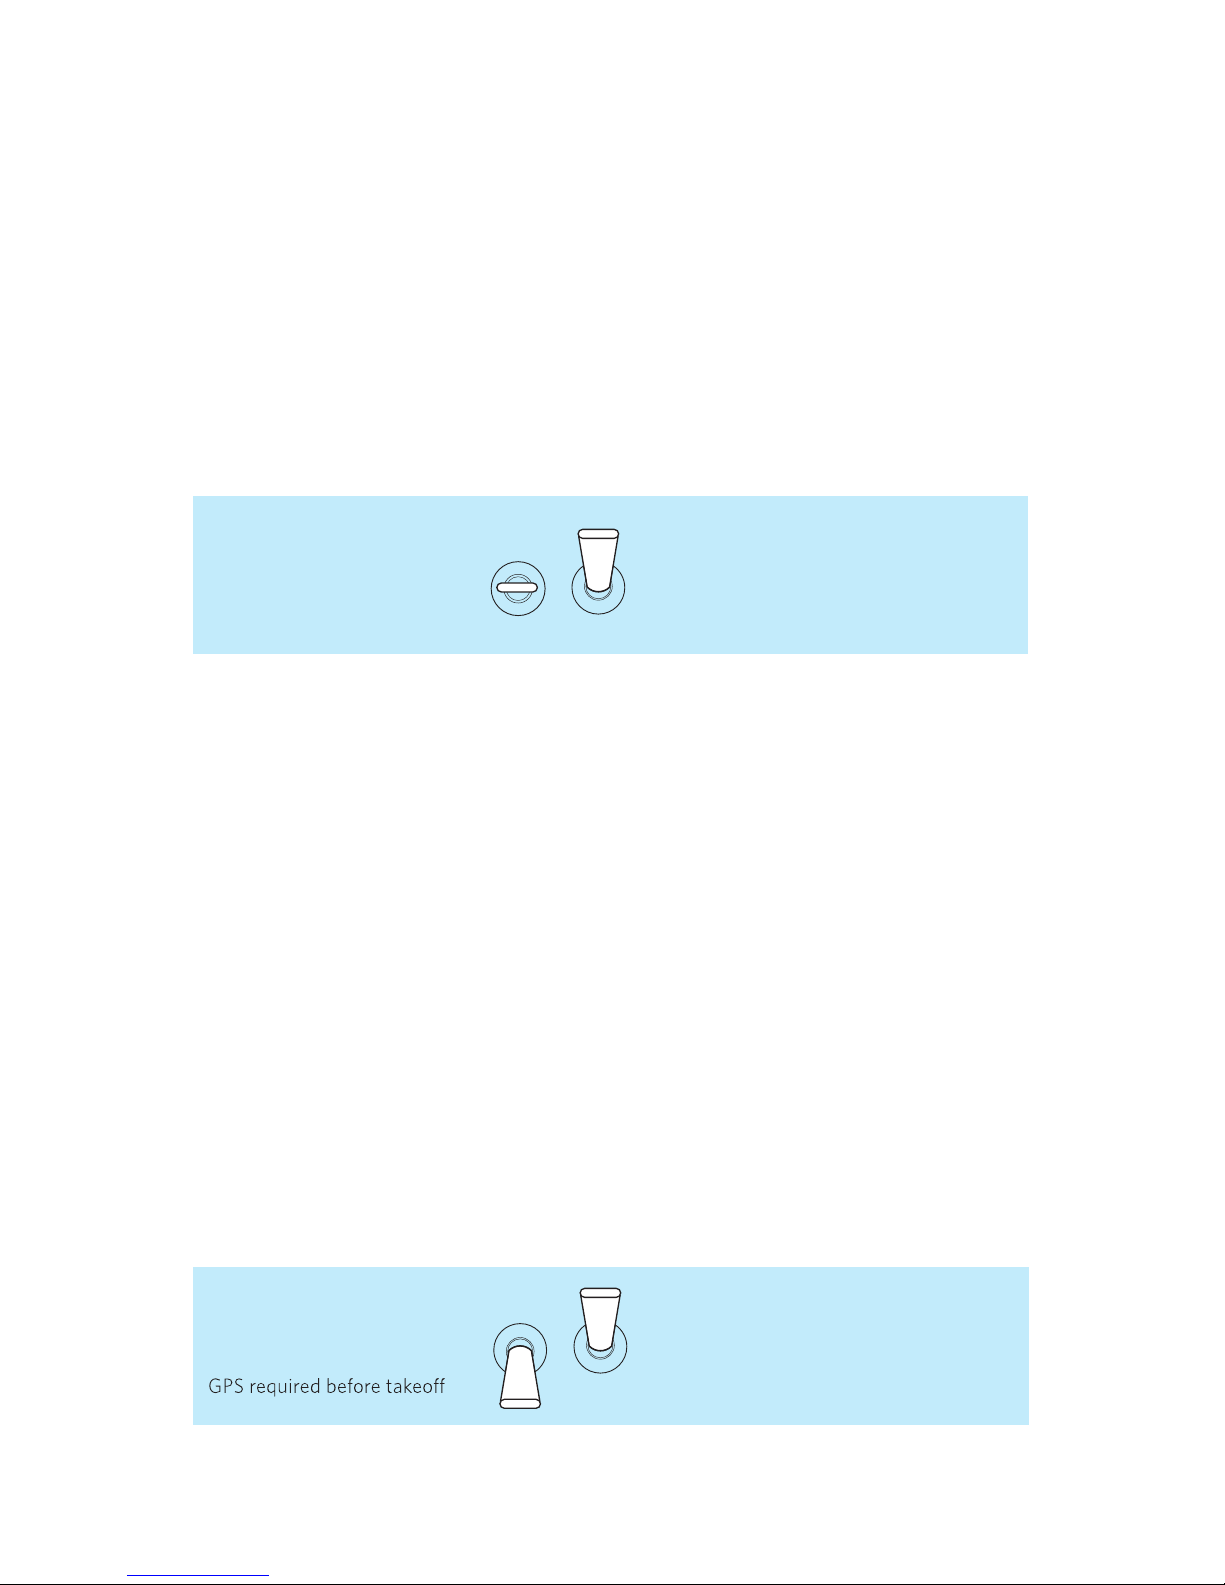
Select stabilize mode by setting left switch to center and right switch up like in
the illustration below.
Stabilize ( STB )
center-up
» Manual ight
» Acrobatic ying
» Recovery
Flying condently in stabilize mode is required for ying your rst mission.
To practice, try the exercises on page 17.
Loiter (LTR)
down-up
» Automatic positioning
» Easy ying
Loiter Mode (LTR)
Loiter mode (LTR) uses GPS positioning to hold Easy Drones’ current position
and altitude automatically. Just release the sticks and it will hover in place. Use
the left stick to adjust altitude and orientation; use the right stick to navigate
and change position.
To select loiter mode, set the left switch to down position and the right
switch to the up position (down-up).
Loiter mode requires GPS lock (ashing green LED) and an HDOP value lower
than 2.0 prior to takeo.
Page 21
19
Return-to-Launch Mode (RTL)
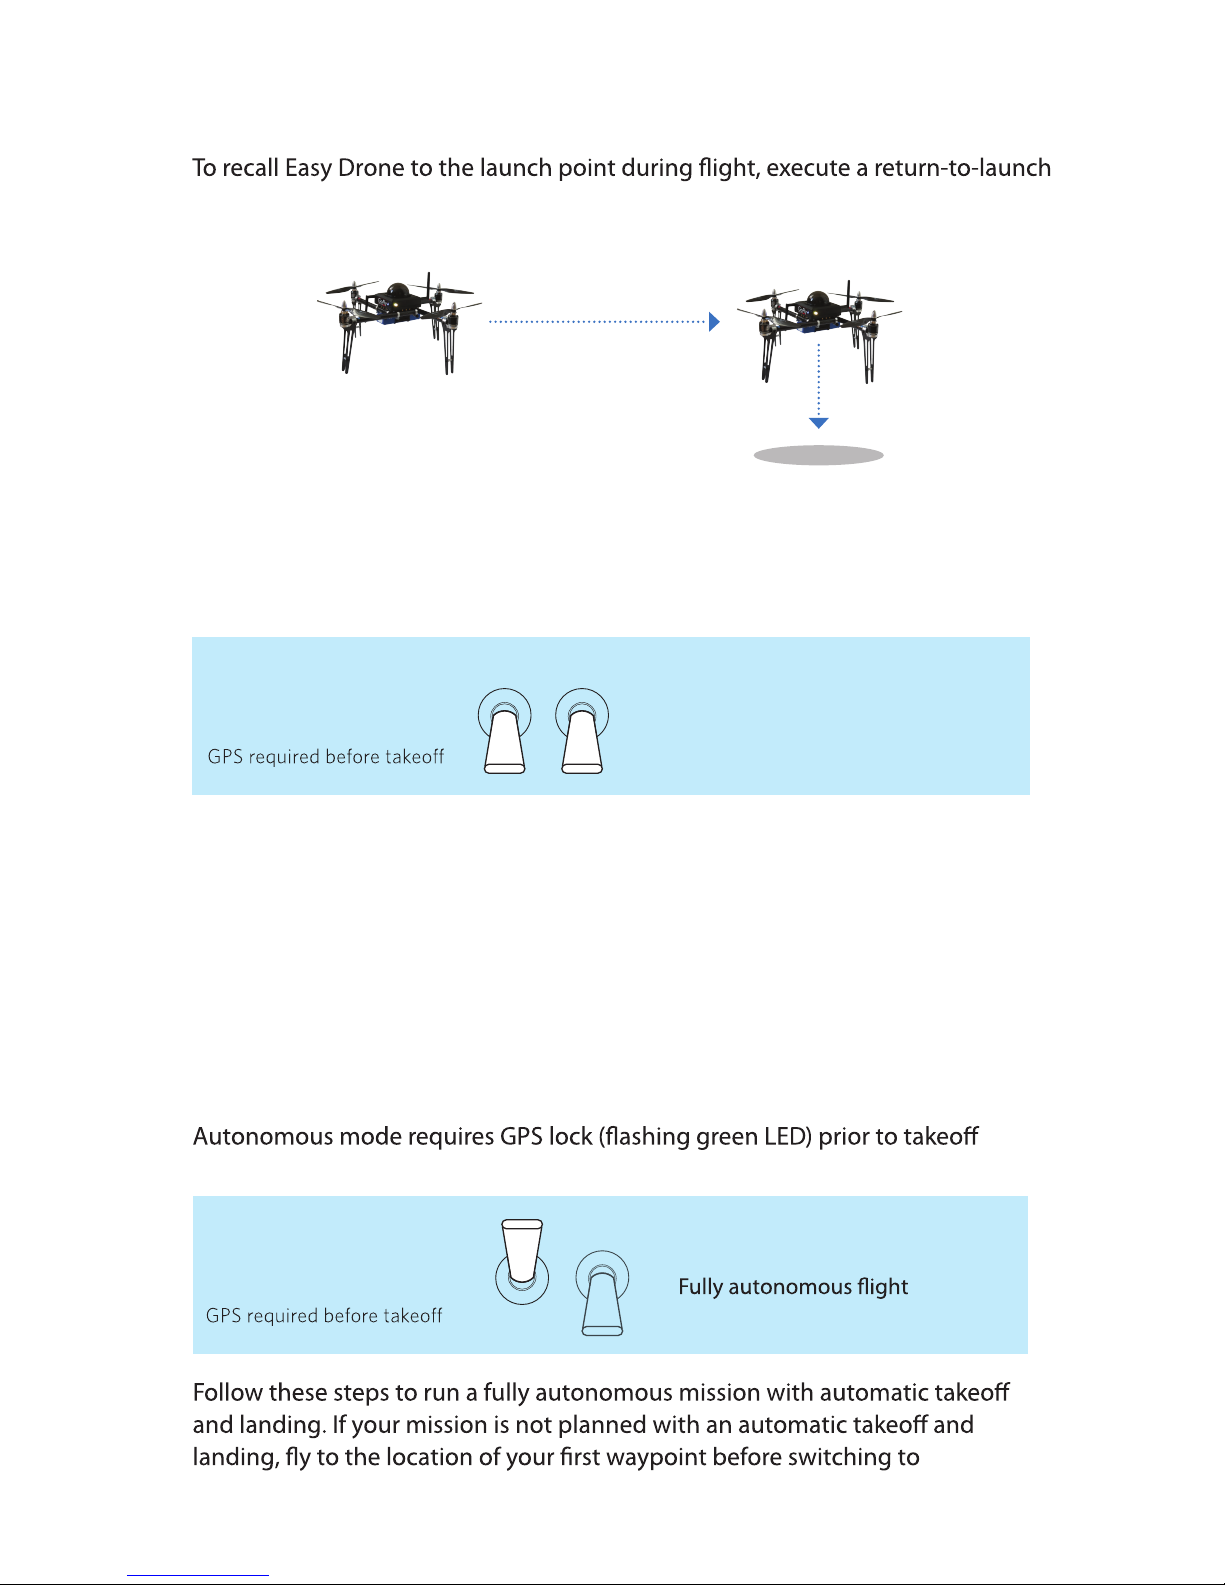
Return to launch (RTL)
down-down
command. RTL automatically returns drone to the launch point, and can be used
any time you would like to land quickly. RTL requires GPS lock.
When commanded to RTL, Easy Drone will:
1 Achieve minimum altitude of 15 m (50 ft)
or maintain current altitude if above 15 m.
2 Move to launch point and loiter for 5 seconds.
3 Land at launch point.
launch point
15 meters
1
2
3
hover 5 seconds
» First, achieve altitude of 15 m
» Next, return to launch point
» Then, land
To RTL, set both switches to the down position (down-down). Ensure the
launch point is clear to allow Easy Drone to land safely.
Autonomous Mode (AUTO) and Missions
Fly a fully autonomous mission using a computer or Android device as a
ground station. When switched into autonomous (AUTO) mode, Easy Drone will
automatically perform the mission and report data back to the ground station.
For instructions on setting up your ground station, planning a mission, and
saving it to Easy Drone, visit www.easyaerial.com.
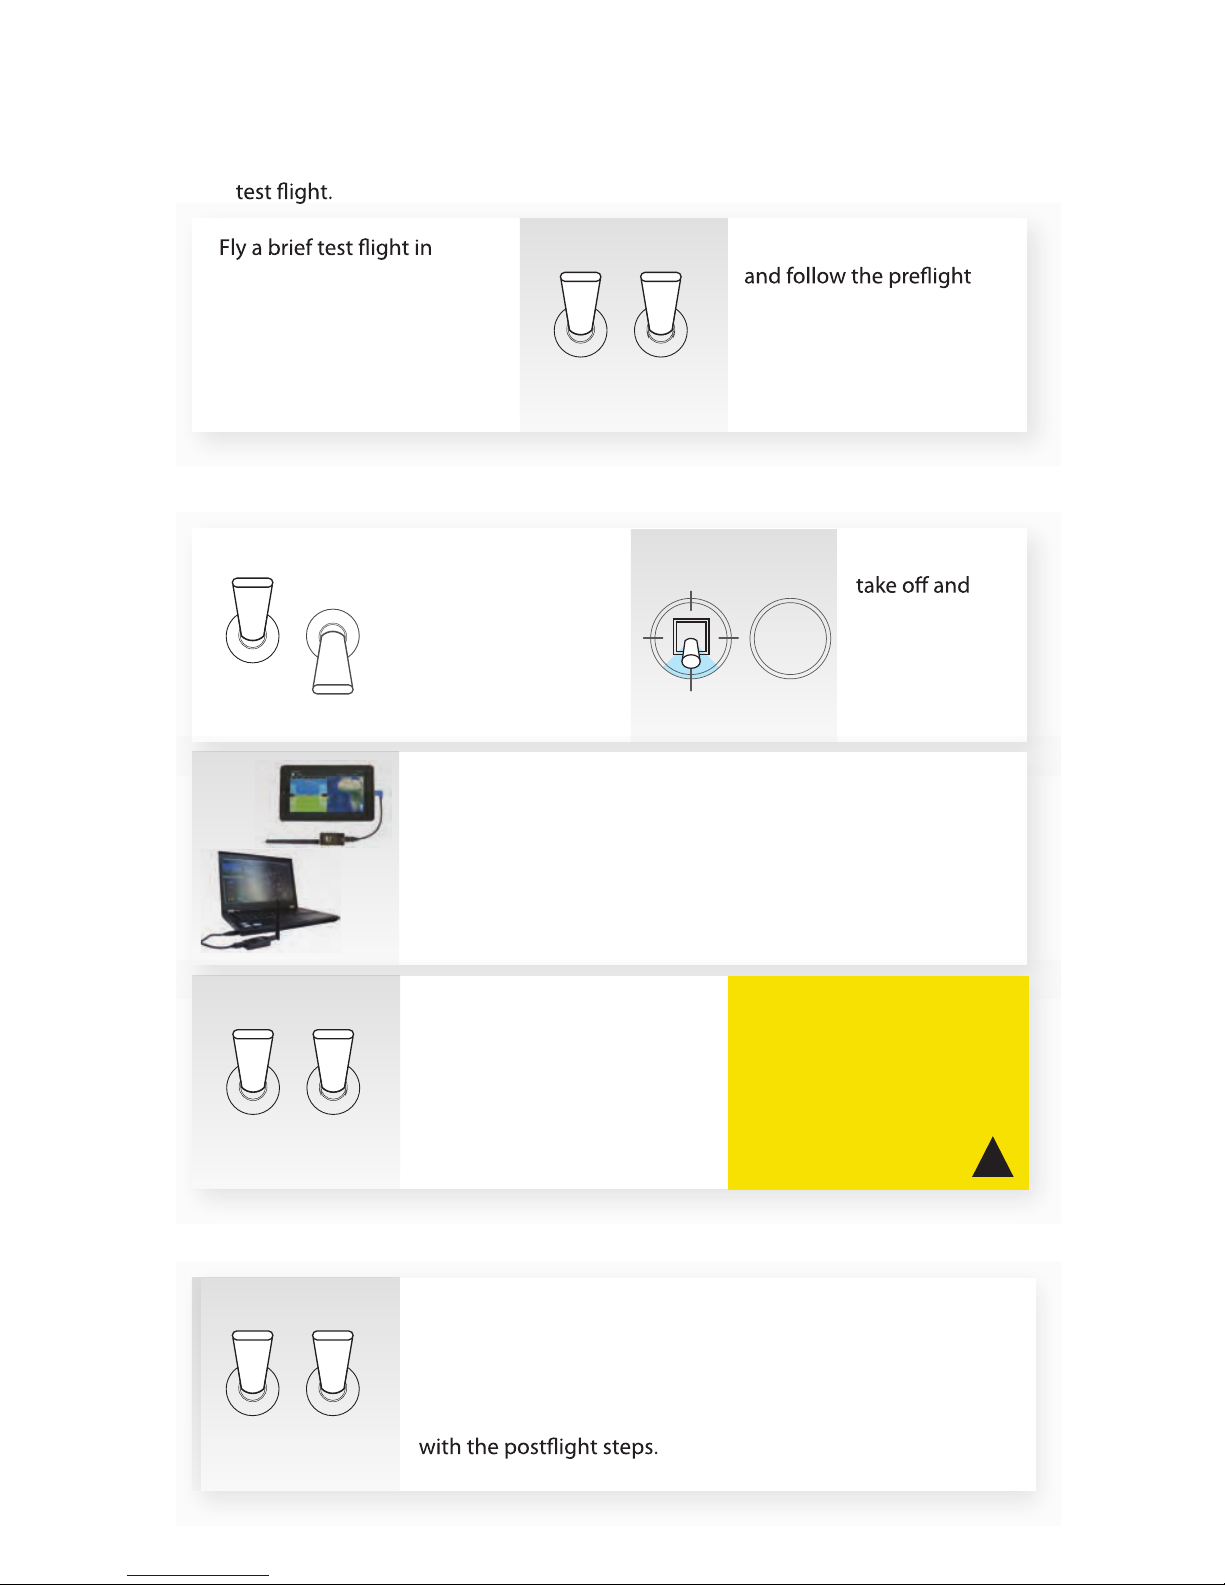
and
HDOP value lower than 2.0.
autonomous mode.
Autonomous (AUTO)
up-down
» Fly a planned mission
»
Page 22
20
!
To avoid sudden changes
in altitude when switching from
autonomous mode to stabilize
mode, ensure that the left stick
is set to the center position.
stabilize mode to verify
that all controls (throttle,
yaw, roll, and pitch) are
responding normally.
weiv ot noitats dnuorg eht esU
.neercs ataD thgilF eht no sutats ’senord ruoy
For more information about using a ground
station, visit www.easyaerial.com .
Easy Drone will
begin the
mission.
1
Perform a pre-mission
Set the switches to stabilize
steps shown on page 13
and the Flight Checklist.
Wait to arm until you see
the blinking green light.
2
Arm in altitude
hold mode.
3
Switch to autonomous
mode (AUTO).
4
Raise the left stick slightly
to initiate the mission.
When the mission is complete
and Easy Drone has landed, use the
transmitter to switch to
alt-hold mode before
disarming and proceeding
5
Switch to alt-hold mode
before disarming.
To recall it during a mission,
use the transmitter to switch
to stabilize mode and land
manually. Or switch to RTL,
ot nruter yllacitamotua dna
the launch point.
AUTO
ALTH
With the motors
armed, switch to
AUTO by setting
the left switch
up and the right
switch down.
up-down
ALTH
ALTH
Missions
up-up
up-up
up-up
Page 23

21
Specications
Autopilot hardware: Pixhawk
Firmware: APM:Copter 3 2
GPS: uBlox GPS with Compass (LEA-6H module, 5 Hz update)
Telemetry radio: Radio Telemetry V2 (915 mHz or 433 mHz)
Motors: 900 kV (L frame) or 810 kV (XL frame)
Frame type: X
Propellers: 10 x 4.5 Slow Flyer - L Frame
11 x 4.7 Slow Flyer - XL Frame
Battery: 4 cell 15.1 V 3.5 Ah lithium polymer
Low battery voltage: 14.5 V
Minimum voltage: 13.2 V 4 cell
Maximum voltage: 16.8 V 4 cell
Payload capacity: 1 lbs (453gr) - L frame or 2lbs (906gr) - XL frame
Radio range: 1 km (.6 miles)
Flight time: 10-13 minutes
Resources
Hardware: www.easyaerial.com
Firmware: copter.ardupilot.com
Software: planner.ardupilot.com and planner2.ardupilot.com
Store: store.easyaerial.com
Community:
YouYube Channel:
diydrones.com
https://www.youtube.com/easydrone
Happy ying!
Page 24

The layout of this manual has been borrowed from 3D Robotics Iris Manual as there is a lot
of the same informations regarding the autopilot inside the drone.
Specic design and functional details, as well as igth mode selection of the Easy Drone have
been edited in to this document.
 Loading...