


GoFit Platinum Cross Trainer
GFELP01
GoFit Platinum Pty Ltd
Phone 1800 446 348 fax 1300 446 348
www.gofit.com.au


IMPORTANT PRECAUTIONS
When using an electrical appliance, the basic following precautions should always be followed:
Read all instructions before using this equipment
DANGER – To reduce the risk of electric shock:
Always unplug this appliance from the electrical outlet immediately after using and before cleaning.
WARNING – To reduce the risk of burns, fire, electric shock, or injury to persons:
1) An appliance should never be left unattended when plugged in.
Unplug from outlet when not in use and before adding or removing parts.
2) Do not operate under a blanket or pillow.
Excessive heating can occur and cause fire, electric shock, or injury.
3) Close supervision is necessary when this appliance is used by , or near children and disabled p ersons .
4) Use this appliance only for its intended use as described in this manual.
Do not use attachments not recommended by the manufact urer.
5) Never operate this appliance if it has a damaged cord or plug, if it is not working properly, if it
has been dropped or damaged, or dropped into water.
In this case, return the appliance to GoFit Platinum for inspection.
6) Do not carry this appliance by supply cord or use cord as a handle.
7) Keep the cord away from heated surfaces.
8) Never operate the appliance with the air openings blocked.
Ensure air openings are always free of debris.
9) Never drop or insert any object into any opening.
10) Do not use outdoors.
11) Do not operate where aerosol (spray) products are being used or where oxygen is being
administered.
12) To disconnect, turn all controls to the off position, then remove plug from outlet.
13) Do not use this machine with an extension cord.

SAFETY INSTRUCTIONS
Before you start training on your fitness equipment, please read the instructions carefully.
This exerciser i s mad e for home use only and is tested up t o a m aximum body weight of 110 kg.
Do not use this Cross Trai n er in any commercial, rental, or institutional setting.
Follow the steps of the assembly instructions carefully.
Use only the original parts as delivered.
Before the assembly, ensure the delivery is complete by checking the included parts list.
For assembly, use only suitable tools and ask for assistance if necessary.
Place the exerciser on a flat, s tabl e base, and non-sl ipper y surface. You wi ll need lev elling for an
uneven floor. Because of possible corrosion, the use of any exerciser in moist areas is not
recommended. Keep the GoFit Platinum Cross T rainer indoors, away from moisture and dust.
Do not put the GoFit Platinum Cross Trai n er in a garage or covered patio, or near water.
Make sure before each use that y ou have enough space around the equipment (at least 1 met er)
so that you clear of potential obstructions ie. walls and surrounding furniture.
Check before the first training session and every 1-2 months to follow that all connecting
elements are tight fitting and in good condition.
WARNING: The safety level of this exerciser can be m aintained only if it is examined regularly
for damage and wear.
Replace defective components immediately and keep the equi p ment out of use unti l repair.
For repairs, use only original spare parts and when in doubt, ask your dealer for advice.
Avoid the use of aggressive detergents when cleaning.
Ensure that training starts only after correct assembly and inspection. For all adjustable parts be
aware of the maximum positions to which they can be adjusted/tightened to.
This equipment is designed for adults. Please ensure that children (under 14) use the equipment only
under the su pervisi on of an adult. Impor tan t: Keep u nsuper vised childr en away from t he equipment.
Ensure that those pres ent ar e aw are of possible hazards, eg. movable part s dur ing training.
Only one person is permitted to use this equipment at the same time.
Do not use this exerciser while eating, drinking, or smoking.
DANGER:
Always unplug the power cord immediately after use, before cleaning the exerciser and before
performing the maintenance and adjustment procedures described in this m anual.
Never leave the equipment unattended while it is running.
Please follow the advice for corr ect training as detailed in training instructions.
If you experience any sickness, pain or other symptoms, stop exercising immediately.
Pregnant woman should have thei r ex erc is e program consulted and approved by their doc tor.
WARNING: Before beginning this or any exercise program, consult your
physician. This is especially important for persons over the age of 35 or
persons with pre-existing health problems. Read all ins t ructions before using.
All dat a d ispl ay ed ar e app roxi mate gu idanc e an d can not be u sed in any medi cal appl icat ion .
SAVE THESE INSTRUCTIONS
2
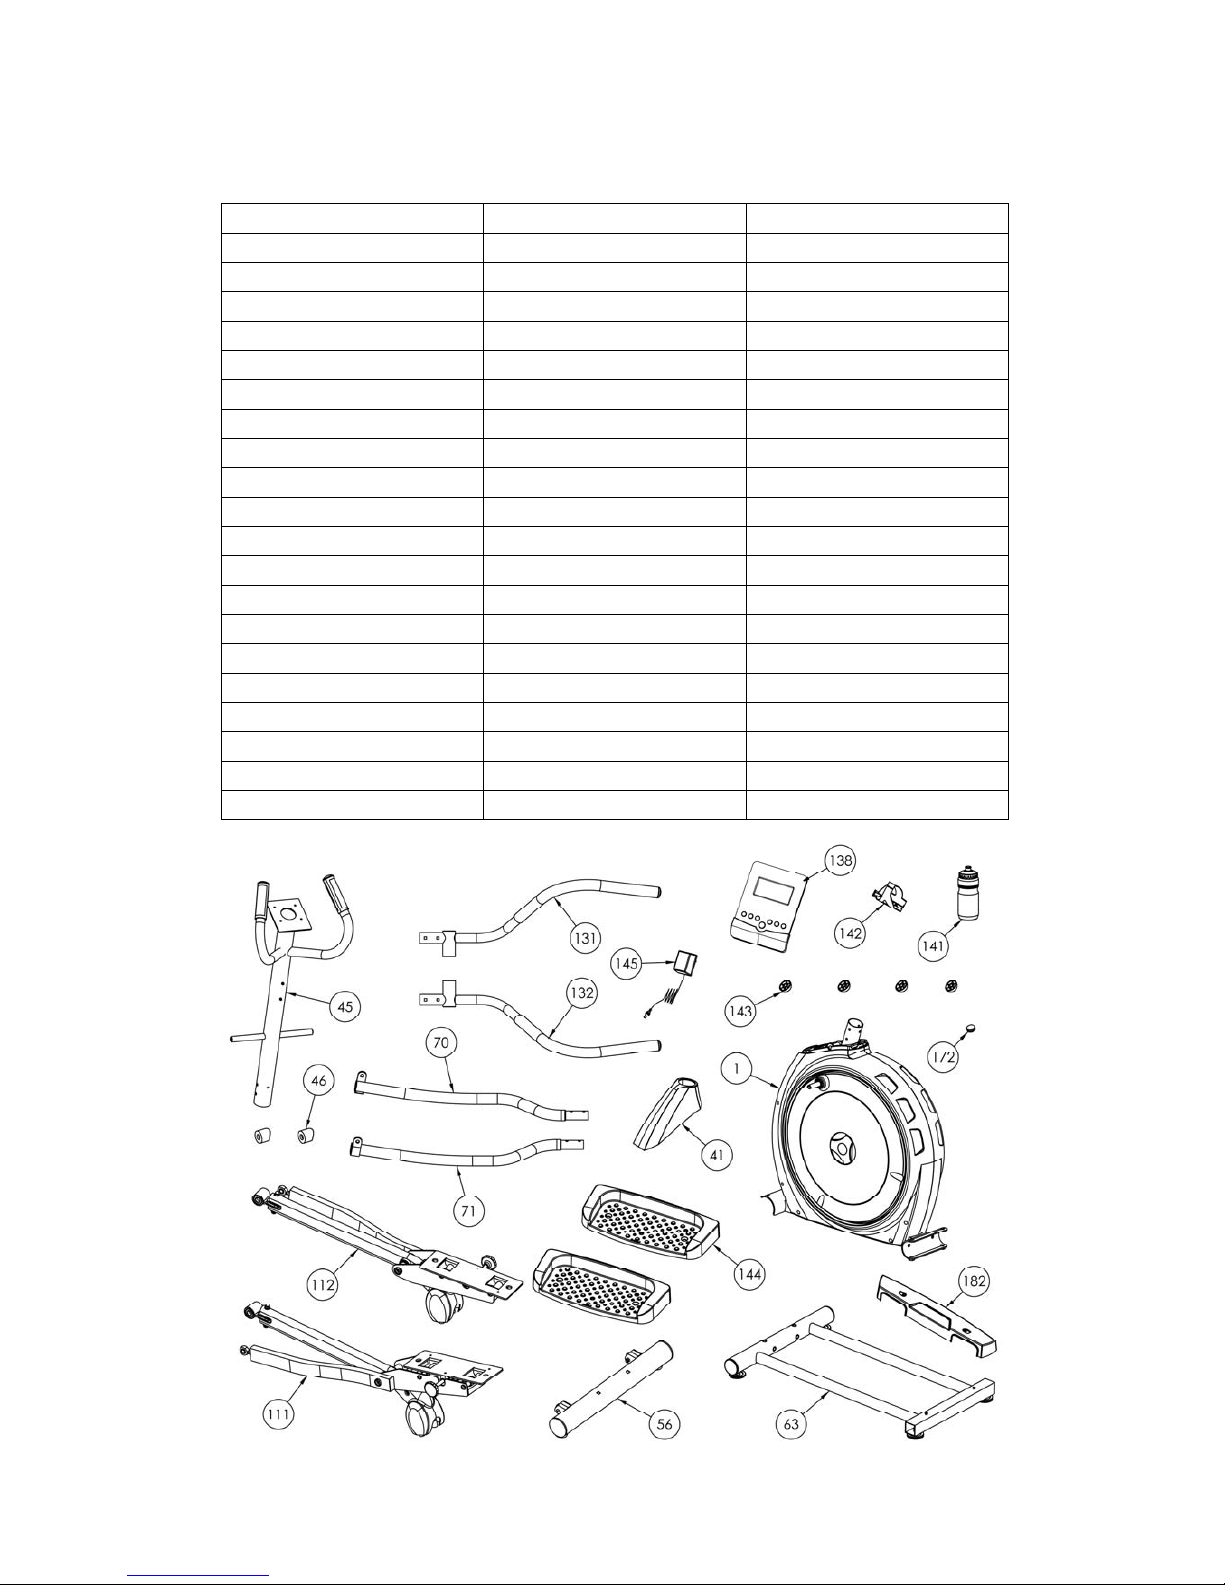
PRE-ASSEMBLY CHECK LIST
ITEM# DESCRIPTION QTY
1. Frame 1
41. Upper Frame Cover
1
45.
Upright
1
46. Cover 2
56.
Front Stabilizer
1
63.
Rear Stabilizer
1
70. Left Rocker 1
71. Right Rocker 1
111.
Pedal Assembl
y
(L)
1
112.
Pedal Assembly(R
)
1
131. Left Handrail 1
132. Right Handrail 1
138. Computer 1
141. Bottle 1
142. Bottle Holder 1
143.
Screw Cove
r
4
144. Pedal 2
145. Adapter 1
172.
Lubricant
1
182. Rear Stabilizer Cover 1

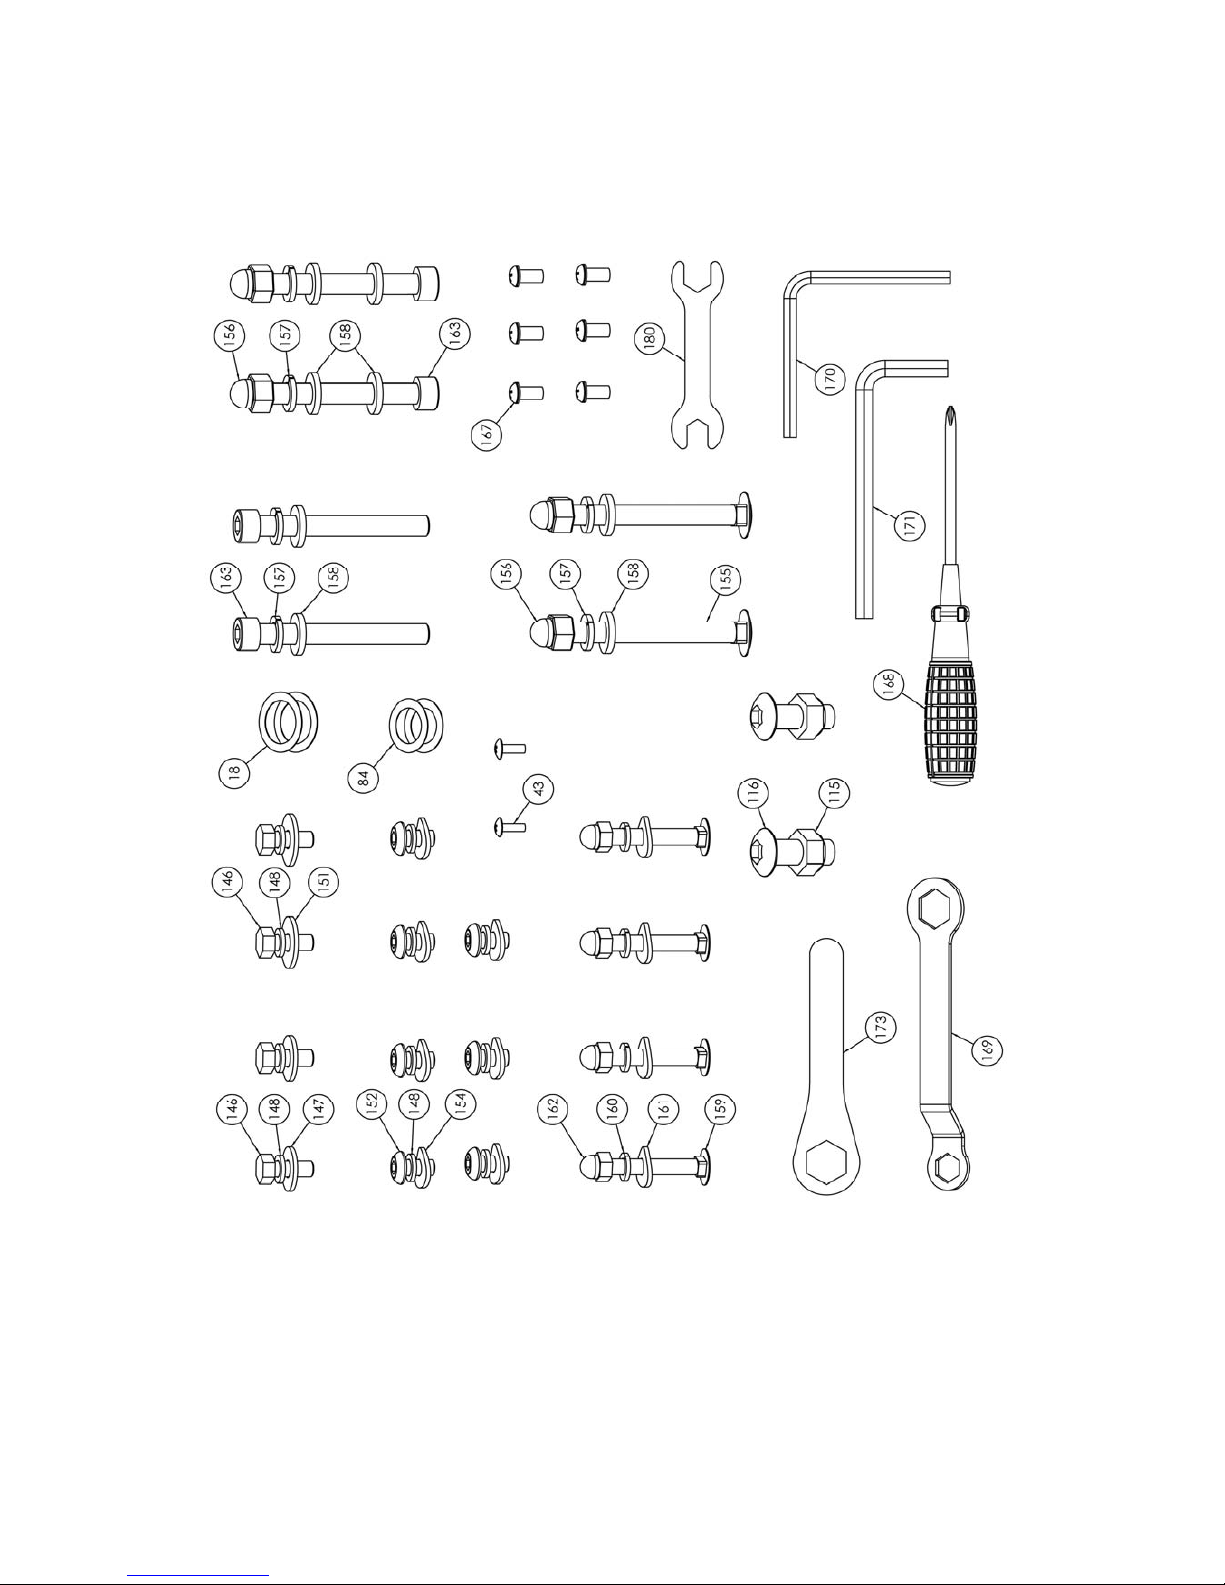
3
PRE-ASSEMBLY CONTINUED
ITEM# DESCRIPTION QTY
18. Wave Washer Ø29xØ21x0.35t 2
43. Truss Philips Screw M4x12 2
84. Wave Washer Ø17.5xØ26x0.3t 2
115. Nylon Nut M12 2
116. Truss Hex Screw M12X35 2
146. Allen Bolt M8x20 4
147. Washer Ø22xØ9x2t 2
148. Spring Washer M8x2.0t BK 11
151. Washer Ø25xØ9x2.0t 2
152. Truss Hex Screw M8x15 7
154. Arc Washer BK 7
155. Truss Carriage Screw M10x95 2
156. Acorn Nut M10 4
157. Spring Washer M10x3.0t 6
158. Washer Ø20xØ10.2x3t 8
159. Truss Carriage Screw M8x50 4
160. Spring Washer M8x2.0t Nickel Plating 4
161. Arc Washer Nickel Plating 4
162. Acorn Nut M8 4
163. Hex Screw M10x85 4
167. Round Head Philips Screw M6x12 6
168. Screwdriver 1
169. Lug Wrench (13, 17 sides) 1
170. Hex Wrench 6mm 1
171. Hex Wrench 8mm 1
173. Lug Wrench (19 sides) 1
180. Open Spanner (10, 13 sides) 1
4
Assembly Screws
5
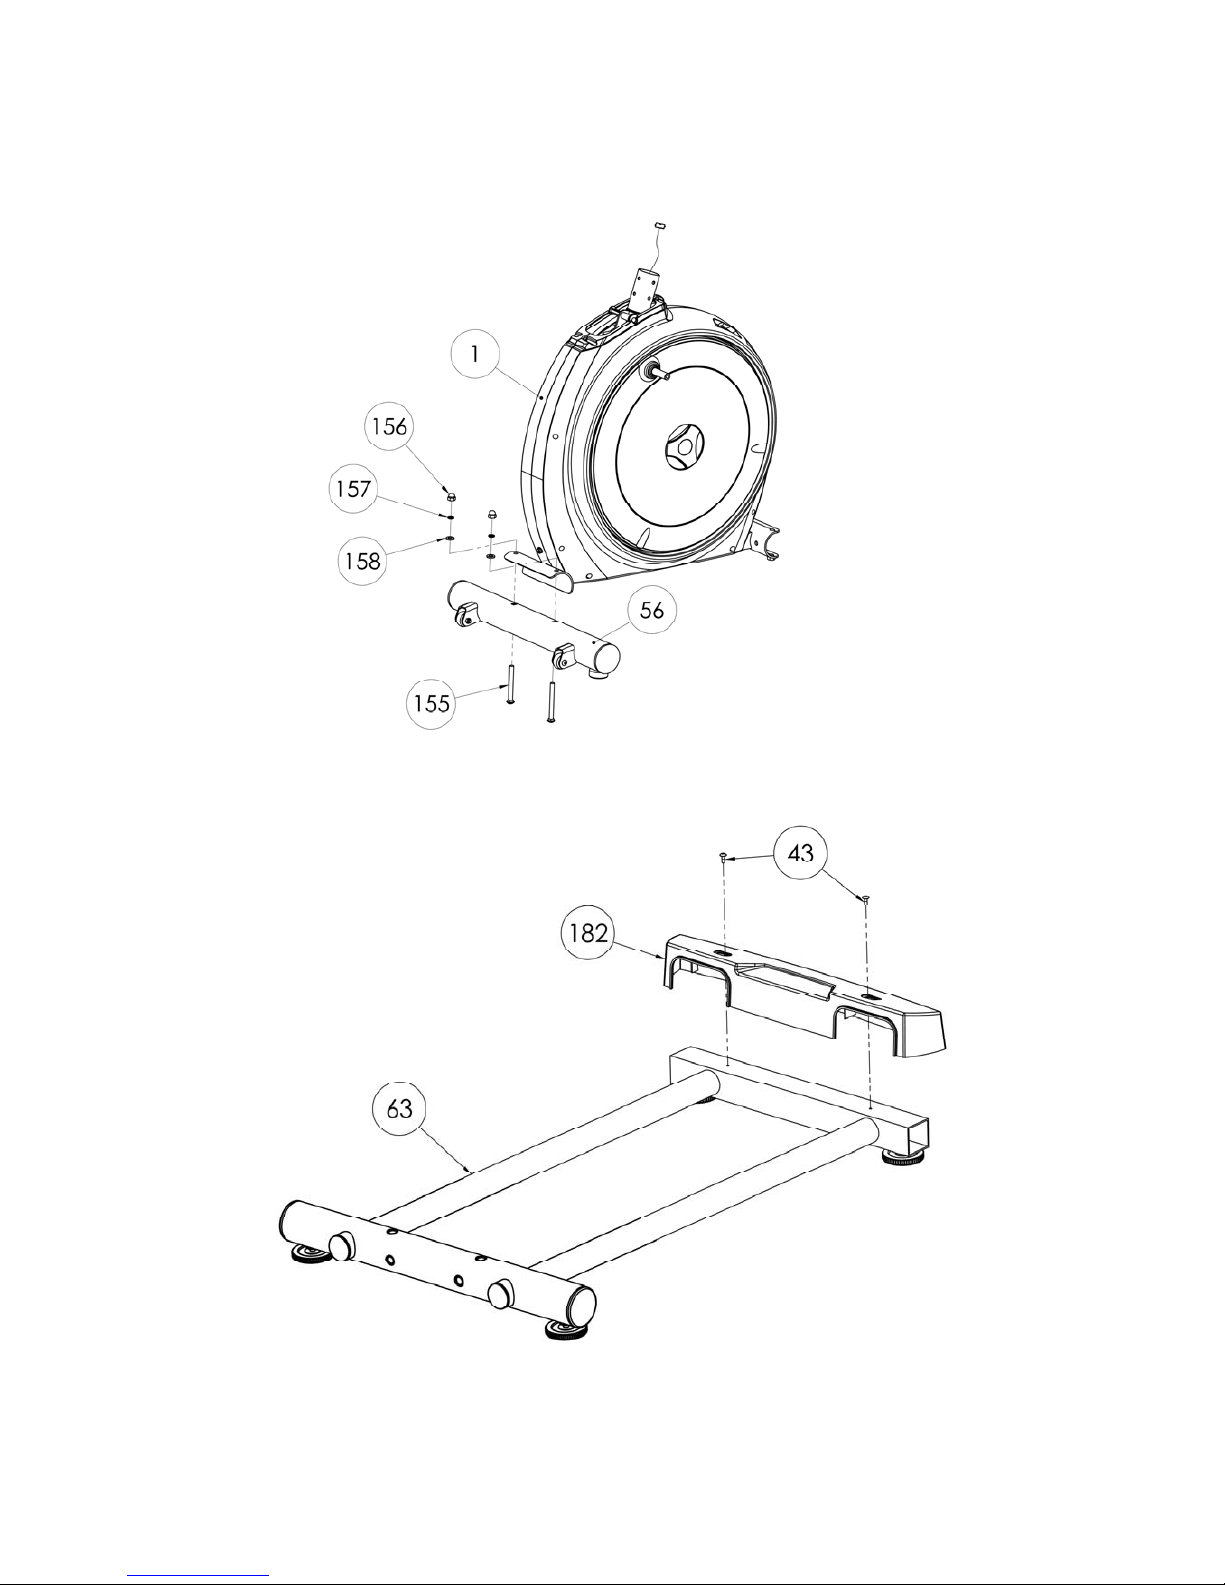
ASSEMBLY INSTRUCTIONS
1. Assemble Front Stabilizer (#56) to Frame (#1) with Screw (#155), Washers (#157,158)
and Acorn Nut (#156).
2. Assemble Rear Stabilizer Cover (#182) to Rear Stabilizer (#63) with Screw (#43).

6
ASSEMBLY INSTRUCTIONS
3. Assemble Rear Stabilizer (#63) to Frame (#1) with Screw (#163), Washers (#157,158)
and Acorn Nut (#156). Don't tighten the screws first.
4. Tighten Rear Stabilizer (#63) and Frame (#1) with Screw (#163) and Washers (#157,
158) and then tighten screws in step 3. When using, daub some Lubricate (#172) onto orbit
of Rear Stabilizer.

7
ASSEMBLY INSTRUCTIONS
5. Set Upper Frame Cover (#41) on Upright (#45) and connect Upper Controller Wire (#51)
with Middle Controller Wire (#31). Attach Upright to Frame (#1) with Screw (#152) and
Washers (#148, 154).
6.Insert Upper Control Wire (#51) into back tie-in of the Computer (#138). Connect Hand
Pulse Wire(52) and Wires of the computer and fix the computer to the upright (45) with
screw(140)

8
ASSEMBLY INSTRUCTIONS
7. First cap Wave Washer (#84) on the Frame (#1). Then attach left and right Pedal
Assembly (#111, 112) to Frame (#1) with Screw (#146) and Washers (#147, 148) and then
cap Screw Cover (#143). When assembly, pay attention to the L" and "R" tabs on
pedal assembly.
8. Cap Cover (#46) and Wave Washer (#18) on the Upright (#45). Assemble left and right
Handrails (#131, 132) to Upright with Screw (#146) and Washers (#148, 151) and then cap
Screw Cover (#143). When assembly, pay attention to the “L" and “R" tabs on the
Handrails.

9
ASSEMBLY INSTRUCTIONS
9. Aim at the “L" and “R" tabs on Handrail and Rocker and then assemble left and
right Rockers (70, 71) to left and right Handrails (131, 132) with Screw (159), Washers
(160, 161) and Acorn Nut (162)
10. Assemble left and right Rockers (#70, 71) and left and right Pedal Assembly (#111,
112) with Screw (#116) and Nylon Nut (#115).

10
ASSEMBLY INSTRUCTIONS
11. Assemble Pedal (#144) to left and right Pedal Assembly (#111, 112) with Screw
(#167).
12. Unscrew the screw with washer(49) of upright(45) and fix the bottle holder(142) to the
upright with screw(49), then insert the bottle(141) onto the bottle holder.

11
ASSEMBLY INSTRUCTIONS
13. Adjust frame to level and lift middle adjustment Foot Pad (#69) to let the middle of the
frame hang in the air. Then adjust rear adjustment foot pad of the frame to let frame be
level and adjust middle adjustment foot pad to floor. Adjust up Nut (#181) with Open
Spanner (#180) to tighten adjustment foot pad.
14. According to individual need, the distance between left and right Pedal (#144) can
be adjusted. Display the knob (#126) according to the rotational direction of the pedal.
There are 5 sections on pedal that can be adjusted and as to adjustment place, please
refer to Display Section.
Display Section

12
ASSEMBLY INSTRUCTIONS
15. Insert Adapter (#145) into power plug of Frame (#1). Be sure to check the
Adapter’s parameters before plug (such as input and output voltage). Assembly is now
completed.

13
TQA Computer Operation Instruction
Start-up operation instruction: After power on, the buzzer gives out a beep,
at the same time LCD displays for 2 seconds(Fig 1), enter into U1 U4
personal data setting, setting group(Fig 2), sex, age(Fig 3), height, weight
press mode, enter into sport menu after confirmation(Fig 4).
Fig 1 Fig 2

14
Fig 3 Fig
4
1. After entering into sport mode, MANUAL(MAN) on dot matrix is blinking as
1HZ. Press UP & DOWN key to select according to the sequence MANUAL→
PROGRAM(Fig 5)→User Program→H.R.C. (Fig 6)→WATT. When press
ENTER / MODE, then enter into this mode. If not select and directly press
START key to enter into MANUAL MODE and then START.

15
Fig 5 Fig
6
2. Set PROGRAM:
If selected PROGRAM, then press UP & DOWN key to select
P01,P02,P03,P04……,P12 of the PROGRAM.
3. Set LEVEL of PROGRAM:
Under START status, it can adjust LEVEL. When adjusting LEVEL, ▲ or ▼
key hasn’t cycle function(Press ▲key can just increase to LEVEL 16, press ▼
key can just decrease to 1).
5. Adjust LEVEL of MANUAL:
Under START status, it can adjust LEVEL of MANUAL. Press ▲ or ▼key
to increase or decrease by 1 level. Press and hold it for 1.5 seconds, increase or
decrease by 2 levels every second. Release it will stop.
6. Adjust value(eg: TIME、DISTANCE、CALORIES、PULSE and so on ):
i. Under MANUAL function, after selected TIME、DISTANCE、
CALORIES、PULSE, press ▲ or ▼key to adjust the values and
have cycle function.
ii. Under PROGRAM、User Program、H.R.C、WATT mode, you can
just set TIME.
iii. Press▲ or ▼key to increase or decrease by 1 level every time.
Press and hold it for 1.5 seconds, increase or decrease by 8 levels every second.
Release it will stop.
7. Select H.R.C.:
If selected H.R.C. and AGE hasn’t been set, then first set AGE. Press MODE
for confirmation and then PULSE window will display the default value
calculated according to the age. If selected TARGET, PULSE window will
display 100 and be blinking. Press ▲ or ▼ key to set TARGET(30~240). ▲
or▼key has cycle function.
8. Select User Program:
If selected User Program, user should press ▲or▼key to set PROGRAM
figure(corresponding LEVEL value of every time axis). The setting step of the

16
figure is blinking, after setting, it will be light. While setting, number and letter
on LOAD window will display for you to set, LOAD value display 1Hz and be
blinking. After setting, press MODE key for confirmation. Time axis of a whole
PROGRAM figure has total 20 steps to set so that the PROGRAM can be
executed When come to the ninth STEP, scroll bar shifts to left, the rest may be
deduced by analogy. If you want to stop in midway, press MODE and hold it for
2 seconds. The unset time axis will save the last setting value.
9. Select WATT:
After entering, WATT value is blinking (Default Value = 120).User
should press ▲or ▼key to set WATT value. After start it, LEVEL value
will be automatically adjusted according to the input WATT value by
user and the sport status.
10. When no signal(SENSOR、KEYBOARD、PULSE value display) input for 4
minutes, system will enter into SLEEP mode and all setting values and calculated
values will be saved. Next start will adopt these calculated values.
11. Key Function:
MODE/ENTER key:
Under STOP status, you can press it to select as TIME,DST,CAL,PULSE, and this
key also has ENTER function.
RESET key:
Press this key once under STOP status, it will return to main menu. Press RESET
key and hold for 2 seconds anytime, Buzzer will beep and LCD will display all for
2 seconds and return to main menu, that is TOTAL RESET.
START/STOP key:
Press this KEY to start running and press it again to stop it.
RECOVERY key:
If no PULSE input, RECOVERY key is invalid. After PULSE value displays,
press this KEY to execute RECOVERY. After 1 minute, it will display F1~F6,
press this key to exit. F1 represents the best and F6 represents the worst.
UP key:
When setting or selecting, it has the function of increasing value.
DOWN key:
When setting or selecting, it has the function of decreasing value.
BODY FAT key:
Under STOP status, press this key once to test fat. DISTANCE window will
display the calculated value and FAT%,BMI. If error test, error signal will

17
display. ”E-1”means not grip handle tightly. ”E-4”means the body fat percentage
is over the setting range(5.0% ~ 50%). The dot matrix displays the symbol of
body fat. Press this key and hold it for 2 seconds to reset personal data, after that,
enter into fat test directly.
12. Functions:
(1). TIME:Setting Range: 0:00~99:00,Display: 0:00~99:99。
(2). DISTANCE:Setting Range: 0.00~99.90KM,Display: 00~99.99。
(3). CALORIES:Setting Range: 0~9990,Display: 0~9999。
(4). PULSE:Setting Range: 0-30~230,Display: P-30~230。
(5). WATT:Setting Range: 10~350,Display: 0~999。
(6). SPEED:0~99.9KM。
(7). RPM:0~999。
(8). MANUAL : No preset function.

Trainings hints:
With buying this fitness equipment you have taken the first step toward improving your fitness.
With the help of this ite m you can add value to your life with improved health, wellbeing and
lifestyle.
Goal of training:
Building of muscles
General fitness
Endurance
Feeling of wellbeing
The training success is mainly depending on the following points.
Continuous training
Good nourishment
Control of training progress
Who can exercise?
Generally every healthy person, young or old, can start to exercise.
Capacity:
The body, especially the heart and circulation needs time to adapt to any new exercise.
Therefore, it is very important to start slowly with your training and to take brakes between and
after exercise. Only exercise at a level you are comfortable with.
After continuous t raini ng you ca n gr adually incr ease t he dur atio n and intensi ty of y our sessi o ns.
After training you should always allow time to stretch and cool down.
Tips for successful and healthy training:
Always remember that training is most effective when you follow the important rules.
Exercise gives the best results when it is undertaken long term and continuously, short
Term exercising has very little effect.
Wear comfortable clothing that is not too tight.
Avoid exercise with a full stomach.
It is recommended not to eat any sooner than one hour before and after training.
Do not exercise if you are very tired or feel exhausted.
Your body needs liquid if you exercise, so ensure you have adequate water nearby at all
times.

Warming up should be done with every sporting activity to decrease the risk or injury.
Training:
A suggested warm up is a 5-10 minute run on the spot or around the room with a f ew jumps at
each minute interval.
The following stretches are gentle but effective in waking up your body, stimulating your
circulation and making your ankles more flexible. Please do these each time before you start
exercising.
Stretching:
The correct form for these basic str etc hes is displayed on the
right.
SUGGESTED STRETCHES
Move slowly as you stretch and avoid bouncing.
1. Toe Touch S tretch
Stand with your knees bent slightly and slowly bend forward
from your hips.
Allow your back and shoulders to relax as
you reach down toward your toes as far as possible. Hold for
15 counts then relax. R epea t 3 times.
Stretches: Hamstrings, back of knees and back.
2. Hamstring Stretch
Sit with one leg extended. Bring the sole of the o ppo site f oot
toward you and rest it against the inn
er thigh of your
extended leg. Reach toward your toes as far as possible.
Hold for 15 counts, then relax. Repeat 3 times for each leg.
Stretches: Hamstrings, lower back and groin.
3. Calf/Achilles Stretch
With one leg in front of the other, reach forward and place
your hands against a wall.
Keep your back leg straight and
your back foot flat on the floor. Bend the front leg.
Stretches: Calves, Achilles tendons and ankles.
4. Quadriceps Stretch
With one hand against a wall for balance, reach back and
grasp one foot with your other hand. Bring your heel as close
to your buttocks as possible. Hold for 15 counts, then relax.
Repeat 3 times for each leg.
Stretches: Quadriceps and hip muscles .
5. Inner Thi gh Stretch
Sit with the soles of your feet to
gether and your knees
outward. Pull your feet toward your
groin area as far as
possible. Hold for 15 counts, then relax. Repeat 3 times.
Stretches: Quadriceps and hip muscles .


Phone 1800 446 348 fax 1300 446 348
www.gofit.com.au
 Loading...