


GoFit Platinum Silver Treadmill
GFTMS01
GoFit Platinum Pty Ltd
Phone 1800 446 348 fax 1300 446 348
www.gofit.com.au


IMPORTANT PRECAUTIONS
When using an electrical appliance, the basic following precautions should always be followed:
Read all instructions before using this equipment.
DANGER – To reduce the risk of electric shock:
Always unplug this appliance from the electrical outlet immediately after using and before cleaning.
WARNING – To reduce the risk of burns, fire, electric shock, or injury to persons:
1) An appliance should never be left unattended when plugged in.
Unplug from outlet when not in use and before adding or removing parts.
2) Close supervision is necessary when this appliance is used by , or near children and di sable d pers ons.
3) Use this appliance only for its intended use as described in this manual.
Do not use attachments not recommended by the manufacturer.
4) Never operate this appliance if it has a damaged cord or plug, if it is not working properly, if it
has been dropped or damaged. In this instance, call GoFit Platinum for an inspection.
5) Do not carry this appliance by supply cord or use cord as a handle.
6) Keep the cord away from heated surfaces.
7) Never operate the appliance with the air openings blocked.
Ensure air openings are always free of debris.
8) Never drop or insert any object into any opening.
9) Do not use outdoors.
10) Do not operate where aerosol (spray) products are being used or where oxygen is being
administered.
11) To disconnect, turn all controls to the off position, then remove plug from outlet.
12) Do not use this machine with an extension cord, connect direct to grounded outlets only.
13) Ensure at the end of use, elevation is back to the original position.
14) The treadmill must be unfolded during use and only folded again at the end of use with
elevation back to 0.
15) This machine is only intended for domestic use.
Do not use this GoFit Platinum Treadmill in any commercial, rental, or institutional setting.

SAFETY INSTRUCTIONS
Before you start training on your treadmill, please read the instructions carefully.
Follow the steps of the assembly instructions carefully.
Use only the original parts as delivered.
For assembly, use only suitable tools and ask for assistance if necessary.
Because of possible corrosion, the use of any exerciser in moist areas is not recommended.
Keep the GoF it Platinum Treadmill indoors, away from moisture and dust.
Do not put the GoFit Platinum Treadmill in a garage or covered patio, or near water.
Make sure before each use that you have enough space around the treadmill so that you are
clear of potential obstructions ie. walls and surrounding furniture.
Check before the first training session and every 1-2 months to follow that all connecting
elements are tight fitting and in good condition.
WARNING : The safety lev el of this treadmill can be maintained only if it is examin ed regul arly for
damage and wear, e.g. connection points, power cord, etc.
Replace defective components immediately and keep the equi p ment out of use unti l repair.
For repairs, use only original spare parts and when in doubt, ask GoFit Platinum for advice.
Only one person is permitted to use this treadmill at the same time.
Do not use this exerciser while eating, drinking, or smoking.
The maxim um load capacity is 120 kg.
Servicing other than the procedures in this manual should be performed by an authorized
service representative only.
Pregnant woman should not use this treadmill unless having consulted and approved by their doctor.
WARNING:
Before beginning any exercise program, consult your physician.
This is especially important for persons over the age of 35 or persons with
pre-existing health problems. If you feel faint, dizzy or experience any sickness
or pain while using this equipment, cease exercise immediately and consult
your physician. Read all instructions and warnings before using.
GROUNDING INSTRUCTIONS
The products must be grounded first. If malfunction or breakdown occurs, grounding will provide a
path of least resistance for electric current to reduce the risk of electric shock. The product is
equipped with a cord having an equipment-grounding conductor and a grounding plug.
The plug must be plugged into an appropriate outlet that is properly installed and grounded in
accordance with all local codes and ordinances.
DANGER – Improper connection of the equipment-grounding conductor can result in a risk of
electric shock. Check w i th a qual ified el ectr ician or serv i ceman i f you ar e in doubt as to w h ether t he
products are properly grounded. Do not modify the plug provided with the product – if it will not fit
the outlet, have a proper outlet install by a qualified electrician.
The product is for use on nominal 220 ~ 240 volts
Make sure that the product is connected to an outlet having the same configuration as the plug.
Do not use any adapters or extension cords with this product
BEFORE YOU BEGIN
Thank you for selecting the revolutionary GoFit Silver Treadmill. The GFTMS01 off ers an
impressive array of features to make your home workouts more enjoyable and effective.
For your benefit, read this manual carefully before using the GoFit Silver Treadmill.
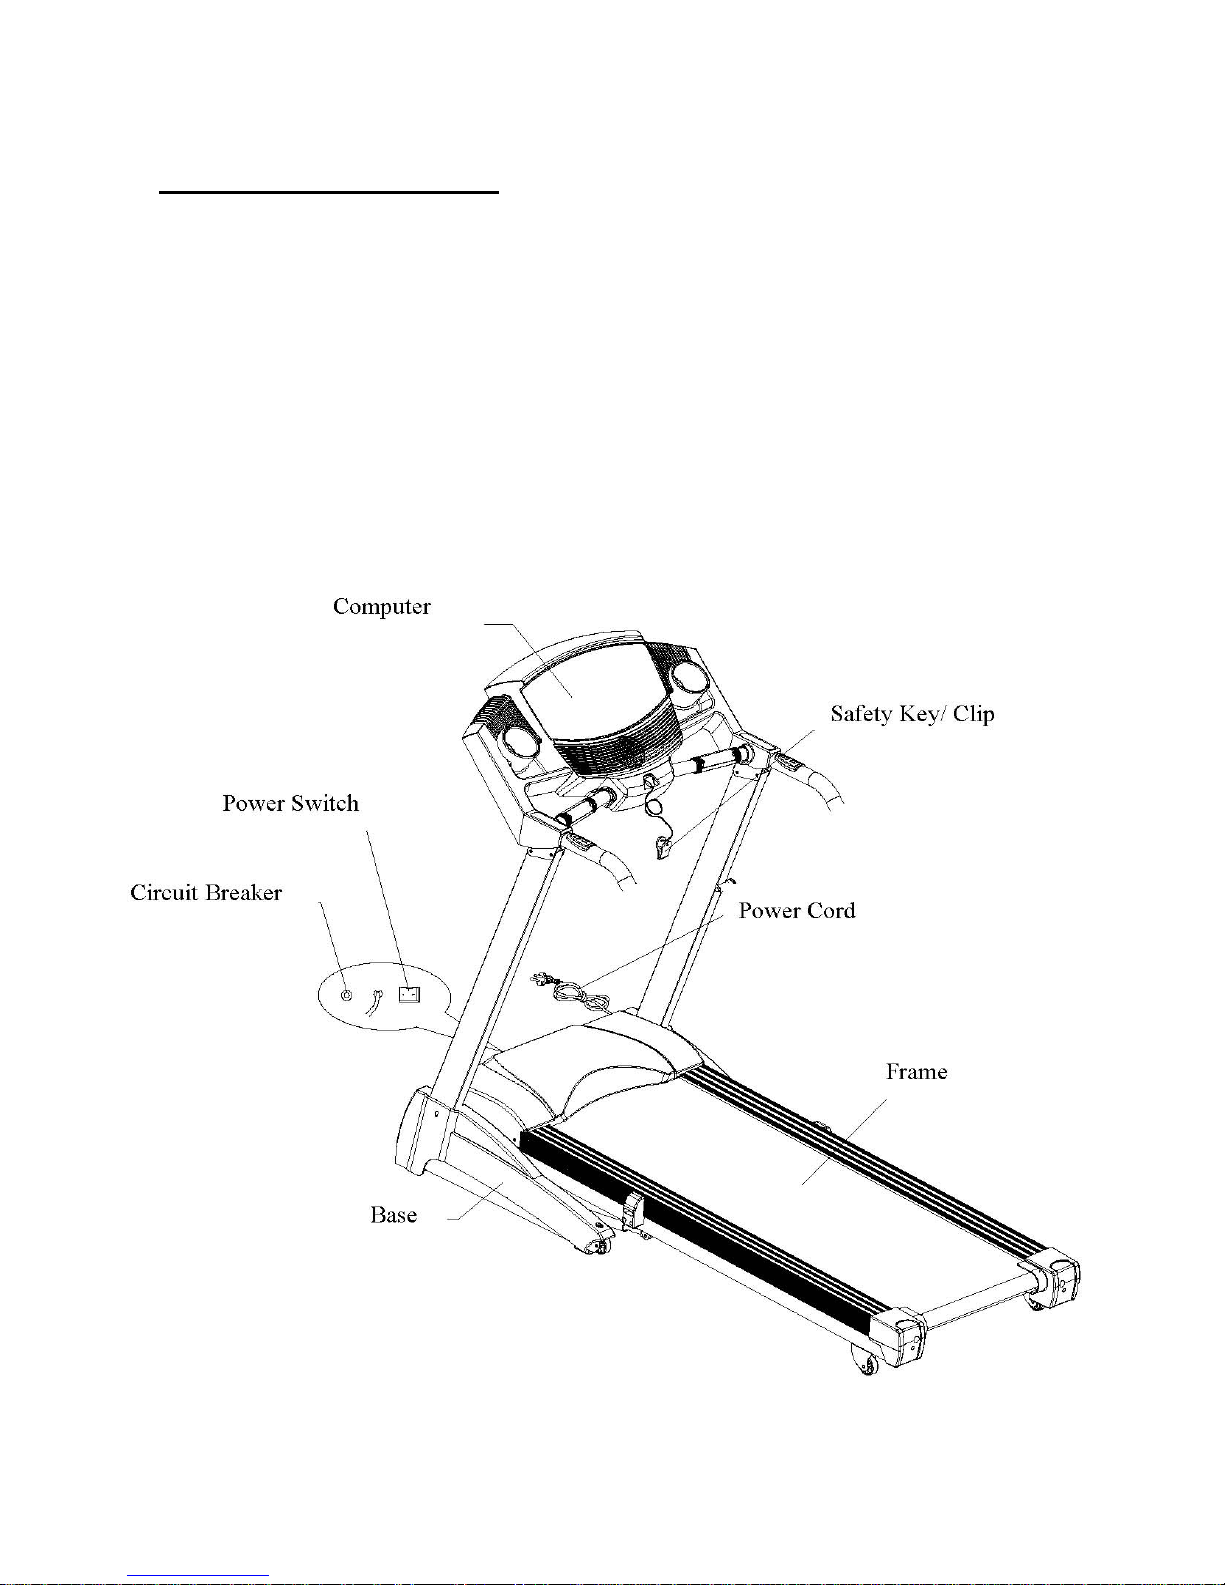
OVERVIEW

TREADMILL PRE-ASSEMBLY CHECKLIST

- 7 -
ASSEMBLY STEPS
CAUTION!
Please follow the assembly steps below
carefully and exactly to aviod injury .
ALWAYS ASSEMBLE THE TR EADMILL
WITH AN ASSISTANT, DO NOT
A TTEMPT A SSEMBL Y BY ONESELF.
STEP ONE
Place the two computer handrail tubes of
Frame (A) as shown to the right and
tighten with hex screw.
STEP TWO
Place the left and right uprights as shown
to the right and tighten with hex screw (B)

- 8 -
STEP THREE
After left and right Uprights are
tightened, cap left and right
Decoration Cover s (B, C) to the Frame
and tighten them with Phillips Screw
(C) and Plastic Washer (D).

- 9 -
CAUTION
>
The cylinday contains high pressur e gas.
Precautions must be taken to avoid it
crashing into other objects
>
If the cylinder is hit, it may cause damage
and make the use not smooth. When the
user is folding the treadmill, it may result in
the falling of the frame and cause injury.
This treadmill is foldable.
All operation should be stopped when
folding (include stopping walking belt &
disconnecting power cord)
Pull out the POP-Pin in the folding f ixing
mechanism as shown in the diagram then
lift the fram e u nt il the POP-Pin inserts into
the frame . On the contrary if you want to
use the treadmill, pull out the POP-Pin of
the folding mechanism as the arrow
shows in the diagram and put down the
frame slowly
• To prevent injury when moving a folded
treadmill, hold on to the adjustment box
with two hands. Then pivot the treadmill
towards you until the wheels of the
treadmill are rolling freely.
• Make sure the floor is cleared an d flat
when moving the folded treadmill around.

- 10 -
MAINTENANCE
1. Centering th e Walking Belt.
If the Walking Belt tracks off center to the
right or lef t of the dec k, fir st turn the power off.
Then use a wrench to tighten the rear roller
bolt on the side of the treadmill toward which
the belt is moving. For example, if the belt
moves to the left and the deck becomes
exposed on the right, tighten the bolt on the
left side of the frame. Tighten about 1/4 of
turn (clockwise). If the belt does not move
back to the center of the treadmill, make
another adjustment to the same bolt.
Once the Walking Belt has been adjusted
closer to the center, the treadmill can be
started again.
• Make sure the walking belt is going on
right without any tracks off the centers
2. It is recommended that the deck be
lubricated every 6-12 months according to the
frequency of usage. First, use the wrench to
loosen the bolts and end caps. Pull up the
Walking Belt, dispense the lubricant on the
deck and spread evenly. After lubricating the
deck, center the belt and check the belt
tension. If the belt happens to slip, follow the
above steps and lubricate the running deck.
SUGGESTED PREVENTIVE MAINTENANCE SCHEDULE IN
ACCORDANCE WITH THE AVERAGE RUNNING SPEED
Measurement
Speed
Interval
Metric
6KM/hr
below
1 year
6~12KM/hr
6 months
12KM/hr
above
3 months
English
4mile/hr
below
1 year
4~8mile/hr
6 months
8mile/hr
above
3 months
Note: This preventive maintenance
schedule is only meant for home use.

- 11 -
COMPUTER INSTR UCTIO N
I. Start Display:
1) If the SAFETY KEY is taken off, the matrix screen will display arrow down.
If the SAFETY KEY is replaced, the matrix screen will display KGS (LBS)
Weight window glitters and displays the pre-set value. The value is 70kg (150LBS) and
range 23~130KG (50~286LBS). At this time the light of Weight window sho ws.
Finish setting, press ENTER and the window will turn to Start / R eady s t at us.
The matrix window displays a heart-shaped picture. The aim of setting weight is to make a
change of burning CALORIES.
This can be only done after starting. It does not need to be set in PROGRAM. It means you
can use the value after starting. You must reset each time you start.
2) If the SAFETY KEY is removed during work out, the beeper will sound and the treadmill
will stop running. At this time place the SAFETY KEY back and all the values will go back
to the initial position.
3) Under the common Start / Ready sta tus, PULSE wind ow wil l dis pla y H P pictu re if you
don’t grip the pulse sensor. If you grip the pulse sensor, you will see the PULSE window
starting to display pulse value.
II. Operation Instruction:
1) Under Start/Ready position, you can press Mode directly to enter the program.
2) Under Start/Ready position, press Start to enter directly the start-up of Manu run.
3) If the machine has a fan function, you can press the fan button to start or stop fan.
Pressing once means starting and pressing twice means stopping.

- 12 -
III. Edit Mode:
1) At Start/Ready position, press Mode to choose Manual and Program by press +/- key.
2) Program Mode : Press +/- key to edit the Program (P1~P8), and the PROGRAM
3) window will flash, LCD window will sho w P1~P8 to edit , you can press +/ - key to edit.
Press E NTE R to enter the TIME edit, the Program pre-set value is 30min, Range is 20~99min,
STEP is 1min. After edit, press ENTER or START to start the machine.
If you press START directly during edit, the rest un-edited functions are pre-set.
During edit, INCLINE and SPEED window will display first level value.
The matrix window will display the picture.
4) WARM UP and COOL DOWN function: During WARM UP or Program position, change
speed or inclination, the value will increase or decrease in the next level.
COOL DOWN is not affected and STOP is the only function which can be carried out.
5) PROGRAM has 30 levels in all. The three anterior are WARM UP, the three later are COOL
DOWN. Each is 3 minutes. The setting time except anterior and later which mean 6 minutes
will be execute averagely by surplus 24 levels.
6) 9 HOLES mode has no functions of WARM UP or COOL DOWN. When distance is equal
to 3.5KM, the motor will stop, the INCLINE is 0 and displays” End”
** When the SAFETY KEY is taken off and then replaced, it will not revert to original position.
You need to press start key to perform the incline to reposition it.
** Under start/ready status, if you c ontinuously pr ess st op key for 5 seconds, i t will reposition.
** During any pr ogra m, if you press stop key , the program will stop.
If users want to continuously perform the program, press start key or again press stop
key to leave the program and back to start/ready status
IV. Program Operation an d Instructio n:
1) When you press START, it will begin t o count dow n for 3 se conds , a f ter that, t he motor wi ll st art,
speed begins at 1 .0KPH (0.6MPH).
2) Speed STEP is 0.1, you can press SPEED UP/DOW N key to select (the speed UP/DOWN
step is 0.1), or press speed instant key 1'2' 4' 6 '8' 10 to select.
3) Incline STEP is 1, you can press INCLINE UP/DOW N key to select (incline UP/DOWN step is
1), or press incline instant key 2 '4 ' 6 ' 8 ' 10 ' 12 to select.
4) SETTING TIME:

- 13 -
• When TIME is set, the window wil l displ ay the coun t dow n value from target value. When time
reaches 0:00, the treadmill will stop automatically.
• When TIME is not set, the window will dis p l ay a positive number.
When time reaches 99:00 the treadmill will stop automatically.
5) Pressing Mode k ey can switch between SP EED, DIS TANCE, CALORIES bu t not INCLINE,
PULSE, WEIGHT. It will just display INCLINE. When there is PULSE signa l, it will display
the PULSE value. When there is heartbeat value, the PULSE window will display the heartbeat
value.
6) Press Stop when the motor is working, the motor will stop and the incline motor will stop, the
Time window will display Stop; If you press START key again, the motor will start after
3-seconds countdown, the speed will be kept at the same before stop, and the incline will be
increased to the set height before stop .
7) When it is at stop position, hold the Stop key for 3 seconds, and it will go back to the
Start/Ready position.
8) It will go back to the Start/Ready position after 30 seconds in the End position
(or press Stop Key)
9) The time pre-set value is 0, range is 20~99. When the time is 20 minutes, press +- to
V. Program mode
P1 Manual time: Pre-set value 0min; Range 20~99min; step 1 min
P2 9 hole LEVEL: Initial Value 1; Range1~10; step1; 3500 meter based on distance.
P3 hill climb LEVEL: Initial Value 1; Range 1~1 0; step 1
time: Pre-set value 30min; Range 20~99min; step 1 m in
P4 hill run LEVEL: Initial Value 1; Range 1~10; step 1
time: Pre-set value 30min; Range 20 ~99min; step 1 min
P5 interval LEVEL: Initial Value 1; Range 1~10; step 1
time: Pre-set value 30min; Range 20 ~99min; step 1 min
P6 rolling LEVEL: Initial Value 1; Range 1~10; step 1
time: Pre-set value 30min; Range 20 ~99min; step 1 min
P7 Weight loss LEVEL: Initial Value 1; Range 1~10; step 1
time: P re-set value 30min; Range 20~99min; step 1 min
P8 Custom time: Pre-set value 30min; Range 20~99min; st ep 1 min

- 14 -
PROGRAM has 30 levels in all and all the pre-set values are lowest value.
1) After entering into the mode function, at th is t ime, the LEVEL light is on, window flashes.
This function is to select acuteness level of movement (L1~L10). You can
press to change the level you need and press ENTER to make sure.
(2) After finishing selecting level, the TIME window will star to flash. At this time press
to set the time you need. Or press START key directly to start with no
count down. ** range of time value: 20~99 min; pre-set 30min; step 1 min.
**If the treadmill has HRC function ' P8 Custom function will be replaced by
HRC function, the operati on a s foll ow ing:
P8 HRC function: (This functi on must b e us ed w i th C hest Bel t)
The purpose of this program is self-training based on heart rate. During the training, when the
heart rate of a runner ri ses to the s etti ng c hosen, the speed and elevation will keep within a
certain range for best training. After you have chosen this mode, the program will ask you to
input values as following step s :
1) When the AGE LED indicator flashes 'you can press to adjust the age, after i t i s
set, press enter to move onto the next option.
Age pre-set value: 30; R ang e of age: 13~80; Step is 1.
2) At this time, the PULSE LED indicator flash e s and the program will ask you to enter the pulse
value, this value will change according to dif ferent ages . Refer to the char t below for the v alues
and select a suitable one, then press to adjust the pulse value.
If you don’t make any changes, press enter and the program will change accordi ng to the
default values and enter into the next setting.
3) At this time the TIME window flashes and the program will ask you to input the time value, to
set the desired exer cise time or press START di rectl y to st art the ex ercise w ith no count dow n
*Range of Time; 20 ~99 min; default value 30min; step is 1

- 15 -
**This chart is about Age and Pulse Value (default value) for HRC Function.
Error Signal:
E1: The treadmill can’t read the speed feedback value
E6: Incline motor can’t work within the ADC range
E7: Incline is higher or lower (Over range)
** If any error signal appears, please contact GoFit Platinum **

- 16 -

- 17 -

- 18 -
Trainings hints:
With buying this treadmill you have taken the first step toward improving your fitness.
With the help of this item you can add value to your life with improved health, wellbeing
and lifestyle.
Goal of training:
Building of muscles
General fitness
Endurance
Feeling of wellbeing
The training success is mainly depending on the following points.
Continuous training
Good nourishment
Control of training progress
Who can exercise?
Generally every healthy person, young or old, can start to exercise.
Capacity:
The body, especially the heart and circulation needs time to adapt to any new exercise.
Therefore, it is very important to start slowly with your training and to take brakes between and after
exercise. Only exercise at a level you are comfortable with.
After continuous training you can gradually increase the duration and intensity of your sessions.
After training you should always allow time to stretch and cool down.
Tips for successful and healthy training:
Always remember that training is most effective when you follow the important rules.
Exercise gives the best results when it is undertaken long term and continuously, short
Term exercising has very little effect.
Wear comfortable clothing that is not too tight.
Avoid exercise with a full stomach.
It is recommended not to eat any sooner than one hour before and after training.
Do not exercise if you are very tired or feel exhausted.
Your body needs liquid if you exercise, so ensure you have adequate water nearby at all times.

- 19 -
Warming up should be done with every sporting activity to decrease the risk or injury.
Training:
A suggested wa rm up is a 5-10 minute run on the spot or around the room with a few jumps at each
minute interval.
The following stretches are gentle but effective in waking up your body, stimulating your circulation and
making your ankles more flexible. Ple ase do these each time before you start exercising.
Stretching:
The correct form for these basic stretches is displayed
SUGGESTED STRETCHES
on the right.
Move slowly as you stretch and avoid bouncing.
1. Toe Touch Stretch
Stand with your knees bent slightly and slowly bend forward from
your hips.
Allow your back and shoulders to relax as you reach
down toward your toes as far as possible. Hold for 15 counts then
relax. Repeat 3 times.
Stretches: Hamstrings, back of knees and back.
2. Hamstring Stretch
Sit with one leg extended.
Bring the sole of the opposite foot
toward you and rest it against the inner thigh of your extended leg.
Reach toward your toe s as far as possible. H old for 15 counts, then
relax. Repeat 3 times for each leg.
Stretches: Hamstrings, lower back and groin.
3. Calf/Achilles Stretch
With one leg in front of the other, reach forward and place your
hands against a wall. Keep your back leg straight and your back
foot flat on the floor. Bend the front leg .
Stretches: Calves, Achilles tendons and ankles.
4. Quadriceps Stretch
With one hand against a wall for balance, reach back and grasp
one foot with your other hand. Bring your heel as close to your
buttocks as possible. Hold for 15 counts, then relax.
Repeat 3 times for each leg.
Stretches: Quadriceps and hip muscles .
5. Inner Thigh Stretch
Sit with the soles of your feet to
gether and your knees outward.
Pull your feet towar d your groin area as far as possible. Hold for 15
counts, then relax. Repeat 3 times.
Stretches: Quadriceps and hip muscles .

- 20 -
Phone 1800 446 348 fax 1300 446 348
www.gofit.com.au
 Loading...