

G4-0011A
®
USB 3.0 to HDMI/DVI
Video Adapter - Black
P/N: USB3HDMI

Congratulations for owning a gofanco product. Our products
aim to meet all your connectivity needs wherever you go.
Have fun with our products!
Please read this manual carefully before first use.
If you need more information about our products, please
visit www.gofanco.com.
For technical support, please email us at support@gofanco.
com.
For drivers/manuals download, please go to http:// www.
gofanco.com/download.
2

Introduction
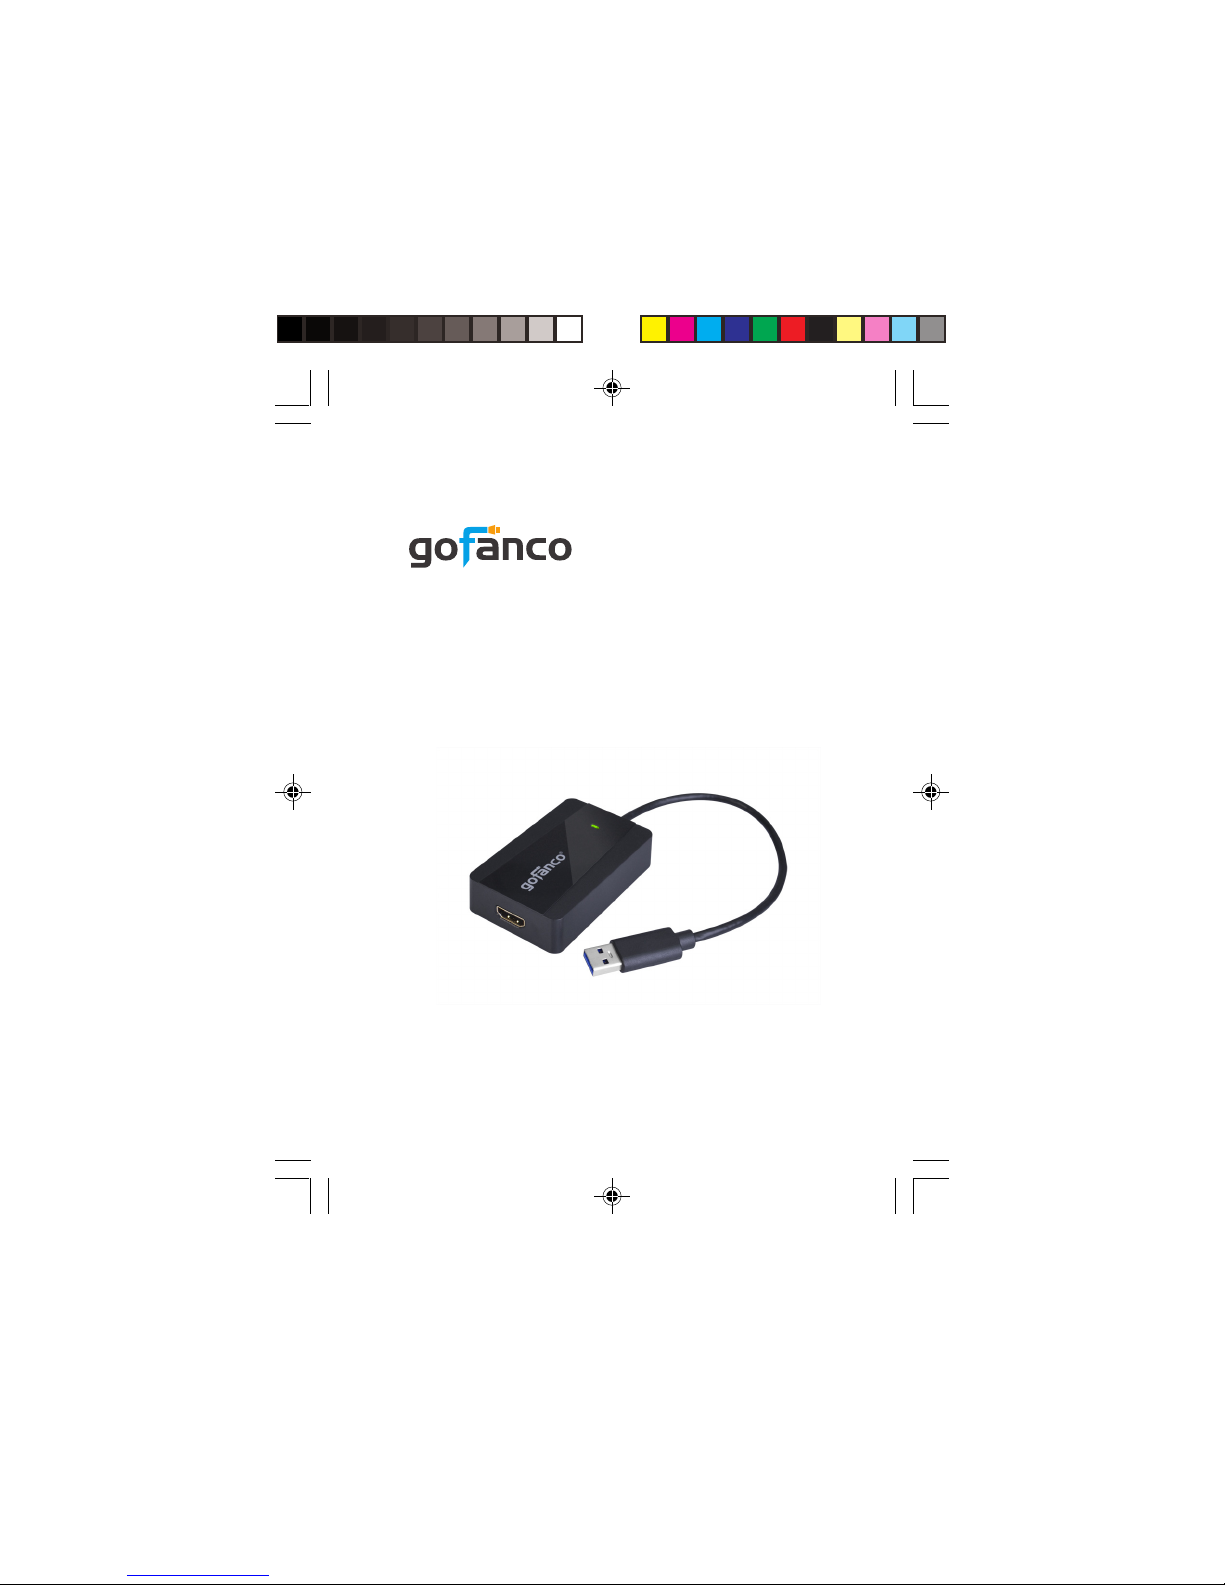
gofanco USB 3.0 HDMI/DVI Video Adapter - Black (part# USB
3HDMI) allows you to add an external HDMI or DVI (with
included adapter) video output to your USB-enabled system.
System Requirements
• PC or Mac system with an available USB port (USB 3.0
recommended)
• Windows® 10 (32-/64-bit) / 8.1 & 8 (32-/64-bit) / 7 (32/64-bit) / Vista (32-/64-bit) / XP (32-bit)
• Mac OS X v10.6 and later
Package Contents
• USB 3.0 to HDMI/DVI Video Adapter - Black
• HDMI to DVI adapter
• Driver CD
• User's guide
3
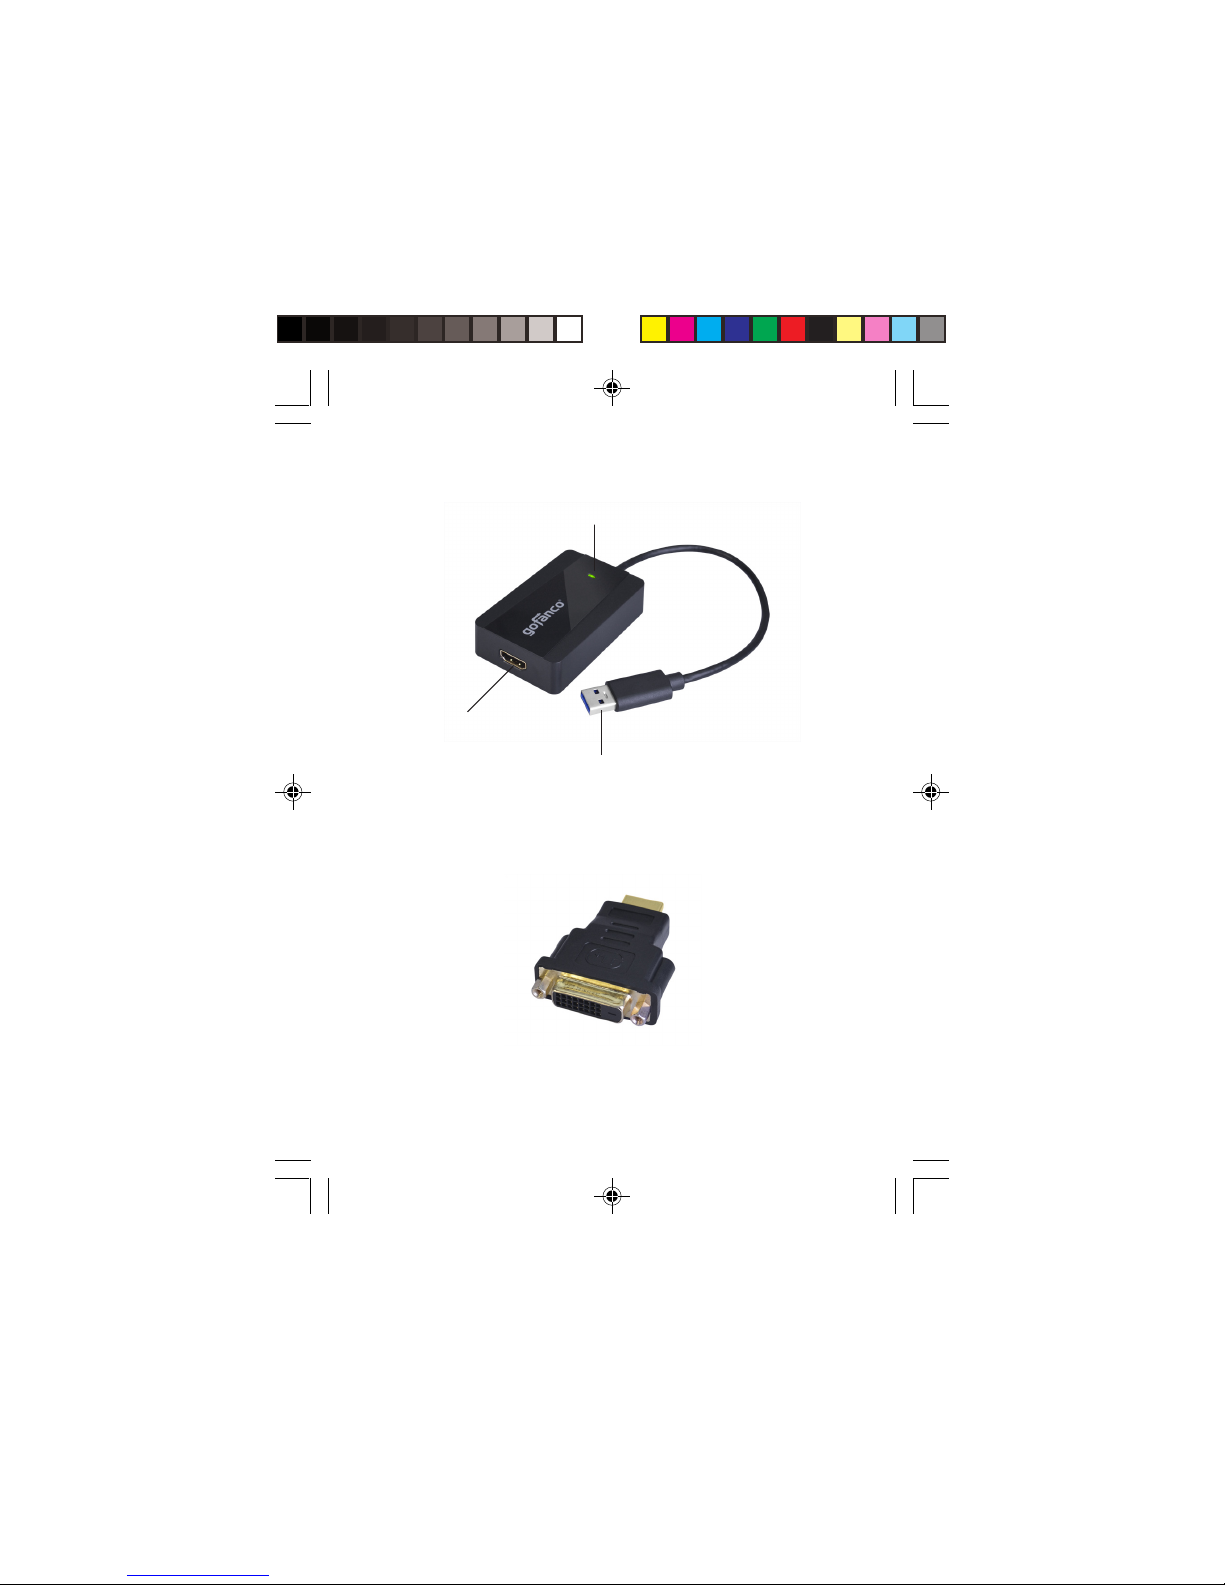
Layout
Power LED
HDMI
USB Type-A
Figure 1: USB 3.0 to HDMI/DVI Video Adapter - Black
4
Figure 2: HDMI to DVI adapter
Windows Installation
Note: Make sure the proper driver for your system's graphics
card is installed. gofanco USB 3.0 Display Adapter is not
designed to work with Windows' Standard VGA Graphics
Adapter driver.
Important: Do not plug the video adapter into the computer
until instructed to do so.
1. Insert the driver CD.
2. The setup program should be displayed automatically.
If not, browse the CD/DVD manually.
3. For Windows 10 / 8.1 & 8 / 7: Run Setup.exe.
For Windows Vista / XP: Choose the folder according to
your OS and run Setup.exe. (XP runs driver installation
automatically)
4. At User Account Control window, click Yes.
5. At System Check, click Install.
6. At First Connect, connect your second monitor to the
video adapter. (use the included adapter if needed)
7. Connect the video adapter to the USB port of the computer.
8. When the video adapter is detected, the Final Setup will
run automatically.
9. When Installation Complete message appears, click
Finish.
10. It's ready for use now.
5
To Verify Windows Installation
1. Right click This PC / Computer / My Computer on the
desktop, then click Manage.
2. Click Device Manager, expand USB Display Adapters,
and USB Display Adapter should be displayed.
Windows Display Utility
After successful driver installation, the utility icon
will appear in the taskbar. This display utility allows you
to quickly change the viewing modes and resolutions. Access
the utility by clicking the icon.
Viewing Modes
• Screen Resolution: Displays a list of available
resolutions.
• Screen Rotation:
Normal - No rotation is applied.
Rotated Left - Rotates the extended or mirrored display
by 270 degrees.
Rotated Right - Rotates the extended or mirrored display
by 90 degrees.
Upside-Down - Rotates the extended or mirrored display
by 180 degrees.
6

• Extend to:
Right - Extends the display to the right of the main
display.
Left - Extends the display to the left of the main display.
Above - Extends the display above of the main display.
Below - Extends the display below the main display.
• Extend (default): Extends your desktop for easy viewing
of multiple windows. Windows will move off the primary
display from the right side and enter the extended
display from the left.
• Set as Main Monitor: Makes the second monitor as the
main display.
• Mirror: You will see the same image on both monitors.
• Off: Turns off the secondary monitor.
• Fit to TV: Adjust the size of the Windows desktop when
the Windows desktop does not completely appear on the
TV.
Using Windows Display Properties (WDP)
Note: Not all the WDP functions are available in
Windows Vista.
Instead of using the utility, you can use the embedded
Windows Display Properties to do the basic setting.
7

WDP allows you to rotate, duplicate or extend screens as
well as modify screen resolution.
Position the mouse anywhere on the Windows Desktop.
For Windows 10: Right click and select Display settings.
For Windows 8 / Windows 7: Right click and select Screen
Resolution.
For Windows Vista: Right click and select Personalize, then
click Display Settings.
For Windows XP: Right click then select Properties.
• Display: Use the drop down list to select a display to be
configured.
• Resolution: Use the drop down list and use the slider to
choose a resolution.
• Orientation:
Landscape - Sets the display to landscape view.
Portrait - Sets the display to portrait mode.
Landscape (flipped) - Sets the display to upside down
landscape mode.
Portrait (flipped) - Sets the display to upside down
landscape mode.
8

• Multiple displays:
Duplicates these displays - Reproduces the main display
on the second display.
Extend these displays - Extends the main display onto the
secondary display.
Show (Desktop) only on 1 - The display marked 2 becomes
blank.
Shows (Desktop) only on 2 - The desktop appears on the
display marked 2. The display marked 1 becomes blank.
• Make this my main display: Check the box and you will
make your connected display as the main display
Make sure the secondary monitor is selected before
choosing this option.
• Display Positions: To move the position of a display, click
and hold the display you wish to move then drag it to the
desired position. The display will be highlighted with a
blue border while you are moving the display to its new
position.
Windows Shortcut
Press Windows key and P to bring up the menu and choose
a desired mode. (Available in Windows 10, 8 and Windows
7 only)
9

Mac OS Driver Installation
1. Connect your second monitor to the video adapter (use
the included adapter if needed) and turn it on, then plug
the video adapter into the computer.
2. Insert the driver CD, then double click Driver CD icon on
the Desktop.
3. Choose the Mac folder according to your OS.
4. Double click DisplayLink_Mac_....dmg.
5. At the DisplayLink Installer, double click DisplayLink
Software Installer.pkg.
6. At the Introduction, click Continue for one to two times.
7. At the License, click Continue, and Agree.
8. At the Destination Select , click Continue. Skip this step
if not prompted.
9. At the Installation Type, click Change Install Location if
you want to change the default saving folder; otherwise,
click Install then Continue Installation.
10. Type in Name and Password, click OK or Install Software.
11. Click Restart to complete the installation.
10
To Verify Driver Installation
1. Click the Apple logo from the top menu bar.
2. Click About this Mac, More Info..., then System Report.
3. Under Hardware/USB, USB Display Adapter will be
displayed.
Mac Display Utility
Click the utility icon in the taskbar to change the modes/
resolutions, or click System Preferences, the Displays icon,
then select the Arrangement pane.
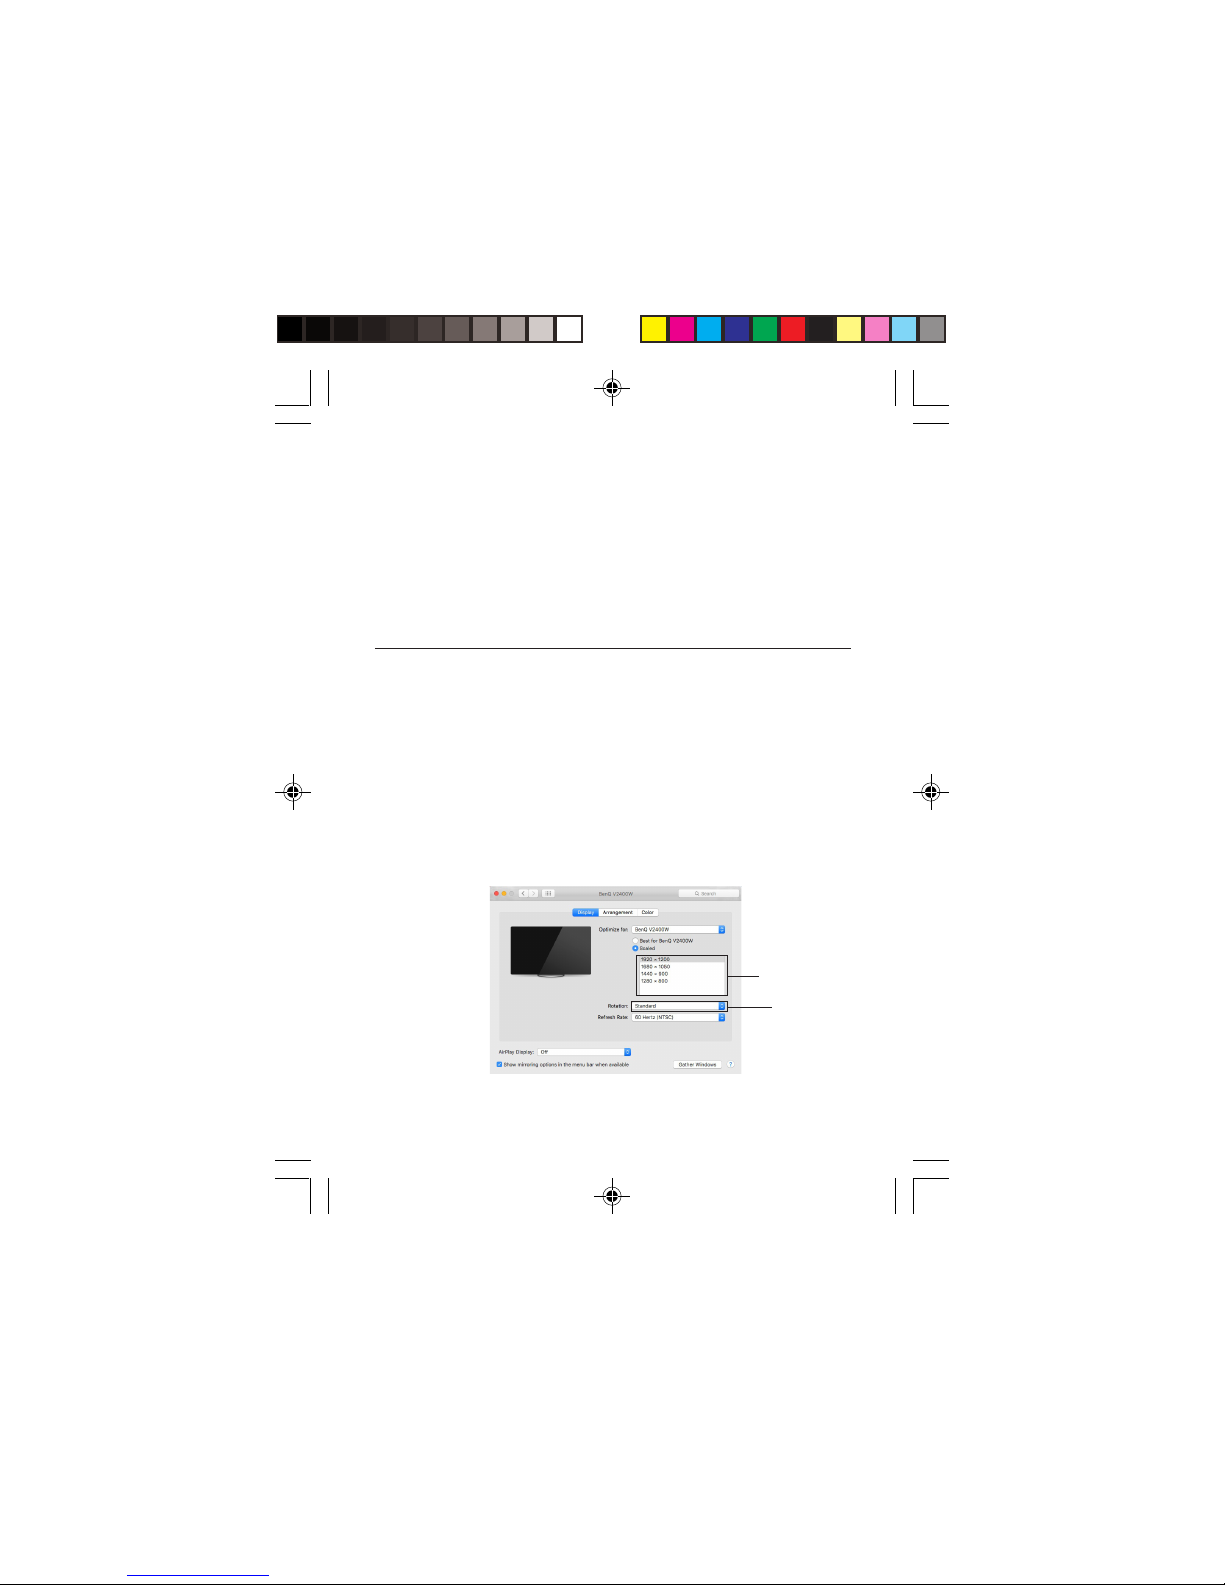
Setting the Display Resolutions
Select an available resolution from the Display Preferences
window. The resolutions available depend on both the
video adapter enabled product and the capabilities of the
connected display.
Resolution list
Rotate drop
down list
Figure 3
11

Rotating a Display
Configure the orientation using the Rotation drop down list,
see Figure 3. Select the appropriate angle of rotation to
match your display's set up.
Setting the Display to Mirror/Extend Mode
Check Mirror Displays box on the Arrangement pane to
enable the mirror mode. Uncheck the box to set the display
to extend mode.
Change the main display by simply dragging the white menu bar
between the displays.
Mirror display
box
Figure 4
Changing the Main Display
As Figure 4, you can change the main display by moving the
Menu Bar between displays. Changing the main display
affects where new windows appear.
12

To Uninstall Mac Driver
1. Insert the driver CD, then double click Driver CD icon on
the Desktop.
2. Choose the Mac folder according to your OS.
3. Double clickDisplayLink_Mac_....dmg.
4. Double click DisplayLink Software Uninstaller, then click
Uninstall.
5. Type in your system password, click OK.
6. Click Restart to complete the uninstallation.
13

Frequently Asked Questions
Q1: Why won't my DVD video play when I move it over to
the extended display?
A1: Some DVD playback software packages do not support
playing on a second display adapter.
Q2: There are lines running up and down my screen or the
screen is distorted
A2: This is due to a low or unsupported refresh rate. You
can change this in Display Properties/Settings/
Advanced/Monitor. Make sure you select the USB 3.0
Video Adapter and not set the refresh rate higher than
what your monitor can support.
Q3: Why can't I make the USB 3.0 Video Adapter the primary
display?
A3: Some video cards ship their product with a utility that
prevents other video cards from being set as the
primary video card. Check the bottom right hand
corner of the taskbar for the utility. Disable the
utility before switching the USB 3.0 Video Adapter to be
the primary display.
14
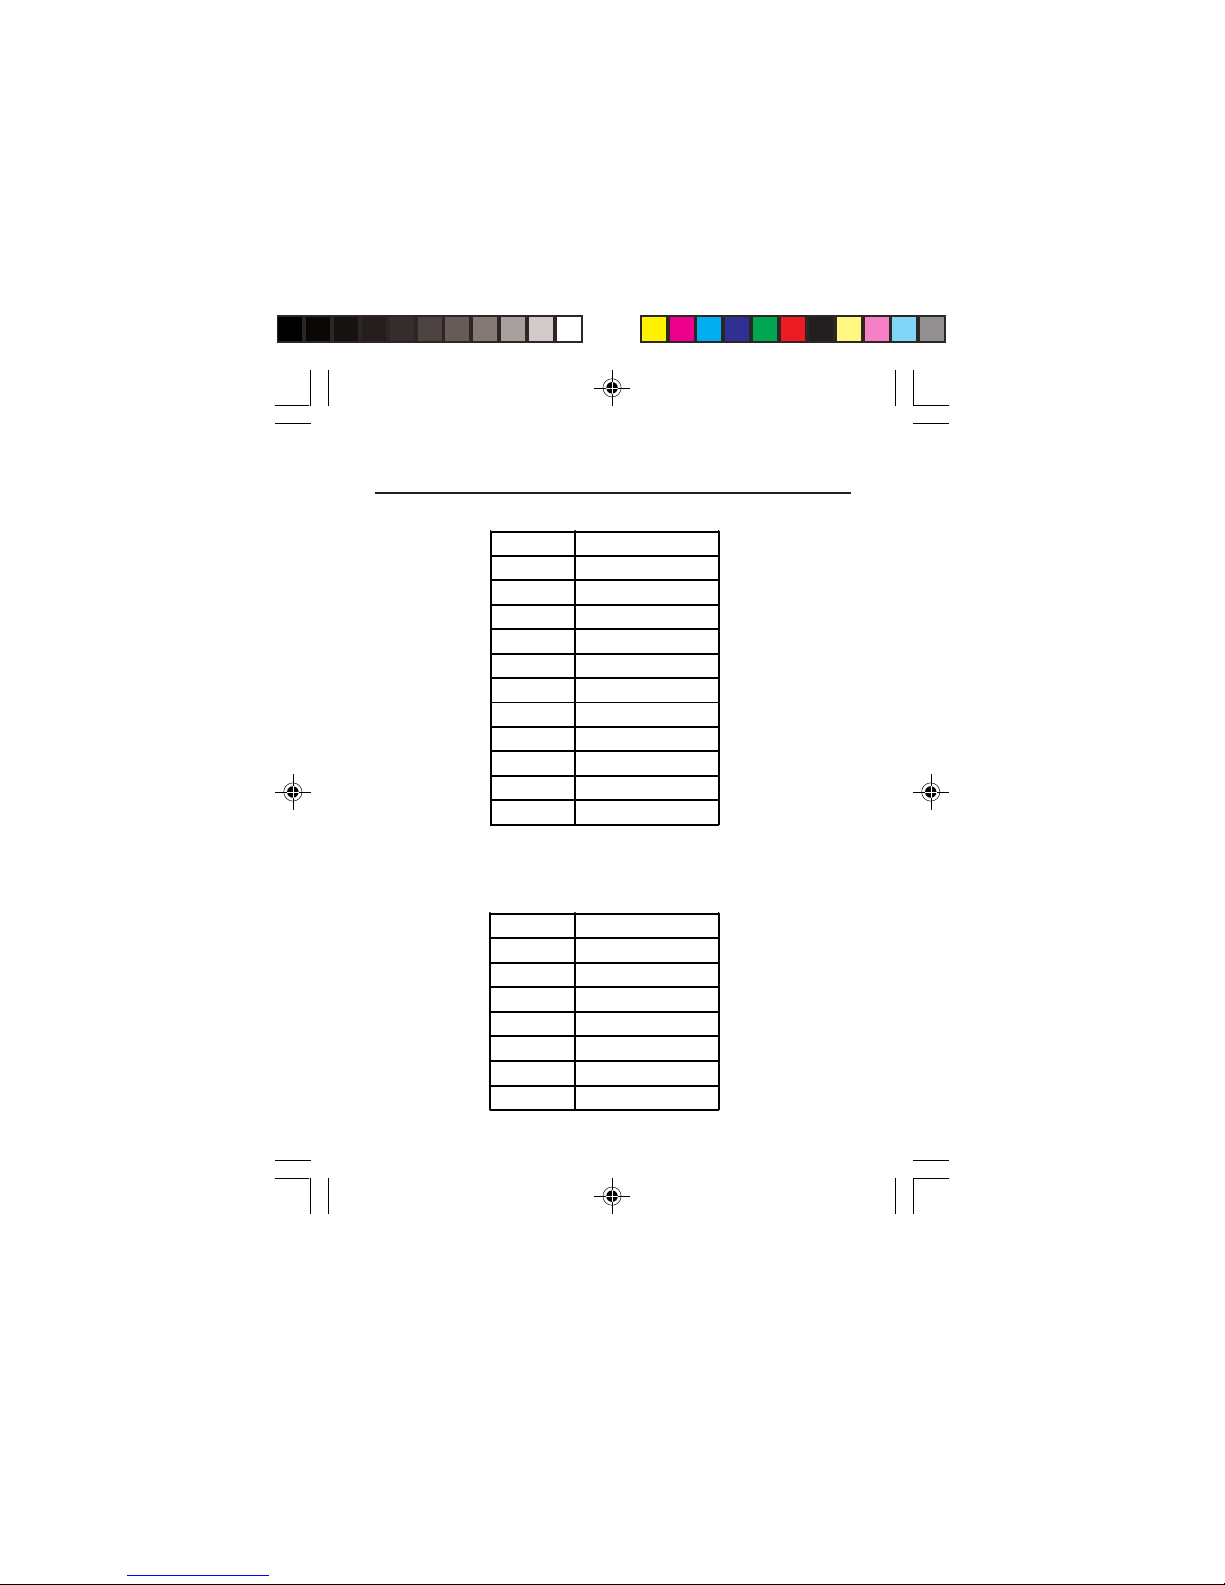
Supported Display Resolution
- Wide Screen Display
Aspe ct Ratio R eso lution
16:9 2560 x 1440 (50Hz) *
16:9 2048 x1152
16:10 1920 x 1200
16:9 1920 x 1080
16:10 1680 x 1050
16:9 1 600 x 900
16:10 1440 x 900
16:9 1 366 x 768
16:10 1280 x 800
15:9 1 280 x 768
16:9 1 280 x 720
*Note: Up to 2560 x 1440 for HDMI only. For DVI, the
maximum resolution is 2048 x 1152
- Standard Display
Aspe ct Ratio Res olu tion
4:3 1600 x 1200
4:3 1400 x 1050
5:4 1280 x 1024
4:3 1280 x960
4:3 1152 x 864
4:3 1024 x 768
4:3 800 x 600
15

®
Thank you for choosing gofanco
www.gofanco.com
 Loading...