

Page 1
TT680-N
Nikon i-TTL Compatible Flash
INSTRUCTION MANUAL
说 明 手 册
中英文双语 / Chinese English Bilingual
82.ATT680N0-00
Thank you for purchasing a GODOX product.
The GODOX TT680-N camera flash applies to Nikon DSLR cameras
and is compatible with i-TTL autoflash. It supports Multi/Stroboscopic
flash function, as well as auto and manual zoom function with a flash
coverage of 24 to 105 mm. With this i-TTL compatible flash, your
shooting will become simpler. You can easily achieve a correct flash
exposure even in complex lighting-changing environment.
Page 2
Contents
1.Getting Started and Basic Operation---------------------------------- 03
2.Using Flash-------------------------------------------------------------------06
3.Reference --------------------------------------------------------------------13
Conventions used in this Manual
● The operation procedures in this instruction manual assume that
both the camera and camera flash’s power switches are ON.
● Reference page numbers are indicated by (p.**).
● This instruction manual uses the following alert symbols:
: The Caution symbol indicates a warning to prevent shooting
problems.
: The Note symbol gives supplemental information.
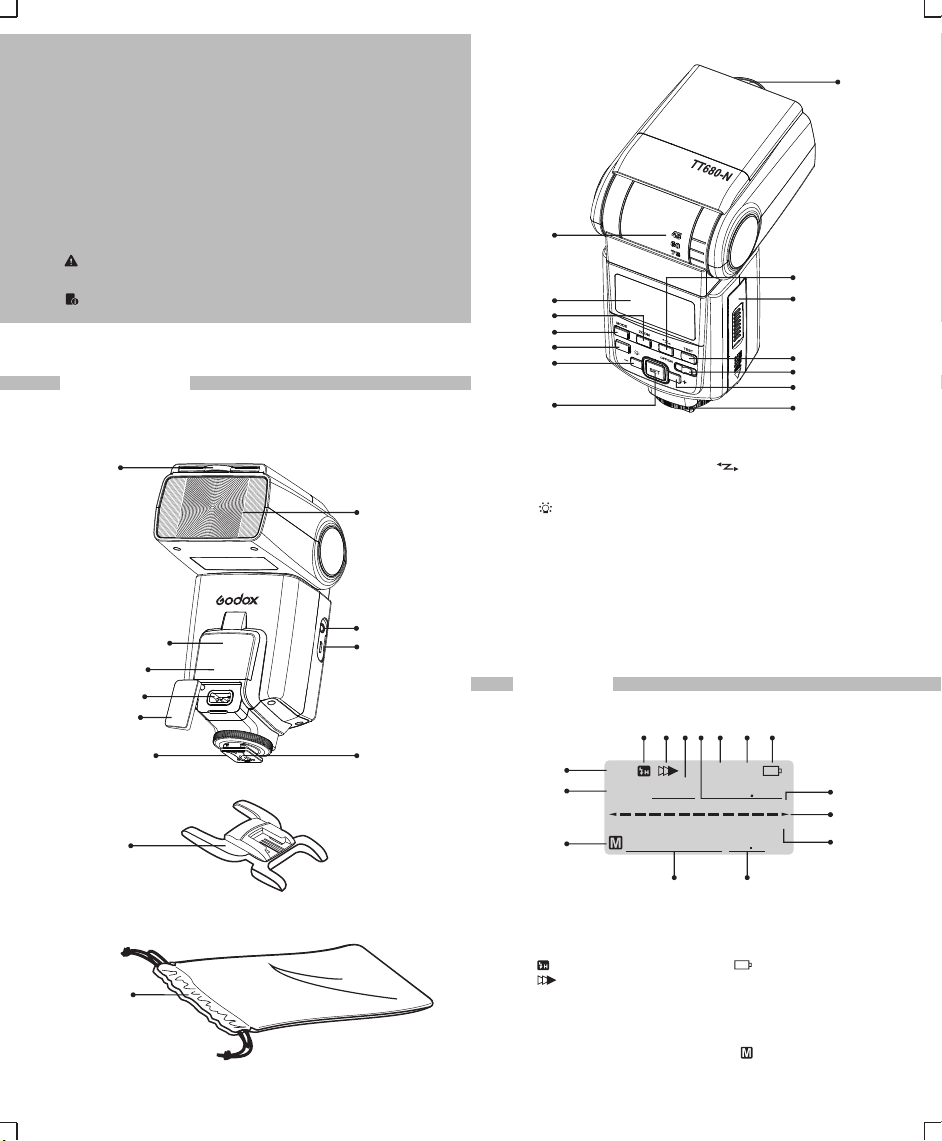
Nomenclature
H
G
I
F
E
D
C
B
A
K
J
L
M
N
Built-in wide panel
(retracted)
AF-assist beam emitter
Optic slave cell
Charging socket
Socket cover
Mounting foot
Mini stand
Protecting bag
Flash head
3.5mm
Sync cord jack
USB port
Contacts
A. < SET > H. Catchlight panel
Set button I. < >
B. < - > Off camera flash mode setting button
Go to next downwards J. Flash-ready indicator
C. < > < TEST >test button
LCD panel illumination K. Battery compartment cover
Custom function setting L. Power switch
D. < MODE > < OFF >:Power off
Flash mode selection < ON >:Power on
E. < ZOOM > M. < + >
Zoom button Go to next upwards
F. LCD panel N. Locking screw
G. Bounce angle
LCD Panel
3 457 9
2
TTL
Multi
1
15
1. < M/Multi>
Manual flash/Multi flash
2. < TTL >,i-TTL autoflash
3. < >High-speed sync (FP flash)
4. < >Second-curtain sync
5. Manual flash output level
6. S1 slave triggering mode
7. Multi flash count
Multi flash frequency
Manual flash output in 1/3rd stop
increments
1/188 88 88
0.5 0.711.5
2.3
4
1.7
Zoom
6 8
S1 S2
Hz
+
3
6 91318
4
2
5
7
10 15 203040 60
mm F
188
88
1314
FEC:Flash exposure compensation
amount
8. S2 slave triggering mode
9. < > Low battery
10. Indicator (meters)
11. Flash range scale
12. Indicator (feet)
13. Aperture
14. Zoom focal length
15. < >Manual zoom
10
m
11
ft
12
01
02
Page 3
Getting Started and Basic Operation
Installing the Batteries--------------------------------------------------------03
Attaching to the Camera-----------------------------------------------------04
Turning on the Power Switch------------------------------------------------04
Fully Automatic Flash Shooting---------------------------------------------04
Using i-TTL Autoflash in the Shooting Modes---------------------------05
Cautions for firing continuous flashes
To avoid overheating and degrading the flash head, do not
●
fire more than 20 continuous flashes. After 20 continuous
flashes, allow a rest time of at least 10 min.
If you fire more than 20 continuous flashes and then fire
●
more flashes in short intervals, the inner overheating
prevention function may be activated to make the recycling
time about 8 to 20 sec. If this occurs, allow a rest time of
about 15 min, and the flash will then return to normal.
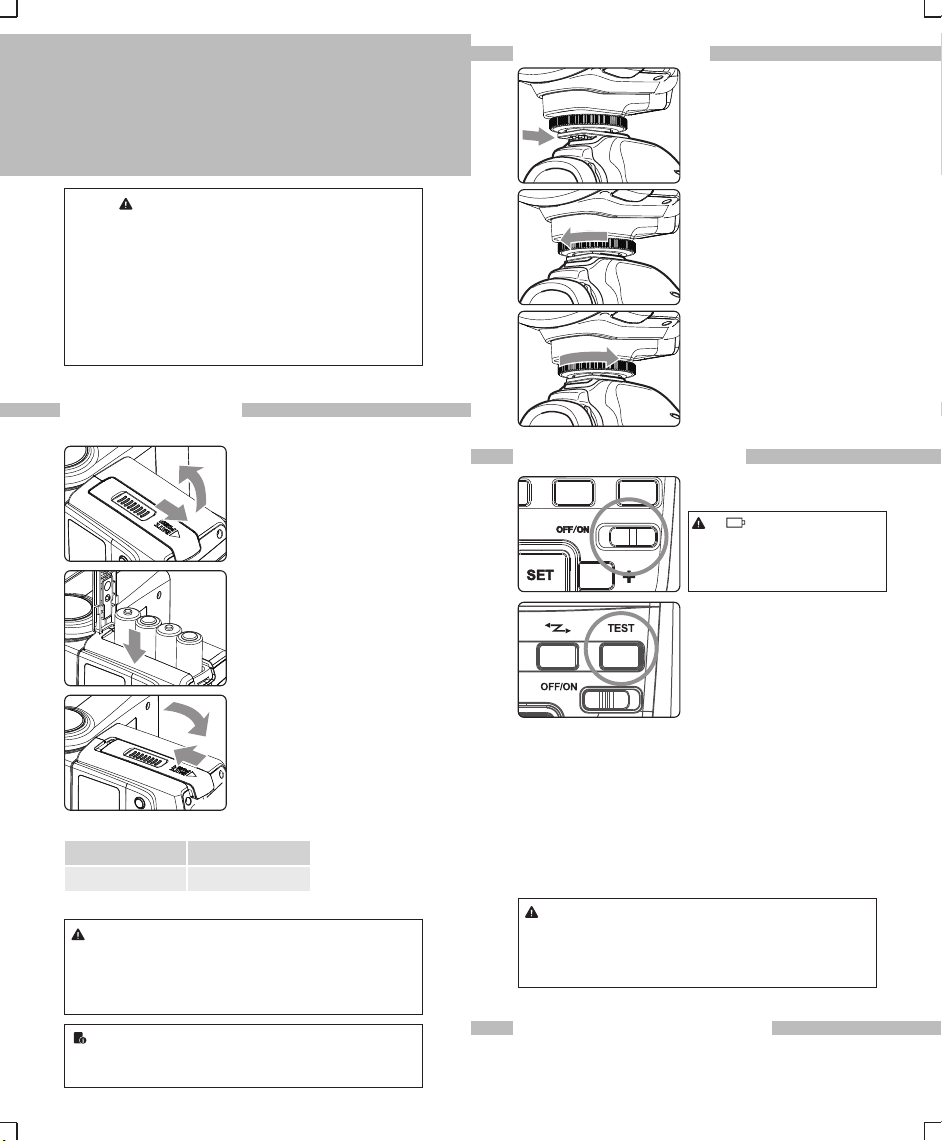
Installing the Batteries
Install four size-AA batteries.
Recycling Time and Flash Count (with size-AA alkaline batteries)
Recycling Time
Approx. 0.1-5 sec
Based on new size-AA alkaline batteries.
● Using size-AA batteries other than the alkaline type may cause
improper battery contact due to the irregular shape of the battery
contacts.
● If you change the batteries after firing many flashes continuously,
be aware that the batteries might be hot.
● Use a new set of four batteries of the same brand. When
replacing the batteries, replace all four at one time.
● Size-AA Ni-MH or lithium batteries can also be used.
03
. Open the cover.
1
● Use your thumb to press the
battery compartment cover, and
then slide it to open the cover.
2. Install the batteries.
● Make sure the + and – battery
contacts are properly oriented
as shown in the compartment.
3. Close the cover.
● Slide the battery compartment
cover as shown by the arrow to
close it.
Flash Count
Approx. 100-700
Attaching to the Camera
. Attach the Camera Flash.
1
● Slip the camera flash’s
mounting foot into the camera’s
hot shoe all the way.
2
. Secure the Camera Flash.
● Rotate the locking screw on the
mounting foot until it locks up.
3
. Detach the Camera Flash.
● Rotate the locking screw on the
mounting foot until it is loosed.
Turning on the Power Switch
1
. Set the power switch to <ON>.
●
Camera flash starts charging.
If < > blinks on the LCD panel, the
battery power is low and the camera
flash stops charging. In this case, the
<ZOOM> button is disabled. Please
change the batteries immediately.
2. Check that the flash is ready.
● The flash-ready indicator turns
red, indicating that the camera
flash is fully charged and ready
for firing.
● Pressing <TEST> button will fire
a test flash.
About Auto Power Off
To save battery power, the power will be off automatically after a certain
period of idle use.
● The flash will enter sleep mode after approx. 90 seconds of idle use
when being attached to the camera.
● Setting as off camera mode, namely, the S1/S2 slave triggering mode,
the flash will enter sleep mode after approx. 60 minutes (adjustable, 30
minutes by default).
To turn on the camera flash again, press the camera’s shutter button
halfway. Or press the camera flash’s test firing button.
When the Power Switch is set to ON and the flash power is off
automatically after a certain period of idle use, power
consumption exists and long-time power discharge damages
batteries. Therefore, make sure to shut down the flash power by
setting the Power Switch to OFF if the flash is not used for long.
Fully Automatic Flash Shooting
When you set the camera's shooting mode to < P > (Program AE)
or < AUTO > (Full Auto), i-TTL fully automatic flash will make it as
easy as normal AE shooting in the < P > and < AUTO > modes.
04
Page 4

TTL
0.5 0.711.5
1.7
Zoom
5
2.3
4
35
60 5.0
3
6 91318
4
2
7
10 15 203040 60
mm F
56
1. Set the Camera Flash to
i-TTL auto flash mode.
m
● Press the <MODE> button
ft
so that <TTL> is displayed.
2. Focus the subject.
• Press the shutter button
halfway to focus.
• The shutter speed and
aperture will be displayed in
the viewfinder.
• Check that the < > icon is
lit in the viewfinder.
TTL
0.5 0.711.5
1.7
Zoom
2.3
5
4
35
3
6 91318
4
2
7
10 15 203040 60
mm F
56
3. Take the picture.
• Check that the subject is
within the effective range
m
displayed on the LCD panel.
ft
• Right before the shot is
taken, a preflash is fired, and
then the main flash is fired.
• <TTL> will be displayed on the LCD panel even if the camera is
compatible with i-TTL.
Using i-TTL Autoflash in the Shooting Modes
Just set the camera’s shooting mode to <A> (aperture-priority AE),
<S> (shutter-priority AE), or <M> (manual) and you can use i-TTL
autoflash.
Select this mode when you want to set the shutter speed
manually.
The camera will then automatically set the aperture
matching the shutter speed to obtain a standard exposure.
S
• If the aperture display blinks, it means that the
background exposure will be underexposed or
overexposed. Adjust the shutter speed until the aperture
display stops blinking.
Select this mode when you want to set the aperture
manually.
The camera will then automatically set the shutter speed
matching the aperture to obtain a standard exposure.
If the background is dark like a night scene, a slow sync
speed will be used to obtain a standard exposure of both
the main subject and background.
Standard exposure of the main subject is obtained with
A
the flash, while a standard exposure of the background is
obtained with a slow shutter speed.
• Since a slow shutter speed will be used for low-light
scenes, using a tripod is recommended.
• If the shutter speed displays blinks, it means that the
background exposure will be underexposed or
overexposed. Adjust the aperture until the shutter speed
display stops blinking.
Select this mode if you want to set both the shutter speed
and aperture manually.
Standard exposure of the main subject is obtained with
M
the flash. The exposure of the background is obtained
with the shutter speed and aperture combination you set.
05
Flash Sync Speeds and Apertures Used
Shutter Speed Setting
Set automatically (1/60s-1/Xs)
P
Set manually (30s-1/Xs)
S
Set automatically (30s-1/Xs)
A
Set manually (buLb,30s-1/Xs)
M
Aperture Setting
Automatic
Automatic
Manual
Manual
• 1/X sec is the camera's maximum flash sync speed.
Using Flash
FEC: Flash Exposure Compensation ----------------------------06
FV Lock: Flash Value Lock -------------------------------------06
High-speed Sync---------------------------------------------07
Bounce Flash---------------------------------------------------07
ZOOM: Setting the Flash Coverage and Using the Wide Panel--------08
M: Manual Flash-------------------------------------------------09
MULTI: Stroboscopic Flash--------------------------------------10
Second-Curtain Sync---------------------------------------11
S1/S2 Slave Triggering Mode------------------------------------11
C.Fn: Setting Custom Functions---------------------------------12
Protection Function--------------------------------------------13
FEC:Flash Exposure Compensation
With FEC function, this flash can adjust from -3 to +3 in 1/3rd
stops. It is useful in situations where minor adjusting of the TTL
system is needed based on the environment.
Setting FEC:
1. Press < SET > button. The
flash exposure compensation
amount will blink on the LCD
panel.
2. Set the flash exposure
compensation amount.
TTL
0.5 0.711.5
1.7
Zoom
2.3
5
4
3
6 91318
4
2
7
10 15 203040 60
mm
F
88+
56
• Press the < - > or < + >
button to set the amount.
• To cancel the flash exposure
m
compensation, set the
ft
amount to “+0.0”. The
amount is not displayed on
the LCD panel.
3. Press < SET > button again to confirm the setting. The flash
exposure compensation amount stops blinking.
• The flash exposure compensation amount can only be set in
TTL mode.
• If the camera has also set the flash exposure compensation
amount, the final flash amount is determined by the common
effects of the two amounts.
FV Lock: Flash Value Lock
FV (flash value) lock locks the correct flash exposure setting for
any part of the scene.
With <TTL> displayed on the LCD panel, you press the camera’s
<FV> button.
06
Page 5

1. Focus the subject.
2. Press the <FV> button.
• Aim the subject at the center of
the viewfinder and press <FV>
button.
• The camera flash will fire a
preflash and the required flash
output for the subject is retained
in memory.
• Each time you press the <FV> button, a preflash will be fired and
a new flash exposure setting will be locked. The FV lock icon
< > will be displayed in the viewfinder.
• If <TTL> is not displayed on the LCD panel, FV lock cannot be
set.
• If the subject is too small, FV lock might not be very effective.
• <FV> button is on the camera. The <FV> button position may
vary based on different Nikon camera models. Please refer to the
instruction manuals of your Nikon camera model.
High-speed Sync
With high-speed sync (FP flash), the flash can synchronize with all
shutter speeds. This is convenient when you want to use aperture
priority for fill-flash portraits.
TTL
0.5 0.711.5
1.7
Zoom
2.3
5
4
35
3
6 91318
4
2
7
10 15 203040 60
mm F
56
Select the high-speed sync
icon < >.
• Set the flash sync speed to
m
1/320s (Auto FP) or 1/250s
ft
(Auto FP) in the Nikon
camera menu. Press the
shutter button halfway. The
icon < > displayed on the flash screen means the high speed
sync function is enabled on the flash.
• Turning the camera command dial can set the shutter speed to
1/250s or faster.
• To check if the FP flash function works properly, look through the
shutter speed in the viewfinder. If it shows a speed of 1/250s or
faster, the FP flash function is on work.
• If you set a shutter speed as 1/320s (Auto FP) or 1/250s (Auto
FP) in the Nikon camera setting,< > will be displayed in the
flash screen regardless of practical shutter speed.
• With high-speed sync, the faster the shutter speed, the shorter
the effective flash range.
• To return to normal flash, set the flash sync speed to other
options other than Auto FP. Then the icon < > will disappear
when pressing the shutter halfway.
• Multi flash mode cannot be set in high-speed sync mode.
• Over-temperature protection may be activated after 15
consecutive high-speed sync flashes.
Bounce Flash
By pointing the flash head toward a wall or ceiling, the flash will
bounce off the surface before illuminating the subject. This can
soften shadows behind the subject for a more natural-looking shot.
This is called bounce flash.
Set the Bounce Direction
Hold the flash head and turn it to a satisfying angle.
07
-7-90
270
• If the wall or ceiling is too far away, the bounced flash might be
too weak and result in underexposure.
• The wall or ceiling should be a plain, white color for high
reflectance. If the bounce surface is not white, a color cast may
appear in the picture.
Creating a Catchlight
With the catchlight panel, you can create a catchlight in the
subject’s eyes to add life to the facial expression.
1. Point the flash head upward
by 90°.
2. Pull out the wide panel.
• The catchlight panel will come
out at the same time.
• Point the flash head straight ahead and then upward by 90°.
The catchlight will not appear if you swing the flash head left or
right.
• For maximum catchlight effect, stay 1.5m/4.9ft away from the
subject.
ZOOM: Setting the Flash Coverage and Using the Wide Panel
The flash coverage can be set to match the lens focal length from
24 mm to 105mm. The flash coverage can be set automatically or
manually. Also, with the built-in wide panel, the flash coverage can
be expanded for 14mm wide-angle lenses.
TTL
5
4
35
3
6 91318
4
2
7
10 15 203040 60
mm F
56
0.5 0.711.5
2.3
1.7
Zoom
3. Push the wide panel back in.
• Push in only the wide panel.
• Follow the same procedures
as for bounce flash.
Press the <ZOOM> button.
Press the <ZOOM> button until
the Zoom value blinks. Press
m
the < - > or < + > button to
ft
change the flash coverage.
If < > is not displayed, the
flash coverage will be set
automatically.
08
Page 6

• If you set the flash coverage manually, make sure it covers the
lens focal length so that the picture will not have a dark
periphery.
• If you use a commercially-available sync cord to connect the
camera to the camera flash' PC terminal, set the flash zoom
manually.
Using the Wide Panel
Pull out the wide panel and place
it over the flash head as shown.
The flash coverage will then be
extended to 14 mm.
• The catchlight panel will come
out at the same time. Push the
catchlight panel back in.
• The <ZOOM> button will not
work.
• If you use bounce flash with the wide panel in place, the subject
will be illuminated by both the bounce flash and direct flash,
which will look unnatural.
• Pull out the wide panel gently. Using excessive force may
detach the wide panel.
M: Manual Flash
The flash output is adjustable from 1/1 full power to 1/128th power in
1/3rd step increments.
Use a hand-held flash meter to determine the required flash output
to obtain a correct flash exposure.
1. Press the <MODE> button
M
1/128
0.5 0.711.5
2.3
1.7
Zoom
Flash Output
When you change the flash output during shooting, the following
table will make it easier to see how the stop changes such as 1/2-
0.3→1/2+0.3 when you increase or decrease the flash output.
For example, when you decrease the flash output to 1/2, 1/2-0.3,
or 1/2-0.7, and then increase the flash output to more than 1/2,
1/2+0.3, 1/2+0.7, and 1/1 will be displayed.
1/1
09
3
6 91318
4
2
5
7
10 15 203040 60
4
mm F
35
Figures displayed when reducing flash output level→
1/1–0.3
1/2+0.7
←Figures displayed when increasing flash output level
56
1/1-0.7
1/2+0.3
so that the <M> is displayed.
m
ft
2. Set the flash output.
• Press the <SET> button.
• The flash output blinks.
• Press the < - > button to set a
lower value. Or press the <+>
button to set a higher value.
• Press the <SET> button again
to lock the settings.
• Press the shutter button
halfway to see the effective
flash range displayed.
1/2-0.7
1/2-0.3
1/2 1/4
1/4+0.7
1/4+0.3
Multi: Stroboscopic Flash
With stroboscopic flash, a rapid series of flashes is fired. It can be
used to capture multiple images of a moving subject in a single
photograph.
You can set the firing frequency (number of flashes per sec.
expressed as Hz), the number of flashes, and the flash output.
1. Press the <MODE> button
Multi
1/16
0.5 0.711.5
2.3
4
1.7
Zoom
Multi
1/128
0.5 0.711.5
2.3
4
1.7
Zoom
Range of flash output:
1/4<->1/8<->1/16<->1/32<->1/64<->1/128
Calculating the Shutter Speed
During stroboscopic flash, the shutter remains open until the firing
stops. Use the formula below to calculate the shutter speed and set
it with the camera.
Number of flashes / Firing frequency = Shutter speed
For example, if the number of flashes is 10 and the firing frequency
is 5 Hz, the shutter speed should be at least 2 sec.
To avoid overheating and deteriorating the flash head, do not use
stroboscopic flash more than 10 times in succession. After 10
times, allow the camera flash to rest for at least 15 min. If you try
to use the stroboscopic flash mode more than 10 times in
succession, the firing might stop automatically to protect the flash
head. If this happens, allow the camera flash to rest for at least
15 min.
• Stroboscopic flash is most effective with a highly reflective
subject against a dark background.
• Using a tripod, a remote switch, and external power source is
recommended.
• A flash output of 1/1 or 1/2 cannot be set for stroboscopic flash.
• Stroboscopic flash can be used with "buLb".
...
...
3
2
5
7
10 15 203040 60
mm
35
3
2
5
7
10 15 203040 60
mm
35
2
6 91318
4
10 10
6 91318
4
so that <Multi> is displayed.
Hz
1
m
ft
2. Select the item to be set.
• Press the <SET> button to
select the item (blinks).
3. Set the desired number.
• Press the <-> button to set a
Hz
lower value. Or press the
m
<+> button to set a higher
ft
value. Then press the <SET>
button. The next item to be
set starts blinking.
• After you set the flash output
and press the <SET> button,
all the settings will be
displayed.
10
Page 7

Maximum Stroboscopic Flashes
Flash Output
Hz
1/4
1/8
1 Hz
2 Hz
3 Hz
4 Hz
5 Hz
6 Hz
7 Hz
8 Hz
9 Hz
10 Hz
20 Hz
30 Hz
40 Hz
50 Hz
60 Hz
70 Hz
80 Hz
90 Hz
6
5
4
4
3
3
3
3
2
2
1/16
14
12
10
8
6
6
5
5
4
4
creating multiple lighting effects. It is respectively applicable to
manual flash environment. In S1 mode, the flash unit will fire
1/32
60
30
60
30
50
20
40
20
32
20
28
20
24
10
22
10
20
8
12
8
90
90
90
90
80
80
70
70
56
56
44
44
36
36
32
32
28
28
24
24
1/128
1/64
synchronously when the master flash fires, the same effect as that
by the use of radio triggers.
S2 Slave Triggering Mode
This mode is also called “Preflash Cancel”, similar to S1 mode. In
this mode, the flash unit will ignore a single “preflash” from the
master flash and will only fire in response to the second, actual
flash from the master. Therefore, this flash unit is applicable when
using a TTL master flash.
• S1 or S2 mode is not supported in the following cases: when
“red-eye reduction” function is started by the master flash (either
camera pop-up flash or external on-camera flash); and when the
master flash uses the modeling flash function.
• In S1 or S2 mode, the flash output level is only manually
adjustable.
• In S1 or S2 mode, TTL flash or Multi flash is not available.
• Setting as S1/S2 slave triggering mode and attaching to the
camera, the flash will change to master mode and be set as TTL
mode automatically when pressing the shutter button halfway.
Second-Curtain Sync
With a slow shutter speed, you can create a light train following the
subject. The flash fires right before the shutter closes.
TTL
0.5 0.711.5
1.7
Zoom
2.3
5
4
35
3
6 91318
4
2
7
10 15 203040 60
mm
• Set the camera to Rear
mode and press the shutter
button halfway, then the flash
m
display panel will show the
ft
second curtain sync icon
< >.
• When the camera is not set
to Rear mode, pressing the
shutter button halfway will
not light up the icon < >
on the flash display panel.
• Second-curtain sync works well in the camera' s "buLb" mode.
• With i-TTL, two flashes will be fired even at slow shutter speeds.
The first flash is only the preflash, and not a malfunction.
• Stroboscopic flash cannot be set.
S1/S2 Slave Triggering Mode
This flash unit supports slave triggering mode. To enter S1/S2
mode from the master mode, press < > button and hold for
seconds, then S1 or S2 will be shown on the LCD display. Setting
as S1 mode, press < > button will enter S2 mode. Setting as
S2 mode, press < > button can back to master mode, then
S1 or S2 will disappear from the LCD panel.
The flash output setting in slave triggering mode is the same as
that in manual mode. After pressing the <SET> button, the flash
output blinks. Press the < - > button or < + > button to set a value.
S1 Slave Triggering Mode
In this mode, the flash unit can function as a slave flash for
C.Fn: Setting Custom Functions
The following table lists the available and unavailable custom
functions of this flash. The icon “√” indicates the flash custom function
is supported but “0” indicates the custom function is not supported.
C.Fn Custom Functions
0
1
0
1
0
1
0
1
0
1
Settings &
Description
Enabled
Disabled
Enabled
Disabled
60 minutes
30 minutes
Within 8 hours
Within 1 hour
Full output
Custom
Functions No.
C.Fn-00
C.Fn-01
C.Fn-02
C.Fn-03
C.Fn-04
Function
Auto power off
AF assist
Slave auto
power off timer
Slave auto
power off cancel
Test firing with
autoflash
Setting No.
1. Press < > button for 2 seconds or longer until < Fn > is
displayed.
2. Select the Custom Function No.
• Press the <-> or <+> button to set the Custom Function No.
3. Change the setting.
• Press< SET > button and the Setting blinks.
• Press the <-> or <+> button to set the desired setting. Pressing
< SET> button will confirm the settings.
• After you set the Custom Function and press < MODE > button to
exit the Custom Function setting, the camera will be ready to
shoot.
Support
or Not
√
√
√
0
1/32
0
11
12
Page 8

Protection Function
1.Over-Temperature Protection
• To avoid overheating and deteriorating the flash head, do not fire
more than 20 continuous flashes in fast succession at 1/1 full
power. After 20 continuous flashes, allow a rest time of at least 10
minutes.
• If you fire more than 20 continuous flashes and then fire more
flashes in short intervals, the inner over-temperature protection
function may be activated and make the recycling time about 10
to 15 seconds. If this occurs, allow a rest time of about 10
minutes, and the flash unit will then return to normal.
2.Other Protections
• The system provides real-time protection to secure the device and
your safety. The following lists prompts for your reference:
LCD Panel
Meaning
E1
A failure occurs on the recycling system so that the flash
cannot fire.
Please restart the flash unit. If the problem still exists,
please send this product to a maintenance center.
E2
The system gets excessive heat. Please allow a rest time
of 10 minutes.
E3
The voltage on two outlets of the flash tube is too high.
Please send this product to a maintenance center.
Reference
Specifications----------------------------------------------------13
Troubleshooting Guide-------------------------------------------15
Compatible Camera Models-------------------------------------16
Specifications
• Type
Compatible cameras
Guide No.
Flash coverage
Flash duration
• Exposure Control
Exposure control system
Flash Exposure
Compensation (FEC)
FV lock:
Sync mode:
Stroboscopic flash:
Optic slave triggering
• Flash Recycling (with size-AA alkaline batteries)
Recycling time
Flash-ready indicator
13
Nikon DSLR cameras (i-TTL autoflash)
58/190(at 105mm focal length, ISO 100 in meters/feet)
24-105mm (14mm with wide panel)
•Auto zoom (Flash coverage set automatically to
match the lens focal length and image size)
•Manual zoom
•Swinging/titling flash head, 0-270°horizontally and
-7-90°vertically (Bounce Flash)
1.2ms or shorter
i-TTL autoflash, manual flash
Manual. ±3 steps in 1/3 step increments
<FV> button
High-speed sync (up to 1/8000 seconds),
first-curtain sync, and second-curtain sync
Provided (1 - 90 Hz)
Provided (S1 & S2)
Normal flash: approx. 0.1-5sec.
Red indicator lights
• AF-Assist Beam
Effective range (approx.)
• Power Source
Internal power
Battery life
(approx. flash count)
Power saving
External power
• Color Temperature
• Dimensions
(W x H x D)
• Weight (approx.)
Product specifications and external appearance are subject to change
without notice.
• Guide No. (at ISO 100, in meters/feet)
Normal Flash (Full Output)
Flash Coverage (mm)
Normal Flash
(Full output)
Manual Flash
Flash Output
14
1/1
1/2
1/4
1/8
1/16
1/32
1/64
1/128
15/
49.2
10.6/
34.8
7.5/
24.6
5.3/
17.4
3.8/
12.5
2.7/
8.9
1.9/
6.2
1.3/
4.3
0.7-6m/2.3-20 feet
4 size-AA alkaline batteries
*Size-AA Ni-MH and lithium batteries also usable
100-700 flashes (with size-AA alkaline batteries)
Power off after certain period (approx. 1.5 min.)
of idle operation
Canon battery pack CP-E4
GODOX power pack PB960, PB820, FB2000, and CP-80
5600±200k
83×154×112 mm/ 3.3×6.1×4.4 in.
395g / 13.9 oz. (camera flash only, excluding batteries)
14
24
28
35
50
70
80
28/
30/
39/
42/
50/
70
50/
164
35.4/
116.1
25/
82
17.7/
58.1
12.5/
41
8.8/
28.9
6.3/
20.7
4.4/
14.4
164
80
53/
173.9
37.5/
123
26.5/
86.9
18.7/
61.4
13.3/
43.6
9.4/
30.8
6.6/
21.7
4.7/
15.4
53/
173.9
28/
91.9
19.8/
14/
45.9
9.9/
32.5
4.9/
16.1
3.5/
11.5
2.5/
8.2
15/
49.2
24
65
7/
23
91.9
98.4
Flash Coverage (mm)
28
35
30/
39/
98.4
127.9
21.2/
27.6/
69.6
90.7
15/
19.5/
49.2
64
10.6/
13.7/
34.8
45.2
7.5/
9.7/
24.6
32
5.3/
6.9/
17.4
22.7
3.8/
4.9/
12.5
16
2.7/
3.5/
8.9
11.4
127.9
50
42/
137.8
29.7/
97.4
21/
68.9
14.8./
48.6
10.5/
34.4
7.4/
24.3
5.3/
17.4
3.7/
12.1
137.8
190.3
134.5
190.3
105
58/
41/
29/
95.1
20.5/
67.3
14.5/
47.6
10.3/
33.8
7.3/
24
5.1/
16.7
105
58/
14
Page 9

Troubleshooting Guide
If there is a problem, refer to this Troubleshooting Guide.
The Camera Flash cannot be charged.
• The batteries are installed in the wrong direction.
→Install the batteries in the correct direction.
• The camera flash's internal batteries are exhausted.
→If < > appears and blinks on the LCD panel, replace the
batteries immediately.
→Install the camera flash' internal batteries even when you use
an external power source (through Charging Socket).
Otherwise, the camera flash cannot work.
The Camera Flash does not fire.
• The camera flash is not attached securely to the camera.
→Attach the camera’s mounting foot securely to the camera.
• The electrical contacts of the Camera Flash and camera are dirty.
→Clean the contacts.
• < > is not displayed in the view finder of camera.
→Wait until the flash is fully recycled and the flash ready indicator
lights up.
→If the flash ready indicator lights up, but < > is not displayed in
the view finder, check whether this flash unit is securely
attached to the camera hotshoe.
→If the flash ready indicator lights up, but < > is blinking in the
view finder, check whether this flash unit is securely attached to
the camera hotshoe. Please power the flash off and reopen it if
necessary.
→If the flash ready indicator does not light up after a long wait,
check whether the battery power is enough. If the battery power
is low, < > will appear and blink on the LCD panel. Please
replace the batteries immediately.
displayed.
• You used Manual Flash mode.
→Set the flash mode to <TTL> or modify the flash output.
Photos have dark corners or only parts of the target subject
are illuminated.
• The focal length of lens exceeds the flash coverage.
→Check the flash coverage you set. This flash unit has the flash
coverage between 24 and 105mm, which fits medium-format
cameras. Pull the wide panel out to extend the flash coverage.
Compatible Camera Models
This flash unit can be used on the following Nikon DSLR camera
models:
D800 D700
D80
D300 D300S D3200
D90
Note:
1. This table only lists the tested camera models, not all
Nikon DSLR cameras. For the compatibility of other
camera models, a self-test is recommended.
2. Rights to modify this table are retained.
D7100
D7000 D5200
D3000 D200 D70S
D3100
D5100
D5000
The power turns off by itself.
• Setting the flash as master unit, auto power off took effect after 90
sec. of idle operation.
→Press the shutter button halfway or press the < TEST > test
flash button to wake up.
• Setting as the slave unit, the flash will enter sleep mode after 60
minutes of idle use (adjustable, 30 minutes by default).
→Press the < TEST > test flash button to wake up.
Auto zoom does not work.
• The flash unit is set to manual zoom mode < >.
→Press the <ZOOM> button until the < > icon disappears.
Then press the < - > button to adjust the setting until the < >
icon disappears.
• The camera flash is not attached securely to the camera.
→Attach the camera flash’s mounting foot to the camera.
• The flash head fails to locate the current position.
→This occurs because the batteries are exhausted. Replace the
batteries immediately.
The flash exposure is underexposed or overexposed.
• There was a highly reflective object (e.g. glass window) in the
picture.
→Use FV lock.
• You used high-speed sync.
→With high-speed sync, the effective flash range will be shorter.
Make sure the subject is within the effective flash range
15
16
 Loading...