

Page 1
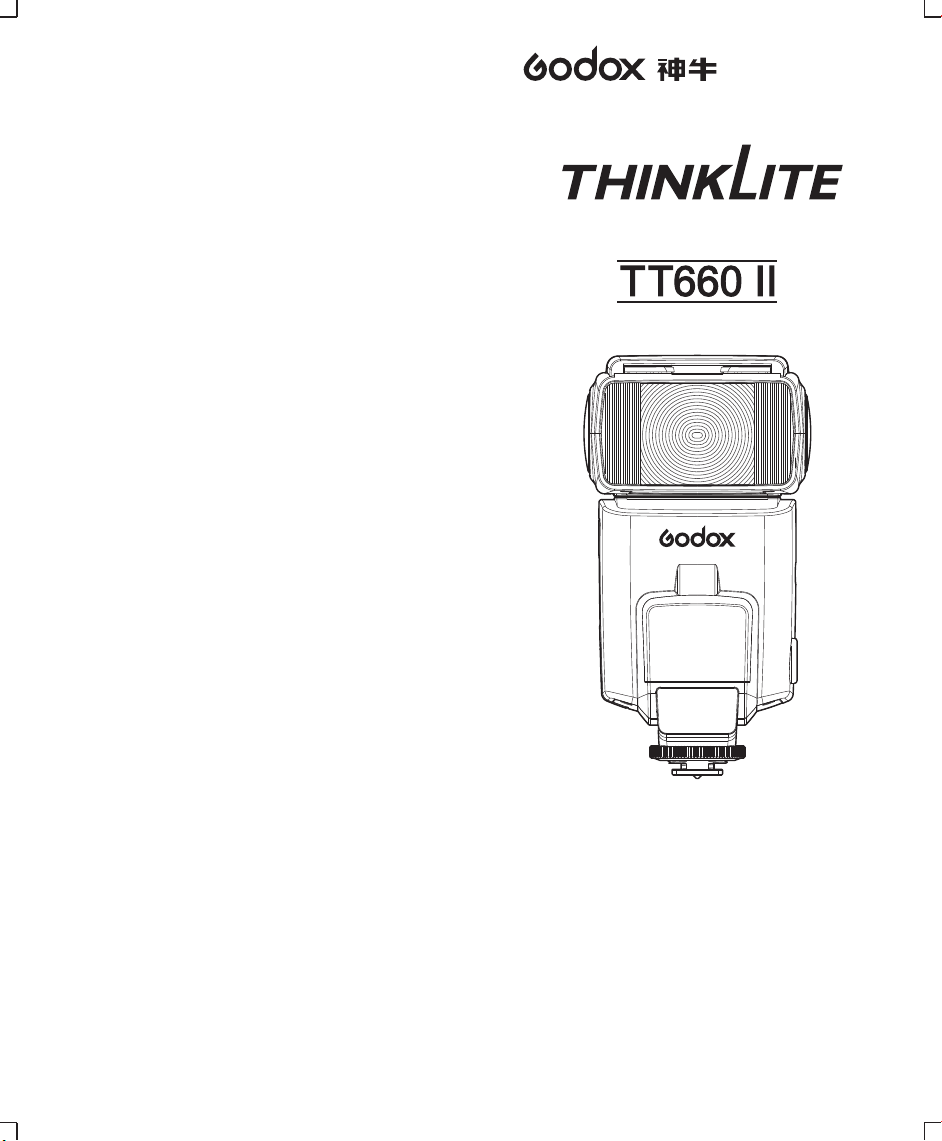
Electronic Camera Flash
说 明 手 册
82.ATT66020-00VA
中英文双语 / Chinese English Bilingual
Before using your product, please read this user manual carefully in
order to ensure your safety. Keep it properly for reference in future.
FOREWORD
Thank you for purchasing a GODOX product.
GODOX camera flash TT660II fits various standard hotshoemounted DSLR cameras from Canon, Nikon, Pentax, and Olympas,
etc. The TT660II offers:
● Wide Power Control Range(1/1~1/128)
● 22 steps of precise adjustment to gain better light effect
● Stable color temperature of 5600±200K
● Supports Multi/Stroboscopic flash, S1/S2 slave triggering flash, etc
● Achieving high-speed sync with remote control
Page 2
WARNING
1. Always keep this product from rain or damp to avoid fire or
electric shock.
2. This device contains high-voltage electronic parts inside. Do
not disassemble or repair it. If you touch the high-voltage
circuit inside the product, electric shock may occur. Send it to
the authorized maintenance center for repair if needed.
3. Stop using this device if it breaks open due to extrusion,
falling or strong hit. Otherwise, electric shock may occur if you
touch the electronic parts inside it.
4. Do not fire the flash direct to the eyes (especially those of
babies) at short distance, or it may damage eyes. When taking
picture for babies, it is recommended to keep the flash unit at
least 1 meter (3.3 feet) away from them. Using bounce flash to
reduce light intensity is also suggested.
5. Always keep batteries or anything that may pose an
ingestion hazard out of children’s reach. Please contact a
doctor immediately if ingestion occurs.
6. When there is caustic liquid leakage inside, wear gloves
before taking out batteries.
7. Do not use the flash unit in the presence of flammable gas,
chemicals and other similar materials. In specific circumstance,
these materials may be sensitive to the strong light emitting
from this flash unit and may cause fire or electromagnetic
interference. Please pay attention to the warning marks in the
shooting surroundings.
8. Do not leave or store the flash unit in temperature over 40°C
(e.g. in automobile), or it may damage the electronic parts.
9. The flash unit is not waterproof. Please keep it away from
rain or humidity.
10. Please take out all batteries and keep the flash unit in dry
places if it will remain unused for long.
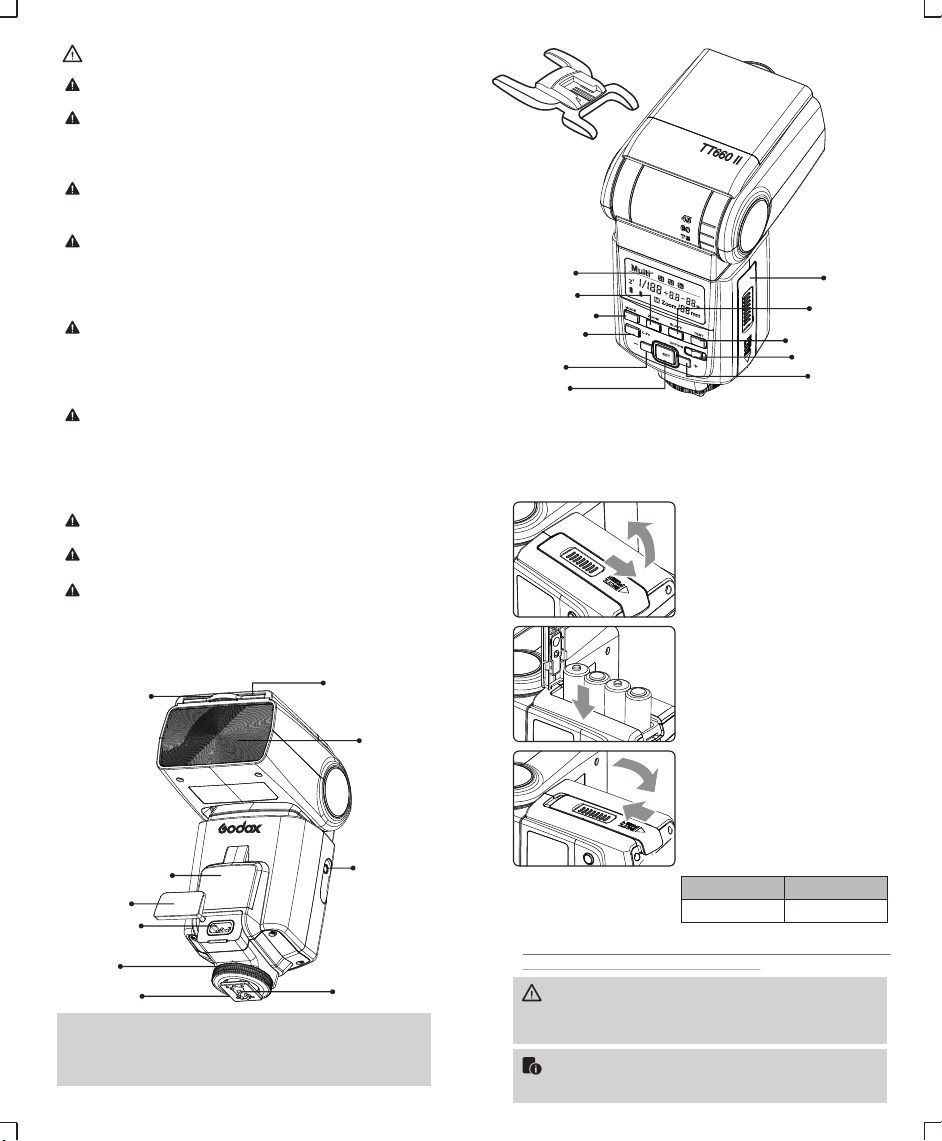
I. Name of Parts
Built-In Wide Panel
Reflection Card
Mini Stand
LCD Panel
Zoom Selection
Mode Selection
C.Fn Custom
Function
“-” Button
Set Button
II. Installation
1.Installing the Batteries
Install four-size AA batteries.
Battery
Compartment
SLAVE Selection
Test Button/
Flash Ready Indicator
Power Switch
“+” Button
1. Open the cover.
● Use your thumb to press the
battery compartment cover, and
then slide it to open the cover.
2. Install the batteries.
Make sure the "+" and "–"
●
battery contacts are properly
oriented as shown in the
compartment.
Flash Head
Optic Control Sensor
Socket Cover
Charging Socket
Lock Ring
Hot Shoe Stand
PC Sync Socket
Hot Shoe Contact
Accessories
To achieve better performance and light effects, Thinklite camera
flash can be operated with such products as, PB960 power pack,
honey comb, color filter, etc.
.
3 Close the cover.
Slide the battery compartment
●
cover as shown by the arrow to
close it.
Recycling Time and Flash Count
Take AA alkaline batteries (LR6)
as an example:
● Based on new size-AA alkaline batteries.
● The battery level indication on the LCD panel will blink if the remaining battery level
is too low to be charged. Please replace the batteries.
Using size-AA batteries other than the alkaline type may cause improper
●
battery contact due to the irregular shape of the battery contacts.
● If you change the batteries after firing many flashes continuously, be
aware that the batteries might be hot.
Use a new set of four batteries of the same brand. When replacing the
●
batteries, replace all four at one time.
● Size-AA Ni-MH or lithium batteries can also be used.
Recycling Time
Approx. 0.1–5sec
Flash Count
Approx. 100-700
Page 3

2. Attaching to the Camera
1. Attach the camera flash.
● Slip the camera flash’s mounting
foot into the camera’s hot shoe all
the way.
2. Secure the camera flash.
● Rotate the locking screw on the
mounting foot until it locks up.
3. Detach the camera flash.
● Rotate the locking screw on the
mounting foot until it is loosed.
III. Using the Camera Flash
1. Power Management
Use ON/OFF Power Switch to power the flash unit on or off. Turn
off if it will not be used for an extended period of time.
You can set the firing frequency (number of flashes per sec.
expressed as Hz), the number of flashes and the flash output.
● Press MODE button so that
< MULTI > is displayed.
● Press the < SET >button to choose
the adjustable projects. (Blinking)
● Press the “-“or “+”button to adjust
the settings.
Calculating the Shutter Speed
During stroboscopic flash, the shutter remains open until the firing
stops. Use the formula below to calculate the shutter speed and set
it with the camera.
Number of Flashes / Flash Frequency = Shutter Speed
For example, if the number of flashes is 10 and the firing frequency
is 5 Hz, the shutter speed should be at least 2 seconds.
2. Power Control
The flash output is adjustable from 1/1 full power to 1/128th power
in 1/3rd step increments. To obtain a correct flash exposure, use a
hand-held flash meter to determine the required flash output.
Press the “-“ or ”+”button to adjust the flash power output.
● M Mode: Set the flash output from 1/1 full power to 1/128th
power in 1/3rd step increments.
● Multi Mode: Set the flash output from 1/4 full power to 1/128th
power in 1 step increments.
● Manual High-Speed Mode: Set the flash output from 1/1 full
power to 1/16th power in 1/3rd step increments.
3. ZOOM: Setting the Flash Coverage
● Set the flash coverage manually to match the lens focal length
from 24mm to 105mm.
● Press the ZOOM button and its settings can be adjusted by
pressing “+”or “-”button.
Note: When setting the flash coverage, the lens focal length
should be covered in case of occurring dark periphery.
4. M Mode
Press Mode Selection Button to enter M mode. In this mode, you
can set the camera flash onto your camera’s hotshoe or trigger to
fire flashes. During shooting, adjust the power output and press the
camera shutter, then the camera flash will fire a flash under the
camera synchronous signal.
5. Multi: Stroboscopic Flash
Press Mode Selection Button to enter Multi mode. With
stroboscopic flash, a rapid series of flashes is fired. It can be used
to capture a multiple images of a moving subject in a single
photograph.
● Stroboscopic flash is most effective with a highly reflective
subject against a dark background.
● Using a tripod and a remote control is recommended.
● A flash output of 1/1 and 1/2 cannot be set for stroboscopic flash.
● Stroboscopic flash can be used with “buLb”.
●
To avoid overheating and deteriorating the flash head, do not use
stroboscopic flash more than 10 times in succession.
Maximum Stroboscopic Flashes:
Hz
Flash
Output
Flash
Output
1/4
1/8
1/16
1/32
1/64
1/128
1/4
1/8
1/16
1/32
1/64
1/128
1
2
3
4
5
7
6
5
4
4
14
14
12
10
8
30
30
30
20
20
60
60
60
50
50
90
90
90
80
80
99
99
99
99
99
Hz
10
11
12-14
15-19
20-50
60-99
2
2
2
2
2
4
4
4
4
4
8
8
8
8
20
20
20
20
18
16
50
40
40
35
30
70
70
60
50
40
6-7
8-9
3
3
5
6
10
20
30
40
60
70
80
90
2
4
20
12
20
40
Page 4

6. High-Speed Sync
Press MODE button makes the flash enter manual mode.
●
● High Speed Sync (FP flash) enables the flash to synchronize with
all camera shutter speeds. This is convenient when you want to
use aperture priority for fill-flash portraits.
Note:
● The FP flash function can only work properly with the high-
speed remote control (e.g. Godox product CELLS II).
● High-speed sync function cannot be achieved when the flash is
set on the camera’s hotshoe.
●
Over-temperature protection may be activated after 10 consecutive
high-speed sync flashes, and its recycle time is 10 seconds slower
than the normal time.
Number of flashes that will activate over-temperature protection
in high-speed sync triggering mode:
Power
1/1
1/2(+0.3,+0.7)
1/4(+0.3,+0.7)
1/8(+0.3,+0.7)
1/16(+0.3,+0.7)
Times
10
15
20
30
40
7. S1 Mode
Press Slave Selection Button to enter S1 mode. In this mode, the
camera flash can function as a slave flash for creating multiple
lighting effects. It is respectively applicable to manual flash
environment. With this function, the flash will fire synchronously
when the main flash fires, the same effect as that by the use of
radio triggers.
8. S2 Mode
Press Slave Selection Button to enter S2 mode. In this mode, the
camera flash can function as a slave flash for creating multiple
lighting effects. It is respectively applicable to TTL flash
environment. With this function, the flash will ignore a single
“preflash” from the main flash and will only fire in response to the
second, actual flash from the main unit.
9. Sync Trigger Function
The Sync Cord Jack is a Φ3.5mm plug. Insert a trigger plug here
and the flash will be fired synchronously with the camera shutter.
10. C.Fn: Setting Custom Functions
Signal
SL
bL
Function
Sleep Time
Setting
Backlight
Setting
Settings & Description
Settable time:
<3>3 min.
<10>10 min.
<30>30 min.
<60>60 min.
<OF> OFF
Press the button to control
backlight setting:
<ON>:Consecutive lighting
<12>:Lighting for 12 sec.
<OF>:Off
Operation Instructions
1. Press C.Fn button to enter
custom setting state.
2. Press “-” or “+”button to
adjust the sleep time.
3. Press C.Fn button to return.
*Press any button to wake it up.
*Please set a short sleep period
if you do not use the flash,
which extends the working
time of the flash.
1. Press C.Fn button to enter
custom setting state.
1. Press “SET” button to enter
“bL” adjustment state.
3. Press the “-” or “+”button to
adjust the settings.
4. Press C.Fn button to return.
11. Protection Function
Over-Temperature Protection
To avoid overheating and degrading the flash head, do not fire
more than 20 continuous flashes at 1/1 full power. After 20
continuous flashes, allow at least 10 minutes for the camera flash
to cool down.
If you fire more than 20 continuous flashes and then fire more
flashes in short intervals, the over-temperature protection function
will be activated to make the recycling time about 10-15 sec. In
such case, give the camera flash about 10 minutes’ break to return
to normal.
When the over-temperature protection is started, the icon is
shown on the LCD display.
Number of flashes that will activate over-temperature protection:
Power Output Level
1/1
1/2 +0.7
1/2 +0.3
1/2
1/4(+0.3,+0.7)
1/8(+0.3,+0.7)
1/16(+0.3,+0.7)
1/32(+0.3,+0.7)
1/64(+0.3,+0.7)
Number of Flashes
20
30
40
60
100
200
300
500
1000
1/128(+0.3,+0.7)
Page 5

IV. Advanced Application
1. Bounce Lighting
When taking photos, you can point the flash head toward a wall or
ceiling to bounce the light off the surface before illuminating the
subject. This can soften shadows behind the subject for a more
natural-looking shot.
2. Creating a Catchlight
Pull out the reflection card and built-in wide panel from the flash
head at the same time and then push the built-in wide panel back.
With the reflection card, you can create a catchlight in the subject’s
eyes to add life to the facial expression. This function can reach
optimal effect when the flash head is 90° upwards.
3. Use the Wide Panel
Pull out the built-in wide panel to enlarge the flash lighting range,
so as to get more softened and natural lighting effect.
V. Technical Data
Model
Power
Guide No. (m ISO 100)
Vertical rotation angle
Horizontal rotation angle
Color temperature
Recycle time
Flash duration
Multi Flash
Dimension
Net weight
TT660II
4*AA batteries: LR6 alkaline or
Ni-MH rechargeable batteries (preferred)
58(1/1 ZOOM 105mm)
-10-90 degrees
0-270 degrees
5600k±200k
Approx. 0.1~5s (AA alkaline batteries used)
1/300s-1/20000s
1~99times; 1~99Hz
83mm*154mm*112mm
380g
Electronic Camera Flash
说 明 手 册
Accessories:
1-Flash unit 1-Protecting bag 1-Mini stand
1-Instruction manual
VI Maintenance
Shut down the device immediately should abnormal operation be
●
detected.
● Avoid sudden impacts and the product should be dedusted
regularly.
● It is normal for the flash tube to be warm when in use. Avoid
continuous flashes if unnecessary.
● Maintenance of the flash must be performed by our authorized
maintenance department which can provide original accessories.
● This product, except consumables e.g. flash tube, is supported
with a one-year warranty.
● Unauthorized service will void the warranty.
● If the product had failures or was wetted, do not use it until it is
repaired by professionals.
● Changes made to the specifications or designs may not be
reflected in this manual.
中英文双语 / Chinese English Bilingual
在使用本产品之前,请先仔细阅读本手册,以确保您能安全使
用。请保存好本手册以备将来查询参考。
前言
感谢您购买神牛产品。
神牛机顶闪光灯TT660 II,适用于各种品牌中带标准热靴的单反
相机,包括佳能、尼康、宾得、奥林巴斯等。产品具有以下亮点:
● 功率调节范围大(1/1~1/128), 22级精确微调, 光效把握更随心
● 色温恒定,全程保持5600±200K
● 支持频闪,S1/S2光控引闪等
● 使用专配遥控器,可实现高速同步功能。
 Loading...