

Page 1

深圳市神牛摄影器材有限公司
GODOX Photo Equipment Co., Ltd
地址/Add: 深圳市宝安区福永镇福洲大道西新和村华发工业园A4栋
Building A4, Xinhe Huafa Industrial Zone, Fuzhou RD West, Fuyong
Town, Baoan District, Shenzhen 518103, China
电话/Tel: +86-755-29609320(8062) 传真/Fax: +86-755-25723423
邮箱/E-mail: godox@godox.com
705-QT0000-02
Made In China
Instruction Manual
说 明 手 册
高 速 影 室 闪 光 灯
F a s t - S p e e d F l a s h
Chinese English Bilingual
中英文双语
Page 2

维护保养
闪光灯在工作时,如发现异常,应立即关掉电源,查明原因。
灯体应避免震动,平时注意表面除尘。
灯体稍有发热为正常现象,无特别需要时,勿连续引闪。
除灯管与造型灯消耗品用户可用原厂配置的自行装卸更换外,所有闪光灯维护工作
概由本厂指定可供原厂配件之维修部负责。
1年保修,由于灯管与造型灯为消耗品,不在1年保修范围内。
经发现擅自检修此闪光灯,将取消闪光灯之一年保修期,维修需要收取相关费用。
如果本品出现故障或者被水淋湿,唯有在专业人员维修后方可继续使用。
在维修和清洁本品时请断开电源。
如有技术更改,恕不另行通知。
- 07 - - 08 -
FOREWORD
Thanks for choosing QT series fast-speed flash. It has wide-range
applicability, not only perfect for all kinds of studio and workshop
photography, but also good at wedding, portrait, advertisement, and fashion
photography. Without recycling time limits, photographers can capture a chain
of fast-changing facial expressions and amazing moves, and clearly freeze
each fleetingly perfect instant into eternal beauty. Among the benefits you'll
enjoy:
Ultra-speedy charging, 0.05-1.2s recycling time
Multi-freeze shots, 1/5000s-1/800s flash duration
Up to 10 shots in one second under high-speed continuous shooting
Exact output control on LED display, 50 steps from 5.0-10.0 in 0.1 increments
High qualified modeling lamp, 150W output adjustable
Small output variability, ≤2% between continuous flashes at the same output level
High color stability, ranging within ±100k between flashes over the entire power
range
CONTENTS
08Foreword
09Warning
09Caution
10Names of Parts
10 Body•
10 Accessories•
11Separately Sold Accessories
11Operations
11 Flash Preparation•
11 Power Connection•
11 Modeling Lamp•
12 Power Output Control•
12 Test Button•
12 Sync Triggering•
12 Slave Trigger Model•
12 Buzz Function•
13 Memory Function•
13 Wireless Control Function•
13 Tube Replacement•
14Technical Data
14Maintenance
Page 3

Warning
To prevent damage to the product or injury to you or to others, read the
following warnings in their entirety before using this product. Keep these
Warnings where users can read them for ready reference.
Do not disassemble or modify. Should the product break down, send the
defective back to the authorized service center for inspection and maintenance.
Keep dry. Do not handle with wet hands, immerse in water, or expose to rain.
Keep out of reach of children.
Please put the device in a ventilation environment and keep the parts of lighting
and heat dissipation holes are unobstructed. Do not use in flammable
environment.
As this product adopts make and break device, please keep it easy to be used.
No touching the heating parts of this product.
Please turn off the power and wear insulated gloves before installing and
connecting accessories. When replacing the tube or modeling lamp, please
make sure that the tube is cool and wear insulated gloves to prevent burns.
Do not flash directly towards naked eyes (especially those of babies), otherwise
it may lead to visual impairment.
Disconnect from the power supply when it will not be used for an extended
period.
NAMES OF PARTS
Body
15
12
04
11
07
06
02
16
17
01
18
19
10
13
05
14
08
09
03
FUSE:10A
4
2
0
-
V
V
~
0
5
2
0
2
H
C
z
A
20
CAUTION
After 30 continuous flashes at full power, the flash should be cooled down for
about 3 minutes. Overheating will occur if it is used continuously without cooling
down.
Do not keep using the modeling lamp for a long time; otherwise flammable
accessories attaching to flash head, e.g. softbox will get burnt. A 10-minute time
is recommended in this case. After 10 minutes, cool it down for 1 minute.
When using a snoot, do not keep the modeling lamp on for a long time or fire too
frequently (not over six times for one minute). Overheating will result in damages
for strobe housing and/or studio light.
Avoid sudden impacts as this can damage the flash tube and/or modeling lamp.
1. AC Power Socket
2. Sync Cord Jack
3. Power Switch
4. Modeling Lamp Output Controller
5. Flash Output Controller
6. Modeling Lamp Button
7. Sound Button
8. Slave Model Button
9. Test Button
10. Digital Display
Accessories
1. Power Cord
2. Standard Reflector
3. Lamp Cover
4. Glass Protection Cover
5. Modeling Lamp
6. Instruction Manual
11. Modeling Lamp Indicator
12. Buzz Indicator
13. Slave Triggering Indicator
14. Test Indicator Lamp
15. Light Sensor
16. Wireless Control Port
17. Fuse
18. Mounting Bracket
19. Umbrella Input
20. Direction Adjusting Handle
- 10 -- 09 -
5
321
4
Page 4
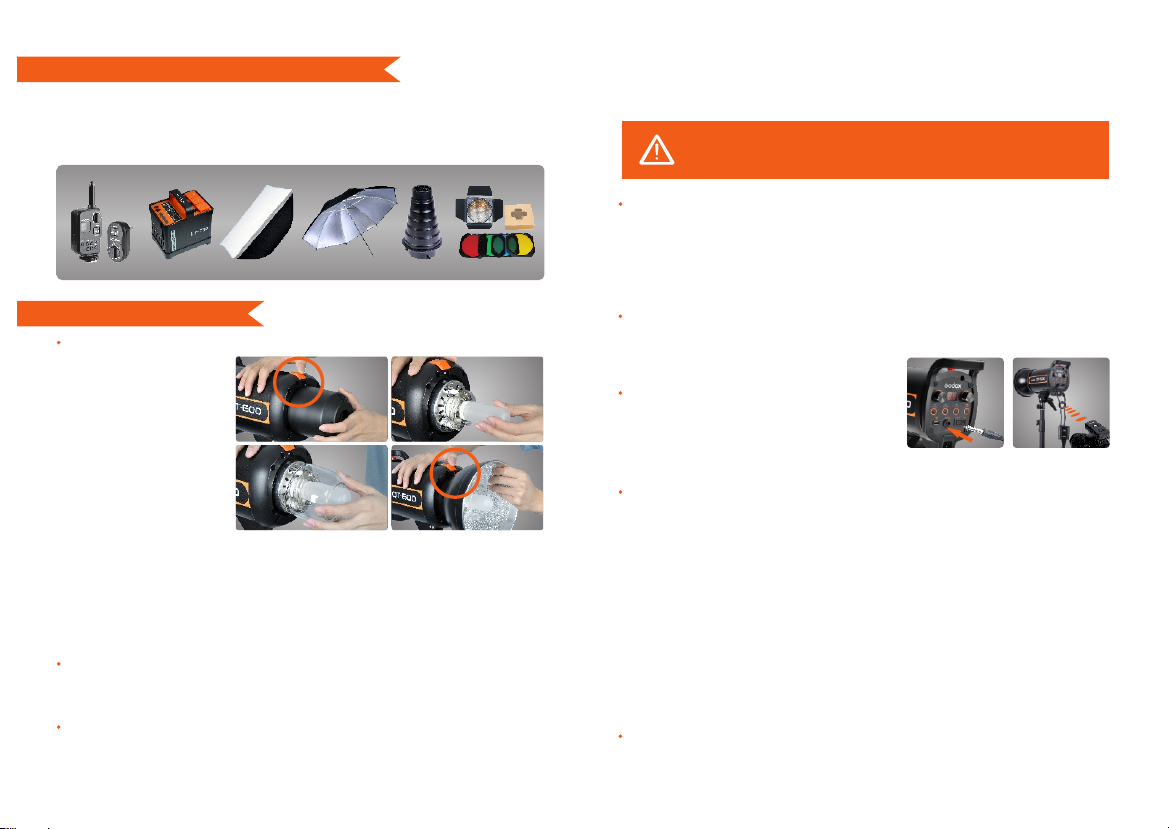
SEPARATELY SOLD ACCESSORIES
The product can be used in combination with the following accessories sold
separately, so as to achieve best photography effects:
Wireless power-control flash trigger, Power Inverter, Softbox, Photographic
Umbrella, Light Stand, Barndoor, Snoot, etc
OPERATIONS
Flash Preparation
1.Take down the lam p
cover. Install the modeling
lamp and put on the glass
protection cover and the
standard reflector.
(To uninstall the standard
2. Attach the flash unit onto an appropriate light stand. Adjust the mounting bracket
(18) for a good angle and make sure it's tightened and fixed. Use the direction
adjusting handle (20) to adjust the flash to a desired direction. Umbrella input (19)
is for different photo umbrellas to put in.
Power Connection
Use the power cord to connect the flash to an AC power source and turn on the
power switch (3). The lamp on the power switch turns on, indicating it's connected.
Modeling Lamp
Modeling Lamp Button (6) controls the modeling lamp status: when modeling lamp
indicator lights up, modeling lamp is on; if not, modeling lamp is off. Modeling lamp
output controller (4) is used for adjusting the power output level of modeling lamp.
Modeling lamp will be off automatically after lighting for 2 hours, avoiding overheat
due to long-time lighting when the user is not nearby.
When there is flammable accessory on the flash unit, do not keep the
modeling lamp on for a long time. It is recommended to cool it down
for one minute after 10 minutes' working.
Power Output Control
Flash output controller (5) decides different power output, satisfying the light
requirements in different environment. The power is adjustable freely from 5.0 to
10.0 which will be accordingly told on the digital display (10)."OF" on the display
indicates that the flash triggering function is turned off.It can discharge
automatically when the flash output is adjusted from high to low.
Test Button
To fire the flash without taking a picture, press the test button (9). It can also help
adjust the flash brightness when combined
with the flash output controller (5).
Sync Triggering
The sync cord jack (2) is a Φ6.35mm plug.
Insert a trigger plug here and the flash will be
fired synchronously with the camera shutter.
Slave Trigger Model
Three slave triggering models are available and can be set by pressing Slave
Model Button (8).
1. No optical control: The slave triggering indicator (13) is off, indicating the slave
triggering function is shut down.
2. One fire model: The slave triggering indicator (13) glows blue, indicating the
flash will fire synchronously on one external flash. In this model, the flash can
function as an auxiliary lamp, offering various effects of light and shadow.
3. Anti-preflash model: The slave triggering indicator (13) glows red, indicating the
flash will receive two external flashes within 2 seconds and will fire synchronously
after receiving the second flash. In this model, the flash can function as an auxiliary
lamp, applicable to TTL system. With this anti-preflash function, synchronization is
supported with cameras having a one-preflash firing system.
Buzz Function
The sound button (7) is used for deciding whether there is sound reminder for
- 12 -- 11 -
Page 5

ready flash after recharging. When the buzz indicator (12) is on, the buzz function
is working; when it is off, the buzz function is not working. A “BI” sound will be
heard when it's fully charged.
Memory Function
The device is equipped with memory function for the panel setting. It will help
remember the panel setting 3 seconds after you set it. When starting up the flash
next time, the panel setting will be the same as that before powering it off.
Wireless Control Function
By using the wireless power-control flash trigger, you can wirelessly control the onand-off of your flash, modeling lamp and buzzer, as well as adjust the flash output
level. To start this function, insert the trigger receiver into the Wireless Control Port
(16) and make settings on the trigger. You can also press the camera shutterrelease button to trigger the flash by setting the transmitter hotshoe onto the
camera hotshoe.
Tube Replacement
Shut down the power and remove the power cord before replacing the flash tube
and wear insulated gloves. Then, loosen the iron wire on the tube, keep a
balanced hold on the two feet of the flash tube and pull out the old tube gently.
Take down the feet casing from the old tube and put it on the new one. Hold two
feet of the new tube, and target directly towards the two copper outlets, then push
them slightly in. Twine the iron wire on the stainless steel sheet to fix the flash
tube.
TECHNICAL DATA
Model
Max Power (WS)
Guide Number(m ISO 100)
Color Temperature
Operating Voltage
Power Output Control
Modeling Lamp (W)
Triggering Method
Flash Duration
Parameters Output from
the Sync Cord Jack
Parameters Output from
the USB Port
Fuse (AC220V-240V~50Hz)
(AC110V-120V~60Hz)
Recycle Time
Dimension
Net Weight
QT300
300Ws
Sync cord, Test button, Slave triggering, Wireless control port
Flash diameterΦ14cm, height of flash with handle 23cm
Approx.
QT400
400Ws
58
AC110V-120V~60Hz or AC220V-240V~50Hz
QT600
600Ws
65
76
5600±100K
OFF, 5.0~10.0(1/128~1/1)
150W
1/5000S~1/800S
9V
5V/200mA (only for Godox receiver)
5A
10A 12.5A
0.05~1.2s
length of flash with lamp
cover 41cm
2.7kg
Approx.
2.8kg
8A
Approx.
3kg
QT800
800Ws
90
10A
0.05~1.5s
length of flash with
lamp cover 51.15cm
Approx.
3.84kg
MAINTENANCE
Shut down the device immediately when it works abnormally and find out the reason.
Avoid sudden impacts and the lamp should be dedusted regularly.
It's normal for lamp being warm when in use. Avoid continuous flashes when not
necessary.
Maintenance of all the flashes is up to our authorized maintenance department which
can provide original accessories. Users can replace the flash tube and modeling lamp
provided by the manufacturer.
One year warranty period will be cancelled when any unauthorized maintenance is
found.
If the product had failures or was wetted, it can be continuously used only after it is
repaired by professionals.
Disconnect the power when doing maintenance work or cleaning.
New changes made to the specifications or designs may not be updated in this manual.
- 14 -- 13 -
QT1200
1200Ws
110
Approx.
4.1kg
 Loading...