

GO-DEVIL Surface Drive Operation Manual And Installation Manual
― INSTRUCTIONS ―
Operation and
Service Manual
July 2011
GO-DEVIL® Manufacturers of Louisiana, INC.
(225) 752-0167 • Toll Free 1-888-490-3254 • Fax (225) 752-0175
18649 Womack Road • Baton Rouge, LA 70817
Please visit our website at www.godevil.com

SURFACE DRIVE SAFETY
• GASOLINE IS EXTREMELY FLAMMABLE! Always handle in properly approved
containers. Spilled fuel could ignite if it comes in contact with a hot engine or sparks!
• DO NOT LEAVE ANY FUEL TANK CONNECTED WITH THE VENT CLOSED (TANKS
SOLD BEFORE JULY 2011)! Heat from the suns radiation will build pressure inside the
fuel tank and will force fuel through the carburetor and into the crankcase. At this point the
crankcase will become over full and will blow oil into the air cleaner from the breather. After
the air cleaner becomes saturated with oil, the fuel mixture will become too rich and will foul
the spark plugs. It is recommended to disconnect an EPA approved Moeller tank when
the boat is not in use. These tanks are used starting July 2011.
• KEEP HANDS, FEET, HAIR, AND CLOTHING AWAY FROM ANY MOVING PARTS to
prevent accidents while engine is running both in the water and, most importantly, while on
land!
• WARNING!! – The trim knob is angled outward and away from a pinch point between the
engine and transom bracket. DO NOT PLACE HANDS BETWEEN ENGINE AND
TRANSOM BRACKET WHILE ENGINE IS RUNNING!!! If the skeg or prop strikes an
obstruction while underway, the engine may tilt violently and cause injury.
• NEVER TOUCH ENGINE COMPONENTS DURING OR IMMEDIATELY AFTER
OPERATION. Components can become extremely hot which could result in severe burns!
• NEVER RUN YOUR SURFACE DRIVE IN AN ENCLOSED AREA! Exhaust gasses contain
poisonous carbon monoxide! Always test run in a well ventilated area.
• ALWAYS ATTACH THE SAFETY ROPE TO THE HANDLE OF YOUR SURFACE DRIVE
AS DESCRIBED ON THE BOTTOM OF PAGE 4 BEFORE STARTING THE ENGINE! This
enables you to run your engine in a neutral position! (See bottom of page 4)
• ALWAYS OPERATE YOUR SURFACE DRIVE WITH THE SAFETY KILL SWITCH
LANYARD ATTACHED TO YOUR WRIST OR BELT LOOP! After warm up, always test
your safety kill switch to make sure it is operating properly!
• OPERATE YOUR SURFACE DRIVE FROM A SITTING POSITION, unless you install a
grab bar in your boat to operate while standing!
• BE ALERT FOR HAZARDS AT ALL TIMES! Shallow water areas in particular can present
a variety of challenges. Continually read the terrain for unexpected obstructions, turns, or
changes in water depth.
• KEEP YOUR SURFACE DRIVE IN SAFE CONDITION. It is important to keep your engine
properly maintained. Having a breakdown can be difficult, especially if you are far away
from help or land. To help avoid problems, inspect your engine before each use and
perform all recommended maintenance.

TABLE OF CONTENTS
SURFACE DRIVE SAFETY
ASSEMBLY AND BOAT SETUP...................................................................... 1-5
• Crate Removal............................................................................................1
• Boat Setup.............................................................................................. 1-5
• Bolting Engine To Transom........................................................................ 4
OPERATION INSTRUCTIONS.......................................................................... 6-9
• Surface Drive Features............................................................................... 6
• Launching, Engine Starting.........................................................................7
• Low Speed Operation................................................................................. 8
• High Speed Operation, Trim Adjustment................................................. 8,9
LUBRICATION............................................................................................... 10-12
• Engine Lubrication.................................................................................... 10
• External Grease Fittings........................................................................... 10
• Pressure Lubrication.................................................................................11
• Internal Drive Lubrication.......................................................................... 12
BELT TENSION AND INSTALLATION......................................................... 13-15
• Tension Tester...How it Works!................................................................ 13
• Checking Belt Tension..............................................................................14
• Adjusting Belt Tension, Replacing belt..................................................... 15
SPECIAL TOOLS TO SERVICE SURFACE DRIVES…………………………….16
PROPELLER REMOVAL AND INSTALLATION………………………………….17
LOWER SEAL REPLACEMENT……………………………………………………17
SHAFT REMOVAL AND INSTALLATION…………………………………………18
BUSHING REMOVAL AND INSTALLATION……………………………………...19
SURFACE DRIVE PROP SHAFT DRIVE ASSEMBLY…………………………...20
SURFACE DRIVE SEAL INSTALLATION………………………………………....21
WARRANTY

1
TO THE NEW OWNER
Dear Customer,
You have just purchased one of the toughest pieces of marine equipment ever built.
The GO-DEVIL Surface Drive will give you many years of service with very little
maintenance. Of the few problems that occur, most are due to dirty fuel or not running
the engine out of fuel at the end of the season. We have found that unleaded gasoline
will gum the carburetor in a few months if your engine is not in use. We recommend
adding a fuel stabilizer such as Briggs & Stratton part number 5041 to the fuel in your
last full tank of the season. Always disconnect the fuel hose from the tank and run the
engine completely out of fuel before storage!
Fuel tanks should also be checked periodically for water which may appear from
condensation. We recommend using a transom mounted water separating fuel filter
(Sierra part # 18-7852-1 or equivalent) to collect water before it reaches the engine.
ASSEMBLY AND BOA T SETUP
1. Lay the crated engine flat with the engine in a normal upright position.
2. Remove the plywood and 2x4’s surrounding the engine.
3. Locate the metal band holding down the prop end of the Surface Drive frame
and cut it with a pair of tin snips or remove the nails with a claw hammer.
4. Remove the plastic wrapping from the engine.
5. Inspect the engine for freight damage and contact our office immediately if
anything seems damaged. Note that the tail end of the skeg just in front of the
propeller is factory bent. This bend is designed to compensate for torque created
by the surfacing propeller.
6. Loosen the transom clamping studs located under the engine.
7. Locate the lifting eyes on the frame just below the muffler. Using the lifting eyes,
hoist the engine vertically from the crate and place it onto the transom of your
boat.
8. Center the engine on the transom measuring from the outside gunnel rails of the
boat to the edges of the transom bracket. Tighten the clamping studs using a
crescent wrench or 1-1/16” wrench or socket (15/16” wrench for galvanized
models).
9. Remove the tiller handle from the frame by cutting all plastic tie-wraps that have
not been trimmed.
2
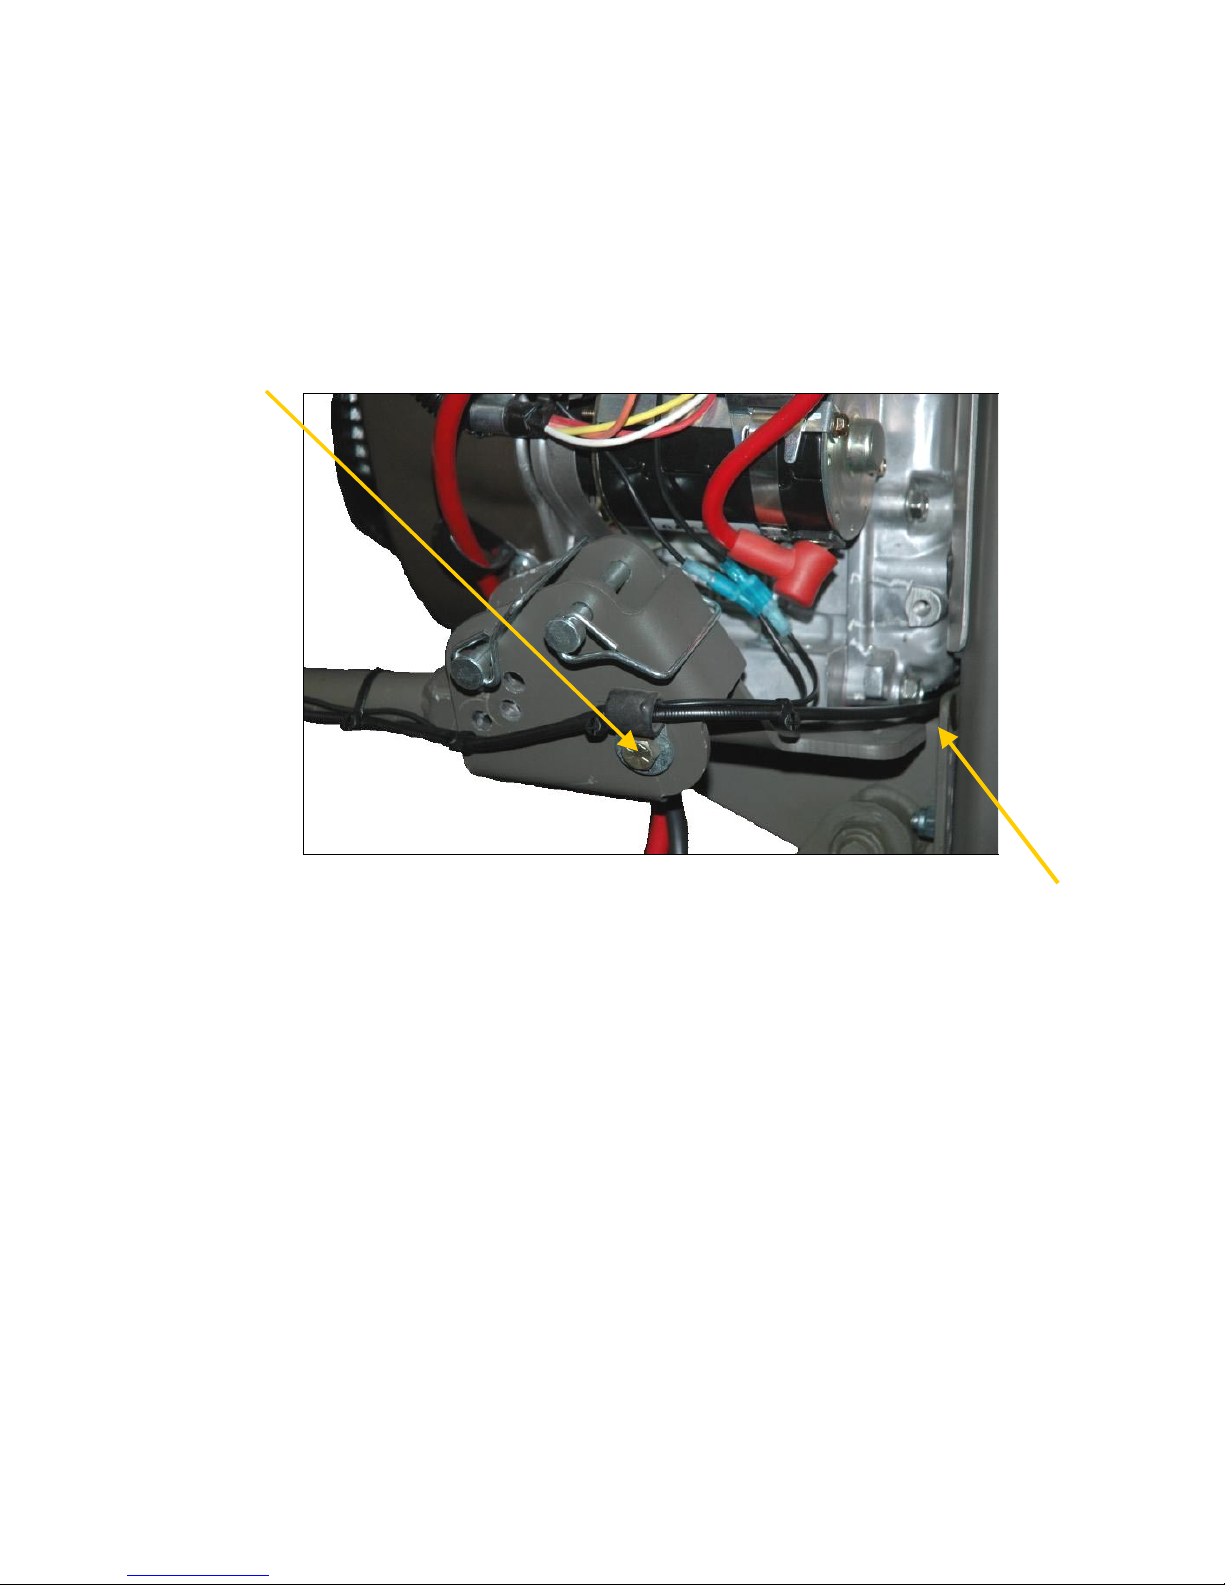
10. The 3/8”x 2-1/2” bolt indicated by the arrow in the figure below is the pivot point
for the Adjustable/Floating handle. Remove the bolt and insert the handle into
the engine-mounted handle bracket. Reinstall the bolt into the bracket, passing it
through the hole at the end of the handle. Be sure to include the wire loom to
secure the cables as it was shipped. Install the washer and nut and tighten the
nut firmly or until a slight amount of drag can be felt while pivoting the handle up
and down from the grip. Attach the safety kill switch wires to the mating
terminals on the engine.
23 Vanguard Shown
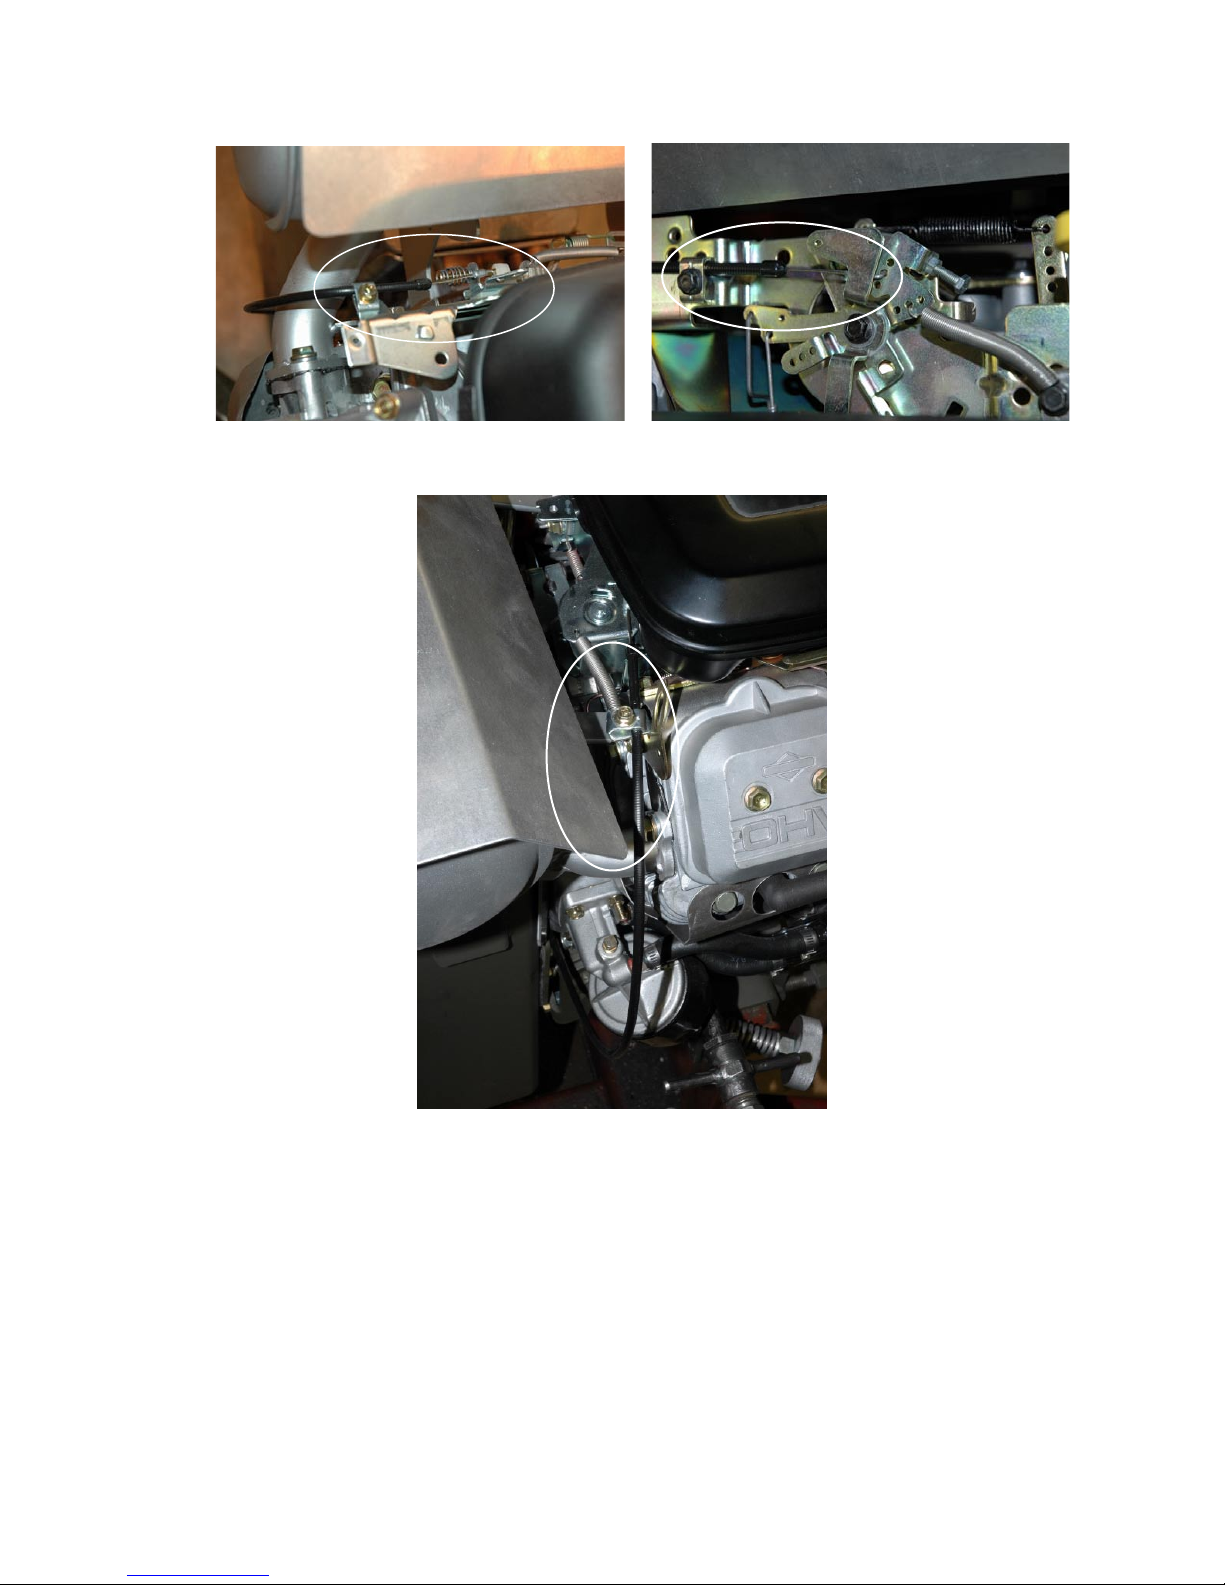
11. Route the throttle cable through the opening near the lower rear section of the
engine and attach the throttle cable to the engine linkage as shown in the
following photos on page 3. A flat spot near the end of the black cable should be
visible, indicating the position where it was originally clamped at the factory.
3
35 HP Vanguard Kohler 27 HP
Vanguard 23 HP
Check to ensure that the throttle linkage on the engine moves throughout its full
range when the throttle lever is depressed and that it returns to the idle position
when released.
For added safety, a stainless steel throttle return spring has been installed during
factory assembly. This spring returns the throttle linkage to idle position when
the squeeze lever is released. To ensure that the throttle operates smoothly,
periodically lubricate the throttle linkages with a WD-40 type spray lubricant. For
freezing temperatures, stand the handle in a vertical position and inject
antifreeze into the throttle cable with a hypodermic needle and work the throttle
back and forth. This will keep any moisture from freezing your throttle.
4
12. Bolt the engine to the transom as described below.
Looking from the rear of the engine, notice that the transom clamp has two
horizontal rows of holes. Either the two upper or two lower holes need to be used
to secure the engine to the transom. Four holes are provided to accommodate
various transom designs.
Using a 3/8” drill bit, drill through the lowest hole pattern on the bracket which
would allow the bolts to pass through a structural cross-member of the transom.
Install the two supplied 3/8”x3” bolts, washers and nylon insert nuts. For GoDevil boats, the engine should be bolted to the transom using the two top holes.
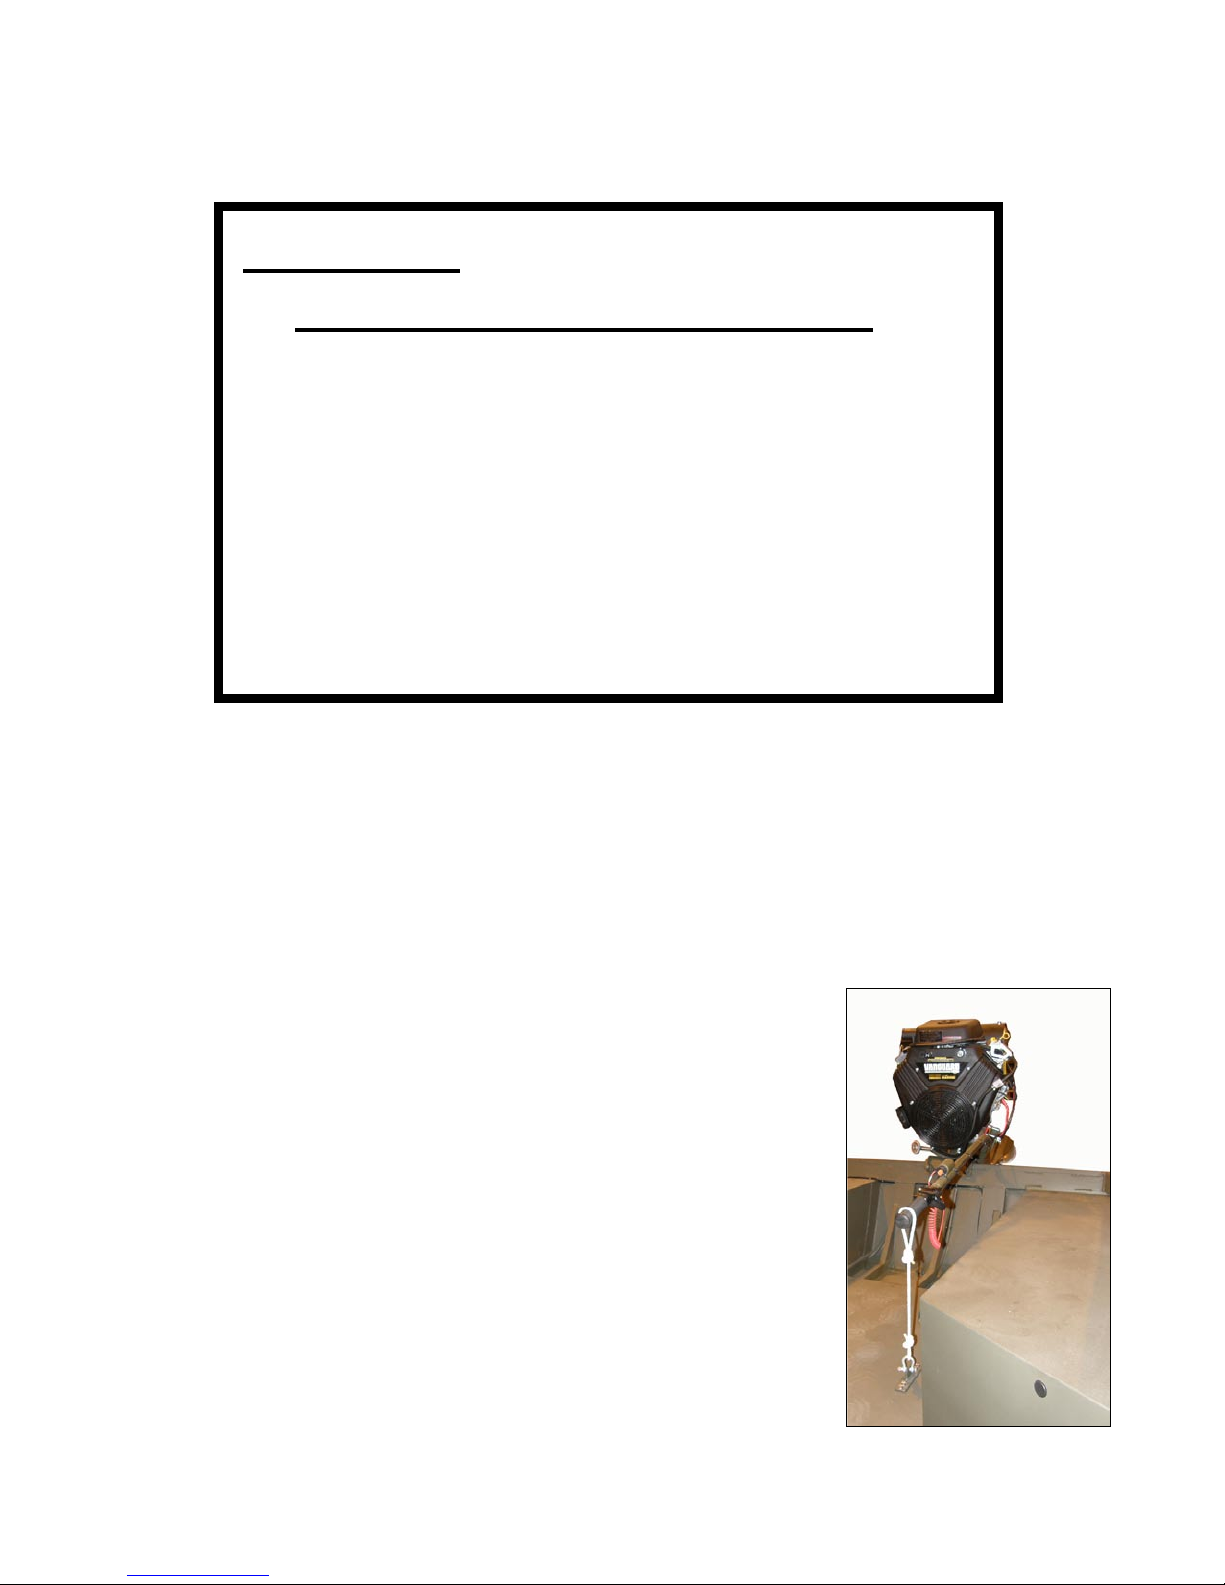
13. Tie a rope to the rib in your boat under the hand grip
of the Surface Drive and put a loop in the rope. Slip
the loop over the handle to hold the engine in a
neutral position while the handle is in its lowest
position. The rope should be short enough so that
the engine can idle with the prop out of the water. If
the handle is used often in a higher fixed position,
it may be necessary to attach an additional longer
rope along side the initial one or use a rope long
enough so that it can be tied securely at various lengths.
ATTENTION: The Go-Devil Surface Drive engine
MUST BE BOLTED TO THE TRANSOM!! ! !!
Failing to do so will cause the transom clamp to
loosen while trailering, allowing the engine to
possibly fall off of the transom!!!!
BOLTS MUST PASS THROUGH A STRUCTURAL
CROSS-MEMBER OF THE TRANSOM!!!
(channel, tube, rib, etc.)

5
14. Connect the battery cables to the battery. Attach the red cable to the positive (+)
side of the battery and attach the black cable to the negative (-) side of the
battery.
The battery should be kept in a covered battery box secured to the floor of the
boat and away from gasoline vapors.
15. We recommend using a good nylon rope to tie
your boat instead of a boat strap. Tie the rope
to the trailer frame on one side of the boat
even with the hand grip. Bring the rope over
the boat and make a wrap around the hand
grip on the Surface Drive, then tie a loop in the
rope before the rope comes down the side of
the boat. Bring the rope around the trailer
frame and back up to the loop, cinch the rope
tight and tie it off.
This procedure will hold your boat as tight as any boat strap and will secure your
Surface Drive so it will not bounce when trailering. We also recommend that you
tie a red flag to the tail end of the Surface Drive when towing your boat down the
highway.
 Loading...