

Page 1

Owner’s Manual
for Gocycle® GS
Version September 2017
www.gocycle.com
Page 2

Gocycle® Owner’s Manual for GS, September 2017
CONTENTS
1 Disclaimer, Copyrights and Trademarks ................................................................................................ 3
1.1 Original Instructions, Translations and Updates .............................................................................. 3
1.2 Disclaimer ............................................................................................................................................... 3
1.3 Copyright Notice ................................................................................................................................... 3
1.4 Trademarks ............................................................................................................................................ 3
1.5 Standards and Conformity ................................................................................................................... 4
2 Safety ............................................................................................................................................................. 5
2.1 General Warning ................................................................................................................................... 5
2.2 Intended Use .......................................................................................................................................... 5
2.3 Modifications and Refinishing ............................................................................................................ 6
2.4 Maximum Design Limit ....................................................................................................................... 6
2.5 Riding in Low Light Conditions .......................................................................................................... 6
2.6 Stopping the Gocycle ............................................................................................................................ 7
2.7 Riding in Wet, Cold or Icy Conditions ............................................................................................... 7
2.8 Limited Life Span .................................................................................................................................. 8
2.9 First Ride ................................................................................................................................................. 8
3 Warranty ...................................................................................................................................................... 10
3.1 Warranty Registration and Setup ...................................................................................................... 10
3.2 Gocycle Frame Number ...................................................................................................................... 10
4 Setup, Configuration, and Getting Started ........................................................................................... 11
4.1 Setup ...................................................................................................................................................... 11
4.2 Warning! Take Care during Assembly ............................................................................................. 11
4.3 Handlebar Reach Adjustment ........................................................................................................... 13
4.4 Assembling the Seatpost Tool Holder .............................................................................................. 16
4.5 Assembling the Front and Rear Reflectors ....................................................................................... 18
4.6 Assembling the Bell ............................................................................................................................. 22
4.7 Labelling for USA Type 1 & Type 2 Configuration ........................................................................ 24
5 Gocycle Lithium Battery........................................................................................................................... 25
5.1 Important Information: Lithium-Ion Batteries ................................................................................ 25
5.2 Getting to Know Your Gocycle Lithium Battery ............................................................................. 25
5.3 Gocycle Lithium Battery: Usage ........................................................................................................ 26
5.4 Gocycle Lithium Battery: Care and Maintenance ........................................................................... 30
5.5 Shipping and Handling of Lithium Batteries .................................................................................. 31
© Karbon Kinetics Limited. All Rights Reserved. i
Page 3

Gocycle® Owner’s Manual for GS, September 2017
5.6 Battery Pack Disposal ......................................................................................................................... 31
5.7 Maximising Your Gocycle’s Motor Performance and Reliability ................................................. 31
5.8 Heat and Over-Temperature Protection .......................................................................................... 32
6 Maintenance and Adjustments ............................................................................................................... 34
6.1 Maintenance and Service .................................................................................................................... 34
6.2 Service Interval .................................................................................................................................... 34
6.3 Visual Inspection Guide – (Every 3 Months/ 500 Miles) ................................................................ 34
6.4 Cleaning and Preventing Corrosion ................................................................................................. 38
6.5 Lubrication ........................................................................................................................................... 39
6.6 Adjusting the Shifting ......................................................................................................................... 40
6.7 Adjusting the Brakes ........................................................................................................................... 40
6.8 Adjusting the PitstopWheel Quick Release Cam Levers ............................................................... 51
6.9 Fleet Management and Tour Operators ........................................................................................... 56
6.10 Checking for and Minimising Wear on the Front and Rear Hubs ........................................... 57
6.11 Tyres ................................................................................................................................................. 58
6.12 Adjusting the Headset ................................................................................................................... 59
6.13 Adjusting the Stem Quick Release Lever .................................................................................... 61
6.14 Adjusting the Bearings on the Rear Hub ..................................................................................... 64
7 Troubleshooting ........................................................................................................................................ 67
7.1 Diagnosis Modes ................................................................................................................................. 67
8 Contact Information .................................................................................................................................. 68
© Karbon Kinetics Limited. All Rights Reserved. ii
Page 4

Gocycle® Owner’s Manual for GS, September 2017
1 DISCLAIMER, COPYRIGHTS AND TRADEMARKS
1.1 Original Instructions, Translations and Updates
Original instructions are produced in English language. Translations of the original instructions to
other languages may take place, however Karbon Kinetics Ltd accepts no responsibility for any errors
or misinterpretation of information as a result of such translation.
Visit www.gocycle.com/manuals to check for any new revisions or updates to this manual.
1.2 Disclaimer
The specifications, information and performance of the Gocycle and other products manufactured by
or sold under license granted by Karbon Kinetics Limited and featured in this document may change
without notice. The use of this information or products and the conditions under which the products
are used are the sole responsibility of the buyer and/or the rider. It is the buyer’s and/or rider’s
responsibility to determine the correct and safe selection of settings and conditions of use of the
products and to periodically check the products for secure and proper operation. To the extent that
the law permits, any liability which may be incurred as a result of the use of a product manufactured
by or sold under license granted by Karbon Kinetics Limited is limited to the cost of repairing or
replacing the failed product or component at the discretion of Karbon Kinetics Limited, either within
or outside of warranty periods, and does not extend to any loss or damage which may be caused as a
consequence of misuse or failure of the products. Damages to the product, other property or any
persons are the responsibility of the buyer and/or rider. By using this product manufactured by or
sold under license granted by Karbon Kinetics Limited, you are stating that you have read this
disclaimer and agree to hold Karbon Kinetics Limited, its owner/s and any of its employees or
directors free from all liabilities, that you agree you are using and operating the product at your own
risk, and that no warrantees or guarantees are made by Karbon Kinetics Limited, expressed or
implied, on performance or operation.
1.3 Copyright Notice
© Copyright Karbon Kinetics Limited. All rights reserved.
This material provided by Karbon Kinetics Limited is the property of Karbon Kinetics Limited and is
protected by copyright, trademark and other intellectual property laws. You may view this material
and print this material only for personal use, provided that you maintain all copyright, trademark
and other proprietary rights or notices. You may not otherwise use, reproduce, store, post, broadcast,
transmit, modify, sell or make available to others or the public, content from this material without the
prior written approval of Karbon Kinetics Limited.
1.4 Trademarks
Gocycle®, PitstopWheel®, Cleandrive® are registered trademarks of Karbon Kinetics Limited.
Pitstoplock™, GocycleConnect™, Gocycle-to-Work™, EmpowerPack™, Vgonomic™ Adjustment,
Lockshock™, Shocklock™ and Performance Commuting™ are trademarks of Karbon Kinetics
Limited.
All trademarks and the Gocycle logo may not be used without the prior written approval of Karbon
Kinetics Limited, a United Kingdom Registered Company Number 4357956.
© Karbon Kinetics Limited. All Rights Reserved. 3
Page 5

Gocycle® Owner’s Manual for GS, September 2017
1.5 Standards and Conformity
Gocycle is an electric power assisted cycle developed in accordance with:
2006/42/EC The Machinery Directive
2004/108/EC The Electromagnetic Compatibility Directive
EN 15194:2009+A1 Cycles - Electrically power assisted cycles - EPAC Bicycles
EN 14764:2005 City and trekking bicycles - Safety requirements and test methods
US Type 1 & Type 2 Electric Bicycle
© Karbon Kinetics Limited. All Rights Reserved. 4
Page 6

Gocycle® Owner’s Manual for GS, September 2017
2 SAFETY
2.1 General Warning
This manual contains many warnings and cautions, which if ignored, may increase the risk of injury to
you as a rider, may cause damage to the product or may invalidate the warranty. We recommend
that you read and understand this manual in its entirety, prior to your first ride. Before riding your
Gocycle you must visit www.gocycle.com/safety for up to date important safety related information.
Riding any bicycle involves the risk of product damage, serious injury or even death. Such risks are
increased in busy, urban environments with moving traffic. By choosing to ride a Gocycle, you
assume the responsibility for these risks, and it is important that you know how to ride responsibly
and to exercise proper maintenance to minimise such risks and potential damage. Do not try to ride
beyond the limits of your ability or the limits of the Gocycle.
We strongly recommend that you learn more about the inherent risks associated with riding bicycles
and suggest that you:
Ask your local bike retailer for information or instruction on safe cycling.
Ride within your means and ability.
Attend a training session or safe cycling workshop run by many local bike clubs, police
departments, schools or government support groups.
Search “bicycle safety” online for reference information.
Skills of riders can vary; for example, it takes a highly skilled rider to travel at high speeds and/or
close to obstacles, cars or other cyclists. Do not ride in a manner that exceeds the limits of your ability.
2.2 Intended Use
Gocycle is an electric bicycle developed and designed for commuting usage and/or simple riding in
fair weather and at speeds relevant to safe and appropriate travel in an urban or suburban
environment. Where applicable, the product meets the minimum requirements outlined in EN
14764:2005 and EN 15194. Abusive riding styles or inappropriate use will invalidate any warranty
protection offered in this agreement.
WARNING! Understand your Gocycle and its intended use. Using your Gocycle in the wrong manner
or for the wrong purpose can be dangerous and may impact the service life of the product.
The Gocycle is a power-assisted bicycle intended for sensible use by physically competent riders. If
you have any concerns or doubts about your use or enjoyment of such a product due to a medical
condition, an illness or if you are recovering from treatment for a condition or illness, you should
consult your doctor regarding the suitability of the product for you. If you are the user of an
implanted medical device such as a pacemaker or defibrillator, you agree to seek appropriate advice
from the manufacturer of such device prior to the usage of Karbon Kinetics Limited products.
WARNING! Regulations for electric bicycle vary throughout the world and are constantly being
updated. There may be usage limitation in place in your local region restricting access on certain bike
paths, roads, parks or other common use areas. We strongly recommend that you consult your local
electric bicycle regulatory body and understand the legislation prior to operating this product. Whilst
most electric bicycles operated in accordance with local legislation are treated in a similar manner to
© Karbon Kinetics Limited. All Rights Reserved. 5
Page 7

Gocycle® Owner’s Manual for GS, September 2017
a bicycle, your insurance provider may have a different policy with regards to bicycles and electric
bicycles. We also strongly recommend that you consult your insurance provider and notify them
about your intended usage of this product prior to operation. Understand your Gocycle and its
intended use. Using your Gocycle in the wrong manner or for the wrong purpose can be dangerous
and may impact the service life of the product.
2.3 Modifications and Refinishing
WARNING! Do not modify or refinish your Gocycle or Gocycle components in any way. Such
modifications or refinishing will void any applicable warranty. Do not modify your Gocycle with
firmware not compliant with your local regional laws and regulations.
Modifications can cause damage and can increase the risk of failure and accidents which may result in
serious injury or death and can render the product non-compliant which place you and others at risk.
Refinishing can hide structural damage, such as fatigue cracks or structural problems which may also
result in an accident.
2.4 Maximum Design Limit
WARNING! This product has been designed with a maximum recommended weight limit of 100kg
(220lbs) for the rider, clothing and all luggage, and is intended for use on paved roads. For rider and
luggage weight 100-115kg (220-250lbs): riding style, road condition, tire pressures and luggage
position may reduce product service life. Luggage weight should not exceed 10% of total rider and
luggage weight. Never exceed rider and luggage weight of 115kg (250lbs) at any time. Exceeding this
limit will void all warranties and may result in the product being unsafe for operation.
2.5 Riding in Low Light Conditions
In low light conditions at night, dawn, dusk or during adverse weather conditions such as fog, the
visibility of cyclists is dramatically reduced.
WARNING! Never ride a bicycle in low light conditions without appropriate front and rear lights fitted
and “on” (illuminated) that meet or exceed the national standards of the country in which it is being
ridden.
We recommend that you consult the relevant national safety organization or a reputable cycle dealer
on what the minimum recommended lighting requirements are in your particular country or region.
For reference when selecting lights, your Gocycle has a 34.9mm diameter seat post and a 28.5
mm upper handlebar stem. We recommend that you choose a light with a variable length
strap mounting system.
The following are additional recommendations:
Wear bright, reflective clothing such as reflective vests, leg and arm bands.
Ensure that your Gocycle is equipped with correctly positioned reflectors (see 4.5 Assembling
the Front and Rear Reflectors).
© Karbon Kinetics Limited. All Rights Reserved. 6
Page 8

Gocycle® Owner’s Manual for GS, September 2017
2.6 Stopping the Gocycle
The Gocycle is equipped with front and rear hydraulic disk brakes, operated by two levers on the
handlebars (shown). Before riding, it is important to familiarise yourself with which brake lever
operates the front brake and which operates the rear brake. Proper use of your brakes will slow and
bring your Gocycle to a safe and controlled stop.
WARNING! To slow or stop the Gocycle in normal operation, apply the brakes appropriately. In the
event that an emergency stop is required, apply the brakes appropriately and in a safe and controlled
manner until you have brought the Gocycle to a complete stop. Do not release the brakes until it is
safe to do so.
Aggressive use of the brakes may cause your Gocycle to skid, potentially resulting in loss of control.
Anticipate your need to stop and slow using appropriate pressure on the brake levers.
2.7 Riding in Wet, Cold or Icy Conditions
Under wet, cold or icy conditions, the stopping power of your brakes and tyres (as well as the brakes
of other vehicles sharing the road) is dramatically reduced. This makes it harder to control speed and
easier to lose control. It also makes skidding during turning more likely. Ride more slowly and
cautiously when in wet weather. If it is cold, near or below the temperature when water freezes, be
careful of ice on the roads which could be dangerous.
WARNING! Wet or icy conditions impair traction, braking and visibility, both for the cyclist and for
other vehicles sharing the road. The risk of an accident is dramatically increased in wet conditions.
To make sure that you can slow down and stop safely in wet conditions, ride more slowly and apply
your brakes more gradually than you would under normal, dry conditions.
We do not recommend riding in heavy rain or standing water, but we do understand that this is not
always avoidable. If your Gocycle gets wet, clean and dry it within 15 minutes of heavy wet weather
riding. See 7.4 Cleaning and Preventing Corrosion for more information.
© Karbon Kinetics Limited. All Rights Reserved. 7
Page 9

Gocycle® Owner’s Manual for GS, September 2017
2.8 Limited Life Span
WARNING! Bicycles have a limited life span for safe operation and are not indestructible.
As with all mechanical components, bicycle components are subject to wear and high stresses.
Different materials and components may react to wear, stress or fatigue in different ways. Exceeding
the useful life of your Gocycle may be hazardous.
The expected life span of a Gocycle or Gocycle component will vary with the material and
construction of the frame and components, the maintenance that is received over its life and the type
and amount of riding. Any unusual or abusive riding style, such as off-road cycling, competitive
riding, stunt cycling, jumping or riding at excessive speed and braking hard, can accelerate wear and
fatigue of components to the point where premature and sudden failure of a component may occur
without warning and risk of injury is increased.
WARNING! Regular maintenance is essential. See Section 6. Maintenance and Adjustments in this
manual and check on www.gocycle.com/safety every 3 months to see if there are any relevant
technical bulletins relating to your frame number. Failure to perform regular checks and maintenance
could result in a reduced service life of the product or render the product unsafe to ride.
Any form of crack, scratch or change of colouring in highly stressed areas indicates that the life of the
component has been reached and you should replace it before any further use.
See Section 6.3 Visual Inspection Guide for parts of the Gocycle that require visual inspection from
time to time.
An impact to your Gocycle, either major or minor, can cause stress and fatigue on the Gocycle and its
components or compromise the integrity of the electronics, including the battery, electronic controller,
motor drive system or wiring. In the event of an accident and if safe to do so put your battery into
sleep mode. (see Section 5.3.3.) Check for visual damage before continuing to ride the Gocycle. If the
Gocycle has sustained damage other than light cosmetic scratches such as dented, cracked, bent or
misaligned components, do not ride your Gocycle until it has been inspected by an authorised
Gocycle service centre. If you are not comfortable inspecting your Gocycle, consult
2.9 First Ride
WARNING! First familiarise yourself with the modes of operation, controls and performance of your
Gocycle before venturing onto busy streets.
We strongly recommend that you familiarise yourself with your new Gocycle by first riding it in a
controlled environment, away from potential hazards such as moving traffic and obstacles. It is
important to become familiar with the modes of operation, controls, brakes and the different
performance characteristics inherent in the electric motor.
WARNING! Your braking efficiency will increase during the first few rides as your brake disks and
pads “bed in”. To accelerate the increase in braking performance, perform a number of controlled
stops under hard braking.
© Karbon Kinetics Limited. All Rights Reserved. 8
Page 10

Gocycle® Owner’s Manual for GS, September 2017
SAFEFY! Please ensure that you visit www.gocycle.com/safety at least once every three months to
check if there are any Technical Bulletins relating to your model and frame number. Having your
contact email as the main registered email with the GocycleConnect App is strongly advised.
© Karbon Kinetics Limited. All Rights Reserved. 9
Page 11

Gocycle® Owner’s Manual for GS, September 2017
Frame number
Compliance information
(European Specification
shown)
Minimum leg height with
standard seat post
(compact seat post
available at
www.gocycle.com)
3 WARRANTY
Please view current warranty terms and conditions at the webstore you purchased your Gocycle
from. www.gocycle.com.
3.1 Warranty Registration and Setup
In the event that you wish to make a warranty claim, you must provide your original proof of
purchase (sales receipt or order confirmation). Keep this information in a safe place. Before we can
process a warranty claim, you must have registered your Gocycle via the Setup process on the
GocycleConnect App. Doing so will enable us to contact you with important product safety-related
information, should the need arise.
Please complete the Setup process on the GocycleConnect App to register your Gocycle for warranty
and in order to stay informed of important safety notices.
3.2 Gocycle Frame Number
Your Gocycle comes with a unique identifier called a frame number, positioned on the rear of the
Gocycle. An example is shown below:
Your Gocycle frame number will be required when registering your Gocycle, making a warranty
claim or making contact with Karbon Kinetics Ltd.
© Karbon Kinetics Limited. All Rights Reserved. 10
Page 12

Gocycle® Owner’s Manual for GS, September 2017
4 SETUP, CONFIGURATION, AND GETTING STARTED
4.1 Setup
www.vimeo.com/gocycle
4.2 What’s in the Small Parts Bag
© Karbon Kinetics Limited. All Rights Reserved. 11
Page 13

Gocycle® Owner’s Manual for GS, September 2017
4.3 Warning! Take Care during Assembly
During assembly or disassembly, do not over-fold the Cleandrive more than is necessary to engage or
disengage the Gocycle Lockshock™. Over-folding the Cleandrive can cause the internal cables to
become taut and in some cases may result in cables becoming disconnected, ultimately affecting the
operation of the product.
© Karbon Kinetics Limited. All Rights Reserved. 12
Page 14

Gocycle® Owner’s Manual for GS, September 2017
Open the quick release (QR) lever, as
shown.
Undo the quick release lever
(anticlockwise).
Reach
adjustment
4.4 Handlebar Reach Adjustment
In addition to Gocycle’s patented VgonomicTM adjustment (changing the effective cross-bar length
when lowering or heightening the saddle), it is also possible to make further adjustments to
accommodate most riders comfortably by changing the handlebar reach.
© Karbon Kinetics Limited. All Rights Reserved. 13
Page 15

Gocycle® Owner’s Manual for GS, September 2017
Completely remove the quick release.
The handlebar stem adjuster has two
positions:
Use the top position for aft adjustment.
(Shorter rider: least reach, handlebars
closest to saddle).
Use the lower position for forward
adjustment. (Taller rider: greatest reach,
handlebars furthest from saddle).
Align the desired position and re-insert
the quick release, as shown.
B. Lower
position
A. Top
position
© Karbon Kinetics Limited. All Rights Reserved. 14
Page 16

Gocycle® Owner’s Manual for GS, September 2017
With the quick release inserted and in the
open position as shown, rotate clockwise
STOPPING before it is fully tight as
shown below.
Close the quick release lever. The lever
should feel harder to close at it reaches a
90- degree position.
The QR should have roughly 120 degrees
of free play before it beings to engage.
The closing resistance should act over the
remaining 60 degrees of movement till it
is firmly shut in the correct location.
© Karbon Kinetics Limited. All Rights Reserved. 15
Page 17

Gocycle® Owner’s Manual for GS, September 2017
Orientate the Tool Holder as
shown
Locate the Snap Rail Tool Holder
above the saddle rails as shown.
Apply pressure onto the right
hand side of the Snap Rail Tool
Holder until this side is properly
located onto the right saddle rail.
Apply pressure onto the left
hand side of the Snap Rail Tool
Holder until this side is properly
located onto the left saddle rail.
Confirm both sides of the Snap
Rail Tool Holder are properly
located onto the saddle rails.
4.5 Assembling the Seatpost Tool Holder
© Karbon Kinetics Limited. All Rights Reserved. 16
Page 18

Gocycle® Owner’s Manual for GS, September 2017
Insert the 4mm Allen key
supplied with the Gocycle.
Tool Holder installation is
complete.
© Karbon Kinetics Limited. All Rights Reserved. 17
Page 19

Gocycle® Owner’s Manual for GS, September 2017
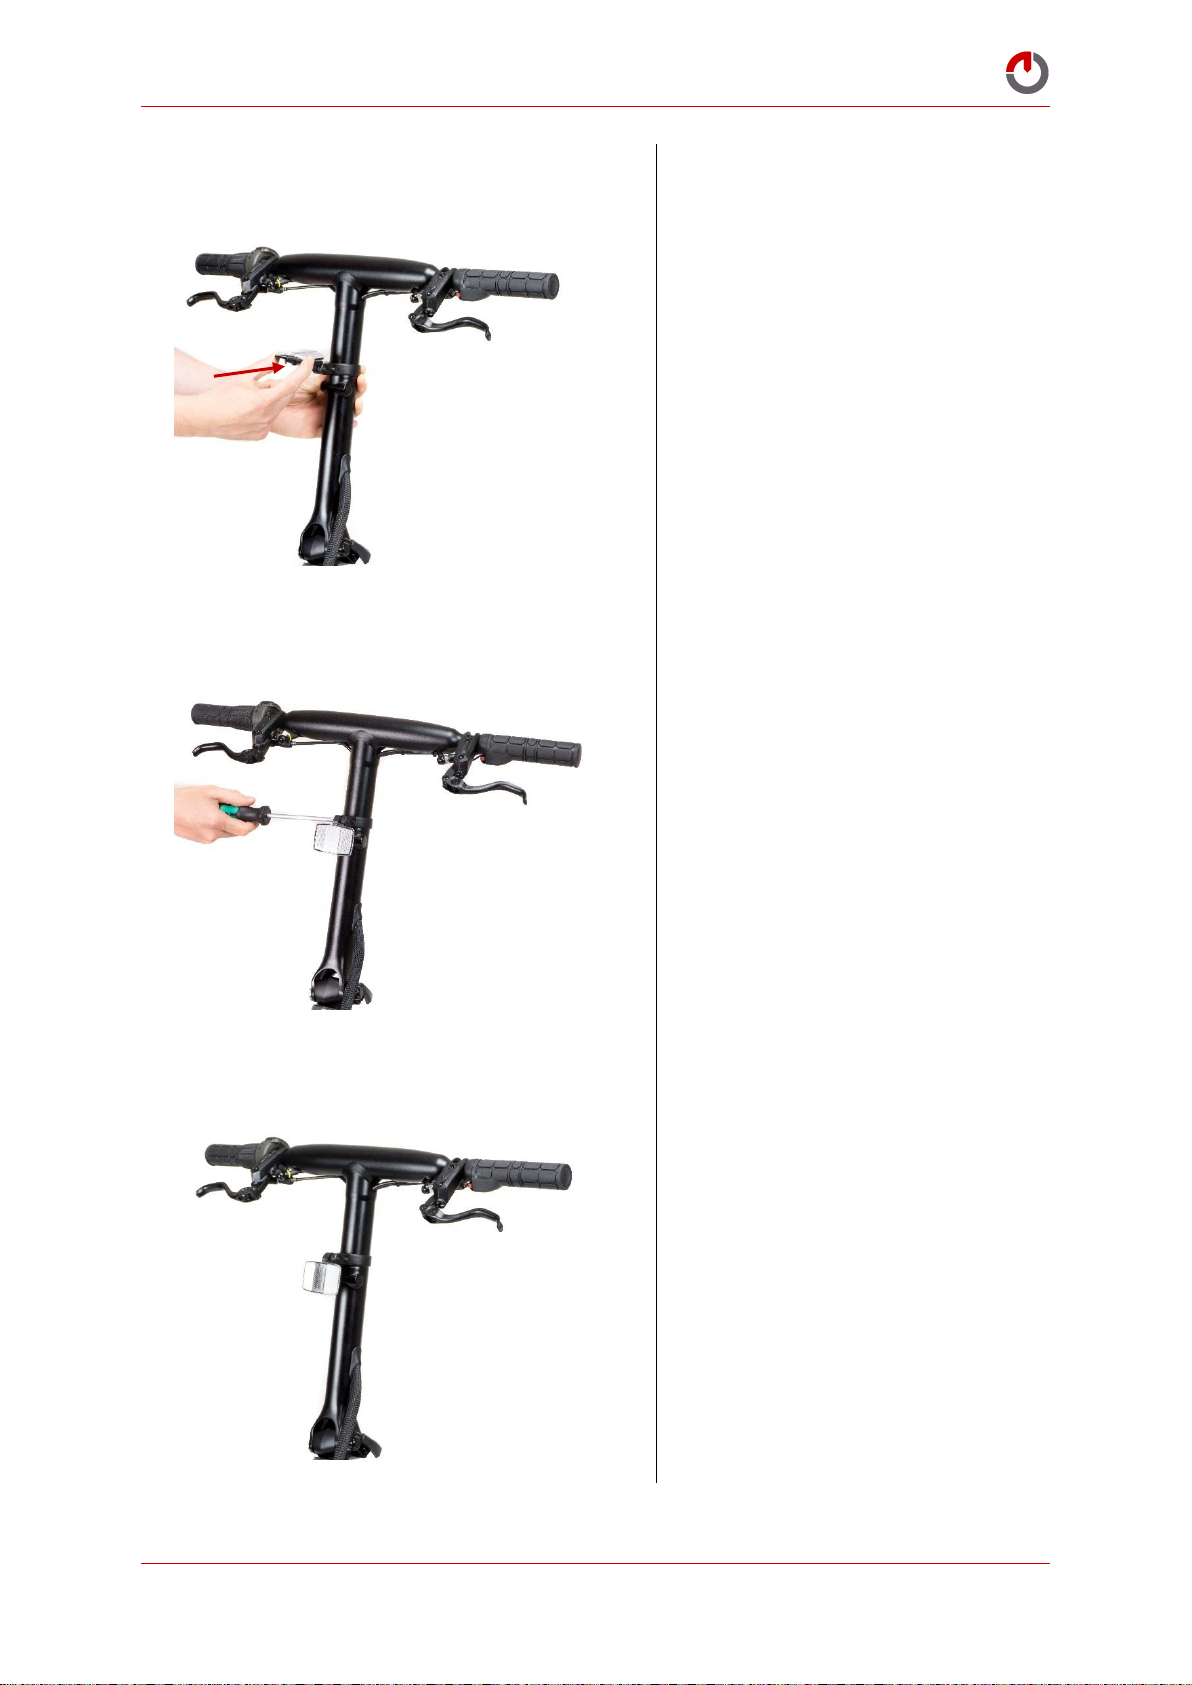
Mount the rear reflector on the upper seat
post
CAUTION! Do not assemble the rear
reflector too close to the saddle as it may
be obscured by clothing
Open the rear reflector bracket
Preferred
range
4.6 Assembling the Front and Rear Reflectors
Front and rear reflectors are supplied as standard with your Gocycle and can be found in the small
parts bag.
To install the rear reflector:
© Karbon Kinetics Limited. All Rights Reserved. 18
Page 20

Gocycle® Owner’s Manual for GS, September 2017
Place the bracket around the upper seat
post and tighten, using a screwdriver, to
secure in a position as shown
Mount the rear (red) reflector onto the
bracket and listen for a “click”
Adjust the bracket to ensure that the
reflector is vertical
© Karbon Kinetics Limited. All Rights Reserved. 19
Page 21

Gocycle® Owner’s Manual for GS, September 2017
Open the reflector bracket
Place the bracket around the upper
stem and tighten, using a screwdriver,
to secure in the position as shown
To install the front reflector:
© Karbon Kinetics Limited. All Rights Reserved. 20
Page 22
Gocycle® Owner’s Manual for GS, September 2017
Mount the front (white) reflector onto
the bracket and listen for a “click”
Adjust the bracket to ensure that the
reflector is vertical
Fix the assembled reflector in a vertical
position as shown
© Karbon Kinetics Limited. All Rights Reserved. 21
Page 23
Gocycle® Owner’s Manual for GS, September 2017
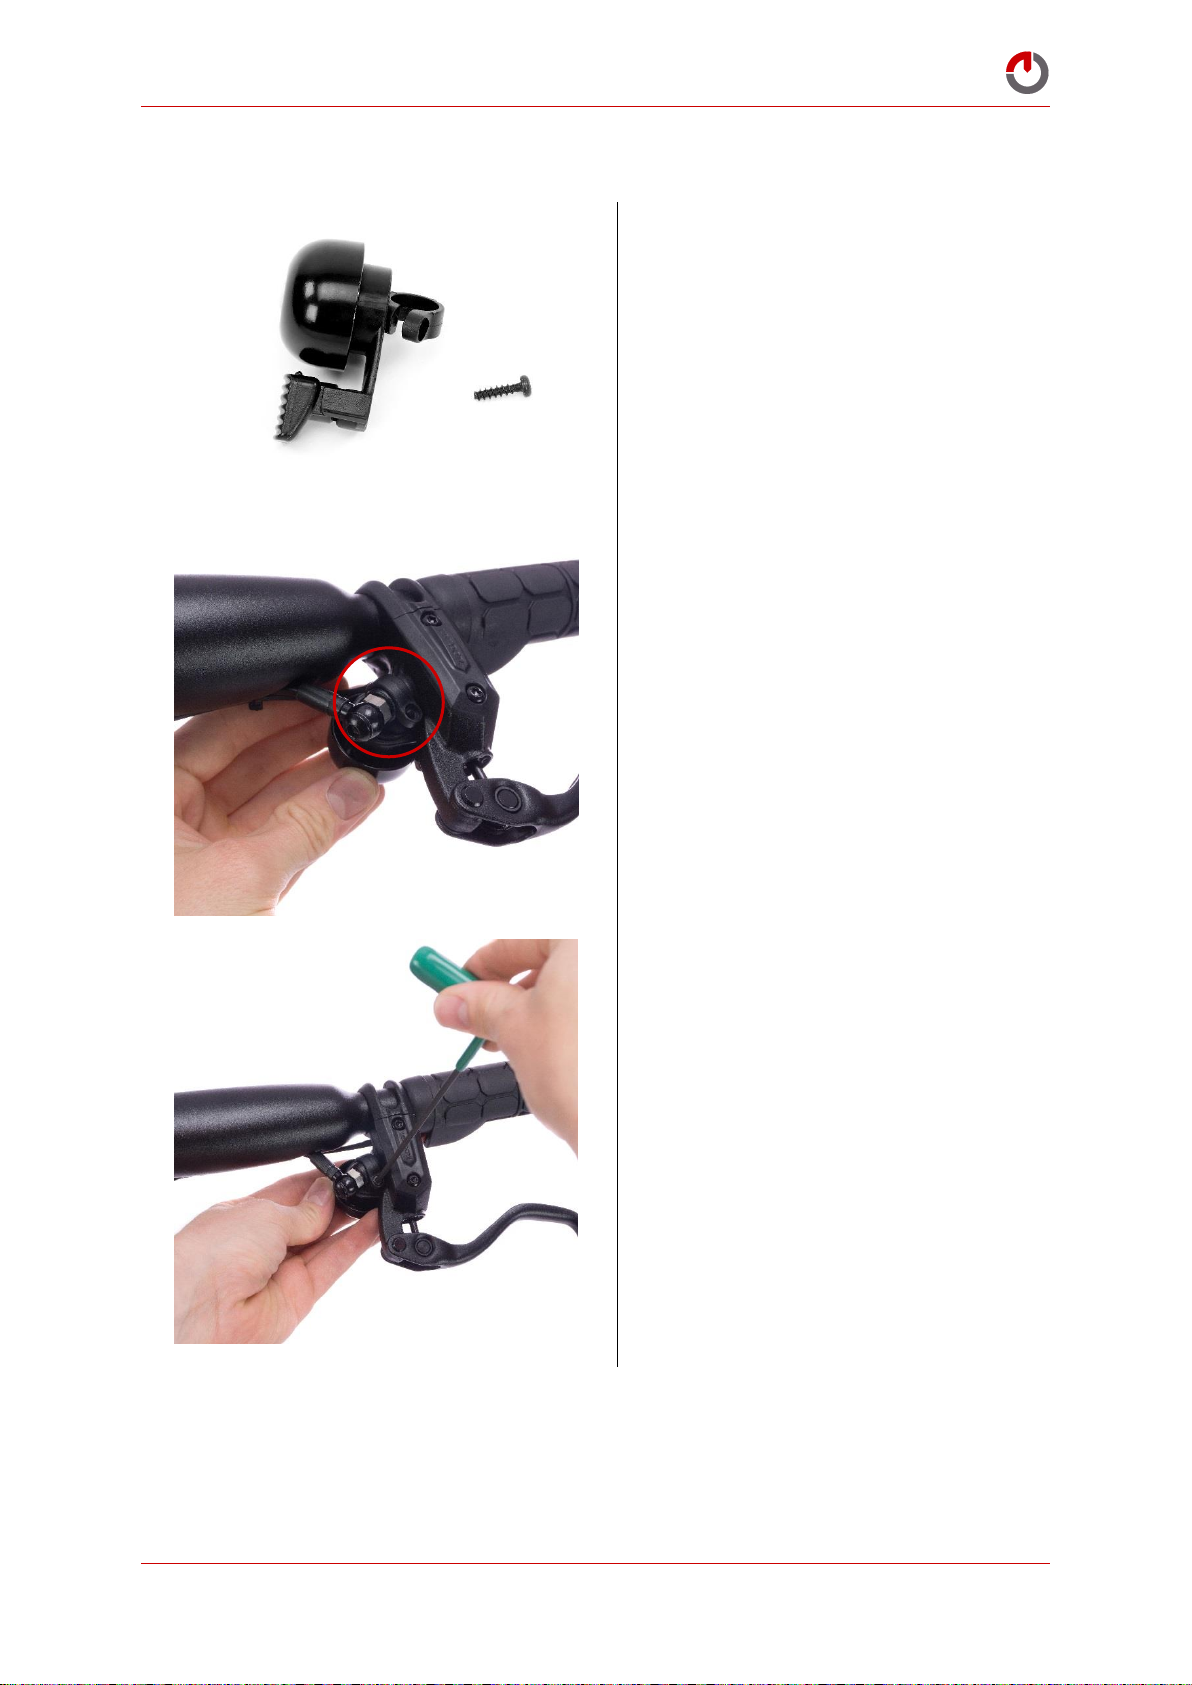
Bell and mounting bracket
(Supplied in small parts bag)
Clip the mounting bracket over the left
brake lever as shown
Tighten the bell mounting bracket with a
Torx T10 to 2-3 Nm.
4.7 Assembling the Bell
© Karbon Kinetics Limited. All Rights Reserved. 22
Page 24
Gocycle® Owner’s Manual for GS, September 2017
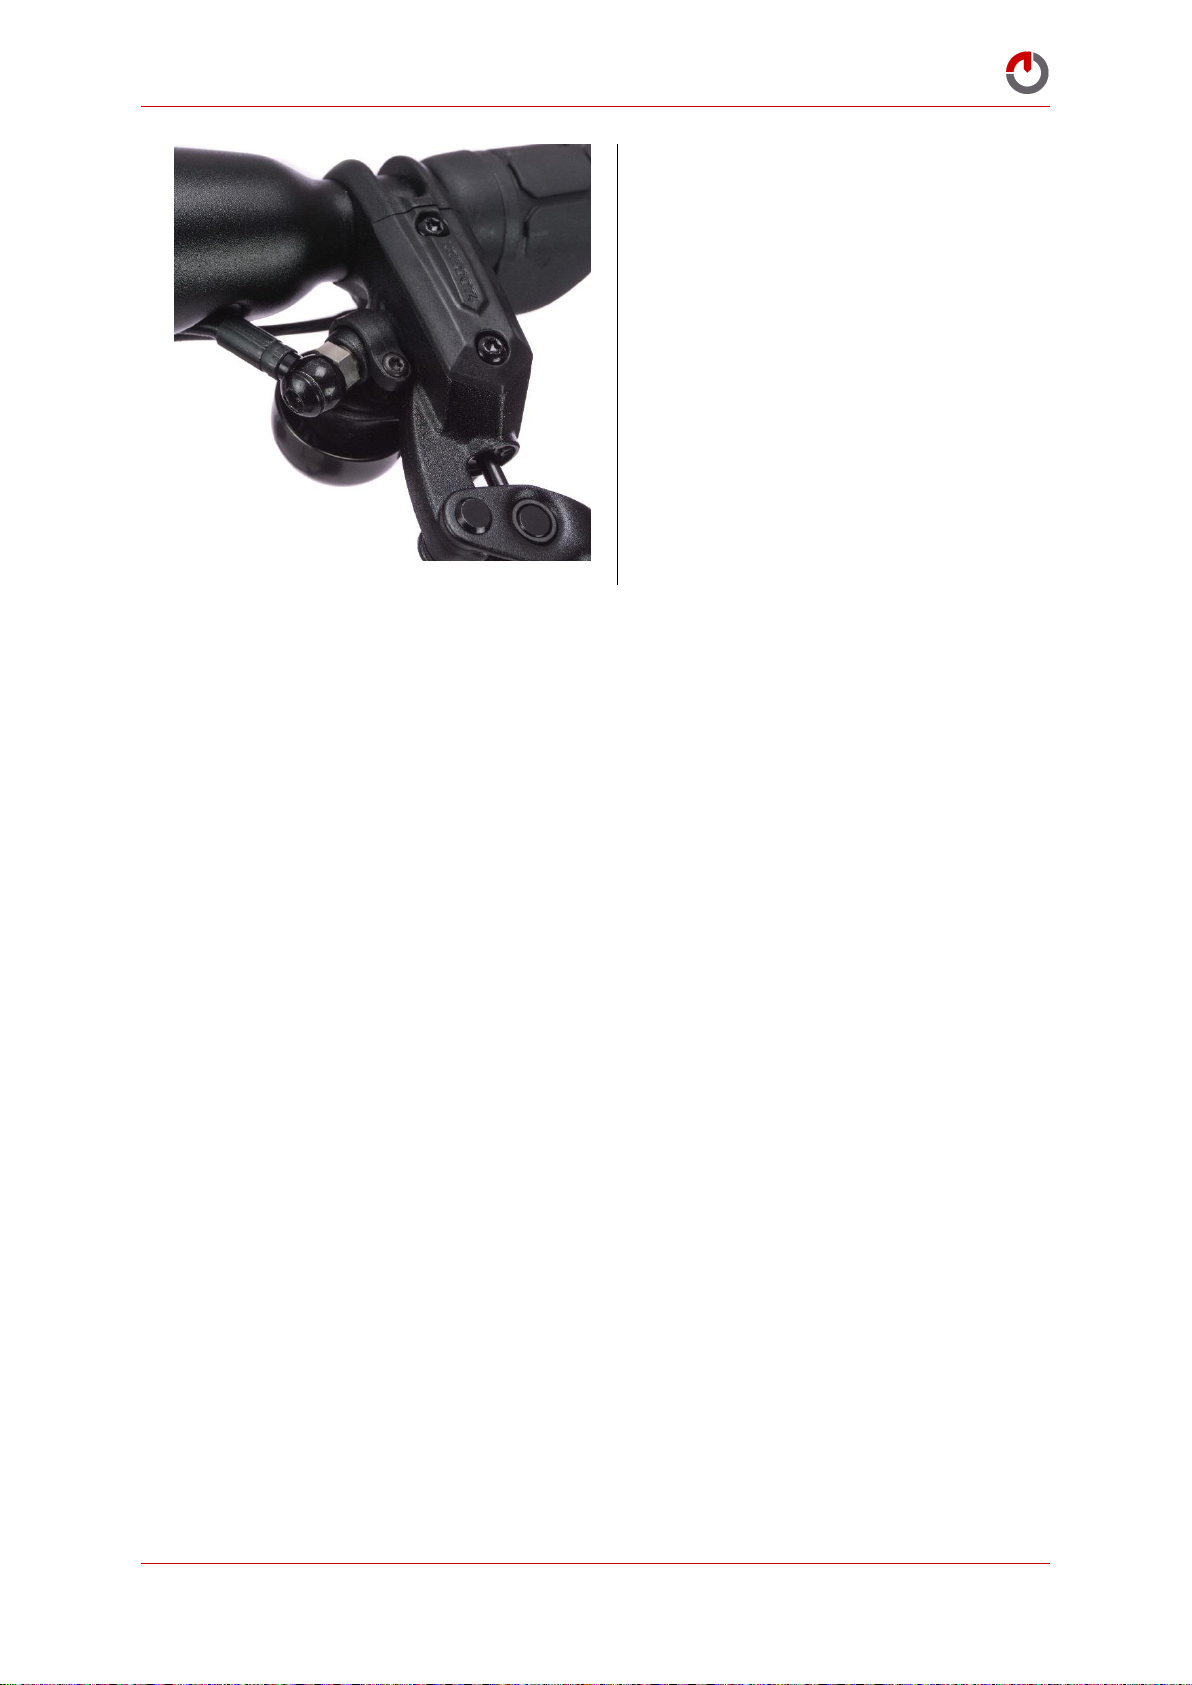
Assembled bell
© Karbon Kinetics Limited. All Rights Reserved. 23
Page 25
Gocycle® Owner’s Manual for GS, September 2017
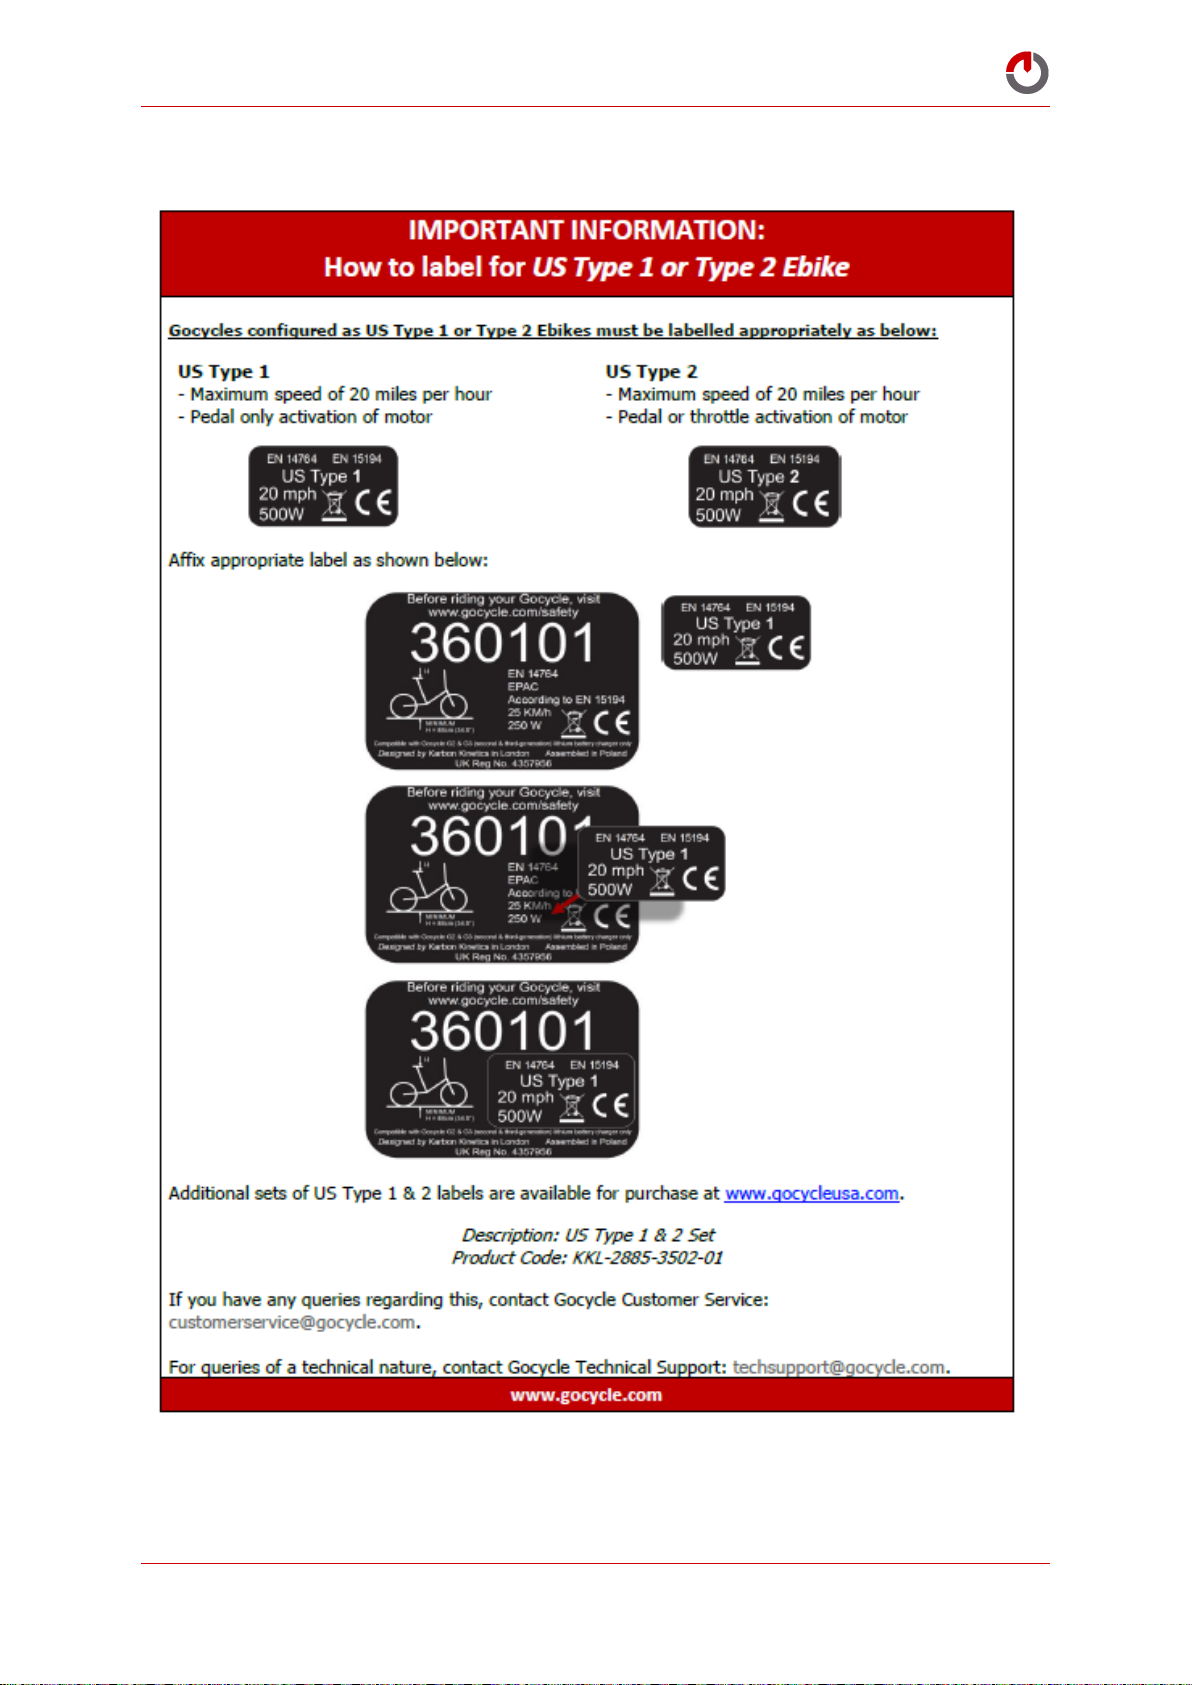
4.8 Labelling for USA Type 1 & Type 2 Configuration
© Karbon Kinetics Limited. All Rights Reserved. 24
Page 26
Gocycle® Owner’s Manual for GS, September 2017
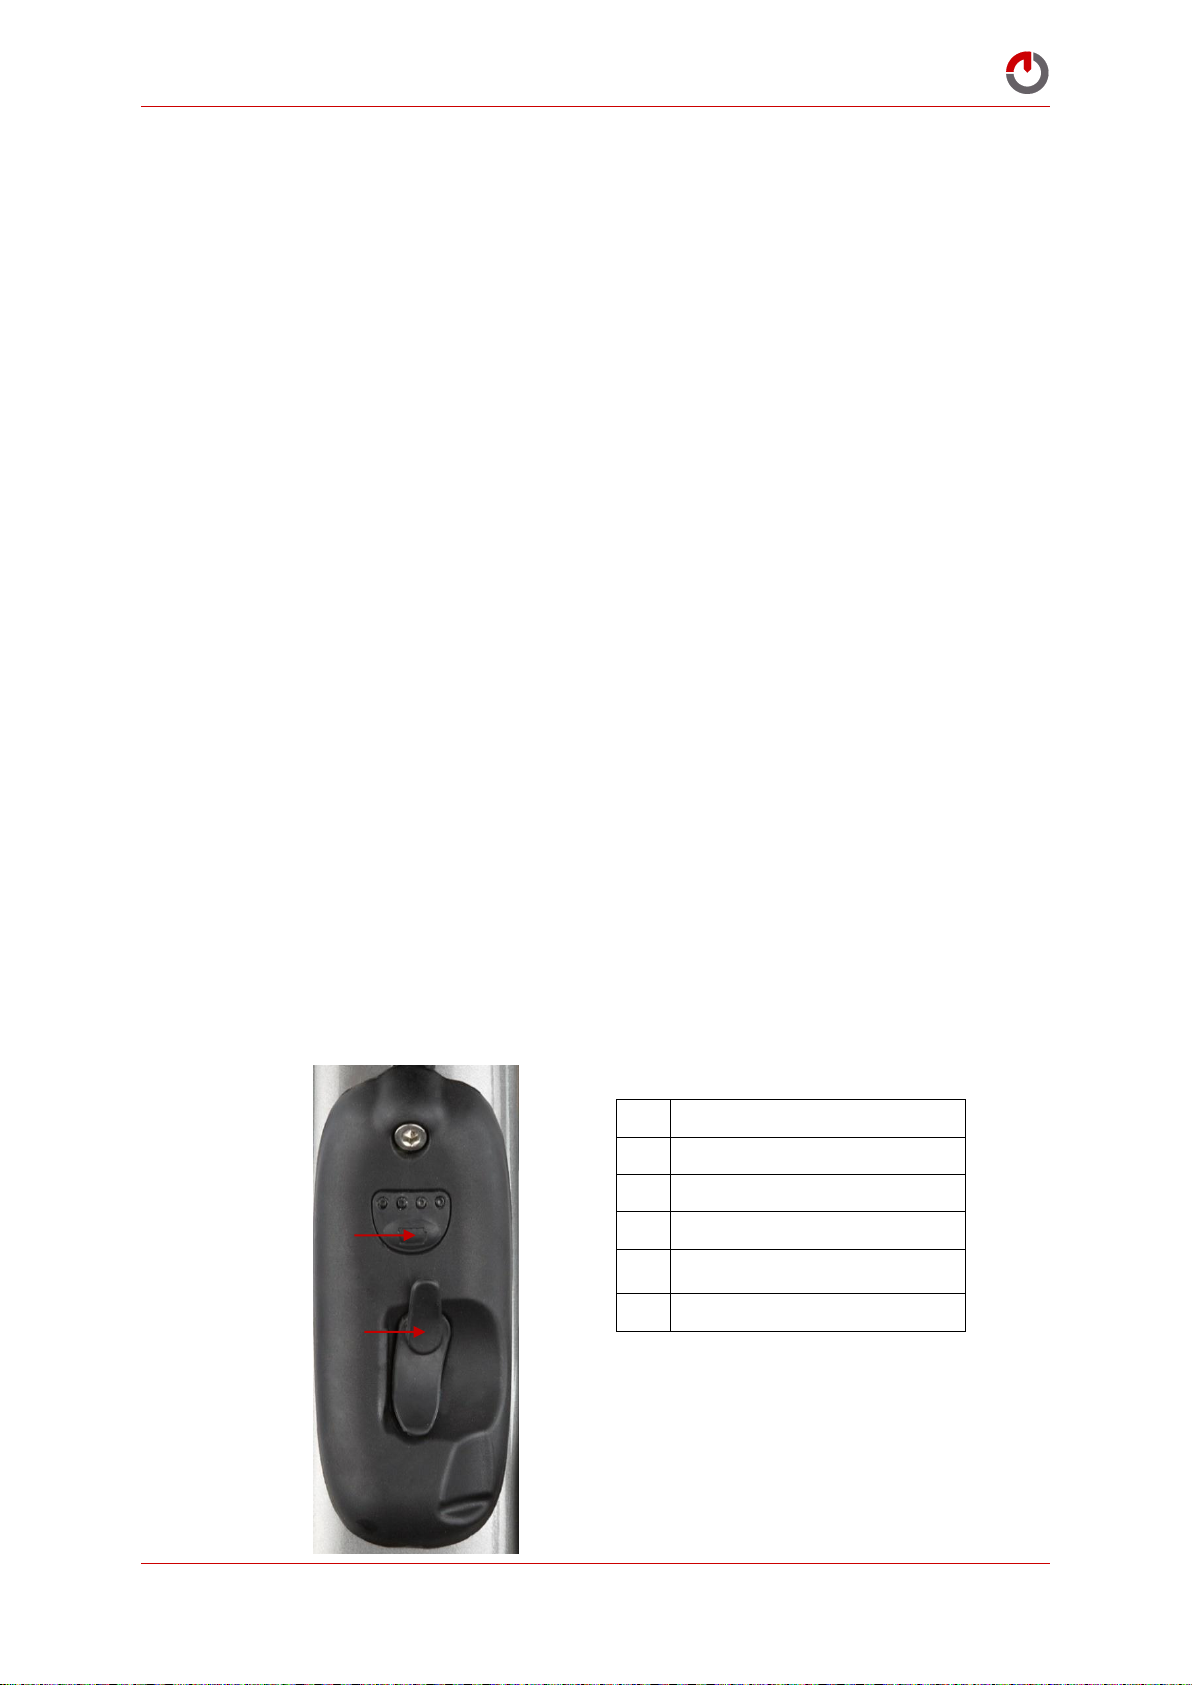
1
LED 1
2
LED 2
3
LED 3
4
LED 4
5
Button (for battery charge test
and changing battery mode)
6
Charging port
1 2 3 4
5
6
5 GOCYCLE LITHIUM BATTERY
5.1 Important Information: Lithium-Ion Batteries
The following important information applies to your Gocycle lithium battery. Read carefully to
ensure the proper and safe operation and storage of the battery.
Your battery has been designed for use with generation-three (G3) and GS Gocycle. Note: the
G3 battery can be used also with G2 Gocycles. Do not use the battery with any other product.
Your battery is intended to remain within the Gocycle frame at all times and should be
removed only by a Gocycle-approved service centre or with the assistance and approval of a
Gocycle technical support executive.
Do not short circuit, disassemble, damage or modify the battery.
Do not expose the battery to fire or high temperatures over 40°C (104°F).
Do not expose the battery to water or moisture. Water can corrode or damage the internal
battery safety devices and cause the battery to overheat, ignite, rupture or leak.
Do not drop or subject the battery to strong impacts. Impacts can damage the internal battery
safety devices and cause the battery to overheat, ignite, rupture or leak.
Only use the specified charger. An inappropriate charger may cause damage or injury through
fire or electric shock.
Do not leave the battery unattended whilst charging.
Only use, charge or store the battery in an environment with ambient temperatures between
0°C and 40°C (32°F and 104°F) and a humidity of 45% to 85% RH.
5.2 Getting to Know Your Gocycle Lithium Battery
© Karbon Kinetics Limited. All Rights Reserved. 25
Page 27
Gocycle® Owner’s Manual for GS, September 2017
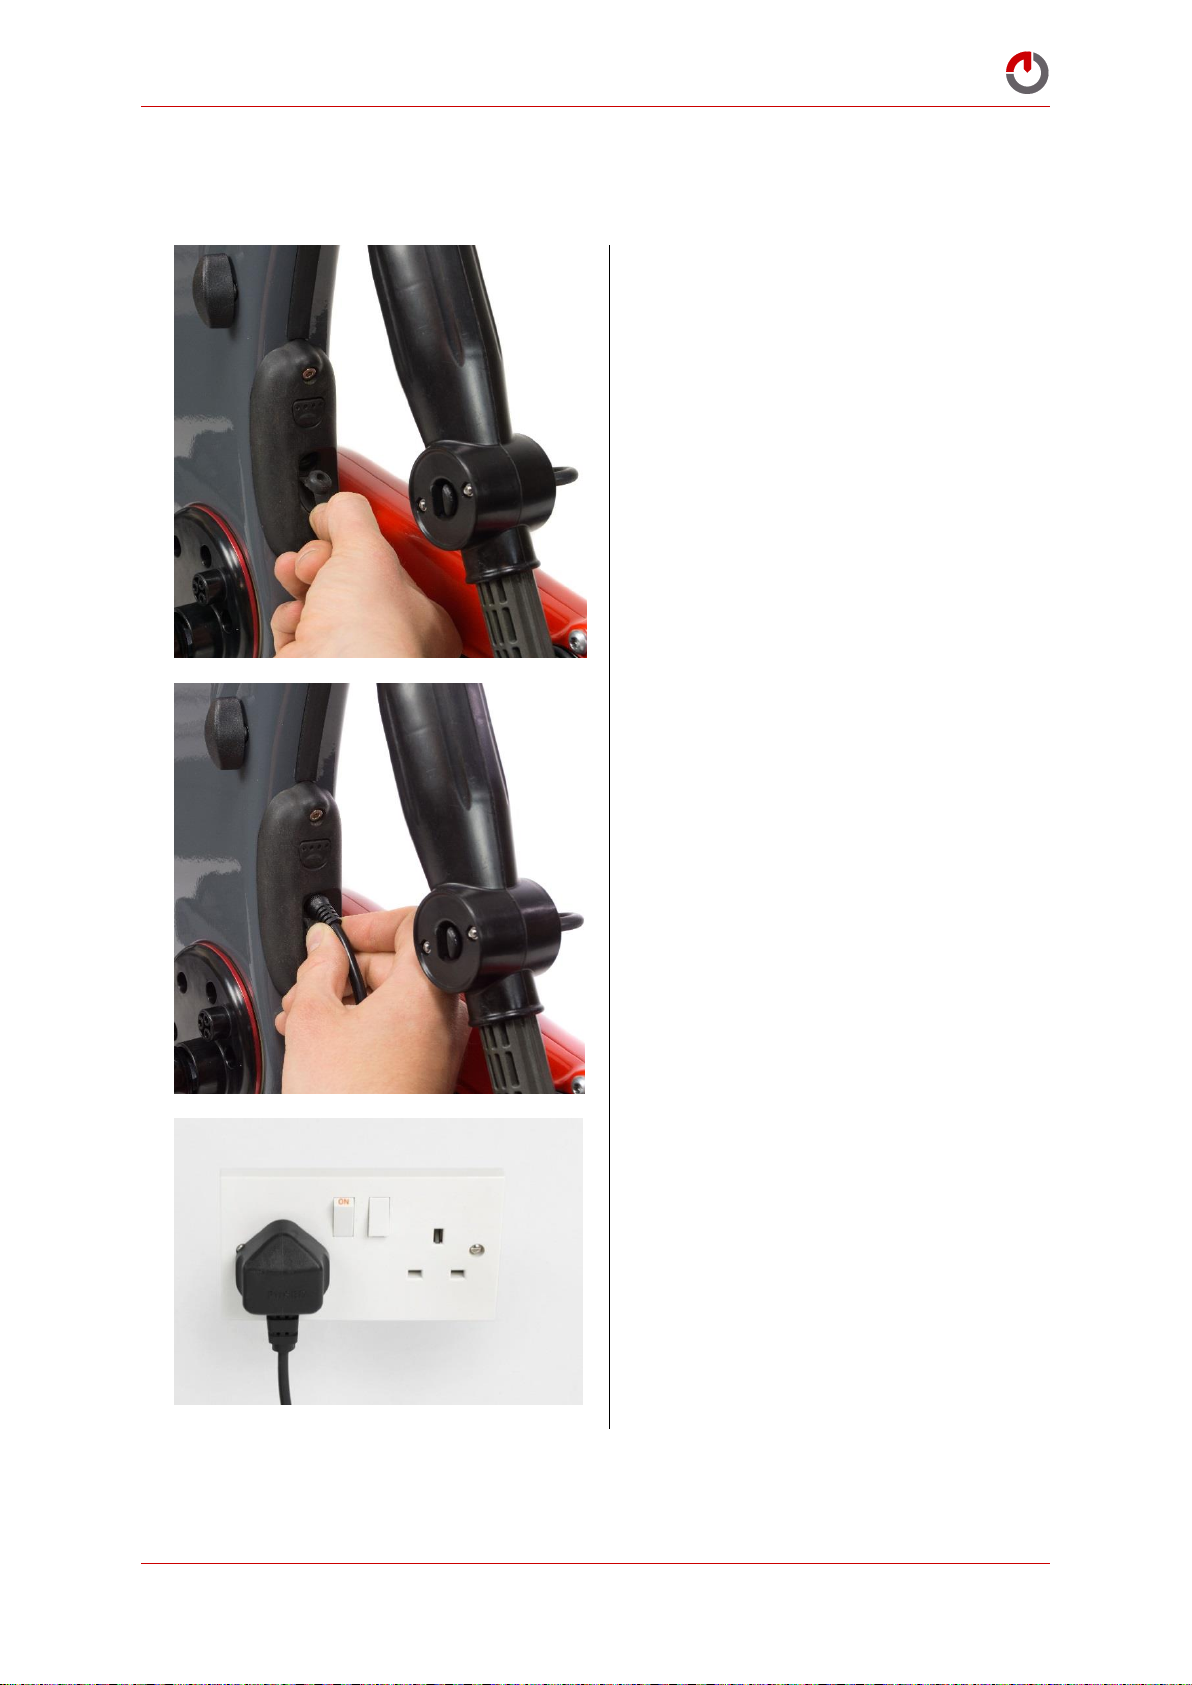
Open the rubber charging port cover, as
shown
While holding open the rubber charging
port cover, insert the charging lead as
shown
Plug the charger into mains electricity and
turn on (where applicable)
ON
5.3 Gocycle Lithium Battery: Usage
5.3.1 Proper Charging Sequence
© Karbon Kinetics Limited. All Rights Reserved. 26
Page 28
Gocycle® Owner’s Manual for GS, September 2017
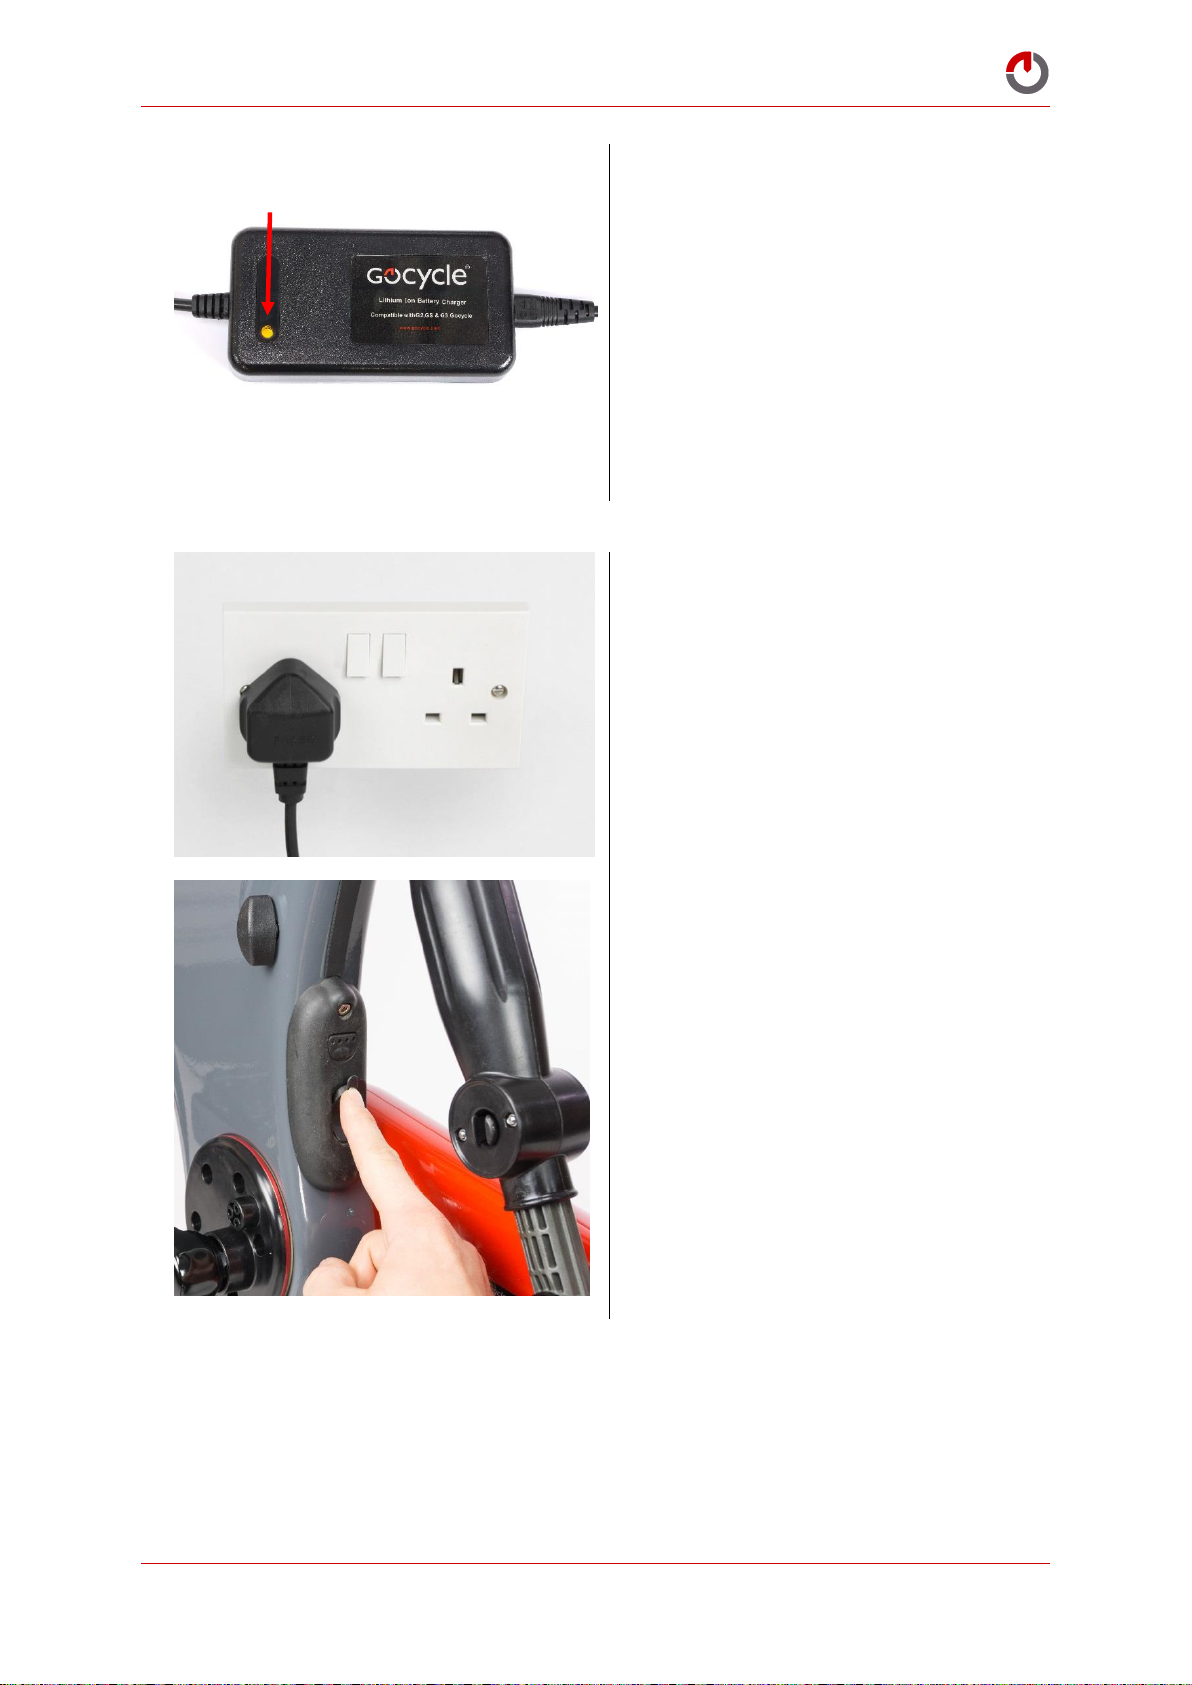
The charger light will turn orange to
indicate charging. Charge time up to 7 hours
When the battery is fully charged (10 LEDs
showing on the dashboard display (G3) or
100% on the GocycleConnect App for GS),
turn off the mains electricity.
Remove the charging lead and replace the
rubber charging port cover
OFF
© Karbon Kinetics Limited. All Rights Reserved. 27
Page 29
Gocycle® Owner’s Manual for GS, September 2017
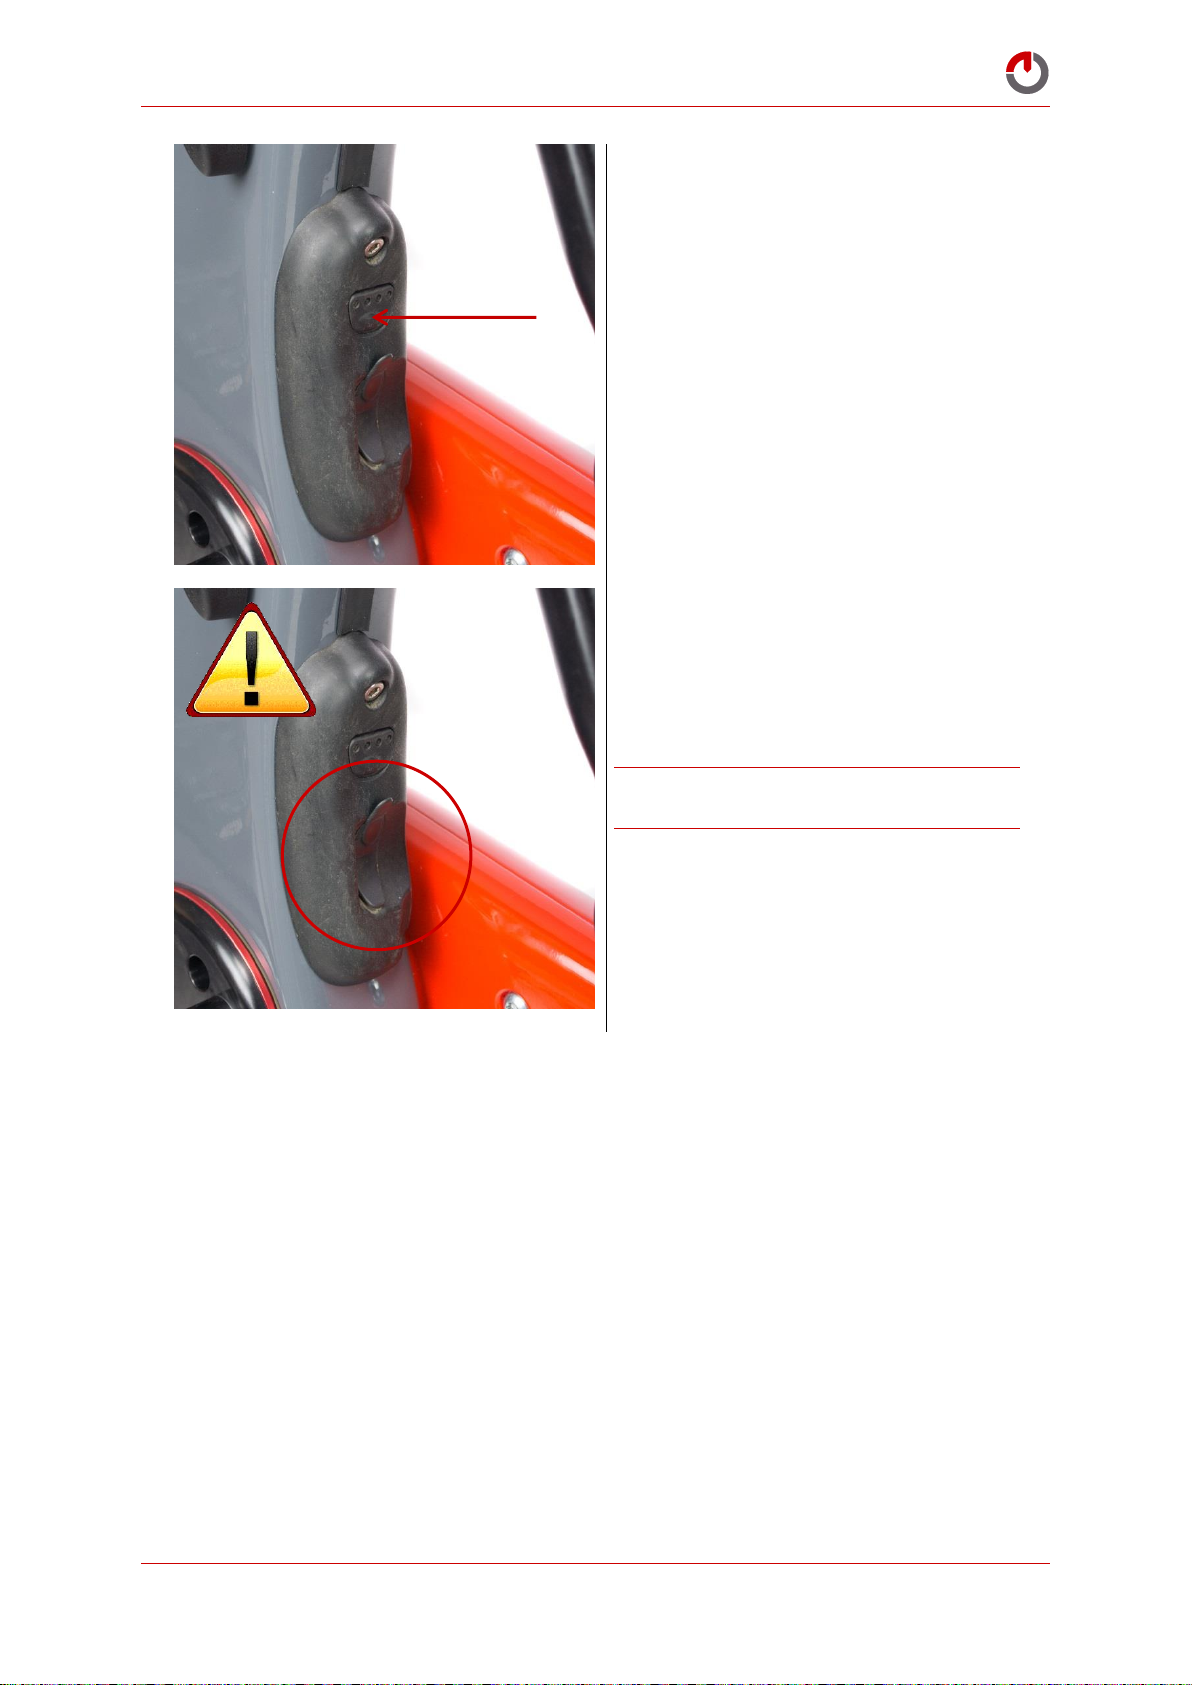
BEST PRACTICE! With the battery fully
charged and the charger disconnected, turn
the battery off by placing it into Sleep Mode.
See section 5.3.3 Returning the Battery to
Sleep Mode for more information. In any
event, leaving the Gocycle on charge
continuously for more than 24 hours is not
recommended.
Ensure that the rubber charging port cover is
in place before riding.
© Karbon Kinetics Limited. All Rights Reserved. 28
Page 30
Gocycle® Owner’s Manual for GS, September 2017
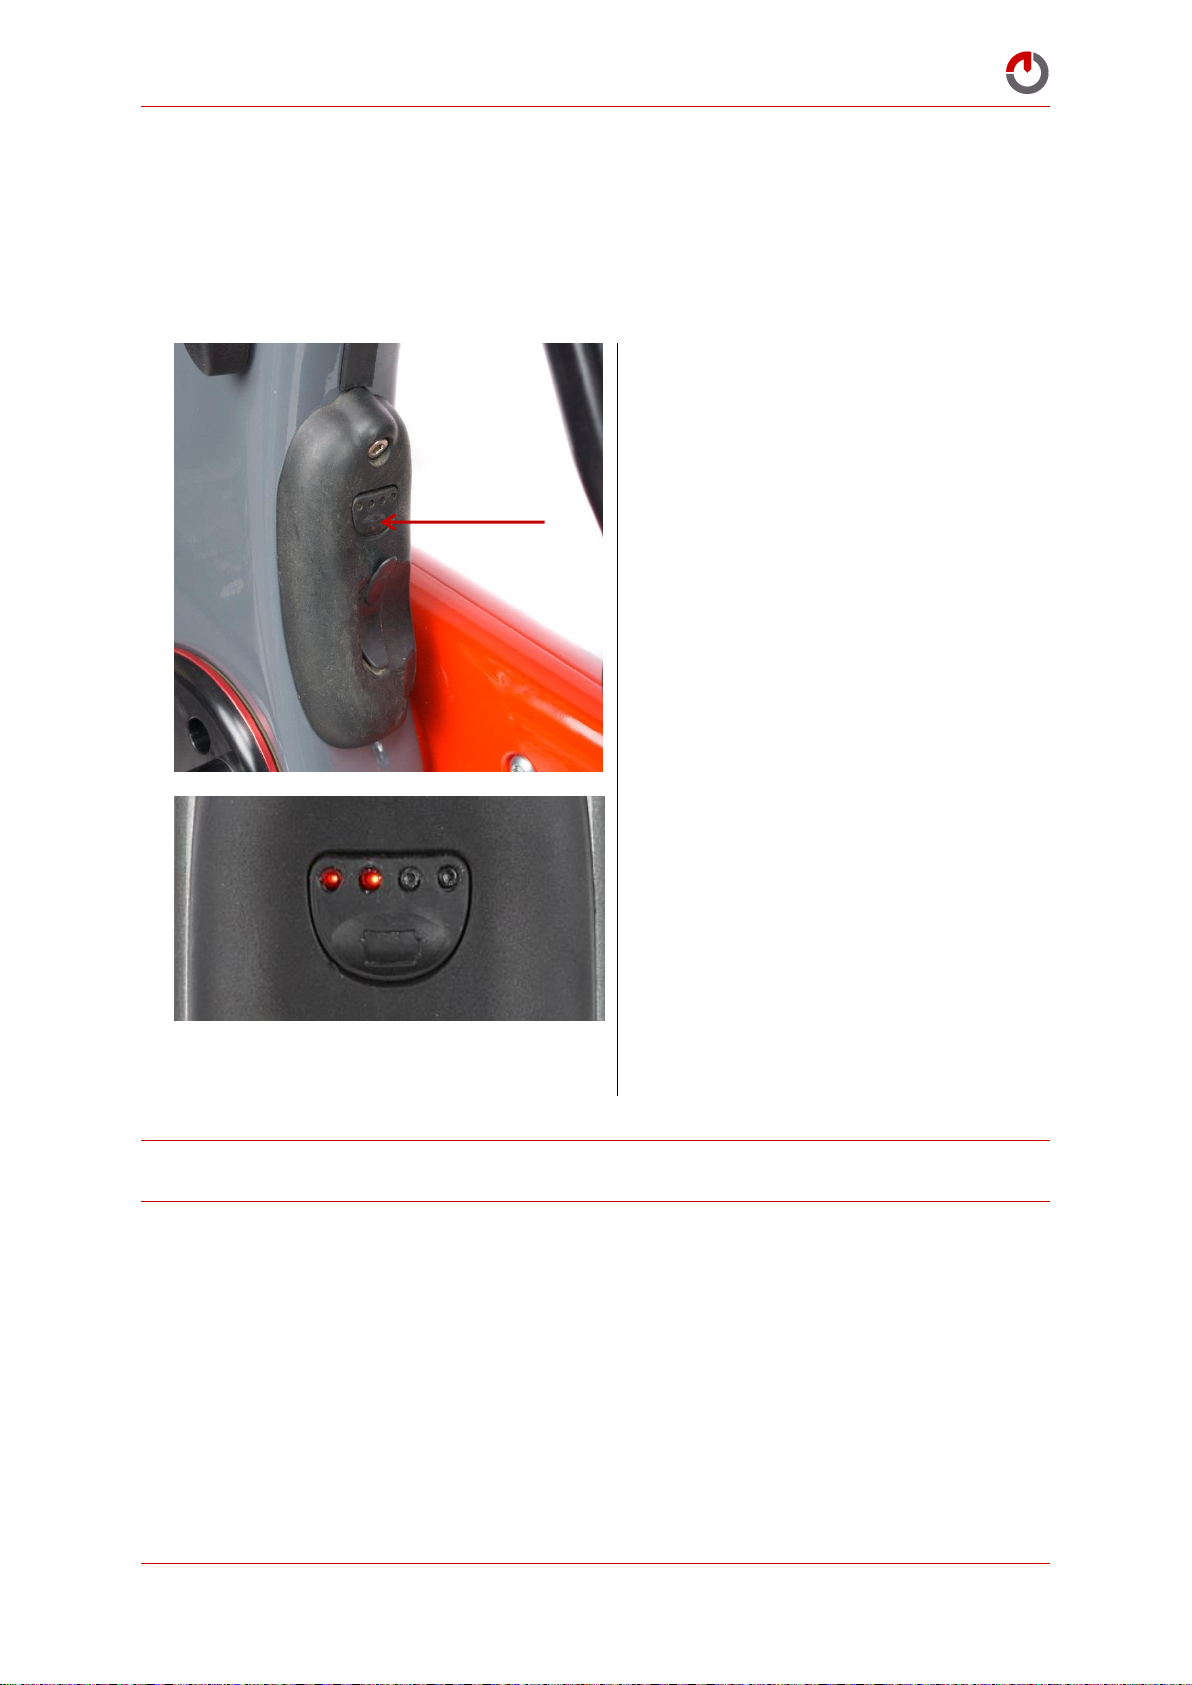
Press the button until the LEDs begin to
flash
The two left LEDs (1,2) will begin to flash
while the battery is waking up.
After the LEDs turn off you can check your
fuel level by momentarily pressing the
button.
5.3.2 Battery Operation Mode (Wakes the Battery for Use)
The battery must be in Operation Mode before you can use your Gocycle. If the battery is not in
Operation Mode, the Gocycle GS motor and Bluetooth to connect to your smart phone will not
function.
To wake the battery for use:
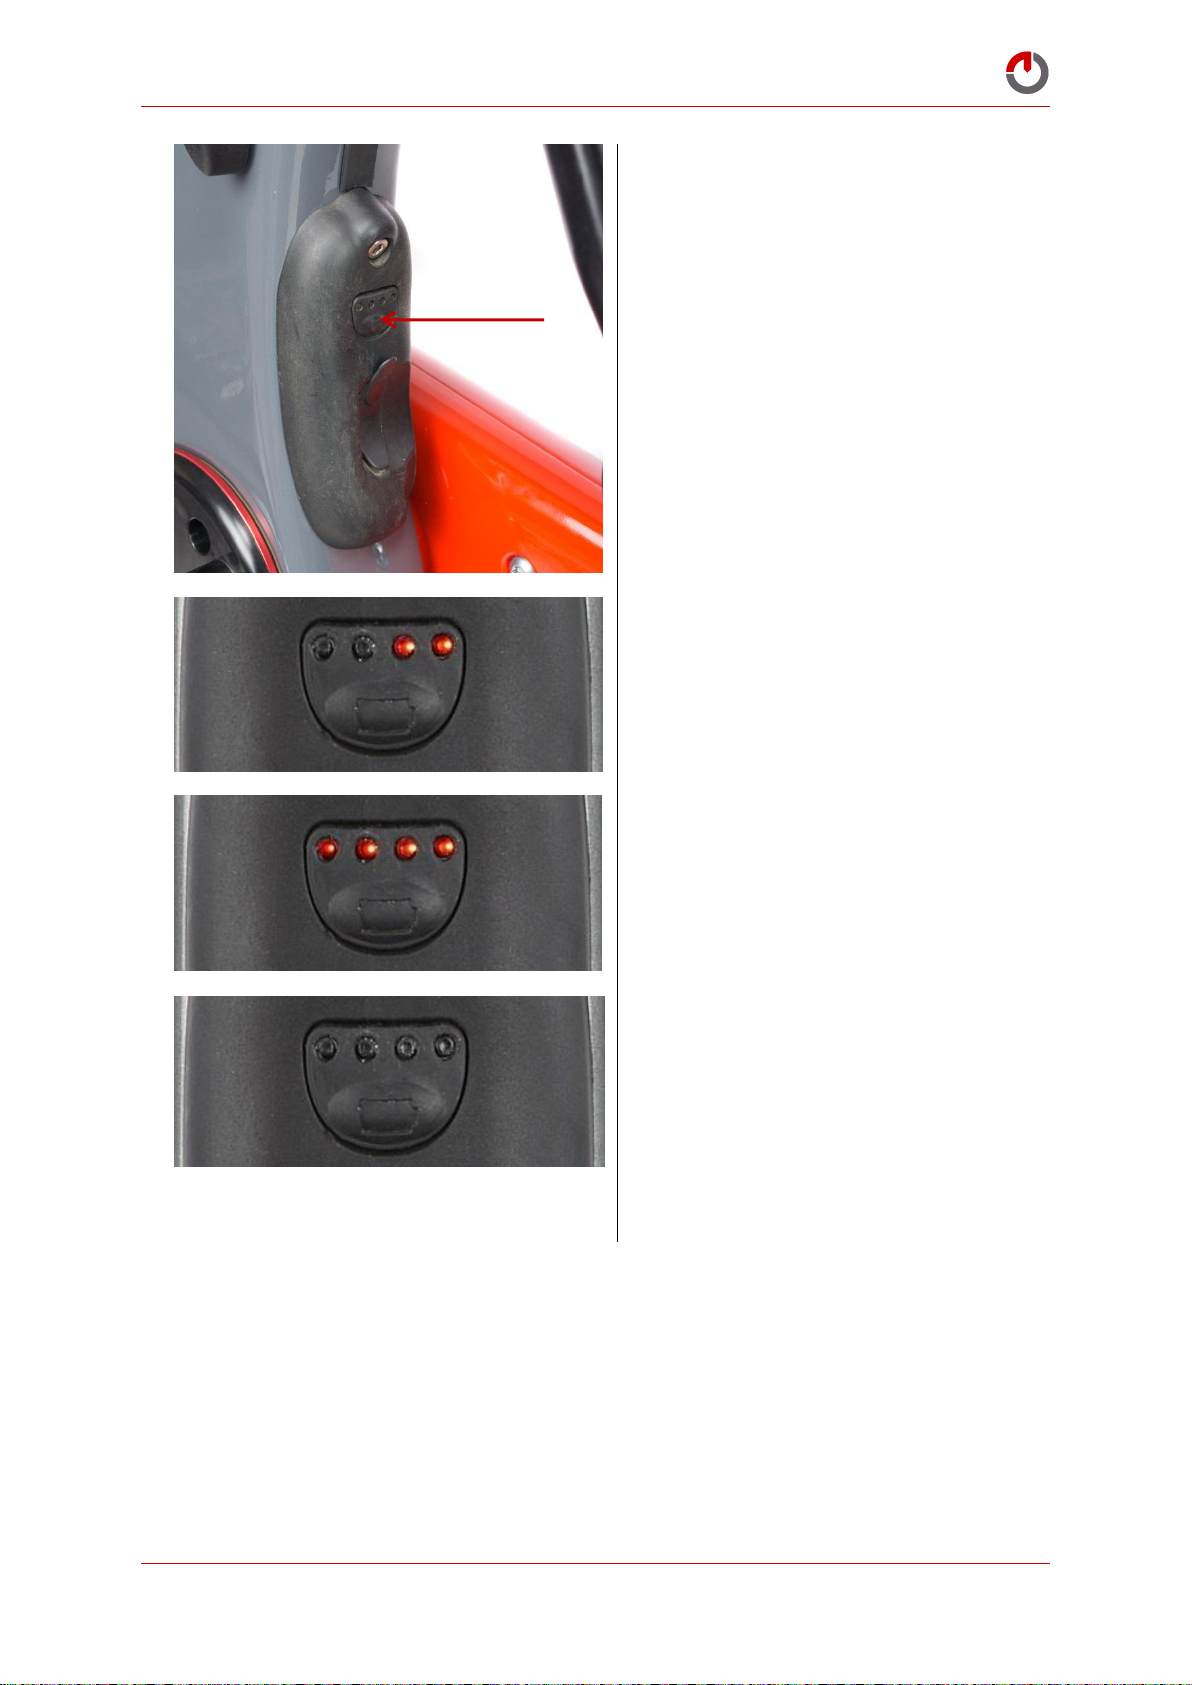
5.3.3 Returning the Battery to Sleep Mode
If no activity is detected by the Gocycle, the battery will enter sleep mode after approximately 5
© Karbon Kinetics Limited. All Rights Reserved. 29
hours.
Page 31
Gocycle® Owner’s Manual for GS, September 2017
To manually enter sleep mode, press and
hold the button until the right LEDs (3,4)
begin to flash
LEDs (3,4) will continue to flash whilst the
battery enters Sleep Mode
All LEDs (1,2,3,4) will flash to confirm that
the battery has entered Sleep Mode
The LEDs will then remain off and will not
illuminate when the button is pressed
momentarily to show fuel level.
5.3.4 Automatic Sleep Mode
The battery will enter Sleep Mode automatically if not in use for 5 hours. Check that the battery is in
Operation Mode before attempting to ride. If the Gocycle is plugged into the charger and the charger is
charging, it will never enter Sleep Mode.
5.4 Gocycle Lithium Battery: Care and Maintenance
Batteries do not last forever. As with lithium-ion batteries found in most battery-powered products,
the Gocycle lithium-ion battery will slowly deteriorate over time. Lithium-ion batteries begin to
degrade from the point of manufacturer due to a chemical reaction that gradually causes the internal
© Karbon Kinetics Limited. All Rights Reserved. 30
Page 32

Gocycle® Owner’s Manual for GS, September 2017
impedance of the cells to increase—in time reducing the ability of the battery to deliver its charge. For
this reason, a new battery will always perform better than one that is six months old.
To maximise the potential lifespan of your Gocycle battery, follow these guidelines:
Before first use, ensure that your battery is fully charged.
Your battery will go into over discharge protection mode if it is discharged to a critically low
level. Recharge your battery as soon as possible after it becomes fully discharged. A battery
will be permanently damaged if left for an extended length of time in a fully discharged state.
Heat accelerates the degradation of batteries. Avoid operating or storing the battery in high
temperatures when possible.
Once your battery displays 1 LEDs on the rear of the battery, charge your battery within 48
hours. Place the battery on charge, and when the charge is complete, press the sleep button.
Do not allow a nearly depleted battery to be unused for more than one month. The battery will
slowly discharge until it becomes fully discharged, and this will permanently damage the
battery cells.
5.5 Shipping and Handling of Lithium Batteries
Like any lithium-ion battery, the Gocycle lithium-ion battery is classified as Miscellaneous Class 9
Dangerous Goods, and as such, must be packaged, shipped and handled in accordance with the strict
guidelines laid out by the relevant international regulatory bodies for air, sea and road transport.
Never attempt to transport your lithium-ion battery by air without first seeking the prior approval of
your airline. Do not discard any of the battery packaging materials.
5.6 Battery Pack Disposal
When your Gocycle lithium battery has reached the end of its service life, you must recycle or dispose
of it properly:
Do not dispose of batteries with general household waste.
When your battery no longer holds a charge, contact your local waste disposal or
environmental agency for advice on disposing of a lithium-ion battery.
Lithium-ion batteries are classified as Miscellaneous Class 9 Dangerous Goods. Consult your
local authority for further advice on storage, handling and shipping.
5.7 Maximising Your Gocycle’s Motor Performance and Reliability
Gocycle’s electric motor is designed to boost performance in terms of getting you from point A to
point B more quickly and with less effort. It is not designed for the motor power to be the sole means
of propulsion.
As with a car, top speed and range (related to fuel consumption) are difficult to define as both factors
are greatly affected by a large number of variables. For the Gocycle, this is including but not limited
© Karbon Kinetics Limited. All Rights Reserved. 31
Page 33

Gocycle® Owner’s Manual for GS, September 2017
to rider weight (including clothing and luggage), tyre type, tyre pressure, terrain, surface texture,
wind conditions and of course, how much pedal input the rider is providing.
The recipe is simple. Continual use of the motor assistance whilst riding and/or selecting a mode with
a higher top speed will have a negative effect on the range of your battery. Using the motor assistance
sparingly with maximum rider pedal input will ensure the best possible range.
To get the best out of your Gocycle, read carefully the following points:
1. Pedalling: We recommend that for the best performance you continue to pedal at all times. The
motor should be used to “top-up” or “boost” power. Not providing pedal input (when a
riding mode allows) will dramatically reduce battery range.
2. Excess weight: Where possible, try to keep the total combined weight of clothing, luggage and
accessories to a minimum. Overloading a Gocycle will reduce the battery range. Overloading
will also affect your Gocycle’s handling and increase the stresses on the clutch, gearbox and
motor, potentially reducing the service life of the product.
3. Tyres: Ensure the tyres are correctly inflated. See 6.11 Tyres for more information.
4. Riding style: Where rough terrains (e.g., poor road surfaces, potholes, speed bumps, etc.) are
unavoidable, you should adapt your riding style accordingly.
WARNING! Never use the motor when passing over obstacles such as ruts in the road or speed
bumps, etc. Doing so will increase the stresses on the drive components and will reduce the service
life of the product, possibly invalidating your warranty.
5. Deceleration/braking: Do not use motor power whilst decelerating or braking. Consciously
using the motor assistance only when required will ensure the maximum possible battery
range.
6. Wet conditions: Gocycle is a British product, designed with British weather in mind. However,
it is important that your Gocycle is dry before storage. A city atmosphere can be a corrosive
environment made worse with high humidity. We recommend a simple check and toweldown (if necessary) after using your Gocycle in wet conditions. See 6.4 Cleaning and
Preventing Corrosion.
5.8 Heat and Over-Temperature Protection
Gocycle’s motor is extremely compact and lightweight. While this design offers benefits, certain
drawbacks exist—specifically, the motor can get hot.
Gocycle’s motor will get hot under normal operation similar to the exhaust pipe or engine of a
motorcycle or moped.
© Karbon Kinetics Limited. All Rights Reserved. 32
Page 34
Gocycle® Owner’s Manual for GS, September 2017
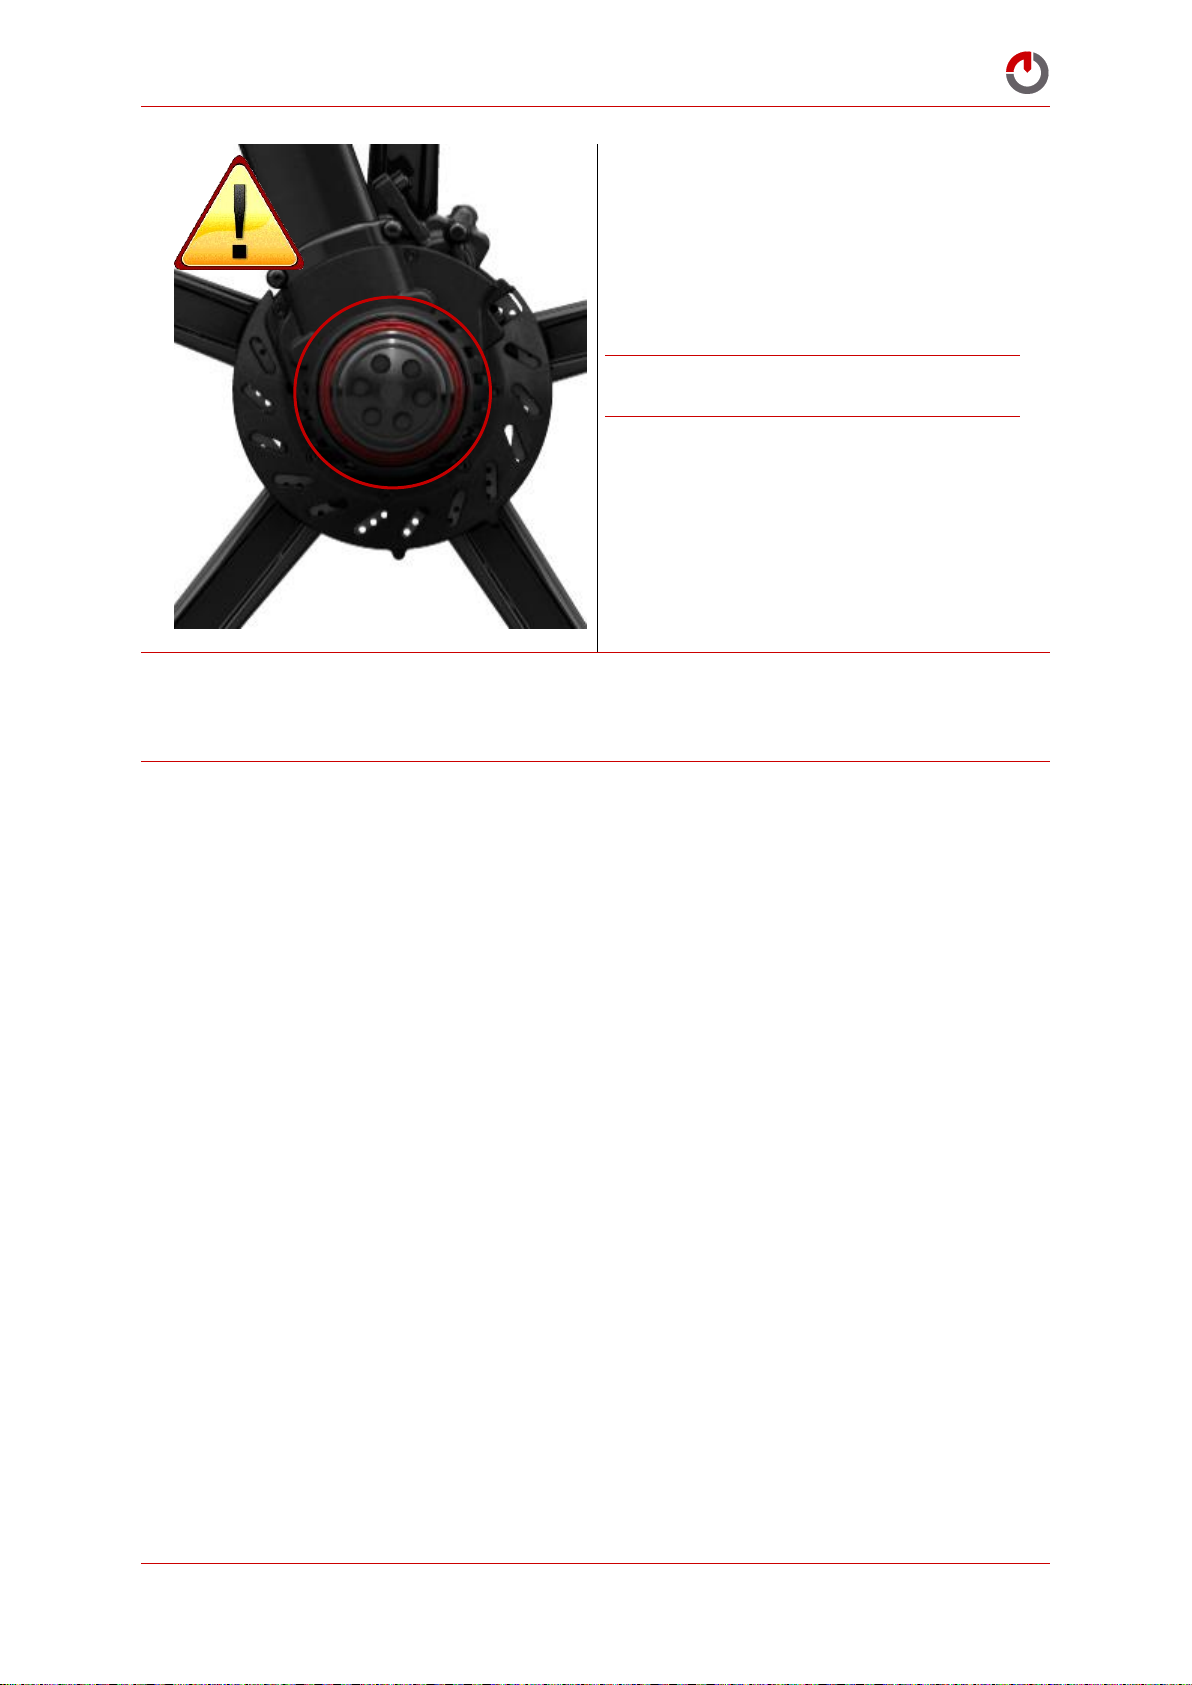
Caution! During and shortly after use, the
motor area (highlighted) will be hot to touch!
WARNING! Extreme caution should be used when attempting to touch any part of the motor after it
has been in operation—the same caution you would use in the kitchen with hot pots or pans or
boiling water. We recommend that you do not attempt to touch the motor unless it has been
switched off for at least five minutes.
The motor and controller are automatically protected against over-temperature operation. If the
temperature of the motor or the controller gets too high, the power will be gradually reduced to
prevent damage to these components. You may experience this condition for example riding up long
steep hills while using full motor assistance. When over-temperature protection is in effect, the power
available to the motor will be reduced. When the temperature of the motor and/or controller has
cooled adequately, the full power will again be available.
© Karbon Kinetics Limited. All Rights Reserved. 33
Page 35
Gocycle® Owner’s Manual for GS, September 2017
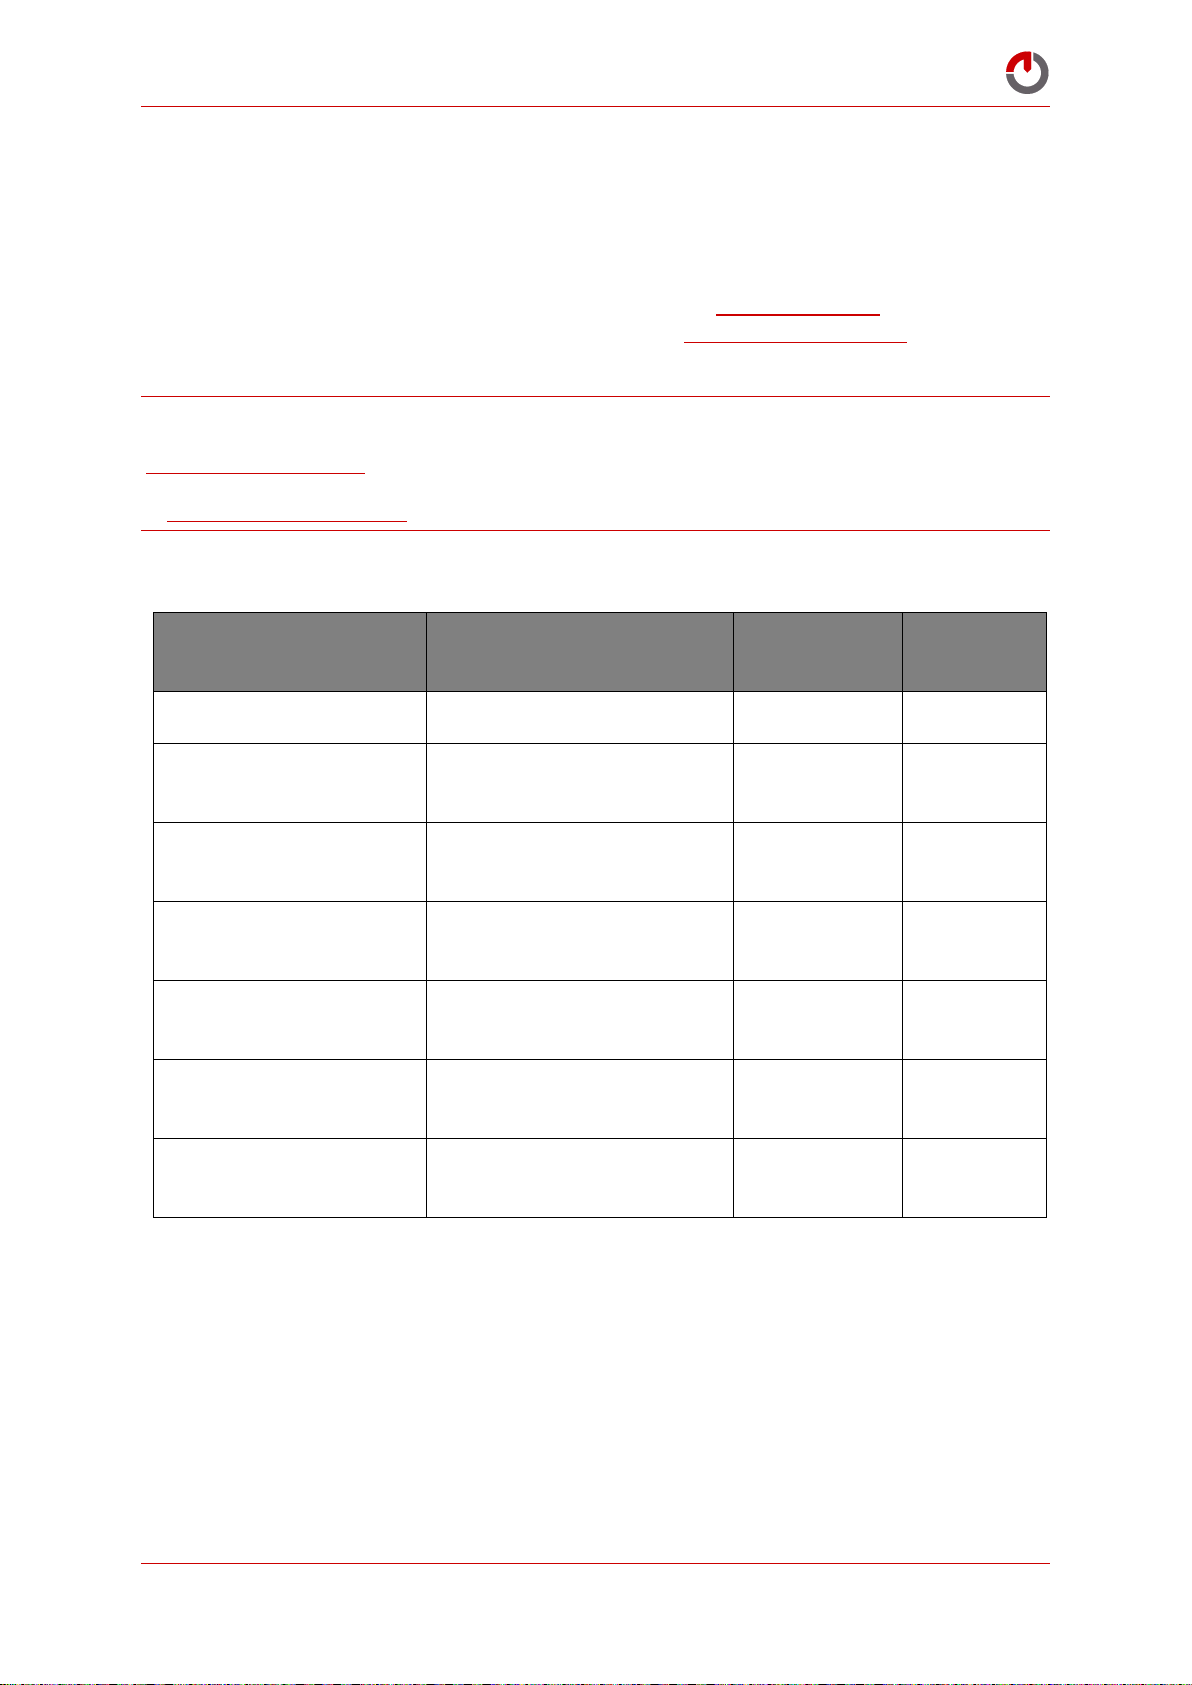
Recommended Service
Interval
Performed By
Distance
Ridden
Time
Pre-Ride Checklist
Owner
Before each ride
Before each
ride
Visual Inspection / Service if
required
Owner or Authorised Gocycle
Reseller (recommended)
After first 100
miles/160 kms
2 months
after first ride
Visual Inspection
Owner
Every 500
miles/800 kms
Every 3
months
Visit
www.gocycle.com/safety
Owner
Every 3
months
Check and Update to latest
Firmware Version
Owner
Every 3
months
Visual Inspection / Service
recommended
Owner or Authorised Gocycle
Reseller (recommended)
Every 2000
miles/3200 kms
Annually
6 MAINTENANCE AND ADJUSTMENTS
6.1 Maintenance and Service
In the event that you require maintenance and service please refer to your nearest authorized Gocycle
service center. A list of approved service centers can be found at www.gocycle.com. Before
attempting any maintenance on your Gocycle you must visit www.gocycle.com/safety for up to date
important safety related information.
NOTE: You must perform regular visual inspections of your Gocycle and perform any recommended
adjustments and maintenance in order to ensure that your product is safe to rider. Please visit
www.gocycle.com/safety and review any important Technical Bulletins and safety information relating
to your Gocycle model. You should also download and review the latest Owner’s Manual from
www.gocycle.com/manuals. Please note the recommended inspection and service interval below.
6.2 Service interval
6.3 Visual Inspection Guide – (Every 3 Months/ 500 Miles)
The following information details mandatory inspection points to be completed every 3 months/ 500
miles (whichever is sooner) of Gocycle ownership. This is to ensure your Gocycle is safe to ride and
operating at peak performance. If you find any of the following items to be damaged or incorrectly
adjusted then please seek immediate assistance from your nearest Authorised Gocycle Service Centre
who will help rectify any issue. Do not adjust fixtures without first consulting the Owner’s Manual or
your Authorised Gocycle Reseller to ensure the correct adjustment is made. Incorrect adjustment
could lead to premature failure of a component.
© Karbon Kinetics Limited. All Rights Reserved. 34
Page 36

Gocycle® Owner’s Manual for GS, September 2017
As with a conventional bicycle, your Gocycle will not last forever. It is a mechanical item that under
normal riding will be stressed, and eventually the parts will fatigue, cracks will develop and it will
become unsafe to ride. The number of miles of riding a bicycle will endure cannot be predicted since
there are many variables that affect product life including:
Rider weight
Riding style
Tyre pressure and type
Roughness of the road
Whether or not the bicycle has been crashed or damaged in transit
Whether or not the bicycle has been ridden over large bumps such as potholes or curbs
The amount and weight of luggage carried
The speed at which it has travelled
Whether it has been subject to abuse or vandalism
Time of exposure to ultraviolet radiation from the sun
Storage conditions, such as ambient temperature and moisture levels
Responsible, safe riding and regular maintenance, such as within the guidelines of this manual,
should afford many thousands of miles of operation of your Gocycle. Nevertheless, you must inspect
the Gocycle every 500 miles to see if any of the components have cracks and need replacing. To do
this, clean the Gocycle thoroughly with a damp cloth. Wipe away all dust or dirt. Look carefully at all
the components under good lighting.
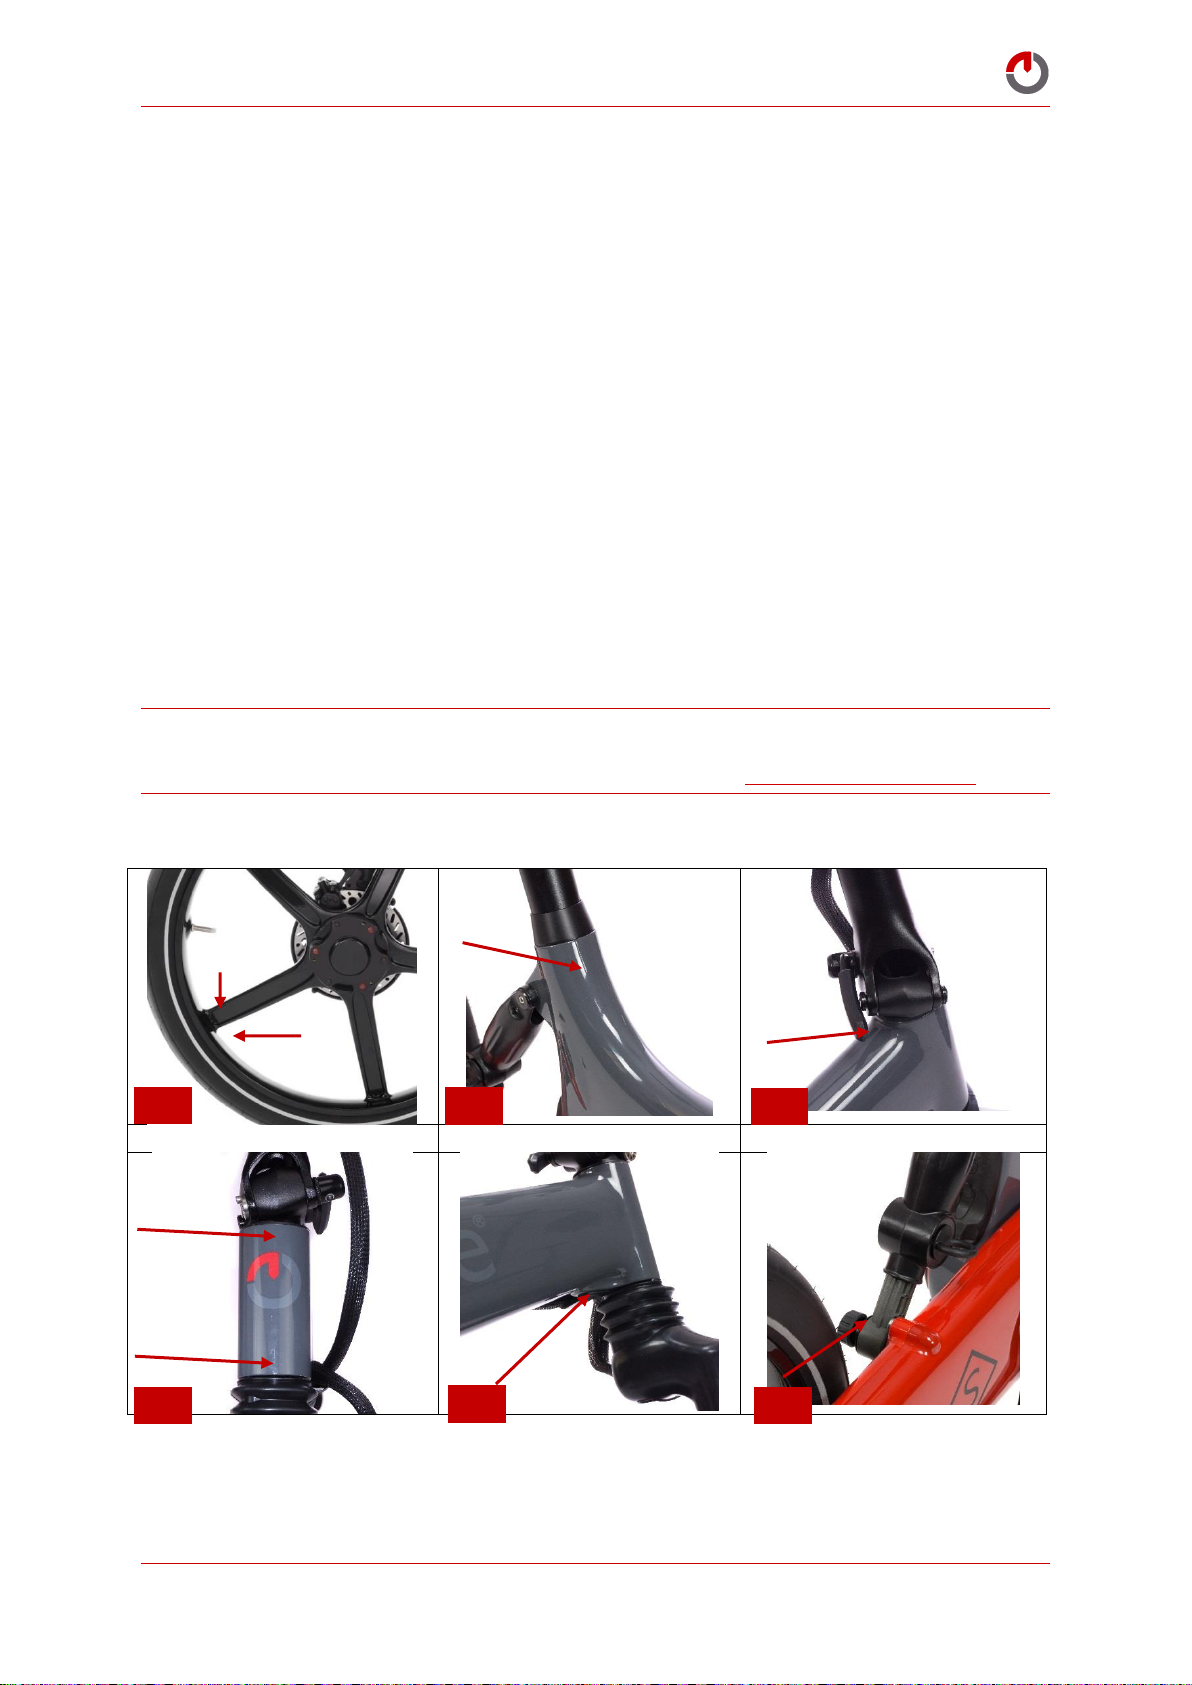
Important sites where cracking may initiate are shown in the images below. If a crack is more than
3mm long, do not ride the Gocycle and immediately contact [email protected]. Under normal
conditions, items under warranty will be replaced.
WARNING! Failure to inspect the Gocycle thoroughly may have serious consequences and could result
in serious bodily injury or even death.
IMPORTANT: Check www.gocycle.com/safety for up to date Technical Bulletins that might affect your
Frame Number.
NOTE: More frequent servicing may be required for Gocycles used in adverse conditions or with a
more aggressive riding style.
1. Inspecting for Cracking and Fatigue Failures (Figures 1a-g)
WARNING! (1f) When not properly assembled, the Lockshock plunger (the grey part as indicated at
left) is susceptible to impact damage from a side load, for example when folding to take in or out of a
car, transporting inside a building or through a doorway. If you suspect this has occurred, do not ride
the Gocycle and contact Gocycle Tech Support.
© Karbon Kinetics Limited. All Rights Reserved. 35
Page 37
Gocycle® Owner’s Manual for GS, September 2017
1a
1b
1c
1d
1e
1f
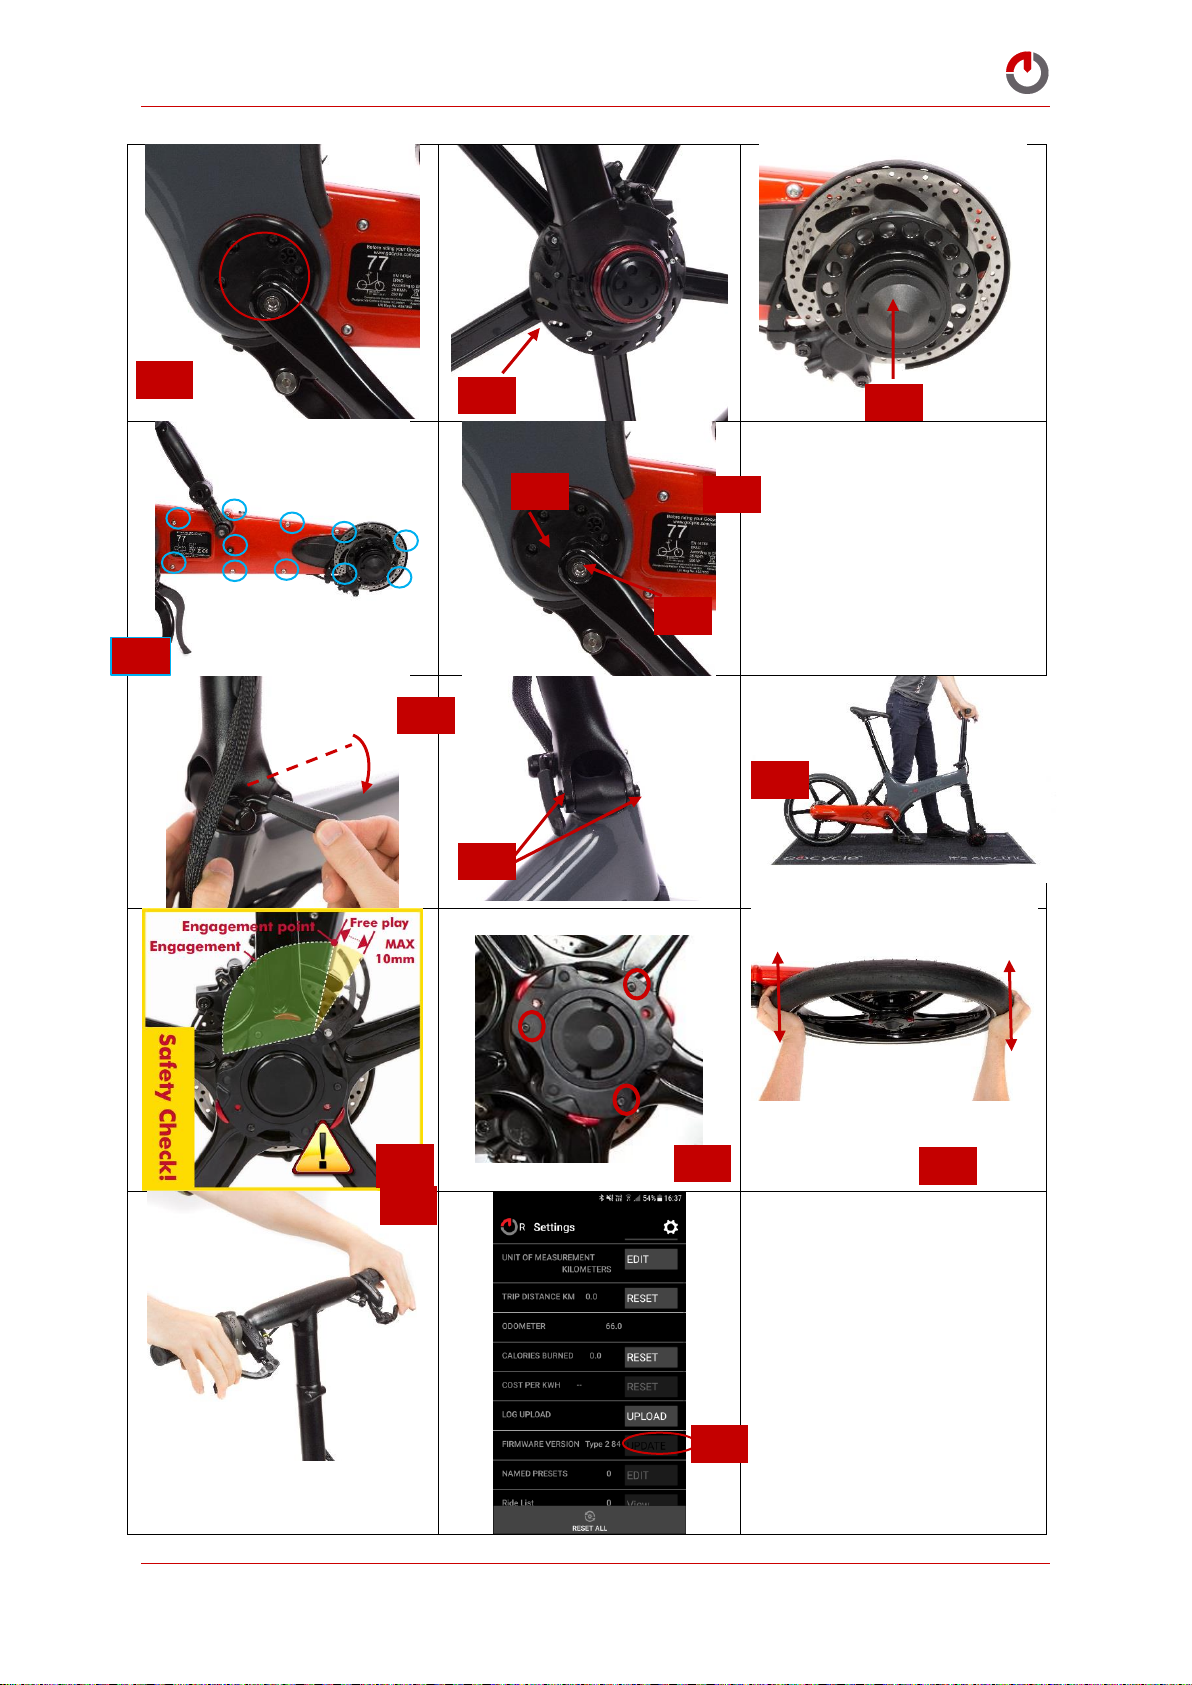
2. Inspection of disc covers for damage (Front and Rear)
3. Hub Cap in position to prevent excessive dust contaminating Hub Gear
4. All Cleandrive magform bolts present x 12, 4-6Nm (one located at front of Cleandrive - check
by folding)
5. Pivot block magform bolts present x 5, 4-6Nm
6. Check pedals are tight, 35-40Nm
7. Check crank bolts are tight, 35-40Nm
8. Not Applicable for GS Models
9. Ensure quick release lever is correctly adjusted and closes with increasing force to keep
handlebar clamped
10. Check steam adjuster bolts and top hats are present and tight, 7-8Nm
11. Check that headset is not loose. (Section 6.12 for adjustment.)
12. Check Cam Lever free play of all three cam levers on both wheels when fitted to the
respective hubs (Section 6.8 for adjustment)
13. Check cam cover bolts are all present and torqued to 0.8Nm Front and Rear Wheel
14. Check hub gear for excessive movement – (conducted after confirming all cam levers are
adjusted correctly) (Section 6.14 for adjustment)
15. Check both brakes are operating correctly and levers cannot be pulled to the bar
16. Ensure Gocycle Firmware is up to date. Go to Settings in your GocycleConnect App and
scroll down to Firmware.
WARNING! Should you discover a fatigue crack more than 3mm long, or should you suspect that a
component may have received an impact in an unusual way—such as if the product has been
dropped—do not ride your Gocycle and immediately contact [email protected].
© Karbon Kinetics Limited. All Rights Reserved. 36
Page 38
Gocycle® Owner’s Manual for GS, September 2017
1g
13
9
5
6
7
4
2
3
10
11
12
14
15
16
© Karbon Kinetics Limited. All Rights Reserved. 37
Page 39

Gocycle® Owner’s Manual for GS, September 2017
6.4 Cleaning and Preventing Corrosion
We do not recommend that you ride your Gocycle in heavy rain or store it in damp or wet areas.
Please read 2.7 Riding in Wet, Cold or Icy Conditions for safety recommendations for riding in wet
conditions.
If you do find yourself riding while it is raining, we recommend that you use the motor when safe to
do so. Using the motor will allow heat to build up in the motor and the electronics, which will
evaporate the water from these moisture-sensitive components. Use caution when you use the motor
on wet roads, as the roads will be slippery and the motor may cause the front wheel to spin.
Water and moisture (especially spray from roads that are salted to reduce the formation of ice) can
accelerate corrosion (rust) of the various metallic components on the Gocycle, and this will reduce the
life of product. Leaving water and moisture on the Gocycle could also result in premature failure of
the electronics, battery or motor system. The warranty will not cover premature failure as a result of
corrosion through neglect.
Here are some best practice recommendations:
If your Gocycle has water on it, we recommend that you wipe it dry as soon as possible with a
towel or dry cloth.
The less you expose your Gocycle to moisture or water, the longer it will last.
Keep your Gocycle inside your house, flat or garage.
If you wish to clean the Gocycle, we recommend that you use a damp towel or cloth and mild
liquid soap. First wipe down all areas with a damp towel, then wipe dry with a dry towel.
To clean the rim and tyre, remove the PitstopWheel, soak the rim and tyre in a bucket of soapy
water and then dry with a towel.
WARNING! Keep your Gocycle clean and dry at all times, where possible. Never spray the Gocycle
with a hose or high-pressure cleaning system. Never use polishes, waxes or solvents to clean your
Gocycle.
© Karbon Kinetics Limited. All Rights Reserved. 38
Page 40
Gocycle® Owner’s Manual for GS, September 2017
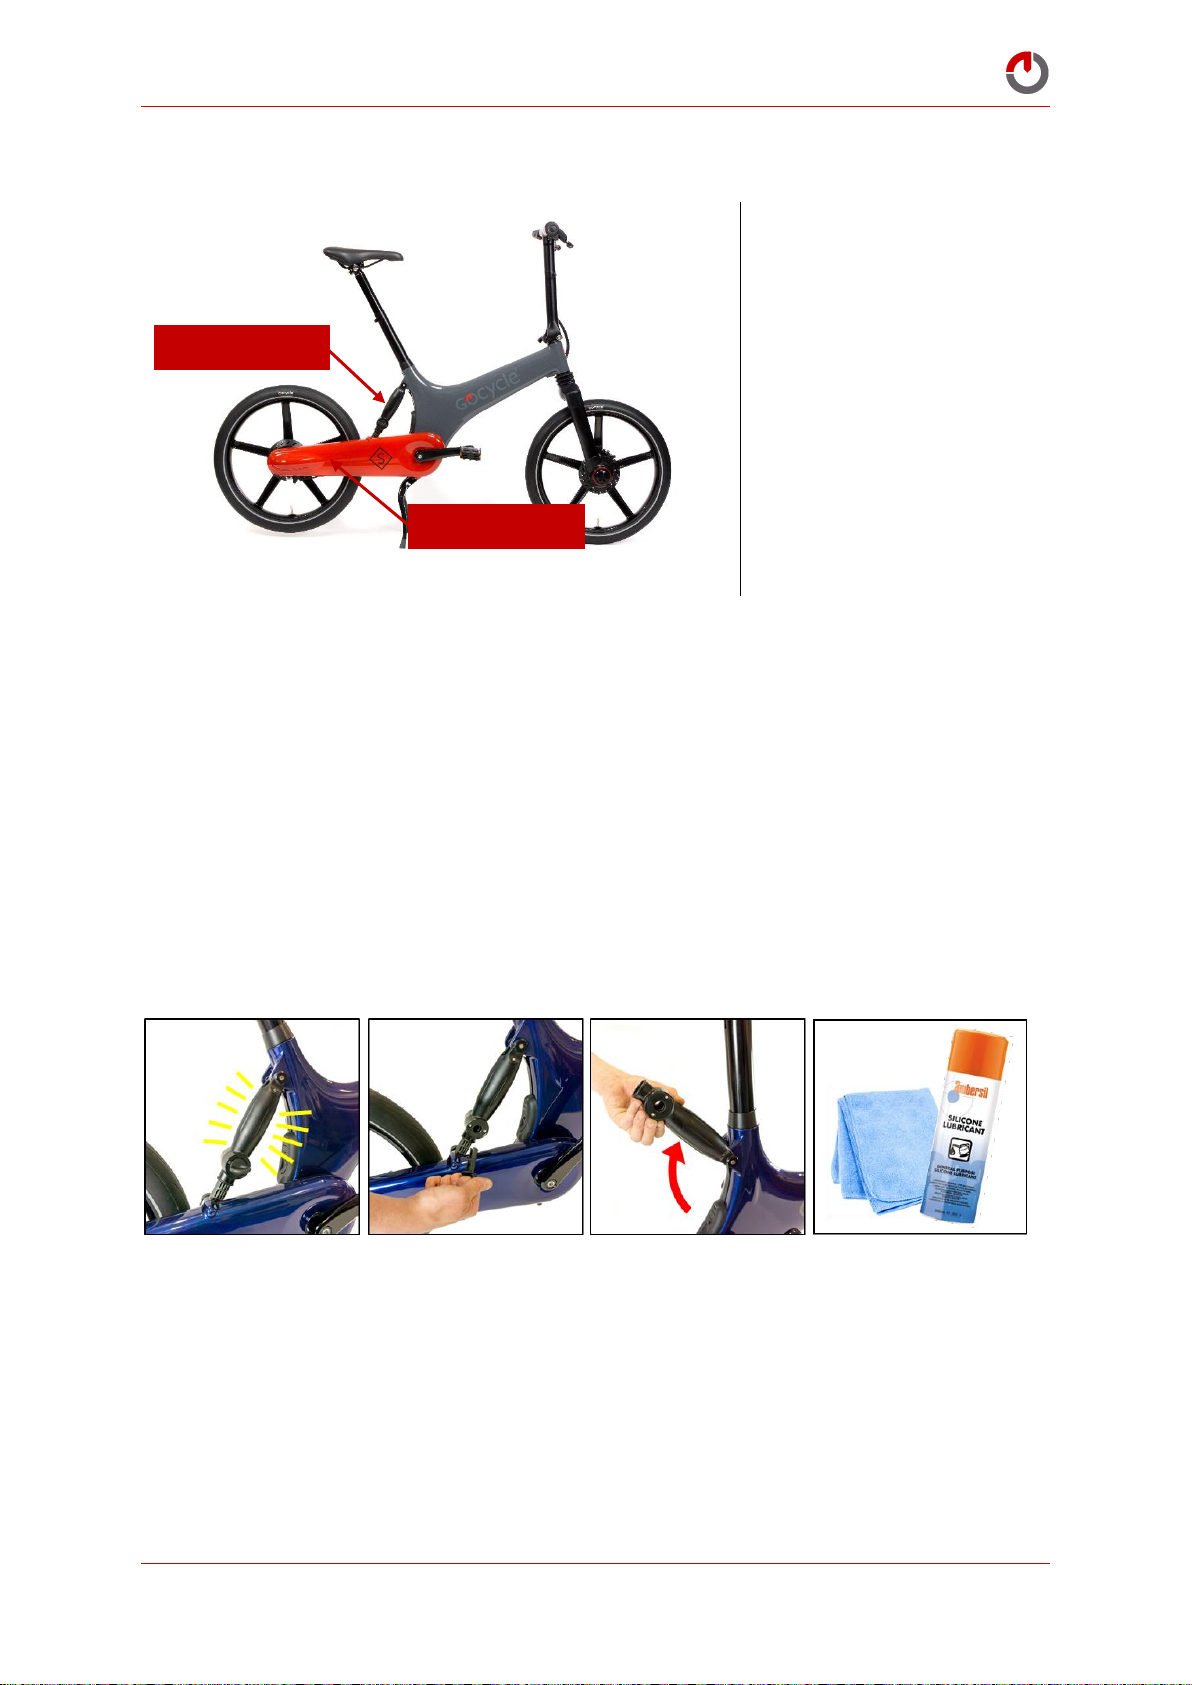
There is no need to regularly
inspect, clean and lubricate
the internal components of
the Cleandrive
®
Cleandrive®
LockshockTM
6.5 Lubrication
The gearbox, rear hub, hub bearings and chain drive system (Cleandrive) are lubricated during
production, and unless the Gocycle is regularly exposed to a high-humidity, corrosion-enhancing
environment, these components will last the lifetime of the product.
From time to time and particularly during periods of hot or abnormal weather, your Lockshock™
may require additional lubrication to prevent undesired noises whilst riding such as squeaking. The
Gocycle Lockshock™ is delivered pre-greased from the factory however certain riding conditions or
environments can, over time, remove some of this grease. Re-lubricating of the Lockshock™ should
be completed as part of your regular maintenance to reduce the likelihood of developing noises when
riding.
As part of regular maintenance or in the event that your Gocycle Lockshock™ develops a noise whilst
riding, the Lockshock™ can be lubricated using a suitable silicone lubricant. With the Gocycle
supported, remove the Lockshock pin and rotate the Lockshock™ so that it is pointing upwards. Be
sure to have a cloth ready to remove any excess silicone lubricant.
Spray a generous amount of silicone lubricant down into the end of the Lockshock™ and remove any
overspray or spillages with a cloth. Wait 5 minutes with the Lockshock™ in the upright position so
that the lubricant can disperse downwards. Re-insert the Lockshock plunger and Lockshock pin to
complete.
© Karbon Kinetics Limited. All Rights Reserved. 39
Page 41
Gocycle® Owner’s Manual for GS, September 2017
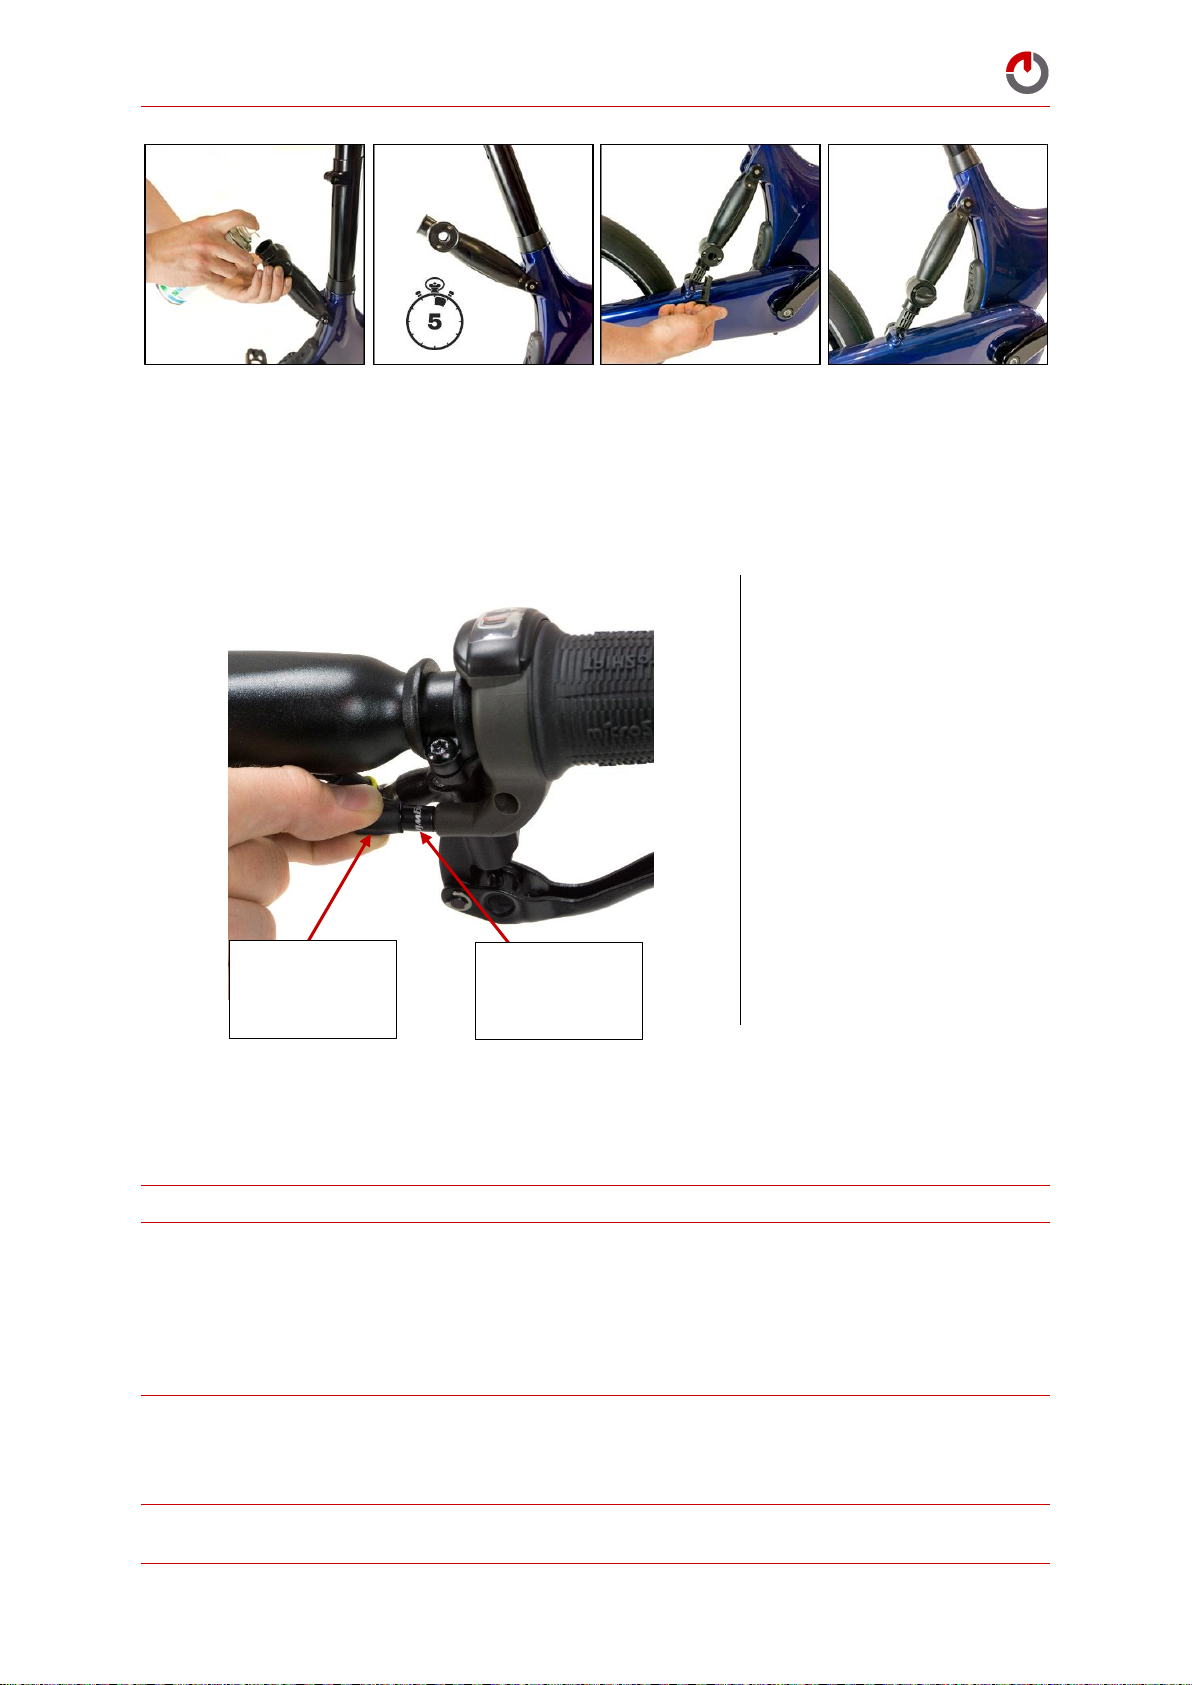
Rotate the gear shift cable
adjuster barrel clockwise or
anti-clockwise to adjust the gear
shift cable. Rotate clockwise
(loosens the cable) if your gear
selection is placing the Gocycle
is in a gear higher than you
select, and anti-clockwise
(tightens the cable) if your gear
selection is placing the Gocycle
in a gear lower than you select.
Wait 5 minutes
Ensure this
part does not
rotate.
Rotate here to
adjust.
6.6 Adjusting the Shifting
From time to time, the shifting cable could stretch which might result in your gear shifting not being
accurate. Adjust the shifting as follows:
6.7 Adjusting the Brakes
For information on how to bleed your Gocycle hydraulic brakes, please contact
[email protected].
6.7.1 Bleeding the Brakes
As with all hydraulic brakes, for the best possible performance, we recommend that the hydraulic
brakes on your Gocycle are bled every 12 months. We advise that your Gocycle brakes are bled by a
skilled bicycle mechanic with experience with bleeding hydraulic cycle brakes.
WARNING! DOT 4 brake fluid can be an irritant when it comes into contact with human tissue. For
skin contact, wash off the brake fluid in flowing clean water. For eye contact, the eye area should be
flushed with fresh water immediately and continuously for 15 minutes. Consult with medical
© Karbon Kinetics Limited. All Rights Reserved. 40
NOTE: The brakes will increase in power over the first 50 to 100 uses.
personnel.
Page 42
Gocycle® Owner’s Manual for GS, September 2017
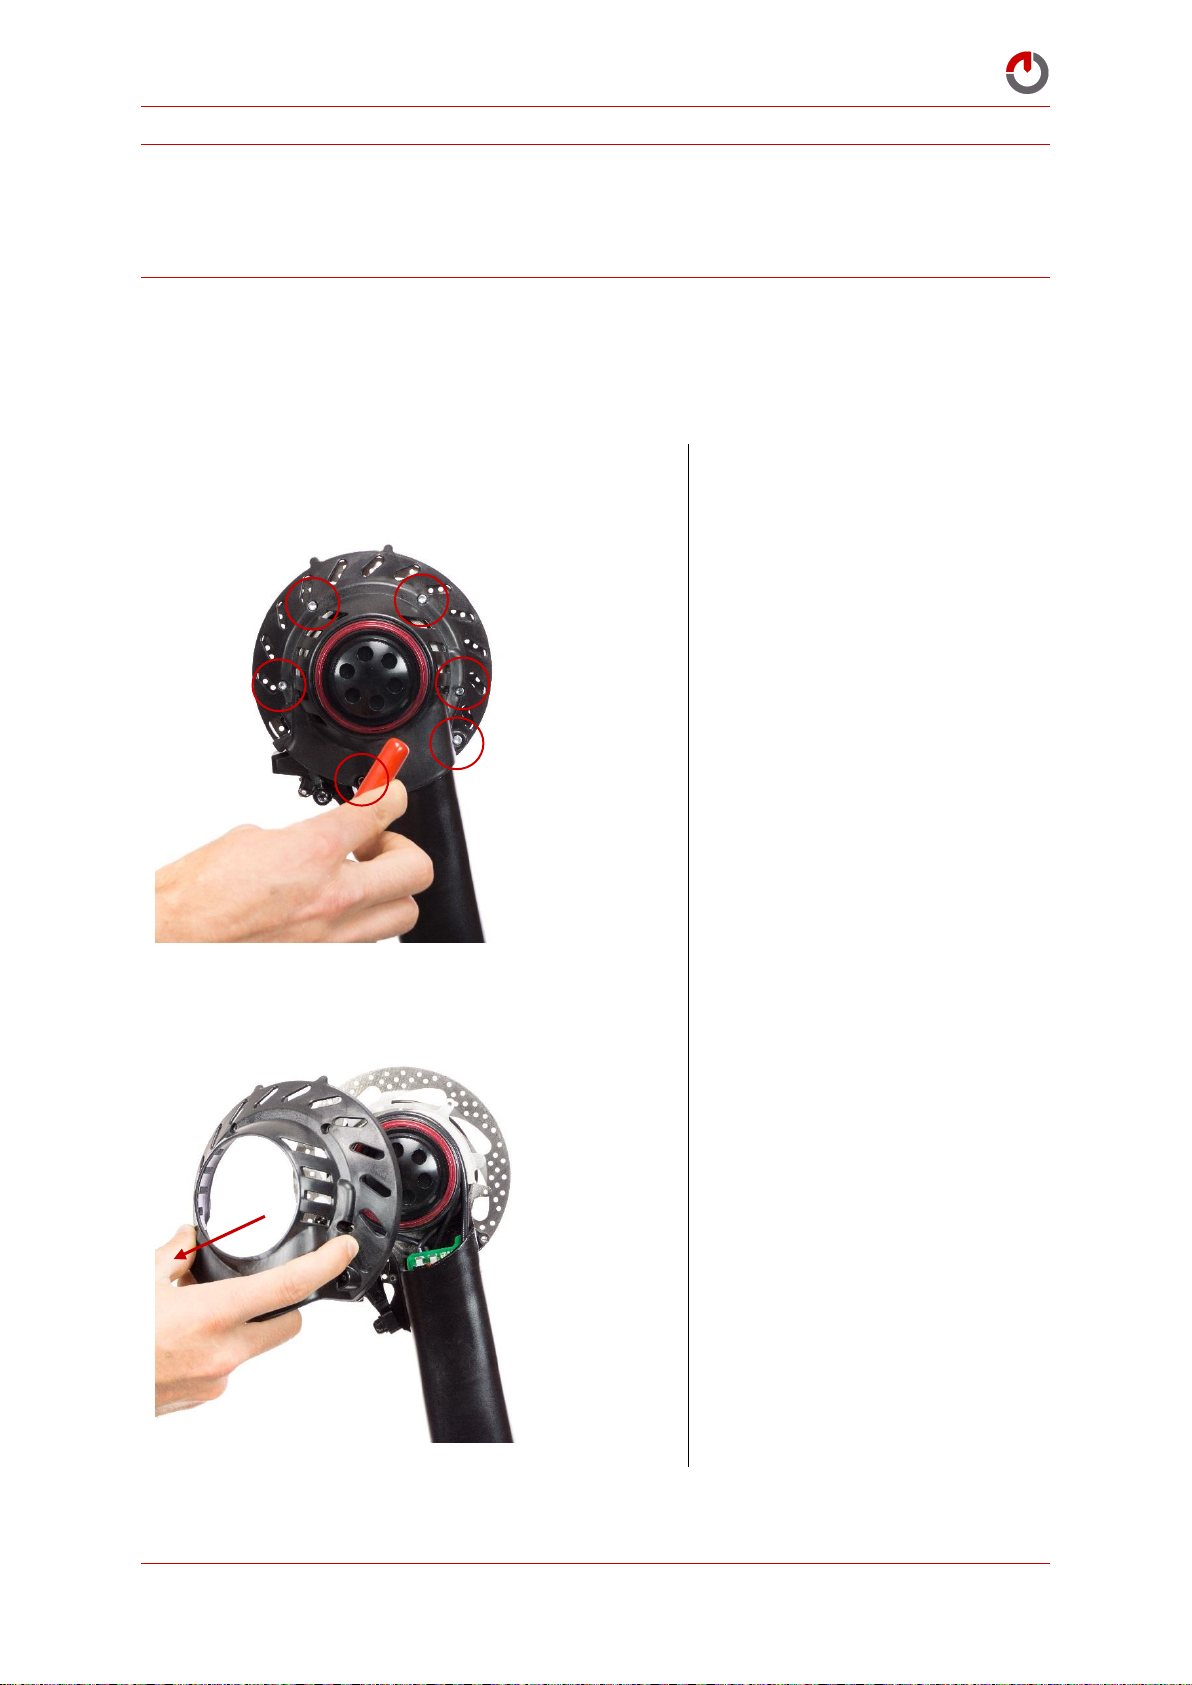
Locate and remove the six securing
bolts on the motor cover
Remove the motor cover
CAUTION! DOT 4 brake fluids will strip paint. Exercise caution to avoid brake fluid coming into
contact with painted surfaces. If brake fluid does come into contact with painted surfaces, wipe the
surface immediately and clean with an isopropyl alcohol.
Dispose of used brake fluid according to local laws.
For additional guidance, consult the manufacturer’s instructions supplied.
6.7.2 Replacing the Brake Pads
6.7.2.1 Replacing the Front Brake Pads
© Karbon Kinetics Limited. All Rights Reserved. 41
Page 43
Gocycle® Owner’s Manual for GS, September 2017
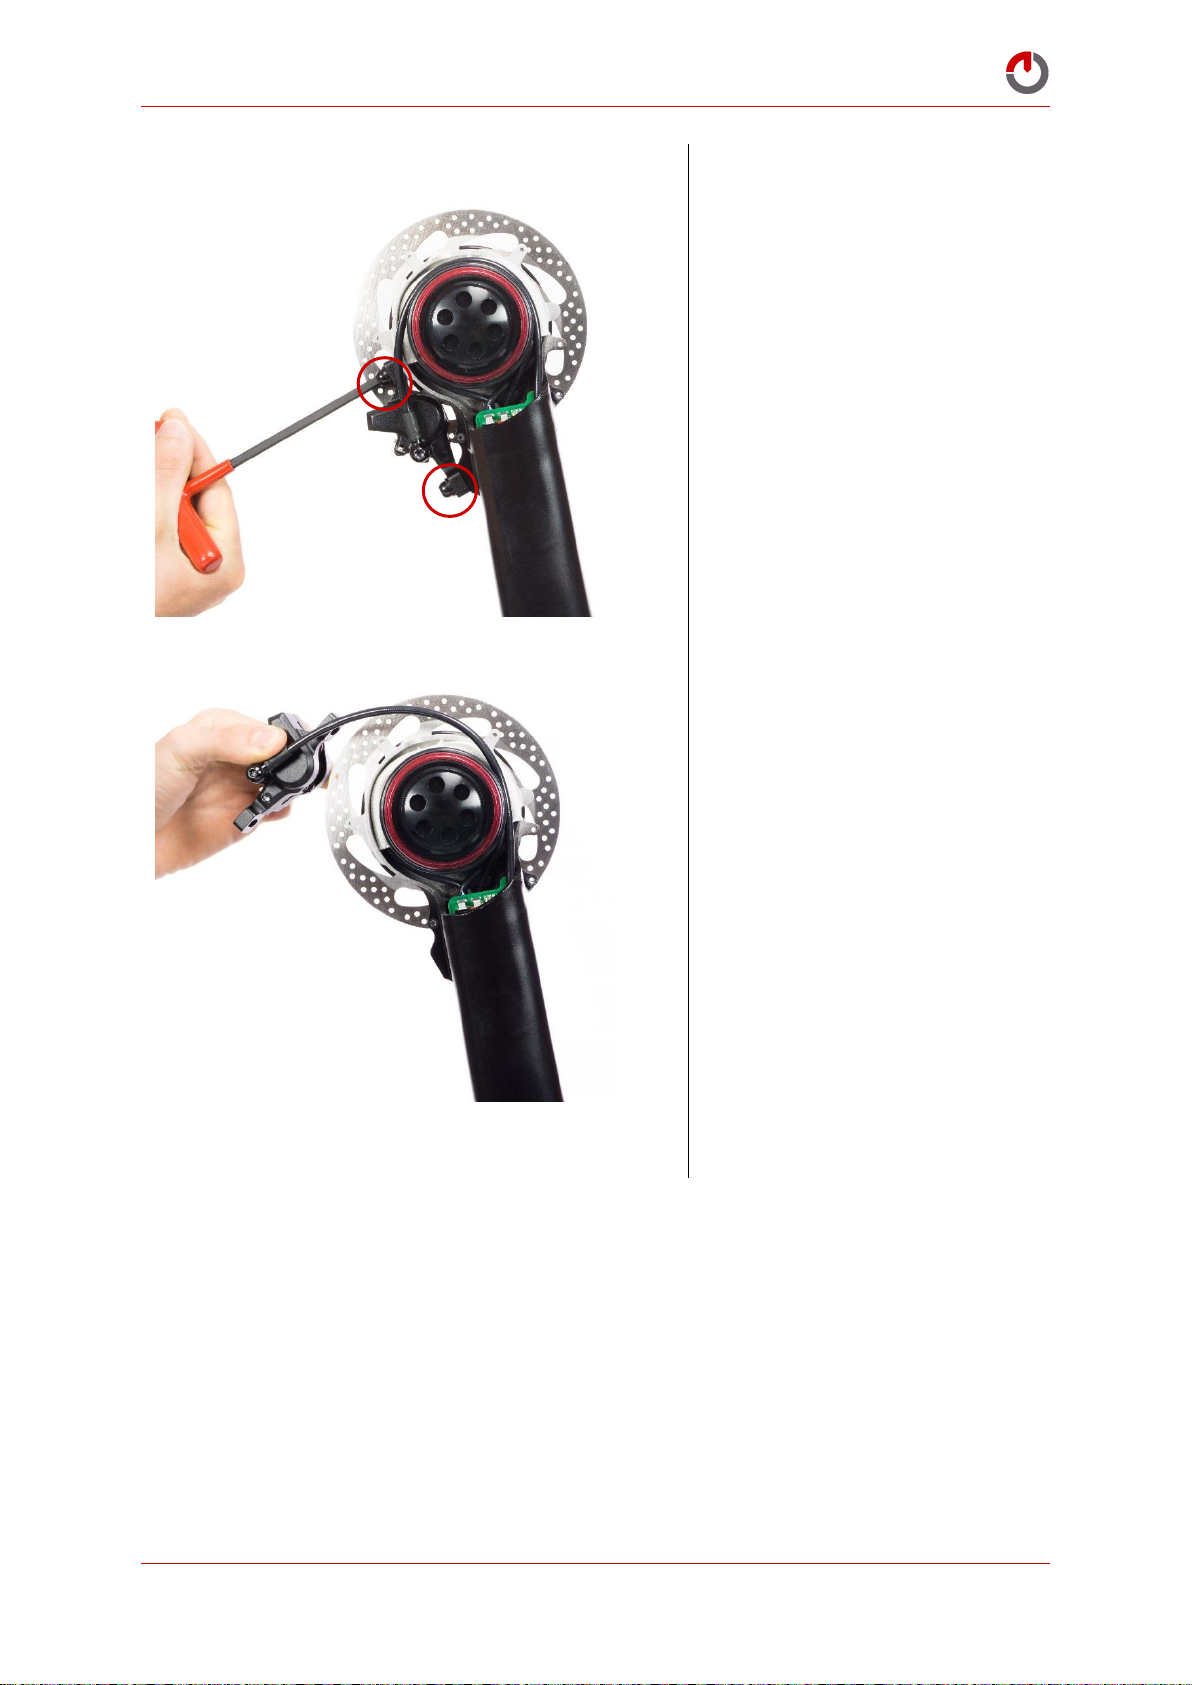
Locate and remove the two calliper
securing bolts
Slide the calliper off the disk rotor
© Karbon Kinetics Limited. All Rights Reserved. 42
Page 44
Gocycle® Owner’s Manual for GS, September 2017
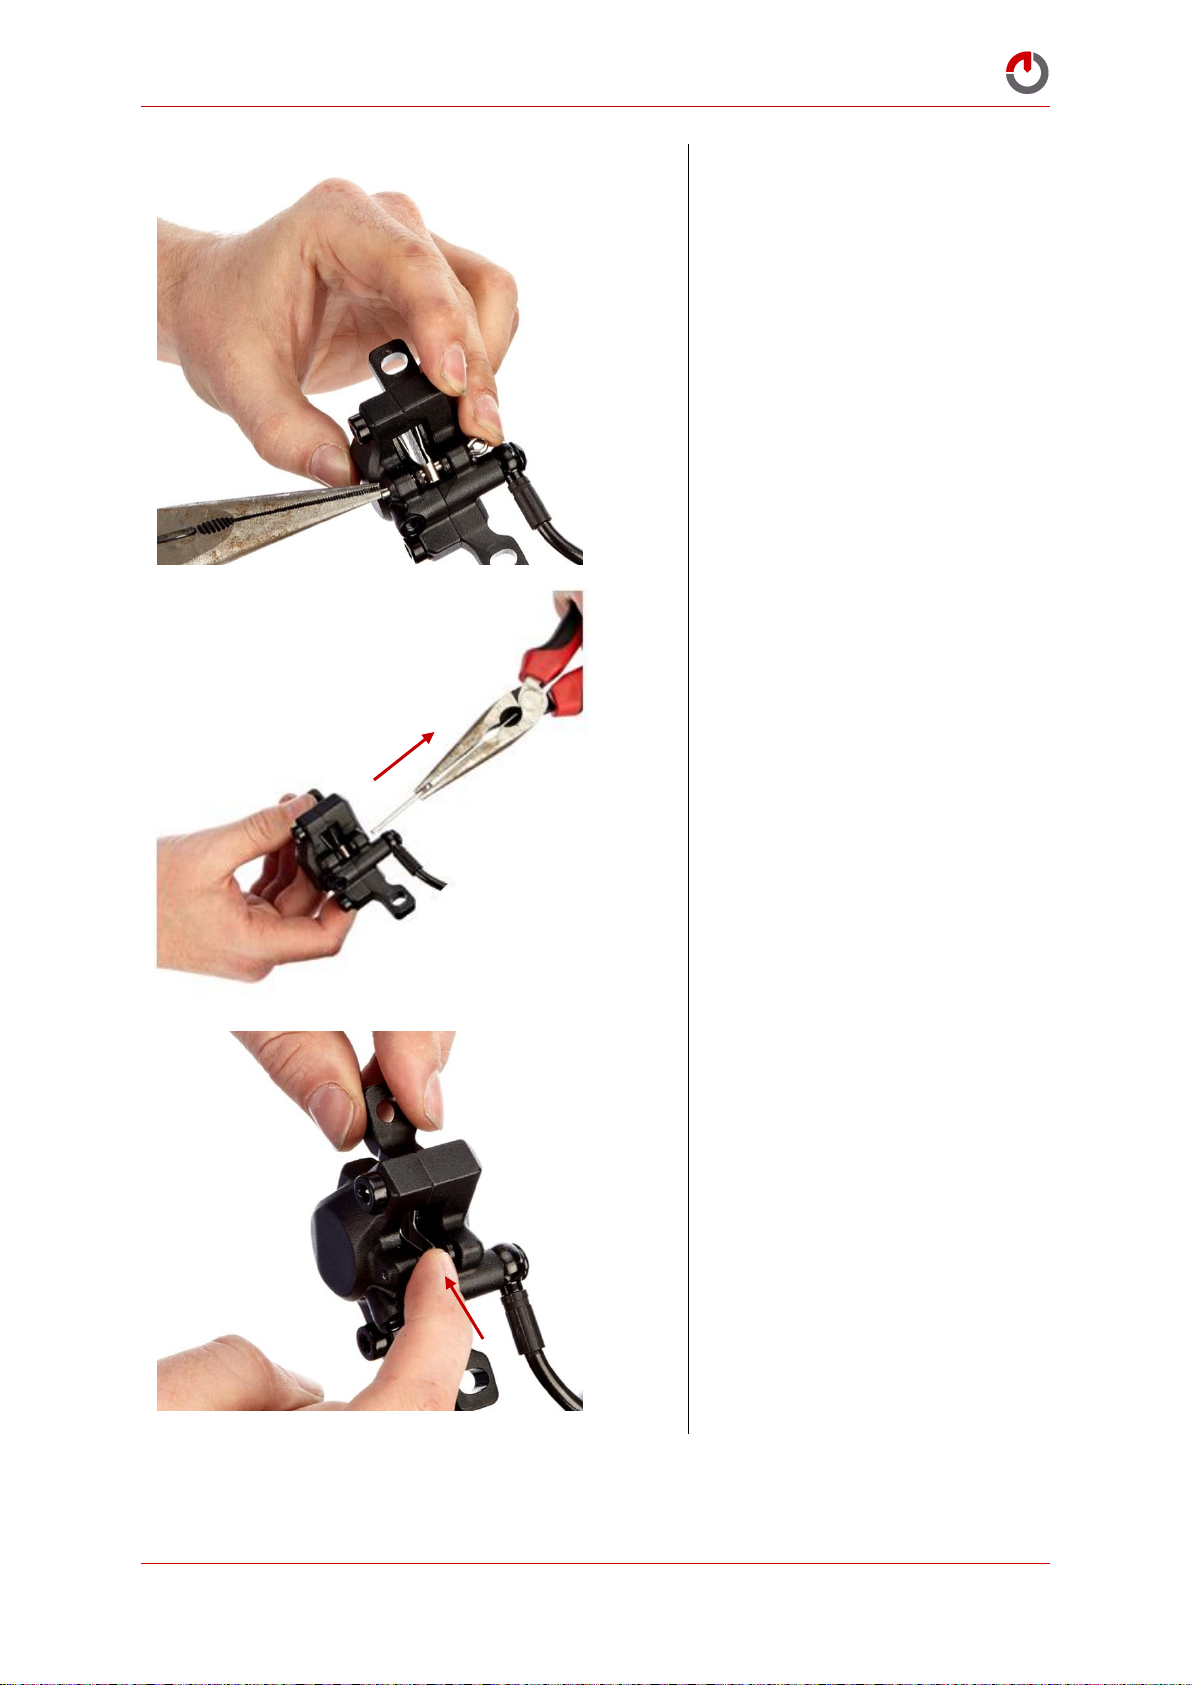
Compress the split pin using a pair of
pliers, as shown.
With the split pin compressed, pull
the pin out using a pair of pliers.
Carefully push the brake pads from
the top of the calliper, as shown.
© Karbon Kinetics Limited. All Rights Reserved. 43
Page 45
Gocycle® Owner’s Manual for GS, September 2017
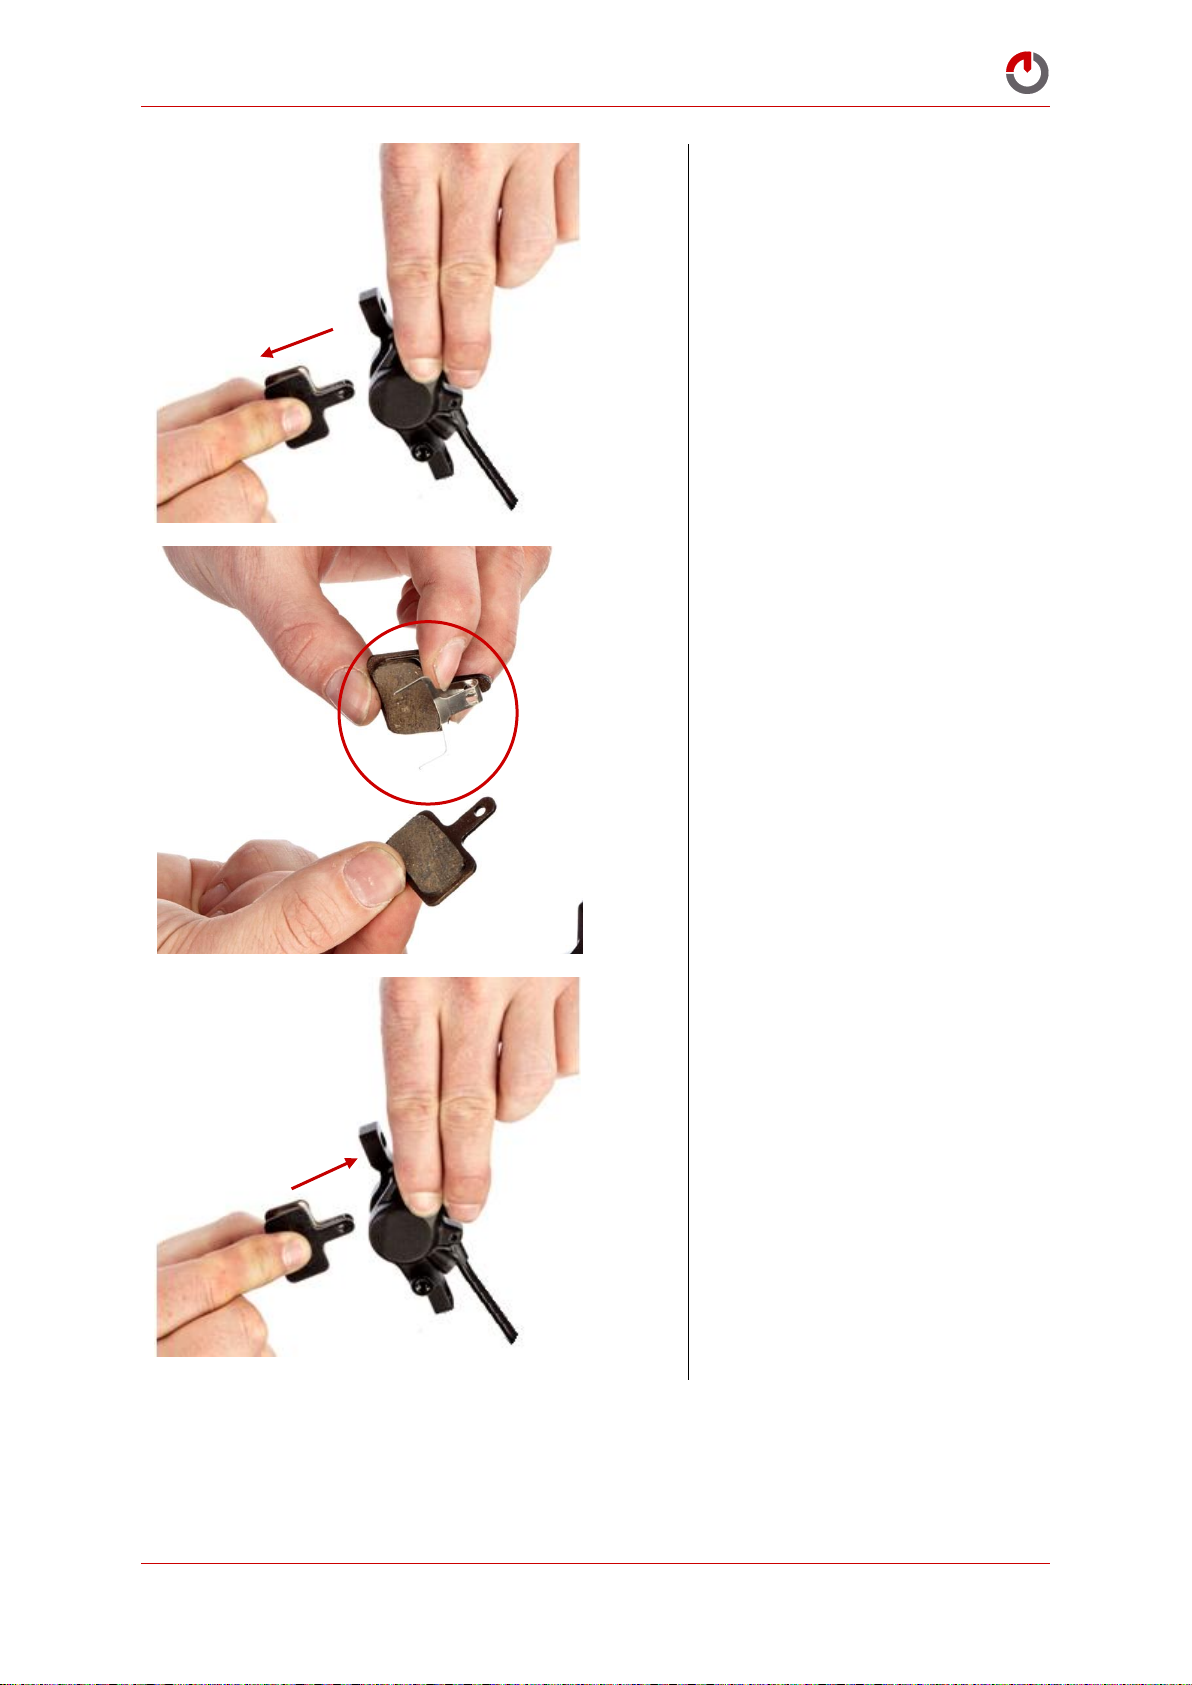
Pinch both brake pads and remove
from the calliper. CAUTION! The
pads are sprung. Be careful not to
accidentally release the spring.
Replace the brake pads as necessary
before reassembly.
Replace the brake pads as necessary.
Pinch together with the spring and
reassemble into the calliper.
© Karbon Kinetics Limited. All Rights Reserved. 44
Page 46
Gocycle® Owner’s Manual for GS, September 2017
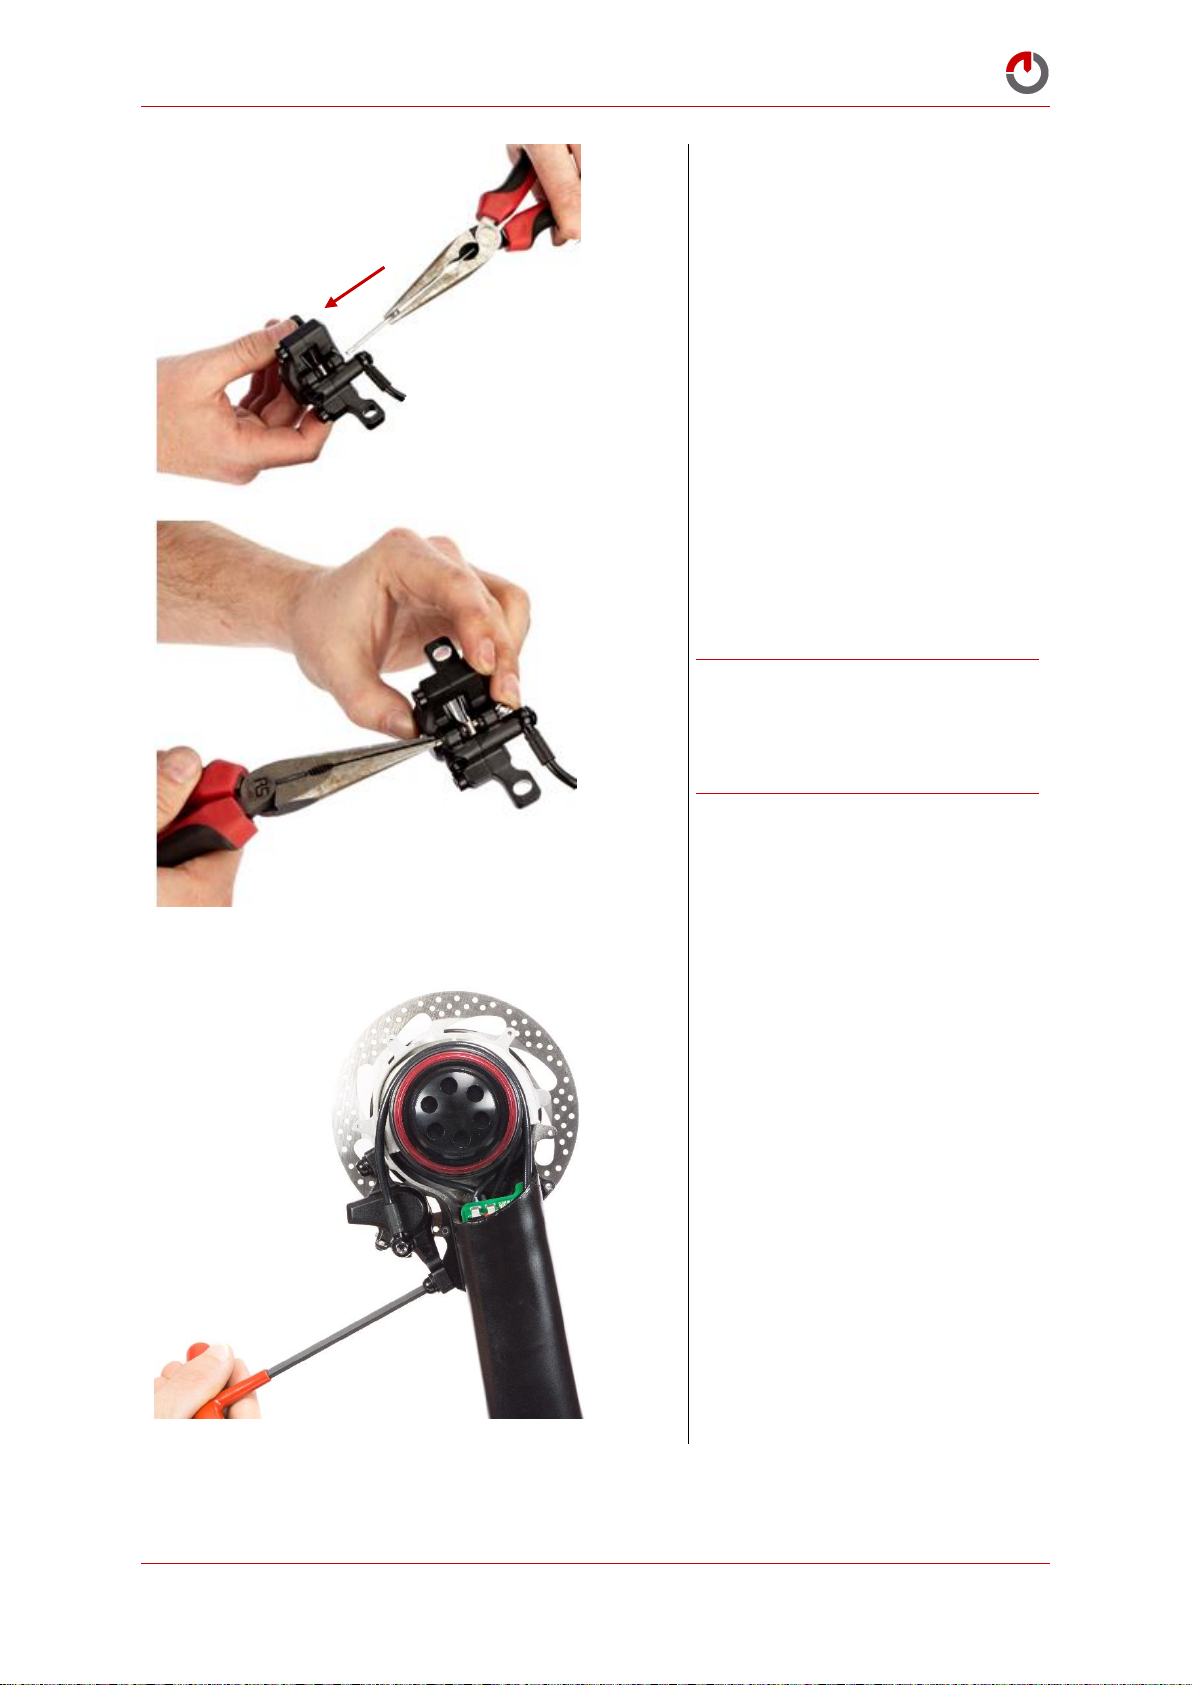
Replace the split pin to secure the
brake pads in position.
Using pliers, bend open the split pin
to lock it in place.
WARNING! Do not attempt to ride
your Gocycle without re-installing the
brake pads and securing split pin.
Doing so may result in injury.
Replace the front brake calliper.
Tighten the calliper securing bolts to
a torque of 6–8Nm.
Ensure that the brake calliper is
parallel to the disk rotor when
tightened in order to prevent disk
rub.
© Karbon Kinetics Limited. All Rights Reserved. 45
Page 47
Gocycle® Owner’s Manual for GS, September 2017
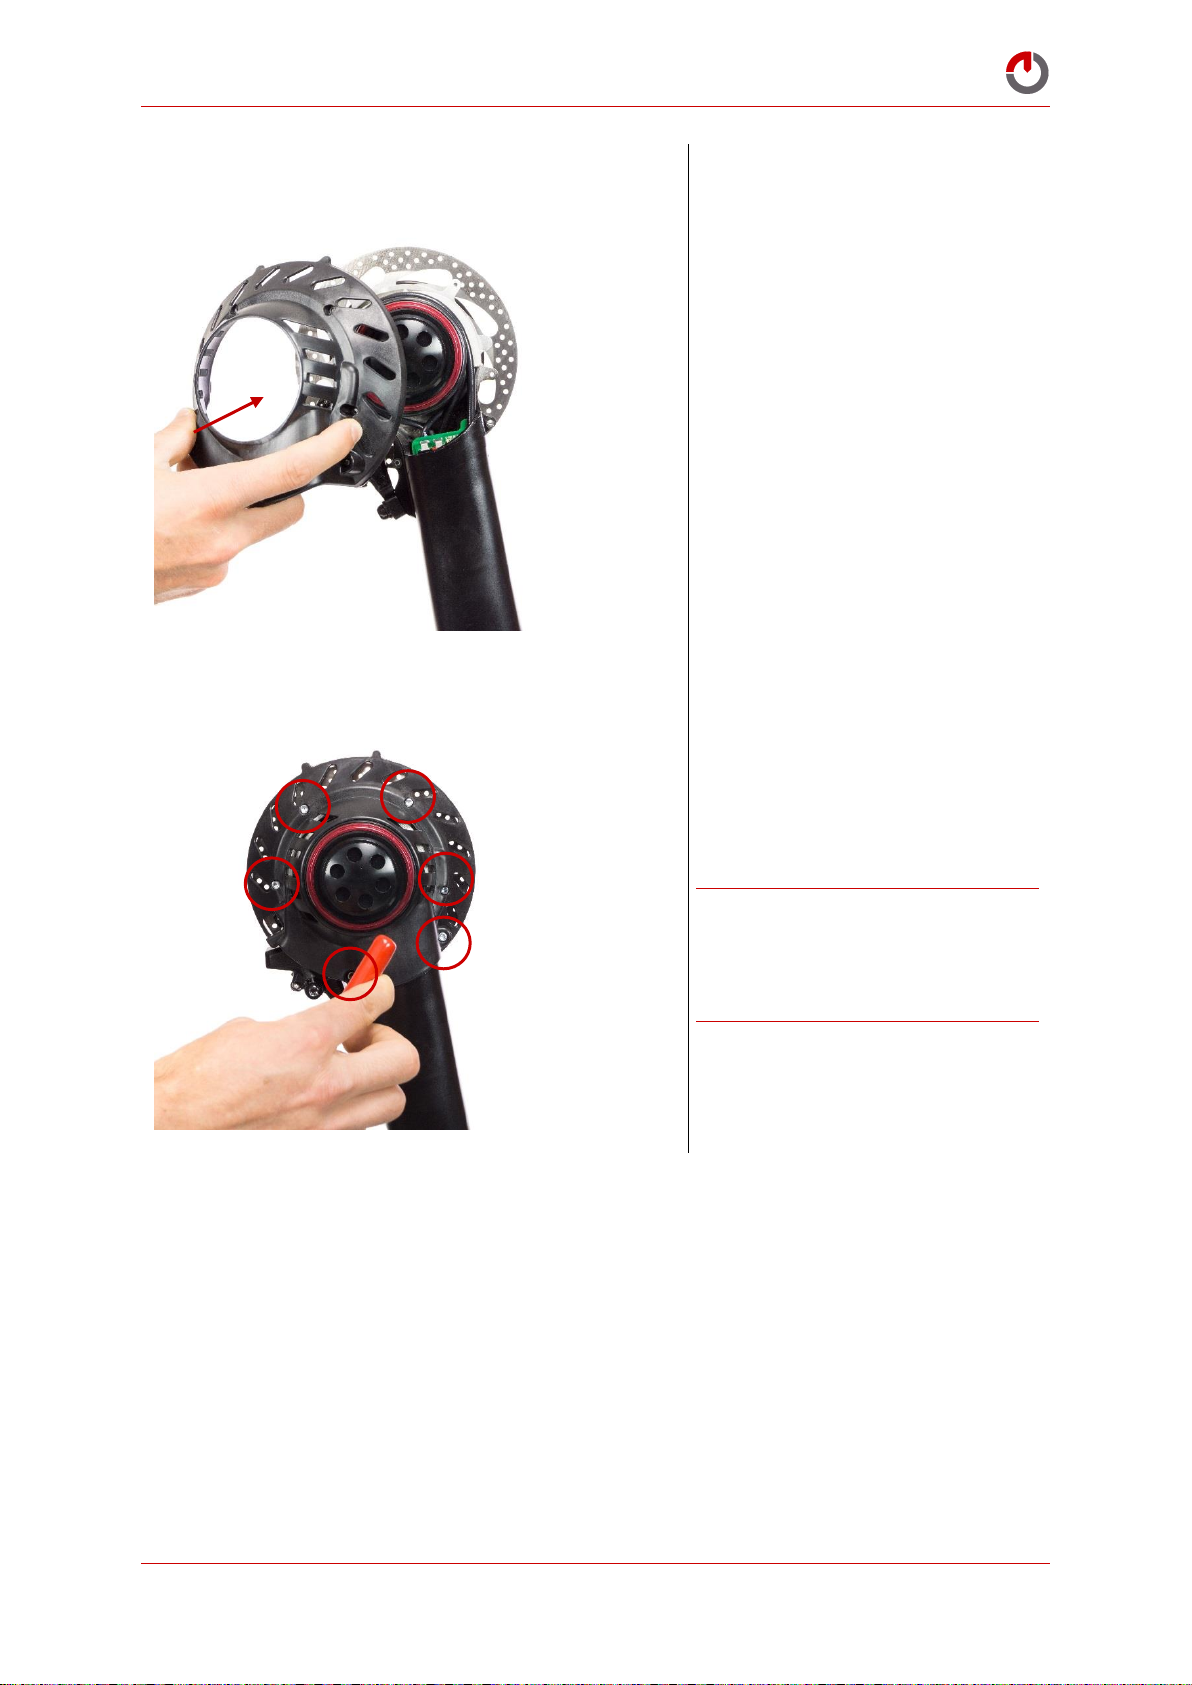
Replace the motor cover
Replace the six motor cover securing
screws. Tighten to a torque of 3–4Nm.
WARNING! The braking performance
of new brake pads will increase over
time. Ensure that you “bed-in” your
brakes by performing a number of
stops.
© Karbon Kinetics Limited. All Rights Reserved. 46
Page 48
Gocycle® Owner’s Manual for GS, September 2017
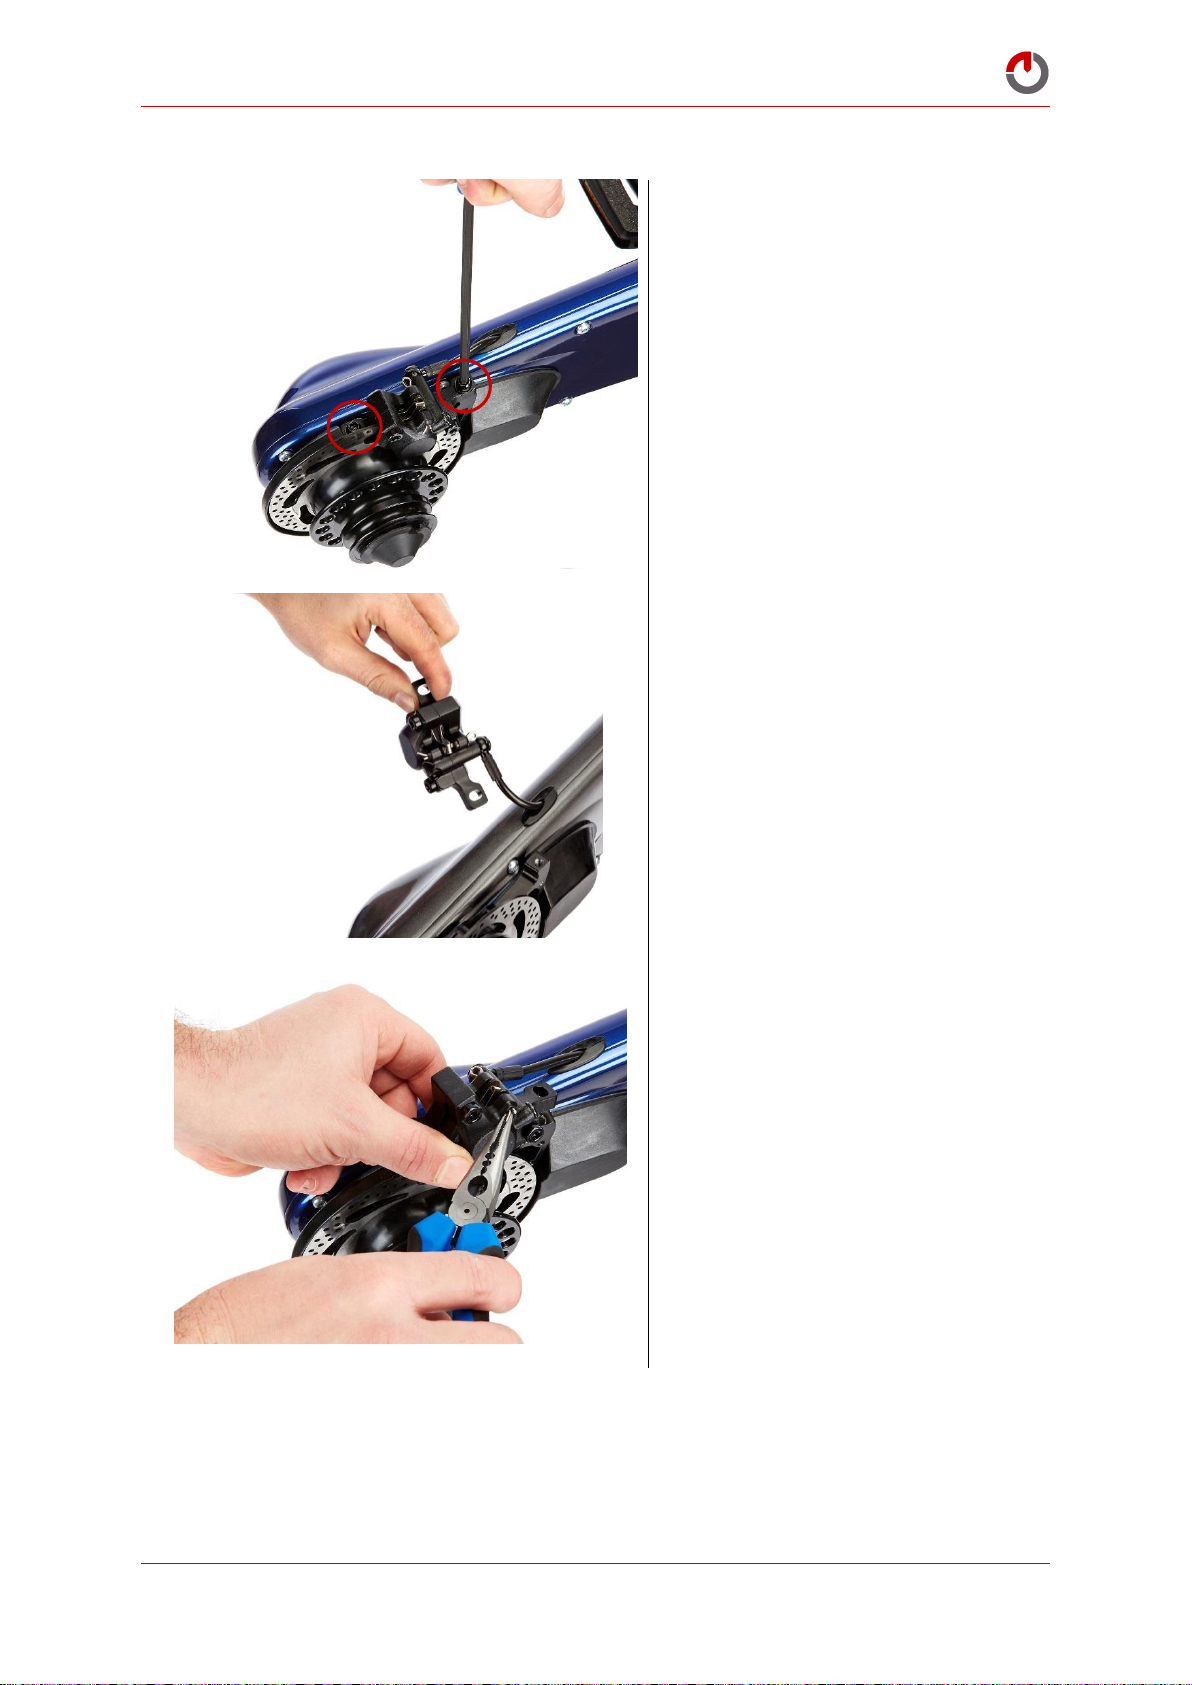
Locate the two rear calliper securing
bolts, shown.
Slide the calliper off the disk rotor.
Compress the split pin using a pair of
pliers, as shown.
6.7.2.2 Replacing the Rear Brake Pads
© Karbon Kinetics Limited. All Rights Reserved. 47
Page 49
Gocycle® Owner’s Manual for GS, September 2017
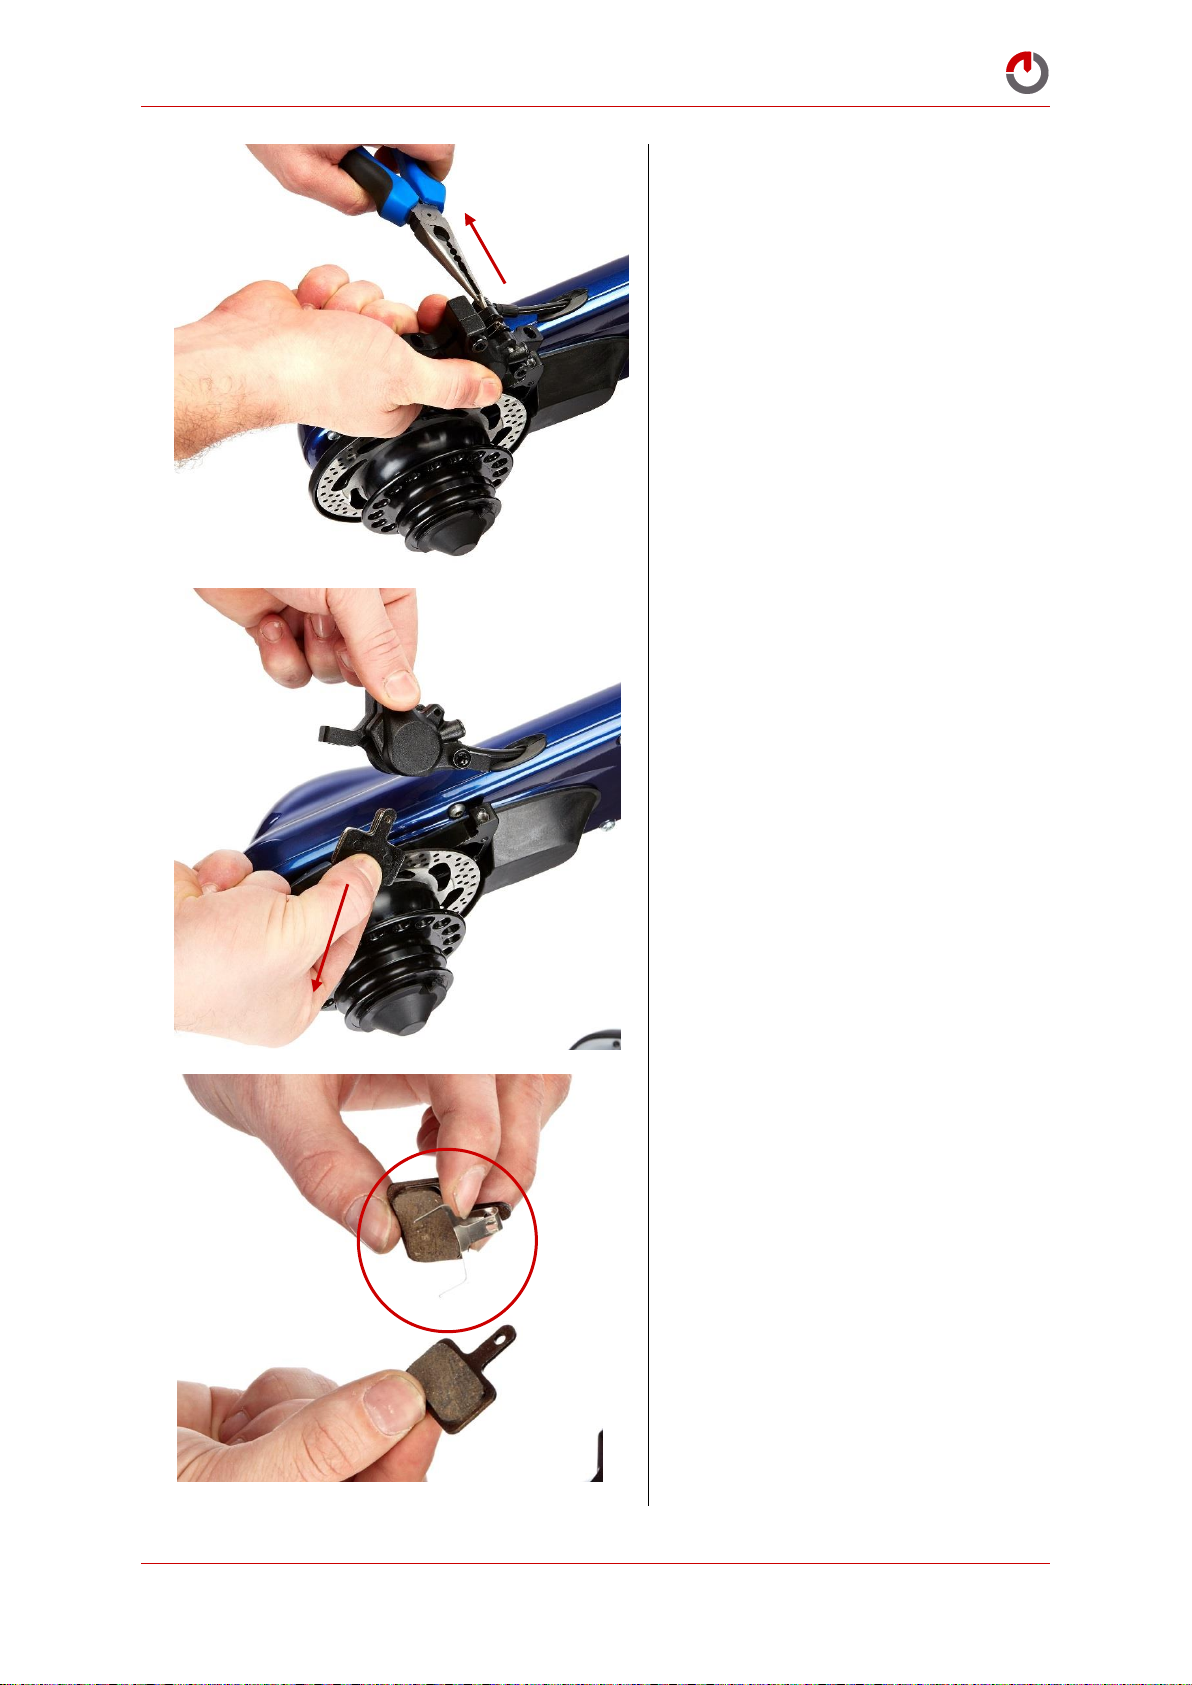
With the split pin compressed, pull the
pin out using a pair of pliers.
Pinch both brake pads and remove from
the calliper. CAUTION! The pads are
sprung. Be careful not to accidentally
release the spring.
Replace the brake pads as necessary
before reassembly.
© Karbon Kinetics Limited. All Rights Reserved. 48
Page 50
Gocycle® Owner’s Manual for GS, September 2017
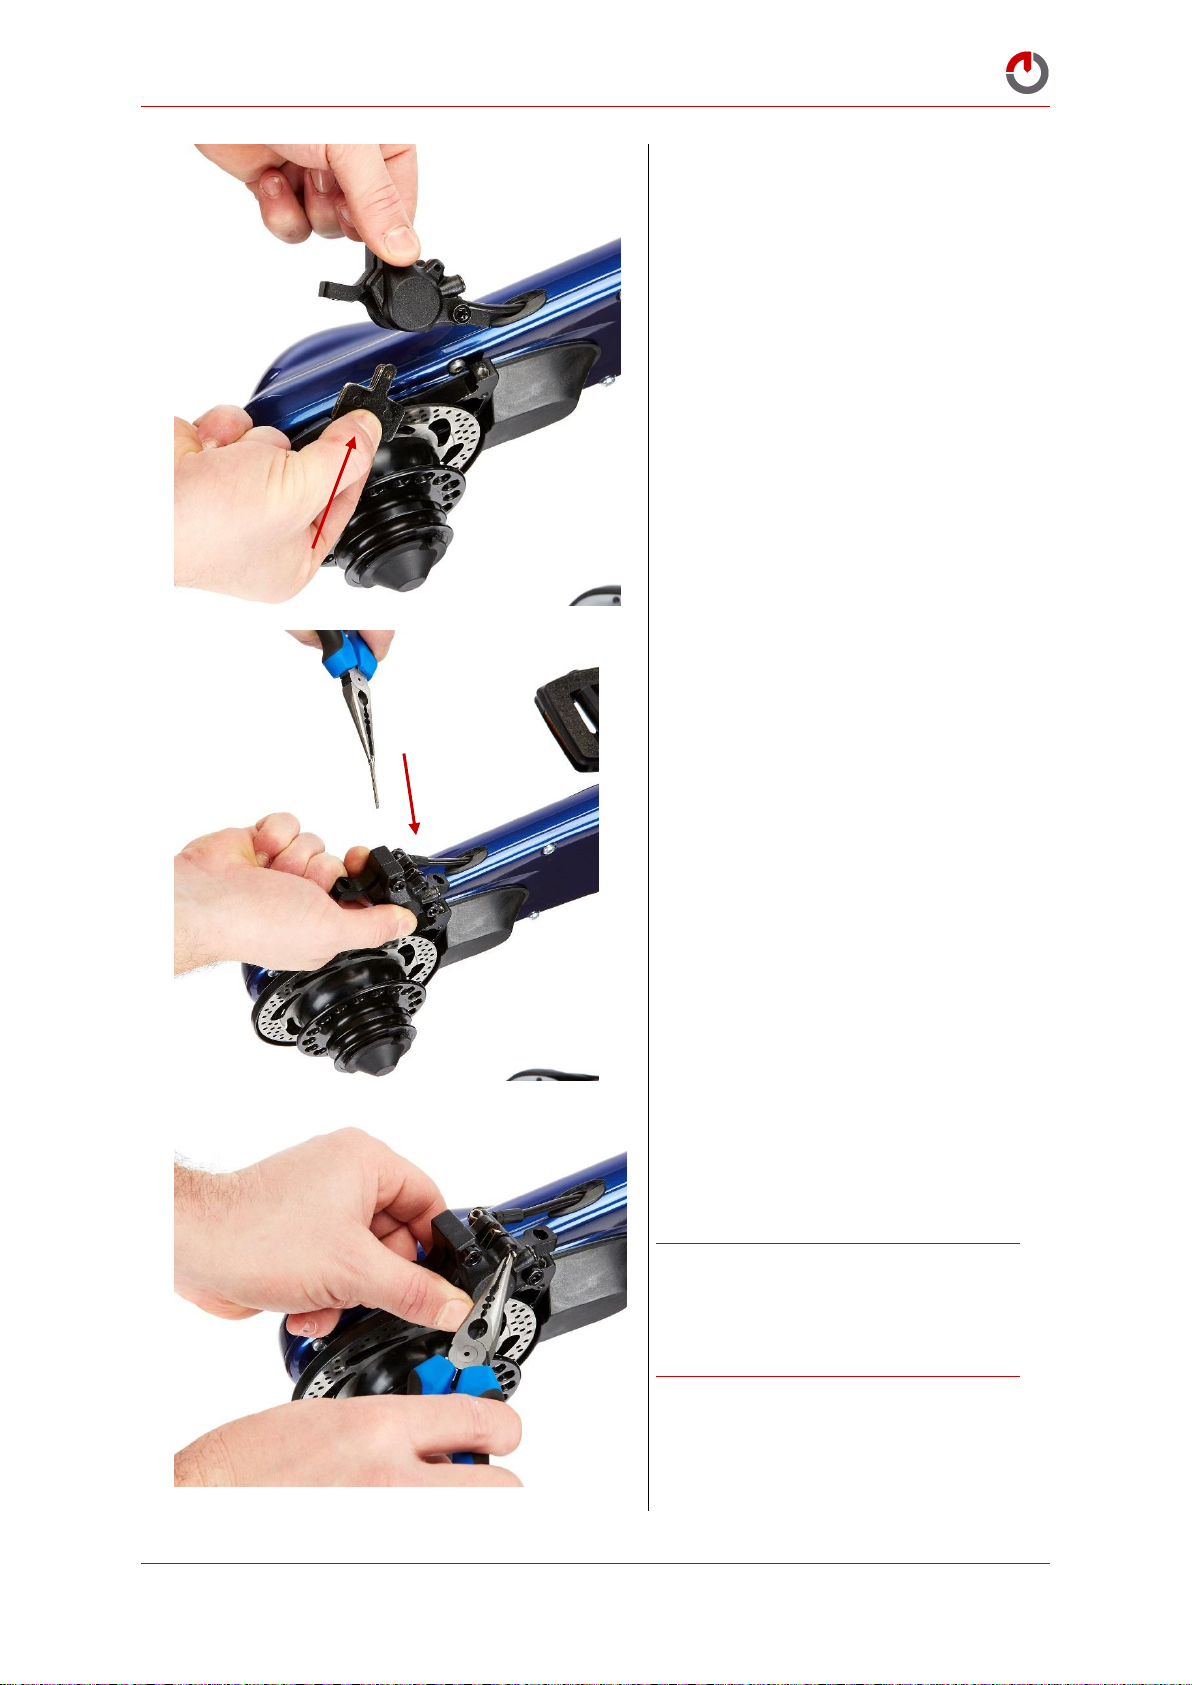
Replace the brake pads as necessary.
Pinch together with the spring and
reassemble into the calliper.
Replace the split pin to secure the brake
pads in position.
Using pliers, bend open the split pin to
lock it in place.
WARNING! Do not attempt to ride your
Gocycle without re-installing the brake
pads and securing split pin.
Doing so may result in injury.
© Karbon Kinetics Limited. All Rights Reserved. 49
Page 51
Gocycle® Owner’s Manual for GS, September 2017
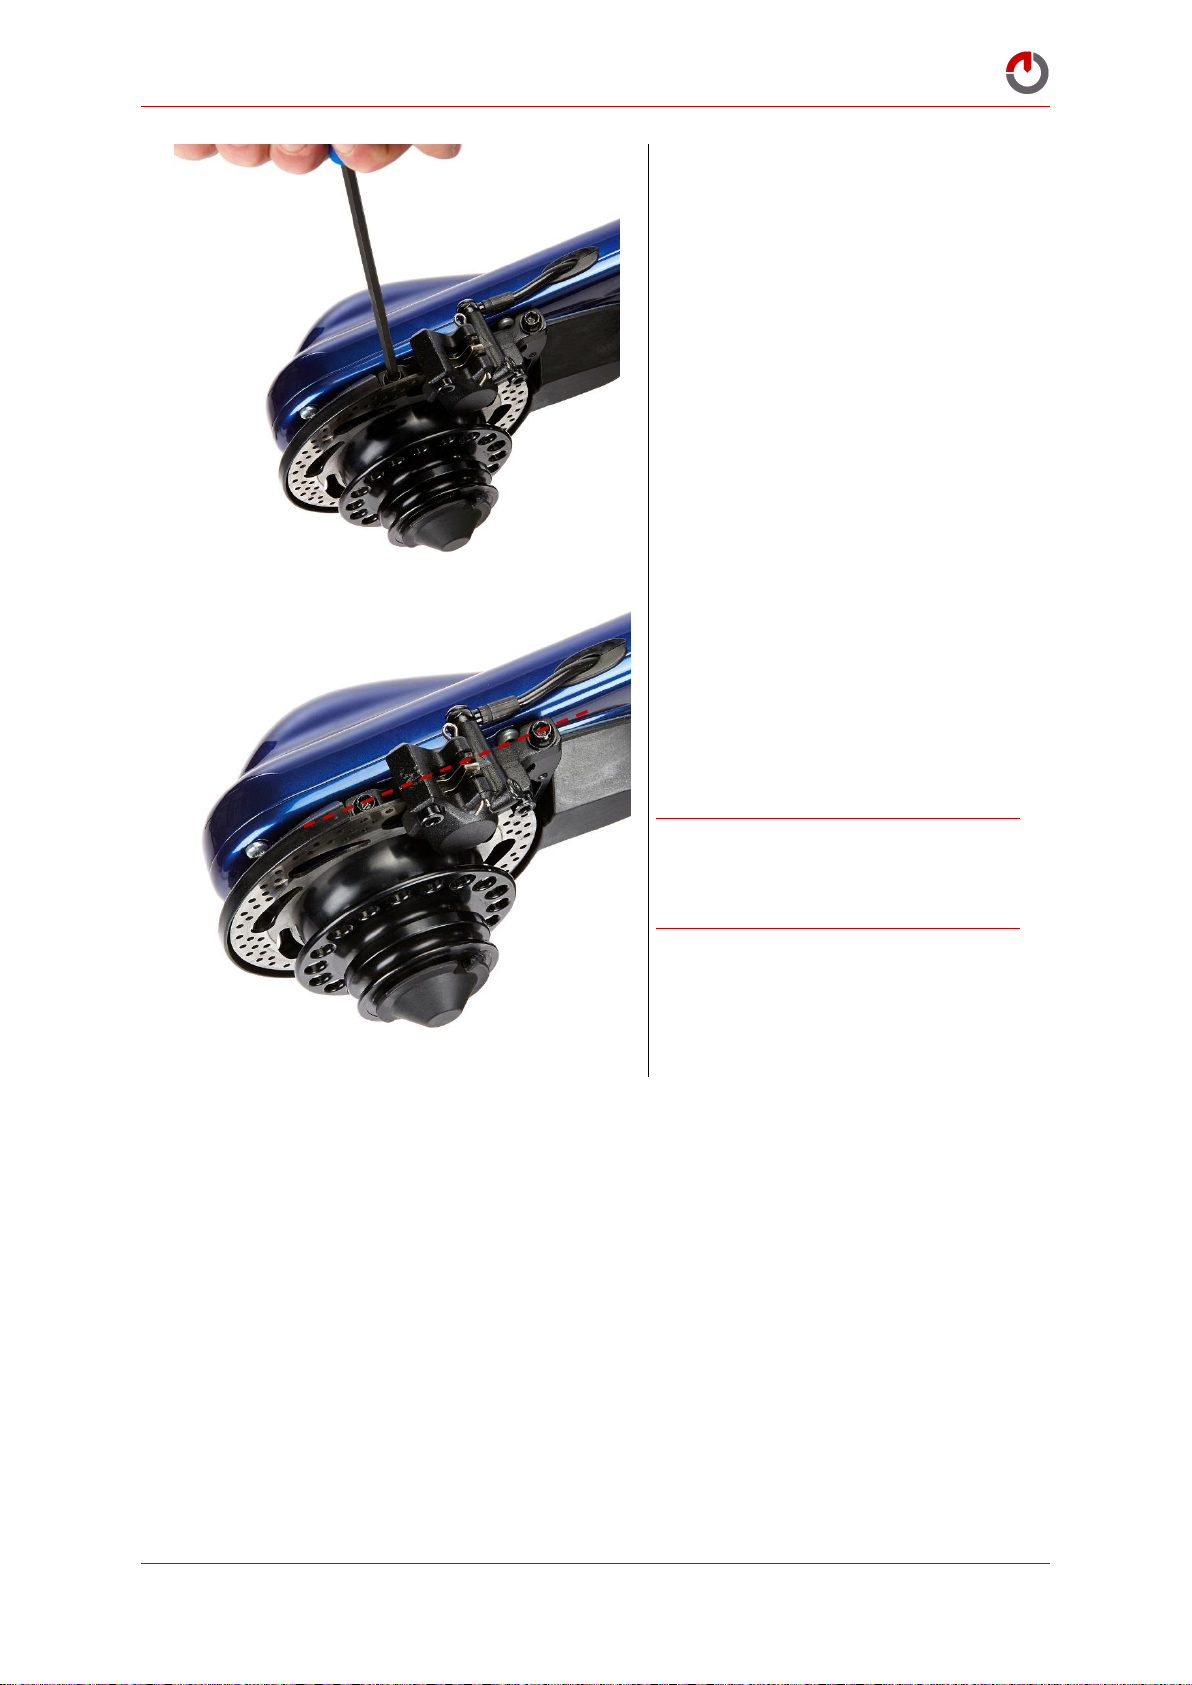
Replace both calliper securing bolts.
Secure to a torque of 6-8 Nm.
Ensure that the brake calliper is parallel
to the disk rotor when tightened in
order to prevent disk rub.
WARNING! The braking performance of
new brake pads will increase over time.
Ensure that you “bed-in” your brakes by
performing a number of stops
© Karbon Kinetics Limited. All Rights Reserved. 50
Page 52

Gocycle® Owner’s Manual for GS, September 2017
6.8 Adjusting the PitstopWheel® Quick Release Cam Levers
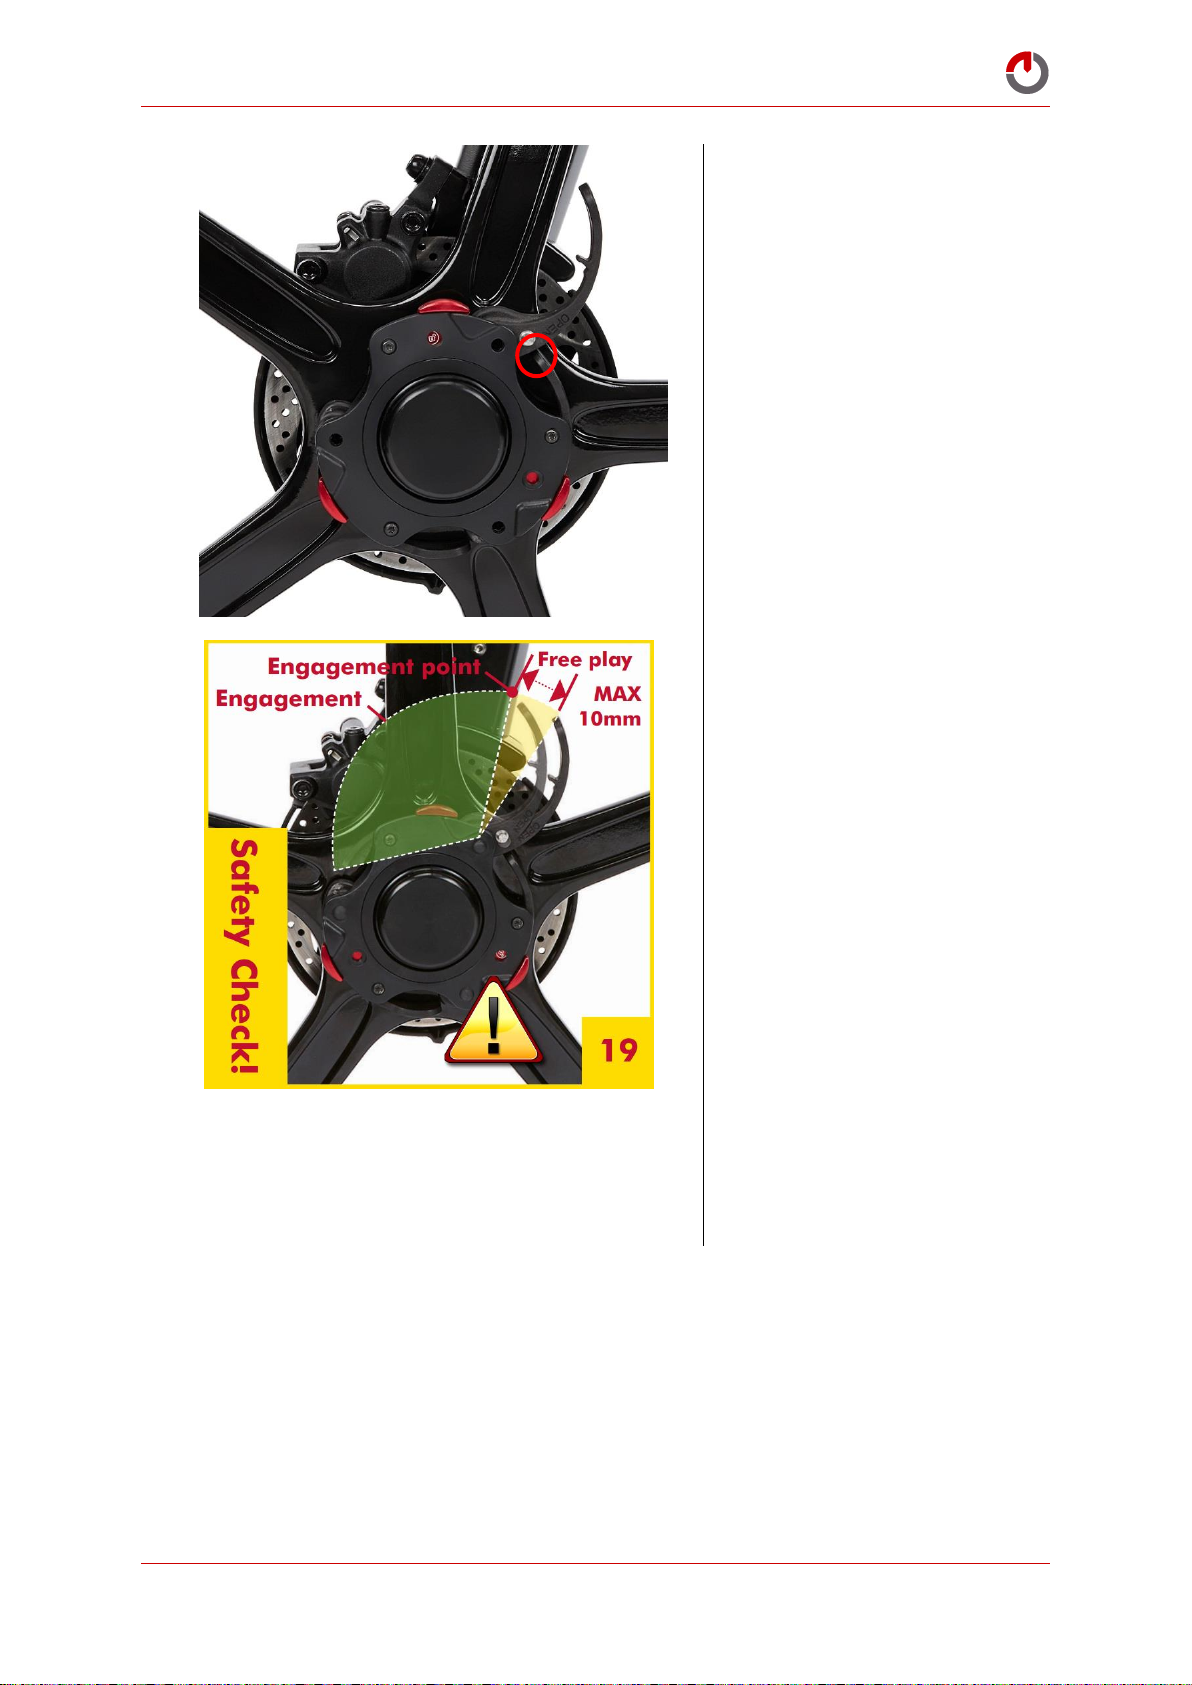
All three Pitstopwheel® quick release cam levers should have equal resistance when closing or
opening. As per the pre-ride checks there must be a maximum of 10mm free play measured at the tip
of the cam lever when open. In the event that the levers have different closing/ opening resistance or
free play in excess of 10mm you must adjust the cam levers before riding.
Adjusting the Pitstopwheel® cam levers is an important task throughout the lifetime of the product.
Cam levers will settle after initial use and prolonged use will cause wear. As such the cam levers
require vigilant attention and adjustment including checking every cam as part of the pre ride checks.
© Karbon Kinetics Limited. All Rights Reserved. 51
Page 53
Gocycle® Owner’s Manual for GS, September 2017
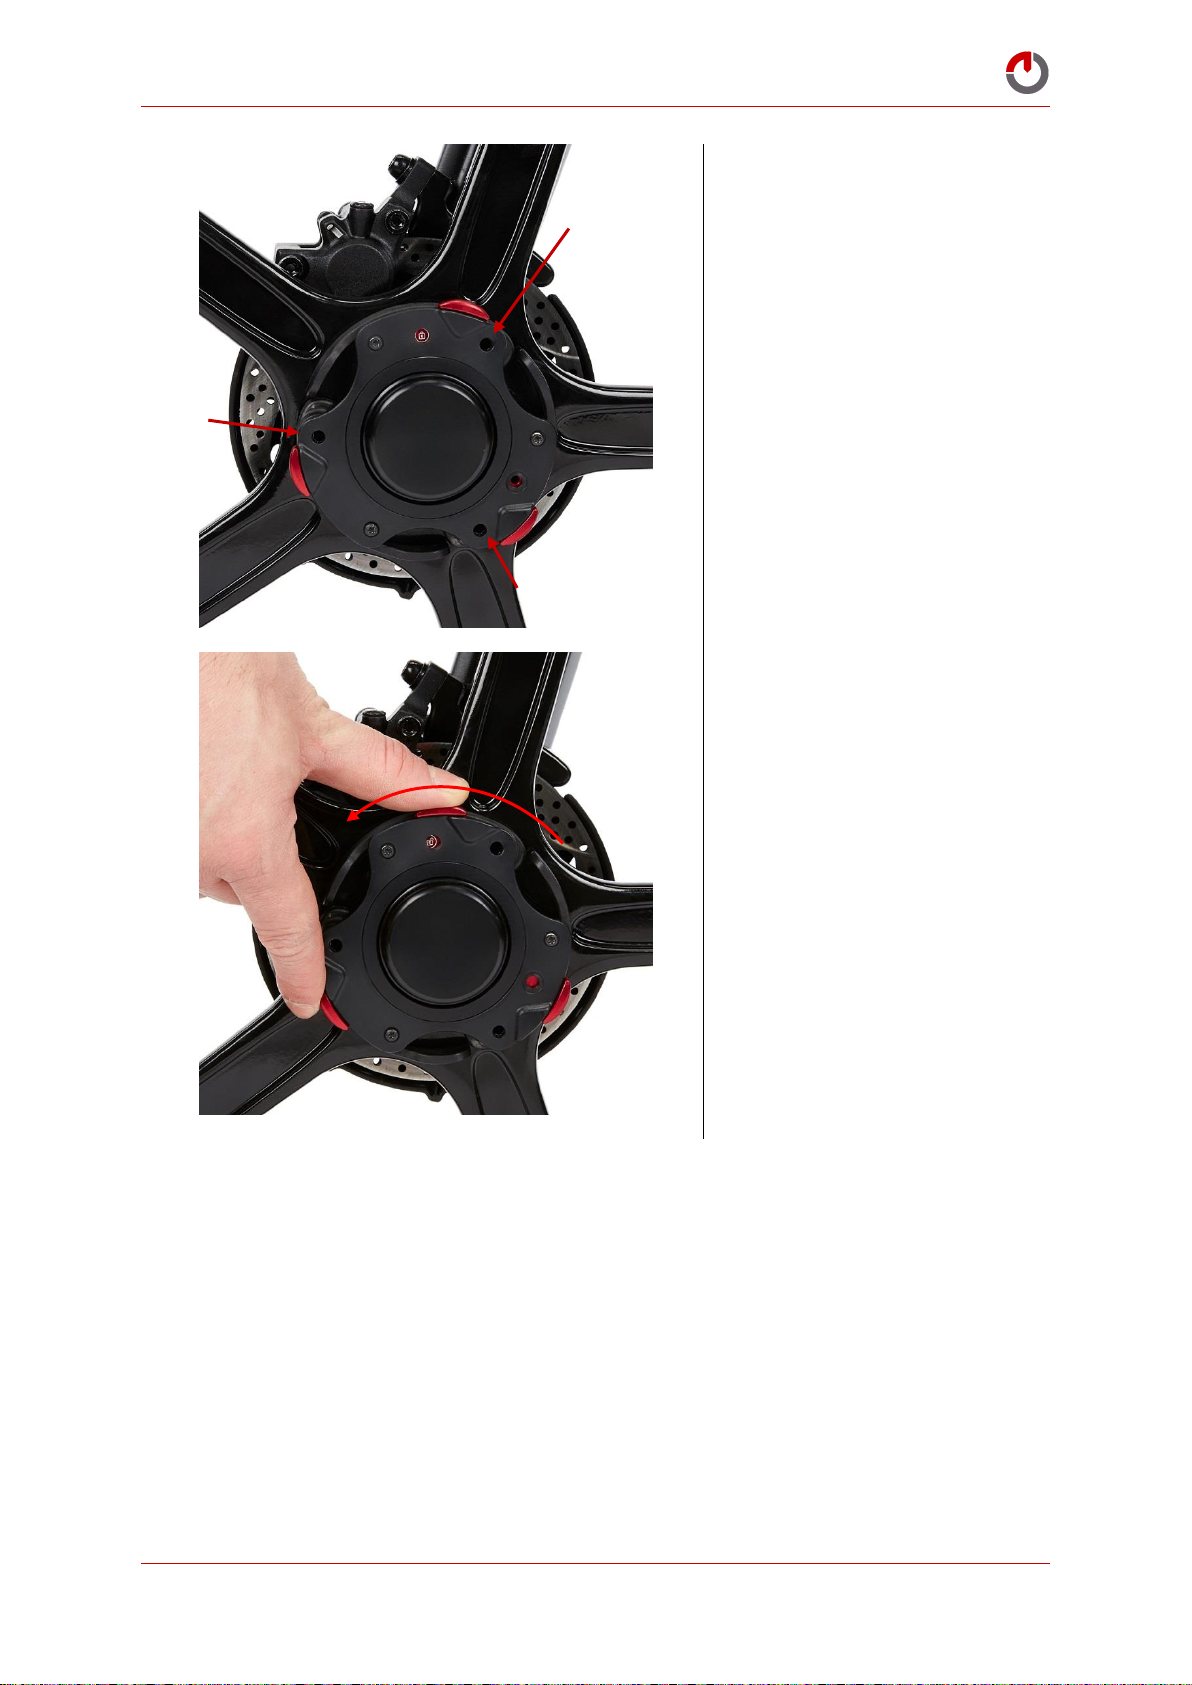
Fit the Pitstopwheel® onto
the hub, close all three
quick release levers, rotate
the red Pitstoplock™ to the
“locked” position. Remove
the three black rubber
grommets as indicated by
the arrows.
Rotate the Pitstoplock™ to
the unlocked position.
© Karbon Kinetics Limited. All Rights Reserved. 52
Page 54
Gocycle® Owner’s Manual for GS, September 2017
Keep 2 cam levers in the
closed position and open
one cam lever fully so that
the back edge touches the
next closed cam lever.
Lightly move the cam lever
back and forth to gauge the
extent of the free play.
Free play is defined as the
portion of movement where
there is no noticeable
pressure required to move
the cam lever before it
engages with the hub. It is
measured at the tip of the
cam lever.
If the free play exceeds
10mm at the tip of the cam
lever, use the 4mm Allen
key to reduce this.
© Karbon Kinetics Limited. All Rights Reserved. 53
Page 55
Gocycle® Owner’s Manual for GS, September 2017
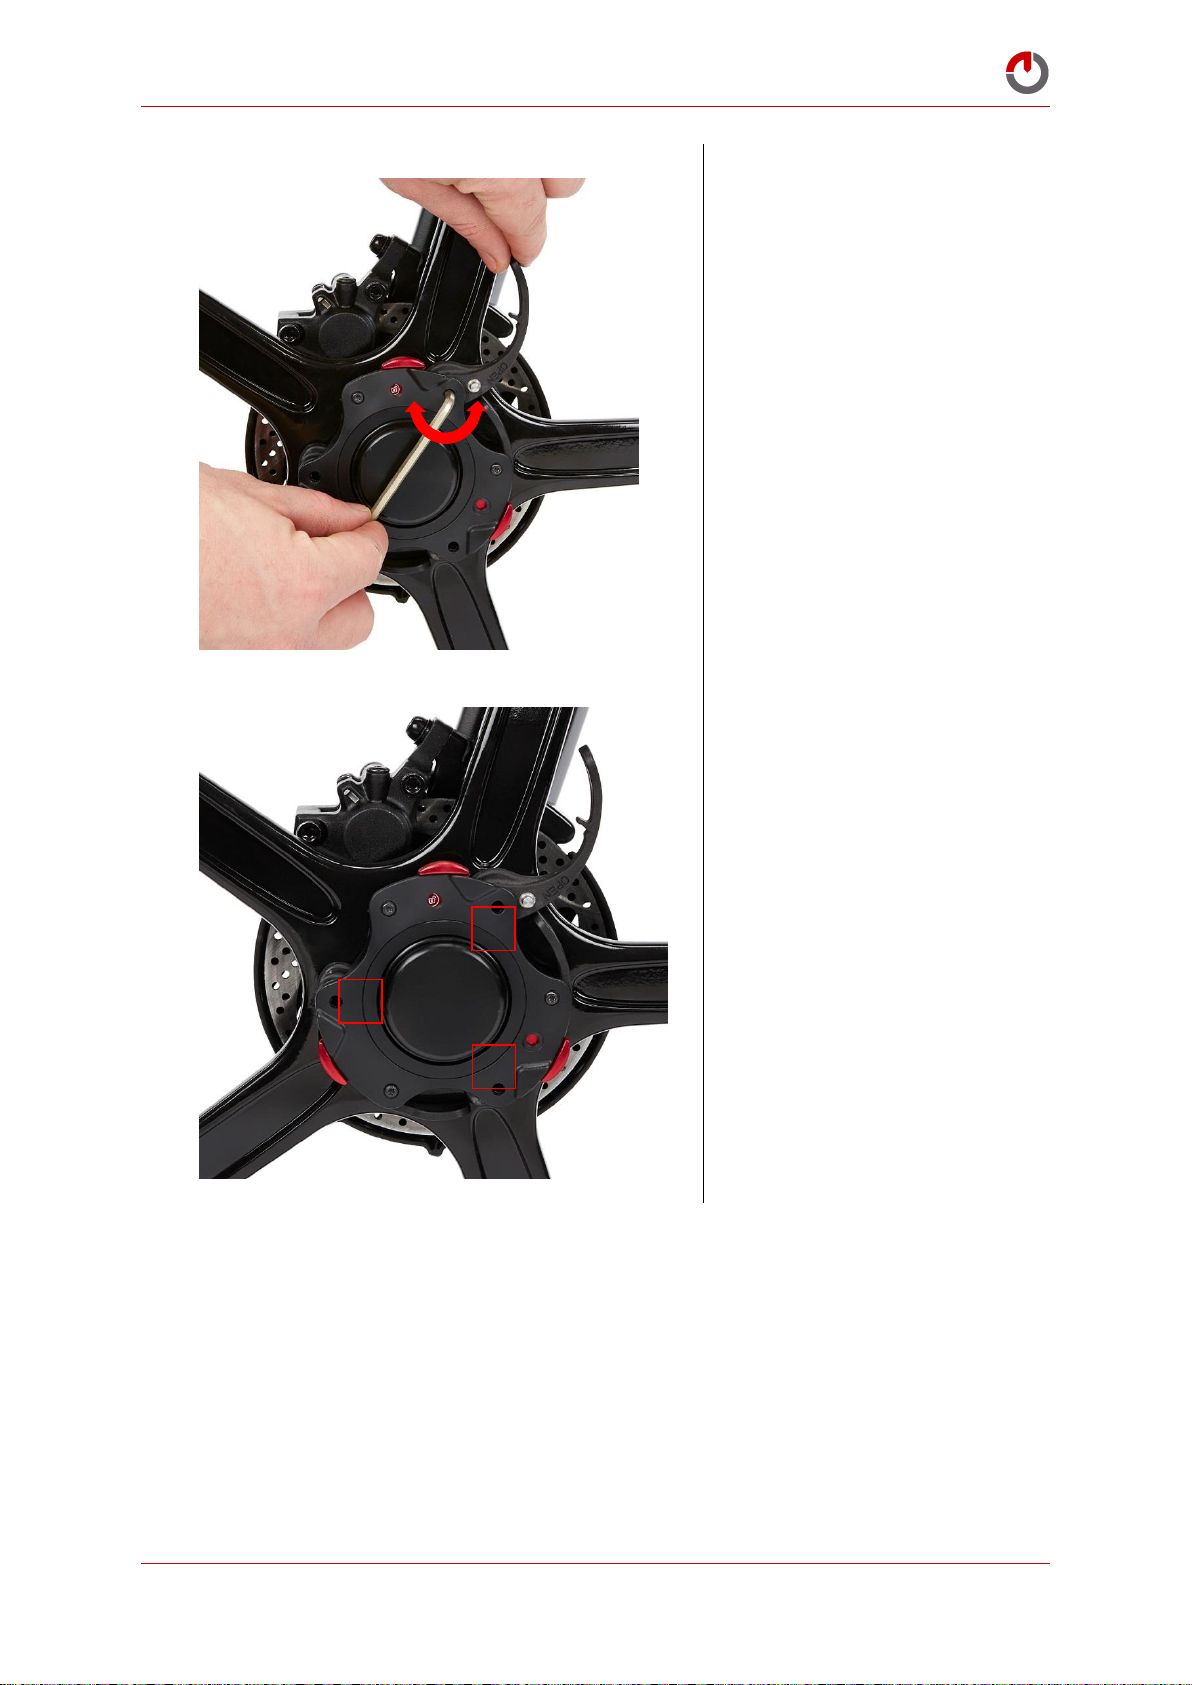
Insert the 4mm Allen key
into the stud and turn
clockwise to reduce the
cam lever free play and
anticlockwise to increase
cam lever free play. Hold
the cam lever lightly while
turning the allen key in
order to detect the
engagement point and Free
play. To check if the
adjustment has corrected
the free play, remove the
allen key and close the cam
lever to allow the system to
set and then reopen and recheck free play. Adjust
until you are satisfied that
the free play is 10mm or
less.
Repeat the process for the
other two cam levers. Then
complete one more full
check of each cam lever to
ensure that, once adjusted
and settled, the resistance to
close the cam levers is equal
across the three levers.
1 2 3
© Karbon Kinetics Limited. All Rights Reserved. 54
Page 56
Gocycle® Owner’s Manual for GS, September 2017
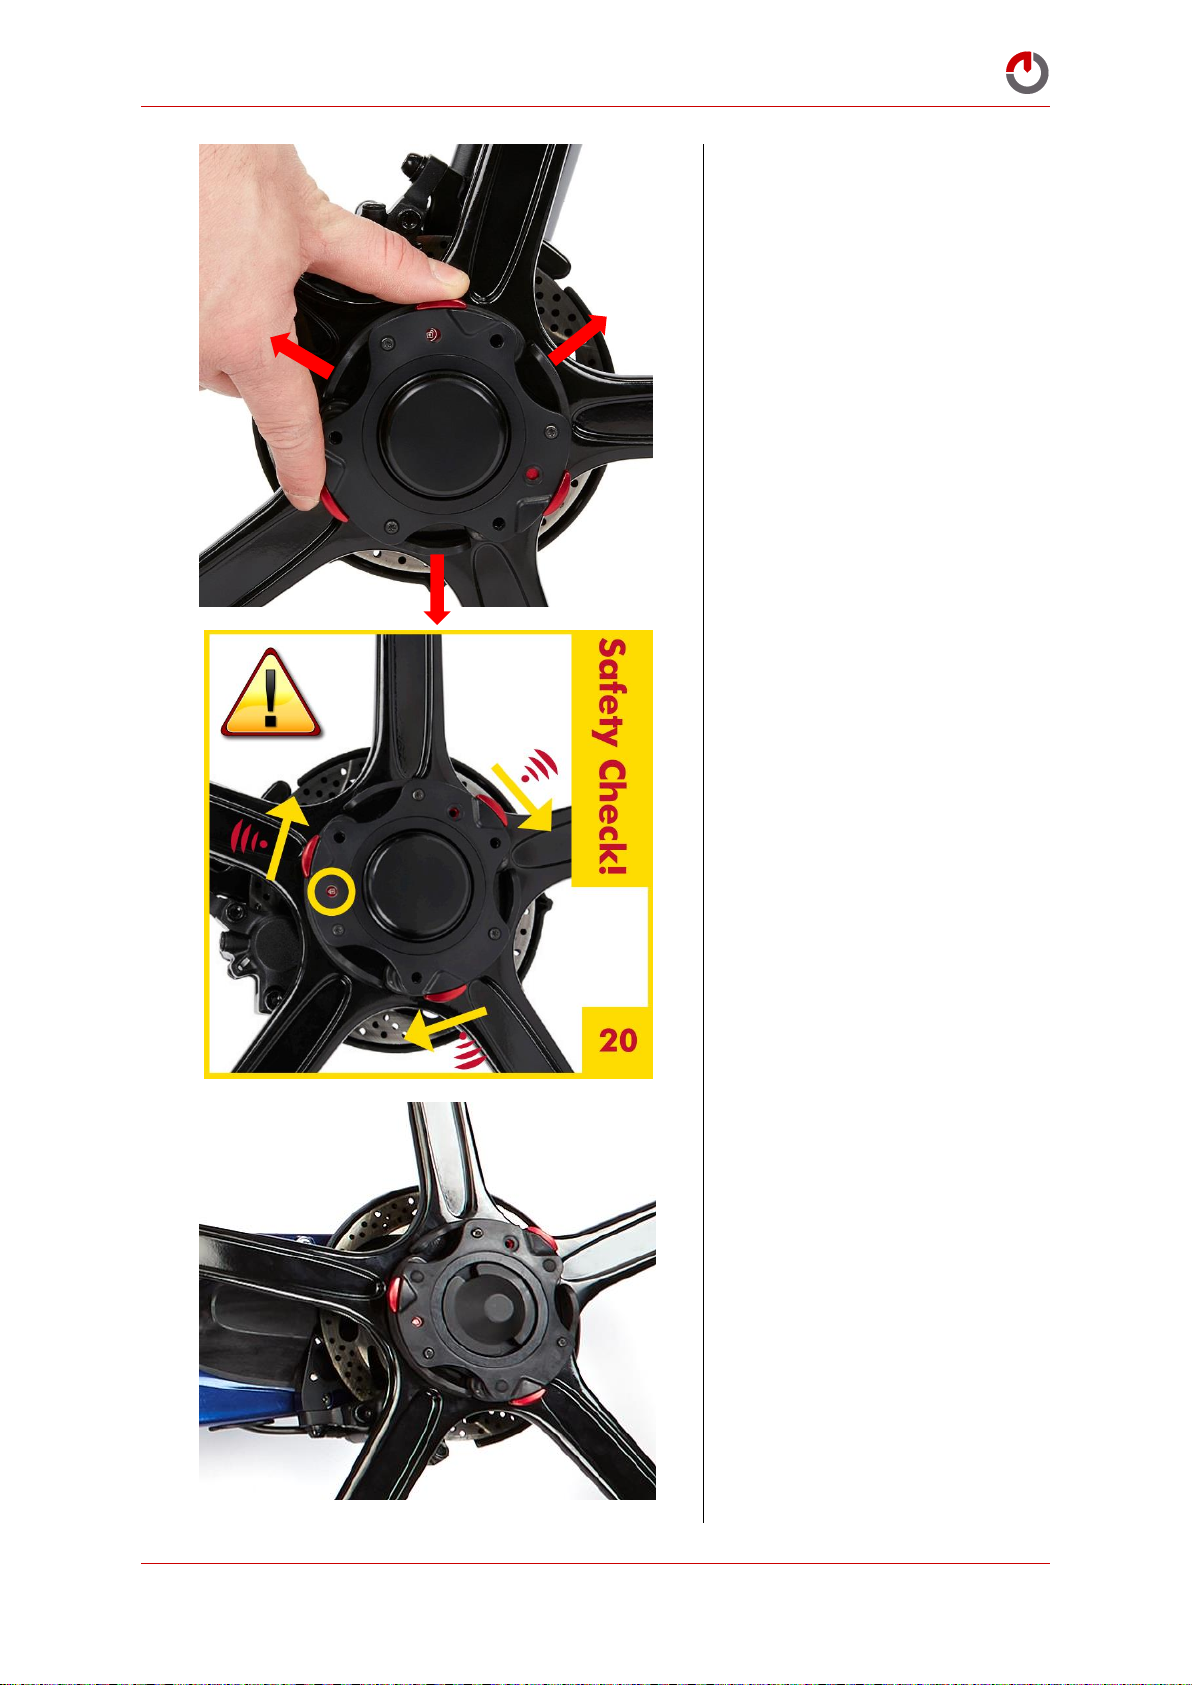
Cross check reference: with
the Pitstoplock™ in the
unlocked position, there
should now be an equal
resistance across all three
cam levers requiring 3-5kg
to open an individual cam
lever.
Ensure all cam levers are
securely closed and the
Pitstoplock™ is in the
locked position.
Repeat the process for the
other wheel on the other
hub.
NB: If you do swap wheels
between hubs while riding
ensure to check the cam
lever free play again as
there can be slight
differences between front
and rear hubs.
3-5kg
© Karbon Kinetics Limited. All Rights Reserved. 55
Page 57

Gocycle® Owner’s Manual for GS, September 2017
6.9 Fleet management and Tour Operators
If you operate a fleet of Gocycles that are lent to people who are not accustomed to the Gocycle or are
running a tour operating service with the Gocycle as the chosen vehicle we would highly recommend
fitting the tamper proof security bolts. This prevents tampering and reduces the chances of novice
users from making a mistake when assembling the product that could potentially make it unsafe to
ride.
If there is a requirement to fold the Gocycle and remove the wheels during use then the importance of
the pre ride checklist must be taught to the operator of the Gocycle. Furthermore, all Gocycles must
be PDI’d with cam lever adjustments completed before each and every handover to the tourist/ fleet
user.
© Karbon Kinetics Limited. All Rights Reserved. 56
Page 58
Gocycle® Owner’s Manual for GS, September 2017
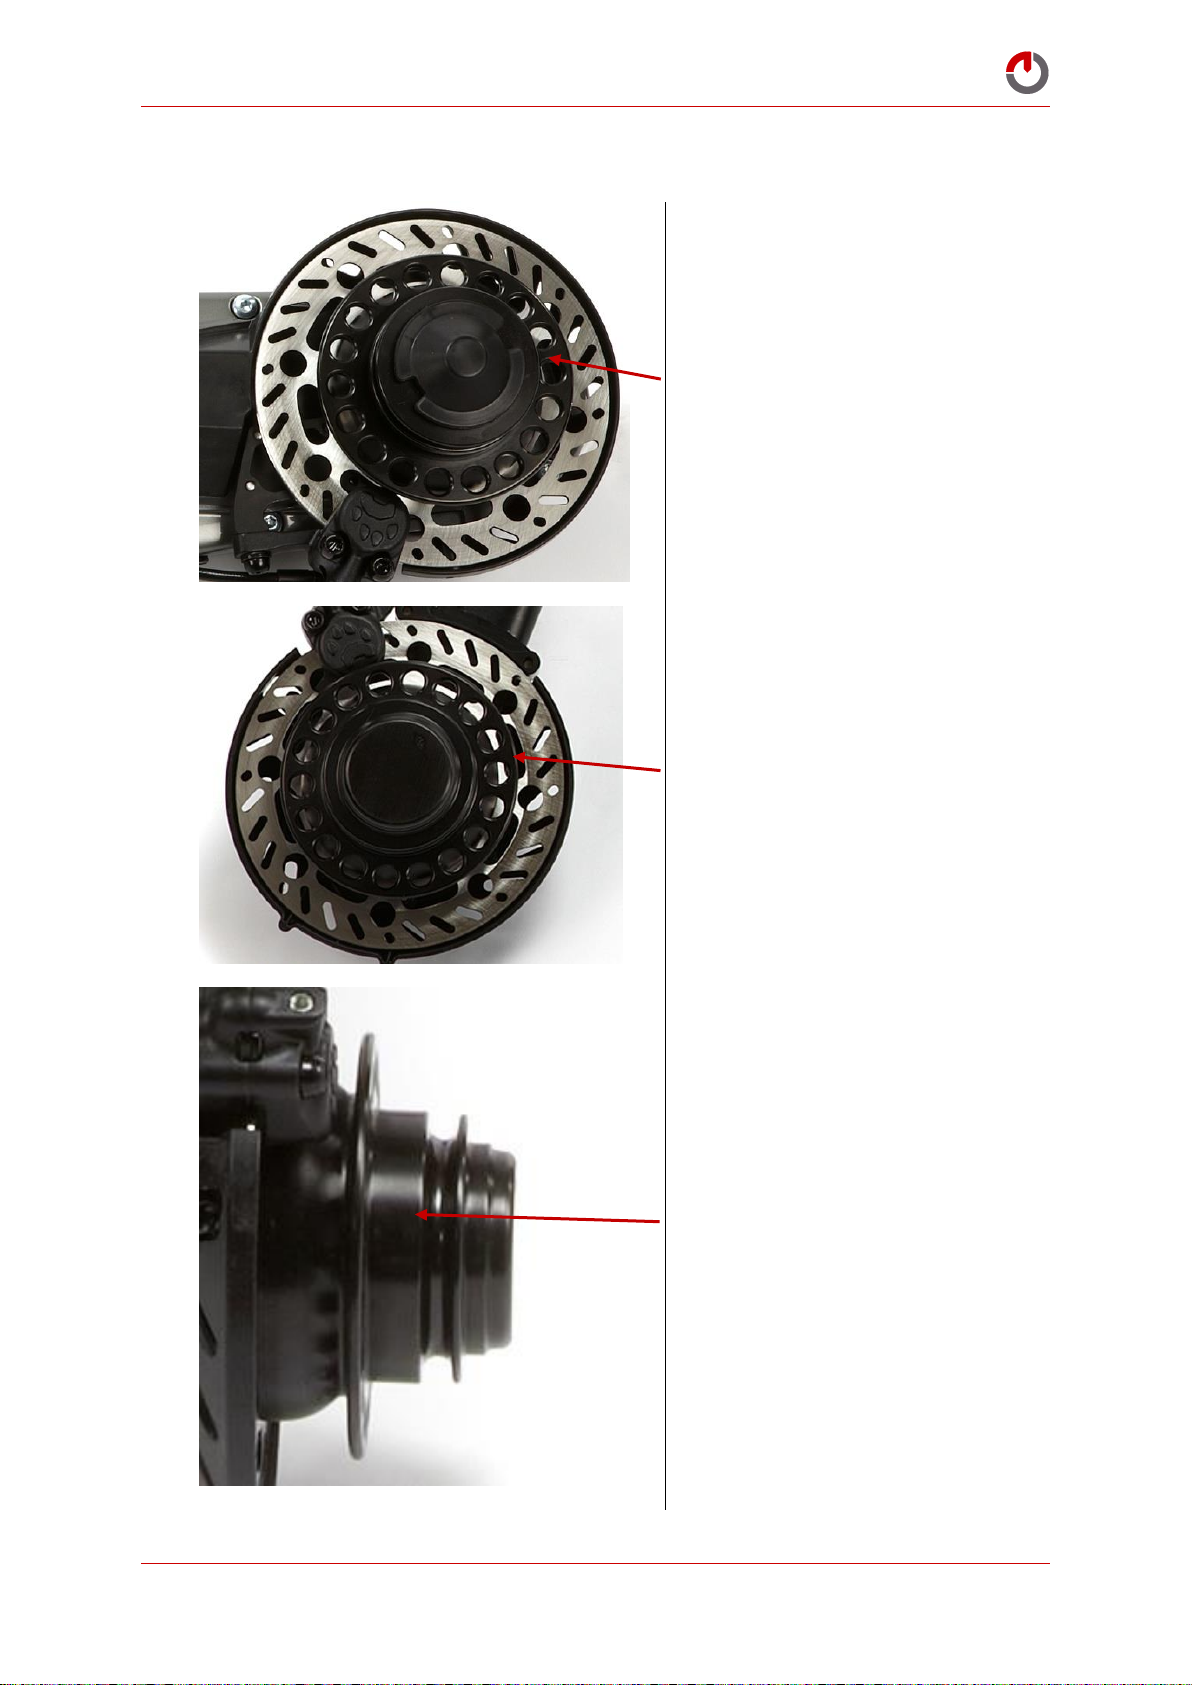
Periodically remove the rear
wheel to check for hub wear
Periodically remove the front
wheel to check for hub wear
Pay particular attention to the
area indicated
6.10 Checking for and Minimising Wear on the Front and Rear Hubs
© Karbon Kinetics Limited. All Rights Reserved. 57
Page 59

Gocycle® Owner’s Manual for GS, September 2017
To minimise the potential for hub wear:
Thoroughly clean and dry your Gocycle after every ride. See 6.4 Cleaning and preventing corrosion
for more information.
Correctly adjust your PitstopWheel cam levers. Check from time to time that their torque is
within the guidelines stated in this manual and that all three on each wheel open and close
with equal pressure.
From time to time, consider moving the rear PitstopWheel to the front and vice-versa.
Typically, in normal usage, the rear of a Gocycle will carry more load than the front, thus
subjecting the rear hub, wheel and tyre to greater stresses. Periodically swapping the front and
rear PitstopWheels will distribute wear more evenly. Note: When swapping the PitstopWheel,
ensure that the tyre pressures remain within the guidelines stated in this manual. See 6.11
Tyres for more information.
6.11 Tyres
Gocycle comes fitted as standard with specialised, high-performance tyres designed to give the best
combination of low rolling resistance, light weight and puncture resistance. To maximise
performance, we do not recommend that you use lower quality tyres than those supplied with
Gocycle.
WARNING! The traction or grip level of bicycle tyres such as the Gocycle Performance Tyre can
reduce dramatically in icy or wet road surface conditions. Take special care when riding in icy or wet
road surface conditions.
We recommend that you operate Gocycle with tyre pressures of 25–30 psi on the front and 40–50 psi
on the rear. This will give the best balance of low rolling resistance and comfort. Running a relatively
softer front acts as a “cushioning effect”, reducing shock loads to the motor fork components—
specifically the clutch and gearbox.
We do not recommend that you inflate the tyres to more than 60 psi. Inflation pressures greater than
60 psi will reduce comfort and the service life of the product.
WARNING! Inflating the front tyre to more than 30 psi places high shock loads into the motor drive
system (motor, gearbox and clutch) whilst using the power on acceleration or over rough roads. Just
like in a car as you would not accelerate rapidly on very rough roads, do not use motor power when
going over potholes or speed bumps or similar obstructions in the road.
Operating the Gocycle with a front tyre pressure greater than 30psi and/or using the motor assistance
on rough terrain, against these recommendations, will invalidate the warranty.
Whilst the Gocycle’s front and rear PitstopWheel is easily interchangeable, ensure that you place the
lower-pressure tyre on the front during assembly.
When changing a tyre, always use plastic tyre levers. Never use a metal tyre lever as you will damage
the wheel rim.
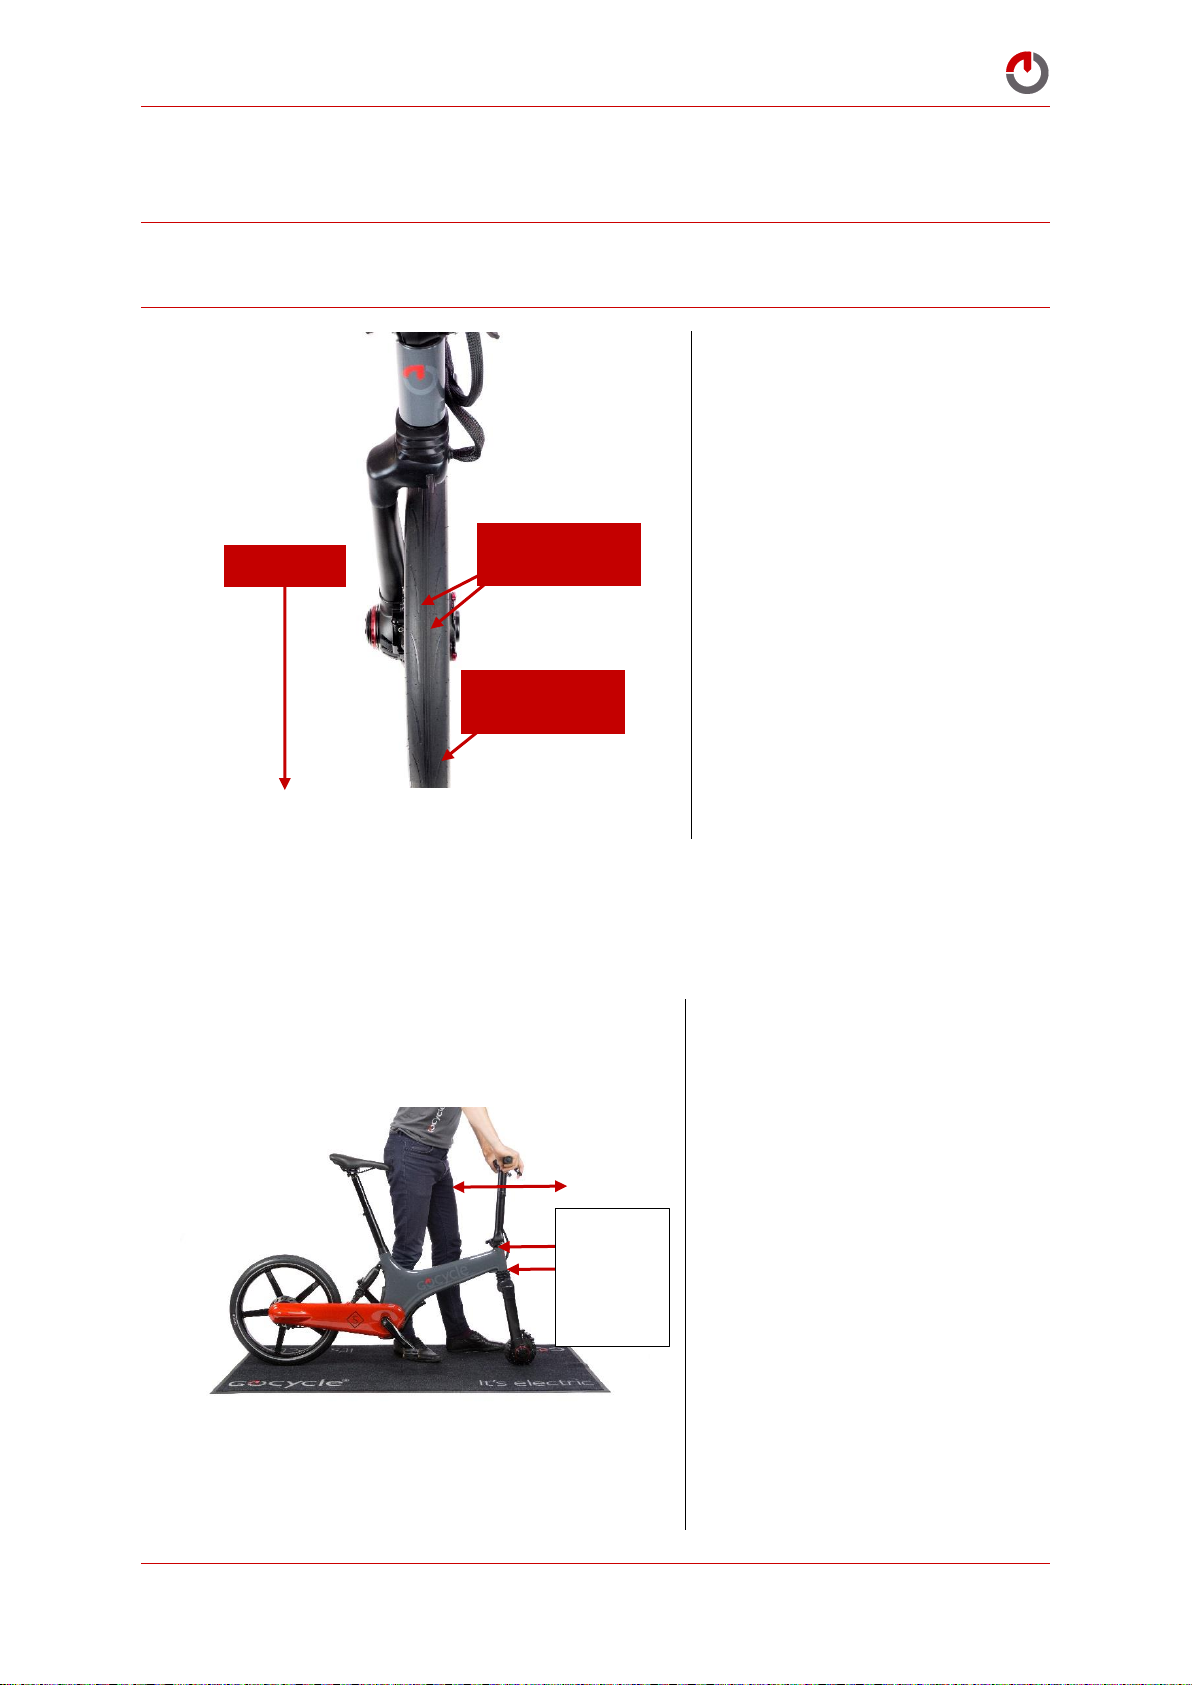
Note the correct direction of the tread of the Gocycle tyre in relation to the wheels (see figure below).
In the event that you wish to use a lower performance tyre with increased puncture resistance, please
consult the Gocycle webstore for recommended alternative. The size of the Gocycle rim is generally
© Karbon Kinetics Limited. All Rights Reserved. 58
Page 60
Gocycle® Owner’s Manual for GS, September 2017
Fitting the tyres and tyre
tread orientation
Check for loose headset. There
should be no play in the steerer
assembly.
Remove front wheel and
carefully place Gocycle onto a
non-slip surface. Grip the
handlebars and rock forwards
and backwards to check for any
fore-aft movement between the
handlebar stem fork assembly
and the main frame as shown.
The connection of the handlebar
stem fork assembly and the
front frame should feel solid
and only be free to rotate with
respect to the main frame.
Note orientation
of tyre tread
Forwards
Centreline
grooves
Headset
here
could be
loose.
compatible with BMX-sized tyre (406x40-47) from 1.75" to 2", but we strongly urge you to choose tires
as recommended from the Gocycle webstore.
WARNING! Bicycle tyres do not last forever. When the tread depth is critically low and the centreline
grooves in the tyre have worn down in any part of the tyre, it may be dangerous to continue to ride
on the tyre, and in this event, we recommend that you replace the tyre.
6.12 Adjusting the Headset
From time to time it may be necessary to tighten the headset if it becomes loose. This process is
explained by the following steps:
© Karbon Kinetics Limited. All Rights Reserved. 59
Page 61
Gocycle® Owner’s Manual for GS, September 2017
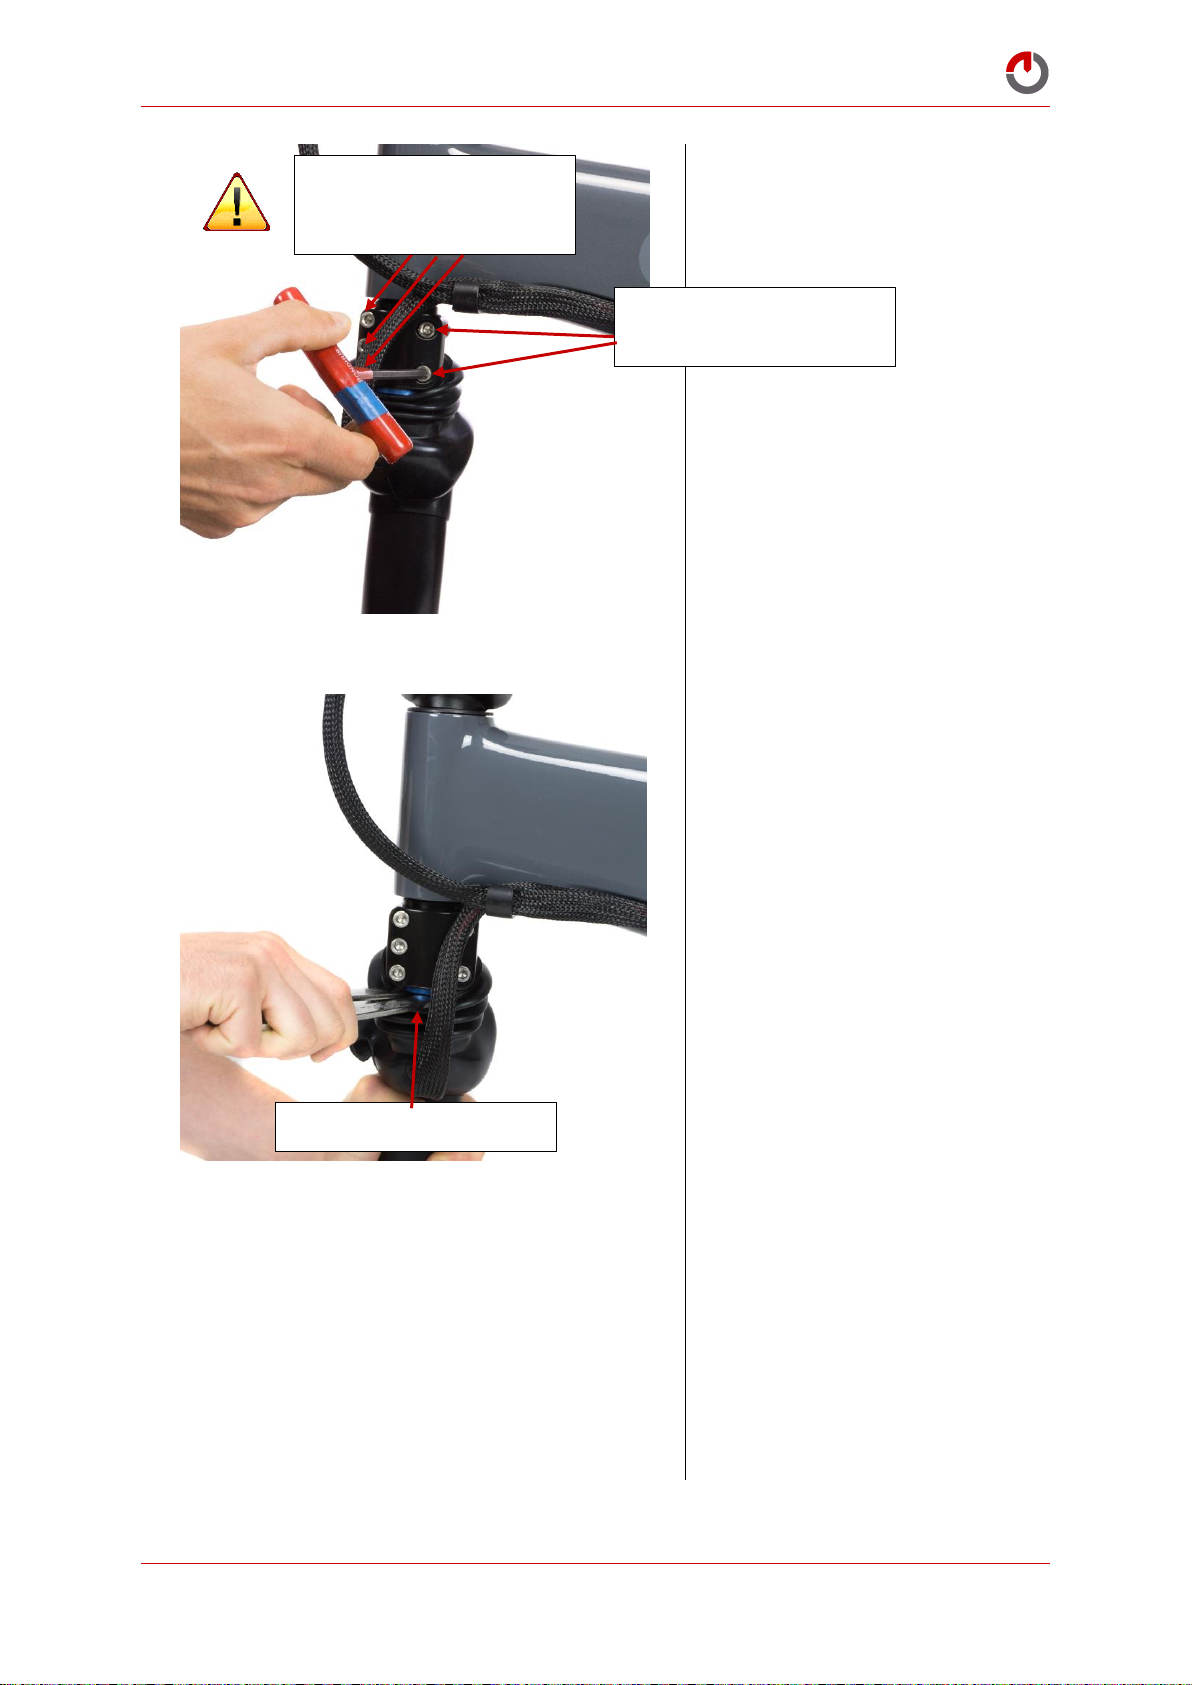
Remove the rubber dust boot as
shown and loosen the two fork
crown bolts approximately 1-2
turns. Ensure that the front fork
and handlebars are able to
rotate independently.
Using right angle circlip pliers
or a pin spanner, tighten the
headset pre load tophat to 8-12
Nm.
NOTE: NEVER TIGHTEN OR
ADJUST THE HEADSET PRE
LOAD TOPHAT UNLESS THE
TWO FORK CROWN BOLTS
ARE LOOSE.
Headset pre load tophat.
WARNING: NEVER
ADJUST THESE
FRONT 3 BOLTS
ADJUST THESE 2
FORK CROWN BOLTS
© Karbon Kinetics Limited. All Rights Reserved. 60
Page 62
Gocycle® Owner’s Manual for GS, September 2017
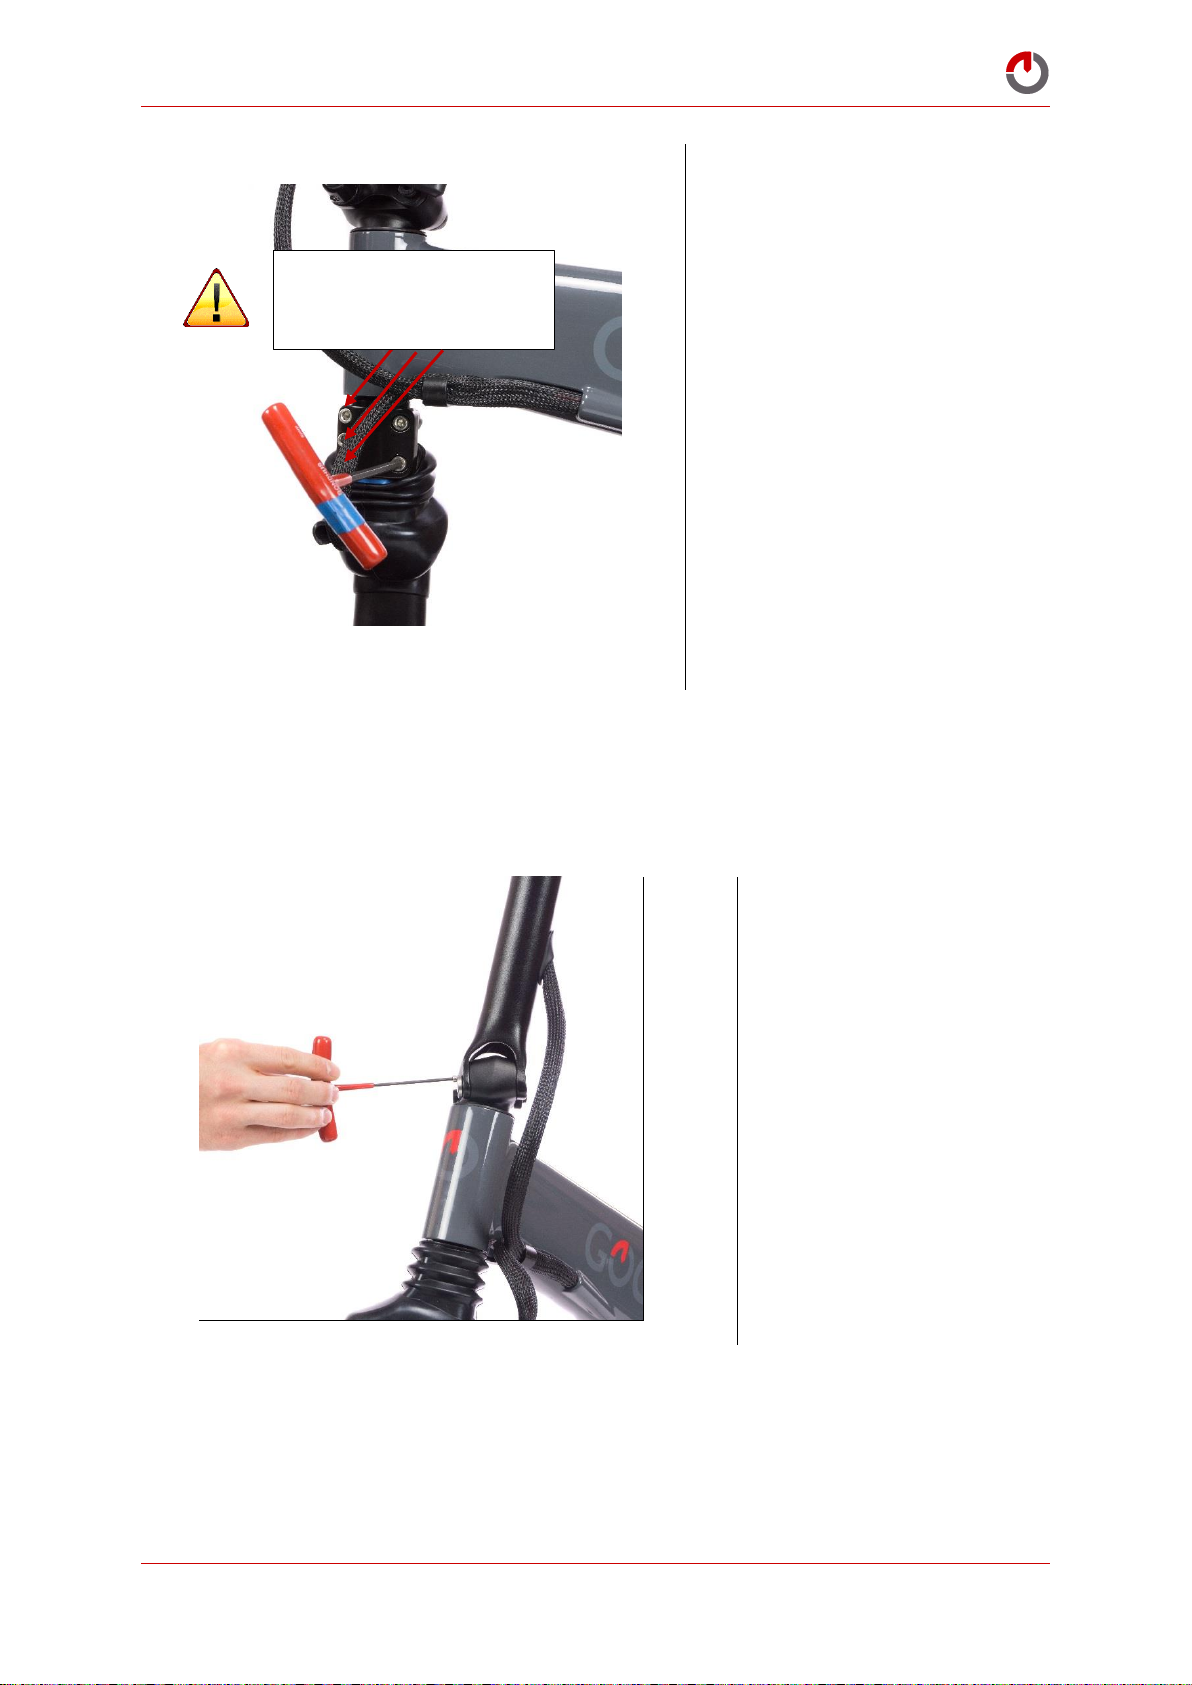
Ensuring that the front fork and
handlebars are aligned, tighten
the two fork crown bolts to 1012 Nm. NOTE: You will need
to recheck both bolts twice to
ensure that torque is even
between each bolt. Replace the
rubber dust boot.
Undo the clock nut
securing bolt using a
2.5mm Allen key
WARNING: NEVER
ADJUST THESE
FRONT 3 BOLTS
6.13 Adjusting the Stem Quick Release Lever
It is unlikely that you will need to adjust Stem Quick Release Lever, however in the event that you
need to replace the lever you will need to adjust the clock nut on the opposite side of the stem
adjuster to ensure the quick release lever closes with the correct force.
© Karbon Kinetics Limited. All Rights Reserved. 61
Page 63
Gocycle® Owner’s Manual for GS, September 2017
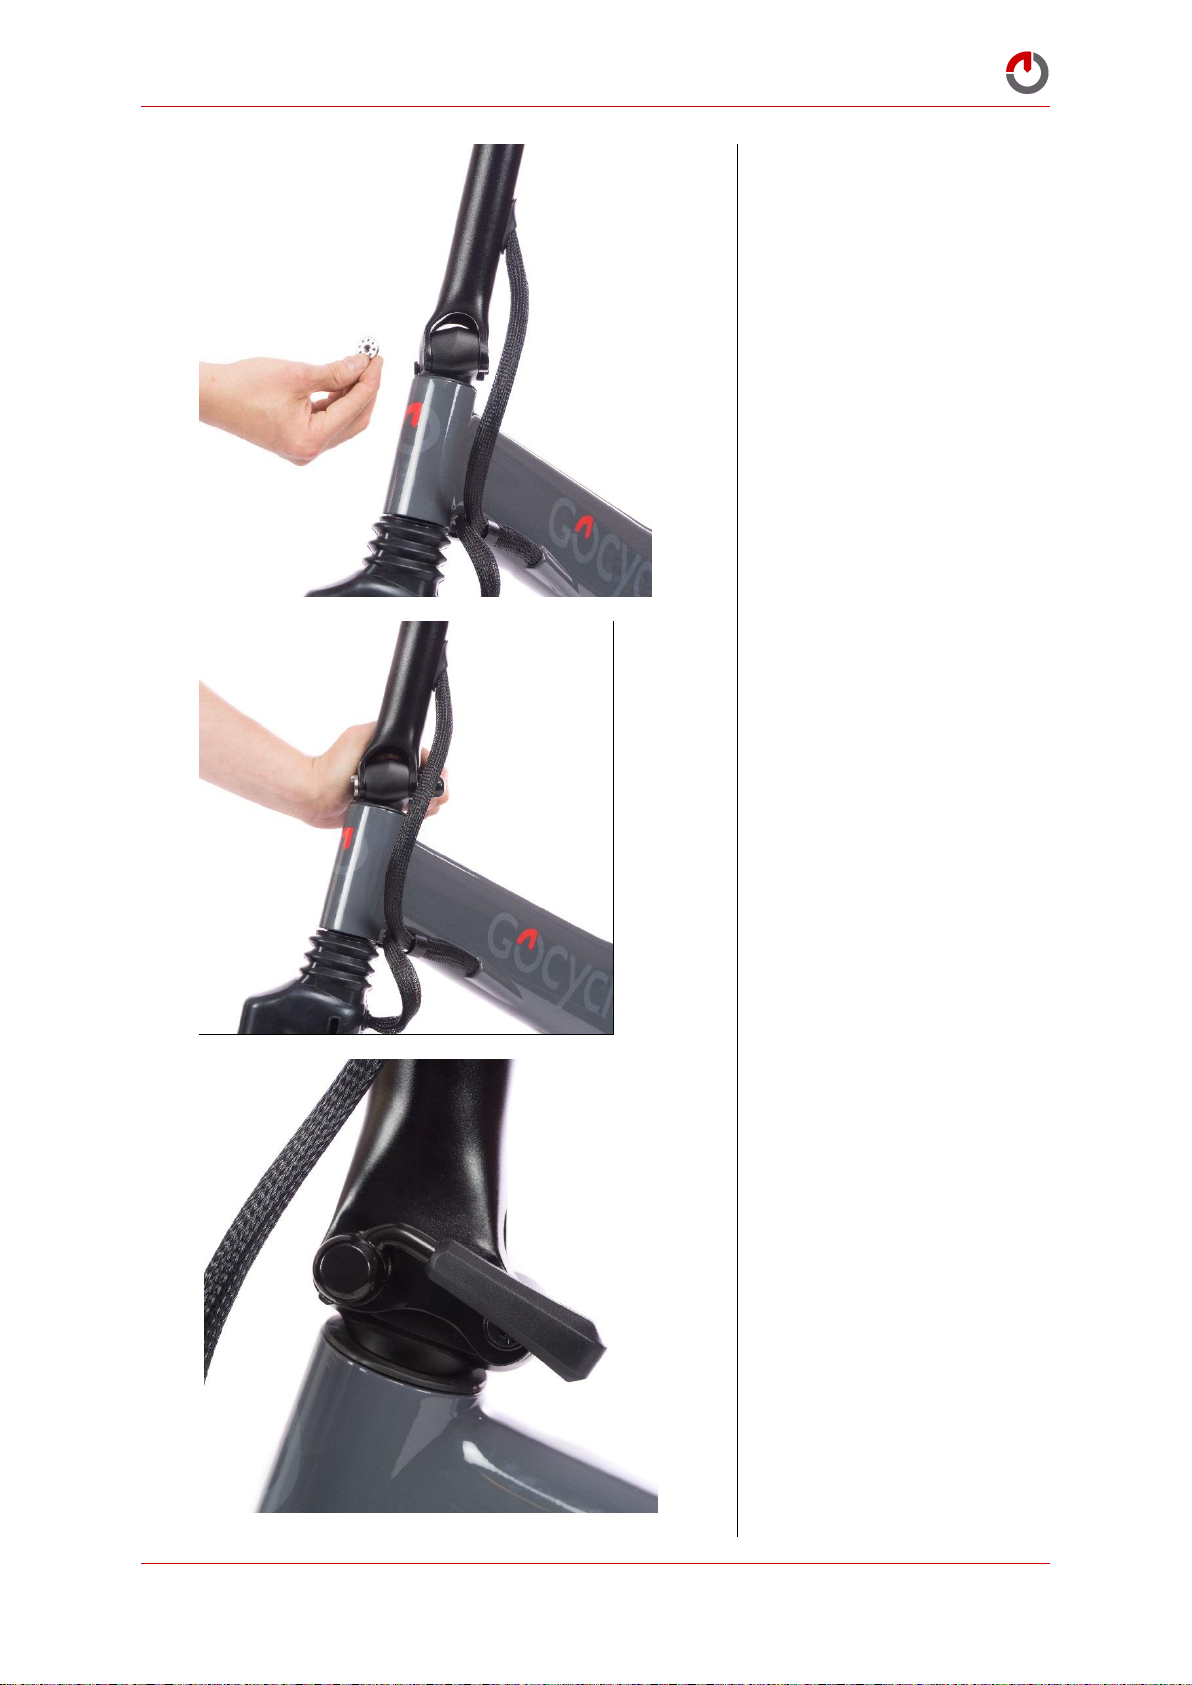
Remove the clock-nut as
shown
Install the quick release
(QR) Lever and hold in
the closed position,
ensuring it is in the
correct zone as
demonstrated in the
below photo.
© Karbon Kinetics Limited. All Rights Reserved. 62
Page 64
Gocycle® Owner’s Manual for GS, September 2017
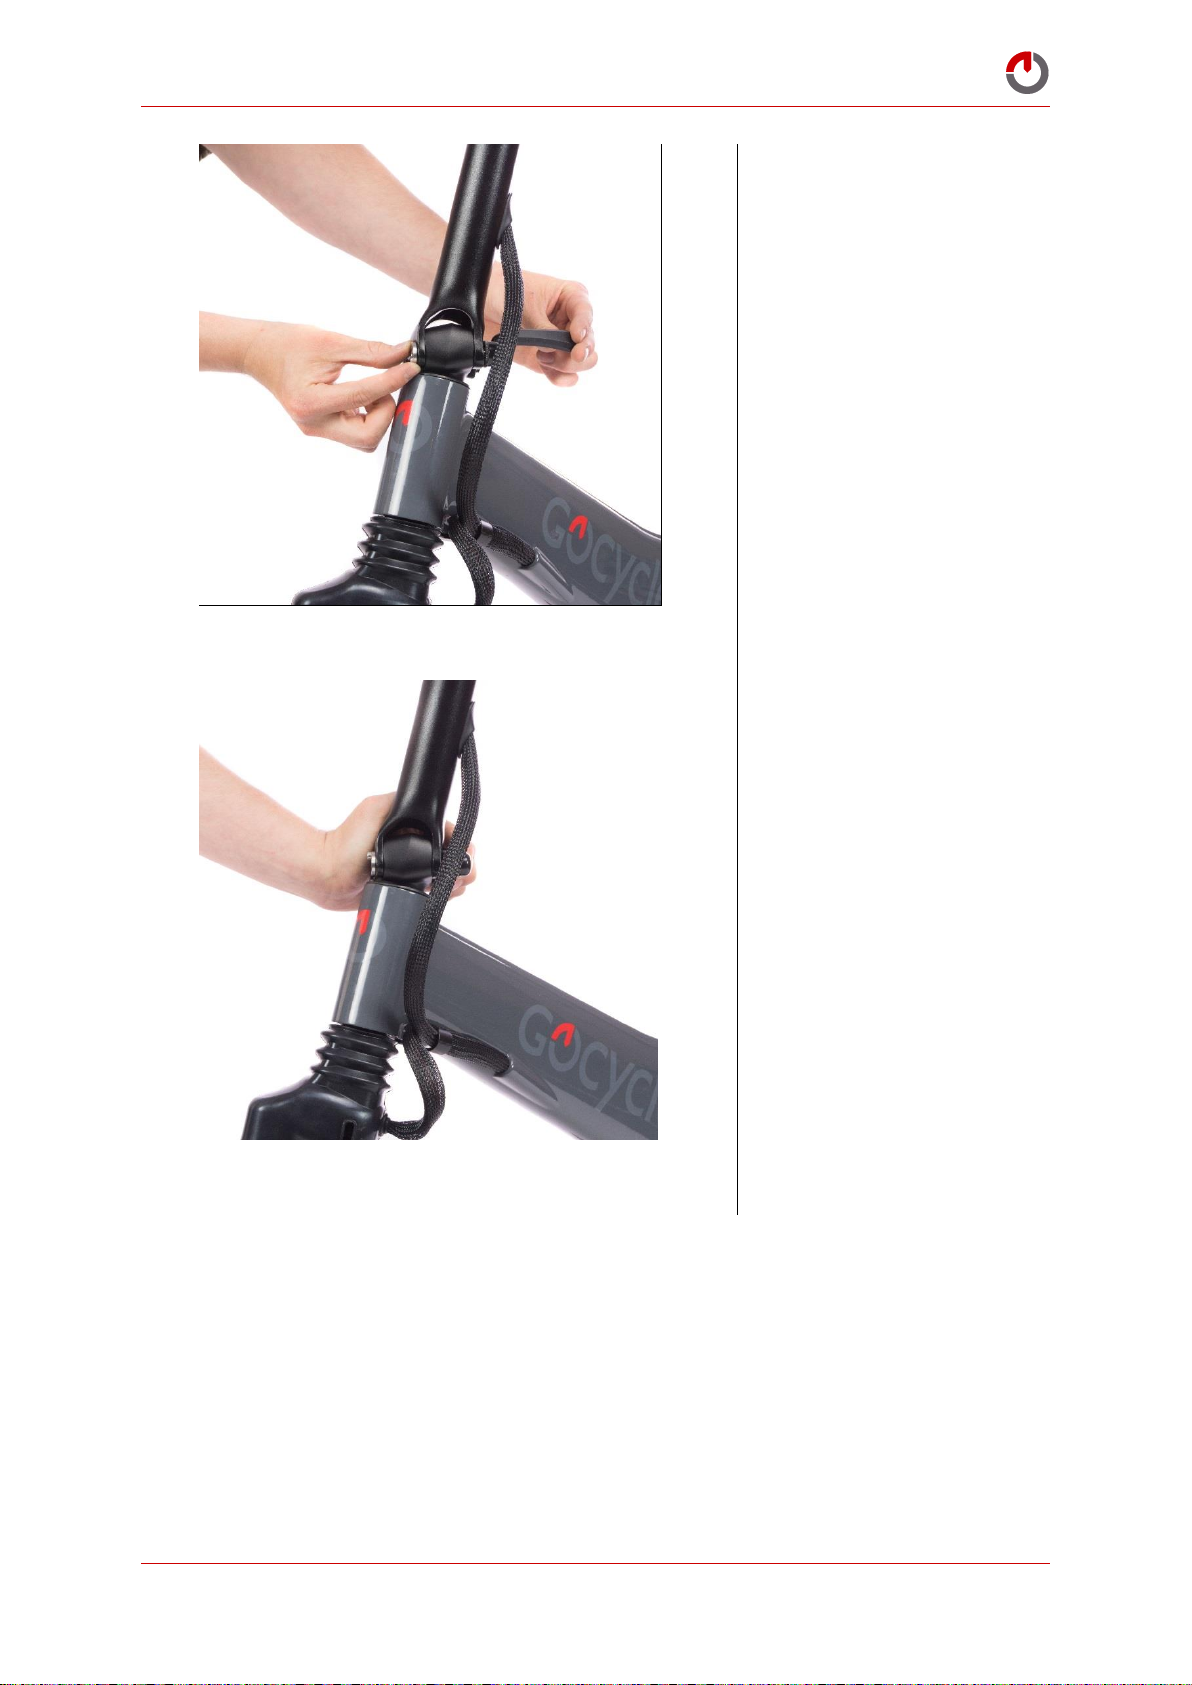
Open the QR Lever to
90 degrees and slowly
rotate the clock nut until
it stops against the
handlebar stem lower.
Rotate so that one of the
holes in the clock nut
aligns with the hole in
the stem lower to allow
the securing bolt to be
refitted.
The QR should have
roughly 120 degrees of
free play before it
beings to engage. The
closing resistance
should act over the
remaining 60 degrees of
movement till it is
firmly shut in the
correct location.
If it is too loose, rotate
the clock-nut clockwise
till the next hole aligns
with the hole in the
stem lower and recheck
Conversely if it is too
tight rotate the clock-nut
anticlockwise to the
next hole and recheck.
© Karbon Kinetics Limited. All Rights Reserved. 63
Page 65
Gocycle® Owner’s Manual for GS, September 2017
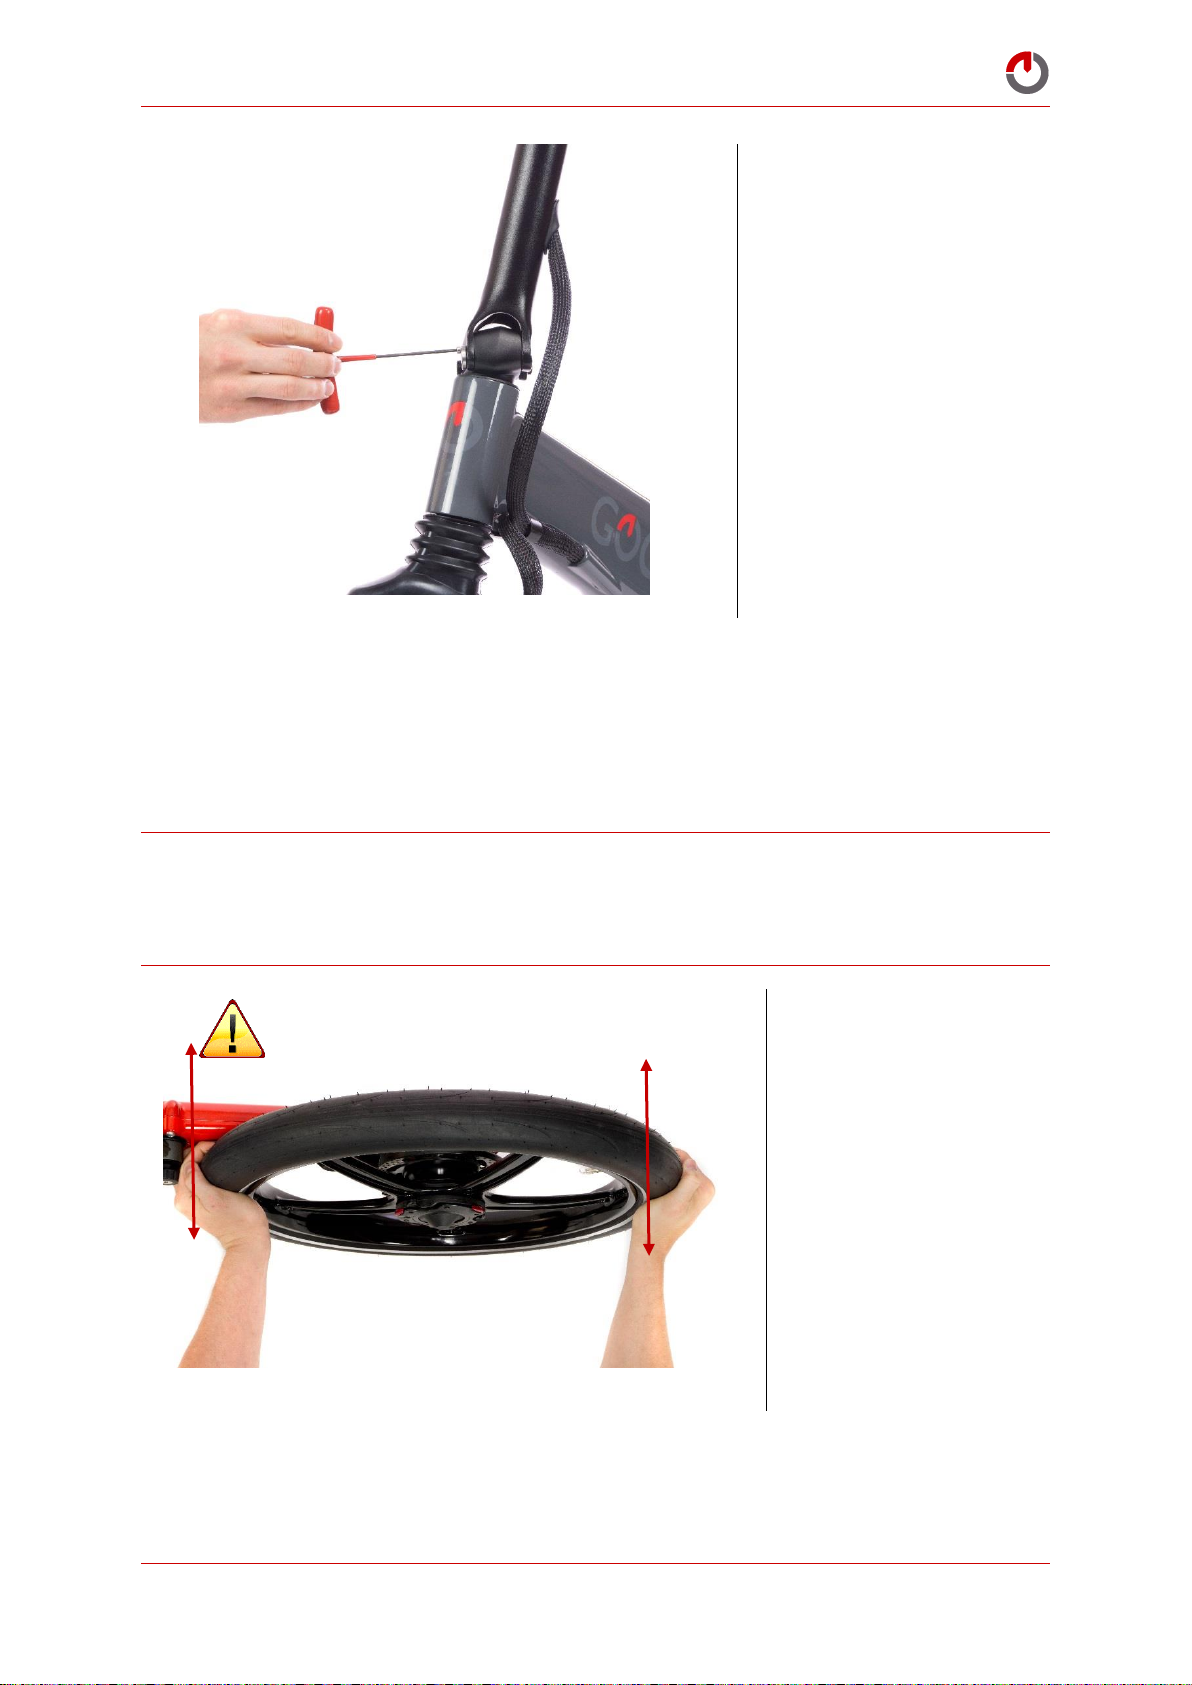
Once adjusted so that
the closing resistance
acts upon the final 60
degrees of movement in
the QR reinstall the
securing bolt using a
2.5mm Allen key.
To check if adjustment is
required, using gentle
pressure, move the
wheel at the rim side to
side.
6.14 Adjusting the Bearings on the Rear Hub
It is unlikely that you will need to adjust the bearings on the rear hub. However, in the event that the
rear wheel develops play (more than 1mm at the rim) or it feels heavy to pedal (i.e., the hub is too
tight), you may need to adjust the bearing cone.
WARNING! Check the hub gear bearing adjustment every 500 miles (800 km) or 3 months. Regular
checks will ensure best possible performance for your Gocycle.
Failure to inspect the hub gear bearing adjustment may have serious consequences and could result
in serious bodily injury or even death.
Some flex in the wheel is normal, but if you feel that the wheel is loose, you will need to adjust the
bearing cone as shown below:
© Karbon Kinetics Limited. All Rights Reserved. 64
Page 66
Gocycle® Owner’s Manual for GS, September 2017
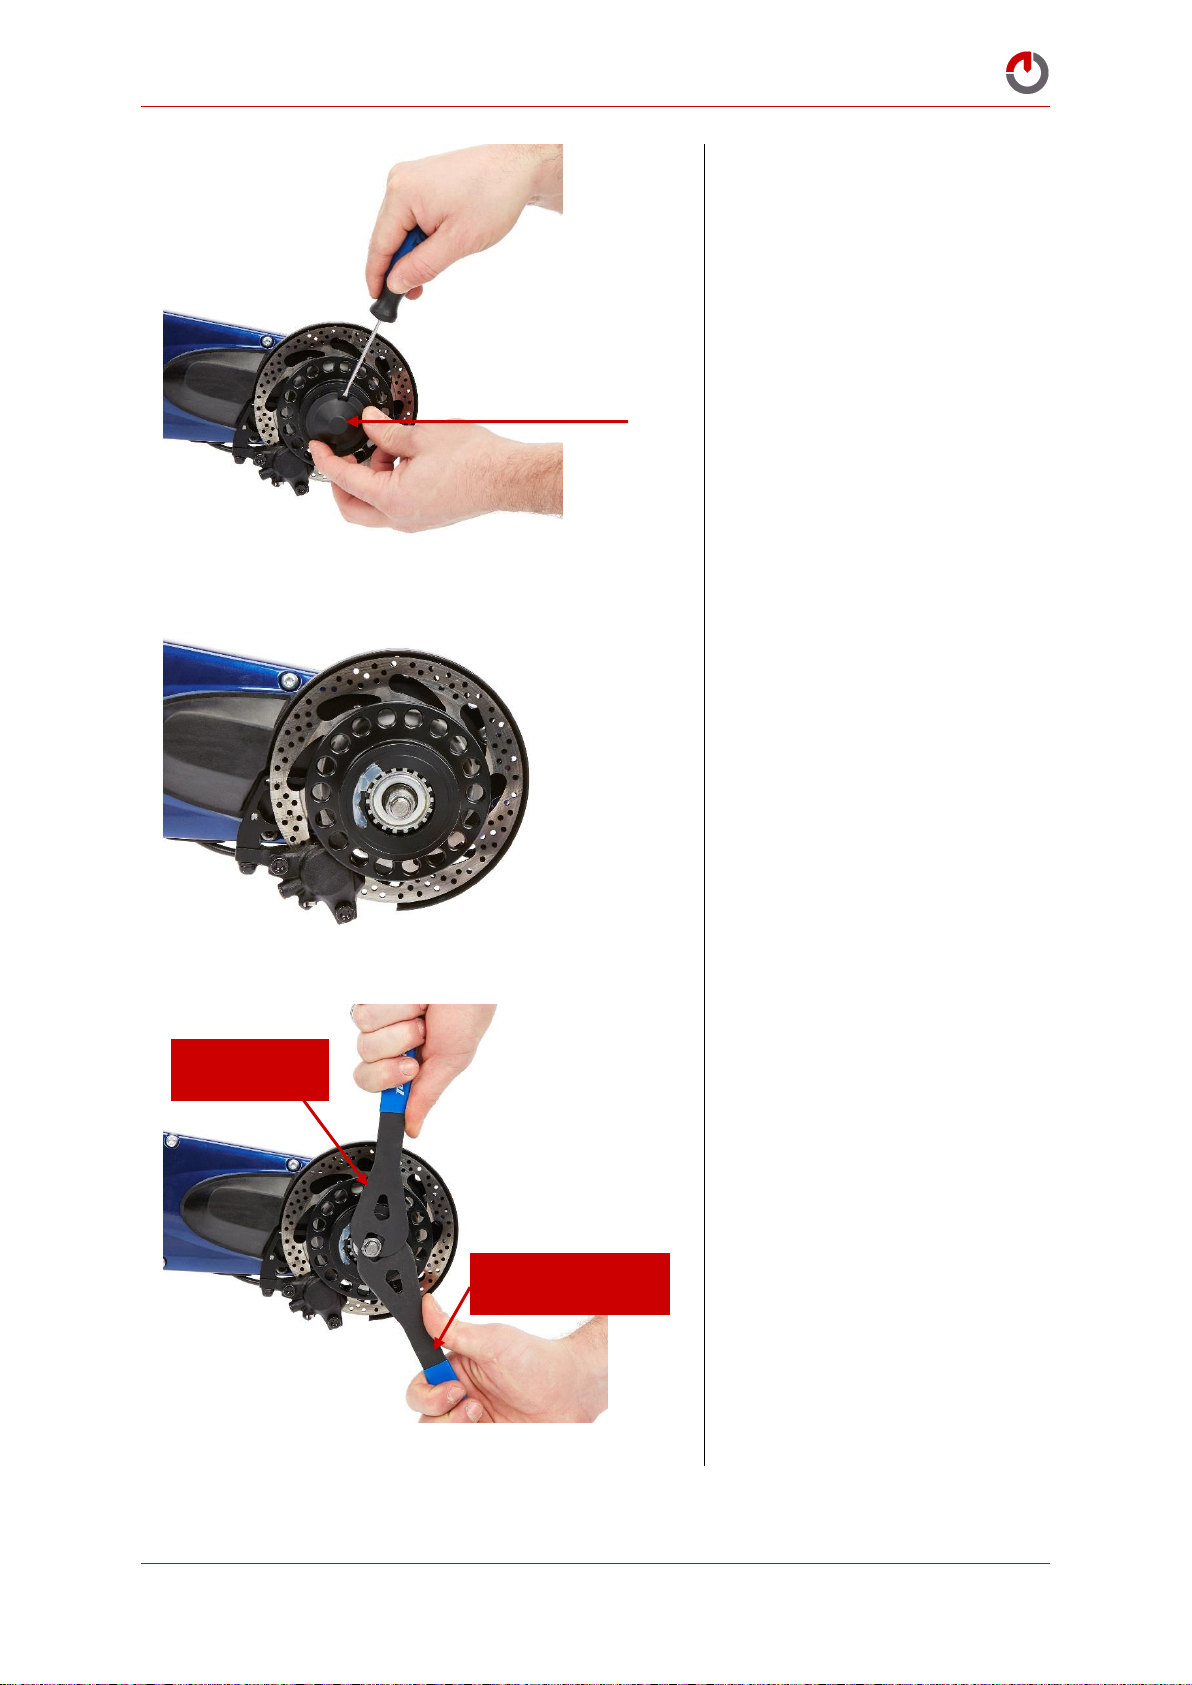
Remove the hub cap
Using (2) 14mm wrenches,
adjust the rear hub gear bearing
cone.
First, loosen the
lock nut.
Second, tighten the
inner adjuster nut.
© Karbon Kinetics Limited. All Rights Reserved. 65
Page 67
Gocycle® Owner’s Manual for GS, September 2017
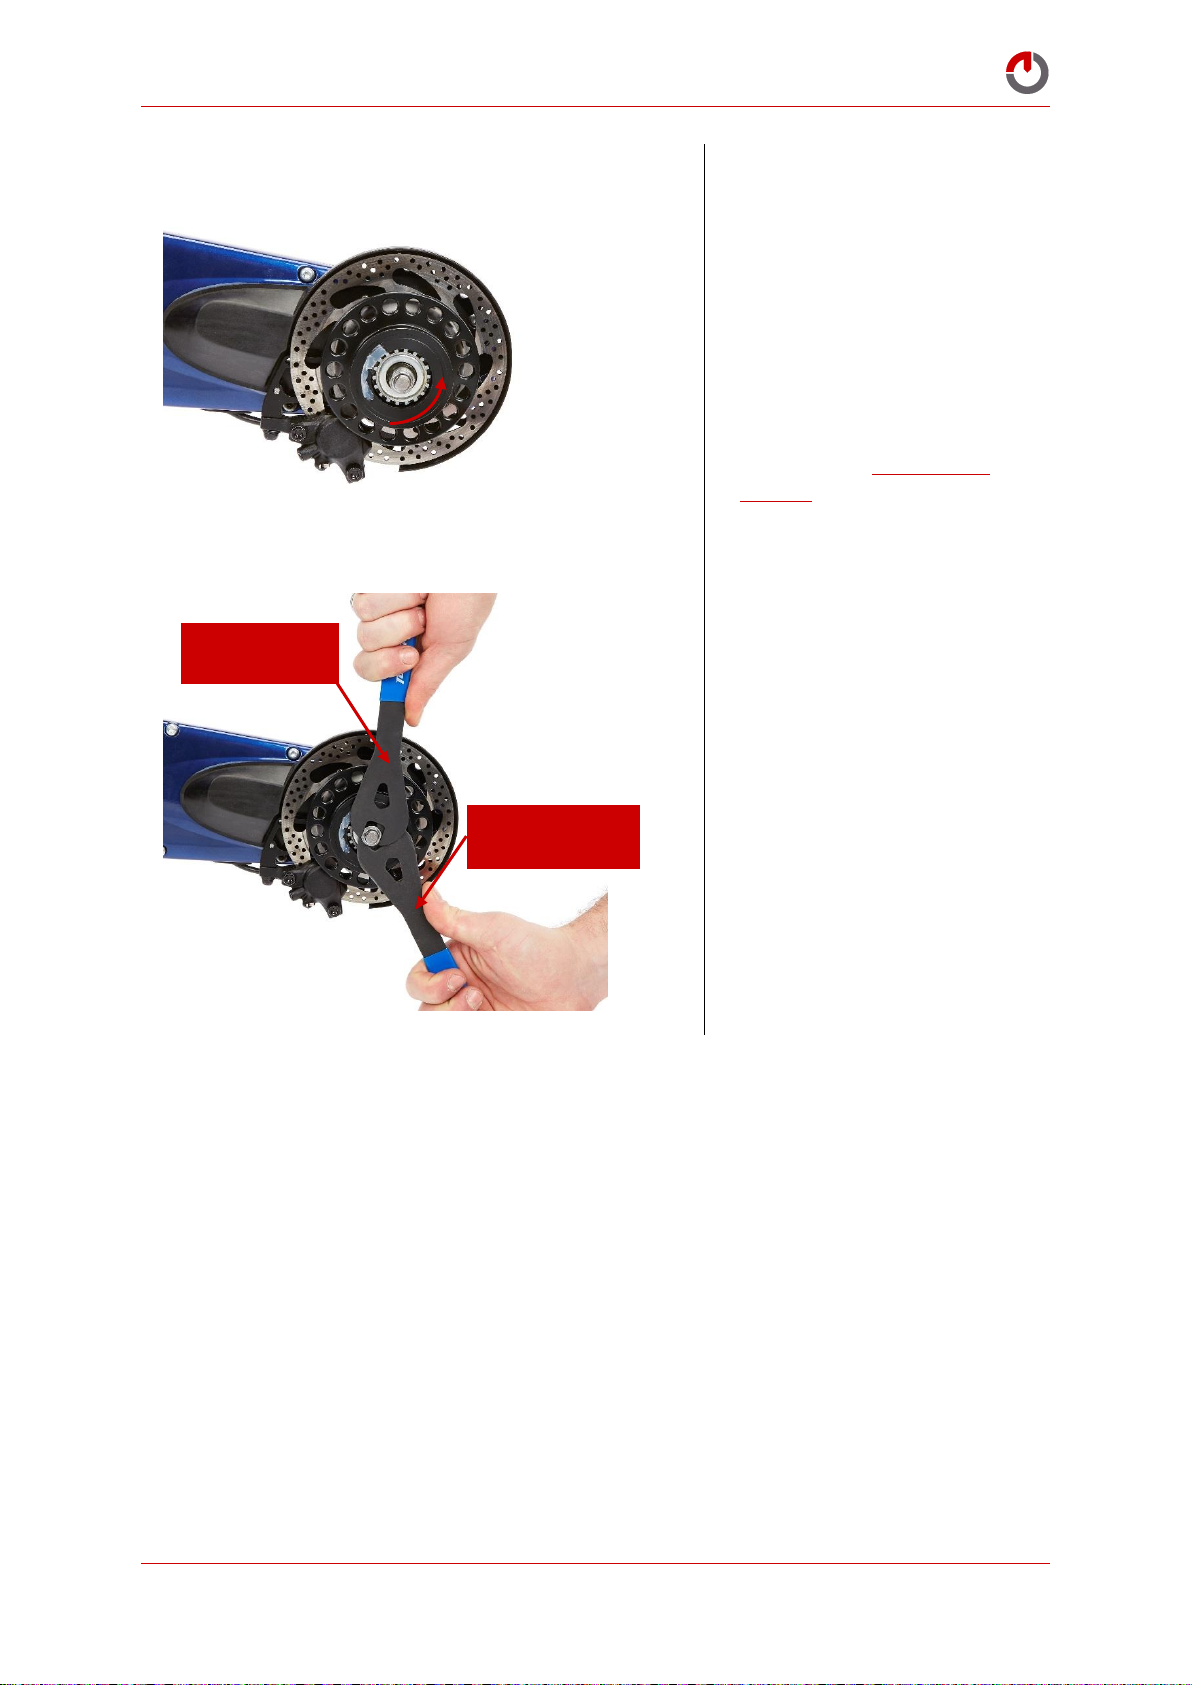
Between adjustments, check
that the rear hub rotates in the
freewheel direction. The bearing
cup nuts should be tightened
until the wheel does not have
more than 1mm of “free” play
at the rim, and the wheel is able
to rotate freely. This is a matter
of compromise and feel. If in
doubt, consult Gocycle Tech
Support for advice.
Retighten the outer lock nut.
Note: after tightening the outer
lock nut, the hub may need readjusting due to the nature of
the tightening process. You may
need to repeat this process until
you have the desired freeness of
rotation and minimal lateral
play at the rim.
Retighten the
outer lock nut
Hold the inner nut
stationary
© Karbon Kinetics Limited. All Rights Reserved. 66
Page 68
Gocycle® Owner’s Manual for GS, September 2017
7 TROUBLESHOOTING
7.1 Diagnosis Modes
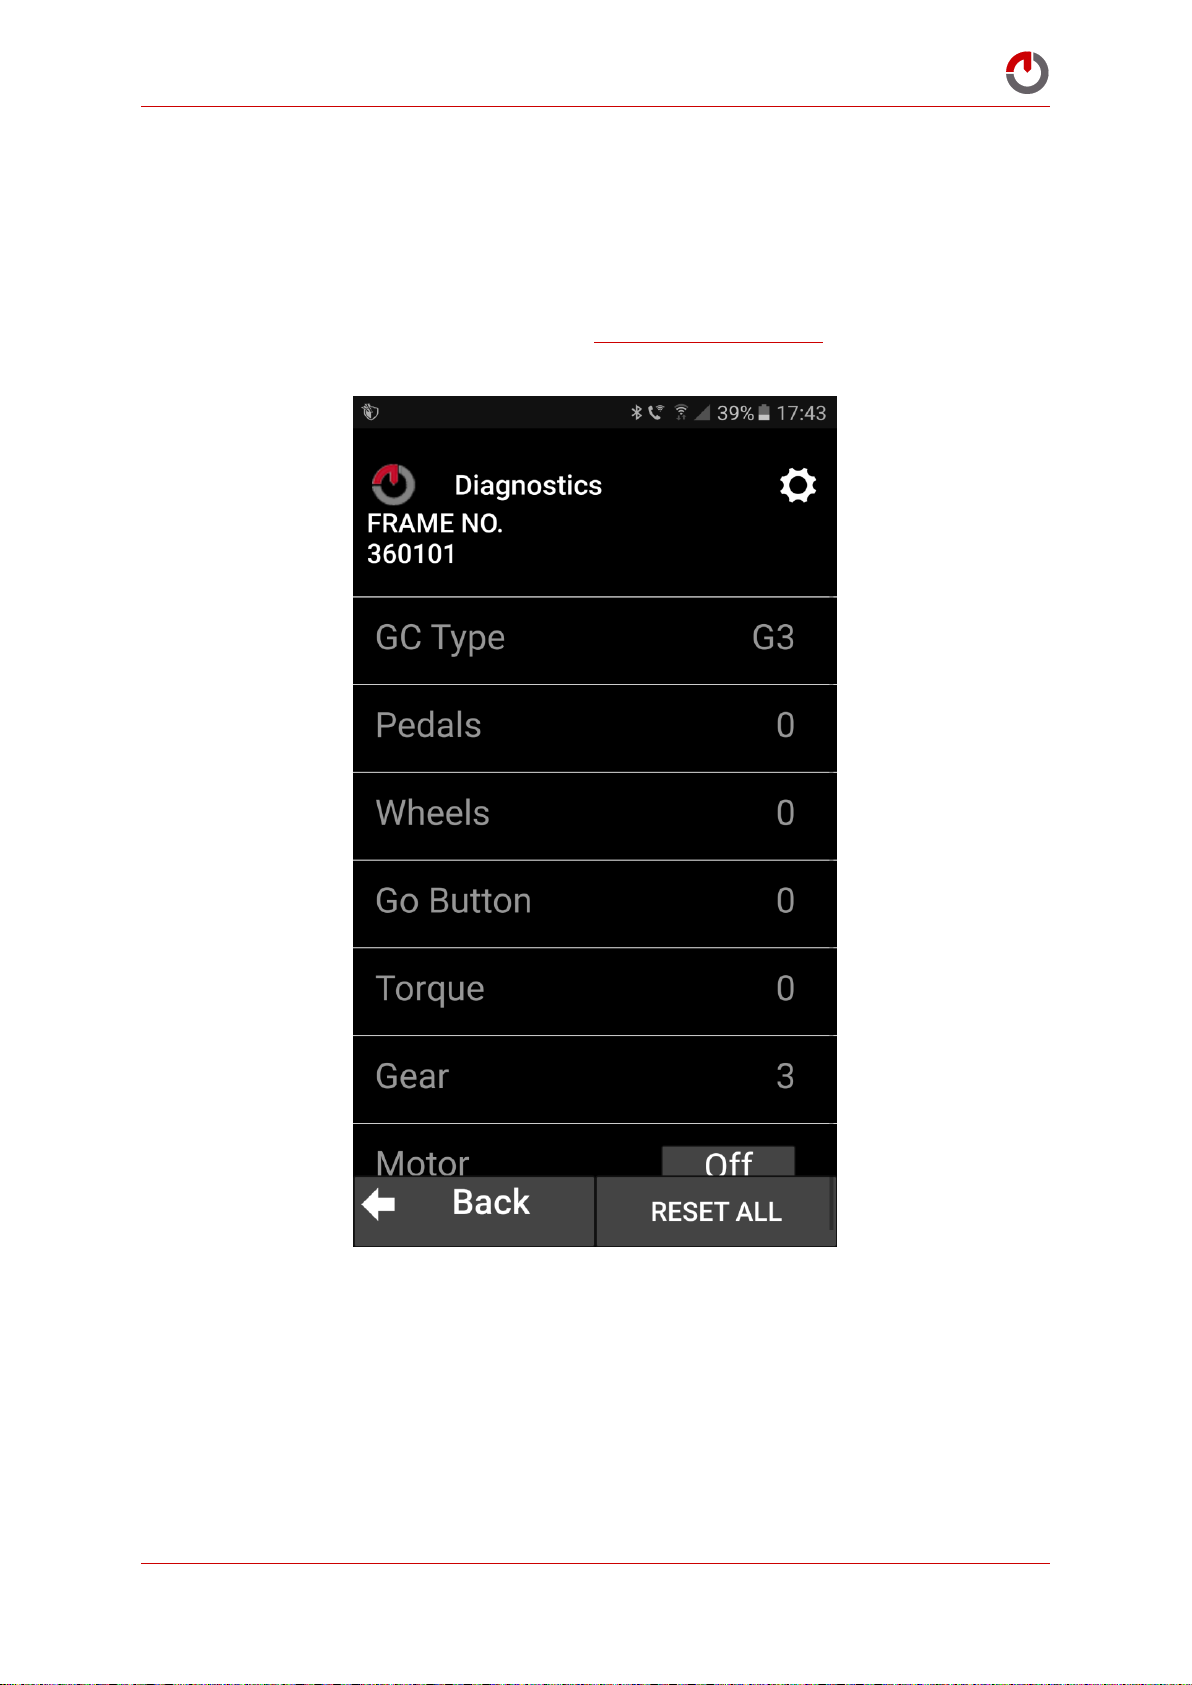
The GocycleConnect® App has a number of diagnostics tools to assist you with troubleshooting.
These tools can be access from the Settings menu. In the event that you require technical assistance to
diagnose an issue, contact your Gocycle reseller or [email protected] in order to assist you in
using the tools available as shown below.
© Karbon Kinetics Limited. All Rights Reserved. 67
Page 69

Gocycle® Owner’s Manual for GS, September 2017
8 CONTACT INFORMATION
Gocycle is a product of Karbon Kinetics Limited, a UK-registered company.
Karbon Kinetics Limited
Unit 30, Barwell Business Park
Chessington, Surrey KT9 2NY
United Kingdom
Registered number 4357956
www.gocycle.com
© Karbon Kinetics Limited. All Rights Reserved. 68
 Loading...