

OWNER’S MANUAL
INSTRUKCJA OBSŁUGI
www.goclever.com

IMPORTANT
Satellite signals are required for this product to funcon in Navigaon Mode. There may be occasions within your home or building
when the signal strength is limited and Navigaon Mode may not
be possible. This is quite normal for products of this type. You can
check the number of satellite signals that the unit is receiving and the
strength of those signals by viewing the GPS Receiver page, see "GPS
Receiver”.
SAFETY
The Global Posioning System (GPS) is a satellite based system that
provides locaon and ming informaon around the globe. GPS is
operated and controlled under the sole responsibility of the Government of the United States of America, who are responsible for its
availability and accuracy.
Using Your navigaon in the Car.
When using while driving it is essenal that you drive with due care
and aenon.
Never modify the sengs or program your navigaon while driving.
Only look at the map when it is safe to do so. Only follow the instrucons when the road regulaons allow you to do so.
When mounng the device in your car make sure that it does not
obscure your view or impede the operaon of any driving controls.
BATTERY
Your navigaon uses a Li-ion baery. Do not use it in humid, wet
or corrosive environments. Do not operate or store your device in
high temperatures (>60 C) or in direct sun light. Do not store in a
microwave or pressurised container. Do not pierce or break the baery casing.
Failure to follow these cauons will invalidate the warranty and may
cause the baery to become hot, explode or ignite and
cause injury or damage. The Li-ion baery contained in this
unit must be recycled or disposed of properly. Do not dispose of in
household waste or burn.
GETTING STARTED
Please make sure that you read all of the informaon contained
within this user guide before contacng the customer helpline.
In the Box
In the box you will nd
• Satellite Navigaon System GOCLEVER NAVIO 515
• USB DC power lead with 5V car adapter
• Car Mounng Cradle
• USB cable to connect to your PC
• User Manuals
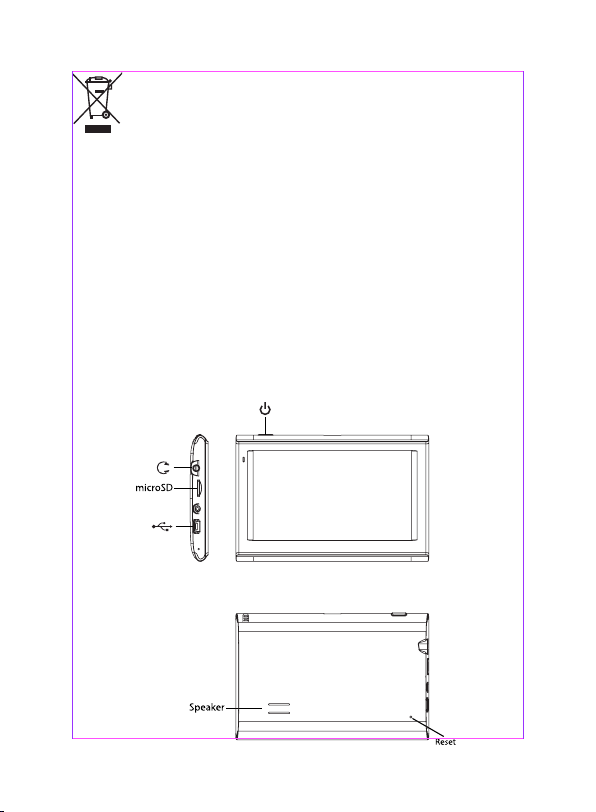
Control’s Posion
Charging the Baery
Before using your device the baery will need to be charged. To
maximize the life of the baery the rst charge must fully charge the
baery. We recommend that you charge the unit for 2 hours in order
to achieve the full charge. Subsequent charge mes may be shorter.
Plug the mains adapter into the socket on the rear of the unit USB
port and switch it on.
The red charging indicator on the front of the unit will light. When
the unit is fully charged the red indicator is exnguished.
We recommend that when you use navigaon in your car, that you
always use the 12V cigaree adapter in order to maintain the baery
level.
Installing the micro SD Memory Card(Oponal)
Once the card is installed it does not need to be removed. If you need
to remove the card, switch the unit o rst, push the card in and it
will eject from the slot.
When re-installing it can only be ed one way - contacts towards
you and the cut-o corner at the top as shown. Slide the card in and
push fully home so that it clicks in place.
It can support up to 8GB micro SD card.
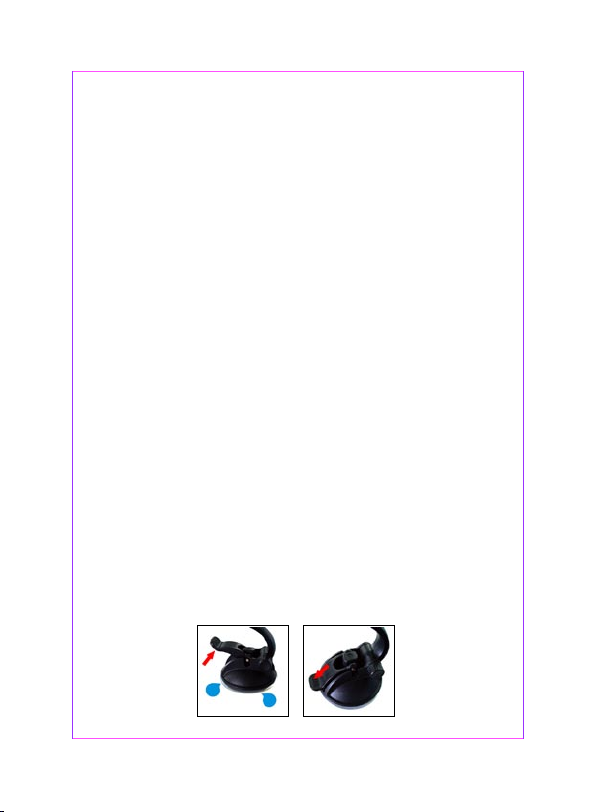
Mounng the Unit in your Car
WARNING!
Device must be mounted in a locaon that does not obscure the drivers vision, impede use of the car’s controls or impede the operaon
of the car’s airbags. Screw the car mount into the back of the unit as
shown below.
Car Adapter
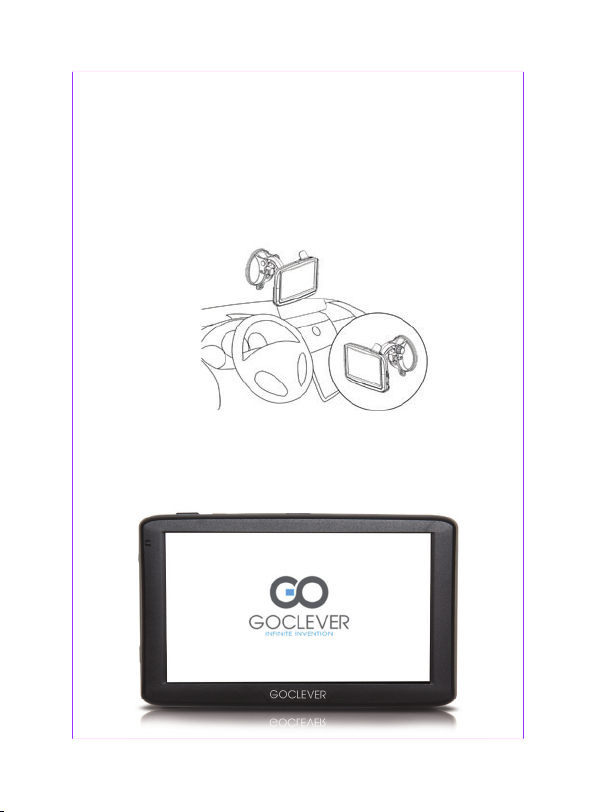
seod t i t ah t os e l bac r ewop eh t xfi elbissop fI .noi tal latsni lac ipyt a swohs egap
When using your naviga on in the car we recommend that you
always use the car adapter to power the unit, especially on long journeys. Plug the car adapter into the socket marked USB port on the
rear of the unit. Plug the other end on the adapter into the car’s 12V
accessory socket. The illustra on on the next page shows a typical
installa on. If possible x the power cable so that it does
not obscure instruments or controls and does not cause a tripping
hazard.
Switching On
Firstly The System logo is displayed.
Then following page will be displayed. Aer a couple of seconds this
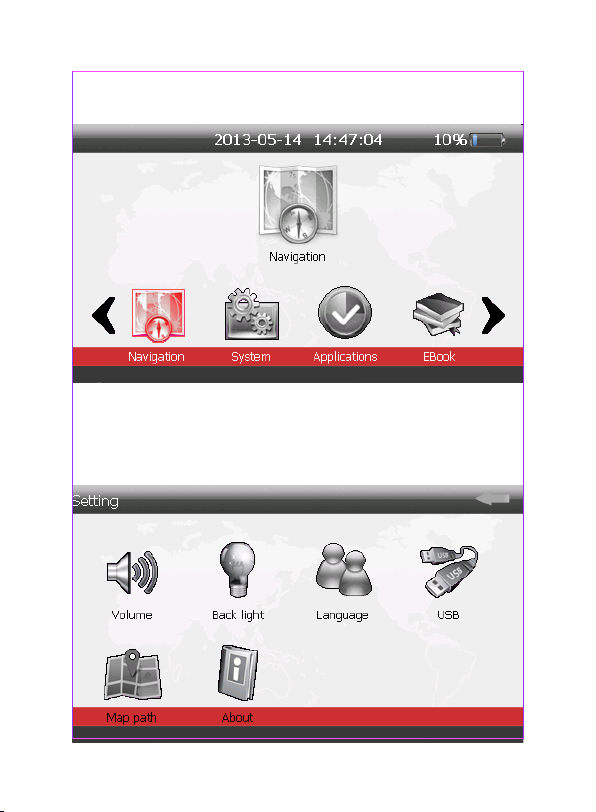
page will be replaced with the open page as shown below.
Sengs
NOTE: You do not need to enter the SETTINGS menu before you start
to navigate.
To exit this page, touch the arrow in the boom le of the screen.

Calibraon
This funcon calibrates the unit to respond to your screen taps. You
will only need to use this funcon if the unit begins to respond inconsistently to your screen taps.
About
The About page is for informaon only. It will give the serial number,
versionEN numbers for the product.
GPS Receiver
NOTE: This page is for informaon only. You can view the number of
satellite signals the unit is receiving and also the strength of these
signals. When the Open page is displayed touch on the GPS Signal
icon. A page similar to that shown below will be displayed.

This page gives your current posion in degrees longitude and
latude, your current speed and the status of your posion, i.e. Fixed
3D or Fixed Invalid etc. The compass s w o h the strength of the signal
from each of these satellites.
NOTE:
At least three GPS signals are required for the device to funcon.
There may be occasions within your home or building when the
signal strength is limited and GPS
Receiver Mode may not be possible. This is quite normal of products
of this type.
Your car may have an athermancy heat reecng windscreen or
windscreen heang that prevents the GPS receiver acquiring a valid
signal.
Navigaon mode
Aer run navigaon this picture appear
Tap to open search address window
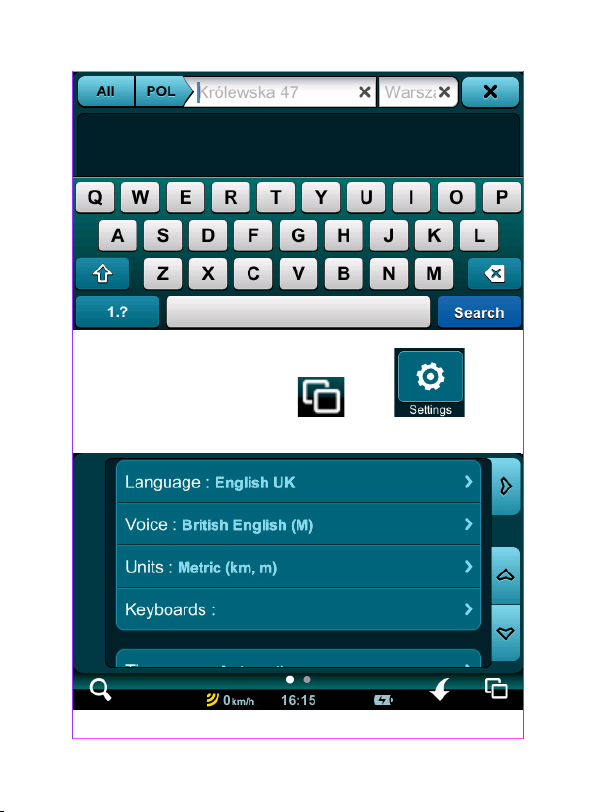
To change default language tap on next
next Language
NOTE. Aer select Language must also select Voice.

Funcon Hardware Specicaon
CPU MStar 500 MHz
Input Method Soware Keyboard
Operang System Microso WinCE.NET.6.0 Core Version
Expansion Slot Micro SD card ( Support up to 8GB)
Antenna Ceramic Antenna ( 25mm x 25 mm ) Internal
Speaker Built-in 2.0W Mono (Internal)
USB USB Client / AcveSync
Memory 128MB DDR2 Ram – 4GB Nandash
Dimension 136mmx 90mmx 13mm
Weight 211g
GOCLEVER’S GENERAL TERMS AND CONDITIONS OF WARRANTY
1. GOCLEVER Sp. z o.o. with registered oce in Poznań (60-431) at
Sianowska Street 4a, hereinaer referred to as Guarantor, guarantees
that GOCLEVER branded product is free from any design or material
defects that could compromise its funconality provided that user
manual supplied at conclusion of the agreement has been adhered
to.
2. This warranty is applicable only on the territory of United Kingdom.
3. Guarantor shall remove any possible defect of the device, in
accordance with the provision of this warranty provided that the
warranty card lled in on the day of the purchase together with a
proof of purchase are presented. Any alteraons or correcons in the
warranty card done by unauthorized persons shall result in the loss of
rights resulng from this warranty
4. The duraon of warranty for GOCLEVER devices shall be 24 months
starng on the date the device was sold, hoverer not to exceed 27
months from the date of producon placed on the Product.
5. The buyer is entled to Return to Base service within 12 months
from date of purchase, however not to exceed 15 months from the
date of producon. Aer those dates the user shall send the defecve device to the repair center, having previously obtained an RMA

number in accordance with the RMA procedure. Cost of delivery back
to the customer aer repair shall be covered by the Guarantor.
6. Warranty for LCDs and baeries mounted in GOCLEVER products
is limited to 12 months from the date of purchase, however not to
exceed 15 months from the date of producon TFT LCD screens with
sizes from 3,5” to 10,1” may have up to 5 faulty pixels (white, black
or the so-called sub-pixels).
7. Warranty for accessories added to the device (e.g. holders, cables,
etc.) is limited to 12 month from the date of sale and excludes mechanical damage.
8. Defects detected within the warranty period shall be removed free
of charge within the possibly shortest me not exceeding 21working
days from the date on which the devices have been received by the
repair center. Should it become necessary to source spare parts from
abroad, the above me may be extended by further 30 days.
9. Fault must be reported to the repair center not later than within
14 days from its occurrence
10. The buyer is obliged to supply the product in original packaging
complete with all accessories. The Buyer shall be responsible for the
damage resulng from use of dierent packaging.
11. Ownership of the devices that have not be collected from the
repair center within 3 months from compleon of the repair shall
pass on to the repair center.
12. In case of unjused claim (claim relang to fault-free device or
user damage) The Claimant shall be charged with tesng fees and
costs of transport.
13. Warranty does not cover:
Any use of the equipment going beyond the scope of its intended
use;
Claims relang to specicaon of the device if they are consistent
with the ones given by the manufacturer in the user manual or other
normave documents
Defects caused by external forces, e.g. mechanical damage, eects of
weather condions, polluon, water damage, overvoltage, etc.

Defecve funconing of unauthorized soware installed in the
device,
Capacive stylus added to the bundle free of chargé.
14. If a warranty repair requires parts to be changed, the replaced
element remains the property of the Guarantor. Replaced parts may
be of a dierent brand provided that technical parameters are at
least equal.
15. The Buyer loses the warranty right if warranty seals are broken,
the tag with serial number if removed, or should repair centre detect
unauthorised repair or systemic or construcon changes of the
device.
16. Guarantor may waive the deadlines for warranty service should
unexpected circumstances of force majeure arise e.g. natural disaster, social unrest, etc.
17. Guarantor is not responsible for damages and losses incurred as a
result of being unable to use the device while it was serviced.
18. Warranty rights does not include the buyer’s right to claim due to
loss of prots, due to defects of the device.
19. Guarantor shall not be responsible for damage resulng from loss
of data on magnec drives, please note that maps are restored back
to the factory condion.
20. The legal relaons between the buyer and the device and the
Guarantor is governed exclusively by the provisions of this warranty.
Claims for compensaon going further than that are excluded unless
they result from mandatory provisions of law..
21. This warranty has a supplementary character in relaons to buyer’s rights towards the seller. Warranty does not exclude, nor limit,
nor suspend buyer’s rights resulng from nonconformity of goods
with the contract.

OWNER’S MANUAL
INSTRUKCJA OBSŁUGI
www.goclever.com

Ważne
Sygnał GPS jest wymagany do poprawnego działania funkcji nawigacja. Sygnał GPS jest ograniczony w budynkach oraz tunelach funkcja
nawigacja nie jest wtedy możliwa. Wynika do z specyki sygnału
GPS i jest normalne w tego typu produktach. Możesz sprawdzić ilość
satelity oraz siłę sygnału w funkcji Sygnał GPS.
Bezpieczeństwo
GPS oparty na satelitach system który umożliwia lokalizację pozycji
na kuli ziemskiej. GPS system jest kontrolowany i nadzorowany przez
rząd Stanów Zjednoczonych, jest on odpowiedzialny za dostępność
sygnału GPS oraz jego dokładność.
Korzystanie w samochodzie
Podczas jazdy samochodem prowadź auto zgodnie z przepisami i
zachowaj ostrożność.
Nigdy nie zmieniaj ustawień nawigacji podczas jazdy. Spoglądaj na
mapę jedynie kiedy jest to bezpieczne. Prowadź samochód z komunikatami jedynie jeśli przepisy na to pozwalają. Podczas montażu
nawigacji upewnij się że to nie grozi twojemu bezpieczeństwu, nie
ogranicza pola widzenia oraz nie utrudnia prowadzenia samochodu.
Bateria
Bateria posiada Litową baterią. Nie należy stosować go w miejscach
wilgotnych, mokrych lub środowiskach korozyjnych. Nie używaj i nie
przechowuj urządzenia w wysokich temperaturach (>60 C) lub bezpośrednio na słońcu. Nie przechowuj w mikrofalówka lub pojemnik
ciśnieniowy.
Niezastosowanie się do tych ostrzeżeń grozi utratą gwarancji i mogą
spowodować wyciek jej nagrzanie, wybuch lub zapalenie,
spowodować obrażenia ciała lub uszkodzenie.
Baterię urządzenia należy utylizować w miejscach do tego

przeznaczonych. Nie wrzucaj do kasza ani nie wkładaj do ognia
baterii.
Rozpoczęcie użytkowania
Upewnij się że zapoznałeś się z instrukcją oraz wszystkimi informacjami przed zadziwieniem na infolinia.
Opakowanie
Zawartość opakowania
• Nawigacja GOCLEVER NAVIO 515
• Ładowarka samochodowa
• Uchwyt nawigacji
• kabel USB
• instrukcja
Schemat nawigacji

Ładowanie baterii
Przed użyciem naładuj baterię nawigacji. Pierwsze ładowanie
powinno być do 100% baterii w celu wydłużenia żywotności baterii.
Zalecamy ładować 2 godziny do pełnego naładowania. Kolejne czasy
ładowania mogą być krótsze. Podłącz ładowarkę do portu USB nawigacji następnie ją włącz.
Dioda czerwona oznacza ładowanie baterii. Kiedy bateria zostanie
naładowana w pełni dioda przestanie świecić.
Zalecamy korzystać z nawigacji zawsze z podłączoną ładowarką w celu
utrzymania stałego poziomu naładowania baterii.
Montaż karty microSD w nawigacji (opcja)
Po prawidłowym włożeniu karty powinieneś usłyszeć delikatny
„click” . Jeśli chcesz wyjąc kartę wyłącz nawigację, przyciśnij ją i karta
powinna samodzielnie wyjść z czytnika. Gdy nie można włożyć karty
do czytnika upewnij się że nie jest w zlej pozycji lub czy w czytniku nie
znajduje się już karta microSD.
Nawigacja obsługuje karty do 8GB microSD HC.
Montaż nawigacji w samochodzie
UWAGA!
Nawigacja powinna być zamontowana w sposób nie ograniczający
pola widzenia, nie blokujący działania poduszek powietrznych lub
ograniczając możliwości prowadzenia samochodu i wykonywania
manewrów.
Ładowarka samochodowa
Podczas korzystania z nawigacji zalecamy zawsze podłączenie ładowarki zgłasza podczas długich tras. Podłącz końcówkę ładowarki do
portu USB nawigacji. Podłącz ładowarkę do gniazda 12V w samocho-

dzie. Ilustracja przedstawia typową instalację nawigacji w samocho-
seod t i t ah t os e l bac r ewop eh t xfi elbissop fI .noi tal latsni lac ipyt a swohs egap
dzie, ułóż kabel zasilania tak aby nie ograniczał manewrów oraz aby
uniknąć możliwości zaplątania się w niego.
Włączanie
Najpierw zostanie wyświetlone logo.

Następnie zostanie wyświetlone menu. Pojawi się ono kilka sekund
po ekranie startowym.
Ustawienia
Ważne: Nie musisz zmieniać Ustawień przed uruchomieniem nawigacji.
Aby wyjść z Ustawień dotknij ikony strzałki w prawym górnym rogu.

Kalibracja
Funkcja ta kalibruje ekran i poprawia odczyt Twoich dotknięć ekranu.
Użyj tej opcji gdy ekran nie będzie prawidłowo reagował na Twoje
dotknięcia.
O Urządzeniu
Storna ta zwiera informacje o urządzeniu jego numer seryjny oraz jaki
to model.
Sygnał GPS
Funkcja ta służy tylko sprawdzeniu poprawności odbioru sygnału GPS.
Jak pokazano poniżej na obrazku

Informacje tu zwarte dotyczą, pozycji czyli współrzędnych na mapie,
dokładności pozycji, czasu, ilości satelity użytych do określenia pozycji, przybliżonej prędkości.
Ważne:
Wymagany jest odbiór sygnału z co najmniej 3 satelity do określenia
pozycji. Gęsta zabudowa lub wewnątrz budynku może uniemożliwiać
odbiór sygnału. Na pogorszenie sygnału może też wpływać jeśli szyba
samochodu jest podgrzewana. W tunelach sygnał GPS nie jest odbierany jest to normalne w tego typu produktach.
Nawigacja
Po uruchomieniu funkcji nawigacja zostanie wyświetlone okno pokazane poniżej
Wybierz aby wprowadzić adres celu

Aby zmienić język w głównym oknie wybierz następnie
wybierz Language (Język)
UWAGA ! Voice (Lektor) należy wybrać dodatkowo.

Funkcja Specykacja
CPU: MStar 500 MHz
Metoda wprowadzania: Klawiatura ekranowa
System: Microso WinCE.NET.6.0
Czytnik: microSD HC karta do 8GB
Antena: Ceramiczna Antena ( 25mm x 25 mm ) wbudowana
Głośnik: 2.0W Mono wbudowany
USB: USB pamięć masowa / AcveSync
Pamięć: 128MB DDR2 RAM – 4GB Nandash
Wymiary: 136mmx 90mmx 13mm
Waga: 211g
OGÓLNE WARUNKI GWARANCJI GOCLEVER
1. GOCLEVER SP. Z O.O. z siedzibą w Poznaniu (60-431) przy ul. Sianowskiej 4a zwany dalej Gwarantem zapewnia, że urządzenie marki
GOCLEVER, jest wolne od wad konstrukcyjnych i materiałowych,
które mogłyby naruszyć jego funkcjonalność, o ile przestrzegana była
instrukcja obsługi dostarczona przy zawarciu umowy.
2. Gwarancja obowiązuje wyłącznie na terytorium Polski.
3. Gwarant bezpłatnie usunie ewentualną niesprawność urządzenia,
zgodnie z postanowieniami niniejszej gwarancji pod warunkiem
przedstawienia wypełnionej w dniu zakupu karty gwarancyjnej
wraz z kopią dowodu zakupu. Dokonywanie zmian i skreśleń w karcie
gwarancyjnej przez osoby nieupoważnione powoduje utratę uprawnień wynikających z niniejszej gwarancji.
4. Okres gwarancji na urządzenia GOCLEVER wynosi 24 miesiące,
licząc od daty sprzedaży sprzętu, jednak nie dłużej niż 27 miesięcy od
daty produkcji umieszczonej na Produkcie.
5. Tryb przyjmowania produktów uszkodzonych w systemie DOOR to
DOOR przysługuje nabywcy w terminie 12 miesięcy od daty zakupu,
jednak nie dłużej niż 15 miesięcy od daty produkcji. Po przekroczeniu
tych terminów użytkownik powinien przesłać uszkodzone urządzenie
do punktu serwisowego na własny koszt po wcześniejszym uzyskaniu

numeru RMA zgodnie z procedurą reklamacyjną. Natomiast koszt
przesyłki do klienta po naprawie pokrywa Gwarant.
6. Gwarancja dla wyświetlaczy LCD i akumulatorów zamontowanych
w urządzeniach GOCLEVER wynosi 6 miesięcy od daty zakupu, jednak
nie dłużej niż 9 miesięcy od daty produkcji, w ekranach TFT LCD 3,5”
do 10,1” dopuszczalne jest wystąpienie do 5 błędnych pikseli (białe,
czarne lub tzw. sub-piksele).
7. Okres gwarancji na akcesoria dołączone do urządzenia (np. uchwyty, kable itp.) wynosi 1 miesiąc od daty sprzedaży z wyłączeniem
uszkodzeń mechanicznych ( nie dotyczy gwarancja door-to-door )
8. Wady ujawnione w okresie gwarancji będą usuwane bezpłatnie w
możliwie najkrótszym terminie nieprzekraczającym 21 dni roboczych od przyjęcia urządzenia na serwis. W przypadku konieczności
sprowadzenia części zamiennych z zagranicy, termin powyższy może
ulec przedłużeniu o kolejne 30 dni.
9. Reklamujący zobowiązany jest zgłosić usterkę poprzez formularz
reklamacyjny na stronie hp://autorma.goclever.com/. W przypadku
nie zgłoszenia usterki i wysłania jej do gwaranta bez uzyskania numeru reklamacyjnego przesyłka nie zostanie przyjęta na serwis.
10. Usterka musi być zgłoszona do serwisu nie później niż 14 dni od
jej zaistnienia.
11. Nabywca zobowiązany jest dostarczyć produkt w oryginalnym
opakowaniu, wraz ze wszystkimi akcesoriami. Odpowiedzialność za
uszkodzenia wynikające z użycia opakowania zastępczego ponosi
nabywca.
12. Sprzęt nieodebrany z serwisu w ciągu 3 miesięcy od ukończenia
naprawy przepada na rzecz serwisu.
13. W przypadku nieuzasadnionej reklamacji (reklamacji sprawnego
urządzenia lub gdy uszkodzenie powstało z winy klienta) zgłaszający
reklamację zostanie obciążony kosztami ekspertyzy oraz transportu.
14. Gwarancja nie obejmuje:
- jakiegokolwiek używania sprzętu wykraczającego poza opis zakresu
jego pracy;
- roszczeń z tytułu parametrów technicznych urządzenia, o ile są one
zgodne z podanymi przez producenta w instrukcji obsługi lub innych

dokumentach o charakterze normatywnym;
- uszkodzeń powstałych z przyczyn zewnętrznych, np.: uszkodzeń
mechanicznych, skutków zjawisk atmosferycznych, zanieczyszczeń,
zalań, przepięć, itp.
- wadliwego działania nieautoryzowanego oprogramowania zainstalowanego na urządzeniu
- rysika pojemnościowego dodawanego do zestawu z klawiaturą jako
gras.
15. W przypadku, gdy naprawa gwarancyjna wymaga wymiany części,
element wymieniony pozostaje własnością Gwaranta. Części użyte
do wymiany mogą być innej marki o parametrach technicznych, co
najmniej równoważnych.
16. Nabywca traci prawa gwarancyjne w przypadku zerwania plomb
gwarancyjnych, tabliczki znamionowej z numerem seryjnym lub
stwierdzenia przez serwis producenta dokonywania nieautoryzowanych napraw lub zmian systemowy bądź konstrukcyjnych urządzenia.
17. Gwarant może uchylić się od dotrzymania terminowości usługi
gwarancyjnej, jeżeli zaistnieją nieprzewidziane okoliczności o charakterze siły wyższej np.: klęska żywiołowa, niepokoje społeczne itp.
18. Gwarant nie odpowiada za szkody i straty powstałe w wyniku
niemożności korzystania z urządzenia będącego w naprawie.
19. Uprawnienia z tytułu gwarancji nie obejmują prawa kupującego
do domagania się zwrotu utraconych korzyści w związku z wadami
urządzenia.
20.Gwarant nie odpowiada za szkody powstałe w wyniku utraty
danych na nośnikach magnetycznych, informujemy również, że mapy
przywracane będą zgodne ze stanem produkcyjnym.
21. Stosunek prawny pomiędzy nabywcą urządzenia i Gwarantem regulowany jest wyłącznie postanowieniami niniejszej gwarancji. Dalej
idące roszczenia odszkodowawcze są wyłączone chyba, że wynikają
one z bezwzględnie obowiązujących przepisów prawa.
22. Gwarancja niniejsza ma charakter uzupełniający w stosunku do
uprawnień nabywcy przysługujących wobec sprzedawcy. Gwarancja
nie wyłącza, nie ogranicza ani nie zawiesza uprawnień nabywcy wynikających z niezgodności towaru z umową.

WARRANTY CARD
DATE OF SOLD: ...........................................................................................................................................................................
DATE OF MANUFACTURED: .........................................................................................................................................................
BRAND NAME OD PRODUCT: …………….….…………….…..................................................………………………………………………
SERIAL NUMBER: ………................................................................................................................................................................
DEALER’S NAME / STAMP SIGNATURE
.........................................................
Date and customer’s signature
Repairs history
Date Confirmed defect Made repairs Servive sign and stamp
KARTA GWARANCYJNA
DATA SPRZEDAŻY: .......................................................................................................................................................................
DATA PRODUKCJI: ......................................................................................................................................................................
NAZWA PRODUKTU: …..............………….….…………….…..................................................………………………………………………
NUMER SERYJNY: ....…................................................................................................................................................................
Nazwa/Pieczęć Sprzedawcy Podpis
.........................................................
Data i podpis klienta
Historia naprawy
Data Potwierdzone uszkodzenie Zrealizowane naprawy Podpis i pieczęć serwisu

www.goclever.com

WARRANTY CARD
DATE OF SOLD: ...........................................................................................................................................................................
DATE OF MANUFACTURED: .........................................................................................................................................................
BRAND NAME OD PRODUCT: …………….….…………….…..................................................………………………………………………
SERIAL NUMBER: ………................................................................................................................................................................
DEALER’S NAME / STAMP SIGNATURE
.........................................................
Date and customer’s signature
Repairs history
Date Confirmed defect Made repairs Servive sign and stamp

www.goclever.com
 Loading...