

QUICK START GUIDE
HOT-AIR FRYER
GB | English
PL | Polski
CZ | Český
DE | Deutsch
PT | Português
Model NO.: HHAFRYER
FR | Français
HU | Magyar
IT | Italiano

GB
INTRODUCTION
Our device is a fatless fryer, which, as a result of its fast hot air circulation technology,
makes it possible to prepare a variety of dishes without oil.
The dishes can be grilled, baked, and heated up to make them light, tasty, and dietetic, since they are free of grease.
TECHNICAL SPECIFICATION
Voltage: 220-240V ~ 50 \ 60Hz
Power: 1500 W
Basket capacity: 3,2 l
Temperature range: 80 oC - 200 oC
Timer: 0-60 min
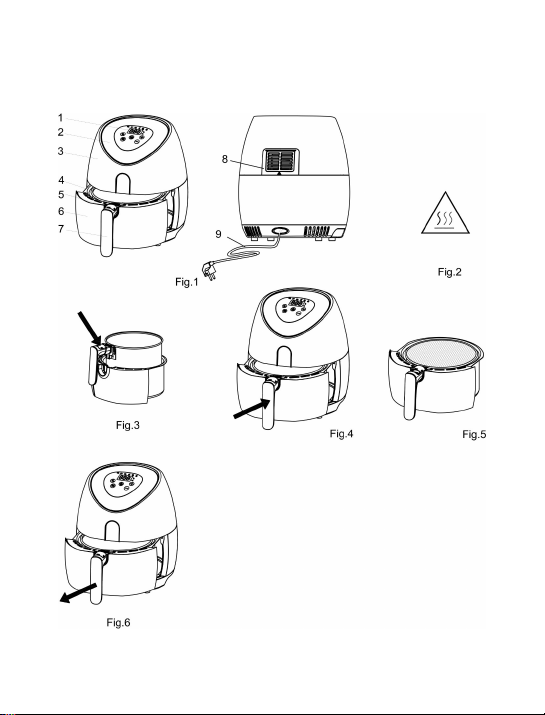
GENERAL DESCRIPTION (FIG.1)
1. Decorative cover
2. Control panel
3. Upper cover
4. Trash
5. Basket release button
6. Bowl
7. Basket holder
8. Air outlets
9. Feeding duct
NOTE
Read this manual carefully before using the device, and keep it for the future.
DANGER
-Never immerse the casing in water, nor rinse under a tap, it contains electrical and
heating elements.
-Do not let water or other liquid into the device to prevent electrocution.
-Always put the products to be fried into the basket, to prevent contact with the heating
elements.
-Do not cover the air inlet and external air openings when the device operates.
-Do not ll the bowl with oil, because this may cause re.
-Never touch the interior of the device while it operates.
WARNINGS
Check whether the voltage indicated on the machine ts the local network voltage.
-If the equipment is damaged, do not use it.
-Repairs should be entrusted to authorized persons only.
-Keep the mains cable away from hot surfaces.

-Do not connect the device or operate the control panel with wet hands.
-Do not place the device on a wall or on other devices. Leave at least 10 cm of free
space at the back and the sides, and 10 cm of free space above the device.
-Do not place anything on the device.
-Do not use the device for any purpose other than those described in this manual.
-Do not let the device operate without supervision.
-When frying with hot air, hot steam is released through the air outlets. Keep your hands
and your face at a safe distance from steam and the air outlets.
Also, watch out for hot steam and air when removing the frying pan from the device.
- All available surfaces can get hot during operation (Fig.2)
- If dark smoke escapes from the device, disconnect the device immediately from its
power supply.
-Make sure that the device is placed on a horizontal, even and stable surface.
-This device is intended only for domestic use. It may not be suitable for safe use in
such environments as company kitchens, farms, motels, and other residential environments. Also, it is not intended for use by customers in hotels, motels, hostels, and at
breakfasts, and in other residential environments.
-If the device is used improperly or for commercial or semi-commercial purposes, or not
in line with the instructions in the operation manual, the warranty becomes invalid, and
the manufacturer may waive any responsibility for the resulting damages.
-Always disconnect the device from its power supply when it is not in use.
-The device needs approximately 30 minutes to cool down for safe servicing or cleaning.
BEFORE THE FIRST USE
1. Remove all packaging elements.
2. Remove the foil and stickers from the device.
3. Thoroughly clear the basket and the frying pan with hot water, with a dish washing
liquid, and a non-scratch sponge.
4. Wipe the device with a damp cloth.
Our device is a fryer, which makes it possible to prepare dishes by means of hot air
without oil.
Remember: Do not ll the pan with oil or grease for frying.
PREPARATION FOR USE
1. Place the device on a stable, horizontal, and even surface.
Do not place the device on a surface that is not resistant to high- temperature
2. Place the basket in a bowl (Fig. 3).
3. Take the cable out of the chamber, which is located at the bottom of the device.
Do not ll the pan with oil or other liquid.
Do not put anything on the device, air ow will be disturbed, and will affect the hot air
frying effect.
OPERATING THE DEVICE
1. Connect the mains plug to an earthed electrical socket.
2. Pull out carefully the frying pan with the bin from the device.
3. Fill the basket with dishes
4. Insert the bowl with the basket back into the device (Fig. 4)
Never use the bowl without the basket.

Note: Do not touch the bowl or the basket during and right after using, it can be very hot.
Hold the bowl only by its holder.
5. Specify the required preparation time for the ingredients
6. Some products require shaking in the middle of the preparation time.
To shake the ingredients, take the bowl out from the device by the holder and shake it.
Then insert the bowl back into the fryer
Note: Do not press the holder’s button during shaking. (Fig. 3)
Note: To mix the ingredients, you can remove the basket from the bowl and only shake
the basket. To do this, remove the bowl from the device, place it on a heat resistant
surface, and press the holder’s button. and remove the basket from the bowl
Note: If you set the timer to the half of the preparation time, you will hear the timer’s ring
when it is time to shake the ingredients. This means, however, that after shaking, the
timer must be re-programmed for the remaining preparation time.
7. When the timer ring activates, the set preparation time has elapsed. Remove the
bowl from the device, place it on a high- temperature resistant surface.
Note: You can also turn the device off manually. To do this, turn the time adjustment
dial to 0.
8. Check whether the ingredients are ready.
If the ingredients are not ready yet, simply insert the frying pan back into the device, set
the timer for additional several minutes.
9. To remove the products, remove the bowl from the hot air fryer and place it on a hightemperature resistant surface, and then press the basket release button to remove the
basket from the bowl.
Do not turn the basket bottom up with the suction cup still xed to it, the excess oil that
has collected at the bottom of the bowl will leak onto the products.
When removing the frying pan from the basket, watch out for the steam that escapes the
device during and after operation.
10. Empty the basket.
Note: To remove large or gentle ingredients, take the ingredients out from the basket
using pliers
11. When a batch of the ingredients is ready, the fryer is immediately ready for another
batch.
12. To end the device’s operation, press the switch and unplug the plug from the socket.
CLEANING
Clean the device after each use.
Wait for the device to cool down, then switch it off, pull out the container, clean food
residues.
The container and the basket are covered with coating that prevents adhesion of food,
do not scrub them.
Use moist sponge or cloth for washing. You can wash the sliding parts under water,
however, after washing, they should be thoroughly dried.
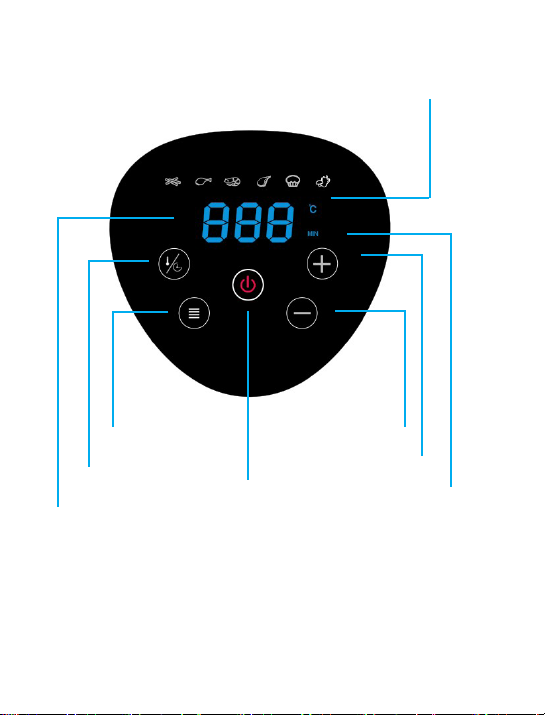
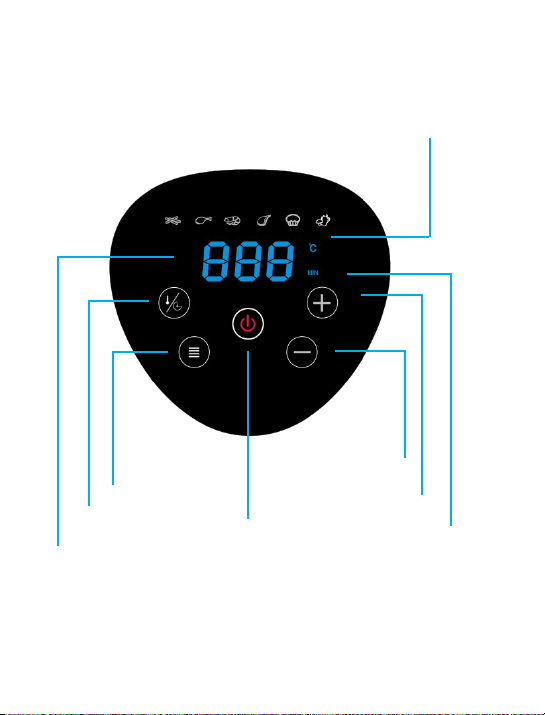
CONTROL PANEL
G.TEMP. SIGNALLING LAMP
B. TEMP/TIME DISPLAY
D. TEMP/TIME SETTING
C. MENU
1.Connect the device to a power supply
2.Hold the (A) START button until the display lights up
3.Using the (C) MENU button, you can choose 1 of the dish preparation modes (French
fries, sh, seafood, meat, bakings, vegetables), the temperature and the time are set
automatically and will be displayed on the display
4. Using the (D) button, you can choose whether to set the temperature or the time and
set them by means of the (E) and (F) buttons
5. To end the device’s operation, select the (A) button
F. TEMP/TIME ADJUSTMENT
A. START/END
E.TEMP/TIME ADJUSTMENT
H.TIME SIGNALLING LAMP
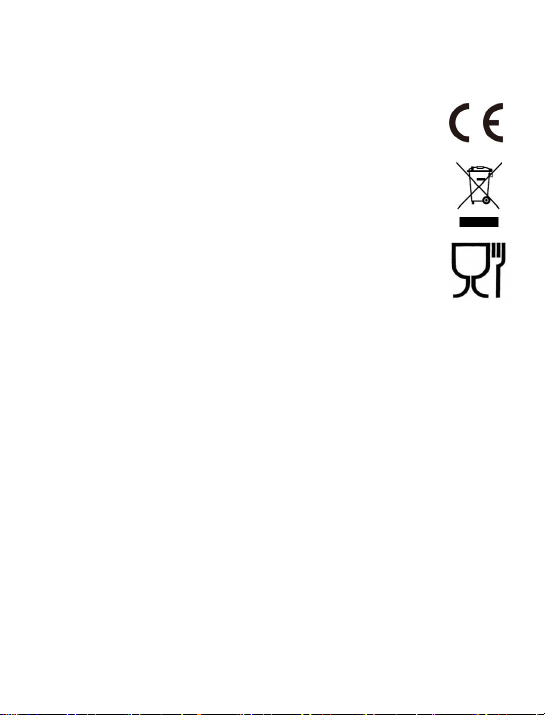
EXPLANATION OF SYMBOLS
DECLARATION OF CONFORMITY WITH EUROPEAN STANDARDS
This device meets the requirements of the Electromagnetic Compatibility
Directive EMC (2014/30/EU) and Low Voltage Directive LVD (2014/35/
EU), for this reason it is marked with the CE sign and a declaration of
conformity with European standards was made out for the device.
This symbol denotes that the device must not be disposed with other
household waste. It is forbidden by law, under pain of ne, to throw away
electrical and electronic equipment together with other waste. It is possible to prevent various negative effects for the natural environment and
human health resultant from improper handling of waste electronics if the
product is properly disposed of.
The product is designed for food contact .

PL
WPROWADZENIE
Nasze urządzenie to beztłuszczowa frytownica , która dzięki technologii szybkiej cyrkulacji gorącego powietrza pozwala na przygotowanie wielu różnych potraw bez użycia
oleju.
Potrawy można grillować, piec i podgrzewać dzięki czemu są lekkie, smaczne i dietetyczne, bo pozbawione tłuszczu.
SPECYFIKACJA TECHNICZNA
Napięcie: 220-240V ~ 50 \ 60Hz
Moc: 1500 W
Pojemność koszyka: 3,2 l
Regulowana temperatura: 80 oC -200 oC
Minutnik: 0-60 min
OPIS OGÓLNY (FIG.1)
1. Ozdobna pokrywa
2. Panel sterowania
3. Górna pokrywa
4. Kosz
5. Przycisk zwalniania koszyka
6. Misa
7. Uchwyt koszyka
8. Otwory wylotowe powietrza
9. Przewód zasilający
WAŻNE
Przeczytaj uważnie niniejszą instrukcję przed użyciem urządzenia i zachowaj ją na
przyszłość.
NIEBEZPIECZEŃSTWO
- Nigdy nie zanurzaj obudowy, która zawiera elementy elektryczne i elementy grzejne,
w wodzie ani nie płucz jej pod kranem.
-Nie pozwól, aby do urządzenia dostała się woda lub inna ciecz, aby zapobiec porażeniu prądem elektrycznym.
-Zawsze wkładaj składniki do smażenia w koszu, aby nie dopuścić do kontaktu z ele-
mentami grzewczymi.
-Nie zakrywaj wlotu powietrza i zewnętrznych otworów powietrza podczas pracy
urządzenia.
-Nie napełniaj misy olejem, ponieważ może to spowodować zagrożenie pożarowe.
- Nigdy nie dotykaj wnętrza urządzenia podczas jego działania.

OSTRZEŻENIA
Sprawdź, czy napięcie wskazane na urządzeniu pasuje do lokalnego napięcia sieciowego.
- Nie używaj urządzenia, jeśli uległo uszkodzeniu.
- Naprawy powinny dokonywać tylko osoby upoważnione.
- Trzymaj przewód sieciowy z dala od gorących powierzchni.
- Nie podłączaj urządzenia ani nie obsługuj panelu sterowania mokrymi rękami.
- Nie umieszczaj urządzenia na ścianie ani na innych urządzeniach. Pozostaw co
najmniej 10 cm wolnej przestrzeni z tyłu i boków oraz 10 cm wolnej przestrzeni nad
urządzeniem.
- Nie umieszczaj niczego na urządzeniu.
- Nie używaj urządzenia do celów innych niż opisane w tej instrukcji.
- Nie pozwól, aby urządzenie działało bez nadzoru.
- Podczas smażenia gorącym powietrzem gorąca para jest uwalniana przez otwory
wylotowe powietrza. Trzymaj ręce i twarz w bezpiecznej odległości od pary i otworów
wylotowych powietrza.
Należy również uważać na gorącą parę i powietrze podczas wyjmowania patelni z
urządzenia.
- Każda dostępna powierzchnia może się nagrzać podczas użytkowania (Fig.2)
- Natychmiast odłącz urządzenie od zasilania, jeśli z urządzenia wydobywa się ciemny
dym.
- Upewnij się, że urządzenie jest umieszczone na poziomej, równej i stabilnej powierzchni.
- To urządzenie jest przeznaczone wyłącznie do użytku domowego. Może nie być
odpowiednie do bezpiecznego stosowania w takich środowiskach, jak kuchnie pracownicze, gospodarstwa rolne, motele i inne środowiska mieszkalne. Nie jest również
przeznaczony do użytku przez klientów w hotelach, motelach, noclegach i śniadaniach
oraz w innych środowiskach mieszkalnych.
- Jeśli urządzenie jest używane niewłaściwie lub do celów profesjonalnych lub półprofesjonalnych lub nie jest używane zgodnie z instrukcjami w instrukcji obsługi, gwarancja traci ważność, a producent może odmówić jakiejkolwiek odpowiedzialności za
spowodowane szkody.
-Zawsze odłącz urządzenie od zasilania, gdy nie jest używane.
-Urządzenie potrzebuje około 30 minut do ostygnięcia w celu obsługi lub czyszczenia
w bezpieczny sposób.
PRZED PIERWSZYM UŻYCIEM
1. Usuń wszystkie elementy opakowania.
2. Usuń folię i etykiety z urządzenia.
3. Dokładnie wyczyść kosz i patelnię gorącą wodą, płynem do mycia naczyń i gąbką
nieścierną.
4. Przetrzyj urządzenie wilgotną szmatką.
Nasze urządzenie to frytownica , która pozwala na przygotowanie potraw za pomocą
gorącego powietrza bez użycia oleju.
Pamiętaj: Nie napełniaj patelni olejem lub tłuszczem do smażenia.
PRZYGOTOWANIE DO UŻYCIA
1 Ustaw urządzenie na stabilnej, poziomej i równej powierzchni.
Nie umieszczaj urządzenia na powierzchni nieodpornej na wysokie temperatury

2 Umieść kosz w misie (Fig. 3).
3 Wyciągnij kabel z komory, która znajduje się na spodzie urządzenia.
Nie napełniaj patelni olejem lub innym płynem.
Nie kładź niczego na urządzeniu, przepływ powietrza zostanie zakłócony i wpłynie na
efekt smażenia gorącym powietrzem.
KORZYSTANIE Z URZĄDZENIA
1. Podłącz wtyczkę sieciową do uziemionego gniazdka elektrycznego.
2. Ostrożnie wysuń patelnię z koszem z urządzenia.
3. Napełnij kosz potrawami
4. Wsuń misę z koszem z powrotem do urządzenia (Ryc. 4)
Nigdy nie używaj misy bez kosza.
Uwaga: Nie dotykaj misy ani kosza podczas i od razu po użyciu, ponieważ może być
ona nagrzana i osiągać wysoką temperaturę. Trzymaj misę tylko za uchwyt.
5. Określ wymagany czas przygotowania składników
6. Niektóre składniki wymagają wytrząsania w połowie czasu przygotowania.
Aby wstrząsnąć składnikami, wyciągnij miskę z urządzenia za uchwyt i potrząśnij nią.
Następnie wsuń misę z powrotem do frytownicy
Uwaga: Nie należy naciskać przycisku uchwytu podczas drżenia. (Ryc. 3)
Wskazówka: Aby przemieszać składniki, możesz wyjąć kosz z miski i potrząsnąć tylko
koszem. Aby to zrobić, wyciągnij miskę z urządzenia, umieść ją na odpornej na ciepło
powierzchni i naciśnij przycisk uchwytu. i wyjmij kosz z miski
Wskazówka: Jeśli ustawisz minutnik na połowę czasu przygotowania, usłyszysz dzwonek zegara, gdy będziesz musiał potrząsnąć składnikami. Oznacza to jednak, że po
wstrząśnięciu trzeba ponownie ustawić czas na pozostały czas przygotowania.
7. Po usłyszeniu dzwonka zegarowego upłynął ustawiony czas przygotowania. Wyciągnij miskę z urządzenia i umieść ją na powierzchni odpornej na wysokie temperatury.
Uwaga: Możesz również wyłączyć urządzenie ręcznie. Aby to zrobić, przekręć pokrętło
regulacji czasu na 0.
8. Sprawdź, czy składniki są gotowe.
Jeśli składniki nie są jeszcze gotowe, po prostu wsuń patelnię z powrotem do urządze-
nia i ustaw czasomierz na kilka dodatkowych minut.
9. Aby usunąć składniki, wyciągnij miskę z frytownicy na gorące powietrze i umieść ją
na powierzchni odpornej na wysokie temperatury, a następnie naciśnij przycisk zwalniający kosz i wyjmij kosz z miski.
Nie odwracaj koszem do góry dnem z przyssawką, która nadal jest do niego przymocowana, ponieważ nadmiar oleju, który zgromadził się na dnie miski, wycieknie na
składniki.
Uważaj na parę wydobywająca się z urządzenia podczas pracy i po jej zakończeniu,
przy wysuwaniu patelni z koszem.
10. Opróżnij kosz.
Wskazówka: Aby usunąć duże lub delikatne składniki, wyciągnij składniki z kosza za
pomocą szczypiec
11. Gdy partia składników jest gotowa, frytownica jest natychmiast gotowa do przygot-
owania kolejnej partii.
12. w celu zakończenia korzystania z urządzenia naciśnij wyłącznik i wypnij wtyczkę
z kontaktu.

CZYSZCZENIE
Należy czyścić urządzenie po każdym użyciu.
Należy odczekać by urządzenie ostygło, następnie przy wyłączonym urządzeniu
wysunąć pojemnik, oczyścić z pozostałości pokarmu.
Pojemnik i kosz pokryte są powłoką zapobiegająca przywieraniu potraw, nie należy
zatem ich szorować.
Do umycia użyj wilgotnej gąbki lub szmatki. Można myć wysuwane części pod wodą ,
jednak po umyciu należy je dokładnie osuszyć.
PANEL STEROWANIA
G.LAMPKA SYGNALIZUJĄCA TEMP.
B. TB. WYŚWIETLACZ
TEMP./CZASU
D. USTAWIENIE TEMP./CZASU
C. MENU
1.Podłącz urządzenie do zasilania
2.Przytrzymaj przycisk (A) START do momentu zapalenia się wyświetlacza
3.Przy użyciu przycisku (C ) MENU można wybrać 1 z trybów przygotowania potraw
(frytki, ryby, owoce morza, mięso, wypieki, warzywa) , temperatur ai czas ustawią się
automatycznie i zostaną wyświetlone na wyswietlaczu
F.REGULACJA TEMP/CZASU
A. START/KONIEC
E.REGULACJA TEMP/CZASU
H.LAMPKA
SYGNALIZUJĄCA
CZAS
4. przy użyciu przycisku (D) można wybrać, czy chcemy ustawić temperaturę, czy czas
i dostosować je za pomocą przycisków (E) i (F)
5. w celu zakończenia pray urządzenia, należy wybrać przycisk (A)
WYJAŚNIENIE SYMBOLI
DEKLARACJA ZGODNOŚCI Z NORMAMI EUROPEJSKIMI
Niniejsze urządzenie odpowiada wymaganiom dyrektywy kompatybilności elektromagnetycznej EMC (2014/30/EU) i niskonapięciowej
LVD (2014/35/EU), dlatego został na nie naniesiony znak CE oraz
została wystawiona dla niego deklaracja zgodności z normami eu-
ropejskimi.
Ten symbol oznacza, że produktu nie wolno wyrzucać razem z innymi
odpadami z gospodarstw domowych. Prawo zabrania pod karą grzywny łączenia zużytego sprzętu elektrycznego i elektronicznego wraz
z innymi odpadami. Można zapobiec potencjalnym negatywnym skutkom dla środowiska naturalnego i zdrowia ludzkiego, jakie mogłyby
wyniknąć z niewłaściwego postępowania z odpadami powstałymi ze
zużytego sprzętu elektronicznego, jeśli produkt zostanie zutylizowały
w należyty sposób.
Wyrób przystosowany do kontaktu z żywnością.
1. GOCLEVER SP. Z O.O. z siedzibą w Wysogotowie k. Poznania (62-081 Przeźmierowo) przy ul. Skórzewskiej 35 zwany dalej Gwarantem zapewnia, że urządzenie
marki GOCLEVER jest wolne od wad konstrukcyjnych i materiałowych, które mogłyby
naruszyć jego funkcjonalność, o ile przestrzegana była instrukcja obsługi dostarczona
przy zawarciu umowy.
2. Gwarancja obejmuje wyłącznie na terytorium Polski, a okres gwarancji na urządzenia
GOCLEVER wynosi 24 miesiące, licząc od daty sprzedaży sprzętu, jednak nie dłużej
niż 27 miesięcy od daty produkcji umieszczonej na produkcie. Gwarancja na lampę
wynosi 12 miesięcy od daty sprzedaży sprzętu.
3. Wady ujawnione w okresie gwarancji będą usuwane bezpłatnie w możliwie najkrótszym terminie nieprzekraczającym 21 dni roboczych od przyjęcia urządzenia zycznie do serwisu. W przypadku konieczności sprowadzenia części zamiennych z
zagranicy, termin może ulec przedłużeniu o kolejne 30 dni.
4. Niniejsza gwarancja nie obejmuje uszkodzeń wynikających z winy klienta, ponadto
gwarant nie odpowiada za szkody i straty powstałe w wyniku korzystania z urządzenia
będącego w naprawie.
5. Postanowieniami niniejszej gwarancji dalej idące roszczenia odszkodowawcze są
wyłączone, chyba że wynikają one z bezwzględnie obowiązujących przepisów prawa.
Niniejszy tekst jest jedynie skróconym opisem warunków gwarancji. Pełne warunki
gwarancji oraz informacje znajdują się na stronie goclever.com.

CZ
ÚVOD
Naším zařízením je horkovzdušná fritéza, která díky technologii rychlé cirkulace
horkého vzduchu umožňuje přípravu mnoha různých pokrmů bez přidání oleje.
Pokrmy můžete grilovat, péct a ohřívat, díky čemuž jsou lehké, chutné a dietní, protože
neobsahují tuk.
TECHNICKÁ SPECIFIKACE
Napětí: 220–240V ~ 50\60Hz
Výkon: 1500 W
Objem koše: 3,2 l
Teplotní rozsah: 80 oC –200 oC
Časovač: 0–60 min.
CELKOVÝ POPIS (OBR. 1)
1. Vytvarované víko
2. Ovládací panel
3. Horní kryt
4. Koš
5. Tlačítko pro uvolnění koše
6. Vyjímatelná vana
7. Rukojeť koše
8. Výstupní otvory vzduchu
9. Napájecí kabel
DŮLEŽITÉ
Dříve než začnete zařízení používat, přečtěte si pozorně tento návod a uschovejte si
jej do budoucna.
BEZPEČNOSTNÍ POKYNY
– Zařízení nikdy neponořujte do vody ani neoplachujte pod tekoucí vodou.
– Zabraňte proniknutí vody nebo jiné tekutiny do zařízení, aby se zabránilo úrazu elek-
trickým proudem.
– Potraviny k fritování vždy vložte do koše, aby nedošlo ke kontaktu s topnými články.
– Během provozu zařízení nezakrývejte vstupní a výstupní otvory vzduchu.
– Nenaplňujte vanu olejem, protože to může způsobit nebezpečí požáru.
– Nikdy se nedotýkejte vnitřku zařízení během jeho provozu.
UPOZORNĚNÍ
Zkontrolujte, zda napětí uvedené na zařízení odpovídá místnímu síťovému napětí.
– Nepoužívejte zařízení, pokud se poškodilo.
– Opravy musí provádět pouze zmocněné osoby.
– Síťový kabel mějte v bezpečné vzdálenosti od horkých povrchů.

– Nepřipojujte zařízení ani neobsluhujte ovládací panel mokrýma rukama.
– Zařízení neumísťujte na stěnu nebo na jiná zařízení. Nechte alespoň 10 cm volného
prostoru zezadu a z bočních stran a 10 cm volného prostoru nad zařízením.
– Na zařízení nepokládejte žádné předměty.
– Zařízení nepoužívejte pro jiné účely, než které jsou popsány v tomto návodu.
– Nedovolte, aby zařízení bylo v provozu bez dohledu.
– Při smažení horkým vzduchem horká pára odchází výstupními otvory vzduchu. Mějte
ruce a obličej v bezpečné vzdálenosti od páry a výstupních otvorů vzduchu.
Také při vytahování koše ze zařízení dávejte pozor na horkou páru.
– Každý dostupný povrch se může během provozu zahřát (obr. 2).
– Zařízení ihned odpojte od napájení, pokud z něj uniká černý kouř.
– Ujistěte se, že zařízení stojí na vodorovném, plochém a pevném povrchu.
– Toto zařízení je určeno pouze pro domácí použití. Není vhodné pro bezpečné
používání v podobných prostorách, jako jsou zaměstnanecké kuchyňky, zemědělské
farmy, motely a další obytné prostory. Není také určeno k tomu, aby jej používali klienti
v hotelech, motelech, na ubytovnách a v dalších obytných prostorách.
– Pokud zařízení nepoužíváte správně nebo jej používáte pro komerční nebo polokomerční použití nebo jej používáte v rozporu s pokyny k návodu k obsluze, záruka
ztratí platnost a výrobce může odmítnout jakoukoli odpovědnost za způsobené škody.
– Pokud zařízení nepoužíváte, vždy jej odpojte od napájení.
– Zařízení nechte asi 30 minut vychladnout, abyste jej mohli bezpečně obsluhovat nebo
čistit.
-Keep the mains cable away from hot surfaces.
PŘED PRVNÍM POUŽITÍM
1. Odstraňte veškerý obalový materiál.
2. Ze zařízení odstraňte fólii a etikety.
3. Koš a vanu pečlivě vyčistěte horkou vodou, přípravkem na mytí nádobí a neabrazivní
houbou.
4. Zařízení otřete vlhkým hadříkem.
Naše zařízení je fritéza, která umožňuje přípravu pokrmů pomocí horkého vzduchu bez
přebytečného oleje.
Pamatujte: Nenaplňujte vanu olejem nebo ztuženým pokrmovým tukem.
PŘÍPRAVA K POUŽITÍ
1 Zařízení postavte na pevný, vodorovný a rovný povrch.
Zařízení neumísťujte na povrch, který není odolný proti vysokým teplotám.
2 Do vany vložte koš (obr. 3).
3 Vytáhněte kabel ze schránky, která je umístěna na spodní straně zařízení. Vanu
nenaplňujte olejem nebo jinou tekutinou.
Na zařízení nepokládejte žádné předměty, může být narušen oběh vzduchu, což ovlivní
účinek fritování horkým vzduchem.
POUŽÍVÁNÍ ZAŘÍZENÍ
1. Vložte zástrčku do uzemněné síťové zásuvky.
2. Za zařízení opatrně vysuňte vanu s košem.
3. Koš naplňte potravinami.

4. Zasuňte vanu s košem zpět do zařízení (obr. 4).
Vanu nikdy nepoužívejte bez koše.
Poznámka: Nedotýkejte se vany ani koše během provozu a po něm, protože se mohou
zahřát na vysokou teplotu. Vanu uchopujte pouze za úchyt.
5. Určete požadovanou dobu přípravy složek.
6. Některé složky je třeba protřepat v polovině doby přípravy.
Chcete-li protřepat složky, vytáhněte vanu ze zařízení uchopením za úchyt a zatřeste jí.
Pak vanu zasuňte zpět do fritézy.
Poznámka: Nestlačujte tlačítko úchytu při vibracích (obr. 3).
Pokyn: Pokud chcete promíchat složky, vyjměte koš z vany a zatřeste pouze košem.
Abyste to mohli provést, vytáhněte vanu ze zařízení, položte ji na žáruvzdorný povrch a
stiskněte tlačítko rukojeti a vyjměte koš z vany.
Pokyn: Pokud nastavíte časovač na polovinu doby fritování, zazní zvukový signál, kdy
budete muset protřepat složky. Znamená to však, že po protřepání bude třeba znovu
nastavit zbývající čas fritování.
7. Po uplynutí nastavené doby fritování zazní zvukový signál. Vytáhněte vanu ze
zařízení a položte ji na žáruvzdorný povrch.
Upozornění: Zařízení můžete také vypnout ručně. Chcete-li to provést, otočte časovač
na 0.
8. Zkontrolujte, zda jsou složky hotové.
Pokud složky nejsou ještě hotové, zasuňte pánev zpět do zařízení a nastavte časovač
na několik dalších minut.
9. Chcete-li vytáhnout složky, vyjměte vanu z horkovzdušné fritézy a položte ji na žáruvzdorný povrch a pak stiskněte tlačítko uvolňující koš a vytáhněte koš z vany.
Koš neotáčejte vzhůru dnem s přísavkou, která je nadále k němu připevněná, protože
přebytek oleje nahromaděného na dně vany steče na složky.
Dávejte pozor na páru unikající ze zařízení během provozu a po jeho ukončení při
vysunutí vany s košem.
10. Vyprázdněte koš.
Poznámka: Chcete-li vytáhnout velké nebo křehké složky, vytahujte složky z koše po-
mocí kleští.
11. Jakmile je dávka složek hotová, je fritéza ihned připravena pro přípravu další dávky.
12. Chcete-li ukončit používání zařízení, stiskněte vypínač a vytáhněte zástrčku ze
zásuvky.
ČIŠTĚNÍ
Zařízení čistěte po každém použití.
Zařízení nechte vychladnout, pak při vypnutém zařízení vysuňte vanu, vyčistěte ji od
zbytků pokrmů.
Vana a koš jsou potaženy nepřilnavým povlakem, a proto je nedrhněte.
K čištění používejte vlhkou houbu nebo hadřík. Vysunovatelné části můžete mýt vodou,
po umytí je však nechte důkladně vyschnout.

OVLÁDACÍ PANEL
G. INDIKAČNÍ KONTROLKA
B. DISPLEJ TEPLOTY/
ČASU
D. NASTAVENÍ TEPLOTY/
ČASU
C. MENU
1. Zařízení připojte k napájení.
2. Stiskněte tlačítko (A) START do okamžiku, až se rozsvítí displej.
3. Použitím tlačítka (C) MENU vyberte jeden z režimů přípravy pokrmů (hranolky, ryby,
mořské plody, maso, pečivo, zelenina), teplota a čas se nastaví automaticky a zobrazí
se na displeji.
4. S použitím tlačítka (D) můžete vybrat, zda chcete nastavit teplotu nebo čas a přizpůsobit je pomocí tlačítek (E) a (F).
5. Chcete-li ukončit provoz zařízení, vyberte tlačítko (A).
F. NASTAVENÍ TEPLOTY/ČASU
E. NASTAVENÍ TEPLOTY/
H. INDIKAČNÍ KONTROLKA
A. START/KONEC
TEPLOTY
ČASU
ČASU

VYSVĚTLENÍ SYMBOLŮ
PROHLÁŠENÍ O SHODĚ S EVROPSKÝMI NORMAMI
Toto zařízení odpovídá požadavkům směrnic o elektromagnetické kompatibilitě EMC (2014/30/EU) a nízkonapěťové LVD (2014/35/EU), proto
bylo označeno značkou CE a bylo vystaveno prohlášení o shodě s ev-
ropskými normami.
Tento symbol znamená, že výrobek se nesmí vyhazovat společně s
jiným domácím odpadem. Zákon zabraňuje pod hrozbou sankce směšovat opotřebená elektrická a elektronická zařízení s jiným odpadem. Lze
zabránit možným negativním vlivům na životní prostředí a lidské zdraví,
které by mohly vzniknout z nesprávného nakládání s odpady z opotřebených elektrických a elektronických zařízení, pokud bude výrobek zužitkován náležitým způsobem.
Výrobek je přizpůsoben styku s potravinami.

DE
EINFÜHRUNG
Unser Gerät ist eine fettfreie Fritteuse, die dank der Technologie der schnellen Heißluftzirkulation viele verschiedene Gerichte ohne den Einsatz von Öl zubereiten kann.
Die Gerichte können gegrillt, gebacken und erhitzt werden, so dass sie leicht, schmackhaft und diätetisch sind, da sie fettfrei zubereitet wurden.
TECHNISCHE SPEZIFIKATION
Spannung: 220-240V ~ 50 \ 60Hz
Leistung: 1500 W
Volumen des Korbs: 3,2 l
Einstellbare Temperatur: 80 oC –200 oC
Timer: 0-60 min
ALLGEMEINE BESCHREIBUNG (ABB. 1)
1. Dekorativer Deckel
2. Bedienfeld
3. Obere Abdeckung
4. Korb
5. Druckknopf zum Lösen des Korbes
6. Schüssel
7. Griff des Korbes
8. Luftaustrittsöffnungen
9. Netzkabel
WICHTIG
Bitte lesen Sie diese Anweisung vor Nutzung des Geräts sorgfältig durch und bewahren
Sie sie für die Zukunft auf.
GEFAHR
- Tauchen Sie das Gehäuse, in dem sich Elektro- und Heizelemente benden, niemals
ins Wasser oder spülen Sie es nicht unter den Wasserhahn.
- Lassen Sie kein Wasser oder andere Flüssigkeiten in das Gerät eindringen, um einen
Stromschlag zu vermeiden.
- Legen Sie die Zutaten zum Braten immer in den Korb, um den Kontakt mit den Heizelementen zu vermeiden.
- Decken Sie den Lufteinlass oder die Außenluftöffnungen nicht ab, wenn das Gerät
in Betrieb ist.
- Füllen Sie die Schüssel nicht mit Öl, da sonst Brandgefahr besteht.
- Berühren Sie während des Betriebes niemals das Innere des Gerätes.

WARNUNGEN
Überprüfen Sie, ob die auf dem Gerät angegebene Spannung mit der örtlichen
Netzspannung übereinstimmt.
- Verwenden Sie das Gerät nicht, wenn es beschädigt ist.
- Reparaturen dürfen nur von autorisiertem Personal durchgeführt werden.
- Halten Sie das Netzkabel von heißen Oberächen fern.
- Schließen Sie das Gerät nicht an und bedienen Sie es nicht mit nassen Händen.
- Bringen Sie das Gerät nicht an eine Wand oder auf andere Geräte an. Lassen Sie
mindestens 10 cm Freiraum an der Rückseite und an den Seiten und 10 cm Freiraum
über dem Gerät.
- Stellen Sie nichts auf das Gerät.
- Verwenden Sie das Gerät nur für die in dieser Anleitung beschriebenen Zwecke.
- Lassen Sie das Gerät nicht unbeaufsichtigt arbeiten.
- Beim Braten mit Heißluft wird heißer Dampf durch die Luftaustrittsöffnungen freigesetzt. Halten Sie Hände und Gesicht in sicherem Abstand zu Dampf und zu Luftauslässen.
Vorsicht ist auch vor heißem Dampf und Luft beim Herausnehmen der Pfanne aus
dem Gerät geboten.
- Jede zugängliche Fläche kann während der Nutzung beheizt werden (Abb. 2).
- Trennen Sie das Gerät sofort von der Stromversorgung, wenn dunkler Rauch aus
dem Gerät austritt.
- Vergewissern Sie sich, ob das Gerät auf eine waagerechte, ebene und stabile Unterlage steht.
- Dieses Gerät ist nur zum Gebrauch im Haushalt bestimmt. Es ist möglicherweise nicht
geeignet für den sicheren Einsatz in Umgebungen wie Arbeitsküchen, Bauernhöfen,
Motels und anderen Wohnumgebungen. Es ist auch nicht für die Nutzung durch Kunden in Hotels, Motels, Unterkünften, Frühstücksräumen und anderen Wohnumgebungen
vorgesehen.
- Wird das Gerät unsachgemäß oder für den gewerblichen oder semigewerblichen Gebrauch verwendet oder nicht entsprechend den in der Bedienungsanleitung enthaltenen
Anweisungen verwendet, erlischt die Garantie und der Hersteller kann jegliche Haftung
für entstandene Schäden ablehnen.
- Trennen Sie das Gerät immer vom Stromnetz, wenn es nicht benutzt wird.
- Es dauert ca. 30 Minuten, bis das Gerät abgekühlt ist, um es sicher zu bedienen oder
zu reinigen.
VOR DEM ERSTEN GEBRAUCH
1. Entfernen Sie alle Verpackungselemente.
2. Die Folie und die Etiketten vom Gerät entfernen.
3. Den Korb und die Pfanne gründlich mit heißem Wasser, Geschirrspülmittel und einem nicht scheuernden Schwamm reinigen.
4. Das Gerät mit einem feuchten Tuch abwischen.
Unser Gerät ist eine Fritteuse, die eine Zubereitung von Gerichten mithilfe der Heißluft,
ohne den Einsatz von Öl ermöglicht.
Bitte beachten: Die Pfanne nicht mit Öl oder Bratfett füllen.
VOR DER VERWENDUNG
1. Stellen Sie das Gerät auf eine stabile, waagerechte und ebene Fläche.
Stellen Sie das Gerät nicht auf eine Fläche, die nicht gegen hohe Temperaturen bestän-

dig ist.
2. Legen Sie den Korb in die Schüssel (Abb. 3).
3. Ziehen Sie das Kabel aus der Ablage an der Unterseite des Geräts heraus.
Füllen Sie die Pfanne nicht mit Öl oder anderen Flüssigkeiten.
Legen Sie keine Gegenstände auf das Gerät, der Luftstrom wird gestört und beeinträchtigt die Wirkung des Frittierens mit heißer Luft.
VERWENDUNG DES GERÄTES
1. Stecken Sie den Netzstecker in eine geerdete Steckdose.
2. Schieben Sie die Pfanne mit dem Korb vorsichtig aus dem Gerät heraus.
3. Füllen Sie den Korb mit Gerichten
4. Schieben Sie die Schüssel zurück in das Gerät (Abb. 4)
Benutzen Sie niemals die Schüssel ohne Korb.
Achtung: Berühren Sie die Schüssel oder den Korb nicht während oder unmittelbar
nach dem Gebrauch, da sie erhitzt werden kann und hohe Temperaturen erreichen
kann. Halten Sie die Schüssel nur am Griff.
5. Geben Sie die erforderliche Zubereitungszeit für die Zutaten an
6. Einige Zutaten müssen zur Hälfte der Zubereitungszeit geschüttelt werden.
Um die Zutaten zu schütteln, ziehen Sie die Schüssel am Griff aus dem Gerät und
schütteln Sie sie. Dann schieben Sie die Schüssel zurück in die Fritteuse herein.
Achtung: Drücken Sie während des Schüttelns nicht auf den Griffknopf. (Abb. 3)
Hinweis: Um die Zutaten zu mischen, können Sie den Korb aus der Schüssel nehmen
und nur mit dem Korb schütteln. Ziehen Sie dazu die Schüssel aus dem Gerät, stellen
Sie sie auf eine hitzebeständige Fläche und drücken Sie den Griffknopf. Dann entnehmen Sie den Korb aus der Schüssel
Hinweis: Wenn Sie den Timer auf die Hälfte der Zubereitungszeit einstellen, hören Sie
den Uhrenring, wenn Sie die Zutaten schütteln müssen. Das bedeutet jedoch, dass die
Zeit für die verbleibende Zubereitungszeit nach dem Schütteln neu eingestellt werden
muss.
7. Nach dem Hören des Uhrklingeltons ist die eingestellte Zubereitungszeit abgelaufen.
Ziehen Sie die Schüssel aus dem Gerät heraus und stellen Sie sie auf eine hitzebeständige Fläche auf.
Achtung: Sie können das Gerät auch manuell ausschalten. Drehen Sie dazu den Timerknopf auf 0.
8. Überprüfen Sie, ob die Zutaten fertig zubereitet sind.
Wenn die Zutaten noch nicht fertig sind, setzen Sie einfach die Pfanne wieder in das
Gerät ein und stellen Sie den Timer noch für einige Minuten ein.
9. Um die Zutaten herauszunehmen, ziehen Sie die Schüssel aus der Fritteuse heraus
und stellen Sie sie auf eine hitzebeständige Fläche, drücken Sie dann den Knopf, um
den Korb zu lösen und nehmen Sie den Korb aus der Schüssel heraus.
Drehen Sie den Korb nicht mit dem Saugnapf, der noch an ihm befestigt ist, auf den
Kopf, da das überschüssige Öl, das sich am Boden der Schüssel angesammelt hat, in
die Zutaten hingelangen kann.
Achten Sie darauf, dass während und nach dem Gebrauch, während Sie die Bratpfanne
mit dem Korb herausziehen, Dampf aus dem Gerät entweicht.
10. Den Korb entleeren.
Hinweis: Um große oder delikate Zutaten aus dem Korb herauszunehmen, verwenden
sie dazu eine Zange
11. Wenn ein Teil von Zutaten fertig ist, ist die Fritteuse sofort bereit, den nächsten Teil
vorzubereiten.
12. Um das Nutzen des Geräts zu beenden, drücken Sie den Netzschalter und ziehen

Sie den Stecker aus der Steckdose.
REINIGUNG
Reinigen das Gerät nach jedem Gebrauch.
Lassen Sie das Gerät abkühlen, nehmen Sie den Behälter bei ausgeschaltetem Gerät
heraus und reinigen Sie ihn von Speiseresten.
Behälter und Korb sind mit einer Antihaftbeschichtung versehen und sollten nicht geschrubbt werden.
Verwenden Sie zum Reinigen einen feuchten Schwamm oder ein feuchtes Tuch. Die
herausschiebbaren Teile können unter Wasser gewaschen werden, müssen aber nach
dem Waschen gründlich getrocknet werden.
BEDIENFELD
G.KONTROLLLEUCHTE ZUR AN-
ZEIGE DER TEMP.
B.TEMPERATUR-/ZEITANZEIGE
D.TEMPERATUR-/ZEITEINSTELLUNG
C. MENU
1. Schließen Sie das Gerät an die Stromversorgung an.
2. Halten Sie die Taste (A) START gedrückt, bis die Anzeige leuchtet.
3. Mit der Taste (C) MENÜ können Sie ein voreingestelltes Zubereitungsmodus (Pommes frites, Fisch, Meeresfrüchte, Fleisch, Backwaren, Gemüse) auswählen, die Temperatur und die Zeit werden automatisch eingestellt und auf dem Display angezeigt.
A. START/ENDE
F.TEMPERATUR-/ZEITEIN-
E.TEMPERATUR-/ZEITEINSTEL-
STELLUNG
LUNG
H.KONTROLLLEUCHTE
ZUR ANZEIGE DER ZEIT

4. Wählen Sie mit der Taste (D) aus, ob Sie die Temperatur oder die Zeit einstellen
möchten, und stellen Sie diese mit den Tasten (E) und (F) ein.
5. Um die Arbeit des Geräts zu beenden, wählen Sie die Taste (A).
ERKLÄRUNG DER SYMBOLE
EU-KONFORMITÄTSERKLÄRUNG
Das Gerät entspricht den Anforderungen der EMV-Richtlinie
(2014/30/EU) über die elektromagnetische Verträglichkeit und Niederspannungsrichtlinie LVD (2014/35/EU), deshalb wurde es mit dem
CE-Zeichen versehen und darauf die EU-Konformitätserklärung ausgestellt.
Dieses Symbol bedeutet, dass das Produkt nicht zusammen mit
anderen Haushaltsabfällen entsorgt werden darf. Das Gesetz verbietet unter Androhung einer Geldstrafe, elektrische und elektronische
Altgeräte zusammen mit anderen Abfällen zu mischen. Die möglichen negativen Auswirkungen auf die Umwelt und die menschliche
Gesundheit, die aus einen unangemessenen Umgang mit Abfall aus
elektronischen Altgeräten entstehen, können verhindert werden,
wenn das Produkt ordnungsgemäß entsorgt wird.
Das Produkt ist für den Kontakt mit Lebensmitteln geeignet.

FR
INTRODUCTION
Notre appareil est une friteuse sans graisse qui grâce à la technologie de circulation
d’air chaud rapide permet de préparer de nombreux plats différents sans utiliser d’huile.
Les plats peuvent être grillés, cuits et chauffés an qu’ils soient légers, savoureux et
diététiques, car ils sont exempts de graisse.
SPÉCIFICATION TECHNIQUE
Tension: 220-240V ~ 50 \ 60Hz
Puissance: 1500 W
Capacité du panier: 3,2 l
Température réglable: 80 oC –200 oC
Minuterie: 0-60 min
DESCRIPTION GÉNÉRALE (FIG.1)
1 Couvercle décoratif
2 Panneau de commande
3 Couvercle supérieur
4 Panier
5 Bouton de déverrouillage du panier
6 Cuve
7 Poignée du panier
8 Trous de sortie d’air
9 Câble d’alimentation
IMPORTANT !
Veuillez lire attentivement cette notice avant d’utiliser l’appareil et conservez-la pour
référence ultérieure.
DANGER
- Ne plongez jamais le boîtier contenant les composants électriques et les éléments
chauffants dans l’eau et ne le rincez pas sous le robinet.
- Ne laissez pas d’eau ou autre liquide pénétrer dans l’appareil pour éviter les chocs
électriques.
- Mettez toujours les ingrédients à frire dans le panier pour éviter tout contact avec les
éléments chauffants.
- Ne bouchez pas l’entrée d’air et les trous d’air externes lorsque l’appareil est en cours
de fonctionnement.
-Ne remplissez pas la cuve d’huile car cela pourrait provoquer un incendie.
- Ne touchez jamais l’intérieur de l’appareil pendant son fonctionnement.
AVERTISSEMENTS

Vériez si la tension indiquée sur l’appareil correspond à la tension secteur locale.
- N’utilisez pas l’appareil s’il a été endommagé.
- Les réparations ne doivent être effectuées que par des personnes autorisées.
- Tenez le c[able d’alimentation à l’écart des surfaces chaudes.
- Ne branchez pas l’appareil et n’utilisez pas le panneau de commande avec les mains
mouillées.
- Ne placez pas l’appareil sur un mur ou d’autres appareils. Laissez au moins 10 cm
d’espace libre sur le dos et les côtés et 10 cm d’espace libre au-dessus de l’appareil.
- Ne mettez rien sur l’appareil.
- N’utilisez pas l’appareil à d’autres ns que celles décrites dans cette notice.
Ne laissez pas l’appareil fonctionner sans surveillance.
- Lors de la friture avec de l’air chaud, de la vapeur chaude est libérée par les sorties
d’air. Gardez vos mains et votre visage à une distance sécuritaire des trous de sortie
de vapeur et d’air.
Faites également attention à la vapeur chaude et à l’air chaud lorsque vous retirez la
casserole de l’appareil.
- Chaque surface disponible peut devenir chaude pendant l’utilisation (Fig.2).
- Déconnectez immédiatement l’appareil de l’alimentation électrique si de la fumée
noire est émise par l’appareil.
- Assurez-vous que l’appareil est placé sur une surface plane, égale et stable.
- L’appareil est conçu uniquement pour un usage domestique. Il peut ne pas convenir
à une utilisation sécuritaire dans des environnements tels que les cuisines, les fermes,
les motels et autres environnements résidentiels. Il n’est pas non plus destiné à être
utilisé par les clients dans les hôtels, les motels ainsi que dans d’autres environnements
résidentiels.
- Si l’appareil n’est pas utilisé correctement ou est utilisé à des ns professionnelles ou
semi-professionnelles ou qu’il n’est pas utilisé conformément aux instructions de la notice d’utilisation, la garantie est annulée et le fabricant peut refuser toute responsabilité
des dommages causés.
- Débranchez toujours l’appareil de l’alimentation électrique lorsqu’il n’est pas utilisé.
- L’appareil a besoin d’environ 30 minutes pour refroidir pour la manipulation ou le
nettoyage en toute sécurité.
AVANT LA PREMIÈRE UTILISATION
1 Retirez tous les éléments de l’emballage.
2 Retirez le lm et les étiquettes de l’appareil.
3 Nettoyez soigneusement le panier et la casserole avec de l’eau chaude, du liquide
vaisselle et une éponge non abrasive.
4 Essuyez l’appareil avec un chiffon humide.
Notre appareil est une friteuse qui permet de préparer des plats en utilisant de l’air
chaud sans utiliser d’huile.
Attention ! Ne remplissez pas la casserole d’huile ou de graisse à frire.
Préparation à l’utilisation
1 Placez l’appareil sur une surface stable et nivelée.
Ne placez pas l’appareil sur une surface non résistante aux hautes températures.
2 Placez le panier dans la cuve (Fig. 3).
3 Retirez le câble du compartiment situé au bas de l’appareil.
Ne remplissez pas la casserole d’huile ou d’autre liquide.
Ne mettez rien sur l’appareil, le ux d’air sera perturbé et affectera l’effet de la friture
avec de l’air chaud.
UTILISATION DE L’APPAREIL

1 Branchez la che d’alimentation à une prise électrique reliée à la terre.
2 Retirez doucement la casserole avec le panier de l’appareil.
3 Remplissez le panier avec de des préparations.
4 Insérer la cuve avec le panier dans l’appareil (g. 4)
N’utilisez jamais la cuve sans le panier.
Attention : Ne touchez pas la cuve ou le panier pendant et immédiatement après l’utilisation, car ils peuvent être chauds et atteindre une température élevée. Tenez la cuve
uniquement par la poignée.
5 Dénissez le temps requis pour préparer les ingrédients.
6 Certains ingrédients doivent être secoués à mi-cuisson.
Pour secouer les ingrédients, sortez la cuve de l’appareil par la poignée et secouez-la.
Ensuite, insérez-la dans la friteuse.
Attention : N’appuyez pas sur le bouton de la poignée en secouant. (Fig. 3)
Consigne: Pour mélanger les ingrédients, vous pouvez retirer le panier de la cuve et
secouer uniquement le panier. Pour ce faire, sortez la cuve de l’appareil, placez-la sur
une surface résistante à la chaleur et appuyez sur le bouton de la poignée et sortez le
panier de la cuve.
Consigne: Si vous réglez la minuterie à la moitié du temps de cuisson, vous entendrez
la sonnerie de l’horloge lorsque vous devez secouer les ingrédients. Cependant, cela
signie qu’après avoir secoué, vous devez régler à nouveau l’heure pour le temps de
préparation restant.
7 Après avoir entendu la sonnerie, le temps de cuisson réglé s’est écoulé. Retirez la
cuve de l’appareil et placez-la sur une surface résistante aux températures élevées.
Attention : Vous pouvez également éteindre l’appareil manuellement. Pour ce faire,
tournez le bouton de réglage du temps à 0.
8 Vériez que les ingrédients sont prêts.
Si les ingrédients ne sont pas encore prêts, insérez simplement la casserole dans l’appareil et réglez la minuterie pour quelques minutes de plus.
9 Pour retirer les ingrédients, sortez la cuve de la friteuse à air chaud et placez-la sur
une surface résistante à la chaleur, puis appuyez sur le bouton de déverrouillage du
panier et sortez le panier de la cuve.
Ne renversez pas le panier avec la ventouse qui y est toujours attachée, car l’excédent
d’huile accumulé au fond de la cuve coulera sur les ingrédients.
Faites attention à la vapeur qui sort de l’appareil pendant et après le travail, lorsque
vous retirez la casserole avec le panier.
10 Videz le panier.
Consigne: Pour retirer les ingrédients grands ou fragiles, sortez les ingrédients du panier à l’aide d’une pince.
11 Lorsque le lot d’ingrédients est prêt, la friteuse est immédiatement prête à préparer
le lot suivant.
12. Pour mettre n à l’utilisation de l’appareil, appuyez sur l’interrupteur d’alimentation
et débranchez la che du contact.
NETTOYAGE
Nettoyez l’appareil après chaque utilisation.
Attendez que l’appareil refroidisse, puis éteignez l’appareil, enlevez le récipient, net-
toyez les résidus d’aliments.
Le récipient et le panier sont recouverts d’un revêtement non adhésif donc ne les frottez
pas.
Utilisez une éponge ou un chiffon humide pour nettoyer. Vous pouvez laver les pièces
sous l’eau, mais après les avoir lavées, séchez-les soigneusement.
PANNEAU DE COMMANDE
G.VOYANT DE TEMPÉRATURE
B. AFFICHAGE DE LA
TEMPÉRATURE/DU
TEMPS
D. DÉFINITION DE LA
TEMPÉRATURE/DU TEMPS
C. MENU
1. Branchez l’appareil à l’alimentation électrique.
2.Maintenez le bouton (A) MARCHE enfoncé jusqu’à ce que l’écran s’allume.
3. À l’aide du bouton (C) MENU, vous pouvez sélectionner un des modes de préparation des aliments (frites, poisson, fruits de mer, viande, pâtisseries, légumes), la
température et le temps seront réglés automatiquement et seront afchés sur l’écran.
4. en utilisant le bouton (D), vous pouvez choisir si vous voulez régler la température ou
le temps et les ajuster en utilisant les boutons (E) et (F).
5. pour terminer le fonctionnement de l’appareil, sélectionnez le bouton (A).
F.RÉGLAGE DE LA TEMPÉRA-
A. MARCHE/ARRÊT
TURE/DU
E.RÉGLAGE DE LA
TEMPÉRATURE/DU
H.VOYANT DE TEMPS

EXPLICATION DES SYMBOLES
DICHIARAZIONE DI CONFORMITÀ ALLE NORME EUROPEE
Il presente le respect de la directive relative à la compatibilité électromagnétique EMC (2014/30 / EU) et de la basse tension LVD (2014/35
/ UE) e par questo motivo è stato riportato il marchio CE e rilasciata la
relativa dichiarazione di conformità alle norme européenne.
Questo simbolo signie que le produit n’a pas été évalué correctement
et que tous les autres produits connexes sont absents. La legge vieta (a
pena pecuniaria) de smaltire gli apparecchi elettrici ed elettronici insieme
ad altri riuti. Se il prodotto vene smaltito dans modo corretto, si prevengono i potenziali effetti negativi par l’ambiente naturale et le salut umana,
dovuti al comportamento scorretto
Le produit est conçu pour le contact alimentaire

HU
BEVEZETÉS
Ez a termék egy olajmentes sütő, mely a forró levegő gyors légkeverésén alapuló
technológiának köszönhetően olaj használata nélkül nyújt lehetőséget számos étel
elkészítésére.
Az olajmentes sütő grillezésre, sütésre és az ételek megmelegítésére alkalmas, ezáltal
azok könnyűek, nomak és diétásak, mivel nem tartalmaznak zsírt.
MŰSZAKI SPECIFIKÁCIÓ
Tápfeszültség: 220-240V ~ 50 \ 60Hz
Teljesítmény: 1500 W
Sütőkosár űrtartalma: 3,2 l
Hőmérsékletszabályozás: 80 oC –200 oC
Időzítő: 0-60 perc
ÁLTALÁNOS LEÍRÁS (FIG.1)
1. Díszfedél
2. Kezelőpanel
3. Felső fedél
4. Sütőkosár
5. Kosárkioldó gomb
6. Edény
7. Kosár fogantyú
8. Levegő kivezető nyílások
9. Tápvezeték
FONTOS
A készülék használatba vétele előtt olvassa el gyelmesen a jelen útmutatót és azt
őrizze meg későbbi felhasználás céljából.
VESZÉLY
- Sohase merítse vízbe és ne öblítse folyóvízben az elektromos elemeket és a fűtőelemeket tartalmazó készülékházat.
- Az áramütés elkerülése végett ne engedje, hogy víz vagy más folyadék kerüljön a
berendezésbe.
- Mindig a sütőkosárba tegye az ételt, hogy elkerülje az étel fűtőelemekkel való érintkezését.
- Ne takarja le a levegő bevezetőnyílást és a külső levegőnyílásokat a berendezés
használata során.
- Ne töltse fel az edényt olajjal, tűzveszélyt okozhat.
- Sohase érintse meg a berendezés belsejét a készülék működése közben.

FIGYELMEZTETÉSEK
Ellenőrizze, hogy a berendezésen megjelölt tápfeszültség megfelel a helyi elektromos
hálózat feszültségének.
- Ne használja a megsérült berendezést.
- A termék javítását kizárólag erre feljogosult személy végezheti.
- Tartsa távol a tápvezetéket a forró felületektől.
- Ne csatlakoztassa a készüléket és ne kezelje a kezelőpanelt nedves kezekkel.
- Ne helyezze a készüléket a falra és más készülékekre. Hagyjon legalább 10 cm szabad helyet a készülék mögött és mellett, valamint 10 cm szabad teret a készülék fölött.
- Semmit sem szabad a készülékre tenni.
- A készüléket csak az útmutatóban leírt célokra szabad használni.
- Ne engedje, hogy a készülék felügyelet nélkül működjön.
- Forró levegővel történő sütés esetén a forró gőz a levegő kivezető nyílásain keresztül
hagyja el a készüléket. Tartsa biztonságos távolságban a kezeit és az arcát a gőztől és
a levegő kivezető nyílásoktól.
Emellett az edény készülékből történő kivétele során is ügyeljen a készüléket elhagyó
forró gőzre és levegőre.
- A termék használata során minden elérhető felület felhevülhet (Fig.2)
- Azonnal húzza ki a tápvezetéket a konnektorból, ha fekete füst szivárog ki a készülékből.
- Győződjön meg róla, hogy a készülék sík, egyenes és stabil felületen áll.
- Ez a készülék kizárólag otthoni használatra szolgál. Nem garantálható a termék biztonságos használata olyan helyeken, mint a dolgozói konyha, mezőgazdaságok,
motelek és más lakóhelyiségek. Nem alkalmas továbbá hotelekben, motelekben,
szálláshelyeken és más lakóhelyiségekben való használatra.
- A termék helytelen, vagy professzionális, illetve félprofesszinális célokra történő
használata, továbbá a használati útmutatóban leírtaktól eltérő használata a garancia
elvesztését eredményezi, míg a gyártó nem vállal felelősséget az ilyen használat okozta károkért.
- A használat végeztével mindig áramtalanítsa a készüléket.
-A készüléknek körülbelül 30 percre van szüksége a teljes kihűléshez. A készülék biztonságos tisztítása, elhelyezése csak ezután lehetséges.
AZ ELSŐ HASZNÁLAT ELŐTT
1. Távolítsa el a csomagolás elemeit.
2. Távolítsa el a védőfóliát és a címkéket a berendezésről.
3. Alaposan tisztítsa meg a kosarat és az edényt forró vízzel, mosogatószerrel és karcmentes mosogatószivaccsal.
4. Törölje át a berendezést nedves törlőkendővel.
A termékünk egy olyan olajmentes sütő, amely forró levegővel, olaj használata nélkül
nyújt lehetőséget az étel elkészítésére.
Ne feledje: Ne töltse meg az edényt olajjal vagy sütőzsírral.
ELŐKÉSZÜLET
1 Helyezze a készüléket stabil, vízszintes és egyenes felületre.
A készüléket hőálló felületre helyezze.
2 Helyezze be a kosarat az edénybe (Fig. 3).
3 Húzza ki a tápvezetéket a készülék alján lévő kábeltartóból.
Ne öntsön az edénybe olajat vagy egyéb folyadékot.

Semmit se helyezzen a készülék tetejére, mert megakadályozza a szabad levegőáramlást és ezzel befolyásolja a forró levegővel történő sütést.
A KÉSZÜLÉK HASZNÁLATA
1. Csatlakoztassa a dugvillát egy földelt konnektorba.
2. Óvatosan húzza ki a készülékből az edényt a kosárral.
3. Töltse fel a kosarat a termékekkel.
4. Tolja vissza az edényt a kosárral (Ryc. 4)
Sohase használja az edényt kosár nélkül.
Figyelem: Ne érintse meg az edényt és a kosarat a készülék használata alatt és közvetlenül a használat végeztével, mivel rendkívül forró. Csak a fogantyúnál fogja az edényt.
5. Állapítsa meg az összetevők elkészítésére szükséges időt
6. Az egyes összetevőket meg kell rázni az elkészítési idő felénél.
Az összetevők megrázásához húzza ki az edényt a készülékből a fogantyúnál fogva és
rázza meg. Ezután tolja vissza az edényt az olajmentes sütőbe
Figyelem: Nem szabad megnyomni a fogantyú gombját a rázás alatt. (Ryc. 3)
Útmutató: Az összetevők összekeveréséhez kiveheti a kosarat az edényből és megrázhatja a kosarat. Ennek végrehajtásához húzza ki az edényt a készülékből, helyezze egy hőálló felületre és nyomja meg a fogantyún lévő gombot, majd vegye ki a
kosarat az edényből.
Útmutató: Ha az időzítőt az elkészítési idő felére állítod, meghallod az óra csengetését,
amikor fel kell ráznod az összetevőket. Ez azt is jelenti, hogy a rázás végeztével újra
állítsa be a hátralévő elkészítési időt.
7. A csengő megszólalása után lejárt a beállított elkészítési idő. Húzza ki az edényt a
készülékből és helyezze egy hőálló felületre.
Figyelem: Kézzel is kikapcsolhatja a készüléket. Forgassa el ehhez az időszabályozó
tekerőgombot a 0 pozícióra.
8. Ellenőrizze, hogy elkészültek-e az összetevők.
Ha még nem készültek el a termékek, egyszerűen tolja vissza az edényt a készülékbe
és állítsa be az időzítőt még néhány percre.
9. Az összetevők eltávolításához húzza ki az edényt a légkeveréses olajmentes sütőből
és helyezze egy hőálló felületre, majd nyomja meg a kosár kioldó gombot és vegye ki
a kosarat az edényből.
Ne forgassa fejjel lefelé a tapadókorongos kosarat, amely még mindig rá van rögzítve,
mivel az edény fenekén összegyűlt olaj az összetevőkre folyik.
Vigyázzon a készülék használata alatt a használat végeztével, az edény kihúzásakor
a készüléket elhagyó gőzre.
10. Ürítse ki a kosarat.
Útmutató: A nagyobb vagy puha összetevők eltávolításához egy konyhai fogóval vegye
ki az ételeket a kosárból.
11. Ha elkészül az összetevők egy része, az olajmentes sütő azonnal készen áll a
következő adag elkészítésére.
12. A készülék használatának a befejezéséhez nyomja meg a kapcsológombot és húzza ki a dugvillát a konnektorból.
TISZTÍTÁS
Minden használat után meg kell tisztítani a készüléket.
Várja meg a készülék kihűlését, majd kikapcsolt készülék mellett húzza ki az edényt és
tisztítsa meg az ételmaradékoktól.
Az edény és a kosár tapadásmentes bevonattal rendelkeznek, ezért tisztítás során nem
szabad súrolni őket.

Tisztításhoz használjon nedves szivacsot vagy törlőkendőt. A kivehető elemek
folyóvízben moshatók, de mosás után meg kell szárítani őket.
KEZELŐPANEL
G.HŐMÉRSÉKLET JELZÉS
A. START/VÉGE
F.HŐM/IDŐ SZABÁLYOZÁSA
E.HŐM/IDŐ SZABÁLYOZÁSA
H.IDŐJELZÉS
B. HŐM./IDŐ KIJELZŐ
D. HŐM/IDŐ BEÁLLÍTÁSA
C. MENU
1. Csatlakoztassa a készüléket tápforrásra
2. Tartsa lenyomva a (A) START gombot a kijelző bekapcsolásáig
3. A (C ) MENU gombbal kiválaszthatja az étel elkészítésének a módját (sült krumpli,
hal, tengeri gyümölcsök, hús, sütemény, zöldség), a hőmérséklet és az idő automatikusan beállítódik és megjelenik a kijelzőn
4. A (D) gombbal kiválaszthatja, hogy be szeretnénk-e állítani a hőmérsékletet vagy az
időt és módosíthatjuk az (E) és (F) gombokkal
5. A készülék kikapcsolásához nyomja meg az (A) gombot

A SZIMBÓLUMOK MAGYARÁZATA
MEGFELELŐSÉGI NYILATKOZAT AZ EURÓPAI SZABVÁNYOKRÓL
Ez a készülék megfelel az EMC (2014/30 / EU) és a kisfeszültségű
irányelv (LVD, 2014/35 / EU) elektromágneses kompatibilitási
irányelvének, ezért CE jelzéssel ellátott, és az európai szabványokkal
való megfelelőségi nyilatkozatot készült a készülékhez
Ez a jel azt jelzi, hogy a készüléket nem szabad más háztartási
hulladékkal együtt elhelyezni. Tilos a törvény, nom fájdalom miatt,
hogy az elektromos és elektronikus berendezéseket más hulladékkal együtt kidobja. Lehetőség van arra, hogy megakadályozzuk a
természetes környezet és az emberi egészség különböző negatív
hatásait a hulladékelektronika helytelen kezeléséből, ha a terméket
megfelelően ártalmatlanítják.
A terméket élelmiszerekkel való érintkezésre tervezték.

IT
INTRODUZIONE
Il nostro dispositivo è una friggitrice ad aria calda che, grazie alla tecnologia di circolazione veloce dell’aria calda permette di preparare diverse pietanze senza olio.
Le pietanze possono essere grigliate, arrosto o riscaldate – in questo modo sono leggere, gustose e dietetiche, perché prive di grassi.
SPECIFICHE TECNICHE
Tensione: 220-240V ~ 50 \ 60Hz
Potenza: 1500 W
Capacità del cestello: 3,2 l
Temperatura regolabile: 80 oC –200 oC
Timer: 0-60 min.
DESCRIZIONE GENERALE (FIG.1)
1. Coperchio decorativo
2. Panello di controllo
3. Coperchio superiore
4. Cestello
5. Pulsante per il rilascio del cestello
6. Scodella
7. Impugnatura del cestello
8. Aperture di ventilazione
9. Cavo di alimentazione
IMPORTANTE
Prima dell’uso leggere attentamente le istruzioni e conservare per futuri riferimenti.
PERICOLO
- Non immergere la friggitrice nell’acqua (contiene elementi elettrici e riscaldanti). Non
sciacquare la friggitrice sotto acqua corrente.
- Per evitare le scosse elettriche, proteggere la friggitrice dall’acqua e da altri liquidi.
- Le pietanze devono essere fritte nel cestello, non possono toccare gli elementi riscaldanti.
- Durante il funzionamento della friggitrice, non coprire i fori di ventilazione, né i fori
esterni.
- Non versare l’olio nella scodella (pericolo di incendio).
- Durante il funzionamento della friggitrice non toccare il suo interno.
AVVERTENZE
Controllare se la tensione riportata nella targhetta dati corrisponde alla tensione di rete.
- Non usare la friggitrice danneggiata.
- Le riparazioni possono essere eseguite soltanto dalle persone qualicate.

- Tenere il cavo di rete lontano dalle superci calde.
- Non collegare né usare la friggitrice con le mani bagnate.
- Non ssare la friggitrice alla parete, né ad altre apparecchiature. Lasciare almeno 10
cm di spazio libero nella parte posteriore, laterale e sopra la friggitrice.
- Non mettere niente sulla friggitrice.
- Non usare la friggitrice per scopi diversi da quelli di cui alle presenti istruzioni.
- Non lasciare la friggitrice incustodita.
- Durante il funzionamento (frittura ad aria) il vapore fuoriesce dai fori di ventilazione.
Allontanare la faccia e le mani, tenerle a distanza di sicurezza dal vapore e dai fori di
ventilazione.
- Fare attenzione al vapore caldo e all’aria mentre la padella viene estratta dalla friggitrice.
- Tutte le superci si possono riscaldare durante l’uso della friggitrice (Fig. 2).
- Se vedi fuoriuscire il fumo scuro, scollega immediatamente la friggitrice dall’alimentazione.
- Assicurarsi che la friggitrice sia posizionata su una supercie orizzontale, uniforme
e stabile.
- Questa friggitrice è per uso domestico. Non è idonea per l’uso in sicurezza negli ambienti come cucine professionali, aziende agricole, motel o altri ambienti residenziali.
Inoltre, non deve essere usata dai clienti di alberghi e motel.
- Se la friggitrice è usata in modo non conforme o per scopi professionali e semiprofessionali, oppure se non è usata conformemente alle istruzioni d’uso, la garanzia viene
annullata e il produttore declina ogni responsabilità per danni subiti.
- Se la friggitrice non è usata, scollegarla dall’alimentazione.
- La friggitrice si raffredda in circa 30 minuti (il tempo necessario per poter eseguire le
operazioni di manutenzione o pulizia in modo sicuro).
PRIMA DEL PRIMO USO
1. Rimuovere tutti gli elementi di imballo.
2. Rimuovere la pellicola e le etichette dalla friggitrice.
3. Pulire accuratamente il cestello e la padella nell’acqua calda con detersivo per piatti.
Usare una spugna non abrasiva.
4. Pulire la friggitrice con un panno umido.
Il nostro dispositivo è una friggitrice ad aria calda che permette di preparare diverse
pietanze senza olio.
Attenzione: Non versare l’olio né altri grassi nella padella.
PRIMA DELL’USO
1. Sistemare la friggitrice su una supercie stabile, orizzontale e uniforme. Non sistemare la friggitrice sulle superci non resistenti ad alte temperature.
2. Inserire il cestello nella scodella (Fig. 3).
3. Estrarre il cavo dalla camera nel fondo della friggitrice. Non versare l’olio né altrigrassi nella padella. Non posare oggetti sulla friggitrice – in questo modo la circolazione
d’aria viene disturbata e inuisce sull’effetto di frittura ad aria calda.
USO DELLA FRIGGITRICE
1. Inserire la spina nella presa elettrica con messa a terra.
2. Estrarre attentamente la padella con il cestello dalla friggitrice.
3. Sistemare le pietanze nel cestello.

4. Inserire la scodella con il cestello nella friggitrice (Fig. 4). Non usare mai la scodella
senza il cestello.
Attenzione: Durante e subito dopo l’uso non toccare la scodella né il cestello – possono essere caldi e raggiungere alte temperature. Tenere la scodella per l’impugnatura.
5. Denire il tempo necessario per la preparazione degli ingredienti.
6. Alcune pietanze devono essere saltate a metà del tempo di preparazione. Per saltare
gli ingredienti, estrarre la scodella dalla friggitrice (tenendo l’impugnatura) e muovere
energicamente. Successivamente nuovamente inserire la scodella nella friggitrice.
Attenzione: Non premere il pulsante sull’impugnatura mentre si saltano le pietanze (Fig.
3).
Indicazione: Per mescolare gli ingredienti puoi estrarre il cestello dalla scodella e muovere energicamente soltanto il cestello. Per farlo, occorre estratte la scodella dalla
friggitrice, posarla su una supercie resistente al calore e premere il pulsante sull’impugnatura. Successivamente estrarre il cestello dalla scodella.
Indicazione: Impostando il timer a metà del tempo di preparazione, sentirai il segnale
acustico quando dovrai saltare gli ingredienti. Questo signica però che, dopo aver
mescolato gli ingredienti occorre nuovamente impostare il tempo residuo per la preparazione.
7. Il segnale acustico informa che è passato il tempo necessario per la preparazione.
Estrarre la scodella dalla friggitrice e sistemarla su una supercie resistente al calore.
Attenzione: puoi spegnere la friggitrice manualmente. Per farlo, occorre girare la
manopola di regolazione del tempo in posizione ).
8. Controllare se la pietanza è pronta.
Se la pietanza non è ancora pronta, inserire nuovamente la padella nella friggitrice e
impostare il timer per alcuni minuti aggiuntivi.
9. Per togliere la pietanza, estrarre la scodella dalla friggitrice ad aria calda e posarla su
una supercie resistente al calore. Successivamente premere il pulsante che rilascia il
cestello ed estrarre il cestello dalla scodella.
Non capovolgere il cestello con la ventosa ancora ssata – l’eccesso di olio raccolto sul
fondo della scodella scolerà sulla pietanza.
Durante il funzionamento e dopo e mentre si estrae la padella con il cestello, fare attenzione al vapore che fuoriesce dalla friggitrice.
10. Svuotare il cestello.
Indicazione: Per togliere gli ingredienti grandi o delicati, usare la pinza.
11. Se la prima parte degli ingredienti è pronta, è possibile mettere nella friggitrice altri
ingredienti.
12. Per spegnere la friggitrice premere l’interruttore ed estrarre la spina dalla presa.
PULIZIA
Pulire la friggitrice dopo ogni uso.
Attendere che la friggitrice si raffreddi. Successivamente, dopo averla spenta, estrarre
il contenitore e rimuovere i residui di alimenti.
Sia il contenitore che il cestello hanno il rivestimento antiaderente. Non devono essere
puliti con detergenti abrasivi.
Pulire con un spugna bagnata o un panno. Gli elementi estraibili possono essere lavati
sott’acqua corrente e poi accuratamente asciugati.

PANNELLO DI CONTROLLO
G.SPIA DI CONTROLLO (TEMPERATURA)
F.REGOLAZIONE TEM-
B. DISPLAY TEMPERATURA/TEMPO
D. IMPOSTAZIONI TEMPERATURA/TEMPO
C. MENU
1.Collegare la friggitrice all’alimentazione.
2.Tenere premuto il pulsante (A) START no all’accensione del display.
3. Con il pulsante (C) MENU è possibile selezionare una delle modalità di cottura
(patatine fritte, pesce, frutti di mare, carne, dolci, verdure). La temperatura e il tempo
necessario saranno impostati automaticamente e visibili sul display.
4. Con il pulsante (D) è possibile scegliere cosa impostare: la temperatura o il tempo.
Impostare con i pulsanti (E) e (F).
5. Per spegnere la friggitrice, premere il pulsante (A).
A. START/FINE
PERATURA/TEMPO
E. REGOLAZIONE TEMPERATU-
RA/TEMPO
H.SPIA DI CONTROLLO
(TEMPO)

SIMBOLI UTILIZZATI
DICHIARAZIONE DI CONFORMITÀ ALLE NORME EUROPEE
Il presente apparecchio è conforme ai requisiti della Direttiva di compatibilità elettromagnetica EMC (2014/30/EU) e di bassa tensione LVD
(2014/35/EU) e per questo motivo è stato riportato il marchio CE e rilasciata la relativa dichiarazione di conformità alle norme europee.
Questo simbolo signica che il prodotto non deve essere smaltito insieme ad altri riuti domestici. La legge vieta (a pena pecuniaria) di
smaltire gli apparecchi elettrici ed elettronici insieme ad altri riuti. Se il
prodotto viene smaltito in modo corretto, si prevengono i potenziali effetti
negativi per l’ambiente naturale e la salute umana, dovuti al comportamento scorretto.
.
Prodotto idoneo al contatto con alimenti.

PT
INTRODUÇĂO
Nosso dispositivo é uma fritadeira sem gordura que, graças ŕ tecnologia de rápida circulaçăo de ar quente, permite preparar muitos pratos diferentes sem usar óleo.
Os pratos podem ser grelhados, assados e aquecidos para que sejam leves, saboro-
sos e dietéticos, porque livres de gordura.
ESPECIFICAÇĂO TÉCNICA
Tensăo: 220-240V ~ 50 \ 60Hz
Poder: 1500 W
Capacidade da cesta: 3,2 l
Temperatura ajustável: 80 oC –200 oC
Temporizador: 0-60 min
DESCRIÇĂO GERAL (FIG.1)
1. Tampa decorativa
2. Painel de controlo
3. Tampa superior
4. Cesta
5. Botăo de liberaçăo da cesta
6. Tigela
7. Punho da cesta
8. Orifícios de saída de ar
9. Cabo de alimentaçăo
IMPORTANTE
Leia este manual cuidadosamente antes de usar o dispositivo e mantenha-o para
referęncia futura.
PERIGO
- Nunca mergulhe a caixa que contém componentes elétricos e elementos de aquecimento em água nem enxágue-a sob a torneira.
- Năo permita que a água ou outro líquido entre no dispositivo para evitar choque
elétrico.
- Coloque sempre os ingredientes de fritura no cesto para evitar o contato com os
elementos de aquecimento.
- Năo cubra a entrada de ar e as aberturas de ar externas enquanto o dispositivo estiver
em operaçăo.
- Năo preencha a tigela com óleo, pois isso pode causar risco de incęndio.
- Nunca toque na parte interna do dispositivo enquanto estiver em operaçăo.

ADVERTĘNCIAS
Verique se a tensăo indicada no dispositivo corresponde ŕ tensăo de rede local.
- Năo use o dispositivo se ele foi danicado.
- As reparaçőes só devem ser realizadas por pessoas autorizadas.
- Mantenha o cabo de alimentaçăo longe de superfícies quentes.
- Năo conecte o dispositivo nem opere o painel de controlo com as măos molhadas.
- Năo coloque o dispositivo na parede ou em outros dispositivos. Deixe pelo menos
10 cm de espaço livre atrás e nos lados e 10 cm de espaço livre acima do dispositivo.
- Năo coloque nada no dispositivo.
- Năo use o dispositivo para ns diferentes dos descritos neste manual.
- Năo deixe o dispositivo funcionar sem supervisăo.
- Ao fritar com ar quente, vapor quente é liberado através das saídas de ar. Mantenha
as măos e o rosto a uma distância segura do vapor e dos orifícios de saída de ar.
Tenha cuidado com vapor e ar quente também ao retirar a frigideira do aparelho.
- Toda superfície acessível pode car quente durante o uso (Fig. 2)
- Desconecte imediatamente o dispositivo da fonte de alimentaçăo se o fumo escuro
sair do dispositivo.
- Certique-se de que o dispositivo está colocado numa superfície horizontal, nivelada
e estável.
- Este aparelho destina-se apenas para uso doméstico. Pode năo ser adequado para
uso seguro em ambientes como cozinhas para trabalhadores, fazendas, motéis e outros ambientes residenciais. Também năo se destina a ser utilizado por clientes em
hotéis, motéis, dormidas e pequenos-almoços e outros ambientes residenciais.
- Se o dispositivo for usado de forma incorreta ou para ns prossionais ou semi-prossionais ou năo for utilizado de acordo com as instruçőes do manual do usuário, a garantia será nula e o fabricante poderá recusar qualquer responsabilidade por danos
causados.
- Sempre desconecte o dispositivo da fonte de energia quando năo estiver em uso.
- O aparelho precisa de cerca de 30 minutos para esfriar com o propósito de manuseio
ou limpeza segura.
ANTES DO PRIMEIRO USO
1. Remova todos os elementos de embalagem.
2. Remova a folha e as etiquetas do dispositivo.
3. Limpe bem a cesta e frigideira com água quente, líquido para lavar louça e esponja
năo abrasiva.
4. Limpe o dispositivo com um pano úmido.
Nosso dispositivo é uma fritadeira que permite preparar pratos por meio de ar quente
sem usar óleo.
Lembre-se: Năo encha a frigideira com óleo ou gordura para fritar.
PREPARAÇĂO PARA USO
1. Coloque o dispositivo em uma superfície estável, horizontal e nivelada.
Năo coloque o dispositivo sobre uma superfície năo resistente a altas temperaturas.
2 Coloque a cesta na tigela (Fig. 3).
3 Puxe o cabo para fora do compartimento na parte inferior do dispositivo.
Năo encha a frigideira com óleo ou outro líquido.
Năo coloque nada no dispositivo, o uxo de ar será perturbado e afetará o efeito de
fritar com ar quente.

O USO DO APARELHO
1. Conecte a cha de rede a uma tomada elétrica aterrada.
2. Tire cuidadosamente a frigideira com a cesta do aparelho.
3. Encha a cesta com comida
4. Meta a tigela com a cesta de volta no aparelho (Fig. 4)
Nunca use a tigela sem a cesta.
Atençăo: Năo toque na tigela nem na cesta durante e imediatamente após o uso,
porque pode ser quente e atingir uma temperatura elevada. Segure a tigela apenas
pelo punho.
5. Especique o tempo necessário para preparaçăo dos ingredientes
6. Alguns ingredientes requerem agitaçăo na metade do tempo da preparaçăo.
Para agitar os ingredientes, puxe a tigela para fora do dispositivo pela alça e agite-a.
Em seguida, meta a tigela de volta na fritadeira.
Atençăo: Năo pressione o botăo do punho enquanto agita. (Fig. 3)
Sugestăo: Para misturar os ingredientes, vocę pode remover a cesta da tigela e agitar
apenas a cesta. Para fazer isso, puxe a tigela para fora do aparelho, coloque-a sobre
uma superfície resistente ao calor e pressione o botăo do punho e tire a cesta da tigela
Dica: Se vocę denir o temporizador para metade do tempo de preparaçăo, vocę ouvirá
a sineta do relógio quando tiver que agitar os ingredientes. No entanto, isso signica
que depois de agitar, é preciso acertar o tempo novamente para o tempo de preparaçăo
restante.
7. Depois de ouvir a sineta do relógio, o tempo de cozimento denido passou. Retire
a tigela do aparelho e coloque-a sobre uma superfície resistente a altas temperaturas.
Atençăo: Vocę também pode desligar o dispositivo manualmente. Para fazer isso, gire
o botăo de ajuste de tempo para 0.
8. Verique se os ingredientes estăo prontos.
Se os ingredientes ainda năo estiverem prontos, meta a frigideira de volta para o apa-
relho e ajuste o temporizador por alguns minutos adicionais.
9. Para remover os ingredientes, retire a tigela da fritadeira ao ar quente e coloque-a
sobre uma superfície resistente a altas temperaturas, depois pressione o botăo de
liberaçăo da cesta e tire a cesta da tigela.
Năo gire a cesta de cabeça para baixo com a ventosa, que ainda está xada a ela,
porque o excesso de óleo que se acumulou no fundo da tigela vazará para os ingre-
dientes.
Cuidado com o vapor que sai do dispositivo durante e depois do trabalho, ao remover
a frigideira com a cesta.
10. Esvazie a cesta.
Dica: Para remover ingredientes grandes ou delicados, retire os ingredientes da cesta
usando um alicate
11. Quando o lote de ingredientes estiver pronto, a fritadeira está imediatamente pronta
para preparar o próximo lote.
12. Para terminar o uso do dispositivo, pressione o interruptor e desconecte o plugue
da tomada.
LIMPEZA
É necessário limpar o dispositivo após cada uso.
Aguarde que o dispositivo esfrie, entăo, com o dispositivo desligado, remova o recipi-
ente, limpe os resíduos de alimentos.
O recipiente e a cesta săo cobertos com um revestimento para evitar a aderęncia da
comida, portanto năo os esfregue.

Use uma esponja úmida ou um pano para limpar. É possível lavar as partes retiradas
sob a água, mas após a lavagem devem ser completamente secadas.
PAINEL DE CONTROLO
G. LUZ DE SINALIZAÇÃO
DE TEMPERATURA
B. VISOR DE TEMPER/
TEMPO
D. ACERTO DE TEMPER/
TEMPO
C. MENU
1. Conecte o dispositivo ŕ fonte de alimentaçăo
2. Pressione o botăo (A) INÍCIO até que o visor se ilumine.
3. Usando o botăo (C) MENU, pode-se selecionar 1 dos modos de preparaçăo de
alimentos (batatas fritas, peixe, marisco, carne, cozeduras, vegetais), a temperatura e
o horário serăo denidos automaticamente e exibidos no visor
4. Usando o botăo (D), vocę pode escolher se deseja denir a temperatura ou a hora e
ajustá-las por meio dos botőes (E) e (F)
5. Para terminar a operaçăo do dispositivo, selecione o botăo (A)
F.REGULAÇÃO DE TEMPER/
E.REGULAÇÃO DE TEMPER/
A. INÍCIO/FIM
TEMPO
TEMPO
H. LUZ DE SINALIZAÇÃO
DE TEMPO

EXPLICAÇÃO DOS SÍMBOLOS
DECLARAÇÃO DE CONFORMIDADE COM AS NORMAS EUROPEIAS
Este aparelho cumpre os requisitos da Diretiva da Compatibili-
dade Eletromagnética EMC (2014/30/UE) e da Baixa Tensão LVD
(2014/35/UE), portanto possui a marca CE e uma declaração de con-
formidade com as normas europeias.
Este símbolo indica que o produto não deve ser descartado com os
resíduos domésticos. A lei proíbe sob pena de multa juntar resíduos
de equipamentos elétricos e eletrónicos com outros resíduos. É pos-
sível prevenir potenciais consequências negativas para o ambiente
e a saúde humana, que poderiam resultar da manipulação incorreta
de resíduos de equipamentos eletrónicos, se o produto for eliminado
corretamente.
Produto apropriado para o contato com alimentos.

 Loading...