


GOCLEVER GENIUS 7
OWNER’S MANUAL
GOCLEVER GENIUS 7
INSTRUKCJA OBSŁUGI
VISIT OUR WEBSITE
WWW.GOCLEVER.COM
TO SEE MORE PRODUCTS TAB, NAVIO, DVR, DVB-T
Przed skorzystaniem z urządzenia zapoznaj się z niniejszą instrukcją obsługi
oraz zachowaj ją na przyszłość

2
GENIUS 7 User Manual
1. Notice of use
2. Product specifications
3. Basic functions
4. Turn on,Turn off, sleep, wake up
5. Home screen
6. Account management
7. System settings
8. About me
9. Parental account features
10. ARTIST
11. Talking Kalala Game
12. My Pet Game
13. Android Browser
14. Kalala app store
15. WeeOcean Bookstore
16. Storybook
17. Bookmark
18. Check SD card content
19. Charging Kalala Pad
20. FAQ

3
1. Notice of use
In order to ensure that you properly use the machines and prevent bodily
injury or property damage, please follow note as bellows .
1.1power considerations
●
Please do not touch the power adapter when hands wet
●The power cord into the jack of a grounded outlet
●Make sure the socket tighten, not loosen.
●If the machine could be damaged, (including power cord exposed or flaking)
please do not use it.
●
If there is lightning or leave for a long time, pull up the plug from the
socket .
1.2
machine NOTE
●Please do not put directly the machine in sunlight or in the car.
●Do not use the machine at dusty place, like the bathroom or wet areas.
●Do not use this machine with a credit card or any other magnetic objects .
●Please do not use non-native supplied accessories.
●Please do not use sharp objects touch the LCD screen.
●Please do not press LCD
●
Please do not use the appliance soak in the water
●Do not drop from a height of more than 1M
●
Do not to repair, disassemble or modify the machine .
1.3 changes or modifications not expressly approved by the party responsible
for compliance could void the user’s authority to operate the equipment.
This equipment has been tested and found to comply with the limits for a
Class B digital device, pursuant to Part 15 of the FCC Rules. These limits are
designed to provide reasonable protection against harmful interference in a

4
Product Type
Children’s tablet + Digital camera
System OS
I-WIT 3.0 (Based on Android 4.0)
CPU
AllsinnerA13 1Ghz
Memory
512MB DDR3
residential installation. This equipment generates, uses and can radiate radio
frequency energy and, if not installed and used in accordance with the
instructions, may cause harmful interference to radio communications. However,
there is no guarantee that interference will not occur in a particular installation.
If this equipment does cause harmful interference to radio or television
reception, which can be determined by turning the equipment off and on, the
user is encouraged to try to correct the interference by one or more of the
following measures:
-- Reorient or relocate the receiving antenna.
-- Increase the separation between the equipment and receiver.
-- Connect the equipment into an outlet on a circuit different
from that to which the receiver is connected.
-- Consult the dealer or an experienced radio/TV technician for
help.
This equipment complies with FCC radiation exposure limits set forth for an
uncontrolled environment. End user must follow the specific operating
instructions for satisfying RF exposure compliance. This transmitter must not be
co-located or operating in conjunction with any other antenna or transmitter.
The portable device is designed to meet the requirements for
exposure to radio waves established by the Federal Communications
Commission (USA). These requirements set a SAR limit of 1.6 W/kg
averaged over one gram of tissue. The highest SAR value reported under
this standard during product certification for use when properly worn on the body
is 0.360W/kg
2. Product specifications
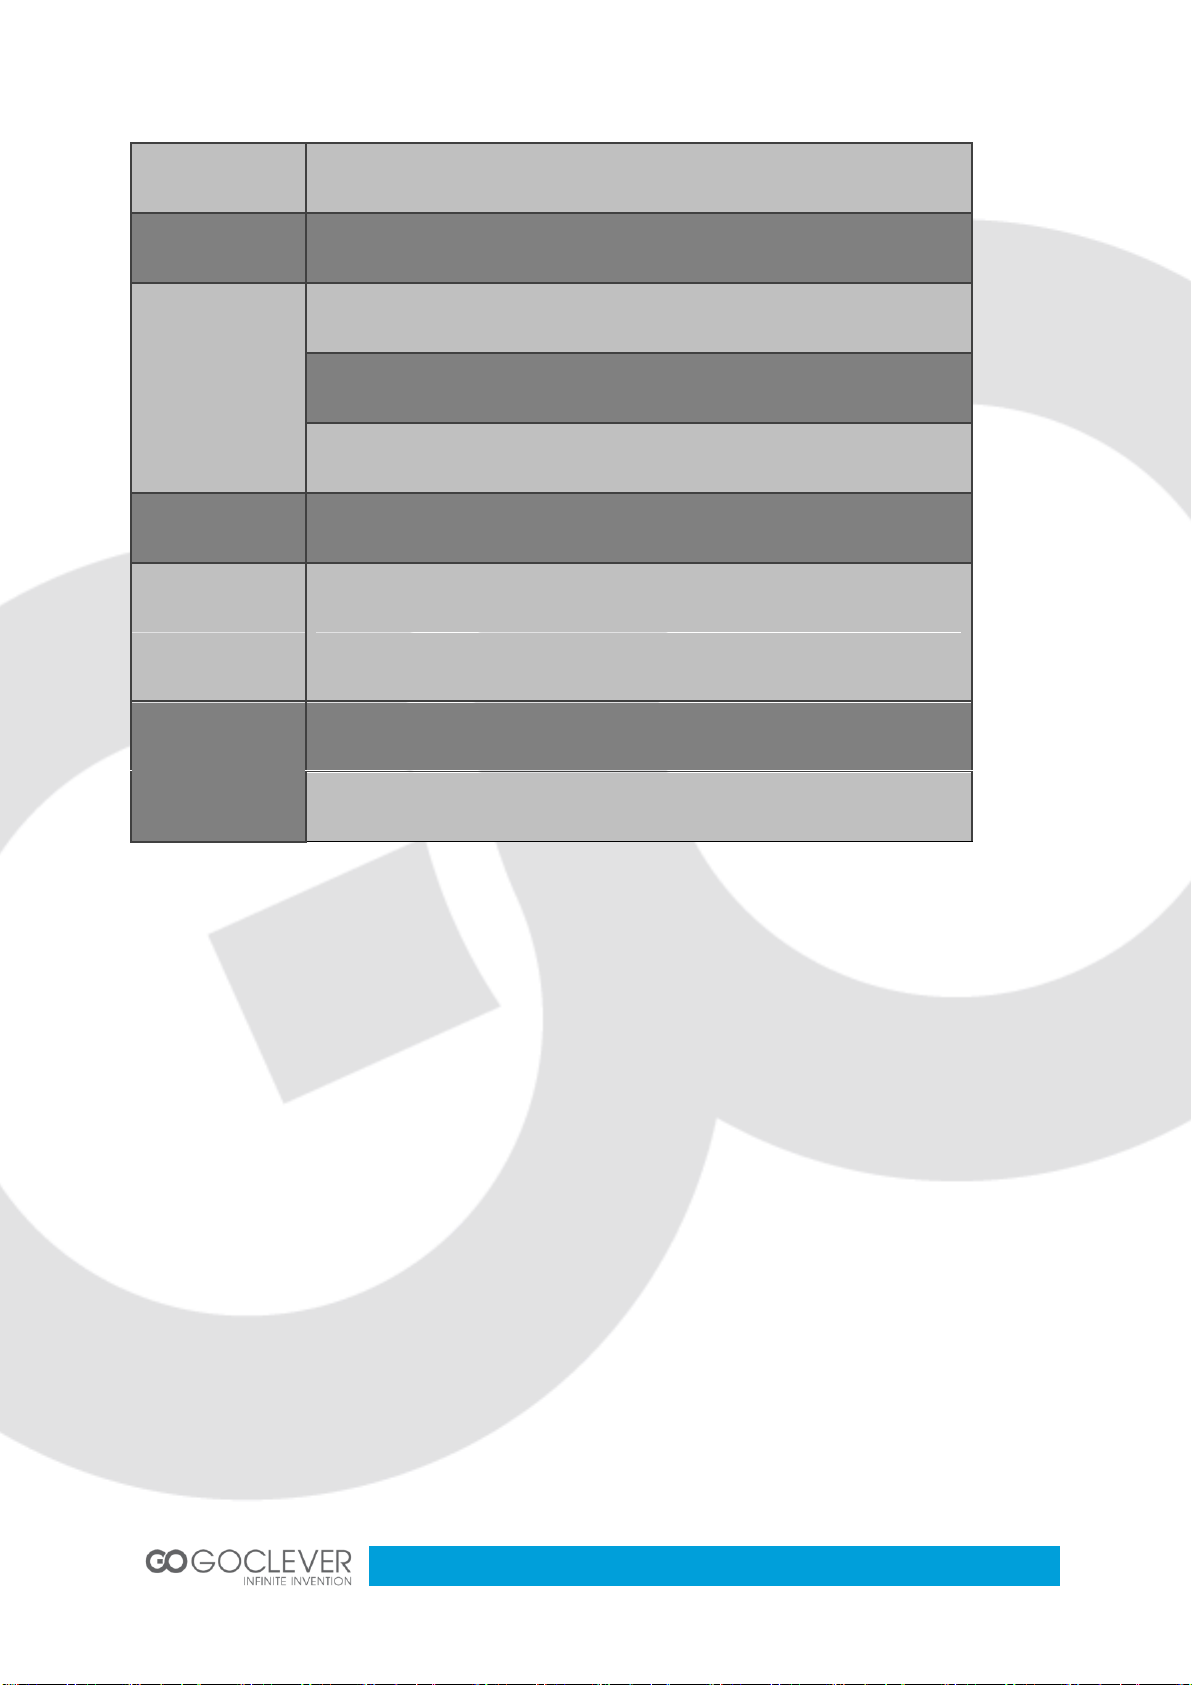
5
Storage
4Gb, micro SD card expansion(up to 32Gb)
Network
WIFI (IEEE 802.11 b/g/n)
Ports
MINI USB 2.0
Micro SD card slot
3.5mm headphone jack
Screen
7.0 inch, touch screen
Camera
Front camera /GT0308 0.3M pixels
Back camera /SP2518 2.0M pixels
Accessories
USB cable
User manual and warranty card
3. Basic
Functions
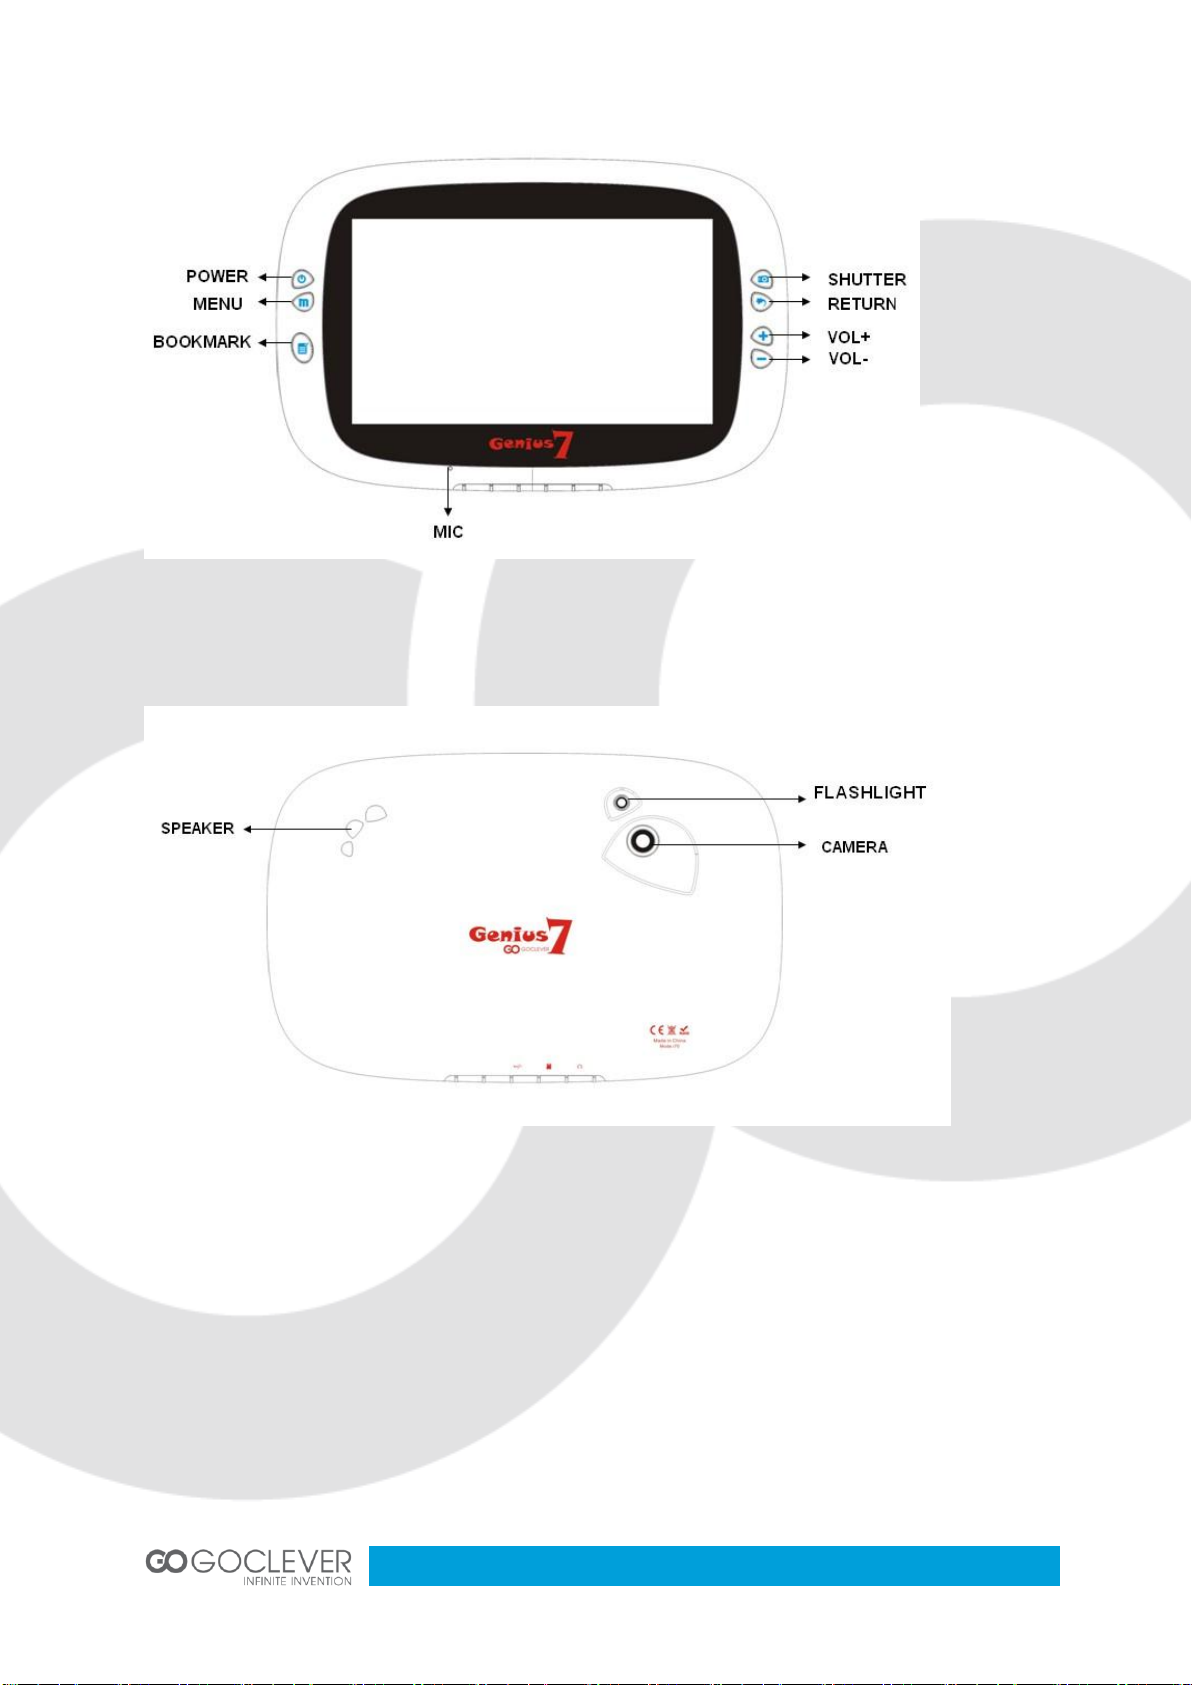
6
·MENU: Show the recently used applications.
BOOKMARK: the bookmark page lists the last 4 APKS run from earliest to latest.
Camera: Single tap the “camera” button to enter the camera mode or hold for 3
seconds to enter while using other applications.
·RETURN: Return to the last screen.
·VOLUME: VOLUME+, VOLUME-
7
Control the volume to rise or reduce, or change the variable focal length in camera
mode.
MIC: Microphone jack
SPEAKER: Sound input/output.
4. Turn on, turn off, sleep, wake up
·Turn on: While off, press and hold the power button for 3 seconds
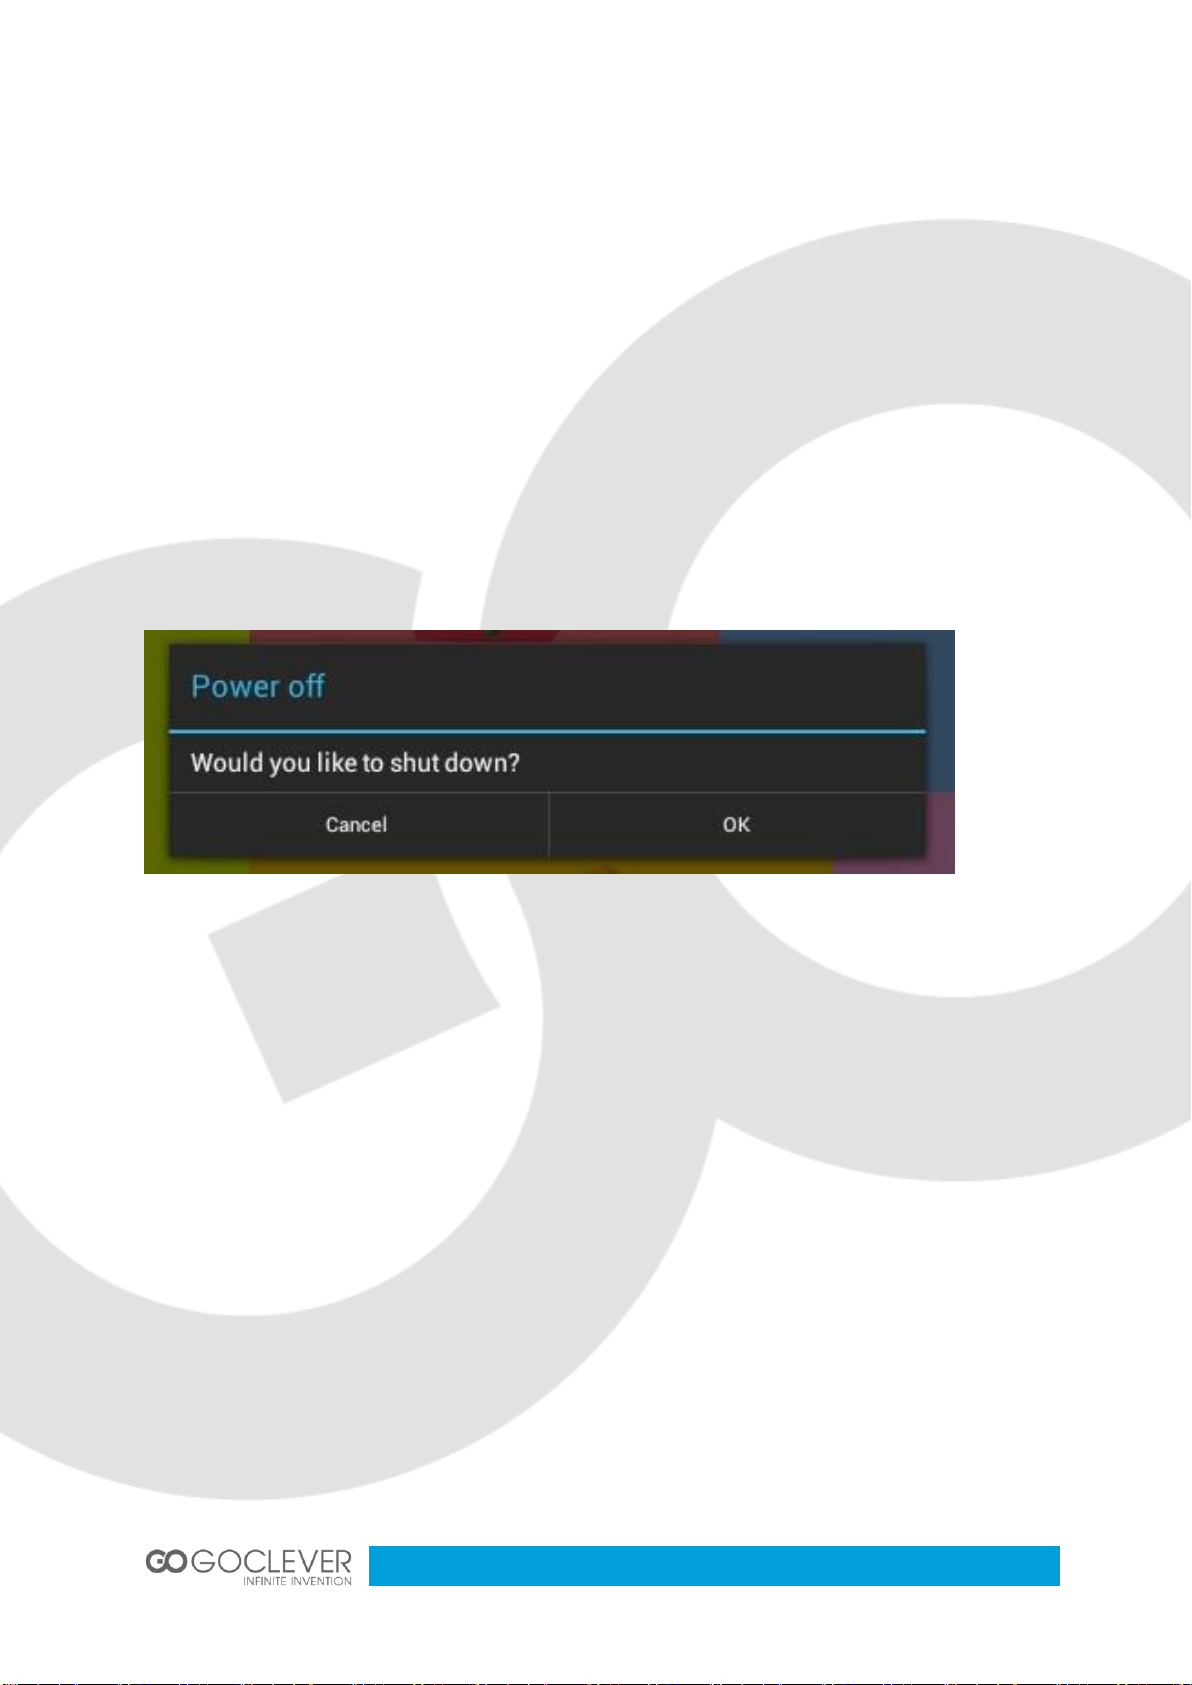
·Turn off: While on, press and hold the power button for 3 seconds, and select “
power off” from the pop up box.
(While on, press and hold the power button for 7 seconds to force turn off).
·Sleep: While on, press the POWER button once to enter sleep mode.
·Wake up: While in sleep mode, press the POWER button once to wake up.
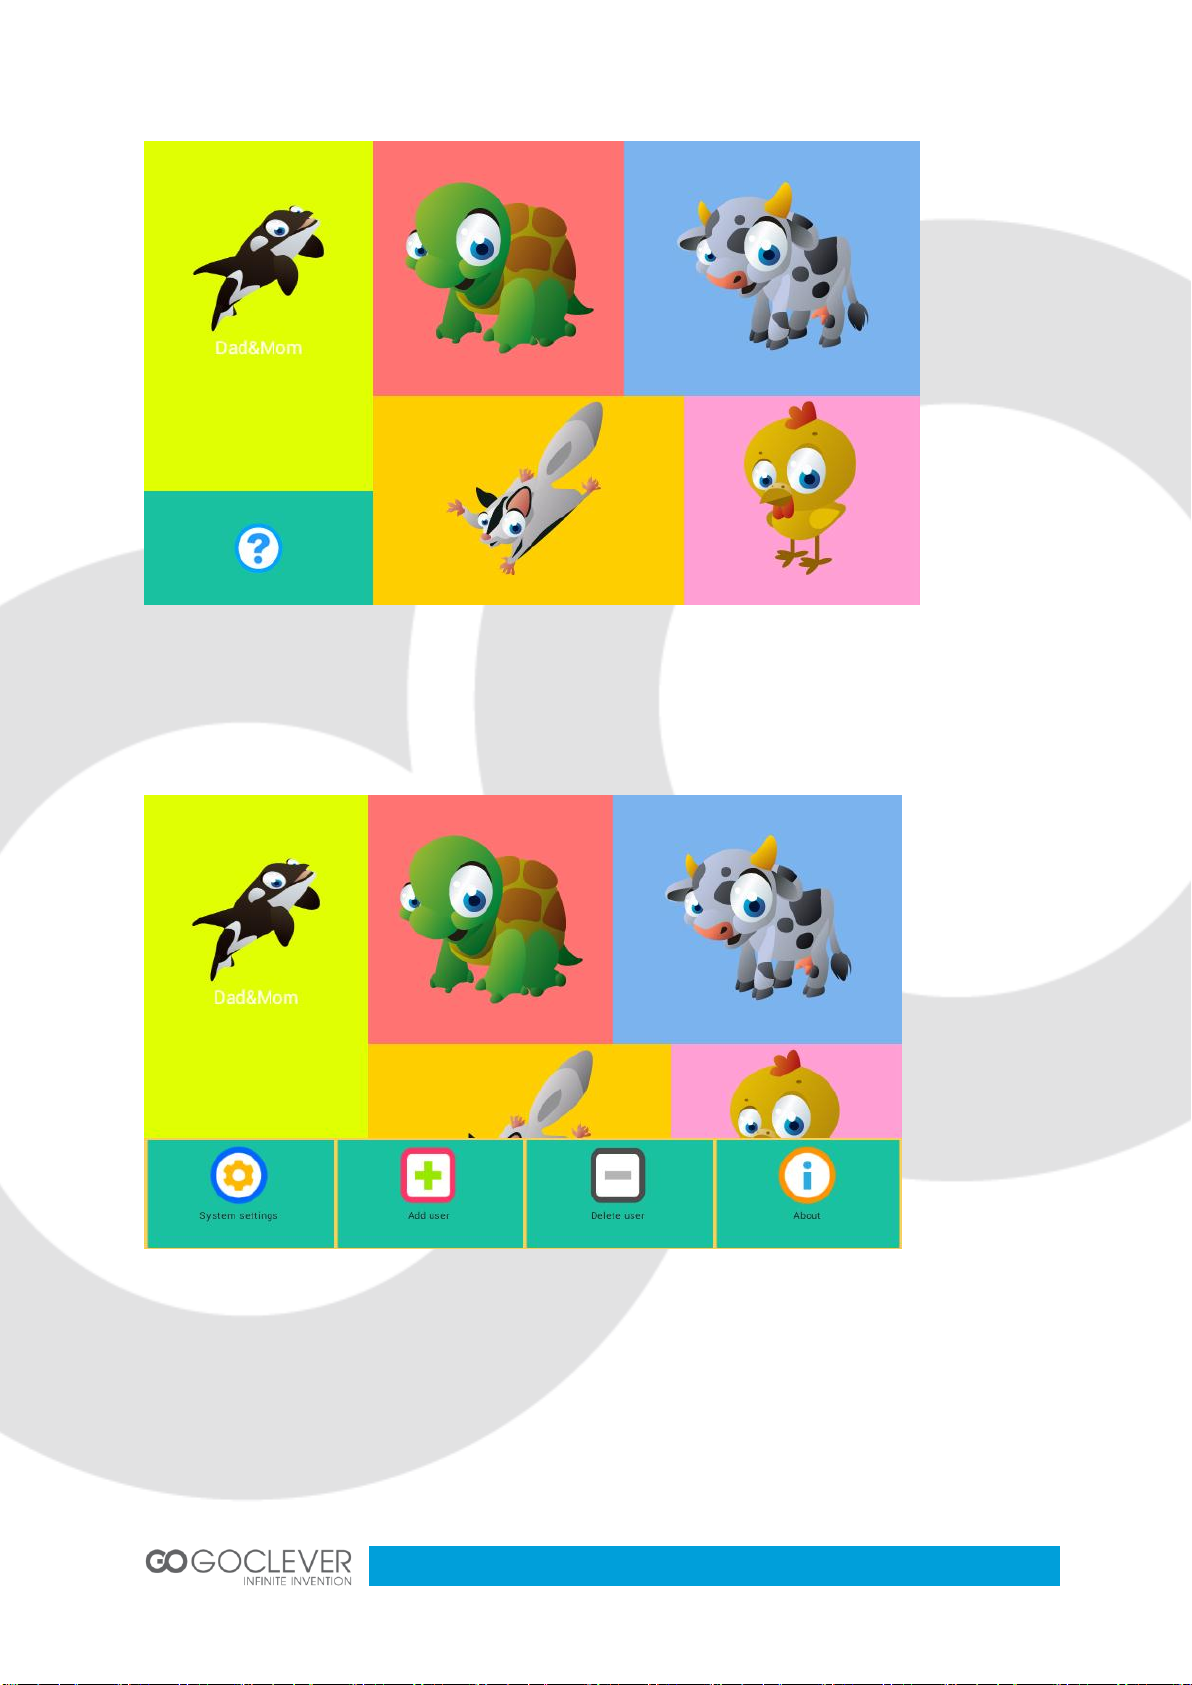
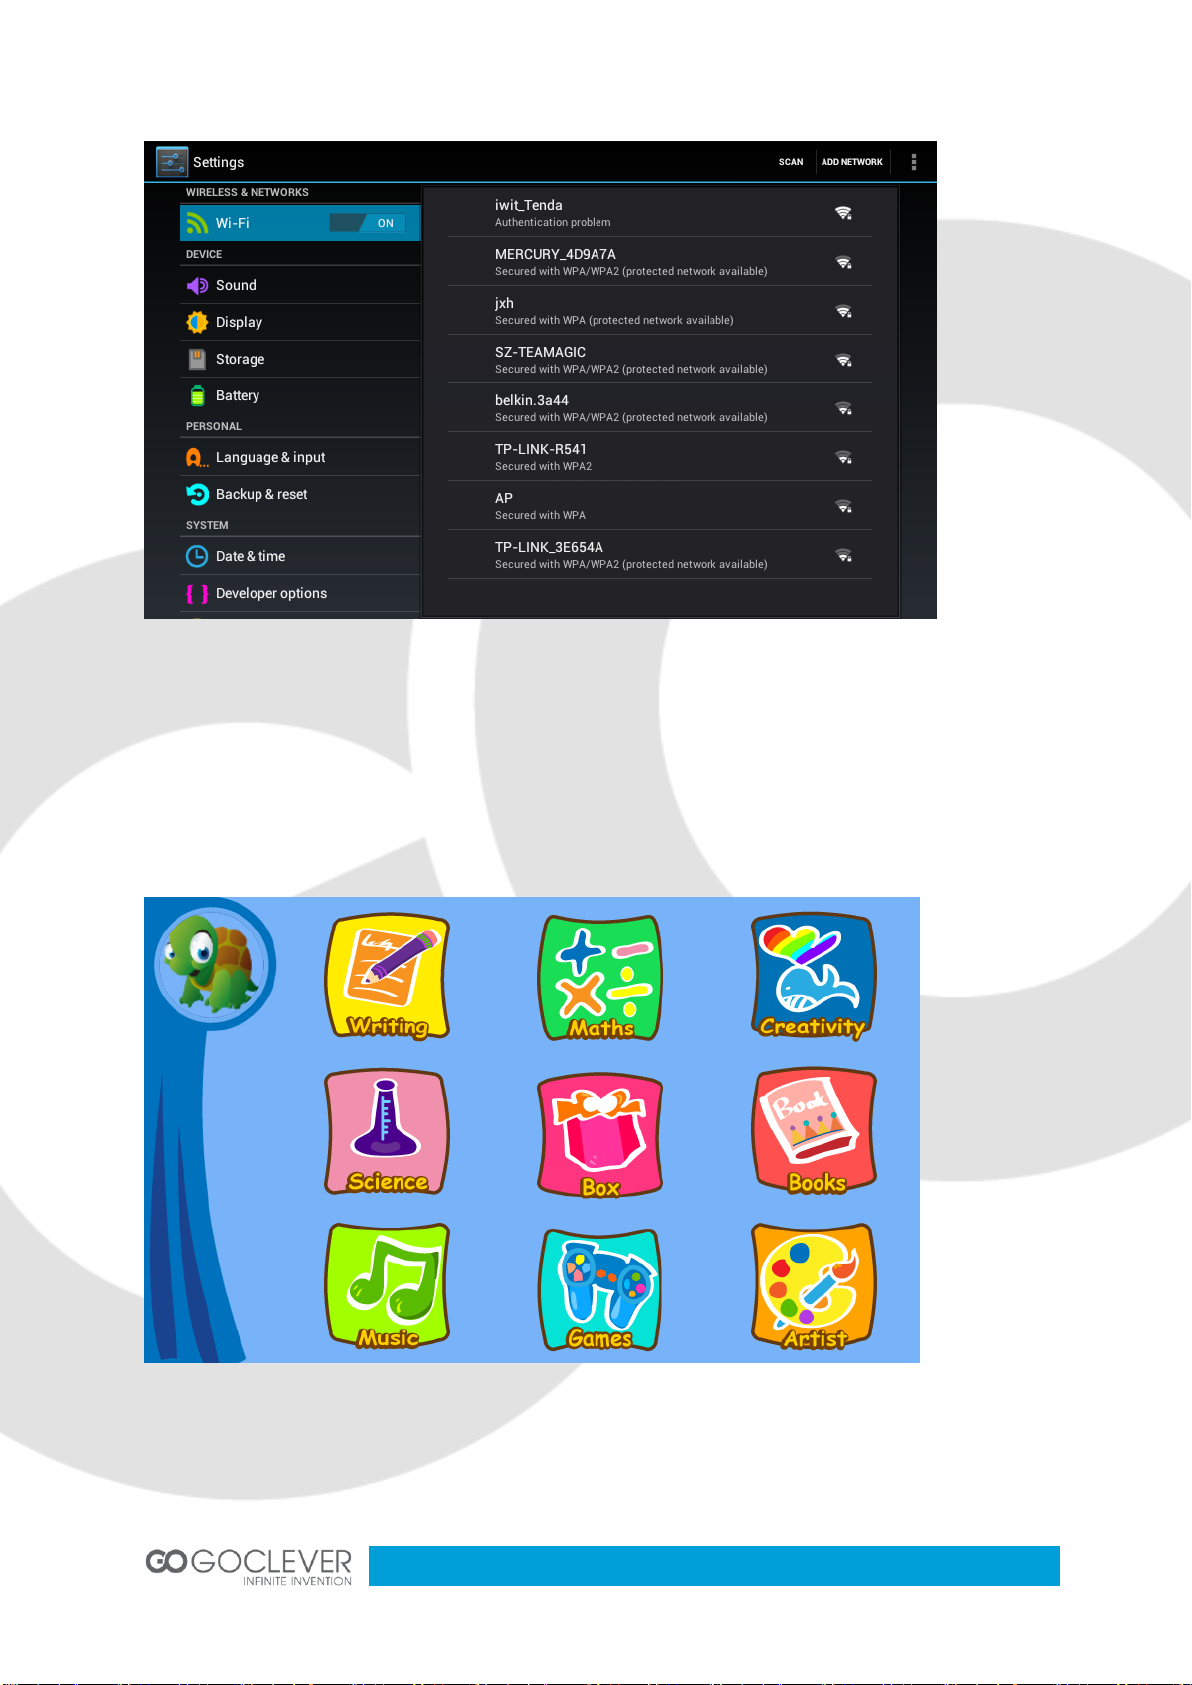
5. Home screen
After starting up and logging into your individual account, you will see the IWIT kid
OS home screen. There are nine folders on the home screen used to store the many
different application programs for kids.
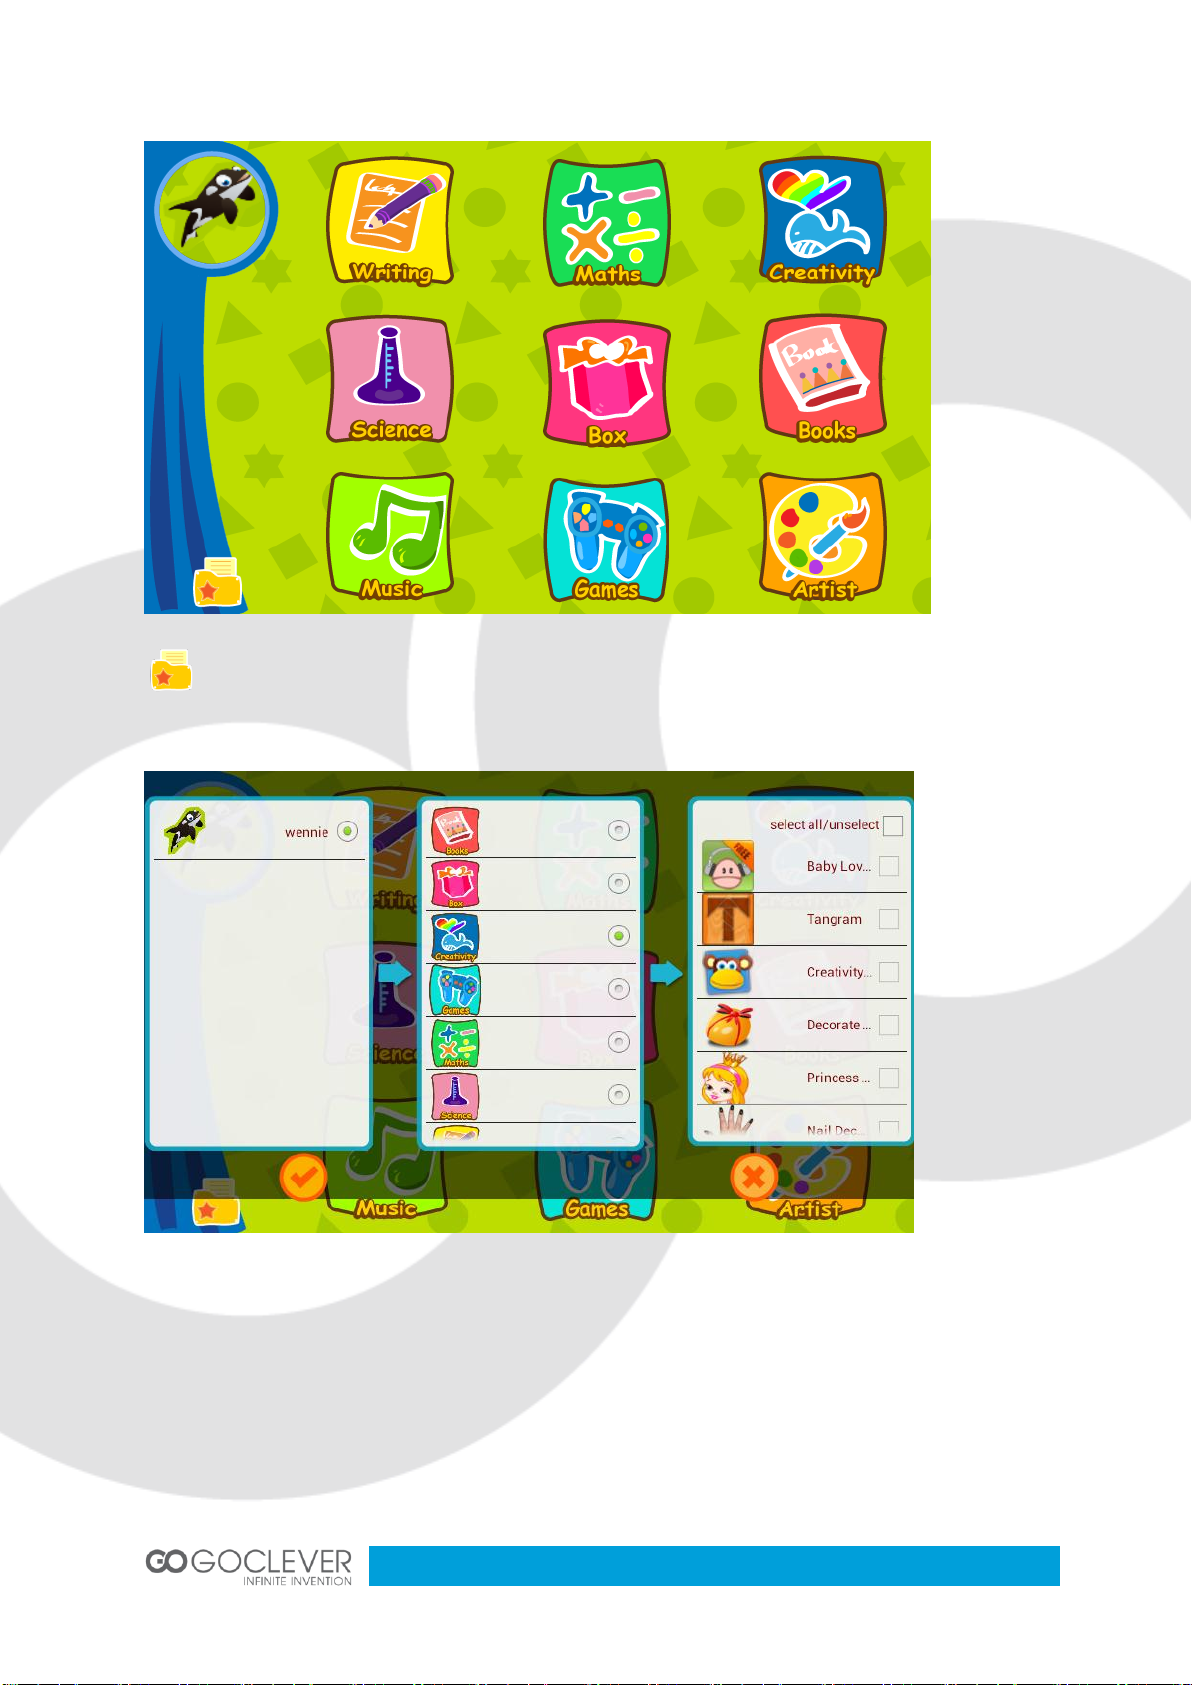
8
The parental account manages all the applications and can authorize other
accounts to use them.
6. Account management
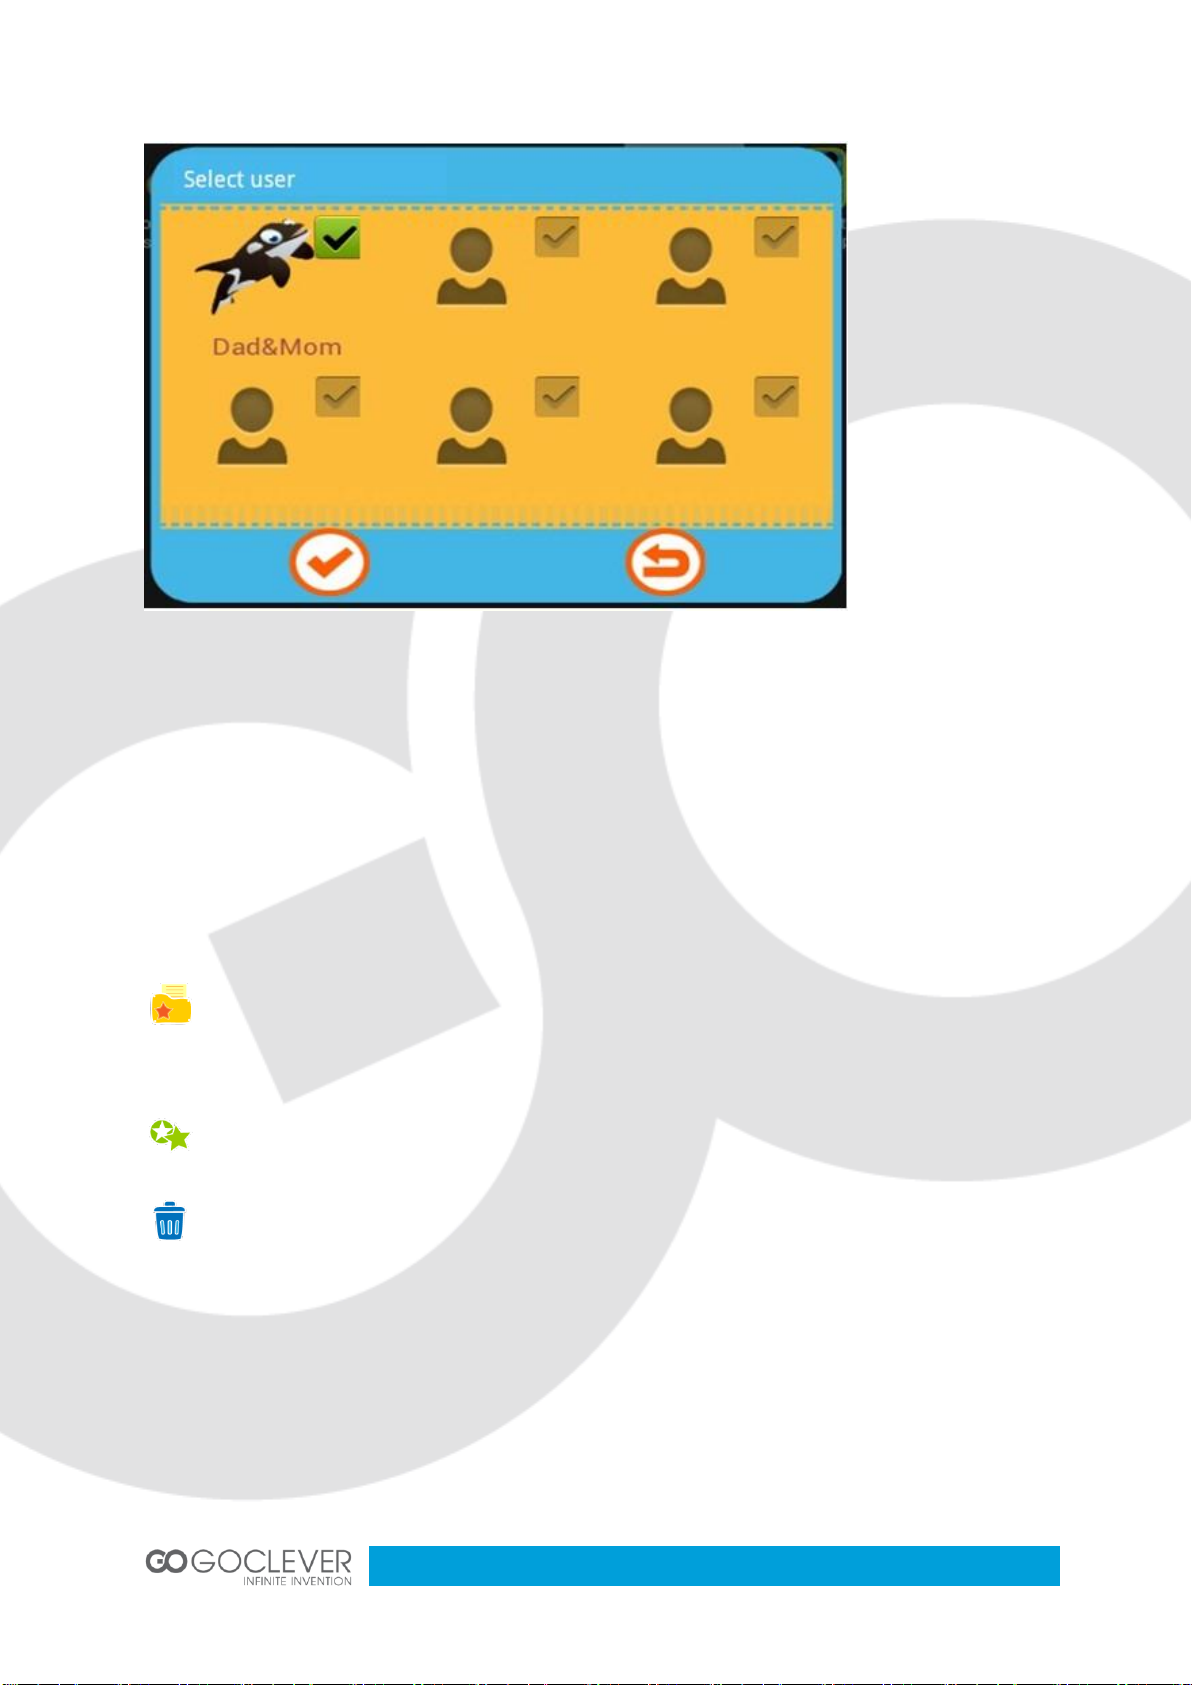
·Login, adding account, and deleting account
The system defaults to the parental account (highest authority). The initial password
is "1111." Each tablet permits up to four child accounts. You can choose to set up a
password or not. Parents can use their own account to manage the child accounts.
9
From the home screen, pressing the " MENU " button will cause the taskbar to pop
up from the bottom with “SYSTEM SETTINGS,” "ADD USER," "DELETE USER," and
"ABOUT IWIT."
Click “Add user” and enter the parent login password.
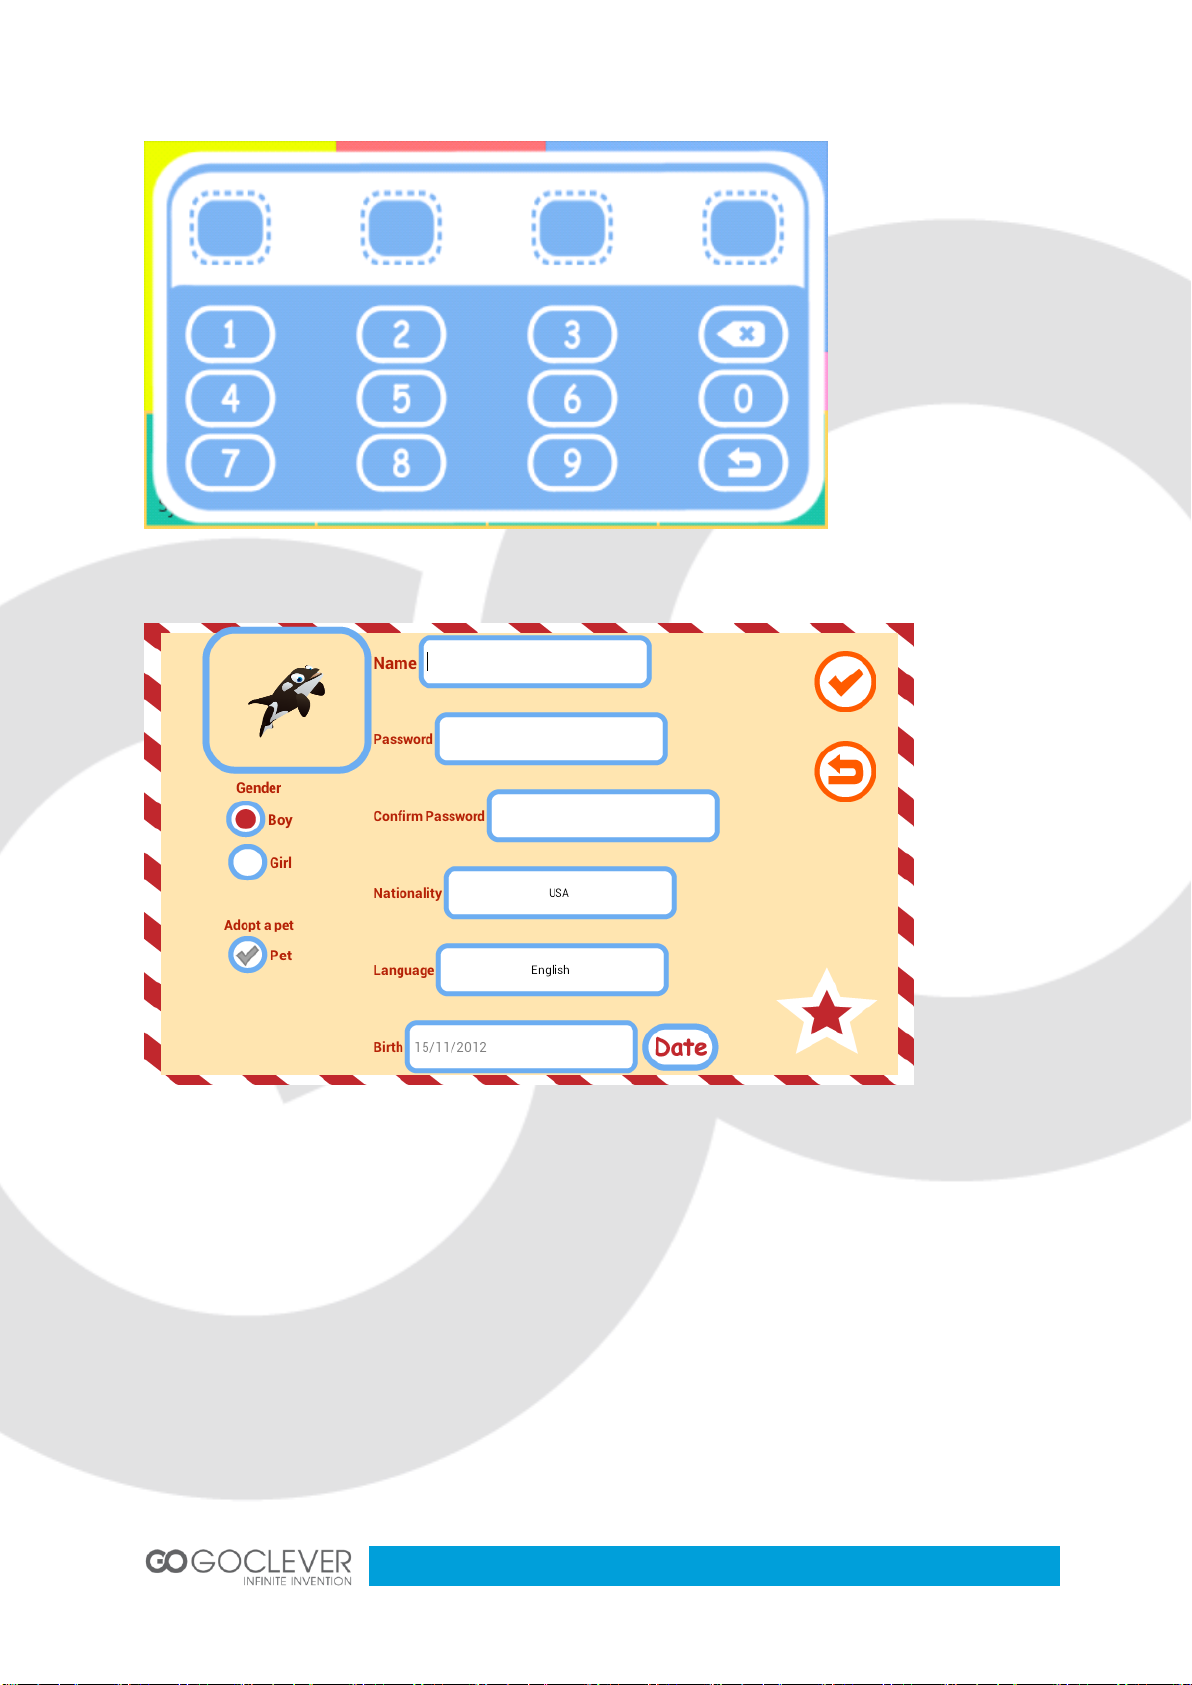
10
Enter account information.
Click “delete user” and enter the parent login password.
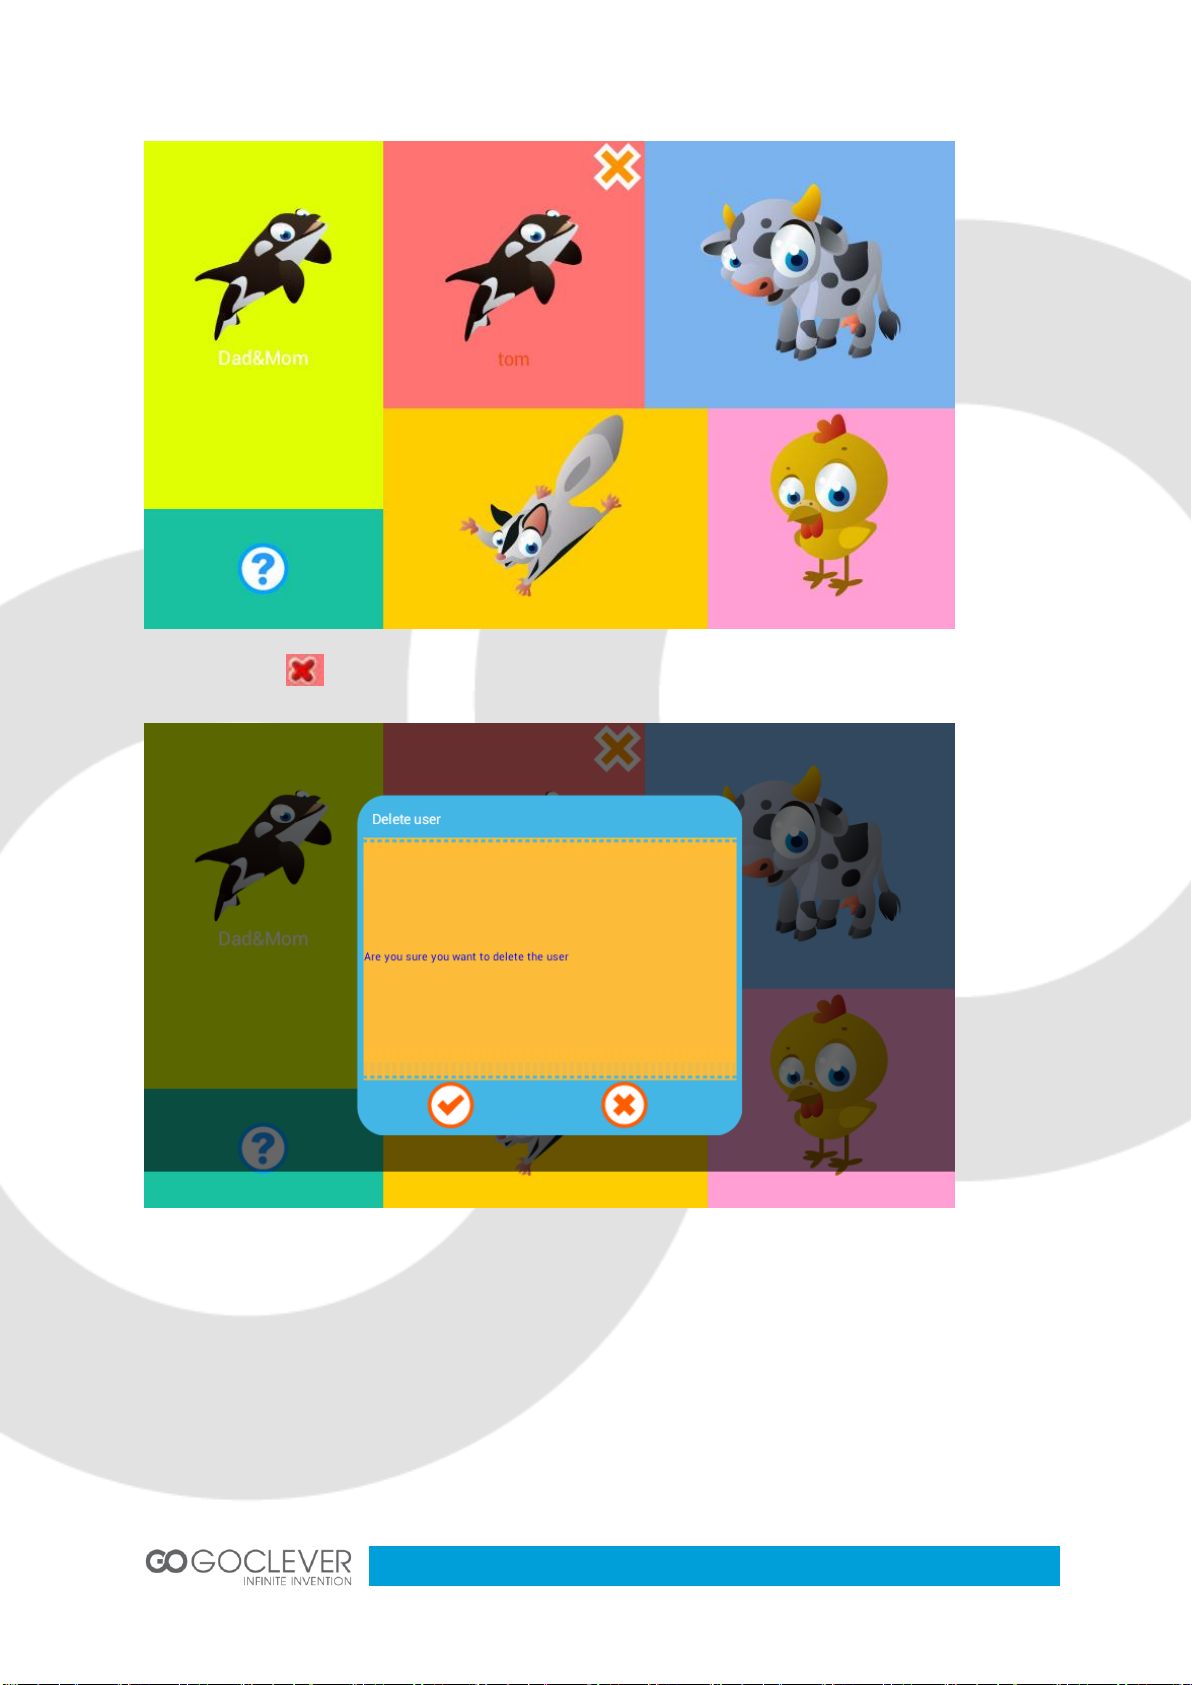
11
Then click on to go to the settings page.
7. System settings
From the login page, press the " MENU " button and click on “SYSTEM
SETTINGS.” Parents can enter their login password to open the system setup
interface and select the following items: WIFI SETTINGS, LANGUAGE SETTINGS,
DATE and TIME SETTINGS, BACKGROUND MUSIC SETTINGS, etc. See below:
12
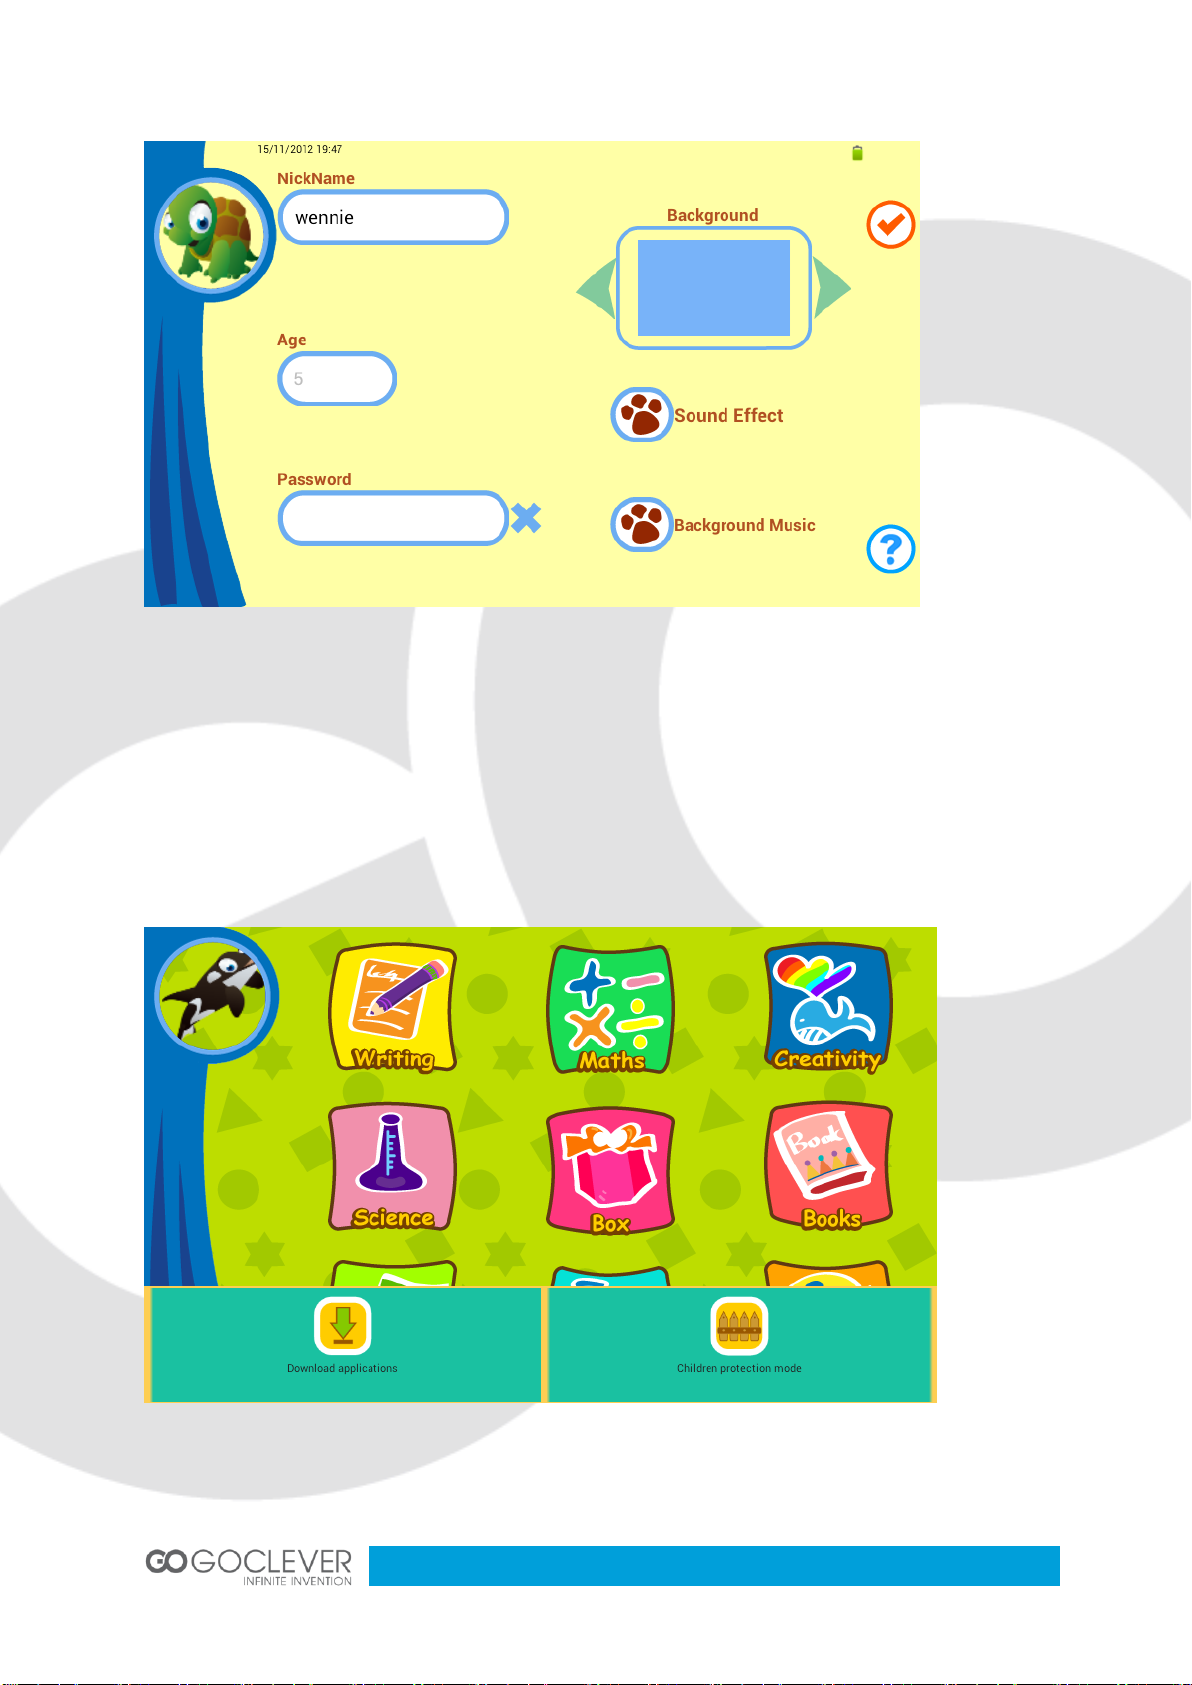
8. About me
After logging in, click on a thumbnail to enter the personal information page to modify
the icon, name, age, background music, sound effects and password.
13
9. Parental account features
9.1. Add applications
Parental account:
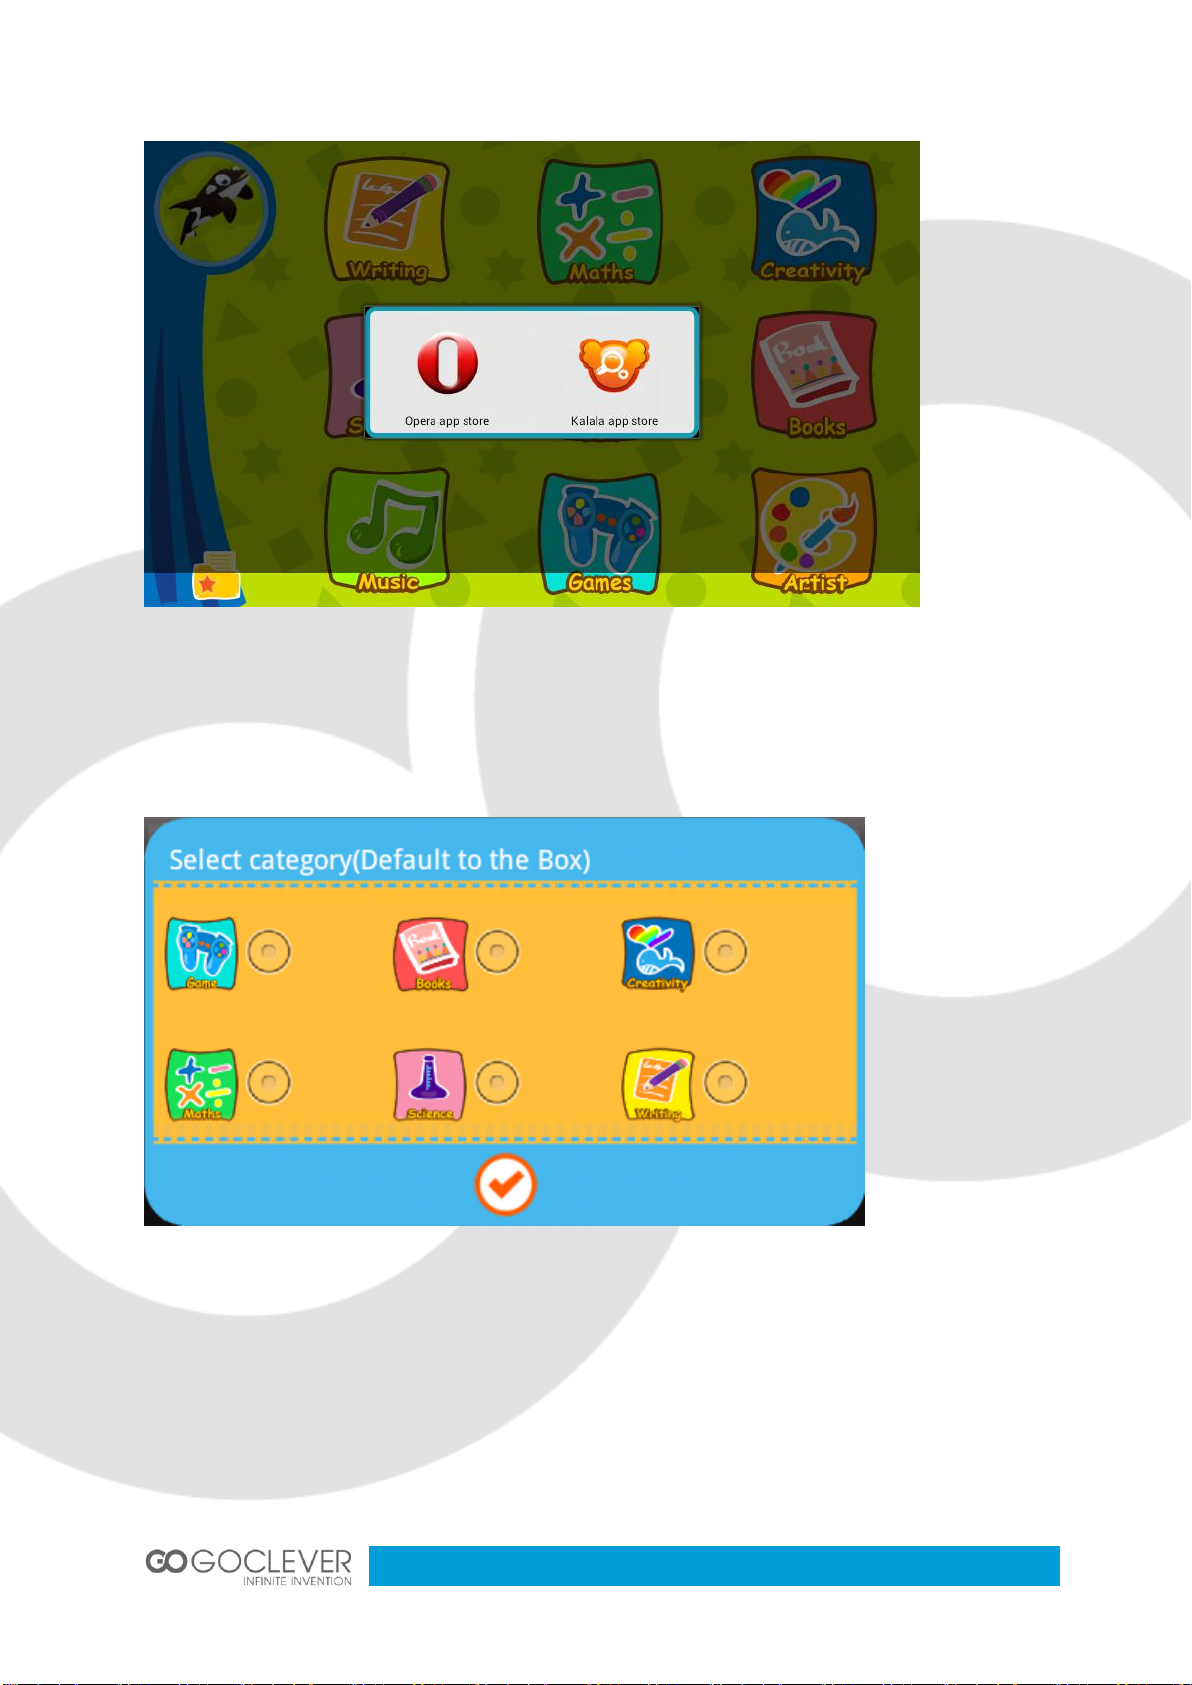
The parental account permits installing new applications. Click on ” MENU”from the
pop up box.
Click on "Download applications" to go to the apps market to browse applications.
14
(Tablet will load different application markets for different countries.)
After the download is completed, select the category you want to install it to and
select the user to confirm the installation.
15
(If the category and user are not selected, the application will be automatically
installed in the parental account).
Child accounts:
Child accounts do not allow installation of applications.
9.2. Applications management
Parental account:
The parental account manages all the applications and can authorize other
accounts to use them.
Move application icons to other categories.
Uninstall applications.
16
Child accounts:
Delete application icon
9.3. Child protection mode settings
From the parents account, click on the “MENU” icon and select “Child protection
mode” from the pop up screen.
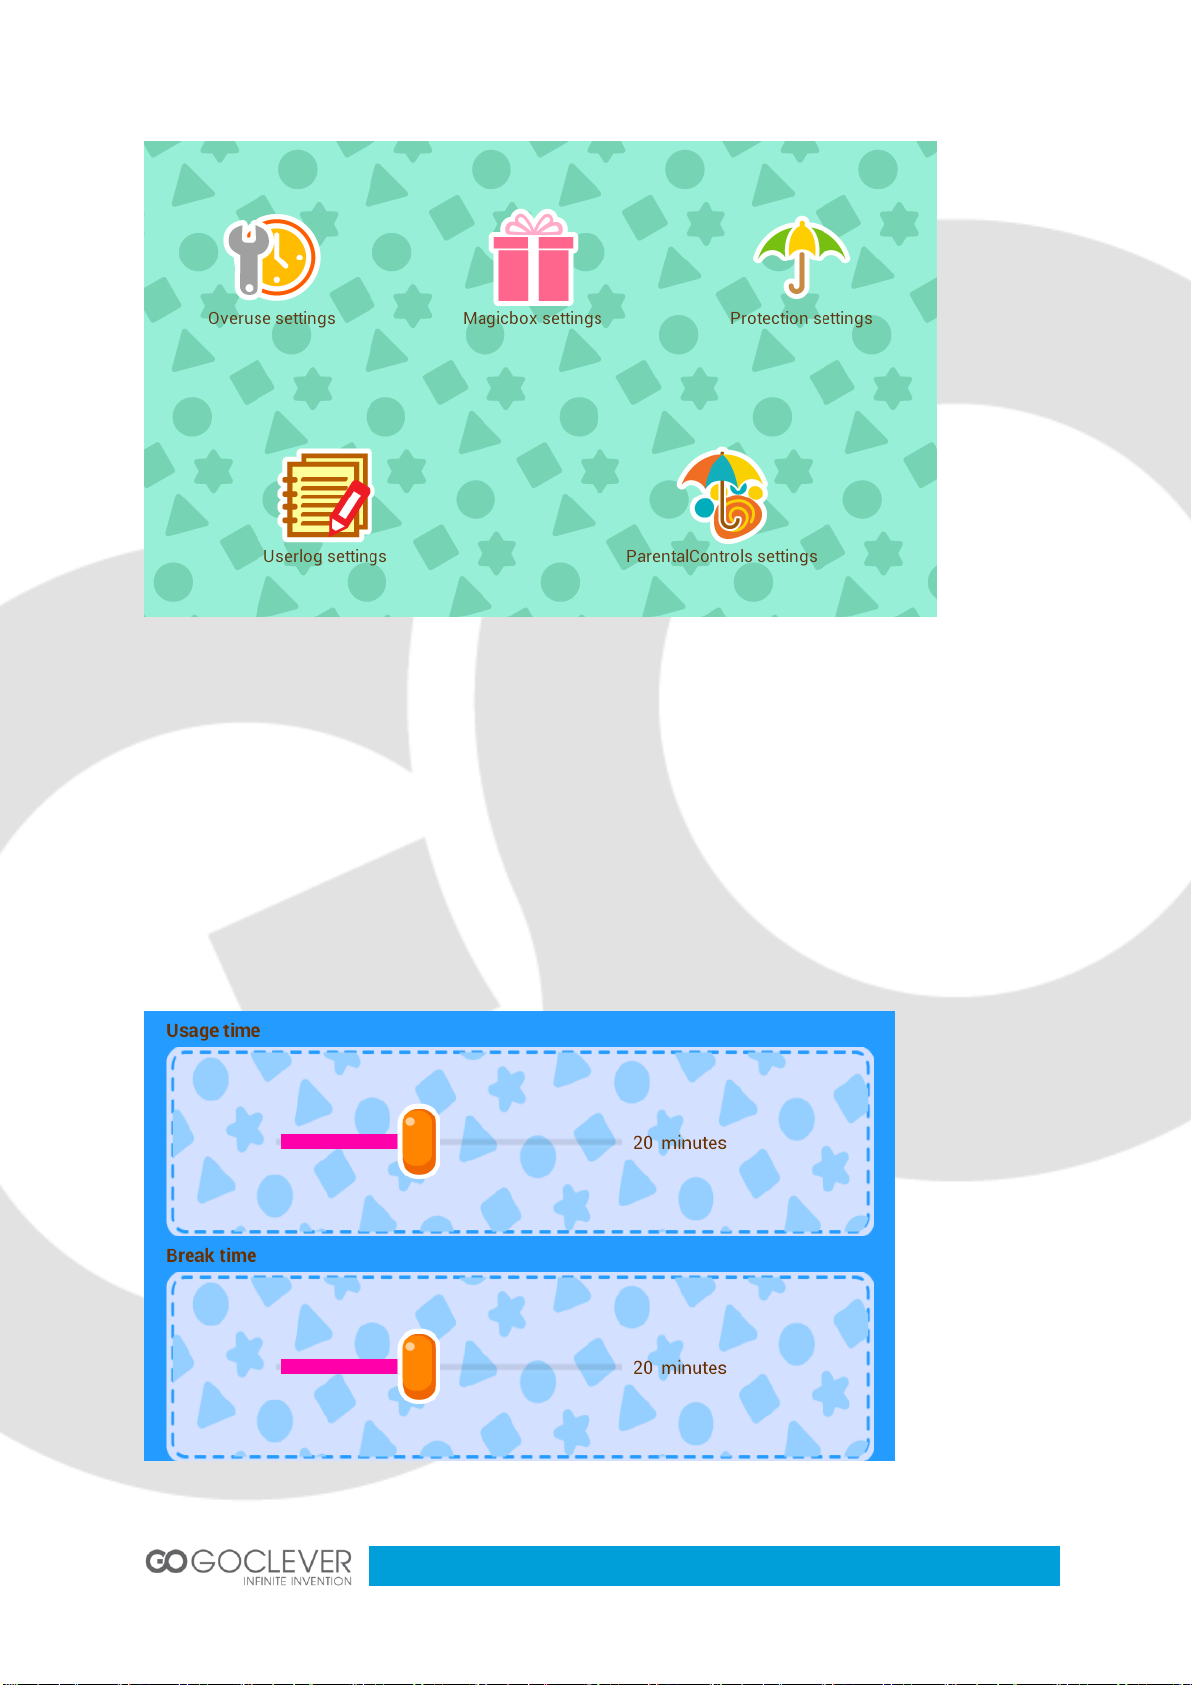
17
· Overuse settings
To prevent children from overusing some applications, you can set their usage time
and break time.
When usage time is up, the tablet will lock automatically. Only parents can use their
password to unlock the tablet.
When break time is up, the tablet will automatically unlock.
·Magic box
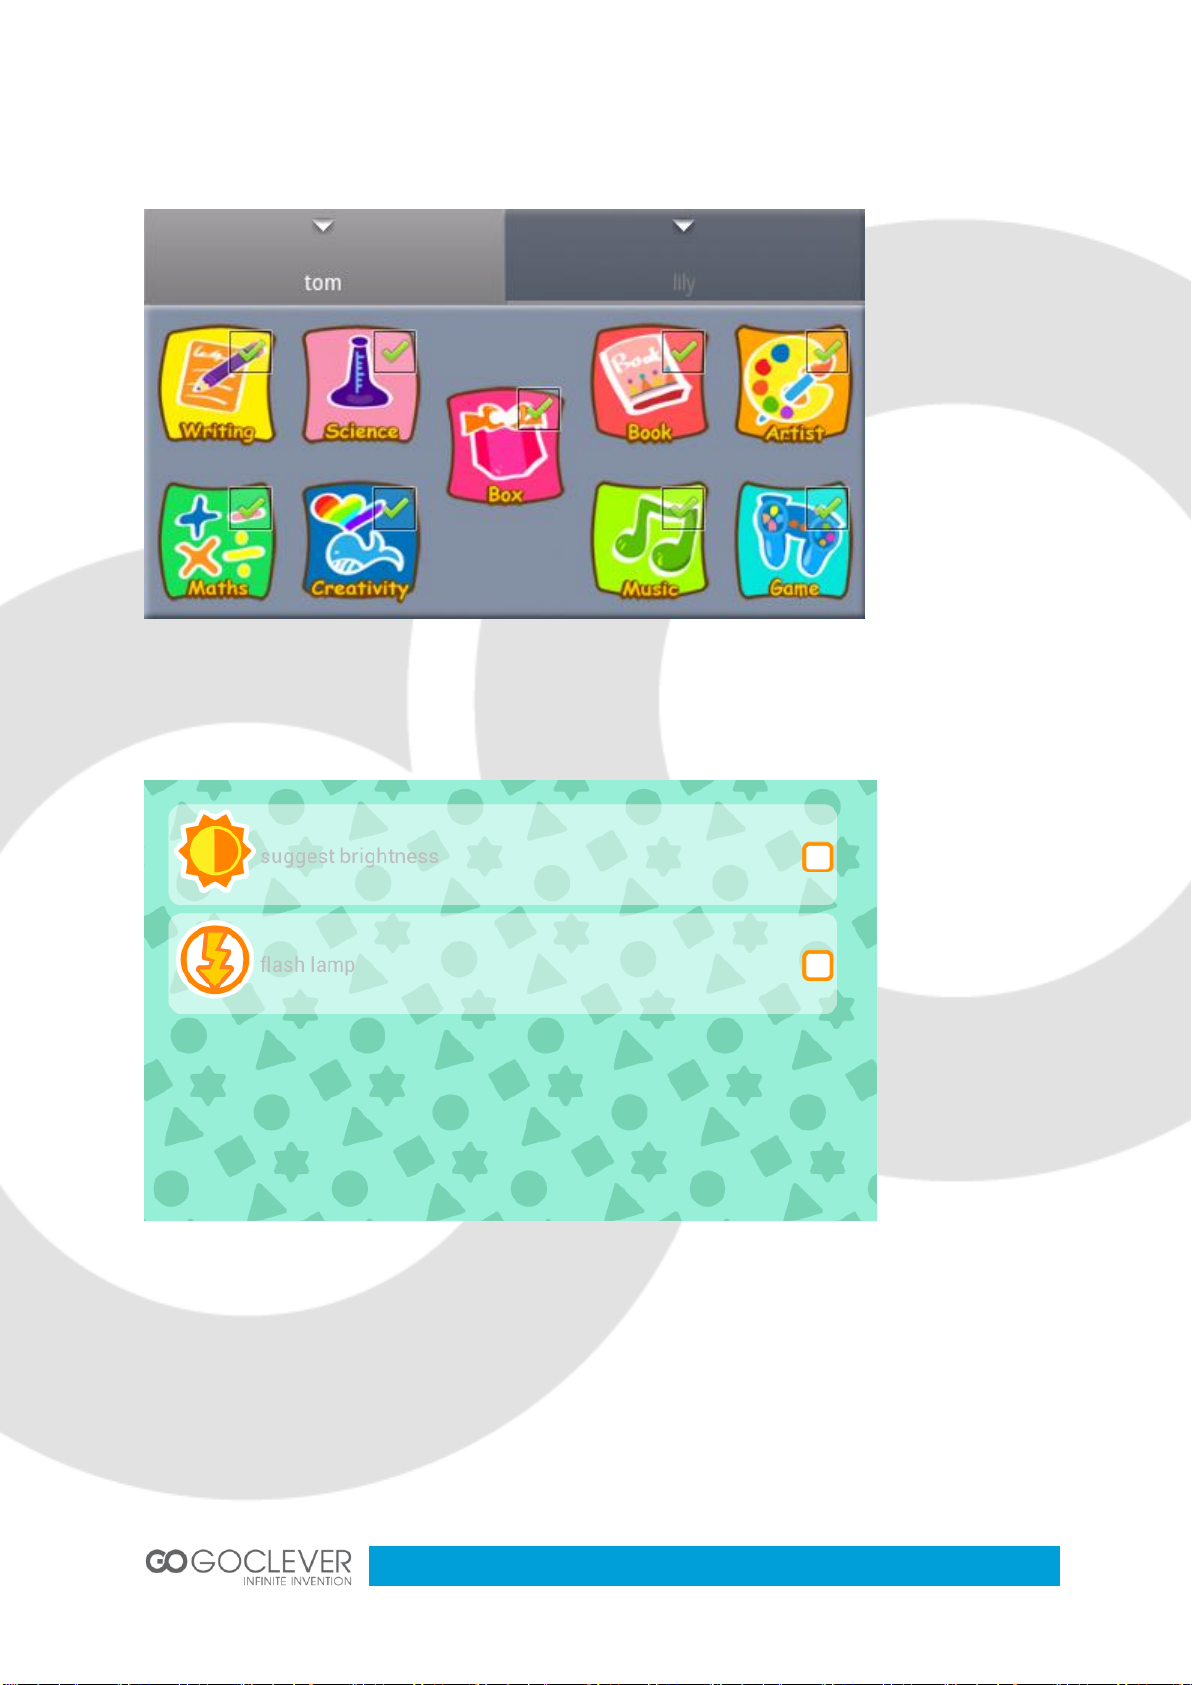
18
Parents control which categories appear in the child accounts.
· Protection settings
Parents can set brightness settings to default or turn on the flash light.
Select “suggest brightness” to return to the default setting.
Select “flash light“ to turn the flash light on or off.
· User logs
You can check the login and logout time of each child’s account in the USER LOGS.
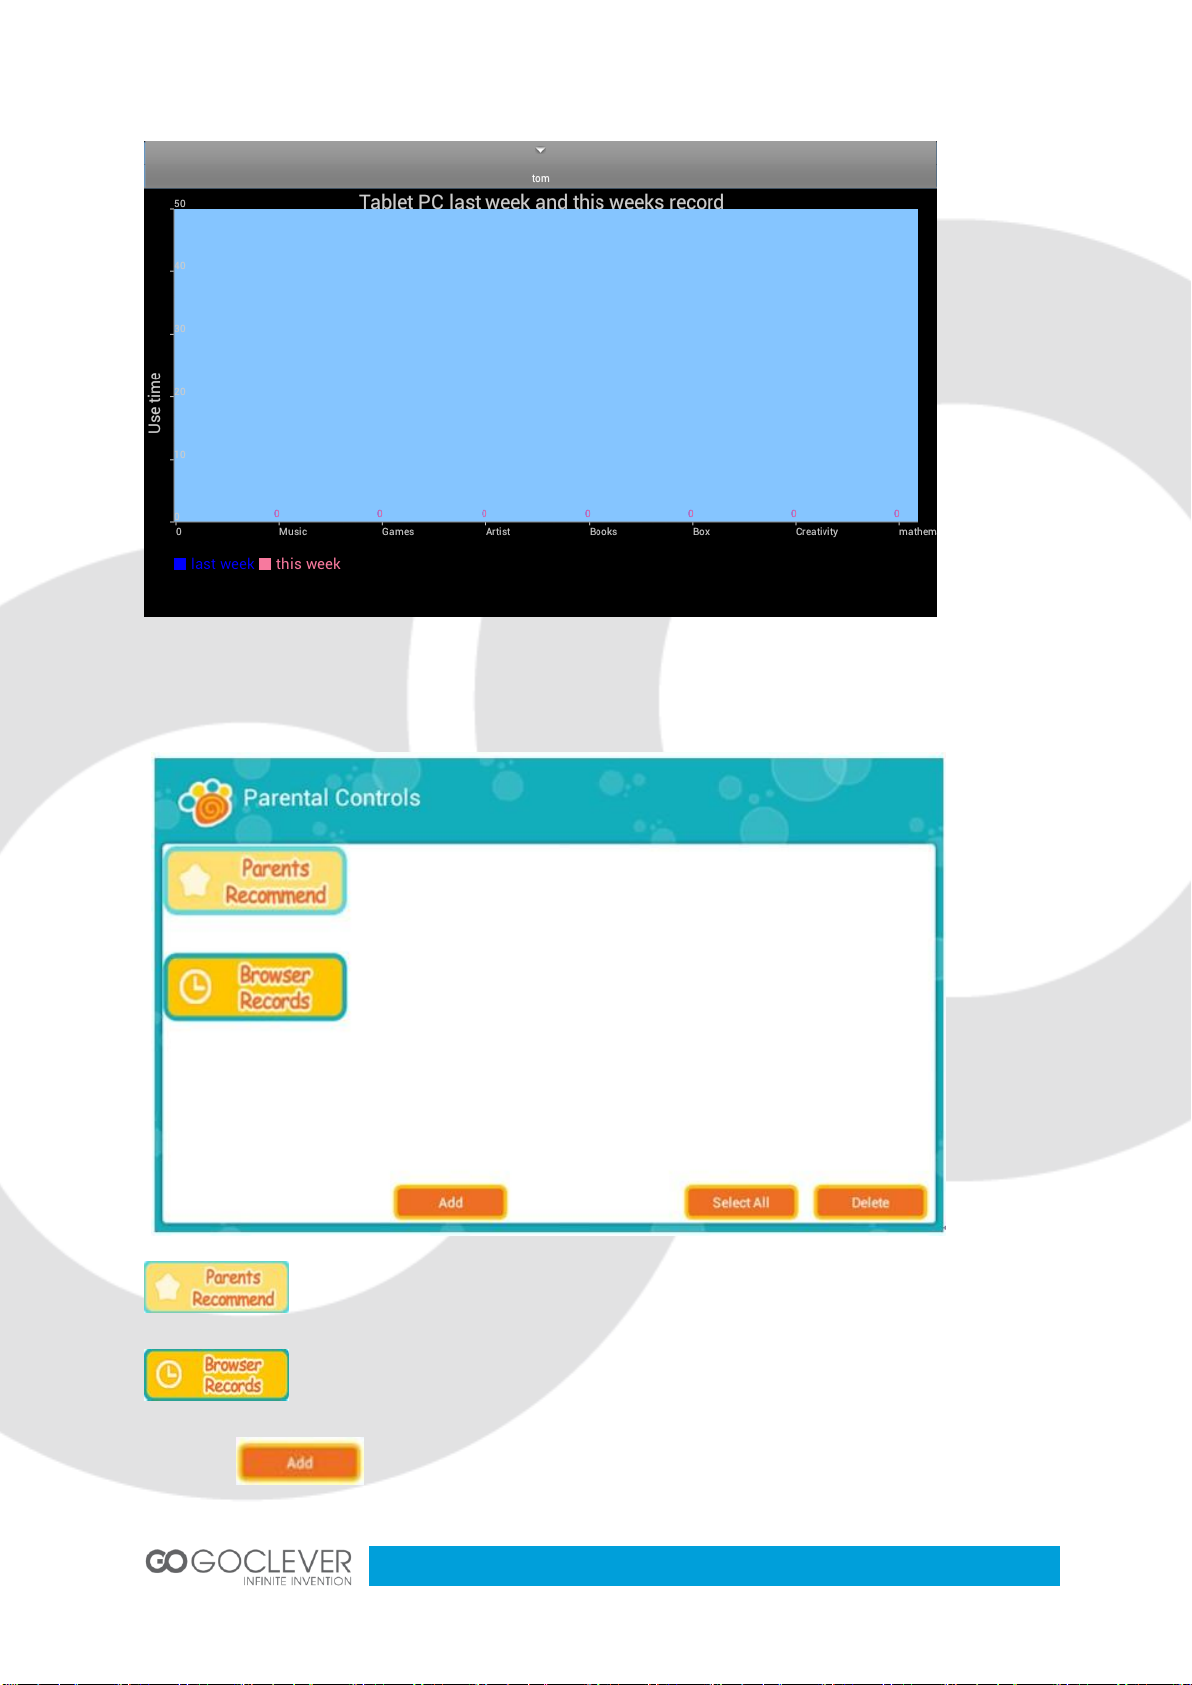
19
Parental Controls
Main page
Parents’ gathering of websites
Check search history
Click on allows adding websites to the search engine
20
Click on to delete a web address by checking the web address or click on
to delete all web addresses.
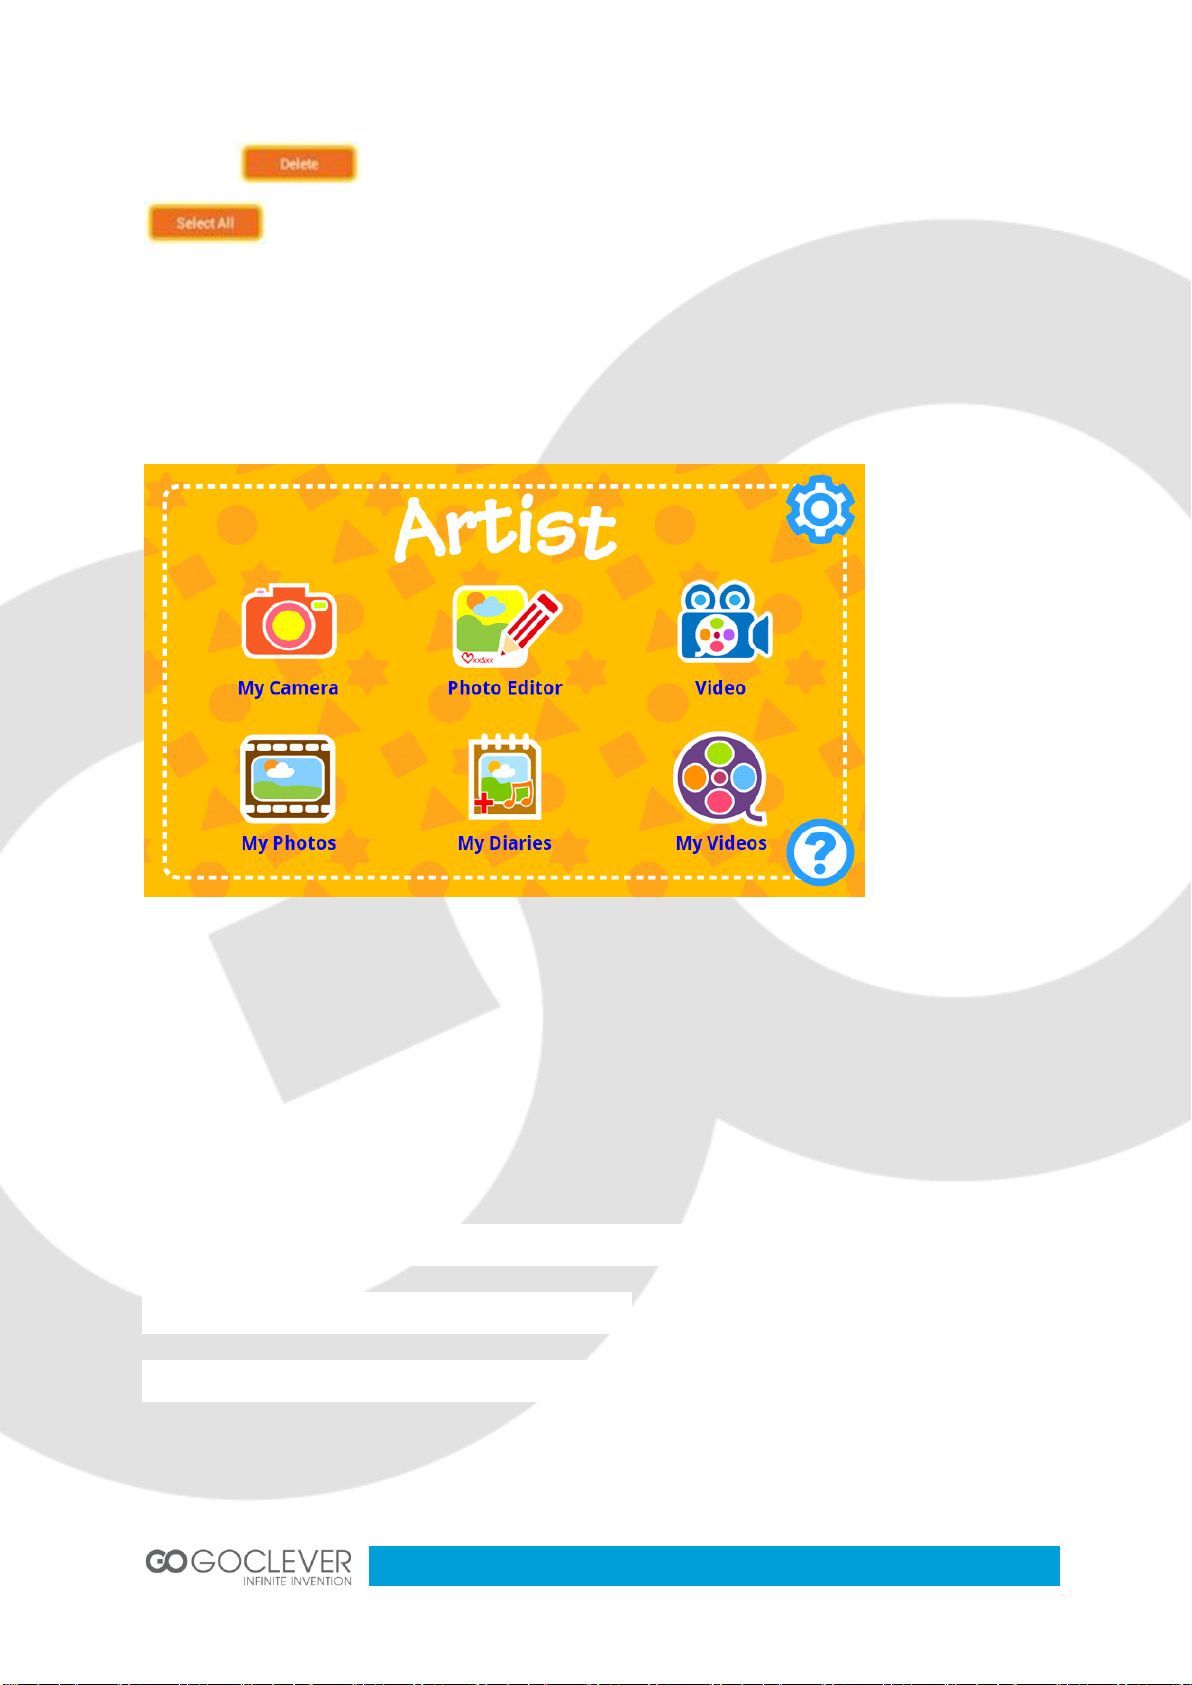
10. ARTIST
Artist is divided into six functions: My Camera、My Photos、Photo Editor、My
Diaries、Video、and My Videos.
10.1. My Camera
Main functions:
Decoration: Select a picture frame to add to your photos.
Special effects: Choose six kinds of special effects: sepia, color tone (red, green, or
blue), negative, and black and white.
Count down: After 5 seconds the camera will automatically take photos.
Preview: Check the previous captured photos.
Camera sounds: Select a sound effect when taking photos.
Collage: Take 4 photos to automatically combine into one picture.
Settings: Set the resolution: high resolution,Moderate Resolution,low resolution

21
Continuous shooting: Shoot 1, 3, 5, or 9 pictures at a time.
10.2. My Photos
Slide up and down to preview pictures. Click on the photos to enlarge.
Delete function: Click on the waste bin, choose any pictures you want to delete,
and click on the waste bin again.
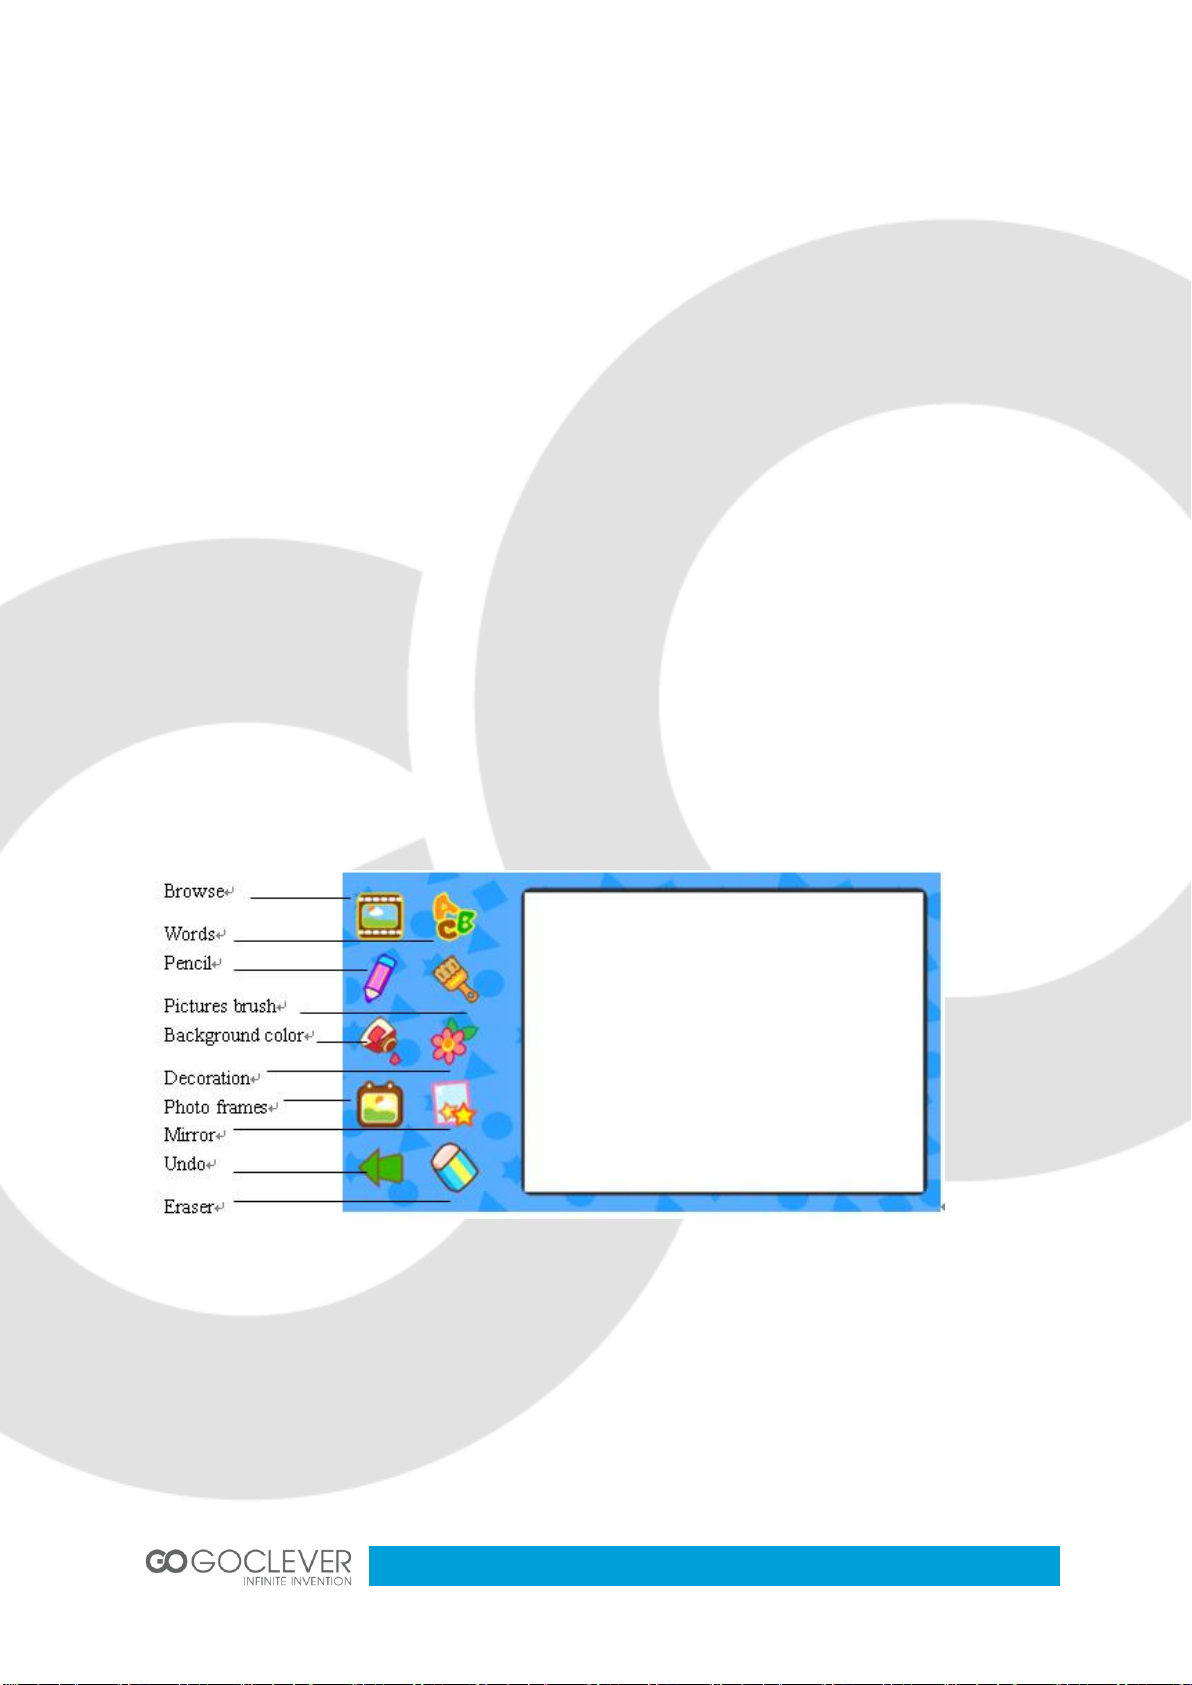
10.3. Photo editor
Function description:
22
Browse: Choose any photos you need to edit.
Undo: Return to the last step.
Pencil: Choose the color, size, and style of the pencil to customize your current
pencil.
Brush: Choose a pattern for your paint brush.
Background color: Choose a photo background color.
Photo frames: Choose a photo frame to add to your photos.
Decoration: Choose a decoration to add to your photos.
Words: Choose words to add to your photos.
Mirror: Mirror photos.
Eraser: Erase a part of the picture.
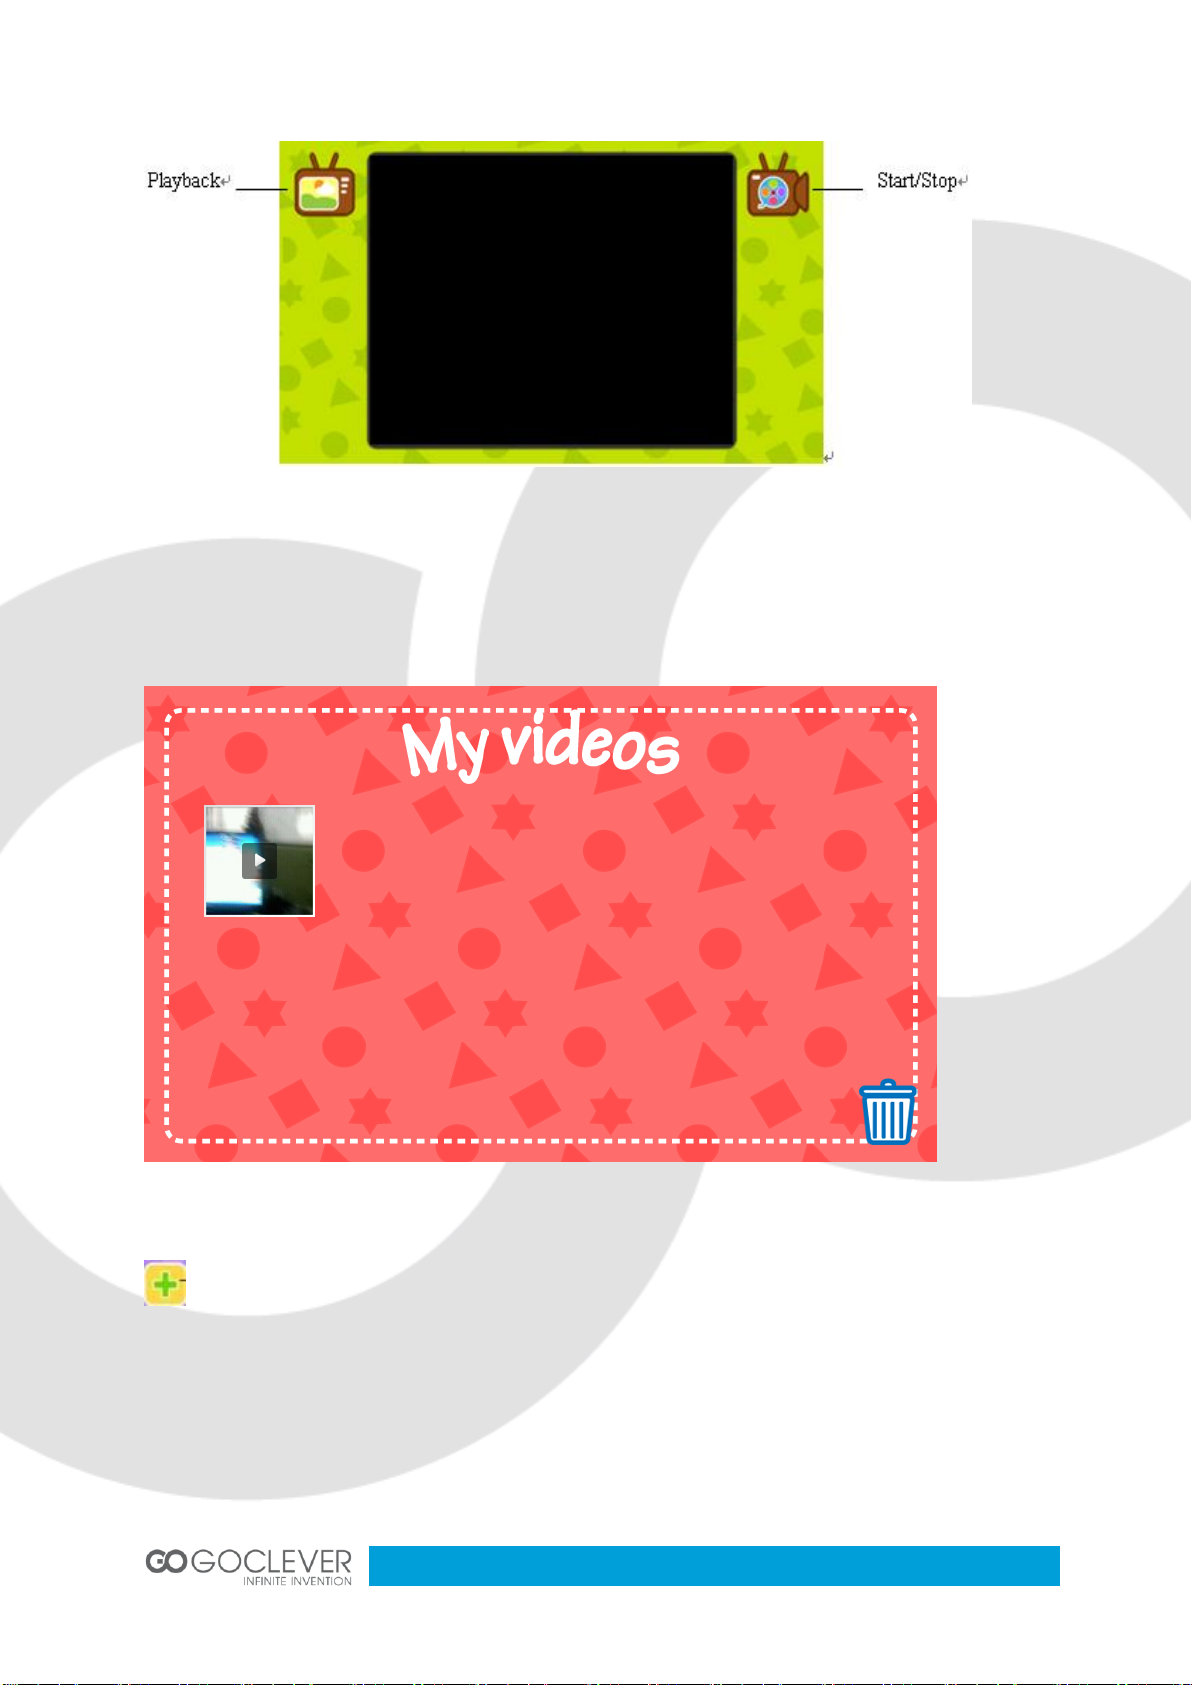
10.4. Video
Main functions:
Start/Stop: Start or stop recording the video.
Playback: Play the last recorded video.
23
10.5. My Videos
Click on a video to play.
Click on the waste bin, choose any video you want to delete, and click on the
waste bin again to delete.
10.6. My Diaries
Enter “My photos” to add photos.
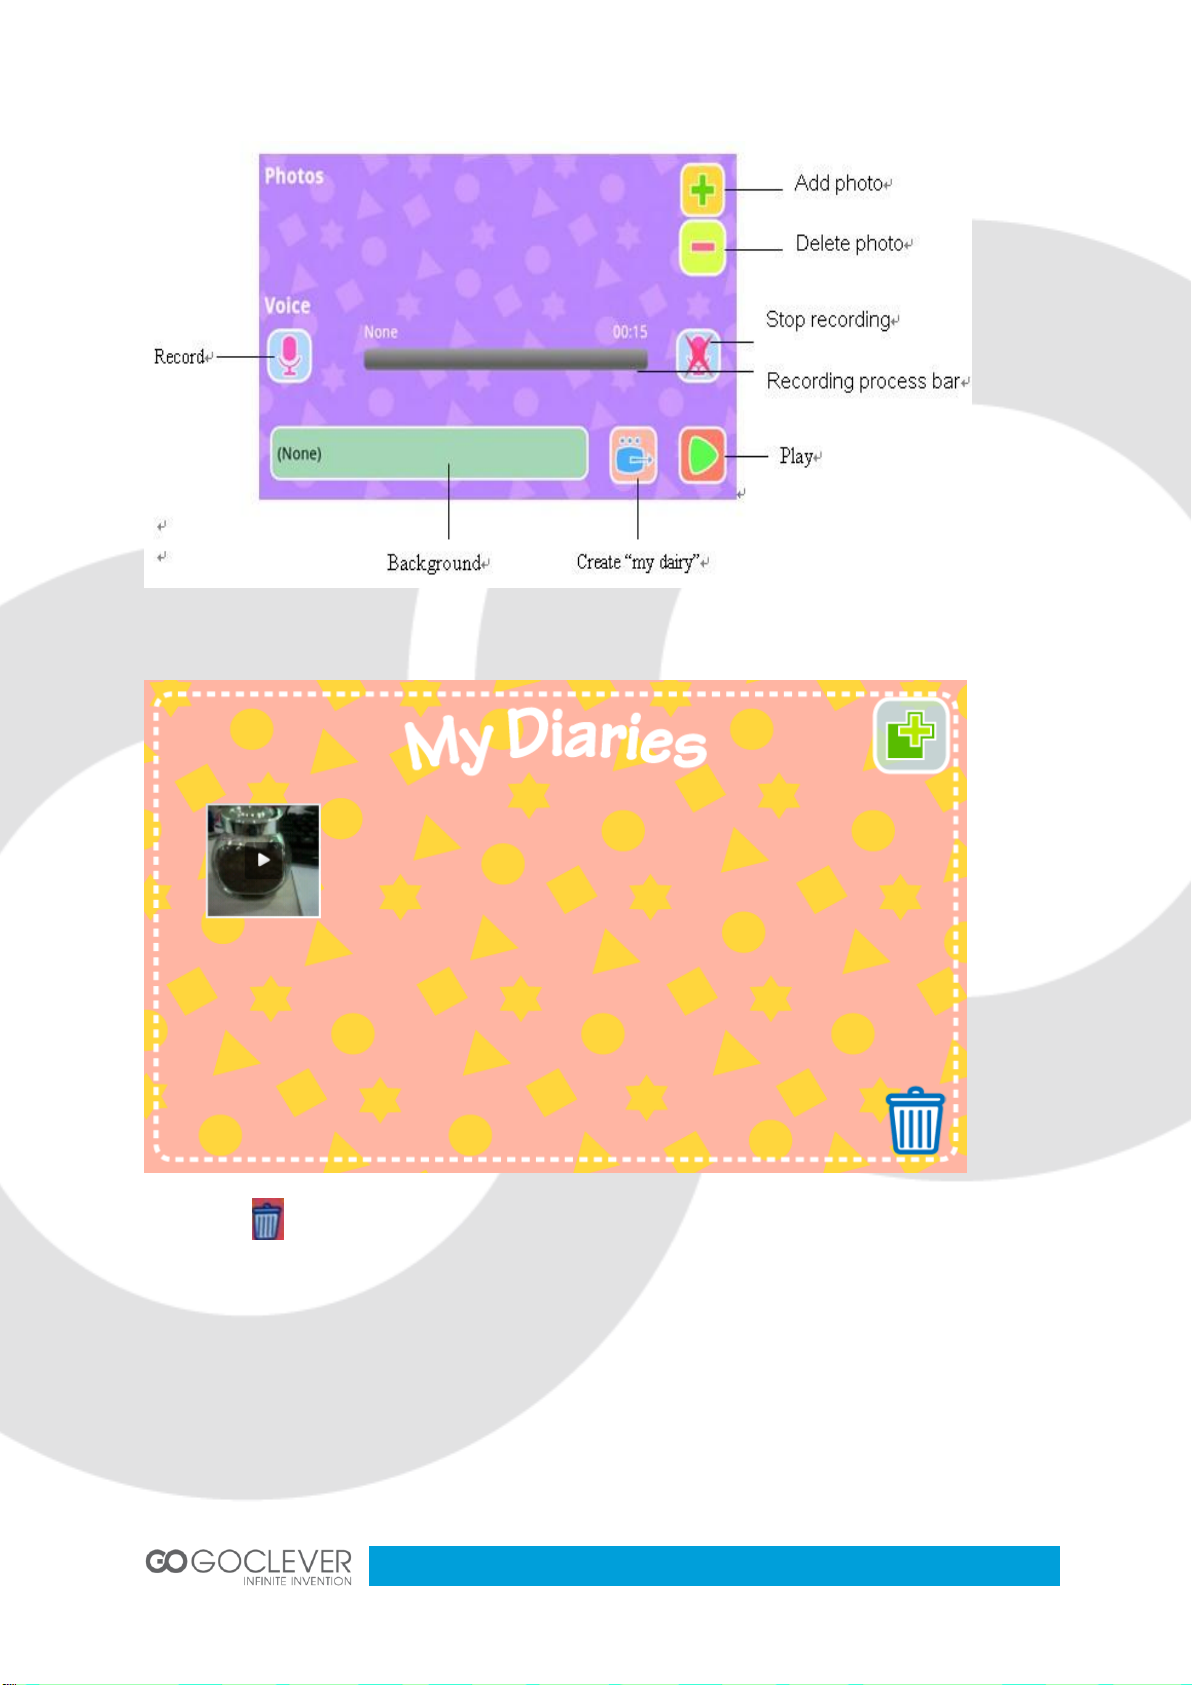
24
All your diaries are stored on the “My Diaries” interface.
Press the icon to confirm if you really want to delete.
11. Talking Kalala Game
Entering the games from the main interface: screen swipe
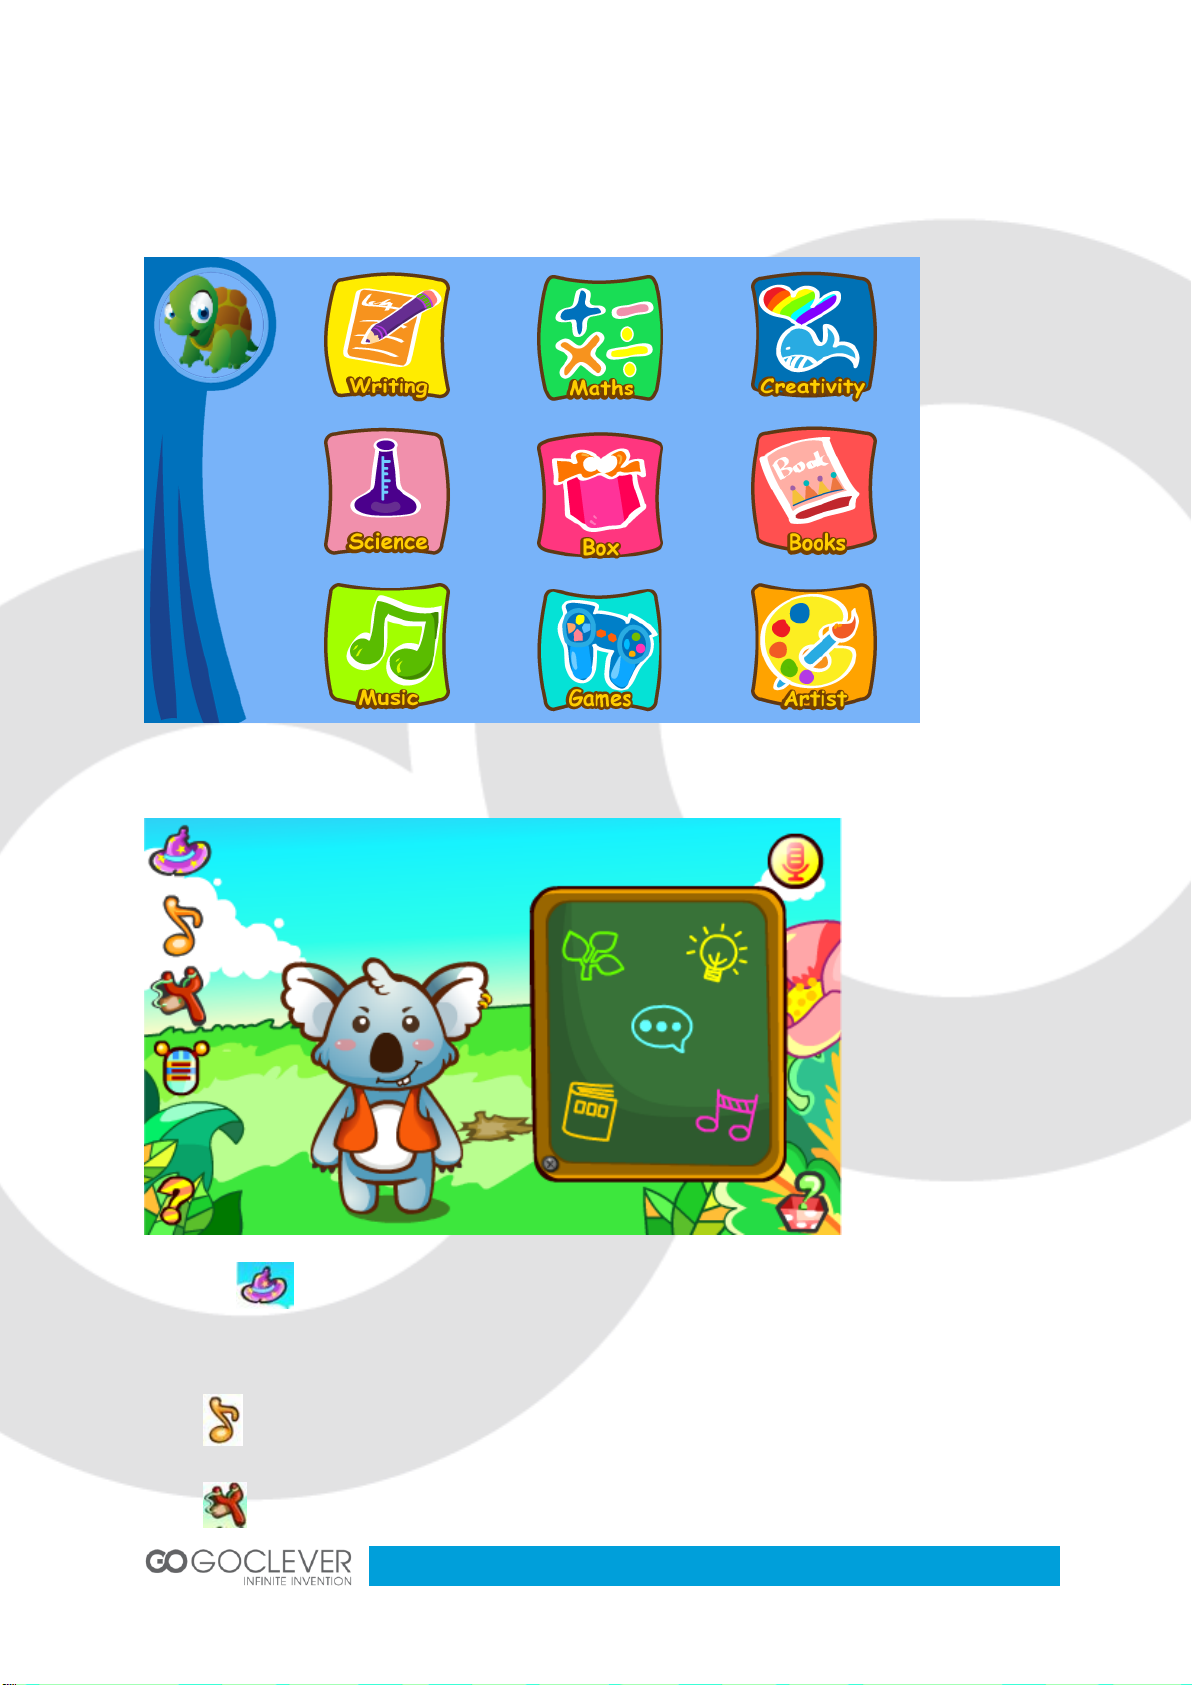
25
Ie: swiping to the left on the main screen to open the Talking Kalala game, and
pressing the return button on the machine to exit the Talking Kalala game.
Touch kalala will make a lovely action.
Click on to cause the Talking Kalala to wave a magical wand, summoning an
owl to land on his head.
Click to cause the Talking Kalala to play beautiful music on a bass guitar.
Click to cause the Talking Kalala to hurl an egg at the screen.

26
Click to enter the mystical sound interface, where the user can select one of
three voice changes: male, female, and robot.
All questions are divided into six main categories: chat, science, life, story, and
music. Clicking on any of them will open the question list, which the user can scroll
up and down.
Clicking on will open the sound wave picture, where the user can speak into the
microphone to ask a question to the blackboard. The Talking Kalala will answer the
question, and the bottom of the screen will show the words. Pictures related to the
answer will also appear over the Talking Kalala’s head.
When the user asks, “please tell me a story” or “please sing a song,” it will
automatically tell a story or sing a song.
Story and music playing interface
Play stories or music
Last song/story
Next song/story
27
Return to the previous menu
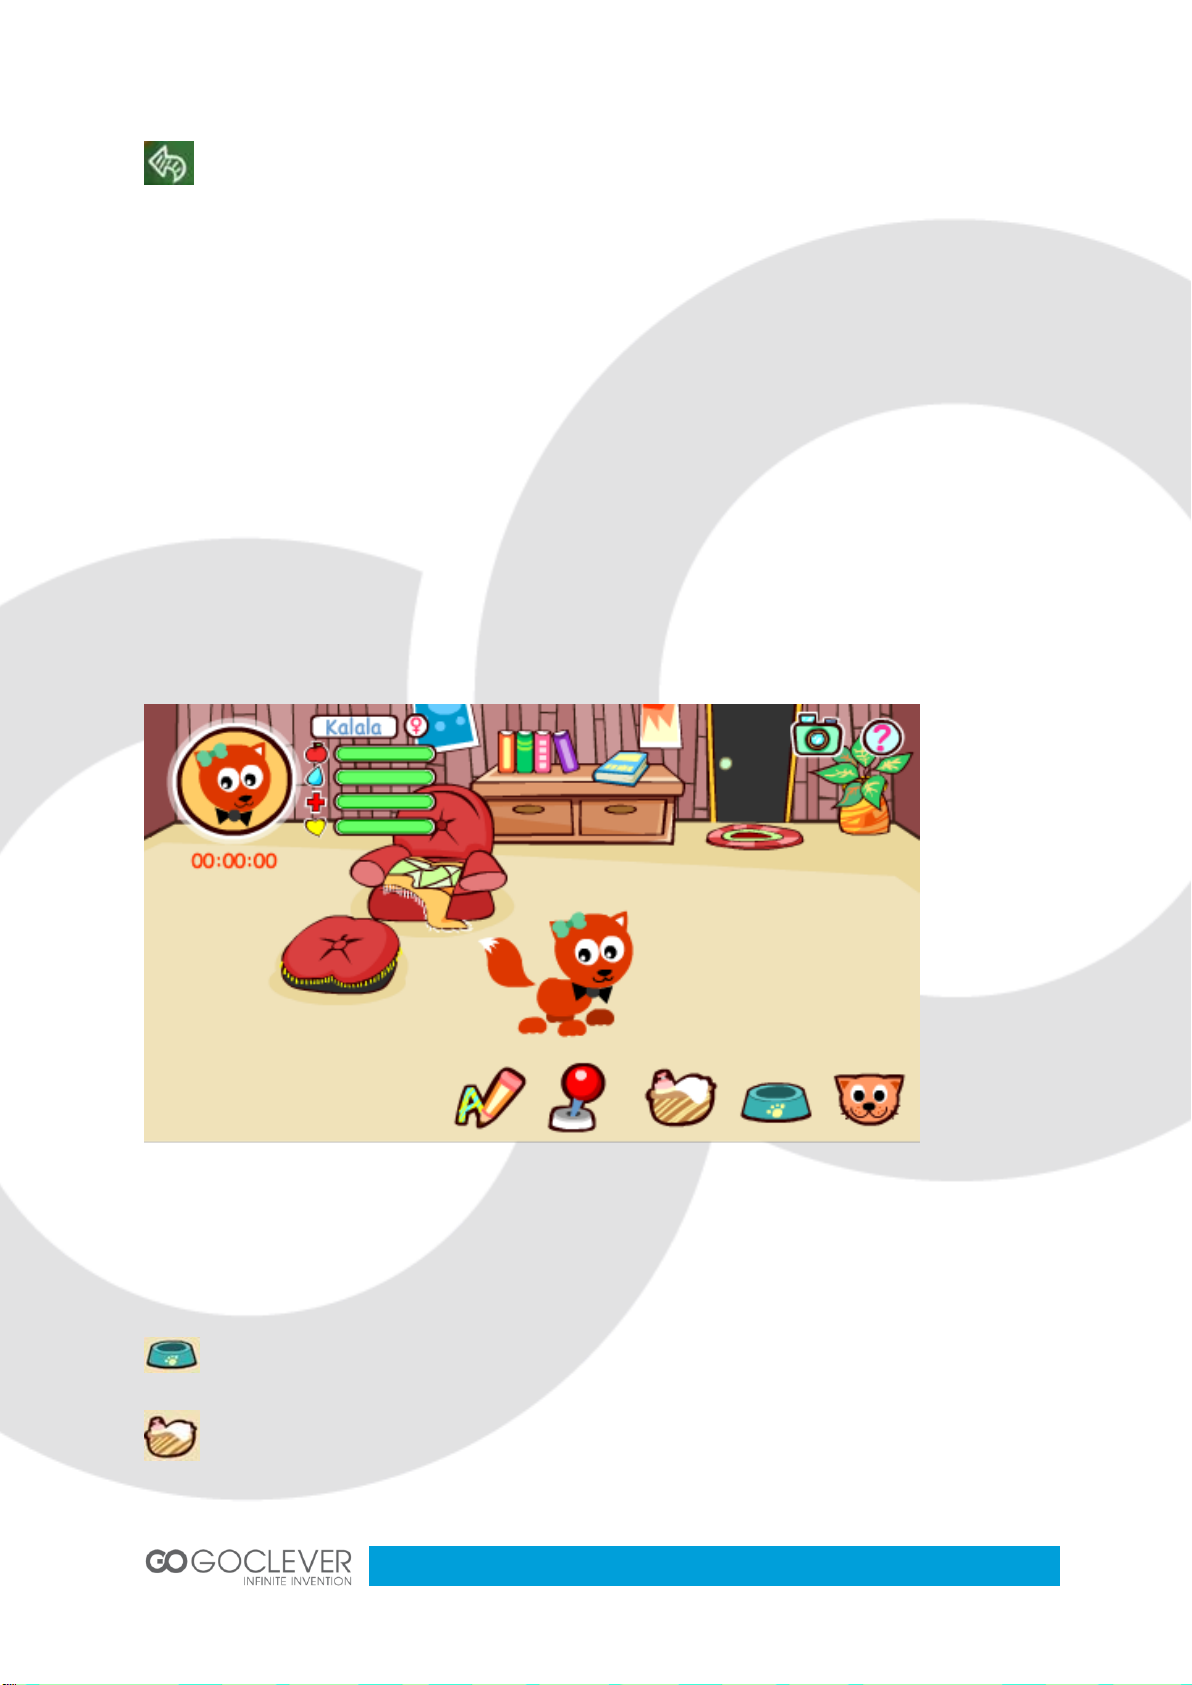
12. My Pet Game
Enter Games
Click on the pet on home page then enter into the pet game.
Click on the pet name above the portrait. User can look through the pet’s information:
name, gender, portrait, the total playing time, and levels (hunger, clean, health, and
mood).
When health level is 0, the pet won’t learn or play games.
When the hunger level and stored value is 0, every two minutes one piece of
food will be sent.
When you touch the pet, its body will move
Select foods to feed the pet
Enter the bathroom to bathe the pet

28
Play game
Study time
Customize pet
Click on the camera icon to snap a pet picture
Provide help
13. Android Browser
Children’s Web Browser’s Main Page
Click on the button to open a new tab and enter a website.
Click on the favorite icon to add a favorite web page.
Recommend children’s videos and movies.

29
Recommend suitable children’s games.
Recommend children’s learning resources.
Recommend children’s learning websites.
Click on the “My Favorites” button to save your favorite learning and
children’s materials.
Parents’ recommend children’s learning games are shown here.
14. Kalala app store
Enter The Kalala Search App Store.
Click on bookmark button of the Kalala pad to open the toolbar and click on
to enter the Kalala Search app store.
The left menu has 9 categories of applications: Hot, Recommend, Writing,
Creativity, Maths, Science, Book, Game, and Box. Each category has abundant
children’s applications for users to download from.
Click on to enter the download manager page.
Click on to open the settings menu.

30
By clicking on any application, you can view the application’s summary page, which
includes the application name, company name, and application description as shown
below:
Click on the button to enter the download page.
Click on the button to return to the home page.
Then Click on to install the application

31
15. WeeOcean Bookstore
15.1 Bookshelf
The My Book bookshelf adds books from its collection. You can click on the
books to read them.
When the user logs into his account, the bookshelf will display its books as well
as the free user downloads.
15.2 Store

32
In order to enter the bookstore, you must first be connected to the Internet.
Recent book updates
Most popular books
Most free books
View books by category
Click on any category to browse books for purchase.

33
15.3 Settings
By clicking on “settings,” the user will open the registration page. Registration is
complete upon entering a valid email address and password.
If not registered, the user can click on to open the registration page.
After filling in the information and clicking “confirm,” the user has successfully
registered. Clicking on the return button returns the user to My books, and clicking on
the “sign in” button returns the user to the login page.

34
16. Storybook
16.1 Storybook cover
Click to enter the sleep mode.
Click to enable automatic storytelling mode. The stories will turn the pages and
play automatically.

35
Click to enable manual mode, which requires the user to finger-swipe the page
to continue playing the story.
Click to exit the story player mode.
“Are you sure exit the story player?”
YES NO
16.2 Sleep Mode.
When in the sleep mode, click on to play stories.
16.3 Storybooks interface
Menu button: sleep mode, home button
Sound: “On” or “Off.”
Manual play and pause.
“Hide words” button.

36
16.4 Children’s storybook
16.5 Encyclopedia

37
17. Bookmark
17.1. The bookmark icon is on the left side of the tablet, when click, the
bookmark page lists the last 4 APKS run from earliest to latest. The user can select
which APK to run from the list.
18. Check SD card content
Put the TF card into the TF card slot,click “BOX” in home screen. Please
follow this path.
19. Charging Kalala Pad
To charge the Kalala Pad, use the power adapter (faster) or USB cable (slower) to
connect the tablet to the PC.
20. FAQ
1. What is APK?
APK stands for Android Application Package.

38
2.The tablet does not respond.
Press the RESET button (in the hole between the headphone jack and USB port) to
restart the tablet.
3.General help.
Click on the "?" icon at the bottom left corner of the screen for help.
4. Operation suggestion:
We recommend not operating the tablet while installing/uninstalling an application or
opening an application. If you do, a system error will occur.
(This is a common issue with the Android system and not a problem caused by the I
wit system).
5. Password recovery
If you forgot your password, use the supervisor password ”8888” to login and renew
your password.
6. How to manage pictures and videos?
Photo storage path: Micro sdcard/pictures/…
Video storage path: Micro sdcard/movies/…
In order to ensure information security, the USB cable is only used for charging, not
for data transfer.

39
7. Display and resolution issues
Because there are many different resolutions for Android tablets, some applications
do not match our tablet. (This is a common issue with the Android system, not a
problem caused by the I wit system).
8. Supported video formats
1080P, MP4, 3GP, AVI, RMVB, WMV, FLV,MKV, etc.
9. How to replace an APK?
If you want to replace an APK, we recommend you uninstall it first.
10. If operating too quickly, voices will overlap occasionally. You can solve this
problem by turning the sound off and back on.
11. When the power icon turns red, you should stop using it. Otherwise it might
shutdown automatically.

40
GOCLEVER GENIUS 7
INSTRUKCJA OBSŁUGI
VISIT OUR WEBSITE
WWW.GOCLEVER.COM
TO SEE MORE PRODUCTS TAB, NAVIO, DVR, DVB-T

41
Instrukcja obsługi urządzenia GENIUS 7
1. Uwagi odnośnie użytkowania
2. Specyfikacja produktu
3. Podstawowe funkcje
4. Włączanie, wyłączanie, tryb snu, budzenie
5. Ekran główny
6. Zarządzanie kontami
7. Ustawienia systemu
8. O mnie
9. Cechy konta rodzicielskiego
10. Artysta
11. Gra „Mówiąca Kalala”
12. Gra „Moje zwierzątko”
13. Przeglądarka Android
14. Wyszukiwanie
15. Sklep z książkami
16. Książka z opowiadaniami
17. ZAKŁADKA
18. Sprawdzanie zawartości karty pamięci
19. Ładowanie tabletu Genius 7
20. Często zadawane pytania
1. Uwagi odnośnie użytkowania
W celu zapewnienia właściwego użytkowania urządzenia i aby zapobiec uszkodzeniu
ciała lub mienia, prosimy przestrzegać następujących zaleceń.
1.1 Zasilanie

42
Nie dotykać adaptera mokrymi rękami.
Przewód zasilania włożyć do uziemionego gniazdka.
Należy upewnić się, że wtyczka jest pewnie umieszczona w gniazdku.
Jeśli doszło do uszkodzenia urządzenia (np. usunięcia izolacji przewodu),
nie należy go używać.
W przypadku wyładowań atmosferycznych lub pozostawienia urządzenia
na dłuższy czas, należy wyjąć wtyczkę z gniazdka.
1.2 Uwagi o urządzeniu
Nie narażać urządzenia na bezpośrednie działanie światła słonecznego i
nie pozostawiać go w samochodzie.
Nie używać urządzenia w łazience lub innych wilgotnych lub zapylonych
pomieszczeniach.
Nie używać urządzenia w pobliżu kart kredytowych lub innych
namagnesowanych przedmiotów.
Używać tylko oryginalnych akcesoriów.
Nie dotykać ekranu LCD ostrymi przedmiotami.
Nie naciskać ekranu LCD.
Nie zanurzać urządzenia w wodzie.
Nie naprawiać, demontować lub modyfikować urządzenia.
1.3 Zmiany lub modyfikacje, które nie zostały wyraźnie zatwierdzone przez stronę
odpowiedzialną za zgodność, mogą unieważnić prawo użytkownika do posługiwania
się urządzeniem.
Niniejsze urządzenie przeszło pomyślnie testy zgodności z wymogami dla urządzenia
cyfrowego klasy B, w rozumieniu części 15 przepisów amerykańskiej Federalnej
Komisji Łączności (FCC). Wymogi te opracowano, aby zapewnić należytą ochronę
przeciw szkodliwym zakłóceniom przy korzystaniu z niego w budynkach
mieszkalnych. Urządzenie to generuje, wykorzystuje i może emitować sygnały o
częstotliwości radiowej i w przypadku instalacji i korzystania niezgodnego z instrukcją
może powodować szkodliwe zakłócenia komunikacji radiowej. Nie ma jednak
gwarancji, że takie zakłócenia nie wystąpią w przypadku konkretnej instalacji. Jeśli
okaże się, że urządzenie powoduje szkodliwe zakłócenia w pracy odbiorników
radiowych lub telewizyjnych, co można ustalić wyłączając i włączając urządzenie,
użytkownik może zmniejszyć zakłócenia w jeden z następujących sposobów:
- Zmienić położenie lub ustawienie anteny odbiorczej.
- Zwiększyć odległość między urządzeniem a odbiornikiem.
- Podłączyć urządzenia do gniazdka zasilającego znajdującego się na obwodzie
innym niż ten, do którego podłączony jest odbiornik.

43
- Zasięgnąć porady sprzedawcy lub doświadczonego technika radiowo-
telewizyjnego w celu uzyskania pomocy.
Niniejsze urządzenie spełnia wymogi ograniczeń ekspozycji na promieniowanie
określonych przez FCC dla środowiska niekontrolowanego. Użytkownik końcowy
musi przestrzegać instrukcji użytkowania dla zapewnienia zgodności normami emisji
fal radiowych. Niniejszy odbiornik nie powinien znajdować się w pobliżu jakiejkolwiek
anteny lub nadajnika ani być używany w połączeniu z nimi.
Przenośne urządzenie zaprojektowane jest w sposób spełniający wymogi dotyczące
ekspozycji na fale radiowe ustalone przez Federalną Komisję Łączności (USA).
Wymogi te określają graniczną wartość współczynnika absorbcji właściwej
promieniowania (SAR) wynoszącą 1,6 W/kg z uśrednieniem na każdy gram ciała.
Maksymalna wartość absorbcji właściwej (SAR) zmierzona według tego standardu
podczas certyfikacji produktu do użytkowania przy właściwym noszeniu na ciele
wynosi 0.360 W/kg.

44
Rodzaj
produktu
Tablet dla dzieci + aparat cyfrowy
System
operacyjny
Android 4.0
CPU
AllwinnerA13 1Ghz
Pamięć
512MB DDR3
Pamięć
wewnętrzna
4GB, rozszerzenie przez karty pamięci microSD (do 32GB)
Sieć
WIFI (IEEE 802.11 b/g/n)
Porty
MiniUSB 2.0
Gniazdo na karty MicroSD
3.5mm gniazdo na słuchawki
Ekran
7.0 cali, ekran dotykowy
Aparat
Aparat z przodu /GT0308 0.3M pikseli
Aparat z tyłu /SP2518 2.0M pikseli
Akcesoria
Przewód USB, Instrukcja użytkownika i karta gwarancyjna,
ładowarka
2. Specyfikacja produktu

45
3. Podstawowe funkcje
MENU: Pokaż ostatnio używane aplikacje.
APARAT: Pojedyncze dotknięcie przycisku „aparat”, aby przejść do trybu
aparatu lub przytrzymanie przez 3 sekundy, aby wejść podczas używania
innych aplikacji.
POWRÓT: Powrót do poprzedniego ekranu.
GŁOŚNOŚĆ: GŁOŚNOŚĆ + ,GŁOŚNOŚĆ -
Zwiększanie lub zmniejszanie głośności lub zmiana długości zmiennej
ogniskowej w trybie aparatu.
MIKROFON: gniazdko do mikrofonu.
GŁOŚNIK: wejście/wyjście dźwięku.

46
4. Włączanie, wyłączanie, tryb snu, budzenie
Włączanie: gdy urządzenie jest wyłączone, wciśnij i przytrzymaj przycisk
zasilania przez 3 sekundy.
Wyłączanie: gdy urządzenie jest włączone, wciśnij i przytrzymaj przycisk
zasilania przez 3 sekundy, a następnie wybierz „wyłącz” z wyskakującego
okienka.
(Gdy urządzenie jest włączone, wciśnij i przytrzymaj przycisk zasilania przez 7
sekund, aby wymusić wyłączenie).
Tryb snu: Gdy urządzenie jest włączone, wciśnij przycisk zasilania raz, aby
przejść do trybu snu.
Obudzenie: Gdy urządzenie jest w trybie snu, wciśnij przycisk zasilania raz,
aby wyjść z trybu snu.

47
5. Ekran główny
Po uruchomieniu urządzenia i zalogowaniu do swojego indywidualnego konta,
zobaczysz ekran główny systemu operacyjnego urządzenia GENIUS 7. Na ekranie
głównym jest dziewięć folderów, w których przechowywane są różne programy dla
dzieci.
Konto rodzicielskie zarządza wszystkimi aplikacjami i może upoważniać inne
konta do używania ich.

48
6. Zarządzanie kontami
Logowanie, dodawanie i usuwanie konta
System domyślnie przechodzi do konta rodzicielskiego (największe uprawnienia).
Początkowe hasło to „1111”. Każdy tablet pozwala na wprowadzenie do czterech
kont dziecięcych. Można wybrać, czy ustanawiać hasło, czy nie. Rodzice mogą
używać własnego konta do zarządzania kontami dzieci.

49
Przyciśnięcie przycisku „MENU” z ekranu głównego spowoduje pokazanie się u dołu
paska zadań z następującymi opcjami „USTAWIENIA SYSTEMU”, „DODAJ
UŻYTKOWNIKA”, „USUŃ UŻYTKOWNIKA” oraz „O GENIUS 7”.
Kliknij na „Dodaj użytkownika”, aby wprowadzić hasło do logowania rodziców.

50
Wprowadź informacje o koncie.
Kliknij na „Usuń użytkownika” i wprowadź hasło rodziców do logowania.

51
Następnie kliknij na , aby przejść do strony z ustawieniami.
7. Ustawienia systemu
Na stronie logowania wciśnij przycisk „MENU” i kliknij „USTAWIENIA SYSTEMU”.
Rodzice mogą wprowadzić swoje hasło do logowania, aby otworzyć interfejs

52
ustawień systemu i wybrać następujące pozycje: USTAWIENIA SIECI
BEZPRZEWODOWEJ, USTAWIENIA JĘZYKA, USTAWIENIA DATY I CZASU,
USTAWIENIA MUZYKI W TLE itd. Zobacz poniżej:
8. O mnie
Po zalogowaniu kliknij na miniaturę, aby wejść na stronę z osobistymi informacjami,
aby zmienić ikonę, nazwisko, wiek, muzykę w tle, efekty dźwiękowe i hasło.

53
9. Elementy konta rodzicielskiego
9.1. Dodaj aplikacje
Konto rodzicielskie:
Konto rodzicielskie pozwala na zainstalowanie nowych aplikacji. Kliknij na „MENU” z
wyskakującego okienka.

54
Kliknij na “Pobierz aplikacje”, aby przejść na rynek aplikacji i przeglądać aplikacje.
(Tablet załaduje różne rynki aplikacji dla różnych krajów).
Po zakończeniu pobierania, wybierz kategorię, w której chcesz to zainstalować i
wybierz użytkownika, aby potwierdzić instalację.

55
(Jeśli kategoria i użytkownik nie zostaną wybrani, aplikacja zostanie automatycznie
zainstalowana na koncie rodzicielskim).

56
Konta dziecięce
Konta dziecięce nie pozwalają na instalację aplikacji
9.2 Zarządzanie aplikacjami
Konto rodzicielskie
Konto rodzicielskie zarządza wszystkimi aplikacjami i może upoważniać inne
konta do używania ich.
Przenieś ikony aplikacji do innych kategorii.
Odinstaluj aplikacje.
Konta dziecięce
Ikona usuwania aplikacji

57
9.3 Ustawienia trybu ochrony dzieci
Z konta rodzicielskiego kliknij na ikonę „MENU” i wybierz „Tryb ochrony dzieci” z
wyskakującego okienka.

58
Ustawienia nadużywania
Aby zapobiec nadużywaniu niektórych aplikacji przez dzieci, można ustawić
maksymalny czas ich używania i czas przerwy.
Kiedy czas używania dobiegnie końca, tablet automatycznie zablokuje się. Tylko
rodzice mogą użyć swojego hasła, aby odblokować tablet.
Kiedy dobiegnie końca czas przerwy, tablet automatycznie odblokuje się.

59
Magiczne pudełko
Rodzice kontrolują, które kategorie pokażą się na kontach dzieci.
Ustawienia ochrony
Rodzice mogą ustawić domyślnie jasność lub włączyć lampę błyskową.

60
- Wybierz “sugerowana jasność”, aby wrócić do ustawienia domyślnego.
- Wybierz „lampa błyskowa”, aby włączyć lub wyłączyć lampę błyskową
Dziennik logowanie użytkownika
Możesz sprawdzić czas zalogowania i wylogowania każdego konta dziecięcego w
DZIENNIKACH LOGOWANIA UŻYTKOWNIKA.
Kontrola rodzicielska

61
Strona główna
Zbiór stron internetowych rodziców
Sprawdź historię przeglądania
Kliknij na , aby dodać strony do przeglądarki.
Kliknij na , aby usunąć adres strony zaznaczając adres strony
internetowej lub
kliknij na , aby usunąć wszystkie adresy stron internetowych.
10. Artysta
Część Artysta podzielona jest na sześć funkcji: Mój aparat, Moje zdjęcia, Edytor
zdjęć, Moje dzienniki, Film oraz Moje filmy.

62
10.1 Mój aparat
Główne funkcje:
Dekorowanie: Wybierz ramkę do zdjęcia, którą można dodać do zdjęć.
Efekty specjalne: Wybierz sześć rodzajów efektów specjalnych: sepia, tonacja
kolorystyczna(czerwona, zielona lub niebieska), negatyw oraz czarno-biały.
Odliczanie: Po pięciu sekundach aparat zrobi zdjęcie automatycznie.
Podgląd: Obejrzyj wcześniej zrobione zdjęcia.
Dźwięk migawki: Wybierz efekt dźwiękowy, który słyszysz przy robieniu zdjęć.
Kolaż: Zrób cztery zdjęcia, które automatycznie połączą się w jedno zdjęcie.
Ustawienia: Ustaw rozdzielczość: wysoka rozdzielczość, średnia rozdzielczość, niska
rozdzielczość.
Zdjęcia w trybie ciągłym: Zrób 1, 3, 5 lub 9 zdjęć od razu.

63
10.2 Moje zdjęcia
Przesuwaj w górę i w dół, aby przeglądać zdjęcia. Kliknij na zdjęcia, aby je
powiększyć.
Funkcja usuwania: Kliknij na kosz, wybierz zdjęcia, które chcesz usunąć i
kliknij znów na kosz.
10.3. Edytor zdjęć

64
Opis funkcji:
Przeglądanie: Wybierz zdjęcia do edycji.
Cofnij: wróć do poprzedniego kroku.
Ołówek: Wybierz kolor, wielkość i styl ołówka, aby dostosować swój obecny ołówek.
Pędzel: Wybierz wzór dla swojego pędzla.
Kolor tła: Wybierz kolor tła zdjęcia.
Ramki do zdjęć: Wybierz ramkę, którą możesz dodać do zdjęć.
Dekorowanie: Wybierz dekoracje, które możesz dodać do zdjęć.
Słowa: Wybierz słowa, które możesz dodać do zdjęć.
Lustro: Lustrzane odbicie zdjęcia.
Gumka: Wymaż część zdjęcia.
10.4 Filmy
Główne funkcje:
Start/Stop: Rozpocznij lub zakończ nagrywanie filmu.
Odtwarzanie: Odtwórz ostatni nagrany film.

65
10.5 Moje filmy
Kliknij na film, by go odtworzyć.
Kliknij na kosz, wybierz film, który chcesz usunąć i kliknij znów na kosz, aby
usunąć film.

66
10.6 Moje dzienniki
Wprowadź „Moje zdjęcia”, aby dodać zdjęcia.
Wszystkie Twoje dzienniki zapisane są w interfejsie „Moje dzienniki”.

67
Naciśnij na ikonę , aby potwierdzić, że chcesz usunąć filmy.
11. Gra „Mówiąca Kalala” (tylko j. angielski)
Wchodzenie do gier z głównego ekranu: przeciągnij ekran
t.j. przeciągnij palcem w lewo na głównym ekranie, aby otworzyć grę „Mówiąca
Kalala” i naciśnij przycisk powrotu na urządzeniu, aby wyjść z gry „Mówiąca Kalala”.
Dotknij Kalali, żeby wykonała jakiś ruch.

68
Kliknij na , aby Mówiąca Kalala machnęła magiczną różdżką, wzywając sowę,
żeby usiadła jej na głowie.
Kliknij na , aby Mówiąca Kalala zagrała pięknie na gitarze basowej.
Kliknij na , aby Mówiąca Kalala rzuciła jajkiem w ekran.
Kliknij na , aby wejść do mistycznego interfejsu dźwięków, gdzie użytkownik
może wybrać jeden z trzech głosów: męski, kobiecy i głos robota.
Wszystkie pytania podzielone są na pięć głównych kategorii: czat, nauka, życie,
opowiadanie i muzyka. Kliknięcie na którąkolwiek z nich otworzy listę pytań, którą
użytkownik może przewijać w górę i w dół.
Kliknięcie na otworzy obraz fali dźwiękowej, gdzie użytkownik może mówić do
mikrofonu, aby zadać pytanie tablicy. Mówiąca Kalala odpowie na pytanie, a u dołu
ekranu pokażą się słowa. Nad głową Kalali pokażą się również obrazki związane z
odpowiedzią. Kiedy użytkownik powie „Proszę opowiedz mi historyjkę” lub „Proszę

69
zaśpiewaj piosenkę”, [Kalala] automatycznie opowie historyjkę lub zaśpiewa
piosenkę.
Interfejs opowiadań i muzyki
Odtwarzaj opowiadania lub muzykę
Ostatnia piosenka/ostatnie opowiadanie
Następna piosenka/następne opowiadanie
Wróć do poprzedniego menu
12. Gra „Moje zwierzątko”
Wejdź do gier
Kliknij na zwierzątko na stronie głównej i wejdź do gry „Moje zwierzątko”.

70
Kliknij na imię zwierzątka nad portretem. Użytkownik może obejrzeć informacje o
zwierzątku: imię, płeć, portret, łączny czas zabawy oraz poziomy (głodu, czystości,
zdrowia i nastroju).
Kiedy poziom zdrowia wynosi 0, zwierzątko nie będzie się uczyło, ani bawiło.
Kiedy poziom głodu i wartość wynosi 0, co dwie minuty wysyłane jest jedzenie.
Kiedy dotkniesz zwierzątko, jego ciało się poruszy.
Wybierz jedzenie, którym nakarmisz zwierzątko.
Wejdź do łazienki, żeby wykąpać zwierzątko.
Pobaw się.
Czas na naukę.
Dostosuj zwierzątko.
Kliknij na ikonę aparatu, żeby zrobić zdjęcie zwierzątka.
Pomoc

71
13. Przeglądarka Android
Główna strona przeglądarki internetowej dla dzieci
Kliknij na przycisk , aby otworzyć nową kartę i wejść na stronę internetową.
Kliknij na ikonę ulubione , aby dodać ulubioną stronę internetową.
Polecane filmy dla dzieci.
Polecane gry odpowiednie dla dzieci.
Polecane pomoce dydaktyczne dla dzieci.
Polecane strony edukacyjne dla dzieci.
Kliknij na przycisk “Moje ulubione”, aby zapisać swoje ulubione
materiały edukacyjne i dla dzieci.

72
Gry edukacyjne dla dzieci polecane przez rodziców pokazane są tutaj.
14. Wyszukiwanie
Wejdź do przeszukiwania sklepu z aplikacjami Kalali
Kliknij na przycisk zakładki na tablecie, aby otworzyć pasek zadań i kliknij na
, aby przejść do przeszukiwania sklepu z aplikacjami Kalali.
Menu po lewej stronie ma 9 kategorii aplikacji: Gorące, Polecane, Pisanie,
Kreatywność, Matematyka, Nauka, Książka, Gra oraz Pudełko. W każdej kategorii
jest wiele aplikacji dla dzieci do pobrania przez użytkowników.
Kliknij na , aby wejść na stronę managera pobierania.
Kliknij na , aby otworzyć menu ustawień.

73
Klikając na dowolną aplikację, możesz obejrzeć stronę opisującą aplikację, które
zawiera jej nazwę, nazwę firmy oraz opis aplikacji, tak jak przedstawiono to poniżej:
Kliknij na , aby wejść na stronę pobierania.
Kliknij na , aby wrócić do strony głównej.
Następnie kliknij na , aby zainstalować aplikację.

74
15. Sklep z książkami
15.1 Półka z książkami
Półka z książkami „Moja książka” dodaje książki ze swojej kolekcji. Możesz kliknąć
na książki, aby je czytać.
Kiedy użytkownik loguje się do swojego konta, półka z książkami pokaże swoje
książki oraz książki do bezpłatnego pobrania przez użytkownika.
15.2 Sklep
Aby wejść do sklepu, wymagane jest połączenie z Internetem.

75
Najnowsze aktualizacje książek
Najpopularniejsze książki
Najczęściej oglądane książki
Oglądaj książki według kategorii.
Kliknij na dowolną kategorię, aby przeglądać książki do kupienia.

76
15.3 Ustawienia
Klikając na „Ustawienia”, użytkownik otwiera stronę rejestracji. Rejestracja jest
kompletna po wprowadzeniu ważnego adresu poczty elektronicznej i hasła.

77
Jeśli użytkownik nie jest zarejestrowany, może kliknąć na ,aby otworzyć
stronę rejestracji. Poprzez podanie wymaganych informacji i kliknięcie na „Potwierdź”
użytkownik dokonuje rejestracji. Klikając na przycisk powrotu użytkownik wraca do
„Moje książki” i klikając na przycisk „Zaloguj się” wraca do strony logowania
użytkownika.

78
16. Książka z opowiadaniami
16.1 Okładka książki
Kliknij, aby przejść do trybu snu.

79
Kliknij, aby uaktywnić tryb automatycznego opowiadania. Opowiadania będą
automatycznie odwracały strony i odtwarzały się.
Kliknij, aby uaktywnić tryb ręczny, który wymaga, aby użytkownik przesuwał
palcem po stronie, aby kontynuować odtwarzanie.
Kliknij, aby wyjść z trybu opowiadacza.
16.2 Tryb snu
W trybie snu, kliknij na , aby odtwarzać opowiadania.

80
16.3 Interfejs książek z opowiadaniami
Przycisk menu: tryb snu, tryb główny.
Dźwięk: włączony lub wyłączony.
Ręczne odtwarzanie i pauza.
Przycisk “Ukryj słowa”
16.4 Książka z opowiadaniami dla dzieci
16.5 Encyklopedia

81
17. ZAKŁADKA
Ikona ZAKŁADKA znajduje się po lewej stronie tabletu. strona z zakładkami
wyświetla 4 aplikacje APKS od uruchamianej najwcześniejszej do najpóźniejszej.
Użytkownik może wybrać, którą aplikację z listy uruchomić.
18. Sprawdzanie zawartości karty SD
Włóż kartę pamięci do gniazda na karty, kliknij “Pudełko” na ekranie głównym. Należy
iść poniższą ścieżką.

82
19. Ładowanie Tabletu Genius 7
Aby naładować tablet, należy użyć adaptera (szybsze ładowanie) lub przewodu USB
(wolniejsze ładowanie), w celu podłączenia tabletu do komputera osobistego. W
zestawie jest również ładowarka sieciowa.
20. Często zadawane pytania
1. Co to jest APK?
APK oznacza Android Application Package (PakietAplikacji Android).
2. Tablet nie odpowiada
Naciśnij przycisk RESET (w otworze między gniazdkiem słuchawek a portem USB),
aby ponownie uruchomić tablet.
3. Ogólna pomoc
Kliknij na “?” w dolnym lewym rogu ekranu, aby uzyskać pomoc.
4. Sugestia dotycząca użytkowania
Zalecamy nie posługiwać się tabletem podczas instalowania/odinstalowania aplikacji
lub otwierania aplikacji. W razie posługiwanie się tabletem w tym czasie, wystąpi błąd
systemowy. (Jest to częsty problem w systemie Android, a nie problem urządzenia
GENIUS 7).

83
5. Odzyskiwanie hasła
Jeśli zapomnisz swojego hasła, skorzystaj z hasła nadzorcy „8888”, aby zalogować
się i odnowić swoje hasło.
6. W jaki sposób zarządzać zdjęciami i filmami?
Ścieżka przechowywania zdjęć: Micro SD://pictures/…
Ścieżka przechowywania filmów: Micro SD://movies/…
W celu zapewniania bezpieczeństwa danych przewód USB przeznaczony jest tylko
do ładowania, a nie do przesyłania danych.
7. Problemy z ekranem i rozdzielczością
Ponieważ w tabletach Android występuje wiele różnych rozdzielczości, niektóre
aplikacje nie pasują do naszego tabletu. (Jest to częsty problem w systemie Android,
a nie problem urządzenia GENIUS 7).
8. Obsługiwane formaty video
480P, MP4, 3GP, AVI, RMVB, WMV, FLVitd.
9. Jak wymienić aplikację APK?
Jeśli chcesz wymienić aplikację APK, zalecamy najpierw odinstalowanie jej.

84
10. W przypadku zbyt szybkiego działania, czasem głosy mogą nachodzić na
siebie. Można rozwiązać ten problem wyłączając dźwięk i włączając do z powrotem.
11.Kiedy ikona zasilania zaświeci na czerwono, należy przestać używać tabletu. W
przeciwnym razie wyłączy się on automatycznie.

85
Warunki gwarancji
1. GOCLEVER SP. Z O.O. z siedzibą w Poznaniu (60-431) przy ul. Sianowskiej 4a zwany dalej
Gwarantem zapewnia, że urządzenie marki GOCLEVER, jest wolne od wad konstrukcyjnych i
materiałowych, które mogłyby naruszyć jego funkcjonalność, o ile przestrzegana była instrukcja
obsługi dostarczona przy zawarciu umowy.
2. Gwarancja obowiązuje wyłącznie na terytorium Polski.
3. Gwarant bezpłatnie usunie ewentualną niesprawność urządzenia, zgodnie z postanowieniami
niniejszej gwarancji pod warunkiem przedstawienia wypełnionej w dniu zakupu karty gwarancyjnej
wraz z kopią dowodu zakupu. Dokonywanie zmian i skreśleń w karcie gwarancyjnej przez osoby
nieupoważnione powoduje utratę uprawnień wynikających z niniejszej gwarancji.
4. Okres gwarancji na urządzenia GOCLEVER wynosi 12 miesięcy, licząc od daty sprzedaży sprzętu,
jednak nie dłużej niż 15 miesięcy od daty produkcji umieszczonej na Produkcie.
5. Tryb przyjmowania produktów uszkodzonych w systemie DOOR to DOOR przysługuje nabywcy w
terminie 12 miesięcy od daty zakupu, jednak nie dłużej niż 15 miesięcy od daty produkcji. Po
przekroczeniu tych terminów użytkownik powinien przesłać uszkodzone urządzenie do punktu
serwisowego na własny koszt po wcześniejszym uzyskaniu numeru RMA zgodnie z procedurą
reklamacyjną. Natomiast koszt przesyłki do klienta po naprawie pokrywa Gwarant.
6. Okres gwarancji na akcesoria dołączone do urządzenia (np. pilot, kable itp.) wynosi 1 miesiąc od
daty sprzedaży z wyłączeniem uszkodzeń mechanicznych ( nie dotyczy gwarancja door-to-door )
7. Wady ujawnione w okresie gwarancji będą usuwane bezpłatnie w możliwie najkrótszym terminie nie
przekraczającym 21 dni roboczych od przyjęcia urządzenia na serwis. W przypadku konieczności
sprowadzenia części zamiennych z zagranicy, termin powyższy może ulec przedłużeniu o kolejne 30
dni.
8.Reklamujący zobowiązany jest zgłosić usterkę w Centralnym Serwisie Klienta na www.goclever.pl
zakładka POMOC>>> Zgłoszenie reklamacji. W Przypadku nie zgłoszenia usterki i wysłania jej do
gwaranta bez uzyskania numeru reklamacyjnego przesyłka nie zostanie przyjęta na serwis.
9. Usterka musi być zgłoszona do serwisu nie później niż 14 dni od jej zaistnienia.
10. Nabywca zobowiązany jest dostarczyć produkt w oryginalnym opakowaniu, wraz ze wszystkimi
akcesoriami. Odpowiedzialność za uszkodzenia wynikające z użycia opakowania zastępczego ponosi
nabywca.
11. Sprzęt nie odebrany z serwisu w ciągu 3 miesięcy od ukończenia naprawy przepada na rzecz
serwisu.
12. W przypadku nieuzasadnionej reklamacji (reklamacji sprawnego urządzenia lub gdy uszkodzenie
powstało z winy klienta) zgłaszający reklamację zostanie obciążony kosztami ekspertyzy oraz
transportu.
14. Gwarancja nie obejmuje:
1. jakiegokolwiek używania sprzętu wykraczającego poza opis zakresu jego pracy;
2. roszczeń z tytułu parametrów technicznych urządzenia, o ile są one zgodne z podanymi przez
producenta w instrukcji obsługi lub innych dokumentach o charakterze normatywnym;
3. uszkodzeń powstałych z przyczyn zewnętrznych, np.: uszkodzeń mechanicznych, skutków zjawisk
atmosferycznych, zanieczyszczeń, zalań, przepięć, itp.
4. wadliwego działania nieautoryzowanego oprogramowania zainstalowanego na urządzeniu
15. W przypadku, gdy naprawa gwarancyjna wymaga wymiany części, element wymieniony pozostaje
własnością Gwaranta. Części użyte do wymiany mogą być innej marki o parametrach technicznych co
najmniej równoważnych.
16. Nabywca traci prawa gwarancyjne w przypadku zerwania plomb gwarancyjnych, tabliczki
znamionowej z numerem seryjnym lub stwierdzenia przez serwis producenta dokonywania
nieautoryzowanych napraw lub zmian systemowy bądź konstrukcyjnych urządzenia.
17. Gwarant może uchylić się od dotrzymania terminowości usługi gwarancyjnej, jeżeli zaistnieją
nieprzewidziane okoliczności o charakterze siły wyższej np.: klęska żywiołowa, niepokoje społeczne
itp.

86
Czechy
BOUNCER S.R.O.
SLAVONICKA 324
67531 Jemnice, Czech Republic
servis@goclever.cz
Serbia
ET Servisd.o.o. Beograd
Member of Logo d.o.o.
Group Bulevarkralja Aleksandra 261
11000 Beograd. Srbija
+381 11 2042 109,+381 11 2042 101
www.etservis.rs
servis@etseivis.rs
Ukraina
Service Center "KROK-TTC"
ul. GeroevDnepra 2A
04212, Kiev, Ukraine
+380 800 504 504
info@krok-ttc.com
Chorwacja
PlayCom
Ulica gradaVukovara 249,10000 Zagreb
+385 01 5618 433,+385 01 6184 115,
+385 01 6184 115
Skype : PlayCom - HR
info@play.com.hr
www.playcom.hr
Rumunia
S.C. Cordon Electronics S.R.L.
Str. SpataruPreda nr. 12, sector 5
Bucuresti, Romania
+40 372324762, +40 213009905,
+40 721909190, +40 740209932
office@cordongroup.ro
www.cordongroup.ro
Słowenia
TopTimed.o.o.,
Litostrojskacesta 44f, Ljubljana
servis@toptime.s
i tel: +386 1 600 50 20
www.toptime.si
18. Gwarant nie odpowiada za szkody i straty powstałe w wyniku niemożności korzystania z
urządzenia będącego w naprawie.
19. Uprawnienia z tytułu gwarancji nie obejmują prawa kupującego do domagania się zwrotu
utraconych korzyści w związku z wadami urządzenia.
20. Gwarant nie odpowiada za szkody powstałe w wyniku utraty danych na nośnikach
magnetycznych.
21. Stosunek prawny pomiędzy nabywcą urządzenia i Gwarantem regulowany jest wyłącznie
postanowieniami niniejszej gwarancji. Dalej idące roszczenia odszkodowawcze są wyłączone chyba,
że wynikają one z bezwzględnie obowiązujących przepisów prawa.
22. Gwarancja niniejsza ma charakter uzupełniający w stosunku do uprawnień nabywcy
przysługujących wobec sprzedawcy. Gwarancja nie wyłącza, nie ogranicza ani nie zawiesza
uprawnień nabywcy wynikających z niezgodności towaru z umową.
Najszybszą metodą rozwiązywania wielu problemów jest kontakt przez zgłoszenie serwisowe
pod adresem:
www.AUTORMA.GOCLEVER.com
Centralny Serwis Klienta Funkcjonuje
od poniedziałku do piątku w godzinach: 9:00 – 16:30
tel. (061) 84 88 767.
Goclever Sp. z o.o.
ul. Sianowska 4a
60-431Poznań, Polska
serwis@goclever.pl
Serwisy partnerskie:

87
DEALER’S NAME /STAMP
SIGNATURE
Date
Confirmed defect
made repairs
Service sign
and stamp
WARRANTY CARD
DATE SOLD:
...................................................................................................................................................................
............................................
DATE MANUFACTURED:
...................................................................................................................................................................
.......................
DEVICE MODEL: ……………….……………………………………………………………………
SERIAL NUMBER:
...................................................................................................................................................................
.........................................................
Date and customer’s signature
Repairs history
 Loading...