

Quick Start Guide
EXTREME PRO 4K S
Model: DVRXTP4KS

2/13
Quick Start Guide
START 2
English GB 4
Polski PL 5
Čeština CZ 6
Deutsch DE 7
Français FR 8
Español ES 9
Ελληνική GR 10
Magyar HU 11
Italian IT 12
Português PT 13
microUSB
USB
DC 5V
0.5 - 1 A
2-3h
Magyar HU 10
Italian IT 11
Lietuvių LT 12
Português PT 13
Pусский RU 14
Slovenský SK 15
Yкраїнська UA 16
EXTREME PRO 4K
Android
APLICATION NAME:
NTK cam
3/13
Quick Start Guide
Quick Start GuideQuick Start Guide
EXTREME PRO 4K
EXTREME PRO 4KS
EXTREME
PRO 4KS
MOBILE APP
Quick Start GuideQuick Start Guide
EXTREME PRO 4K
1234567890
WIFI PASSWORD:
micro SD 4K@30FPS/1080P@60FPS 1080P@30FPS 720P@FPS
32 GB 120min 240min 320min
16 GB 60min 120min 160min

4/13
Quick Start Guide
GB
ADDITIONAL INFORMATION
GOCLEVER Sp. z o. o. hereby declares
under our sole responsibility that the
product is in conformity with following
directives: RED (2014 / 53 /EU),
EMC (2014/53/EU), EMC (2014/30/EU). Full
document (declaration of conformity) is available
for download from www.goclever.com in product
page.
Correct Disposal Of This Product (Waste
Electrical & Electronic Equipment).
(Applicable in the European Union and
other European countries with separate
collection systems)
This marking indicates that at the end of
its working life this product should not be disposed
of with other household waste in the EU. To prevent
possible harm to the environment or human health
from uncontrolled waste disposal, please separate
this from other types of wastes and recycle it
responsibly to promote the sustainable reuse of
material resources.
Installing mobile app for smartphone
Use QR code on page (2) to install software for your
smartphone. You should search for NTK Cam mobile
app on Google Play or App Store.
Charging camera: page (2). There is battery icon
on LCD (9&10) showing battery status.
Turning camera ON/OFF
Press button (1) for 3 seconds to turn camera ON
or OFF.
Memory cards for video recording
Device accepts micro-SD cards with rated speed of
10 or faster. In case camera detects memory card
which is too slow, it will restrict certain recording
modes (for example 4K).
Recording videos
Insert micro-SD card to slot (5). With camera
turned on, press once button (8) start recording.
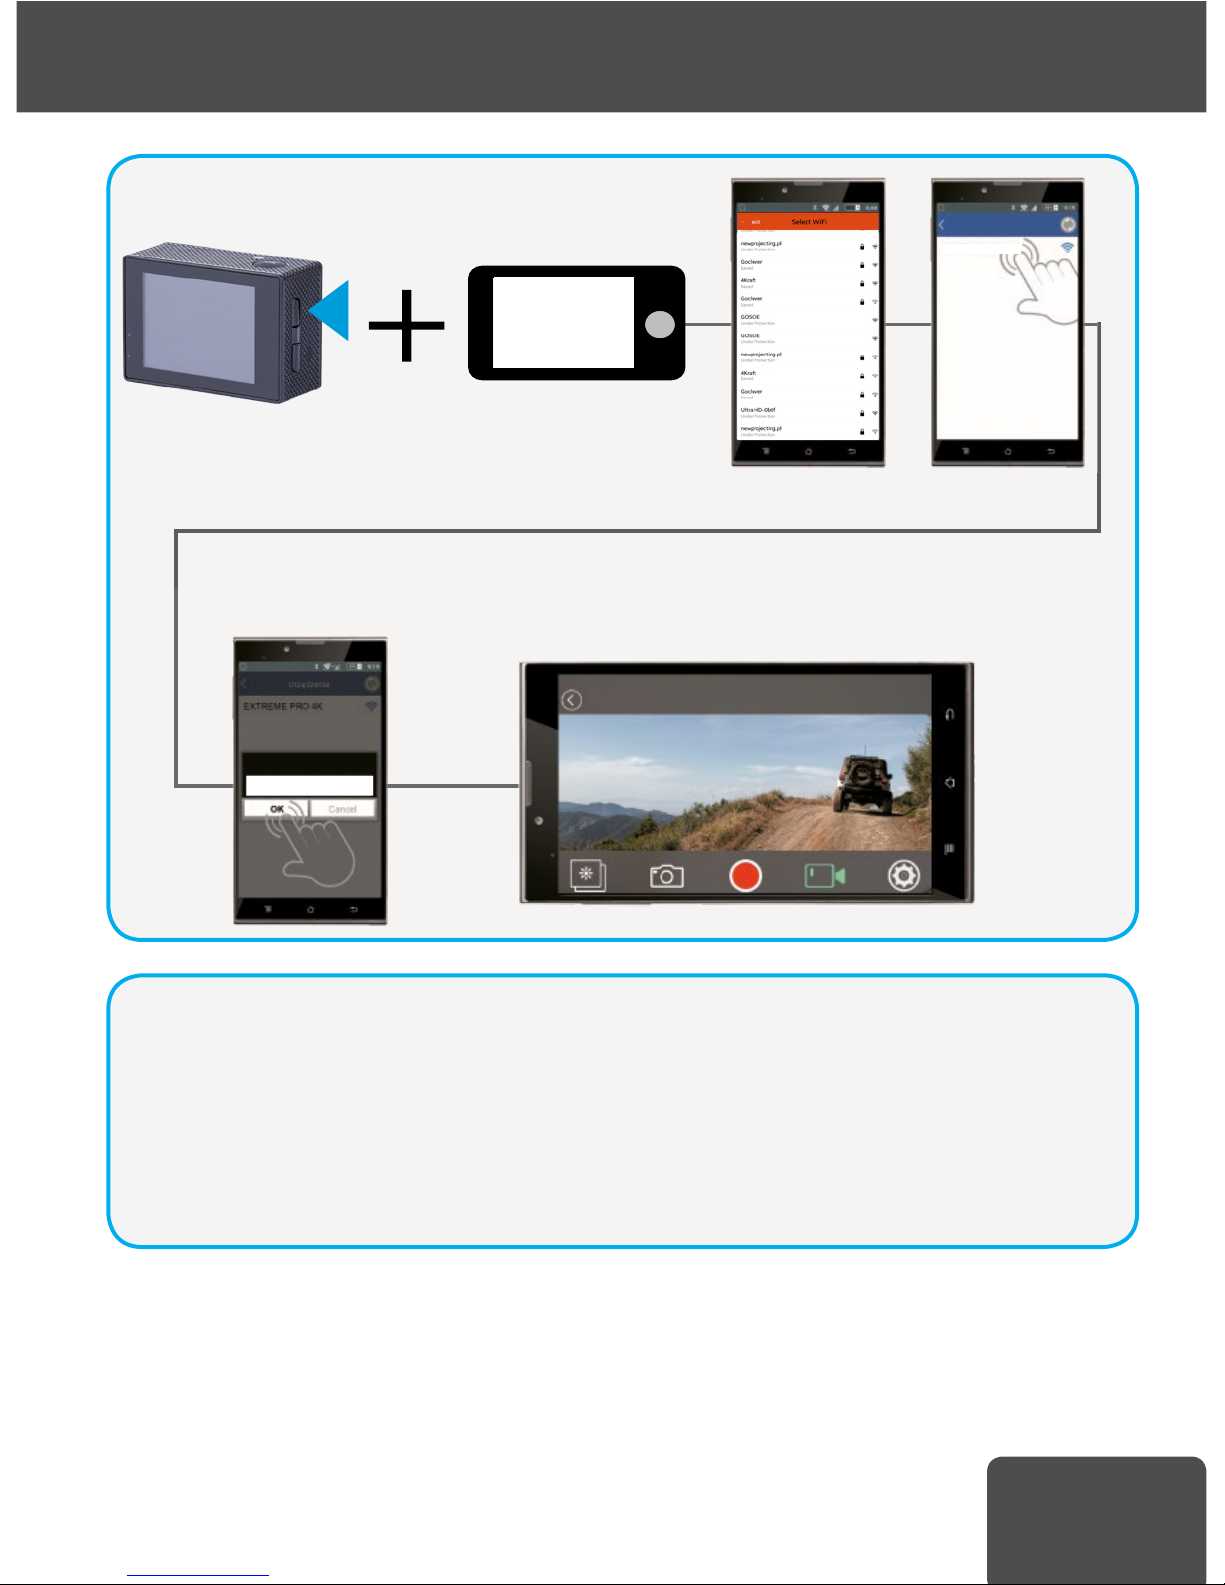
Connecting camera with smartphone over WiFi
Insert micro-SD card to slot (5) and turn camera
ON. Press once button (2) to turn Wi-Fi module on.
Go to page number (3) in this manual to see how to
proceed with smartphone.
Camera modes
You can cycle through following modes by pressing
button
(1). 1: continuous video recording, 2: photo taking,
3:Slow motion, 4:video review, 5:settings. 4/16
Press button (1) four times and accept choice
by pressing (8) you can enter settings menu.
Short press button (3) to travel
downwards, to move up (2). Press button
(8) to enter/accept. Press button (1) to
get back/exit menu.
Menu items:
Video resolution: choose between 4K,
2.7K, 1080 and 720 modes.
Looping video: splits video into 2,3 or 5
minutes segments.
Time stamp: set it on if you need to
show date and time on videos and photos.
Exposure: choose to make videos
brighter or darker manually.
Photo resolution: choose between 16
Mpx, 12 Mpx, 8Mpx, 5Mpx and 2 Mpx.
Burst photo: enables shooting 3,5 or 10
photos in a row. Time lapse: set interval
after which camera
take a photo in agreed time and show as
a one movie.
Slow Motion – video recording in slow
motion (1080p 60kl/sek lub 720p 120
kl/sek
Motion detection – changes in motion
will be detected and camera start
recording Language: you can change
language of menu in camera.
Date and time: set current time and
date. Sound indicator: set sound
notications.
Upside down: enables to rotate cameras
display 180 degrees.
Screen saver: set after how much time
camera will turn o display to conserve
energy. Power saver: choose for how
long camera will operate without use.
Format: you can format your micro-SD
card. It advisable to do it once for each
memory card before using camera for the
rst time.
Reset: you can reset all settings in
camera. Version: information about
rmware version.
1. POWER BUTTON/MODE
2. UP/WIFI
3. DOWN
4. LENSES
5. MICRO SD PORT
6. MICRO USB PORT
7. MICRO HDMI PORT
8. OK/RECORD/ENTER BUTTON
9. LCD
10. SMALL SCREEN (SHOW TIME, BATTERY LEVEL,
MODE, SD CARD..)
11. these 2 Leds conrm that camera is power on,
blue light is blinking when recording
12. Charging diodes
1
2
3
8
4
5
6
7
10
9
11
12

5/13
Quick Start Guide
PL
Instalacja aplikacji mobilnej na smartfonie
Aplikację na system Android lub iOS można
zainstalować poprzez zeskanowanie kodu QR
znajdującego się na stronie (2). Można także wyszukać
aplikacji o nazwie NTK cam w sklepach Google Play lub
App Store.
Ładowanie kamery: strona (2). Na wyświetlaczach
(9 i 10)
widoczna jest ikona informująca o statusie baterii.
Włączanie i wyłączanie kamery
Przyciśnij przycisk (3) przez 3 sekundy, aby włączyć lub
wyłączyć urządzenie.
Karty pamięci do nagrywania video
Kamera współpracuje z kartami micro-SD o szybkości
10 lub wyższej. W przypadku włożenia karty wolniejszej
kamera wyłączy możliwość nagrywania w niektórych
trybach video (np 4K@25 fps).
Nagrywanie lmów
Włóż kartę micro-SD do gniazda (5). Gdy kamera
jest włączona, naciśnij raz przycisk (8), aby zacząć
nagrywać.
Połączenie kamery i smartfonu przez Wi-Fi
Włóż kartę pamięci do gniazda (6) i włącz kamerę.
Naciśnij raz przycisk (2), aby włączyć moduł Wi-Fi.
Informacje, jakie czynności wykonać na smartfonie
znajdują się na stronie (3).
Tryby kamery
Kamera posiada tryby pracy. Wybieranie ich odbywa
się przez jednorazowe naciśnięcie (1). 1: nagrywanie
lmów, 2: wykonywanie zdjęć, 3: nagrywanie lmów
w zwolnionym tempie 4: podgląd lmów, 5: ustawienia
Naciśnięcie przycisku (1) cztery razy i potwierdzenie
przyciskiem (8) wyświetli menu kamery (ikona
„SETTINGS”). Aby poruszać się w dół, naciśnij (3), w
górę (2), Akceptacja wyboru: (8), cofnięcie wyboru /
wyjście z menu: (1).
Pozycje menu:
Video resolution: umożliwia w y b ó r
rozdzielczości wideo: 4K, 2.7K, 1080, 720.
Looping video: nagrywanie w pętli,
dzieli pliki wideo na 2,3 lub 5 minutowe
fragmenty.
Time stamp: umożliwia dodanie czasu i
daty do lmów i zdjęć.
Exposure: ręczne zwiększenie lub
zmniejszenie jasności lmów i zdjęć.
Photo resolution: umożliwia w y b ó r
rozdzielczości zdjęć: 16 Mpx, 12 Mpx,
8Mpx, 5Mpx, 2 Mpx
Burst photo: umożliwia wykonywanie
serii 3, 5, 10 zdjęć po rząd.
Time lapse: tu ustawisz odstęp czasu,
po którym kamera wykona zdjęcie w
ustalonym odstępie czasu i wyświetli jako
jeden lm.
Slow motion – nagranie lmu w
zwolnionym tempie do wyboru 1080p
60kl/sek lub 720p 120 kl/sek
Motion detection – rozpoczęcie nagrania
po wykryciu ruchu
Date and time: ustaw czas i datę.
Sound indicator: ustaw powiadomienia
dźwiękowe.
Upside down: obraca ekran LCD o 180
stopni
Screen saver: ustaw czas, po którym
kamera wygasi wyświetlacz LCD.
Power saver: wybierz jak długo kamera
ma być włączona, gdy nie jest używana.
Format: umożliwia sformatowanie
(wymazanie) karty pamięci. Formatowanie
jest zalecane pierwszy raz po włożeniu
karty pamięci.
Reset: resetuje wszystkie ustawienia.
Version: informacje wersji o
oprogramowania.
INFORMACJE DODATKOWE
Niniejszym GOCLEVER Sp. z o. o.
oświadcza, że urządzenie jest zgodne z
dyrektywami: RED(2014/53/EU), EMC
(2014/53/EU), EMC (2014/30/EU). Pełen dokument (deklaracja zgodności) jest dostępny na
stronie internetowej: www.goclever.com w za-
kładce dotyczącej danego produktu.
Poprawna utylizacja tego produktu (zu-
żyty sprzęt elektryczny i elektroniczny
– utylizacja odpadów elektrycznych i
elektronicznych).
(Dotyczy Unii Europejskiej oraz innych
krajów Europy posiadających odrębne systemy
utylizacji). To oznaczenie wskazuję, iż urządzenie nie powinno być utylizowane wraz z innymi
opadami na terenie UE. By zutylizować Twoje
urządzenie prosimy korzystać z funkcjonujących
systemów zbierania odpadów.
SERWIS NAPRAW
Serwis napraw dostępny pod adresem:
E-mail: serwis@goclever.com
Tel.: (+48) 61 848 87 67
1. Przycisk zasilania/ Trybów pracy
2. Przejście w górę/ Wi
3. Przejście w dół
4. Soczewka
5. Port micro SD
6. Port micro USB
7. Port micro HDMI
8.OK/Przycisk nagrywania / Potwierdzenia wyboru
9. Wyświetlacz LCD
10. Mały ekran przedni (godzina, poziom baterii,
tryb, karta sd..)
11. Te dwie diody informują, że kamerka jest włączona, niebieskie, migające światło informuje o
trybie nagrania
12. Diody ładowania
1
2
3
8
4
5
6
7
10
9
11
12

6/13
Quick Start Guide
CZ
DALŠÍ INFORMACE
GOCLEVER Sp. z o.o. tímto prohlašuje, že
výrobek je v souladu se směrnicemi: RED
(2014 / 53 /EU), EMC (2014/53/EU),
EMC (2014/30/EU). Celý dokument (prohlášení o shodě) je
dostupný na: www.goclever.com v záložce týkající se daného
výrobku.
Řádná likvidace tohoto produktu (Norma
o odpadních elektrických a elektronických
zařízeních).(Platí v Evropské unii a ostatních
státech Evropy, které uplatňují vlastní samostatné
systémy sběru odpadu.) Toto označení informuje, že
produkt na konci své životnosti nesmí být likvidován
na území EU společně s běžným komunálním odpadem. Za
účelem prevence negativního vlivu na životní prostředí a lidské
zdraví je nezbytné tento odpad izolovat od ostatních druhů
odpadu a zodpovědným způsobem jej recyklovat a přispět tak
k udržitelné recyklaci zdrojů surovin. Při likvidaci zařízení využijte
možnosti zpětného odběru či sběrných systémů, které
jsou ve vašem regionu k dispozici, nebo se obraťte na
prodejce, od kterého jste produkt zakoupili.
I Instalace mobilní aplikace na smartphon
Aplikaci pro systém Android nebo iOS můžete nainstalovat
naskenováním QR kódu nacházejícího se na stránce (2).
Můžete také vyhledat aplikaci s názvem NTK cam v obchodech
Google Play nebo App Store.
Nabíjení kamery: stránka (2). Na displejích (9 a 10) se
zobrazuje ikona indikující stav baterie.
Zapnutí/vypnutí kamery
Chcete-li kameru zapnout či vypnout, stiskněte a podržte
tlačítko (1) po dobu 3 sekund.
Paměťové karty pro nahrávání videa
Zařízení lze používat s kartami microSD s rychlostí 10 a vyšší.
Zjistí-li kamera přítomnost příliš pomalé paměťové karty, omezí
určité režimy nahrávání (např. režim 4K při 25 fps).
Nahrávání video záznamu
Do slotu (5) vložte paměťovou kartu microSD. Je-li kamera
zapnutá, stiskněte jednou tlačítko (8). Tím zahájíte nahrávání.
Propojení kamery s chytrým telefonem
přes síť Wi-Fi
Vložte paměťovou kartu microSD do slotu (5) a zapněte
kameru. Chcete-li zapnout modul Wi-Fi, stiskněte jednou
tlačítko (2). Na stránce (3) tohoto návodu se dozvíte, jak
postupovat s chytrým telefonem.
Režimy kamery
Kamera má provozní režimy. Jejich výběr provedete stisknutím
(1). 1: nahrávání videa, 2: provádění snímků, 3: zpomalené
nahrávání videa, 4: náhled na videa, 5: nastavení Stiskněte
až šestkrát tlačítko (1) a volbu potvrďte stisknutím tlačítka (8).
Poté se zobrazí menu nastavení. Pro listování v menu stiskněte
krátce tlačítko (3). Pro zadání/potvrzení volby stiskněte tlačítko
(2). Pro návrat/opuštění menu stiskněte tlačítko (1).
Položky menu:
Video resolution (Rozlišení videa): vyberte mezi režimy 4K,
2.7K a 1080, 720.
Looping video (Nahrávací smyčka): rozdělí
video do 2,3,5 minutových segmentů. Time
stamp (Časové razítko): chcete-li videa a
fotograe opatřit časovým údajem, funkci
zapněte.
Exposure (Expozice): ručně lze nastavit
stupeň jasu videa.
Photo resolution (Rozlišení fotograí):
vyberte mezi možnostmi 16 MPx, 12 Mpx,
8 Mpx a 5 Mpx, 2 MPx
Burst photo (Režim Burst Photo): umožňuje
zachytit 3, 5, 10 fotograe v řadě za sebou.
Time lapse (Režim Time Lapse): zde
nastavíte časový interval, po němž kamera
provede snímek ve stanoveném časovém
úseku a přehraje jako video.
Language (Jazyk): zde lze zvolit jazyk menu
kamery.
Date and time (Datum a čas): nastavte
aktuální čas a datum.
Zpomalené záběry zpomalené nahrávání
videa na výběr 1080p 60 snímků/sek nebo
720p 120 snímků/sek
Detekce pohybu zahájení nahrávání při
detekci pohybu
Sound indicator (Zvuková oznámení):
nastavení informativních zvuků.
Upside down (Vzhůru nohama): umožňuje
otočit displej kamery o 180 stupňů.
Screen saver (Spořič obrazovky): nastavení
časového úseku, po jehož uplynutí se displej
vypne za účelem úspory energie.
Power saver (Spořič energie): zvolte
dobu, po kterou zůstane kamera zapnutá při
nečinnosti.
Format (Formátování): lze formátovat
kartu microSD. Formátování doporučujeme
provést u každé paměťové karty před prvním
použitím kamery.
Reset (Resetování): zde lze resetovat
veškerá nastavení kamery.
Version (Verze): informace o verzi
rmwaru
1. TLAČÍTKO NAPÁJENÍ /
PROVOZNÍCH REŽIMŮ
2. PŘECHOD NAHORU / WIFI
3. PŘECHOD DOLŮ
4. ČOČKA
5. MICRO SD PORT
6. MICRO USB PORT
7. MICRO HDMI PORT
8. OK/TLAČÍTKO NAHRÁVÁNÍ/POTVRZENÍ
VÝBĚRU
9. LCD DISPLEJ
10. MALÁ PŘEDNÍ OBRAZOVKA (HODINA, KAPACITA BATERIE, REŽIM, SD KARTA)
11. TYTO 2 DIODY INDIKUJÍ, ŽE KAMERA JE
ZAPNUTÁ, MODRÉ BLIKAJÍCÍ SVĚTLO INDIKUJE
REŽIM NAHRÁVÁNÍ
12. NABÍJECÍ DIODY
1
2
3
8
4
5
6
7
10
9
11
12

7/13
Quick Start Guide
DE
ZUSÄTZLICHE INFORMATIONEN
Hiermit erklärt GOCLEVER Sp. z o.o., dass
das Gerät den Richtlinien entspricht: RED
(2014 / 53 /EU), EMC (2014/53/EU),
EMC (2014/30/EU). Das vollständige Dokument (Kon-
formitätserklärung) steht auf der Website: www.goclever.
com im das Produkt betreffenden Tab zur Verfügung.
Korrekte Entsorgung dieses Produkts (Elektround Elektronikschrott).
(Gültig in der Europäischen Union und anderen
europäischen Ländern mit einem eigenen Sammelsystem)
Dieses Symbolweist darauf hin, dass dieses
Produkt in der EU nicht im Hausmüll entsorgt werden
darf. Um möglichen Umwelt- und Gesundheitsschäden
vorzubeugen, muss die Entsorgung vorschriftsgemäß und
getrennt vom normalen Hausmüll erfolgen, um die nachhaltige Wiederverwertung der Rohstoffe zu gewährleisten.
Bitte entsorgen Sie das Produkt über die Sammel- und Recyclingprogramme in Ihrer Nähe oder kontaktieren Sie den
Händler, bei dem Sie das Produkt gekauft haben.
Smartphone-App installieren
Die Android- oder iOS-Anwendung kann durch Scannen des QRCodes auf der Seite (2) installiert werden. Man kann auch nach
der Anwendung mit dem Namen NTK cam in Google Play oder im
App Store suchen.
Kamera auaden: Seite (2). Auf den Displays (9 und 10) wird ein
Symbol angezeigt, das den Batteriestatus anzeigt.
Kamera ein- und ausschalten
Halten Sie Taste (1) 3 Sekunden lang gedrückt, um die Kamera
ein- bzw. auszuschalten.
Speicherkarten für die Videoaufnahme
Für dieses Gerät sind Micro-SD-Karten mit einer Geschwindigkeit
von 10 oder höher geeignet. Falls die Kamera eine zu langsame
Speicherkarte erkennt, werden bestimmte Aufnahmemodi
eingeschränkt (z.B. Der Modus 4K@25 FPS).
Videos aufzeichnen
Stecken Sie eine Micro-SD-Karte in den Steckplatz (5). Drücken
Sie bei eingeschalteter Kamera einmal auf die Taste (8), um die
Aufnahme zu starten.
Kamera über WLAN mit dem Smartphone verbinden
Stecken Sie eine Micro-SD-Karte in den Steckplatz (5) und schalten
Sie die Kamera EIN. Drücken Sie einmal auf die Taste (2), um das
WLAN-Modul einzuschalten. Auf Seite (3) erfahren Sie, wie Sie mit
Ihrem Smartphone vorgehen müssen.
Kameramodi
Die Kamera verfügt über Betriebsarten. Sie können sie durch
einmaliges Drücken von (1) auswählen. 1: Aufnahme von Filmen,
2: Fotograeren, 3: Aufnahme von Zeitlupenlmen 4: Vorschau
von Filmen, 5: Einstellungen Drücken Sie sechsmal Taste (1) und
bestätigen Sie Ihre Auswahl, indem Sie (8) auf dem Bildschirm
drücken und so das Kameramenü anzeigen. Drücken Sie kurz
auf Taste (3), um nach unten zu scrollen. Drücken Sie Taste (2)
zur Eingabe. Drücken Sie Taste (8), um das Menü zu verlassen/
zurück zu gehen (1)
Menüelemente:
Video resolution (Videoauösung): Wählen Sie zwischen den
Modi 4K, 2.7K, 1080, 720.
Looping video (Videoeinteilung): Teilt Videos in
2,3,5-Minuten-Segmente.
Time stamp (Zeitstempel): Aktivieren, wenn
Sie Videos und Fotos mit Datum und Uhrzeit
versehen möchten.
Exposure (Belichtung): Videos manuell
aufhellen oder abdunkeln.
Photo resolution (Fotoauösung): Wählen Sie
zwischen 16 MPx, 12 MPx, 8 MPx, 5 MPx, 2 MPx
Burst photo (Serienfotoaufnahme): Aktiviert
die Serienaufnahme von 3, 5, 10 Fotos
hintereinander.
Time lapse Hier stellen Sie das Zeitintervall ein,
nach dem die Kamera das Bild im eingestellten
Zeitintervall aufnimmt und als ein Film anzeigt.
Language (Sprache): Hier können Sie die
Sprache des Kameramenüs anpassen.
Date and time (Datum und Uhrzeit): Stellen
Sie die aktuelle Uhrzeit und das Datum ein.
Sound indicator (Töne): Stellen Sie
Tonbenachrichtigungen ein.
Upside down (Kopfüber): Das Kameradisplay
kann um 180 Grad gedreht werden.
Screen saver (Bildschirmschoner): Stellen Sie
ein, wann die Kamera den Bildschirm abschalten
soll, um Energie zu sparen.
Slow motion Aufnahme des Films in einem
langsamen Tempo zur Wahl 1080p 60FPS oder
720p 120FPS
Power saver (Energiesparmodus): Wählen Sie
aus, wann sich die Kamera bei Nichtgebrauch
abschalten soll.
Format (Formatieren): Sie können Ihre
micro-SD-Karte formatieren. Sie sollten jede
Speicherkarte vor der ersten Verwendung mit
der Kamera einmal formatieren.
Move detection Start der Aufzeichnung nach
Bewegungserkennung
Reset (Zurücksetzen): Sie können alle
Einstellungen der Kamera zurücksetzen.
Version: Informationen über die Firmware-
Version.
1. POWER- / BETRIEBSMODITASTE
2. NACH OBEN /WIFI
3. NACH UNTEN
4. LINSE
5. MICRO SD-PORT
6. MICRO-USB-PORT
7. MICRO HDMIX-PORT
8.OK/AUFNAHME-/BESTÄTIGUNGSTASTE
9. LCD-DISPLAY
10. KLEINER VORDERBILDSCHIRM (UHRZEIT,
BATTERIELADEZUSTAND, MODUS, SD-KARTE.)
11. DIESE 2 LEDS ZEIGEN AN, DASS DIE KAMERA
EINGESCHALTET IST, BLAUES BLINKLICHT ZEIGT
DEN AUFNAHMEMODUS
12. LADEDIODEN
1
2
3
8
4
5
6
7
10
9
11
12

8/13
Quick Start Guide
FR
Installation d’une application mobile sur un
smartphone L’application pour Android ou iOS peut être
installée en scannant le code QR situé à la page (2). Vous
pouvez également rechercher les applications appelées
NTK cam dans Google Play ou App Store.
Le chargement de la caméra : page (2). Sur les écrans
(9 et 10) il y a une icône indiquant l’état de la batterie.
L’activation et désactivation de la caméra
Appuyez sur (1) pendant 3 secondes pour activer ou
désactiver le dispositif.
Les cartes de mémoire pour l’enregistrement vidéo.
La caméra est compatible avec les cartes micro-SD
d’une vitesse de 10 ou plus. Si vous insérez une carte
d’une vitesse inférieure, certains modes d’enregistrement
(p.ex.4K@25 fps) seront désactivés
L’enregistrement des vidéos
Insérez la carte micro-SD dans le lecteur (5). Lorsque la
caméra est allumée, appuyez une fois sur le bouton (8)
pour commencer l’enregistrement.
La connexion de la caméra et du smartphone via le
Wi-Fi
Insérez la carte de mémoire dans le lecteur (5) et activez
la caméra.
Appuyez une fois sur le bouton (2) pour activer le module
Wi-Fi. Les informations sur la façon de procéder sur le
smartphone se trouvent sur la page (3).
Le mode de caméra
La caméra a des modes de travail. Les sélectionner se fait
par une simple pression (1). 1: enregistrer des vidéos, 2:
prendre des photos, 3: enregistrer des vidéos au ralenti 4:
regarder des vidéos, 5: paramètres
Pour acher le menu de la caméra (l’icône « SETTINGS
»), appuyez six fois sur (8) et conrmez en appuyant sur
(3). Pour aller vers le bas, appuyez sur
(2). La conrmation de sélection (8), retour de
sélection / sortie du menu : (1).
Video resolution: permet de sélectionner la
résolution vidéo 4K, 2.7K and 1080, 720.
Looping video : divise les chiers vidéo en
fragments de 2, 3, 5 minutes.
Time stamp : permet d’acher l’heure et la
date sur les vidéos et les photos.
Exposure : permet d’augmenter ou de
diminuer la luminosité des vidéos et des
photos.
Photo resolution : permet de sélectionner la
résolution des phots : 16 MPx, 12 Mpx, 8Mpx
i 5Mpx, 2 MPx
Burst photo : permet d’eectuer une série
de 3, 5, 10 photos.
Time lapse : ici, vous dénissez l’intervalle
de temps après lequel l’appareil prendra une
photo dans un intervalle de temps déni et
l’achera comme une vidéo.
Slow motion enregistrement d’une vidéo au
ralenti pour la sélection 1080p 60 fps ou 720p
120fps
Language : sélectionnez la langue du menu
de la caméra.
Date and time : réglez l’heure et la date.
Ralenti - enregistrement d’une vidéo au ralenti
pour la sélection 1080p 60 fps ou 720p 120fps
Détection de mouvement - commencer
l’enregistrement après la détection de
mouvement
Sound indicator : dénissez des notications
sonores.
Upside down: permet de tourner l’écran de
180 degrés Screen saver: choisissez la période
après laquelle la caméra éteindra l’écran LCD.
Power saver: sélectionnez la durée
d’activation de la caméra lorsqu’elle n’est pas
utilisée.
Format: permet de formater (eacer)
les cartes de mémoire. Le formatage est
recommandé pour la première utilisation de la
carte de mémoire.
Reset: permet de réinitialiser tous les
paramètres. Version : informations sur la
version de logiciel.
INFROMATIONS SUPPLEMENTAIRES
GOCLEVER Sp. z o.o. déclare par la présente
que le produit est conforme aux directives
suivantes: RED (2014 / 53 /EU), EMC
(2014/53/EU), EMC (2014/30/EU). Le document complet
(déclaration de conformité) est disponible sur le site : www.
goclever.com dans la section relative au produit concerné.
Comment éliminer ce produit (déchets d’équipements
électriques et électroniques provenant des
équipements électriques et électroniques).
(Applicable dans l’Union européenne
et dans d’autres pays européens disposant de
systèmes distincts d’élimination des déchets).
Cette désignation indique que le produit ne
doit pas être éliminé avec les autres déchets ménagers
dans l’UE. Pour éliminer votre appareil, veuillez utiliser les
systèmes existants de collecte des déchets.
SERVICE DE GARANTIE
Le service de garante disponible à l’adresse :
E-mail: serwis@goclever.com
1. BOUTON D’ALIMENTATION /
MODES DE TRAVAIL
2. ALLER VERS LE HAUT/WIFI
3. ALLER VERS LE BAS
4. LENTILLE
5. PORT MICRO SD
6. PORT MICRO USB
7. PORT MICRO HDMI
8. OK/BOUTON D’ENREGISTREMENT/
DE VALIDATION
9. ÉCRAN LCD
10. PETIT ÉCRAN AVANT (HEURE, NIVEAU DE BAT-
TERIE, MODE, CARTE SD…)
11. CES DEUX VOYANTS INFORMENT QUE L’APPAREIL EST ÉTEINT, LA LUMIÈRE BLEUE CLIGNOTANTE INDIQUE LE MODE D’ENREGISTREMENT
12. Diodes de charge
1
2
3
8
4
5
6
7
10
9
11
12

9/13
Quick Start Guide
ES
INFORMACIÓN ADICIONAL Por la presente
GOCLEVER Sp. z o.o. declara que el dispositivo
es conforme con las directivas: RED (2014/53/
UE), EMC (2014/53/UE), EMC (2014/30/UE). El
documento completo (declaración de conformidad)
está disponible en la página web: www.
goclever.com en la pestaña relacionada con
un determinado producto.
Eliminación correcta de este producto (equipos
eléctricos y electrónicos usados
- eliminación de residuos eléctricos y electrónicos).
(Hace referencia a la Unión Europea y otros
países de Europa que tengan sistemas de
recogida selectiva). Este marcado indica
que el dispositivo no debería ser eliminado
junto con otros residuos en el territorio de
la UE. Para eliminar tu dispositivo, rogamos
utilizar los sistemas de recogida de residuos
en funcionamiento.
SERVICIO DE REPARACIONES
serwis@goclever.com
Tel.: (+48) 61 848 87 67
Instalación de la aplicación móvil en un
smartphone
La aplicación para el sistema Android o iOS puede instalarse
escaneando el código QR que se encuentra en la página (2).
También puede buscarse la aplicación llamada NTK cam en las
tiendas Google Play o App Store.
Carga de la cámara: página (2). En las pantallas (9 y 10)
es visible un icono que informa del estado de la batería.
Encendido y apagado de la cámara
Presiona el botón (1) durante 3 segundos para encender o
apagar el dispositivo.
Tarjetas de memoria para la grabación de vídeo
La cámara es compatible con tarjetas micro-SD de velocidad 10
o superior. En caso de insertar una tarjeta más lenta la cámara
deshabilitará la posibilidad de grabación en algunos modos de
vídeo (p.ej. 4K).
Grabación de vídeos
Inserta la tarjeta micro-SD en el puerto (5). Cuando la cámara
esté encendida, presiona una vez el botón (8) para empezar a
grabar.
Conexión de la cámara y el teléfono a través de Wi-Fi
Introduce la tarjeta de memoria en el puerto (5) y enciende la
cámara. Presiona una vez el botón (2) para conectar el módulo
Wi-Fi. La información acerca de las acciones a realizar en el
smartphone se encuentra en la página (3).
Modos de la cámara
La cámara tiene modos de trabajo. Su selección tiene lugar
presionando una vez (1). 1: grabación de vídeos, 2: toma
de fotografías, 3: grabación de vídeos a cámara lenta, 4:
visualización de vídeos, 5: ajustes.
La presión del botón (1) cuatro veces y la conrmación
mediante el botón (8) muestra el menú de la cámara (icono
«SETTINGS»). Para moverte hacia abajo presiona (3), hacia
arriba (2), Conrmación de la selección: (8), anulación de la
selección / salir del menú: (1).
Posiciones del menú:
Video resolution: permite seleccionar la
resolución de vídeo: 4K, 2.7K, 1080, 720.
Looping video: grabación en bucle, divide los
archivos de vídeo en fragmentos de 2, 3 o 5
minutos.
Time stamp: permite añadir la hora y la fecha a
vídeos y fotografías.
Exposure: aumento o disminución manual del
brillo de los vídeos y fotografías.
Photo resolution: permite seleccionar la
resolución de las fotografías: 16 Mpx, 12 Mpx,
8Mpx, 5Mpx, 2 Mpx
Burst photo: permite tomar una serie de 3, 5 o
10 fotografías una tras otra.
Time lapse: aquí ajustas el intervalo de tiempo
tras el cual la cámara toma una fotografía en el
intervalo de tiempo congurado y lo muestra
como un vídeo.
Slow motion: grabación de vídeo a cámara
lenta, a elegir entre 1080p 60 fps o 720p 120 fps.
Motion detection: inicia la grabación tras
detectar un movimiento.
Date and time: ajustes de hora y fecha.
Sound indicator: ajusta las noticaciones
sonoras.
Upside down: gira 180 grados la pantalla LCD
Screen saver: ajusta el tiempo tras el cual la
cámara apaga la pantalla LCD.
Power saver: selecciona cuánto tiempo debe
permanecer encendida la cámara cuando no es
utilizada.
Format: permite formatear (borrar) la tarjeta
de memoria. Se recomienda formatear la tarjeta
de memoria tras ser insertada por primera vez.
Reset: resetea todos los ajustes.
Version: información sobre la versión del
software.
1. BOTÓN DE ALIMENTACIÓN/
MODOS DE TRABAJO
2. IR HACIA ARRIBA/WIFI
3. IR HACIA ABAJO
4. LENTE
5. PUERTO MICRO SD
6. PUERTO MICRO USB
7. PUERTO MICRO HDMI
8.OK/BOTÓN DE GRABACIÓN/CONFIRMACIÓN DE LA SELECCIÓN
9. PANTALLA LCD
10.PANTALLA DELANTERA PEQUEÑA
(HORA, NIVEL DE BATERÍA, MODO,
TARJETA SD...)
11. ESTOS 2 DIODOS INFORMAN
DE QUE LA CÁMARA ESTÁ ENCENDIDA, LA LUZ AZUL INTERMITENTE
INFORMA DEL MODO DE GRABACIÓN
12. DIODOS DE CARGA
1
2
3
8
4
5
6
7
10
9
11
12

10/13
Quick Start Guide
GR
ΠΡΟΣΘΕΤΕΣ ΠΛΗΡΟΦΟΡΙΕΣ
Δια του παρόντος η εταιρεία GOCLEVER Sp. z o.o. δηλώνει ότι η συσκευή είναι
συμβατό με τις εξής οδηγίες: RED (2014
/ 53 /EU), EMC (2014/53/EU), EMC
(2014/30/EU). Πλήρες έγγραφο (δήλωση
συμβατότητας) είναι διαθέσιμο στην εξής ιστοσελίδα:
www.goclever.com στη σελιδοδείκτη που αφορά το
ορισμένο προϊόν.
Σωστή απόρριψη αυτού του προϊόντος
(Απορρίμματα ηλεκτρικού &
ηλεκτρονικού εξοπλισμού) (Ισχύει
για την Ευρωπαϊκή Ένωση και άλλες
ευρωπαϊκές χώρες με ξεχωριστά συστήματα
συλλογής). Αυτό το σήμα υποδεικνύει ότι στο τέλος
της ζωής εργασίας του, το προϊόν δεν θα πρέπει να
απορρίπτεται μαζί με λοιπά οικιακά απορρίμματα
στην ΕΕ. Για να αποφευχθούν πιθανές βλαβερές
συνέπειες στο περιβάλλον ή στη δημόσια υγεία λόγω
της αλόγιστης διάθεσης των αποβλήτων, διαχωρίστε
αυτό το προϊόν από τους άλλους τύπους αποβλήτων
και ανακυκλώστε το υπεύθυνα, ώστε να ενισχυθεί η
διαρκής επαναχρησιμοποίηση των υλικών.
Εγκατάσταση εφαρμογής για κινητά smartphone
Η εφαρμογή για σύστημα Android ή iOS μπορεί να εγκατασταθεί με
τη σάρωση του κώδικα QR που βρίσκεται στην σελίδα (2). Μπορείτε
επίσης να αναζητήσετε την εφαρμογή με την ονομασία NTK cam στα
καταστήματα Google Play ή App Store.
Φόρτιση κάμερας: σελίδα (2). Στις οθόνες (9 και 10) εμφανίζεται
εικονίδιο που πληροφορεί σχετικά με την κατάσταση της μπαταρίας.
Ενεργοποίηση/Απενεργοποίηση κάμερας
Πατήστε το κουμπί (1) για 3 δευτερόλεπτα για να ενεργοποιήσετε ή να
απενεργοποιήσετε την κάμερα.
Κάρτες μνήμης για εγγραφή βίντεο
Η συσκευή δέχεται κάρτες micro-SD με βαθμονομημένη ταχύτητα 10
ή ταχύτερες. Σε περίπτωση που η κάμερα ανιχνεύσει κάρτα μνήμης
η οποία είναι υπερβολικά αργή, θα περιορίσει ορισμένες λειτουργίες
εγγραφής (για παράδειγμα, τη λειτουργία 4K@25 fps).
Εγγραφή βίντεο
Εισάγετε την κάρτα micro-SD στην υποδοχή (5). Με ενεργοποιημένη
την κάμερα, πατήστε μία φορά το κουμπί (8) για να ξεκινήσει η
εγγραφή.
Σύνδεση κάμερας με smartphone μέσω Wi-Fi
Εισάγετε την κάρτα micro-SD στην υποδοχή (5) και ενεργοποιήστε την
κάμερα. Πατήστε μία φορά το κουμπί (2) για να ενεργοποιηθεί το WiFi. Μεταβείτε στον αριθμό σελίδας (3) σε αυτό το εγχειρίδιο για να δείτε
πώς να συνεχίσετε με το smartphone.
Λειτουργία κάμερας
Η κάμερα διαθέτει τρόπους λειτουργίας. Η επιλογή τους γίνεται με
ένα μόνο πάτημα του πλήκτρου (1). 1: εγγραφή βίντεο, 2: λήψη
φωτογραφιών, 3: εγγραφή βίντεο σε αργή κίνηση 4: προβολή
αρχείων βίντεο, 5: ρυθμίσεις Πατήστε το κουμπί (1) έξι φορές και
αποδεχτείτε την επιλογή πατώντας το (8) για να μπορέσετε να
μπείτε στο μενού ρυθμίσεων. Πατήστε σύντομα το κουμπί (2) για
να μετακινηθείτε προς τα κάτω. Πατήστε το κουμπί (8) για είσοδο/
αποδοχή. Πατήστε το κουμπί (1) για να επιστρέψετε/βγείτε από
το μενού.
Στοιχεία μενού:
Video resolution (Ανάλυση βίντεο): επιλέξτε από
τις λειτουργίες 4K, 2.7K και 1080, 720.
Looping video (Σύνδεση βίντεο): χωρίζει τα
βίντεο σε τμήματα 2,3,5 λεπτών.
Time stamp (Χρονοσήμανση): ενεργοποιήστε τη
εάν χρειάζεστε να εμφανίζεται η ημερομηνία και η
ώρα στα βίντεο και τις φωτογραφίες.
Exposure (Έκθεση): επιλέξτε να γίνουν τα βίντεο
πιο φωτεινά ή πιο σκοτεινά χειροκίνητα.
Photo resolution (Ανάλυση φωτογραφίας):
επιλέξτε από 16 MPx, 12 Mpx, 8Mpx και 5Mpx,
2 MPx.
Burst photo (Φωτογραφία ριπής): καθιστά
δυνατή τη λήψη 3, 5, 10 φωτογραφιών στη σειρά.
Time lapse εδώ ρυθμίζετε το χρονικό διάστημα
κατά το οποίο η κάμερα λαμβάνει μια φωτογραφία
σε καθορισμένο χρονικό διάστημα και την
εμφανίζει ως μία ταινία.
Language (Γλώσσα): μπορείτε να αλλάξετε τη
γλώσσα του μενού στην κάμερα.
Slow motion – εγγραφή βίντεο σε αργή κίνηση
προς επιλογή 1080p 60καρέ/δευτ ή 720p 120
καρέ/δευτ
Motion detection – έναρξη εγγραφής μετά από
ανίχνευση κίνησης
Date and time (Ημερομηνία και ώρα): ορίστε την
τρέχουσα ώρα και ημερομηνία.
Sound indicator (Ηχητική ένδειξη): ορίστε
ηχητικές ειδοποιήσεις.
Upside down (Ανάποδα): δίνει τη δυνατότητα να
περιστραφεί η οθόνη της κάμερα κατά 180 μοίρες.
Screen saver (Εξοικονόμηση ενέργειας οθόνης):
ορίστε μετά από πόσο χρόνο θα απενεργοποιηθεί η
οθόνη της κάμερας για να διατηρηθεί η ενέργεια.
Power saver (Εξοικονόμηση ενέργειας):
επιλέξτε για πόσο χρόνο η κάμερα θα λειτουργεί
χωρίς χρήση. Format (Διαμόρφωση): μπορείτε
να κάνετε διαμόρφωση στην κάρτα micro-SD
σας. Συνίσταται να το κάνετε μία φορά για κάθε
κάρτα μνήμης πριν χρησιμοποιήσετε την κάμερα
για πρώτη φορά Reset (Επαναφορά): μπορείτε
να επαναφέρετε όλες τις ρυθμίσεις στην κάμερα.
Version (Έκδοση): πληροφορίες για την
έκδοση υλικολογισμικού.
1.ΠΛΗΚΤΡΟ ΤΡΟΦΟΔΟΣΙΑΣ/
ΕΠΙΛΟΓΩΝ ΛΕΙΤΟΥΡΓΙΑΣ
2. ΜΕΤΑΚΙΝΗΣΗ ΠΡΟΣ ΤΑ ΠΑΝΩ/
WIFI
3. ΜΕΤΑΚΙΝΗΣΗ ΠΡΟΣ ΤΑ ΚΑΤΩ
4. ΦΑΚΟΣ
5. ΘΥΡΑ MICRO SD
6. ΘΥΡΑ MICRO USB
7. ΘΥΡΑ MICRO HDMI
8.OK/ΠΛΗΚΤΡΟ ΕΓΓΡΑΦΗΣ/ΕΠΙΒΕΒΑΙΩΣΗ ΕΠΙΛΟΓΗΣ
9. ΟΘΟΝΗ LCD
10. ΜΙΚΡΗ ΜΠΡΟΣΤΙΝΗ ΟΘΟΝΗ (ΩΡΑ, ΕΠΙΠΕΔΟ
ΜΠΑΤΑΡΙΑΣ, ΛΕΙΤΟΥΡΓΙΑ, ΚΑΡΤΑ SD..)
11. ΑΥΤΕΣ ΟΙ ΔΥΟ ΛΥΧΝΙΕΣ ΕΝΗΜΕΡΩΝΟΥΝ ΑΝ Η
ΚΑΜΕΡΑ ΕΙΝΑΙ ΕΝΕΡΓΟΠΟΙΗΜΕΝΗ, ΤΟ ΜΠΛΕ ΦΩΣ
ΠΟΥ ΑΝΑΒΟΣΒΗΝΕΙ ΕΝΗΜΕΡΩΝΕΙ ΓΙΑ ΤΟΝ ΤΡΟΠΟ
ΕΓΓΡΑΦΗΣ 12. ΦΟΡΤΙΣΗ ΔΙΟΔΩΝ
1
2
3
8
4
5
6
7
10
9
11
12

11/13
Quick Start Guide
HU
TOVÁBBI INFORMÁCIÓK
Az alábbiakban a GOCLEVER Sp. z o.o. kijelenti, hogy a készülék megfelel a következő irányelvek követelményeinek:
RED (2014/53/UE), EMC (2014/53/UE),
EMC (2014/30/UE). A teljes dokumentum
(megfelelőségi nyilatkozat) a www.goclev-
er.com honlapon érhető el az adott termék
oldalán. A termék megfelelő hulladékba helyezése
(elektromos és elektronikus hulladékok).
(Az Európai Unióra és az eltérő hulladékkezelé-
si rendszerrel rendelkező más európai
országokra vonatkozik). Ez a jelölés azt
jelenti, hogy az EU területén az ezzel a
jelöléssel ellátott terméket felhasználásuk
után nem szabad más hulladékokkal együtt
kezelni. A természetes környezetre és az
emberi egészségre kifejtett esetleges negatív hatás
elkerülése érdekében ajánlatos az ilyen hulladékok
különválogatása és az ásványi nyersanyagok újrahasznosításának az elősegítése.
Mobil alkalmazás telepítése az okostelefonon
Az alkalmazás a (2) oldalon található QR kód beolvasásával
telepíthető az Android vagy iOS rendszerre. Továbbá kikeresheti
az NTK cam nevű alkalmazást a Google Play vagy App Store
áruházakban.
A kamera töltése: 2) oldal. A kijelzőkön (9 és 10) látható az
akku töltési szintjét jelző ikon.
A kamera be- és kikapcsolása
Nyomja le három másodpercre a (1) gombot a kamera bevagy kikapcsolásához.
Memóriakártyák a videofelvételhez
Az eszköz Calss 10 vagy nagyobb sebességű mikro-SDkártyákat képes kezelni. Amennyiben a kamera túl lassú
memóriakártyát észlel, korlátozni fog bizonyos felvételi
módokat (például a 4K@25 fps módot).
Videók felvétele
Helyezze be a mikro-SD-kártyát a foglalatba (5). A bekapcsolt
kamerán nyomja meg az (8) gombot a felvétel elindításához.
A kamera csatlakoztatása okostelefonnal Wi-Fi-n
keresztül
Helyezze be a mikro-SD-kártyát a foglalatba (5), és kapcsolja be
a kamerát. Nyomja meg egyszer a (2) gombot a Wi-Fi-modul
bekapcsolásához. Az okostelefonra vonatkozó utasításokért
lépjen a kézikönyv (3) oldalára.
Kameramódok
Η κάμερα διαθέτει τρόπους λειτουργίας. Η επιλογή τους
γίνεται με ένα μόνο πάτημα του πλήκτρου (1). 1: εγγραφή
βίντεο, 2: λήψη φωτογραφιών, 3: εγγραφή βίντεο σε αργή
κίνηση 4: προβολή αρχείων βίντεο, 5: ρυθμίσεις. Nyomja
meg hatszor a (8) gombot a kívánt menüelem képernyőn
való megjelenítéséhez, majd nyomja meg az (3) gombot a
megerősítéshez. Nyomja meg röviden a (2) gombot a lefelé
való mozgáshoz. Nyomja meg az (8) gombot a belépéshez/
elfogadáshoz. Nyomja meg a (1) gombot a visszalépéshez/
menüből való kilépéshez.
Menüelemek:
Video resolution (Videofelbontás): választhat a
4K, 2.7K és 1080, 720 módok közül.
Looping video (Videó ismétlése): felosztja a
videót 2, 3, 5 perces.
Time stamp (Időbélyegző): kapcsolja be, ha meg
akarja jeleníteni a dátumot és az időt a videókon
és fényképeken.
Exposure (Megvilágítás): kézzel világosabbra
vagy sötétebbre állíthatja a videókat.
Photo resolution (Fényképfelbontás): választhat
a 16 MPx, 12 Mpx, 8 Mpx és 5 Mpx, 2 MPx érték
között.
Burst photo (Fényképsorozat): lehetővé teszi egy
3, 5, 10 fényképből álló sorozat készítését.
Time lapse (Időzítő): itt állítod be azt az időközt,
mely elteltével a kamera fényképet készít a
megadott időben és egy lmként jeleníti meg.
Language (Nyelv): módosíthatja a kamera
menüjének nyelvét.
Date and Time (Dátum és idő): az aktuális dátum
és pontos idő beállítása.
Sound indicator (Hangjelző): beállíthat hangos
értesítéseket.
Upside down (Fejjel lefelé): lehetővé teszi a
kamera kijelzőjének 180 fokkal való elforgatását.
Slow motion lassított felvételű lmkészítés,
választható: 1080p 60kép/mp vagy 720p 120
kép/mp
Motion detection lmkészítés mozgásérzékelés
esetén
Screen saver (Képernyőkímélő): beállíthatja,
mennyi idő után kapcsoljon ki a kamera kijelzője
az energia megtakarításához.
Power Save (Energiatakarékos mód):
kiválaszthatja, milyen hosszan üzemeljen a
kamera használaton kívül.
Format (Formázás): formázhatja a mikro-
SD-kártyát. Javasolt az elvégzése minden
memóriakártyánál, mielőtt először használná a
kamerában. Reset (Alaphelyzet): a kamera
összes beállítását alaphelyzetbe állíthatja.
Version (Verzió): információk a rmware
verziójáról.
1.BEKAPCSOLÁS/ÜZEMMÓD
GOMB
2. FEL/WIFI
3. LE
4. LENCSE
5. MICRO SD PORT
6. MICRO USB PORT
7. MICRO HDMI PORT
8.OK/FELVÉTEL GOMB/MEGERŐSÍTÉS GOMB
9. LCD KIJELZŐ
10. ELÜLSŐ KIS KÉPERNYŐ (ÓRA,
TÖLTÉSI SZINT, ÜZEMMÓD, SD
KÁRTYA)
11. EZ A 2 DIÓDA ARRÓL TÁJÉ-
KOZTAT, HOGY A KAMERA BE
VAN KAPCSOLVA. A VILLOGÓ KÉK
FÉNY A FELVÉTEL ÜZEMMÓDOT
JELZI
12. PUNJENJE DIODA
1
2
3
8
4
5
6
7
10
9
11
12

12/13
Quick Start Guide
IT
INFORMAZIONI AGGIUNTIVE
Con la presente la società a responsabilità limita-
ta GOCLEVER Sp. z o.o. dichiara che il
dispositivo è conforme alle direttive: RED
(2014 / 53 /EU), EMC (2014/53/EU),
EMC (2014/30/EU). Il testo completo
(dichiarazione di conformità) è disponibile
sul sito web: www.goclever.com sezione relativa ad
un dato prodotto.
Smaltimento corretto del prodotto (Riuti
di Apparecchiature Elettriche ed Elettron-
iche).
(Riguarda la Comunità Europea e gli altri
stati europei dotati di sistemi di smaltimen-
to differenziati)
Tale marcatura indica che alla ne della vita tale apparecchiatura, essa non dovrebbe essere smaltita
con gli altri riuti sul territorio della Comunità Europea. Per prevenire la possibile inuenza negativa
sull’ambiente naturale e sulla salute degli esseri
umani è consigliata la separazione dei riuti e un
riciclaggio responsabile che promuove il riutilizzo
delle fonti materiali.
Installare un’app mobile per lo smartphone
L’applicazione può essere installata sul sistema Android o iOS
scannerizzando il codice QR riportato nella pagina (2). Inoltre, è
possibile trovare l’applicazione denominata NTK cam nei negozi
Google Play o App Store.
Accendere/Spegnere la telecamera
pagina (2). Sui display (9 e 10) è visualizzata l’icona della batteria.
Schede di memoria per la registrazione video
Il dispositivo accetta schede SD con velocità nominali di 10
o superiori. Se la telecamera rileva una scheda di memoria
troppo lenta, essa limiterà certe modalità di registrazione (ad es.
modalità 4K@25 fps).
Registrare i video
Inserire la scheda micro SD nello slot (5) Con la telecamera
accesa, premere una volta il pulsante (8) per iniziare la
registrazione.
Collegare la telecamera con lo smartphone tramite Wi-Fi
Inserire una scheda micro SD (5) e attivare la telecamera.
Premere una volta il pulsante (2) per attivare il modulo Wi-Fi.
Andare al numero di pagina (3) in questo manuale per vedere
come procedere con lo smartphone.
Modalità telecamera
La telecamera lavora con diverse modalità. Per scegliere una
delle modalità premere una volta (1). 1. Registrazione video, 2.
Fotograa, 3: Registrazione video a rallentatore, 4: Anteprima
video, 5: Impostazioni Premere il pulsante (8) sei volte e
confermare la scelta premendo (3) sullo schermo per mostrare
il menu particolare della telecamera. Premere brevemente il
pulsante (2) per andare indietro. Premere il pulsante (8) per
confermare / accettare. Premere il pulsante (1) per accedere al
menu indietro / esci.
Elementi di menu:
Video resolution (Risoluzione video):
scegliere fra le modalità 4K, 2.7K e 1080, 720.
Looping video (Loop video): divide i video in
segmenti di 2, 3, 5 minuti.
Time stamp (Marcatempo): impostarlo se
serve mostrare la data e l’ora su video e foto.
Exposure (Esposizione): scegliere per rendere
manualmente i video più chiari o più scuri.
Photo resolution (Risoluzione foto): scegliere
fra 12 Mpx, 8Mpx e 5Mpx.
Burst photo: consente di scattare 3, 5, 10 foto
di seguito.
Time lapse (Intervallo di tempo): permette di
impostare l’intervallo di tempo alla scadenza del
quale la telecamera scatterà le foto nel tempo
preimpostato e le visualizzerà come un video
solo.
Language (Lingua): è possibile cambiare la
lingua del menu nella telecamera.
Date and time (Data e ora): impostare la data
e l’ora attuale
Slow motion registrazione del video a
rallentatore, a tua scelta: 1080p 60 fotogrammi/
sec. o 720p 120 fotogrammi/sec.
Motion detection la registrazione inizia se il
moto è stato rilevato
Sound indicator (Indicatore audio): imposta
le notiche audio.
Upside down (Capovolto): consente di ruotare
il display della telecamera di 180 gradi.
Screen saver: imposta dopo quanto tempo la
telecamera spegnerà il display per risparmiare
energia.
Power saver (Risparmio energetico):
scegliere per quanto tempo la telecamera dovrà
funzionare senza essere utilizzata.
Format (Formattazione): si può formattare la
scheda micro SD. È consigliabile farlo una volta
per ogni scheda di memoria prima di usare la
telecamera per la prima volta.
Reset: si possono resettare tutte le
impostazioni nella telecamera.
Version (Versione): informazioni sulla versione
del rmware.
1. PULSANTE DI ALIMENTAZIONE/MODALITÀ DI FUNZIONAMENTO
2. PASSAGGIO SU/WIFI
3. PASSAGGIO GIÙ
4. LENTE
5. PORTA MICRO SD
6. PORTA MICRO USB
7. PORTA MICRO HDMI
8. OK/PULSANTE DI REGISTRAZIONE
/CONFERMA DELLA SELEZIONE
9. DISPLAY LCD
10. SCHERMO PICCOLO ANTERIORE (ORARIO, LIVELLO DELLA BATTERIA, MODALITÀ, SCHEDA SD).
11. QUESTI DIODI INFORMANO CHE LA TELE-
CAMERA È ACCESA. LA LUCE LAMPEGGIANTE
INFORMA DELLA MODALITÀ DI REGISTRAZIONE.
12. DIODI DI CARICA
1
2
3
8
4
5
6
7
10
9
11
12

13/13
Quick Start Guide
PT
INFORMAÇÃO ADICIONAL
A GOCLEVER Sp.zo.o. vem por este meio declarar
que o aparelho está conforme com as Diretivas
RED (2014 / 53 /EU), EMC (2014/53/EU), EMC
(2014/30/EU). O documento completo (declaração
de conformidade) está disponível no sítio
www.goclever.com, na página do produto.
Eliminação correta deste produto (equipamento elétrico e eletrónico usado
- utilização dos resíduos elétricos e eletrónicos).
(Aplicável na União Europeia e noutros países europeus com sistemas de tratamento separados)
Esta marca indica que no m da vida do
produto este dispositivo não deve ser eliminado em conjunto com outros resíduos na
UE. Para evitar possíveis consequências
negativas para o ambiente e para a saúde
humana, recomenda-se a separação destes
resíduos de outros tipos de resíduos, bem
como uma reciclagem responsável que promova a
reutilização dos recursos materiais. Para se desfazer
do seu dispositivo, utilize os sistemas de recolha de
resíduos disponíveis ou contacte a loja onde comprou
o produto.
Instalação da aplicação móvel num smartphone
A aplicação pode ser instalada no sistema Android ou iOS,
scaneando o código QR que se encontra na página (2). Pode
também pesquisar a aplicação chamada NTK nas lojas Google
Play ou App Store.
Carregar a câmara:página (2). Nos mostradores (9 e 10)
está visível um ícone que sinaliza o nível da bateria.
LIGAR/DESLIGAR a câmara
Prima o botão (1) durante 3 segundos para LIGAR ou
DESLIGAR a câmara.
Cartões de memória para gravação de vídeo
O dispositivo aceita cartões micro-SD com velocidade de
10 MB/s ou superior. Caso a câmara detete um cartão de
memória que seja muito lento, restringirá determinados
modos de gravação (por exemplo, modo 4K@25fps).
Gravação de vídeos
Insira o cartão micro-SD na ranhura (5). Com a câmara
ligada, prima uma vez o botão (8) para iniciar a gravação.
Ligar a câmara ao smartphone através
de Wi-Fi
Insira o cartão micro-SD na ranhura (5) e LIGUE a câmara.
Prima uma vez o botão (2) para ligar o módulo Wi-Fi. Consulte
a página (3) deste manual para saber como se ligar ao
smartphone.
Modos da câmara
A câmara tem vários modos de operação. Os mesmos são
selecionados através de um toque (1). 1: gravar vídeos; 2:
tirar fotograas; 3: gravar vídeos no modo “câmara lenta”;
4: ver vídeos; 5: congurações Prima o botão (8) seis vezes
e aceite a escolha premindo (3) para entrar no menu de
denições. Prima rapidamente o botão (2) para navegar para
baixo. Prima o botão (8) para entrar/aceitar. Prima o botão (1)
para voltar/sair do menu.
Video resolution: escolha entre 4K, 2,7K
e os modos de 1080, 720
Looping video: divide o vídeo em segmentos
de 2, 3, 5 minutos para 1080p@30fps e em
segmentos de 5 minutos.
Exposure: opte por tornar os vídeos mais claros
ou mais escuros manualmente.
Photo resolution: escolha entre 16 MPx,
12Mpx, 8Mpx e 5Mpx, 2 MPx.
Burst photo: permite fotografar 3, 5, 10
fotograas consecutivas.
Time lapse: aqui pode selecionar o período
de tempo depois do qual a câmara tirará uma
fotograa e visualizará como um vídeo.
Language: pode mudar o idioma do menu na
câmara.
Date and time: dena a data e hora atuais.
Slow motion gravação de vídeos no modo
de “câmara lenta” - pode selecionar 1080p 60
fotogramas/s ou 720p 120 fotogramas/s.
Motion detection início de gravação após a
deteção de um movimento
Sound indicator: para denir as noticações
sonoras.
Upside down: permite rodar a exibição da
câmara em 180 graus.
Screen saver: dene o tempo que a câmara
demora a desligar o ecrã para economizar
energia.
Power saver: escolha quanto tempo a câmara
permanece ativa, sem ser utilizada.
Format: pode formatar o seu cartão micro-SD.
É aconselhável formatar cada cartão de memória
ao utilizá-lo pela primeira vez na câmara
Reset: pode repor todas as denições da
câmara.
Version: informações sobre a versão do
rmware
1. BOTÃO DE LIGAR/ MODOS
DE OPERAÇÃO
2. PASSAR PARA CIMA/WIFI
3. PASSAR PARA BAIXO
4. LENTE
5. PORTA MICRO SD
6. PORTA MICRO USB
7. PORTA MICRO HDMI
8. OK/BOTÃO DE GRAVAÇÃO/
CONFIRMAÇÃO DA OPÇÃO SELECIONADA
9. MOSTRADOR LCD
10. PEQUENO ECRÃ FRONTAL
(HORA, NÍVEL DA BATERIA,
MODO, CARTÃO SD)
11. ESTES 2 DÍODOS INFORMAM
QUE QUANDO A CÂMARA ESTÁ
LIGADA A LUZ AZUL A PISCAR SINALIZA O MODO DE GRAVAÇÃO.
12. DIODOS DE CARREGAMENTO
1
2
3
8
4
5
6
7
10
9
11
12
 Loading...