

Page 1

DVB-T 100
OWNER’S MANUAL
DVB-T 100
INSTRUKCJA OBSŁUGI
ODWIEDŹ NASZĄ STRONĘ
WWW.GOCLEVER.COM
ABY ZAPOZNAĆ SIĘ Z INNYMI PRODUKTAMI TAB, NAVIO, DVR, DVB-T
Przed skorzystaniem z urządzenia zapoznaj się z niniejszą instrukcją obsługi
oraz zachowaj ją na przyszłość
Page 2

2
Contents / Spis treści
English
3
Polski
26
Warunki gwarancji
50
Karta gwarancyjna
52
Page 3

3
Contents
SAFETY INSTRUCTIONS
4
PRECAUTIONS
5
FEATURES
6
ACCESSORIES
7
FRONT PANEL
7
REAR PANEL
8
ABOUT REMOTE CONTROL
9
START
10
Battery Installation
10
Service Life of Batteries
10
Operation Range of Remote Control
10
Basic Connections
11
Connecting TV-Set
11
Fast Installation
12
ADVANCED OPERATION
13
Menu Operation
13
Program
13
Picture
15
Channel Search
16
Time
16
Options
17
System
17
USB
19
Timeshift and REC
20
APPENDIX
22
Maintenance
22
Terminology
22
Specifications
23
Troubleshooting
24
Page 4
4
Safety Instructions
This marking indicates that this product should not be disposed with
other household wastes throughout the EU. To prevent possible harm to
the environment or human health from uncontrolled waste disposal, recycle it
responsibly to promote the sustainable reuse of material resources. To
return your used device, please use the return and collection systems or
contact the retailer where the product was purchased. They can take
this product for environmental safe recycling.
Dear customer,
Thank you for purchasing this DVB Terrestrial Receiver. Please read this manual carefully
before operating your product and pay close attention to the precautions which are mentioned
below.
This product only can be operated where the mains supply is ~176-246V, 50Hz.
To avoid fire and electric shock, do not expose this equipment to rain or moisture.
The apparatus shall not be exposed to dripping or splashing and that no objects filled
with liquid, such as vases, shall be placed on the apparatus.
To reduce the chance of fire, electric shock, or annoying interference, use only the
recommended accessories.
The mains plug is used as the disconnect device, the disconnect device shall remain
readily operable.
Keep not less than 5cm distances around the apparatus for sufficient ventilation.
Keep the ventilation should not be impended by covering the openings with items such
as newspapers, table-cloths, curtains, etc.
No naked flame sources, such as lighted candles, should be placed on the apparatus.
Batteries shall not be exposed to excessive heat such as sunshine, fire or the like;
The label was silk-printed on the exterior of the bottom of the apparatus.
Correct Disposal of this product:
To reduce the chance of fire, electric shock, do not open the cover when it works.
This product has been manufactured to conform to the International Safety
Standards. Please peruse the following safety precautions before use it.
Page 5

5
Precautions
Peruse the following precautions before
using.
Power Cord Protection
Please complaint the following
regulations to avoid malfunction, fire and
electric shock or other damage to human
body.
Make sure to connect and disconnect the
power cord with holding the plug.
Do not connect or disconnect the AC
power with wet hands.
Separate the AC power cord from
heating appliances as distance as
Do not insert fingers or other objects
into the product
It may damage the product or even hurt
human body by touching any internal
parts of the product because of high
voltage.
Do not dismantle the product.
Do not stack any object on the product.
Keep water and magnetic things away
Contact with liquid may cause serious
damage, please keep the product away
from it.
Keep product far away from magnetic
things, such as speaker and so on.
OVERLOADING
Do not overload a wall outlet, extension cord or adapter as this may result in fire or electric
shock.
CLEANING
Disconnect the product from the wall outlet before cleaning. Do not use any aerosol products
to clean the product. Dust the outer surface with a cloth lightly dampened with water (no
solvents).
CONNECTING TO ANTENNA
Disconnect the product from mains before connecting or disconnecting to antenna. Otherwise,
it may damage the product and antenna.
CONNECTING TO TV SET
Unplug the power cord when connecting or disconnecting to TV Set. Otherwise, it may
damage the product and antenna
EARTHING
The antenna cable must be earthed to the antenna system and the Earthing System must
comply with the local Electric Safety Standards.
LOCATION
The DVB-T is designed for indoor use only. Do not install the product where it may expose to
bright light or direct sunlight.
Page 6

6
possible.
Do not stack any heavy objects on the
AC power cord.
Do not repair or reconstruct the AC
power cord without authorization.
Clean the plug regularly.
Cut off the power and disconnect the AC
cord immediately if the product has been
dropped or damaged.
Cut off the power and disconnect the AC
cord immediately if you find the product is
smoking, burning or noisy.
Location
Do not install the product in following
locations,
Where it may expose to direct sunlight or
heat resources such as heat register and
stove.
Ambient temperature over 35°C or
ambient atmospheric moisture over 90%.
Dusty place.
Where it may influence by magnetic field
or static electricity.
Where it may subject to physical shock,
vibration or dropping.
Non-use Periods
Switch the product to standby status or
turn off the power when the product will
not be used. Unplug the power cord from
the AC outlet when the product will be
idle for a long period of time.
Position
Place the product on a horizontal
surface. Do not stack heavy things on
it.
Do not place the product beneath the
magnifier or other devices that emit
heat.
Signal Interference
Under the condition of TV signal
receive situation, TV Set may get signal
interference when you are watching a
TV program with the DVB-T on. This is
not means that the product or the TV
Set is malfunction. Please turn off the
DVB-T while watching the TV.
Features
Fully MPEG-4 / DVB-T compliant
Intelligentized Operation Menu
(OSD)
Electronic Program Guide(EPG)
Multi-language Support
User-friendly Graphical Interface
Auto scan/ Manual Scan
Digital Coaxial Output
Power Memory
USB PVR
Support USB Upgrade
Page 7

7
Accessories
Front Panels
After unpacking, please find out the following accessories:
Remote control one piece
User Manual one piece
1. USB PORT
2. Power/Standby Indicator
3. IR Receiver Window
4. CH - Button
5. CH + Button
6. Power/Standby Button
Page 8
8
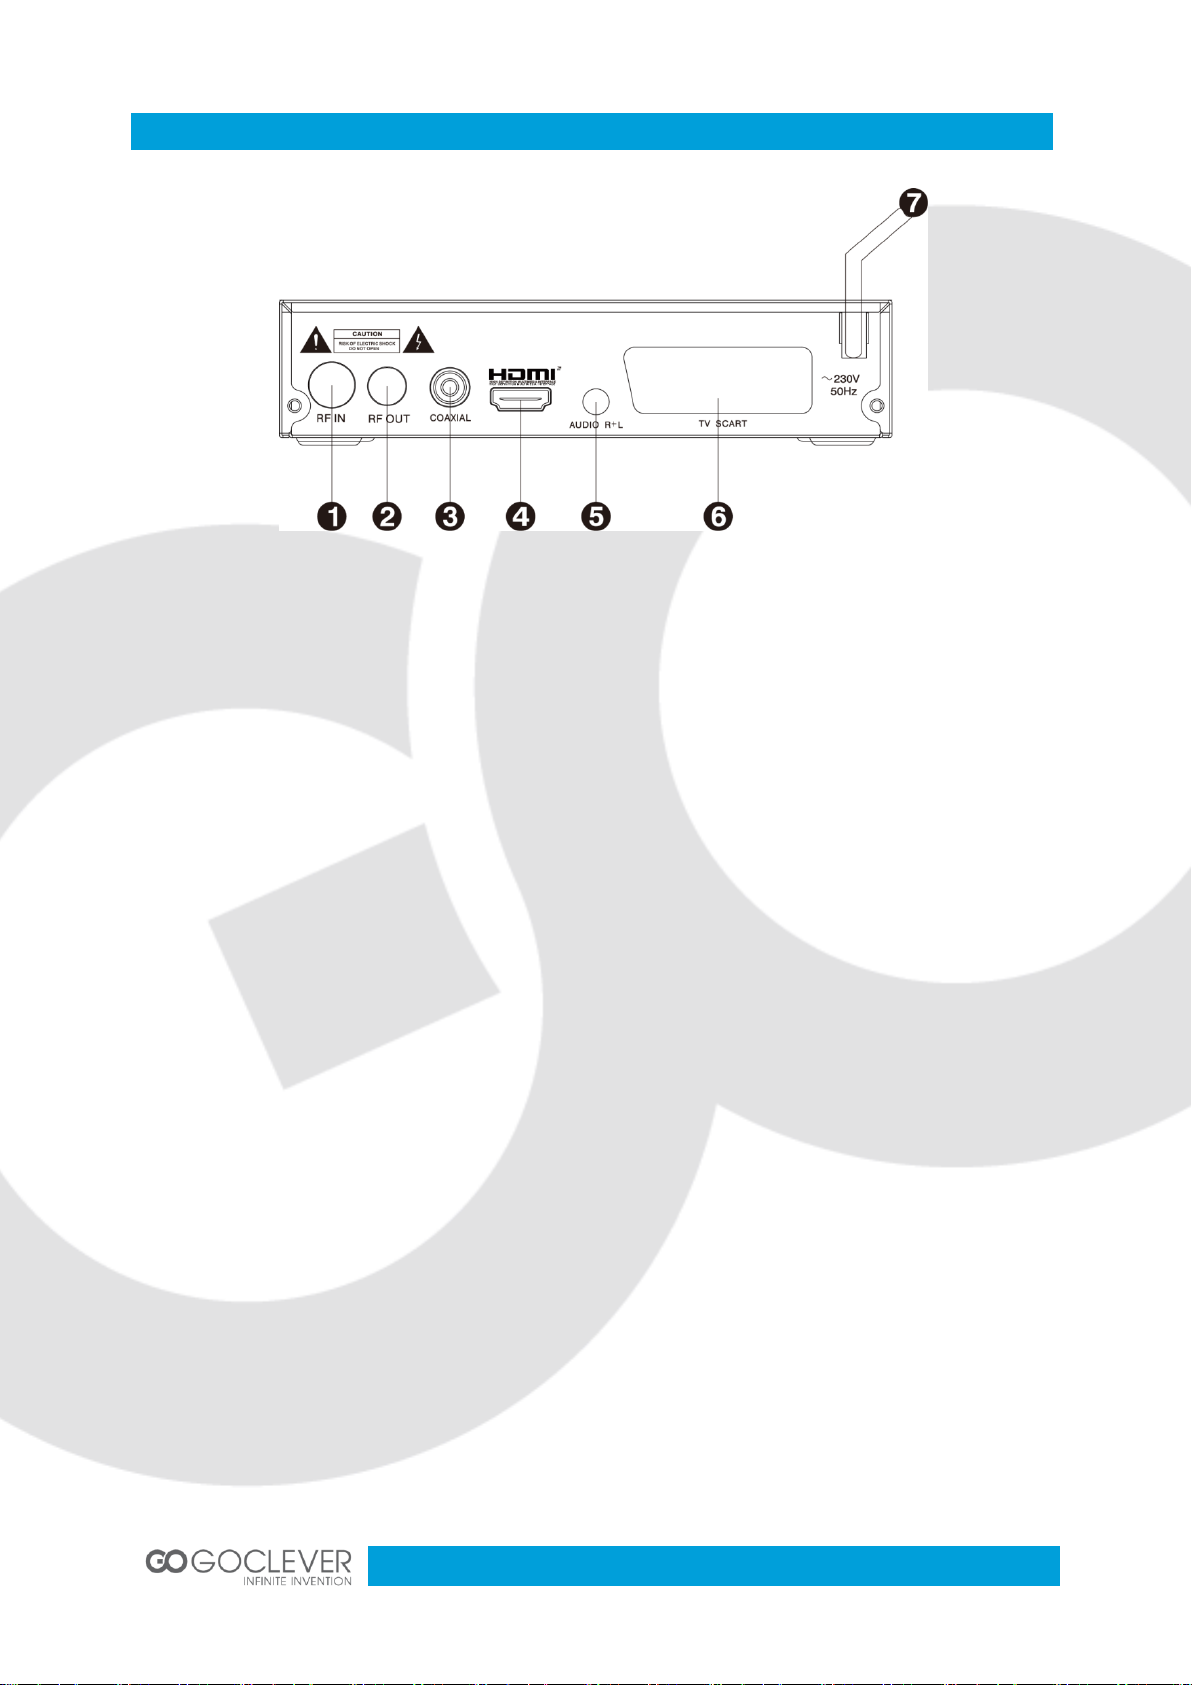
Rear Panels
1. RF IN
2. RF OUT
3. Digital Coaxial Out
4. HDMI Socket
5. Sound Track – Left & Right Socket
6. TV SCART Socket
7. AC IN
NOTES
1. In order to avoid electric leakage and shock caused by scratched power cord, please unplug
the power cord from the wall outlet and keep it orderly if the product is not going to be used for
a long period time.
2. This product must be used with the original power adapter. Please hand it over to a qualified
service agent if the original power adapter is broken.
Page 9
9
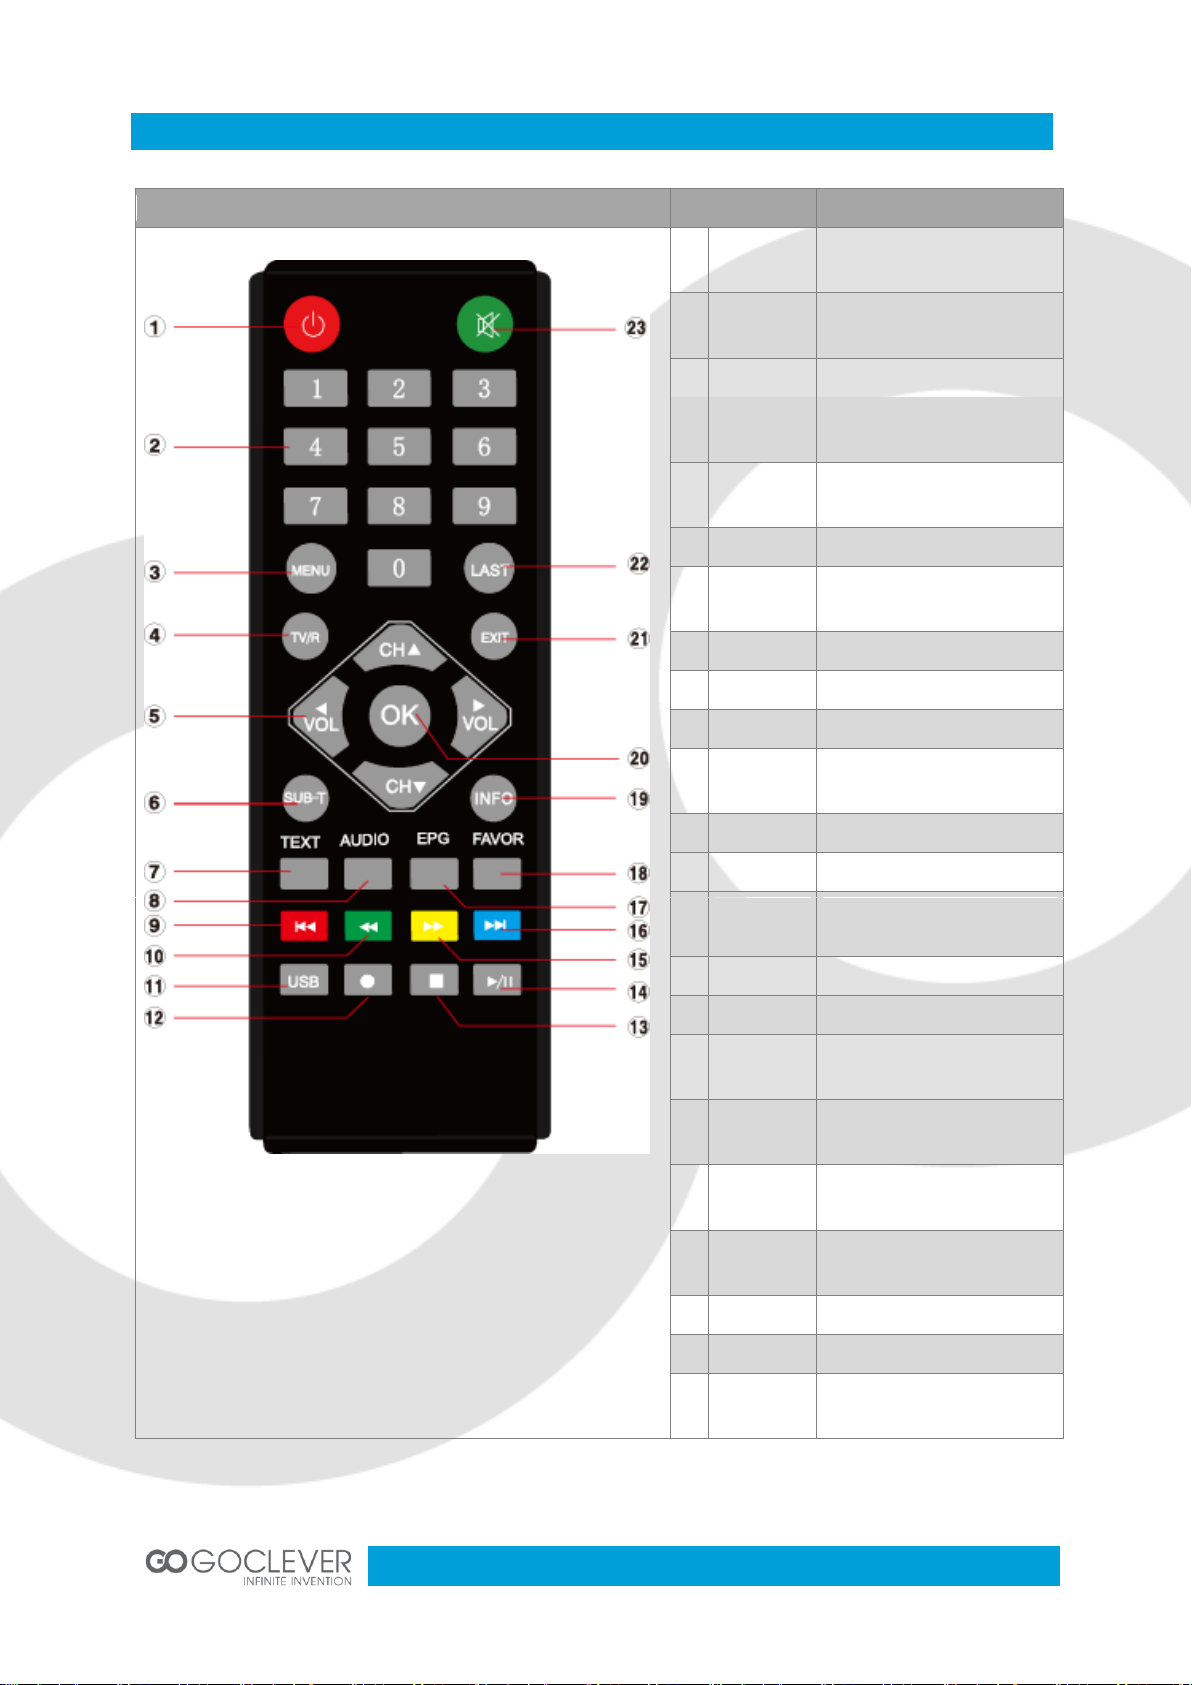
About Remote Control
Remote control
Name
Descriptions
1
STANDBY
Switch your device on
from standby mode.
2
Numeric
Buttons
Select channel or
programming parameters.
3
MENU
Enter in main menu.
4
TV/R
Switch between TV and
Radio programs.
5
Navigation
Buttons
Move cursor.
6
SUB-T
Subtitle setup.
7
TEXT
Show teletext information
of current channel.
8
AUDIO
Audio channels setup.
9
PREW
Back to previous.
10
F.RWD
Fast backward.
11
USB
Enter in USB setup
interface.
12
REC
Switch to PVR mode.
13
STOP
Stop playing.
14
PLAY/
PAUSE
Start watching. Make a
pause.
15
F.FWD
Fast forward.
16
NEXT
Skip to next.
17
EPG
Display the Electronic
Program Guide.
18
FAVOR
Switch to favorite
channel
19
INFO
Display information bar of
current service.
20
OK
Display channel list on
screen. Confirm selection.
21
EXIT
Exit from current menu.
22
LAST
Back to previous channel.
23
MUTE
Enable or disable the
audio.
Page 10
10
Start
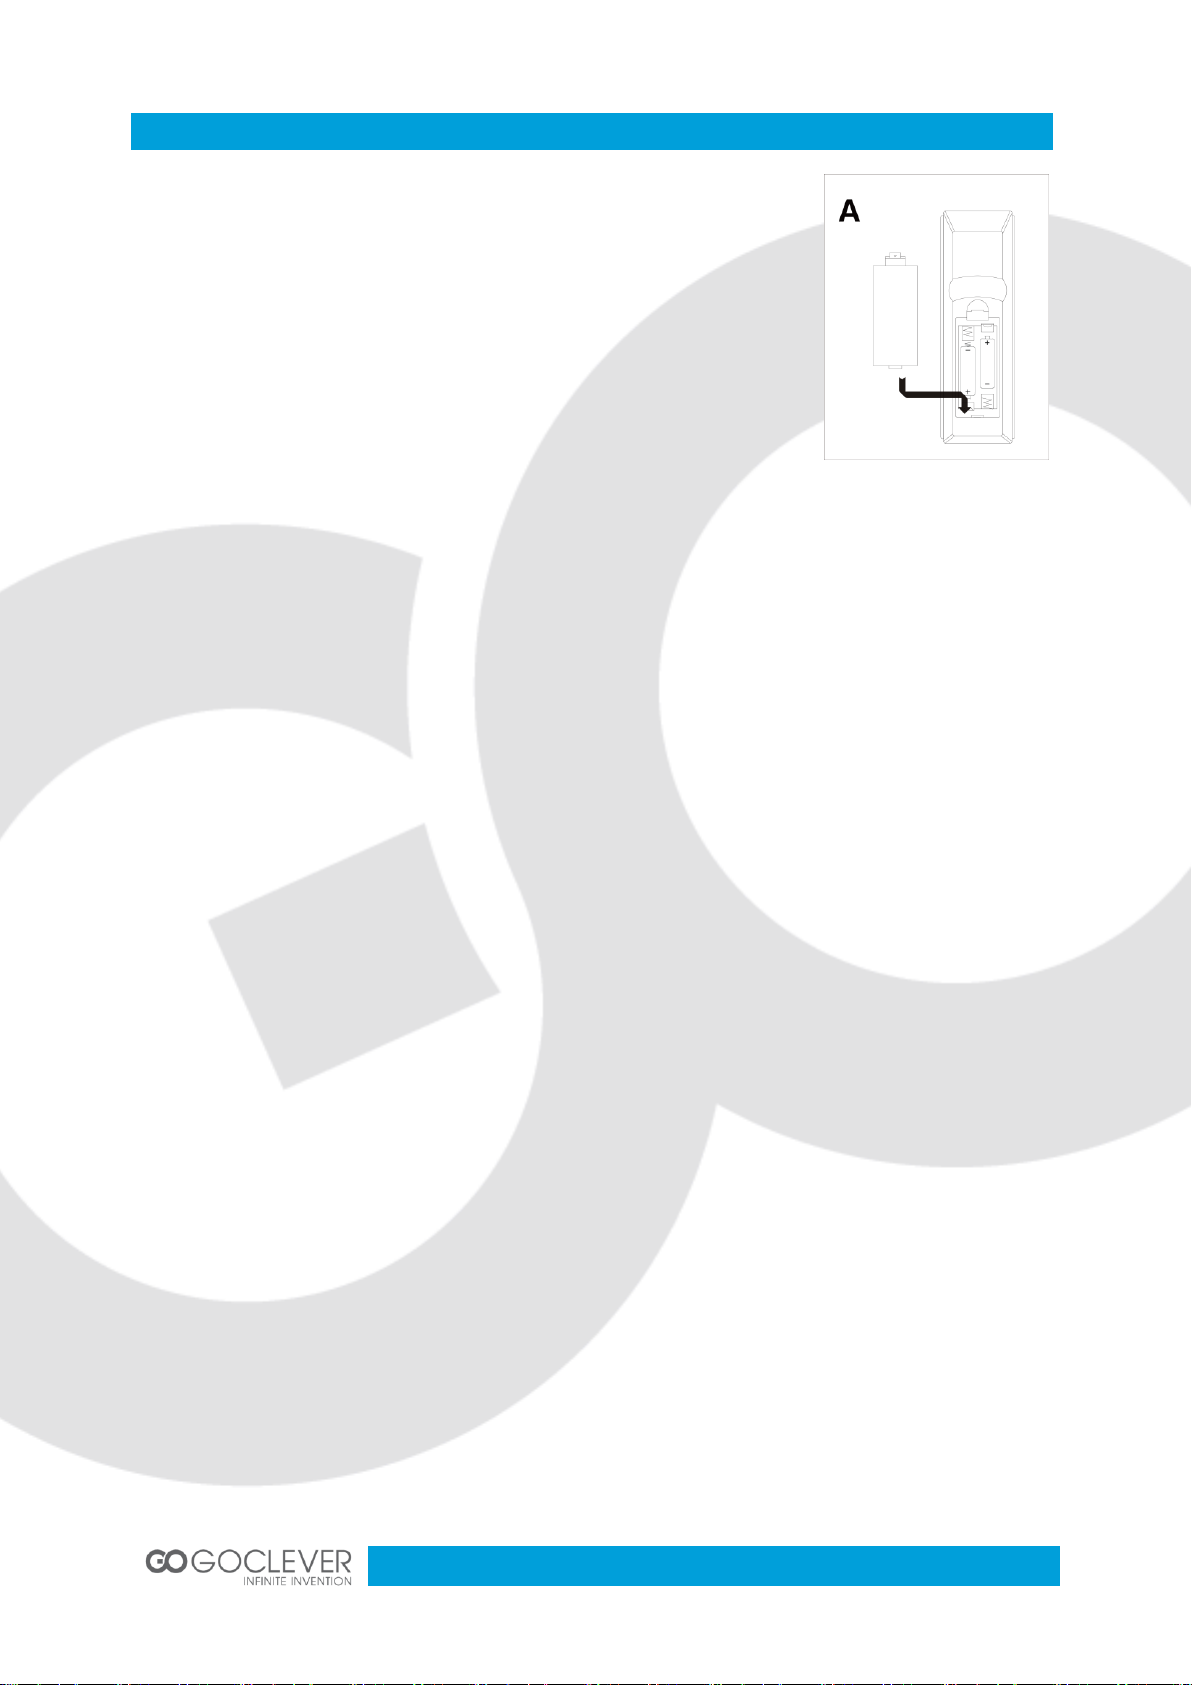
Battery installation
Install the batteries and make sure the positive (+) and negative (-)
polarities matches as shown in Figure A.
Service life of batteries
The batteries normally last for about one year despite that it
depends on how often and in what way the remote control is
operated.
Replace the batteries if the remote control fails to work even when it is operated near
the DVB-T receiver.
Use 2 pieces of 7 (AAA or UM-4) batteries.
Notes
Do not use rechargeable (Ni-Cd) batteries.
Do not attempt to recharge, short circuit, disassemble, heat the batteries or dispose of
in fire.
Do not drop or step on the remote control unit or subject it to shocks. Otherwise the
parts of the remote control unit may get damaged and lead malfunction.
Do not use the new and old batteries together.
Please remove the batteries if the remote control is not going to be used for a long
period of time. Otherwise, it may cause electrolyte leakage and lead malfunction, even
fire accidents. Carefully wipe the electrolyte out of the remote control compartment and
replace with new batteries. If any electrolyte happens to touch your skin, wash it off
thoroughly with clean water immediately.
Operation range of remote control
Point the remote control to the IR receiver window. The remote control shall be
effective within a distance of about 5 meters and an angle of about 60 degrees as
shown in Figure B.
The effective range may vary slightly with the brightness of the room.
Do not shine bright light to the remote control sensor.
The remote control unit may not work if there are obstacles between the remote control
and the sensor.
Do not recommend this remote control using for other products.
Page 11

11
Basic Connections
Preparation
Switch off this product and other equipments before connecting
Read the User Manual carefully before connecting other equipments
Plug the Audio and Video cable correctly
When connecting this product with TV set, only one kind of video output format will be
accepted. Please choose a corresponding video output mode for the product, otherwise the
image will be distorted.
NOTE
Users can choose any proper video output formats according to the TV socket and personal
requirements.
Connecting TV-set (Figure C)
1. Antenna (Not included)
2. TV Set (Not included)
3. DVB-T Receiver
4. Digital Coaxial cable for connecting TV set and DVB-T
receiver (Not included)
5.HDMI cable for connecting TV set and DVB-T receiver
(Not included)
6. TV SCART cable for connecting TV set and DVB-T
receiver (Not included)
7. AC IN
8. Another DVB-T Receiver (Not included)
Page 12
12
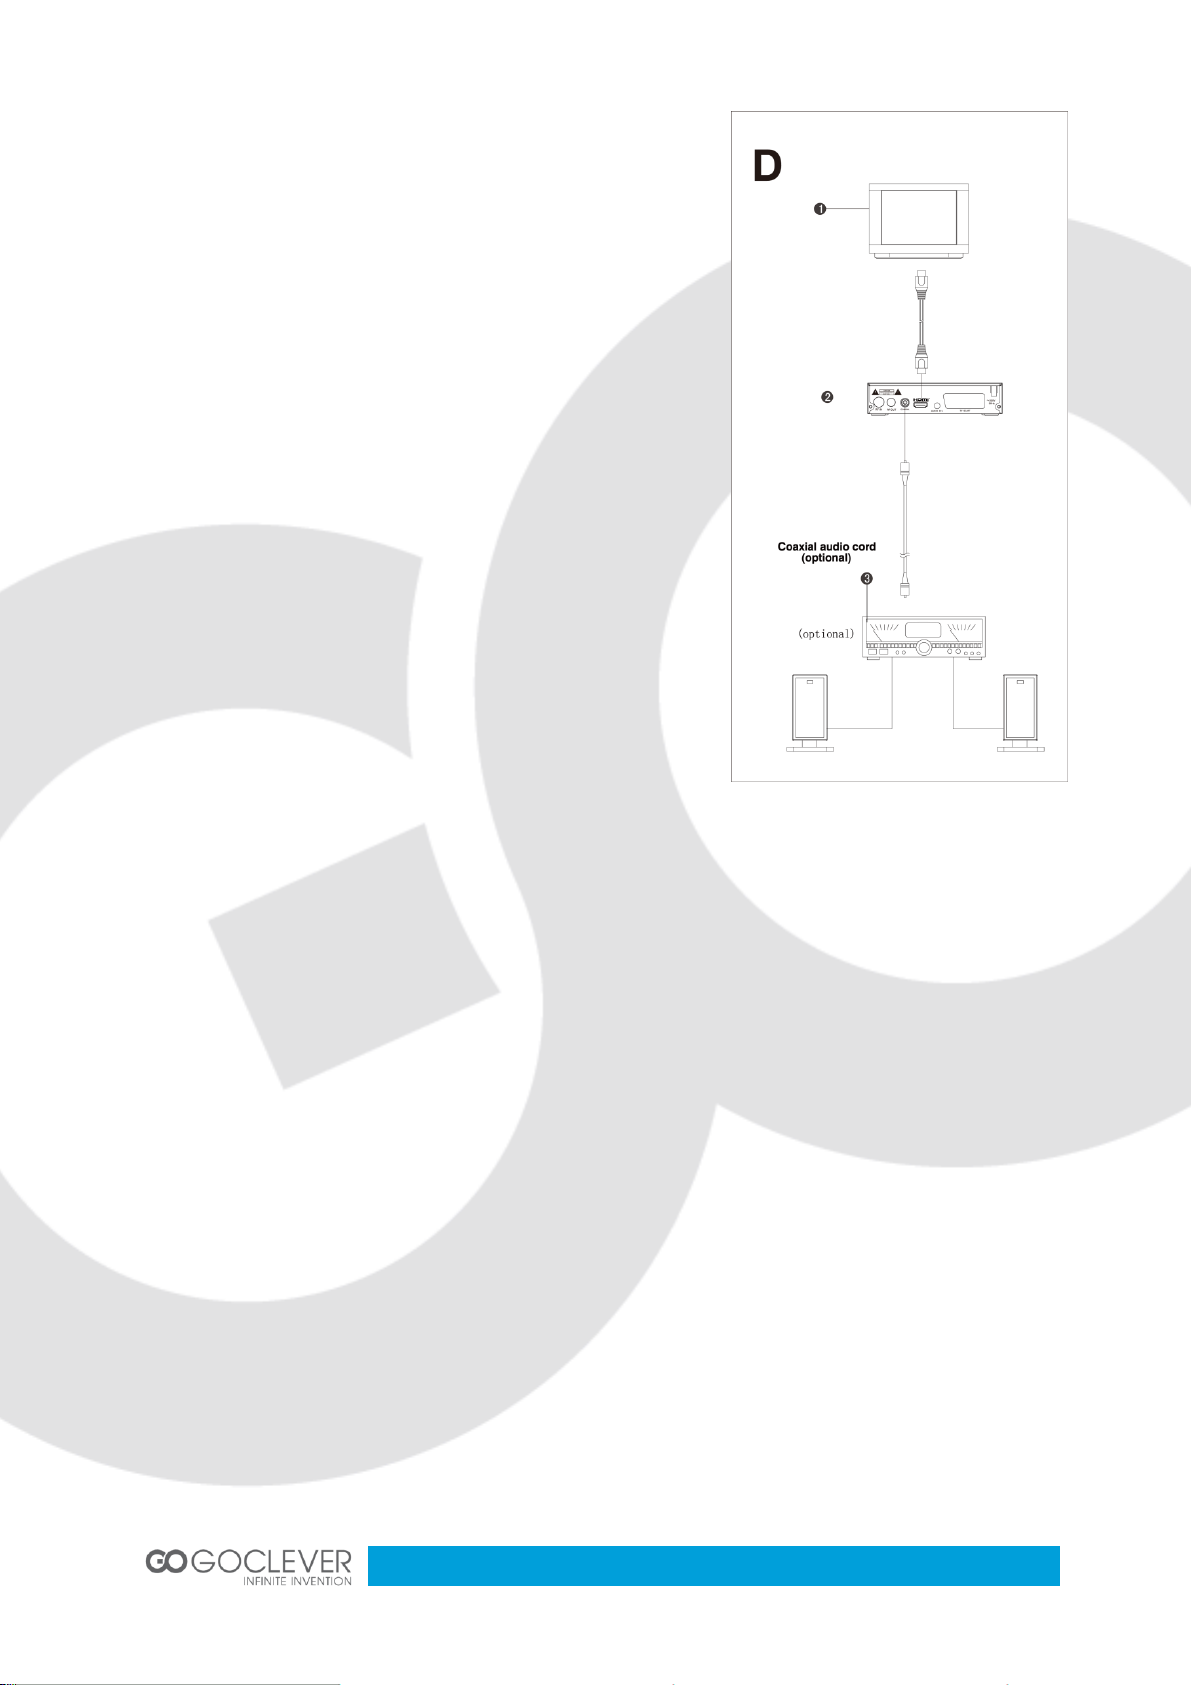
Connecting Amplifier or Decoder (Figure D)
1. Antenna (Not included)
2. DVB-T Receiver
3. Amplifier or Decoder (Not Included)
Fast Installation
Connect this unit and other apparatus according to
Chapter “BASIC CONNECTIONS”. Plug the power cord
and wait “Installation Guide” window appears:
1. Use [CH▲/▼] button to select item and [VOL◄/►]
button to enter in its setup interface.
2. The default OSD Language is “English”, country is
“England”.
3. Move cursor to ”Channel Search” and press [OK] button
to start auto search.
4. Press [EXIT] button to back to channel list after auto
search has been done. Press [OK] button to display
channel list, use [CH▲/▼] button to select channel and press [OK] button to enjoy watching.
If the “Installation Guide” does not appear:
5. Press [MENU] button, move cursor to “Tools” and press [OK] button to enter in its interface
to load factory default. Default password is “000000”. (This step must be done at first use or
after upgrade.)
6. Press [OK] button to start load factory default.
7. After the factory default has been done, wait “Installation Guide” window and please operate
according to step 1, 2, 3 and 4.
Read Advanced Operation for more details.
Page 13

13
Advanced Operation
Menu Operation
Main Menu
Press [MENU] button to browse the Main Menu including 7 sub-menus which are listed below:
Program
Picture
Channel Search
Time
Option
System
USB
Press [CH▲/▼] buttons to select menu item, press [OK] button to browse its submenu. Press
[EXIT] button to return to the previous menu.
Notes:
1. The four navigation buttons ([▲/▼/◄/►]), [OK] and [EXIT] buttons have same functions in
all level menus.
2. Some buttons have different functions in different menus. Please find out according to
screen.
3. Programmable buttons (which with color) functionality depends on the menu that is active at
press moment. Please find out according to the screen.
1. Program
Move cursor to “Program” and press [OK] button to enter in its submenu. There are 4 options
which are listed below.
Program Edit
EPG
SORT
LCN
1.1 Program Edit
Move cursor to “Program Edit” and press [OK] button, input password “000000” to enter in
“Program Edit” submenu.
Page 14

14
Rename
Press [LAST] button to enter in “Rename” interface, use [VOL ◄/►], [CH▲/▼] buttons to
choose letters in dialog box which will be showed on screen. Press [OK] button to confirm
imputation.
Lock
Press [YELLOW] button to enter in “Lock” interface. Use [CH▲/▼] buttons to select channel
and press [OK] button to lock, press [OK] button again to cancel lock. Press [EXIT] button to
quit and save according to screen.
Move
Press [RED] button to enter in “Move” interface. Use [CH▲/▼] buttons to move channel and
press [OK] button to confirm movement. Press [OK] button again to cancel movement. Press
[EXIT] button to quit and save according to screen.
FAV
Press [FAV] button to enter in “Favorite” interface. Use [CH▲/▼] buttons to select channel
and press [OK] button to set up the chosen channel as favorite channel. There are 5 options:
Disable\Movie\News\Sport\Music. Choose “Disable” to cancel.
Delete
Press [BLUE] button to enter into “Delete” interface. Use [VOL ◄/►] buttons to choose
channel to be deleted. Delete channel according to screen. Press [EXIT] button to cancel.
Skip
Press [GREEN] button to set the chosen TV program to be skipped when consecutive
switching of programs.
1.2 EPG
Move to the submenu of “EPG” and press [OK] button to open the window of program guide. If
some programs are available at the moment, all the relevant information will appear on the
window. Under the window are the navigation guides for further operation.
OK: Book. Press [OK] button to book a program.
INFO: Book List. Press [INFO] button to set up a book list.
YELLOW: Page Down. Press [YELLOW] button to turn down the pages to check EPG
information when there are couples of pages.
BLUE: Page Up. Press [BLUE] button to turn up the pages to check EPG information when
there are couple of pages.
Page 15

15
1.3 SORT
Select this submenu to sort the programs in the following ways: By LCN/By ON ID/By Service
Name/By Service ID.
1.4 LCN
Choose this submenu to enable or disable the LCN mode.
The system will sort the channels in an order preset in the signal stream in on mode.
Otherwise, the system will sort the channels in a routine order.
The default status is “OFF”.
2. Picture
Move cursor to “Picture” and press [OK] button to enter in its submenu. There are 4 submenus
which are listed below.
Aspect Ratio
Resolution
TV Format
Video Output
2.1 Aspect Ratio
Auto
4:3 Full
4:3 Pan & Scan
4:3 Letter Box
16:9 Wide Screen
2.2 Resolution
PAL (1080P/1080i/720P/576P/576i)
NTSC (1080P/1080i/720P/480P/480i)
2.3 TV Format
PAL
NTSC
2.4 Video Output
CVBS
YPbPr
Page 16

16
3. Channel Search
Move cursor to “Channel Search” and press [OK] button to enter in its submenu. There are 4
submenus which are listed below.
Auto Search
Manual Search
Country
Antenna Power
3.1 Auto Search
Use [CH▲/▼] buttons to select “Auto Search “and press [OK] button to start auto search.
3.2 Manual Search
Use [CH▲/▼] buttons to select “Manual Search” and press [OK] button to enter in “manual
search” interface. Press [VOL◄/►] buttons to set up “Channel No.”, “Frequency” and
”Bandwidth”. Press [OK] button to start search.
3.3 Country
Select this submenu with [CH▲/▼] buttons, and use [VOL◄/►] buttons to shift the options:
Czech,Italy,Sweden,Poland,Austria,Croatia,Greece,Rumania,Finland,Bulgaria,Russia,
Australia,,Iran,Spain,Portugal,France,Netherlands,Serbia,Germany,Belgium,Hungary,Danmar
k,Slovenia,Luxembourg, Norway.
The default country is England.
3.4 Antenna Power
On
Off
The default status is OFF.
4. Time
Move cursor to “Time” and press [OK] button to enter in its submenu. There are 4 submenus
which are listed below.
Time Offset
Country Region
Time Zone
Power Down After
4.1 Time Offset
Auto
Manual
Page 17

17
4.2 Country Region
It is activated when Time Offset is in Auto mode. The default country is England.
4.3 Time Zone
It is activated when Time Offset is in Manual mode. The default time zone is GMT+01:00, use
[VOL◄/►] buttons to setup.
4.4 Power Down After
OFF
1~12 Hours
Set up time to turn down device automatically.
5. Options
Move cursor to “Option” and press [OK] button to enter in its submenu. There are 4 submenus
which are listed below.
OSD Language
Subtitle Language
Audio Language
Digital Audio
5.1 OSD Language
English/ Persian
The default OSD language is Persian.
5.2 Subtitle Language
OFF/English/ Persian
5.3 Audio Language
English/Persian
5.4 Digital Audio
OFF/RAW/PCM
6. System
Move cursor to “System” and press [OK] button to enter in its submenu. There are 5
submenus which are listed below.
Page 18

18
Parental Guidance
Set Password
Restore Factory Default
Information
Software Update
6.1 Parental Guidance
Input password “000000” to enter in its interface.
Age: 4-18 years old, totally 16 levels for options.
The default password is “000000”.
6.2 Set Password
Choose “Set Password” and press [OK] button to set new password.
6.3 Restore Factory Default
Choose “Restore Factory Default” and press [OK] button to load factory default. Press [EXIT]
button to quit. Please operate according to screen.
6.4 Information
Move cursor to “Information” and press [OK] button to browse information of the device.
Model
SW Version
HW Version
6.5 Software Update
Move cursor to “Software Update” and press [OK] button to enter in its interface.
USB Upgrade
Tips
Connect USB device and load document named “bin. AP”.
Press [MENU] button and enter in “USB” setup interface.
Choose “USB Software Update”, the update document will be found in “Upgrade list”
automatically.
Choose “START” to load the update document. “Load data” window will display the
process.
Press “EXIT” button to quit.
Page 19

19
7. USB
Move cursor to “USB” and press [OK] button to enter in its submenu. There are 4 submenus
which are listed below.
Multimedia
Photo Configure
Movie Configure
PVR Configure
7.1 Multimedia
Move cursor to “Multimedia” and press [OK] button to enter in its setup interface. Press [EXIT]
button to quit.
Music
Use [CH▲/▼] buttons to select song and press [OK] button to play. Use [VOL◄/►] buttons to
adjust the volume level.
Photo
Use [CH▲/▼] buttons to select photo and press [OK] button to browse. Press [EXIT] button to
quit.
Movie
Use [CH▲/▼] buttons to select movie and press [OK] button to play. Press [EXIT] button to
quit.
PVR
Use [CH▲/▼] buttons to select recorded video and [OK] button to play. Use [VOL◄/►]
buttons to adjust the volume level.
7.2 Photo Configure
Move cursor to “Photo Configure” and press [OK] button to enter in its setup interface. Press
[EXIT] button to quit.
Slide Time
1-8 Seconds
Slide Mode
Random/0-59
Aspect Ratio
Keep/Discard
7.3 Movie Configure
Move cursor to “Movie Configure” and press [OK] button to enter in its setup interface. Press
[EXIT] button to quit.
Page 20

20
Subtitle Specific
Normal/Big/Small
Subtitle BG
Transparent/Grey/Yellow Green/White
Subtitle Font Color
White/Black/Red/Blue/Green
7.4 PVR Configure
Move cursor to “PVR Configure” and press [OK] button to enter in its setup interface. Press
[EXIT] button to quit.
Record Device
Disk
Format
Format/File System
Timeshift
Connect USB drive with the device, press [PAUSE] button to start record the program while
watching.
Tips for record real-time channel program.
Connect USB device with receiver.
Press [PAUSE] button to stop the TV program and the receiver will start recording as
much as the USB device capacity is. Press [PLAY] button to continue watch the
program from the stopped place.
Use [F.REW] and [F.FWD] buttons to forward or backward of recorded program. There
are 5 options, x2, x4, x8, x16 and x32.
The recorded program will be ereased automatically once channel has been shifted.
REC
Connect USB drive with the device, press [REC] button to start record while watching.
Tips for record video
Connect USB device with receiver.
Press [REC] button to start recording program.
Press [STOP] button to stop record.
The receiver will start recording as much as the USB device capacity is.
Recorded video will be stored in the disk.
Page 21

21
Difference between “Timeshift” mode and “REC” mode
Timeshift mode is only used to record real-time channel program.
In Timeshift mode, the program will be stopped while watching. In REC mode, you can
watch and record at the same time.
Record in Timeshift mode will be ereased once channel has been shifted. Record in
REC mode will be stored in USB drive.
Page 22

22
Appendix
Name
Descriptions
DVB
The abbreviation of Digital Video Broadcasting.
DVB-T
One type of DVB modes (T=Terrestrial).
MPEG
The abbreviation of Motion Picture Experts Group.
MPEG-2
The MPEG-2 standards are mainly used in digital TV signals.
Subtitles
The words appear at the bottom of the screen. They are usually recorded on
DVD discs and have 32 languages at most.
FEC
FEC stands for Forward Error Correction, used to correct signal transmission
errors between antennas and the receiver.
PID
The PID code (Packed Identification) is the identification number of audio and
video signals in the digital data flow/stream of DVB MPEG-2 signals. It is used
to transmit audio and video signals to a specific address.
Maintenance
Unplug the power cord before maintenance.
Keep the product surface clean. Please use a piece of soft cloth to clean the outer if it’s
dirty.
Do not use any chemical products like Alcohol or dilution to clean the product.
Refer all servicing to a qualified service agent.
Terminology
Page 23

23
Items
Features
High
Frequency
Tuner
Input Frequency Range
174~230, 470 ~~ 862MHz (VHF&UHF)
Bandwidth
6, 7 or 8 MHz
Input Signal Level
-75~-20dBm
RF Input Connector
IEC169-2, Female
Input impedance
75Ω
Demodulation
Mode
Waveform
COFDM(Code Orthogonal Frequency Division
Multiplexing)
Demodulation
QPSK,QAM16,QAM64
Transmission Mode
2K,8K
Guard interval
1/4, 1/8, 1/16, 1/32
Code rate
1/2, 2/3, 3/4, 5/6, 7/8
Video, Audio
Decoding
Video decoding
ISO/IEC13818-2 MPEG2(MP@ML)/ MPEG4 AVS /H.264 Compatible
Video resolution
PAL 720×576/ NTSC 720X480, 1080i
Video input code rate
15Mbit/s Max.
Teletext
Support DVB-ETS300472
Audio decoding
ISO 11172-3
Audio Track
Stereo, Monophony (L, R)
Audio Sample rate
32, 44.1, 48KHz
USB
USB Port
USB2.0
Format
MP3/JPEG/BMP
System
FAT32, NTFS
Power
Input Power
230V,50Hz
Rated Power
Consumption
≤ 8W
Power Consumption
≤ 10 W Max
Work
Environment
Temperature
0~+40℃
Humidity
≤95%
Dimensions
Weight
≤1.0 Kg
Size
155(W)*98(D)*38(H) mm
Specifications
Notes
The data for weight and size are approximations only.
Specifications are subject to change (by manufacturer) without notice.
Page 24

24
Troubles
Possible Cause
Suggested Solutions
No power
The power cord has not been well
connected
Plug the power cord into the outlet
tightly and turn on the power; if still
no power, turn off the power again,
and wait for 5-10 minutes, then
restart again.
Can’t scan
programs
The antenna is not adjusted well
Adjust the antenna or use an
outdoor antenna
Antenna incorrectly
Use an antenna with 75 Ω
impedance input
Parameter input incorrectly
Input Frequency, Bandwidth
parameter correctly
No picture
Output cord is connected incorrectly
Connect the output cord correctly. If
the problem is still exit, the output
cord may damage.
The video output mode of the unit is
different from the mode of monitor
Reset the mode
No Color
The video output system of the unit is
different from the mode of monitor
Reset the color system
Image
distortion at
channel shift
normal
The remote
control fails
to work
Batteries incorrectly installed
Install the battery correctly
Batteries exhausted
Replace the battery
Beyond the effective operation range
Operate within an effective range
The remote sensor is pointed to by bright
light.
Place the unit elsewhere for a
change
Audio track
and subtitle
language
are not the
chosen
items
Has not chosen the right sound track
Press the Audio button to shift the
track
No sound
The unit is in a mute status
Cancel the mute
Volume is too low
Augment the volume
Cable is connected incorrectly
Connect the cable correctly
Troubleshooting
Look through the following table about the possible troubles and you may find answers before
request service. It may help you to resolve the problems with some easy operations according
to this table. If something goes wrong with the receiver and can’t back to normal, please cut off
the power for few minutes and restart the product. If the problem remains and proves to
beyond your capability, you had better hand it over to a qualified service agent.
The integrated circuits are easily breakdown by static. Make sure the antistatic protection has
been well taken before maintenance.
Page 25

25
No sound by
chance
There might be a short circuit
Correct the output cable
connection, and turn on again.
In mute status
Cancel the mute
In standby mode
Turn on the unit
Poor picture
quality
Too much interferential signals
Adjust the position of antenna.
No response
May interfered by static
Plug the power cord again
Flash Drive
can’t be read
The USB cable connected incorrectly
Connect the cable correctly.
The flash drive’s current is too heavy, the
product wouldn’t afford it.
Provide external power source.
The flash drive runs self-protection
program because of external device short
circuit.
Change the short circuit device and
restart the product.
Page 26

26
DVB-T 100
INSTRUKCJA OBSŁUGI
ODWIEDŹ NASZĄ STRONĘ
WWW.GOCLEVER.COM
ABY ZAPOZNAĆ SIĘ Z INNYMI PRODUKTAMI TAB, NAVIO, DVR, DVB-T
Przed skorzystaniem z urządzenia zapoznaj się z niniejszą instrukcją obsługi
oraz zachowaj ją na przyszłość
Page 27

27
Spis Treści
ZASADY ZACHOWANIA BEZPIECZEŃSTWA
28
OSTRZEŻENIA
29
FUNKCJE
30
AKCESORIA
31
PRZEDNI PANEL
31
TYLNY PANEL
32
PILOT ZDALNEGO STEROWANIA
33
ROZPOCZĘCIE UŻYTKOWANIA
34
Instalacja Baterii
34
Żywotność Baterii
34
Zasięg Działania Pilota Zdalnego Sterowania
34
Podstawowe Połączenia
35
Podłączanie zestawu TV
35
Szybka Instalacja
36
ZAAWANSOWANA OBSŁUGA
37
Obsługa Menu
37
Program
37
Obraz
39
Wyszukiwanie Kanałów
40
Czas
40
Opcje
41
System
41
USB
43
Funkcja Timeshift oraz Nagrywanie
44
DODATKI
46
Konserwacja urządzenia
46
Terminologia
46
Specyfikacja
47
Rozwiązywanie problemów
48
Page 28

28
Zasady zachowania bezpieczeństwa
Symbol oznaczający zakaz składowania urządzenia z innymi odpadami na
terenie UE. Aby zniwelować ryzyko zagrożenia zdrowia ludzi
oraz środowiska, należy oddać urządzenie do odpowiednich
punktów recyklingu. Możesz zgłosić się do producenta lub sprzedawcy w
celu zwrotu urządzenia, które przeznaczone zostanie na recykling.
Drogi Kliencie,
dziękujemy za zakup naziemnego odbiornika DVB. Przed użyciem urządzenia, prosimy o
zapoznanie się z instrukcją obsługi oraz z ostrzeżeniami wymienionymi poniżej.
Urządzenie może zostać podłączone do następującego źródła zasilania: ~176-246V,
50Hz.
Chroń urządzenie przed wilgocią, aby uniknąć uszkodzeń urządzenia lub porażenia
prądem.
Nie umieszczaj na urządzeniu pojemników wypełnionych cieczą (szklanek, wazonów
itp.).
Aby uniknąć uszkodzeń urządzenia lub zakłóceń jego pracy, używaj tylko i wyłącznie
oryginalnych akcesoriów.
Wtyczka zasilania powinna być łatwo dostępna, ponieważ pełni funkcję głównego
wyłącznika urządzenia.
Otwory wentylacyjne w urządzeniu powinny być oddalone o co najmniej 5cm od
przeszkód.
Otwory wentylacyjne nie mogą zostać zakryte przez np. gazetę lub serwetę.
Nie stawiaj przy urządzeniu źródeł otwartego ognia (np. świeczek).
Baterie nie mogą zostać wystawiane na bezpośrednie działanie promieni słonecznych
lub innych źródeł ciepła.
Etykieta na spodzie urządzenia została wydrukowana na jedwabiu.
Aby uniknąć pożaru lub porażenia prądem, nie otwieraj obudowy urządzenia podczas
jego pracy.
Właściwe składowanie produktu
This product has been manufactured to conform to the International Safety
Standards. Please peruse the following safety precautions before use it.
Page 29

29
Ostrzeżenia
Przed użyciem urządzenia, przeczytaj
poniższe ostrzeżenia:
Ochrona Gniazda Zasilania
Proszę stosować się do poniższych
zaleceń, aby zapobiec wznieceniu
pożaru, porażeniu prądem lub innym
uszkodzeniom sprzętu lub ciała.
Podczas odłączania wtyczki z gniazda
zasilania, pociągaj za wtyczkę. Nie
ciągnij kabla.
Nie odłączaj/podłączaj zasilania mokrymi
rękoma.
Chroń wtyczkę zasilania przed źródłami
Nie umieszczaj palców ani żadnych
przedmiotów w urządzeniu
Takie działanie może uszkodzić
produkt lub spowodować okaleczenie
ciała.
Nie demontuj urządzenia.
Nie umieszczaj żadnych przedmiotów
na urządzeniu.
Chroń urządzenie przed wodą i polem
magnetycznym
Kontakt urządzenia z cieczą może
poważnie je uszkodzić
Nie umieszczaj sprzętów mogących
wytwarzać pole magnetyczne (np.
PRZEŁADOWANIE
Przeładowanie gniazda elektrycznego za pomocą przedłużaczy grozi powstaniem pożaru lub
porażeniem prądem.
CZYSZCZENIE
Przed rozpoczęciem czyszczenie urządzenia, odłącz jego zasilanie z gniazda elektrycznego.
Nie używaj produktów czyszczących w aerozolu. Urządzenie powinno być czyszczone za
pomocą lekko zwilżonej szmatki.
PODŁĄCZANIE DO ANTENY
Przed podłączeniem lub odłączeniem urządzenia od anteny, wyłącz jego zasilanie. W
przeciwnym razie urządzenie lub antena mogą ulec uszkodzeniu.
PODŁĄCZANIE DO ZESTAWU TV
Przed podłączeniem lub odłączeniem urządzenia od zestawu TV, wyłącz jego zasilanie. W
przeciwnym razie urządzenie lub antena mogą ulec uszkodzeniu.
UZIEMIENIE
Kabel od anteny powinien być uziemiony, a instalacja uziemiająca powinna spełniać standardy
bezpieczeństwa związane z uziemianiem.
UMIEJSCOWIENIE URZĄDZENIA
Urządzenie przeznaczone jest do użytku wewnątrz budynków. Nie umieszczaj urządzenia w
miejscach mocno naświetlanych przez promienie słoneczne.
Page 30

30
ciepła.
Nie obciążaj wtyczki zasilania żadnymi
ciężkimi przedmiotami.
Nie podejmuj się naprawy lub
przebudowy wtyczki zasilania.
Regularnie czyść wtyczkę zasilania.
Odłącz wtyczkę zasilania, jeżeli
urządzenie zostało upuszczone lub
uszkodzone.
Odłącz wtyczkę zasilania, jeżeli z
urządzenia wydobywa się dym, ogień lub
hałas.
Umiejscowienie urządzenia
Nie umieszczaj urządzenia w
następujących miejscach:
Blisko źródeł ciepła takich jak piec lub
grzejnik lub w miejscu, na które
bezpośrednio działają promienie
słoneczne.
Temperatura przekracza 35°C lub
wilgotność powietrza wynosi więcej niż
90%.
Zakurzonych miejscach.
Gdzie działa pole magnetyczne lub
elektryczność statyczna
Na powierzchniach narażonych na
wibracje.
Podczas nieużywania urządzenia
Wyłącz urządzenie lub odłącz jego
zasilanie. Odłącz wtyczkę zasilania, jeżeli
urządzenie nie będzie używane przez
długi okres czasu.
głośników) w pobliżu urządzenia
Pozycja urządzenia
Umieść urządzenie na płaskiej
powierzchni.
Nie umieszczaj urządzenia pod szkłem,
lub innym materiałem mogącym
skupiać promienie słoneczne.
Zakłócenia sygnału
Podczas oglądania telewizji,
urządzenie może generować
zakłócenia. Proszę wyłączyć
urządzenie, gdy nie jest ono używane.
Funkcje
Pełna kompatybilność z MPEG-4 /
DVB-T
Menu wyświetlane na ekranie (OSD)
Elektroniczny Przewodnik po
Programach (EPG)
Obsługa wielu języków
Przyjazny Interfejs
Automatyczne lub ręczne
skanowanie
Cyfrowe Wyjście Koncentryczne
Pamięć Zasilania
USB PVR
Obsługa Aktualizacji USB
Page 31

31
Akcesoria
Przedni Panel
Po otwarciu opakowania, proszę sprawdzić następujące elementy zestawu:
Pilot Zdalnego Sterowania [1 szt.]
Instrukcja Obsługi [1 szt.]
1. Port USB
2. Dioda zasilania
3. Odbiornik fal podczerwonych
4. Przycisk zmiany kanału +
5. Przycisk zmiany kanału -
6. Przycisk zasilania
Page 32

32
Tylny Panel
1. Wejście antenowe
2. Wyjście antenowe
3. Cyfrowe Wyjście Koncentryczne
4. Gniazdo HDMI
5. Gniazdo Audio – Lewy + Prawy kanał
6. Gniazdo TV SCART (EURO)
7. Wejście zasilania
UWAGI
1. Aby uniknąć porażenia prądem, odłącz urządzenie od gniazda zasilania, jeżeli sprzęt nie
będzie używany przez długi okres czasu.
2. Urządzenie posiada oryginalną wtyczkę zasilania, która nie powinna zostać wymieniana
przez użytkownika. W razie uszkodzenia wtyczki, proszę zgłosić się do sprzedawcy.
Page 33

33
Pilot Zdalnego Sterowania
Pilot Zdalnego Sterowania
Nazwa
Opis
1
WYŁĄCZ
Włącz/wyłącz urządzenie
2
Klawisze
numeryczne
Wybierz kanał lub parametry programu.
3
MENU
Przejdź do menu
4
TV/R
Przełącz pomiędzy TV a
Radio.
5
Przyciski
Nawigacji
Przesuń kursor.
6
SUB-T
Ustawienia napisów
dialogowych
7
TEXT
Wyświetl informacje o
danym kanale
8
AUDIO
Ustawienia kanałów audio
9
PREV
Wróć do poprzedniego.
10
F.RWD
Przewiń w przód.
11
USB
Ustawienia interfejsu USB
12
REC
Przełącz na tryb
nagrywania programów.
13
STOP
Zatrzymaj odtwarzanie.
14
PLAY/
PAUSE
Wznów odtwarzanie.
15
F.FWD
Szybkie przewijanie w
przód
16
NEXT
Przejdź do następnego.
17
EPG
Wyświetl Elektroniczny
Przewodnik po Programach
18
FAVOR
Przełącz na ulubiony
kanał
19
INFO
Wyświetl pasek informacji
20
OK
Wyświetl listę kanałów.
Zatwierdź.
21
EXIT
Wyjdź z danego menu.
22
LAST
Powrót do poprzedniego.
23
MUTE
Włącz/wyłącz dźwięk.
Page 34

34
Rozpoczęcie Użytkowania
Instalacja baterii
Umieść baterie w pilocie zdalnego sterowania jak pokazano na
rysunku A, pamiętając o poprawnym ułożeniu biegunów [+] i [-].
Żywotność baterii
Energia baterii wystarcza na około rok użytkowania pilota,
jednak czas ten może ulec zmianie w zależności od
częstotliwości używania urządzenia.
Wymień baterie, jeżeli urządzenie reaguje tylko na bardzo bliskie odległości od
odbiornika.
Używaj dwóch baterii AAA lub UM-4.
Uwagi
Nie używaj baterii akumulatorowych (Ni-Cd).
Nie próbuj ładować baterii, wrzucać ich do ognia lub rozbierać .
Nie upuszczaj pilota, ani nie narażaj go na duże wibracje.
Nie mieszaj starych baterii z nowymi.
Wyjmij baterie z pilota, jeżeli urządzenie nie będzie używane przez dłuższy czas.
Nieprzestrzeganie tej zasady może spowodować wyciek elektrolitu z baterii, a nawet
pożar. W razie wycieku elektrolitu, zmyj ciecz z pilota i dokładnie umyj ręce.
Zasięg działania Pilota Zdalnego Sterowania
Wyceluj pilot w odbiornik fal podczerwonych umieszczony na przednim panelu
urządzenia. Pilot działa na odległość do 5 metrów oraz pod kątem około 60 stopni.
Efektywność pilota może ulec zmianie wraz ze zmianą oświetlenia pomieszczenia.
Chronić odbiornik fal podczerwonych przed bardzo jasnym światłem.
Pilot może nie działać, jeżeli pomiędzy odbiornikiem a pilotem znajduje się przeszkoda.
Nie zaleca się używania pilota do obsługi innych urządzeń.
Page 35

35
Podstawowe połączenia
Przygotowanie
Przed podłączeniem sprzętu, wyłącz wszystkie urządzenia.
Przed podłączeniem zestawu, przeczytaj instrukcję obsługi.
Pamiętaj o prawidłowym podłączeniu przewodów audio i wideo.
Podczas podłączania urządzenia do telewizora, zwróć uwagę na to, że tylko jeden rodzaj
wyjścia przewodowego jest odpowiedni. Użycie wyjścia innego rodzaju może skutkować
zniekształceniem obrazu.
UWAGI
Użytkownik może wybrać odpowiednie wyjście wideo, dopasowane do telewizora oraz
własnych potrzeb.
Podłączanie zestawu TV (rys. C)
1. Antena (brak w zestawie)
2. Zestaw TV (brak w zestawie)
3. Odbiornik DVB-T
4. Cyfrowy kabel kompozytowy dla połączenia TV z
DVB-T (brak w zestawie)
5.Kabel HDMI dla połączenia TV z DVB-T (brak w
zestawie)
6. EURO złącze (SCART) dla połączenia TV z
DVB-T (brak w zestawie)
7. Wejście zasilania
8. Inne urządzenie DVB-T (brak w zestawie)
Page 36

36
Podłączanie wzmacniacza do dekodera (rys. D)
1. Antena (brak w zestawie)
2. Zestaw TV (brak w zestawie)
3. Wzmacniacz lub dekoder (brak w zestawie)
Szybka instalacja
Podłącz jednostkę oraz inne elementy zgodnie z opisem
w rozdziale “Podstawowe połączenia”. Podłącz zasilanie i
poczekaj na komunikat kreatora instalacji na ekranie:
1. Użyj klawisza [CH▲/▼] aby zaznaczyć pozycję
kursora, oraz [VOL◄/►] aby przejść do zaznaczonego
interfejsu.
2. Domyślny język oprogramowania to angielski, a
państwo to Anglia.
3. Przesuń kursor na ”Wyszukiwanie Kanałów” i naciśnij
przycisk [OK] aby rozpocząć automatyczne wyszukiwanie.
4. Naciśnij przycisk [EXIT] aby powrócić na listę kanałów,
jeżeli automatyczne wyszukiwanie zakończyło się. Naciśnij przycisk [OK] aby wyświetlić listę
kanałów, użyj klawisza [CH▲/▼] aby wybrać kanał, a następnie naciśnij przycisk [OK] aby
oglądać wybrany program.
Jeżeli kreator instalacji nie pojawia się na ekranie:
5. Naciśnij przycisk [MENU], przesuń kursor na pozycję “Narzędzia” i naciśnij przycisk [OK]
aby przejść do interfejsu i przywrócić ustawienia fabryczne. Domyślne hasło to “000000”.
(Takie działanie wykonuje się na początku użytkowania lub po aktualizacji oprogramowania.)
6. Naciśnij przycisk [OK] aby rozpocząć przywracanie ustawień fabrycznych.
7. Po przywróceniu ustawień fabrycznych, poczekaj na pojawienie się kreatora instalacji na
ekranie, a następnie przejdź do kroków 1, 2, 3 i 4.
Więcej szczegółów znajdziesz w rozdziale „Zaawansowana obsługa”.
Page 37

37
Zaawansowana Obsługa
Obsługa menu
Menu główne
Naciśnij przycisk [MENU] aby przeglądać menu główne zawierające 7 pozycji:
Program
Obraz
Wyszukiwanie kanałów
Czas
Opcje
System
USB
Naciśnij przycisk [CH▲/▼] aby wybrać pozycję w menu, naciśnij przycisk [OK] aby zatwierdzić
wybór. Naciśnij przycisk [EXIT] aby powrócić do poprzedniego menu.
Uwagi:
1. Cztery przyciski nawigacji ([▲/▼/◄/►]), [OK] oraz [EXIT] odpowiadają za tę samą funkcję
w każdym menu.
2. Niektóre przyciski zmieniają swoją funkcję w zależności od menu, w którym znajduje się
użytkownik. Proszę zwrócić na to uwagę obserwując instrukcje na ekranie.
3. Przyciski programowalne (kolorowe) zmieniają swoją funkcję w zależności od menu, w
którym znajduje się użytkownik. Proszę zwrócić na to uwagę obserwując instrukcje na ekranie.
1. Program
Przesuń kursor na pozycję “Program” i naciśnij przycisk [OK] aby zatwierdzić wybór. W
wybranym menu znajdują się 4 opcje:
Edycja Programu
EPG
Sortowanie
LCN
1.1 Edycja Programu
Przesuń kursor na pozycję “Edycja Programu” i naciśnij przycisk [OK]. Wprowadź hasło
“000000” aby przejść do podmenu.
Page 38

38
Zmień nazwę
Naciśnij przycisk [LAST] aby przejść do interfejsu zmiany nazw. Użyj klawisza [VOL ◄/►],
[CH▲/▼] aby wybrać litery z okna dialogowego, które pojawią się na ekranie. Naciśnij
przycisk [OK] aby potwierdzić wybór.
Zabezpieczanie
Naciśnij przycisk [ŹÓŁTY] aby przejść do interfejsu zabezpieczania kanałów. Użyj klawisza
[CH▲/▼] aby wybrać kanał. Naciśnij przycisk [OK] aby go zabezpieczyć, naciśnij ponownie
przycisk [OK] aby anulować zabezpieczenie. Naciśnij przycisk [EXIT] aby wyjść i zapisać
zmiany.
Przemieszczanie
Naciśnij przycisk [CZERWONY] aby przejść do interfejsu przemieszczania kanałów. Użyj
klawisza [CH▲/▼] aby przemieścić kanał. Naciśnij przycisk [OK] aby zatwierdzić nową
pozycję. Naciśnij ponownie przycisk [OK] aby anulować. Naciśnij przycisk [EXIT] aby wyjść i
zapisać zmiany.
FAV
Naciśnij przycisk [FAV] aby przejść do interfejsu ulubionych. Użyj klawisza [CH▲/▼] aby
wybrać kanał. Naciśnij przycisk [OK] aby ustalić wybrany kanał jako ulubiony. Istnieje 5 opcji:
Wyłączony\Film\Wiadomości\Sport\Muzyka. Wybierz opcję “Wyłączony”, aby anulować
przypisywanie kanału do ulubionych.
Usuwanie
Naciśnij przycisk [NIEBIESKI] aby przejść do interfejsu usuwania. Użyj klawisza [VOL ◄/►]
aby wybrać kanał do usunięcia. Usuń kanał. Naciśnij przycisk [EXIT] aby anulować.
Pomijanie
Naciśnij przycisk [ZIELONY] aby ustalić pomijanie wybranego programu podczas przełączania
kanałów.
1.2 EPG
Wybierz podmenu “EPG” i naciśnij przycisk [OK] aby otworzyć okno przewodnika po
programach telewizyjnych. Jeżeli programy są dostępne, będziesz mógł przeczytać dołączone
do nich informacje. Pod oknem znajdują się instrukcje pozwalające na dalszą nawigację.
OK: Zakładka. Naciśnij przycisk [OK] aby dodać program do zakładek.
INFO: Lista zakładek. Naciśnij przycisk [INFO] aby wybrać listę zakładek.
ŹÓŁTY: Strona w dół. Naciśnij przycisk [ŻÓŁTY] aby przewinąć stronę w dół.
NIEBIESKI: Strona w górę. Naciśnij przycisk [NIEBIESKI] aby przewinąć stronę w górę.
Page 39

39
1.3 Sortowanie
Wybierz to menu, aby posortować programy według: LCN lub ON ID lub nazwy usługi lub
identyfikatora usługi
1.4 LCN
Wybierz to menu aby włączyć lub wyłączyć tryb LCN.
Tryb LCN pozwala na automatyczne sortowanie kanałów według numerów nadanych kanałom
przez operatora. Wyłączenie trybu sprawi, że numeracja odbędzie się w sposób domyślny.
Fabrycznie funkcja jest wyłączona.
2. Obraz
Przesuń kursor na pozycję “Obraz” i naciśnij przycisk [OK] aby przejść do interfejsu ustawień
obrazu. Znajdują się tam 4 opcje:
Proporcje obrazu
Rozdzielczość
Tryb TV
Wyjście wideo
2.1 Proporcje obrazu
Auto
4:3 Pełen
4:3 Pan & Scan
4:3 Koperta
16:9 Szerokokątny
2.2 Rozdzielczość
PAL (1080P/1080i/720P/576P/576i)
NTSC (1080P/1080i/720P/480P/480i)
2.3 Tryb TV
PAL
NTSC
2.4 Wyjście wideo
CVBS
YPbPr
Page 40

40
3. Wyszukiwanie kanałów
Przesuń kursor na pozycję “Wyszukiwania kanałów” i naciśnij przycisk [OK] aby przejść do
interfejsu wyszukiwania kanałów. Znajdują się tam 4 opcje:
Automatyczne wyszukiwanie
Ręczne wyszukiwanie
Kraj
Zasilanie antenowe
3.1 Automatyczne wyszukiwanie
Użyj klawisza [CH▲/▼] aby wybrać automatyczne wyszukiwanie. Naciśnij przycisk [OK] aby
rozpocząć proces wyszukiwania.
3.2 Ręczne wyszukiwanie
Użyj klawisza [CH▲/▼] aby wybrać ręczne wyszukiwanie. Naciśnij przycisk [OK] aby przejść
do interfejsu wyszukiwania. Naciśnij przycisk [VOL◄/►] aby ustalić “Numer kanału”,
“Częstotliwość” oraz ”Pasmo”. Naciśnij przycisk [OK] aby rozpocząć proces wyszukiwania.
3.3 Kraj
Użyj klawisza [CH▲/▼] aby wybrać interfejs wyboru kraju. Użyj klawisza [VOL◄/►] aby
przesuwać opcje:
Czechy, Włochy, Szwecja, Polska, Austria, Chorwacja, Grecja, Rumunia, Finlandia, Bułgaria,
Rosja, Norwegia. Krajem domyślnym jest Anglia
3.4 Zasilanie anteny
Włączone
Wyłączone
Domyślnie opcja jest wyłączona
4. Czas
Przesuń kursor na pozycję “Czas” i naciśnij przycisk [OK] aby przejść do podmenu. Znajdują
się tam 4 opcje:
Przesunięcie czasu
Kraj i region
Strefa czasowa
Wyłącz po upłynięciu czasu
4.1 Przesunięcie czasu
Automatyczne
Ręczne
Page 41

41
4.2 Kraj i region
Opcja jest aktywna tylko wtedy, gdy przesunięcie czasu jest włączone. Krajem domyślnym jest
Anglia.
4.3 Strefa Czasowa
Opcja jest aktywna tylko wtedy, gdy przesunięcie czasu jest w trybie ręcznym. Domyślna
strefa czasowa to GMT+01:00. Użyj klawisza [VOL◄/►] aby zmienić ustawienia.
4.4 Wyłącz po upłynięciu czasu
WYŁĄCZONE
1~12 Godzin
Ustaw czas po którym urządzenie automatycznie wyłączy się.
5. Opcje
Przesuń kursor na pozycję “Opcje” i naciśnij przycisk [OK] aby przejść do interfejsu opcji.
Znajdują się tam 4 pozycje:
Język oprogramowania (OSD)
Język napisów dialogowych
Język audio
Dźwięk cyfrowy
5.1 Język oprogramowania (OSD)
Angielski/Perski
Domyślnym językiem jest język perski
5.2 Język napisów dialogowych
WYŁĄCZONY/Angielski/Perski
5.3 Język audio
Angielski/Perski
5.4 Dźwięk cyfrowy
WYŁĄCZONY/RAW/PCM
6. System
Przesuń kursor na pozycję “System” i naciśnij przycisk [OK] aby przejść do interfejsu ustawień
systemowych. Znajduje się tam 5 opcji:
Page 42

42
Kontrola Rodzicielska
Ustaw hasło
Przywróć ustawienia fabryczne
Informacje
Aktualizacja oprogramowania
6.1 Kontrola Rodzicielska
Wprowadź hasło “000000” aby przejść do interfejsu.
Wiek: 4-18 lat, w sumie 16 poziomów ustawień.
Domyślne hasło to “000000”.
6.2 Ustaw hasło
Wybierz opcję “Ustaw hasło” i naciśnij przycisk [OK] aby wprowadzić nowe hasło.
6.3 Przywróć ustawienia fabryczne
Wybierz tę opcję i naciśnij przycisk [OK] aby przywrócić domyślne ustawienia fabryczne.
Naciśnij przycisk [EXIT] aby wyjść. Postępuj zgodnie z instrukcjami na ekranie.
6.4 Informacje
Przesuń kursor na pozycję “Informacje” i naciśnij przycisk [OK] aby przeglądać informacje o
urządzeniu:
Model
Wersja oprogramowania
Wersja sprzętu
6.5 Aktualizacja oprogramowania
Przesuń kursor na pozycję “Aktualizacja oprogramowania” i naciśnij przycisk [OK] aby przejść
do interfejsu aktualizacji.
Aktualizacja przez USB
Wskazówki
Podłącz urządzenie USB i załaduj dokument o nazwie “bin.AP”.
Naciśnij przycisk [MENU] i przejdź do ustawień “USB”.
Wybierz pozycję “Aktualizacja przez USB”, dokument zostanie automatycznie wykryty i
wyświetlony na liście dostępnych aktualizacji.
Wybierz “START” aby załadować aktualizację. Okno „Ładowania danych” przedstawi
proces aktualizacji.
Naciśnij przycisk “EXIT” aby wyjść.
Page 43

43
7. USB
Przesuń kursor na pozycję “USB” i naciśnij przycisk [OK] aby przejść do interfejsu USB.
Znajdują się tam 4 opcje:
Multimedia
Konfiguracja Zdjęć
Konfiguracja Filmów
Konfiguracja PVR
7.1 Multimedia
Przesuń kursor na pozycję “Multimedia” i naciśnij przycisk [OK] aby przejść do interfejsu
multimediów. Naciśnij przycisk [EXIT] aby wyjść.
Muzyka
Użyj klawisza [CH▲/▼] aby wybrać utwór i naciśnij przycisk [OK] aby go odtworzyć. Użyj
klawisza [VOL◄/►] aby dostosować poziom głośności.
Zdjęcia
Użyj klawisza [CH▲/▼] aby wybrać zdjęcie i naciśnij przycisk [OK] aby je obejrzeć. Naciśnij
przycisk [EXIT] aby wyjść.
Filmy
Użyj klawisza [CH▲/▼] aby wybrać plik wideo i naciśnij przycisk [OK] aby go odtworzyć.
Naciśnij przycisk [EXIT] aby wyjść.
PVR
Użyj klawisza [CH▲/▼] aby wybrać nagrane wideo i naciśnij przycisk [OK] aby je odtworzyć.
Użyj klawisza [VOL◄/►] aby dostosować głośność.
7.2 Konfiguracja zdjęć
Przesuń kursor na pozycję “Konfiguracja zdjęć” i naciśnij przycisk [OK] aby przejść do
interfejsu konfiguracji zdjęć. Naciśnij przycisk [EXIT] aby wyjść.
Czas slajdów
1-8 sek.
Tryb slajdów
Losowo/0-59
Proporcje obrazu
Zachowaj/Anuluj
7.3 Konfiguracja Filmów
Przesuń kursor na pozycję “ Konfiguracja Filmów” i naciśnij przycisk [OK] aby przejść do
interfejsu konfiguracji filmów. Naciśnij przycisk [EXIT] aby wyjść.
Page 44

44
Określenie napisów dialogowych
Normalne/Duże/Małe
Tło napisów dialogowych
Przezroczyste/Szare/Żółte/Zielone/Białe
Kolor czcionki napisów dialogowych
Biały/Czarny/Czerwony/Niebieski/Zielony
7.4 Konfiguracja PVR
Przesuń kursor na pozycję “Konfiguracja PVR” i naciśnij przycisk [OK] aby przejść do
interfejsu konfiguracji nagranych wideo. Naciśnij przycisk [EXIT] aby wyjść.
Urządzenie nagrywające
Dysk
Format
Format/System Plików
Funkcja Timeshift
Podłącz dysk USB do urządzenia. Naciśnij przycisk [PAUZA] aby zacząć nagrywać aktualnie
oglądany program telewizyjny.
Wskazówki dotyczące nagrywania w czasie rzeczywistym.
Podłącz urządzenie USB do urządzenia.
Naciśnij przycisk [PAUZA] aby zatrzymać program TV i rozpocząć nagrywanie
programu do momentu zapełnienia pamięci USB. Naciśnij przycisk [PLAY] aby
rozpocząć oglądanie programu od zatrzymanego momentu.
Użyj klawisza [F.REW] i [F.FWD] aby przewijać nagrany program. Możesz skorzystać z
przyspieszeń x2, x4, x8, x16 oraz x32.
Program zostanie automatycznie usunięty podczas przełączenia na inny kanał.
Nagrywanie
Podłącz dysk USB do urządzenia. Naciśnij przycisk [REC] aby zacząć nagrywać aktualnie
oglądany program telewizyjny.
Wskazówki dotyczące nagrywania
Podłącz urządzenie USB do urządzenia.
Naciśnij przycisk [REC] aby rozpocząć nagrywanie programu.
Naciśnij przycisk [STOP] aby przerwać nagrywanie.
Urządzenie nagra materiał wideo tak duży, jak duża jest pojemność dysku USB.
Nagrane wideo zostanie zachowane na dysku.
Page 45

45
Różnica pomiędzy trybem “Timeshift” oraz “Nagrywanie”
Funkcja timeshift używana jest tylko do nagrywania programów w czasie rzeczywistym.
W trybie timeshift oglądany program zostanie zatrzymany. Tryb nagrywania umożliwia
nagrywanie i oglądanie nagrywanego programu jednocześnie.
Materiał nagrany w trybie timeshift zostanie wymazany z pamięci po przełączeniu
kanału, natomiast program nagrany w normalnym trybie zostanie zachowany na dysku.
Page 46

46
Dodatki
Nazwa
Opis
DVB
Skrót od Digital Video Broadcasting (cyfrowa transmisja sygnału).
DVB-T
Jeden z typów DVB (T = Naziemny).
MPEG
Skrót od Motion Picture Experts Group (format plików wideo).
MPEG-2
Standardowy format plików wideo.
Napisy
dialogowe
Tłumaczenie występujące w formie tekstu pojawiającego się na ekranie.
FEC
Używane do korekty błędów występujących pomiędzy odbiornikiem a anteną
PID
Kod PID jest numerem identyfikacyjnym sygnałów wizualnych i dźwiękowych w
strumieniu danych DVB MPEG-2. Używane do transmisji sygnału we
wskazane miejsce.
Konserwacja
Odłącz wtyczkę zasilania przed rozpoczęciem konserwacji.
Wyczyść powierzchnię urządzenia używając miękkiej szmatki.
Nie używaj produktów chemicznych, szczególnie takich, które zawierają alkohol lub
środki rozpuszczalne.
Wszelkie naprawy powinny zostać przeprowadzane przez serwisanta.
Terminologia
Page 47

47
Nazwa
Funkcje
Odbiornik
wysokich
częstotliwości
Zasięg częstotliwości
wejściowej
174~230, 470 ~~ 862MHz (VHF&UHF)
Pasmo
6, 7 lub 8 MHz
Poziom sygnału
wejściowego
-75~-20dBm
Złącze antenowe
IEC169-2, Źeńskie
Impedancja wejściowa
75Ω
Tryb
demodulacji
Przebieg fali
COFDM (Code Orthogonal Frequency Division
Multiplexing)
Demodulacji
QPSK,QAM16, QAM64
Tryb transmisji
2K, 8K
Odstęp
1/4, 1/8, 1/16, 1/32
Częstotliwość kodowania
1/2, 2/3, 3/4, 5/6, 7/8
Dekodowanie
audio/wideo
Dekodowanie wideo
Kompatybilność: ISO/IEC13818-2
MPEG2(MP@ML)/ MPEG-4 AVS /H.264
Rozdzielczość wideo
PAL 720×576/ NTSC 720X480, 1080i
Częstotliwość kodowania
15Mbit/s Max.
Teletekst
Obsługa DVB-ETS300472
Dekodowanie audio
ISO 11172-3
Ścieżka audio
Stereo, Monofonia (L, R)
Częstotliwość
próbkowania audio
32, 44.1, 48KHz
USB
Port USB
USB2.0
Format
MP3/JPEG/BMP
System plików
FAT32, NTFS
Zasilanie
Wejściowe
230V,50Hz
Nominalny pobór energii
≤ 8W
Pobór energii
≤ 10 W Max
Środowisko
pracy
Temperatura
0~+40℃
Wilgotność powietrza
≤95%
Wymiary
Waga
≤1.0 Kg
Rozmiar
155(szer.)*98(dł.)*38(wys.) mm
Specyfikacja
Uwagi
Dane dotyczące wymiarów są przybliżone.
Specyfikacja może ulec zmianie bez wcześniejszego uprzedzenia.
Page 48

48
Problem
Możliwa przyczyna
Rozwiązanie
Brak zasilania
Wtyczka zasilania nie została
odpowiednio podłączona
Podłącz wtyczkę zasilania do
gniazda zasilania. Jeżeli
urządzenie nie reaguje, odłącz
wtyczkę i podłącz ją ponownie po
5-10 minutach.
Brak
wyszukiwania
programów
Antena nie została wyregulowana
Wyreguluj antenę lub użyj anteny
zewnętrznej.
Niewłaściwy model anteny
Użyj anteny z impedancją
wyjściową równą 75 Ω
Niewłaściwe parametry kanału
Wprowadź prawidłowe parametry
częstotliwości i pasma programu.
Brak obrazu
Wtyczka nieprawidłowo podłączona
Podłącz wtyczkę we właściwy
sposób. Jeżeli nie widać obrazu,
wtyczka może być uszkodzona.
Tryb wideo różni się od trybu
obsługiwanego przez ekran
Zresetuj tryb
Brak kolorów
Tryb wideo różni się od trybu
obsługiwanego przez ekran
Zresetuj system kolorów
Zniekształcenie
obrazu podczas
przełączania
pomiędzy
kanałami
Powinno występować.
Pilot nie działa
Baterie umieszone niewłaściwie
Umieść baterie we właściwy
sposób
Baterie wyczerpane
Wymień baterie
Pilot jest za daleko od odbiornika
Przybliż pilot do urządzenia
Odbiornik skierowany jest w stronę
jasnego światła
Umieść odbiornik w ciemniejszym
miejscu
Język oraz
napisy dialogowe
są w innym
języku niż mój
Nie wybrano opcji w ustawieniach
Naciśnij przycisk Audio aby
wybrać odpowiadającą ścieżkę
dźwiękową
Brak dźwięku
Urządzenie jest wyciszone
Włącz dźwięk za pomocą pilota
Niski poziom głośności
Zwiększ poziom głośności
Kabel umieszczony niewłaściwie
Podłącz kabel w odpowiedni
sposób
Rozwiązywanie problemów
Przed zgłoszeniem awarii do serwisu, zapoznaj się z poniższą tabelą. Możliwe, że rozwiążesz
problem łatwym sposobem. Jeżeli urządzenie działa nieprawidłowo, spróbuj odłączyć jego
zasilanie na kilka minut i podłączyć je ponownie. Jeżeli napotkany problem przekracza twoje
kompetencje, zgłoś awarię do serwisu.
Układy scalone mogą zostać łatwo uszkodzone przez energię statyczną. Przed podjęciem
jakichkolwiek napraw, upewnij się, że podjęte zostały ku temu środki ostrożności.
Page 49

49
Nagły zanik
dźwięku
Mogło nastąpić zwarcie
Wyłącz urządzenie, odłącz kabel
audio i przyłącz go ponownie
Urządzenie jest wyciszone
Włącz dźwięk za pomocą pilota
Urządzenie w trybie uśpienia
Włącz urządzenie
Słaba jakość
obrazu
Zbyt duże zakłócenia antenowe
Wyreguluj ustawienie anteny
Brak odpowiedzi
Zakłócenia elektryczne
Odłącz urządzenia od prądu i
podłącz je ponownie
Brak odczytu z
dysku USB
Kabel USB podłączony niewłaściwie
Podłącz kabel we właściwy
sposób
Zasilanie potrzebne dla dysku USB jest
za małe
Zapewnij dodatkowe zasilanie dla
dysku USB
Dysk zabezpieczony przed zapisem lub
zwarcie
Wymień urządzenie powodujące
zwarcie i uruchom odbiornik
ponownie
Page 50

50
Warunki gwarancji
1. GOCLEVER SP. Z O.O. z siedzibą w Zakrzewie ( 62-069) przy ul. Przemysłowej 18 zwany dalej
Gwarantem zapewnia, że urządzenie marki GOCLEVER, jest wolne od wad konstrukcyjnych i
materiałowych, które mogłyby naruszyć jego funkcjonalność, o ile przestrzegana była instrukcja
obsługi dostarczona przy zawarciu umowy.
2. Gwarancja obowiązuje wyłącznie na terytorium Polski.
3. Gwarant bezpłatnie usunie ewentualną niesprawność urządzenia, zgodnie z postanowieniami
niniejszej gwarancji pod warunkiem przedstawienia wypełnionej w dniu zakupu karty gwarancyjnej
wraz z kopią dowodu zakupu. Dokonywanie zmian i skreśleń w karcie gwarancyjnej przez osoby
nieupoważnione powoduje utratę uprawnień wynikających z niniejszej gwarancji.
4. Okres gwarancji na urządzenia GOCLEVER wynosi 12 miesięcy, licząc od daty sprzedaży sprzętu,
jednak nie dłużej niż 15 miesięcy od daty produkcji umieszczonej na Produkcie.
5. Tryb przyjmowania produktów uszkodzonych w systemie DOOR to DOOR przysługuje nabywcy w
terminie 12 miesięcy od daty zakupu, jednak nie dłużej niż 15 miesięcy od daty produkcji. Po
przekroczeniu tych terminów użytkownik powinien przesłać uszkodzone urządzenie do punktu
serwisowego na własny koszt po wcześniejszym uzyskaniu numeru RMA zgodnie z procedurą
reklamacyjną. Natomiast koszt przesyłki do klienta po naprawie pokrywa Gwarant.
6. Okres gwarancji na akcesoria dołączone do urządzenia (np. pilot, kable itp.) wynosi 1 miesiąc od
daty sprzedaży z wyłączeniem uszkodzeń mechanicznych ( nie dotyczy gwarancja door-to-door )
7. Wady ujawnione w okresie gwarancji będą usuwane bezpłatnie w możliwie najkrótszym terminie
nieprzekraczającym 21 dni roboczych od przyjęcia urządzenia na serwis. W przypadku konieczności
sprowadzenia części zamiennych z zagranicy, termin powyższy może ulec przedłużeniu o kolejne 30
dni.
8. Reklamujący zobowiązany jest zgłosić usterkę w Centralnym Serwisie Klienta pod numerem
telefonu ( 061) 84 88 767. W Przypadku nie zgłoszenia usterki i wysłania jej do gwaranta bez
uzyskania numeru reklamacyjnego przesyłka nie zostanie przyjęta na serwis.
9. Usterka musi być zgłoszona do serwisu nie później niż 14 dni od jej zaistnienia.
10. Nabywca zobowiązany jest dostarczyć produkt w oryginalnym opakowaniu, wraz ze wszystkimi
akcesoriami. Odpowiedzialność za uszkodzenia wynikające z użycia opakowania zastępczego ponosi
nabywca.
11. Sprzęt nieodebrany z serwisu w ciągu 3 miesięcy od ukończenia naprawy przepada na rzecz
serwisu.
12. W przypadku nieuzasadnionej reklamacji (reklamacji sprawnego urządzenia lub gdy uszkodzenie
powstało z winy klienta) zgłaszający reklamację zostanie obciążony kosztami ekspertyzy oraz
transportu.
14. Gwarancja nie obejmuje:
1. Jakiegokolwiek używania sprzętu wykraczającego poza opis zakresu jego pracy;
2. Roszczeń z tytułu parametrów technicznych urządzenia, o ile są one zgodne z podanymi przez
producenta w instrukcji obsługi lub innych dokumentach o charakterze normatywnym;
3. Uszkodzeń powstałych z przyczyn zewnętrznych, np.: uszkodzeń mechanicznych, skutków zjawisk
atmosferycznych, zanieczyszczeń, zalań, przepięć, itp.
4. Wadliwego działania nieautoryzowanego oprogramowania zainstalowanego na urządzeniu
15. W przypadku, gdy naprawa gwarancyjna wymaga wymiany części, element wymieniony pozostaje
własnością Gwaranta. Części użyte do wymiany mogą być innej marki o parametrach technicznych,
co najmniej równoważnych.
16. Nabywca traci prawa gwarancyjne w przypadku zerwania plomb gwarancyjnych, tabliczki
znamionowej z numerem seryjnym lub stwierdzenia przez serwis producenta dokonywania
nieautoryzowanych napraw lub zmian systemowy bądź konstrukcyjnych urządzenia.
17. Gwarant może uchylić się od dotrzymania terminowości usługi gwarancyjnej, jeżeli zaistnieją
nieprzewidziane okoliczności o charakterze siły wyższej np.: klęska żywiołowa, niepokoje społeczne
itp.
Page 51

51
Czechy
BOUNCER S.R.O.
SLAVONICKA 324
67531 Jemnice, Czech Republic
servis@goclever.cz
Serbia
ET Servis d.o.o. Beograd
Member of Logo d.o.o.
Group Bulevar kralja Aleksandra 261
11000 Beograd. Srbija
+381 11 2042 109,+381 11 2042 101
www.etservis.rs
servis@etseivis.rs
Ukraina
Service Center "KROK-TTC"
ul. Geroev Dnepra 2A
04212, Kiev, Ukraine
+380 800 504 504
info@krok-ttc.com
Chorwacja
PlayCom
Ulica grada Vukovara 249,10000 Zagreb
+385 01 5618 433,+385 01 6184 115,
+385 01 6184 115
Skype : PlayCom - HR
info@play.com.hr
www.playcom.hr
Rumunia
S.C. Cordon Electronics S.R.L.
Str. Spataru Preda nr. 12, sector 5
Bucuresti, Romania
+40 372324762, +40 213009905,
+40 721909190, +40 740209932
office@cordongroup.ro
www.cordongroup.ro
Słowenia
TopTime d.o.o.,
Litostrojska cesta 44f, Ljubljana
servis@toptime.s
i tel: +386 1 600 50 20
www.toptime.si
18. Gwarant nie odpowiada za szkody i straty powstałe w wyniku niemożności korzystania z
urządzenia będącego w naprawie.
19. Uprawnienia z tytułu gwarancji nie obejmują prawa kupującego do domagania się zwrotu
utraconych korzyści w związku z wadami urządzenia.
20. Gwarant nie odpowiada za szkody powstałe w wyniku utraty danych na nośnikach
magnetycznych.
21. Stosunek prawny pomiędzy nabywcą urządzenia i Gwarantem regulowany jest wyłącznie
postanowieniami niniejszej gwarancji. Dalej idące roszczenia odszkodowawcze są wyłączone chyba,
że wynikają one z bezwzględnie obowiązujących przepisów prawa.
22. Gwarancja niniejsza ma charakter uzupełniający w stosunku do uprawnień nabywcy
przysługujących wobec sprzedawcy. Gwarancja nie wyłącza, nie ogranicza ani nie zawiesza
uprawnień nabywcy wynikających z niezgodności towaru z umową.
Najszybszą metodą rozwiązywania wielu problemów jest kontakt przez zgłoszenie serwisowe
pod adresem:
www.AUTORMA.GOCLEVER.com
Centralny Serwis Klienta Funkcjonuje
od poniedziałku do piątku w godzinach: 9:00 – 16:30
tel. (061) 84 88 767.
Goclever Sp . z o.o.
ul. Przemysłowa 18
62-069 Zakrzewo, Polska
serwis@goclever.pl
Serwisy partnerskie:
Page 52

52
NAZWA DYSTRYBUTORA / PIECZĘĆ
PODPIS
Data
Usterka
Wykonane naprawy
Podpis i pieczątka
SERWISU
Karta Gwarancyjna
DATA SPRZEDAŻY:…...............................................................................................................................................................
DATA PRODUKCJI:....................................................................................................................................................................
MODEL URZĄDZENIA: GOCLEVER DVB-T 100…….………………………..………………………………………………………
NUMER SERYJNY:......................................................................................................................................................................
.........................................................
Data i podpis klienta
Historia napraw
 Loading...