

Goclever Cineo 300 User Manual

33
34
1
17
33
49
65
1
USER’S MANUAL
GoClever Cineo 300
HD H.264 DVB-T
HD DIGITAL TERRESTRIAL RECEIVER
HDMI

2

3
INDEX
Important Safety Instructions 4
Front and Rear Panel 5
Remote Control 6
Connecting to Television 6
First Time Installation 7
Basic Operation 8
1.Program Manage Settings 8
2. Program Edit 8
3.EPG(Electronic program guide) 10
4.Sort 10
5.LCN (Logical channel number) 10
6.Video Setting 10
7.Channel Search 11
8.Time Setting 12
9.Option 13
10. System Setting 13
11.USB 14

4
Dear Customer,
Thank you very much for purchasing GoClever Cineo. In the digital era, this
product is a great home entertainment partner. With the outstanding design,
you can enjoy free HD digital terrestrial television and play movies, music,
and view photos of precious moments from USB disk.
Note: All the information contained in this manual was correct at the time of
publication. However, as our engineers are always updating and improving
the product, your device’s software may have a slightly different appearance
or modified functionality than presented in this manual.
IMPORTANT SAFETY INSTRUCTIONS
1) Read these instructions.
2) Keep these instructions.
3) Read all warnings.
4) Follow all instructions.
5) Do not use this device near water.
6) Clean only with dry cloth.
7) Do not block any ventilation openings, install in accordance with the
instructions.
8) Do not install near any heat sources such as radiations, heat registers,
stoves, or other devices(including amplifiers)that produce heat.
9) Only use attachments/accessories specified by the manufacturer.
10) Unplug this device during lighting storms or when unused for long
periods of time.
11) Refer all servicing to qualified service personnel. Servicing is required
when the device has been damaged in any way, such as power-Supply
cord or plug is damaged, liquid has been spilled or objects have fallen
into the device
12) Main plug is used as the disconnect device.
13) The ventilation should not be impeded by covering the ventilation
openings with items, such as newspapers, table-cloth, curtains,etc.
14) Attention should be drawn to the environmental aspects of battery
disposal.
WARNING:To reduce the risk of fire or electric shock, do not expose this
apparatus to rain or moisture.
WARNING:The batteries shall not be exposed to excessive heat such as
sunshine, fire, etc.
5
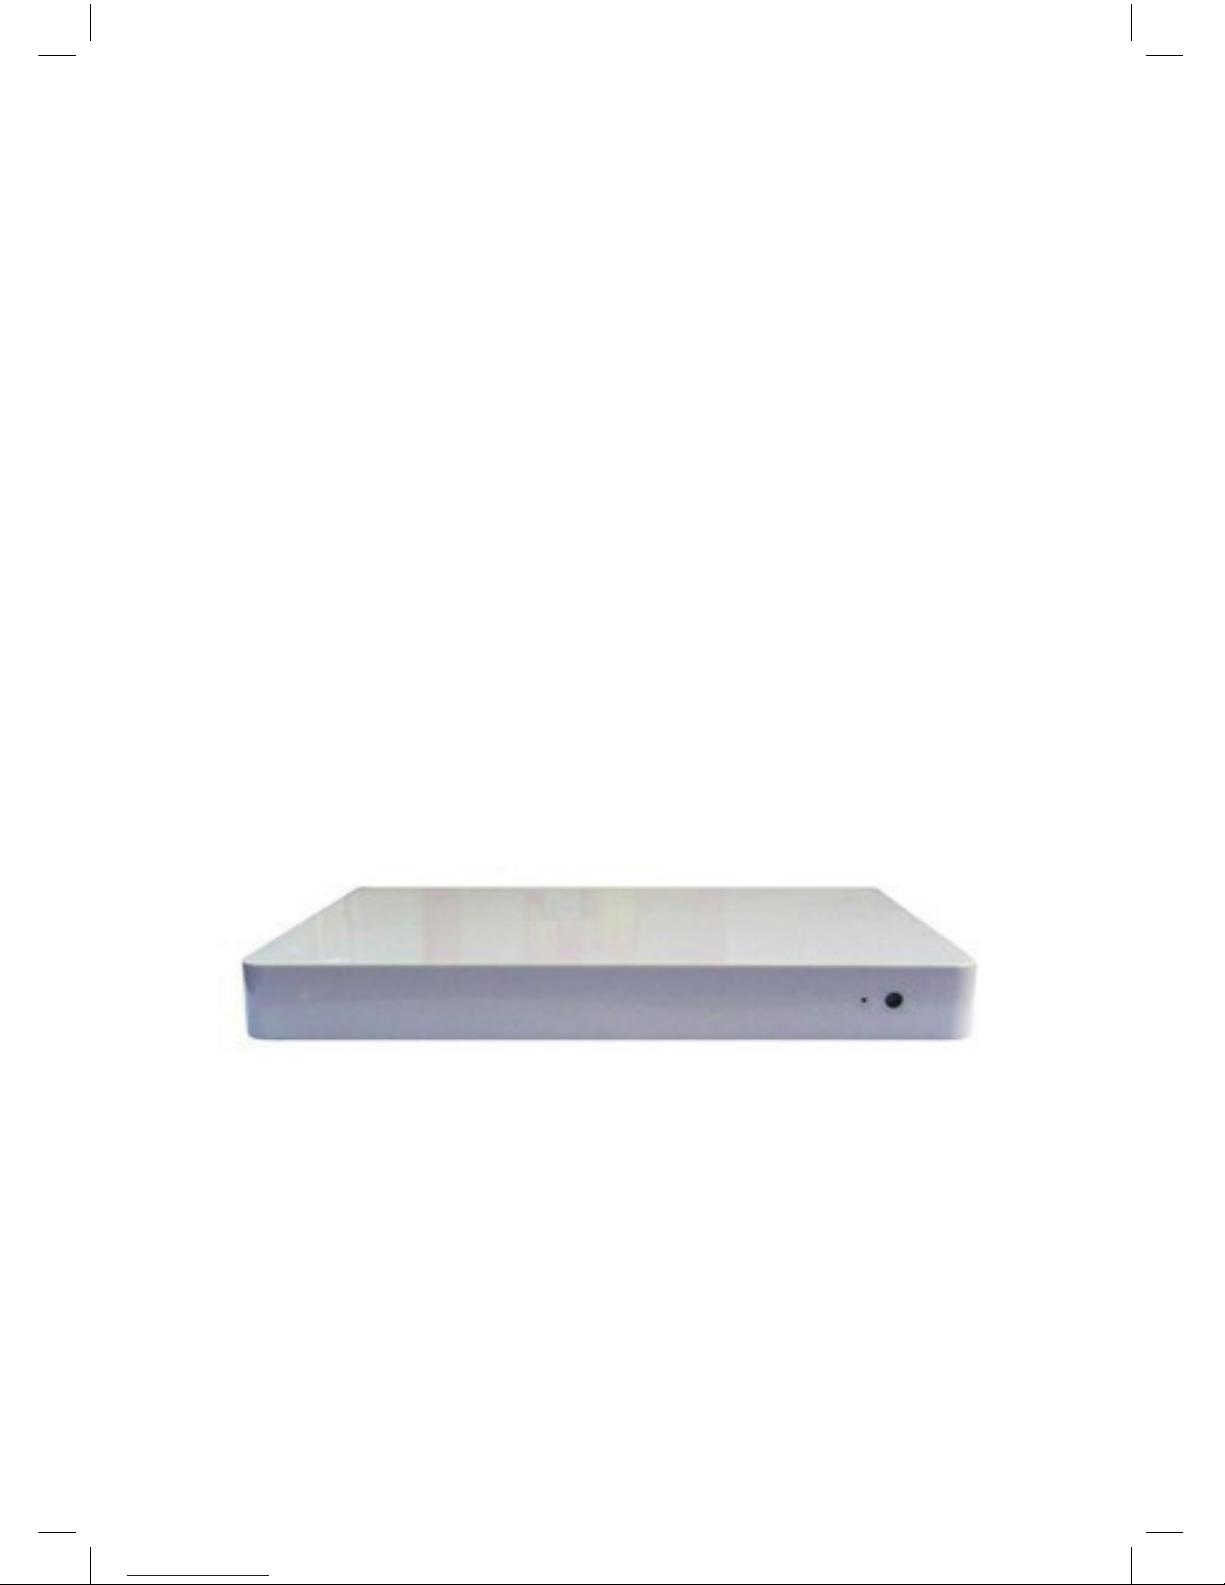
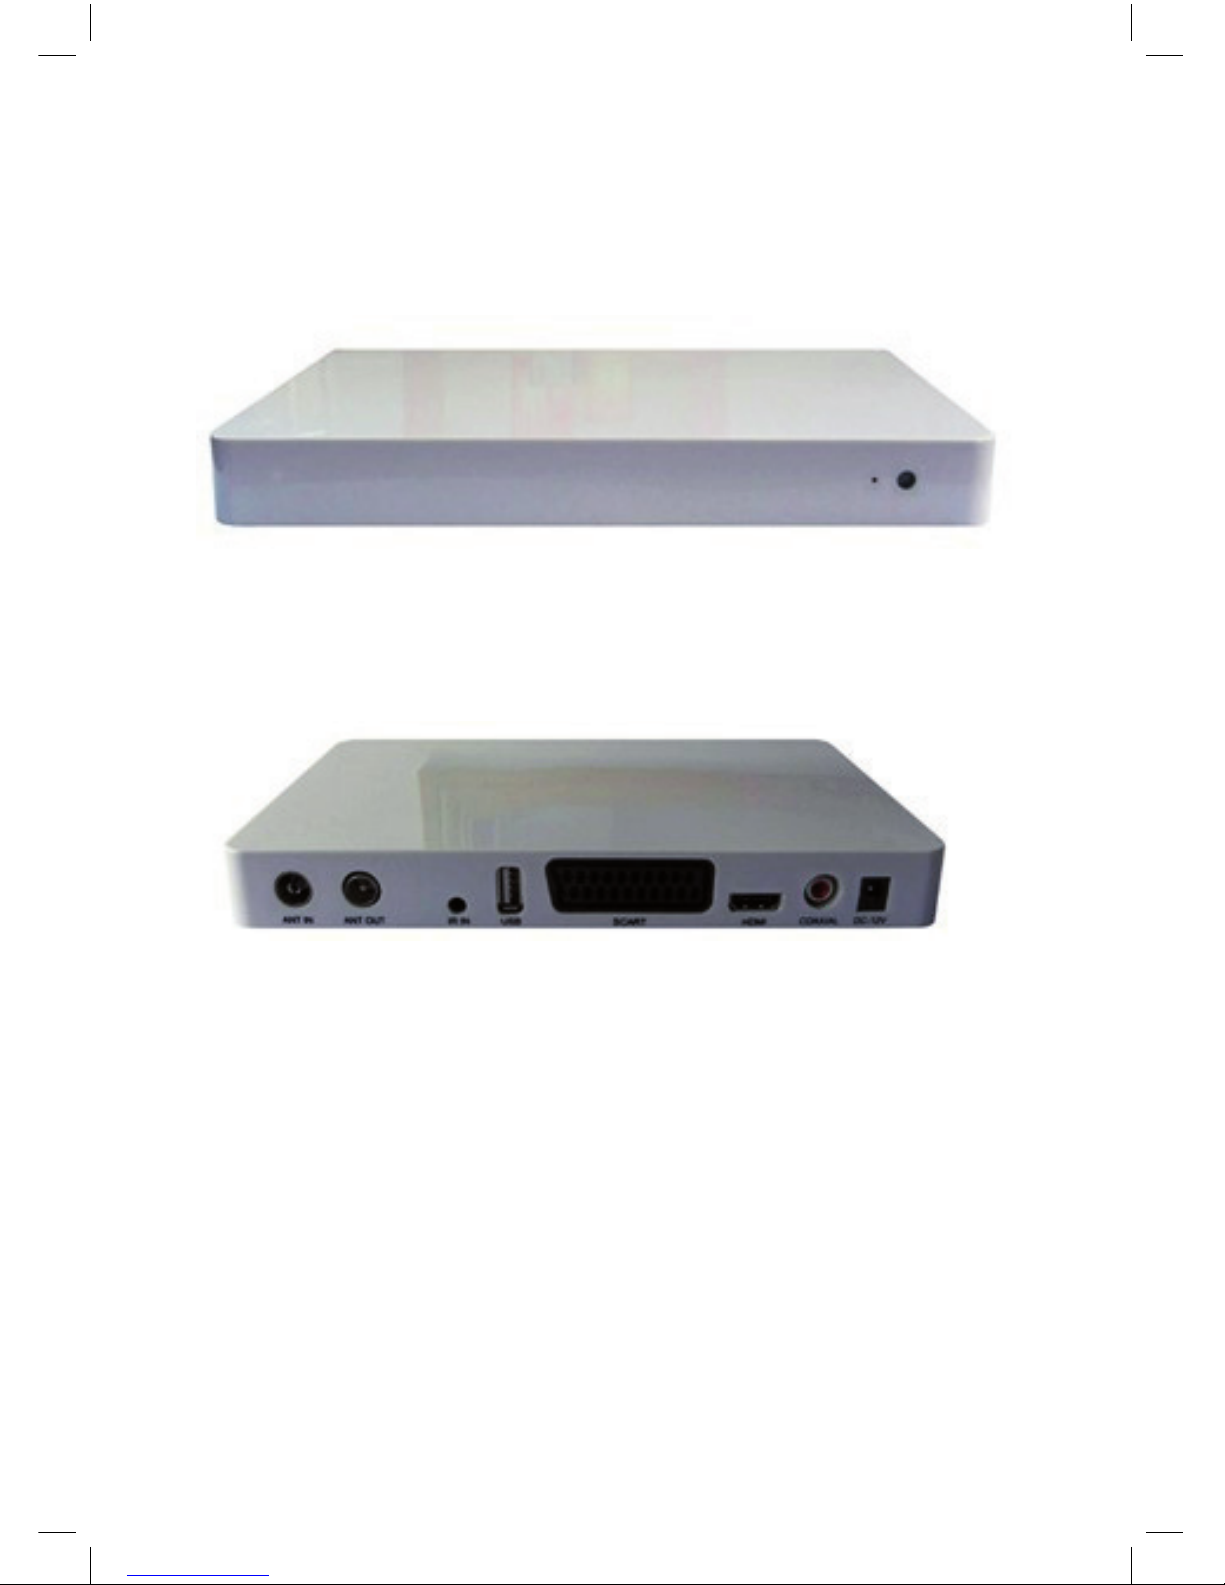
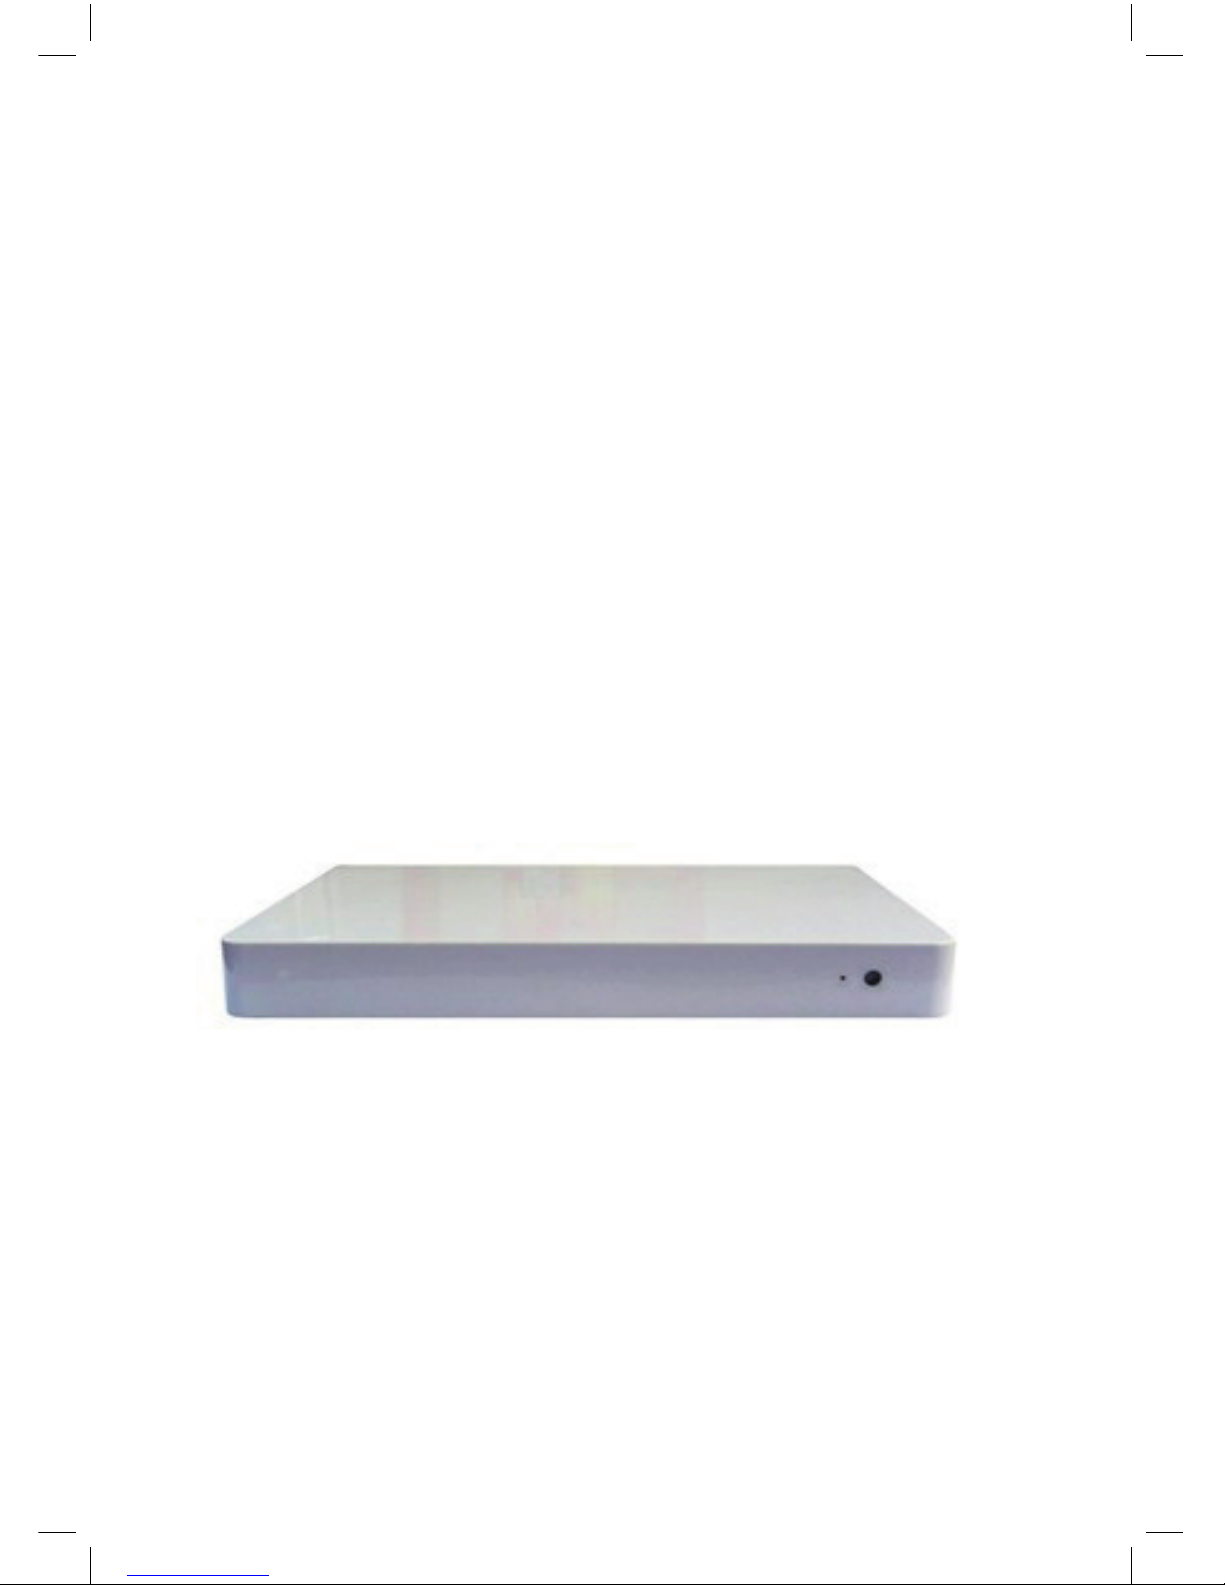
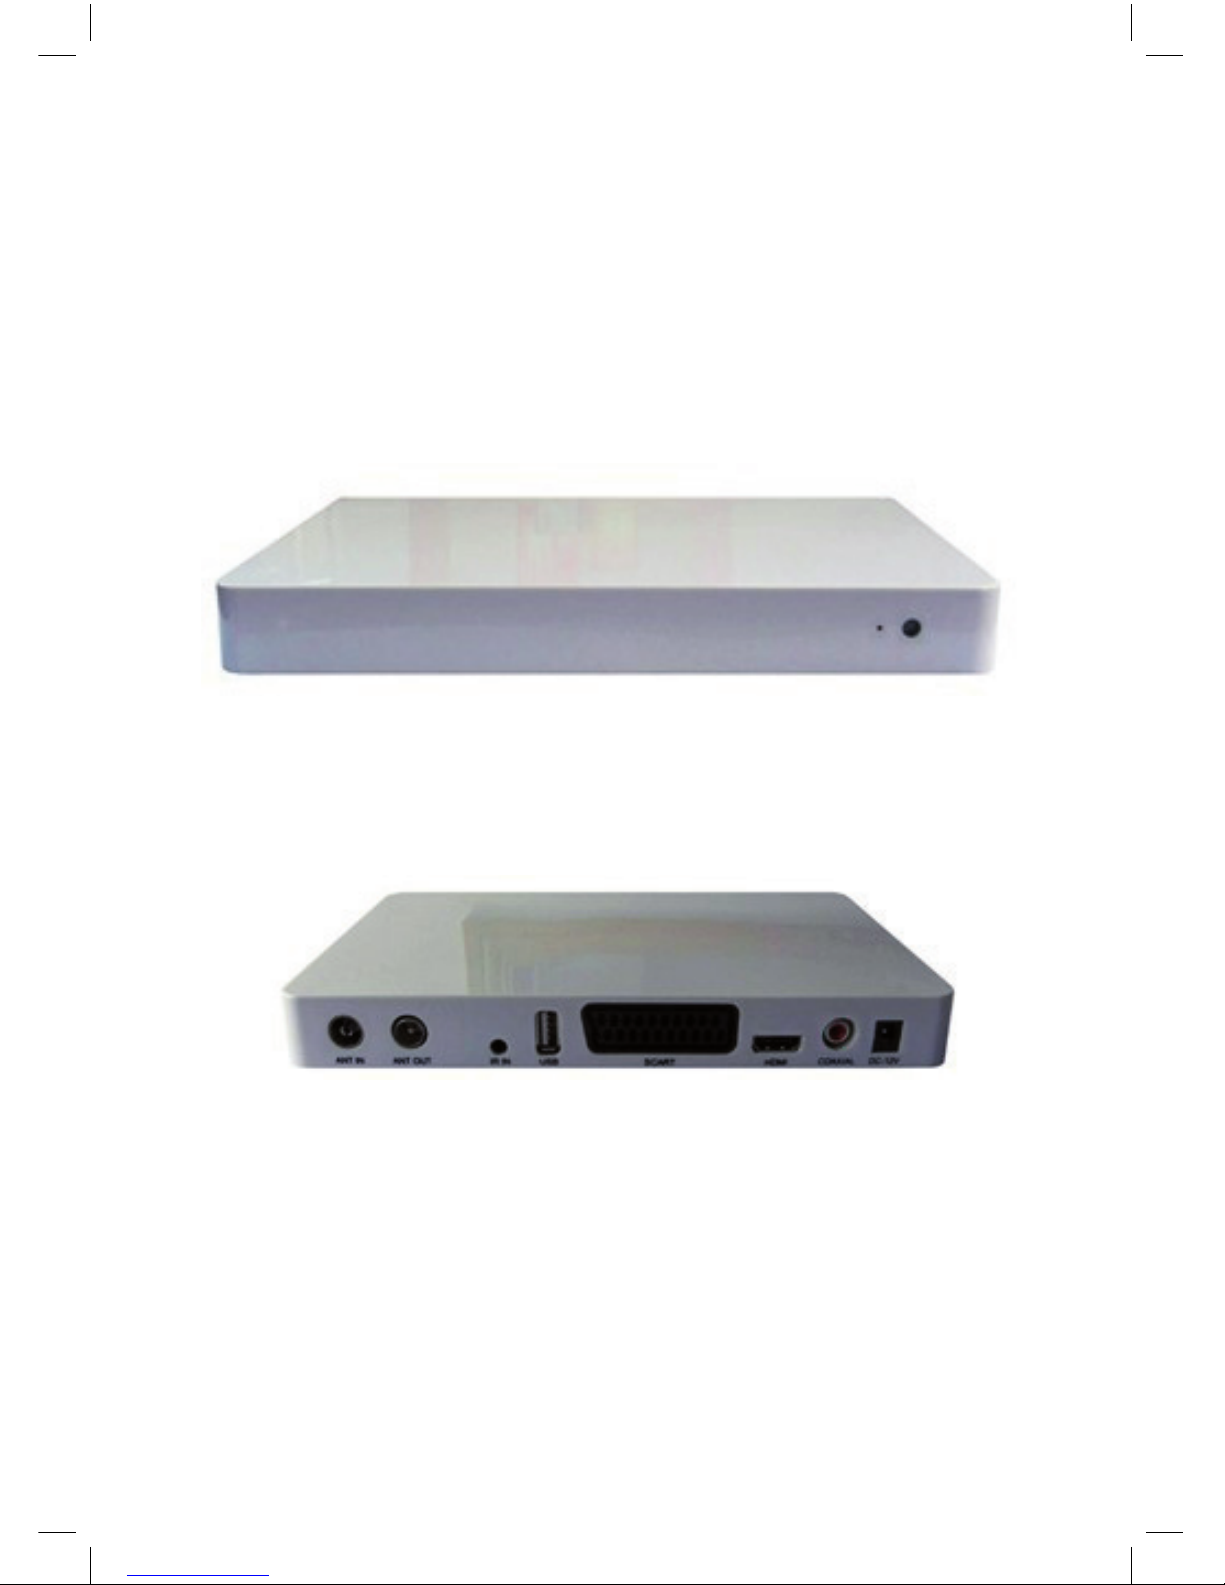
FRONT AND REAR PANEL
Front panel Guide
Rear panel Guide:
1. ANT OUT: This socket will bypass the RF signal to either your TV
or another video system.
2. ANT IN: This socket connects to your external Antenna.
3. TV SCART: This socket connects to your TV
4. HDMI: High definition audio and video output used to connect to
a HDMI device
5. USB: for multimedia play or update
6
REMOTE CONTROL
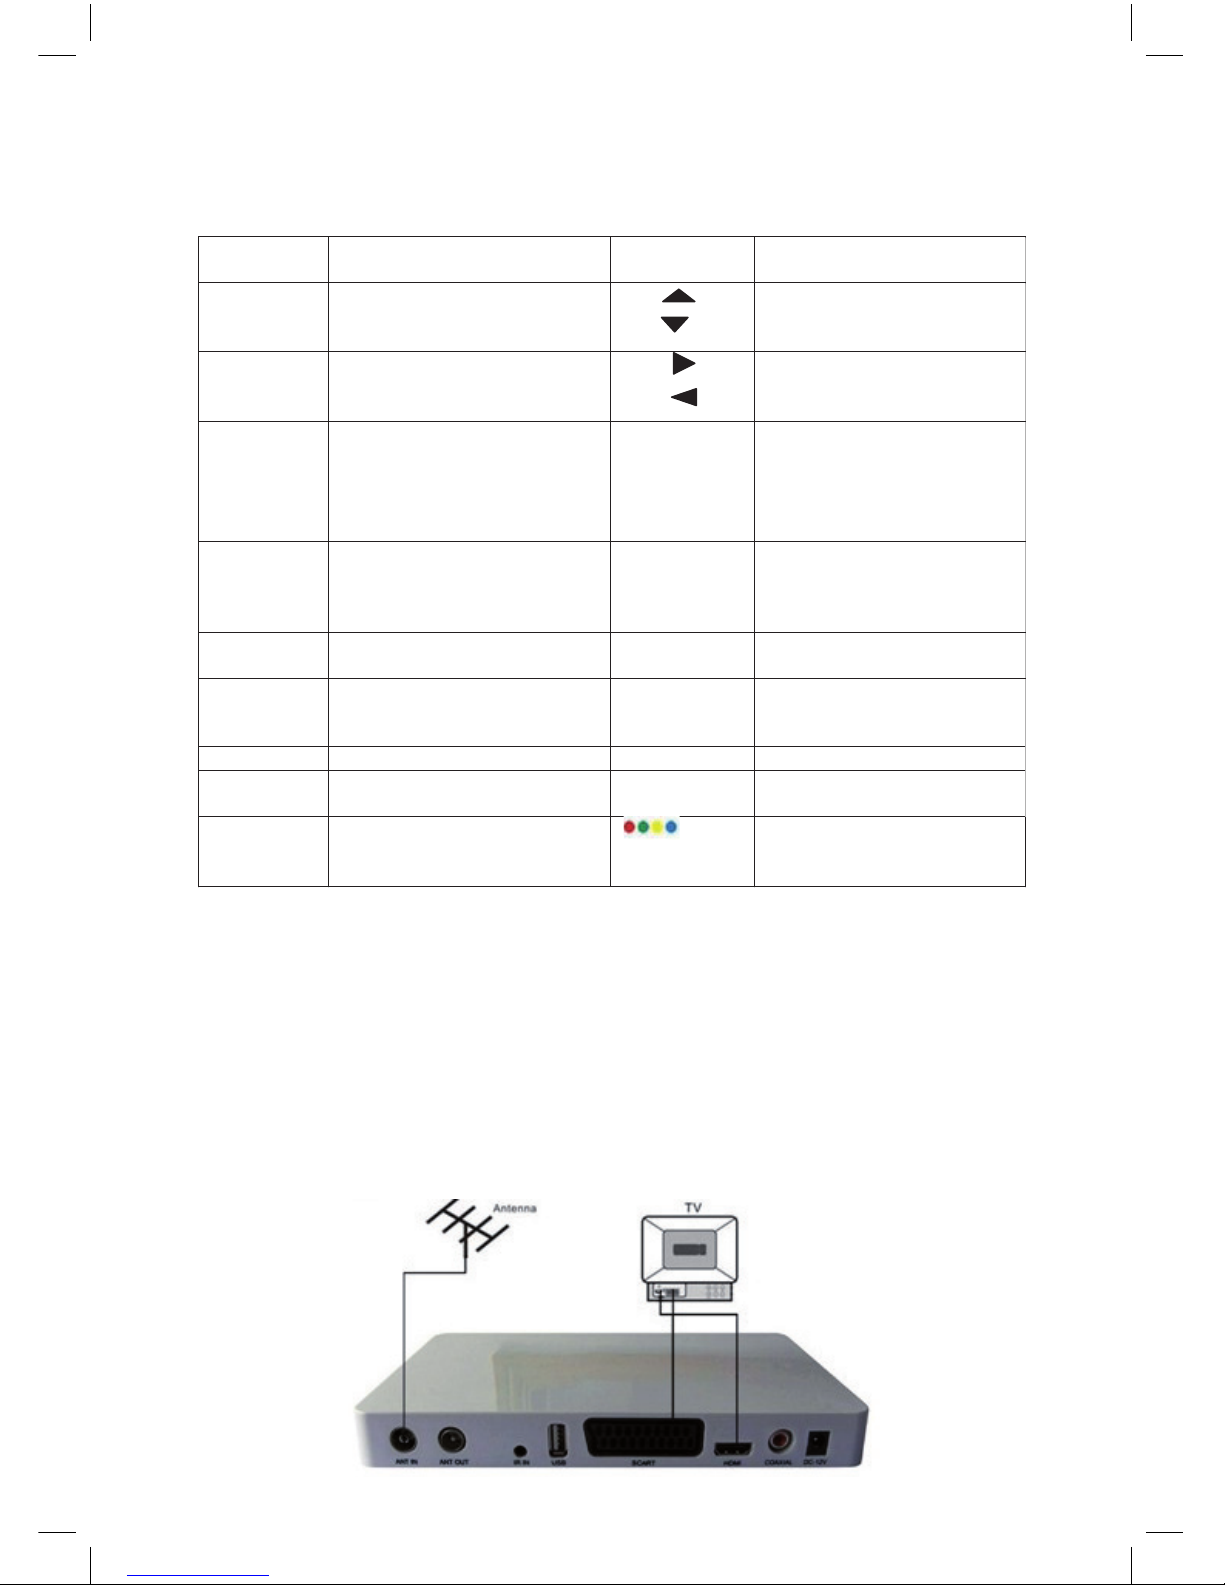
CONNECTING TO TELEVISION
For a basic connection between Cineo 300 and TV. Use the Composite
connection outlined bellow.
For a higher quality connection, use the Component Video connection
outlined below combined with the Composite Audio.
For the highest quality connection use a direct HDMI connection, see
below.
FUNCTION KEY FUNCTION
POWER Turn Receiver
ON or Standby
CH
CH
Navigates through the
Menus Selects the net or
previous Channel
OK Use for each step to enter VOL
VOL
Navigates through the
Menus Increases or
decreases Volume
0-9 Selects a channel or
Setting
PREV Skips to the previous track
During playing media and
Skips to the previous
channel during playing DTV
Language Select an language Next Skips to the next track durin
Playing,media and sking to
the next channel during
playing DTV
RETURN GO back to the previous
viewed channel
REC Press this key start to record
the program
Subtitle Display subtitle options
(availability depends on the
channel)
TV/RADIO Switches from TV function to
Radio function and from
Radio to TV
MENU Turns on Main Menu PLAY /pause Play or pause media play
EPG (Electronic program Guide)
Turns the program guide on
TXT View text information of
current service (if available)
EXIT Use this key to quit current
menu
Operate different function in
TEXT screen
7
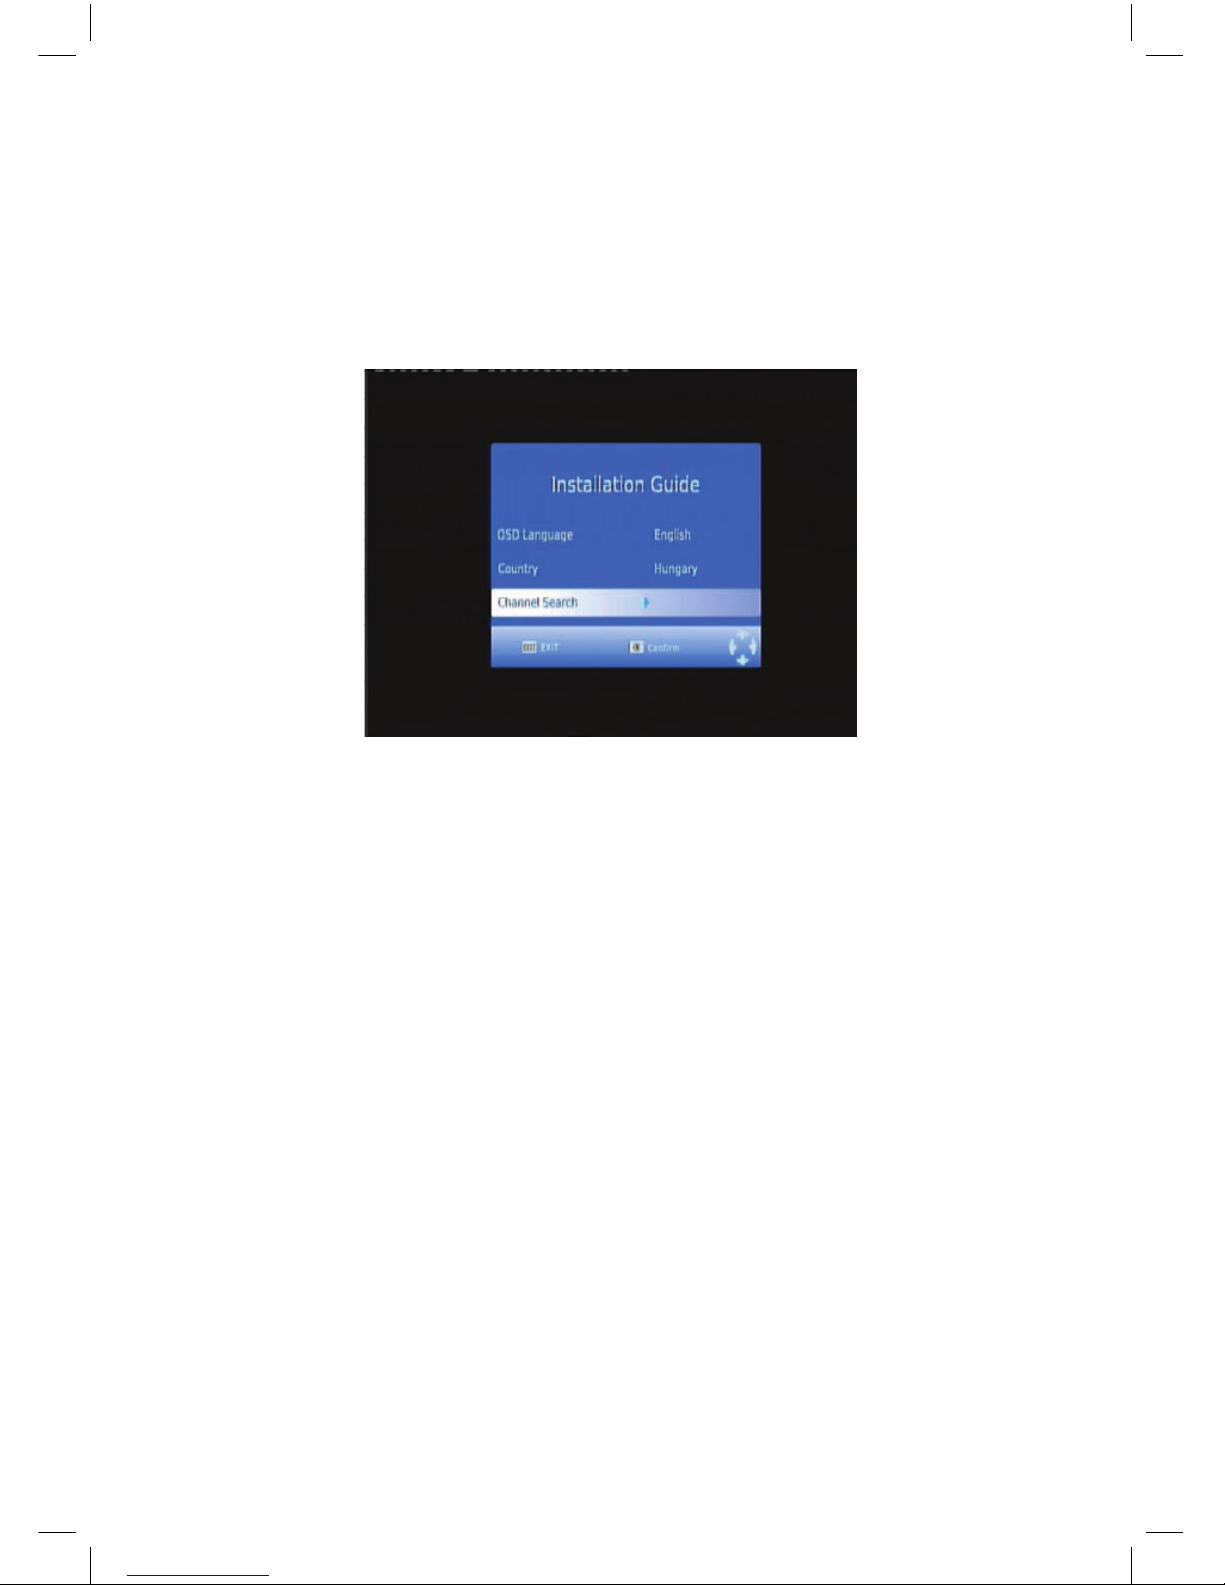
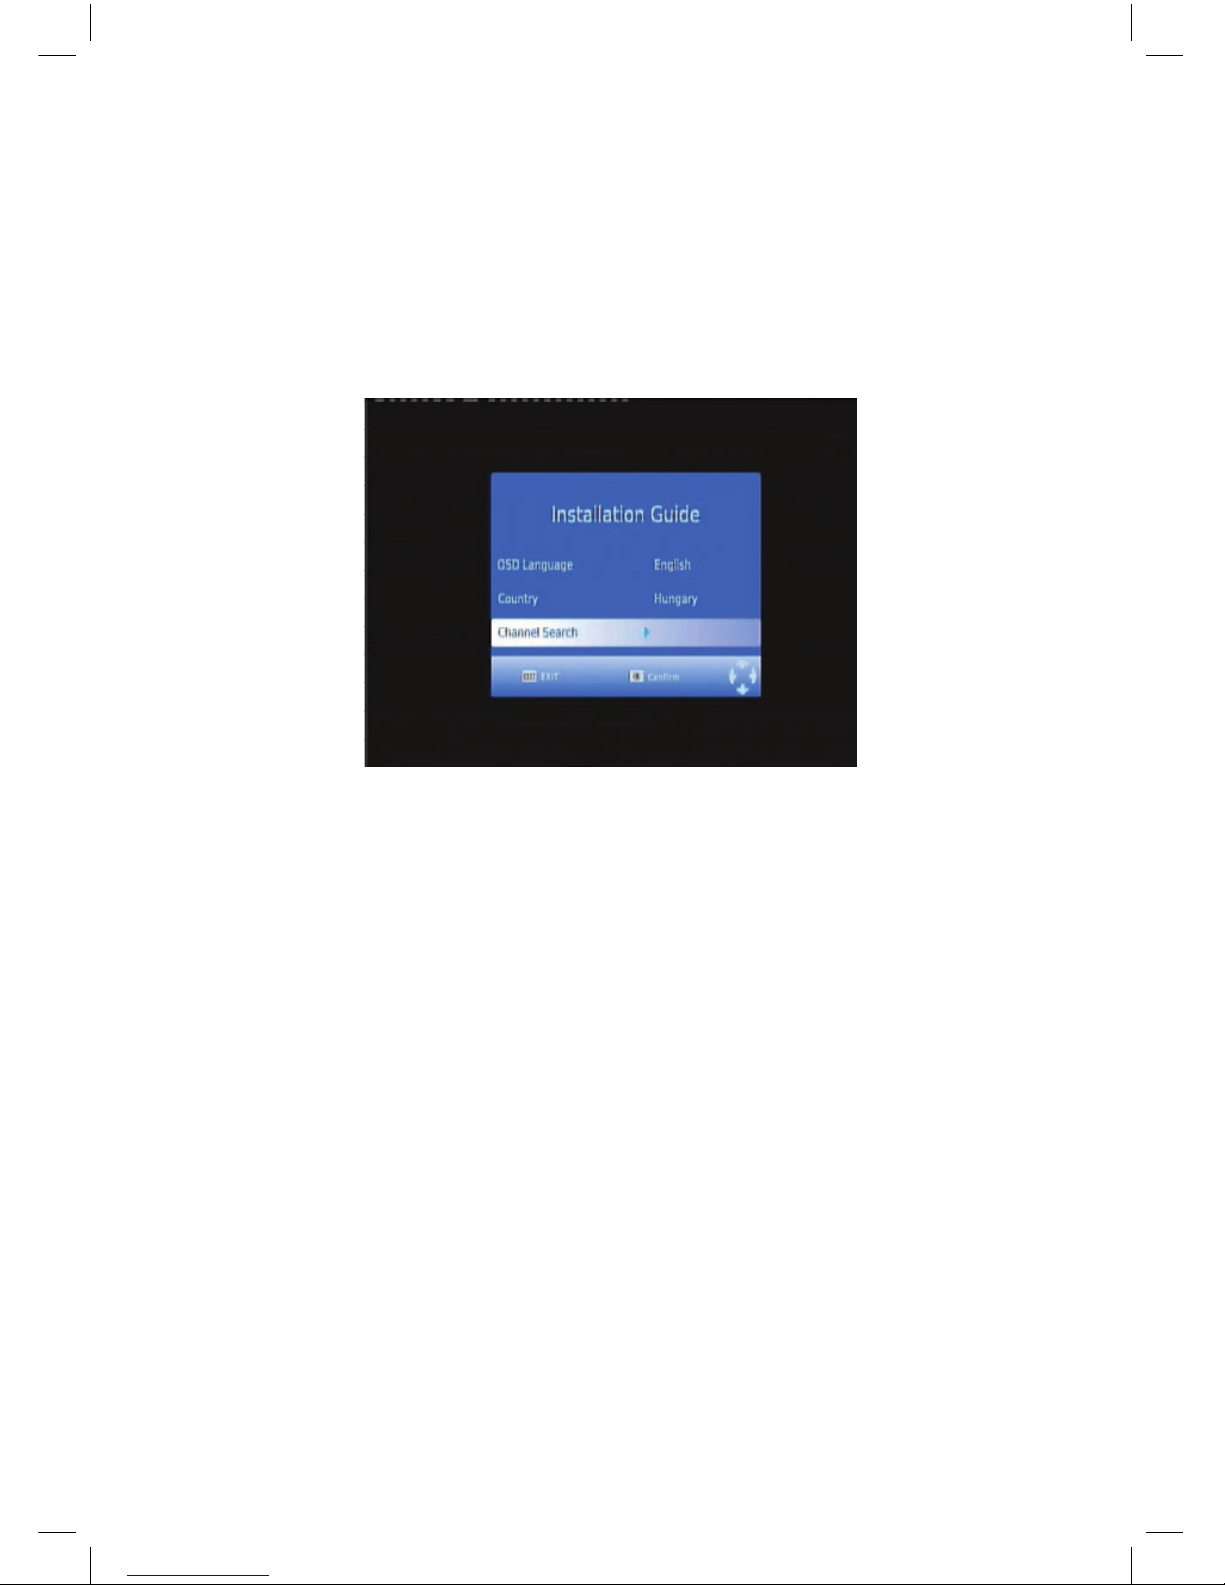
FIRST TIME INSTALLATION
After all connections have been made properly. Switch on TV and make sure
the receiver is connected to the Main Power. If you are using the receiver for
the time or restored to Factory Default..the Main Menu will appear on your
TV screen.
1. Select[OSD Language] and press RIGHT/LEFT key to select an
language.
2. Select[Country]and press RIGHT/LEFT key to select your country of
residence.
3. Select[Channel Search] and press RIGHT or OK key to begin
Automatic channel search.
4. Once channel tuning is complete, you are now ready to watch TV

8
BASIC OPERATION
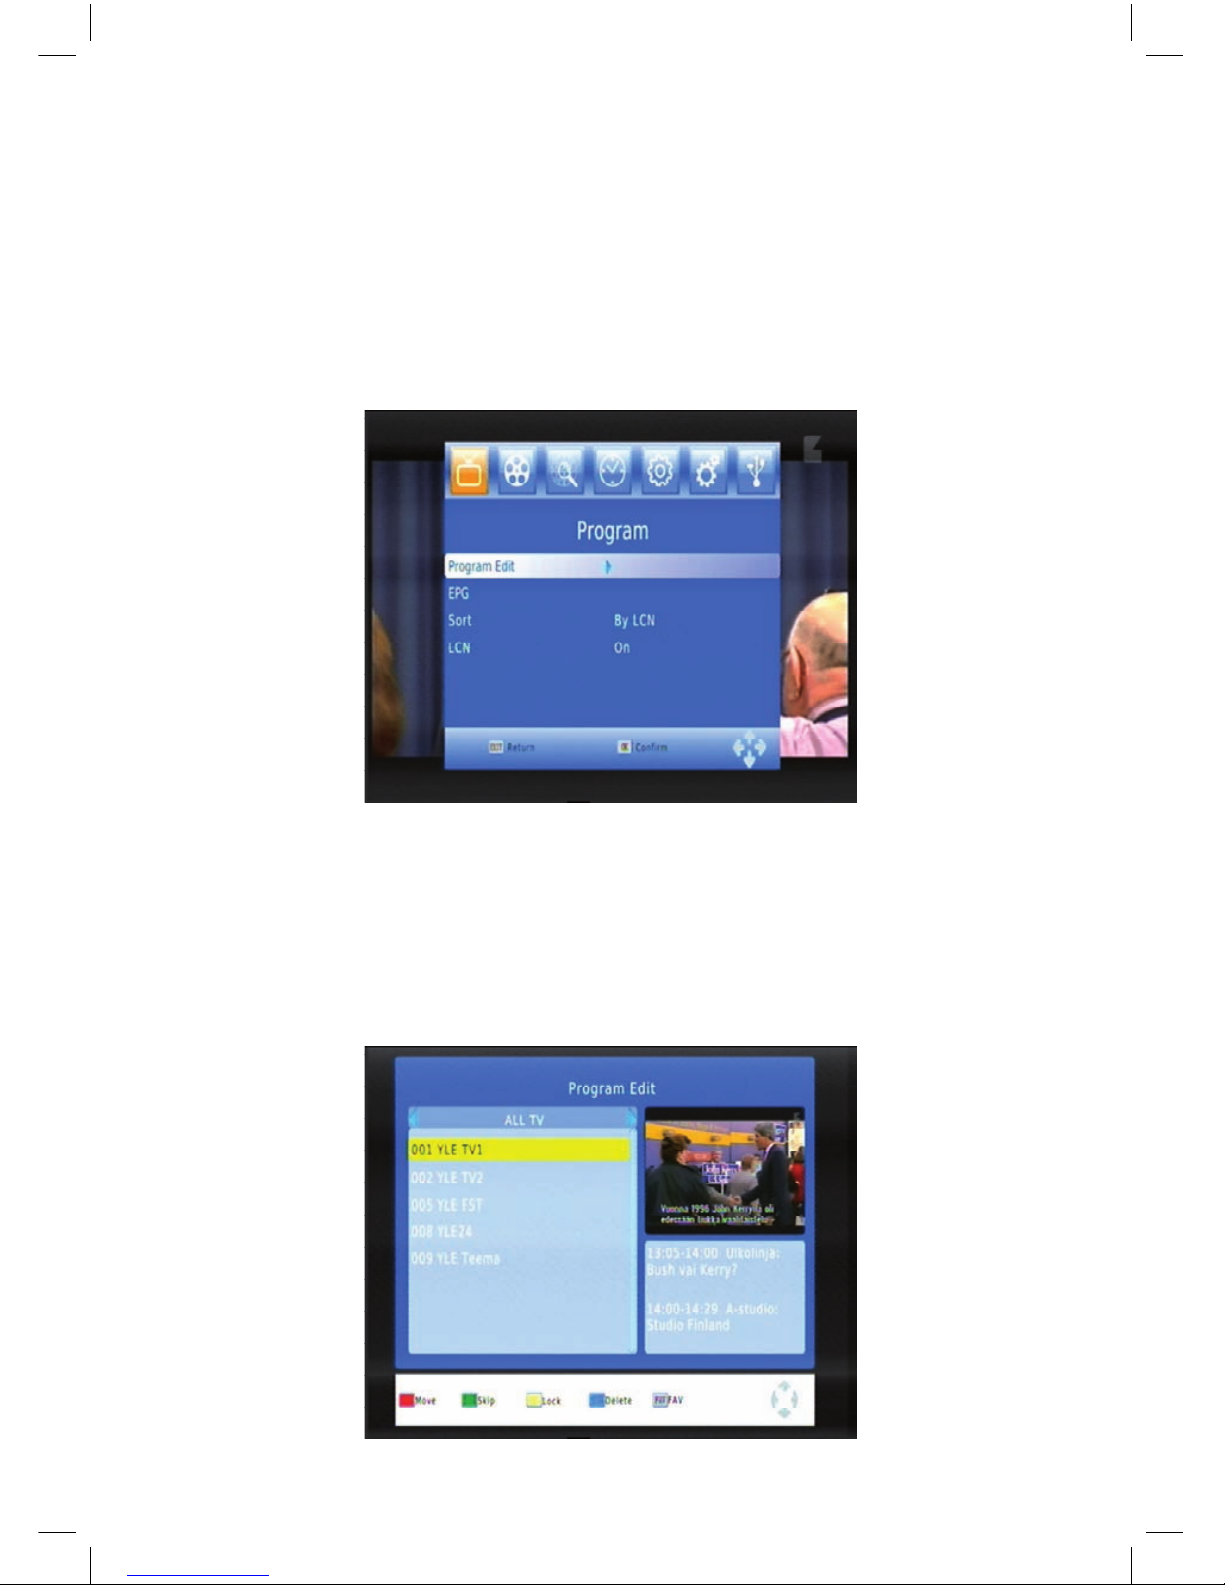
1. PROGRAM MANAGE SETTINGS
To access the Menu, press the MENU button and select[Program].The Menu
provides options to adjust the Program Manage settings. Select an option
and press OK or RIGHT to adjust that setting. Press the EXIT button to exit
the Menu.
2. PROGRAM EDIT
To edit your program preferences (lock, skip, favorite, move or delete), you
will need to enter the Program Edit Menu. This Menu requires a password to
access. Enter the default password’000000’.

9
2.1 Set Favorite program
You can create a shortlist of favorite programs that you can easy access.
Set Favorite TV or Radio program:
(1).Select the preferred program then press the FAVORITE button.
A heart-shaped symbol will appear and the program is marked as a
favurite.
(2).Repeat the previous step to select more Favorite programs.
(3).To confirm and exit the Menu, press the EXIT key Disable favorite TV
or Radio program: Press the FAVOURITE button on the Remote Control with
the heart-shaped symbol.
2.2 View Favorite Program
(1) .Press the Favorite button and the Favorite Menu will appear.
(2) .press UP/DOWN to select your Favorite programs.
(3) .press OK to select your favorite program
2.3 Delete a TV radio program
(1).Select the program and then press the BLUE button. Message will
appear. Press OK to delete the program.
(2).Repeat the previous step to select more programs to delete.
2.4 Skip TV or Radio program
(1).Select the program you would like to skip and press the GREEN
button. A skip symbol is displayed. The program is marked as a skip.
(2).Repeat the previous step to select more programs.
(3).To confirm and exit the menu, press EXIT key.
Disable a skip TV or Radio Program:
Press the GREEN button on the skip program with the skip symbol.
2.5 Move a TV or Radio program
(1).Select the preferred program then press the RED button. A move
symbol will appear.
(2).press UP/DOWN to move the program.
(3).press OK to confirm.
(4).Repeat the above steps to move channels.
2.6 Lock program
You can lock selected programs for restricted view.
Lock a TV or Radio program
(1).Select the preferred program then press the YELLOW button. A lockshaped symbol is displayed. The program is now marked as locked
(2).Repeat the previous step to select more programs

10
(3).To confirm and exit the menu, press the EXIT button
(4).press the YELLOW button to disable the locked program
(5).To view the locked program, you will be require to enter the default
password ’000000’ or your last set password.
3.EPG(ELECTRONIC PROGRAM GUIDE)
The EPG is an on-screen TV guide that shows scheduled programs seven
days in advance for every tuned channel. Press the EPG button on the
Remote control to access guide. You can use the UP/DOWN key to select
the preferred program. If there is more than one page of information, use the
BLUE button for page up and YELLOW button for page down.
4.SORT
Sort your channels from the flowing options
LCN-Sort the channels in ascending order
Name-Sort the channels in alphabetical order
Service ID-Sort the channels according to the station
5.LCN (LOGICAL CHANNEL NUMBER)
Set LCN on or off.
6.VIDEO SETTING
To access the Menu, press MENU then select[PICTURE].The Menu provides
options to adjust the video settings. Press UP/DOWN to select an option and
press RIGHT/LEFT to adjust that setting. Press EXIT to exit the menu.
(1) Aspect Ratio
You must set the display format to either 4:3 Pascal,4:3 Letter box,16:9 Full
Screen or Auto to get the maximum display when watching TV.
(2)Resolution
If the video does not appear correctly, change the setting. This setting is to
match the most common setting for HDMI.
[480i]:for NTSC system TV
[480p]:for NTSC system TV.
[576i]:for PAL system TV
[576P]:for PAL system TV.
[720P]:for NTSC or PAL system TV.
[1080I]:for NTSC or PAL system TV.
(3) TV format
If the video does not appear correctly. You need to change the settings. This
should match the most common setting for TVs in your country.
[NTSC]:for NTSC system TV.
[PAL]:for AL system TV.
11
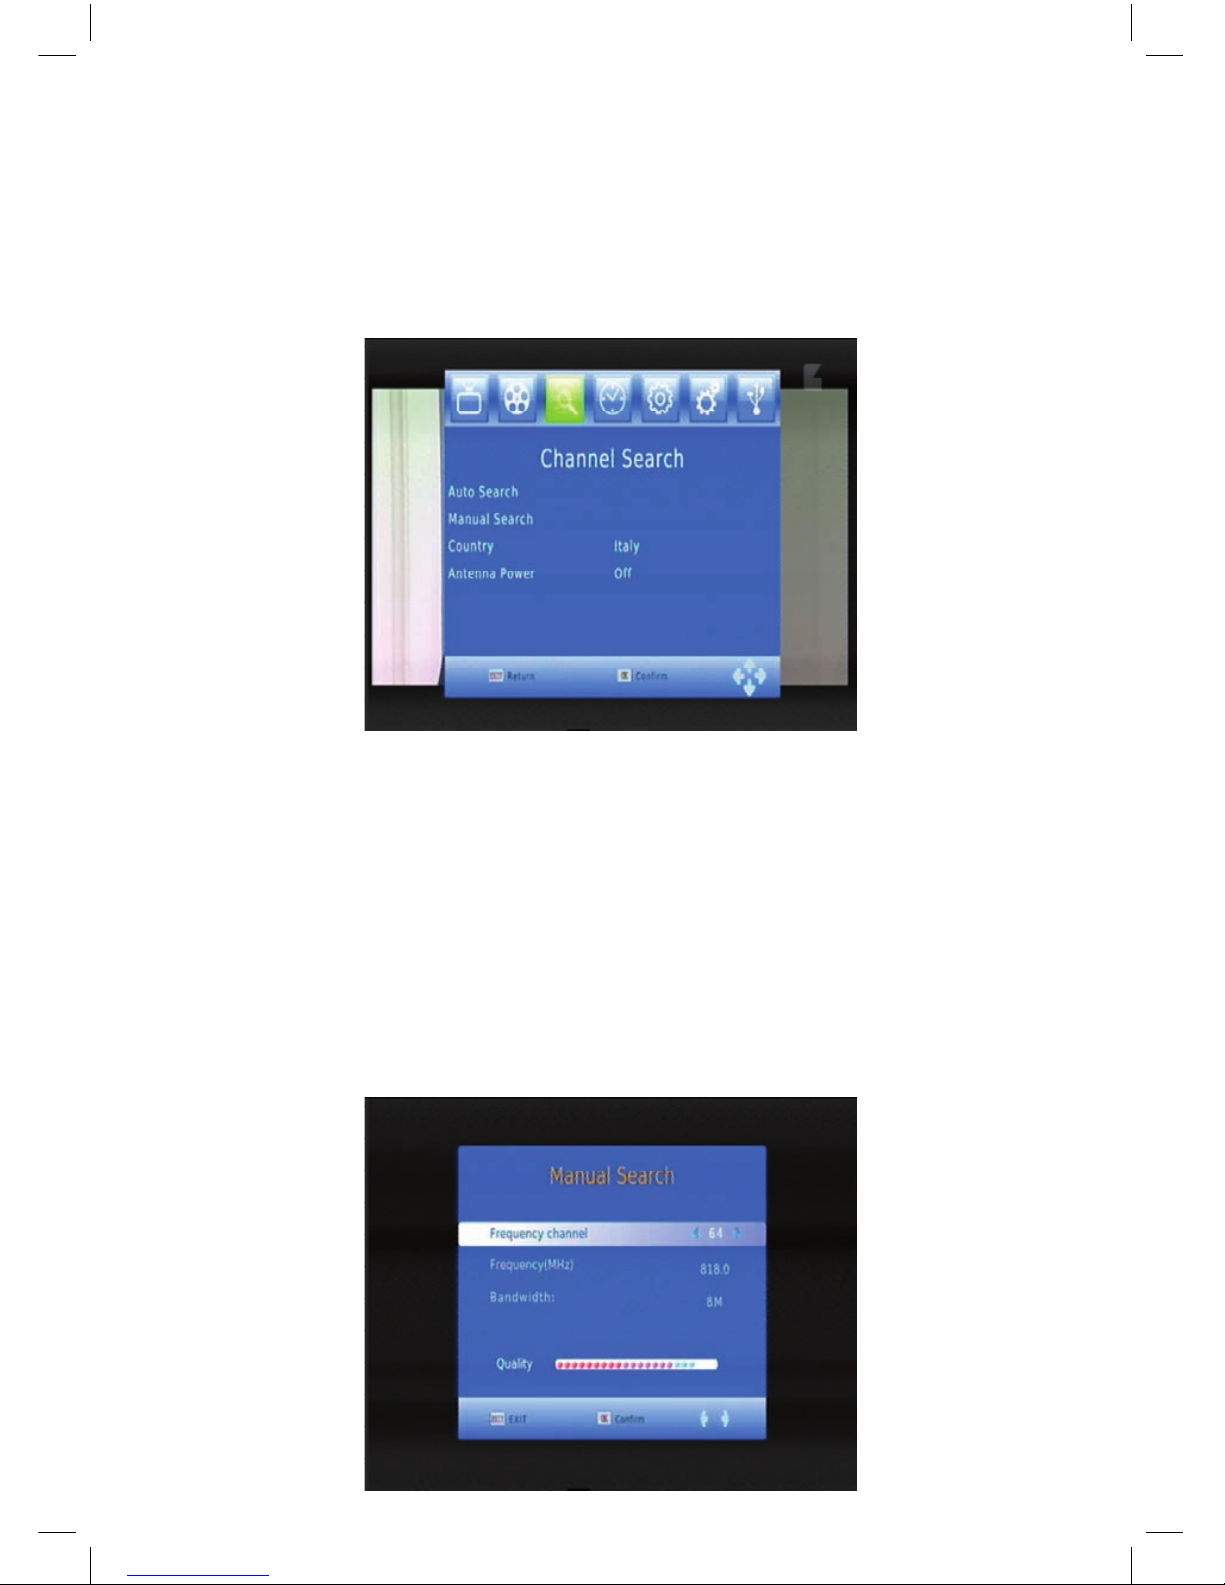
7.CHANNEL SEARCH
To access the menu, press MENU and select [Search Channel].
The Menu provides options to adjust the Search Channel settings.
Select an option and press RIGHT/LEFT to adjust the settings.
Press EXIT to exit the menu.
7.1 Auto Search
Search and install all channels automatically. This option overwrites all
preset channels.
(1).Select[Auto Search] and press OK or RIGHT to start channel search
(2).To cancel channel search, press EXIT.
7.2 Manual Search
Install new channels manually. This option adds new channels without
changing the current channels list.
(1).Select [Manual Search] then press OK or RIGHT. The channel search
screen will appear.
12
(2) Press the RIGHT/LEFT key to select the channel frequency.
(3) Press OK to start searching channels.
If a channel is found,it is saved and added to the channels list.
If channels can’t be found, then exit the menu.
(3) Country
Select your country of residence.
(4) Antenna power
Enable Antenna power if an external active antenna is connected.
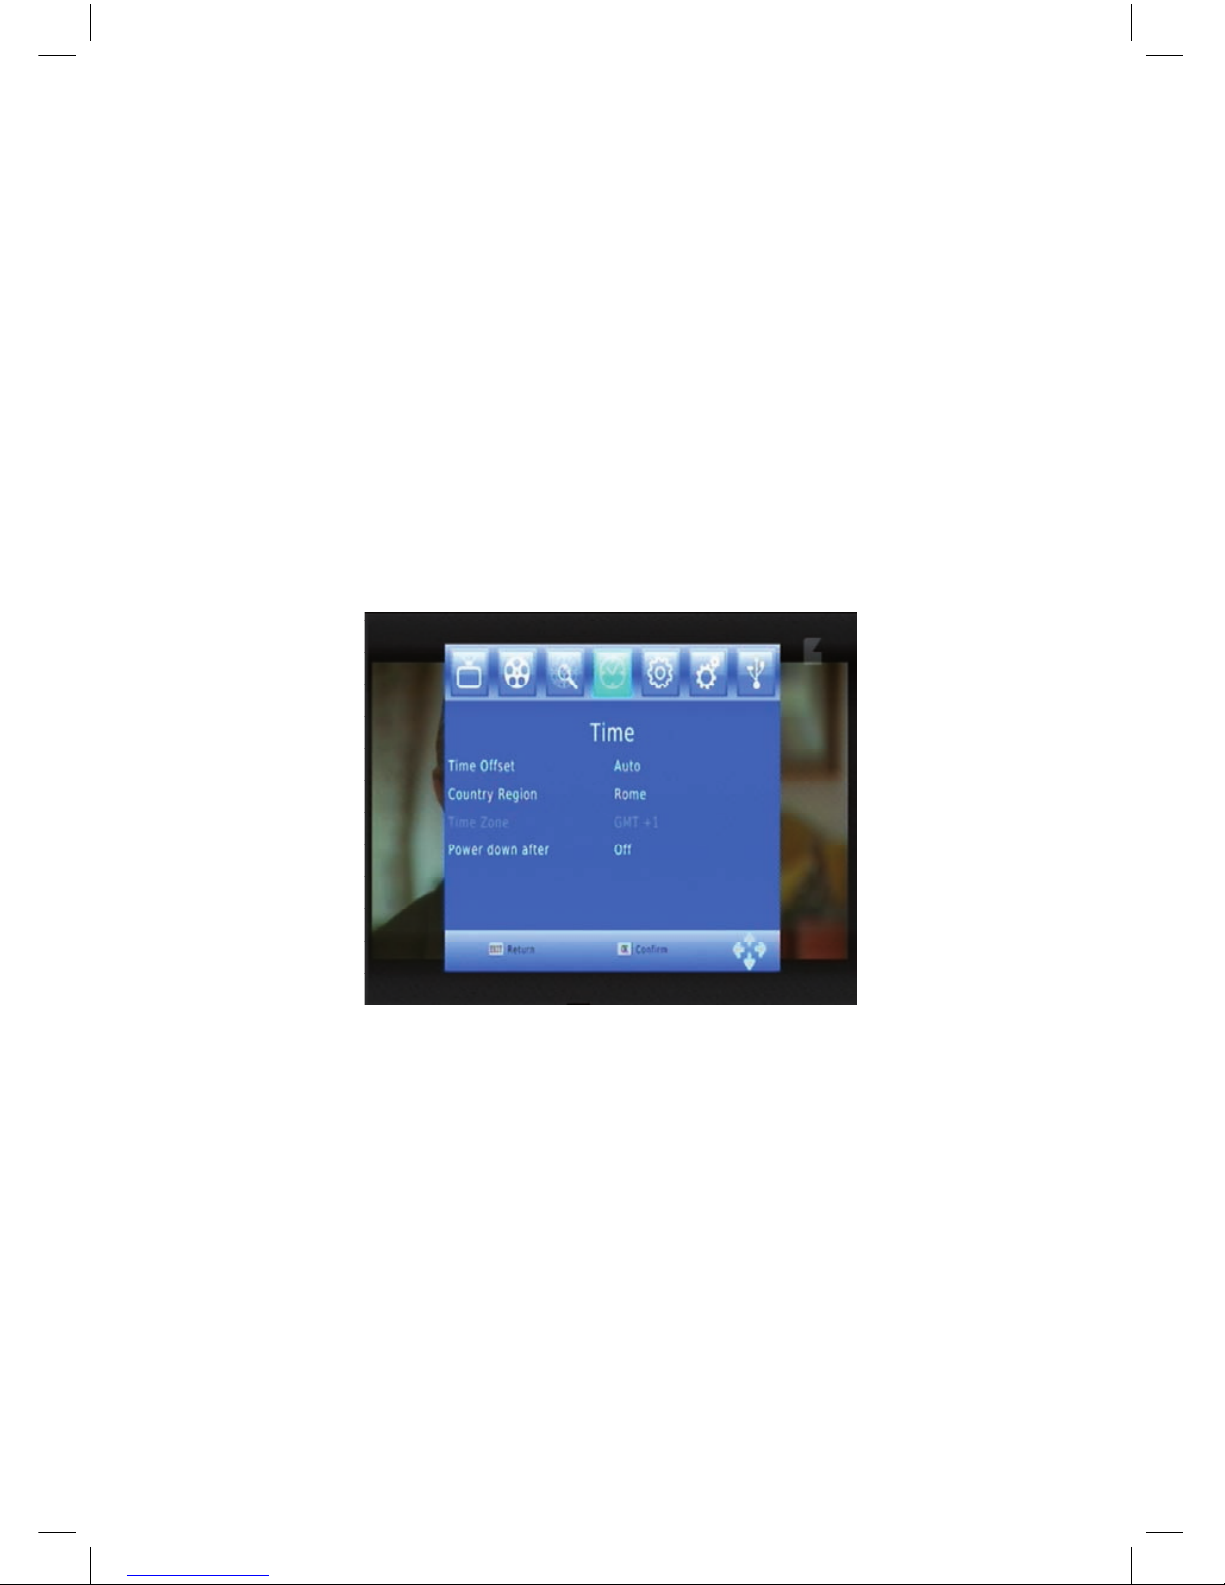
8.TIME SETTING
To access the Menu, press MENU then select[time].The Menu provides
options to adjust the time settings.
Press UP/DOWN to select an option and press RlGHT/LEFT to adjust the
setting .Press EXIT to exit the menu.
(1) Time offset
Select auto or manual for GMT offset adjustments.
(2) Country Region
Select the Country Region when [Time Offset] is set to Auto.
(3) Time Zone
Select the Time Zone Offset when[Time Offset] is set to Manual.
(4) Sleep
If this setting is off, this function does not work. If this setting is not off a
message will pop up after your preferred time to inform you, that the device
will go in to sleep mode.
This message will appear under no any operation. Auto-off function can be
set in a time period at 0-12 hours. Standard setting is 3 hours.
Press STANDBY button to exit sleep/ auto-off mode.
13
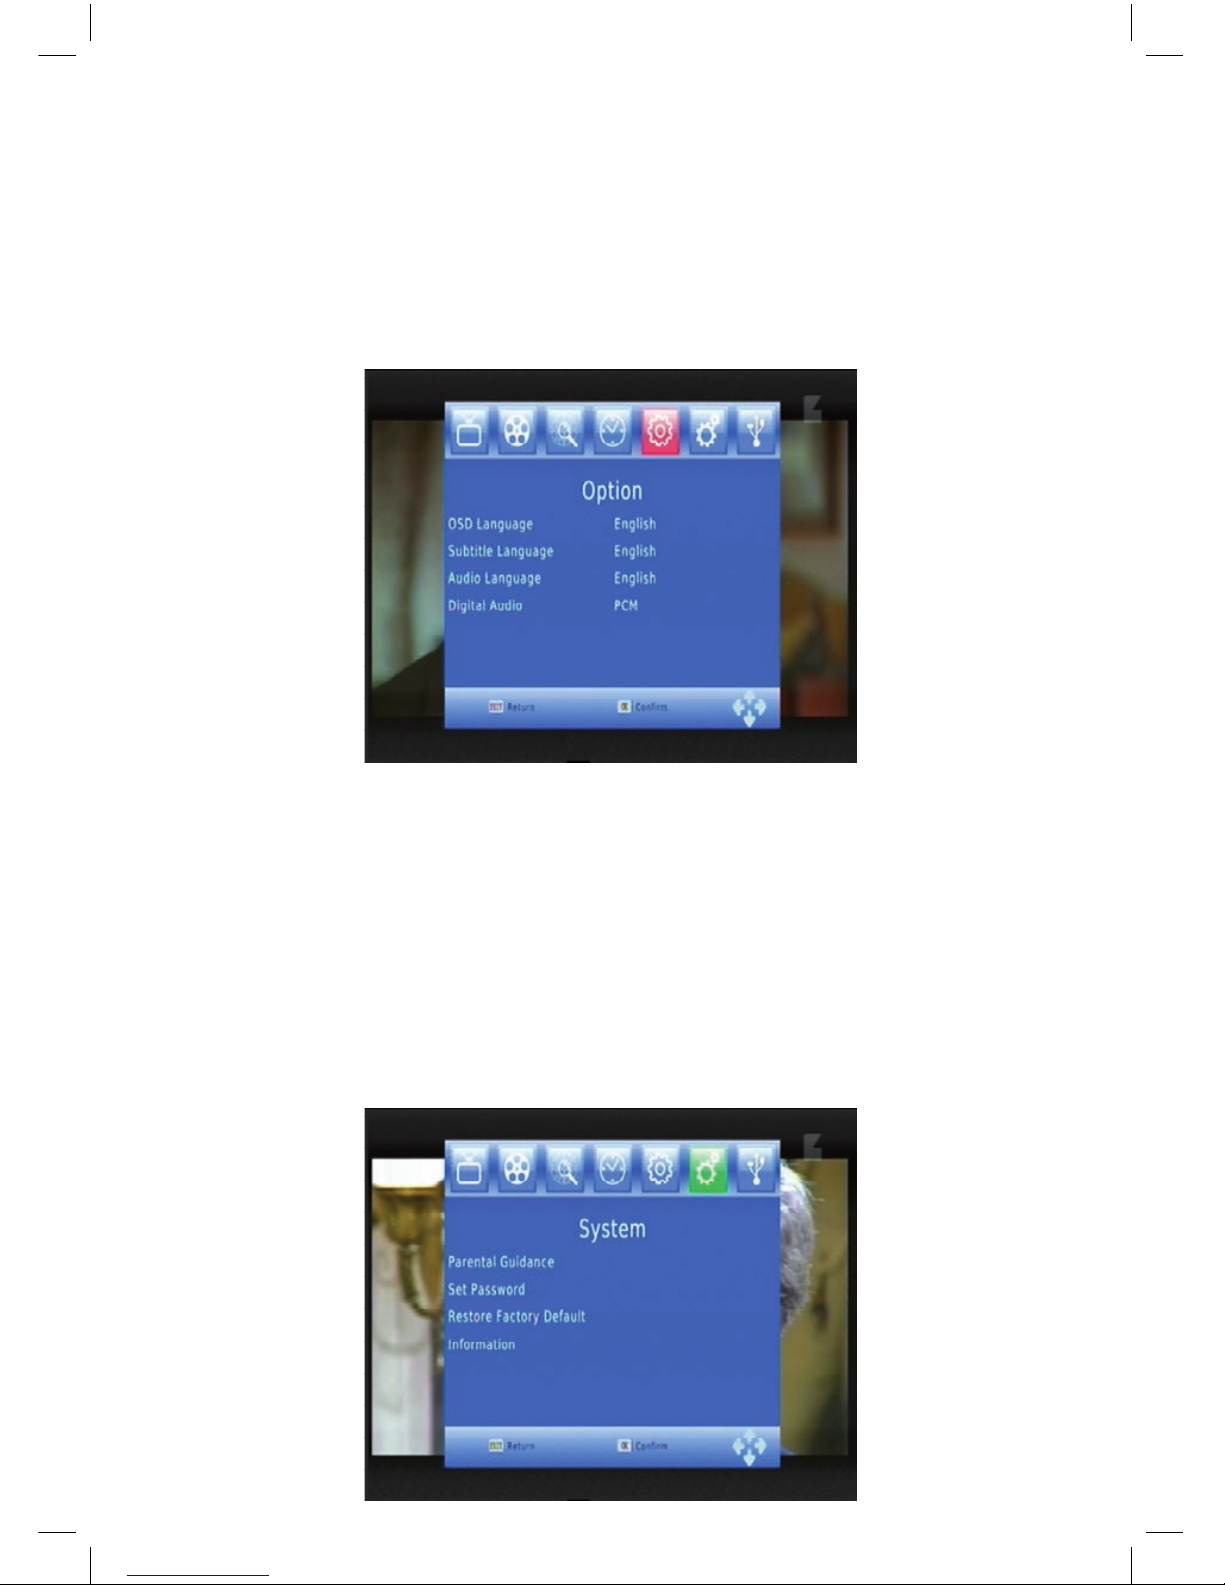
9. OPTION
To access the menu, press MENU and select[Option].The menu provides
options to adjust the OSD Language, Subtitle Language and Audio
Language.
Select an option and press RlGHT/LEFT to adjust the setting.
Press EXIT to exit the Menu.
(1).OSD Language Select OSD language
(2).Audio Language
Select the preferred audio language for watching TV channels.
If the language is not available, the default program language will used
(3).Subtitle Language: Select the preferred subtitle language.
(4).Digital Audio: Select digital audio output mode. Press EXIT to exit the
Menu.
10. SYSTEM SETTING

14
To access the Menu, press MENU and Select[System].The menu provides
options to adjust the system settings. Press the UP/DOWN key to select an
option and press RIGHT/LEFT to adjust the setting. Press EXIT to exit the
menu.
(1) Parental Guidance
You can restrict access to channels that are unsuitable
For children. To restrict/lock the channel you will need to enter either the
default password’000000’ or your own password.
(2) Set Password
Set or change the password for locked programs. Enter your old password
or the default password’000000’.You will then be asked to enter your new
password. Once it is confirmed, press EXIT to exit the Menu.
(3) Restore Factory Default
Reset your Set top Box to the Default Factory Settings.
In Main Menu select [Restore Factory Default] and press OK or RlGHT to
select. Enter your password or the default password’000000’ and press OK
to confirm. This option will delete all preset channels and settings.
(4) Information
View model, hardware and software information.
(5) Software update
If the status is set ’ON’, it will scan new software from broadcast according to
your preferred time in ’Start time’.
11. USB
To access the Menu, press the MENU button and select[USB].The menu
provides options to playback Music and Photo files, it can supp ort MP3,
WMA,JPEG,BMP files. The unit will only support USB device with FAT and
FAT 32 file system. It will not support NTFS file system.

15
(1) Multimedia: if no USB device plug in, a warning message “NO USB
Device is Found” displays, otherwise you can select the Music or photo
type in this menu and press OK to enter the browser and select the file to
playback.
(2) Photo configure:
-Slide Time : adjust slide show interval to 1-8 seconds
-Slide Mode: adjust slide show effect as mode 0-59 or random
-Aspect Ratio: Keep displays the picture as its original aspect.
Discard displays the picture in full screen mode.
(3) Movie Configure (Aspect Ratio):
[keep]:play movie as its original aspect.
[Discard]: Play movie in full screen mode.
-Subtitle Specific:
[Small]:Displays the subtitle as small mode.
[Normal]:Displays the subtitle as normal mode.
[Big]: Displays the subtitle as big mode.
-Subtitle BG:
[White]: Displays the subtitle in white background.
[Transparent]: Displays the subtitle in transparent background.
[Grey]: Displays the subtitle in grey background.
[Yellowgreen]: Displays the subtitle in yellowgreen background.
-Subtitle Font Color:
[Red]: Displays Subtitle in red font. [Blue]: Displays Subtitle in blue font.
16
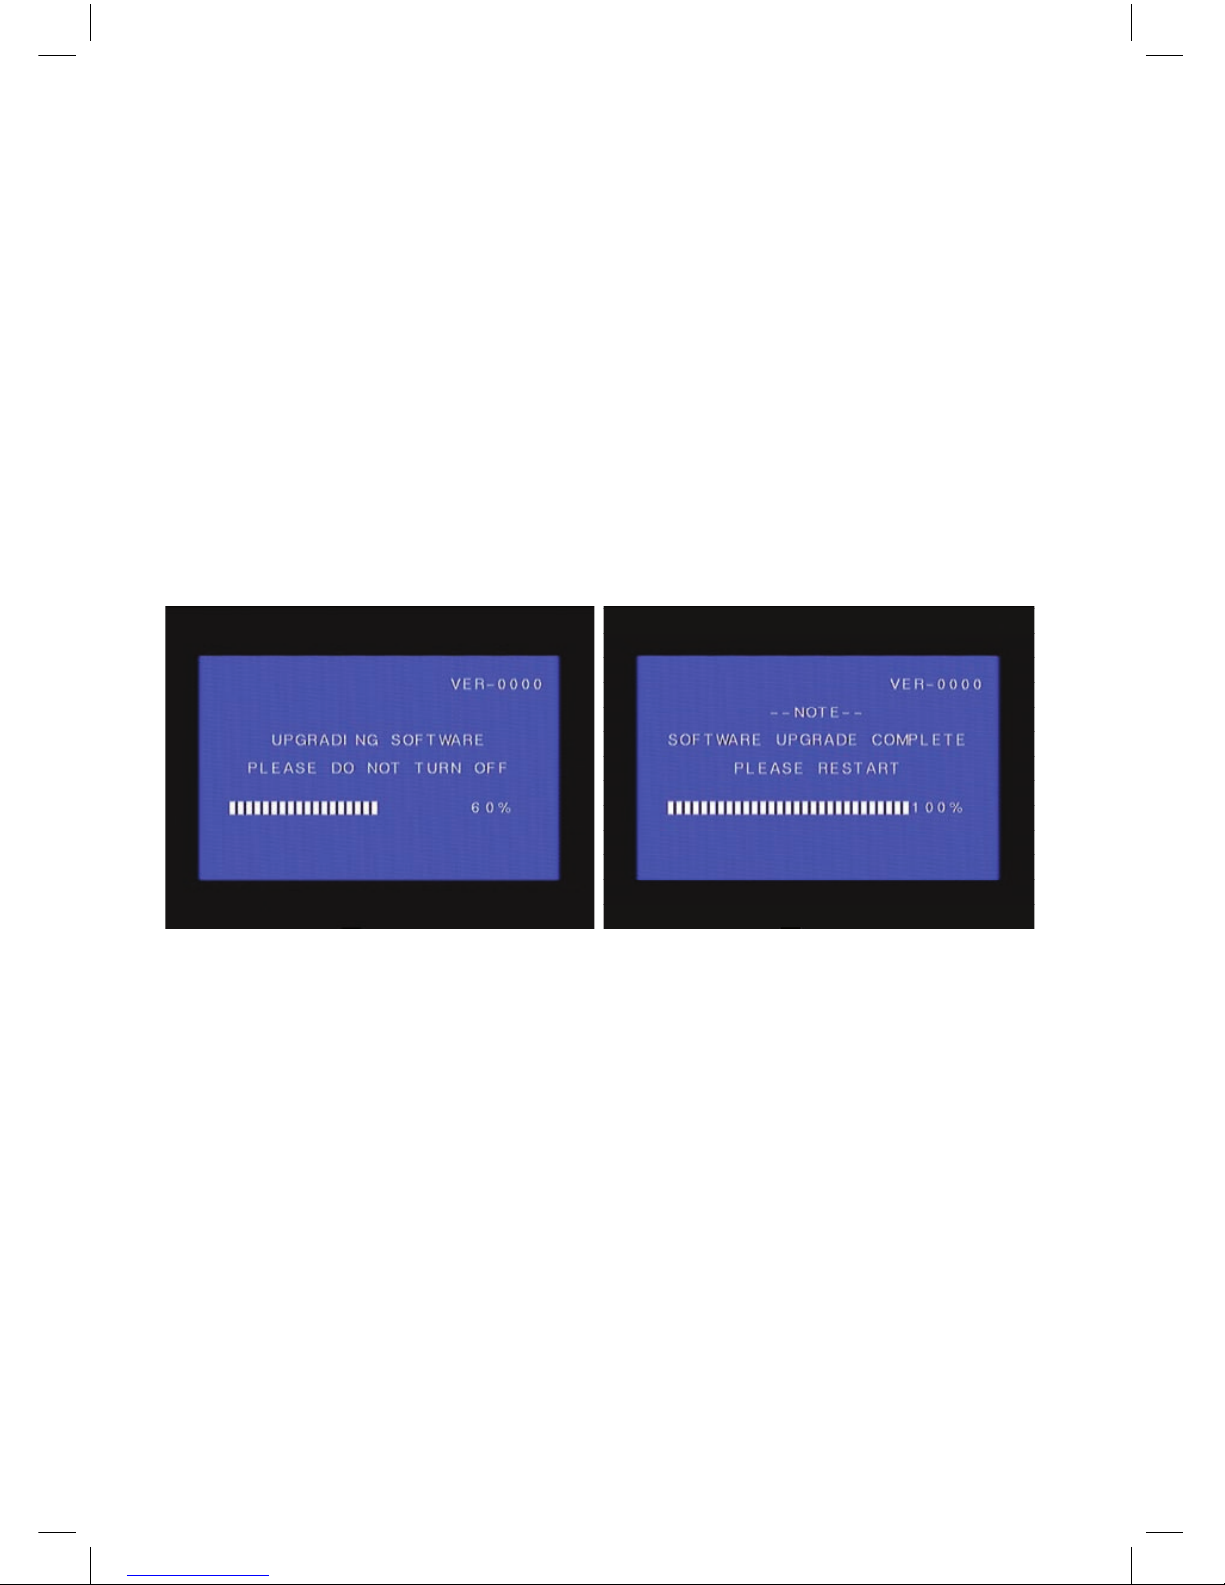
(4)UPDATE THE RECEIVER BY USB INTERFACE
1. Plug the USB drive that with the update file to the USB interface of the
receiver.
2. Go to main menu and press to start upgrade process. While the
upgrade progress showing 100% and update finish, remove the USB flash
drive and power on the receiver again.
3. Please set the receiver to the factory settings after reboot the
receiver.
NOTE: Please do not remove the USB drive from the receiver and power
off the receiver during upgrading process. Otherwise the receiver may
not work properly.
17
INSTRUKCJA OBSŁUGI
GoClever Cineo 300
HD H.264 DVB-T
CYFROWY ODBIORNIK TELEWIZJI
NAZIEMNEJ HD
HDMI

18

19
SPIS TREŚCI
Ważne instrukcje dotyczące bezpieczeństwa 20
Przedni i tylny panel 21
Pilot 22
Podłączenie do telewizora 22
Pierwsze uruchomienie 23
Podstawowe funkcje 24
1. Zarządzanie ustawieniami programów 24
2. Edycja programów 24
3. Elektroniczny przewodnik po programach (EPPP) 26
4.Sortowanie 26
5.LCN (Logical channel number) 26
6.Ustawienia wideo 26
7.Szukanie kanałów 27
8.Ustawienia czasu 28
9. Opcje 29
10. Ustawienia systemu 30
11. USB 31

20
Drogi kliencie,
Dziękujemy za zakup urządzenia GoClever Cineo. W panującej erze technologii cyfrowej, nasz produkt staje się wspaniałym towarzyszem podczas
rozrywki. Ciesz się darmową telewizją w jakości HD, oglądaj filmy, słuchaj
muzyki i przeglądaj własne zdjęcia z urządzenia USB.
Informacja: Wszystkie informacje zawarte w tej instrukcji zostały spraw-
dzone w chwili jej publikacji. Jednak ze względu na to, że nasi inżynierzy
często aktualizują i wzbogacają produkt, twój sprzęt może nieco się różnić
w wyglądzie lub działaniu
WAŻNE INSTRUKCJE DOTYCZĄCE BEZPIECZEŃSTWA
1) Przeczytaj te instrukcje.
2) Zachowaj je.
3) Przeczytaj wszystkie ostrzeżenia.
4) Stosuj się do każdej instrukcji
5) Nie używaj tego urządzenia w pobliżu wody.
6) Do czyszczenia urządzenia używaj tylko suchej szmatki.
7) Nie blokuj żadnych otworów wentylacyjnych, zamontuj zgodnie
z instrukcją.
8) Nie instaluj urządzenia w pobliżu źródeł wydzielających ciepło takich jak kaloryfer, grzejnik, piec lub inne urządzeń wydzielających ciepło(również wzmacniaczy)
9) Używaj tylko akcesoriów dostarczonych przez producenta .
10) Odłącz urządzenie podczas burzy lub podczas gdy nie będziesz
go używał przez dłuższy okres.
11) Wszelkie naprawy pozostaw specjalistom. Serwisowanie wymagane jest wówczas, gdy uszkodzone zostały elementy takie jak zasilacz, wtyczka lub gdy rozlana została ciecz lub niepożądane elementy
dostały się do urządzenia.
12) Główna wtyczka używana jest jako wyłącznik urządzenia.
13) Wentylacja nie powinna być zakrywana przez gazety, nakrycia
stołu, firany itp.
14) Należy zwrócić uwagę na ekologiczne aspekty utylizacji baterii.
UWAGA: Aby zredukować ryzyko porażenia prądem, nie narażaj urzą-
dzenia na kontakt z żadną cieczą
21
UWAGA: Baterie nie powinny mieć kontaktu z bezpośrednim nasłonecz-
nieniem lub ogniem.
PRZEDNI I TYLNY PANEL
Panel przedni
Panel tylny:
1.ANT OUT: To gniazdo mija sygnał częstotliwości radiowej telewizora lub innego sprzętu wideo.
2.ANT IN: To gniazdo zapewnia połączenie z anteną zewnętrzną
3.TV SCART: To gniazdo zapewnia połączenie do telewizora
4.HDMI: Wyjście wysokiej rozdzielczości audio i wideo używane do
połączenia z urządzeniem HDMI.
5.USB: Gniazdo do odtwarzania multimediów lub do celów przeprowadzenia aktualizacji

22
PILOT
PODŁĄCZENIE DO TELEWIZORA
Użyj połączenia kompozytowego, obramowanego poniżej, aby uzyskać
podstawowe połączenie pomiędzy Cineo 300 a telewizorem.
Użyj połączenia analogowego z kompozytowym połączeniem audio, obramowanym poniżej, aby uzyskać połączenia lepszej jakości.
Dla najwyższej jakości połączenia, użyj wejścia HDMI, patrz poniżej.
KLAWISZ FUNKCJA KLAWISZ FUNKCJA
POWER Włącz/wyłącz odbiornik CH
CH
Nawigacja w menu lub
przełączanie kanałów
OK Zatwierdzenie wyboru VOL
VOL
Nawigacja w menu lub
regulacja głośności
0-9 Wybierz kanał lub numer opcji PREV Przejdź do poprzedniego
utworu podczas odtwarzania
multimediów lub przejdź do
poprzedniego kanału
podczas oglądania telewizji
Language Wybierz język Next Przejdź do następnego
utworu podczas odtwarzania
multimediów lub przejdź do
następnego kanału podczas
oglądania telewizji
RETURN Wróć do poprzedniego kanału REC Nagrywaj program
Subtitle Wyświetl listę dialogową
(dostępność zależy od
kanału)
TV/RADIO Przełącz pomiędzy telewizją
a radiem
MENU Kieruje do menu PLAY /pause Odtwarzaj lub wstrzymaj
odtwarzanie multimediów
EPG Uruchamia elektroniczny
przewodnik po programach
TXT Zobacz informacje aktualnej
usługi (jeżeli są dostępne)
EXIT Opuść aktualnie otwarte
menu
Przełącz różne funkcje na
ekranie tekstu
23
PIERWSZE URUCHOMIENIE
Po prawidłowym połączeniu kabli, włącz telewizor i upewnij się, że odbiornik jest podłączony do zasilania. Jeżeli używasz odbiornika pierwszy
raz lub jeżeli przywróciłeś ustawienia fabryczne, na ekranie powinno pokazać się menu główne.
1. Wybierz [OSD Language] i wciśnij klawisz RIGHT/LEFT aby wybrać język.
2. Wybierz [Country] i wciśnij klawisz RIGHT/LEFT aby wybrać swój
kraj.
3. Wybierz [Channel Search] i wciśnij klawisz RIGHT lub OK aby rozpocząć automatyczne wyszukiwanie kanałów.
4. Kiedy dostrajanie kanałów zostanie zakończone, możesz już oglą-
dać telewizję.
24
PODSTAWOWE FUNKCJE
1.ZARZĄDZANIE USTAWIENIAMI PROGRAMÓW
Aby wejść do menu, wciśnij klawisz MENU i wybierz [Program]. W tym
menu możesz zarządzać ustawieniami programów. Wybierz opcję i wciśnij klawisz OK lub RIGHT aby dopasować ustawienie. Wciśnij klawisz
EXIT aby opuścić menu.
2. EDYCJA PROGRAMÓW
Aby edytować ustawienie programów (zablokowanie, pomijanie, ulubione, przeniesienie lub usunięcie), wejdź w menu edycji programów. To
menu zabezpieczone jest hasłem. Wpisz hasło domyślne ’000000’.
 Loading...