

Go Clever @400 INTERNET TV Owner's Manual

GOCLEVER @400
INTERNET TV
OWNER’S MANUAL
GOCLEVER @400
INTERNET TV
INSTRUKCJA OBSŁUGI
VISIT OUR WEBSITE
WWW.GOCLEVER.COM
TO SEE MORE PRODUCTS TAB, NAVIO, DVR, DVB-T
Przed skorzystaniem z urządzenia zapoznaj się z niniejszą instrukcją obsługi
oraz zachowaj ją na przyszłość

2
Contents / Spis treści
English
3
Polski
21
Warunki gwarancji
38
Karta gwarancyjna
41

3
Installation
4
Remote Control
5
Connections
6
Installing the Batteries
7
Setting Language
7
Service Searching
8
Auto Scan
8
Manual Scan
9
STB Operation
9
Main Menu
9
Broadcasting
10
TV/Radio and Recorder
10
Multimedia
12
Photo thumbnail
12
Photo play
12
Music thumbnail
13
Music play
13
Movie thumbnail
13
System Settings
13
Installation
14
My Box
15
TV Setup
15
Password
16
SW Update
16
Set Default
16
More
16
Calendar
16
Calculator
17
Game
17
Specifications
18
Troubleshooting
19
English
4
Installation
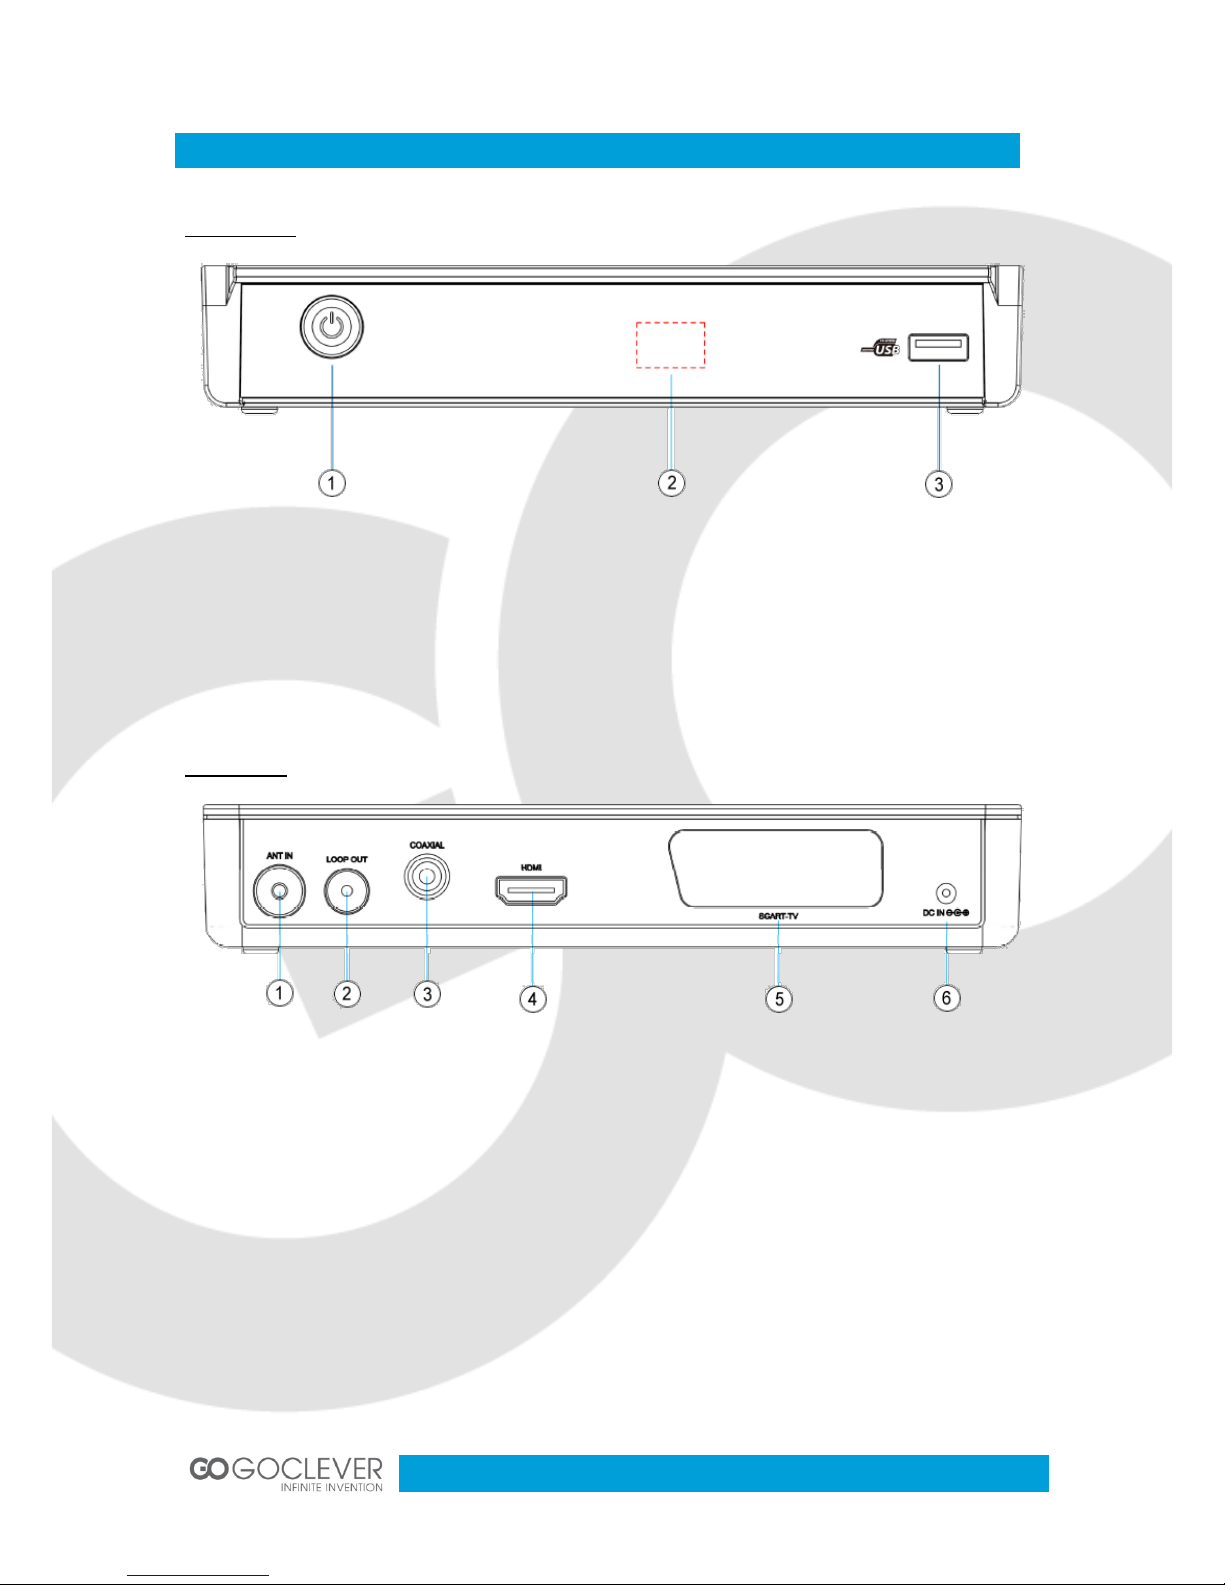
Front panel
1. POWER BUTTON: Use to indicate the power state of the Set Top Box.
2. REMOTE CONTROL SENSOR: Use to receive the signal from the Remote Control.
3. USB: For software upgrade and media playback.
Rear panel
1. ANT IN: This socket connects to your external Aerial.
2. RF LOOP: This socket will feed the RF signal to either your TV or another video system.
3. COAXIAL: For digital audio output for connection to an amplifier (or TV).
4. HDMI: High definition audio and video output used to connect to a HDMI device.
5. SCART-TV: Connects to the TV using a TV SCART cable.
6. DC IN: main power supply.

5
Remote Control
6
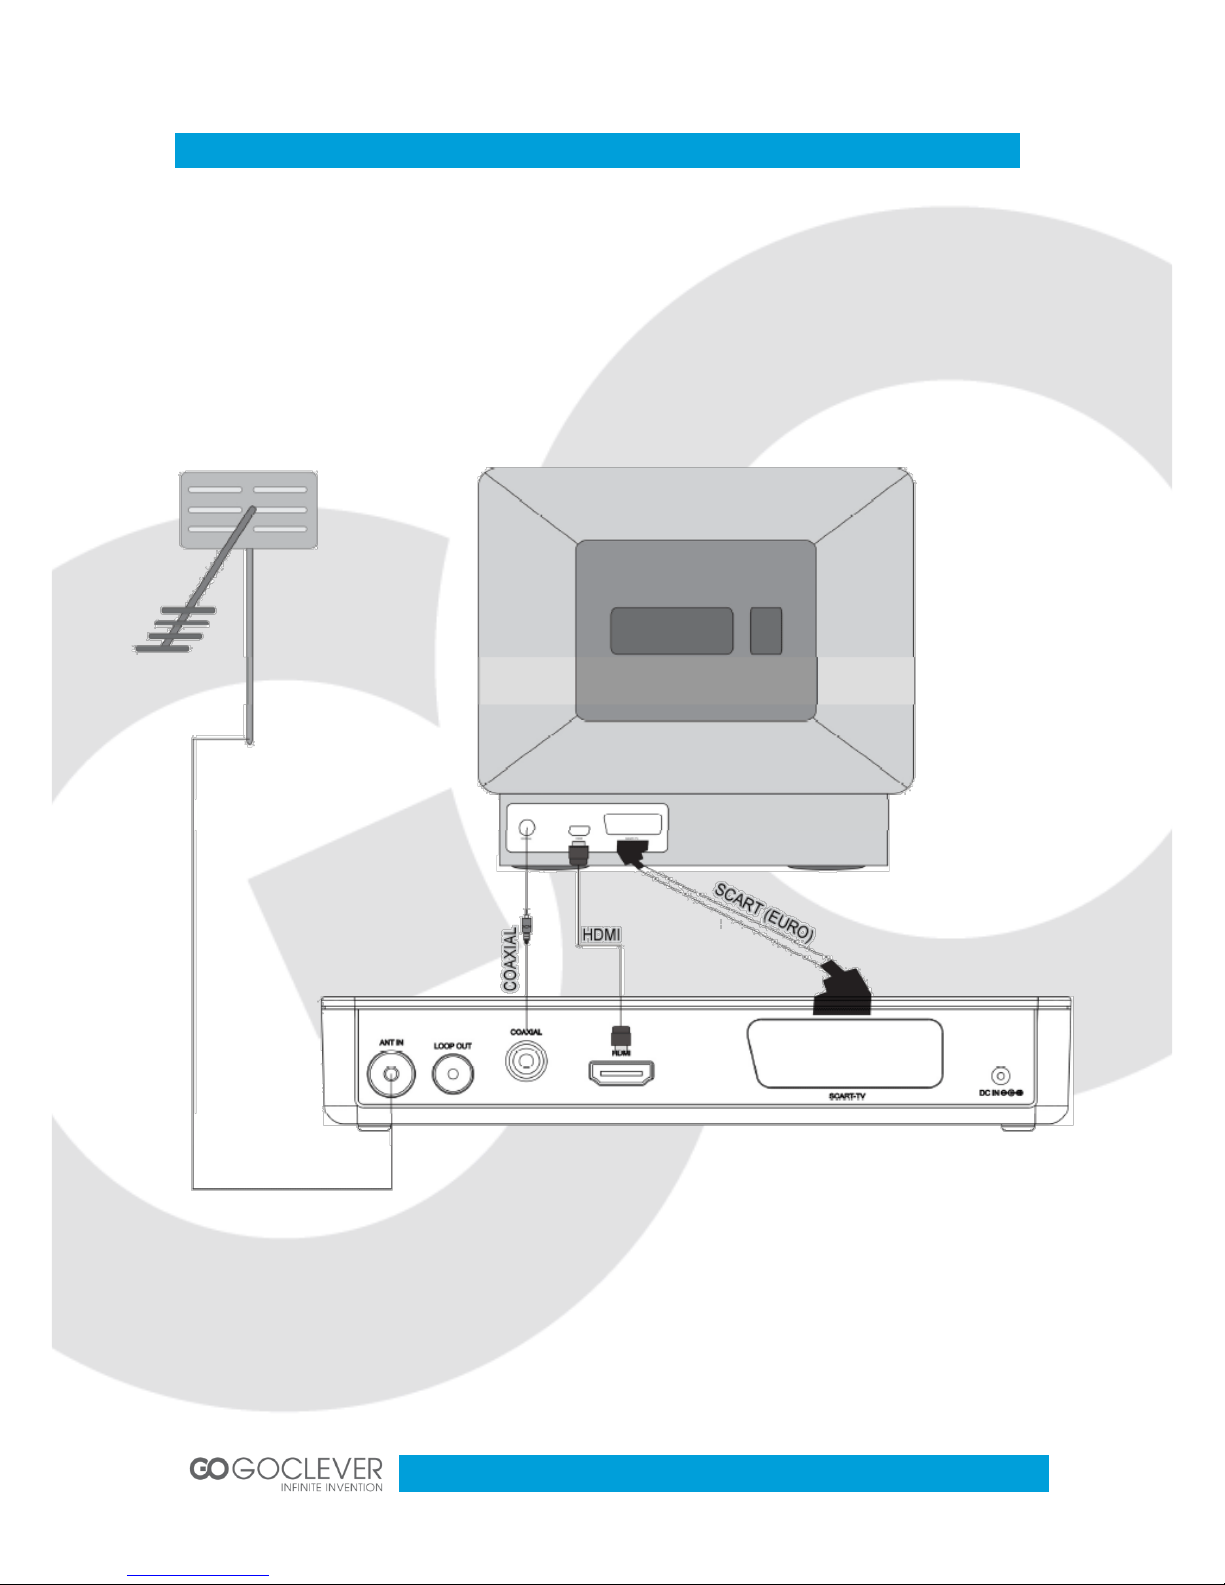
Connections
For a basic connection from your Set Top Box to the television, use the Composite
connection outlined below.
For a higher quality connection, use the Component Video connection outlined below
combined with the Composite Audio Connection.
For the highest quality connection use a direct HDMI connection, see below.
Note: When connecting the receiver to other equipment, e.g. ,TV,VCR and amplifier, make
sure to refer to relevant user manual for instruction. Also, make sure you disconnect all the
equipments from the main supply before the connection.
7
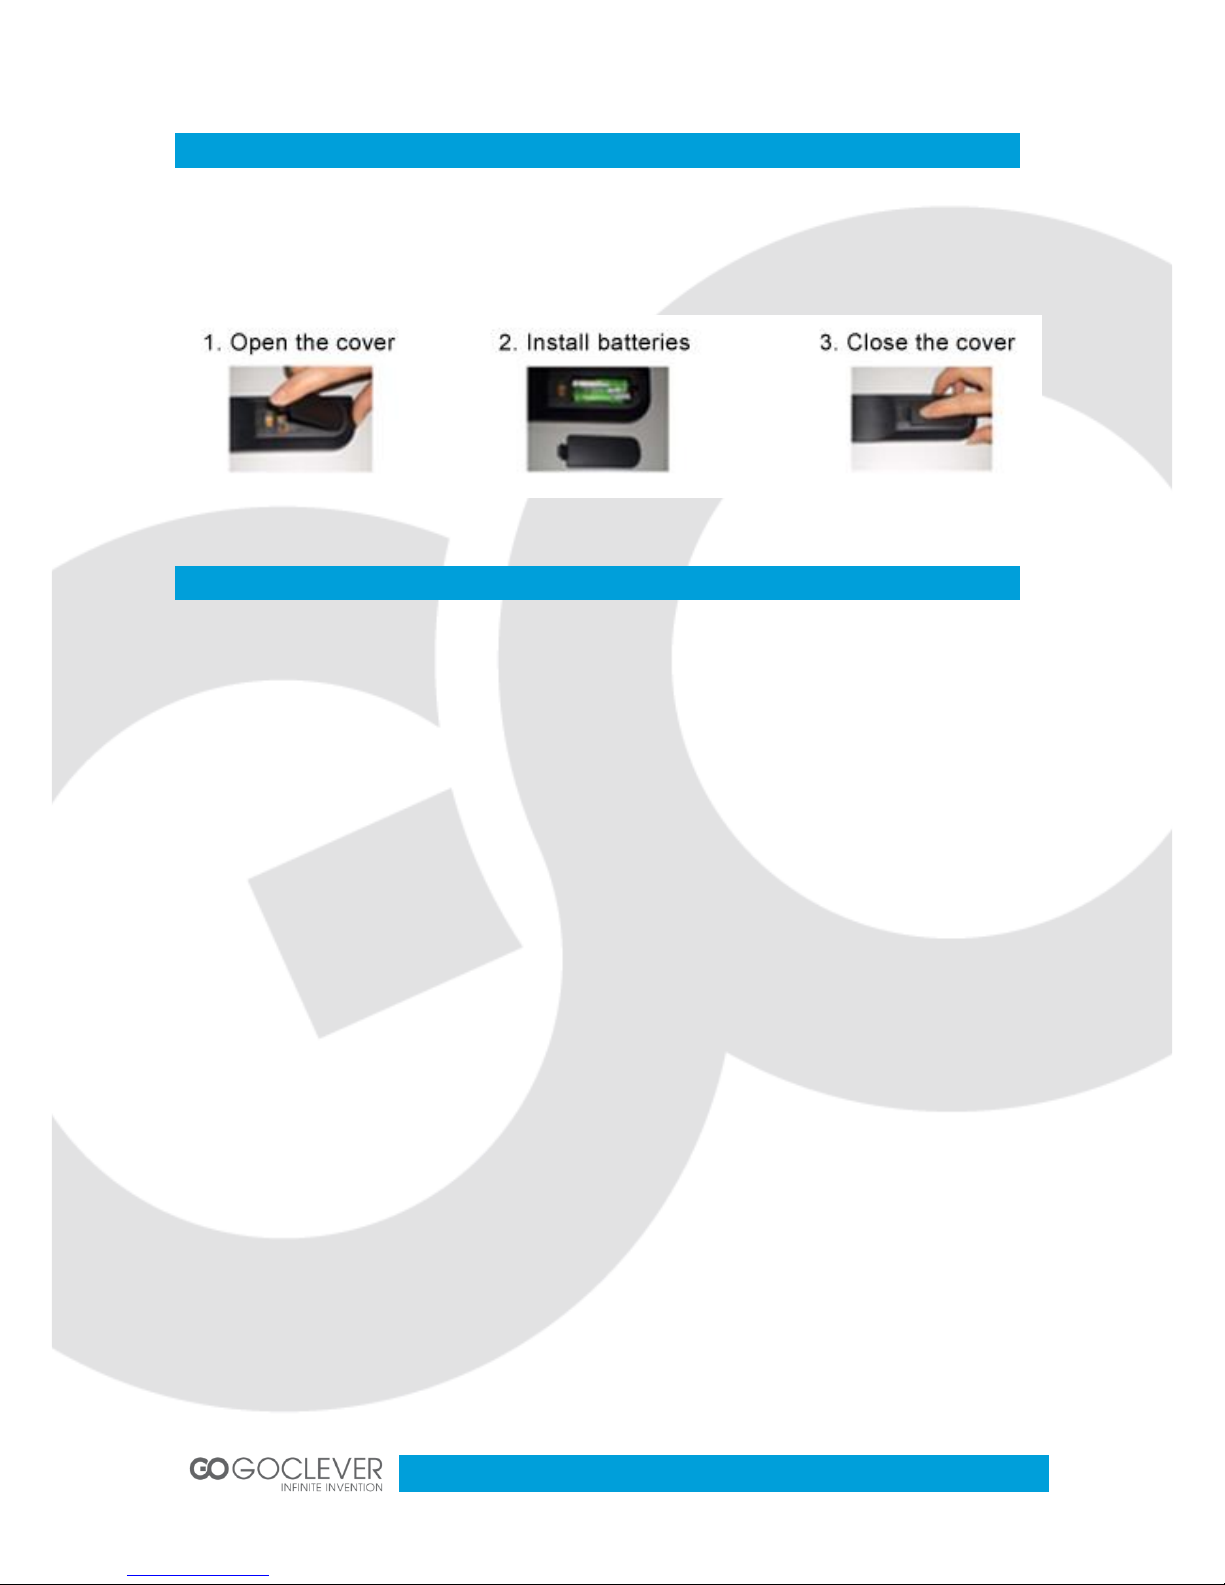
Installing the Batteries
Remove the battery cover from the remote control and put 2XAAA size batteries inside the
compartment. The diagram inside the battery compartment shows the correct way to install
the batteries.
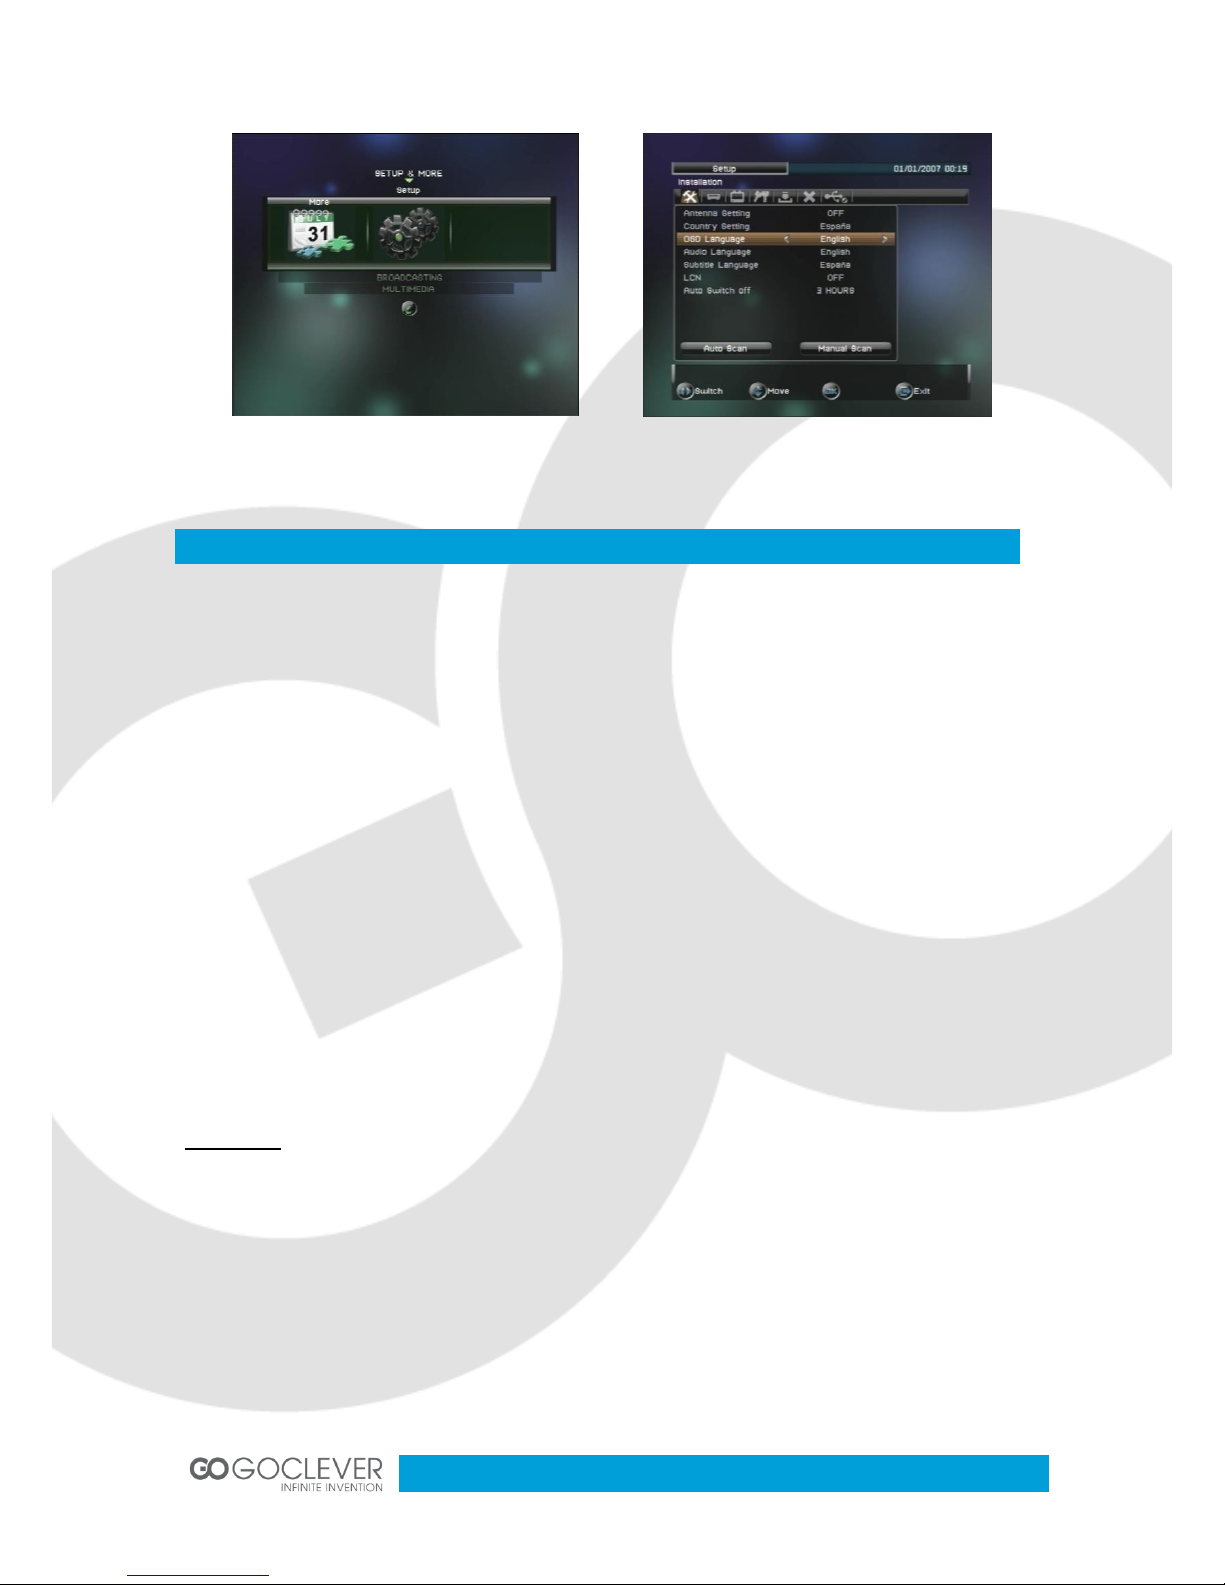
Setting Language
User can select a preferred language among various languages at Installation page. Illustrate
as figure 1, 2.
(1) Press <Menu> to enter main menu.
(2) Press <Up/Down> until switching to “SETUP&MORE” item.
(3) Press <Left/Right> until switching to “SETUP”. Then press <OK> to enter.
(4) Press <Left/Right> until switching to “Installation”.
(5) Press <OK> to enter the “Installation” menu.
(6) Press <Up/Down> to focus on “OSD Language” bar.
(7) Press <Left/Right> to select one language.
(8) Press <Up/Down> to focus on “Audio Language” bar.
(9) Press <Left/Right> to select one language.
(10) Press <Up/Down> to focus on “Subtitle Language” bar.
(11) Press <Left/Right> to select one language.
(12) Press <Exit> to save current settings.
8
Service Searching
Scan possible frequencies to search services. Select user’s country site in “Country Setting”
menu at first. The corresponding country’s default frequency table would be loaded then. In
auto scan, the frequencies in table would be scanned one by one.
(1) Press <Menu> to enter main menu.
(2) Press <Up/Down> until switching to “SETUP&MORE” item.
(3) Press <Left/Right> until switching to “SETUP”. Then press <OK> to enter.
(4) Press <Left/Right> until switching to “Installation”.
(5) Press <OK> to enter the “Installation” menu.
(6) Press <Up/Down> to focus on "Country Setting” bar.
(7) Press <Left/Right> to select country.
(8) Press <Up/Down> to select “Auto Scan” or “Manual Scan”.
Auto Scan
Auto Scan will erase the database first, and scans default frequency and bandwidth by
Country Setting. Follow the steps (1) - (8) at Main Menu section (page 9)
(1) Press <OK>. A dialog would appear to confirm whether to empty database.
(2) Press <OK> to confirm the empty action and start auto scan.
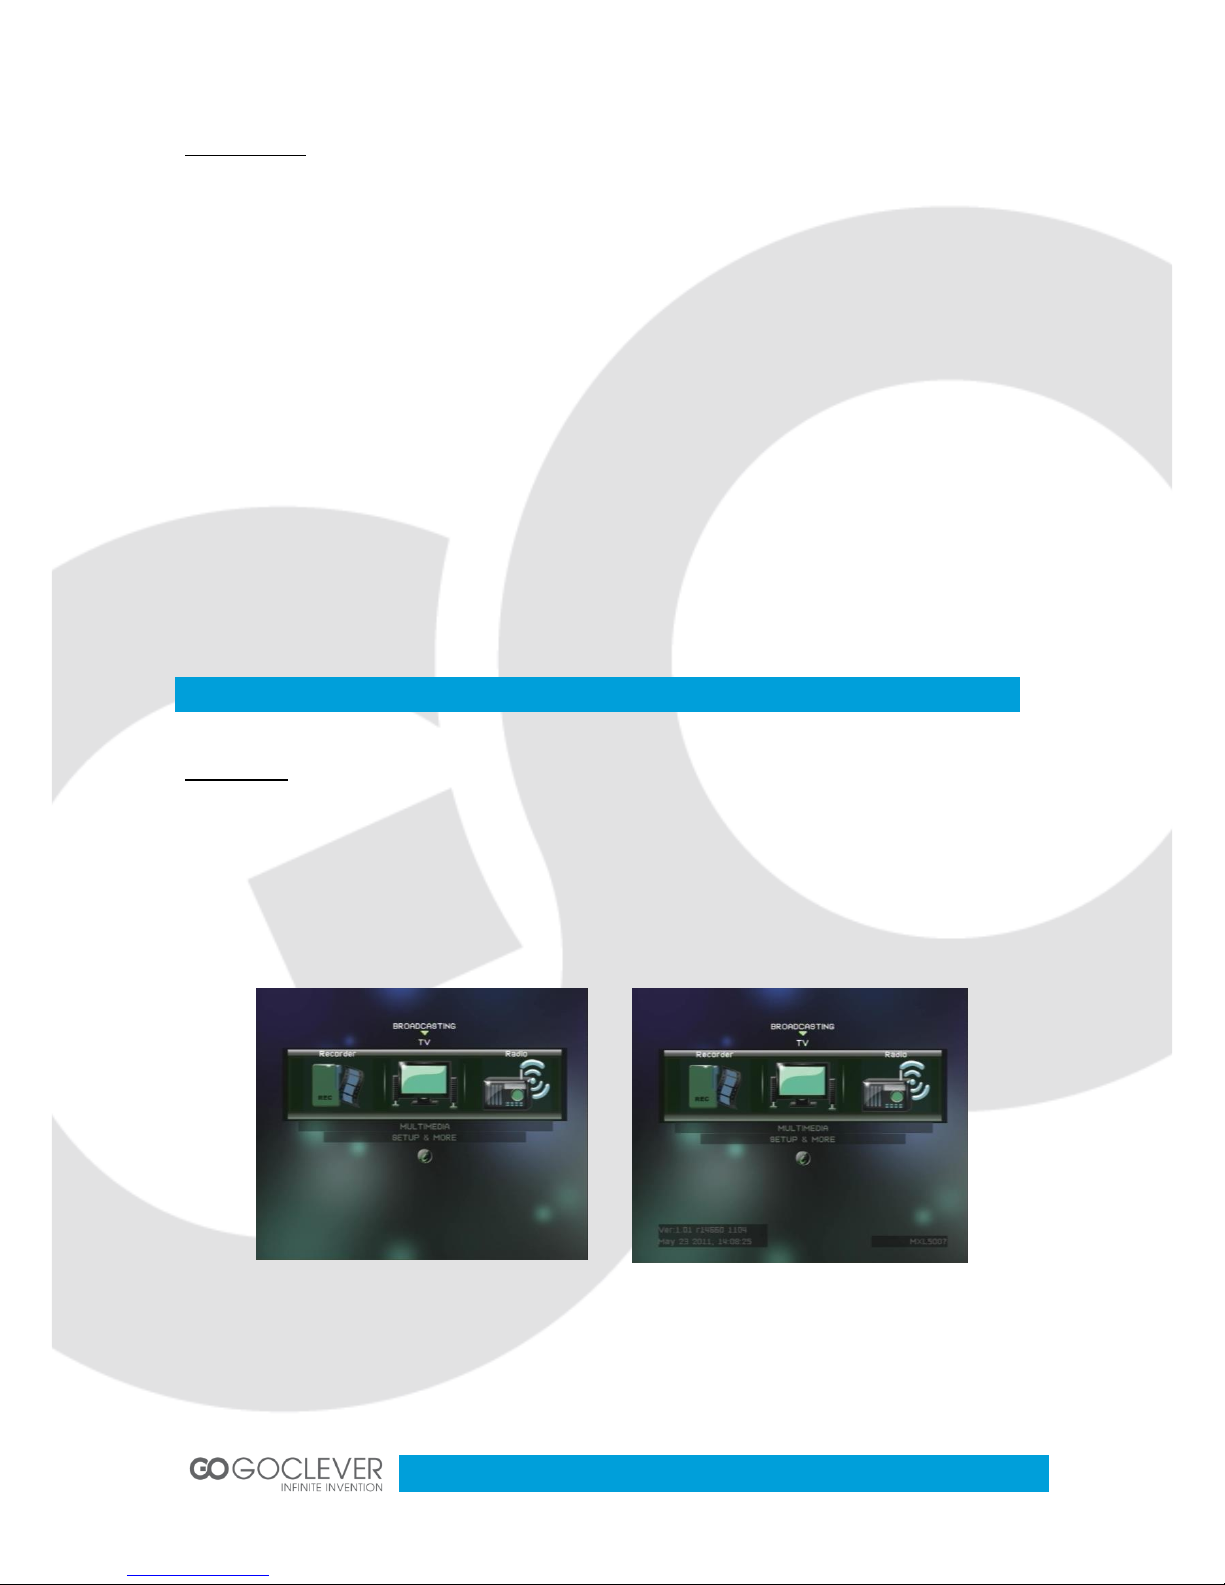
Figure 1. “SETUP” in “Main Menu”
Figure 2. Installation Page
9
Manual Scan
Manual Scan adds the scanning results into database, it doesn’t erase the database. But
User has to know the Frequency and Bandwidth for scanning. If user scans the same
Frequency and Bandwidth more than once, the programs will be duplicated. Follow the steps
(1) - (8) at Main Menu section (page 9)
(1) Press <OK> to enter “Manual Scan” menu.
(2) Press <Up/Down> to focus on “Frequency” bar.
(3) Press <0 ~ 9> to input frequency value.
(4) Press <Up/Down> to focus on “Bandwidth” bar.
(5) Press <Left/Right> to set bandwidth.
(6) Press <OK> to start manual scan. And press <Exit> to cancel scan.
STB Operation
Main Menu
Main Menu for operating a lot of functions. Illustrated as figure 3, 4.
(1) Press <menu> button to enter Main Menu.
(2) Press <info> button to display the version information of STB.
Figure 3. Main menu
Figure 4. System version

10
Broadcasting
In “Broadcasting” menu, you can select TV, Radio and Recorder.
(1) Press <Menu> to enter “Main Menu”.
(2) Press <Up/Down> until switching to “Broadcasting” item.
(3) Press <Left/Right>, switching to the wanted service type.
(4) Press <OK> to watch the service.
TV/Radio and Recorder
Selecting “TV” or “Radio” would enter service mode at once, switching to the specified
service.
“Recorder”: User can play and manage the recorded services here.
(1) Press <Menu> to enter “Main Menu”.
(2) Press <Up/Down> until switching to “Broadcasting” item.
(3) Press <Left/Right> until switching to “Recorder”.
(4) Press <OK> to enter “My Recorder” menu.
My Recorder
In “My Recorder” menu, user can manage the recorder. And through Navi bar, five subfunctions are provided, including “Edit”, “Vol”, “Del”, “Device” and “Option”.
(1) Press <Navi> to enable recorder Navi bar.
(2) Press <Left/Right> to select Navi bar item.
(3) In “Edit” item, name of record can be modified. In keyboard UI, <Up/Down/Left/Right>
are used to edit the new name. And pressing <Exit> would exit current editing and
save the new name.
(4) In “Vol” item, current volume can be read/set through a displayed volume bar.
Pressing <Exit> would exit the current Navi bar item.
(5) Selecting “Del” Navi bar item, system would ask whether to delete the selected files.
Press <OK> to confirm and <Exit> to cancel. Before deleting, user should use
“Enable Arrow Key” item to select the target files.
(6) In “Device” item, user can view and manage all storage devices, which are currently
plugged-in the STB.

11
Focus on “Device” bar item, pressing <Left/Right> can select device type. Focus on
“Slot” bar, pressing <Left/Right> would switch between the devices with the same
type and different plug-in slots. Focus on “Partition” bar, pressing <Left/Right> can
select the part on target device, with the UI below displaying the partition info.
Pressing <OK> on “Format” button would format current selected partition. The data
on formatted partition would be permanently deleted. And the function should be used
with caution.
(7) “Option” item corresponds to PVR related settings.
Play Records
In “My Recorder” menu, user can select the record to play.
(1) Press <Up/Down/Left/Right/Page Up/Page Down> to view and select records.
(2) Press <OK> to preview the selected record in the small video window on bottom-right
screen.
(3) Press <Yellow> to play the selected record in full screen.
Navi for Record Playing
When playing record, press <Navi> can enter record playing navigation bar, providing
functional items of “File”, “Step”, “Vol”, “Zoom+”, “Zoom-”, “Info” and “Option”.
(1) When playing record, press <Navi> to load recorder Navi bar.
(2) Press <Left/Right> to select Navi bar item.
(3) Select “File” item would return to “My Recorder” menu.
(4) In “Step” item, every <OK> pressing would cause current playing moves forward by
one-step. Press <OK> can return to normal play speed.
(5) In “Vol” item, current volume can be read/set through a displayed volume bar.
Pressing <Exit> would exit volume adjust.
(6) “Zoom+” item provides video output zoom in function.
(7) “Zoom-” item provides video output zoom out function. Pressing <OK> would switch
between 75%, 50% and 25% modes. Pressing <Exit> would exit the function.
(8) When playing record, user may select “Info” item to see the related record info.
(9) “Option” item corresponds to PVR related settings.
12
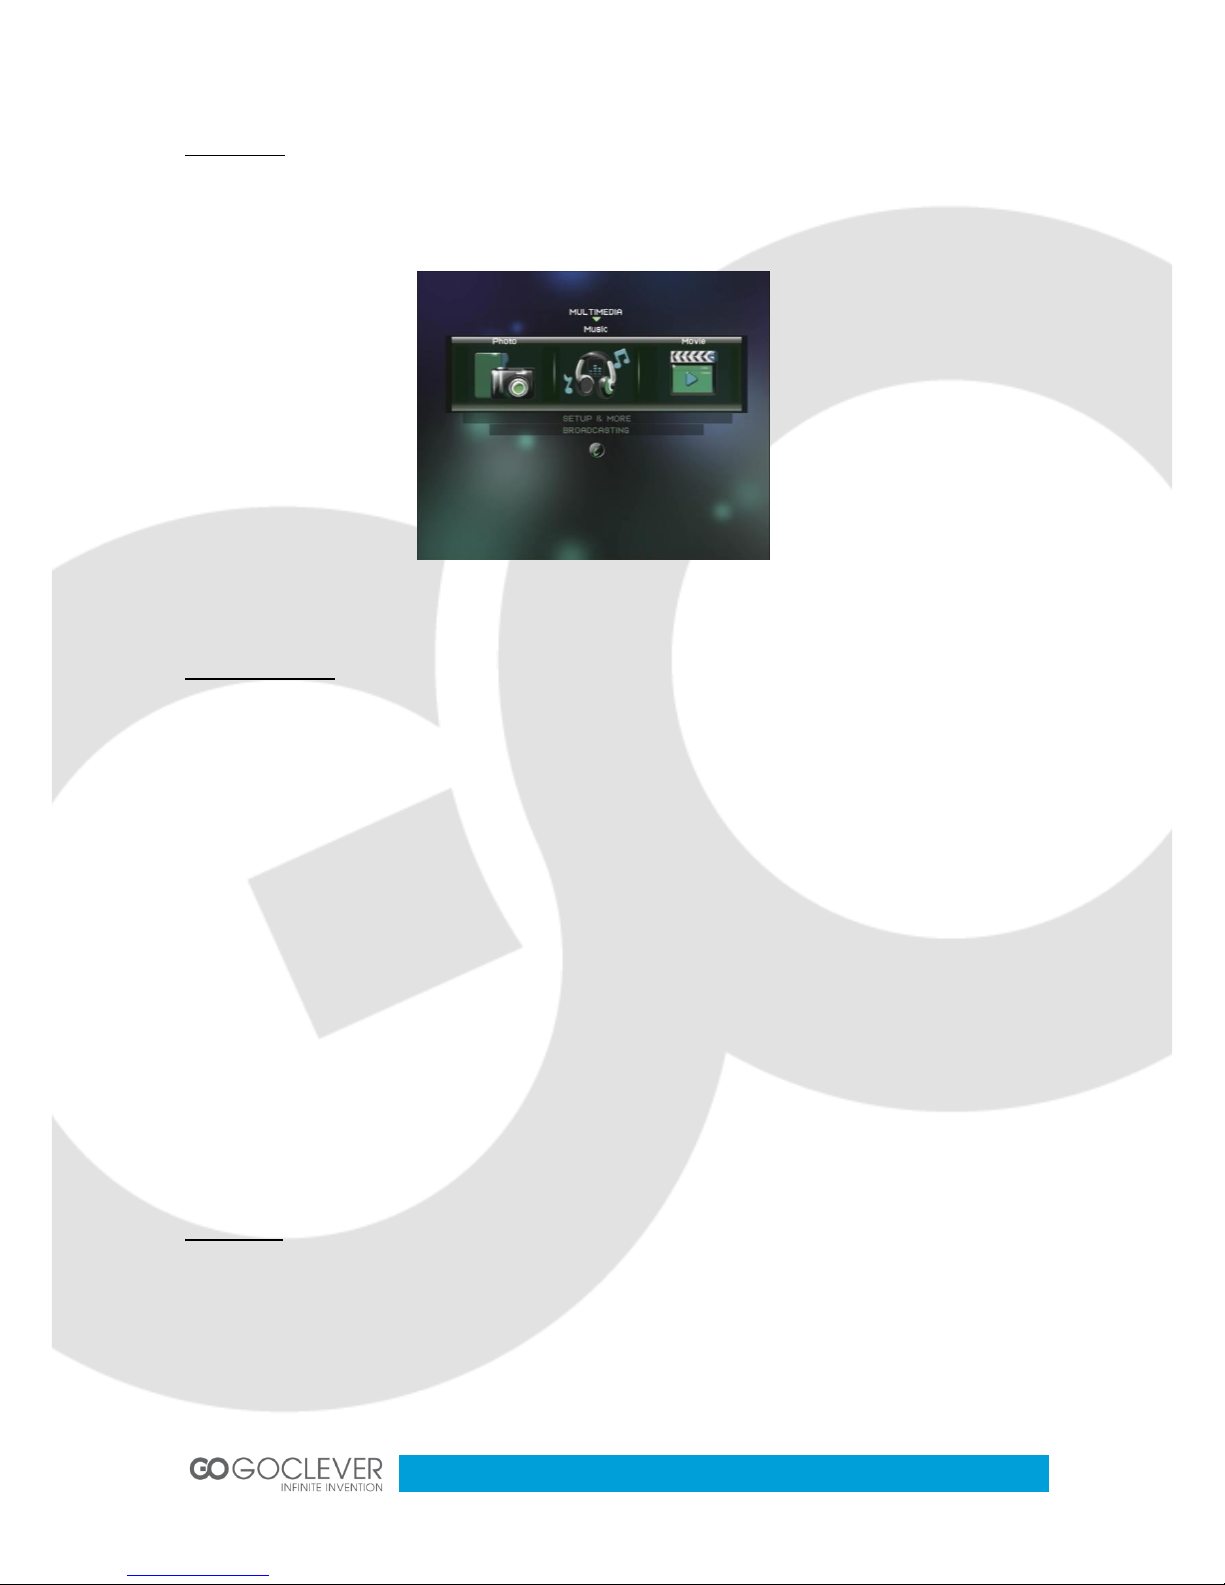
Multimedia
In “multimedia”, user can select to play multi-media files. Illustrated as figure 5.
Photo thumbnail
(1) How to enter the photo thumbnail
After STB starting up, press <menu> to enter “Main Menu”. Then press <Up/Down>
until switching to "MULTIMEDIA" item and press <Left/Right> until switching to
“Photo” (photo item has been selected when the photo icon is in the middle of
screen). In the condition, press <OK> to enter “Photo Thumbnail”.
(2) The keys which are available in “Photo Thumbnail” and the functions of these keys
are explained below:
Press <Left/Right> to switch the focus of files, when the focused item is in
“Thumbnail".
Press <Left/Right> to switch the focus of top option item, when the focused item is in
“Top Option”.
Press <Left/Right> to switch the focus of Navi bar item, when the focused item is in
Navi bar.
Photo play
(1) The way to enter photo play;
Pressing <Yellow> would enter the “Photo Play” page when focusing on folder or file
item in “Photo Thumbnail”.
Figure5. MULTIMEDIA menu

13
Music thumbnail
Focusing on “Main Menu” -> “MULTIMEDIA” -> “Music”, press <OK> to enter “Music
Thumbnail” page.
Press <Menu> to exit the Music Thumbnail” page and return to “Main Menu”.
Music Play
Pressing <OK> would enter “Music Play”
Movie thumbnail
Focusing on “Main Menu” -> “MULTIMEDIA” -> “Movie”, press <OK> to enter “Movie
Thumbnail” page. Movie play
“Movie Play” screen can be entered by pressing <Yellow> key in “Movie Thumbnail” or
choose “Exit & play” in “Top Option”.
<Menu>: Press <menu> to return to “Main Menu”.
<Red>: Press <Red> to play backward in trick mode. The modes include “X2”, ”X4”, ”X8”,
”X16”, ”X32”, ”X1/2”, ”X1/4” and “X1”.
<Green>: Press <Green> to stop playing movie.
<Yellow>: Press <Yellow> to pause/resume playing.
<Blue>: Press <Blue> to play forward in trick mode. The modes include “X2”, ”X4”, ”X8”,
”X16”, ”X32”, “X1/2”, ”X1/4” and ”X1”.
Press<Navi> to display/hide the Navi bar.
System Settings
In “Setup” menu, user can set/change STB system parameters.
(1) Press <Menu> to enter “Main Menu”.
(2) Press <Up/Down> until switching to “SETUP&MORE” item.
(3) Press <Left/Right> until switching to “Setup”.
(4) Press <OK> to enter “Setup” menu.
 Loading...