


Gocap System
User’s Guide
™
™

3
Hello!
This User's Guide will help you get started using Gocap.
Gocap is an aid to help you in eective management
of your diabetes. Before you begin using the Gocap
system, please read this User’s Guide carefully.
The Gocap system is an accessory for insulin pens. The
Gocap is intended to automatically log and view inject-
able insulin dose behavior for people with diabetes and
healthcare professionals.
Introduction
What’s in the Box
System Requirements
Safety Instructions
Intended Use of the Gocap System
Support
Gocap Basics
A Look at the Gocap
The Gocap Display Screen
The Gocap App
Setting Up and Using the Gocap
Before You Begin
Setting Up the Gocap
Using the Gocap
Setting Up and Using the Gocap App
Setting Up the Gocap App
Troubleshooting Connection Problems
Setting Up Multiple Gocaps
Using Dierent Types of Insulin
Changing Modes on the Gocap
About the Gocap App
Using the Gocap App
5
5
5
6
8
8
9
10
10
11
12
12
13
14
17
17
22
23
23
24
26
27
Contents

54
Viewing Recent Activity on the Timeline Screen
Working with Logbook Entries
Working with Graphs
Adding a Device
Sharing Your Gocap Information with Others
Setting Up Gocap Alerts
Setting Up a Dosing Schedule
Recharging your Gocap
How to Recharge Your Gocap
Caring for Your Gocap
Cleaning Your Gocap
Troubleshooting Gocap Problems
Handling Gocap Problems
Handling Unread Doses
Handling Other Problems
Disposing of Your Gocap
Gocap System Technical Specifications
FCC Notice
About Common Sensing
Warranty Information
28
28
32
36
40
42
46
48
50
54
54
56
56
60
61
61
62
63
63
64
Contents (continued) Introduction
What’s in the Box
System Requirements
The Gocap system must be used with one of these brands of
insulin pens:
• Lantus® SoloSTAR®
• Apidra® SoloSTAR®
1 Gocap
2 AC Power Adapter
3 Micro USB Cable
4 Quick Start Guide
1
2
3
4

76
The Gocap App must be used with one of these
smartphones and operating systems:
• Apple® iPhone or iPod Touch device running iOS iPhone 4S
or higher
• Android® mobile phone running Android OS minimum 2.3.3
(Gingerbread) API level 10
For more information about compatible devices and
operating systems, visit http://gocap.me.
Safety Instructions
Remember these important safety instructions as you use
the Gocap system.
WARNING: Never use the Gocap system to make insulin
dosing decisions. The Gocap App may not always be
updated with your most recent dose information, or its
display screen reading may not correspond with the number
of insulin units your insulin pen injected into your body.
If you are unsure of a dosing decision, contact a medical
professional for assistance.
• Always check the type of insulin you are dosing.
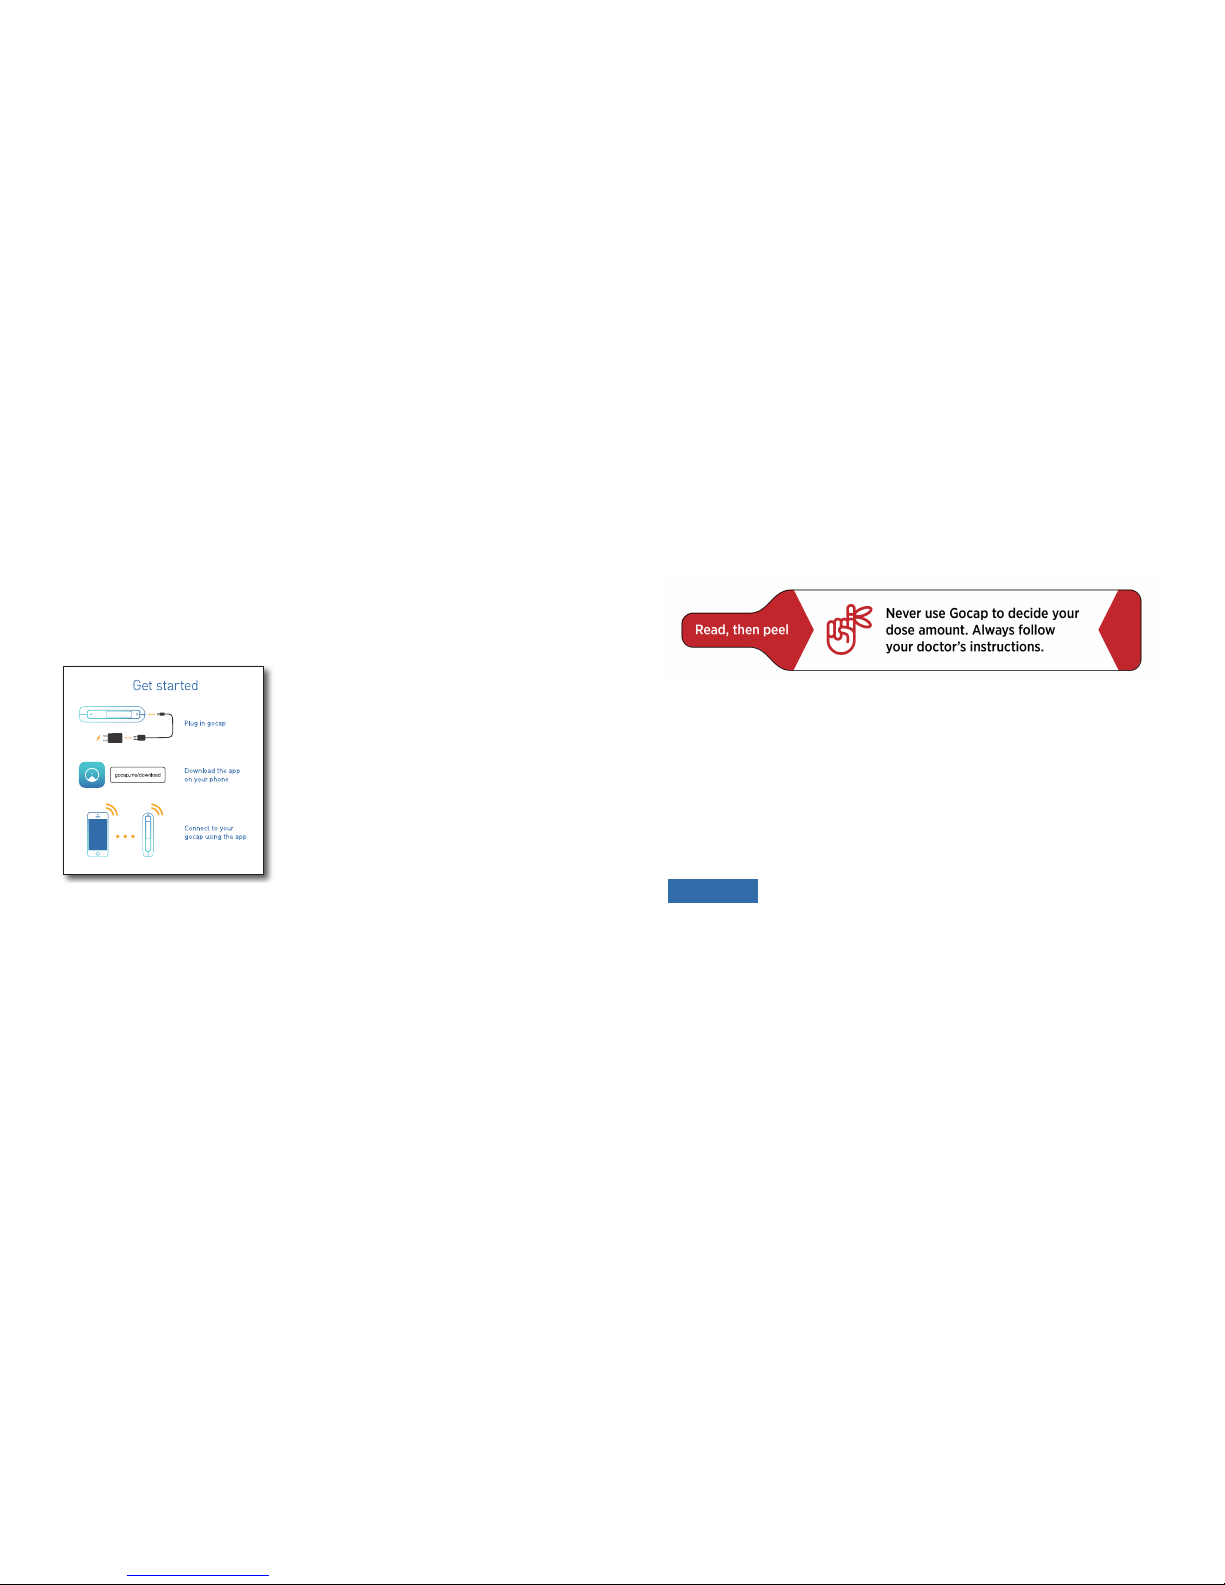
• Gocap is not a blood glucose monitor. Always follow your
doctor's instructions for making any dosing decisions.
• If you are unsure of a dosing decision, contact a medical
professional for assistance. Misdosing can lead to
hypoglycemia.
• The Gocap system does not provide real-time
communication with any persons you may invite to share
your information.
• The Gocap system is not intended for use as a dose monitor
for critical care.

98
Intended Use of the Gocap System
The Gocap system is intended for use to aid logging and
viewing injectable insulin dose amounts by people with
diabetes and by healthcare professionals.
The Gocap system’s additional features include pushing
medication reminders and other notifications, providing
safety alerts, and transmitting reading data to the
appropriate medical data servers for data review and
analysis.
The Gocap is not on the insulin pen during injection, and it
is not intended to aect the safety and ecacy of existing
dosing processes with an insulin pen.
Support
For help, visit the Gocap support website at
http://gocap.me/help, e-mail help@gocap.me, or call
1-855-310-3377.
Gocap Basics
The Gocap system works with insulin pens to create an
automatic and shareable logbook of your insulin doses. This
logbook can be conveniently stored on your smartphone
using the Gocap App.
The Gocap replaces the plastic cap that comes with
an insulin pen. Each time you use the Gocap, it stores
information about the dose. You can use your Gocap by
itself, or you can use it in combination with the Gocap App
installed on your smartphone.
If you use just the Gocap by itself, you can see a reading of
insulin remaining and doses taken on the Gocap’s display
screen. If you also use the Gocap App, the Gocap uploads
its stored information to the Gocap App. Then you can
use the app to view all of your stored information. You can
also use the app as a logbook for other information you
enter directly, like information about a meal or a glucose
reading. The Gocap App can also remind you when it’s time
to take a dose or let you share information directly with your
healthcare provider, family member, or friend.
1110
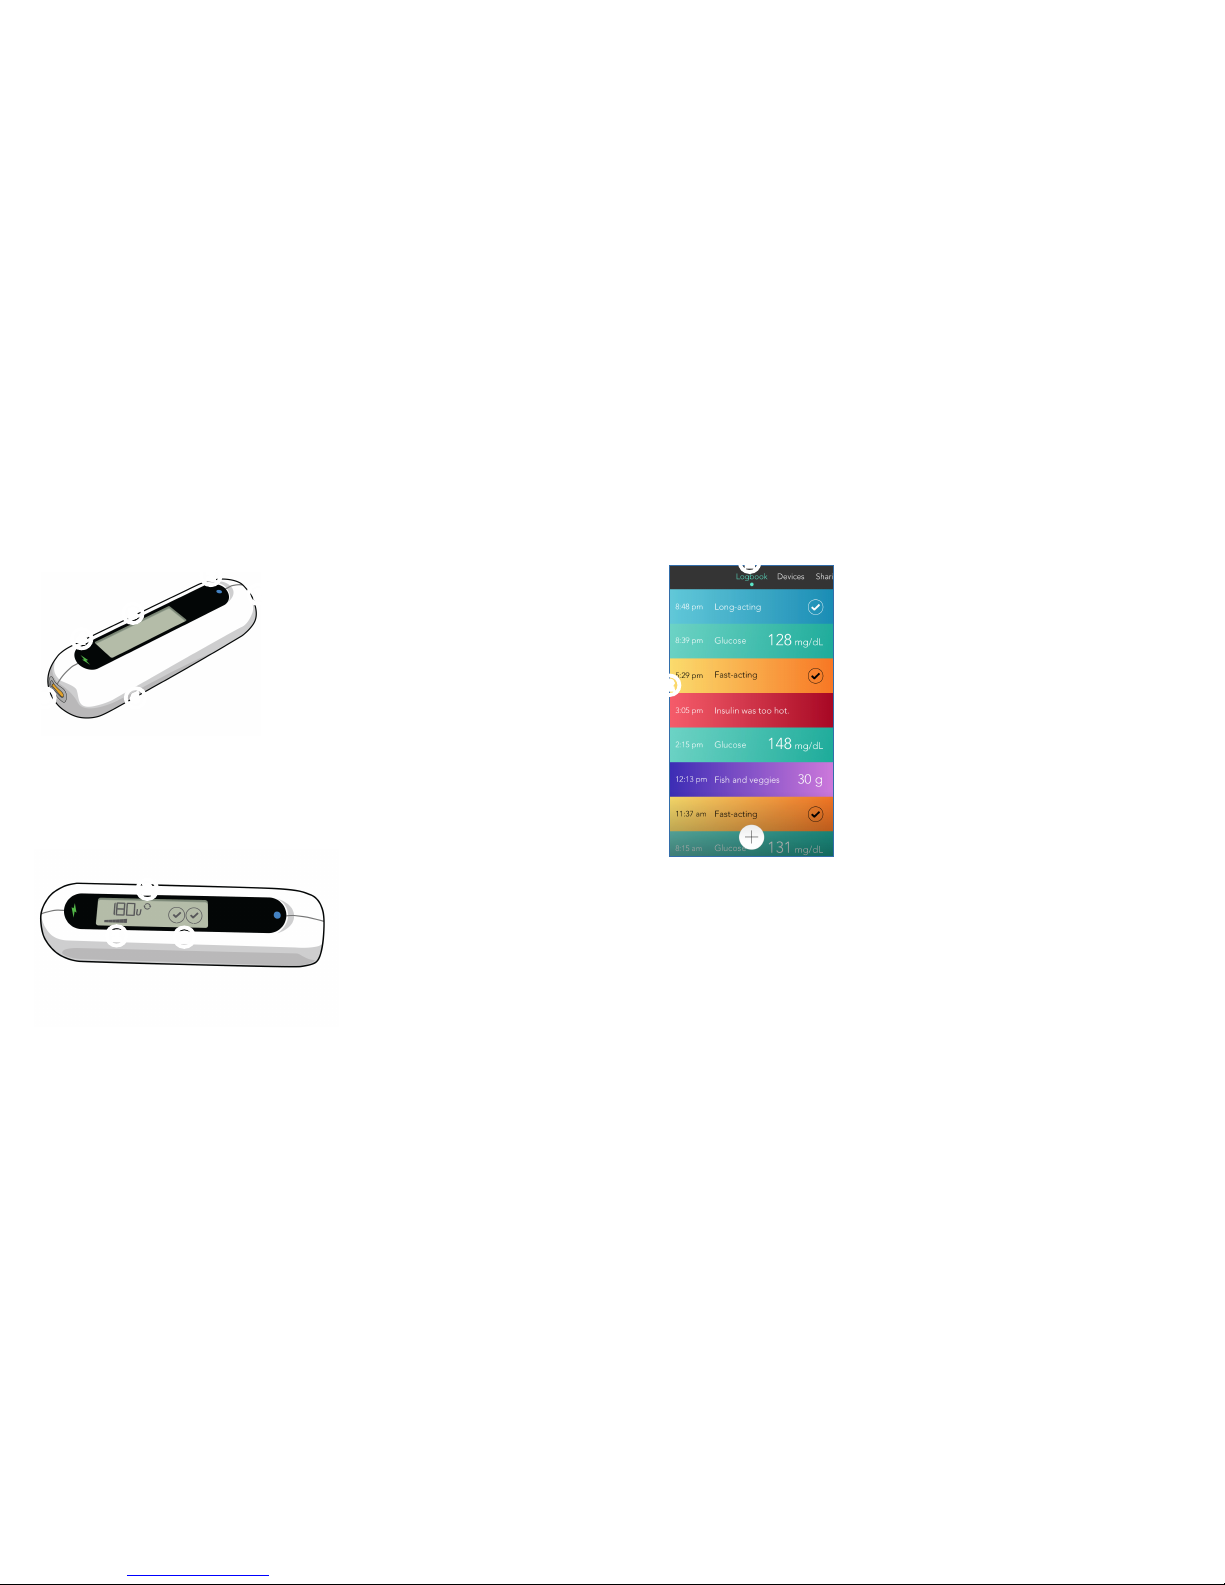
A Look at the Gocap
1
Port for Inserting Insulin Pen
2 Insulin Pen Type Indicator Light
3 Display Screen
4 Charge Indicator Light
5 USB Charging Port
6 Rechargeable Battery (inside,
non-replaceable)
The Gocap Display Screen
1 Insulin meter
2 Syncing icon
3 Dosing schedule
The Gocap App
1 Gocap App navigation menu
2 Gocap App logbook screen
1
1
2
2
3
3
4
5 6
1
2
1312
Setting Up the Gocap
The Gocap comes with a removable “Reminder” label. Read
the warning on the label. Then remove the label.
Remove the cap from a new insulin pen. Push the insulin
pen into the Gocap and turn until you hear a click. The
Gocap takes the place of the cap that came with the pen.
The Gocap is now ready to use.
CAUTION: Once you have placed the Gocap on an insulin
pen, always store and use the pen in accordance with the
insulin pen manufacturer’s instructions.
Setting Up and Using the Gocap
The Gocap replaces the plastic cap that comes with an
insulin pen. Follow the steps in this section to set up your
Gocap.
Before you Begin
Before you begin using the
Gocap system to record your
insulin doses:
• Read this User’s Guide
carefully.
• Decide whether you are
going to use the Gocap by
itself, or whether you want to
use the Gocap App on your
smartphone as well.
• Take all of the Gocap components out of the box and look
them over. See the Quick Start Guide included in the box for
an introduction to the components of your Gocap and an
overview of the setup process.
1514
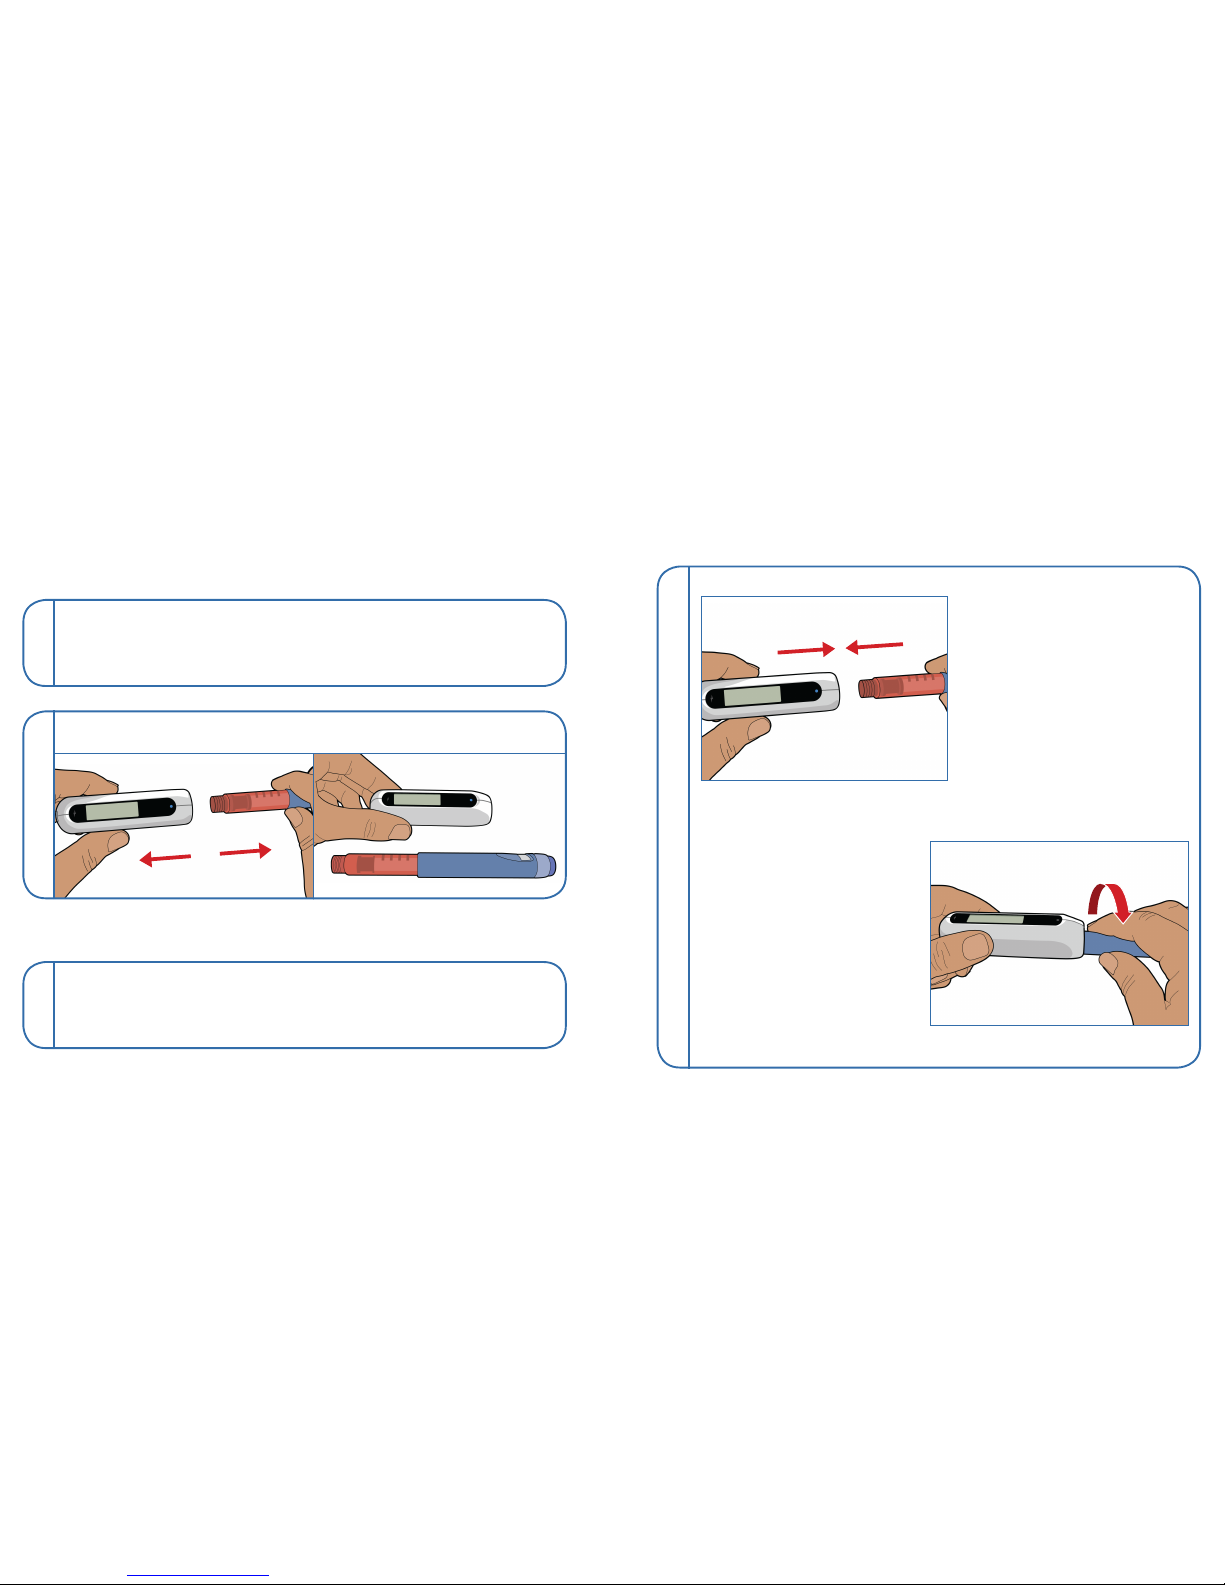
Using the Gocap
When it’s time for you to dose, follow these steps.
Check that your insulin pen is in the Gocap.
To log a dose, you need to start with your pen inside the
Gocap.
Remove the Gocap, and take your dose.
Follow your doctor’s instructions for dosing.
2
4
Put your insulin pen back
in the Gocap.
Push the insulin pen
into the Gocap and turn
it until you feel the pen
click. When the pen clicks,
Gocap can read your dose
properly. If you don’t hear
a click, Gocap can’t read
the dose.
A light flashes on the
Gocap to indicate it is
reading the pen, and
flashes quickly after the
dose was read. If you don’t
see a flashing light, push
and turn the pen again.
Leave the Gocap on your
pen until your next dose.
1
3
1716
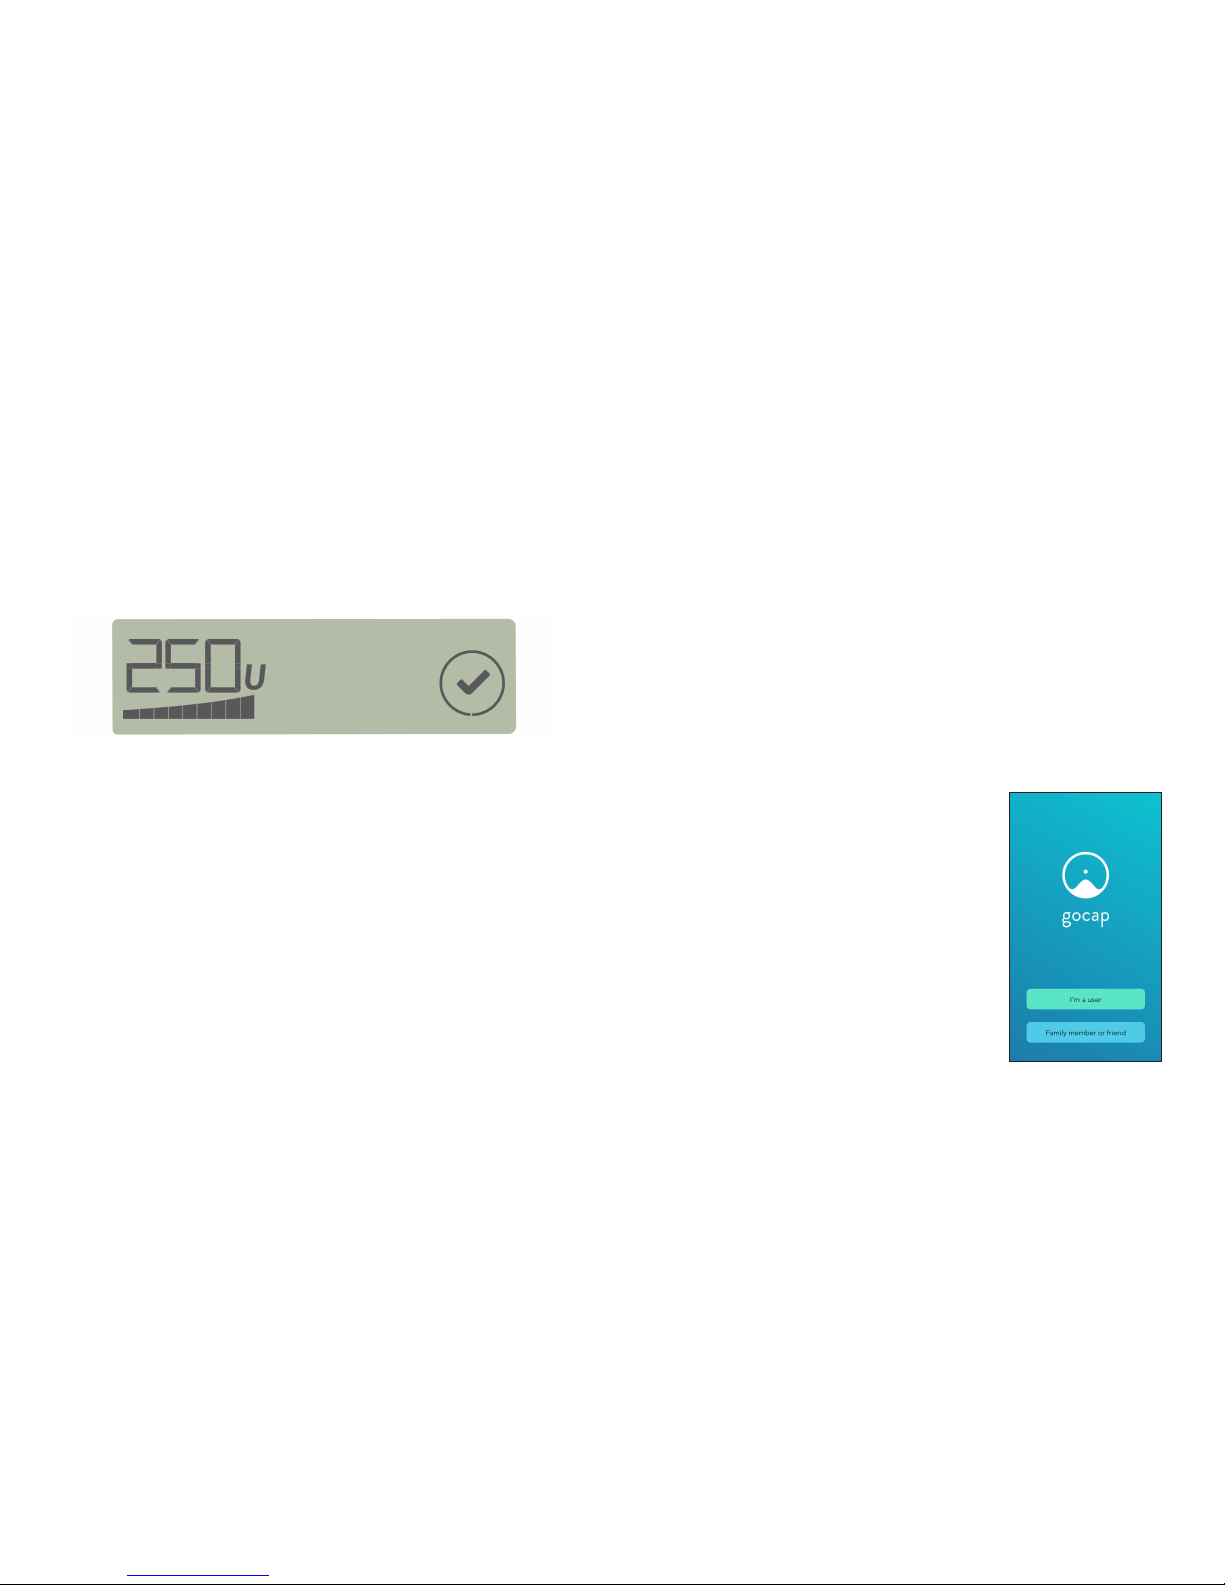
After you compete a dose, the Gocap display screen will add
a check mark for each dose you take in a day. You can see
up to three check marks at once.
Note: If you set up a dosing schedule using the Gocap App,
your Gocap will start showing a blinking circle one hour
before the time selected in the dosing schedule.
Note: The insulin meter shows how many units are left in
your insulin pen, rounded to the nearest 10 units. If you dose
a small amount, the dose meter may not change. To see
your logged doses, check the logbook entry in the Gocap
App (if you are using the Gocap App).
Note: If you purge insulin from the pen before taking a dose,
the amount you purged will be included in the dose amount.
Setting Up and Using the Gocap App
If you want to use the Gocap App, follow these steps to set
up the Gocap App.
1 Install the Gocap App on the smartphone you want to
use. The Gocap App is free to download and install. Choose
the appropriate download for your smartphone.
For Android Devices
• Go to the Google Play Store on your phone.
• Search for “Gocap.”
• Download and install the Gocap App.
For iPhone
• Go to the Apple App Store on your
phone or device.
• Search for “Gocap.”
• Download and install the Gocap App.
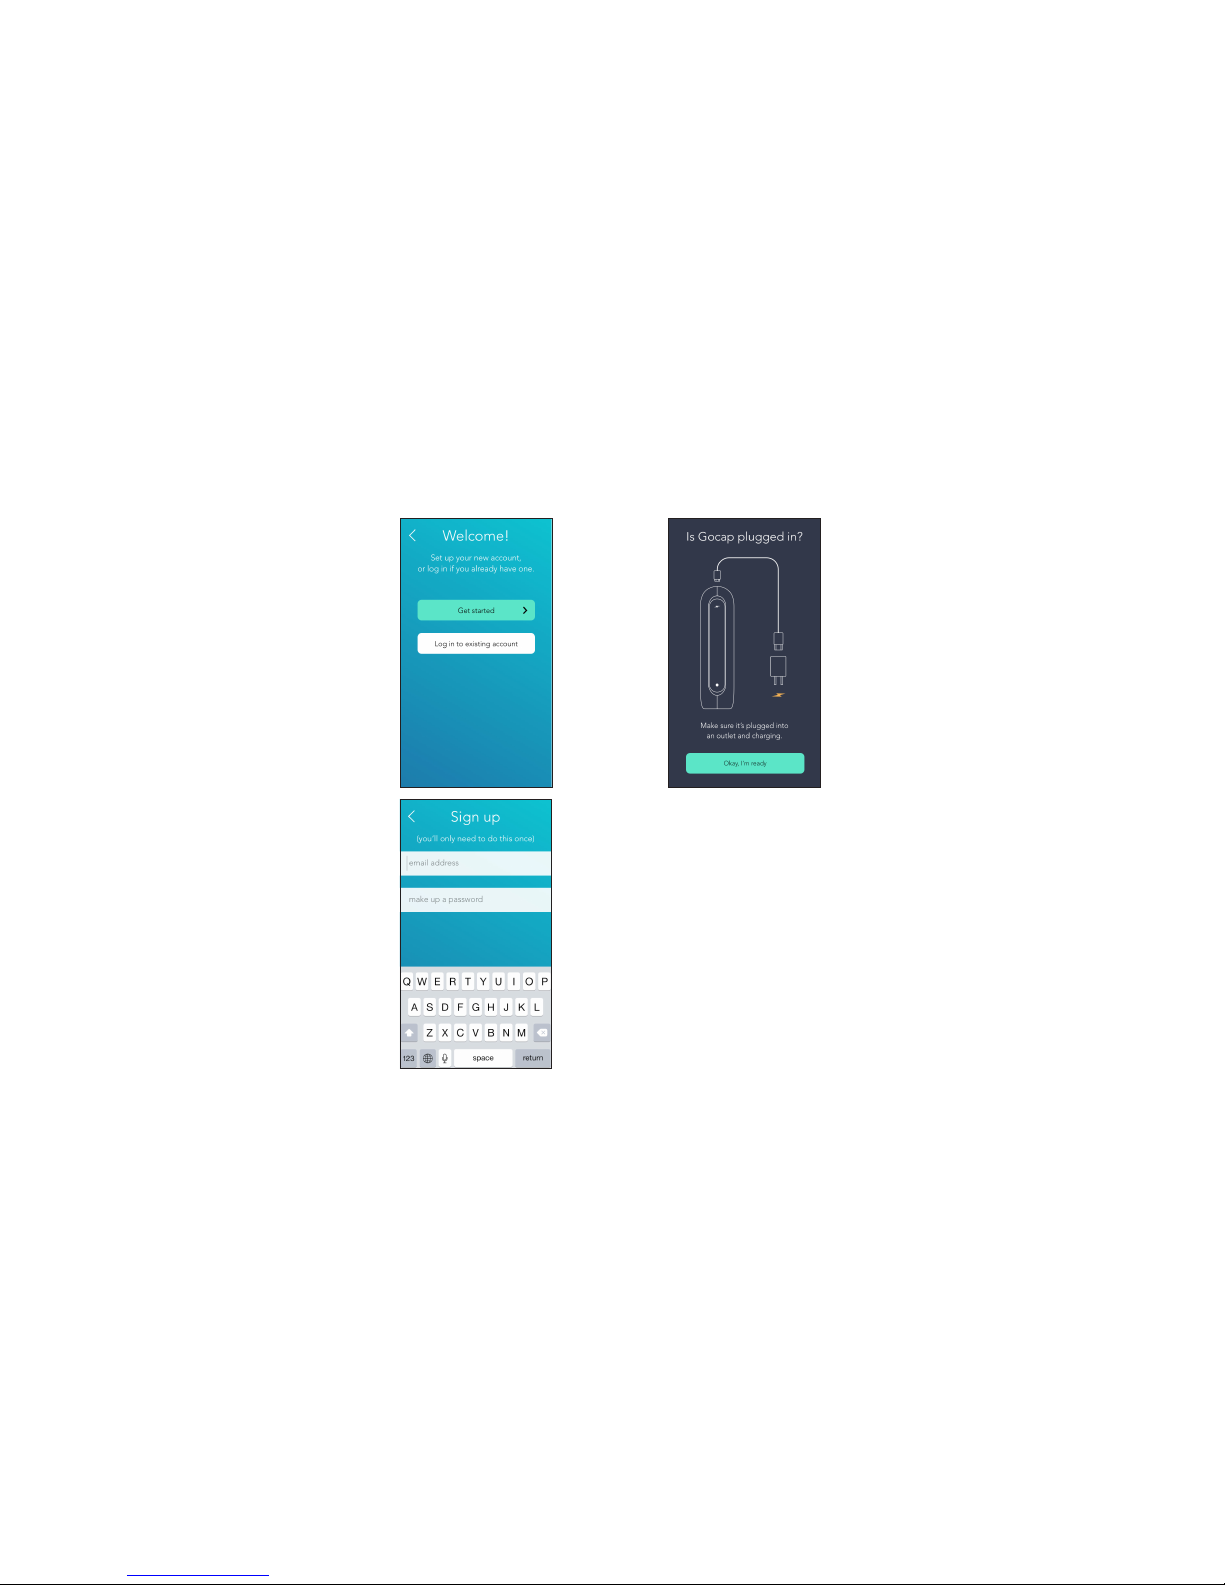
2 Set up your Gocap account. Open
the Gocap App. The Gocap screen
displays.
1918
3 Set up the Gocap's connection to
your smartphone. Plug one end of the
micro USB cable into the port on the
tip of your Gocap, plug the other end
into the AC power adapter, and then
plug the power adapter into a wall
outlet. You can also plug your USB
cable directly into a laptop or desktop
computer, but make sure the computer
is not in sleep mode.
Plugging the Gocap into a USB power
source switches the Gocap into
connection mode. The charging light on the Gocap should
be either red or green.
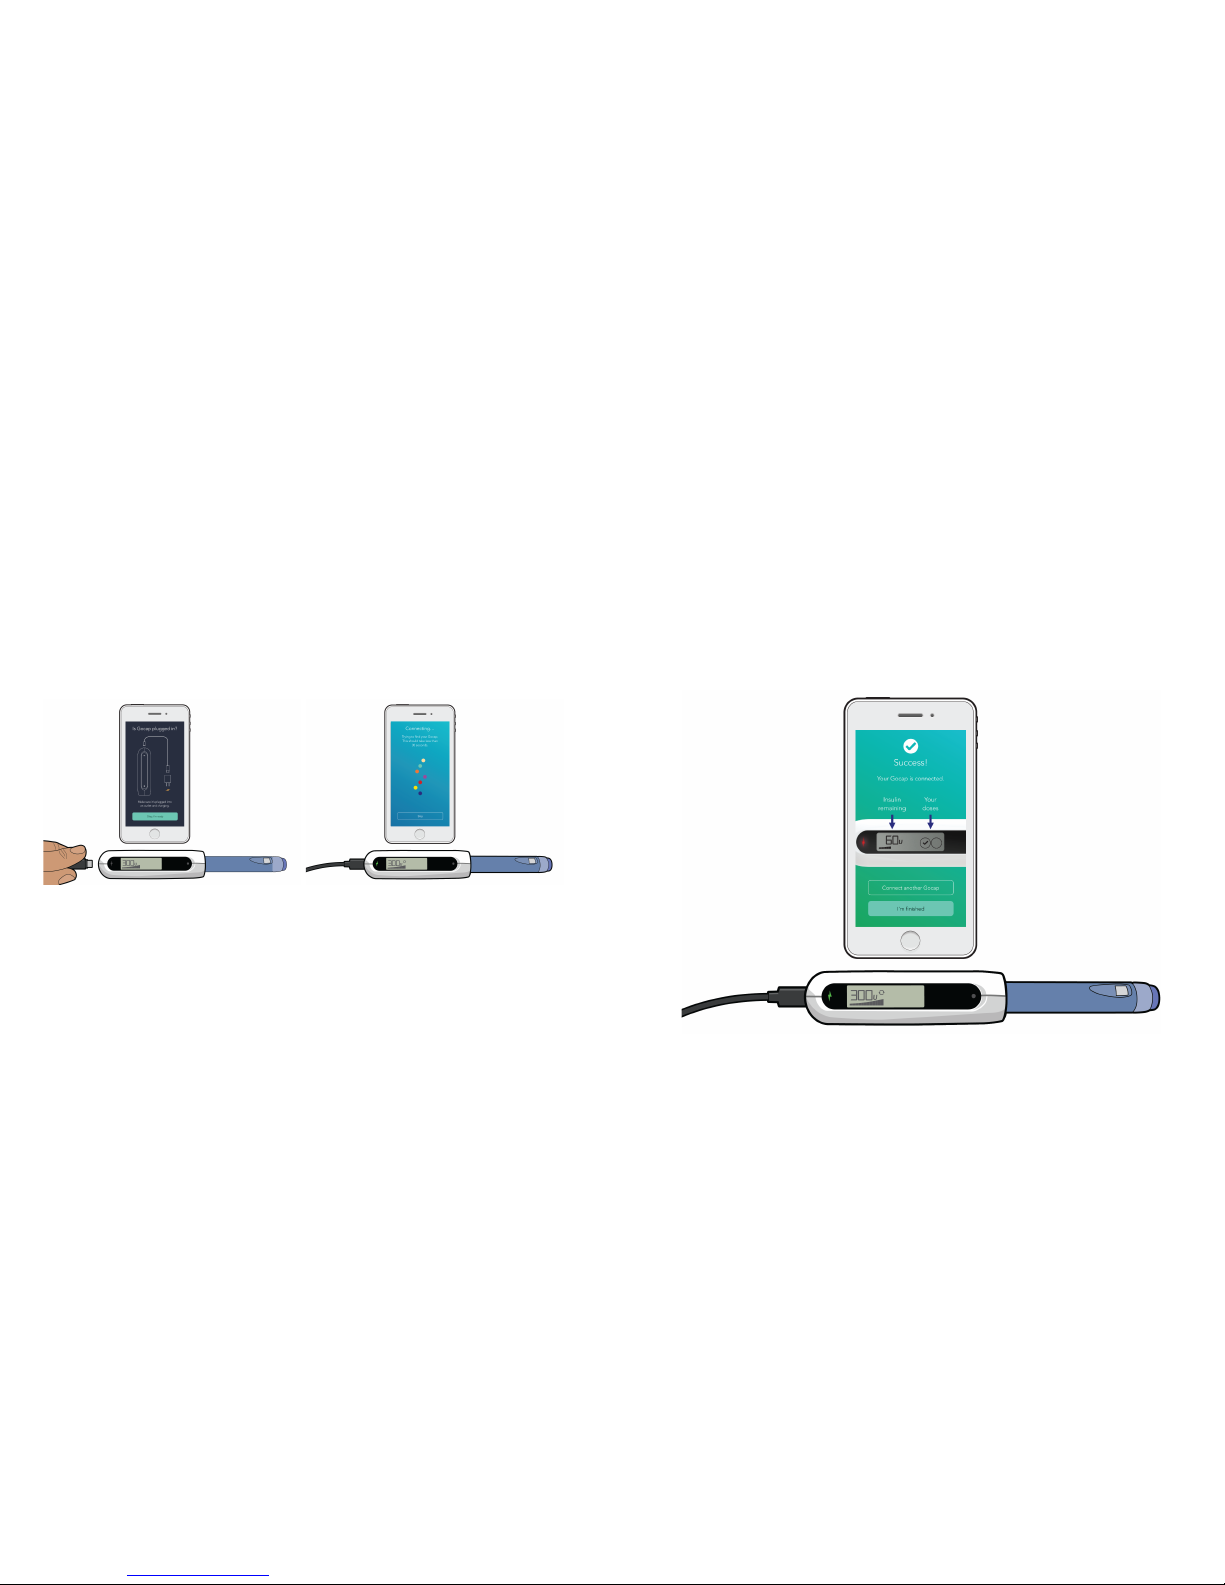
Make sure the Connect your Gocap screen displays on the
Gocap App. Place your smartphone near your Gocap.
Tap Ready on the app screen on your smartphone. The
Connecting… screen displays. Your smartphone will display
a confirmation dialog to confirm that you want to pair your
Gocap. Tap Pair or OK on the dialog. The Success! screen
displays.
Tap the I’m a patient button on the
Gocap screen. The Welcome! screen
displays with a Get started button.
Tap the Get started button. The Get
started screen displays.
Enter your e-mail address and a
password on the Get started screen,
and then tap the Ready button.
The Gocap App signs you in and the
Connect your Gocap screen displays.
2120
Notes
• If you plug your USB cable directly into a laptop or desktop
computer, the computer should be turned on and not in
“sleep” or “standby” mode. The charging light on the Gocap
should be either red or green.
• If you are using an iPhone, make sure Bluetooth is turned
on in the Settings menu.
If your Gocap does not connect successfully, an error
message displays about “Sorry, couldn’t connect with your
Gocap.” If you see this error message, see “Troubleshooting
Connection Problems” (Page 22) for help.

2322
Troubleshooting Connection Problems
If you see error messages about your Gocap being unable
to connect with your smartphone, try these steps to resolve
the problem.
• Make sure the Gocap is within 10 feet of the smartphone.
• Make sure the Gocap is plugged into a USB power source.
• If you use an iPhone, check the iPhone Settings menus to
make sure Bluetooth is set to “On.”
• Try an alternative method of connecting. In the Gocap App,
tap Devices on the top navigation menu and then tap Add
a device (You may need to swipe left on the top navigation
menu.) The Gocap and the Gocap App will automatically try
to connect again.
• Check the list of supported telephones on the Gocap
support site at http://gocap.me/help to confirm that your
smartphone is supported.
Setting Up Multiple Gocaps
If you want to add another Gocap, first tap the Add a
Device button, and follow the setup instructions. For more
information, see “Adding a Device” (Page 36).
CAUTION: Always use Gocap with one insulin pen at a time.
For best results, always start with a new insulin pen, and use
until completion before starting another. If you are using
two Gocaps, never swap insulin pens.
Using Dierent Types of Insulin
Your Gocap can log doses from Lantus® pens right out of
the box. If you want to use an Apidra® pen with Gocap, you
must first switch Gocap from long-acting insulin mode
to fast-acting insulin mode. See “Changing Modes on the
Gocap” (Page 24) for more about inserting and removing
insulin pens.

2524
Changing Modes on the Gocap
To change modes on the gocap, follow these steps.
1 If there is already an insulin pen inside Gocap, remove
the insulin pen.
2 Insert an empty pen of the kind you want to use. If you
want to use Lantus®, insert an empty Lantus pen. If you want
to use Apidra®, insert an empty Apidra® pen.
Note: Make sure you push the insulin pen into the Gocap
and turn it until you feel the pen click. See “Using the Gocap”
(Page 14) for more about inserting and removing insulin
pens.
3 Wait until the pen type indicator light changes color and
flashes rapidly. If you inserted an empty Lantus® pen, the
light should flash blue. If you inserted an empty Apidra® pen,
the light should flash orange.
Now that you have changed modes, you can start using
Gocap with the new type of insulin pen. You can get rid of
the empty insulin pen and use Gocap as usual with the new
type of insulin.
If you are using the Gocap App, your new doses will appear
in your logbook as the new insulin type.

2726
About the Gocap App
The Gocap App lets you work with
your stored insulin dose information in
several ways:
• You can view a detailed chronological
log of doses, or you can see graphs of
activity.
• You can add information manually to
your logbook.
• You can share your information with
others.
The Logbook screen displays all of your logged activity, with
your most recent activity at the top.
Notice that there are six dierent color-coded types of log
entries (one color each for fast-acting insulin, long-acting
insulin, meals, glucose, alerts, and unread doses). Be sure
you understand what each color stands for.
For more about unread dose and new pen log entries, see
Dealing with Unread Doses (page 58).
Using the Gocap App
To use the Gocap App, sign in with the user name and
password you created when you set the Gocap system up.
After you have signed in, you can do the tasks listed below.
This section explains how to do each task.
• View recent activity on the Logbook screen
• Work with logbook entries (add, edit, or delete an entry)
• Add an additional Gocap
• Share your Gocap information with others
• Set alerts and set up your insulin dosing schedule

2928
Viewing Recent Activity on the
Timeline Screen
1 Swipe up or down to view the
detailed logbook of specific dosing
and timing information.
Note: If the alerts function is turned
on, alerts and notifications appear
on this screen about missed doses,
temperature alerts, etc.
2 Tap a logbook entry to view more
details about that entry.
Note: There may be graphs visible on the details screen. For
more information, see "Working with Graphs" (Page 32).
Working with Logbook Entries
You can manually add a logbook entry, or delete an existing
logbook entry.
Adding a manual logbook entry
You can choose among logbook entries for glucose readings,
meals, and insulin doses.
1 Tap Logbook on the top navigation menu. The Logbook
screen displays, with the button.
2 Tap the button to add a new entry. The Add menu
displays.
3 Tap the button for the type of activity you want to log.
A log entry screen displays for your choice.

3130
4 Enter your information in the
appropriate fields on the screen.
5 Tap Save to save your log when you
are finished.
Note: If you tap the back arrow in the
top left corner, your information will not
be saved and the log will be deleted.
Deleting a logbook entry
You can delete any logbook entry,
whether it was uploaded from the Gocap
or entered manually. Follow these steps to
delete an entry.
1 Tap Logbook on the top navigation
menu.
2 Tap the entry you want to delete in
the chronological display of entries.
You may need to scroll through the list to
find the entry.
3 Tap Delete on the Log details screen.
The Delete button changes to “Confirm?”
Tap Confirm? to delete the entry.

3332
Working with Graphs
You may see graphs of the information
in your logbook by selecting one of the
logbook entries.
1 Tap Logbook on the top navigation
menu.
2 Tap the entry you want to view
graphs for.
Scroll up and down the entry details
screen to view the graphs related to
that entry type.
The number of graphs available is
based on the number of entries in your
logbook. As you enter more information,
more graphs will be available.
Note: Some graphs are based on the dosing schedule
feature. To see all of the graphs, you will need to set up your
dosing schedule. For more information, see "Setting Up a
Dosing Schedule" (Page 44).
Here are all of the possible graphs and what they show you:
Fast-acting on schedule
How many fast-acting insulin
doses you've taken on time,
over the last 7 days
Long-acting on schedule
How many long-acting insulin
doses you've taken on time,
over the last 7 days

3534
Morning glucose
Your first glucose reading of
the day, for the last 4 days
Glucose today
Your glucose entries for today
Recent meals & glucose after
Three recent meals and the
glucose reading after each
meal
Carbs each day
The carbs you entered each
day, for the last 10 days

3736
Adding a Device
You may connect two Gocap pen caps,
and an Agamatrix® Jazz™ Wireless
glucose meter, to the Gocap App. To
connect an additional Gocap, follow
these steps:
1 Tap Devices on the top navigation
menu.
2 Scroll down and tap the Add a
device button at the bottom of the
screen.
3 Tap the Gocap button.
4 Plug one end of the micro USB cable
into the port on the tip of your Gocap,
plug the other end into the AC power
adapter, and then plug the power
adapter into a wall outlet.
5 Tap the Ready button on the
Connect your Gocap screen.
The Connecting screen displays. The
Gocap App automatically tries to
establish a connection with the Gocap.
If the Gocap App fails to establish a
connection, an Oops! screen displays.
To try again, tap the Try again button.
For more information about diculties
connecting, see “Troubleshooting
Connection Problems” (Page 22).
If you want to use an Apidra® pen with
Gocap, you must switch Gocap from
long-acting insulin mode to fast-acting
insulin mode. See “Changing Modes on
the Gocap” (Page 24) for more about
inserting and removing insulin pens.

3938
To connect an Agamatrix® Jazz™
Wireless glucose meter, follow these
steps:
1 Tap Devices on the top navigation
menu.
2 Tap the Add a device button near
the bottom of the screen.
3 Tap the Glucose meter option.
4 On your glucose meter, press and
hold the meter button to get your
meter ready to pair.
5 Tap the "Ok, I'm Ready!" button on
the Connect your glucose meter screen.
Your meter will show you some
numbers. Get ready to enter them.
6 Type in the pairing code shown on
your glucose meter.
The Connecting screen displays.
The Gocap App automatically tries
to establish a connection with the
glucose meter.
If the Gocap App fails to establish a
connection, an Oops! screen displays.
To try again, tap the Try again button.
For more information about diculties
connecting, see “Troubleshooting
Connection Problems” (Page 22).

4140
Sharing your information with others
You can share the information stored
in your Gocap App with others using
the Sharing function. These people
are called your “followers.” Followers
can be anyone you choose—a friend, a
family member, a care provider, or your
doctor. Follow these steps to share
your information.
1 Tap Sharing on the top navigation
menu.
Note: You must be connected to the
Internet to edit your sharing settings.
If you are not connected to the
Internet, a screen that instructs you to
connect appears.
2 Tap the Invite a follower button
near the bottom of the screen.
3 Enter a working e-mail address in
the appropriate field on the screen for
the person you want to invite to follow
you.
4 Tap the Send invitation button.
The Gocap App sends an invitation to
the e-mail address you entered.
5 Tap the Done button near the top of
the screen. The follower appears on the
Sharing screen.
Note: Once you have added a follower,
it is easy to remove them. Just tap the
Remove followers button in the Sharing
screen, then tap Delete next to the row
for the follower you wish to remove.

4342
Setting up Gocap Alerts
Your Gocap and the Gocap App can provide alerts and
notifications to you. Some of these appear in the Gocap
App on your smartphone, and some come directly from
the Gocap. Some alerts and notifications are based on a
dosing schedule you set up in the Gocap App. Instructions
for setting up a dosing schedule are in this section. If you do
not set up a dosing schedule, the alerts or notifications like
“Did you take your insulin?” or “Fast-acting at wrong time?”
will not be triggered. Here are the alerts or notifications you
may see or hear:
Did you take
your insulin?
No dose is
recorded within
an hour of the
time set using the
dosing schedule
you have set up.
Message in your
smartphone's
notification center;
Message when
you open the
Gocap app.
Alert type Triggered when... What you see/hear
Fast-acting at
wrong time?
Unusually high
dose
Double dose or
split dose?
You take out a
fast-acting pen
during a longacting scheduled
dose time.
The last dose was
much higher than
other doses in the
Gocap logbook.
Two doses were
logged very close
together.
Gocap beeps
rapidly 15 times
when insulin
pen is removed
from the Gocap;
A red band with
message displays
in the Logbook.
Red band with
message displays
in the Logbook.
Red band with
message displays
in the Logbook.
Alert type Triggered when...
What you see/hear

4544
Insulin was too
hot.
Insulin expired.
Gocap isn't
connected.
Time to check
your glucose!
or
Time to log your
long-acting!
The temperature
of your insulin pen
was higher than
the manufacturer's
recommended
range.
Insulin pen could
be past the
manufacturer’s
use-by date.
Gocap hasn't been
able to sync for
more than a day.
You set a glucose
or dose reminder
for yourself.
Red band with
message appears
in the Logbook,
and/or the Gocap
displays HOT on
its screen.
A red band with
message appears
in the Logbook.
A red band with
message appears
in the Logbook.
A message
appears in the
mobile device's
notification center,
reminding you to
log an entry.
Alert type Triggered when... What you see/hear
To turn any of these alerts to O,
navigate to the Settings screen, then
tap on Alerts.
A screen displays the alerts. Tap the
button to the right of the option
button to toggle the alert to O.

4746
Setting Up a Dosing Schedule
Follow these steps to set up or change
your dosing schedule.
1 Tap Settings on the top navigation
menu. The Settings screen displays.
2 Tap the Dosing schedule button. The
Dosing Schedule screen displays. The
screen has a section for long-acting
insulin and a section for fast-acting
insulin.
3 Create an entry for each of your
scheduled doses. To create an entry,
tap the button to the left of the
appropriate dose. A time selector
screen displays.
4 Enter the time of day you usually
take the dose.
5 Tap the Done button to save your
dosing schedule information.
Note: Taking a dose within an two
hours of your scheduled time will meet
your schedule. If you miss a scheduled
dose, you will see a "Did you take your
insulin?" message in the Gocap App.

4948
Recharging Your Gocap
Your Gocap uses a rechargeable battery. Battery life
depends on environmental and use factors. Depending
on use, your Gocap will operate for approximately 1 week
before it needs to be recharged. For best results, charge
your Gocap as often as you can.
To recharge the battery, attach the micro USB cable to the
Gocap and then plug the other end of the cable into either
the Gocap AC adapter which you then plug into a wall outlet,
or a computer USB port. Recharging the battery can take up
to 3 hours.
Note: When your Gocap’s rechargeable battery can no
longer hold a charge, it cannot be replaced. You will need to
replace your Gocap. Visit support at http://gocap.me/help,
e-mail help@gocap.me, or call 1-855-310-3377 to learn more.
Recharge your Gocap when you see the empty battery icon.
The empty battery icon means the battery does not have
enough power for the Gocap to operate correctly. You must
recharge the Gocap immediately before using it again. If you
use the Gocap App, you can also check the battery status
on the Devices screen.

5150
How to Recharge your Gocap
Follow these directions to recharge your battery, using the
method you prefer.
Note: You can use your Gocap while it is charging if the
Charge Indicator Light is glowing. If the battery is very low,
you may have to wait for the charging light to come on.
CAUTIONS
• If the micro USB cable, USB AC adapter, or Gocap is
damaged, discolored, abnormally hot, or has an unusual
odor, do not recharge the battery. Contact Gocap support
by visiting http://gocap.me/help, e-mailing help@gocap.me,
or calling 1-855-310-3377.
• Charge the battery only in a dry area indoors.
Recharging the Gocap
1 Plug one end of the micro USB cable into the port on
the tip of your Gocap, plug the other end into the AC
power adapter, and then plug the power adapter into a
wall outlet.
You can also plug your USB
cable directly into a laptop
or desktop computer, but
make sure the computer is
not in sleep mode.
The Charge Indicator Light
glows red on the Gocap.

5352
If you do not see a glowing light, try another USB port,
another USB cable, or another wall outlet.
2 When the battery is fully charged, the Charge Indicator
Light turns green.
Remove the micro USB cable from the Gocap before you
use it.
Note: Make sure that, if connecting to a computer, the
computer you are connecting to is turned on and not
“asleep” (in standby mode).
Note: If the Charge Indicator Light has not turned green
after 3 hours of recharging, check to see that the micro USB
cable is correctly plugged
into the USB port or into
the adapter. If this does not
solve the problem, contact
Gocap support at
http://gocap.me/help,
e-mail help@gocap.me, or
call 1-855-310-3377.
Note: If you use a wall outlet, make sure the voltage on
the wall outlet matches the voltage on the AC adapter.
Depending on the country you are in, you may need an
additional adapter before you can plug the AC adapter into
a wall outlet.

5554
Caring For Your Gocap
Storing Your Gocap
After you have placed the Gocap on an insulin pen, store
the pen with the Gocap as recommended by the insulin pen
manufacturer.
Overview of Cleaning
Clean your Gocap regularly. Cleaning your Gocap helps
assure that it functions normally.
Cleaning Your Gocap
To clean your Gocap you need the following items, available
from most drug stores and grocery stores:
• Isopropyl alcohol wipes
• Clean gauze
• Isopropyl alcohol antiseptic spray (in a spray bottle)
• 6-inch Q-Tip® cotton swabs (longer than normal 3-inch
swabs)
Follow the safety instructions included with these items.
Follow these steps to clean your Gocap:
1 Clean the outside of the Gocap.
Hold the Gocap with the USB
port pointing down. Wipe the
outside of the Gocap with an
isopropyl alcohol wipe. Be sure
to squeeze out any excess liquid
before you wipe the dosing
monitor. Wipe the Gocap dry
with clean gauze.
2 Clean the inside of the Gocap.
Spray the inside of your Gocap with isopropyl alcohol.
Pour out any remaining solution. Use a Q-Tip® cotton swab
to wipe and dry the surface of the inside of the Gocap.
Make sure the inside of the Gocap is dry and free of residue
before using.

5756
Troubleshooting Gocap Problems
Handling Gocap Problems
Here are some possible problems you may experience with
your Gocap and steps you can take to resolve each.
Gocap will not turn on
Gocap will not recharge
when plugged into a USB
power source.
Gocap will not recharge
after you have tried
recharging it with two
dierent USB power
sources.
Recharge the battery. Plug
into the provided micro USB
cord and AC power adapter
for at least 3 hours.
Plug into a dierent power
source for at least 3 hours.
Contact Gocap support at
help@gocap.me, visit
http://gocap.me/help, or call
1-855-310-3377.
Problem What to do
Gocap's display screen
shows "HOT".
Gocap’s display screen
shows only dashes.
No reading or dose
information is shown.
"HOT" indicates that the
temperature is too high for
your Gocap to work properly.
You should keep your Gocap
safe from very hot places.
The dashes indicate a
problem with the Gocap’s
ability to read the insulin
pen. Review the possible
causes on page 58 and take
steps to correct the problem.
If those steps do not resolve
the problem, contact Gocap
support at help@gocap.me,
or visit http://gocap.me/
help.
Problem What to do

5958
Here are some possible causes of the screen display of
dashes that indicates an error condition, and what you
should do about each.
Gocap is dirty. Clean your Gocap.
Possible cause What to do
The insulin pen is not
properly placed inside
Gocap.
Something other than
an insulin pen is inside
Gocap.
See “Using the Gocap” (page
14) to review the steps for
using an insulin pen with
Gocap. Remember to push
the insulin pen into the
Gocap and turn it until you
feel the pen click.
Remove the object, and
place an insulin pen inside
Gocap.
Possible cause What to do
The insulin pen is dirty.
Gocap is damaged.
Clean the insulin pen.
Contact Gocap support at
help@gocap.me, or visit
http://gocap.me/help.
Gocap is broken.
The insulin pen is
damaged.
Discard the Gocap and
replace it with a new Gocap.
Discard the damaged pen
and replace with a new pen.
Gocap is outside its
temperature operating
range (too hot or too
cold).
Move to a warmer or cooler
location as needed to bring
Gocap within its temperature
operating range.

6160
Handling Unread Doses
Occasionally, Gocap may show an "unread dose" entry in
your logbook. An unread dose can occur during normal use
of Gocap, but also may indicate a problem with Gocap or its
use. Here are some possible causes of an unread dose entry,
and what you should do about each.
You removed and
replaced Gocap from and
to an insulin pen without
dosing.
There is a problem with
the Gocap or its use.
Tap the unread dose entry in
the logbook. If you did not
take a dose, delete the entry.
See “Handling Gocap
Problems” (page 56).
Possible cause What to do
Handling Other Problems
If you are experiencing a health problem or medical
emergency, you should contact your healthcare provider or
emergency services.
Travelling with Your Gocap
When travelling with your Gocap, remember:
• Bring the provided charging cord and USB adapter so you
can recharge your Gocap.
• Countries can have dierent types of power outlets. You
should find out whether you need to bring a power adapter
for your charging cord.
• Time zones can change. If you travel to a new time zone,
you should double-check to make sure your dosing schedule
is correct.
Disposing of Your Gocap
Electrical products waste should not be disposed of with
household waste. Please recycle where facilities exist. Check
with your local authority or retailer for recycling advice.

6362
Gocap System Technical Specifications
Model
Dimensions
Measurement Method
Measurement Range
Power Supply
Battery Charging
Wireless
Storage Conditions
Operating Conditions
Life Span
1.1
93mm × 25mm × 26mm,
30g
Optical
0 – 310 units
⎓DC 3.7V Nominal
45mAh Lithium Polymer
Battery
⎓DC 4.95 – 5.25V @
0 – 0.6A USB Charger
Bluetooth v4.0 Dual
Mode 2.4GHz
−20°C – 45°C
1°C – 45°C, 10-90%
relative humidity
1 year
If the equipment is used in a manner not specified by the
manufacturer, the protection provided by the equipment
may be impaired.
FCC Notice
This device complies with Part 15 of the FCC Rules.
Operation is subject to the following two conditions:
1 this device may not cause harmful interference, and
2 this device must accept any interference received,
including interference that may cause undesired operation.
About Common Sensing
Gocap dose monitor by:
Common Sensing, Inc
Cambridge, MA 02139
1-855-310-3377
common-sensing.com

6564
Warranty Information
Common Sensing, Inc. (the "Company") hereby warrants
that its product with which this One Year Limited Warranty
(this "Warranty") is included (the "Product") will operate as
intended and free of material defects for a period of one (1)
year from its date of original sale.
THE SOLE REMEDY UNDER THIS WARRANTY SHALL BE
A REFUND OF THE PRODUCT'S PURCHASE PRICE, OR
REPAIR OR REPLACEMENT OF THE PRODUCT, IN ANY
EVENT AT COMPANY'S SOLE AND ABSOLUTE DISCRETION.
THIS WARRANTY SHALL BE MADE VOID AND OF NO
FURTHER FORCE OR EFFECT IN THE EVENT OF ANY OF
THE FOLLOWING:
A TAMPERING WITH OR DISASSEMBLY OF THE PRODUCT;
B FAILURE TO OPERATE OR CARE FOR THE PRODUCT
IN A REASONABLE MANNER OR AS SPECIFIED IN ANY
COMPANY INSTRUCTIONAL OR TECHNICAL LITERATURE
(THE "MANUALS");
C ANY USE OF THE PRODUCT OTHER THAN AS SET
FORTH IN THE MANUALS AND
D ANY RELIANCE ON THE PRODUCT FOR TREATMENT
DECISIONS, INCLUDING WITHOUT LIMITATION ANY
INSULIN OR GLUCOSE DOSING DECISIONS.
THE COMPANY HEREBY EXPRESSLY DISCLAIMS ANY
AND ALL OTHER WARRANTIES, EXPRESS OR IMPLIED,
INCLUDING WITHOUT LIMITATION ANY IMPLIED
WARRANTIES OF MERCHANTABILITY OR FITNESS FOR
ANY PARTICULAR PURPOSE.

66
GCIFU-Online content
Revised 04/03/17

 Loading...