

Goby ROBO H20 Quick Start Manual

Robo H2O PoolTM Cleaner Quick Start Guide
IMPORTANT SAFETY INSTRUCTIONS Read all instructions before using this pool cleaner.
DROWNING AND SUCTION RISKS!
In order to effectively clean your pool, this ROBO H20 cleaner operates through the use of suction. You must be aware
of serious risks created by the misuse of this suctioning cleaner. If you do not follow the instructions and warnings set out
below, serious bodily injury and/or entrapment and drowning may occur:
• Do not allow swimmers to enter pool when cleaner is in use. No exceptions!
• This pool cleaner should be used only by adults who can properly operate the pool cleaner. Children should never
be allowed to use, or play near, the cleaner or hose.
• Instruct swimmers of the dangers of contact with suction ports, cleaner head and cleaner hose as disclosed in these
instructions.
• Do not allow anyone to apply the cleaner or its suction hose to hair, clothing, or body parts. Keep hair, ngers,
loose clothing, and all body parts away from the cleaner, its hose and suction parts. The pool cleaner and/or its hose
could get ahold of your hair, clothing or body parts and cause serious bodily harm or injury. Suction from the pool
cleaner or the hose could also trap a pool user under water.
• You must cover the suction port in the pool wall when the port is not being used for the cleaner. Failure to cover the
port can lead to entrapment injury and/or drowning.
SAFE USE OF YOUR POOL CLEANER
STOP PUMP PRIOR TO USING THE POOL IF CLEANER IS INSTALLED
If cleaner is in the pool, you must stop the pump before any swimmers enter the pool. If cleaner is operating in the pool
while bathers are present, the cleaner as well as its hose and suctions ports could entrap swimmers and cause permanent injury or death.
STOP PUMP TO SERVICE CLEANER
Turn off the pool pump and all suction prior to inspecting or performing maintenance on the cleaner. Moving parts inside
the cleaner head as well as suction from the pool system can cause harm to ngers or other body parts.
STOP PUMP TO MOVE CLEANER
Turn off the pool pump and all suction prior to removing the hose. Move the hose and pool cleaner to an area of the pool
that is not in use. If there is potential for the hose to interfere with pool users, remove it from the pool.
USE CLEANER ONLY AS DESCRIBED IN THIS MANUAL
Use only with Goby recommended attachments, replacement parts and accessories.
PREPARING YOUR POOL
Before installing your Robo H2O Pool Cleaner, you need to prepare your pool as Robo H2O will not operate unless the
lter system is clean and ready for use. Backwash or manually clean lter prior to installing Robo H20. This cleaner was not
designed to be the rst clean after pool construction or at the beginning of the season. If you have a vinyl pool, check for
wear and tear, creases in the vinyl, or any obstructions under the liner. Gunite, plaster, tile and berglass pools must be in
good condition. Pool must be cleaned of algae and debris prior to the cleaner’s rst use.
CHECK CONTENTS AFTER PREPARING YOUR POOL
Remove the Robo H2O cleaner and all accessories from the box to check the contents. Refer to Figure 1.
Note: It is important to hold the cleaner by the handles and not to hold it in any other location.
NO: Description Part # Quant
1 Robo H2O Pool Cleaner Head 65001 1
2 Hose Lengths 65226 12
3 Flow Control Valve 65231 1
4
5 Hose Float 65229 1
6 Control Valve Adaptor 61231 1
7 Flow Gauge 65232 1
Female/Female Hose
(for skimmer installation only)
65227 1
Figure 1
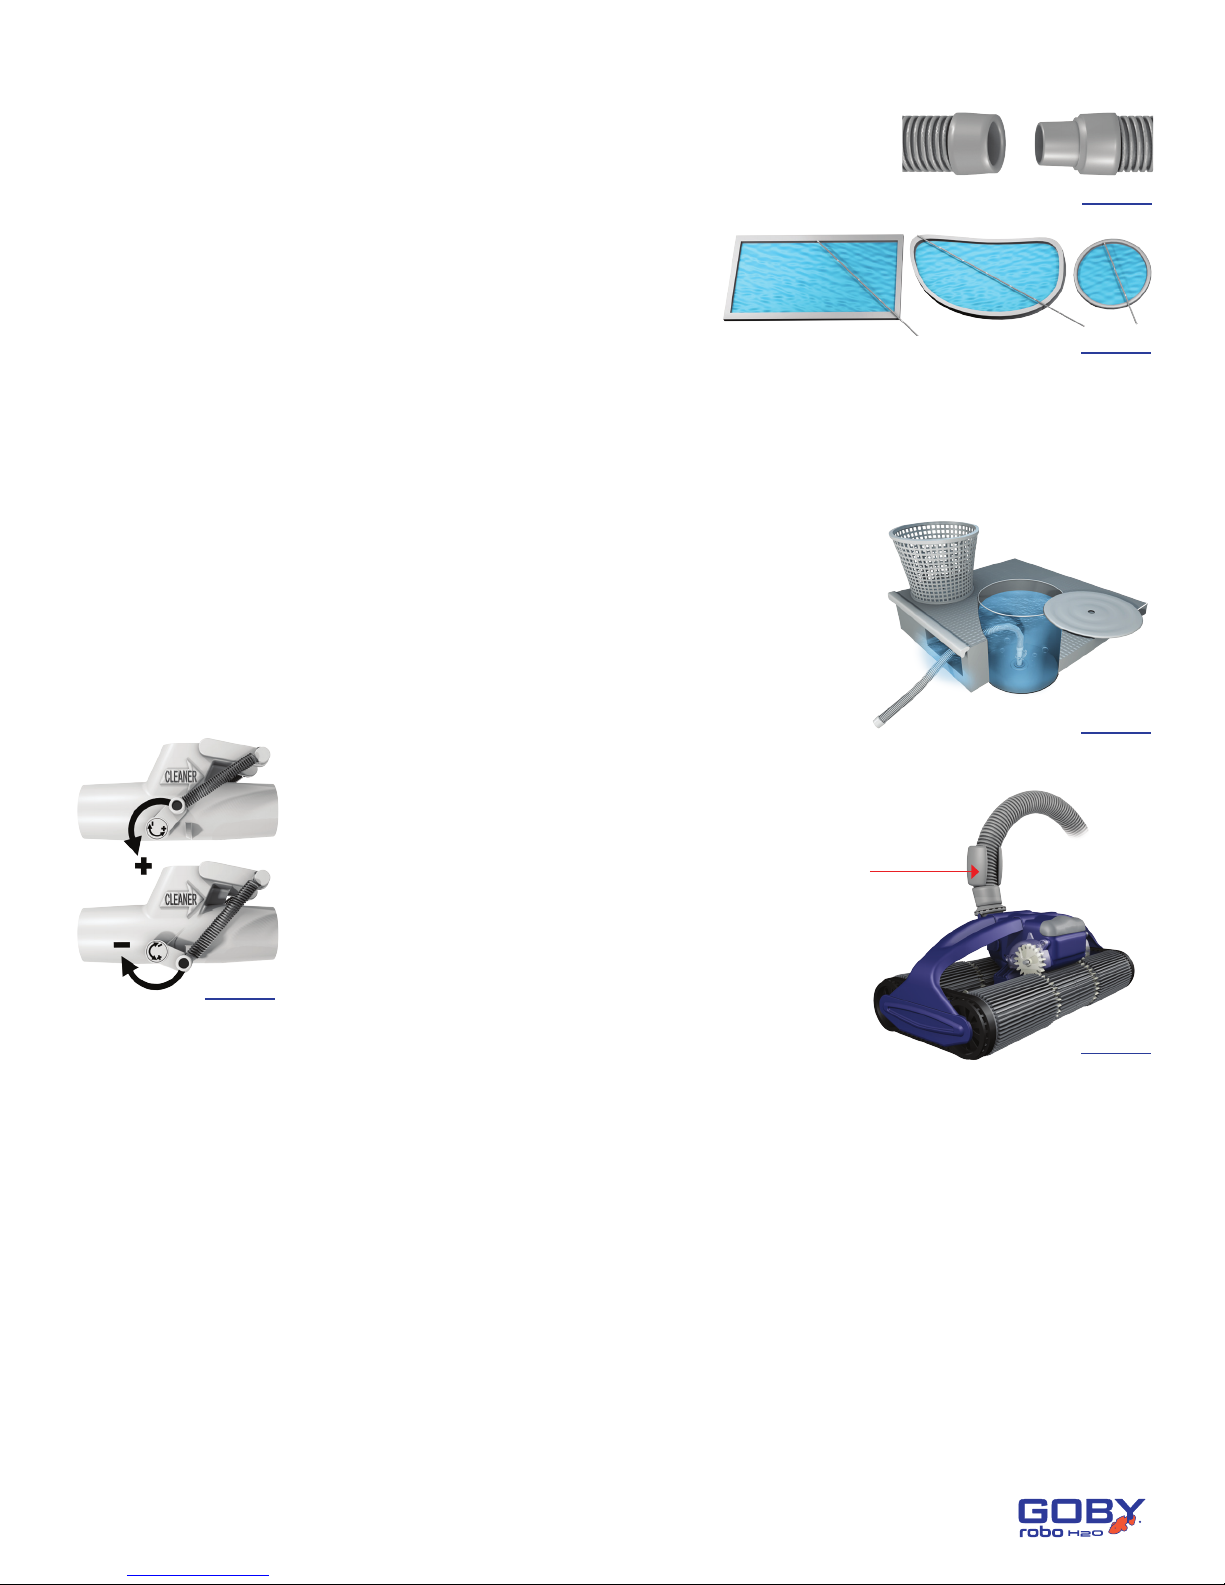
HOSE CONNECTION AND REMOVAL OF AIR FROM HOSE
1. Connect sufcient lengths of hose by inserting the male hose end into the female end
(see Figure 2) until you have sufcient lengths of hose to cover the distance from the
pool skimmer or dedicated suction line to the furthest point of your pool.
2. Then add one extra length so that you have enough hose to reach the furthest point
of your pool plus one extra hose length. See Figure 3. For skimmer application, the
Female/Female Hose should be used and connects directly to the
Flow Control Valve inside the skimmer. For dedicated vacuum line
installation, the Flow Control Valve is not used and the male end
of the hose connects to the suction port in the pool wall.
3. Remove air from hose (see Owner’s Manual for complete details).
Female Male
Figure 2
Figure 3
WHEN CONNECTING TO THE POOL SKIMMER
When connecting to the pool skimmer, the Flow Control Valve is often used. The Flow Control Valve ensures your Robo
H20 Pool Cleaner receives the ow required for optimum performance. If you have two skimmers, the Flow Control Valve may
not be necessary.**
** Note: For two skimmer application, use the skimmer closest to pool equipment and connect hose using only the Male
Hose end (Flow Control Valve is not used).
1. Attach Flow Control Valve to the Female/Female Hose closest to the skimmer.
The Flow Control Valve will automatically regulate the ow to your Robo H2O
Cleaner. If the ow from the pump is too high, the spring-loaded ap will open to
bypass the excess, so only the correct amount of ow goes through the cleaner.
2. Remove the skimmer basket.
3. Insert Control Valve Adaptor to hole in skimmer to ensure a good connection/snug
t. Then insert the Flow Control Valve into the Control Valve Adaptor as shown
in Figure 4. If there are two holes at the bottom of the skimmer, place it into the one
at the back (the hole farthest from the opening in the skimmer).
4. Once air has been removed from cleaner and Flow Control Valve has been installed, test the ow using the Flow
Gauge. Remove cleaner head from female end of hose.
Attach the Flow Gauge to the end of the hose that will
connect to the cleaner head. The Flow Gauge should
read around 5. If the Flow Gauge does not read around 5,
see section on how to count RPMs in Owner’s Manual.
If sufcient ow is not obtained with the factory setting of
the Flow Control Valve (low), adjust as needed using the
handles on the side of the valve. See Figure 5.
Figure 5
6. Add Hose Float and position it as close to the Articulating Swivel as possible. See
Figure 6. Turn the pool pump ON and your Robo H20 Pool Cleaner will now begin
automatically vacuuming your pool.
5. Once ow is in proper range, remove Flow Gauge from hose
and connect hose to the cleaner’s Articulating Swivel.
Hose
Figure 4
Figure 6
WHEN CONNECTING TO A DEDICATED VACUUM LINE IN THE POOL
Some pools are equipped with a dedicated vacuum line, which allows the cleaner to be connected to this line instead of
the skimmer. In such cases, the Flow Control Valve should NOT BE USED. To connect to the dedicated vacuum line:
1. Open the spring-loaded ap on the vacuum line wall tting and insert the male (smaller) open end of the hose. Ensure it is
well secured. Once air has been removed from cleaner, it is important to test using the Flow Gauge. Remove cleaner
head from female end of hose. Attach the Flow Gauge to the end of the hose that will connect to the cleaner head in
order to ensure there is proper ow to the cleaner. The Flow Gauge should read around 5. If Flow Gauge does not
read around 5, see how to count RPMs in Manual.
2. If ow management is required, adjust valves at pool pad as needed as shown in Figure 20 on page 18 of the Owner’s
Manual.
3. Once ow is in proper range, remove Flow Gauge from hose and connect hose to the Articulating Swivel.
4. Add Hose Float and position it as close to the Articulating Swivel as possible. See Figure 6. Turn the pool pump
ON and your Robo H20 Pool Cleaner will now begin automatically vacuuming your pool.
Note about suction: If more or less suction is needed, you will need to adjust the Sliders on the pool cleaner itself.
Closing the white sliders increases the suction and opening the white sliders decreases suction. See page 11 in the
Owner’s Manual for detailed instructions on Slider adjustment.
 Loading...