

Page 1
GoBidet Bidet Attachment
®
1 Ruths Place #
Sequim WA 98382
Tel 1-800-681-0753 • Fax +1 360-681-4029
www.Go-Bidet.com
CONGRATULATIONS!
You have purchased a product made with the highest quality
standards. In the unlikely event that you have any problems with this
unit, please do NOT return your GoBidet™ to the purchase location.
Instead, please contact us at 1-800-681-0753 to speak with a customer
service representative, who will provide friendly, personal service
and answer any questions you have regarding your new personal
hygiene system.
MODEL #2003
In this box:
• 1 User Manual
• 1 GoBidet™ Unit w/ mounting bracket, nut, rubber washer, and plastic washer
• 1 Plastic Spacer (part no. 2003.11)
• 1 3/8” Hose (part no. 2003.14)
• 1 7/8” T-valve (part no. 2003.18) - installs on bottom of toilet tank
• Tape
1
Page 2
INSTALLATION INSTRUCTIONS & IMPORTANT NOTES
This unit can accommodate hot and/or cold water installations. For cold
water only, install as directed. For hot water installation, please use the Hot Water
Installation Kit (Part no. 2003HIK ), available by calling 1-800-681-0753.
Your GoBidet™ will attach to a one-piece toilet (tank/bowl are molded into one
or elongated toilets. See “Parts Breakdown”page for instructions on changing
the bushing bracket mounting location.
Use T
on all connections.
A. Disconnecting your toilet’s water supply line
on wall beneath toilet.
connection at tank to catch excess water.
B.
Installing your bidet
Remove toilet seat and clean mounting area. (See “G. Troubleshooting” for help.)
1.
Save seat mounting parts to re-use.
2.
2003.16 and 2003.14) and tighten.
3.
Determine if your toilet is a one-piece or two-piece unit. If you have a
one-piece unit please follow instructions on changing bushing bracket
(Part no. 2003.09) mounting location on “Parts Breakdown” page
before continuing.
Insert threaded bushing of support bracket (Part no.
4.
bowl screw opening used for mounting toilet seat. Use opening on your
left when facing the toilet tank. Secure to toilet by installing rubber washer
bushing. Finger tighten only.
5.
Before tightening bushing completely, move shower arm (Part no. 2003.01)
to its maximum extension, moving the support bracket (Part no. 2003.09)
until shower head is in center of toilet. Upon retraction, shower arm should
rest beneath rim of toilet. Finish tightening bracket in place.
DO NOT OVER-TIGHTEN BUSHING OR TOILET WILL CRACK.
2
2003.09)
into toilet
Page 3
C. Hose Installation
1.
Install the 7/8” T (Part no 2003.18) to the bottom of the toilet.
2.
Connect the 3/8” hose to the 3/8” nipple and then connect to the bidet.
3.
Connect the other end of the hose to the already installed 7/8” T valve.
4.
Dry your work area completely. Turn on water supply.
5.
Check for leaks.
6.
D. Final Installation Instructions
If no leaks are found, re-install your toilet seat using existing bolts and
1.
nuts. If they are unusable, purchase new ones at your local hardware store.
2.
First, insert a bolt through the seat and the threaded bushing. Second,
insert the remaining bolt through the seat, the provided plastic spacer
(Part no. 2003.11), and the toilet. Tighten nuts onto screws.
3.
Check to be sure that the seat does not rest heavily upon the shower
assembly (Part no 2003.01) of the GoBidet® when in the down position.
If it does, see section ”G. Troubleshooting” on page 4.
E. Operating Instructions
1. While sitting on your toilet seat, use the horiziontal control handle on your
GoBidet® to move the shower head assembly toward the center of the
toilet (underneath the desired area).
2. VERY GENTLY turn ON and adjust water
by moving the vertical
water control stick (Part no. 2003.04) backward toward toilet tank and to wards the toilet bowl for cold water operation.
3. When
cleansing, return water to OFF position by moving
water control stick forward. Move shower head to “rest” position under neath the toilet’s rim.
How to use GoBidet with Hot Water Connection Kit (optional)
VERY GENTLY turn on and adjust water by moving the vertical
water control stick (Part no. 2003.04) backward toward toilet tank.
Adjust water control stick left-to-right to choose your water temperature
comfort zone.
VERY IMPORTANT! To avoid scalding do not use only hot water !
F. Care & Maintenance
To keep the GoBidet® operating as intended, clean and wipe with baby oil or
a similar product when necessary using a soft cloth.
3
Page 4
G. Troubleshooting
Removal of toilet seat is usually easily done by popping open the plastic screw covers behind the seat
cutter to remove screws from the toilet. Be sure to protect your toilet from damage if a hacksaw is used.
1. Water will not turn on:
Make sure water supply is connected AND turned on at the wall inlet.
•
Make sure vertical water control stick (Part no 2003.04) on GoBidet® is in
•
cold water position. If hot water is not installed and water control stick
Make sure hose is not kinked or twisted.
•
2. Water leaks from connections:
•
on and check for leaks. Repeat if necessary.
3. Water leaks from location where shower head assembly connects to GoBidet:
Firmly tighten nut holding shower head assembly (Part no. 2003.01) to
•
GoBidet.
4. Water leaks from GoBidet behind the bell handle assembly (Part no. 2003.04):
Insert screwdriver in hole at bottom of bell handle assembly and loosen
•
set screw to remove bell handle assembly. Unscrew (counter clockwise
direction) chrome nut cover (Part no. 2003.24) from the front of the GoBidet
housing. This can usually be accomplished by hand.
Tighten (clockwise direction) large brass nut (Part no. 2003.45).
•
Replace chrome nut cover and bell handle assembly.
•
5. Shower head assembly (Part no.2003.01) will not move when sitting on the toilet:
If you used all of the included spacers (Part no 2003.11 ) on the side of seat
•
without the GoBidet (Step “D.2”) you can request more by contacting us
at 1-800-681-0753.
•
with taller bumpers or one with less seat contour.
6. GoBidet moves too much when manipulating the controls:
Snugly tighten threaded bushing (Step “B.4”).
•
•
Firmly tighten chrome nut holding GoBidet to mounting bracket
(Part no. 2003.09).
.
In some cases, you may need to also use a strong double-sided tape
•
between the mounting bracket and the bowl.
double-sided tape.
For all other issues, please visit www.Go-Bidet.com or call 800-681-0753
4
We recommend 3M industrial,
Page 5
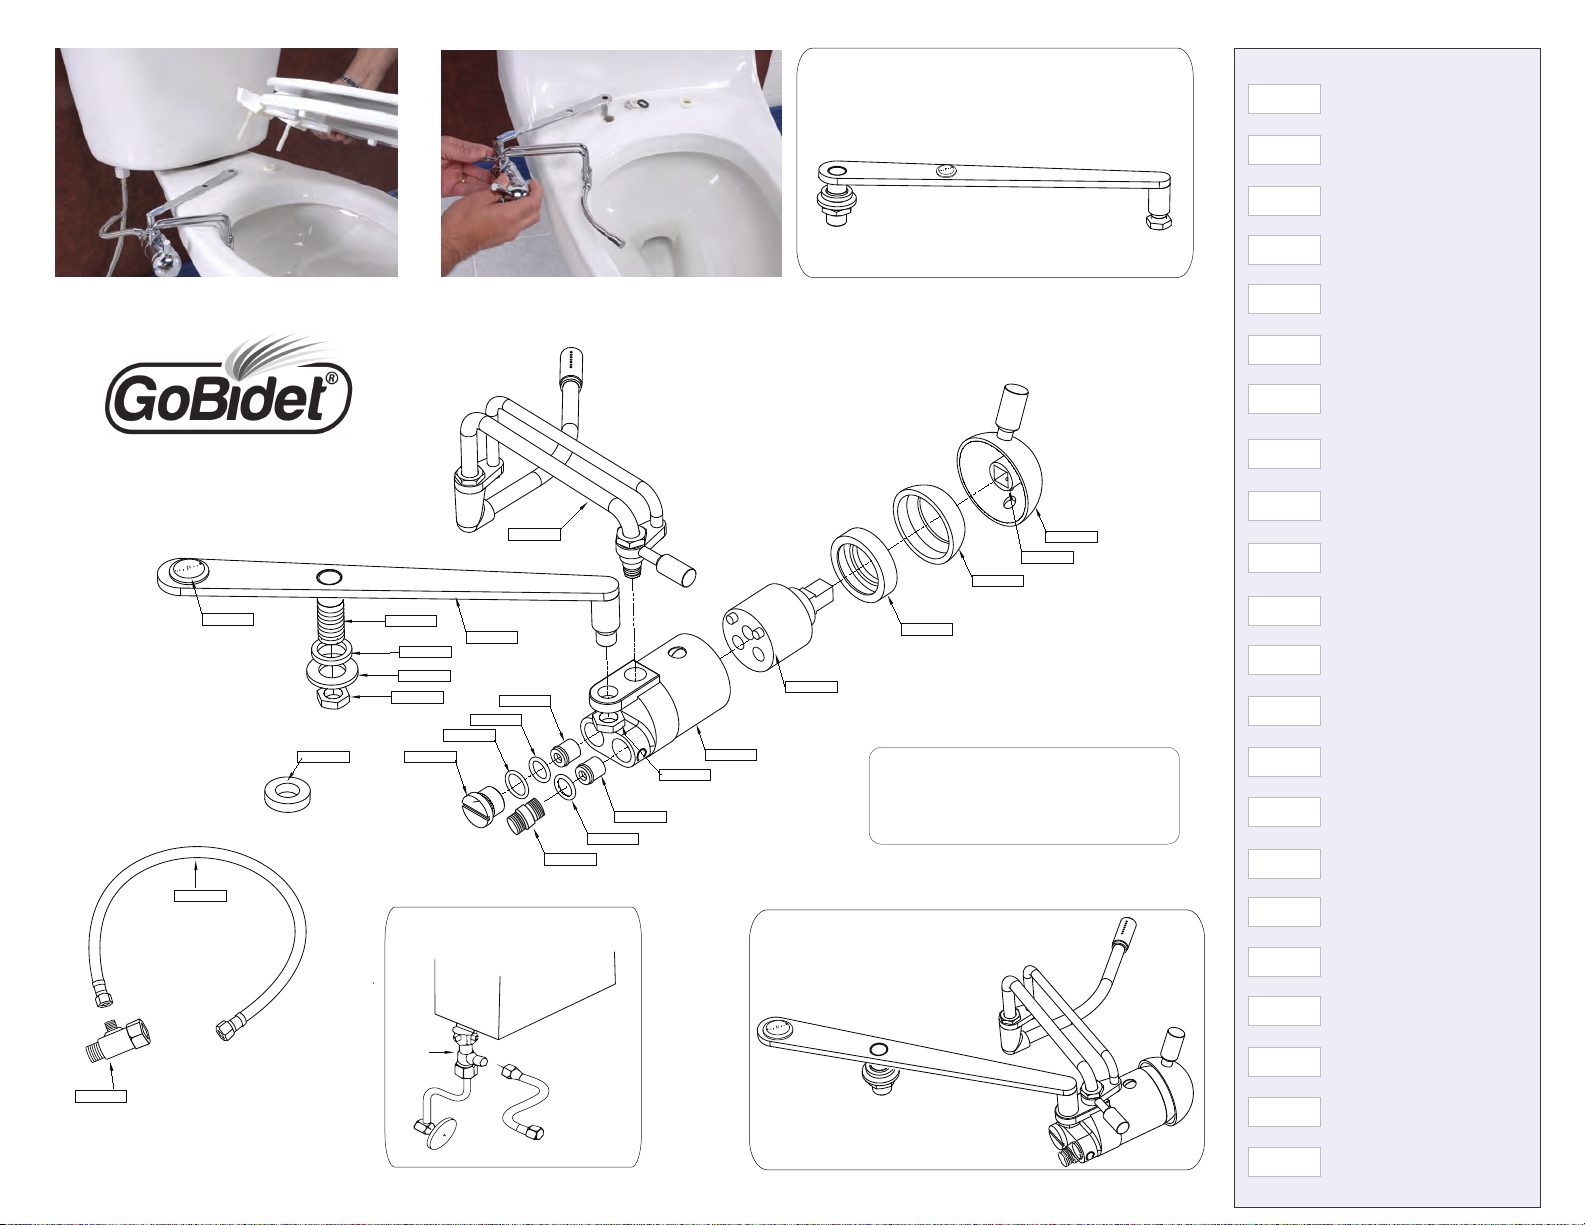
2003.18
Rev. 20150810
Two-Piece Toilet One-Piece Toilet
www.Go-Bidet.com
2003.01
B. COMO INSTALAR EL
2003.17
2003.11
2003.14
2003.20
2003.13
2003.15
2003.10
2003.05
2003.08
2003.09
2003.06
2003.07
T-valve installation location
T-valve
2003.06
2003.07
2003.16
D. INSTRUCCIONES FINALES
2003.03
2003.02
2003.12
MODEL 2003 • Completed Assembly
Mounting to one-piece toilets
Swap location of plastic cap and threaded
nut/bushing to position shown.
2003.04
2003.19
2003.24
2003.45
FOR INDIVIDUAL PARTS
CALL 1-800-681-0753
Parts Breakdown
2003.01
Complete Shower Assembly
2003.02
Bidet Body Casing
2003.03
Single Lever Ceramic Mixer Cartridge
2003.04
Water Control Assembly
2003.05
3/8” Plug
2003.06
10mm Flow Regulating Check Valve
2003.07
12mm Neoprene 'O’ Rings
2003.08
14mm Neoprene 'O’ Rings
2003.09
Bracket w/ Bushing, Nut, & Washer
2003.10
Chrome Nut, Large
2003.11
One Inch Plastic Spacer
2003.12
Chrome Nut, Small
2003.13
Rubber Washer
2003.14
3/8" Stainless Steel Hose
2003.15
Plastic Washer
2003.16
3/8" Chrome Plated Nipple
2003.17
Plastic Beauty Cap
2003.18
1-7/8” T-valve
2003.19
Handle Set Screw
2003.20
Threaded Bushing
2003.24
Nut Cover Ring
2003.45
Brass Retainer Nut
 Loading...